

Seresco: (pronounced Sir-ES-co) meaning “to become dry”
Installation and Operation Manual
NE Series Dehumidifiers
For NE-004-016 Models:
PV, NV, PH and NH Configuration Natatorium Dehumidifiers
NC Series Outdoor Air-cooled Condensers
1

CAUTION
ONLY TRAINED, QUALIFIED PERSONNEL SHOULD INSTALL AND/OR SERVICE SERESCO
EQUIPMENT. SERIOUS INJURY AND PROPERTY DAMAGE CAN RESULT FROM
IMPROPER INSTALLATION/SERVICE OF THIS EQUIPMENT. HIGH VOLTAGE ELECTRICAL
COMPONENTS AND REFRIGERANT UNDER PRESSURE ARE PRESENT
1-888- SERESCO (737-3726)
Additional copies of this manual can be downloaded from:
www.seresco.net
Seresco Technologies Incorporated
1283 Algoma Road, Unit 1
Kanata, Ontario,
K1B 3W7
2

TABLE OF CONTENTS
1. Introduction ...................................................................………………...................…… 4
1.1 Packaged Mechanical Refrigeration Systems............................................….........…… 5
1.2 NE Series Dehumidifier features……..............................................….........…………… 6
2. Installation .................................................................................………….……………..
2.1 Uncrating and Inspecting..................................................................................….…… 7
2.2 Mounting and Service Clearance………………………….........................................…… 7
2.3. High Voltage Electrical Connections ...................................................................…….. 8
2.3.1 Wire and Fuse Sizing.............................................................................…… 8
2.3.2 Line Voltage Connections.................................................................….…… 8
2.4. Control Wiring......……………………...................................................................……… 8
2.5. Controller and Programming....................……........................................................…… 9
2.5.1 Normal Mode and Programming……………........................................…….. 10
2.5.3 Logs…………….....................................……………………………………….. 11
2.5.5 Sensors and locations………….....................................…………………….. 12
2.6. System Design Overview….................................................................…………....……. 13
2.6.1 System duct design and air pattern ………...................................….......….. 13
2.6.2 Evaporation rate and latent loads…………...................................….......….. 14
2.6.3 Required Access Space……………………...................................….......…… 14
2.6.4 Exhaust Air……….........…………………………….........................…......…… 15
2.6.5 Supply Air flow…………………………….…...................................…......…… 15
2.6.6 Cooling and Heating loads…………………....................................…......…… 15
2.6.7 Outdoor Air……………………………………...................................…......…... 15
2.7. Condensate Drain ….........................................................………............................…… 16
2.8. Pool Water Heating (PH AND PV Models Only)…..................................……………….. 16
2.8.1 Water Flow Schedule …………................................................................…... 16
2.8.1 Pool Water Piping Diagram ………...............................................…………… 17
2.9. Outdoor Air-cooled Condenser Installation......................…………...........................….. 18
2.9.1 Refrigerant Piping to Remote Condensers....……................................….. 18
2.9.2 Charging of Remote Condensers…......................………………………....….. 19
3. Pool Water Chemistry ….................……………………..…...............……….............… 20
4. Start-up Procedures …...........................…………….....................………….........…….. 21
4.1. Pre Start-up …........................................................…………….................................….. 21
4.2. Start-up Procedure ….............................................………........................................….. 21
4.3. System Operation Modes…..................................................................................……... 22
4.3.1 Power On………………………….….........................................................…... 22
4.3.2 Dehumidification Mode…......................……………...................................…. 22
4.3.3 Air Conditioning Mode …....................................................……………….….. 22
4.3.4 Pool Water Heating Mode (PH AND PV Models Only)…...........…………….. 22
4.3.5 Blower Operation….................................................………........................…. 22
4.3.6 Compressor Start Sequence…..........................................................….....…. 23
4.3.7 Air Heat Demand ….........................................................................….......…. 23
5. Service and Maintenance…................................................………………….……....... 23
5.1. Routine Maintenance….........................................................................………….......…. 23
5.2. Compressor Replacement…..................................................................................……. 23
6. Service References …………………………………………………………………………. 24
6.1. Nameplate …....................................................…………………................................…. 24
6.2. Mechanical System Trouble shooting….....................................................................…. 25
6.3. Microprocessor Trouble shooting…...........................................................................…. 27
6.4. Blower Adjustment Procedure…...................................................…………..............…. 28
6.5. Basic Unit Operation …...........................................................……………….……....…. 28
6.6. Factory Start-up Supervision…..…..........………….................................................…… 29
6.7. Warranty…………………….…..................................................…............................…… 30
6.8. Refrigeration Diagrams……………………….…....…..............….………………………… 32
6.9. Field Wiring Diagram…………………….…....…................….………………………… 33
6.10. Typical Electrical Panel Layout………..……………………..…......…..............…… 33
6.11. Warranty Registration and Start-up Report……………………..…......…..............…… 34
7
3
1. Natatorium: a facility that
contains an indoor pool,
whirlpool or spa ranging in size
from a small residential
installation to a large commercial
indoor waterpark.
Seresco’s Natatorium Dehumidifiers were
developed by a team of industry experts with a
lifetime of experience developed while working
with many thousands of indoor pools. A
natatorium has many critical design issues that
must be fully understood and properly addressed
to ensure years of comfortable and trouble free
operation of the facility.
This booklet contains valuable design guidelines
based on Seresco's extensive knowledge and
experience in solving humidity control problems
in many thousands of indoor pool installations.
Seresco Technologies Inc., manufacturer of the
NE Series of natatorium air quality control
systems is dedicated to providing state-of-the-art
features and design, quality engineering and the
most reliable products in the market.
The environment in a natatorium should be the
same as in any other room in a building:
comfortable and healthy for the occupants and
their activity, and provide good air quality. The
space conditions in a natatorium need to be
precisely maintained in order to maximize human
comfort and health as well as preserve building
integrity. Relative humidity, air temperature,
water temperature and air quality are all key
environmental aspects to control. High relative
humidity levels are not only a problem to bather
comfort and health, but can seriously damage the
building structure possibly leading to building
component failures. Revenues can also be
affected in commercial facilities. Several hotel
chains offer a full money-back guarantee should
the hotel guest have any complaint regarding
their stay.
A properly designed and maintained natatorium
delivers years of pleasure. The first step is to
become familiar with the design challenges and
to understand how to address them. A
Natatorium’s overall performance is inversely
proportional to the amount of compromises and
shortcuts taken in the design and construction of
the natatorium.
A Successful Facility. A natatorium is
one of the most notoriously difficult facilities to
design because there are so many critical
considerations that if overlooked develop into
problems with the building structure or complaints
from the occupants. The designer must take a
complete system approach, from basic
engineering issues to the more subtle details in
the air distribution. Experience and a complete
understanding of the design issues help the
designer satisfy:
Comfort and Health
Humidity Control
Indoor Air Quality
Condensation Control
Comfort and Health: Human comfort
levels are very sensitive to temperature and
relative humidity. It is essential that both are
controlled and stable. While temperature control
is generally well understood and mastered by
designers, it is important to recognize what
temperature levels natatorium patrons want. The
space temperatures in a natatorium are unique to
each project and assumptions must never be
made. Fluctuation of relative humidity levels can
be an even greater concern because it has a
direct effect on human comfort and health.
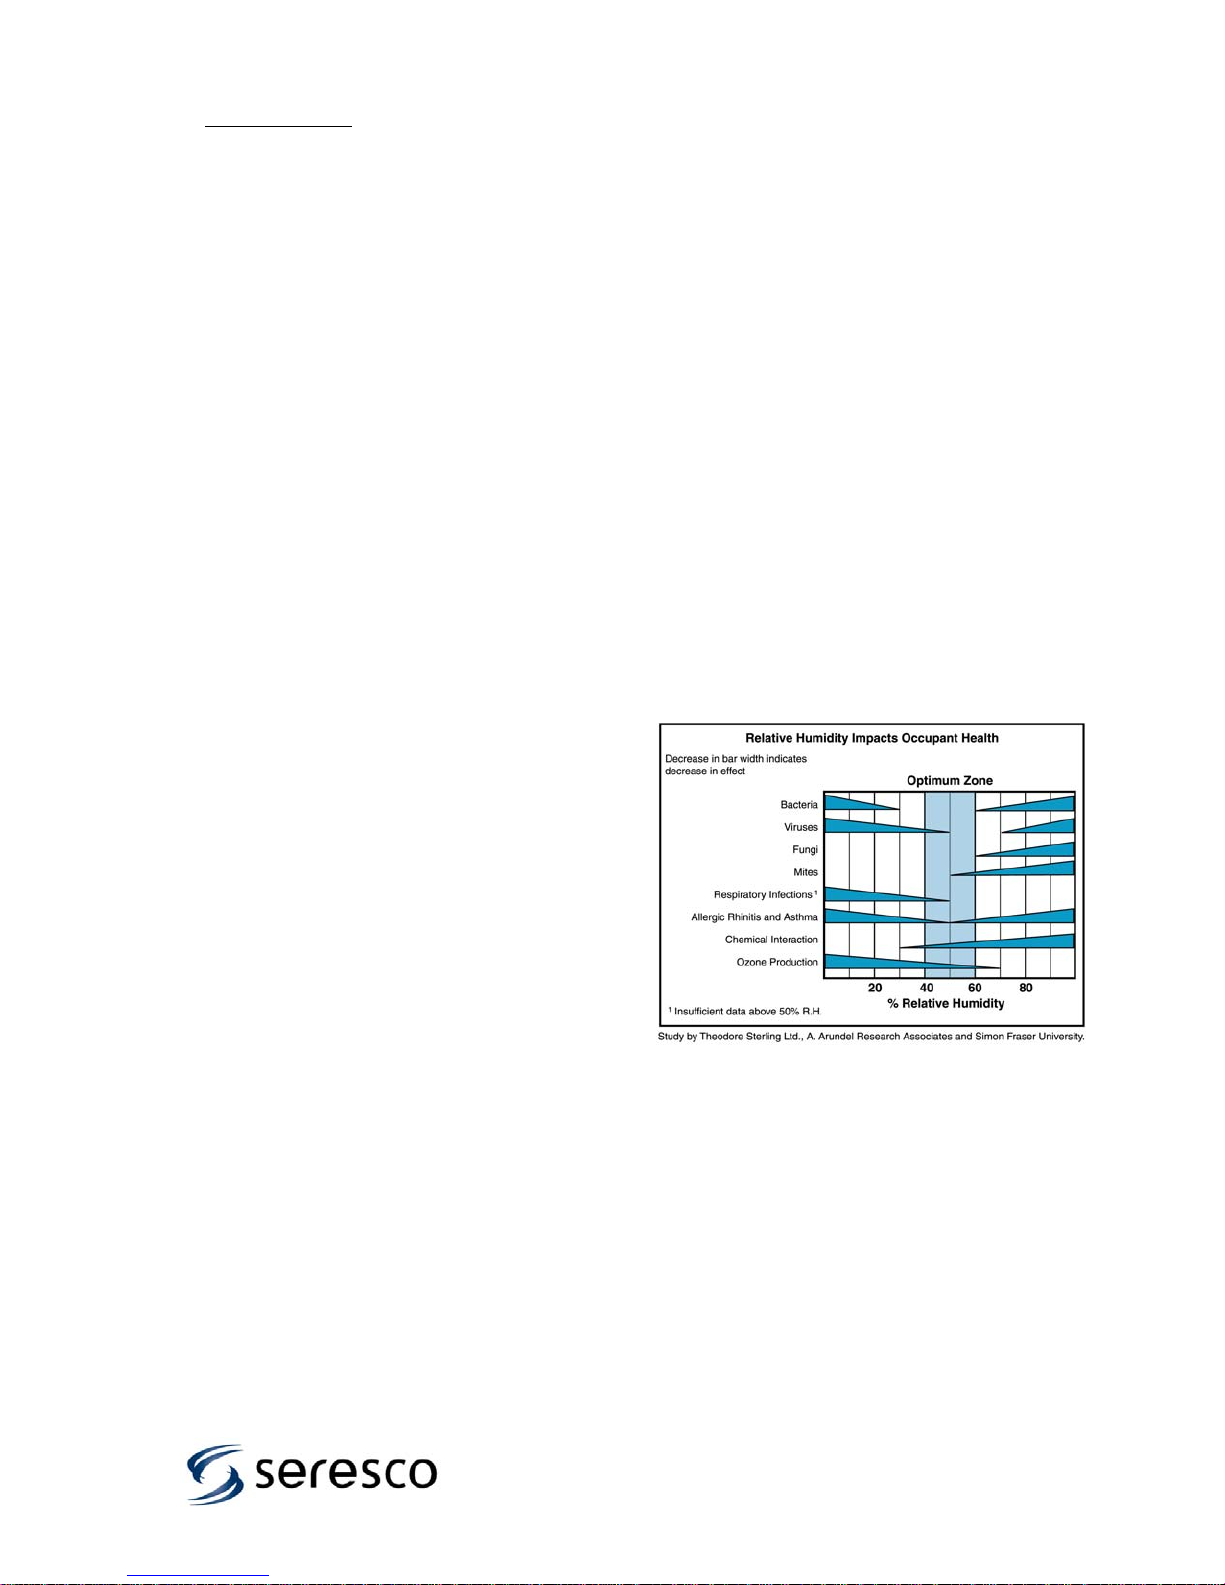
Figure 1 shows that relative humidity levels
outside the 40%- 60% range can result in
increased human susceptibility to disease from
bacteria, viruses, fungi and other contaminants
that reduce air quality and potentially lead to
respiratory problems.
Figure 1- Relative Humidity Effect on Health
Factors.
4
The type of facility being designed dictates the
space temperature. Table 1 helps target some
typical conditions. It is critical to understand who
will be using the facility in order to deliver the
conditions most likely to satisfy them.
Pool Type
Competition 78 to 85 76 to 82
Diving 80 to 85 84 to 88
Elderly Swimmers 84 to 85 85 to 90
Hotel 82 to 85 82 to 86
Physical Therapy 80 to 85 90 to 95
Recreational 82 to 85 80 to 85
Whirlpool/spa 80 to 85 102 to 104
Air
Temperature, °F
Water
Temperature, °F
Table 1 – Typical Natatorium Operating
Conditions
Indoor pools are normally maintained between 50
and 60% RH for two reasons:
Swimmers leaving the water feel chilly at lower
relative humidity levels due to evaporation off the
body and:
It is considerably more expensive (and
unnecessary) to maintain 40% RH instead of
50% RH.
General Notes:
Facilities with warmer water temperatures tend to
have warmer space temperatures.
Physical Therapy facilities will cater to therapist
comfort rather than the patient because they are
generally not in the space for more than an hour,
whereas the therapist is there all day. The
designer should consult local codes. Some
States require a full purge of the room air with
100% outdoor air for every hour of occupancy.
Elderly swimmers tend to prefer much warmer air
and water temperatures.
Humidity Control: High relative humidity
levels inside a building are well known for their
destructive effects on building structure and can
pose serious health concerns. Buildings with high
humidity levels are prone to condensation problems
that can destroy the building structure. They also
facilitate the growth of mold and mildew, which in
addition to being unsightly, can adversely impact
the air quality. Controlling humidity requires that a
total moisture load be accurately calculated. This
amount of moisture must be removed from the
space at the same rate it is generated to maintain
stable space conditions.
1.1 Packaged mechanical refrigeration
system. By far the most common and popular
method of removing moisture from the space, these
are packaged refrigeration units like those built by
Seresco. The units are designed and developed
specifically for dehumidifying indoor pools.
A major benefit of this approach is that both the
sensible and latent heat is combined with the heat
generated by the compressor’s power consumption
and can be directed to wherever heat may be
required in the natatorium. This process is unique in
the HVAC industry as is uses both the cooling and
heat rejection sides of the refrigeration cycle. The
system can be simultaneously dehumidifying
(cooling) the air and then reheating it (and/or the
pool water) to deliver dehumidified and reheated air
to the space, and warm water to the pool.
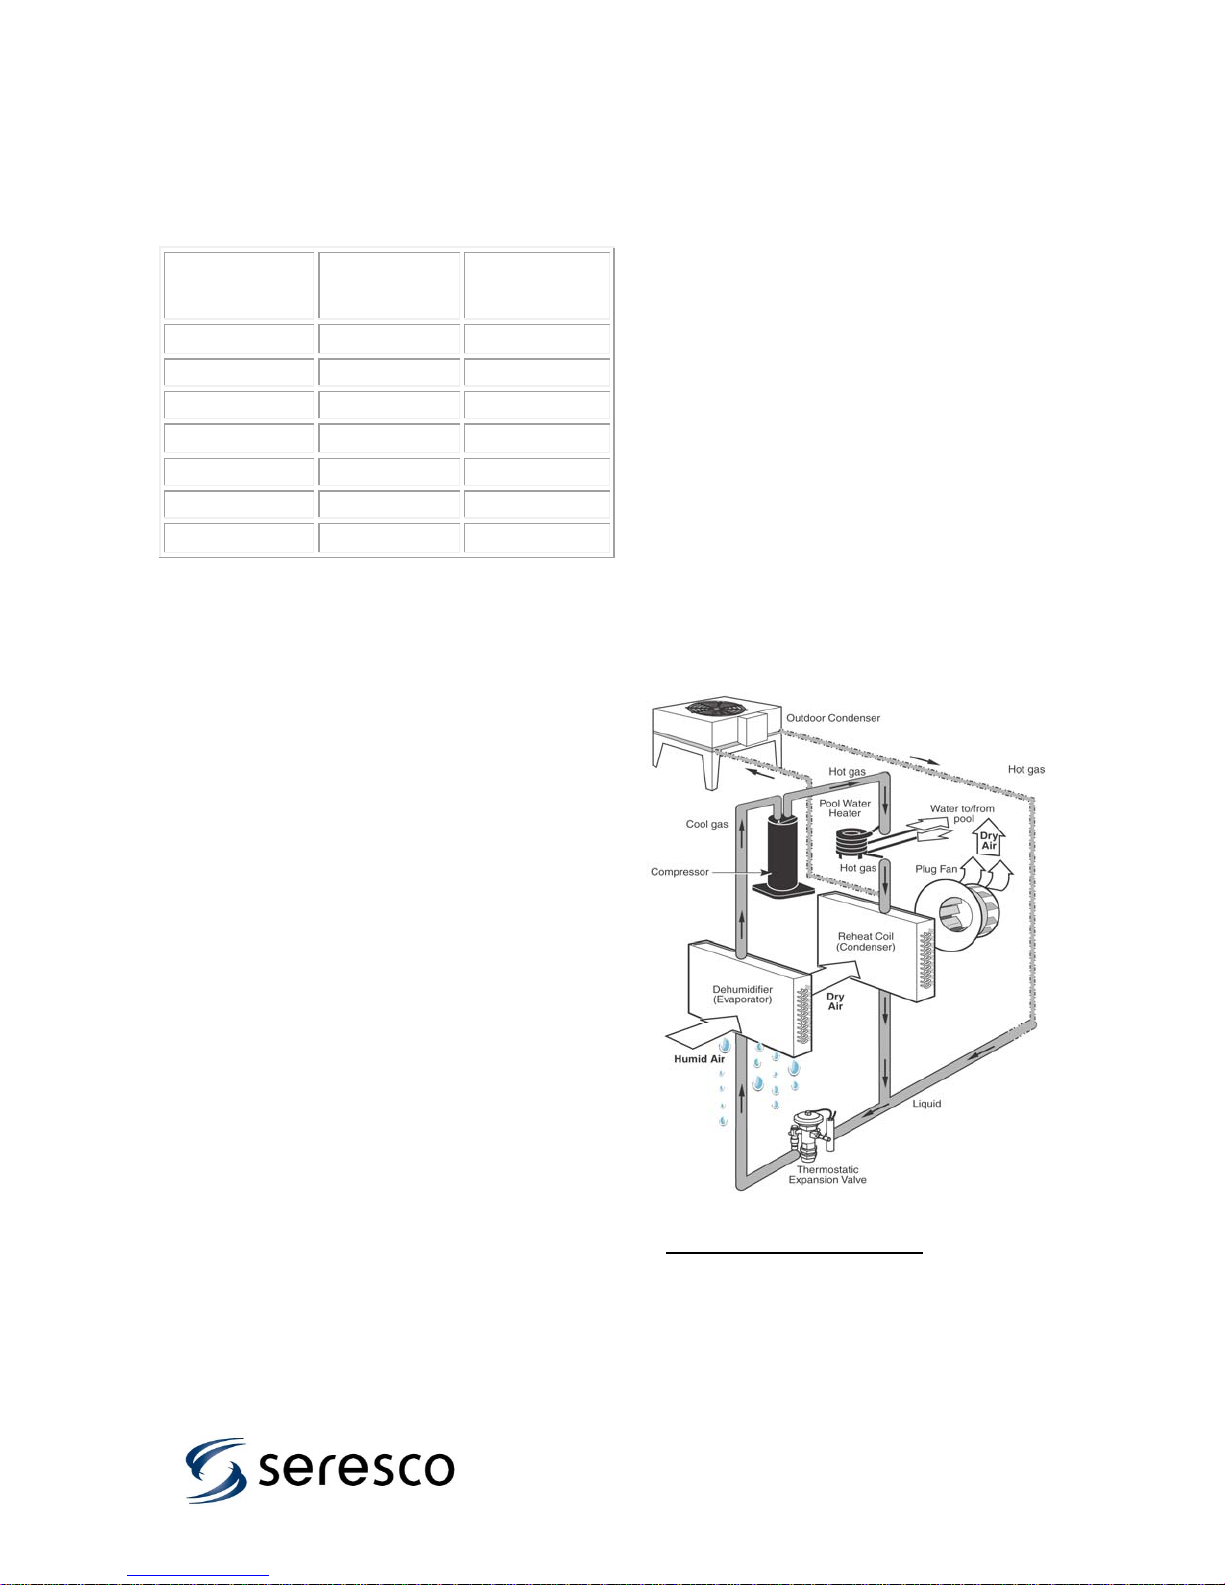
How it works. Figure 2 illustrates schematically
how warm humid air passes through the
dehumidifying coil and is cooled to below its dew
point. As a result moisture condenses out of the air.
Depending on the space temperature requirements
the hot gas from the compressor can be used to
reheat the air or reject its heat to an outdoor
condenser. Compressor hot gas can also be used
to heat the pool water
Figure 2 Mechanical Refrigeration System.
Typical Operating Conditions:
Air On Evaporator: 84°F, 50% RH
Air Off Evaporator: 50°F
Suction Pressure: 65 PSIG
High Pressure: 220 PSIG
Superheat: 12-15 °F
Pool Water Heat: in 84°F- out 92°F
.
5
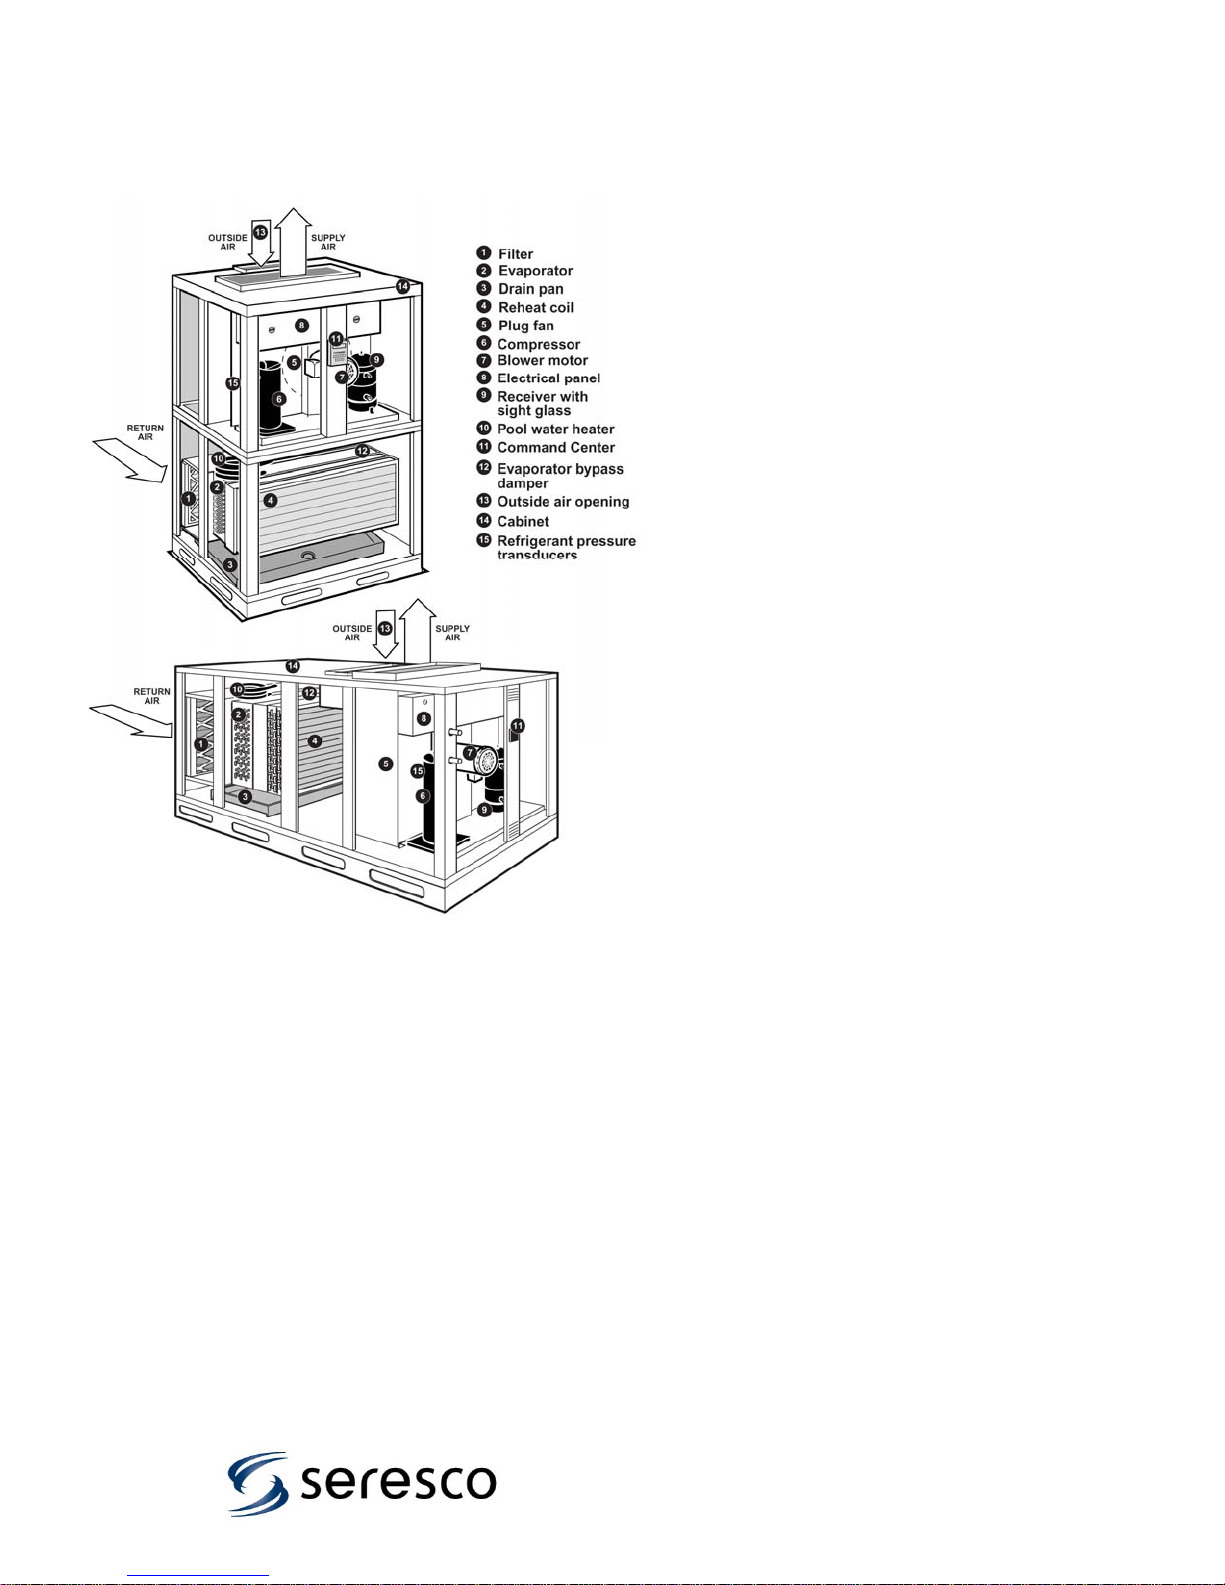
1.2 NE Series Dehumidifier
Features. Figure 3 identifies where several
major components are located within the NE Series
unit.
Figure 3 – NE Series Dehumidifier Major
Components
1 - Air Filters. The standard filter is a 2” pleated
30% efficient filter. 4” 95% filters are available on
certain models. Access to the filters is through a
service access door.
2 - Evaporator. The coil is corrosion protected to
ensure a long lifespan and designed to ensure
premium dehumidification performance. It is also
recessed into the cabinet allowing these units to
perform even if the duct connection is less than
perfect.
3 - Drain Pan. The drain pan has compound slopes
to ensure zero water retention.
4 - Reheat Coil. This corrosion protected
condenser coil is capable of rejecting 100% of
compressor heat to the air steam.
5 - Blower. Plug fans are standard on all units. The
backward inclined airfoil blower wheel provides high
static pressure with low motor power. This feature
helps ensure the NE unit will perform to
specifications even if the duct connections to the
unit or if the overall duct installation are less than
ideal.
6 - Compressors: The NE Series is equipped with
robust high-efficiency scroll compressors.
7 - Direct driven blowers: No belts to adjust or
maintain! The motor is even out of the air stream.
The NE Series uses Inverter Spike Resistant direct
driven blower motors. This blower drive design
simplifies unit maintenance and delivers the air
more efficiently.
8 - Electrical Panel. All electrical components and
connections are inside this panel.
9 - Receiver. The receivers have two sight glasses.
This facilitates the system charging process
10 - Pool Water Heater. This coaxial heat
exchanger is provided with the PH and PV models.
The water circuit is corrosion resistant cupro-nickel
pipe.
11 - Command Center. The Keypad and Display
panel has a backlit graphic Liquid Crystal Display
(LCD) and 7 system status LEDs.
12 - Evaporator Bypass Damper. The motorized
bypass damper is controlled by the Command
Center and it is used to ensure the evaporator is
always operating at optimum pressures.
13 - Outside Air Opening. Manual air balancing
dampers are provided and two-inch air filters.
14 - Cabinet: Seresco has taken all possible
commercially feasible precautions to protect the NE
Series units against the corrosion. The sheet metal
is galvanized automotive grade G-90 with both
sides painted.
15 - Refrigerant Pressure transducers. These
allow the user or serviceman to access the vital
information of refrigerant pressures through the
operator panel of the microprocessor rather than
having to connect a set of refrigerant manifold
gauges. This is the most important operation and
diagnostic data for any refrigeration system.
6
2. Installation
2.1 Uncrating and Inspecting
Seresco inspects and fully tests each
dehumidifier in all operating modes before it
ships from the factory. The unit can suffer
damage in transit. Check the equipment
thoroughly for both visible and concealed
damage before you sign the receiving papers.
Document any damage in writing on the
carrier’s bill of lading to ensure that damage
claims are handled promptly. If the unit has
been damaged, obtain a claim form from the
carrier. Promptly fill out and return the form,
and notify Seresco of any damage.
Damage claims or missing parts must
be filed with the freight carrier.
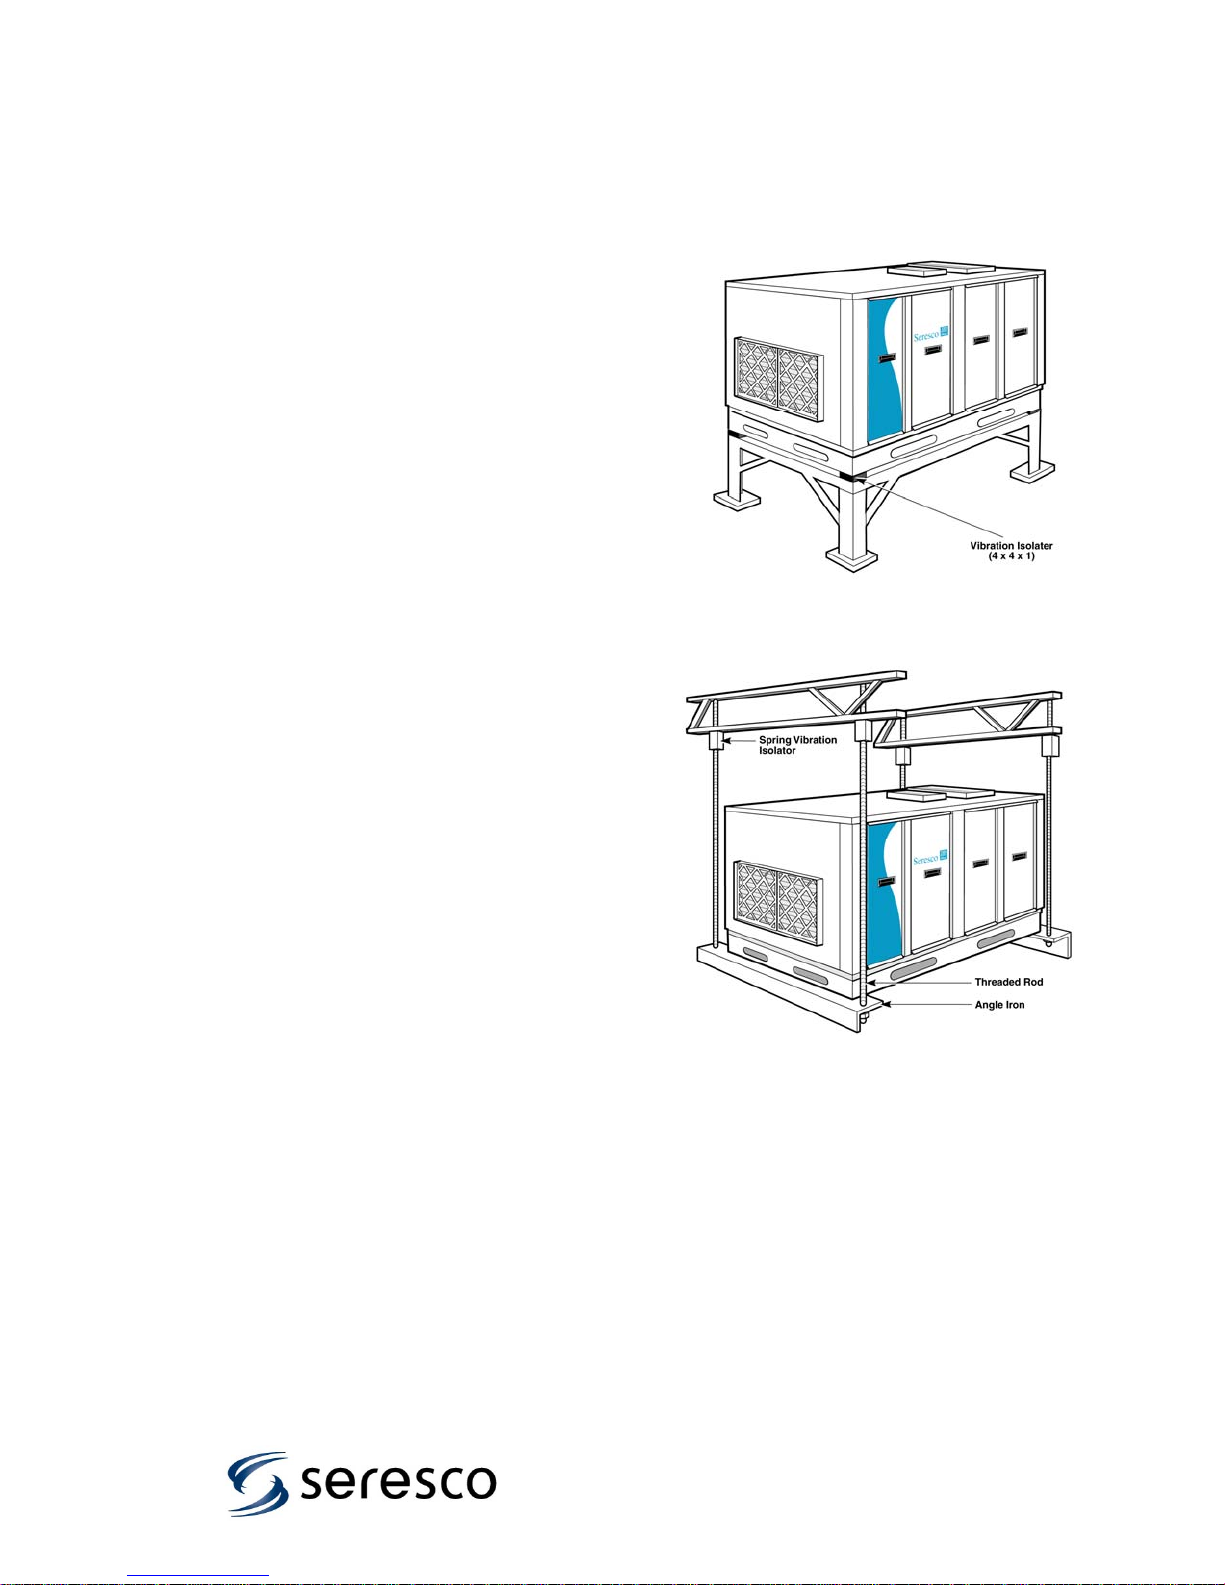
2.2. Mounting and Service Clearance
The NE Series dehumidifier continuously
removes a significant amount of moisture from
the room air. Some models have a pool water
heating option. Condensate lines and pool
water circuits can leak.
Do not install the unit in a location
where a water leak will cause damage.
The mechanical room where the unit is
installed should have a floor drain.
If there is no floor drain, a secondary pan
with a drain or condensate pump should be
installed under the entire unit. (as is done
with a residential washing machine)
Do not store pool chemicals in the same
room as the dehumidifier.
Install the unit on an appropriate mounting
base or a platform. Install industry standard
components that prevent vibration and sound
transmission. Never install the dehumidifier on
a wooden platform that can resonate. Do not
install the unit near occupied rooms such as
bedrooms. Never suspend from the floor joists
of an occupied room above the mechanical
room. Never locate the unit above a swimming
pool or a spa water surface.
Figures 5 & 6 illustrate typical unit mounting
configurations.
Ensure the support structure will not
interfere with the operation of or access to
unit.
No Access = no service or maintenance.
All NE series units have been designed to
require only two sides access.
Looking into the return duct connection allow a
minimum of 36 inches of clearance on the
right side (with the logo on it) and opposite
end of the NE series dehumidifier for piping,
duct connections, and service access.
Figure 5 – Typical Floor
Installation
Figure 6 – Typical Suspended Installation
DO NOT install a standard indoor
dehumidifier in an unconditioned space or
where ambient temperatures can fall below
45°F or climb above 90°F.
being considered, Seresco offers outdoorrated dehumidifiers with weatherproofing and
thicker insulation.
If such a space is
7

2.3. High Voltage Electrical
Connections
The installing contractor must ensure
that all electrical wiring satisfies all
National, State and Local codes.
2.3.1 Wire and Fuse Sizing
The field-installed power supply wires and
over current devices must be sized to
handle the minimum ampacity of the
dehumidifier without exceeding the
maximum fuse size rating. Both the MCA
and MOP are indicated on the unit
nameplate.
Improper wiring to the dehumidifier
could create the possibility of
shock and may lead to system
failure.
2.3.2 Line Voltage Connections
Figure 7 shows typical power wiring
connections. Single-phase units power
supply must have 3 wires (2 power, 1
ground). On three phase units the power
supply must have 4 wires (3 power, 1
ground). Connect the power supply wires
to the main power block located inside the
electrical panel.
Always check the nameplate voltage before
connecting to the unit.
Figure 7 – Power Wire Connection
2.4. Control Wiring
The NE Series dehumidifiers have all necessary
sensors unit mounted and set points preprogrammed at the factory. Remote duct heaters,
outdoor air-cooled condensers, auxiliary pool water
heaters and remote exhaust fans all require
interfacing with the dehumidifier. Their connection
terminals are identified on page 33
The microprocessor has been programmed to
control their operation. Figure 8 illustrates how an
Ethernet connection to the Internet allows all
functions to be monitored by trained professionals
with Seresco’s Websentry. It is the final step to
ensure the facility operates trouble free.
Figure 8 – Control Wiring
8
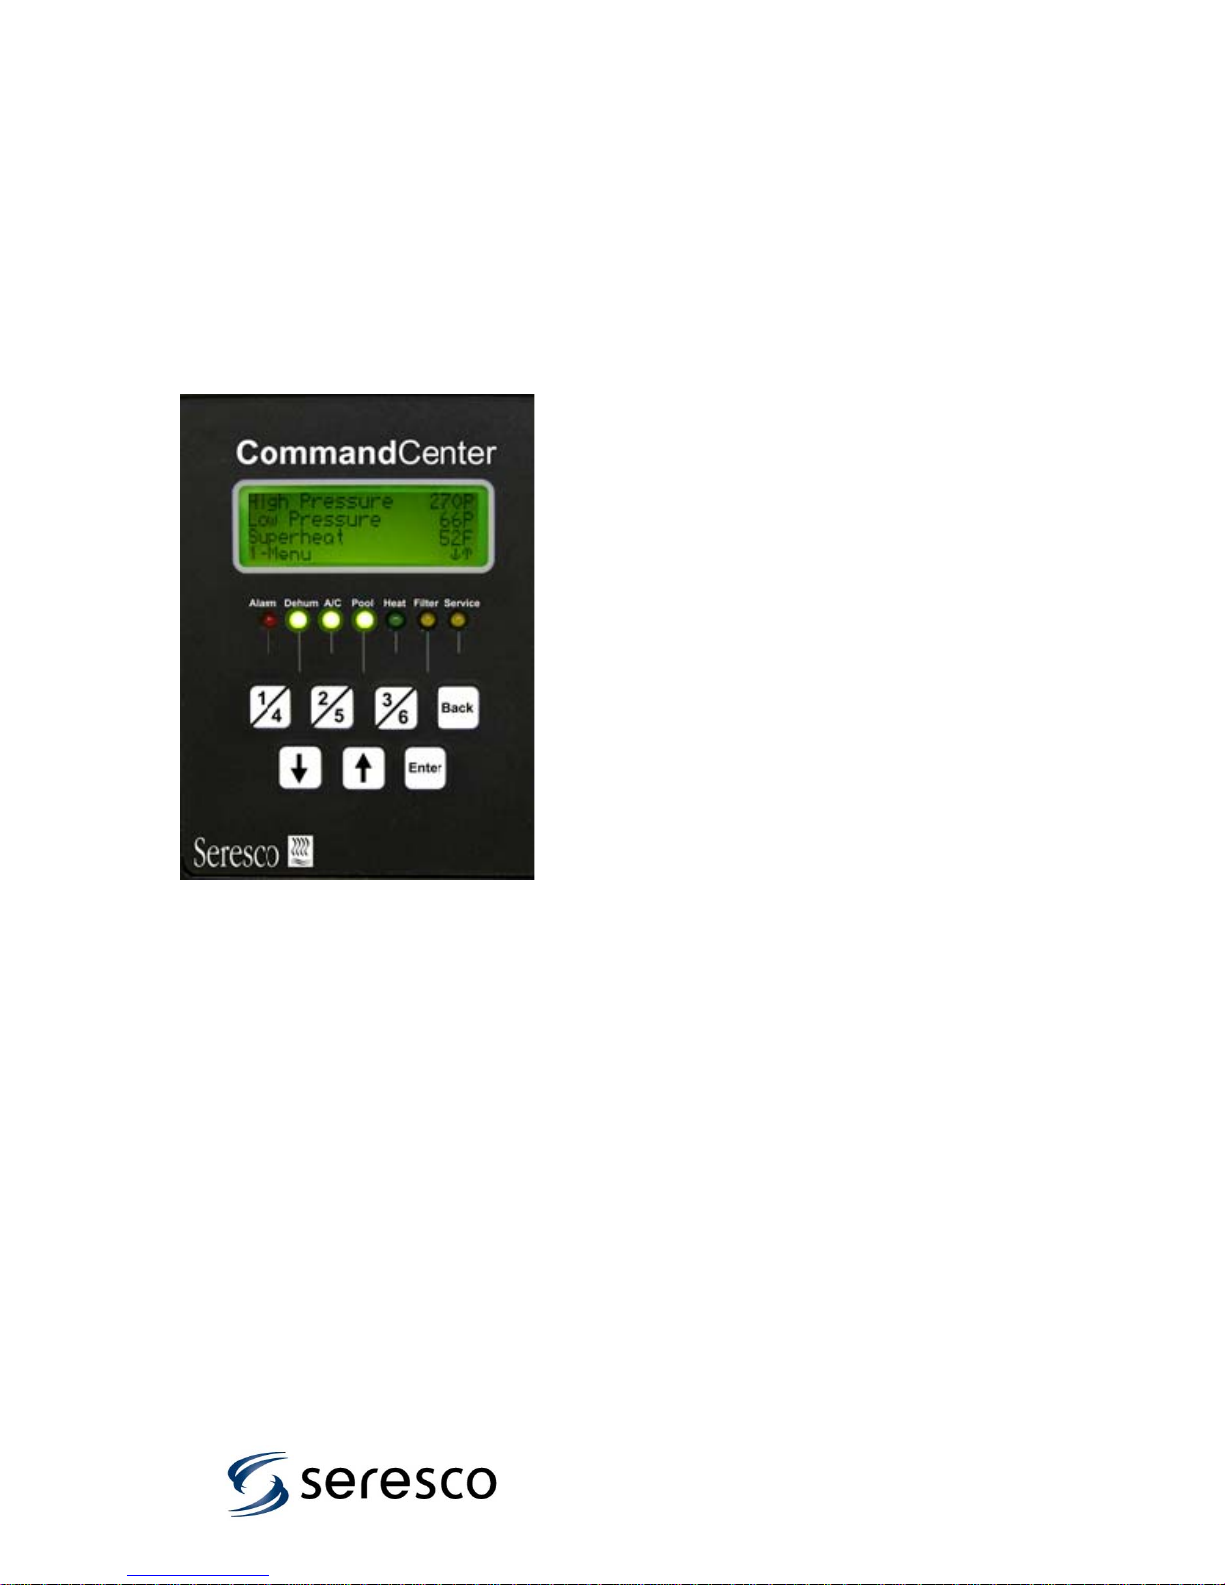
2.5 Controller, Programming and
Sensors
The NE Series Command Center (Figure 9) is
the brains behind the NE Series
Dehumidification System. The Command
Center is composed of a microcontroller
system, an LCD display and keypad, an
Ethernet interface, and WebSentry – a web
browser based remote interface tool for
monitoring and controlling NE Series systems
from anywhere in the world via the internet
Figure 9 – Command Center
The keyboard/display panel is shown in Figure
9 and is located on the NE Series unit at the
mechanical compartment access. The LCD
display has a built-in backlight for easy
reading in low light conditions.
The keys have the following functions:
1, 2, 3 Correspond to numbered selections
4, 5, 6 (menu items and parameters) on the
screen (eg. 1-Menu, press 1for the
main menu)
Back Allows you to return to the previous
menu or cancel a parameter change.
Used for viewing additional
menus, alarms or operating
data and for changing
parameters on the screen such as
setpoints.
Enter Press to save changes to
parameters and (optionally) press
again to return to the main sensor
screen.
There are 7 LEDs as shown and their function
is as follows:
Alarm Solid Red indicates an active alarm
(that has not yet been cleared). A
Flashing Red indicates an alarm that
has not been acknowledged yet.
Dehum Solid Green indicates system is in
dehumidification mode. Compressor
will run when anti-short cycle timer is
satisfied.
A/C Solid Green indicates system is
in air-conditioning mode. Compressor
will run when anti-short cycle timer is
satisfied.
Pool Solid Green indicates that pool
heating is on. If Dehum or A/C is also
on, then heating is by the NE Series
unit. If Dehum and A/C are off,
auxiliary heating is energized.
Heat Solid Green indicates that the
auxiliary air heating system is on.
Filter Solid Yellow indicates that the air
filters are dirty and need changing
(optional only).
Service Solid Yellow indicates that the NE
Series unit is in Service Mode.
Flashing Yellow indicates that the
blower or compressor have been
manually disabled (when not in
Service Mode).
There are two main modes of operation for the
NE Series Units: “Normal Mode” and “Service
Mode”. In normal mode, the user can view
sensor information, view unit operating status,
change setpoints (password protected), adjust
the occupied/unoccupied schedule (password
protected), and view alarms and warnings.
The system operates automatically.
In Service Mode, the trained technician has
access to special features to aid in system
commissioning and troubleshooting, including
Ethernet network access test utilities.
The system operates under manual control.
9

2.5.1 Normal Mode:
Menus and selections are accessed using the “1-6” numbered keys – each menu item and
parameter is preceded by a number from 1 to 6. When the scroll keys can be used to access
additional menu items they will appear on the screen ( and ). The same scroll keys are used to
change values after a parameter has been selected.
A User Password is required to view/change setpoints and schedules. Passwords are 3 digits
long, and entry is done using the scroll keys ( and ) to change the 1
password value – then press Enter to accept that digit and move on to the 2
rd
3
digit. The User password is supplied to the customer under separate cover.
st
digit to the correct
nd
digit, repeat for the
From the main screen, which shows sensor readings, press 1 (-Menu) to open the main menu
structure below. From any menu level, the Back button will return to the previous menu
level without making any changes. Note that some menu items are only visible if the unit
has been configured with that option:
Temperature Room temperature setpoint
Humidity Room relative humidity setpoint
Pool Temp Pool water temperature setpoint
Economizer Outdoor air temperature below which economizer not used
Freezestat Supply air temperature below which Freezestat alarm trips
Purge Supply air temperature below which Purge will stop
Heat Recovery Outdoor air temperature below which heat recovery starts
Schedule Sets occupied/unoccupied state for ventilation control
Time Slot 1-6 There are 6 available time slots that can be established
Weekday None/All/Weekday/Weekend/Monday to Sunday selection
On Time at which occupied status and ventilation begins
Off Time at which unoccupied status begins, ventilation stops
System
Blower/Compressor Enabling/disabling blower and compressor operation
Purge Starts/stops purge 100% ventilation operation
System Restart Manual reset
Alarm Log View Alarms
System Status See Section 2.5.4
System Summary Summary of system configurations
User Settings
Display
Backlight Turn backlight on or off
Reset Display Idle time before display reverts to the main sensor screen
Short Message Time for which short information messages remain visible
Long Message Time for which long information messages remain visible
System Clock
Date Set the date
Time Set the time
Zone Set the time zone
Daylight Set daylight savings on or off manually
Date Format Format the date on the screen
Time Format Format the time on the screen
Synch Synchronize with internet time server (when connected)
User Password
Enabled Enable/disable user password control
Password Change user password
Retention Set time for which password entry remains valid
Factory Settings
Service Mode
Setpoint
Figure 10 Command Center Quick Menu
10

2.5.2 Service Mode
From the Startup Menu there is a Service
Mode available for factory trained service
technicians. Please contact factory for
additional information.
2.5.3 Logs
The CommandCenter logs alarm messages
which can be accessed from the
LCD/Keypad.
Alarm messages are as follows:
HP# -NN High pressure trip (# indicates
compressor, NN can be SW
or TD indicating switch or
transducer alarm)
LP# -NN Low pressure trip (# indicates
compressor, NN can be SW
or TD indicating switch or
transducer alarm)
Blower OL Blower overload trip
No Air Airflow alarm, air pressure
switch (optional) reading too
low air pressure differential
Fire Firestat signal active
Waterflow Low water flow, controls have
detected pool water out
temperature is too high
Filter Dirty filter, filter switch
(optional) reading a high
pressure differential
Pumpdown Compressor pumpdown timed
out (no LP switch detected)
Freeze Freezestat
Purge Supply air too cold during
purge, purge shut down
Volt Mon Voltage monitor
Oil # Oil failure (# indicates
compressor)
No Config System not configured at
startup (only needs to be
done once)
Restart Manual Reset required to start
normal operation
SW Error System has detected an
internal error – contact factory
CompPower Indicates that compressor has
been manually disabled
through an external switch for
an extended period of time
SensorNNN Indicates sensor fault where
NNN identifies the sensor
2.5.4 System Status
The CommandCenter has a feature which
will provide more detailed information about
the internal operation of the system, which
can assist an owner or service technician in
understanding his NE Series unit is doing at
any given moment.
This feature is accessed through the menu
system at /Main Menu/System/System
Status.
The various system elements are broken
into three main groups:
Environment Related to air relative
humidity and temperature
control, pool heating control
Compressor Related to the operation of
the compressors
Other Related to miscellaneous
system operations
Selecting the Compressor elements takes
you to a screen showing the compressor
status, and also which solenoid valves and
contactors are energized. The solenoid
valves and contactors are coded as follows:
PW Compressor contactor
PD Pumpdown valve
DH Dehumidification (reheat) valve
AC Air conditioning valve
PH Pool water heating valve
PB Pool water heating bypass valve
11

2.5.5 Sensors and location.
Figures 11 & 12 identify where the sensors are
located in the NE Series units. Each sensor is
accessible through the Command Center or Web
Sentry. Sensor history is stored and can be
reviewed in tabular form.
All Sensors can be calibrated in service mode.
Figure 11 – Sensor location in a Vertical unit
Sensors:
Room air temperature
Room air humidity
Pool water entering temperature
Pool water leaving temperature
Outside air temperature
Air temperature leaving the evaporator
Supply air temperature
Compressor hot gas discharge temperature
Compressor suction gas temperature
Refrigerant Pressure Transducers:
Refrigerant High pressure
Refrigerant Suction pressure
These allow the user or serviceman to access the
vital refrigerant pressures through the operator
panel of the microprocessor rather than having to
connect a set of refrigerant manifold gauges.
Figure 12 – Sensor location in a Horizontal unit
12

2.6. System Design Checklist. Ensuring
that all critical system design aspects have been
addressed is paramount to obtaining a safe and
healthy pool environment. Seresco’s name is a
System duct design and air
useful checklist.
pattern
Evaporation rate and latent
loads
Required Access Space
Exhaust Air
Supply Air flow
Cooling and Heating loads
Outdoor Air
2.6.1 System Duct Design and Air
Pattern
The overall duct design will determine whether or
not the space will be comfortable and
condensation free. Special care must be taken to
ensure the entire room sees the required air
changes per hour and that all
exterior windows have air delivered to them.
Stagnant areas, especially where occupants can
access (the deck area for example) will suffer
from poor air quality and lead to complaints.
Traditional problems in indoor pools are easily
predictable and can be avoided by following to
models provided here. Figures 13 & 14 illustrate
good air distribution practices and layouts.
All air distribution systems should:
Supply 4-6 volumetric air changes per hour.
Blanket exterior windows, exterior surfaces
prone and other areas prone to
condensation with supply air. A good rule of
thumb is 3 - 5 CFM per ft² of exterior glass.
Locate the return grille to enhance the
overall air pattern within the room.
Prevent air short-circuiting. Avoid installing
the return air grille too close to a supply
grille.
Select grilles, registers and diffusers that
deliver the required throw distance, and the
specified CFM rating.
Introduced outdoor air per local codes and/or
ASHRAE Standards
Maintain a negative pressure in the space
with an exhaust fan.
13
Figure 13 – Perimeter Duct Layout

Figure 14 – Perimeter Below Grade Duct Layout
General Recommendations:
Galvanized sheet metal ducts are
acceptable in most installations. A
below-grade duct system should use
PVC or plastic-coated galvanized spiral
pipe to avoid deterioration.
Ductwork that passes through an
unconditioned area should be insulated
on the exterior.
When applicable, locate exhaust fan
air intakes as close to the whirlpool as
possible.
To prevent excessive vibration noise,
install neoprene flex connectors when
attaching ductwork to the
dehumidifier.
Skylights require significant airflow to
avoid condensation on their surfaces.
2.6.2 Evaporation and Latent Loads
Every building’s moisture (latent) load is
calculated in the same way. There are
generally three sources of moisture that are
considered:
It is important to be aware of the design criteria
used to calculate the total load and reconcile a
unit selection. Seresco’s Natatorium Design
Manual has more information on this subject.
Internal load; evaporation rate
Occupants
Outdoor air load
2.6.3 Required Access Space
Access Space
No Access = no service or maintenance.
All NE series dehumidifiers have been
designed to require only two sides access.
Allow a minimum of 36 inches of clearance
on the sides indicated in Figure 15 for piping
and service access. Mirror access units are
also available.
Figure 15 – Recommended Access Space
14

2.6.4 Exhaust Air. ASHRAE recommends
the room be maintained at 0.05-0.15” WC
negative pressure relative to surrounding spaces.
Ten percent more exhaust air than
outdoor air is a good
rule of thumb.
Figure 16 illustrates how the location of the
exhaust fan can also significantly improve the air
quality in the space. A spa or whirlpool should
have the exhaust air intake grille located directly
above it. This extracts the highest concentration
of pollutants before it can diffuse into the space
and negatively impact the room air quality.
Figure 16 – Exhaust Air Intake recommendation
2.6.5 Supply Air. ASHRAE
recommendations for proper volumetric air
changes per hour are important to ensuring that
an entire room will see air movement. Stagnant
areas must be avoided, as they will be prone to
condensation and air quality problems.
Short-circuiting between supply and return air
must also be avoided as it significantly reduces
the actual air changes within the space.
ASHRAE recommends:
4-6 volumetric air changes per hour in a
regular natatorium.
6-8 volumetric air changes per hour in
facilities with spectators
A quick calculation will determine the supply air
requirement. Nominal air flows from NE series
units are summarized in Table 3.
Supply air required (CFM) = [room volume (ft³) x
desired air changes] / 60
Model 1.0” ESP
004
005
006
007
008
010
012
014
2000
2500
3000
3400
3800
4600
5600
6400
Table 3. Nominal Air Flow Rates (CFM)
2.6.6 Cooling and Heating Loads. All
buildings should have cooling and heating load
calculations done to determine their specific
requirements. The room air temperature of an
indoor pool facility is generally 10-15 ºF warmer
than a typical occupied space. Therefore, the
heating requirement is larger than a traditional
room and the cooling needs are less.
Rules of thumb do not apply. This is a
unique space that requires accurate load
calculations.
Outdoor air must be included in load
calculations as it often represents up to 50%
of the heating load.
Space cooling is a free byproduct from packaged
dehumidifiers. These systems dehumidify by
cooling the air below its dew point. The
compressor heat can be used to heat the pool
water during this time or merely sent outdoors to
a condenser as is done with traditional air
conditioning systems. If the cooling load exceeds
the standard output of a dehumidification unit, a
larger unit with compressor staging is often
specified.
2.6.7 Outdoor Air. The introduction of
outdoor air is essential to maintaining good air
quality in any facility. The impact of outdoor air
ventilation on a natatorium changes with the
weather. Introducing outdoor air during the
summer adds moisture to the space and in the
winter removes moisture from the space. For
maximum dehumidification load calculation the
Summer Design conditions are considered.
Ventilation codes generally require that outdoor
air be introduced into a commercial building
during occupied hours. ASHRAE Standard 621999 recommends the introduction of outdoor air
into a natatorium at the following rates:
0.5 CFM/ft² of pool and (wet) deck area
15 CFM per spectator.
Most designers use the larger of
the two values.
Seresco suggests that only the wet deck (a 5-6’
perimeter) be considered in this calculation, as
the purpose of this outdoor air is to help dilute
chemicals off-gassed from water. A predictably
15

dry portion of the deck will not factor into the IAQ
issues.
The NE Series units have an outdoor air opening
with a filter and manual balancing damper.
Optional unit mounted motorized dampers and
time clocks are available. Figure 17 illustrates a
typical connection configuration.
Outdoor air requires considerable heating in
Locate the outdoor air intake away from any
If more than 20% of the total airflow is
If outdoor air is introduced into the return
Figure 17 – Outdoor Air Duct Detail
the winter and can add significant moisture
in the summer. Exceeding code
requirements is not recommended as it will
increase the operating expenses and may
increase the size of the dehumidifier.
sources of airborne contamination such as
exhaust fans or plumbing vents.
outdoor air or if the winter design
temperature is below 10ºF: The outdoor air
must be preheated to 65ºF.
duct: it must be preheated to the space
temperature.
2.7. Condensate Drain. The dehumidifier is
a draw through configuration as a result the
Figure 18 – P Trap
entire cabinet is under negative pressure.
Without a trap, condensate will not drain and the
unit will overflow into your mechanical room.
Per Figure 18 pitch the condensate drain line
a minimum of 1/8” per linear foot, and
support the pipe with code-approved
hangers at least every 5 feet.
If the drain line passes through an
unconditioned space, heat tracing is required
to prevent the condensate in the drain from
freezing.
When gravity disposal is not possible, a
condensate pump can be used. Follow the
pump manufacturer’s installation
instructions.
2.8. Pool Water Heating (PH and PV
Models Only).
through evaporation represents approximately
90% of its annual water-heating requirement. The
Seresco unit captures 100% of this heat as a byproduct of the dehumidification process and can
return this energy back to the pool, thereby
greatly reducing pool water heating costs. During
the cooling season the dehumidifier is capable of
providing 100% of the pool’s water-heating
requirement. Refer to Figure 18 for proper pool
water piping connections to the NE Series unit.
2.8.1 Water Piping Connections.
unit requires only a fraction of the total water
being circulated by the main filter system. Refer
to Table 4 or the unit nameplate for nominal
water flow rates.
The water circuit should tap off the main pool
water line downstream of the main filter and
upstream of the auxiliary pool water heater
and chemical feeder.
Install an auxiliary water pump to deliver the
unit’s required water flow. It is an open
system and the pool’s main circulating pump
can rarely accommodate additional system
pressure.
All systems require auxiliary pool water
heaters. The Seresco unit will control
their operation when it is not able to
provide water heating.
The energy a pool loses
The NE
Max Water Flow Rates (GPM) &
Pressure Drop (PSI)
Model GPM PSI
004
005
006
007
008
010
012
014
Table 4. Unit GPM Schedule
6 6
8 4
12 5
12 6
16 4
18 6
22 6
25 6
16

Figure 19 – Proper Pool Water Piping Installation
17
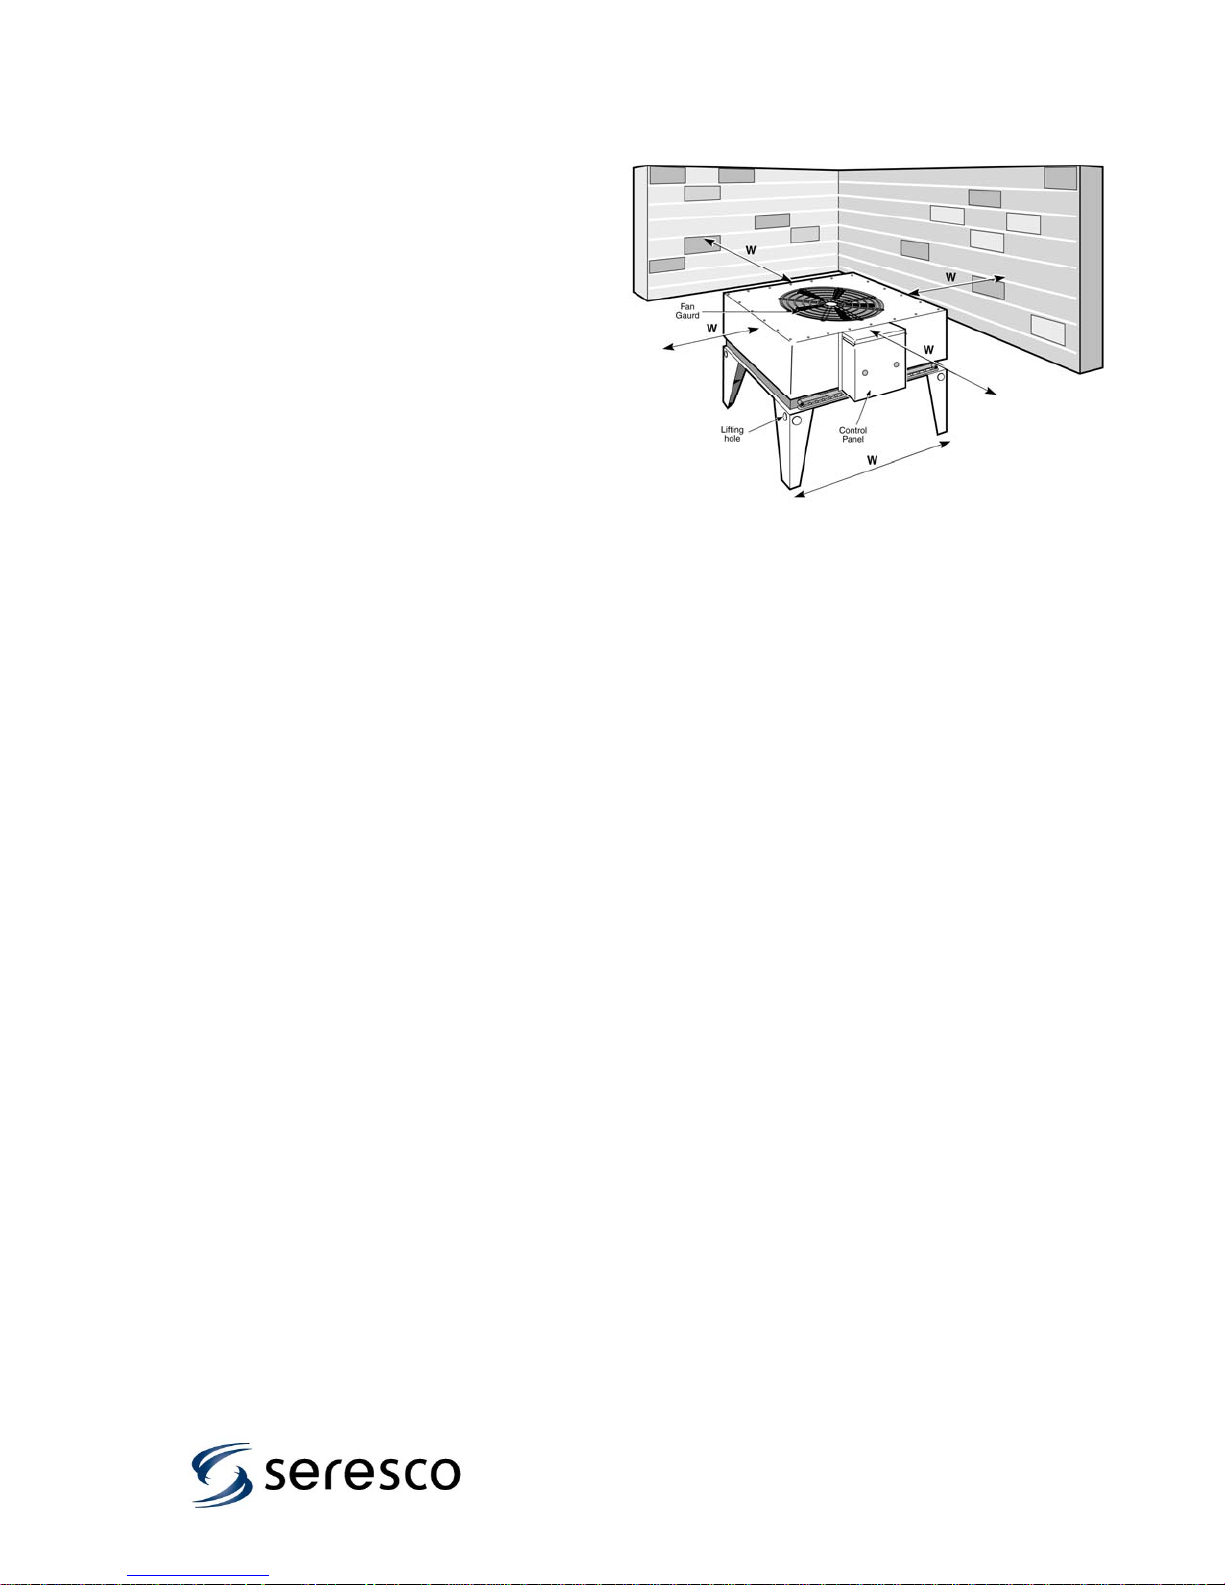
2.9. Outdoor Air Cooled Condenser
Installation.
This condenser is used in air conditioning mode
where it rejects unneeded heat from the space to
outdoors. Proper installation is essential to
ensure it can function as intended. Proper airflow
and refrigerant piping are paramount.
Ensure an appropriate maximum ambient air
temperature has been specified.
Ensure the unit has proper airflow per Figure
20. A perimeter of free area equal to its width
must be provided.
Use line sizes as specified by Seresco.
To avoid potential seasonal system charge
problems, ensure the installed line lengths
are never longer than indicated on the plans
and specifications.
If the condenser is installed above the
dehumidifier, ensure the hot gas line has
proper oil traps.
Contact Seresco if the condenser is installed
more than eight (8) feet below the
dehumidifier.
The installer must endeavor to ensure that
all industry standards for refrigeration
component installation are met. This
includes but is not limited to; proper line
sizing, materials, nitrogen purging, brazing
with Silfos 5 or better (NO SOFT SOLDER),
evacuation, cleanliness, traps, long radius
elbows and system charging.
Install the remote condenser on a level, hard
surface.
2.9.1 Refrigerant Piping of Remote
Condensers
1. NE series dehumidifiers are equipped
with isolation valves and access valves
located in the blower compartment. Do
not open the isolation valves until all
exterior piping is leak checked and
evacuated. The last outdoor condenser
vacuum can be broken with liquid R-22.
Monitor the exact amount of R-22
added, as the total system charge must
be per the unit nameplate.
2. NE series dehumidifiers have refrigerant
pipe stubs for the line set connection
inside the cabinet.
3. Use standard commercial refrigeration
piping practices when installing the
refrigeration piping between the
dehumidifier and the remote air-cooled
condenser.
o Hot Gas and Liquid line sizes should
be per unit nameplate. The stubs
inside the NE unit will be the correct
sizes for line lengths up to 50’.
Figure 20 – Typical Outdoor Condenser
Installation
o Do not exceed 50’ total line length or
install the condenser more than 8’
below the NE unit.
o Per figure 21, install an oil trap at the
start of and at every 15 feet of vertical
lift in the hot gas discharge line as
shown in Figure 18. Pitch horizontal
lines a minimum of 1/2” every 5 feet in
the direction of flow. All piping must be
clean and de-burred. Keep copper
chips and foreign materials out of the
tubing. A nitrogen purge while brazing
is paramount to reduce the chances of
oxidation in the pipes.
o Keep the Hot Gas and Liquid lines a
minimum of 2” apart to prevent heat
transfer. Insulate the hot gas line in all
areas where a person may come in
contact with the line and be in danger
of a burn.
o When all piping work is complete,
check for leaks by pressurizing the
remote condenser and line set with
dry nitrogen. If no leaks are detected,
the circuit is ready to be evacuated.
Evacuate the condenser and piping to
a minimum 250 microns. Isolate the
piping for ONE HOUR to verify that
the system is free from leaks,
moisture, and non-condensables.
Consult Seresco before installing the
outdoor air-cooled condenser
more then 8 feet below or more than
50 feet away from the dehumidifier.
18

Figure 21 – Typical Outdoor Condenser Installation
NE
Model
004
005
006
007
008
010
012
014
Factory
Charge
(Lbs)
25 17 9
27 28 12
27 29 12
28 32 14
44 32 15
48 48 20
51 62 29
61 77 35
50’ line
contractor
charge
(Lbs)
Factory
Oil
Charge
(Oz)
Table 5 - R-22 and Oil Charges
2.9.2 Charging of Remote Condensers
Once a proper evacuation has been
accomplished the system is ready for
charging. The outdoor air-cooled condenser
requires a field charge by the installing
contractor. The field charge required
depends on the size of the condenser and
the length of the piping. The unit nameplate
will show the exact field charge required.
Refer to Table 5 to determine the necessary
charge for your application.
1. The last vacuum can be broken with
liquid R-22. Monitor the exact amount of
R-22 added, as the total system charge
must be per the unit nameplate.
2. Connect the control wiring to the
terminals provided inside the electrical
compartment of the dehumidifier and
outdoor condenser. Refer to the low
voltage wiring schematic for details. The
condenser fan(s) will not operate until
this is complete.
3. Once you have charged and checked
the condenser and line set for leaks,
open the service valves located in the
compressor compartment of the
dehumidifier.
19

4. There is an access valve in the liquid
line after the pump down valve. The
pump down valve can be manually
closed during start-up mode via the
controller. Add only as much refrigerant
as is needed to get to the total charge
indicated on the nameplate
. Never
charge liquid into the suction line
access valve!
5. The receiver has 2 sight glasses with
float balls to help ensure the maximum
and minimum refrigerant levels are
easily met.
3.0 Pool Water Chemistry. Pool water
quality directly affects space air quality, lifespan
and performance of the mechanical equipment.
Poor water chemistry is the single
biggest cause of indoor air quality
(IAQ) and corrosion problems in a
Natatorium.
Table 6 shows the National Spa and Pool
Institute recommended levels for water quality.
3.1 Chlorine smell in the pool area. The
chlorine smell that is often associated with indoor
pools is not actually the smell of excess chlorine
in the water but of that of off-gassed Combined
Chlorines. Combined Chlorines are a product of
insufficient free chlorine and can result in high
levels of bacteria and algae in the pool water.
Maintaining proper free chlorine levels will help
eliminate the foul odors.
The proper amount of outdoor air and exhaust air
to and from the space is also crucial to ensuring
chemical concentration levels are maintained
within acceptable levels.
The powerful chlorine smell that is
often associated with indoor
pools is NOT the result of too
much free chlorine in the water; it
is TOO LITTLE free chlorine that is
the culprit!
3.2 Filtration. Elevated concentrations of
biological waste and dissolved solids in water
have been shown to directly contribute to high
combined chlorine (chloramine) levels. It is
important to provide adequate water exchange
rates as well as proper treatment and filtration to
prevent any build up of these undesirable
components.
3.3 pH Level. High pH allows for scale formation,
which reduces pool water heater efficiency. Low
pH levels (acidic) are corrosive and may damage
the metal parts in pumps, water heaters and
piping. Maintaining pH levels between 7.2 and
7.6 are vital for the longest possible life for the
pool equipment.
Table 6 lists the NSPI recommended levels of
each.
Pools
Desirable Range
pH 7.4 – 7.6
Alkalinity 80 – 100 PPM
Free
Chlorine
Combined
Chlorine
Dissolved
Solids
Total
Hardness
Table 6 - National Spa and Pool Institute
Recommended Levels for Water Quality
3.4 Corrosion. The deterioration of the pool
building and equipment can result from poor
water chemistry. A well balanced pool with proper
water treatment and sufficient outdoor air/exhaust
air dilution offers an environment that will not
affect the health of the users or cause damage to
mechanical equipment or the structure.
Local codes generally require a separate,
ventilated space MUST be provided to store
pool chemicals.
DO NOT STORE POOL CHEMICALS IN THE
MECHANICAL EQUIPMENT ROOM!
Seresco has taken all possible commercially
feasible precautions to protect the NE Series
units against the corrosion caused by
accidentally high chemical levels. The equipment,
materials and paints are all resistant to airborne
chemicals for a short period of time.
2.0 – 3.0 PPM
0 PPM
100 – 300 PPM
225 – 250 PPM
20

4. Start-up Procedures
4.1. Pre Start-up
A complete start-up is required to ensure all
systems have been setup and adjusted to
ensure optimum and reliable unit operation.
The final adjustment and balancing must be
done when all space and water
temperatures are at design conditions. The
use of auxiliary or portable air heaters may
be required to heat the room. Read this
section thoroughly before attempting to
commission the Seresco dehumidifier.
N
OTE: Do not use the unit as a construction
site heater. Construction dirt will invade the
unit and can significantly deteriorate unit
performance and lifespan.
1. Ensure the unit installation conforms to
all recommendations made by Seresco
in this manual.
2.
Check to ensure all packing materials
and shipping brackets have been
removed from the unit.
3.
Leak test (with halogen leak detector) all
factory and field piping. Shipping and
handling may have caused refrigerant
leaks inside the dehumidifier.
4. Check the nameplate for power
requirements and confirm that it
matches the available power supply.
5. Voltage must be within ±10% of the
voltage printed on the nameplate. Verify
that all field wiring matches the Seresco
wiring schematics. Inspect and tighten
all field and factory wiring.
6. Leave power on and allow 24 hours of
crankcase heater operation before
attempting the start-up.
7. Check the drain pan and the
condensate piping. Test the drain and
prime the P-trap by pouring water into
the drain pan.
8. Verify that any space heating coil is
installed in the supply air duct (after the
evaporator coil) and not in the return
duct.
9. PV or PH models have a pool water
heater. Energize the circulating pump
and establish water flow. Inspect the
piping and repair any water leaks.
Ensure the control wiring has been
installed between the unit and auxiliary
pool water heater.
10. Ensure the control wiring has been
installed to the outdoor air-cooled
condenser.
11. Ensure all peripheral controls and
sensors are connected and wired
correctly.
12. Verify that all service valves in the
refrigeration lines are fully open.
13. Inspect the air filters and coils to assure
they are clean. If necessary, clean the
coils and install new air filters.
14. Verify that the unit has appropriate
vibration isolators and that the unit is
level.
15. Complete the Pre Start-up checklist
section of the Warranty
Registration/Start-up Form (copy
provided with the unit and on page 34 of
this manual).
4.2. Start-up Procedure
All appropriate fields and sections of the
Warranty Registration and Start-up report
should be completed. A proper start-up
requires that the unit be run and monitored
in all modes of operation at design
conditions with the operating data recorded
on the forms provided in the annex of this
manual. Seresco reviews every report to
ensure all aspects of the system are
functioning within normal operating
parameters. Carefully follow the process
detailed in the start-up report.
If the space is not at design conditions at
the time of the start-up, a follow up visit
for final adjust and balance is required.
Mail or fax the completed start-up report
back to Seresco to validate your unit’s
warranty. Seresco will archive it for future
reference. If you do not have a start-up
report, call the Seresco for a new copy or
download a PDFversion from
www.seresco.net
.
21

4.3. System Operation Modes
The standard sequence of operation for a
Seresco dehumidifier is relatively simple.
Whenever the compressor operates the
evaporator coil is active where it absorbs
heat from the warm, humid air stream. The
cooling process at the evaporator coil drops
the air well below its dew point and thereby
dehumidifies the air.
Whenever the compressor operates the
evaporator is always dehumidifying and
cooling the return air.
The heat removed from the air at the
evaporator (plus the heat of compression)
must be rejected to one of three heat sinks;
room air, pool water (PH AND PV models)
or outdoors (remote condenser/Dry
cooler/cooling tower). The microprocessor
will direct the heat to where it is needed
based on the room conditions.
In the case of PH AND PV models with
remote condensers, if both the water and
the air require heat, the dehumidifier heats
the air first. If neither the water nor the air
require heat, then the dehumidifier rejects
the heat to the Air conditioning condenser.
4.3.1 Power turned ON (or after power
failure)
Microprocessor self test and system
diagnostics begins. If all systems are a
go, the microprocessor will use sensor
feedback to resume normal unit
operation.
Blower begins to operate after a 60 sec
initial delay and then runs continuously.
Microprocessor confirms with internal
real time-clock and operation log that
compressor has been off for 5 minutes.
4.3.2 Dehumidification Mode
This mode occurs when the space requires
dehumidification. The air discharged from
the unit is dehumidified and about 20F
warmer than when it entered.
The return air Relative Humidity is
above setpoint.
The compressor starts.
The evaporator sees nominal airflow.
The compressor hot gas condenses at
the reheat coil.
4.3.3 Air Conditioning Mode.
When the room air requires cooling only, the
NE unit will direct 100% the refrigerant hot
gas heat outdoors. The air discharged from
the unit is dehumidified and about 15F
cooler than when it entered.
Air Conditioning Mode Stage 1
The return air temperature is above
setpoint.
The compressor starts if not already
operating in dehumidification mode.
The evaporator sees nominal airflow.
The compressor hot gas condenses at
the outdoor air-cooled condenser.
Air Conditioning Mode Stage 2
The return air temperature has been
significantly above setpoint for an
extended period of time.
The compressor starts if not already
operating in Stage 1 AC or
dehumidification mode.
The evaporator bypass damper closes
for maximum airflow across the coil.
The compressor hot gas condenses at
the outdoor air-cooled condenser.
4.3.4 Pool Water Heating Mode (PH AND
PV Models Only)
If the unit is in dehumidification or air
conditioning mode then there is free heat
available from the dehumidifier.
The pool water temperature drops below
setpoint.
Water heating demand alone will not
start the compressor. There must be a
pre-existing demand to operate. If the
compressor is already operating:
o The pool water control valve
directs hot refrigerant flow through
the heat exchanger.
o The heat exchanger rejects heat
If there is no other demand requiring
compressor operation the
microprocessor sends an on/off signal to
the external auxiliary pool water heater
(by others). If the auxiliary pool water
heater has a separate controller, ensure
the set point is set lower or equal to pool
water setpoint on the NE control panel.
4.3.5 Blower Operation
Units have been factory wired for continuous
blower operation. This helps prevent air
stagnation and stratification. Continuous
blower operation is also required to ensure
that the sensors read conditions
representative of the entire Natatorium.
to the pool water. Operating in
pool water heating mode
increases system capacity and
efficiency.
22

4.3.6 Compressor Start Sequence
All NE units have a pump down sequence
and anti-short cycle timer. When a demand
requires the compressor to operate the
following sequence occurs:
Blower operation confirmed by
microprocessor and ASCT sequence
completed.
Pump down solenoid opens.
50 psig will close the low pressure
safety switch contact.
Compressor starts.
4.3.7 Space Heat Demand (Unit Mounted
or remote)
The Seresco unit’s microprocessor is
designed to control a space-heating coil
(unit mounted or remote). When the room
temperature drops below the set point the
microprocessor will send a signal to the
heating coil’s control mechanism.
5. Service and Maintenance
The NE unit is a piece of mechanical
equipment, which requires routine
maintenance and service. The service
required is nothing more than a traditional
commercial air conditioner. If a problem is
encountered, refer to the T
GUIDE in Section 6.2.
If all suggestions in the “Trouble shooting
guide” have been exhausted, call Seresco’s
service department. Be sure to have the
Model and Serial number when you call.
1-888-SERESCO (737-3726)
If the unit has been ordered with the internet
connection capabilities, Seresco or the local
factory representative can directly access
the unit and diagnose the problem from their
facility.
5.1. Routine Maintenance
Seresco dehumidifiers are designed for
years of reliable service. In order to ensure
this, they require periodic maintenance.
5.1.1 Monthly Service
Check the air filters and replace them if
necessary.
Check all water connections for leaks
and ensure all hose clamps are tight.
ROUBLESHOOTING
5.1.2 Annual Service
Tighten all field and factory electrical
connections.
Verify that the coils in the dehumidifier
and the remote outdoor air-cooled.
condenser or dry cooler are clean. Use
compressed air or a commercial coil
cleanser if they are dirty.
Verify that the airflow around the remote
condenser or dry cooler remains
unobstructed.
Check drainpan and clean out any
residue that may have accumulated.
Conduct a complete system check up.
This requires the service technician to
fill out page #2 of the Warranty
Registration and Start-up Report. A
copy of this worksheet is located on
page 34. This form is a valuable
maintenance tool, which can help to
uncover problems before they get
expensive.
5.2 Compressor Replacement
Compressor failures can be caused by:
liquid slugging, air or moisture in the
refrigerant circuit, solid contaminants,
excessive heat or electrical service
malfunctions. To avoid repeated failures, the
cause of the failure must be determined and
then corrected. If the compressor has failed
because its’ motor has burned out, the
refrigerant, oil, and piping is contaminated.
The procedure in section 5.2.1 should be
followed to replace the compressor and
clean the refrigerant system.
All acid must be removed from the
system to avoid future burnouts.
Use an oil test kit to determine the severity
of the burnout. Be sure to follow directions
provided by the test kit manufacturer for
complete system cleansing and acid
removal. Make sure you use rubber gloves
and eye protection, as contaminated
refrigerant and oil can cause severe burns!
5.2.1 Compressor Burnouts
If the compressor has failed due to a
burnout, the entire refrigerant charge has
been contaminated. In the service mode, all
solenoid valves can be opened in order to
evacuate the circuit completely. On systems
equipped with an optional pool water
condenser, take care to avoid freezing the
condenser during evacuation.
23

Verify that the TX Valve and solenoid
valves are free of debris. Clean or
replace them as necessary.
Replace the suction filter with a suction
line filter-drier designed specifically for
cleaning system burnouts (Sporlan “HH”
series or equivalent). Select filters that
are equipped with a tap for measuring
the pressure drop across the filter.
Remove the old liquid line filter-drier and
replace it with a new filter one size
larger than the original.
Remove the old compressor if you have
not already done so. Install the new
compressor.
Evacuate the system to 250 microns or
lower.
Replace all compressor contactors, start
capacitors, run capacitors, and starting
relays.
Check the piping and joints for leaks,
and recharge the system.
Operate the unit for an hour in all
modes. (The duct heater may have to
operate to maintain the space
temperature while operating in air
conditioning mode. Contact Seresco for
instructions.)
It is critical that the unit be run in
AC mode for cleaning system
burnouts. The entire system must
clean and acid free.
Monitor the pressure drop across the
suction filter. If the pressure drop is 3 psi
or less after one hour, continue to run
the system for 24 hours, then take an oil
sample. If the oil sample is dirty or
acidic, or if the one-hour pressure drop
is greater than 3 psi, then recover the
system charge and replace both the
suction and liquid filter-dryers.
Repeat the previous step until your oil
sample tests negative.
Seresco will require a copy of the acid test
result if there is a warranty replacement
request.
6. Service References
6.1. Nameplate/Factory Label. The unit
nameplate (Figure 24) and is attached to the
outside of the electrical box door. You will
require the rating plate information when you
install and service the dehumidifier.
The serial number will be required
should you ever require information
to a specific unit.
Figure 24 – Unit Nameplate/Factory Label
24

6.2. Mechanical System Troubleshooting
Issue Possible Cause Remedy
Firestat contact closure Check firestat switch
Loss of main power
Manually shut down on
controller
Supply blower will not start
Compressor will not start
Low Suction pressure
Normal: 60 – 75 PSIG
Faulty control wiring
Faulty wiring
Motor windings have shorted Replace motor
Blower overload has tripped reset overload
Manually shut down on
controller
Faulty control wiring
No demands to run
Loss of main power
Blower not operating
Faulty wiring
Compressor thermal protector
is open
Compressor delay-timer Wait 3 minutes for timer
Compressor overload has
tripped
Compressor draws locked
rotor amps
Motor windings have shorted Replace compressor
Compressor starts but does
not pump
Excessive bubbles in sight
glass (more than 10% of
volume)
Return air is below 70°F
Check for tripped circuit
breaker or blown fuses
Restart
Check for loose or incorrect
wires on system and controller
Check for loose or faulty wiring
on system and controller
Restart
Check for loose or incorrect
wires on system and controller
Adjust setpoints to what is
indicated on the unit
Nameplate
Check for tripped circuit
breaker or blown fuses
Refer to supply blower
problem section
Check for loose or faulty wiring
on system and controller
Allow one hour for compressor
to cool off.
Correct cause and reset
overload
Replace compressor (or check
fuses on three-phase units)
Replace compressor
Lack of refrigerant. Check
receiver sight glasses –level
indicators. Is the bottom ball
floating?
Blocked filter drier.
Is cold outdoor air mixing
upstream of the coil?
Too much cold outdoor air
being introduced to the space.
Duct heater not able to
accommodate actual load.
Review space heating
requirement.
25

Low Suction pressure
Normal: 60 – 75 PSIG
Keep head pressure above
Head pressure too low
Return air % RH level too low
Insufficient evaporator air flow
Blocked filter drier
Expansion valve not feeding
properly
Restriction in refrigeration
piping
Compressor discharge service
valves closed or not fully open
200 PSI by adjusting head
pressure regulator
Check register locations for
short-cycling of air.
Check setpoints; unit should
not be operating.
Evaluate system air flow
Check for dirty filters or
restricted ductwork
Assure coils are not blocked or
dirty.
Close bypass damper to force
additional air across the coil.
Evaluate filter pressure drop
and replace if necessary
Evaluate expansion valve
setting and performance.
Replace if necessary.
Check piping for kinks
Fully open service valves
High Head pressure
Normal: 200- 280 PSIG
Outdoor Condenser and Dry
Cooler related High Head
Pressure
Check receiver sight glasses –
Excessive refrigerant charge
Non-condensables in system Evacuate or purge system
Solenoid valve not opening
Restriction in refrigeration
piping
Refrigeration system is
overloaded
Too much airflow across
evaporator
Air on condenser temperature
above design condition.
Excessive pressure drop in
line sets
Fan motor overload tripped.
Contactor faulty Replace contactor
Outdoor condenser fan does
not run.
ORI valve setting too high
level indicators. Is the top ball
floating? Re-evaluate system
charge
Check all solenoid valves
operation
Check coil and tubing for kinks
Check operating conditions
against the unit design
conditions on the nameplate. It
may be undersized.
Verify the bypass damper is
open.
Balance the system airflow as
directed in section 6.4
If this is a chronic situation a
larger condenser or dry cooler
may be required.
Re-evaluate remote
condenser installation and line
sizing
Reduce fan speed and reset
overload
Control wiring missing from
dehumidifier
Adjust ORI in water heating
mode so unit delivers 10
degrees of water heating.
26

Poor air distribution
Airflow across evaporator is
Unit operates but windows
have condensation
Pool Water Heating
(PH and PV Models)
Compressor runs for short
periods and shuts off
Low Supply Air Temperature
rise in Dehumidification Mode
High Supply Air Temperature
rise in Dehumidification Mode
too high. Coil only doing
sensible cooling
Unit is undersized
Air and/or pool water
temperature incorrect
Low water temperature rise
High water temperature rise Insufficient water flow.
Conditions are being satisfied
Too much airflow through unit.
Too little airflow through unit.
6.3. Microprocessor Troubleshooting
Issue Possible Cause Remedy
Broken or loose wire between
controller and IO board
Communication fault
Sensor fault
Setpoint out of range
Emergency operation mode on
Corrosion on pins or terminals Clean pins and terminals
Defective IO board – LED is
Defective controller Replace controller
Sensor wires broken or
shorted to ground
Sensor reading outside design
Setpoint parameters are
outside acceptable limits
Manually selected by user Replace controller
Ensure all exterior windows
see 3-5 CFM/ft² of glass over
their entire area
Check bypass damper
operation. Ensure fully open or
recalibrate in Service mode.
Re-evaluate unit sizing. Check
for initially neglected sources
of humidity
Reset controller setpoints to
original design specifications
Solenoid valve not opening
Excessive water flow. This
erodes the water heater and
must be rectified.
Check register locations for
quickly
not on
parameters
short-circuiting of air
Unit oversized
Balance the system airflow as
directed in section 6.4
Close bypass plugs until
desired target range reached.
Re-evaluate duct pressure
losses to ensure they are
within the parameters
indicated on the unit
nameplate.
Repair any damaged or loose
wires.
Replace IO board
Connect sensor directly to IO
board. If it functions replace
wire.
Replace sensor
Reenter setpoint. Replace
sensor if problem persists
27

6.4 Airflow Adjustment Procedure
6.4.1 Supply Airflow adjustment. All
Seresco units have internal airflow balancing
ports. When removed, each port internally
recirculates approximately 5% of the unit
airflow. This is a quick and simple way to
adjust the supply airflow. The plugs and their
location are shown in Figure 26.
Figure 26 - Airflow adjustment plugs
6.4.2 Internal Static Pressures (ISP).
The standard NE Series unit is configured
for ¾” - 1” External Static Pressure (ESP)
depending on options. Should the ESP
change, Table 7 can help evaluate whether
a blower wheel change may be required.
Contact Seresco if there is more than a
½” change in the system ESP.
Design
Model
004
005
006
007
008
010
012
014
Table 7 - Internal Static Pressures (“ WC)
TSP
(“WC)
1.8 0.8 1.1
2.1 1.1 1.4
2.3 1.3 1.6
2.5 1.5 1.8
2.0 1.0 1.3
2.4 1.4 1.7
3.0 2.0 2.3
2.4 1.4 1.7
ISP
(“ WC)
ISP with
heating
coil
6.5. Basic Unit Operation
6.5.1 Controller Set Points
All NE units have been selected based on
predetermined operating conditions for each
facility. Most operating conditions fall within
the parameters suggested in Table 1 on
page 5. Changing setpoints can significantly
increase the evaporation load from the pool.
Before making significant changes (more
than 2ºF) to the setpoints indicated on the
unit nameplate, contact factory to verify that
the resulting load does not exceed unit
capacity.
R
ECOMMENDED SET POINTS:
Humidity: 50% to 60% RH.
Air temperature: 2º
pool water temperature.
Refer to Table 1 on page 5 for
guidelines.
ARNING: Never shut down a dehumidifier.
W
Even when not in use, pool water continues
to evaporate moisture to the air. It is also
prudent to cover the pool if the facility is to
be unattended for longer periods of time.
6.5.2 Typical Unit Operation Parameters.
There are several variables that impact unit
performance. If the unit is operating within
the parameters listed in Table 8, the
systems are well balanced and the unit is
performing well.
These are “Rule of Thumb” guidelines
only and do not include outdoor air.
Outdoor air would need to be shut off
fully during the time of the measurement
or be factored into these values based
on its exact conditions at the time of the
test.
The indicated refrigerant pressures are
the most important to target as they
directly impact all aspects of system
performance.
If any operating parameters are outside
those listed in Table 8 on page 29, refer
to the trouble-shooting guide in section
6.3 for possible solutions.
Suction temperature once unit has
stabilized should not exceed 75ºF or be
below 55ºF under normal conditions.
to 4º F above the
28

Typical Unit Performance (For R 22 units)
Dehumidification
Supply Air
Temperature change
Air off evaporator
Leaving Water
Temperature change
Suction - PSIG
High - PSIG
+ (10 – 15)ºF - (10 – 15)ºF - (10 – 15)ºF + (0 – 3)ºF
47- 55ºF 47- 55ºF 47- 55ºF 47- 55ºF
0 ºF 0 ºF + (8 – 10)ºF + (8 – 10)ºF
60 - 80 60 - 80 60 - 80 60 - 75
200 - 265 200 - 290 200 - 240 200 - 240
Table 8 – Typical Operating Parameters
6.6. Factory Start-up Supervision
Seresco factory start-up supervision can be
purchased with the equipment. A factory start-up
includes several key services:
The expertise of an accomplished,
factory-trained technician who will
supervise the commissioning of the
equipment.
This Seresco representative will assist
the installing contractor with filling out
the Start-Up Report.
They will also inspect the installation to
make sure that the dehumidifier has
been properly integrated with the rest of
the equipment on the jobsite.
Finally, they can train the maintenance
personnel to operate and service the
equipment if necessary.
A factory start-up does not include installation
assistance. The installing contractor is
responsible for ensuring that the system is ready
for start-up when the Seresco representative
arrives. If the system is not ready, Seresco
reserves the right to bill the contractor for a
second visit.
When the installing contractor is confident the
system will be ready, contact the Seresco Sales
representative to schedule the start-up. Please
call at least two weeks before the desired start-up
date to prevent scheduling conflicts.
Items required for Start-Up
A service technician and a fully stocked
service vehicle.
A set of refrigerant manifold gauges.
Air balancing equipment (magnehelic
differential pressure gauge).
Volt/Amp/Ohm meters.
A digital thermometer w/clamp on
sensors.
A halogen leak detector, R-22 and a
scale.
Air
Conditioning
Water Heat &
A C
Items to be Completed Before Start-up
Refrigerant leak-check (with halogen
leak detector) and inspect the unit for
internal concealed damage.
Level and support the dehumidifier
properly.
Install the outdoor air duct filters and
damper (if applicable).
Install the condensate P- trap and drain
lines and prime P-trap.
Pipe the remote condenser fan pressure
controls to the condenser hot gas lines
(if applicable).
Evacuate and leak-check the remote
condenser line set (if applicable).
Tighten all electrical connections and
verify that the line voltage is correct for
the unit.
Install all controls and verify that all field
wiring matches the schematic.
Fill and heat the pool and room to
design conditions.
Install the pool water piping and a flow
meter (if applicable). Purge all air from
pool lines.
A complete system air balancing.
Water Heat &
Dehumidification
29

6.7 Warranty
General Policy
This warranty applies to the original
equipment owner and is not transferable.
Seresco Inc. warrants as set forth and for
the time periods shown below that it will
furnish, through a Seresco Inc. authorized
installing contractor or service organization,
a new or rebuilt part for a part which has
failed because of defect in workmanship or
material. Seresco Inc. reserves the right to
apply handling and inspection charges in
the case of parts or equipment improperly
returned as defective whether under
warranty or not.
Warranty Registration and Start-up
Report
Warranty void unless upon start-up of the
unit the “Warranty Registration and Start-up
Report ” is completed and sent to the
factory within one week of initial start-up.
This report will also register the compressor
warranty with the compressor
manufacturer.
Labor Warranty
During the first 90 days from initial start-up
and subject to prior approval from the
factory Seresco Inc. will provide and/or
reimburse the required labor, materials, and
shipping costs incurred in the replacement
or repairing of a defective part.
Parts Warranty
If any part supplied by Seresco Inc. fails
because of a defect in workmanship or
material until completion of the 24th month
from date of shipment, Seresco Inc. will
furnish a new or rebuilt part F.O.B. factory.
No reimbursement will be made for
expenses incurred in making field
adjustments or replacements unless
specifically approved in writing beforehand
by Seresco Inc.
Applicability
This warranty is applicable only to products
that are purchased and installed in the
United States and Canada. This warranty
is NOT applicable to:
1. Products that have become defective
or damaged as a result of the use of a
contaminated water circuit or operation
at abnormal water temperatures and/or
flow rates.
2. Parts that wear out due to normal
usage, such as air filters, belts and
fuses. Refrigerant lost during the parts
warranty will be reimbursed in
accordance to the current market price
of refrigerant at the time of repair.
Seresco Inc. will not be responsible for
refrigerant lost from the system due to
improperly installed contractor piping to
the remote outdoor air cooled
condenser.
3. Refrigerant coils that corrode due to
improperly balanced pool chemistry or
corrosive air quality.
4. Components that have been relocated
from their original placement at the
factory.
5. Any portion of the system not supplied
by Seresco Inc.
6. Products on which the model and/or
serial number plates have been
removed or defaced.
7. Products which have become defective
or damaged as a result of unauthorized
opening of refrigeration circuit, improper
wiring, electrical supply characteristics,
poor maintenance, accidents,
transportation, misuse, abuse, fire,
flood, alteration and/or misapplication of
the product.
8. Products not installed, operated and
maintained as per Seresco Inc. Owner’s
Manual.
9. Products on which payment is in
default.
Transportation Costs
After the initial 90-day warranty period has
expired, charges covering transportation of
the defective part to Seresco Inc. from the
customer site and replacement part(s) from
Seresco Inc. to the customer site are not
covered by this warranty.
30

Limitations
This warranty is given in lieu of all other
warranties. Anything in the warranty
notwithstanding, any implied warranties of
fitness for particular purpose and
merchantability shall be limited to the
duration of the express warranty.
Manufacturer expressly disclaims and
excludes any liability for consequential or
incidental damage for breach of any
express or implied warranty.
Where a jurisdiction does not allow
limitations or exclusions in a warranty, the
foregoing limitations and exclusions shall
not apply to the extent of the legislation,
however, in such case the balance of the
above warranty shall remain in full force
and effect.
This warranty gives specific legal rights.
Other rights may vary according to local
legislation.
Force Majeure
Seresco Inc. will not be liable for delay or
failure to provide warranty service due to
government restrictions or restraints, war,
strikes, material shortages, acts of God or
other causes beyond Seresco Inc. control.
Second to Fifth Year Compressor
Warranty (optional) This extended
warranty must be purchased before the
shipment of the unit.
Seresco Inc. will provide a replacement
compressor for 60 months from the date
of shipment provided the compressor
fails as a result of manufacturing defect
and is returned to the factory with
transportation prepaid. This extended
compressor warranty is subject to all the
terms of the standard Seresco Inc.
warranty but applied to the compressor
only.
No charges attributed to the replacement
of a component, except as detailed in the
above Labor Warranty, will be allowed
unless specifically granted in writing
beforehand by Seresco Inc.
Second to Fifth year Coil Warranty (optional)
This extended warranty must be
purchased before the shipment of the
unit.
Under this warranty a replacement coil will
be supplied at Seresco Inc.’s expense,
provided the failed coil is returned to the
factory with transportation prepaid. This
extended coil warranty is subject to all the
terms of the standard NE Series warranty
but applied to the coil only.
This warranty is contingent to the proper
maintenance of pool water chemistry
including a pH of between 7.2 and 7.6 free
chlorine not exceeding 2.0 ppm and
combined chlorine maintained at less than
0.3 ppm. These parameters are to be
measured and recorded daily and be
available for review upon request.
Second to Tenth year Coil Warranty
(optional)
purchased before the shipment of the
Under this warranty a replacement coil will
be supplied at Seresco Inc.’s expense,
provided the failed coil is returned to the
factory with transportation prepaid. This
extended coil warranty is subject to all the
terms of the standard NE Series warranty
but applied to the coil only.
This warranty is contingent to the proper
maintenance of pool water chemistry
including a pH of between 7.2 and 7.6
free chlorine not exceeding 2.0 ppm and
combined chlorine maintained at less
than 0.3 ppm. These parameters are to
be measured and recorded daily and be
This extended warranty must be
unit.
available for review upon request.
31

6.8 Refrigeration Diagrams
Figure 26 – Refrigeration Diagram – Basic unit and Outdoor Condenser
Figure 27 – Refrigeration Diagram – Pool Heating and Outdoor Condenser
32

6.9 Field Wiring Diagram
6.10 Typical Electrical Panel Layout
33

6.11 Start Up and Warranty Registration Form
Project Name __________________________
Location _______________________________
Jobsite telephone number ________________
Seresco Representative _________________
Electrical Data L1 – L2 L2 – L3 L1 – L3 Nameplate
Compressor Amperage
Compressor Voltage
Blower Amperage
Blower Voltage
NE Series Model _____________________
Serial Number _______________________
Compressor Serial # __________________
Voltage on site _______________________
Installation Review and Checklist
Supply air blowing
on exterior doors
and windows?
No supply-return
air shortcircuiting?
Outdoor air
connected to
Seresco unit?
Exhaust fan
installed and
operating?
Vapor Barrier
installed?
Adequate service
access provided?
Units level and
vibration isolated?
Flex-Connectors
used at both unit
duct connections?
Condensate P-
Trap installed and
filled?
Condensate line
tested?
Pool Water piping
properly installed?
Pool water
circulating pump
operating?
Auxiliary
circulating pump
installed?
Pool water flow
per specifications?
Floor Drain in
mechanical room?
Chemicals stored
in separate
ventilated room?
Outdoor air cooled
condenser or Dry
Cooler properly
installed?
Unit nameplate
voltage verified?
Main disconnect
installed?
Wiring connections
checked & tightened?
Control wiring to
outdoor condenser or
Dry Cooler installed?
Control wiring to
auxiliary pool water
heater installed?
Ethernet cable
connected to unit.
Blower rotation
correct?
Air balance report on
file?
34

Outdoor Air cooled condenser or
Dry Cooler location:
……. ft [above / below] Seresco unit
If above, oil traps installed: [yes / no]
Same Level as Seresco Unit
Condenser/Dry Cooler Model
Total line length to OACC or
Dry Cooler………………………….
Hot gas line size……………….…..
Liquid line size……………………..
Total lbs R-22 added………………
Pipe size to Dry Cooler……………
installed:………………………….
Water Cooled and Dry Cooler AC
Fluid GPM………………………..
Glycol %:…………………………
Glycol stabilizers added: [yes / no]
Piping and valves installed per Specs?
Water/fluid temperatures:
Entering Seresco unit:……………..
Exiting Seresco unit:……………….
Controller Programming
Sensor Setpoint
Space temperature
humidity
Water temperature
Outdoor Air
CFM
DB/WB
from an exhaust
outlet?
Preheated prior to
entering unit?
Heat recovery
device used?
Dehum. A C
Return Air (°F)
Supply Air (°F)
Return Air %RH
Entering Water (°F)
Leaving Water (°F)
Water – GPM
Air off evaporator (°F)
Suction - PSIG
High - PSIG
Compressor Discharge
Temp (°F)
Sight Glass Clear?
Receiver sight glass
ball floating?
Top/Bottom
Operational Data
Water Heat
& A C
Space relative
Intake minimum 6’
Water
heat &
Dehum
Comments:…………………………………………………………………………………
………………………………………………………………………………………………
………………………………………………………………………………………………
………………………………………………………………………………………………
………………………………………………………………………………………………
………………………………………………………………………………………………
Technician……..………………………………. Company:……………………………….
Telephone Number:……………………………. Date:…………………………………….
35

Your local Seresco representative:
Design
Checklist
Project: ____________________________________________________________________
Reviewed by: ________________________________________________________________
System design and air flow pattern
All exterior windows, doors and skylights
are fully blanketed with supply air.
No stagnant areas including the water
surface.
Vapor retarder is installed on the warm
side of the dew point in the roof and
walls.
Evaporation rate and latent loads
Pool load calculated.
Outdoor Air load calculated.
Water features reviewed with factory.
Spectators and swim meet mode
calculated.
Required Access Space
Unit is accessible.
Unit has adequate service clearance.
Suspended unit has unobstructed
access.
Exhaust Air
Exhaust fan identified on the plans.
Exhaust Air is minimum 110% the
outdoor air CFM.
Exhaust air drawn from the whirlpool or
any other warm or highly active water
area.
System design and air flow pattern
Evaporation rate and latent loads
Required Access Space
Exhaust Air
Supply Air
Cooling and Heating loads
Outdoor Air
Supply Air
System delivers 4 air changes per hour
or greater.
Supply air is delivered to the deck area.
No short-circuiting of supply air to the
return duct.
Cooling and Heating loads
Sensible cooling load has been
calculated for the space design
temperature.
Heating load has been calculated for the
space design temperature.
Outdoor air has been included in all load
calculations.
Outdoor Air
1.0 CFM/ft² of water and wet deck for
pool with water features.
0.5 CFM/ft² of water and wet deck for
regular pool.
15 CFM per spectator.
Comments:
_________________________________
_________________________________
_________________________________
_________________________________
For more information visit www.seresco.net
1-888-Seresco (737-3726)
 Loading...