

Page 1

PSLHTM36
USER’S MANUAL
CORDLESS HEDGE
TRIMMER
Page 2

2
DESCRIPTION OF PARTS
1 Soft grip rear handle 10 Lock spanner of front handle
2 On/off switch on main handle 11 Hand guard
3 Button for rotary handle 12 Blade
4 Main housing 13 Blade transport guard.
5 Lock/release button for battery
pack
14 Aluminium Bar
6 Battery pack 15 Impact protection with suspension
shackle
7 On/off switch on front handle
(All around switch function)
16 Charger inlet on battery pack
8 Soft grip front handle 17 Battery charger
9 Locking bolt of front handle 18 LED indicator on charger
Page 3

3
GENERAL SAFETY WARNINGS FOR THE TOOL
WARNING! Read all safety warnings and instructions.
Failing to follow the warnings and instructions can result in an electric shock, a re and/or a
serious injury.
Keep all warnings and all instructions to be able to refer to them later on. The term “tool” in the warnings
refers to your electrical mains powered tool (with power cord) or your battery operated tool (without power
cord).
1 – Safety of the work area
a) Keep the work area clean and well lit. Cluttered and dark areas invite accidents.
b) Do not operate electric tools in explosive atmospheres, for example in the presence of ammable
liquids, gases or dust. Electric tools create sparks that can ignite the dust or fumes.
c) Keep children and bystanders away while operating the tool. Distractions can +cause you to lose control
of the tool.
2 – Electrical safety
a) The electric tool plugs must match the outlet. Never modify the plug in any way. Do not use adapters
with earthed (grounded) tools. Unmodied plugs and matching outlets will reduce the risk of electric
shock.
b) Avoid any body contact with earthed or grounded surfaces such as pipes, radiators, cookers and
refrigerators. There is an increased risk of electric shock if your body is earthed or grounded.
c) Do not expose tools to rain or wet conditions. Water entering a tool will increase the risk of electrical shock.
d) Do not abuse the cord. Never use the cord for carrying, pulling or unplugging the tool. Keep the cord
away from heat, lubricants, edges and moving parts. Damaged or entangled cords increase the risk of
electric shock.
e) When using a tool outside, use an extension cable suitable for outside use. Use of a cord suitable for
outside use reduces the risk of electric shock.
f) If operating a power tool in a damp location is unavoidable, use a residual current device( RCD) protected
supply. Use of an RCD reduces the risk of electric shock.
3 – Personal safety
a) Stay alert, watch what you are doing and use common sense when operating the tool. Do not use the
tool when you are tired or under the inuence of drugs, alcohol or medication. One moment of
carelessness while using a tool can result in serious personal injury.
b) Use safety equipment. Always wear eye protection. Safety equipment such as dust masks, non-slip
safety shoes, a hard hat and hearing protection used for appropriate conditions will reduce personal
injuries.
c) Avoid unintentional starting. Make sure that the switch is in the off position before plugging the tool
into the mains and/or tting the batteries, picking it up or carrying it. Carrying tools with your nger on
the switch or plugging in tools with the switch in the on position is a cause of accidents.
d) Remove any adjustment key before operating the tool. A key left attached to a rotating part of the tool
can result in personal injury.
e) Do not overreach. Keep a proper position and balance at all times. This enables better control of the
tool in unexpected situations.
f) Dress in a suitable manner. Do not wear loose clothing or jewelry. Keep hair, clothing and gloves away
from moving parts. Loose clothing, jewelry or long hair can be caught in moving parts.
g) If devices are provided for the connection of dust extraction and collection equipment, make sure that
they are connected and used correctly. Using dust collectors can reduce the dust-related risks.
Page 4
4
4 – Use and maintenance of the tool
a) Do not force the tool. Use the correct tool for your application. The correct tool will do the work better
and safer in the conditions for which it was manufactured.
b) Do not use the tool if the switch does not make it possible to change from the operating condition to stop
and vice versa. Any tool which cannot be controlled by the switch is dangerous and should be repaired.
c) Disconnect the power cord before any adjustment, changing an accessory or before storing the tool.
Such preventive safety measures reduce the risk of starting the tool accidentally.
d) Keep idle tools out of the reach of children and do not allow persons unfamiliar with the tool or these
instructions to operate it. Tools are dangerous in the hands of untrained users.
e) Maintain the tool. Check that there is no misalignment or obstruction of the moving parts, broken parts
or any other condition that could affect the operation of the tool. In the event of damage, have the tool
repaired before using it. Many accidents are due to badly maintained tools.
f) Keep cutting tools sharp and clean. Properly maintained tools with sharp cutting edges are less likely to
bind and are easier to control.
g) Use the tool, accessories and blades etc., in accordance with these instructions, while taking into ac
count the work conditions and the work to be done. The use of the tool for operations other than those
intended could result in dangerous situations.
5 – Maintenance and service
a) Have the tool serviced by qualied repair personnel using only identical replacement parts. This will
ensure that the safety of the tool is maintained.
BEFORE USE
Caution! The charger must only be operated in dry rooms Only use the battery charger indoors.
• The battery should be fully charged before using for the rst time. The charging time is about 1hour
• The battery charger supplied matches the lithium battery pack supplied, and you must not use any
other charger to recharge the battery pack. The battery may not take a charge when used with other
type charger.
• To protect the lithium battery against deep discharging, when the battery is at, the tool will automatically
switch off via a protective circuit. The blade will stop moving and a slight whistling sound will be heard.
Do not continue to press the On/Off switch after an automatic shut-off of the machine. The battery can
become damaged.
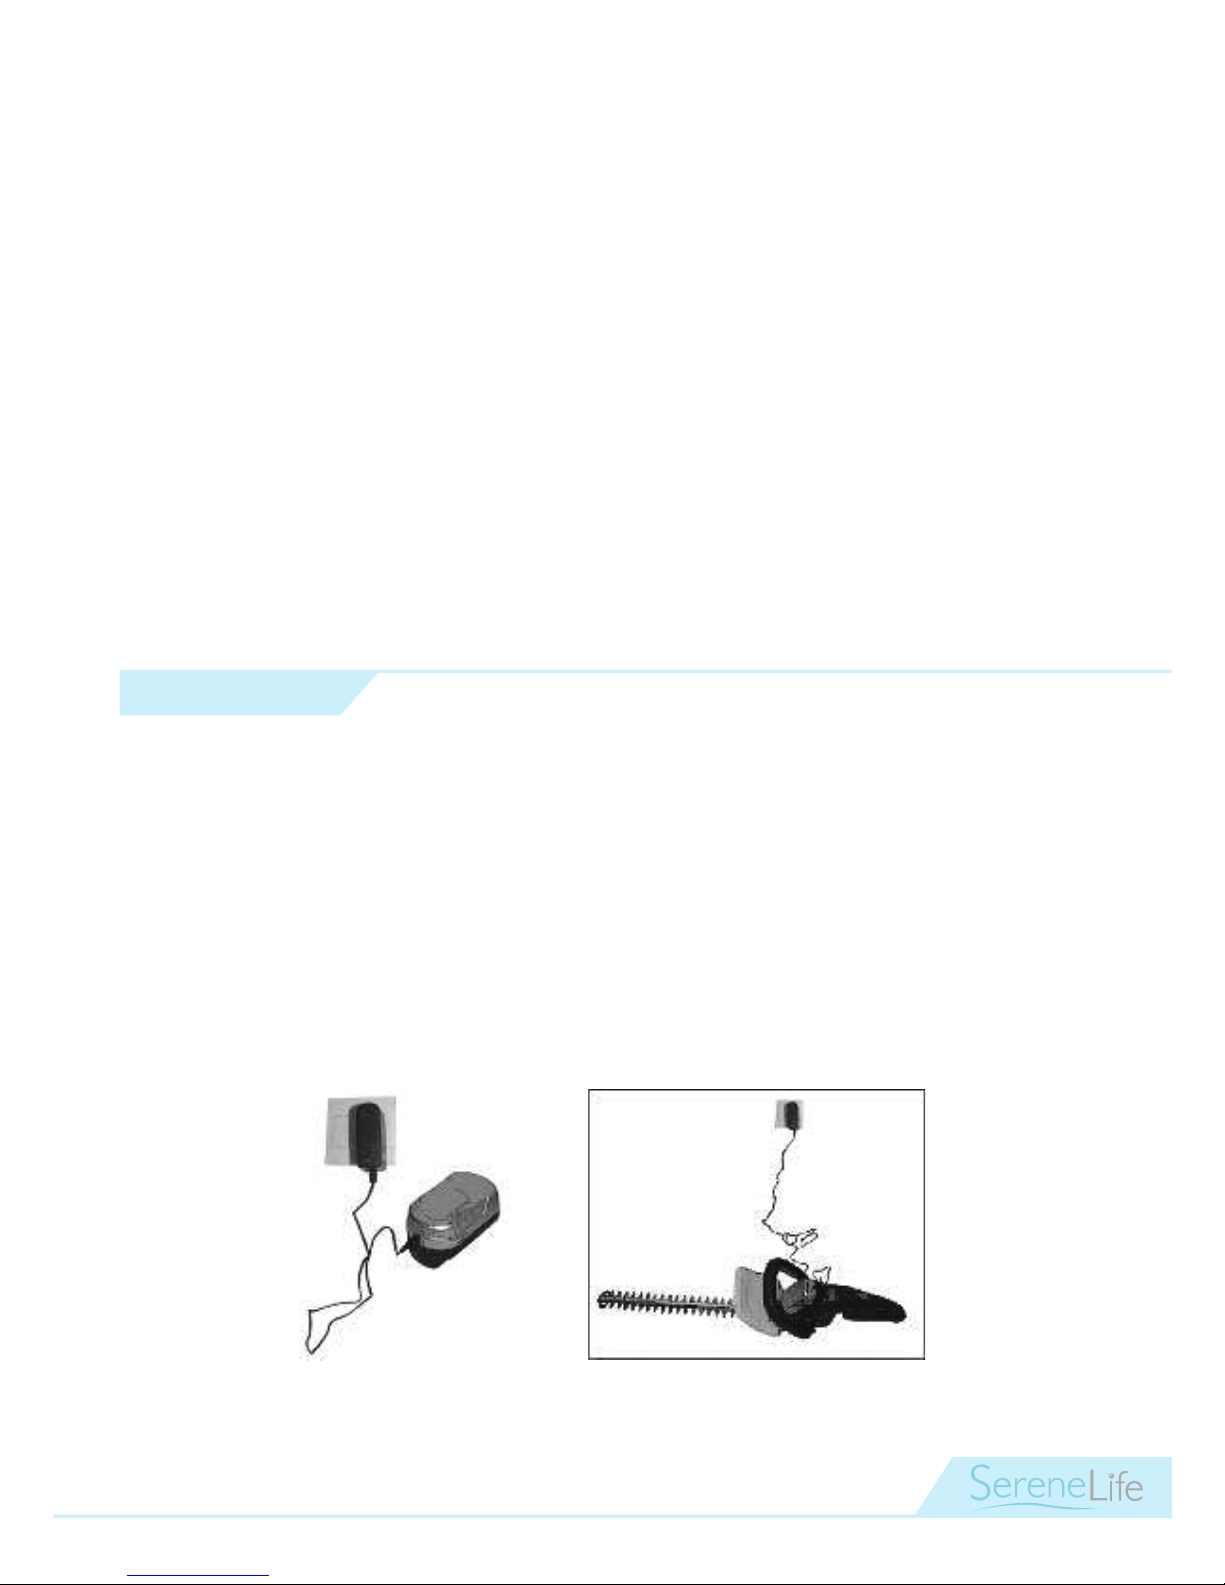
Fig. 1 Fig. 2
Page 5

5
Fig. 3 Fig. 4
Charging Procedure (Fig. 1,2,3,4)
Battery can be charged outside the machine (Fig.1) or on the machine (Fig 2-3). It is recommended to charge the battery pack outside the machine, If charge on the machine, switch will lose
function and machine can not be started during charging process.
1. Open the rubber cover to see charging inlet (16) on the battery pack. (Fig.4)
2. Insert the charger cable into charging inlet (16) . (Fig.3)
3. Making sure the wall outlet in your home is normal household voltage (AC230V, 50Hz); insert the battery
charger plug into the mains power supply.
4. The red LED charging indicator (18) on charger lights up to tell you that the battery pack is on change,
The battery is fully charged when the red LED charging indicator (18) is no longer lit but turns to be
green. Use the rubber cover to close the charging inlet (Fig. 4)
• During the charging process, the surface of battery pack will warm up, but this is perfectly normal.
• When not using the tool for extended periods, disconnect the battery charger from the socket.
• Only change the battery between 10˚ - 45˚C
• After prolonged use, allow battery to cool down first before recharging.
For your safety
Remove battery before any adjusting or cleaning and before leaving the machine unattended
for any period.
The blade continues to rotate for a few seconds after the cordless trimmer is switched off. Do
not touch the rotating blade.
Ensure that the cordless trimmer is assembled in the follwing order:
1. Fitting the Hand Guard
Insert the guard into the slot as illustrated in Fig. 5, making sure it is securely attached. Use two screws to
x the guard securely. (Fig. 5)
ASSEMBLY
Do not insert the battery until the hedge trimmer is completely assembled.
Fig. 5
Page 6

6
2. Fitting the Front Handle
The front handle must be assembled before use: Make sure the lock spanner (10) is in the unlock position. Unscrew the lock ring bolt (9) of front handle with a screw driver and pull it out. (Fig. 5 - 6)
3. Inserting or Removing Battery Pack
Hold battery pack with one hand and insert the battery pack to the chute, slide down the battery pack
as shown in Fig. 8. With a click the battery pack will be tted correctly. Make sure the lock/release button (5) for the battery pack is at the lock position and the battery pack must be felt engage.
Release the battery pack by pressing the lock/release button (5) with one hand and pull out the battery
pack with the other handle as shown in Fig. 9.
Attach the front handle to the main housing as illustrated in Fig. 7. Make sure the lock spanner (10) is at
the right side before attaching the front handle, otherwise the front handle can not be aligned with the
housing. (Fig. 7)
Check whether front handle is rmly secured, if not; re-tighten the lock ring bolt (9). Adjust the front handle to the required position and close the lock spanner (10).
Fig. 5 Fig. 6
Fig. 7
Fig. 8 Fig. 9
Page 7

7
1. Adjustment on the rear handle (Fig. 10 - 11)
The rear handle can be rotated in 5 steps from 90˚, 45˚, 0˚ to -45˚, -90˚ to get the desired position. (Fig.
10 -11):
1. Push the button for rotary handle (3) backwards.
2. Rotate the rear handle into the desired position. (Fig. 11)
3. Release the button and make sure it engages. Then the handle is xed.
2. Adjustment on the front handle (Fig.12-13)
The front handle can be set in three positions. Release the lock spanner to adjust the front handle to the
most comfortable position. Then close the lock spanner to lock it in that position.
Caution: Ensure you support the weight of the hedge trimmer before you adjust the front handle.
The machine can’t be switched on during the adjustment on the rear handle.
ADJUSTMENTS
Fig. 10 Fig. 11
Fig. 12 Fig. 13
1. Starting and Stopping (Fig.14)
Before start your hedge trimmer, remove blade guard from blade.
Starting:
press and hold the On/Off switch on the rear handle and any of the three On/Off switch on the front handle
(6) at the same time.
STARTING & STOPPING
Page 8

8
Stopping:
Release any of the On/Off switch
Fig. 14
OPERATING INSTRUCTIONS
This cordless hedge trimmer is designed exclusively for cutting garden hedges in your private domestic
ardens. Please note that this tool is not designed for commercial, trade or industrial use. Only use this
roduct for the purpose specied in these instructions. Any other use will void the guarantee.
For Your Safety:
Warning! Personal Injury and Damage!
Keep your hands and feet away from the cutting tool, especially when the products are witched
on! Never switch on the product while you are adjusting the handle.
Important ! Any use, which is not expressly permitted in the manual, may result in damage to
the machine and place the user in serious danger. Please carefully read the restrictions in the
safety instructions.
Remove battery before adjusting or cleaning, and before leaving the machine unattended for
any period. Caution! Do not touch the moving blades.
Important ! Before each use, check for damaged/worn parts, especially check the blade for proper
alignment.
In order to take full advantage of the battery capacity, you should not switch the machine on and off unnecessarily.
Cutting hedge
• Before cutting, check the hedge for foreign objects e.g. wire.
• When using the tool hold it away from yourself and stand in a secure position with your weight evenly
balanced over both feet.
• Cuts stems up to 14 mm in thickness. When cutting, move steadily along the line of cut, so that stems
are fed directly into the cutter blades. The double edge cutting blade enables cutting in either direction,
or with a side to side motion.
• Cut the sides of the hedge rst, then the top.
• To keep the sides at, cutting upwards with the growth is recommended. Younger
stems tend to move outwards when cutting them from top to bottom, resulting in shallow patches or
holes in the hedge.
• To reach a level nish, fasten a piece of string along the length of the hedge at the required height and
use as an alignment guide. Cut the hedge just above the string.
• After use, replace the blade transport guard.
Page 9

9
MAINTENANCE
Blades can cause injury. Before any work on the machine itself, remove battery from machine.
Note: To ensure long and reliable service, regularly carry out the following maintenance:
• Check for obvious defects such as loose, dislodged or damaged blade, loose xings and worn or dam-
aged components.
• Check that covers and guards are undamaged and correctly tted. Carry out necessary maintenance or
repairs before using.
• If the hedge cutter should happen to fail despite the care taken in manufacturing and testing, repair
should be carried out by an authorized customer service agent.
Blade Maintenance
Blades can cause injury. Before any work on the machine itself, remove battery from machine.
Never clean the hedge blades in water (especially running water), as there is a risk of personal
injury and damage to the blades
• Wear gloves when handling or cleaning the cutting blade
• To obtain good cutting results, always make sure the blades are sharp, and clean them from time to
time with a soft dry cloth.
• Always clean the cutting blade after operation and lubricate with protective spray. During longer
cutting jobs, we recommend periodically lubricating the cutting blade with protective spray.
• Visually check the condition of the cutting edges of the cutting blade. Check tightness of blade bolts.
• Ensure that the blade is covered with the blade guard supplied.
CLEANING / STORAGE
Remove the battery from the product. Ensure battery is removed before storage. Take care not to
short the battery terminals with metallic objects.
Clean the exterior of the machine thoroughly using a soft brush and cloth. Do not use water, solvents or
polishes.
• Remove all debris, especially from the ventilation slots.
• Always lubricate the cutting blade with protective spray before storage.
• After use, cover the blades with the guards provided.
• Fully charge the battery pack before storage.
• During storage, charge the battery at least once every three months to protect it from damage.
• Store the machine in a dry, secure place out of reach of children.
• Do not place any other objects on top of the machine.
• The machine must not be stored over 35ºC or under direct exposure to sunlight.
• Do not store the machine in places with static electricity.
• When battery pack is not in use, keep it away from other metal objects like paper clips, coins, keys, nails,
screws, or other small metal objects that can make a connection from one terminal to another. Shorting
the battery terminals together may cause burns or a re.
Page 10

10
CORDLESS GRASS & SHRUB SHEARS
FEATURES AND SPECIFICATIONS
Features:
• Versatile & Cordless Hedge Trimmer
• Built-in Rechargeable Battery
• Removable Bat tery for Convenient Charging
• Adjustable Handle for Precision & Control
• Cut & Chop Small Branches up to 0.4'' Thick
• Comfortable Handheld Grips
• Simple Button Operation
• Safety Power Lock Switch
• Rugged & Heavy-Duty Design
• Lightweight, Portable & Powerful
• Includes Battery Wall Charger Adapter
• Blade Cover for Safe Transpor t & Storage
• Perfect for Lawns, Gardens, Sidewalks, Walkways, Landscapes
Technical Specs:
• Construction Material: Engineered ABS
• Operation Speed: 1100+ RPM
• Cutting Blade Length: 20.5'' inches
• Battery Type: Lithium-ion, 18V
• Average Charge Time: 4 Hours
• Assembled Dimensions: 38.2'' x 8.7'' x 8.3''
• Sold as: 1
• Weight: 5.7 lbs.
Page 11

Page 12

 Loading...