

Page 1

RoboSHOOT
+
©
X Series
USER
MANUAL
addendum
Page 2

Basic Operation
RoboSHOOT
+
©
User Manual Page 2
TABLE OF CONTENTS
Key New Features ......................................... 3
Master (MX) Devices .................................... 4
Stand Alone Operation ................................ 5
Group Assignment on Slaves ................... 5
Customization (MX-20+ Only) .................. 5
Flash Test / Modeling Light ...................... 6
Flash Exposure Lock ................................. 6
Selecting a Profile .................................... 7
Multi-Master Mode ................................. 9
In-Camera Control ..................................... 10
Basic Menu Mode .................................. 11
Commander Menu Mode ...................... 13
In-Camera Control Considerations ........ 15
Focus Beam / Catch Light ...................... 16
Page 3

Basic Operation
RoboSHOOT
+
©
User Manual Page 3
This User Manual addendum covers the most
significant changes in the new MX+ units. The full
user manual and latest information can be found at:
www.sereneautomation.com
KEY NEW FEATURES
AutoFP/HSS (High Speed Sync) both TTL and
Manual (with Flashes in TTL mode) **
Advanced In-Camera Flash Group Control **
Flash Group Profile selection and Edit
Focus Beam / Catch Light support
**
Modeling Light function
**
Extensive In-App settings to control flash
group operation and customize functions
Full support for External Triggering via
optional remote switch or sensors
** On compatible speedlights and/or cameras. See
compatibility information at www.sereneautomation.com.
And for the X-20+ series:
Page 4
Basic Operation
RoboSHOOT
+
©
User Manual Page 4
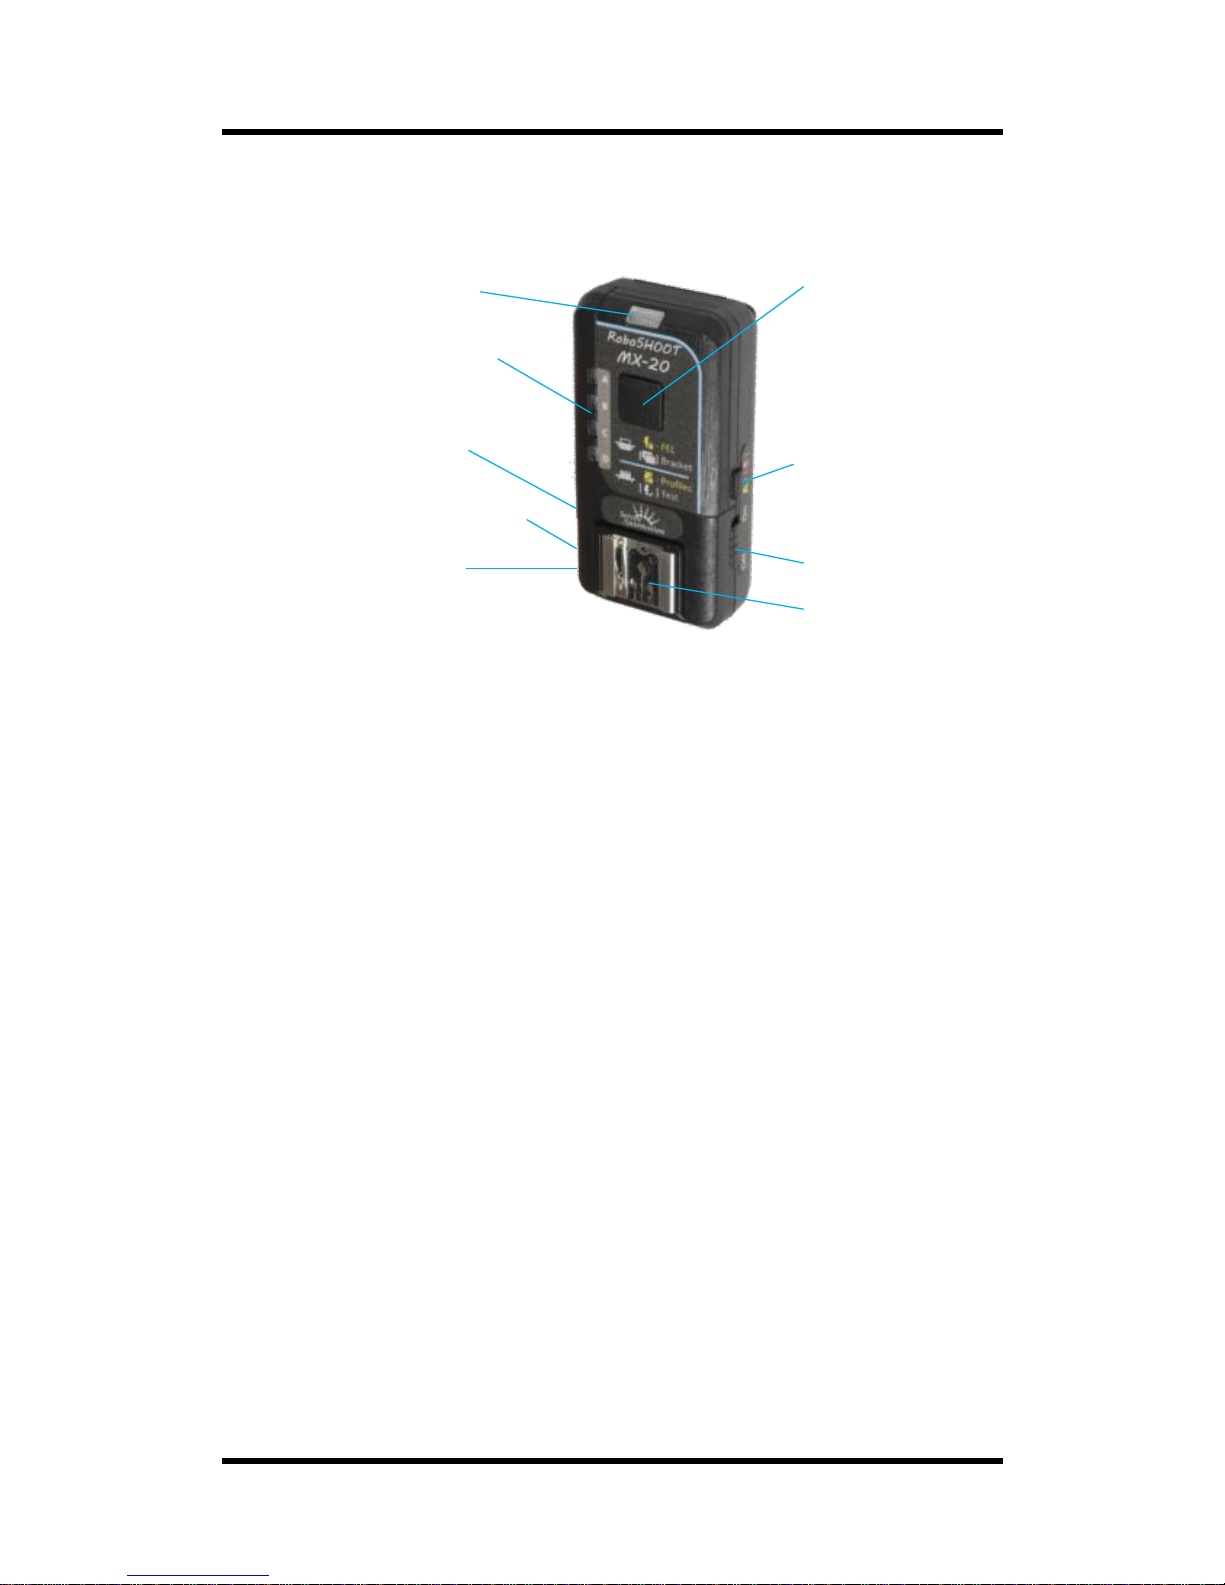
Master (MX) Devices
1) Top Function Button
Flash Exposure Lock
Profile Select /
Bracketing*
(½) Flash Test
(½) Modeling Light
2) Side Function Button
Return to Normal
Flash Enable/Disable
3) Power Switch
6) Flash Shoe
4) Main Indicators
5) Group Indicators
8) Camera Port*
9) Sensor/Trigger Port*
7) Camera Shoe
(beneath)
* - MX-20+ Only
1) Top function button (defaults)
- Full Click to activate Flash Exposure Lock
- Full Hold to activate Profile Select / Bracketing – p7
(Profile Select on MX-15+)
- Half Click (Hold on MX-15
+
) to Test Flashes – p6
- Half Hold to Activate Modeling Light (MX-20
+
) – p6
- During Profile Select, Half Hold to save current profile.
2) Side Function Button
- Click to Clear Active Functions (Return to Normal)
- Hold to Toggle Flash Enable / Disable
- Click with camera menu active toggles between basic and
commander mode in supported cameras
3) Power Switch
4) Main Indicators
5) Group Indicators
8) Camera Shutter Port (MX-20
+
only)
Connects to camera shutter release for a variety of functions
9) Sensor Trigger Port (MX-20
+
only)
Page 5

Basic Operation
RoboSHOOT
+
©
User Manual Page 5
Stand Alone Operation
Using the MX-15+ or MX-20
+
(without using smartphone)
With the new Fujifilm cameras with EF-X500 control,
nearly all functions are available even without the
App. Key new additions and changes to prior
versions include:
Extensive In-Camera control
Profile Selection and Edits
Improved Profile Bracketing*
Sensor Activated Exposures*
Modeling Light activation*
* - MX-20+ only, shutter release cable may be
required.
Group Assignment on Slaves
The slave group defaults to Group A. To change a
slave to a specific group, push-and-hold the top
button fully on that slave.
Customization (MX-20
+
Only)
Note: Several Features, Defaults, and Button
functions can be customized via App settings and
may function differently than described here. (see
‘Settings’ info on the in-App info pages for more
details).
Page 6

Basic Operation
RoboSHOOT
+
©
User Manual Page 6
Flash Test / Modeling Light
To Test fire each TTL speedlight ½ click (hold on MX15+) the top button for Flash Test or ½ hold the
button to briefly activate the Modeling Light (MX20+) if your compatible flash is so equipped.
Top Button configuration for the MX-20+ can be
changed via Flash Group Settings while connected
to the unit. The unit will respond according to last
programmed settings.
Flash Exposure Lock
Flash Exposure Lock (FEL) is engaged by fully clicking
the top button. If an exposure was previously taken,
the reference power may be already available for
use. Otherwise, the next exposure will be used for
the reference. If a camera mode change occurs
(exposure mode, aperture, ISO, etc), the reference
will remain active and set using prior exposure
values. This allows for more creativity. If you wish to
compensate you can use flash exposure
compensation (TTL Offset).
Exit FEL by clicking the side button or turning the
camera off/on.
Page 7

Basic Operation
RoboSHOOT
+
©
User Manual Page 7
Selecting a Profile
With profiles, you can quickly set all group levels,
the Master Offset, Zoom, and Angle to previously
defined values. Briefly, a profile is just a snapshot of
values used to setup the flashes. RoboSHOOT has
space for four profile snapshots. This is useful, for
example, to:
Quickly Access a set of favorite values
Provide repeatability – for example, when
taking several shots of multiple subjects,
you can quickly apply the same settings to
each subject.
Experiment with uncertain lighting very
quickly, for example with Macros. In this
case, RoboSHOOT can bracket across the
four profiles automatically. (MX-20+)
Profile selection is performed by holding the top
button to enter select mode and clicking the same
button to select the desired profile. While in profile
Select Mode, the main Red LED is blinking a slow
dash-dot pattern and the Green Group LEDs indicate
which profile is active (A is profile 1, D is profile 4).
The group Red LED brightness indicates the relative
power levels of the current profile. Profile Select
mode exists after about 10 seconds of inactivity.
Page 8

Basic Operation
RoboSHOOT
+
©
User Manual Page 8
When Profile Select is activated the Button
functions are reconfigured:
Full Hold – Exit profile Select mode, and
optionally enter Profile Bracketing Mode
(MX-20+, per setting option).
Full click – Select the next profile.
½ hold – Save the Current Profile values.
½ click – Restore Profile values that were
present before profile selection was
activated. Thereby allowing you to save
the prior settings to the selected profile.
If you save a new profile the current group values
and zoom modifiers are saved (such as Zoom
override and Angle, if provided by camera). Editing
is only possible on cameras that support In-Camera
group control.
Note, by default, holding the Top button
toggles between Profile Select, Profile
Bracketing (MX-20+ only), and none. This can
be configured via the App.
Page 9

Basic Operation
RoboSHOOT
+
©
User Manual Page 9
Multi-Master Mode
Multi-Master mode allows you to share flashes with
additional cameras. Each MX unit configured in
multi-master mode will take control of shared RX
units when its camera is turned on. This is all done
automatically. The flash Group settings are retained
for each MX independently, so, the flashes will
respond to each camera as if they are not shared. In
this way, your settings can be customized according
to the use of the camera. For example, a flash not
required for one camera can be disabled for it and
enabled for others – in use this set automatically
according to which camera is active.
To use Multi-Master mode:
Set all MX units to Multi-Master mode
(see Device Admin in the RoboSHOOT+
User Manual for information)
Make sure each MX device is using the
same radio channel and the same App
settings
It is recommended to use this mode ONLY when the
capability is needed. Otherwise, you may start
sharing your flashes with others unintentionally!
Flashes in use by Multi-Master MX units will ignore
MX units not in this mode, so unintentional sharing
can only happen when others are using this mode.
Page 10

In-Camera Control
RoboSHOOT
+
©
User Manual Page 10
In-Camera Control
Cameras that support In-Camera control of the
Fujifilm EF-X500 flash also can control the MX-20+ or
MX-15+. There are two menus within these cameras
for this purpose: Basic and Commander. We
recommend setting a function button to ‘Flash
Function Setting’ to quickly access these menus.
RoboSHOOT makes use of both menus. This is a
conceptual change from the X500, where the Basic
menu is only available when controlling on-camera
flash and the Commander menu is only available
when controlling off-camera flash. RoboSHOOT
does not distinguish between on-camera and offcamera. Instead, all flashes are considered members
of groups which may or may not be off-camera. This
gives you more powerful control: The Basic menu
applies to global control for one or more flashes and
groups and the Commander menu lets you control
individual groups.
When the Camera’s flash function menu is
displayed you can toggle between the two menu
types by clicking the side button on your MX unit.
Page 11

In-Camera Control
RoboSHOOT
+
©
User Manual Page 11
Basic Menu Mode
Basic Flash Function Menu
The Basic menu provides the following controls:
Flash Enable or Disable: M/Off with no TTL
flash present, TTL/Off otherwise. Multi-
Strobe not supported.
TTL Offset: Master offset for all TTL
groups.
Manual Power – Not supported (cannot
set manual power for all groups at once,
use commander menu instead).
Page 12

In-Camera Control
RoboSHOOT
+
©
User Manual Page 12
TTL Mode: All modes available per camera
settings.
Sync: All modes available with TTL flash
present.
Zoom: Usual usage: lets you manually set
zoom head focal length.
Angle: Usual usage: lets you modify zoom
head focal length to be wider or narrower
than lens or set value.
LED: Enables Catch Light and/or Focus
beam on assigned group.
Page 13

In-Camera Control
RoboSHOOT
+
©
User Manual Page 13
Commander Menu Mode
Commander Menu
The Commander Menu provides the following
controls:
Group Mode, Enable or Disable: TTL, %TTL, M,
or Off. Multi-strobe not supported.
Group TTL Offset or Group Manual Power
o %TTL enables setting of overall TTL
offset for all groups and Group
A/Group B balance.
Page 14

In-Camera Control
RoboSHOOT
+
©
User Manual Page 14
TTL Mode: All modes available per camera
settings.
Sync: All modes available with TTL flash
present.
Zoom: Usual usage: lets you manually set zoom
head focal length.
Angle: Usual usage: lets you modify zoom head
focal length to be wider or narrower than lens
or set value.
Master (Group Assignments): this lets you
determine the On-Camera group assignment.
And for the MX-20+ it can control which group
the Auxiliary (Catch/Focus) Light emits from.
App settings specify how this is done.
o On-Camera flash can be set to: Group
D, Group A, or According to the
Master Group assignment.
o Focus Beam / Catch light can be sent
from: On-Camera flash, All Groups, of
the Master Group Assignment. (MX20+ only)
Profile Number: Because channels are robust in
RoboSHOOT, channel assignment is rarely
needed. So, CH is reassigned to Profile
Page 15

In-Camera Control
RoboSHOOT
+
©
User Manual Page 15
selection to quickly recall your favorite
settings. This also facilitates the ability to
modify stored group values to a profile (profile
editing) when used in conjunction with the
device Top button.
In-Camera Control Considerations
Please check out the In-App help pages for more
information on each individual control and note
these items to be aware of:
When shooting using M exposure mode, the
focus beam is not provided by the camera.
Unsupported modes will be skipped if selected.
o Multi-Strobe flash (strobe effect) is
not supported at the present time. It
will be skipped, if possible, when
selected and TTL flashes are present.
o On Basic menu Manual mode is
prevented if TTL flashes are present
and TTL mode is prevented if no TTL
flashes are present.
A shutter mash when the menu is active may
result in a misfire if commander mode (group
control) is active. If a misfire does happen,
Page 16

In-Camera Control
RoboSHOOT
+
©
User Manual Page 16
simply take another shot. However, this is an
unusual circumstance and easily avoided by
any of the following:
o Exit the menu before shooting.
o Slowly pressing the shutter to take an
exposure rather than ‘mash’ it.
o Half press the shutter.
o Exit commander mode (side button).
Focus Beam / Catch Light
This utilizes the auxiliary beam of selected
compatible speedlights. The light is sent the MX unit
flash if for the MX-15+. For the MX-20+ you can
specify where it is emitted from as specified in the
App’s Flash Group Settings. Default is On-Camera
MX unit flash, but you can also decide from: Camera
Assigned group (‘Master’ in the Commander menu),
or All groups. The focus beam and catch light is
enabled via the LED setting in the camera menus.
 Loading...