

Page 1

ADT Interactive Solutions: Control & Pulse
MDC845 FHD Wi-Fi Mini Dome Camera
FCC ID:P27MDC845
IC: 527A-MDC845
Quick Installation Guide
Page 2

ADT MDC845 FHD Wi-Fi Mini Dome Camera
2
Quick Installation Guide
Table of Contents
1 Introduction............................................................................... 3
1.1 Feature Overview ..........................................................................................
1.2 Physical Details .............................................................................................
1.3 Packaging Contents ......................................................................................
2 Basic Setup ............................................................................... 5
2.1 Assembling the Camera................................................................................
2.2 Power Up .......................................................................................................
2.3 Final Steps ....................................................................................................
3 ADT Control Enrollment ............................................................ 9
3.1 Using a Wired Connection to Enroll the Camera ..........................................
3.2 Using Soft AP to Enroll Camera ....................................................................
4 ADT Pulse Enrollment .............................................................13
4.1 Using a Wired Connection to Enroll Camera
................................................
4.2 Using WPS PIN to Enroll Camera ..................................................................
5 Ceiling Mounting .....................................................................23
6 Wireless Connectivity Troubleshooting ..................................26
6.1 If the Camera Continually Goes Offline
........................................................
7 Appendix .................................................................................27
7.1 Technical Specifications
...............................................................................
7.2 Regulatory Approvals ....................................................................................
7.2.1 Federal Communication Commission Interference
Statement
....................................................................................................
7.2.2 Industry Canada Statement ..............................................................
©2019 ADT LLC dba ADT Security Services. All rights reserved. ADT, the ADT logo,
1.800.ADT.ASAP and the product/service names listed in this document are marks and/or
registered marks. Unauthorized use is strictly prohibited. MDC845 (11/19)
Property of ADT, LLC. Information accurate as of published date and is provided “as is”
without warranty of any kind.
MDC845 FHD Wi-Fi Mini Dome Camera Installation Guide
Page 3
ADT MDC845 FHD Wi-Fi Mini Dome Camera
3
Quick Installation Guide
1 Introduction
This section provides information about the MDC845 FHD Wi-Fi Mini Dome
Camera's features, components and capabilities.
1.1 Feature Overview
The MDC845 is a Wi-Fi Mini Dome Camera with FHD resolution and 802.11ac WiFi connectivity intended for use with both ADT Control
• Standalone Design. The camera is a standalone system with built-in CPU
and video encoder. It requires only a power source and a connection to the
network (customer router for Control
• Dual Video Support. The MDC845 supports H.264 and MJEPG video
compression.
• Day/Night Switch. With the day/night switching feature, you can view and
record images even at night.
• IR LED Support. The two infrared (IR) LEDs can provide illumination for up to
5 meters/16 feet, providing superior video quality under low-light conditions.
or ADT Pulse gateway).
®
and Pulse®.
• Built-in Heater. The built-in heater ensures that the camera operates even
in extremely cold climates. The heater turns on when the temperature falls
below -4°F (-20°C).
• 802.11ac Support. The 802.11ac standard provides backward
compatibility with the 802.11 a/b/g/n standards.
• Supports Soft AP, WPS PIN, and Wired Enrollment. Software-enabled
Access Point (Soft AP) connectivity is used on the Control platform. Wi-Fi
Protected Setup PIN (WPS PIN) uses a push button and PIN to connect to
the Pulse platform. Both platforms support wired enrollment.
• Wireless and Wired Operation. The MDC845 operates either wired or wirelessly.
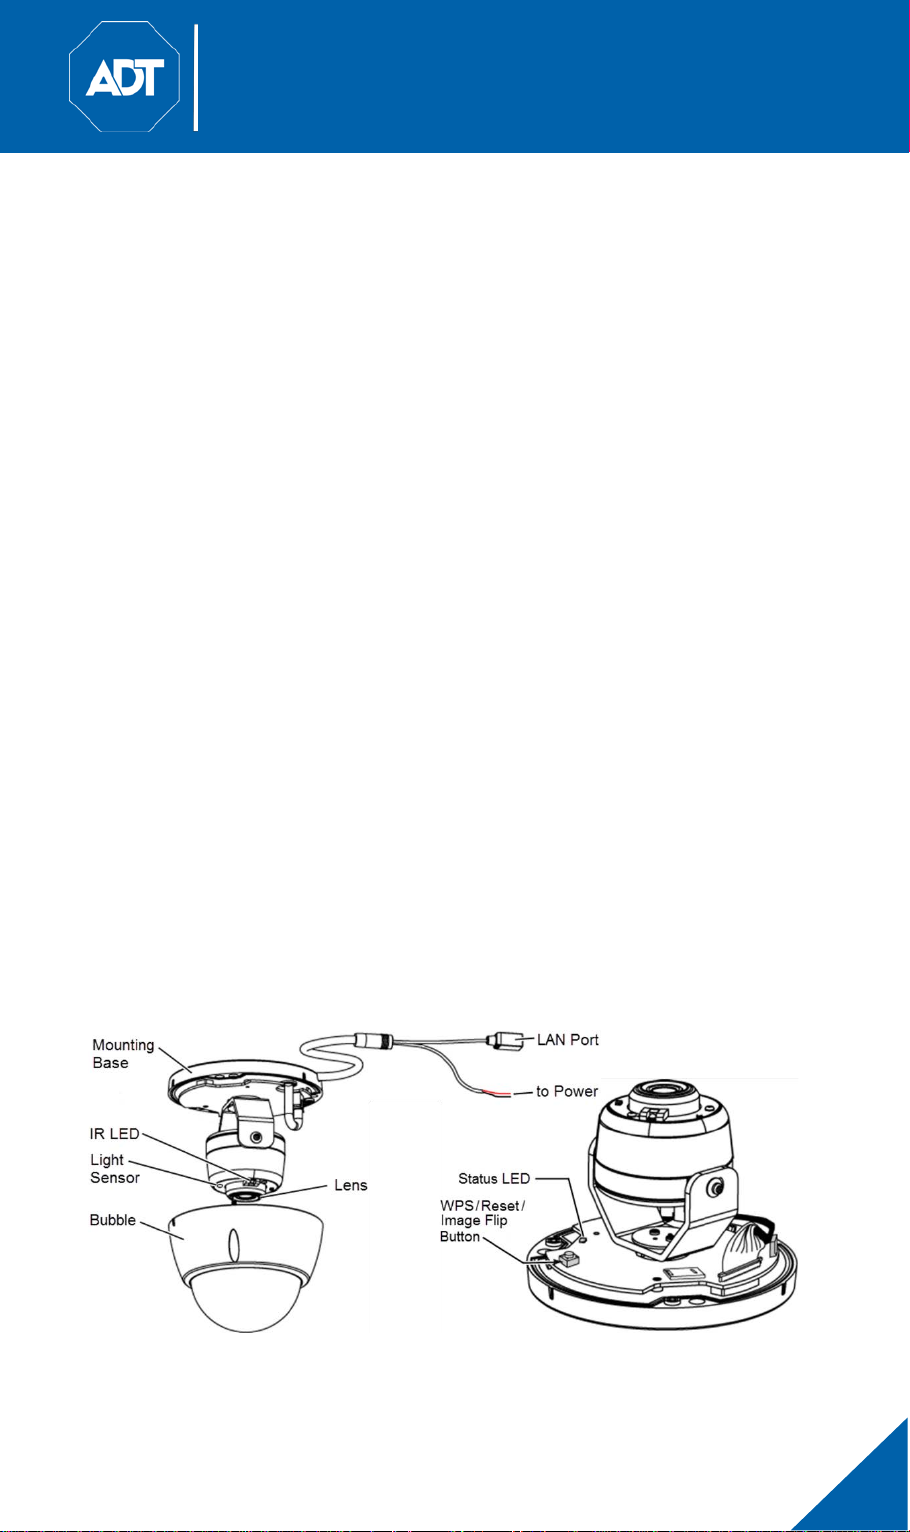
1.2 Physical Details
MDC845 FHD Wi-Fi Mini Dome Camera Installation Guide
Page 4

ADT MDC845 FHD Wi-Fi Mini Dome Camera
4
Component
Description
Power Port
The red and black flying leads connect to the terminal
Connect the supplied 12V power adapter. Do not use other
power adapters; doing so may damage the camera.
LAN Port
Use a standard Ethernet cable (not included) to connect
gateway.
Status LED
Off: Unit does not have power.
On:
Blinking:
On:
Blinking:
Blinking:
On:
off, the WPS function has failed.
WPS/Reset/Image Flip
This button serves three functions on the camera.
WPS PIN Mode:
Reset: When pressed and held for 15 seconds, the camera
Image Flip Button:
180°.
Lens
The lens is fixed and cannot be adjusted. Please ensure
that the lens cover remains clean of dust and debris.
IR LED
Built-in infrared LEDs for night time illumination.
Light Sensor
This is a hardware sensor to detect daylight level or lux.
Micro SD Card Slot
Built-in microSD card slot for future enhancements.
Note:
Note:
Note:
Quick Installation Guide
block, which attaches to a power cable (not supplied) and
power adapter.
the LAN port to either the customer’s router or the Pulse
(Blue) Unit is booting up then LED will blink blue ten
times indicat ing the boot-up process is complete.
(Green/Amber) The power LED blinks
green/amber after initial startup is completed. This
indicates that the Soft AP OR WPS PIN mode is ready.
(Green) Camera is connected to the network.
(Green) Camera has lost connection to the
network
(Amber) Unit is in WPS PIN mode and/or the WPS
connection is in progress.
(Amber) If the LED is on for 5 seconds and then turns
Button
Because the microSD card slot is not currently functional, please do not
remove this protective cover.
Plugging in the Ethernet cable disables the wireless interface. Only one
interface can be active at any time.
The Ethernet cable should be connected or disconnected only when the
camera is powered off. Attaching or detaching the Ethernet cable while the
camera is powered on does NOT switch the interface between wired and wireless.
When pressed and held for 5 seconds
during the Pulse enrollment process, the camera creates
an encrypted secure wireless connection.
reboots and settings are restored to default values.
When double-clicked, the image rotates
MDC845 FHD Wi-Fi Mini Dome Camera Installation Guide
Page 5
ADT MDC845 FHD Wi-Fi Mini Dome Camera
5
Quick Installation Guide
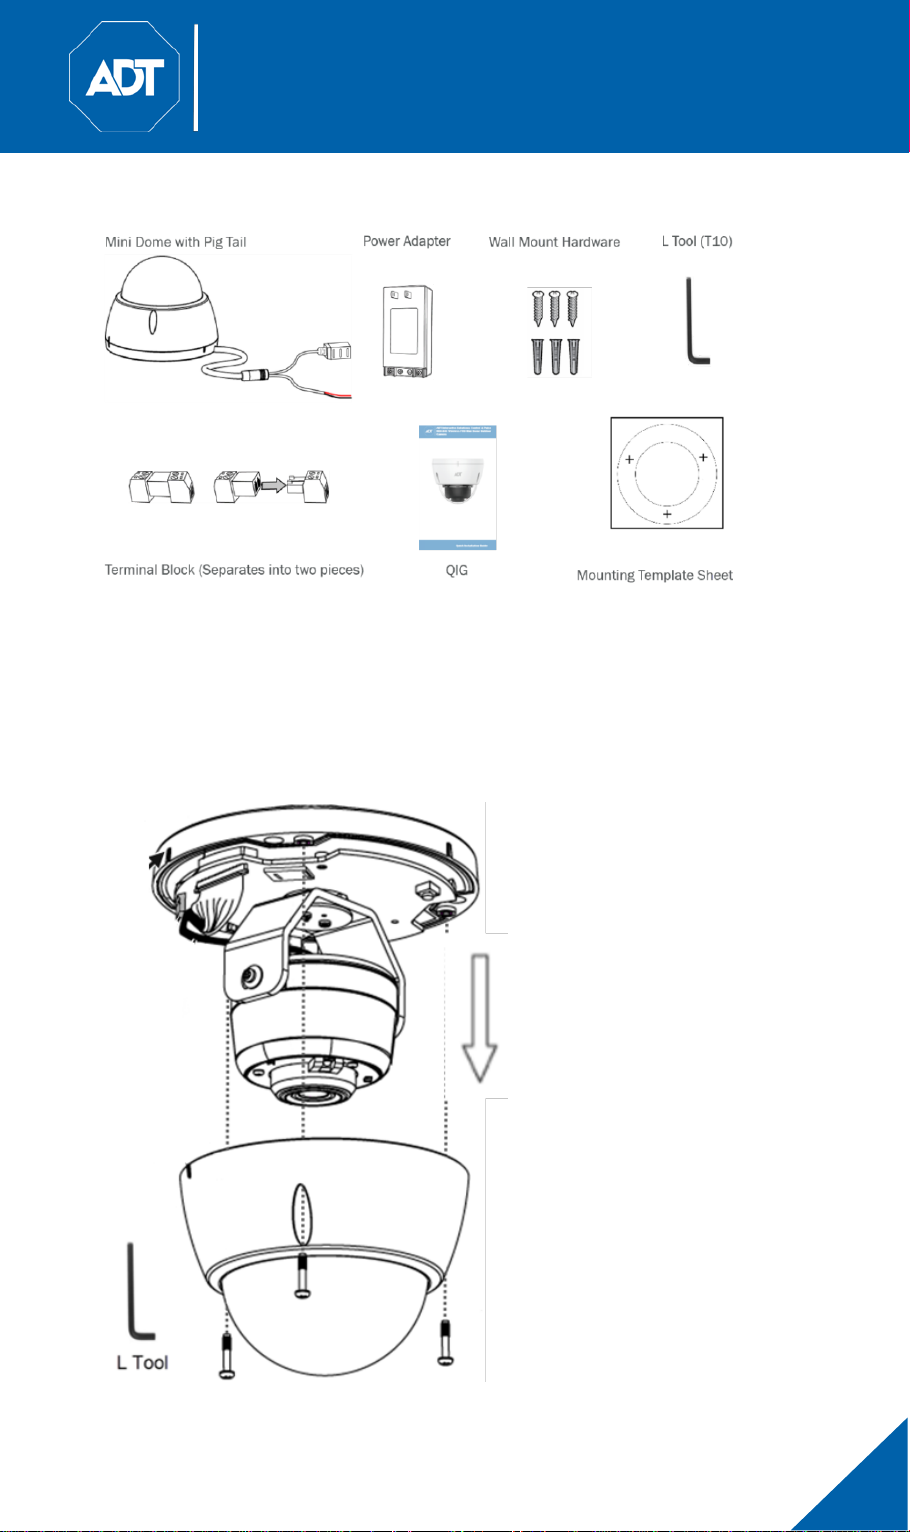
1.3 Packaging Contents
2 Basic Setup
This section provides information on how to assemble and configure the
MDC845 FHD Wi-Fi Mini Dome Camera for enrollment.
2.1 Assembling the Camera
• Use the L tool to remove the three retaining screws and bubble
Note: Leave the bubble detached
for later access to the WPS
button and for ceiling
mounting.
MDC845 FHD Wi-Fi Mini Dome Camera Installation Guide
Page 6
ADT MDC845 FHD Wi-Fi Mini Dome Camera
6
Quick Installation Guide
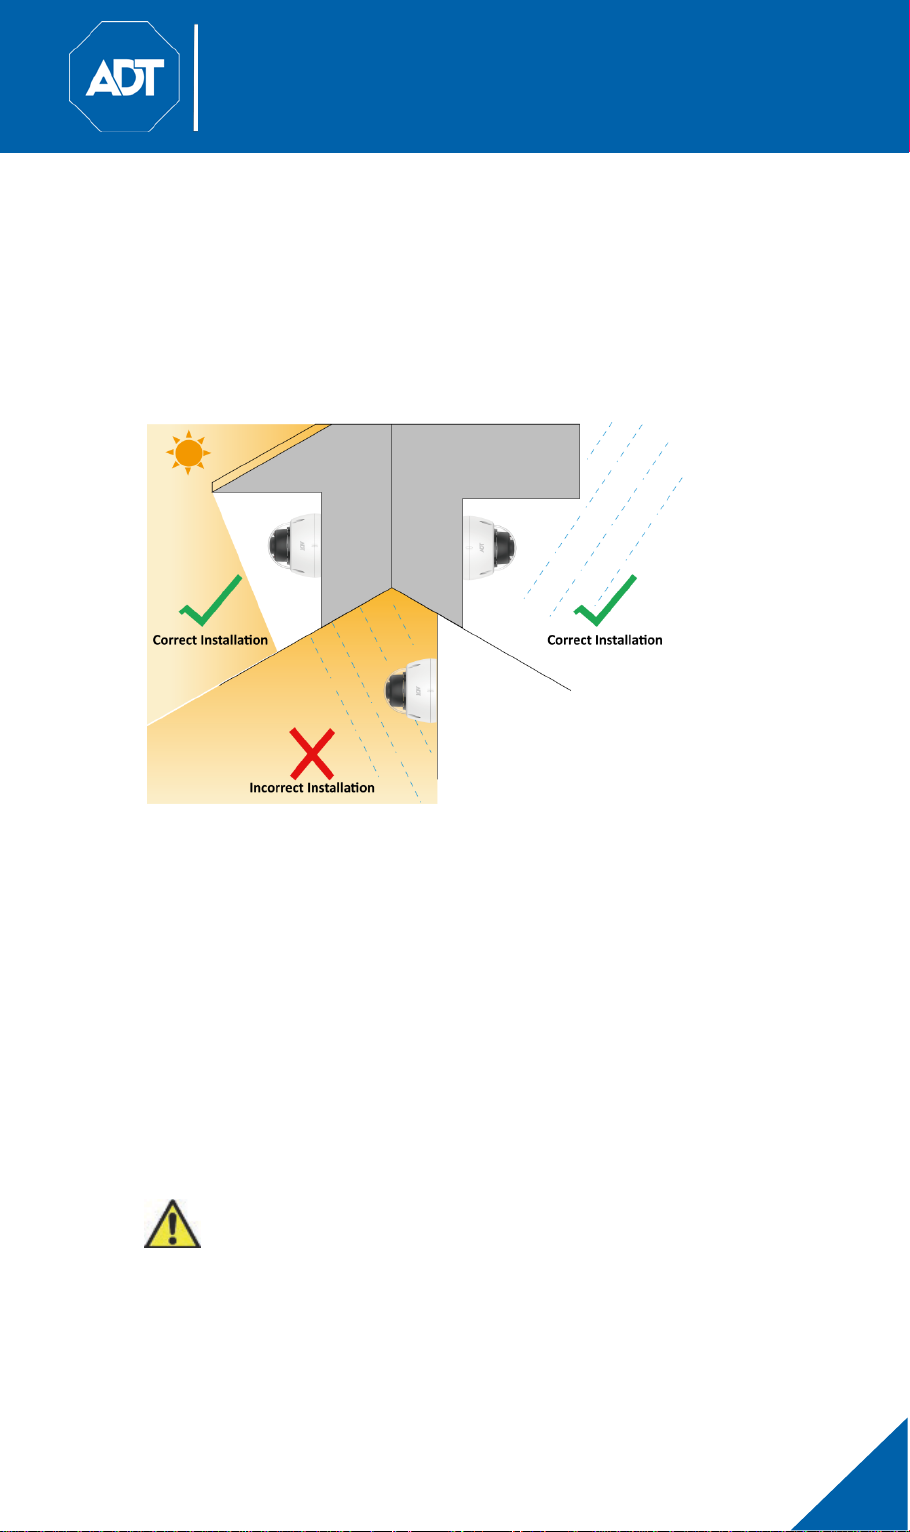
• While the MDC845 is water resistant, it is must to limit direct exposure to
rain.
• Install the MDC845 under a building overhang to ensure the least amount
of exposure to the elements.
• The camera is only to be connected to PoE networks without routing to
outside plants.
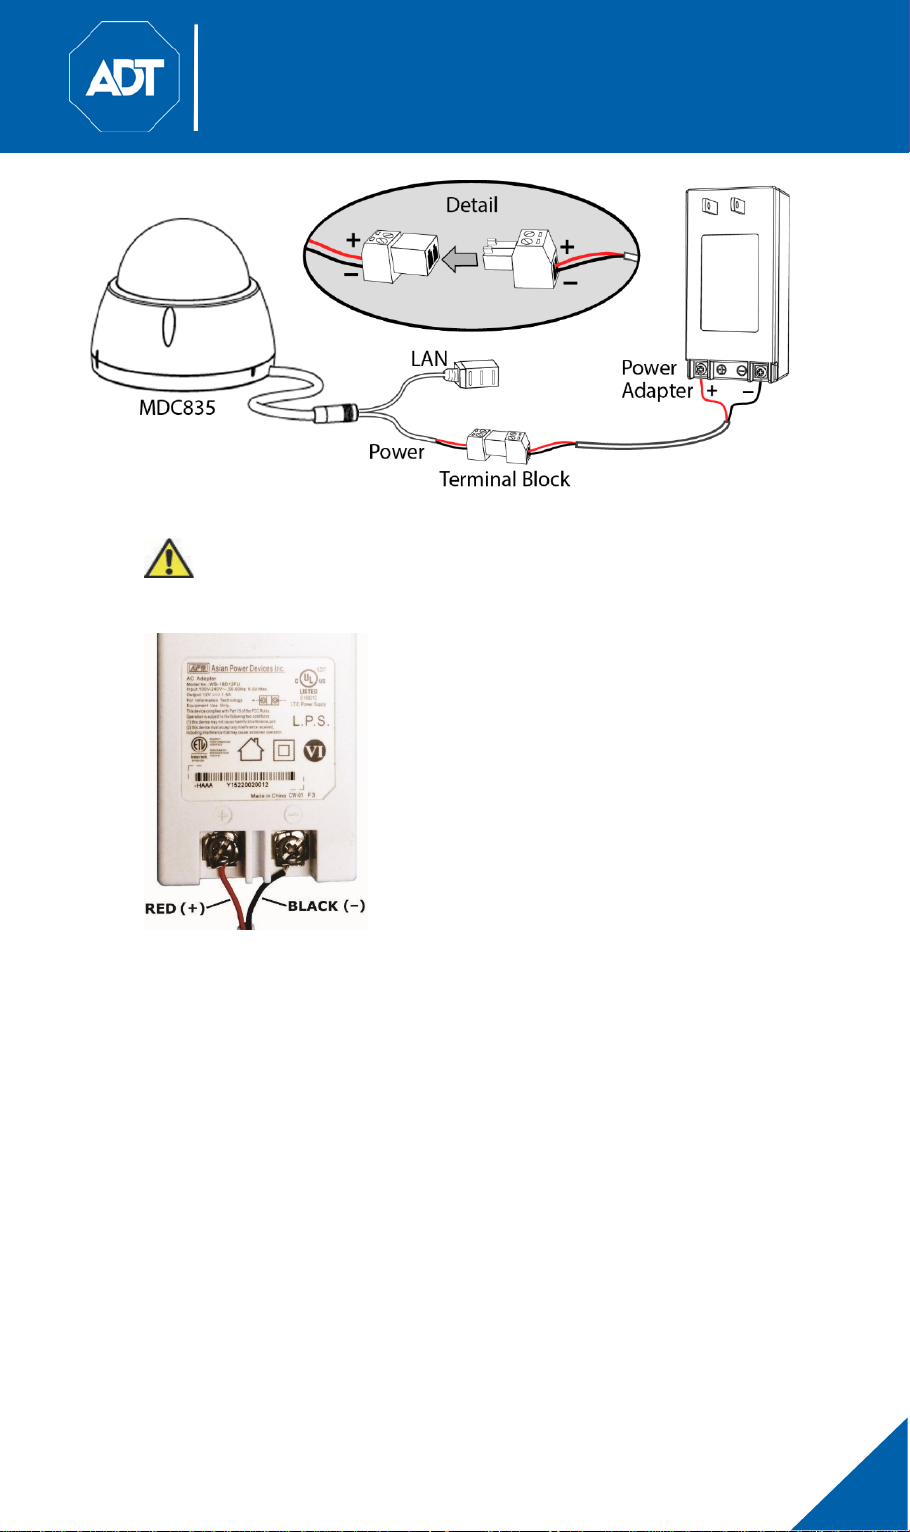
2.2 Power Up
• The green terminal block separates into two sides (male / female). Insert
the red and black flying leads from the camera’s power cord into the female
side of the terminal block (see figure below). Secure both wires by
tightening the screws on the terminal block.
• Similarly, secure both wires from one end of the power cable (not included)
into the male side of the terminal block, ensuring that like-colored wires
(red and black) are aligned with those just installed.
• Secure both wires from the other end of the power cable onto the
appropriate (+ and –) screw terminals of the power adapter.
• Plug the power adapter into an AC power outlet.
Caution: Use the power adapter provided. Using a different
power adapter may result in hardware damage.
MDC845 FHD Wi-Fi Mini Dome Camera Installation Guide
Page 7
ADT MDC845 FHD Wi-Fi Mini Dome Camera
7
Quick Installation Guide
Caution: To avoid damaging the camera, be sure to observe proper
polarity. Although the + and – terminals are marked on the power
adapter, they are white on white and may be difficult to see.
2.3 Final Steps
• Check LED status
- The LED lights up solid blue and then blinks ten times during
startup, which takes about 30 seconds. After startup is completed,
and prior to enrollment, the power LED blinks green/amber.
• Network connections
- If you are using a wired connection to the MDC845, prior to
powering up, connect a standard Ethernet cable (not included)
from the LAN port of the camera cable to either the device LAN
port on the Pulse Gateway or directly to the customer’s router for
Control.
- If you are using a wireless connection to the MDC845, this step is
performed during enrollment.
MDC845 FHD Wi-Fi Mini Dome Camera Installation Guide
Page 8

ADT MDC845 FHD Wi-Fi Mini Dome Camera
8
Quick Installation Guide
Note: The Wireless and LAN interfaces cannot be used simultaneously. Using
a wired LAN connection disables the wireless interface.
• Enroll the camera
- The process for enrolling the camera on Control is described in
“Section 3: ADT Control Enrollment”.
- The process for enrolling the camera on Pulse is described in
“Section 4: ADT Pulse Enrollment”.
• Mounting the camera
- Mount the camera in its final permanent location. For details about
using the mounting bracket, see “Section 5: Ceiling Mounting”.
MDC845 FHD Wi-Fi Mini Dome Camera Installation Guide
Page 9
ADT MDC845 FHD Wi-Fi Mini Dome Camera
9
Quick Installation Guide
3 ADT Control Enrollment
This section provides examples of two different methods for enrolling the
MDC845 FHD Wi-Fi Mini Dome Camera onto the ADT Control platform. The first
method uses a wired connection while the second method uses the Soft AP to
wirelessly connect the FHD camera to the customer’s network.
3.1 Using a Wired Connection to Enroll the Camera
• Set up the camera as described in the previous section.
- Ensure the Ethernet cable is plugged into the customer’s router.
- Connect the camera’s power adapter and plug it into a power outlet.
- Wait for the power LED to become solid green.
• Connect a laptop or mobile device to the customer’s network and then log in
to the Control web portal,
setup.
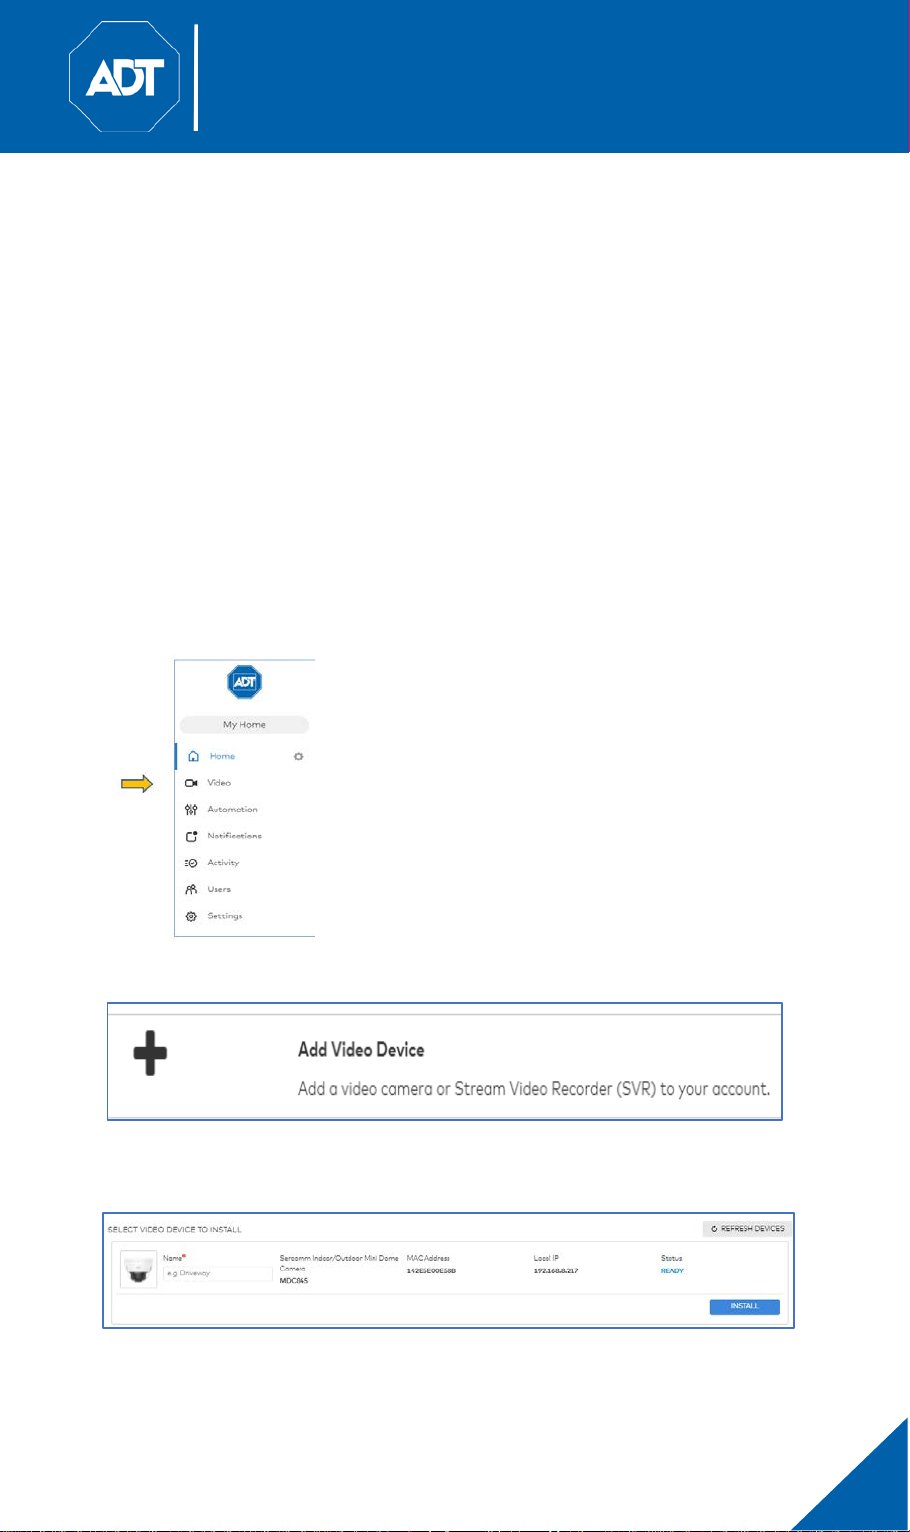
• Select Video from the menu list.
https://www.adt.com/control-login, to complete the
• Click Settings and then select Add Video Device.
• Select Install from the video device list to begin adding the camera. If a
laptop or mobile device are not on the customer’s network, then enter the
MAC address of the camera.
MDC845 FHD Wi-Fi Mini Dome Camera Installation Guide
Page 10

ADT MDC845 FHD Wi-Fi Mini Dome Camera
10
Quick Installation Guide
• Follow the on-screen instructions to finish adding the camera.
3.2 Using Soft AP to Enroll Camera
• Set up the camera as described in the previous section.
- Connect the camera’s AC power adapter and plug it into a power
outlet.
- Wait for the power LED to blink green/amber.
• Connect to the camera’s network SSID using a laptop or mobile device.
The SSID is the model number of the camera and part of the MAC
address. (for example, SSID = MDC845 (XX:XX:XX)).
• Open a web browser (Internet Explorer, Chrome, Firefox, etc.). Enter
adt1.com and you are directed to the install wizard page.
• Choose a language.
• Click Scan for Wi-Fi Networks and select the customer’s router SSID.
Note: Control cameras connect to the
customer’s Wi-Fi network to access the
Internet and be added to the Control
platform. It is imperative that the customer
understand that all camera locations are
MDC845 FHD Wi-Fi Mini Dome Camera Installation Guide
Page 11

ADT MDC845 FHD Wi-Fi Mini Dome Camera
11
Quick Installation Guide
limited by the existing Wi-Fi network and its range. Additionally, the customer
will need to enter the SSID password during the subsequent step.
• Enter the wireless credentials and click Save.
• The LED turns solid green when data is being transmitted indicating that
the connection to the customer’s router is complete.
• Connect a laptop or mobile device to the customer’s network and log in to the
Control web portal,
https://www.adt.com/control-login, to complete the setup.
• Select Video from the menu list.
• Click Settings and select Add Video Device.
• Select Install from the video device list to begin adding the camera. If a
laptop or mobile device are not on the customer’s network, enter the MAC
address of the camera.
• Follow the on-screen instructions to finish adding the camera.
MDC845 FHD Wi-Fi Mini Dome Camera Installation Guide
Page 12

ADT MDC845 FHD Wi-Fi Mini Dome Camera
12
Quick Installation Guide
MDC845 FHD Wi-Fi Mini Dome Camera Installation Guide
Page 13

ADT MDC845 FHD Wi-Fi Mini Dome Camera
13
Quick Installation Guide
4 ADT Pulse Enrollment
This section provides examples of two different methods for enrolling the
MDC845 FHD Wi-Fi Mini Dome Camera onto the ADT Pulse network. The first
method uses a wired connection while the second method uses the Wi-Fi
Protected Setup (WPS) with PIN method to wirelessly enroll the FHD camera
to the gateway with the ADT Pulse Portal or TS Installer App.
4.1 Using a Wired Connection to Enroll Camera
Note: This method is not supported by Cloud Link, as that device does not
have a Device LAN port for making the wired connection
• Set up the camera as described in “Section 2: Basic Setup”.
- Ensure the ethernet cable is plugged into the Pulse gateway.
- Connect the camera’s power adapter and plug it into a power outlet.
- Wait for the power LED to become solid green.
• Launch an Internet browser and log in to the Pulse portal or TS Installer app.
• Enter the Manage Devices screen using one of these methods:
- For Pulse portal, select the System Tab and click Manage Devices.
- For TS Installer app, click the Pulse Devices link. The Manage
Devices screen appears.
• In the Manage Devices screen, click Cameras.
• Click the Add button located at the bottom of the screen.
MDC845 FHD Wi-Fi Mini Dome Camera Installation Guide
Page 14

ADT MDC845 FHD Wi-Fi Mini Dome Camera
14
Quick Installation Guide
• Locate the camera’s MAC ID on the product label on the rear of the camera.
• Enter the camera’s MAC into the MAC ID field and click Continue.
MDC845 FHD Wi-Fi Mini Dome Camera Installation Guide
Page 15

ADT MDC845 FHD Wi-Fi Mini Dome Camera
15
Quick Installation Guide
• The following screen is shown while the camera is configured
• When the Camera Details screen appears, showing that the camera has
been enrolled, assign the MDC845 a unique name (usually based on the
location of the camera) in the
Name field, and then click Save.
MDC845 FHD Wi-Fi Mini Dome Camera Installation Guide
Page 16

ADT MDC845 FHD Wi-Fi Mini Dome Camera
16
Quick Installation Guide
• The Pulse enrollment is complete. The newly added device is shown in the
Cameras list.
• At the top of the screen, click Go Back.
• You are returned to the Manage Devices screen. The total number of
installed cameras has increased by one.
• Click Close and Close again to confirm.
• Wait until the LED is lit solid green, and then disconnect the camera from
power.
MDC845 FHD Wi-Fi Mini Dome Camera Installation Guide
Page 17

ADT MDC845 FHD Wi-Fi Mini Dome Camera
17
Quick Installation Guide
• Install the camera in its final location.
• Please refer to “Section 5: Wall Mounting”.
4.2 Using WPS PIN to Enroll Camera
• Set up the camera as described in “Section 2: Basic Setup”.
• Launch an Internet browser and log in to the Pulse portal or TS Installer app.
• Navigate to the Manage Devices screen using one of these methods:
- For Pulse portal, select the System Tab and click Manage Devices.
- For TS Installer app, click the Pulse Devices link. The Manage
Devices screen appears.
• In the Manage Devices screen, click Cameras.
• Click the Add Using WPS button located at the bottom of the screen.
MDC845 FHD Wi-Fi Mini Dome Camera Installation Guide
Page 18

ADT MDC845 FHD Wi-Fi Mini Dome Camera
18
Quick Installation Guide
• Locate the camera’s PIN number on the product label on the rear of the
camera.
• Enter the camera’s PIN in the WPS PIN field.
• Ensure that the camera is powered on and that the LED is flashing
green/amber.
MDC845 FHD Wi-Fi Mini Dome Camera Installation Guide
Page 19

ADT MDC845 FHD Wi-Fi Mini Dome Camera
19
Quick Installation Guide
• Click the Continue button to initiate the WPS process. The following screen
appears.
• Press and hold the WPS/Reset/Image Flip button on the camera for 5
seconds to establish a wireless connection.
• The LED flashes amber as the gateway attempts to connect to the camera.
The wireless connection is successful when the LED turns solid green.
Note: You must complete the WPS connection within 2 minutes or the process
will time out. The time remaining appears in the upper-left portion of the screen.
MDC845 FHD Wi-Fi Mini Dome Camera Installation Guide
Page 20

ADT MDC845 FHD Wi-Fi Mini Dome Camera
20
Quick Installation Guide
• The following screen is shown while the camera is configured
• When the Camera Details screen appears, showing that the camera has
been enrolled, assign the MDC845 a unique name (usually based on the
location of the camera) in the
Name field, and then click Save.
MDC845 FHD Wi-Fi Mini Dome Camera Installation Guide
Page 21

ADT MDC845 FHD Wi-Fi Mini Dome Camera
21
Quick Installation Guide
• The Pulse enrollment is complete. The newly added device is shown in the
Cameras list.
• At the top of the screen, click Go Back.
• You are returned to the Manage Devices screen. The total number of
installed cameras has increased by one.
MDC845 FHD Wi-Fi Mini Dome Camera Installation Guide
Page 22

ADT MDC845 FHD Wi-Fi Mini Dome Camera
22
Quick Installation Guide
• Click Close and then click Close again to confirm.
• Wait until the LED is lit solid green, and then disconnect the camera from
power.
• Install the camera in its final location.
• Please refer to “Section 5: Ceiling Mounting”.
MDC845 FHD Wi-Fi Mini Dome Camera Installation Guide
Page 23

ADT MDC845 FHD Wi-Fi Mini Dome Camera
23
Quick Installation Guide
5 Ceiling Mounting
This section provides details for final mounting of the MDC845 FHD Wi-Fi
Mini Dome Camera. You should ensure that the camera is configured and
enrolled in the platform before permanently mounting it.
• Locate an unused, non-switchable, indoor outlet to plug the AC/DC power
adapter into. This outlet should be located as close as possible to the
location where the camera will be permanently mounted.
Caution: Do not plug in the power adapter until all the connections
are completed and the camera is fully mounted.
• Identify the location where you would like to mount the camera. Using the
mounting template included in the box as a guide, drill three mounting
holes into the ceiling.
• If you have not done so already, use the L tool to remove the three screws
and the bubble from the camera.
• If using the anchors, insert them into the mounting holes.
• Align the three mounting holes of the camera stand with the three drilled
holes, and then mount the camera stand onto the ceiling using the
provided screws.
Note: It is recommended that you route the cable through the side opening of
the mounting base.
• Make the camera angle adjustments. The camera offers 3 axis adjustments:
MDC845 FHD Wi-Fi Mini Dome Camera Installation Guide
Page 24

ADT MDC845 FHD Wi-Fi Mini Dome Camera
24
Quick Installation Guide
- Loosen the Tilt Adjust Screw to adjust the tilt angle (0°~70°).
- Adjust the Pan Angle (0°~330°) by turning the black Gimbal.
- Turn the Head to rotate the camera (0°~350°).
Note: Make sure that the LVDS cable does not cover up or become caught on
the antenna.
•
Attach the bubble to the camera, and then secure it using the three
screws
.
MDC845 FHD Wi-Fi Mini Dome Camera Installation Guide
Page 25

ADT MDC845 FHD Wi-Fi Mini Dome Camera
25
Quick Installation Guide
Note: Use the alignment marks to properly align the camera and bubble while
attaching them together.
Caution: Make sure to tighten up the three screws in order to prevent
water ingress.
Caution: Be careful not to let the bubble cover the light sensor or
damage the LVDS cable while attaching the bubble to the camera.
• Make sure that the camera is firmly secured to the ceiling.
• Connect the power cable as described in “Section 2.2: Power Up”.
• Remove the retaining screw from the receptacle plate and plug the power
adapter into the lower power outlet.
• Insert the retaining screw through the opening at the top of the power
adapter and reinstall it into the receptacle, securing the adapter to the wall.
• Verify that the camera is active on the wireless network and is recognized
by the platform.
MDC845 FHD Wi-Fi Mini Dome Camera Installation Guide
Page 26

ADT MDC845 FHD Wi-Fi Mini Dome Camera
26
Quick Installation Guide
6 Wireless Connectivity Troubleshooting
This section provides details for troubleshooting wireless connection issues of
the MDC845 FHD Wi-Fi Mini Dome Camera
6.1 If the Camera Continually Goes Offline
If the camera continually goes offline (LED blinks green continually) after it is
enrolled, the camera will automatically attempt to recover the wireless
connection. If the camera cannot recover on its own, take the following
measures to re-establish the Wi-Fi connection.
• Power cycle the camera.
• If the previous measure fails, power cycle the gateway.
• If the previous measure fails, move the gateway closer to the camera, if
possible.
• If the previous measure fails, press the camera’s reset button for 15
seconds, and then re-enroll the camera into the platform.
.
• If the previous measure fails, install a Wi-Fi Range Extender
- EX6100 for Control
- WN3000RPH-3ADPAS for Pulse
MDC845 FHD Wi-Fi Mini Dome Camera Installation Guide
Page 27

ADT MDC845 FHD Wi-Fi Mini Dome Camera
27
Sensor and Lens
Image Sensor
1/2.8” CMOS Senor
Mini mum Illumination
0 Lux (with IR LED On)
Lens FoV (Field-of-View)
Diagonal Viewing Angle: 100°
LDC Enabled, Fix Focus Lens, Aperture: F2.0
Video
Vide o Compression
H.264 Main Profile, M-JPEG
Vide o St reaming
Simultaneous, H.264, M-JPEG
Image Settings
Flip, Brightness, Sharpness, Mirror, Contrast
Resolution & Frame Rate
16:9 Full HD (1920*1080) ,HD 720p (1280*720), QHD
Mixed Mode 720p, VGA, and QVGA, Up to 30 FPS
Alarm and Event Management
Alar ms
Object Detection
Event Notification
Push Notification, Email, Text Notification
Network
Wireless
IEEE 802.11ac, IEEE 802.11a/b/g/n , WPS
Protocols
TCP/IP, HTTP, HTTPS, DHCP, FTP, uPnP, NTP, RTCP,
DNS, RTSP
Hardware
Connectors
Internal microSD Card Slot, External Wire split
Ethernet port and DC flying lead
Processor
CPU: ARM Cortex A9, 720 MHz
Memory
Flash: 128MB, RAM: 256MB
Night Vision
IR LED x 2: Range: 16 feet (5 meters)
LED Indicator
1 tri-color LED for Power, Network/WPS
Push Button
Reset (with WPS Function)
Power Adapter
Input: 100~240 VAC, 50~60 Hz
Output: 12v, 1.5A
Compliance
FCC, IC, UL, cUL
Dimensions (D x H)
110 x 92 mm
Weight
340g
Environment
Operation
Temperature: -40° ~ 122°F (-40° ~ 50°C)
Humidity: 0% - 85% RH (non-condensing)
Storage
Temperature: -40° ~ 158°F (-40° ~ 70°C)
Humidity: 0% - 85% RH (non-condensing)
Ingress
IP66
Accessories
Accessories
Screw Terminal Power Supply (12V / 1.5A, 100 240V), Wall mount screw package
Ordering Information
Part Numbe r
MDC845: FHD Wi-Fi Mini Dome Camera
Quick Installation Guide
7 Appendix
7.1 Technical Specifications
640*360
4:3 VGA (640*480) and QVGA (320*240)
MDC845 FHD Wi-Fi Mini Dome Camera Installation Guide
Page 28

ADT MDC845 FHD Wi-Fi Mini Dome Camera
28
Quick Installation Guide
7.2 Regulatory Approvals
7.2.1 Federal Communication Commission Interference Statement
This equipment has been tested and found to comply with the limits for a
Class B digital device, pursuant to Part 15 of the FCC Rules. These limits are
designed to provide reasonable protection against harmful interference in a
residential installation. This equipment generates, uses and can radiate radio
frequency energy and, if not installed and used in accordance with the
instructions, may cause harmful interference to radio communications.
However, there is no guarantee that interference will not occur in a particular
installation. If this equipment does cause harmful interference to radio or
television reception, which can be determined by turning the equipment off
and on, the user is encouraged to try to correct the interference by one of the
following measures:
• Reorient or relocate the receiving antenna.
• Increase the separation between the equipment and receiver.
• Connect the equipment into an outlet on a circuit different from that to
which the receiver is connected.
• Consult the dealer or an experienced radio/TV technician for help.
FCC Caution: Any changes or modifications not expressly approved by the
party responsible for compliance could void the user's authority to operate
this equipment.
This device complies with Part 15 of the FCC Rules. Operation is subject to
the following two conditions: (1) This device may not cause harmful
interference, and (2) this device must accept any interference received,
including interference that may cause undesired operation.
IMPORTANT NOTE:
Radiation Exposure Statement:
This equipment complies with FCC radiation exposure limits set forth for an
uncontrolled environment. This equipment should be installed and operated
with minimum distance 20cm between the radiator & your body.
This transmitter must not be co-located or operating in conjunction with any
other antenna or transmitter.
Country Code selection feature to be disabled for products marketed to the
US/CANADA
MDC845 FHD Wi-Fi Mini Dome Camera Installation Guide
Page 29

ADT MDC845 FHD Wi-Fi Mini Dome Camera
29
Quick Installation Guide
7.2.2 Industry Canada Statement
This device contains licence-exempt transmitter(s)/receiver(s) that comply
with Innovation, Science and Economic Development Canada’s licenceexempt RSS(s). Operation is subject to the following two conditions:
(1) This device may not cause interference
(2) This device must accept any interference, including interference that may
cause undesired operation of the device
Cet appareil contient des émetteurs / récepteurs exempts de licence qui sont
conformes au (x) RSS (s) exemptés de licence d'Innovation, Sciences et
Développement économique Canada. L'opération est soumise aux deux
conditions suivantes:
(1) Cet appareil ne doit pas causer d'interférences
(2) Cet appareil doit accepter toute interférence, y compris les interférences
pouvant provoquer un fonctionnement indésirable de l'appareil
Caution:
The device for operation in the band 5150–5250 MHz is only for indoor use
to reduce the potential for harmful interference to co-channel mobile satellite
systems;
Avertissement:
Les dispositifs fonctionnant dans la bande de 5150 à 5250MHz sont
réservés uniquement pour une utilisation à l'intérieur afin de réduire les
risques de brouillage préjudiciable aux systèmes de satellites mobiles
utilisant les mêmes canaux;
Radiation Exposure Statement:
This equipment complies with Canada radiation exposure limits set forth for
an uncontrolled environment. This equipment should be installed and
operated with minimum distance 20cm between the radiator & your body.
Déclaration d'exposition aux radiations:
Cet équipement est conforme Canada limites d'exposition aux radiations
dans un environnement non contrôlé. Cet équipement doit être installé et
utilisé à distance minimum de 20cm entre le radiateur et votre corps.
MDC845 FHD Wi-Fi Mini Dome Camera Installation Guide
 Loading...