

Sequentix CIRKLON Operation Manual

SEQUENTIX MUSIC SYSTEMS
Ltd.
CIRKLON SEQUENCER
OPERATION MANUAL
V1.11
© 2015

Sequentix Music Systems
Cirklon Sequencer User Manual
1-2

Sequentix Music Systems
Cirklon Sequencer User Manual
1-3
Table Of Contents
Table Of Contents ........................................................................................................................... 1-3
Getting Started with Cirklon ......................................................................................................... 1-9
1. The Cirklon Concept............................................................................................................. 1-10
Song Play Mode ........................................................................................................................ 1-12
2. The Main Pages ....................................................................................................................... 2-1
Using more than 16 tracks...................................................................................................... 2-3
Track Muting and Status ........................................................................................................ 2-4
Changing Song Values ........................................................................................................... 2-4
Creating and Assigning an Instrument .................................................................................... 2-8
Deleting An Instrument ....................................................................................................... 2-12
Creating and Assigning a Pattern ........................................................................................... 2-13
Fill Patterns ............................................................................................................................... 2-15
3. Pattern Edit .............................................................................................................................. 3-1
What’s in a P3 Pattern ? ............................................................................................................. 3-2
Editing Pattern Values ............................................................................................................... 3-3
Editing Multiple Steps ................................................................................................................ 3-6
Gang ......................................................................................................................................... 3-6
Slope Edit................................................................................................................................. 3-9
Pattern Level Values ................................................................................................................. 3-10
Directions .............................................................................................................................. 3-11
Timebase ................................................................................................................................ 3-12
Last Step ................................................................................................................................ 3-12
Bar Length ............................................................................................................................. 3-13
Bar Edit ...................................................................................................................................... 3-14
Bar Copy ................................................................................................................................ 3-15
Bar Extend and Copy............................................................................................................ 3-15
Bar Values ................................................................................................................................. 3-15
Bar Loops ............................................................................................................................... 3-16
More On Step Editing ............................................................................................................... 3-17
Copy / Insert .......................................................................................................................... 3-17
Sculpting and Randomisation ............................................................................................. 3-19
Audition................................................................................................................................. 3-19
Configuring the Aux Rows ...................................................................................................... 3-20
P3 Edit Menu Options .............................................................................................................. 3-22
First step ................................................................................................................................ 3-22
ReSync ................................................................................................................................... 3-23

Sequentix Music Systems
Cirklon Sequencer User Manual
1-4
Sync ........................................................................................................................................ 3-23
Apply FTS ............................................................................................................................. 3-23
Aux Macro & Accumulator Config ..................................................................................... 3-23
Saving Patterns ......................................................................................................................... 3-24
4. Using Scenes ........................................................................................................................... 4-1
Gbar ......................................................................................................................................... 4-2
Length ...................................................................................................................................... 4-2
Song Advance ......................................................................................................................... 4-2
Force To Scale ......................................................................................................................... 4-2
Xpose ....................................................................................................................................... 4-4
Saving a SCENE.......................................................................................................................... 4-4
Mute Hold ............................................................................................................................... 4-5
The Scene List ............................................................................................................................. 4-7
Move SCENE .......................................................................................................................... 4-8
Scene Loops ............................................................................................................................. 4-8
Recall / Copy To Workscene .................................................................................................. 4-9
Deleting A Scene ..................................................................................................................... 4-9
Change View / Scene Select View ....................................................................................... 4-10
Editing a Saved Scene .............................................................................................................. 4-12
Pattern “Saved” Status ......................................................................................................... 4-13
5. Creating Another Song .......................................................................................................... 5-1
6. Play Mode Menu .................................................................................................................... 6-3
Scene Auto Save ...................................................................................................................... 6-3
Edit Track Thru Over-ride ..................................................................................................... 6-3
Tune ......................................................................................................................................... 6-3
MIDI Reset .............................................................................................................................. 6-3
Card / Sysex ............................................................................................................................ 6-4
More… ..................................................................................................................................... 6-4
User Configuration ................................................................................................................. 6-5
7. MIDI configuration................................................................................................................. 7-1
Port Configuration ..................................................................................................................... 7-1
soft thru ................................................................................................................................... 7-1
thru FTS ................................................................................................................................... 7-2
record enable ........................................................................................................................... 7-2
mclk send ................................................................................................................................ 7-3
MIDI Clock Reception ............................................................................................................ 7-4
MTC – MIDI Time-code ......................................................................................................... 7-4
MIDI Options .............................................................................................................................. 7-5

Sequentix Music Systems
Cirklon Sequencer User Manual
1-5
Remote Control MIDI Input .................................................................................................. 7-5
8. CVIO and Drum Trig Configuration .................................................................................... 8-1
CVIO Config ............................................................................................................................... 8-1
CV Output Settings ................................................................................................................. 8-2
Gate Port Settings ................................................................................................................... 8-7
Drum Trig Config ....................................................................................................................... 8-9
9. Track values ............................................................................................................................ 9-1
Adding a track MIDI value .................................................................................................... 9-1
Assigning Knobs A & B .......................................................................................................... 9-6
Saving Track Values ............................................................................................................... 9-6
Track Control Values .............................................................................................................. 9-8
Track Mixer Page .................................................................................................................. 9-10
10. CK patterns ........................................................................................................................ 10-1
Drum Grid Edit ......................................................................................................................... 10-2
Row View .............................................................................................................................. 10-5
Quick Note Number Edits ................................................................................................... 10-8
Bar Length ................................................................................................................................. 10-8
Last Step .................................................................................................................................... 10-9
View and Signature Timebase ............................................................................................... 10-10
Changing the Signature Timebase .................................................................................... 10-11
GANGing Notes in CK Edit .................................................................................................. 10-12
GANGing by Step or Row ................................................................................................. 10-13
Clearing the Ganged Selection .......................................................................................... 10-14
Copying, Deleting and Inserting Notes ................................................................................ 10-15
Copying by Bar or Ganged Selection ................................................................................ 10-17
Delete (Cut) Notes .............................................................................................................. 10-17
Fixing and Labelling Rows .................................................................................................... 10-18
Other Edit Menu Functions ................................................................................................... 10-19
Apply Quantisation ............................................................................................................ 10-19
Delete Doubles .................................................................................................................... 10-20
First Step and Pattern Rotate ............................................................................................. 10-20
11. CK Event List Edit ............................................................................................................ 11-1
12. Real- and Step-time record ............................................................................................... 12-1
CK Pattern Record .................................................................................................................... 12-1
P3 Record................................................................................................................................... 12-4
P3 Step-time record (Arp capture) .......................................................................................... 12-5

Sequentix Music Systems
Cirklon Sequencer User Manual
1-6
13. P3 Patterns & Aux events ................................................................................................. 13-1
Randomizing Pattern Values ................................................................................................... 13-1
How Events Work .................................................................................................................... 13-3
Inter Track Events .................................................................................................................... 13-6
A Quick Grab ........................................................................................................................ 13-7
Auxes With Double Values.................................................................................................. 13-7
Target Values For Grab, Swap and Push ............................................................................ 13-9
Transpose By Events .......................................................................................................... 13-10
Aux Notes ............................................................................................................................... 13-12
Chord Memory ................................................................................................................... 13-13
Polyphonic Real-time Record ............................................................................................ 13-13
Accumulator Events ............................................................................................................... 13-14
What Is An Accumulator? ................................................................................................. 13-14
Putting An Accumulator To Work .................................................................................... 13-15
Relative Accumulation ....................................................................................................... 13-17
Accumulator Configuration .............................................................................................. 13-18
Auxiliary Value Scaling – No More .................................................................................. 13-22
The Accumulator Events.................................................................................................... 13-23
Accumulator Mask Events..................................................................................................... 13-24
Knob Mask Events .................................................................................................................. 13-24
Knob Grab Events .................................................................................................................. 13-25
Set Step Value Events ............................................................................................................. 13-26
Repeat Events ......................................................................................................................... 13-26
Redirect Aux Events ............................................................................................................... 13-28
Pattern Control ....................................................................................................................... 13-28
Global Control ........................................................................................................................ 13-28
14. Loading and Saving Data ................................................................................................. 14-1
Wipe Songs ............................................................................................................................... 14-1
Card SAVE ................................................................................................................................ 14-2
Card LOAD ............................................................................................................................... 14-7
MIDI Sysex .............................................................................................................................. 14-10
Factory Reset / Memory Initialisation................................................................................... 14-11
15. Firmware update .............................................................................................................. 15-1

Sequentix Music Systems
Cirklon Sequencer User Manual
1-7
Sequentix Music Systems
Cirklon Sequencer User Manual
1-8
Cirklon Sequencer front panel

Sequentix Music Systems
Cirklon Sequencer User Manual
1-9
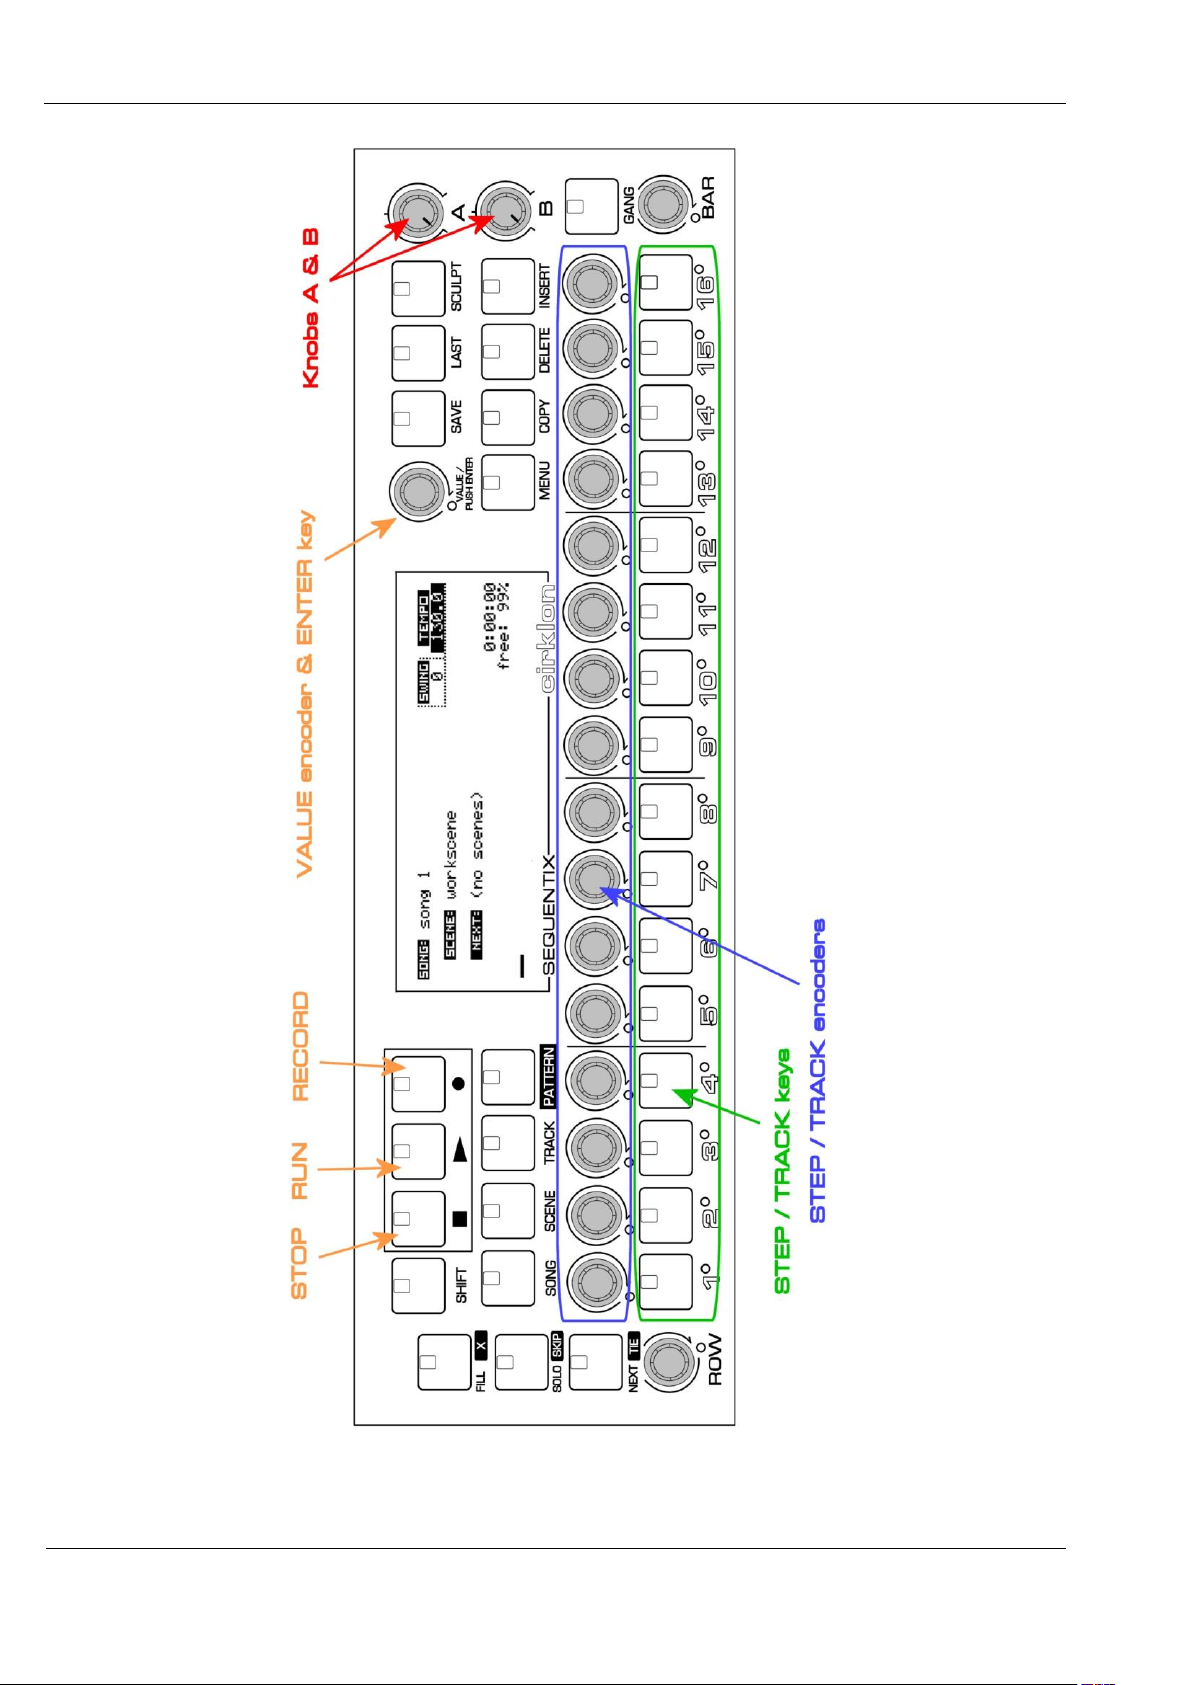
Getting Started with Cirklon
In order to follow these instructions for the Cirklon sequencer, it will help to familiarise
yourself with the layout of the front panel, and the names of the various controls.
Refer to the diagram on the previous page.
The horizontal row of keys along the lower part of the panel labelled with numbers 1 to 16 are
the STEP or TRACK KEYS.
The knobs located directly above the step keys, are the STEP or TRACK ENCODERS.
In modes where they are used to alter track settings, such as muting and muting tracks, they
will be referred to as TRACK keys/encoders.
In pattern edit modes, where they are used to alter the settings for the steps of a pattern, they
will be referred to as STEP keys/encoders.
The encoders rotate continuously, and have no marker positions.
They are used to make relative changes to numeric values, and to scroll and select in lists.
All encoders have a centre-push action, so they can be pressed as well as turned.
In some cases, the encoder may also be held in while it is turned, to enable coarse adjustment
of values in larger steps.
In contrast, the two KNOBs, labelled A & B, which are used for absolute control of values,
have a 300 degree range, and have no press-switch.
The encoder to the immediate right of the display is the VALUE encoder.
The centre push switch of the VALUE encoder is the ENTER key.
This encoder is often turned to alter a numeric value, then pressed to confirm the change.
It is also used to confirm operations where it was not used to edit any value.
All other keys and encoders are labelled with their respective names, except for the transport
keys, where the commonly used square, triangle and circle symbols denote the keys for
STOP, RUN and RECORD.

Sequentix Music Systems
Cirklon Sequencer User Manual
1-10
1. The Cirklon Concept
Cirklon is a multi-track MIDI and CV/gate hardware sequencer.
It has a maximum of 64 TRACKS, each of which can play a PATTERN of notes and/or
controller messages on a connected INSTRUMENT.
Instruments can be connected to one of 5 independent MIDI ports, an optional multi-channel
CV/gate port, one of 6 virtual ports on the class-compliant USB-MIDI interface, or to an
optional drum-trigger interface connected to the SYNC port.
All the MIDI ports can send MIDI tempo clock or time-code.
The SYNC port can be used to slave DIN SYNC equipped devices at 24 or 48 ppqn.
Cirklon has 2MB of battery-backed RAM, which holds all the song and instrument data, and
configuration options.
The contents of RAM are retained while the power is off, so you are ready to return to the
music you were working on the moment it is powered up.
Songs, instrument definitions and configuration settings can be saved to, and loaded from
internal flash storage, or a standard FAT format SD or MMC card in the rear panel slot.
The entire contents of memory can also be saved as a single .SYX file to internal or card
storage, or backed up and restored via MIDI system exclusive dump.
All the patterns which make up one piece of music are grouped together in a SONG.
Multiple songs can be loaded in Cirklon’s memory, but only one can play at a time.
As well as the patterns, each song also has an instrument assignment for each track, and a set
of SCENES.
The instrument assignments determine which instrument will play the pattern on each track.
Scenes are used to recall the pattern selections for every track, along with the initial
active/muted status, and a number of other values.
By creating a sequence of scenes in a song, a whole piece can be assembled from smaller
sections, each composed of a number of patterns playing across the tracks.
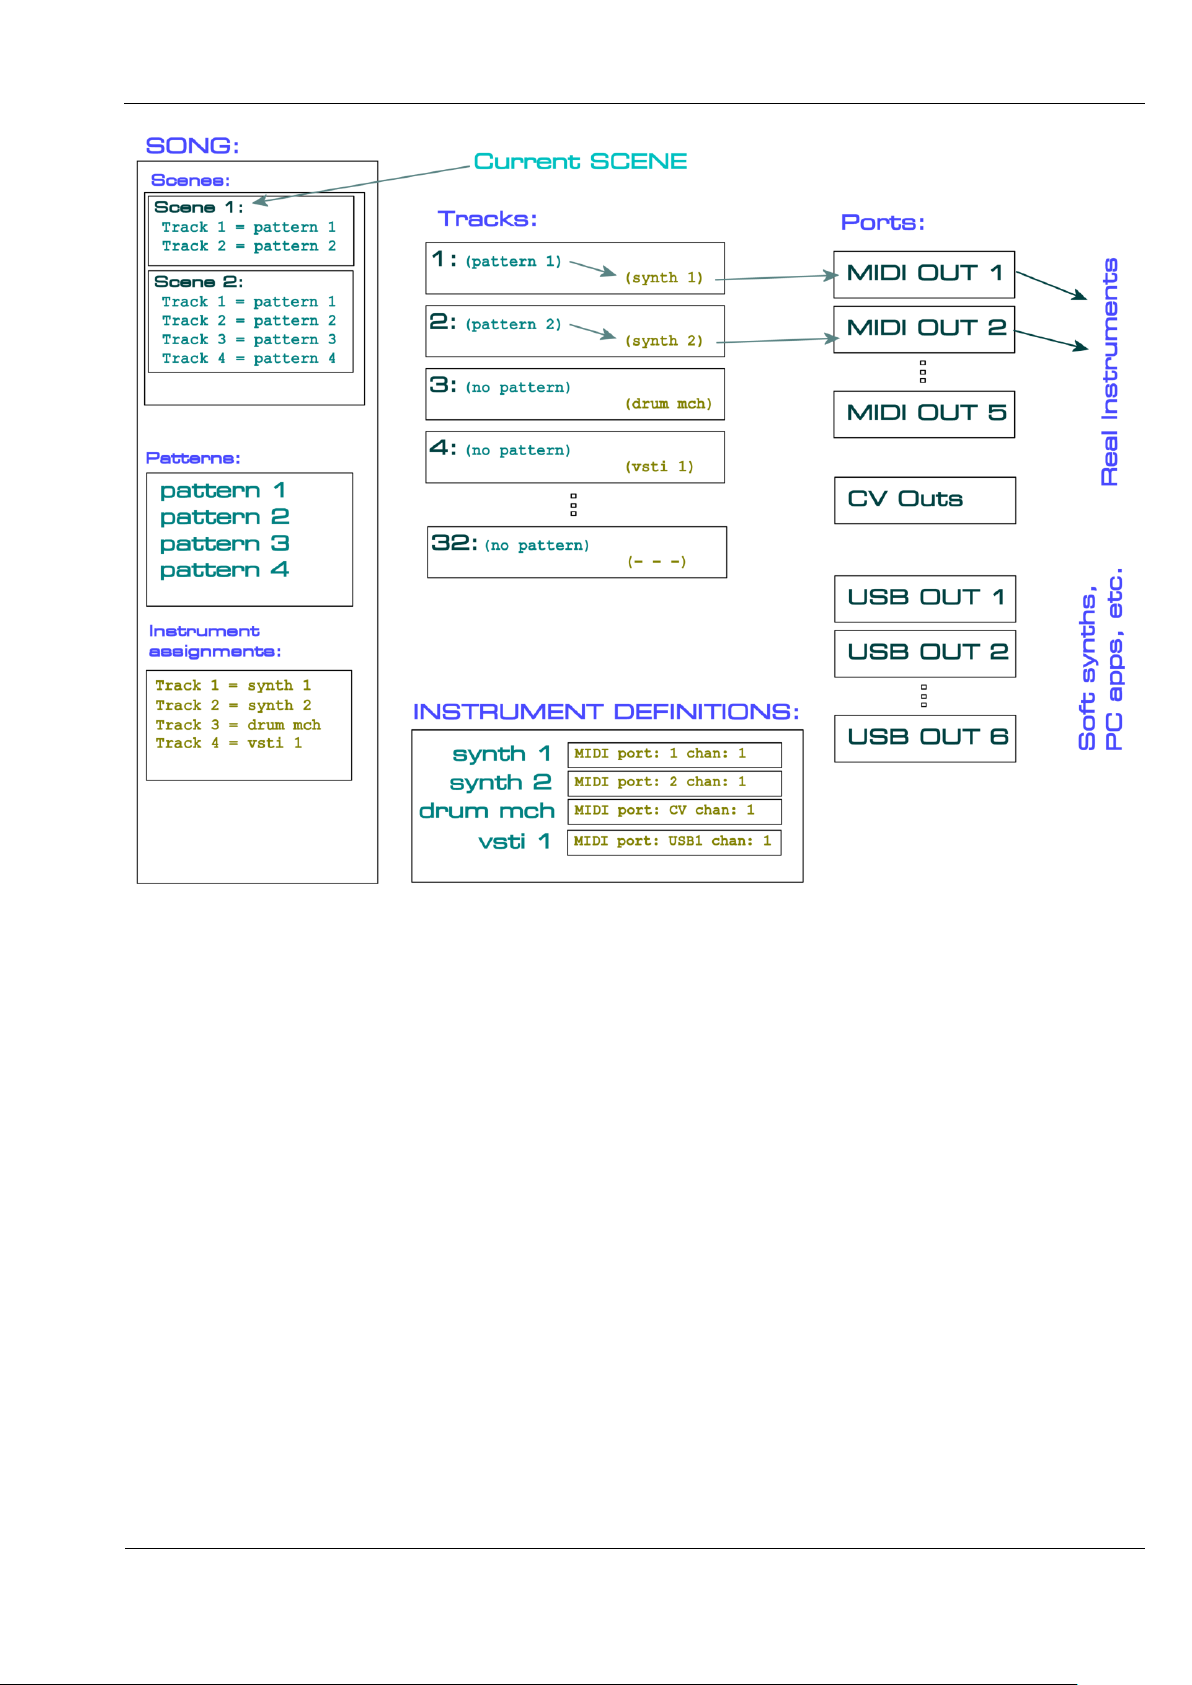
The following figure shows a simplified example of what is going on inside Cirklon while
playing a song.
After describing what’s there, we’ll go through the stages needed to get to this point.
Sequentix Music Systems
Cirklon Sequencer User Manual
1-11
The box on the left shows the contents of a simple song.
All the information needed to play a piece of music is contained in the current song, and the
instrument definitions.
The tracks are part of the sequence engine, which controls pattern playback and generates all
the outgoing MIDI events.
The instrument definitions describe the real instruments which Cirklon is to control, most
importantly the MIDI port and channel to which the instrument is connected.
The instrument definitions also include some options to alter track behaviour, and can store
user-defined note and controller labels to aid editing, and a set of ‘track values’ for real-time
control. We’ll look at these advanced settings later.
Instrument definitions are global - the choice of which instrument to use on each track is
made as part of each song, but every song loaded has access to the same set of instruments.

Sequentix Music Systems
Cirklon Sequencer User Manual
1-12
In this example, the song contains:
- 2 scenes (scene 1 and scene 2)
- 4 patterns (pattern 1, pattern 2, pattern 3 and pattern 4)
- 4 instrument assignments
When the song is loaded:
- the instrument assignments tell each track which instrument to use
- Scene 1 becomes the current scene, telling each track which pattern (if any) it should
play
The tracks look at the instrument definitions to see which MIDI port and channel they should
send note and controller messages to.
For this song, track 1 would use the settings held for synth 1, track 2 for synth 2, track 3 for
drum mch, and track 4 for vsti 1.
Scene 1 tells track 1 to play pattern 1, and track 2 to play pattern 2.
Recalling scene 2 will assign patterns to tracks 3 and 4, which were not used during scene 1.
In scene 2, tracks 1 and 2 continue to play the same patterns they were assigned during
scene 1.
Note that the scenes only tell the tracks which patterns to play – the patterns themselves are
not part of the scene.
The same pattern can be used by many different scenes in a song.
Song Play Mode
Any of the scenes in a song can be manually recalled at any time.
In order to play through all the scenes of a song automatically, for a controlled song structure,
Cirklon must be in song play mode.
In song play mode, each scene will play for a chosen number of bars, then advance to the next
scene in the list.
Some scenes may be set to require ‘manual advance’, so you can have a song which plays
automatically through some sections, but repeats certain scenes indefinitely until you choose
to proceed. You may also set a scene loop, which will cause playback to loop round a number
of consecutive scenes in the song.
By default, Cirklon will enter song play mode whenever you are on the SONG page.

Sequentix Music Systems
Cirklon Sequencer User Manual
1-13
You can change this behaviour by holding the SONG key and pressing the RUN key.
This combination will not start the sequencer running, it only changes the song play setting.
There are three choices:
auto scenes advance only while on the SONG page
song scenes always advance, except in pattern edit
work scenes must be recalled or advanced manually
In order to get to the stage of having a first song play on a new Cirklon, we’ll need to cover
the following tasks:
- creating and assigning some instruments
- creating and assigning some patterns
- saving the pattern assignments as a scene
So let’s get started…

Sequentix Music Systems
Cirklon Sequencer User Manual
2-1
2. The Main Pages
There are four main pages which can be viewed on the display.
These are:
- SONG
- SCENE
- TRACK
- PATTERN
These pages are selected using four dedicated keys on the left of the panel.
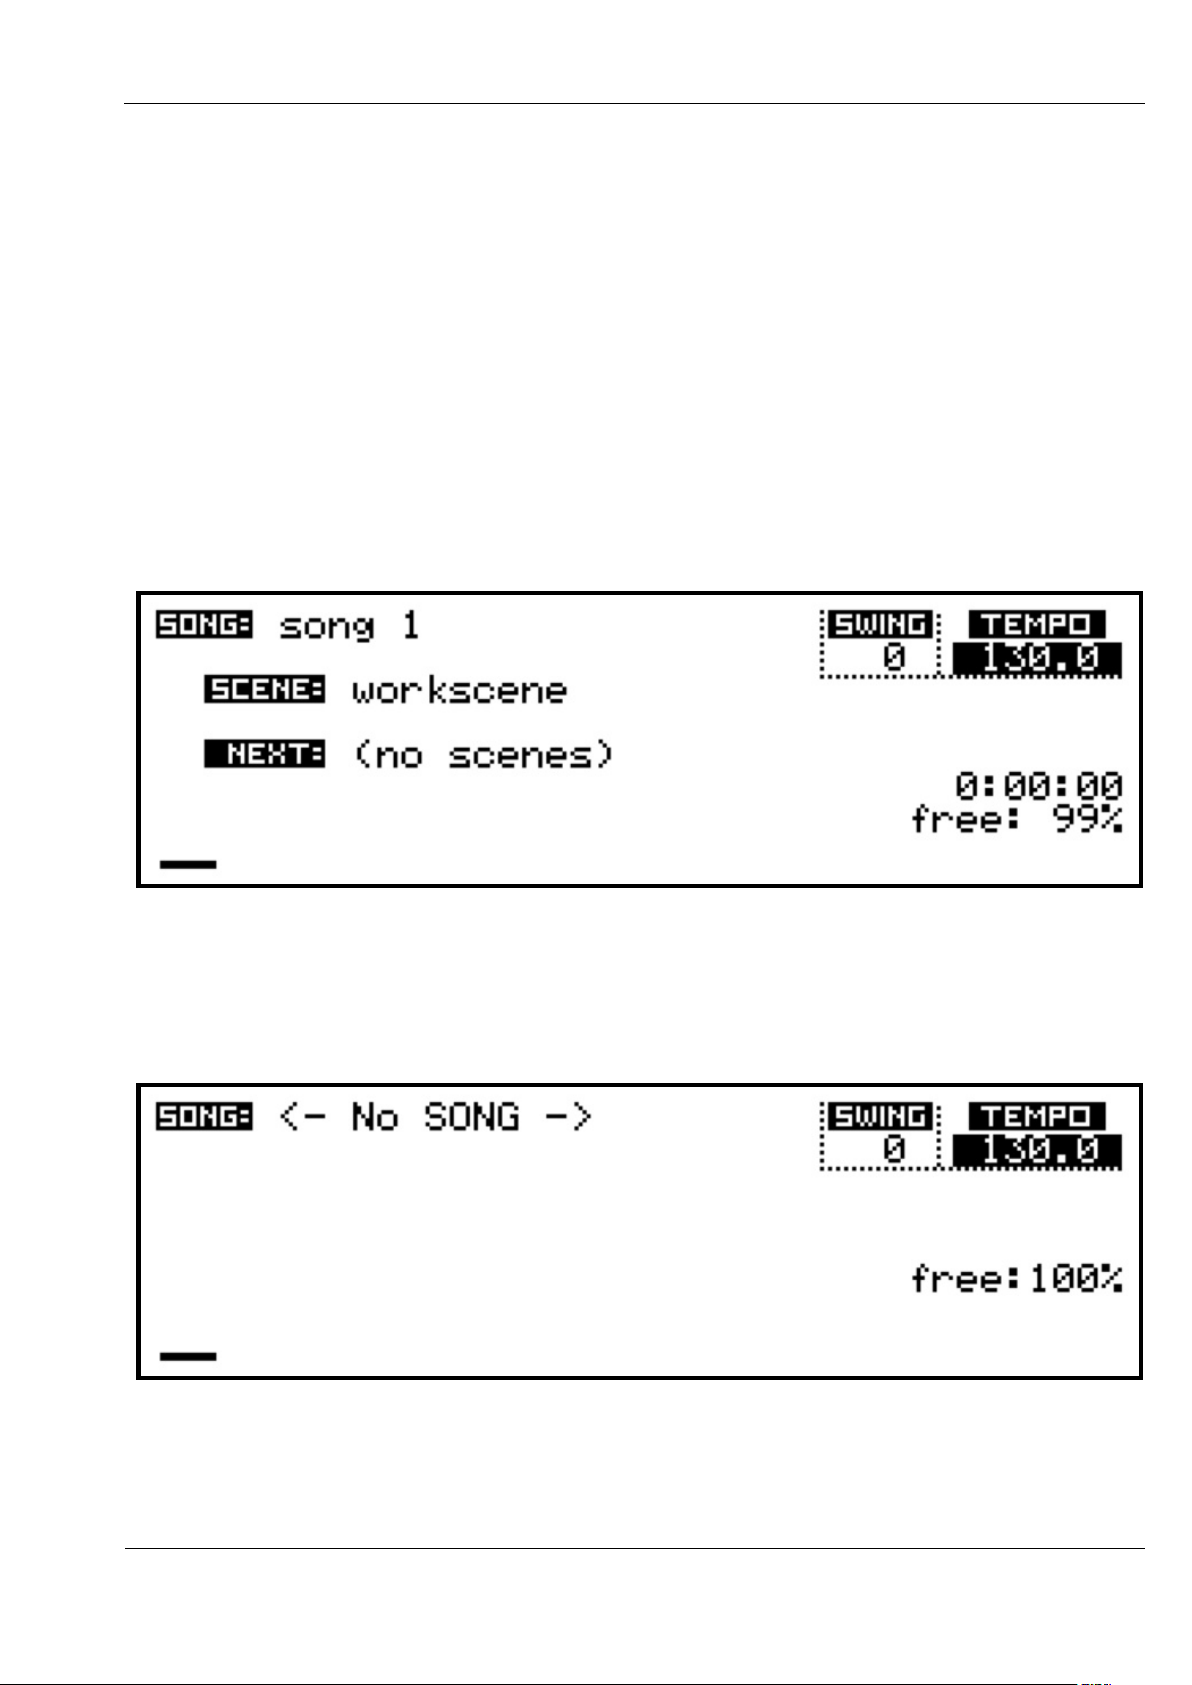
When you first power on a new Cirklon, you should see the SONG page, like this:
The LED in the SONG key will be lit to show you are on the SONG page.
Note: In the event that Cirklon’s memory has been wiped and there are no songs present, the
SONG page may look like this:
In this case, you’ll need to create a new song. Hold SHIFT and press SONG, then press
encoder 6, below the text “create new”, which should have appeared on the display.
Sequentix Music Systems
Cirklon Sequencer User Manual
2-2
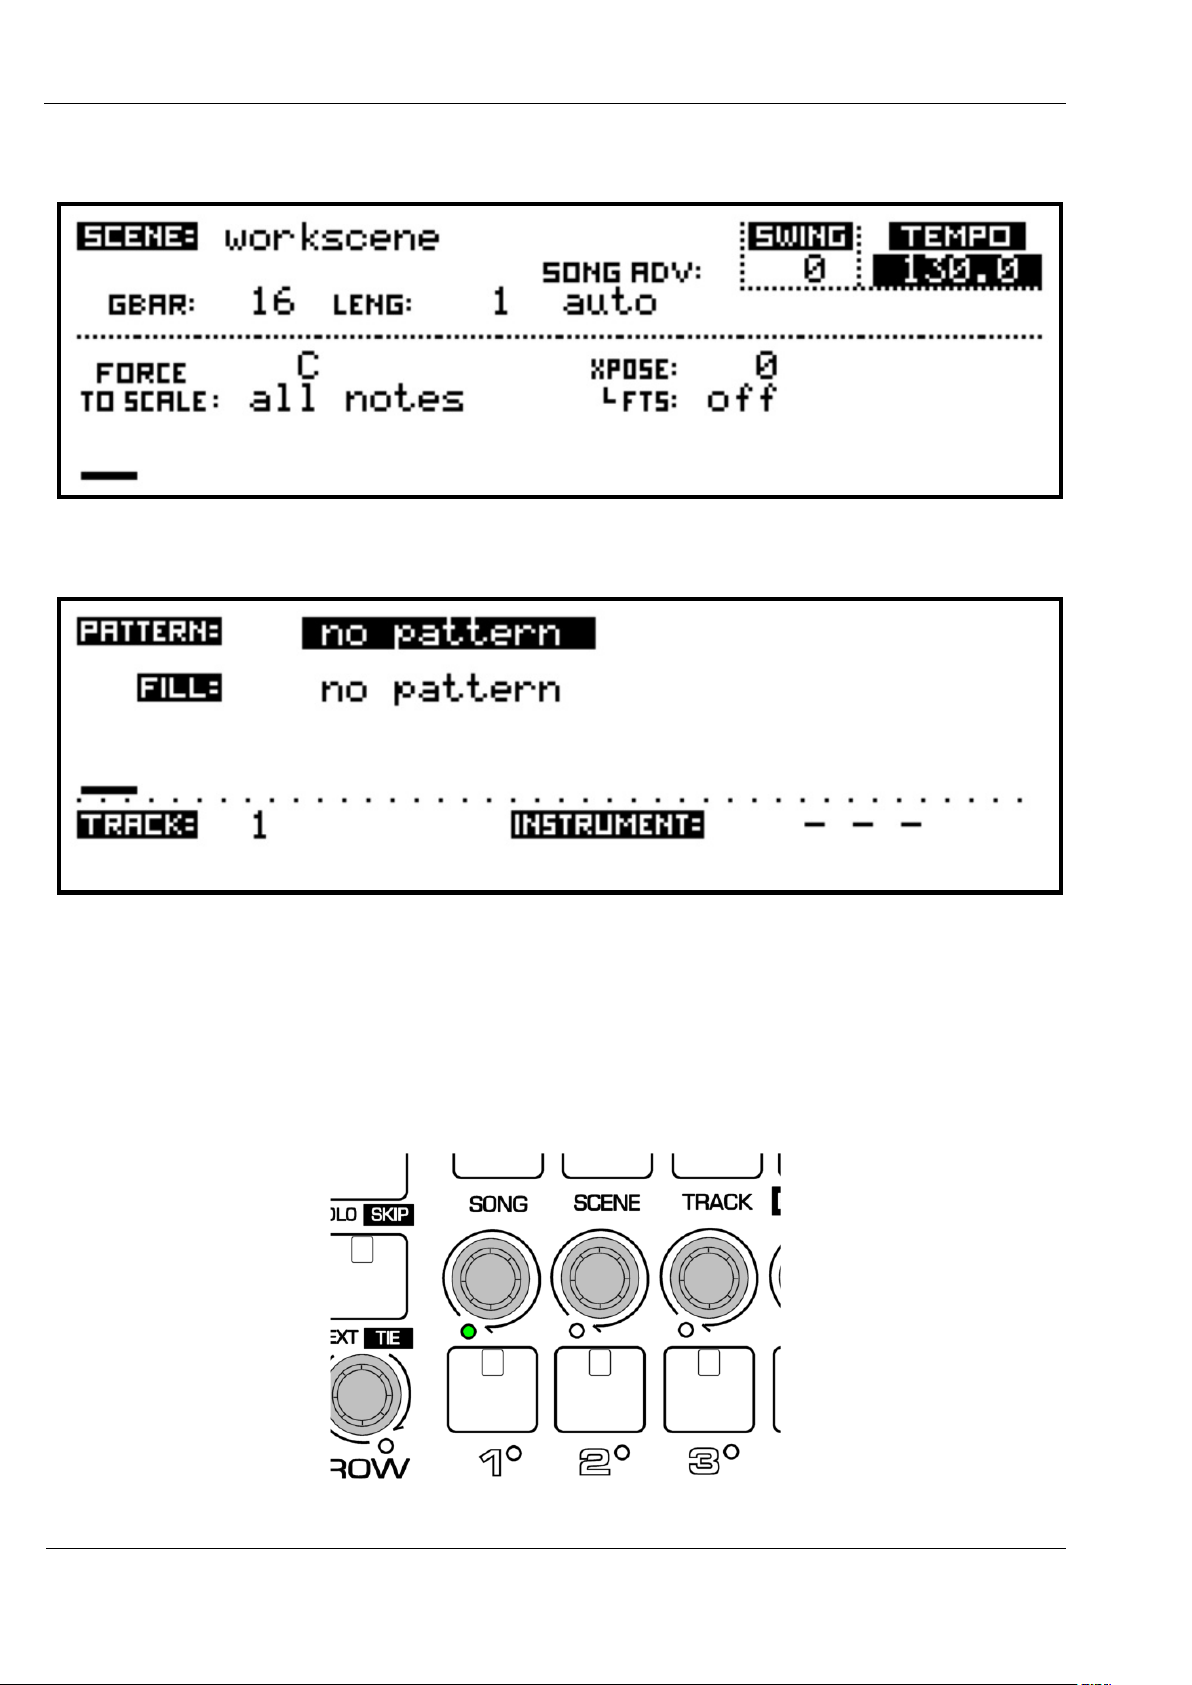
Press the SCENE key, and you will switch to the SCENE page, which should look like this:
Pressing the TRACK key will switch to the TRACK page, which should look like this:
The TRACK page shows information for the current edit track – the single track that is active
for pattern selection, editing and real-time recording.
The lower left of the display above shows the current edit track is number 1.
This will also be shown by a green LED, just below and left of track encoder 1:

Sequentix Music Systems
Cirklon Sequencer User Manual
2-3
Note: Where they are used on the SONG, SCENE or TRACK pages, the 16 keys and encoders
will be referred to as the track keys/encoders, since they each control one of 16 tracks.
In pattern edit, they will be referred to as the step keys/encoders, since they edit the step
values of the pattern.
The edit track selection can be changed on the SONG, SCENE or TRACK pages by pressing
the track encoders, or by turning the BAR encoder.
Using more than 16 tracks
The total number of tracks available is user-configurable to 16, 32, 48, or 64.
To change the number of tracks, see section 6 – Play Mode Menu, User Configuration.
Since there are only 16 track keys and encoders, if the number of tracks is set to 32 or more,
the tracks are mapped to the track keys and encoders in banks of 16.
You can step through the banks by pressing the BAR encoder.
A message on the display will show which tracks are selected.
Note that this may result in the edit track selection being outside the current track bank
selection, in which case none of the track encoder LEDs will be lit.
You may also change bank along with the edit track selection by turning the BAR encoder.
The single green track encoder LED will scroll across the tracks, and continue into the next
bank as you go past the end.
Sequentix Music Systems
Cirklon Sequencer User Manual
2-4
Track Muting and Status
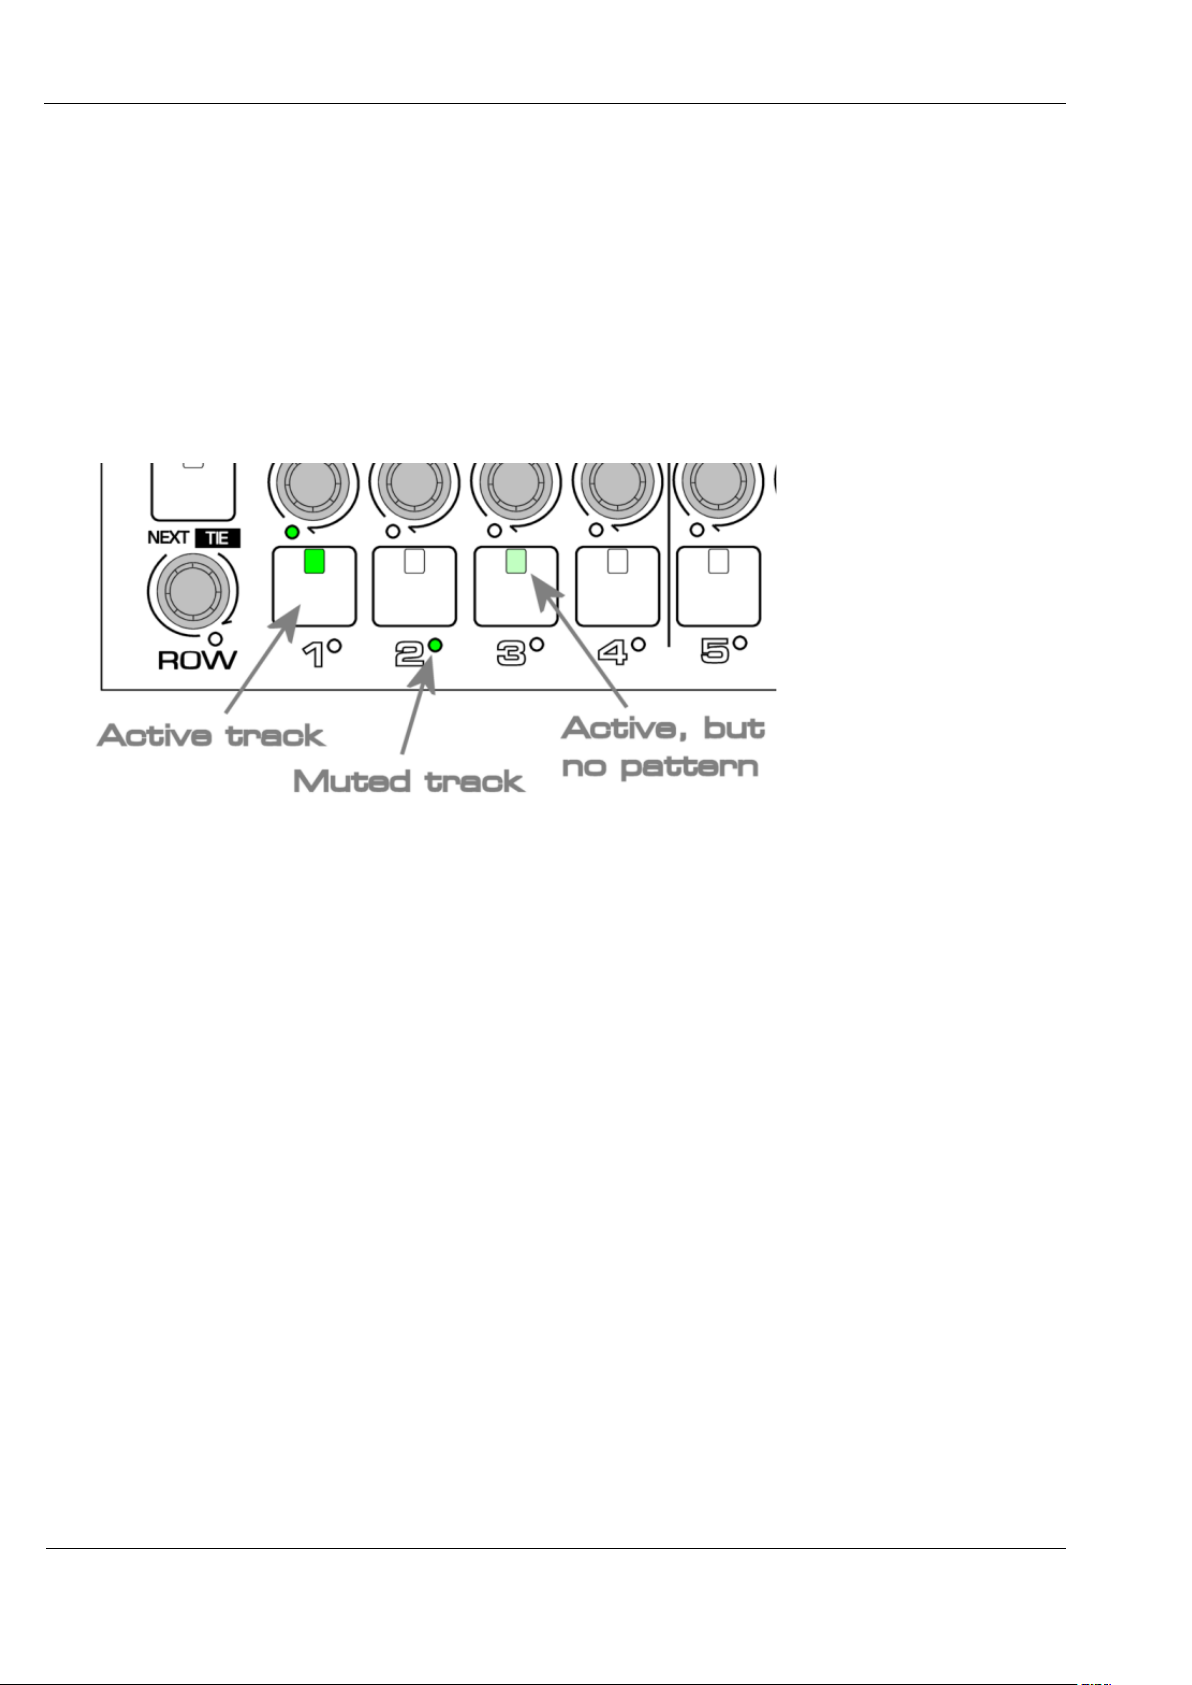
The track keys are used to control the active/muted status of each track.
A pattern assigned to a track will not play unless the track is active, with the key LED on.
If a pattern is assigned to a track which has been muted, the LED below the track key will
light green to show the track is in use.
If a track has been set active, but no pattern is assigned, nothing will play, so the key LED will
be lit at half brightness.
It is possible to “arm” a muted track, so that it will become active at the next global bar loop.
Do this by holding the SHIFT key as you press the track key for the track to be unmuted.
The LED below the track key will be amber until the track becomes active.
The SHIFT + <track key> function will not mute an active track unless a user configuration
option for this is enabled – see the later section on user config.
Changing Song Values
Changes to the main values on each of the play pages are made using the VALUE encoder.
The selected value is shown with an inverse or highlighted background.
Sequentix Music Systems
Cirklon Sequencer User Manual
2-5
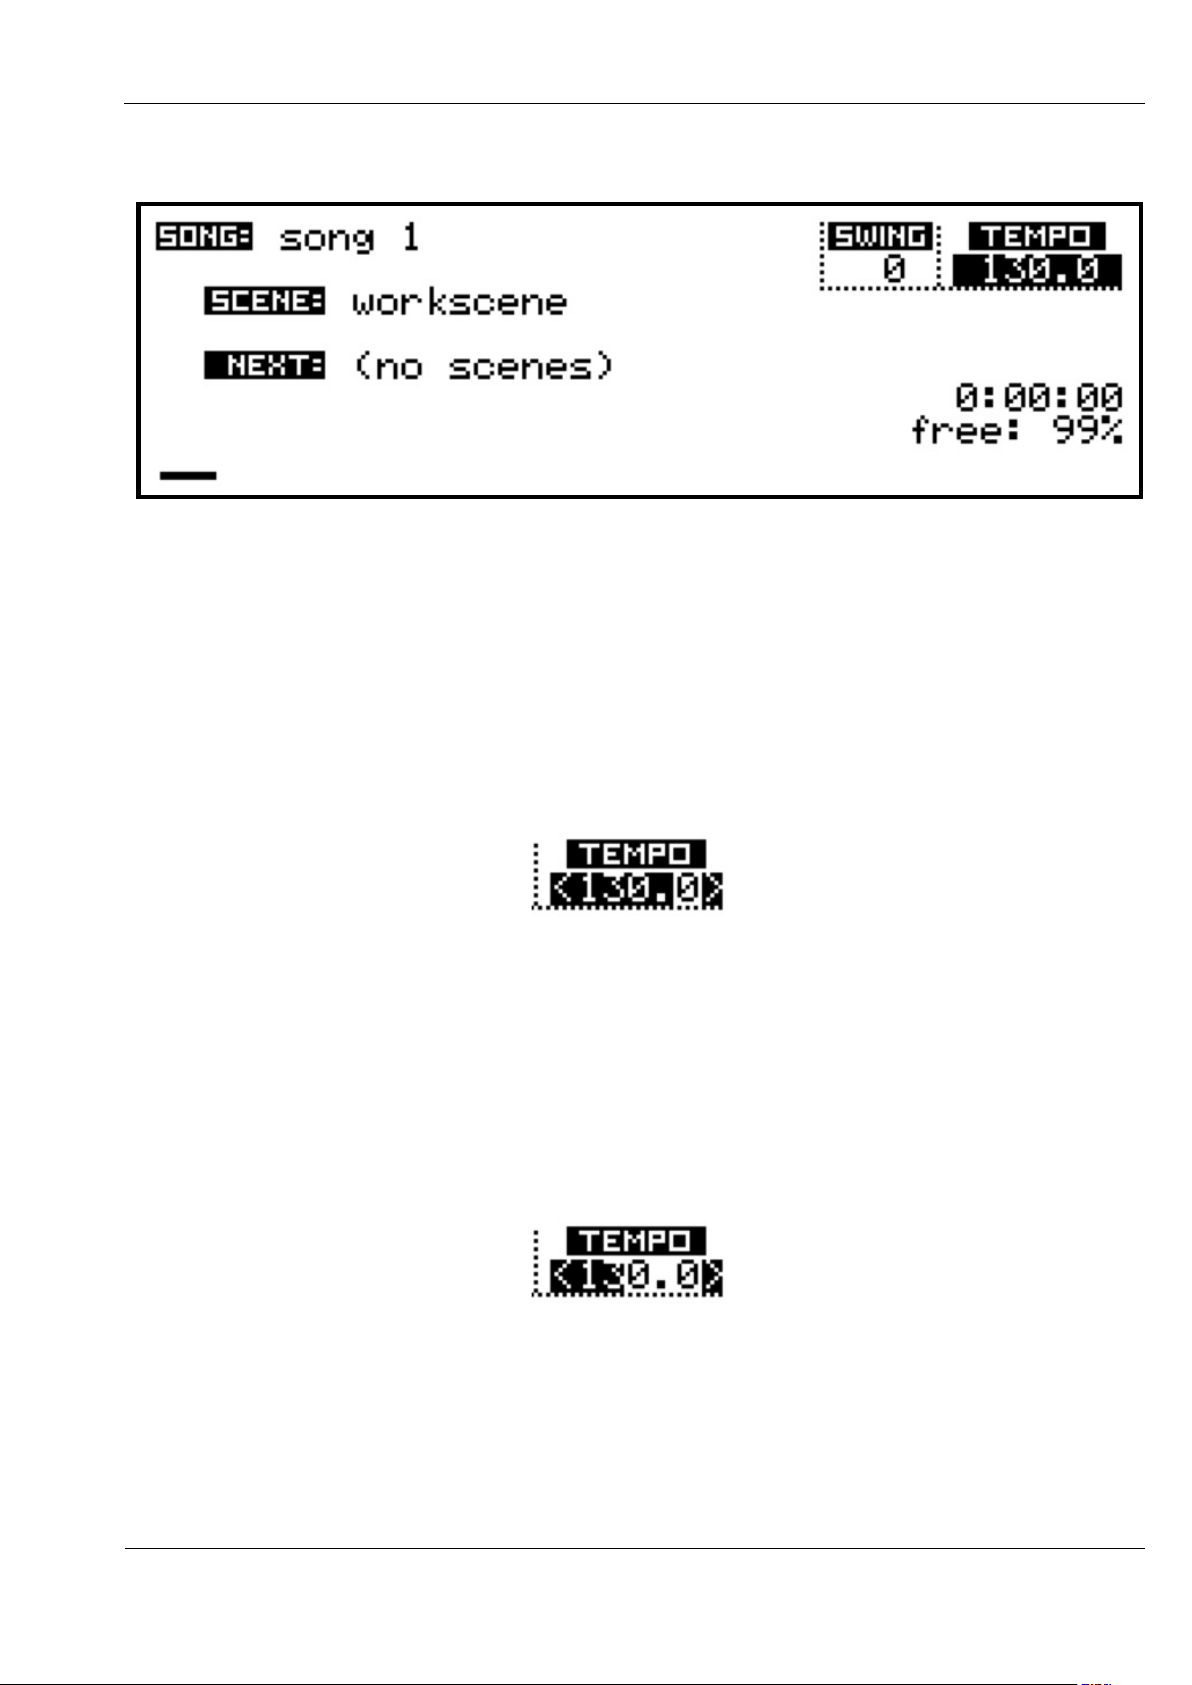
Go back to look at the SONG page:
There are 3 values which can be adjusted here:
- the TEMPO
- the SWING setting
- the song name
The display above shows the selection highlight over the TEMPO value, but it is not yet active
for editing. Press the VALUE encoder (ENTER), and arrow symbols will appear around the
TEMPO value:
You will also see that the selection highlight no longer covers the fractional part of the tempo.
By default, tempo is adjusted in steps of 1 BPM. Turn the VALUE encoder and you should
see the value change.
It is possible to adjust the tempo in coarser or finer steps.
Hold the SHIFT key, and turn the VALUE encoder one step to the left, then release SHIFT.
The highlight should now look like this:
Adjustment of tempo will be in steps of 10 BPM.
Now hold SHIFT, and turn VALUE back two steps to the right.
The highlight will now cover all the digits, and you will find tempo will change by steps of
0.1 BPM.
Sequentix Music Systems
Cirklon Sequencer User Manual
2-6
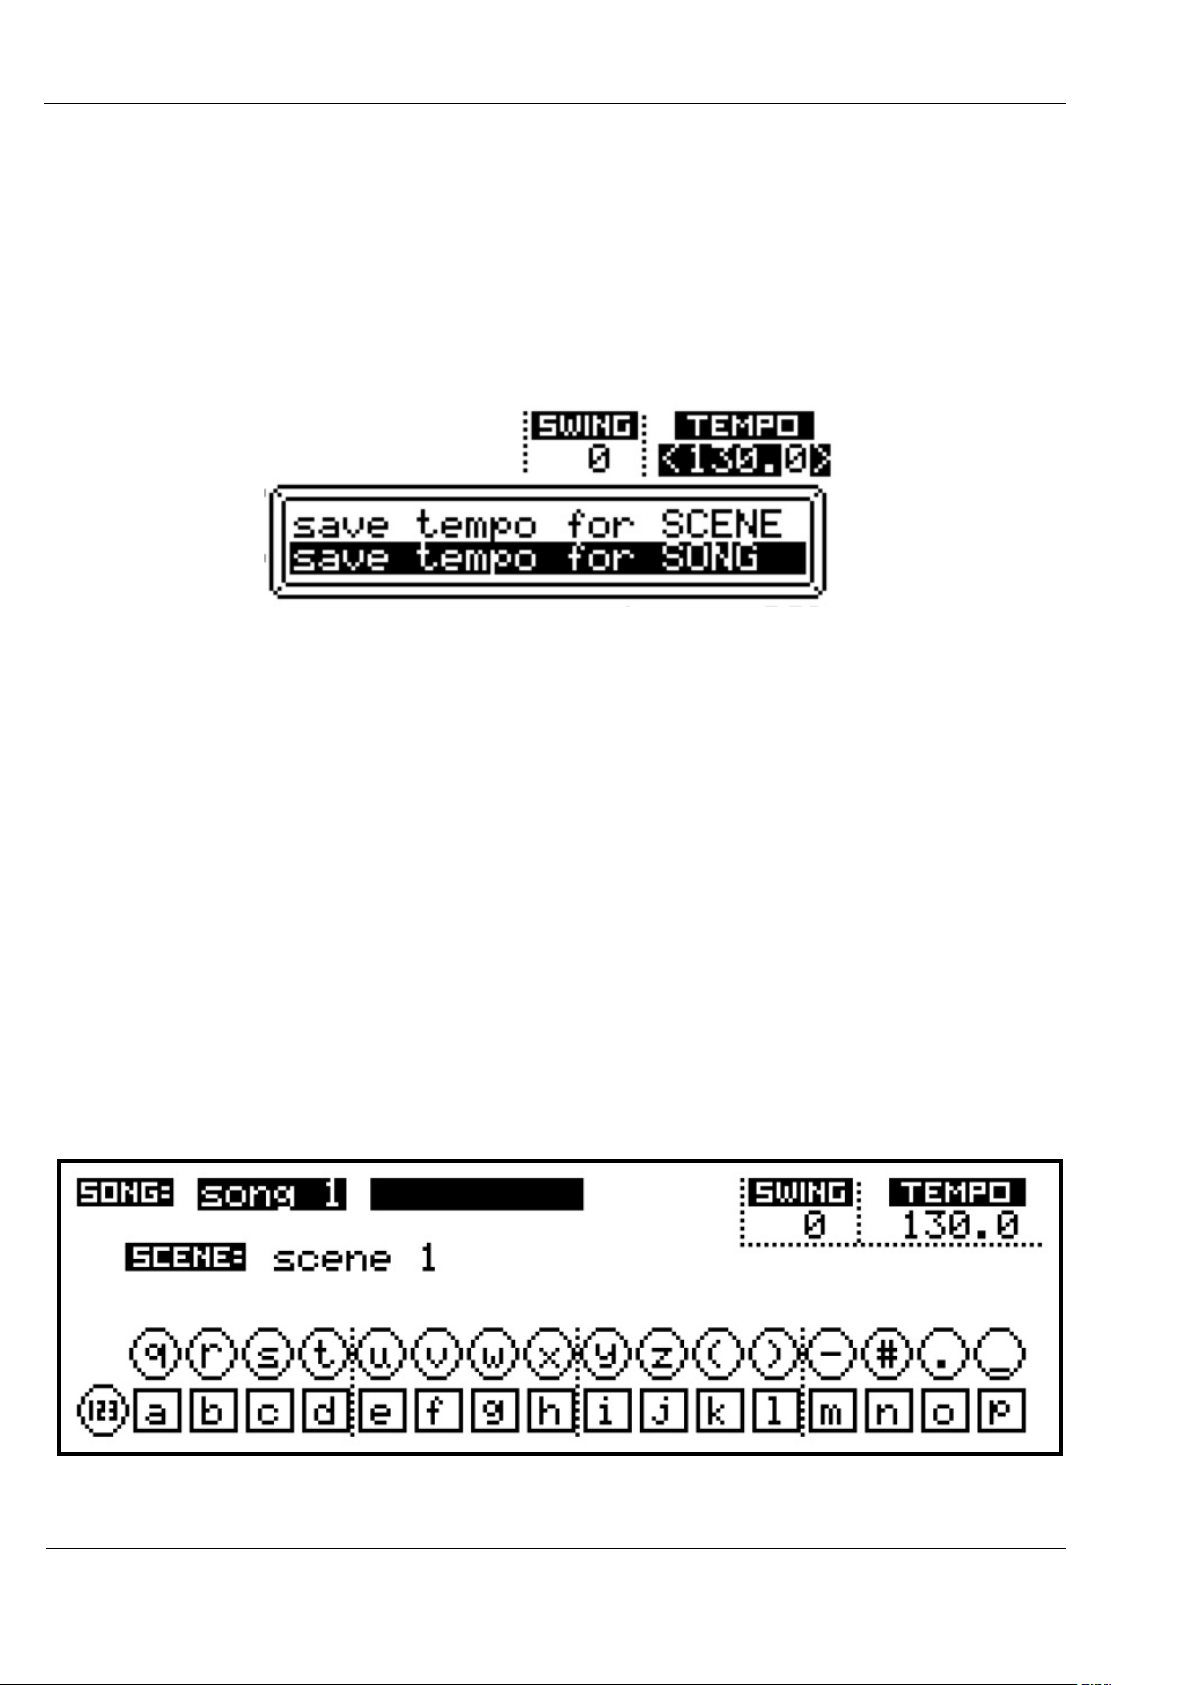
It is also possible to set the tempo using the SCULPT key.
Tap the SCULPT key at least twice, at the desired tempo. The display will show the tempo
detected.
While the TEMPO value is selected for editing, it is possible to save the value for the current
song or scene by pressing the SAVE key.
A popup window will show two options, with song selected by default:
To save the current tempo value for this song, press ENTER.
When a song has a stored tempo, the label [SONG] will appear below the value.
You can remove the stored value by pressing the DELETE key while the tempo value is active
for edit.
When the song is later recalled, the tempo will be adjusted to its stored tempo value.
Once the tempo has been set as required, press VALUE/ENTER again.
The arrows will disappear and the encoder is once more active for selecting the other values
on the page.
The SWING setting is adjusted in the same way as tempo, and can be saved for the song or
scene.
Swing has a range of 0 (off) to 16, and adds a 16th note shuffle feel to the playback of patterns.
If you select the song name, then press VALUE/ENTER, you will see a display like this:

Sequentix Music Systems
Cirklon Sequencer User Manual
2-7
The flashing cursor at the end of the song name, and the visual representation of the step keys
and encoders at the bottom of the display show you are in text input mode.
All track key, encoder and lower LEDs also light up in this mode.
In text input mode, you can enter or edit the name using the keys and encoders.
The character on each key is shown in the visual aid.
Press DELETE to delete the character before the cursor.
Hold the SHIFT key to enter upper case letters.
Pressing the ROW encoder toggles between letters and numbers – the visual aid will switch
accordingly.
You can move the cursor within the text by turning the VALUE encoder.
When the cursor is within existing text, the INSERT key will switch between new characters
being inserted into, or over-writing the text.
To confirm the edited text, press ENTER (the VALUE encoder).
To exit without affecting the stored name, press the MENU key.
This mode of text entry is used for naming a number of objects, such as songs, scenes,
patterns and instruments.
Sequentix Music Systems
Cirklon Sequencer User Manual
2-8
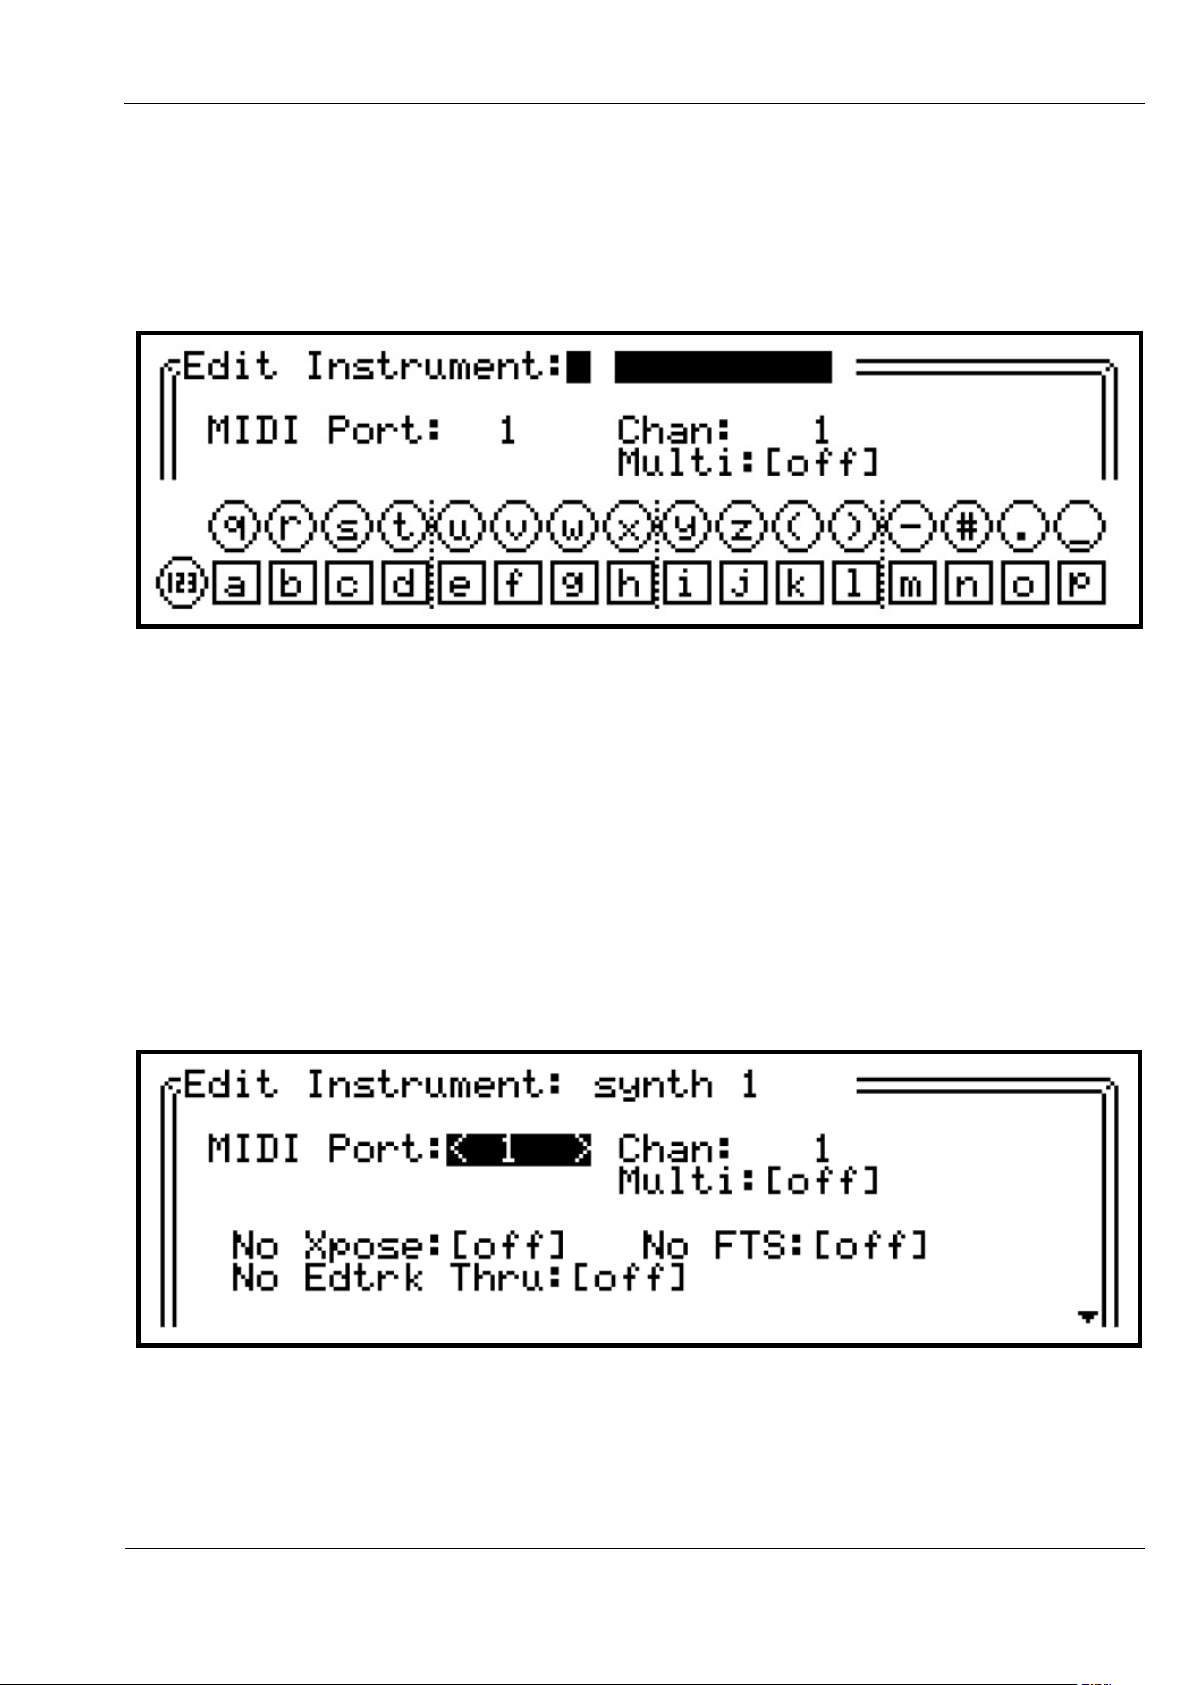
Creating and Assigning an Instrument
Let’s return to the task of creating and assigning an instrument.
This is done from the TRACK page. If not already selected, press TRACK to get there.
There are four values shown on the main TRACK page:
- the pattern selection, labelled PATTERN:
- the fill-in pattern selection, labelled FILL:
- the track number (or name), labelled TRACK:
- the current instrument assignment, labelled INSTRUMENT:
Remember the values shown here are for the current edit track, in this example track 1.
One of the values will be highlighted to show it is active for editing.
As on the song page, to move the selection highlight turn the VALUE encoder.
Turn the VALUE encoder clockwise, until the instrument field is highlighted.
The instrument field will show “ - - - “ where no instrument is assigned.
Then press VALUE/ENTER to access the instrument list:
Sequentix Music Systems
Cirklon Sequencer User Manual
2-9
The instrument list will be empty on a new machine, so the only choices are to assign “no
instrument” to the track, or to create a new instrument.
“create new…” will be selected by default, so press ENTER to define the first instrument.
The instrument definition page will first appear like this:
The field on the top line of the display is active in text input mode, waiting for the name of
the new instrument. Using the track keys and encoders, enter an instrument name in the
same way as for the song name.
Once a name has been entered, the rest of the instrument definition values will be accessible.
Use the VALUE encoder to move the highlight selection between the fields, then press to edit
the values as before.
Arrows will appear around a numeric value to show it is active for editing.
When highlighted, the values between square brackets will toggle on each press of ENTER.
In this view, the MIDI port value is active:
The MIDI port should match the port the instrument is connected to. This can be one of the 5
standard MIDI ports, one of 6 ‘virtual’ ports on the USB MIDI interface, or the CV port, which
is used to route note and controller output to the optional CVIO expansion for CV/gate
output.
Sequentix Music Systems
Cirklon Sequencer User Manual
2-10
The Multi option is intended for use with multi-timbral synthesizers which may respond to
MIDI messages on a number of channels at the same time. When multi is enabled, an extra
field to specify the MIDI channel number will appear alongside the instrument assignment on
the track page. This saves any need to redefine the same instrument for each channel it is
active on.
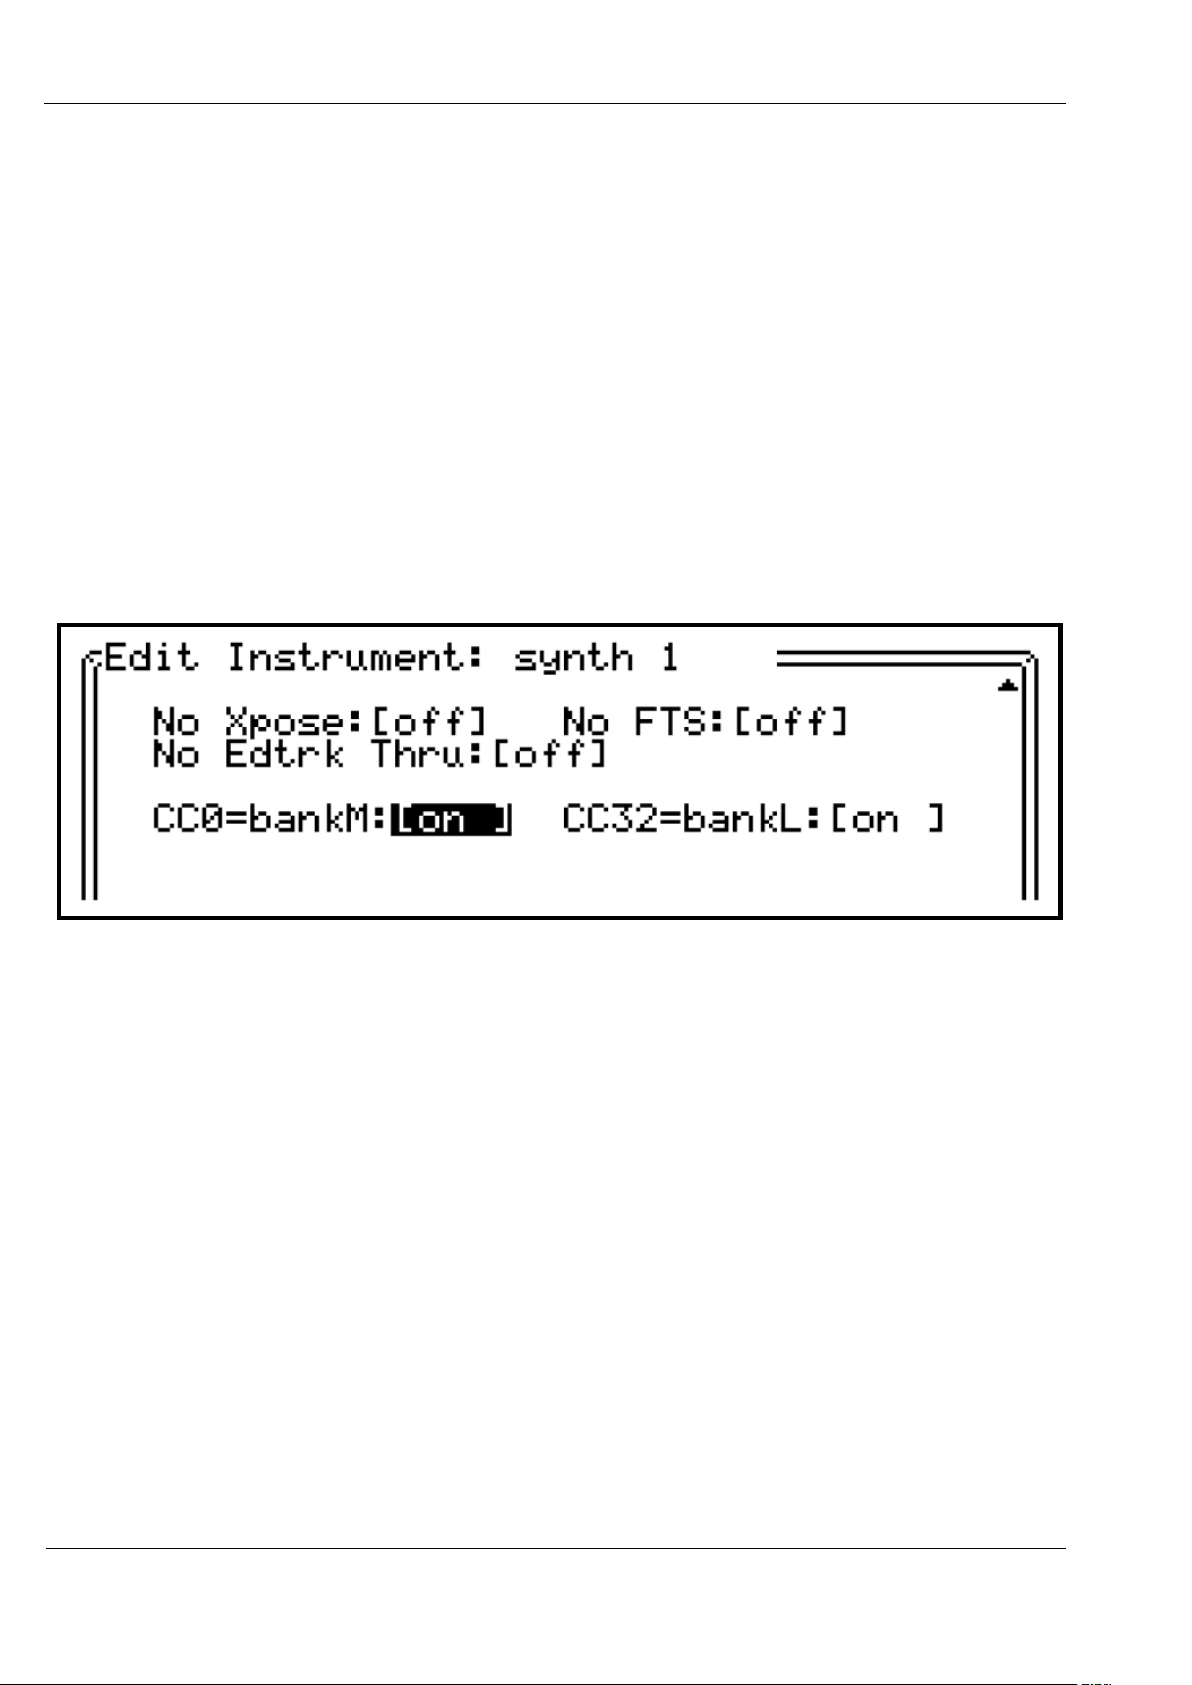
The No Xpose and No FTS options globally disable the effect of any pattern transposition or
force-to-scale for the instrument. This is most commonly used with drum machines or
percussion modules, where specific sounds are mapped to each note number.
The No Edtrk Thru option disables automatic soft-thru of incoming MIDI notes to the
instrument, even if it is assigned to a track selected as the current edit track.
Two further instrument values can be found by scrolling the value selection further, indicated
by the down-arrow at the bottom right:
The CC0=bankM and CC32=bankL options enable the use of CC numbers 0 and 32 for the
bank select MSB and LSB messages which some instruments use in conjunction with MIDI
program change messages to select from more than 128 internal sounds.
When either bank select CC is enabled and a value is in use, it will be transmitted and stored
along with the program change message, as described in the later chapter on Track Values.

Sequentix Music Systems
Cirklon Sequencer User Manual
2-11
Once the correct MIDI port and channel have been set, press the SAVE key to store the new
instrument. This will return you to the TRACK page, with the newly created instrument
assigned to the current track:
If you wish to create and assign instruments for other tracks, press another track encoder.
The display will switch to the new track, with the instrument assignment field still active for
selection.
Press ENTER to access the instrument selection for the new track. Then choose the “create
new…” option once more.
If you wish to edit the settings for a previously created instrument, access the instrument list
as normal, scroll to the instrument you wish to edit as if to assign it, then hold the SHIFT key
while pressing ENTER. This will return to the instrument definition page for the stored
instrument, where you can change any of its values.
Press SAVE to confirm the changes, or MENU to cancel the changes and restore the previous
settings.
For the example song, we would continue to create the instruments synth 2, drum mch and
vsti 1.
As each new instrument is defined, they will appear in the instrument list, along with their
port and channel values, like this:

Sequentix Music Systems
Cirklon Sequencer User Manual
2-12
Deleting An Instrument
If an instrument definition is no longer required, you can delete it by highlighting the
instrument in the selection list, then pressing the DELETE key.
A two-step confirmation page will appear to make sure you don’t do this by accident.
Also, if the instrument is used by any loaded songs, you will be prompted to choose an
alternative instrument with which to replace the existing assignments.

Sequentix Music Systems
Cirklon Sequencer User Manual
2-13
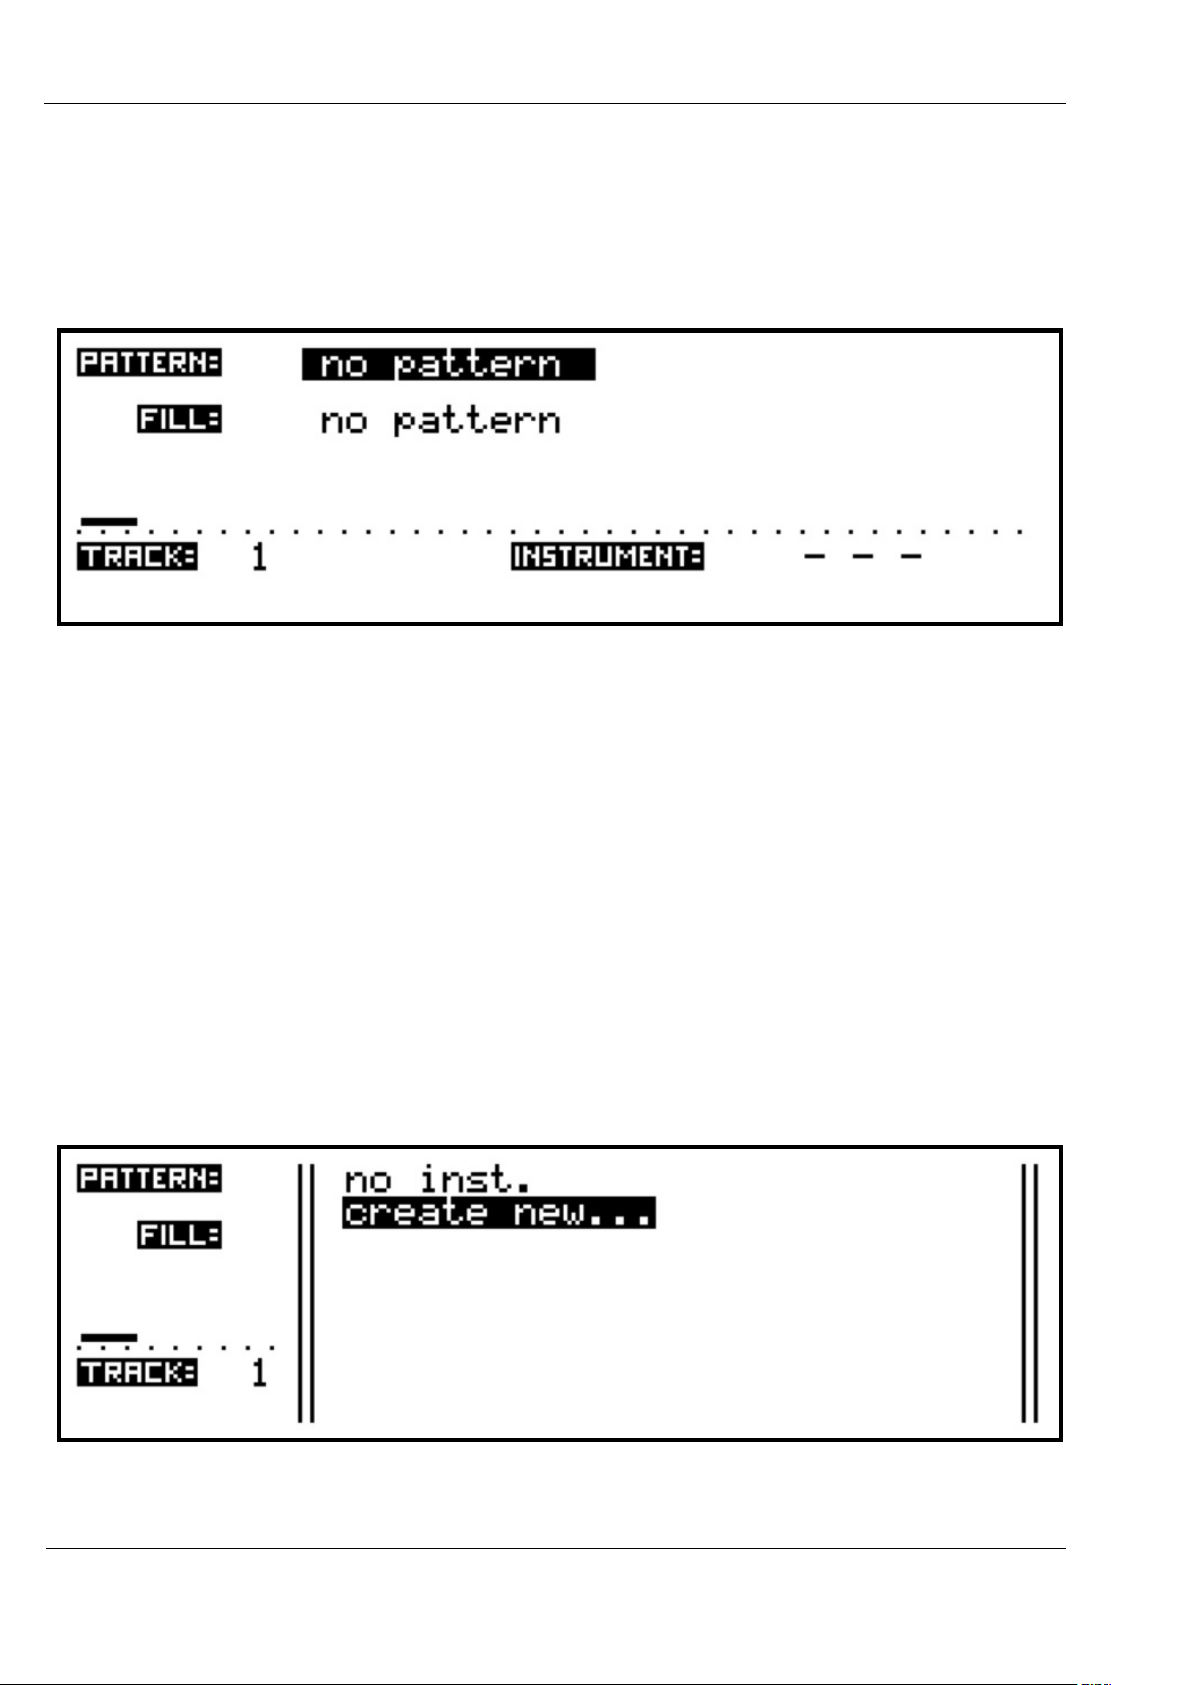
Creating and Assigning a Pattern
With the instruments created and assigned to tracks, we can create some patterns.
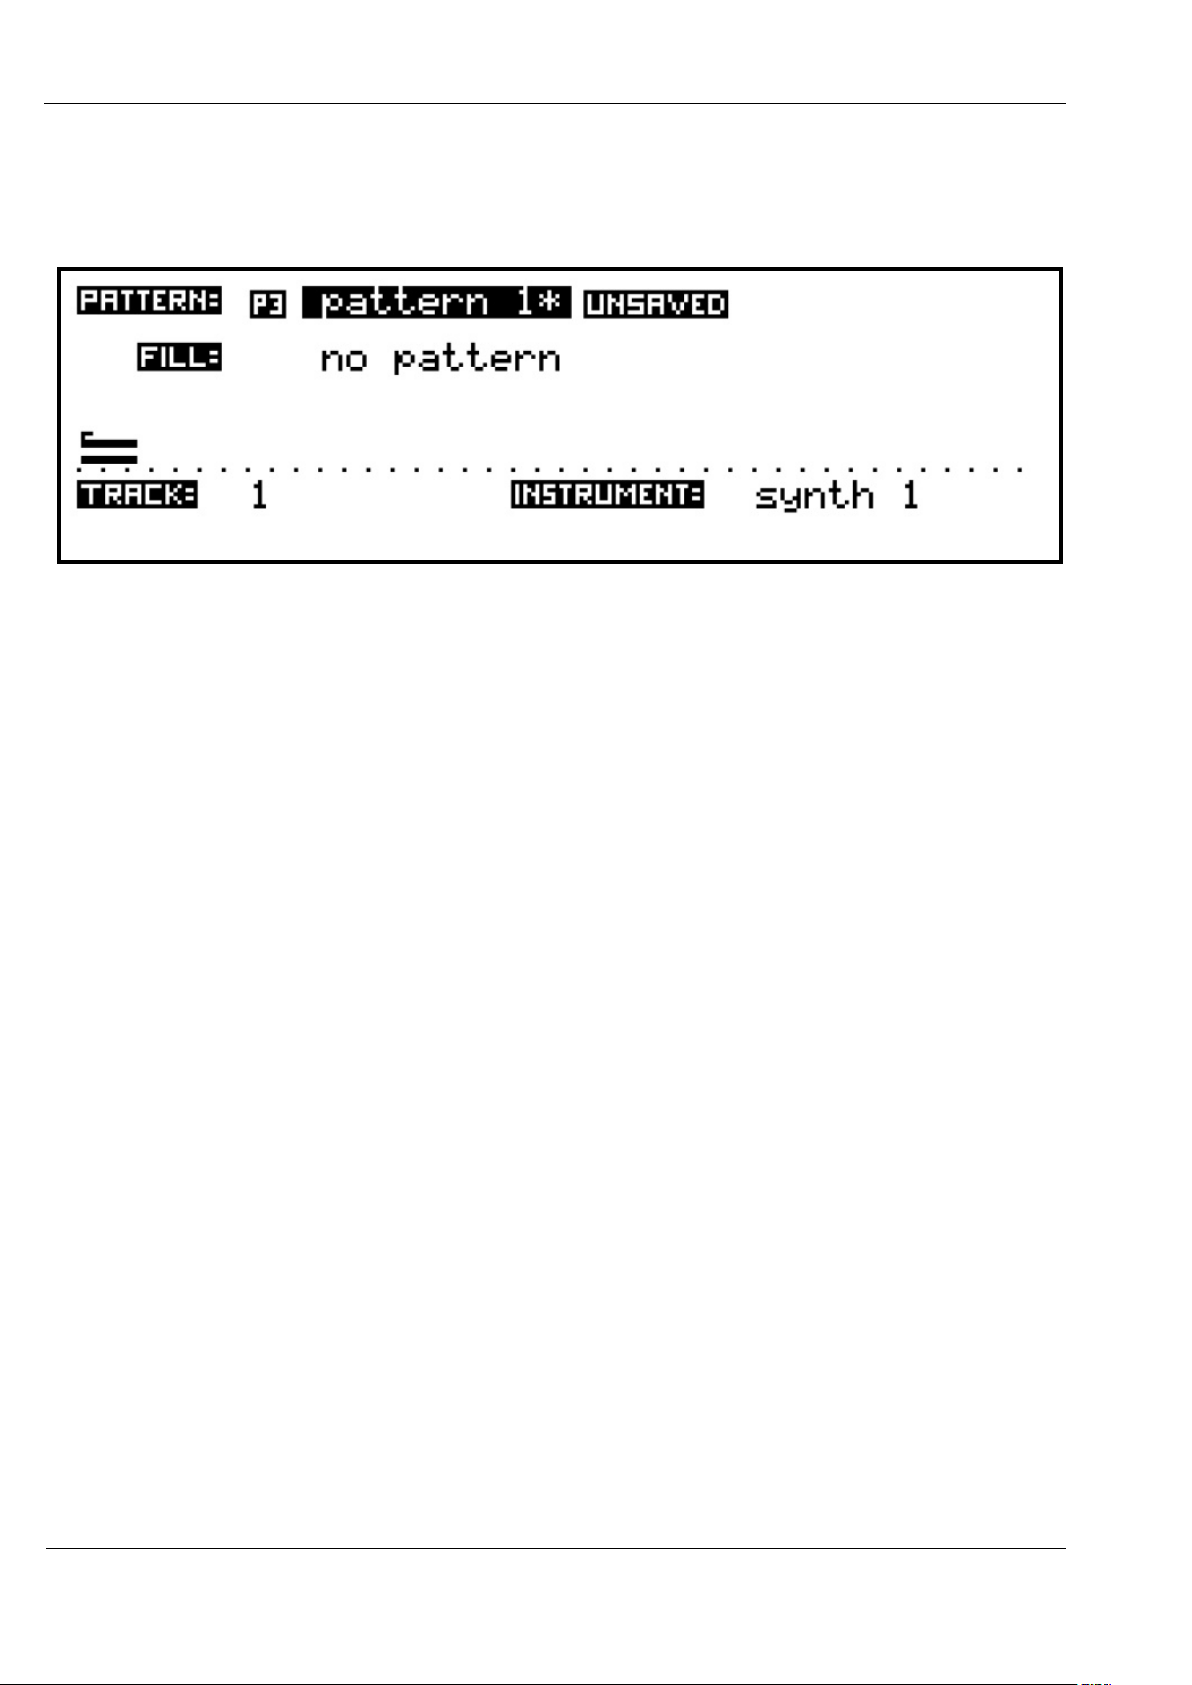
On the TRACK page, use the VALUE encoder to highlight the PATTERN: field.
As with the instrument assignment, pressing ENTER on the pattern selection will bring up
the pattern list.
In a newly created song, or on a track which has not yet had a pattern created for it, this list
will be empty, except for the options shown:
There are two different types of pattern which can be created.
The first is the P3 pattern, which is an enhanced version of the patterns found on the
Sequentix P3 Sequencer.
The P3 was intended to allow pattern creation in a similar fashion to analogue step
sequencers, with added means for patterns to modulate and interact in ways only possible
with a processor-based machine.
The second type is the CK pattern, which is an event-list pattern better suited to polyphonic
keyboard and percussion parts, and un-quantised real-time recording.
These will be described in depth later.
Normally the pattern list will show only the patterns that were created on the current track.
You can expand the list to include all patterns in the song by holding SHIFT as you press
ENTER to bring up the selection list.
Sequentix Music Systems
Cirklon Sequencer User Manual
2-14
To create the first pattern, scroll to “+ create P3 pattern” and press ENTER.
The display will return to the track page, with the newly created P3 pattern assigned to the
track:
The pattern field now shows a symbol for the pattern type (P3), and its default name “pattern 1”.
You will also see an asterisk following the pattern name, and a further symbol indicating the
pattern status is unsaved.
If a pattern is used in a number of different scenes in a song, making changes to the pattern
could cause unexpected changes elsewhere in your song.
To prevent this, a pattern may be marked as saved. This can be done manually in pattern
edit, or it will happen automatically when a scene is saved which uses the pattern.
When you edit a saved pattern, an edit copy of the pattern is made.
This means you can easily undo any changes since the point of saving by recalling the saved
version. Or you can save the edited pattern as a new version, leaving the original pattern as it
was before editing.
The asterisk after the pattern name shows that there are unsaved changes to the pattern,
either because it is newly created, or because edits have been made since it was last saved.
The saved status of each pattern can also be seen in the pattern selection list.
If you make changes to any saved patterns and then save the scene, you will be prompted to
choose whether you want to save the changes to the pattern, save-as a new version of the
pattern, skip saving to leave the edit copy in place, or lose the edits.
As well as protecting against unexpected changes to a song, this behaviour also simplifies the
creation of incrementally changing versions of a pattern over the course of a number of
scenes.
Sequentix Music Systems
Cirklon Sequencer User Manual
2-15
Fill Patterns
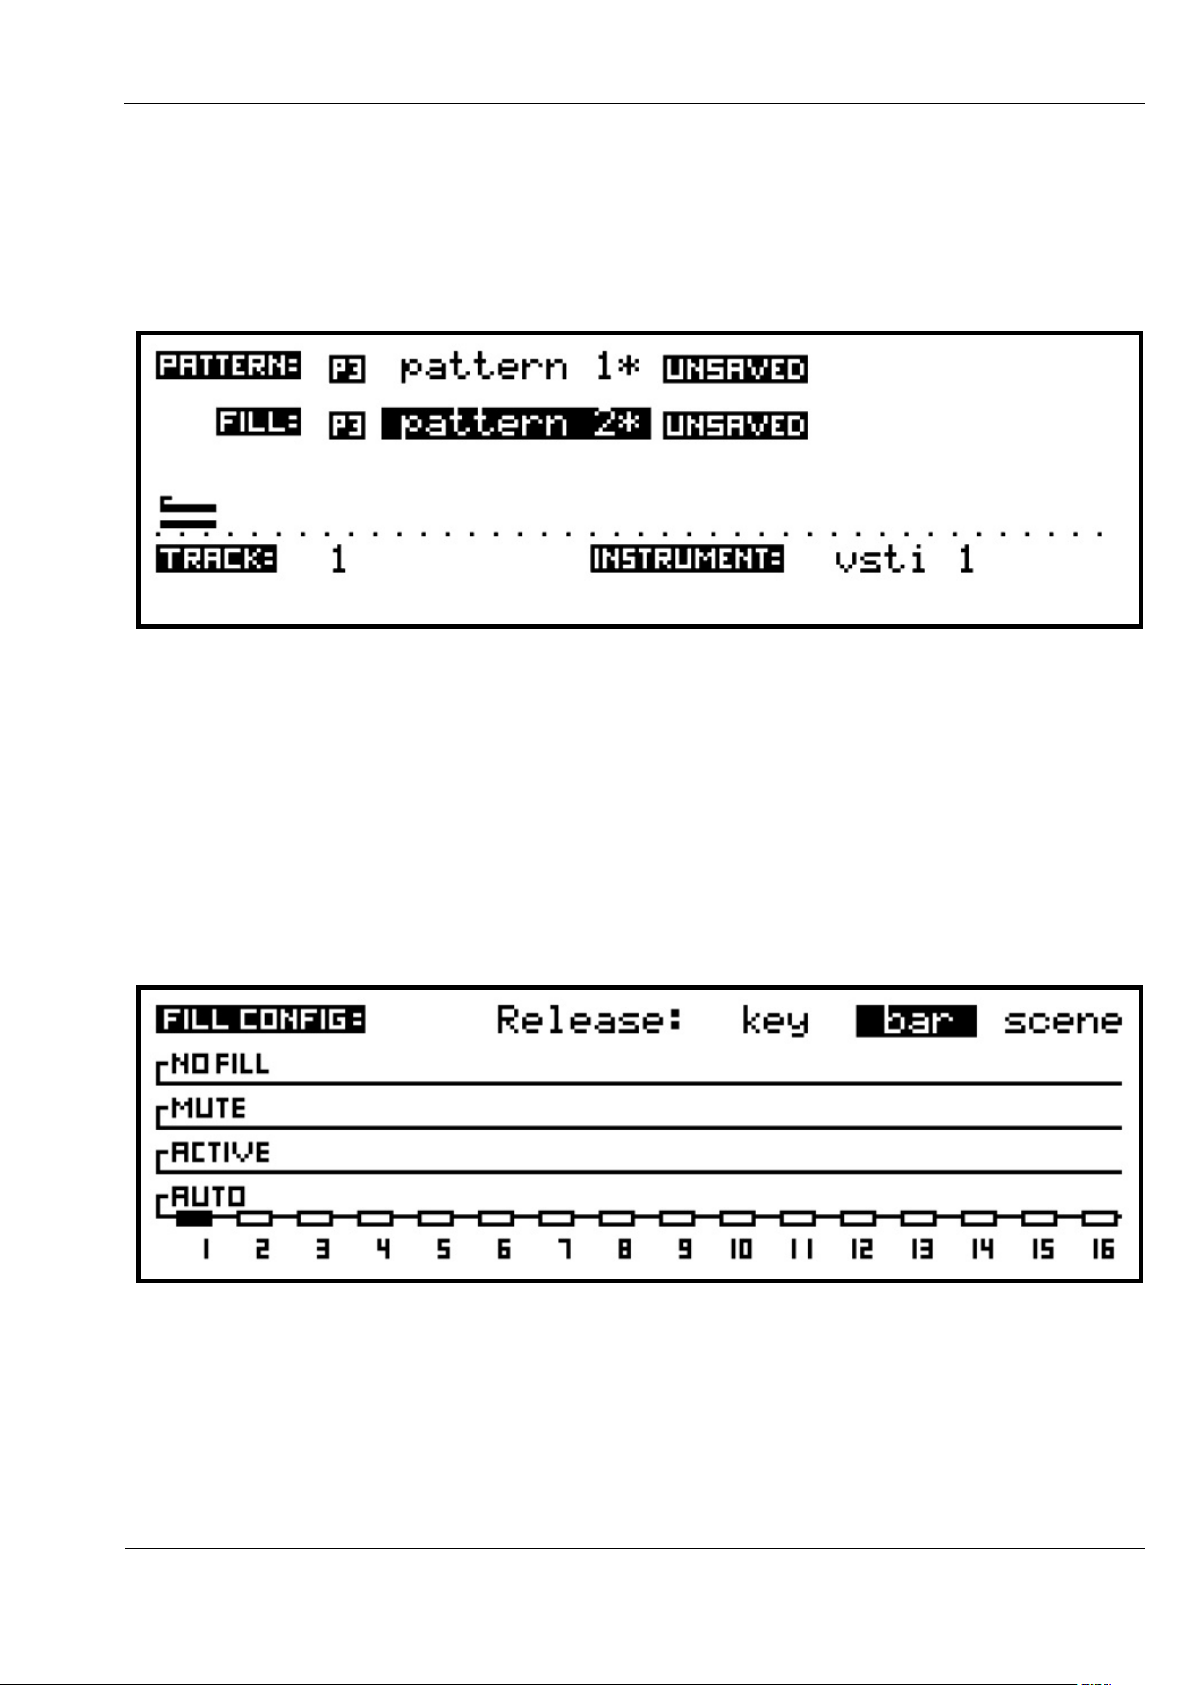
In addition to the main pattern, you may optionally assign a fill pattern to each track.
Fill patterns are selected in the same way as the main pattern, from the same pattern list, by
selecting the FILL: field.
Any track assigned a fill pattern will switch to playing that pattern during a fill-in.
A fill-in can be manually triggered while in play mode using the FILL key. Once triggered,
the FILL key will light until the fill-in completes, or turn off immediately if there are no tracks
with a fill pattern assigned. Fills will trigger continuously if you hold the FILL key.
There are options to control how each track behaves during a fill-in, and when the fill-in
should finish. These options are set on the fill config page, which is accessed by holding the
SHIFT key then pressing FILL. The fill config page looks like this:
The track numbers for each track in the current bank are shown along the bottom of the
display, with a block above.
Tracks which have a fill pattern assigned will have a filled-in block, as shown here for track 1.
The vertical position of each block on the four lines, labelled auto, active, mute or no fill shows
the fill mode for that track. Change the mode by turning the encoder above each track key.
The behaviour for each mode is as follows:

Sequentix Music Systems
Cirklon Sequencer User Manual
2-16
auto - the fill pattern will play if the track is active (un-muted)
active - the fill pattern will always play
mute - the track will be muted during a fill-on
no fill - the track will ignore the fill-in
At the top right of the fill config page, the fill release setting is shown.
This determines when the tracks will return to their main pattern after a fill has been
triggered, as follows:
key - fill patterns play only while the FILL key is held
bar - fill patterns play until the end of the next global bar
scene - fill patterns play for the rest of the current scene
Change the release option using the VALUE encoder.
Note that in pattern edit, the FILL key is assigned a different purpose, you can only trigger a
fill-in while on the SONG, SCENE or TRACK pages.
Pattern edit and real-time record will act on the fill pattern if the FILL field is selected on the
TRACK page when you enter pattern edit or record modes.
The fill pattern on the current edit track will play continually while you are editing or
recording it if the user config option “play fills in edit/record” is enabled – see the section on
“Play Mode Menu” for details of setting user config options.
 Loading...