

Page 1
8/16-Voice Polyphonic Synthesizer
Page 2

User’s Guide
Version 1.2
Feb 2019
Sequential LLC
1527 Stockton Street, 3rd Floor
San Francisco, CA 94133
USA
©2019 Sequential LLC
www.sequential.com
Page 3

Tested to Comply
With FCC Standards
FOR HOME OR OFFICE USE
This device complies with Part 15 of the FCC Rules. Operation is subject to
the following two conditions: (1) This device may not cause harmful interference and (2) this device must accept any interference received, including
interference that may cause undesired operation.
Table of Contents
A Few Words of Thanks ...............................ix
Getting Started ........................................1
Sound Banks ...........................................1
Selecting Programs ......................................2
Editing Programs ........................................2
Comparing an Edited Program to its Original State ..............3
Creating a Program from Scratch ............................ 3
Saving a Program ........................................ 4
Canceling Save ..........................................4
Naming a Program .......................................5
Working with Stacked or Split Programs ......................6
Moving to the Next Level .................................10
Connections .........................................12
Global Settings ......................................14
This Class B digital apparatus meets all requirements of the Canadian
Interference-Causing Equipment Regulations.
Cet appareil numerique de la classe B respecte toutes les exigences du
Reglement sur le materiel brouilleur du Canada.
For Technical Support, email: support@sequential.com
Oscillators ..........................................20
Oscillator Parameters ....................................21
Filter ...............................................23
Filter Envelope .......................................25
Amplier Envelope ...................................27
Auxiliary Envelope ...................................29
Low Frequency Oscillators. . . . . . . . . . . . . . . . . . . . . . . . . . . . .31
Modulation ..........................................33
Modulation Parameters ...................................34
Modulation Examples ....................................34
Page 4

Effects. . . . . . . . . . . . . . . . . . . . . . . . . . . . . . . . . . . . . . . . . . . . . .36
Effects Parameters ......................................38
Arpeggiator .........................................40
Arpeggiator Beat Sync ...................................41
Arpeggiator “Momentary Sustain” Mode ...................... 42
MIDI Note Output from the Arpeggiator and Sequencer ..........42
Arpeggiator Parameters ..................................43
Clock Parameters .......................................44
Sequencer ..........................................45
Changing Presets While the Poly Sequencer is Running ......... 46
Programming the Polyphonic Sequencer .....................47
Editing a Polyphonic Sequence ............................48
Copying a Polyphonic Sequence Between Layers .............. 49
Programming the Gated Sequencer. ..............................50
Using Slew ............................................51
Sequencer Parameters ................................... 52
Clock Parameters .......................................53
Unison .............................................54
Using Chord Memory ....................................55
Master Volume/Program Volume ........................57
Exporting Programs and Banks .........................67
Importing Programs and Banks .........................68
Calibrating the Prophet Rev2 ...........................69
Calibrating the Oscillators and Filters ........................ 69
Calibrating the Pitch and Mod Wheels ..........................69
Resetting the Global Parameters ...........................70
Using USB ..........................................70
Appendix A:
Modulation Sources ..................................72
Appendix B:
Modulation Destinations ...............................73
Appendix C: Alternative Tunings ........................74
Appendix D: Troubleshooting and Support ...............78
Troubleshooting ........................................78
Contacting Technical Support ..............................80
Warranty Repair ........................................81
Pan Spread ..........................................58
Transpose. . . . . . . . . . . . . . . . . . . . . . . . . . . . . . . . . . . . . . . . . . .58
Hold ................................................59
Glide ...............................................59
Pitch and Mod Wheels ................................61
Pitch Wheel ............................................ 61
Modulation Wheel ....................................... 62
Adding Aftertouch ....................................62
Appendix E: MIDI Implementation .......................82
MIDI Messages ......................................... 83
NRPN Messages .......................................87
Control NRPN Data .....................................95
SysEx Messages .......................................95
Packed Data Format ....................................98
Page 5

SOUND DESIGN
Joseph Akins, Rory Dow, Peter Dyer, Josh Eustis, Peter Gorges, Mike Hiegemann,
Tim Koon, Kurt Kurasaki, Kevin Lamb, Cord Mueller, Drew Neumann, Bob Oxley,
Francis Preve, Lorenz Rhode, Nick Semrad, Huston Singletary, James Terris, and
Mitch Thomas.
A Few Words of Thanks
Thank you for purchasing the Prophet Rev2, the successor to our popular Prophet ’08
synthesizer, which has been a workhorse in the music industry for nearly 10 years.
As enduringly popular as the Prophet ’08 has been, we felt it was time to update it
with new technology and new features.
THE SEQUENTIAL CREW
Art Arellano, Fabien Cesari, Bob Coover, Carson Day, Chris Hector, Tony Karavidas,
Mark Kono, Justin Labrecque, Andy Lambert, Michelle Marshall, Andrew McGowan,
Joanne McGowan, Julio Ortiz, Tracy Wadley, and Mark Wilcox.
Special thanks to Robert Rich for the alternative tunings content.
To that end, we designed the Prophet Rev2 by enhancing and improving everything we could about the original Prophet ’08 and, in many cases, doubling its
power. We took the classic sound of the Prophet ’08’s DCO and Curtis-lter-based
voice and added powerful new features that the original never had, such as waveshape modulation, digital effects, an expanded modulation matrix, a polyphonic step
sequencer (in addition to its original gated step sequencer), a more intuitive user interface, USB connectivity, and more. The result is a modern classic revisited.
Creating the Prophet Rev2 has been a very satisfying adventure in making a good
synth even better. Create some great sounds with it!
Cheers,
Page 6

Page 7
Getting Started
OSC 1 FREQ
SYNC
FINE TUNE
SHAPE
SOURCE
DESTINATION
SHAPE MOD SUB OCTAVE
OSC MIX
CUTOFF
PROGRAM
BANK
PARAMETER
VALUE
RESONANCE ENV AMOUNT VELOCITY
Edit Layer B
Stack A+B
MISC PARAMS
show
Split A | B
Compare
Write
Global
U1 P1
Filter Sweep
Osc 1 Freq
C2
120
Phones Left
MAIN/A OUTPUT B OUTPUT
Right Left Right Pedal/CV Sustain Sequencer MIDI Thru MIDI Out MIDI In USB On/OffAC In
KEY AMOUNT AUDIO MOD
SHAPE MOD
NOISE
OSC SLOP
1 2
Triangle
Sawtooth
Rev Saw
Square
Random
SHAPE 4 POLE DELAY ATTACK DECAY SUSTAIN RELEASE
Sawtooth
Saw+Tri
Triangle
Pulse
SHAPE
KEY SYNC
CLK SYNC
Sawtooth
Saw+Tri
Triangle
Pulse
OSC 2 FREQ
FREQUENCY
AMOUNTDESTINATION
PITCH MOD
1
2
3
4
FINE TUNE
OSCILLATORSLOW FREQUENCY OSCILLATORS LOW-PASS FILTER
AUXILIARY ENVELOPEEFFECTCLOCK ARPMODULATION
DESTINATIONMASTER VOLUME
ATTACK
ENV AMOUNT
DECAY
SELECT
AMOUNT
RATE
GLIDE
HOLDUNISON
VELOCITY
SUSTAIN
DELAY
TAP TEMPO ON/OFF
MODEBPM DIVIDE
RELEASE
SELECTON/OFF
CLK SYNC
MIX
PARAM 1 PARAM 2
AMPLIFIER
PAN SPREAD
ATTACK
ENV AMOUNT
DECAY
VELOCITY
SUSTAIN
DELAY
RELEASE
TYPE MODE
rest
DESTINATION
tie
RECORD
Gated
Poly Seq
Only
TRACK
Poly
SEQUENCER
TRANSPOSE
Down
Up
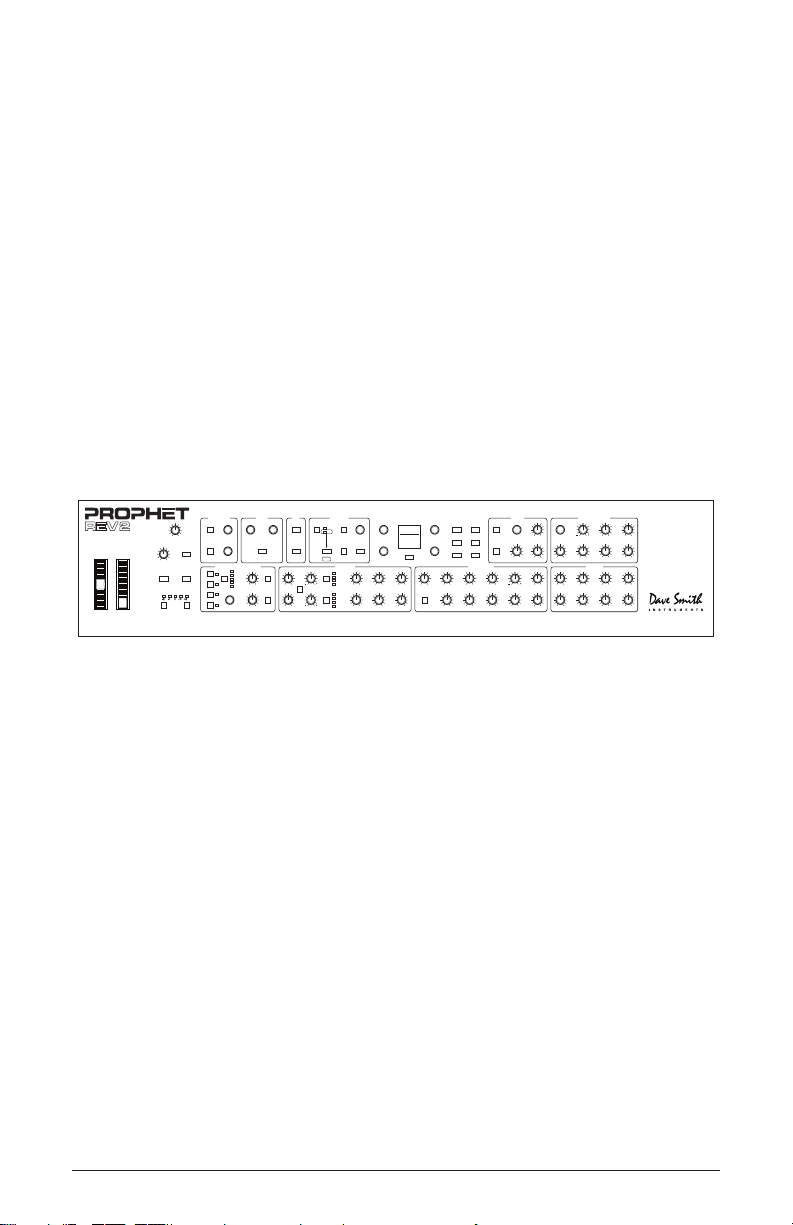
The Prophet Rev2 is a 8/16-voice polyphonic synthesizer with analog
oscillators, lters, and ampliers. The majority of its sound-shaping
controls are located on its front panel, putting a tremendous amount of
power and versatility within easy reach.
This chapter of your user’s guide provides a brief overview of the Rev2,
including such essential tasks as how to edit and save sounds. Later
sections of this manual explain each of the Prophet Rev2’s parameters.
Don’t hesitate to dive right in and start turning knobs and pressing
buttons before you begin reading. Start exploring and let your ears guide
you!
Prophet Rev2 front panel
Sound Banks
The Prophet Rev2 contains a total of 1024 programs. Banks U1-U4 are
user banks that can be overwritten. Banks F1-F4 are factory banks that
are permanent. As shipped, user banks U1-U4 are identical to permanent
factory banks F1-F4. Each bank has 128 programs (x 4 banks = 512
programs each). You can edit the programs of either bank, but you can
only save them to user banks U1-U4.
Why do we include banks of non-rewritable permanent sounds? So
that they are always available, to be used as is, or as templates for new
sounds of your own. It’s easy to design a new sound by tweaking an
existing one.
Prophet Rev2 User’s Guide
Getting Started
1
Page 8

Edit Layer B
Stack A+B
Split A | B
Compare
Write
Global
U1 P1
AUXILIARY ENVELOPEEFFECTCLOCK ARPMODULATION
DESTINATIONMASTER VOLUME
ATTACK
ENV AMOUNT
DECAY
VELOCITY
SUSTAIN
DELAY
RELEASE
SELECTON/OFF
CLK SYNC
MIX
PARAM 1 PARAM 2
Filter Sweep
Osc 1 Freq
C2
show
MISC PARAMS
120
PROGRAM
BANK
Comparing an Edited Program to its Original State
When editing a program, it is often useful to compare its edited state
to its original state to evaluate your edits. Alternatively, before saving
a program to a new location you may want to check the program in the
target location before you overwrite it.
To compare an edited program to a saved version:
1. Edit a program.
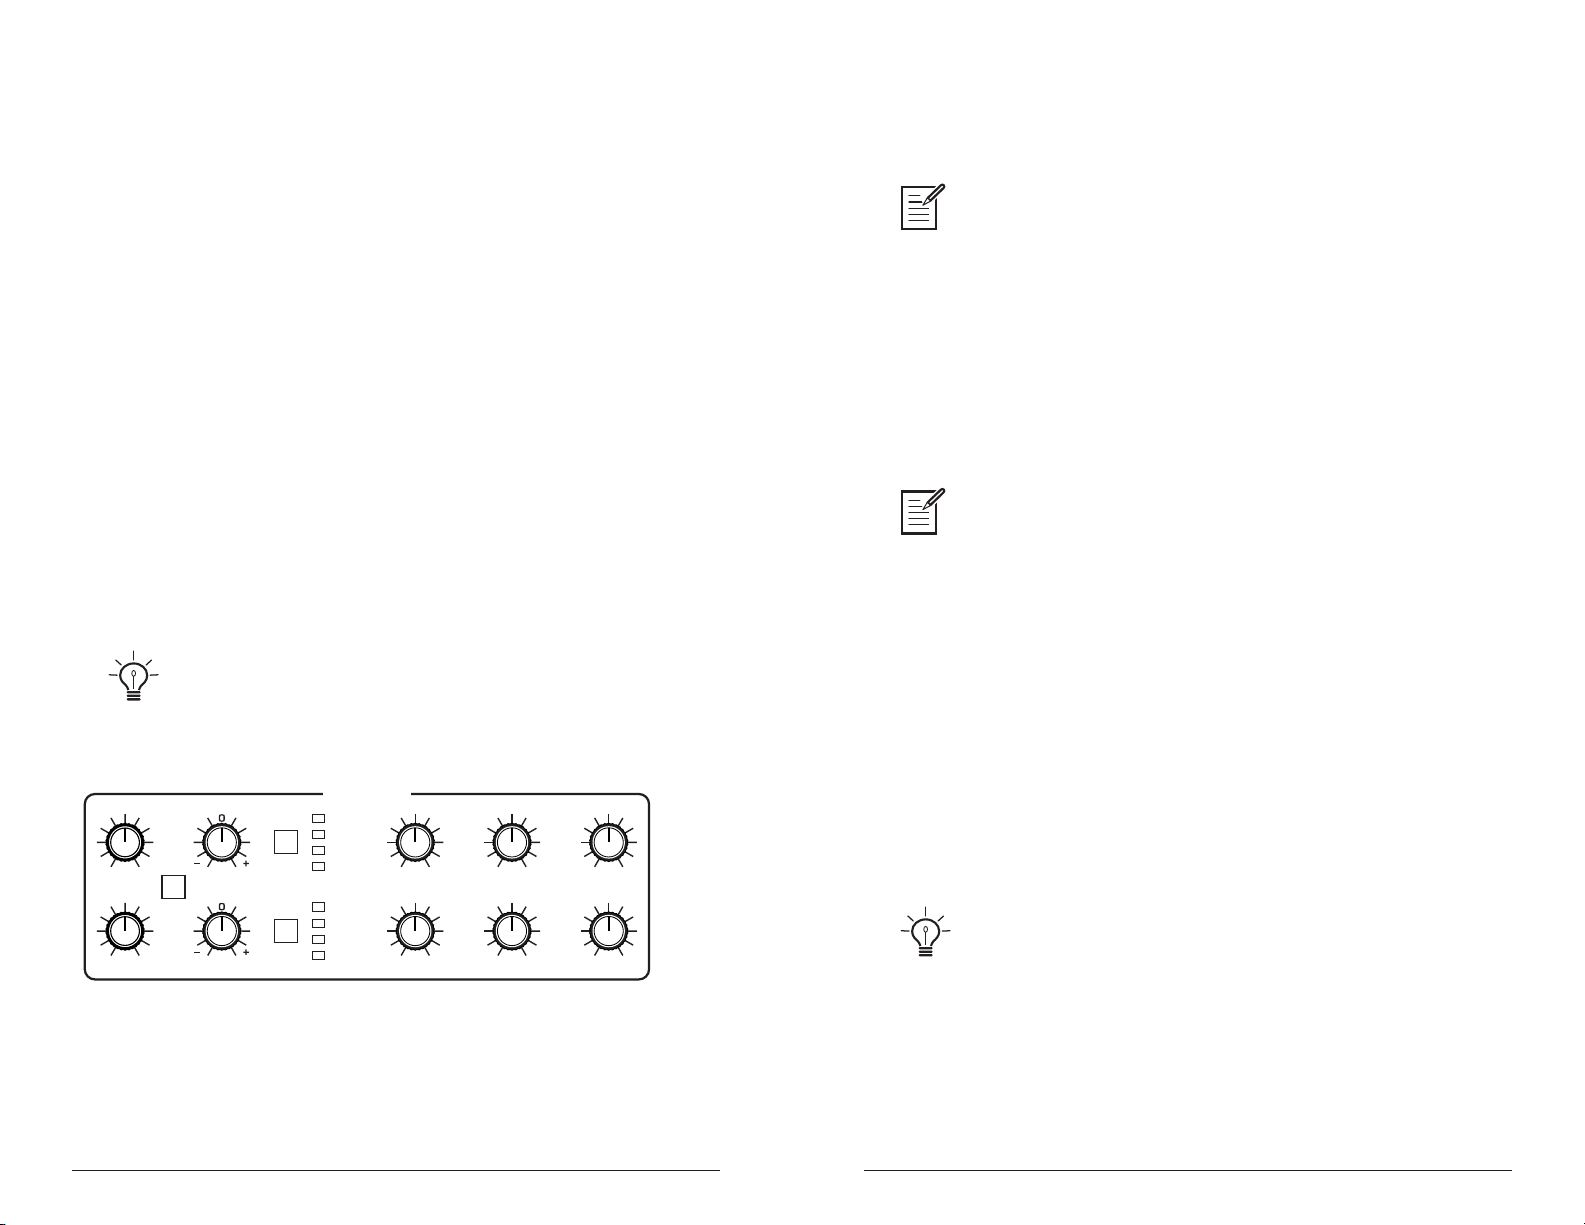
Program and Bank controls
Selecting Programs
Use the bank and program knobs to select and recall programs.
To choose a program:
1. Turn the bank knob to select the bank you want.
2. Turn the program knob to select a program within that bank.
Editing Programs
Because the majority of the sound-shaping controls of the Prophet Rev2
appear on its front panel, editing an existing program is simple: just turn a
knob and listen to its effect. Keep turning knobs and pressing buttons. If you
like what you’ve created, save the program. (See “Saving a Program” on
page 4.)
The rotary controls on the front panel are a mixture of “endless” rotary encoders
(which have no position indicator) and potentiometers or “pots,” which have a position
indicator and a nite travel range from left to right. You can choose between three
different modes that determine how the synth reacts when you edit its parameters with
a pot. For details, see “Pot Mode” on page 16.
2. Press the compare button. It lights up, indicating compare mode.
3. Play the keyboard to hear the saved version of the sound.
4. To disable the compare function and return to the edited sound, press
the compare button again to turn it off. Programs can’t be written while
in compare mode.
It’s also useful to be able to check the value of a parameter for reference.
Normally, to make a parameter value appear in the display, you have to
turn the parameter’s knob — which will change the parameter value. But
there is a way to do this without changing the value:
To check the value of a parameter without changing it:
1. Press and hold the misc parameter button.
2. Turn any parameter knob. The value appears in the display.
3. To check additional parameter values, continue holding d own the
misc parameter button and turn other knobs to check their value.
Creating a Program from Scratch
An existing program can be very useful as a jumping off point for new
sounds. But it’s also useful (and educational) to create a new sound from
scratch. The Prophet Rev2 makes this easy by providing a “basic preset”
that you can quickly recall at any time. This preset is very simple, with a
single oscillator as its basis.
To recall the basic preset:
2
Sequential Prophet Rev2 User’s Guide
• In the transpose section, press and hold the down and up buttons simultaneously, then press the hold button.
Getting Started
3Getting Started
Page 9

To recall the basic preset using the Global Menu:
1. Press the global button.
2. Use the parameter knob to select basic program.
Comparing Before You Save
Before saving a program to a new location, it’s a good idea to listen to the
program in the target location to make sure you really want to overwrite it.
3. Press the write button.
Saving a Program
If you’ve created a sound that you like, you’ll probably want to save it.
Saving a program overwrites a previously saved program. Sound designers often save many incremental versions of a program as they continue
to rene it. These intermediate versions often make good jumping off
points for new sounds.
To save a program to the same preset location:
1. Press the write button. Its LED begins blinking.
2. Press the write button again. Its LED stops blinking and the program is
saved.
To save a program to a different location:
1. Press the write button. Its LED begins blinking.
2. Turn the bank or program knobs to select a new location. You can only
save to banks U1-U4.
3. Press the write button again. Its LED stops blinking and the program is
saved.
To evaluate a program before you overwrite it:
1. Get ready to save by pressing the write button. It starts ashing.
2. Press the compare button. Its LED lights up.
3. Use the bank and program knobs to navigate to the sound you want to
compare and play the keyboard to hear the sound.
4. To disable the compare function and go back to the edited sound, press
the compare button again to turn it off. (Programs can’t be written
while in compare mode.)
5. If you want to save the edited sound, the write button is still ashing
and ready to save, so navigate to a location with the bank and program
knobs and press write. The sound is saved.
6. Alternatively, if you want to cancel saving and continue editing, press
the global button. Saving is canceled.
Naming a Program
You can rename a program when the write command is active.
To rename a program:
1. Press the write button. Its LED begins blinking.
Saving a program saves any edits to programs on both Layer A and Layer B.
Canceling Save
Sometimes you may want to cancel saving a program before you commit.
To cancel the save process before you commit:
• If the write button LED is ashing, press the global button. The write
LED stops ashing and saving is canceled. You can return to editing if
you want.
4
Sequential Prophet Rev2 User’s Guide
2. Turn the parameter knob to move the cursor forward or backward
3. Turn the value knob to select a character.
4. When you’re done naming the program, press the write button again.
Its LED stops blinking and the program is saved.
Getting Started
5Getting Started
Page 10

Working with Stacked or Split Programs
The Prophet Rev2 is bi-timbral, meaning that it can produce two
different sounds/programs at the same time, either by stacking them, or
by allowing you to split the keyboard and assign one sound to the upper
section of the keyboard and a different sound to the lower section of the
keyboard.
Stacked Programs
Stacking two programs allows you to create extra fat sounds, since you
can have two completely different programs layered on top of each other.
Polyphony is halved in Stack mode, so if you have a 16-voice Prophet
Rev2, in Stack mode, it functions as an 8-voice because it uses two
voices for each key played.
The two layers are referred to as Layer A and Layer B. By default, Layer
A is always active when you recall a program. If either the split a|b
button or the stack a+b button is lit, then Layer B is also active.
Each Layer can have different Effect, Unison, Arpeggiator, and
Sequencer settings. This allows for some very interesting combinations
of sounds.
As you scroll through various factory programs, you can tell which are
stacked and which are split. On stacked sounds, the stack a+b button is
lit. On split sounds, the split a|b button is lit.
All factory programs have a “B” layer, even if that layer isn’t currently enabled.
To hear Layer B in isolation, press the edit layer b button and disable stack or split (if
active) by turning off the stack a+b btutton or split a|b button. Pressing edit layer b a
second time enables Layer A again.
Button is lit when
split is active
To turn Stack mode on:
• If it’s not currently lit, press the stack a+b button. The button becomes
lit. The program on Layer B is stacked with the program on Layer A.
Polyphony is halved since two voices are used per note.
To turn Stack off:
• If it’s currently lit, press the stack a+b button. The button becomes
unlit. Only the program on Layer A is heard.
To edit Layer B:
1. Press the edit layer b button. Layer B editing is enabled.
2. Change any parameters to change the sound of Layer B.
3. Press the edit layer b button again to turn off Layer B editing.
To edit Layer A and B simultaneously:
1. With Stack mode on (stack a+b button is lit) press and hold the edit
layer b button. It begins ashing, indicating that you are in “Link”
mode.
2. Change any parameters. The parameters are changed on both Layer A
and Layer B.
PROGRAM
BANK
Split and Stack buttons
6
Global
Write
Compare
Split A | B
Stack A+B
Edit Layer B
Button is lit when
stack is active
Press to enable
Layer B editing
3. To turn off Link mode, press the edit layer b button again. It stops
ashing.
Saving a program saves any edits to programs on both Layer A and Layer B.
Sequential Prophet Rev2 User’s Guide
Getting Started
7Getting Started
Page 11

To copy Layer A to Layer B:
1. Press both the split a|b button and the stack a+b button simultaneously.
2. Turn the parameter knob and select copy layer a to b.
3. Press the write button. Layer A is copied to Layer B.
Split Programs
In split mode, playing a key on the left side of the keyboard will play the
Layer A sound and playing a key on the right side will play the Layer B
sound. Polyphony is allocated equally between the two sounds, with half
of the available voices on Layer A and half on Layer B.
To copy Layer B to Layer A:
1. Press both the split a|b button and the stack a+b button simultaneously.
2. Turn the parameter knob and select copy layer b to a.
3. Press the write button. Layer B is copied to Layer A.
To swap Layer A and Layer B:
1. Press both the split a|b button and the stack a+b button simultaneously.
2. Turn the parameter knob and select swap a and b.
3. Press the write button. Layer A and B are swapped.
The specic key that starts the Layer B sound is called the split point,
and is saved with the program.
All factory programs have a “B” layer, even if that layer isn’t currently enabled.
To turn Split on:
• If it’s not currently lit, press the split a|b button. The button becomes
lit. The left side of the keyboard plays the Layer A sound and the right
side of the keyboard plays the Layer B sound.
To turn Split off:
• If it’s currently lit, press the split a|b button. The button becomes unlit.
Only the program on Layer A is heard across the full range of the
keyboard.
To set the split point:
1. Make sure the split a|b button is lit.
2. Press and hold the split a|b button and press a key on the keyboard.
This sets the start point for Layer B.
3. Release the split a|b button.
To swap Layer A and Layer B sounds:
1. Press both the split a|b button and the stack a+b button simultaneously.
2. Turn the parameter knob and select swap a and b.
3. Press the write button. Layer A and B are swapped.
8
Sequential Prophet Rev2 User’s Guide
Getting Started
9Getting Started
Page 12

Moving to the Next Level
Before you start exploring the sound creation capabilities of the Prophet
Rev2 we’d like to point you toward a few things that will help you tailor
the instrument to your needs.
First, check out the Global Settings section of this manual. Read about
Pot Modes and determine which works best for you when you’re editing
sounds. You’ll also nd information about MIDI setup. Read this to more
effectively integrate the Prophet Rev2 into your MIDI rig. To get the
most out of the Prophet Rev2’s live performance capabilities, read up on
using a footswitch or expression pedal.
And nally, be on the lookout for tips and notes scattered throughout
this manual to gain a better working knowledge of the Prophet Rev2.
The better you know it, the more you’ll get out of it. We wish you many
hours of musical exploration!
10
Sequential Prophet Rev2 User’s Guide
Getting Started
11Getting Started
Page 13
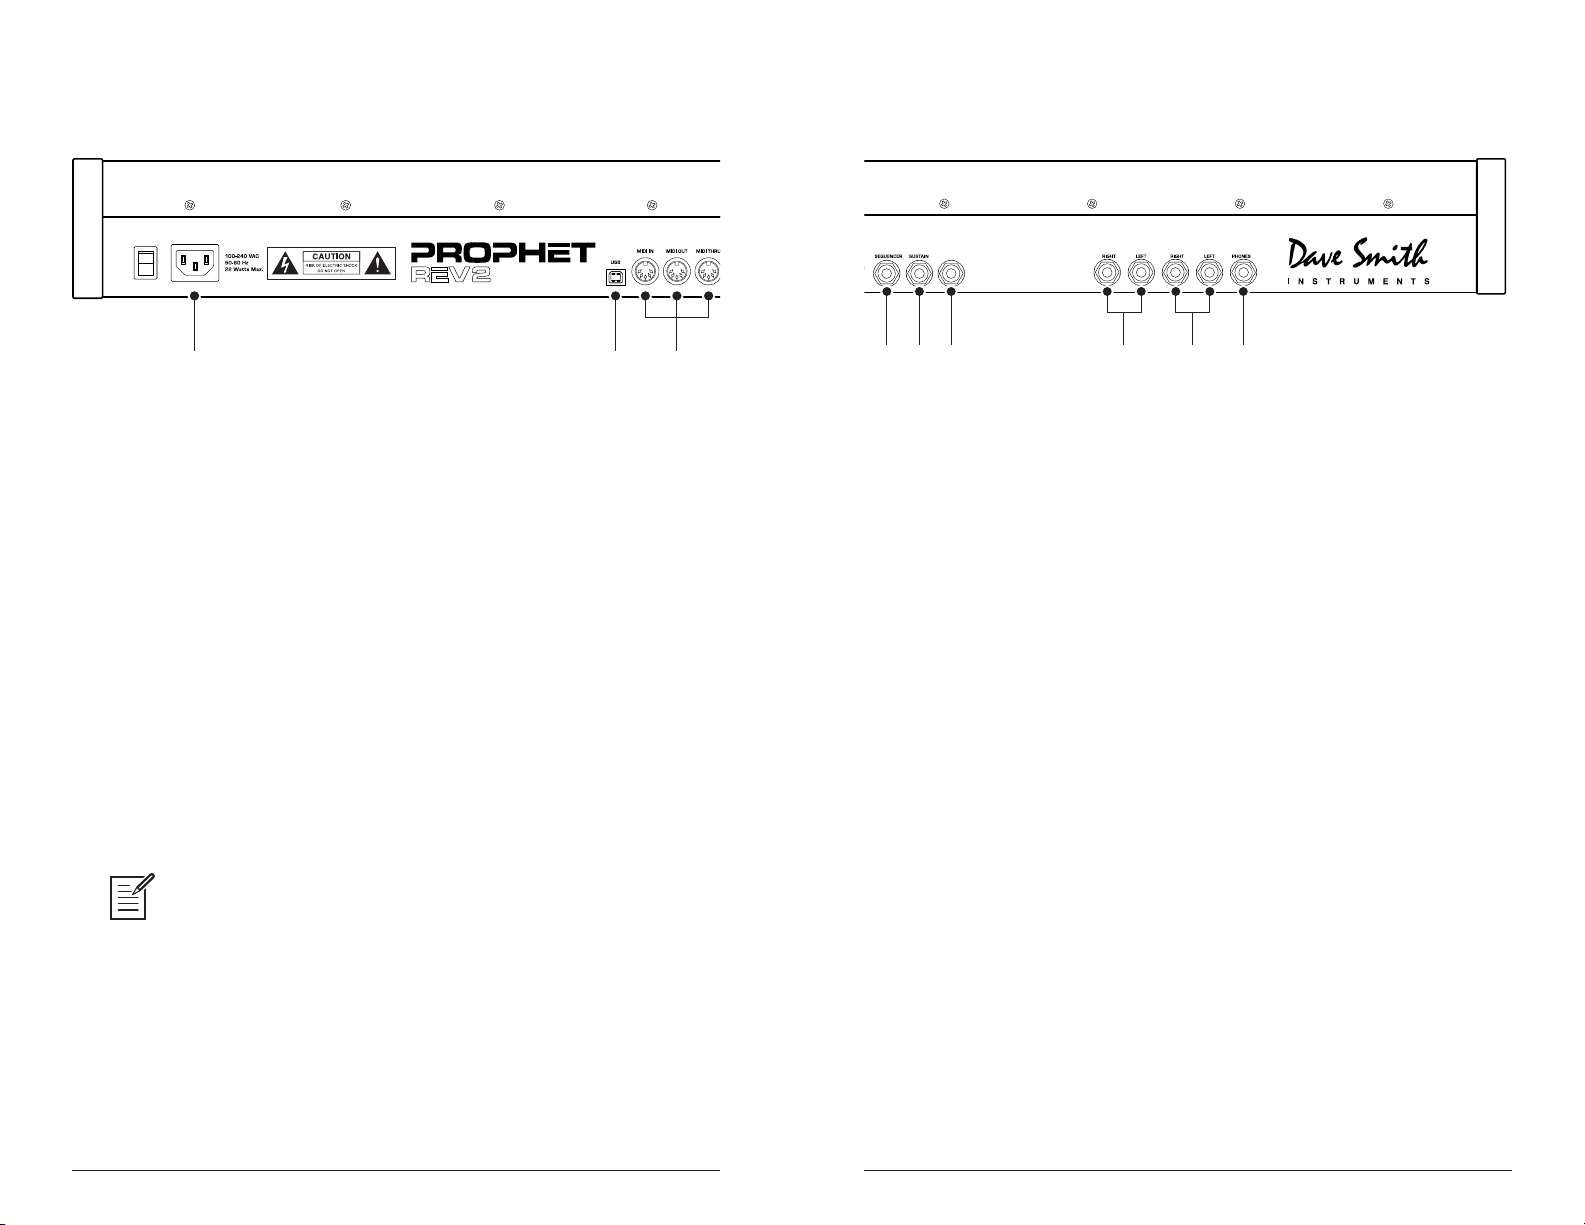
Connections
4 5 6 9
PEDAL/CV
MAIN A OUTPUT
7 8
B OUTPUT
1 2 3
1. AC Power Connector—Accepts a standard, grounded IEC power
cord. Operates over a range of 100 to 240 volts and 50 to 60 Hz.
2. USB—For bidirectional MIDI communication with a computer. The
Prophet Rev2 is a Class Compliant USB device and does not require
additional drivers when used with Mac OS or Windows. See “Using
USB” on page 70 for more information.
3. MIDI In, Out, and Thru—Standard 5-pin MIDI DIN connectors.
4. Sequencer—Accepts a momentary, normally open or normally closed
footswitch to turn the sequencer or arpeggiator on and off. Alternatively, an
audio signal connected to this jack can be used to either control sequencer/
arpeggiator playback, or to gate the lter and amplier envelopes while
notes are held. See Pedal/CV on page 13 for more information about
choosing the appropriate mode for these behaviors.
PEDAL/CV
4 5 6 9
B OUTPUT
MAIN A OUTPUT
7 8
6. Pedal/CV—Accepts a standard expression pedal that has a variable
resistor on a TRS (tip-ring-sleeve) ¼ inch phone plug. Once connected,
you can use the modulation matrix to route the pedal to control a variety
of things such as volume or lter cutoff frequency to add expressiveness
to live performance.
7. B Audio Outputs—Unbalanced, ¼ inch audio outputs. Connect audio
cables to these jacks if you want separate stereo outputs for Layer B. If
no cables are connected, Layer B is output on the Main A Outputs.
8. Main/ A Audio Outputs—Unbalanced, ¼ inch audio outputs. These
are the main stereo outputs for the synth. They carry Layer A and also
Layer B if no cables are connected to the “B Audio Outputs” jacks.
9. Headphones—A ¼ inch stereo headphone jack. Headphone volume is
controlled by the master volume knob on the front panel.
Audio signals used to drive the arpeggiator/sequencer should not exceed 5
volts peak-to-peak.
5. Sustain—Accepts a momentary, normally open or normally closed
footswitch to control sustain.
12
Sequential Prophet Rev2 User’s Guide
Connections
13Connections
Page 14

Global Settings
Press the global button and use the parameter and value knobs to scroll
through and set parameters such as Master Tune and MIDI Channel that
affect all programs globally.
1. Master Coarse Tune: -12…+12—Master Transpose control, 0 is
centered. Steps in semitones up to one octave up (+12) or down (-12).
2. Master Fine Tune: -50…+50—Master Fine Tune control; 0 centered.
Steps in cents as much as a quarter-tone up (+50) or down (-50).
3. MIDI Channel: All, 1…16—Selects which MIDI channel to send and
receive data, 1 to 16. Choosing all receives on all 16 channels.
4. MIDI Clock Mode: Sets the synthesizer’s ability to send and receive
MIDI clock messages:
• Off: MIDI Clock is neither sent nor received
• Master: MIDI Clock is sent, but not received.
• Slave: MIDI Clock is received, but not sent.
• Slave Thru: MIDI Clock is received and passed to MIDI Out
• Slave No S/S (no start and stop): Receives MIDI Clock but does not
respond to MIDI Start or Stop command.
7. MIDI Param Receive: Off, CC, NRPN—Sets the method by which
parameter changes are received via MIDI. As with transmission, NRPNs
are the preferred method.
8. MIDI Control Enable: Off, On—When On, the synth will respond to
MIDI controllers, including Pitch Wheel, Mod Wheel, Pedal, Breath,
Volume, and Expression.
9. MIDI Program Enable: Off, On—When On, the synth will respond
to received MIDI Program Change and other SysEx messages, and will
transmit them (when prompted) to the MIDI Out. See “SysEx Messages”
on page 95 for details.
10. MIDI Program Send: On, Off—When enabled, selecting a program
on the Rev2 will select a program with a corresponding number on an
external synthesizer or device that is congured to accept MIDI Program
Change commands.
11. MIDI Sysex Cable: None, MIDI Port, USB—Sets the port, MIDI or
USB, by which System Exclusive data will be transmitted and received.
12. MIDI Out Select: Off, MIDI, USB, MIDI+USB—Sets the port by which
MIDI data will be transmitted.
In Slave and Slave Thru modes, if no MIDI clock is present at the selected
input, the arpeggiator and sequencer will not function.
5. MIDI Clock Cable: MIDI Port, USB—Sets the port, MIDI or USB, by
which MIDI clocks are received.
6. MIDI Param Send: Off, CC, NRPN—Changes to the values of front
panel controls are transmitted via MIDI as Non-registered Parameter
Number (NRPN) controllers or as Continuous Controllers (CC). Transmission of parameters can also be turned off. See “Appendix E: MIDI
Implementation” on page 82 for details.
NRPNs are the preferred method of parameter transmission, since they cover
the complete range of all parameters, while CCs are limited to a range of 128.
14
Sequential Prophet Rev2 User’s Guide
13. MIDI Arp+Seq: Off, On—When On, the synth’s arpeggiator and
sequencer output MIDI note numbers. You can use this feature to drive
other MIDI-equipped devices such as synthesizers and drum machines.
14. Arp Beat Sync: Off, Quantize—When set to quantize, Arpeggiator
note playback occurs only on the beat — regardless of when you press a
key on the keyboard.
15. Multi Mode: On, Off—Multi Mode allows separate MIDI control of
voices 1-8 and voices 9-16 on 16-voice systems. (On 8-voice systems
this is voices 1-4 and voices 5-8.) This enables independent, bi-timbral
control of the Prophet Rev2.
Global Settings
15Global Settings
Page 15

When Multi Mode is on, the Prophet Rev2 responds to MIDI data on two
consecutive MIDI channels — the base channel (selected in the Global
menu) and the next highest channel. The base channel controls voices 1-8
(or 1-4 on 8-voice systems) and the other channel controls voices 9-16
(or 5-8 on 8-voice systems). Notes, program changes, and other MIDI
data received on the specied channels provide independent control of
the two parts.
Note that a program change needs to be sent to each of the two channels when setting up Multi Mode. Only Layer A of the selected program
is loaded. There are no stacks or splits in Multi Mode. Use CCs or
Layer A NRPNs for automation of parameters. Program Layer B data is
completely ignored in Multi Mode
16. Local Control: Off, On—When on (the default), the keyboard and
front panel controls directly affect the Prophet Rev2. When off, the
controls are transmitted via MIDI but do not directly affect the “local”
synth (that is, the Prophet Rev2). This is primarily useful for avoiding
MIDI data loops that can occur with some external sequencers.
17. Velocity Curve: Curve 1... Curve 8—Sets one of the eight velocity
curves for the keyboard to adjust the velocity response to your playing
style.
18. Pressure Curve: Curve 1, Curve 2, Curve 3, Curve 4—Sets one of four
pressure curves for the keyboard to adjust the aftertouch to your playing style.
When set to relative, changes are relative to the stored setting. In Rela-
tive mode, the full value range is not available until either the minimum
or maximum value and the respective lower or upper limit of the pot’s
travel is reached.
For example, the Resonance parameter has a value range of 0 to 127.
Let’s say the physical position of the Resonance pot is the equivalent of
a value of 100. If you switch to a program that has a stored Resonance
setting of 63 and turn the pot all the way up, it will only go to 90. To get
to the maximum value of 127, you rst have to turn down until the value is
at the other extreme and the pot is at the limit of its travel (in this case, 0
and fully counter-clockwise, respectively).
In Passthru mode, turning the pot has no effect until after the edited value
equals the preset value (that is, until the edited value “passes through”
the stored value).
Jump mode uses an absolute value based upon the position of the pot
when edited: turn a pot and the value jumps immediately from the stored
value to the edited value.
21. Alt Tuning: Equal Temperment, 1…17—Selects one of the Prophet
Rev2’s built-in tunings. Set to 1. equal temperment, the tuning is standard,
chromatic tuning. Choosing 2 through 16 selects an alternative, non-chromatic, non-Western scale that can be used to emulate ethnic instruments or in
other creative ways.
19. Mono/Stereo: Stereo, Mono—The Prophet Rev2 defaults to stereo
operation. When set to Mono, this parameter defeats all pan settings and
modulation, effectively making each of the outputs a mono output.
20. Pot Mode:
Prophet Rev2’s front
Relative, Passthru, Jump—The rotary controls on the
panel are a mixture of “endless” rotary encoders and
potentiometers or “pots.” The pots are identiable by their lined knobs
and the fact that they have about 300° of travel. There are three pot
modes to determine how the synth reacts when the programmable parameters are edited. (Master volume is not programmable, so these modes
don’t apply.)
16
Sequential Prophet Rev2 User’s Guide
See “Appendix C: Alternative Tunings” on page 74 for a description of
each tuning. Additional tunings can be imported as a SysEx message. For
more information, see Appendix A.
Global Settings
17Global Settings
Page 16

22. Screen Saver: On, Off—The Prophet Rev2 display has a built-
in screen saver that puts it to sleep when not in use. This features is
designed to prolong the life of the display and we recommend using it. If,
however, you want to disable this feature you can do so by setting it to Off.
23. Seq Pedal Mode: Normal, Trigger, Gate, T-G—Selects the mode for
signals received on the rear-panel sequencer jack.
• With normal selected, a footswitch will start sequencer playback.
• With trig selected, an audio signal connected to the sequencer jack will
step the sequencer when the sequencer’s play button is on.
• With gate selected, an audio signal connected to the sequencer
jack will trigger and gate the envelopes while you hold a note or
chord. Additionally, turning on the sequencer or arpeggiator will add
sequencer or arpeggiator playback — but controlled by the Prophet
Rev2’s clock bpm and value settings and not the audio trigger.
• With t-g (trigger+gate) selected, an audio signal connected to the
sequencer jack will trigger and gate the envelopes while you hold a
note or chord. Additionally, pressing the sequencer’s play button will
also add synchronized sequencer playback.
24. Foot Assign: Breath CC2, Foot CC4, Exp CC11, Volume, LPF Full,
LPF Half—Sets the modulation destination for the rear-panel Pedal/CV
input.
25. Pedal Polarity: Normal, Reversed—There are two types of momen-
tary footswitches, normally open and normally closed. Either type can
be used with the Sustain switch input. This setting allows you to accommodate both models in case yours behaves in a way that is the opposite
of what you expect due to its polarity. (Sustain is on until the footswitch
is pressed and then it turns off, which is the opposite of the expected
behavior.) Connect your pedal and choose the appropriate setting based
on its behavior.
26. Sustain Arp: Arp hold, Sustain—Sets the function for the Sustain
pedal input the rear of the synthesizer. Selecting arp hold and pressing
the sustain pedal causes the arpeggiator to hold the current arpeggio as
if you had pressed the hold button on the front panel. Selecting sustain
chooses normal sustain pedal operation. Selecting hold mom causes the
arpeggiator to sustain (even when you release the notes on the keyboard)
for as long as you hold down the pedal. Releasing the Sustain pedal stops
the arpeggiator.
27. Save Edit B: Off, On—When off, disables saving of Layer B when
you save a program. When on, both Layer A and Layer B of the program
are saved .
28. Calibrate Wheels—Calibrates the Pitch and Mod wheels.
29. Basic Program—Loads a basic, template program.
30. Calibrate—Calibrates the oscillators and lters. You shouldn’t need
to do this under normal circumstances since the lters are calibrated at
the factory and generally don’t require re-calibration or re-tuning.
31. Reset Globals—Sets the global parameters to the factory default
settings.
32. Dump Program—Transmits the current program in SysEx format via
the selected MIDI port. Dumped programs will load back into the same
location in memory when imported back into the synth via MIDI.
33. Dump Bank—Transmits the current bank in SysEx format via the
selected MIDI port. (See item 11, “MIDI Sysex Cable.”) Dumped banks
will load back into the same location in memory when imported back
into the synth via MIDI.
34. Dump All Banks—Transmits all four User Banks in SysEx format
via the selected MIDI port. (See item 11, “MIDI Sysex Cable.”) Dumped
banks will load back into the same location in memory when imported
back into the synth via MIDI.
18
Sequential Prophet Rev2 User’s Guide
Global Settings
19Global Settings
Page 17
33. Dump Scale—Transmits the currently active alternative tuning scale
in SysEx format via the selected MIDI port. (See item 11, “MIDI Sysex
Cable.”) Dumped scales will load back into the same location when
imported back into the synth via MIDI.
Oscillator 1 can be hard-synced to Oscillator 2 for harmonically-complex
sounds when modulated. Both oscillators feature a fine tune knob for
detuning and thickening sounds.
34. Dump All Scales—Transmits the entire set of 16 alternative tuning
scales in SysEx format via the selected MIDI port. (See item 11, “MIDI
Sysex Cable.”).
Oscillators
Oscillators provide the raw building blocks of the Prophet Rev2’s sound
by producing waveforms, each of which has its own inherent sound character based on its harmonic content. The Prophet Rev2 has two oscillators, plus a sub oscillator and a noise generator, per voice.
Oscillator 1 and 2 are capable of generating sawtooth, sawtooth + triangle, triangle, and pulse waves. You can vary the width of any of these
waveshapes using the shape mod parameter. This provides a great variety
of different waveshapes and timbres.
The oscillators on the Prophet Rev2 are extremely stable. To emulate the
random pitch drift and oscillator instability of vintage instruments, use the osc slop
parameter to dial in as little or as much drift as you like.
You can force either or both of the oscillators to start its wave cycle from its
beginning (its zero crossing) each time you press a note on the keyboard by setting
note reset to on in the misc parameters menu. This is can be useful for creating sounds
that have a very consistent sound each time you trigger them.
Oscillator Parameters
Osc Freq: Sets the base frequency of Oscillator 1 or 2 over a 9-octave
range from 16 Hz to 8KHz (when used with the Transpose buttons). Adjustment is in semitones.
The global master coarse and master fine settings affect the pitch of the oscilla-
tors. See “Global Settings” on page 14 for more information.
Fine Tune: Fine tune control with a range of a quartertone up or down.
The 12 o’clock position is centered. Steps are in cents (50 cents = 1/2
semitone).
Shape: Sawtooth, Sawtooth + Triangle, Triangle, Pulse —This button
selects the waveshape generated by the oscillator. You can also turn the
oscillator off by selecting no waveshape.
OSC 1 FREQ
SYNC
OSC 2 FREQ FINE TUNE
The Oscillator section
20
OSCILLATORS
Sawtooth
Saw+Tri
Triangle
FINE TUNE SHAPE MOD SUB OCTAVE
SHAPE
SHAPE
Pulse
Sawtooth
Saw+Tri
Triangle
Pulse
1 2
OSC MIXSHAPE MOD
Shape Mod: Changes the “pulse” width of the selected waveform, which
modies its harmonic content and timbre. To generate a square wave
NOISE
OSC SLOP
Sequential Prophet Rev2 User’s Guide
when pulse is selected as the waveform, set this parameter to 50.
Applying waveshape modulation using a low frequency oscillator or other
modulation source in the mod matrix is a great way to add movement and thickness to
a sound.
Oscillators
21Oscillators
Page 18
Sync: Off, On—Turns Oscillator 1 hard sync on. Sync forces Oscillator 1
CUTOFF RESONANCE ENV AMOUNT VELOCITY KEY AMOUNT AUDIO MOD
4 POLE DELAY ATTACK DECAY SUSTAIN RELEASE
LOW-PASS FILTER
(the slave) to restart its cycle every time Oscillator 2 (the master) starts
a cycle. This provides a way to create more complex, harmonically rich
shapes from simple waveforms—especially when the frequency of Oscillator 1 is set to a different interval than Oscillator 2.
Filter
The Filter takes the basic, raw sound of the oscillators and noise generator and subtracts frequencies, changing the harmonic content and character of their sound. This change can be varied over time using the Filter
Envelope to produce more dynamic, animated timbres.
Oscillator 1
Oscillator 2
Oscillator 1
synced to
Oscillator 2
Oscillator hard sync
Try using the auxiliary envelope to sweep the pitch of Oscillator 1 when it is
synced to generate the classic, hard-edged sync sound.
Sub Octave: 0…127—Controls the level of a square wave oscillator
pitched one octave below Oscillator 1. Adding a sub octave to sounds
such as bass is a great way to increase low-register presence.
Osc Mix: 0…127—Enables the outputs of oscillators 1 and 2 to be mixed
in varying amounts. A setting of 0 is equivalent to 100% Oscillator 1
and 0% Oscillator 2. A setting of 127 is the opposite. A setting of 64 is a
50-50 mix of both oscillators.
Noise: 0…127 – Sets the output level of the white noise generator.
The Prophet Rev2’s lter is a classic, resonant low-pass Curtis lter that is
switchable between 2-pole operation (12 dB per octave) and 4-pole operation
(24 dB per octave). The 4-pole lter can self-oscillate when resonance is
set to its maximum.
The Prophet Rev2 Filter
Cutoff: 0...164—Sets the lter’s cutoff frequency. Frequencies are
reduced from the top down, cutting the high frequencies and passing the
low frequencies, hence the name “low-pass.”
Resonance: 0...127—Emphasizes a narrow band of frequencies around
the cutoff frequency. High levels of resonance can cause the lter to self-
oscillate in 4-pole mode and generate its own pitch.
Osc Slop: 0…127 – Adds randomized detuning to the oscillators to
emulate the tuning instability of vintage analog oscillators. This tuning
instability is a big part of what made vintage instruments sound characteristically warm and fat. The oscillators in the Prophet Rev2 are very
stable, and will not drift. Use osc slop parameter to dial in as little or as
much drift as you like.
22
High levels of resonance can sometimes cause the Prophet Rev2 outputs to
clip. Monitor your outputs carefully to ensure optimal, clean signal levels. If you experi-
ence signal clipping, try reducing the levels of the resonance parameter in the lter.
Env Amount: -127...127—Sets the amount of modulation from the lter
envelope to the lter’s cutoff frequency. Any setting above zero means
that each time you strike a key, the lter envelope controls how the lter
opens and closes. Higher amounts more dramatically affect the cutoff
frequency. This control is bipolar. Positive settings produce standard
behavior. Negative settings invert the envelope.
Sequential Prophet Rev2 User’s Guide
Filter
23Oscillators
Page 19

The description of envelope behavior just given is true when the amount param-
CUTOFF RESONANCE ENV AMOUNT VELOCITY KEY AMOUNT AUDIO MOD
LOW-PASS FILTER
attack
decay
sustain
release
amplitude
time
note offnote on
delay
eter is set to a positive value. But since this control is actually bipolar, it is possible to
set a negative amount of modulation. In this case, the envelopes are inverted and their
behavior changes. The best way to get a feel for the difference is to experiment with
both positive and negative settings of the env amount parameter.
Filter Envelope
The Prophet Rev2 lter has a dedicated, ve-stage envelope generator
(DADSR). The Filter Envelope is used to shape the harmonic charac-
teristics of a synthesized sound by giving you ltering control over its
attack, decay, sustain, and release stages (plus a delay parameter to delay
the onset of the envelope).
The cutoff frequency setting may limit the effect of the envelope on the lter. For
example, in low-pass lter mode , if cutoff is at its highest setting, a positive envelope
amount will have no effect on the lter since the lter is already completely open.
Velocity: 0...127—Allows key velocity to inuence lter frequency. If
the amount is set to a positive value, the harder you play, the more the
lter will open and the brighter the sound will be. Conversely, if set to a
negative value, the harder you play, the more the lter will close and the
less bright the sound will be. This control makes for more touch-sensitive
sounds.
Key Amount: 0...127—Sets the amount of modulation from the
keyboard to the lter’s cutoff frequency. Any setting above zero means
that the higher the note played on the keyboard, the more the lter opens.
This is useful for adding brightness to a sound as higher notes are played,
which is typically how acoustic instruments behave. When set to zero,
keyboard lter tracking is off, meaning that lter frequency is unaffected by
playing higher or lower notes on the keyboard. When set to 64, the lter
will track in half-step increments (which can be useful if you are using
the lter to generate a pitch through self-oscillation in 4-pole mode).
Audio Mod: 0...127—Controls the amount of audio from Oscillator 1
used to modulate the lter cutoff frequency. It is useful for adding a bit
of harmonic movement and high end sizzle to many sounds, especially in
4-pole lter mode with some lter resonance.
This is one of the most important aspects of designing a sound. Without
an envelope, the lters would be completely static. They would stay
open or closed by a xed amount that wouldn’t change over the duration
of a sound. That’s not very interesting to listen to and it’s not how instruments behave in the real world.
In general, sounds produced by an instrument are brighter at their beginning (the attack stage) and grow mellower as they die out (the decay
and release stages). In other words, their harmonic content changes over
time. This is exactly what the lter envelope is designed to emulate.
4 POLE DELAY ATTACK DECAY SUSTAIN RELEASE
Filter Envelope
To create bell-like FM sounds with audio mod, set the lter to 4-pole mode, set
audio mod to 127, set osc mix to 127, set osc 2 shape to off, and set osc 1 shape to the
desired waveshape. Then turn resonance to 127 and experiment different osc 1 freq
tunings, lter cutoff, and key amount settings. Adjust the lter and amplier envelopes
as necessary.
24
A typical 5-stage DADSR envelope
Sequential Prophet Rev2 User’s Guide
Filter Envelope
25Filter
Page 20

Delay: 0...127—Sets a delay between the time the envelope is triggered
AMPLIFIER
(note on) and when the attack portion actually begins.
Attack: 0...127—Sets the attack time of the envelope. The higher the
setting, the slower the attack time and the longer it takes for the lter to
open from the level set with the lter cutoff knob to the level set by the
lter envelope amount. Percussive sounds typically have sharp (short)
attacks.
Decay: 0...127—Sets the decay time of the envelope. After a sound
reaches the lter frequency set at its attack stage, decay controls how
quickly the lter then transitions to the cutoff frequency set with the
sustain knob. The higher the setting, the longer the decay. Percussive
sounds, such as synth bass, typically have shorter decays (and a generous
amount of low-pass lter resonance).
Sustain: 0...127—Sets the lter cutoff frequency for the sustained
portion of the sound. The sound will stay at this lter frequency for as
long as a note is held on the keyboard.
Release: 0...127—Sets the release time of the envelope. This controls
how quickly the lter closes after a note is released.
Amplier Envelope
After passing through the lters, a synthesized sound goes into an analog
voltage controlled amplier or VCA, which controls its overall volume.
The VCA has a dedicated, ve-stage envelope generator (DADSR).
The Amplier Envelope is used to shape the volume characteristics of a
sound over time by giving you control over its attack, decay, sustain, and
release stages (plus a delay parameter to delay the onset of the envelope).
Along with the lter envelope, this is one of the most important factors in
designing a sound.
Without a volume envelope, the volume of a sound wouldn’t change
over the duration of a note. It would begin immediately, remain at its full
volume for the duration of the note, then end immediately when the note
was released. Again, that’s not very interesting sonically and it’s not typically how instruments behave in the real world.
To give you a real-world example, the main difference between the sound
of the wind and the sound of a snare drum is that they have very different
volume envelopes. Otherwise, they are essentially both white noise.
Wind has a relatively slow attack, a long sustain, and a long decay and
release. A snare drum has a sharp attack, no sustain, and very little decay
or release. But again, they are both fundamentally white noise.
26
PAN SPREAD
ATTACK
Amplier Envelope
Sequential Prophet Rev2 User’s Guide
ENV AMOUNT
DECAY
VELOCITY
SUSTAIN
DELAY
RELEASE
Amplier Envelope
27Filter Envelope
Page 21

attack
decay
sustain
release
amplitude
time
note offnote on
delay
A typical ve-stage, DADSR envelope
Delay: 0...127—Sets a delay between the time the envelope is triggered
(note on) and when the attack portion actually begins.
Attack: 0...127—Sets the attack time of the envelope. The higher the
setting, the slower the attack time and the longer it takes for a sound to
reach its full volume. Pads typically have softer (longer) attacks. Percussive sounds have sharper (shorter) attacks.
Decay: 0...127—Sets the decay time of the envelope. After a sound
reaches its full volume at its attack stage, decay controls how quickly the
sound transitions to the level set with the sustain control. The higher the
setting, the longer the decay. Percussive sounds, such as synth bass, typically have shorter decays.
Sustain: 0...127—Sets the sustain level of the envelope. The higher the
setting, the louder the sustained portion of the sound will be. The sound
will stay at this level for as long as a note is held on the keyboard.
Release: 0...127—Sets the release time of the envelope. This controls
how quickly a sound dies out after a note is released.
Pan Spread: 0...127—Pans the audio in the stereo eld individually
per voice. With a pan spread setting of zero, all voices are panned in the
middle (monophonic). As you turn up pan spread, the audio in each voice
is gradually moved away from the center by different amounts. Every
other voice goes in a different direction. This provides a wide stereo eld
as you play. Any modulation to Pan will individually move each voice
from its static position as set by the pan spread setting.
Env Amount: 0...127—Sets the amount of modulation from the Ampli-
er Envelope to the VCA. In most cases you will probably want to set
this fully clockwise for maximum VCA volume. If you experience signal
clipping, try reducing the env amount.
To recreate the “gated VCA” effect used on certain classic rock anthems,
choose an organ sound, then set the env amount of the Amplier to zero, route the LFO
square wave to amp with an amount setting of 100% and hold a few chords.
Velocity Amount: 0...127—This enables keyboard velocity to modu-
late the VCA Envelope Amount. It doesn’t enable keyboard velocity to
directly control the VCA (loudness). To do this, see the note below.
To create a program in which velocity controls the VCA, turn vca envelope
amount down and turn velocity amount up. To achieve the best results, it may be
necessary to set an initial level using Envelope Amount. Just remember that once
Envelope Amount is set to the maximum, no modulation from velocity—or any other
source—will cause it to go higher than that.
Auxiliary Envelope
The Prophet Rev2 has an additional ve-stage envelope generator. It
is useful for creating modulation that varies over time according to the
shape of the envelope. Routing an envelope to an oscillator’s frequency,
for example, causes the oscillator’s pitch to rise and fall according to the
contour of the envelope.
As with all of the Prophet Rev2’s envelopes, there are controls for modulating the envelope amount using keyboard velocity. The Auxiliary Envelope
can be routed to any of the modulation destinations in the mod matrix. In
addition, the Auxiliary Envelope can repeat (loop) using the env 3 repeat
function in the misc params menu. This is useful for cyclical 4-stage modulation.
Actually, any of the Prophet Rev2’s envelopes can be routed to any destination (or
multiple destinations) using the modulation matrix. See “Modulation” on page 33 for more
information.
28
Sequential Prophet Rev2 User’s Guide
Auxiliary Envelope
29Amplier Envelope
Page 22

AUXILIARY ENVELOPE
DESTINATION
LOW FREQUENCY OSCILLATORS
ATTACK
ENV AMOUNT
DECAY
VELOCITY
SUSTAIN
DELAY
RELEASE
Sustain: 0...127—Sets the sustain level of the envelope. The higher the
setting, the louder the sustained portion of the sound will be. The sound
will stay at this level for as long as a note is held on the keyboard.
Release: 0...127—Sets the release time of the envelope. This controls
how quickly a sound dies out after a note is released.
The Auxiliary Envelope
Destination: Various—Selects a modulation destination for the Auxiliary
Envelope. See “Appendix B:
Modulation Destinations” on page 73 for a list of possible destinations.
Env Amount: -127...127—Sets the amount of modulation from the envelope
to the chosen destination. The modulation amount can be positive or negative,
allowing for inverted envelope control.
Velocity: 0...127—This enables keyboard velocity to modulate the Enve-
lope Amount. It doesn’t enable keyboard velocity to directly control the
modulation. To do this, see the user tip that follows
To create a program in which velocity controls modulation amount, turn aux
envelope amount down and turn velocity amount up.
Delay: 0...127—Sets a delay between the time the envelope is triggered
(note on) and when the attack portion actually begins.
Attack: 0...127—Sets the attack time of the envelope. The higher the
setting, the slower the attack time and the longer it takes for a sound to
reach its full volume. Pads typically have softer (longer) attacks. Percussive sounds have sharper (shorter) attacks.
Low Frequency Oscillators
The four LFOs are special-purpose oscillators that produce a frequency
that is typically below the range of human hearing (although these can
actually extend into the audio range if set to their maximum frequency).
The LFOs are typically used for periodic modulation such as vibrato
(periodic pitch modulation) and tremolo (periodic amplitude modulation). They can also be used as modulation sources for any of the many
modulatable parameters in the Prophet Rev2.
The LFOs produce a variety of waveshapes, including triangle, sawtooth,
reverse sawtooth, square, and random. Though most often used for lowfrequency modulation, the Prophet Rev2 LFOs can actually function at
speeds that extend into the audible range for extreme effects.
1
2
3
4
The Low Frequency Oscillators
SHAPE
Triangle
Sawtooth
Rev Saw
Square
Random
CLK SYNC FREQUENCY
AMOUNTDESTINATION
KEY SYNC
Decay: 0...127—Sets the decay time of the envelope. After a sound
reaches its full volume at its attack stage, decay controls how quickly the
sound transitions to the level set with the sustain control. The higher the
setting, the longer the decay. Percussive sounds, such as synth bass, typically have shorter decays.
30
Sequential Prophet Rev2 User’s Guide
Triangle and Random waves are bipolar. That is, their waveshape is positive for half of their cycle and negative for the other half. In the case of the
triangle wave, this makes it possible to generate a natural-sounding vibrato
that goes alternately sharp and at in equal amounts on either side of a center
frequency. Random, also known as “sample and hold,” generates a series
of random values, each held for the duration of one cycle
Low Frequency Oscillators
31Auxiliary Envelope
Page 23

The square wave, sawtooth, and reverse sawtooth generate only positive values. In
SOURCE
DESTINATION
MODULATION
SELECT
AMOUNT
the case of the square wave this makes it possible to generate natural-sounding trills.
Square RandomSawtooth Reverse
0
Triangle
Sawtooth
Modulation
Although the overall sonic character of the Prophet Rev2 is deter-
mined by its analog oscillators and lters, much of its power to make
truly unique and unusual sounds comes from creative use of modulation. Modulation is the process of routing one parameter (i.e. a control
voltage) to another in order to change the way the targeted parameter
behaves.
LFO waveshapes
The LFOs can be free-running or synced to the arpeggiator, sequencer, or
MIDI clock for tempo-synced effects such as lter sweeps, tremolo, and so on.
Shape: Triangle, Sawtooth, Reverse Sawtooth, Square, Random—This
button sets the waveshape of the selected LFO.
Frequency: Sets the frequency of the selected LFO from a slow .022Hz
to a fast 500Hz. This is affected by the clk sync (clock sync) parameter
as explained below.
Clk Sync: When on, the LFO synchronizes with the master clock, which
controls the arpeggiator, sequencer, and certain effects.
Destination: Routes the selected LFO to one of the many modulatable
destinations within the synthesizer. You can also use the modulation
matrix to route an LFO to additional destinations.
Amount: Sets the amount of LFO modulation routed to the selected
destination. Setting an amount here applies the selected modulation
continuously. You can also use the modulation matrix to route an LFO
to additional destinations and use a different modulation amount if you
want.
The concept is simple:
1. Choose a source.
2. Choose a destination.
3. Set an amount. The amount can either be positive or negative.
You already understand and apply the concept of modulation whenever
you use the lter envelope to control the lter’s cutoff frequency. In this
case, the modulation source is the lter envelope (or more precisely, any
of its controls, such as attack, decay, sustain, or release). The modulation
destination, is the lter’s cutoff frequency. The modulation amount is set
with the env amount knob.
There are twenty-two different modulation sources and fty-three different destinations to choose from. (See page 73 for a complete list.)
There are 8 freely assignable modulation paths (mod slots 1-8) as well as
5 additional dedicated mod sources: Mod Wheel, Pressure (aftertouch),
Breath Controller, Velocity, and MIDI Footswitch. This gives you a large
number of sound-shaping options.
Key Sync: When enabled, this makes the LFO wave cycle reset when you
press a key (but is not reset if you press a key while other notes are held).
There is a shortcut for routing an LFO to a front-panel destination (provided
that the destination is a valid destination). Simply hold down the selector button of the
desired LFO, then and move the knob or control you want to use as a destination (the
lter cutoff, for example). Set the amount using the LFO amount knobs. Be aware that
not all front-panel controls can be used as a modulation destinations.
32
The Modulation section
Sequential Prophet Rev2 User’s Guide
Modulation
33Low Frequency Oscillators
Page 24

Modulation Parameters
Source: Selects a modulation source. The are twenty-two different
modulation sources. See page 72 for a complete list.
Use pressure as the modulation source instead of the mod wheel in the previ-
ous example to add vibrato with key pressure/aftertouch.
Destination: Selects a modulation destination. The are fty-three differ-
ent modulation destinations. See page 73 for a complete list.
Amount Sets the modulation amount. Modulation can be either positive
or negative.
Modulation Examples
Below are several modulation scenarios that illustrate how to use the modulation matrix. The examples provide full, step-by-step instructions for clarity.
In actual practice, there are shortcuts for routing modulation to various
front panel sources/destinations. Simply hold down the source button
and move the control you want to use as a source (the mod wheel, for
example). Then hold down the destination button and move the control
that you want to use as a destination (lter cutoff, for example). Set
the amount using the parameter and value knobs next to the display.
Be aware that not all front-panel controls can be used as a modulation
sources/destinations.
To use the mod wheel to add vibrato:
1. In the low frequency oscillators section, set LFO 1 to triangle and
set frequency to 75. Set destination to osc all freq. Set amount to 0.
(You will control the amount with the mod wheel.)
To use the mod wheel to control the lter cutoff:
1. In the modulation section, press the source button. Use the parameter
knob next to the display to scroll to Mod Slot 1 if it’s not already displayed.
2. Use the parameter knob to select the source eld. Use the value knob
to scroll through the various mod sources and choose mod wheel.
3. Use the parameter knob to select the dest eld. Use the value knob to
scroll through the various mod destinations and choose cutoff.
4. Hold down a note on the keyboard (or press the hold button and play a
note on the keyboard) and turn the mod wheel.
5. Use the parameter knob to select the amount eld. Use the value knob
to set the amount to your preference. Higher amount settings cause the
lter to open wider the further you push the mod wheel. A negative
amount setting will close the lter the further you push the mod wheel.
Use pressure as the modulation source instead of the mod wheel in the previous example to open the lter (positive amount) or close the lter (negative amount)
with key pressure/aftertouch.
Other modulation ideas:
• Route env 3 to osc all freq to create a rising or falling pitch effect each
time your press a key. This technique is often used to create the “attack
pitch blip” effect in classic synth brass sounds.
2. In the modulation section, press the source button. Use the param-
eter knob next to the display to scroll to Mod Slot 1 if it’s not already
displayed.
3. Use the parameter knob to select the source eld. Use the value knob
to scroll through the various mod sources and choose mod wheel
4. Use the parameter knob to select the amount eld. Use the value knob
to set the amount to 30.
5. Use the parameter knob to select the dest eld. Use the value knob to
scroll through the various mod destinations and choose lfo1 amt.
6. Hold down a note on the keyboard and turn the mod wheel. You should
hear vibrato.
34
• Route an LFO to pan to create an auto-panning effect. Panning width is
controlled by the modulation amount. Panning speed is controlled by
the LFO frequency. Add a second mod path to control the LFO speed
with the Mod Wheel for a faux rotating speaker spin-up/spin-down
effect. Enable the chorus effect and set up a third mod path to control
fx mix with the mod wheel for even better results.
• Route the mod wheel to osc mix and set Oscillator 1 and 2 to different
frequencies and/or waveshapes. Then transition between them with the
mod wheel. Set osc 1/2 mix to 0 and mod amount to 127. This is one
way to simulate a guitar feedback effect, especially on sounds that use
the distortion effect. Oscillator 1 could be the main tone and Oscillator
2 could be the “feedback harmonic.” Set up a second mod path to also
add vibrato with the mod wheel.
Sequential Prophet Rev2 User’s Guide
Modulation
35Modulation
Page 25

Effects
The Prophet Rev2 allows you to add an effect to any sound. In stacked or split
sounds, each layer can have its own effect.
• Phaser Mst - emulation of Tom Oberheim’s original 6-stage phaser
• Flanger 1 - vintage through-zero anger, high feedback
• Flanger 2 - vintage through-zero anger, no feedback
Adding a touch of reverb or delay can add a subtle (or not so subtle)
sense of ambience and depth. Other effects such as the chorus and phaser
are useful for adding more obvious tonal enhancement and are also
useful for emulating classic instruments such as string synthesizers.
While the effects themselves are digital, the main signal path of the
Prophet Rev2 is analog. The on/ off switch enables and disables an
effect, ensuring an analog signal path when off.
Effects settings are saved individually with each program. Time-based
effects such as the delays can be synchronized to the arpeggiator, sequencer,
or MIDI clock to produce repeats that occur on the beat.
EFFECT
CLK SYNC
The Effect section
SELECTON/OFF
PARAM 1 PARAM 2
MIX
• Reverb - classic digital reverb with adjustable size and color
• Ring Mod - emulation of Tom Oberheim’s classic ring modulator
• Distortion - digital distortion (analog emulation)
• HP Filter - high-pass lter.
For best performance,run the angers and high-pass lter 100% wet. (i.e. set
the mix parameter to 127).
To use Effects:
1. Press the on/off switch to turn on effects.
2. Turn the select knob to choose an effect, depending on which you want
to apply and congure.
3. Turn the mix knob to blend in a good amount of the processed signal.
You’ll want to be able to clearly hear the effect when you tweak its settings.
You can dial it down afterward.
4. Use the param 1 and param 2 knobs to adjust the effect’s parameters
to your taste. See “Effects Parameters” on page 38 for details on the
adjustable parameters on each effect type.
5. Finally, adjust the mix knob again to optimize the amount of the effect.
Full left is completely dry. Full right is completely wet (a 100%
processed signal).
Effects:
• Delay Mono - classic mono delay
• DDL Stereo - classic digital delay
• BBD Delay - vintage bucket-brigade emulation
• Chorus - vintage chorus
• Phaser High - vintage 6-stage phaser, high feedback
• Phase Low - vintage 6-stage phaser, lower feedback
36
Sequential Prophet Rev2 User’s Guide
Effects
37Effects
Page 26

Effects Parameters
On/Off: Turns the effect on or off. On stacked or split sounds, enable the
edit layer b button to affect Layer B.
Parameter 1: Variable, depending on the effect—This knob adjusts
parameter 1 for the chosen effect. Each effect has two adjustable parameters, which differ depending on the effect.
Select: Selects the effect type.
Mix: 0...127—Sets the balance between the processed (wet) signal
and unprocessed (dry) signal. Full left is completely dry. Full right is
completely wet.
Clk Sync: On, Off—When a delay effect is chosen, this enables syncing of
the timed delay repeats (feedback) to the arpeggiator, sequencer, or MIDI
clock. When clk sync is on, delay time (parameter 1) provides the
following values:
Value Delay Time
Whole 4 beats
Half dot 3 beats
Half 2 beats
Quarter dot 1 1/2 beats
Quarter 1 beat
Quarter triplet 1 1/3 beats
8th dot 3/4 of 1 beat
8th 1/2 of 1 beat
8th triplet 1/3 of 1 beat
16th dot 3/8 of 1 beat
16th 1/4 of 1 beat
Parameter 2: Variable, depending on the effect—This knob adjusts
parameter 2 for the chosen effect. Each effect has two adjustable parameters, which differ depending on the effect.
Effect Type Parameter 1 Parameter 2
mono delay delay time feedback amount
DDL stereo delay time feedback amount
BBD delay delay time feedback amount
chorus rate depth
phaser high rate depth
phaser low rate depth
phaser mst rate depth
anger 1 rate depth
anger 2 rate depth
reverb time color
ring mod ring mod tuning low-note pitch
tracking on/off
distortion gain tone
HP lter cutoff resonance
To recreate a classic bucket-brigade time-shifting effect, try adjusting the delay
time parameter in real time.
Maximum delay time is 1 second. The combination of longer synced delay
times with slower tempos can result in delay times that would be greater than 1
second. When that happens, the delay time is divided by 2 until it no longer exceeds
the 1 second limit. For example, if the BPM is set to 60 and Delay Time (Parameter 1)
is set to Half, the expected delay time would be 2 seconds. The actual delay time will
be 1 second (i.e. 2 seconds divided by 2).
38
The ring modulator’s mode of operation is determined by Parameter 2, (pitch
tracking) which can be set to either on or off. With this parameter off, the ring modulator functions like the original Oberheim unit. In this mode, pitch tracking is off, and
Parameter 1 sets the modulation frequency, which remains the same regardless of
what note you play on the keyboard. With parameter 2 on, the ring modulator tracks
the pitch of the lowest note that you play on the keyboard. In this case the Parameter
1 sets a ratio between the lowest note that you play and the modulator note (instead of
setting a xed frequency). The modulation frequency will then change as you change
the lowest note that you’re playing, so that the ratio will remain constant between
the note that you play and note of the modulator. If you are only playing one note at
a time, then the ring modulator will modulate with the same ratio as you play up and
down the keyboard. Set Parameter 2 to the “on” position to get more musical results.
Sequential Prophet Rev2 User’s Guide
Effects
39Effects
Page 27

Arpeggiator
The Prophet Rev2 has a full-featured arpeggiator. Turn it on, hold a
chord and the synthesizer will play a pattern based on the individual
notes held. Choose a mode (up, down, random, etc.), an octave range (1,
2, or 3), and a tempo, then pair it with an appropriate sound and explore.
While you hold down a chord, pressing any additional notes will add
those notes to the arpeggio. You can change chords and notes and the
arpeggio will continue to play as long as at least one note is always held.
You can also use the hold feature with the arpeggiator. When you enable
hold, you can release the notes on the keyboard and the arpeggio will
continue to play — with any additional notes that you play added to the
arpeggio.
To prevent the arpeggiator from adding new notes to an arpeggio when keys
are continuously held (and instead start a new arpeggio each time you change notes),
turn arp relatch on in the arpeggiator. To do this, press the arpeggiator’s mode button
and scroll to the arp relatch menu item in the display.
Set the tempo of the arpeggiator with the tap tempo or bpm and divide
controls in the clock section. To use tap tempo, tap this button at least
4 times to set the tempo. You can also sync the arpeggiator to external
MIDI clock, or even an external audio signal. When the arpeggiator is
playing, the sequencer is disabled.
CLOCK ARP
To use the arpeggiator:
1. Press the arpeggiator on/off switch to turn it on.
2. Hold down one or more notes on the keyboard. The arpeggiator plays
them according to the settings you’ve chosen.
3. To latch arpeggiation on (so that you don’t have to continuously hold
down notes) press the hold button.
4. Adjust settings such as mode, octave, repeats, and bpm.
5. To synchronize a delay effect to the arpeggiator, turn on clk sync in the
effects section, choose a delay, and adjust its delay time setting as desired.
An audio signal connected to the rear-panel sequence jack can be used to control
arpeggiator (and sequencer) playback. This makes it possible to tempo sync the arpeggiator to a recorded drum track or other audio source. Audio signals used to drive the
arpeggiator/sequencer should not exceed 5 volts peak-to-peak. See “Seq Pedal
Mode” on page 18 for more information about choosing the appropriate mode for
these behaviors.
Arpeggiator Beat Sync
is option, found in the Global menu, quantizes keyboard performance of the arpeggiator so that notes are quantized to the current clock
divide setting. When this option is o, changing notes or chords on the
keyboard during arpeggiator playback will retrigger notes whether or not
the note is played precisely on the beat. With this option enabled, arpeggiator note playback occurs only on the beat — regardless of when you
press a key on the keyboard.
TAP TEMPO ON/OFF
The Clock and Arpeggiator controls
40
To enable Arpeggiator Beat Sync:
1. Press the button, then use knob to select
MODEBPM DIVIDE
.
2. Turn the knob to select .
3. Press the button again to exit the Global menu.
Sequential Prophet Rev2 User’s Guide
Arpeggiator
41Arpeggiator
Page 28

Arpeggiator “Momentary Sustain” Mode
The Rev2 allows you to use the sustain pedal to turn the arpeggiator’s
Hold function on and off and perform other arpeggiator-related functions.
To access this feature, use the sustain arp setting in the global menu.
ere are three modes to choose from:
To control an external MIDI device:
1. Connect the MIDI or USB output of the Rev2 to the MIDI or USB input
of the external device, depending on which type of connection the
external device requires.
2. On the Rev2, press the button, then use the knob
to select .
• - With the arpeggiator running in this mode, pressing the
Sustain pedal once causes the arpeggiator to hold the sequence (even
when you release the notes on the keyboard). Pressing it again stops the
arpeggiator.
• - With the arpeggiator running in this mode, pressing and
holding the Sustain pedal sustains the notes, as the Sustain pedal
normally would.
• - With the arpeggiator running in this mode, pressing
and holding the Sustain pedal causes the arpeggiator to sustain (even
when you release the notes on the keyboard) for as long as you hold
down the pedal. Releasing the Sustain pedal stops the arpeggiator.
To select the arpeggiator’s sustain pedal mode:
1. Press the button then use knob to select
.
2. Turn the knob to select either , , or
, depending on your preference. Press the button again to
exit the Global menu.
MIDI Note Output from the Arpeggiator and Sequencer
e Rev2’s arpeggiator and sequencer output MIDI note numbers. Any
notes that you hold on the Rev2 keyboard will be arpeggiated according to the current settings of the arpeggiator and output over MIDI as
MIDI notes. Similarly, any notes output by the sequencer will be output
over MIDI as MIDI notes. You can use this feature to drive other MIDIequipped devices such as synthesizers and drum machines. To access this
feature, use the + setting in the menu.
3. Use the knob to select , or , or +, depending on
how your Rev2 and external device are connected.
4. Press the button again to exit the Global menu.
5. On the external device, set the the MIDI Channel and MIDI Receive
port to match the Rev2.
6. Hold down a chord on the Rev2 or start sequencer playback. e external device should be triggered by the arpeggiated or sequenced notes.
Arpeggiator Parameters
On/Off—This button turns the arpeggiator on and off.
Mode: Pressing this button shows various arpeggiator options in the
OLED display. You can scroll through these and choose their settings
with the parameter and value knobs.
Arp Mode: Sets the order in which notes play when the arpeggiator is on. See
the table.
Arp Mode Behavior
Up Plays from lowest to highest note
Down Plays from highest to lowest note
Up + Down Plays from lowest to highest and back to lowest
Random Plays notes in random order
Assign Plays notes in the order the keys were pressed
To enable MIDI Note output from the arpeggiator:
1. Press the button, then turn the knob to select
+.
2. Turn the knob to select .
42
Sequential Prophet Rev2 User’s Guide
Arpeggiator
43Arpeggiator
Page 29

Arp Range: 1, 2, 3 —Set to 1, only the held notes are arpeggiated. Set to
2, the held notes and the notes one octave above them arpeggiate. Set to
3, the held notes and the notes one and two octaves above them arpeggiate.
Tap Tempo—Tapping the tap tempo button sets the tempo. The LED
ashes at the BPM rate you set. For best results, tap the button 4 times.
Arp Repeats: 1, 2, 3 —Set to 1, each note in the arpeggio plays once.
Set to 2, each note in the arpeggio plays twice. Set to 3, each note in the
arpeggio plays three times.
Arp Relatch: Off, On—Works in conjunction with hold. When hold and
the arpeggiator are on, and arp relatch is off, played notes are held on
and arpeggiated, with additional played notes added to the held notes
and the arpeggio. When arp relatch is on, played notes are held on and
arpeggiated, but additional played notes will restart the arpeggio with the
new notes.
Clock Parameters
BPM: 30…250—Sets the tempo for the arpeggiator in BPM (beats per
minute). The tap tempo LED ashes at the BPM rate. When lfo sync is
enabled on the low-frequency oscillator, or clk sync is enabled in the Effects
section, the BPM rate affects the LFO frequency and/or delay effect. When
syncing to an external MIDI clock source, the BPM setting has no effect.
Divide—Selects a basic note value relative to the BPM. See the table below:
Name Tempo Timing Division
Half BPM/2 Half note
Quarter BPM Quarter note
8th BPM x 2 Eighth note
8 Half BPM x 2 Eighth note, half swing timing
8 Swing BPM x 2 Eighth note, full swing timing
8 Trip BPM x 3 Eighth note triplets
16th BPM x 4 Sixteenth note
16 half BPM x 4 Sixteenth note, half swing timing
16 Swing BPM x 4 Sixteenth note, full swing timing
16 Trip BPM x 6 Sixteenth note triplets
32nd BPM x 8 Thirty-second note
32 Trip BPM x 12 Thirty-second note triplets
64 Trip BPM x 16 Sixty-fourth note triplets
Sequencer
There are 2 types of sequencers in the Prophet Rev2:
• 1-track, 64-step polyphonic sequencer for creating a repeating pattern of
chords and melodies
• 4-track, 16-step, non-polyphonic gated sequencer for creating a repeating
pattern for modulation (and can also be used for notes)
Press to toggle between
gated sequencer and
polyphonic sequencer
SEQUENCER
Gated
Poly
TYPE MODE
Poly Seq
Only
The Sequencer
Polyphonic Sequencer
With the polyphonic sequencer you can create sequences that are rhythmically and melodically complex by constructing a repeating musical
phrase with notes, ties, and rests. You can play up to 64 steps with up to
6 notes held simultaneously per step. Use the bpm, divide, or tap tempo
controls to adjust sequencer playback speed.
In addition, you can play along with a sequence (provided there is available polyphony), making it a powerful live performance tool. When the
sequencer is playing, the arpeggiator is disabled.
rest
tie
DESTINATION
TRACK
RECORD
44
Sequential Prophet Rev2 User’s Guide
Sequencer
45Arpeggiator
Page 30

All factory programs have a sequence associated with them. Recall a program
and press the sequencer’s play button to hear its associated sequence.
An audio signal connected to the rear-panel sequence jack can be used to
control sequencer playback. This makes it possible to tempo sync the sequencer (or
arpeggiator) to a recorded drum track or other audio source. Audio signals used to
drive the arpeggiator/sequencer should not exceed 5 volts peak-to-peak. See “Seq
Pedal Mode” on page 18 for more information about choosing the appropriate mode
for these behaviors.
Changing Presets While the Poly Sequencer is Running
If you change programs while the polyphonic sequencer is running, the
sequencer will continue playing, but will switch to the sequence associated with the new program. This conveniently allows you to scroll
through programs and listen to their sequences without having to press
play to restart sequencer playback with each program change.
It’s important to note that if you switch to a dual layer program (i.e. a
program with Stack or Split engaged) while the sequencer running, the
sequencer automatically starts/plays the sequences on both layers of the
program.
Programming the Polyphonic Sequencer
For most sequences you’ll probably want to use sounds with a relatively
sharp attack and short release.
To program a note sequence:
1. Press the record button.
2. Perform the sequence on the keyboard. The display indicates the
current step, note, and velocity as you play.
When recording a chord as a step, as long as you continue to hold at least one
note down, you can keep adding notes to the chord/step, and even use the transpose
buttons to extend the keyboard range while doing it.
3. To add a rest as you play, press the sequencer’s mode button for that
step, then continue playing. To add multiple rests, press the mode
button once for each rest that you want to add.
4. To add a tie that extends the length of a note, play the note or chords,
then press the sequencer’s destination button repeatedly to extend the
note the number of steps you want.
5. To step back in the sequence, turn the sequencer’s parameter knob
counterclockwise. This will allow you to step backward to the desired
step so that you can rerecord it.
If you switch to a program with Split enabled, and you want to stop
polyphonic sequencer playback, press the sequencer’s play button to turn
off each layer individually. Alternatively, press and hold the edit layer
b button until it blinks, then press the sequencer’s play button. This will
stop playback on both layers.
If you stop sequencer playback on a program that has the Gated
sequencer or arpeggiator enabled, and you stop sequencer playback
(which will also stop the arpeggiator or gated sequencer), you can return
to the original state of the program (i.e. arpeggiator/gated sequencer on)
by switching momentarily to a different sound and then back again.
46
Sequential Prophet Rev2 User’s Guide
6. When you’re done, press play to listen to your sequence.
7. To save the sequence, save the program and they are saved together.
(See “Saving a Program” on page 4.)
To play a polyphonic sequence:
1. Press play. The sequence plays back at the current BPM setting.
2. To stop playback, press play again.
Alternatively, you can start and stop sequencer playback using a footswitch
connected to the rear-panel sequencer jack or using MIDI start/stop messages sent
from a DAW or other MIDI device. See “Seq Pedal Mode” on page 18 for more
information.
Sequencer
47Sequencer
Page 31

Use the bpm, divide, or tap tempo controls to adjust sequencer playback speed.
To transpose a polyphonic sequence:
1. Press play. The sequence begins playback.
2. Press and hold record and press a key on the keyboard. “Middle C”
is the reference point. Playing a note above middle C transposes the
sequence higher by that interval. Playing a note below middle C transposes the sequence lower by that interval.
Editing a Polyphonic Sequence
You can edit a sequence after you’ve recorded it. This is convenient for
xing mistakes or modifying it without having to completely re-perform it.
To edit a polyphonic sequence:
1. Press the sequencer’s record button.
2. Use the sequencer’s track knob to select the track (1-6). Because you
can record up to 6 notes per step, tracks 1-6 each represent a note. If a
track/step has no note recorded on it, the Velocity parameter will say
“Rest.”
Copying a Polyphonic Sequence Between Layers
You can copy a sequence from Layer A to Layer B and vice-versa. You can
also swap sequences between layers.
To copy a sequence on Layer A to Layer B:
1. Press both the split a|b button and the stack a+b button simultaneously.
2. Turn the parameter knob and select copy seq a to b.
3. Press the write button.
To copy a sequence on Layer B to Layer A:
1. Press both the split a|b button and the stack a+b button simultaneously.
2. Turn the parameter knob and select copy seq b to a.
3. Press the write button.
To swap the sequences on Layer A and Layer B:
1. Press both the split a|b button and the stack a+b button simultaneously.
2. Turn the parameter knob and select swap seq a and b.
3. Press the write button.
3. Use the sequencer’s parameter knob to select the step you want to edit.
If a track/step has no note recorded on it, the Velocity parameter will
say “Rest.”
4. Use the sequencer’s value knob to change the note (C0 - G10). Turn
the knob fully clockwise to add a tie. Alternatively, press a key on the
keyboard to enter the note quickly (along with the velocity at which
you play it).
5. If you make a mistake, or simply want to re-enter a note or change
its velocity use the sequencer’s parameter knob to step backward or
forward to the step you want to edit.
6. To edit a note’s velocity numerically, hold down the record button and
turn the value knob.
7. To save the sequence, save the program by pressing the write button
twice.
48
Gated Sequencer
The gated sequencer provides four 16-step sequences that play in parallel. Each sequence can be routed to a chosen modulation destination.
Each step in a sequence can be set to a different value used to modulate that
destination.
Unlike the polyphonic sequencer, the gated sequencer doesn’t play notes
unless one or more of the sequences are routed to oscillator frequency.
A gated sequence is really just a series of events at timed intervals that
changes the value of one of the synth’s parameters in discrete steps.
Because the four sequences play in parallel, up to four parameters can be
affected by each step, one per sequence. For the most part, the sequence
destinations are the same as the modulation destinations, since a gated
sequence is really just another modulation source.
Sequential Prophet Rev2 User’s Guide
Sequencer
49Sequencer
Page 32

For each sequence step, the envelopes are gated on for half the step’s
duration. The duration varies according to the BPM and Divide settings
(or the MIDI clock, if synced to an external source). The envelope
settings of the current program ultimately determine how long each step
plays, however, and longer (more legato) or shorter (more staccato)
effects can be achieved by editing the lter and or amplier envelopes.
7. Repeat steps 5-6 as necessary to create the rest of the gated sequence.
8. When you’re done, hold down a key to listen to your sequence.
9. To save the sequence, save the program and they are saved together.
(See “Saving a Program” on “Saving a Program” on page 4.)
The sequencer requires a note to be gated on — that is, played from the
keyboard or via MIDI — in order for the sequencer to run. There is no
dedicated start or play button and it doesn’t respond to MIDI start/stop/
continue messages. But it can still sync to an external clock.
To start the gated sequencer running, simply press the type button to
select the gated sequencer, then hold down a note. Sequencer playback
then begins.
An audio signal connected to the rear-panel sequence jack can be used to
control sequencer playback. This makes it possible to tempo sync the sequencer (or
arpeggiator) to a recorded drum track or other audio source. Audio signals used to
drive the arpeggiator/sequencer should not exceed 5 volts peak-to-peak. See “Seq
Pedal Mode” on page 18 for more information.
Programming the Gated Sequencer.
To program a gated sequence:
1. Press the type button and toggle to the gated sequencer.
2. Press the mode button and use the value knob to select the desired
mode. See “Sequencer Parameters” on page 52.
3. Use the track knob to select desired track.
4. Press the destination button and use the value knob to select the
desired destination.
5. Use the parameter knob to navigate to step 1 (or any desired step,
1-16).
6. Use the value knob to enter a value from 0-125. Choosing reset marks
the end of the sequence if you want to use fewer than 16 steps. The
sequence will loop when it reaches that step.
Try using different sequence lengths on different gated sequencer tracks to
create non-repetitive modulations. For example, if track 1 utilizes the full 16 steps, set
track 2 to repeat after 12 steps (by setting step 13 to reset).
Gated sequencer tracks are also modulation sources and appear as such
in the modulation matrix. This means that you can route a gated sequencer track to
multiple destinations.
Using Slew
In modular analog synthesizers, a lag processor or slew limiter is used to
create a smooth transition between successive, discrete control voltage
levels. The rate of change is called the slew rate and one common application is to create a glide (aka portamento) effect between notes.
Among the possible destinations for gated sequences, tracks 2 and 4
offer a sequencer-only parameter called Slew. Slew behaves a little
differently from the other modulation destinations, in that it is not really
a destination at all. Instead, it affects the sequence in front of it. That is,
if Slew is the chosen destination for sequence 2, it controls sequence 1,
and Slew in sequence 4 controls sequence 3.
In the gated sequencer, Slew sets the slew rate between the previous
step’s value and the current step’s value when the step is gated on.
For example, let’s say sequence 1 is routed to oscillator frequency and
sequence 2 to Slew. Increasing the Slew value for step 4 will cause the
oscillator frequency to glide from the step 3 value when step 4 is gated
on. The higher the Slew value, the slower the slew rate. And the slew
rate can be different for each step. But its not just for oscillator glide.
Slew can be applied to any of the destinations. For example, sequence 3
could be routed to lter cutoff with Slew in sequence 4 used to create a
less abrupt transition from one step to the next.
50
Sequential Prophet Rev2 User’s Guide
Sequencer
51Sequencer
Page 33

Depending upon the BPM and Clock Divide settings, the slew rate can actually
exceed the time the envelopes are gated on, causing a step in the affected sequence
to not reach its set value. For example, if Slew is applied to oscillator frequency, high
Slew values may cause a step to sound at or sharp. If that’s not what you want,
simply reduce the Slew value.
Sequencer Parameters
Type: Gated, Poly—This switch toggles between the polyphonic
sequencer and the gated sequencer.
No Gate: In this mode, the envelopes respond to the keyboard/received
MIDI notes, and not by each advancing sequencer step. This mode is great
for complex parameter modulation of sounds with long envelope contours,
such as pad sounds. Each new key press/received MIDI note starts the
sequence for that key/note at step one.
No Gate No Reset: Same as No Gate, except that new key presses/
received MIDI notes do not begin the sequence for that note at step one.
Key Step: Striking any key or playing a note via MIDI advances the
sequencer one step.
Play: On, Off—This switch starts and stops polyphonic sequencer playback.
Record: On, Off—This switch turns sequencer recording/editing on and
off on the polyphonic sequencer.
Destination: Various—In the gated sequencer, this button allows you to
select a modulation destination for the currently selected track. Destinations appear in the display. Use the value knob to choose the destination.
Track: 1, 2, 3, 4—This knob allows you to select a track for recording or
editing.
Mode: Normal, No Reset, No Gate, No G/R,Key Step—Selects one of
the following operation modes for the gated sequencer:
Normal: Good for melodic and rhythmic sequences. With each step, the
envelopes are retriggered, so works best with shorter envelop contours. Each
new key press/received MIDI note starts the sequence for that key/note at step
one. When programming melodies, the note value you select is relative to the
note/key played, and not the actual note played back for that step. For example,
if you set track one to osc all freq., and set step one to C2, playing Middle C
on the keyboard will produce C two octaves above middle C on step one. A
value of C0 will produce the exact note that you play on the keyboard. A value
of G0 will produce the note a 5th above what you play on the keyboard.
No Reset: Same as Normal, except that new key presses/received MIDI
notes do not begin the sequence for that note at step one. In this sense,
the gated sequencer is free-running in No Reset mode. This makes is less
useful for melodies, but still great for rhythmic parameter changes.
Clock Parameters
BPM: 30…250—Sets the tempo for the sequencer and arpeggiator in BPM
(beats per minute). The tap tempo LED ashes at the BPM rate. When lfo
sync is turned on, the BPM rate affects the LFO frequency. When syncing to
an external MIDI clock source, the BPM setting has no effect.
Tap Tempo: 30…250—Tap this button at least 4 times to quickly set the
tempo for the sequencer and arpeggiator. The LED ashes at the BPM
rate you set.
Divide: Sets the note value for each sequencer/arpeggiator step relative
to the BPM. divide works with both internal and external clock sources.
The following table lists the values:
Name Tempo Timing Division
Half BPM/2 Half note
Qtr BPM Quarter note
8th BPM x 2 Eighth note
8th Half BPM x 2 Eighth note, half swing timing
8th Swing BPM x 2 Eighth note, full swing timing
8th Trip BPM x 3 Eighth note triplets
16th BPM x 4 Sixteenth note
16th Half BPM x 4 Sixteenth note, half swing timing
16th Swing BPM x 4 Sixteenth note, full swing timing
16th Trip BPM x 6 Sixteenth note triplets
32nd BPM x 8 Thirty-second note
32nd Trip BPM x 12 Thirty-second triplets
64th BPM x 16 Sixty-fourth note
52
Sequential Prophet Rev2 User’s Guide
Sequencer
53Sequencer
Page 34

Unison
HOLD
To use Unison:
When unison is on, the Prophet Rev2 functions like a monophonic
synthesizer in that only one note can be played at a time. However, that
one note can be powered by as many as 8 or 16 voices, depending on
how many you choose to use (and whether you have an 8 or 16-voice
Prophet Rev2). With many oscillators powering a single note, you can
create some very dense, speaker-rattling sounds.
If you want to create an ultra-heavy synth bass, try using Unison!
Unison gives you control over not only how many voices to stack, but
also the amount of detuning between the oscillators (with the unison
detune parameter in the misc params menu), and what note gets priority
if you happen to play more than one note on the keyboard. (This is
called the key assign mode or note priority. See “Key Modes and Unison
Mode” on page 56 for details.)
UNISON
The Unison button
1. Press the unison button.
2. Press the misc params button and use the parameter knob to scroll to
unison mode.
3. Use the value knob to choose the number of voices to stack.
4. To detune the oscillators while in unison, use the parameter knob to
scroll to unison detune in the misc params menu.
5. Use the value knob to choose the amount of detuning.
Using Chord Memory
Unison has another useful feature: chord memory. Instead of assigning
voices to a single note, hold down a chord on the keyboard and press the
unison button. The Prophet Rev2 memorizes the notes of the chord. Single
notes played on the keyboard will then trigger all notes of the stored chord,
transposing them as you play up or down the keyboard. Try using this
feature to create powerful chord stabs.
If you save a program that uses chord memory, the chord is saved with
the program.
To use chord memory:
Use this knob to
scroll to the
“Unison Mode”
Parameter
Use this knob to
select the number
of unison voices
(or chord memory)
Unison Mode parameter
54
PARAMETER
VALUE
U1 P1
Filter Sweep
Unison Mode
4 Voices
show
MISC PARAMS
120
Press to toggle on
Misc Parameters
Sequential Prophet Rev2 User’s Guide
1. Press the misc params button and use the parameter knob to scroll to
unison mode.
2. Turn the value knob fully clockwise to choose chord.
3. Hold down a chord on the keyboard.
4. Press the unison button. The chord voicing is memorized. Play a few
notes to listen to the result.
5. If you save the program, the unison chord memory is saved with it.
To store a different chord in chord memory:
1. With chord selected as the unison mode in the misc params menu, hold
down a different chord on the keyboard.
2. Press the unison button. The chord voicing is memorized. Play a few
notes to listen to the result.
Unison
55Unison
Page 35

To switch back to single-note unison mode:
1. Press the misc params button and use the parameter knob to scroll to
unison mode.
2. Turn the value knob to choose the number of voices to stack.
Key Modes and Unison Mode
Key Mode (sometimes called note priority) determines what note has
priority when more than one note is played on the keyboard or via MIDI.
This is particularly important when using Unison Mode:
• Low-Note Priority is most common in vintage synths and is often used
for playing trills by holding a note and repeatedly tapping a lower note.
• Low Retrigger causes the envelopes to be retriggered with each
keystroke.
• High Note and High Retrigger are similar to the low note settings,
except that the highest note is given priority.
• Last Note and Last Retrigger give priority to the last note played.
To choose the Key Mode:
1. Press the misc params button and use the parameter knob to scroll to
the desired mode.
Master Volume/Program Volume
The master output level of the Prophet Rev2 is controlled by the frontpanel master volume knob. In addition, the volume of an individual
program can be set with the misc params controls. This is useful for
ensuring that your sounds have roughly the same volume from program
to program. Unison sounds in particular can be very loud compared to
other programs.
U1 P1
Filter Sweep
Program Volume
MISC PARAMS
Program Volume
To set the volume of an individual program:
1. Choose a program.
120
127
show
Press to toggle on
Misc Parameters
2. Play a few notes to listen to the result.
Key Assign settings are only relevant to Unison mode. They do not affect poly-
phonic playback.
56
1. Press the misc params button and use the parameter knob to scroll to
program volume.
2. Hold down a chord on the keyboard.
3. Turn the value knob to set the volume level from 1 to 127.
4. Save the program. (See “Saving a Program” on page 4.)
MIDI volume can also inuence the overall volume of the Prophet Rev2 if you
are controlling it from an external MIDI source.
Sequential Prophet Rev2 User’s Guide
Master Volume/Program Volume
57Unison
Page 36

Pan Spread
MASTER VOLUME
Hold
Pan Spread, in the Amplier section, pans audio in the stereo eld individually per voice. Set to 0, all voices are panned to the center. As you
turn the pan spread knob clockwise, each voice is gradually moved away
from the center by greater amounts. Every other voice goes in a different
direction, left or right. This creates a broader stereo eld while playing.
AMPLIFIER
Pans individual voices
in the stereo field
Pan Spread
PAN SPREAD
ATTACK
ENV AMOUNT
DECAY
VELOCITY
SUSTAIN
DELAY
RELEASE
Transpose
The up and down buttons in the transpose section transpose the keyboard
up or down in octaves. The LED indicates the current keyboard transposition state. Transposing the keyboard also changes the MIDI note
numbers of the keys so that MIDI notes sent are also transposed. Transpose settings are global and are not saved with individual programs.
When hold is on, any notes played will continue to play until hold is
turned off. When used in conjunction with the arpeggiator, notes are
latched on. If hold is on and at least one key continuously held down,
any new notes played are added to the arpeggio.
HOLD
The Hold button
Glide
Glide causes the pitch of a note to glide up or down from the pitch of the
previously played note. Glide is turned on and off using the glide switch,
but the rate must also be set. If the glide button is on, but rate is set to
0, glide has no effect.
GLIDE
RATE
The Glide controls
Down
TRANSPOSE
The Transpose controls
58
Up
To use glide:
1. Press the glide button.
2. Play a series of notes up and down the keyboard while you turn the
rate knob to adjust the amount of glide.
To set the glide amount separately for each oscillator:
1. Press the glide button.
2. Press the misc params button and use the parameter knob to scroll to
osc 1 glide.
3. Turn the value knob to set the mode and play a series of notes up and
down the keyboard to hear the effect.
Sequential Prophet Rev2 User’s Guide
Hold
59Pan Spread
Page 37

4. Next, use the parameter knob to scroll to osc 2 glide.
5. Turn the value knob to set the mode and play a series of notes up and
down the keyboard to hear the effect.
There are four modes that determine how glide behaves.
Pitch and Mod Wheels
The Prophet Rev2 has a spring-loaded Pitch wheel and a Mod wheel.
You can use these controls to enhance live performance by bending notes
and adding modulation in real time as you play.
Fixed Rate: The time to transition between notes varies with the interval
between the notes; the greater the interval, the longer the transition time.
The glide rate is xed. This is the default glide mode.
Fixed Rate A: The same as Fixed Rate, but glide is only applied when
playing legato. That is, glide only occurs when a note is held until the
next note is played. This effectively allows glide to be turned on and off
from the keyboard.
Fixed Time: Glide is set to a xed time, regardless of the interval
between notes.
Fixed Time A: The same as Fixed Time, but glide only occurs when
playing legato.
To select a glide mode:
1. Press the glide button.
2. Press the misc params button and use the parameter knob to scroll to
glide mode.
3. Turn the value knob to set the mode.
4. Play a series of notes up and down the keyboard to hear the effect.
In the same way that guitar players use note bends and vibrato to give
their playing expressiveness and character, these two controls can help
you dene your sound as a performer and take you beyond just playing
notes on the keyboard.
Pitch Mod
The Pitch and Modulation wheels
Pitch Wheel
You can set a range in semitones for the pitch wheel, depending on your
playing preference. The range is up to 12 semitones (1 octave). Many
musicians use a range of 2 semitones (a whole step) since this is the bend
range of many acoustic instruments. For guitar whammy bar effects, you
many wish to set a wider range.
60
To set the pitch bend range:
1. Press the misc params button and use the parameter knob to scroll to
pitchbend range.
2. Turn the value knob to set the range in semitones.
3. Hold a note and move the pitch wheel wheel to hear the effect.
Sequential Prophet Rev2 User’s Guide
Pitch and Mod Wheels
61Glide
Page 38

Modulation Wheel
The mod wheel controls the amount of modulation for any program that
uses it as a modulation source. This allows you to “perform” modulation in
real time by moving the wheel. This is a great way to add expressiveness
to a sound or performance by using it to control vibrato, lter effects, and
potentially a lot more.
To choose a modulation destination for the Mod wheel:
1. In the modulation section, press the source button. Use the param-
eter knob next to the display to scroll to Mod Slot 1 if it’s not already
displayed.
2. Use the parameter knob to select the source eld. Use the value knob
to scroll through the various mod sources and choose mod wheel.
3. Use the parameter knob to select the dest eld. Use the value knob
to scroll through the various mod destinations and choose a parameter
(such as cutoff).
4. Hold down a note on the keyboard (or press the hold button and play a
note on the keyboard) and turn the mod wheel.
5. Use the parameter knob to select the amount eld. Use the value
knob to set the amount to your preference. Higher amount settings add
greater modulation the further you push the mod wheel. A negative
amount setting will apply modulation in the negative direction.
Adding Aftertouch
For example, if you select the lter cutoff as modulation destination
(cutoff), set a positive amount of pressure, then press the keys harder,
the lter cutoff frequency will increase, making the lter open wider and
the sound become brighter.
Conversely, if you select the lter frequency as destination, set a negative amount of pressure, then press the keys harder, the lter cutoff
frequency will be lowered, making the lter close more and the sound
become more muted.
To choose aftertouch (pressure) as a source for modulation:
1. In the modulation section, press the source button. Use the param-
eter knob next to the display to scroll to Mod Slot 1 if it’s not already
displayed.
2. Use the parameter knob to select the source eld. Use the value knob
to scroll through the various mod sources and choose pressure.
3. Use the parameter knob to select the dest eld. Use the value knob
to scroll through the various mod destinations and choose a parameter
(such as cutoff).
4. Hold down a note on the keyboard. Then, press harder.
5. Use the parameter knob to select the amount eld. Use the value
knob to set the amount to your preference. Higher amount settings
add greater modulation the harder you press a key. A negative amount
setting will apply modulation in the negative direction.
Aftertouch is a performance feature that allows you to add modulation to
a sound by applying additional pressure to a key after the key is already
down. The greater the pressure applied, the more modulation is applied.
The Prophet Rev2 provides monophonic (or “channel”) aftertouch,
which means that applying pressure to any key within a chord will apply
modulation to all notes currently held.
The modulation section lets you choose the amount of modulation
applied using aftertouch and also which parameters are modulated (oscil-
lator frequency, lter frequency, etc.). You can set either a positive or
negative amount.
62
Sequential Prophet Rev2 User’s Guide
The Prophet Rev2 provides four different pressure response settings for your
convenience. The default setting provides a linear response. To choose a different
response curve, use the pressure curve parameter in the global menu.
Adding Aftertouch
63Adding Aftertouch
Page 39

Misc Parameters
The misc parameters button allows you to access controls for a number
of essential functions, described below.
Program Volume: 0…127—The master output level of the Prophet Rev2
is controlled by the front-panel master volume knob. In addition, the
volume of an individual program can be set with the program volume
parameter. This is useful for ensuring that sounds have roughly the same
volume from program to program. Unison sounds in particular can be
very loud compared to other programs.
Osc 1 Note Reset: Off, On—When note reset is off, the oscillators are
free running, which is typically how analog synths behave. That is, the
oscillators are running whether a note is being gated on (played) or not.
When the amplier envelope is set for a fast attack, this can cause a
soft, but detectable, pop or click at the beginning of a note because the
note might be gated on at a point in the wave’s cycle other than a zero
crossing. The rst cycle to play might be truncated. For some sounds,
like monophonic basses, this may actually be desirable. It adds a bit of
randomness to the attack that can make it sound more organic. When
note reset is on, the wave is always reset to zero — the start of its cycle
— when a note is gated on.
Osc 2 Note Reset: Off, On—See the explanation above.
Osc 1 Key On/Off: Off, On—When on, the oscillator is controlled by the
keyboard or note data received via MIDI. When off, the oscillator plays
at its base frequency setting and its pitch doesn’t change when you play
notes on the keyboard (although its pitch may be affected by modulation
from other sources).
Osc 2 Key On/Off: Off, On—See the explanation above.
Pan Mod Mode: Alternate,Fixed—Designates the behavior of panning
when Pan is used as a modulation destination. Choosing alternate
directs modulation to the Pan Spread parameter, and thereby affects the
panning width of individual voices within a program. Choosing fixed
directs modulation to panning for the entire program.(In this case you
should set Pan Spread to zero.) For example, if you choose Mod Wheel
as a source and Pan as a destination in the mod matrix with an Amount
setting of 127, pushing the Mod Wheel to its full (top) position will pan
the sound hard right. An Amount of -127 will pan the sound hard left
when you push the Mod Wheel to its top position.
Glide Mode: Fixed Rate,Fixed Rate A,Fixed Time, Fixed Time A—Sets
the way the oscillators respond to Glide settings. See “Glide” on page
59for more details.
Osc 1 Glide: 1...127—While the glide rate knobs sets the same amount
of glide for both oscillators simultaneously, you can use the osc glide 1
parameter to set an individual glide amount for Oscillator 1.
Osc 2 Glide: 1...127—While the glide rate knobs sets the same amount
of glide for both oscillators simultaneously, you can use the osc glide 2
parameter to set an individual glide amount for Oscillator 2.
Pitchbend Range: 1...12—Sets the bend range, in semitones, of the
pitch wheel. The setting is the range in the positive or negative direction.
For example, a setting of 7 lets you bend a note up or down by a fth.
Unison Mode: 1...16, Chord—Sets the number of voices stacked
when unison is enabled. Choosing chord, enables chord memory. See
“Unison” on page 54 for more details.
Unison Detune: 0…16—When unison is enabled, unison detune allows
you to detune the unison voices by a variable amount.
64
Sequential Prophet Rev2 User’s Guide
Adding Aftertouch
65Adding Aftertouch
Page 40

Key Mode: Low, Hi,Last, LowR, HiR, LastR—Sometimes called “note
priority,” this determines what note has priority when more than one note
is played on the keyboard or via MIDI when unison mode is enabled:
• Low-Note Priority is most common in vintage synths and is often used
for playing trills by holding a note and repeatedly tapping a lower note.
• Low Retrigger causes the envelopes to be retriggered with each
keystroke.
• High Note and High Retrigger are similar to the low note settings,
except that the highest note is given priority.
Exporting Programs and Banks
You can use the pgm dump command in the global menu to transmit the
current program, bank, or all banks in SysEx format via the selected
MIDI port. This allows you to save your programs so that you can share
them or archive them. You will need a computer and software application
such as SysEx Librarian for Macintosh, or MIDIOX for Windows.
To export a program or bank as a SysEx le over MIDI:
1. Connect your synthesizer to a computer using a USB cable.
• Last Note and Last Retrigger give priority to the last note played.
Env 3 Repeat: Off, On—When on, the Delay, Attack, and Decay
segments of the envelope repeat. Sustain still affects the level at which
the Decay segment ends, but instead of sustaining at a xed level while
a note is gated on, Delay, Attack, and Decay loop until the note is turned
off. The Release segment begins when the note is gated off, just as it
does when Repeat is off.
VCA Level: 1...127—Sets a base level for the VCA (Voltage Controlled
Amplier). This allows the VCA to be bypassed for programs that drone.
If VCA LEVEL is on full, Envelope Amount has no effect. For typical keyboard
playing, VCA LEVEL is set to zero.
Split Point: C-2...C8—Sets the split point for Layer B in Split A|B mode.
In split mode, playing a key on the left side of the keyboard will play the
Layer A sound and playing a key on the right side will play the Layer B
sound. Polyphony is allocated equally between the two sounds, half of
the available voices on Layer A and half on Layer B. The split point is
saved with the program.
2. Open your MIDI librarian software (SysEx Librarian, etc.) and congure it to receive SysEx messages.
3. Press the global button on your synth.
4. Use the parameter knob to select midi sysex cable, then use the value
knob to choose usb.
5. Use the parameter knob to select dump prog, dump bank, or dump all
banks, depending on which of these you would like to do.
6. Press write. The program or bank is exported
Dumped programs will load back into the same bank and program location in
memory when received by the Prophet Rev2 via MIDI.
66
Sequential Prophet Rev2 User’s Guide
Exporting Programs and Banks
67Adding Aftertouch
Page 41

Programs can also be dumped directly from one Rev2 to another using
the MIDI DIN jack, if the midi sysex cable parameter is set to midi in the
global menu.
To export a program or bank as a SysEx le over MIDI:
5. In the MIDI librarian, open the programs and/or banks you want to send.
6. Transmit the programs. The Prophet Rev2 should load them. They will
replace any existing programs in those memory locations on the synth.
1. Connect two Rev2 synthesizers together using MIDI cables and the
midi in and midi out jacks on their rear panels.
2. Press the global button on Rev2 that you want to send programs from.
3. On both synthesizers, use the parameter knob to select midi sysex
cable, then use the value knob to choose midi.
4. On the Rev2 that you want to send the programs from, press the global
button (if it’s not already on) and use the parameter knob to select
dump prog, dump bank, or dump all banks, depending on which of
these you would like to do.
5. Press write. The program or bank is exported to the other Rev2.
Importing Programs and Banks
You can use a MIDI librarian application such as such as SysEx Librarian for Macintosh, or MIDIOX for Windows to transmit exported
program or banks back into your Prophet Rev2. You will need a
computer and an appropriate software application.
The Prophet Rev2 is compatible with Prophet ’08 sounds, so you can
import any Prophet ’08’ programs and they will sound just as good, if not
better!
To import a program or bank as a SysEx le over MIDI:
1. Connect your synthesizer to a computer using a USB cable (or MIDI
cable, if you are using a dedicated MIDI interface).
2. Press the global button on your Rev2.
3. Use the parameter knob to select midi sysex cable, then use the value
knob to choose either usb or midi, depending on which port you are
using to connect to your computer.
Programs will load back into the same bank and program locations from which
they were originally exported.
Calibrating the Prophet Rev2
Because the Prophet Rev2 is calibrated at the factory, controls such as
the Pitch and Mod wheels shouldn’t require re-calibration. However, if
for some reason you experience unexpected behavior with these controls,
you can use the built-in calibration function to tune them occasionally.
Calibrating the Oscillators and Filters
To calibrate the oscillators and lters:
1. Press the global button.
2. Use the parameter knob to select calibrate, then press the write button.
3. The synthesizer performs its auto-calibration procedure. Don’t turn off
the power while it’s doing this.
4. When nished, the front panel controls will return to normal and you
can play the Prophet Rev2 again.
Calibrating the Pitch and Mod Wheels
To calibrate the Pitch and Mod wheels:
1. Press the global button.
2. Use the parameter knob to select calibrate wheels, then follow the
instructions in the display.
3. When nished, the front panel controls will return to normal and you
can play the Prophet Rev2 again.
4. Open your MIDI librarian software and congure it to send SysEx
messages to your synthesizer.
68
Sequential Prophet Rev2 User’s Guide
Calibrating the Prophet Rev2
69Importing Programs and Banks
Page 42

Resetting the Global Parameters
If you’re trying to track down a problem, it’s sometimes a good idea to
reset the Global parameters to their defaults. This is a quick way to make
sure that the Prophet Rev2 returns to its factory settings.
To reset all Global parameters to their default settings:
1. Press the global button.
2. Use the parameter knob to select reset globals, then press write.
Using USB
The Prophet Rev2’s USB 2.0 port enables bidirectional MIDI communication with a computer. A MIDI interface and MIDI cables are not
necessary, just a USB cable. The Prophet Rev2 is a Class Compliant
USB device. That means it does not require any additional drivers to be
installed to communicate with a Mac or Windows computer. The Prophet
Rev2 transmits and receives MIDI data via USB, but does not transmit
audio.
In Windows, if you unplug the USB cable and plug it back in while a
program has the Prophet Rev2 port open, you may have to resync. That
usually means going to the Prophet Rev2 Keyboard Properties — in the
Windows Device Manager under “Sound, video, and game controllers”
— and clicking OK. If Prophet Rev2 Keyboard is no longer listed in the
Device Manager, power the Prophet Rev2 down and back up again while
it is connected via USB. It should be detected on power up.
MIDI In and USB should not be used at the same time, as overlapping
messages from different sources may cause the Prophet Rev2 to respond unpredictably. MIDI Out and USB can be used at the same time and transmit the same data.
USB Notes
Under Mac OS X, “Prophet Rev2 Keyboard” will appear as a MIDI port
when connected via USB and can be congured using the Mac’s Audio
MIDI Setup utility (typically found in Applications/Utilities).
Under Windows, the rst time the Prophet Rev2 is connected via USB,
the “Found new hardware” alert appears and it is automatically installed
as “Prophet Rev2 Keyboard.”
70
Sequential Prophet Rev2 User’s Guide
Using USB
71Using USB
Page 43

Appendix A:
Appendix B:
Modulation Sources
Off
Seq 1
Seq 2
Seq 3
Seq 4
LFO 1
LFO 2
LFO 3
LFO 4
Env LPF
Env VCA
Env 3
Pitchbend
Mod Wheel
Pressure
Breath
Foot Pedal
Expression Pedal
Velocity
Note Number
Noise
DC
Audio Out *
* Audio Out is the digitized audio signal after the
Amplier VCA.
Modulation Destinations
Off
Osc 1 Freq
Osc 2 Freq
Osc All Freq
Osc 1 Level
Osc Mix
Noise Level
Sub Osc Level
Osc 1 Shape
Osc 2 Shape
Osc All Shape
Filter Cutoff
Filter Resonance
Filter Audio Mod
VCA
Pan
LFO 1 Freq
LFO 2 Freq
LFO 3 Freq
LFO 4 Freq
LFO All Freq
LFO 1 Amount
LFO 2 Amount
LFO 3 Amount
LFO 4 Amount
LFO All Amount
LP Filter Env Amount
Amp Env Amount
Env 3 Amount
Env All Amount
LPF Attack
VCA Attack
Env 3 Attack
Env All Attack
LPF Decay
VCA Decay
Env 3 Decay
Env All Decay
LPF Release
VCA Release
Env 3 Release
Env All Release
Mod 1 Amount
Mod 2 Amount
Mod 3 Amount
Mod 4 Amount
Mod 5 Amount
Mod 6 Amount
Mod 7 Amount
Mod 8 Amount
Osc Slop
FX Mix
FX Param 1
FX Param 2
72
Sequential Prophet Rev2 User’s Guide
Appendix B: Modulation Destinations
73Appendix A: Modulation Sources
Page 44

Appendix C: Alternative Tunings
By default, the Prophet Rev2 is set to standard, chromatic western
tuning. Additionally, it supports up to 16 additional alternative tunings,
which you can access using the alt tunings parameter in the global
menu.
From the factory, the Prophet Rev2 ships with 16 preset alternative
tunings ranging from Equal temperament to Indonesian Gamelan
tunings. If you want, you can replace these with other tunings that you
can nd on the Internet. These must be in SysEx format. You can download them into the Prophet Rev2 using SysEx Librarian for Mac or
MIDI-OX for Windows.
Here are descriptions of the default alternative tunings:
5. 1/4 Tone Equal Temperament
24 notes per octave, equally spaced 24root2 intervals. Mexican composer
Julian Carillo used this for custom-built pianos in the early 20th century.
6. 19 Tone Equal Temperament
19 notes per octave (19root2) offering better thirds than 12 ET, a better
overall compromise if you can gure out the keyboard patterns.
7. 31 Tone Equal Temperament
Many people consider 31root2 to offer the best compromise towards just
intonation in an equal temperament, but it can get very tricky to keep
track of the intervals.
1. 12-Tone Equal Temperament (non-erasable)
The default Western tuning, based on the twelfth root of two.
2. Harmonic Series
MIDI notes 36-95 reect harmonics 2 through 60 based on the fundamental of A = 27.5 Hz. The low C on a standard 5 octave keyboard acts
as the root note (55Hz), and the harmonics play upwards from there. The
remaining keys above and below the 5 octave range are lled with the
same intervals as Carlos’ Harmonic 12 Tone that follows.
3. Carlos Harmonic Twelve Tone
Wendy Carlos’ twelve note scale based on octave-repeating harmonics.
A = 1/1 (440 Hz). 1/1 17/16 9/8 19/16 5/4 21/16 11/8 3/2 13/8 27/16 7/4
15/8
4. Meantone Temperament
An early tempered tuning, with better thirds than 12ET. Sounds best in
the key of C. Use this to add an authentic touch to performances of early
Baroque music. C=1/1 (260 Hz)
8. Pythagorean C
One of the earliest tuning systems known from history, the Pythagorean
scale is constructed from an upward series of pure fths (3/2) transposed
down into a single octave. The tuning works well for monophonic melo-
dies against fth drones, but has a very narrow palate of good chords to
choose from. C=1/1 (261.625 Hz)
1/1 256/243 9/8 32/27 81/64 4/3 729/512 3/2 128/81 27/16 16/9 243/128
9. Just Intonation in A with 7-Limit Tritone at D#
A rather vanilla 5-limit small interval JI, except for a single 7/5 tritone
at D#, which offers some nice possibilities for rotating around bluesy
sevenths. A=1/1 (440 Hz) 1/1 16/15 9/8 6/5 5/4 7/5 3/2 8/5 5/3 9/5 15/8
10. 3-5 Lattice in A
A pure 3 and 5-limit tuning which resolves to very symmetrical derived
relationships between notes. A=1/1 (440 Hz)
1/1 16/15 10/9 6/5 5/4 4/3 64/45 3/2 8/5 5/3 16/9 15/8
74
Sequential Prophet Rev2 User’s Guide
Appendix C: Alternative Tunings
75Appendix C: Alternative Tunings
Page 45

11. 3-7 Lattice in A
A pure 3 and 7-limit tuning which resolves to very symmetrical derived
relationships between notes. Some of the intervals are very close
together, offering several choices for the same nominal chords. A=1/1
(440 Hz)
1/1 9/8 8/7 7/6 9/7 21/16 4/3 3/2 32/21 12/7 7/4 63/32
12. Other Music 7-Limit Black Keys in C
Created by the group Other Music for their homemade gamelan, this
offers a wide range of interesting chords and modes. C=1/1 (261.625 Hz)
1/1 15/14 9/8 7/6 5/4 4/3 7/5 3/2 14/9 5/3 7/4 15/8
16. Harry Partch 11-Limit 43 Note Just Intonation
One of the pioneers of modern microtonal composition, Partch built
a unique orchestra with this tuning during the rst half of the 20th
century, to perform his own compositions. The large number of intervals
in this very dense scale offers a full vocabulary of expressive chords
and complex key changes. The narrow spacing also allows xed-
pitched instruments like marimbas and organs to perform glissando-like
passages. G = 1/1 (392 Hz, MIDI note 67)
1/1 81/80 33/32 21/20 16/15 12/11 11/10 10/9 9/8 8/7 7/6 32/27 6/5 11/9
5/4 14/11 9/7 21/16 4/3 27/20 11/8 7/5 10/7 16/11 40/27 3/2 32/21 14/9
11/7 8/5 18/11 5/3 27/16 12/7 7/4 16/9 9/5 20/11 11/6 15/8 40/21 64/33
160/81
13. Dan Schmidt Pelog/Slendro
Created for the Berkeley Gamelan group, this tuning ts an Indonesian-
style heptatonic Pelog on the white keys and pentatonic Slendro on the
black keys, with B and Bb acting as 1/1 for their respective modes. Note
that some of the notes will have the same frequency. By tuning the 1/1 to
60 Hz, Dan found a creative way to incorporate the inevitable line hum
into his scale. Bb, B = 1/1 (60 Hz)
1/1 1/1 9/8 7/6 5/4 4/3 11/8 3/2 3/2 7/4 7/4 15/8
14. Yamaha Just Major C
When Yamaha decided to put preset microtunings into their FM synth
product line, they selected this and the following tuning as representative
just intonations. As such, they became the de-facto introduction to JI for
many people. Just Major gives preferential treatment to major thirds on
the sharps, and a good fourth relative to the second. C= 1/1 (261.625)
1/1 16/15 9/8 6/5 5/4 4/3 45/32 3/2 8/5 5/3 16/9 15/8
15. Yamaha Just Minor C
Similar to Yamaha’s preset Just Major, the Just Minor gives preferential
treatment to minor thirds on the sharps, and has a good fth relative to
the second. C= 1/1 (261.625) 1/1 25/24 10/9 6/5 5/4 4/3 45/32 3/2 8/5
5/3 16/9 15/8
17. Arabic 12-Tone
A 12-tone approximation of an Arabic scale, which appears in some electronic keyboards designed for use with Arabic music. Not a JI scale, nor
equal tempered. These are the intervals in Cents relative to C:
60 = Cents 0
61 = Cents +151
62 = Cents +204
63 = Cents +294
64 = Cents +355
65 = Cents +498
66 = Cents +649
67 = Cents +702
68 = Cents +853
69 = Cents +906
70 = Cents +996
71 = Cents +1057
72 = Cents +1200
76
Sequential Prophet Rev2 User’s Guide
Appendix C: Alternative Tunings
77Appendix C: Alternative Tunings
Page 46

Appendix D: Troubleshooting and Support
Troubleshooting
If you’re experiencing problems or unexpected behavior from your
Prophet Rev2, here are a few typical scenarios and their solutions:
If the Prophet Rev2 is behaving erratically.
• This is almost always caused by a MIDI data loop. Make sure that any
MIDI Thru functionality is turned off on the MIDI interface/hardware
or in the MIDI software application. Disconnect all the Prophet Rev2’s
MIDI connections—MIDI and USB cables—and see if the problem
persists. You can also monitor the MIDI trafc with MIDI Monitor
(Mac OS) or MIDI-OX (Windows) to see if the Prophet Rev2 is being
overrun with duplicate messages.
If the Prophet Rev2 isn’t producing sound:.
1. Initialize a basic preset by holding the Transpose down and up buttons
and pressing the hold button.
2. If the problem is still there, check the following:
• Master Volume - make sure it is set to an appropriate value
• Rear-panel output jacks - make your audio cables are connected to main/a
output.
• In the global menu, make sure that local control is set to on.
If the sequencer or arpeggiator has stopped running:
• Check the midi clock mode setting in global to ensure the Prophet
Rev2 is set to master or off. Or if set to slave or slave thru or slave
no s/s, make sure the Prophet Rev2 is receiving MIDI clock.
If some of the programs sound different than usual:
• In the Global menu, check alt tunings and make sure it’s set to equal
temperament. Also, check the mod wheel position. The mod wheel can
do more than just add vibrato. Also, check the midi clock mode setting
in the global menu to ensure the Prophet Rev2 is set to master or off.
Or if set to slave or slave thru or slave no s/s, make sure the Prophet
Rev2 is receiving MIDI clock.
If the Prophet Rev2 doesn’t seem to respond to its controls:
• Make sure local control is on in the global menu.
If MIDI System Exclusive data is not transmitted/received:
• Make sure that the midi sysex cable setting in the global menu is set
to usb or midi depending on which you are using to transmit or receive
MIDI messages.
If the Prophet Rev2 plays out of tune:
• Check the master coarse and master fine parameter in the global
menu. If they seem correct, you may need to retune the oscillators. See
“Calibrating the Oscillators and Filters” on page 69.
If the pitch or mod wheel doesn’t go to full range:
• Recalibrate the pitch and mod wheels. See “Calibrating the Pitch and
Mod Wheels” on page 69.
If the lter sounds strange or out of tune:
• You may need to retune the lters. See “Calibrating the Oscillators and
Filters” on page 69.
If there is a ground hum in the audio output:
• USB can cause ground loops, so try to resolve any grounding issues
between the computer and the Prophet Rev2. Or use MIDI, which is optoisolated.
78
Sequential Prophet Rev2 User’s Guide
Appendix D: Troubleshooting and Support
79Appendix D: Troubleshooting and Support
Page 47

If the OS fails to load correctly when you update:
• The Prophet Rev2 is equipped with a MIDI bootloader, which will
allow you to reload the OS in the event you accidentally “brick” your
synth (permanently freeze it) while updating its OS.
To restore your Prophet Rev2 if it is frozen.
1. Power on the Prophet Rev2 while holding the glide switch to enter
bootloader mode. You’ll see a message in the display.
2. Use a MIDI cable (not USB) to transmit the new OS to your synth. You
must use a standard MIDI cable for this. USB MIDI doesn’t work in
bootloader mode.
3. As the OS loads, you will see the main display count upward from zero
to 99. When it reaches 99, a second count will begin. Do not power
down. The Prophet Rev2 will restart itself when it is done.
Contacting Technical Support
If you are still having a problem with the Prophet Rev2, contact
Technical Support at support@sequential.com. Please include your
Prophet Rev2’s serial number, the version of the operating system
(displayed when the Global button/menu is enabled), and the purchase
date.
Warranty Repair
Sequential warrants that the Prophet Rev2 will be free from defects in
materials and/or workmanship for 1 year from the date of purchase.
Please register your product online at www.sequential.com to establish
the date of purchase. (This is not a requirement for warranty service, but
it will help expedite the process.)
Please contact support@sequential.com to determine the best course of
action for getting your Prophet Rev2 repaired. For your own protection,
as well as ours, please do not return any product to Sequential without
a return authorization (RA) number. To issue an RA number, Technical
Support needs:
• Your name
• Your return address
• Your email address
• A phone number where you can be reached
• Your Prophet Rev2’s serial number
• The date of purchase and where purchased
If you need to return your instrument for repair, you are responsible for
getting it to Sequential. We highly recommend insuring it and packing in
the original packaging. Damage resulting from shipping a product with
insufcient packaging is not covered by warranty.
If you have not already reset the Global parameters and run the calibration
routines (see Troubleshooting), you should do it before contacting Technical Support.
It’s probably the rst thing they’ll ask you to do.
80
Sequential Prophet Rev2 User’s Guide
Appendix D: Troubleshooting and Support
81Appendix D: Troubleshooting and Support
Page 48

Appendix E: MIDI Implementation
The Prophet Rev2 receives MIDI data according to the settings you have
chosen in globals. In addition, there is interaction between some of the
program parameters that determine the overall response of Prophet Rev2
to MIDI data. Following are the globals parameters that affect response
to MIDI:
MIDI Channel: All, 1…16—Selects which MIDI channel to send and
receive data, 1 to 16. All receives on all 16 channels.
MIDI Clock Mode: Sets the Prophet Rev2’s ability to send and receive
MIDI clock messages:
• Off: MIDI Clock is neither sent nor received
MIDI Prog Enable: Off, On—When set to On, the synth will respond to
MIDI controllers, including pitch wheel, mod wheel, pedal, and volume.
MIDI SysEx Cable: MIDI, USB—When set to MIDI it will receive
and transmit them using the MIDI ports/cables When set to USB it
will receive and transmit them using the USB port/cable. MIDI SysEx
messages are used when sending and receiving a variety of data including, programs, alternative tunings, system updates, and more.
MIDI Out Select: MIDI, USB—Sets the port by which MIDI data will be
transmitted.
MIDI Messages
• Master: MIDI Clock is sent, but not received
• Slave: MIDI Clock is received, but not sent
• Slave Thru: MIDI Clock is received and passed to MIDI Out
• Slave No S/S (no start and stop): Receives MIDI Clock but does not
respond to MIDI Start or Stop command.
When set to slave or slave thru, if no MIDI clock is present at the selected input,
the arpeggiator and sequencer will not function.
MIDI Clock Cable: MIDI Port, USB—Sets the port, MIDI or USB, by
which MIDI clock signals are received.
MIDI Param Send: Off, CC, NRPN—Changes to the values of front panel
controls are transmitted via MIDI as Continuous Controllers (CC) or
Non-Registered Parameter Number (NRPN). Transmission of parameters
can also be turned off.
NRPNs are the preferred method of parameter transmission, since they cover
the complete range of all parameters, while CCs are limited to a range of 128.
System Real-Time Messages
Status Description
1111 1000 MIDI Timing Clock
Received Channel Messages
Status Second Third Description
1000 nnnn 0kkkkkkk 0vvvvvvv Note Off. Velocity is ignored
1001 nnnn 0kkkkkkk 0vvvvvvv Note On. Note off if vvvvvvv = 0
1010 nnnn 0kkkkkkk 0vvvvvvv Polyphonic Key Pressure
1011 nnnn 0vvvvvvv 0vvvvvvv Control Change; see “Received Controller Messages”
1100 nnnn 0ppppppp Program change, 0-127 for Programs 1-127 within
current Bank
1101 nnnn 0vvvvvvv Channel Pressure
1110 nnnn 0vvvvvvv 0vvvvvvv Pitch Bend LS Byte then MS Byte
Notes: 0kkkkkkk Note number 0 — 127
nnnn Channel number 0 to 15 (MIDI channel 1-16).
Ignored if MIDI channel set to ALL
0vvvvvvv Value
Param Rcv: Off, CC, NRPN—Sets the method by which parameter changes
are received via MIDI. As with transmission, NRPNs are the preferred method.
82
Sequential Prophet Rev2 User’s Guide
Appendix E: MIDI Implementation
83Appendix E: MIDI Implementation
Page 49

Received Controller Messages
Status Second Third Description
1011 nnnn 0000 0001 0vvvvvvv Mod Wheel: directly assignable controller
1011 nnnn 0000 0100 0vvvvvvv Foot Controller: directly assignable controller
1011 nnnn 0000 0111 0vvvvvvv Volume: Combined with Master Volume and Program
Volume
1011 nnnn 0100 1010 0vvvvvvv Brightness: Added to lter cutoff frequency
1011 nnnn 0010 0000 0vvvvvvv Bank Select: 1 - 4 select user banks 1 - 4; 5 - 8 select
factory banks 1 - 4; others ignored
1011 nnnn 0100 0000 0vvvvvvv Damper pedal: Holds envelopes in Sustain if 0100 0000
or higher
1011 nnnn 0111 1011 0vvvvvvv All Notes Off: Clear all MIDI notes
1011 nnnn 0111 1001 0vvvvvvv Reset All Controllers: Clears all MIDI controllers to 0,
MIDI volume to maximum
See sections below for additional Continuous Controller (CC) and NonRegistered Parameter Number (NRPN) messages received.
Transmitted Channel Messages
Status Second Third Description
1000 nnnn 0kkkkkkk 0000000 Note Off.
1001 nnnn 0kkkkkkk 0vvvvvvv Note On.
1011 nnnn 0vvvvvvv 0vvvvvvv Control Change; see “Transmitted Controller Messages”
1100 nnnn 0ppppppp Program change, 0-127 for Programs 00-128 within
current Bank
1101 nnnn 0vvvvvvv Channel Pressure
1110 nnnn 0vvvvvvv 0vvvvvvv Pitch Bend LS Byte then MS Byte
Transmitted Controller Messages
Status Second Third Description
1011 nnnn 0000 0001 0vvvvvvv Mod Wheel
1011 nnnn 0000 0010 0vvvvvvv Breat Controller: When assigned to Pedal/CV
1011 nnnn 0000 0100 0vvvvvvv Foot Controller: When assigned to Pedal/CV
1011 nnnn 0000 1101 0vvvvvvv Expression: When assigned to Pedal/CV
1011 nnnn 0000 0111 0vvvvvvv Volume: When assigned to Pedal/CV
1011 nnnn 0100 1010 0vvvvvvv Brightness: Assigned to Pedal/CV
1011 nnnn 0010 0000 0vvvvvvv Bank Select: 0 - 9
1011 nnnn 0100 0000 0vvvvvvv Damper pedal: Sends 0 if off, 0111 1111 when on
1011 nnnn 0000 0111 0vvvvvvv Volume knob
See sections that follow for additional Continuous Controller (CC) and
Non-Registered Parameter Number (NRPN) messages transmitted.
Notes: 0kkkkkkk Note number 0 — 127
nnnn Channel number 0 to 15 (MIDI channel 1-16).
Ignored if MIDI channel set to ALL
0vvvvvvv Value
84
Sequential Prophet Rev2 User’s Guide
Appendix E: MIDI Implementation
85Appendix E: MIDI Implementation
Page 50

Additional Continuous Controllers Transmitted/Received
The following table details how MIDI Continuous Controllers (CCs) are
mapped to Rev2 controls. They are transmitted when Param Xmit is set
to CC, and recognized/received when MIDI Rcv Receive is set to CC.
CC# Param
1
Mod Wheel
3
FX Type
5
Glide Mode
7
Master Volume
8
Sub Oscillator
9
Osc. Slop
10
Pan Mod Mode
12
FX Param 1
13
FX Param 2
14
BPM
15
Clock Divide
16
FX On/Off
17
FX Mix
18
A/B Mode
19
Sequencer Type
20
Osc 1 Frequency
21
Osc 1 Fine Tune
22
Osc 1 Shape
23
Osc 1 Glide Rate/Time
24
Osc 2 Frequency
25
Osc 2 Fine Tune
26
Osc 2 Shape
27
Osc 2 Glide Rate/Time
28
Osc Mix
29
Noise Level
30
Osc 1 Shape Mod
31
Osc 2 Shape Mod
33
Arp On/Off
34
Arp Mode
35
Arp Range
36
Arp Repeats
37
Voice Volume
CC# Param
39
Split Point
64
Sustain Pedal
65
Glide On/Off
75
Amp Sustain
76
Amp Release
77
Env 3 Sustain
78
Env 3 Release
85
Env 3 Destination
86
Env 3 Amount
87
Env 3 Velocity
88
Env 3 Delay
89
Env 3 Attack
90
Env 3 Decay
102
Filter Frequency
103
Resonance
104
Filter Key Amount
105
Filter Audio Mod
106
Filter Env. Amount
107
Filter Env. Velocity
108
Filter Delay
109
Filter Attack
110
Filter Decay
111
Filter Sustain
112
Filter Release
113
VCA Level
114
Pan Spread
115
Amp Env. Amount
116
Amp Env. Velocity
117
Amp Delay
118
Amp Attack
119
Amp Decay
NRPN Messages
The Non-Registered Parameter Number (NRPN) MIDI messages are
used to transmit and receive both global and program parameters. They
are transmitted when MIDI Parameter Send is set to NRPN in globals,
and received when MIDI Parameter Receive is set to NRPN in globals.
The messages are handled in standard MIDI format using the NRPN CC
commands in running status byte format. Below is the format used for
transmitting a NRPN parameter.
Transmitted NRPN Messages
Status Description
1011 nnnn Control Change
0110 0011 NRPN parameter number MSB CC
0vvv vvvv Parameter Number MSB
0110 0010 NRPN parameter number LSB CC
0vvv vvvv Parameter Number LSB
0000 0110 NRPN parameter value MSB CC
0vvv vvvv Parameter value MSB
0010 0110 NRPN parameter value LSB CC
0vvv vvvv Parameter value LSB
The parameter number can be found in the two tables below, one for
global parameters, and the other for program parameters. The parameter
numbers and the parameter values are broken into two 7-bit bytes for
MIDI transmission; the LSB has the seven least-signicant bits, and the
MSB has the seven most-signicant bits, though in most cases the MSB
will be zero or one, and never more than two.
When receiving an NRPN, all messages do not necessarily need to be
transmitted, since the synth will track the most recent NRPN number,
though it is usually good practice to send the entire message above.
Once an NRPN is selected, the synth will also respond to NRPN Data
Increment and Decrement commands, which some controllers utilize.
Finally, it responds to one RPN (Registered Parameter Number)
command, the RPN/NRPN Reset command, which can be handy for
resetting the currently selected parameter to a known state.
86
Sequential Prophet Rev2 User’s Guide
Appendix E: MIDI Implementation
87Appendix E: MIDI Implementation
Page 51

Received NRPN Messages
Status Second Third Description
1011 nnnn 0110 0011 0vvvvvvv NRPN parameter number MSB CC
1011 nnnn 0110 0010 0vvvvvvv NRPN parameter number LSB CC
1011 nnnn 0000 0110 0vvvvvvv NRPN parameter value MSB CC
1011 nnnn 0010 0110 0vvvvvvv NRPN parameter value LSB CC
1011 nnnn 0110 0000 0xxxxxxx NRPN parameter value Increment
1011 nnnn 0110 0001 0xxxxxxx NRPN parameter value Decrement
1011 nnnn 0010 0101 0 111111 RPN parameter number MSB CC - Reset NRPN param-
eter number (when both MSB and LSB received)
1011 nnnn 0010 0100 0 111111 RPN parameter number LSB CC - Reset NRPN param-
eter number (when both MSB and LSB received)
Global Parameter Data
The table shows the global data sent and received on global parameter
dumps, and corresponding NRPN number when sent/received individually.
NRPN Range Description
4097 0-24 Master Coarse Tune
4096 0-50 Master Fine Tune
4098 0-16 MIDI Channel
0 = All
4099 0-4 MIDI Clock Mode
0 = Off
1 = Master
2 = Slave
3 = Slave Thru
4100 0-1 MIDI Clock Cable
0 = MIDI Port
1 = USB
4101 0-2 MIDI Param Send*
0 = NRPN
1 = CC
2= Off
4102 0-2 MIDI Param Receive†
0 = NRPN
1 = CC
2= Off
4103 0-1 MIDI Control Enable
0 = Off
1 = On
4104 0-1 MIDI SysEx Cable
0 = MIDI
1 = USB
4105 0-2 MIDI Out Select
0 = Off
1 = MIDI
2 = USB
3 = MIDI+USB
4107 0-1 Local Control*
0 = Off
1 = On
4109 0-2 Pot Mode
0 = Relative
1= PassThru
2 = Jump
4111 0-3 Seq Pedal Mode
0 = normal
1= trigger
2= gate
3= trigger+gate
NRPN Range Description
4112 0-1
4113 0-7
Sustain Polarity
0 = normally open
1= normally closed
2= Sustain Normally Open/
Sequencer Normally Closed
3= Sustain Normally Closed/
Sequencer Normally Open
Velocity Curve
4114 0-3 Pressure Curve
4115 0-1 Mono/Stereo
Mono/Stereo
0 = Stereo
1 = Mono
4116 0-16 Alt. Tunings
4118 0-1 MIDI Prog Enable
0 = Off
1 = On
4119 0-1 Multi Mode
0 = Off
1 = On
4120 0-1 Screen Saver
0 = Off
1 = On
4121 0-1 Sustain/Arp
4190 0-1 Layer A/B Switch
*Controller received, but not transmitted.
†Controller transmitted, but ignored when received.
88
Sequential Prophet Rev2 User’s Guide
Appendix E: MIDI Implementation
89Appendix E: MIDI Implementation
Page 52

Program Parameter Data
The following table lists Rev2’s program parameters.
NRPN Layer ANRPN Layer BValue Description
0 2048 0-120 Osc 1 Freq
1 2049 0-100 Osc 1 Freq Fine
2 2050 0-4 Osc 1 Shape
3 2051 0-127 Osc 1 Glide
4 2052 0-1 Osc. 1 KBD on/off
5 2053 0-120 Osc 2 Freq
6 2054 0-100 Osc 2 Freq Fine
7 2055 0-4 Osc 2 Shape
8 2056 0-127 Osc 2 Glide
9 2057 0-1 Osc 2 Kbd on/off
10 2058 0-1 Sync On/Off
11 2059 0-3 Glide Mode
12 2060 0-127 Slop
13 2061 0-127 Osc Mix
14 2062 0-127 Noise
15 2063 0-164 Filter Cutoff
16 2064 0-127 Filter Resonance
17 2065 0-127 Keyboard Tracking
18 2066 0-127 Audio Mod
19 2067 0-1 2 pole/4 pole mode
20 2068 0-254 Filter Envelope Amt
21 2069 0-127 Filter Envelope Vel
22 2070 0-127 Filter Envelope Dly
23 2071 0-127 Filt Env Attack
24 2072 0-127 Filt Env Decay
25 2073 0-127 Filt Env Sustain
26 2074 0-127 Filt Env Release
28 2076 0-127 Pan Spread
29 2077 0-127 Program Volume
30 2078 0-127 VCA Env. Amt
31 2079 0-127 VCA Env. Velo.
NRPN Layer ANRPN Layer BValue Description
32 2080 0-127 VCA Env. Del.
33 2081 0-127 VCA Env. A
34 2082 0-127 VCA Env. D
35 2083 0-127 VCA Env. S
36 2084 0-127 VCA Env. R
37 2085 0-150 LFO 1 Freq.
38 2086 0-4 LFO 1 Shape
39 2087 0-127 LFO 1 Amt.
40 2088 0-52 LFO 1 Dest.
41 2089 0-1 LFO 1 Clock Sync
42 2090 0-150 LFO 2 Freq.
43 2091 0-4 LFO 2 Shape
44 2092 0-127 LFO 2 Amt.
45 2093 0-52 LFO 2 Dest.
46 2094 0-1 LFO 2 Clock Sync
47 2095 0-150 LFO 3 Freq.
48 2096 0-4 LFO 3 Shape
49 2097 0-127 LFO 3 Amt.
50 2098 0-52 LFO 3 Dest.
51 2099 0-1 LFO 3 Clock Sync
52 2100 0-150 LFO 4 Freq.
53 2101 0-4 LFO 4 Shape
54 2102 0-127 LFO 4 Amt.
55 2103 0-52 LFO 4 Dest.
56 2104 0-1 LFO 4 Clock Sync
57 2105 0-52 Env. 3 Dest.
58 2106 0-254 Env. 3 Amt.
59 2107 0-127 Env. 3 Velo.
60 2108 0-127 Env. 3 Del.
61 2109 0-127 Env. 3 A
62 2110 0-127 Env. 3 D
63 2111 0-127 Env. 3 S
64 2112 0-127 Env. 3 R
65 2113 0-22 Mod 1 Source
90
Sequential Prophet Rev2 User’s Guide
Appendix E: MIDI Implementation
91Appendix E: MIDI Implementation
Page 53

NRPN Layer ANRPN Layer BValue Description
NRPN Layer ANRPN Layer BValue Description
66 2114 0-254 Mod 1 Amount
67 2115 0-52 Mod 1 Destination
68 2116 0-22 Mod 2 Source
69 2117 0-254 Mod 2 Amount
70 2118 0-52 Mod 2 Destination
71 2119 0-22 Mod 3 Source
72 2120 0-254 Mod 3 Amount
73 2121 0-52 Mod 3 Destination
74 2122 0-22 Mod 4 Source
75 2123 0-254 Mod 4 Amount
76 2124 0-52 Mod 4 Destination
77 2125 0-22 Mod 5 Source
78 2126 0-254 Mod 5 Amount
79 2127 0-52 Mod 5 Destination
80 2128 0-22 Mod 6 Source
81 2129 0-254 Mod 6 Amount
82 2130 0-52 Mod 6 Destination
83 2131 0-22 Mod 7 Source
84 2132 0-254 Mod 7 Amount
85 2133 0-52 Mod 7 Destination
86 2134 0-22 Mod 8 Source
87 2135 0-254 Mod 8 Amount
88 2136 0-52 Mod 8 Destination
97 2145 0-1 Env. 3 Rpt. on/off
98 2146 0-127 VCA Level
99 2147 0-1 OSC 1 Note Reset
102 2150 0-99 Osc. 1 Shape Mod
103 2151 0-99 Osc. 2 Shape Mod
104 2152 0-1 OSC 2 Note reset
105 2153 0-1 LFO 1 Key Sync
106 2154 0-1 LFO 2 Key Sync
107 2155 0-1 LFO 3 Key Sync
108 2156 0-1 LFO 4 Key Sync
110 2158 0-127 Sub Osc.
111 2159 0-1 Glide ON/OFF
113 2161 0-12 Pitch Bend Range
114 2162 0-1 Pan Mode
116 2164 0-254 Mod Wheel Amt.
117 2165 0-52 Mod Wheel Dest.
118 2166 0-254 Pressure Amt.
119 2167 0-52 Pressure Dest.
120 2168 0-254 Breath Amt.
121 2169 0-52 Breath Dest.
122 2170 0-254 Velocity Amt.
123 2171 0-52 Velocity Dest.
124 2172 0-254 Foot Cntrlr Amt.
125 2173 0-52 Foot Cntrlr Dest.
153 2201 0-1 FX on/off
154 2202 0-13 FX select
155 2203 0-127 FX mix
156 2204 0-255 FX param 1
157 2205 0-127 FX param 2
158 2206 0-1 FX clock sync
163 N/A 0-2 A/B Mode
164 2212 0-1 Seq Start/Stop
167 2215 0-16 Unison Detune
168 2216 0-1 Unison on/off
169 2217 0-16 Unison Mode
170 2218 0-5 Keyboard Mode
171 N/A 0-120 Split Point
172 2220 0-1 Arp. on/off
173 2221 0-4 Arp. Mode
174 2222 0-2 Arp. Range
175 2223 0-12 Clock Divide
177 2225 0-3 Arp. Repeats
178 2226 0-1 Arp. Relatch
179 2227 30-250 BPM Tempo
92
Sequential Prophet Rev2 User’s Guide
Appendix E: MIDI Implementation
93Appendix E: MIDI Implementation
Page 54

NRPN Layer ANRPN Layer BValue Description
182 2230 0-4 Gated Seq. Mode
183 2231 0-1 Gated Seq. on/off
184 2232 0-52 Seq. 1 Destination
185 2233 0-53
(slew)
186 2234 0-52 Seq. 3 Destination
187 2235 0-53
(slew)
192-207 2240-2255 0-127 Gated Seq Track 1
208-223 2256-2271 0-127 Gated Seq Track 2
224-239 2272-2287 0-127 Gated Seq Track 3
240-255 2288-2303 0-127 Gated Seq Track 4
276-339 2324-2387 0-127 Seq Step 1-64
340-403 2388-2451 128-255 Seq Step 1-64
404-467 2452-2515 0-127 Seq Step 1-64
468-531 2516-2579 128-255 Seq Step 1-64
532-595 2580-2643 0-127 Seq Step 1-64
596-659 2644-2707 128-255 Seq Step 1-64
660-723 2708-2771 0-127 Seq Step 1-64
724-787 2772-2835 128-255 Seq Step 1-64
788-851 2836-2899 0-127 Seq Step 1-64
852-915 2900-2963 128-255 Seq Step 1-64
916-979 2964-3027 0-127 Seq Step 1-64
980-1043 3028-3091 128-255 Seq Step 1-64
Seq. 2 Destination
Seq. 4 Destination
Step 1-16
Step 1-16
Step 1-16
Step 1-16
Note 1
Velocity 1
Note 2
Velocity 2
Note 3
Velocity 3
Note 4
Velocity 4
Note 5
Velocity 5
Note 6
Velocity 6
Control NRPN Data
The following table lists the Rev2’s control NRPN data. It is received
and transmitted but not saved as part of a program.
NRPN Value Description
1088 0-1 Seq Play/Stop
16383 0-1 Seq Rec On/Off
SysEx Messages
Universal System Exclusive Message (Device Inquiry)
Status Description
1111 0000 System Exclusive (SysEx)
0111 1110 Non-realtime message
0vvv vvvv If MIDI channel is set to 1 - 16, 0vvvvvvv must match (unless MIDI Channel = ALL); always
responds if 0vvvvvvv = 0111 1111.
0000 0110 Inquiry Message
0000 0001 Inquiry Request
1111 0 111 End of Exclusive (EOX)
The Rev2 responds with:
Status Description
1111 0000 System Exclusive (SysEx)
0111 1110 Non-realtime message
0vvv vvvv If MIDI Channel = ALL, 0vvvvvvv = 0111 1111. Otherwise 0vvvvvvv = Channel Number
0 - 15.
0000 0110 Inquiry Message
0000 0010 Inquiry Reply
0000 0001 DSI ID
0010 1111 Rev2 ID (Family LS)
0000 0001 Family MS
0000 0000 Family Member LS
0000 0000 Family Member MS
0jjj nnnn Main Software version: jjj - Minor rev; nnnn - Major rev
1111 0 111 End of Exclusive (EOX)
94
Sequential Prophet Rev2 User’s Guide
Appendix E: MIDI Implementation
95Appendix E: MIDI Implementation
Page 55

Request Program Dump
Status Description
1111 0000 System Exclusive (SysEx)
0000 0001 DSI ID
0010 1111 Rev2 ID
0000 0101 Request Program Transmit
0000 00vv Bank Number, 0 - 7
0vvv vvvv Program Number, 0 - 127
1111 0 111 End of Exclusive (EOX)
The Rev2 will respond by sending out the program data in the format
described below in Program Data Dump.
Request Program Edit Buffer Dump
Status Description
1111 0000 System Exclusive (SysEx)
0000 0001 DSI ID
0010 1111 Rev2 ID
0000 0110 Request Program Edit Buffer Transmit
1111 0 111 End of Exclusive (EOX)
The Rev2 will respond by sending out the current program edit buffer in
the format described below in Program Edit Buffer Data Dump.
Request Global Parameter Dump
Status Description
1111 0000 System Exclusive (SysEx)
0000 0001 DSI ID
0010 1111 Rev2 ID
0000 1110 Request Global Parameter Transmit
1111 0 111 End of Exclusive (EOX)
Program Data Dump
Status Description
1111 0000 System Exclusive (SysEx)
0000 0001 DSI ID
0010 1111 Rev2 ID
0000 0010 Program Data
0000 00vv Bank Number: 0 - 9
0vvv vvvv Program Number: 0 - 99
0vvv vvvv 2046 bytes expanded to 2339 MIDI bytes in “packed MS bit” format
1111 0 111 End of Exclusive (EOX)
Program Edit Buffer Data Dump
Status Description
1111 0000 System Exclusive (SysEx)
0000 0001 DSI ID
0010 1111 Rev2 ID
0000 0011 Edit Buffer Data
0vvv vvvv 2046 bytes expanded to 2339 MIDI bytes in “pa cked MS bit” format
1111 0 111 End of Exclusive (EOX)
Global Parameters Data Dump
Value Description
1111 0000 System Exclusive (SysEx)
0000 0001 DSI ID
0010 1111 Rev2 ID
0000 1111 Main Parameter Data
0vvv vvvv 50 nibbles (LS then MS) for 25 Global parameters
1111 0 111 End of Exclusive (EOX)
The Global Parameters Data Dump is not recognized when received. It is only
transmitted when requested. NRPN messages are used to change Globals.
The Rev2 will respond by sending out the current values of the global
parameters in the format described in Global Parameters Data Dump.
96
Sequential Prophet Rev2 User’s Guide
Appendix E: MIDI Implementation
97Appendix E: MIDI Implementation
Page 56

Packed Data Format
Data is packed in 8 byte “packets”, with the MS bit stripped from 7 parameter bytes, and packed into an eighth byte, which is sent at the start of the 8
byte packet.
Example:
Input Data Packed MIDI data
1 A7 A6 A5 A4 A3 A2 A1 A0 1 00 G7 F7 E7 D7 C7 B7 A7
2 B7 B6 B5 B4 B3 B2 B1 B0 2 00 A6 A5 A4 A3 A2 A1 A0
3 C7 C6 C5 C4 C3 C2 C1 C0 3 00 B6 B5 B4 B3 B2 B1 B0
4 D7 D6 D5 D4 D3 D2 D1 D0 4 00 C6 C5 C4 C3 C2 C1 C0
5 E7 E6 E5 E4 E3 E2 E1 E0 5 00 D6 D5 D4 D3 D2 D1 D0
6 F7 F6 F5 F4 F3 F2 F1 F0 6 00 E6 E5 E4 E3 E2 E1 E0
7 G7 G6 G5 G4 G3 G2 G1 G0 7 00 F6 F5 F4 F3 F2 F1 F0
8 00 G6 G5 G4 G3 G2 G1 G0
This explains why it takes 2339 MIDI bytes to transmit 2046 Program data bytes.
98
Sequential Prophet Rev2 User’s Guide
Appendix E: MIDI Implementation
99Appendix E: MIDI Implementation
Page 57

100
Sequential Prophet Rev2 User’s Guide
Appendix E: MIDI Implementation
101Appendix E: MIDI Implementation
Page 58

Sequential LLC
1527 Stockton Street, 3rd Floor
San Francisco, CA 94133
USA
©2019 Sequential LLC
www.sequential.com
DSI-10266R
 Loading...