

Sephra CF44R2,CF34R2,CF27R2,CF23R2 Operating Manual

CHOCOLATE FOUNTAIN
OPERATING MANUAL
Models: CF44R2, CF34R2, CF27R2, CF23R2

The Legend of Sephra
The Legend of Sephra
The Legend of SephraThe Legend of Sephra
Woven among the threads of ancient Aztec legend lies the story of Sephra, an enchanting
goddess whose beauty could be described only as the richness of the dark earth combined
with the luster and glow of pure gold. Her voice was softer than the most delicate flower, and
her presence carried the aroma of sweet cocoa. It was Sephra who gave the ancient Aztecs the
precious gift of the cocoa tree.
The legend reveals that the spirit of Sephra nourished the cocoa trees and lived within the
priceless beans they produced. The Aztec kings named the cocoa tree “Theobroma Cacao,”
meaning “food of the gods.” So valuable were cocoa beans that they were used to pay tribute
to royalty and were given as sacred offerings to the gods.
Montezuma, the ruler of the wealthy Aztec Empire, was so enchanted by Sephra that he
commissioned an elite force of skilled artisans and master craftsmen to construct a temple in
her honor. As a special offering to the goddess, Montezuma built a magnificent fountain in the
highest room of the temple and filled it with glistening spring water, which flowed from
beneath its walls. He then surrounded the fountain with a splendid array of the most perfect
cocoa beans, in hopes that Sephra would continue to bless the people with the unique and
valuable crop.
So pleased was Sephra with Montezuma's gift that she came to him in a dream and told him
that her spirit would always live in the fountain he had given her. Moments later, Montezuma
awoke to the sweet smell of cocoa lingering in the air. The aroma led him to the upper room of
the temple where Sephra's fountain stood. To his astonishment, the fountain no longer flowed
with water, but with the richest, purest chocolate . . . this was truly a gift from the gods . . .
For centuries, Sephra's fountain remained hidden beneath the ruins of the ancient Aztec
temple, waiting to be discovered. At long last it was, and with it was unveiled the secret of the
pure, rich chocolate once coveted by gods and kings . . .

Dear Sephra Customer:
Thank you for choosing a Sephra Chocolate Fountain for your business. Our fountains
have been engineered to a high standard of quality and will provide many years of
trouble-free service. Please read through this manual, which will walk you through
proper setup, operation, and cleanup of your fountain. If you have any questions after
reviewing these instructions, please call our Customer Service Department and a trained
representative will be more than happy to assist you.
We encourage you to use Sephra Fondue Chocolate, available in Dark, Milk, and White
varieties. This specialty fondue chocolate is formulated to flow perfectly through the
fountain every time, without the mess and hassle of mixing in oil that is required with
most other chocolate. Adding oil not only dilutes the taste of chocolate, but it also
makes it runny and diminishes its aroma. With Sephra Fondue Chocolate, simply melt
the chocolate chips in the fountain basin, microwave, or double boiler and it is ready to
use! Remember, if you are serving only the finest fondue chocolate, your customers will
taste the difference! You can order Sephra Fondue Chocolate by calling us toll-free at
(877) 617-8803 or by visiting our website at www.sephra.com.
We aim to help you make your Sephra Chocolate Fountain a very profitable aspect of
your business and look forward to assisting you. Thank you for choosing Sephra!
Sincerely,
The Sephra Team
- IMPORTANT -
For your protection, please read all instructions and set up and
operate your fountain PRIOR TO YOUR FIRST EVENT as
damage may have occurred during shipping. Doing so will help
prevent potential complications during your event. Sephra
Customer Service representatives are available to assist you
Monday–Friday, 7am–4pm PST.
WASH BASIN AND ALL TIER SET COMPONENTS PRIOR
TO USE.

IMPORTANT SAFEGUARDS
1. READ ALL INSTRUCTIONS BEFORE USING THIS FOUNTAIN.
2. When the fountain basin is removed, the top of the fountain base can be extremely
hot. AVOID ANY CONTACT WITH THE TOP OF THE FOUNTAIN BASE WHEN IT IS
EXPOSED. Heating element is located directly beneath.
3. Avoid all other surfaces that have become hot during use.
4. To protect against electrical shock and damage to the fountain, do not put the
fountain base in water or other liquids. Never allow liquid, dust or chocolate to enter
the fountain base through the bottom grate, vent holes, or other openings.
5. When the basin is removed, take extra caution to keep liquid or other objects from
entering into the exposed opening at the top of the fountain base.
6. Avoid contact with moving parts, such as the auger in the cylinder or the square pin
in the center of the basin.
7. Close supervision is necessary when the fountain is used near children.
8. Do not operate the fountain if you observe damage to the electrical cord or plug or if
the base of the fountain has been dropped or damaged in any manner. The fountain
must be returned to Sephra or a designated repair facility for examination and
repair.
9. Always unplug the fountain from the electrical outlet when it is not in use, before
putting on or taking off parts, and before cleaning.
10. Do not allow the electrical cord to come into contact with hot surfaces. An extension
cord may be used if necessary. Care should be taken to position the electrical cord so
that it does not create a hazard by hanging over a table or counter edge in such a
way where it might be tripped on or pulled by those around the fountain.
11. Never place any object, especially your fingers, inside the central cylinder while the
fountain is in use. Doing so may cause severe injury to persons or damage to the
fountain itself.
12. The use of accessory attachments, other than those made available specifically for
use with this fountain, is not recommended by the manufacturer, may cause injury,
and will void your product warranty.
13. Extreme caution must be used when moving a fountain or fountain components
containing hot liquid.
14. Use of the fountain outdoors is not recommended unless a Sephra manufactured
wind guard is used.
15. Do not use this fountain for other than its intended use.
16. The fountain must be level to operate properly.
17. Observe and follow customary sanitation guidelines when using this machine.

TABLE OF CONTENTS
Fountain Components.................................................................................2
Commercial Fountain Illustrations................................................................3
Fountain Assembly.....................................................................................4
Chocolate Preparation ................................................................................5
Melting Temperatures .............................................................................5
Starting the Fountain .................................................................................6
Recommended Chocolate (or Fondue) Amounts..........................................6
Adding Additional Chocolate to the Fountain...............................................6
Chocolate Operating Temperatures ...........................................................7
Cleaning the Fountain ................................................................................7
Helpful Tips...............................................................................................9
Fountain Specifications.......................................................................... 10
Troubleshooting....................................................................................... 10
Maintenance ........................................................................................ 12
Frequently Asked Questions ...................................................................... 13
Health and Sanitation Guidelines ............................................................... 14
Limited Lifetime Warranty......................................................................... 16
Appendices:
I-The Sephra System: Preparing You to Succeed in the Chocolate Fountain
Rental Business
II-Sephra Maintenance Service
Sephra Chocolate Fountains
This manual covers the use of the following commercial chocolate fountain
models:
CF 44R2—Sephra
CF 34R2—Montezuma
CF 27R2—Aztec
CF 23R2—Cortez

SAVE THESE INSTRUCTIONS
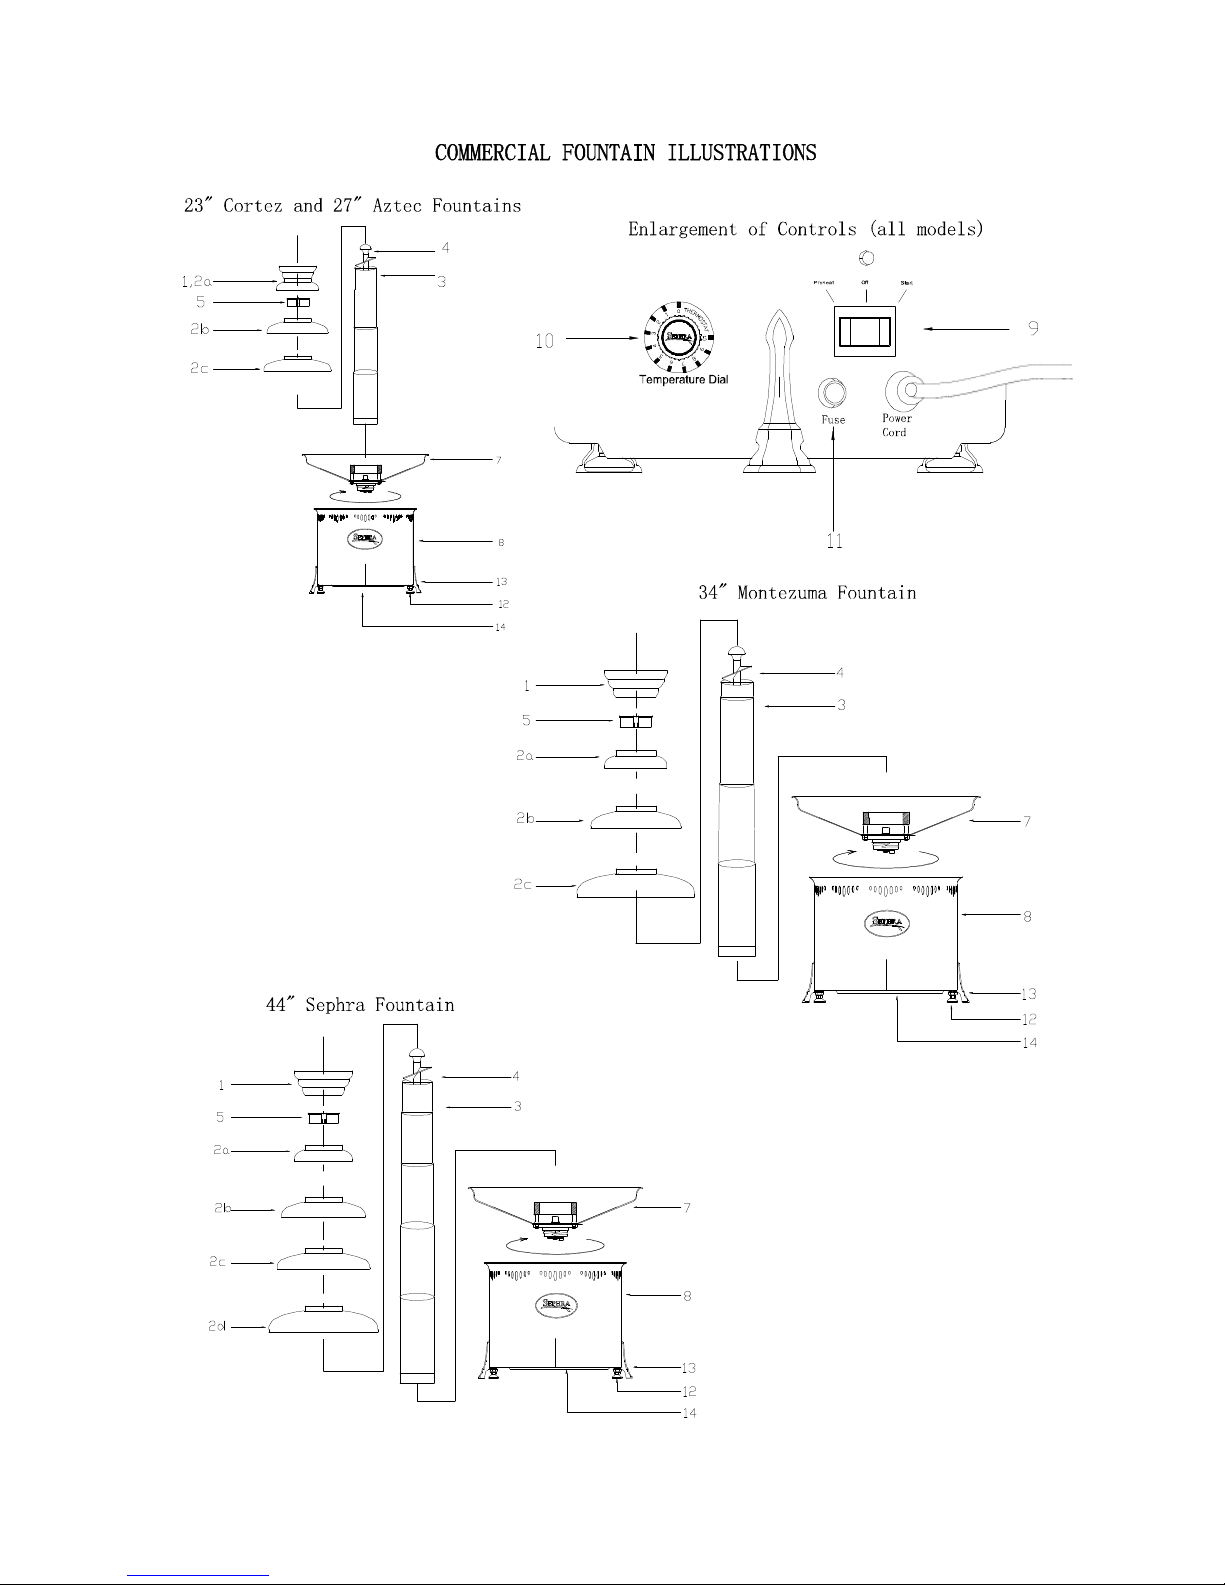
FOUNTAIN COMPONENTS
1. Crown—Fits on top of the cylinder and sits on top of the stabilizer. On Aztec and
Cortez fountains, this is attached to the first tier (2a).
2. Tiers—Slide down the cylinder to rest into place. Tiers slope downward to create the
various fondue “curtain” levels.
a.) First Tier (Top)—Attached to the crown on Aztec and Cortez models.
b.) Second Tier
c.) Third Tier (Bottom on Montezuma, Aztec, and Cortez models)
d.) Fourth Tier (Bottom on Sephra model)
3. Cylinder—Rests inside sleeve located in the center of the basin.
4. Auger—Sits inside the cylinder and carries fondue to the top of the fountain,
creating a constant flow of fondue from the top of the crown down to the basin.
5. Stabilizer— Black plastic piece with a slit in one side that fits over the auger knob
and rests inside the top of the cylinder under the crown. Helps keep the auger
centered in the cylinder, reducing noise.
6. Cylinder Sleeve—Fixed onto fountain basin; supports cylinder.
7. Removable Basin—Holds the fondue. Twists off for easy cleanup. The basin is
directly over the internal heating element.
8. Fountain Base
a.) Base Housing—Surrounds the electrical components, including the
motor.
b.) Vent Holes—Allow hot air produced by the motor and heating element to
escape, cooling the electrical components. Vent holes should never be
covered during use.
9. PREHEAT/OFF/START Toggle Switch—Activates power to the fountain. PREHEAT
turns on the heating element only; START turns on both the heating element and the
motor, causing the auger to turn and the fondue to flow; OFF shuts off both the heat
and the motor.
10. Temperature Dial—Allows you to select appropriate heat setting (1-10) for fondue.
11. Fuse Housing—Encases the fuse that protects the motor from power surges.
12. Leveling Feet (3)—Screw into bottom of fountain base. These may be loosened or
tightened to raise or lower a particular side of the fountain for leveling.
13. Decorative Legs—Fixed to sides of fountain base for enhanced visual presentation.
14. Base Screen—Protects fountain’s internal components and allows air flow. Unscrews
for access into base for maintenance purposes.
2
3

FOUNTAIN ASSEMBLY
1. Before using the fountain, wash basin and other removable components with warm,
soapy water and dry thoroughly. The basin bowl should be hand washed and
not be submerged in liquid or put in a dishwasher. All other removable
components are dishwasher-safe. Do not allow water to enter the fountain
housing through the vent holes, bottom grate, or other openings as this will
damage the electrical components.
2. Make sure fountain basin is secured tightly onto fountain base. Turn clockwise to
tighten; do not over-tighten.
3. Place the fountain base on a sturdy, level surface. The fountain MUST be level in
order for the chocolate to curtain properly. Rotate the adjustable leveling feet up or
down until all sides are even. Assess the level of the fountain by placing a spirit level
on the basin rim in several different places if necessary.
4. Position the cylinder to fit inside the stainless steel sleeve located in the basin so that
the cylinder stands in place. The welded knob on the cylinder should fit inside the
groove on the sleeve. Press down on the cylinder to ensure that it is firmly
placed.
5. Slide the largest tier over the cylinder until it stops in position over the bottom step
on the cylinder wall. Position the remaining tiers in the same way, working from
largest to smallest. All tiers should slope downward. On Aztec and Cortez fountains,
the top tier is attached to the crown and will be positioned in step 7.
6. Place the stabilizer over the auger knob. Holding the auger by its knob, lower it into
the cylinder. Fit the auger over the square pin in the center of the basin. The lip of
the stabilizer will rest on the top of the cylinder. Turn the auger clockwise to be sure
it is securely in place. You should feel resistance. If melting chocolate in the
basin, wait until the chocolate is completely melted before inserting the
auger into the cylinder.
7. Fit the crown on top of the cylinder. The widest part of the crown should be at the
top.
8. Plug the fountain in and move the switch to PREHEAT. Turn the temperature dial to
10 and allow the basin to preheat for 5 minutes. Once basin is preheated, see
“CHOCOLATE PREPARATION” for melting temperatures and instructions.
*** All tier set components should be at room temperature before adding melted
chocolate to the fountain. Chocolate will harden if it comes into contact with cold metal
and can cause the auger to bind. ***
4

CHOCOLATE PREPARATION
We strongly encourage you to use Sephra Fondue Chocolate, available in Dark, Milk, and
White varieties. Sephra chocolate is specially formulated with the proper viscosity to
flow perfectly through the fountain every time. Our unique fondue chocolate is
exquisite in taste and aroma and your guests and clients are sure to be delighted.
Before using the chocolate, store it in a cool, dry place. Do not freeze or refrigerate it
as moisture affects the chocolate’s consistency.
Melt chocolate directly in the fountain basin, in a double boiler, or in its microwavable
bags according to the instructions on the bags. WHEN MICROWAVING CHOCOLATE,
ALWAYS USE HALF-POWER TO PREVENT SCORCHING.
Melting chocolate directly in the fountain basin takes approximately 35–60 minutes. Add
chocolate 1-2 pounds at a time to expedite the melting process. Stir chocolate every 2-3
minutes, scraping it from the basin with a spatula as you go, to prevent scorching. Milk
and White chocolate are more susceptible to scorching so be sure to stir more
frequently (every 2-3 minutes) and use appropriate temperature settings.
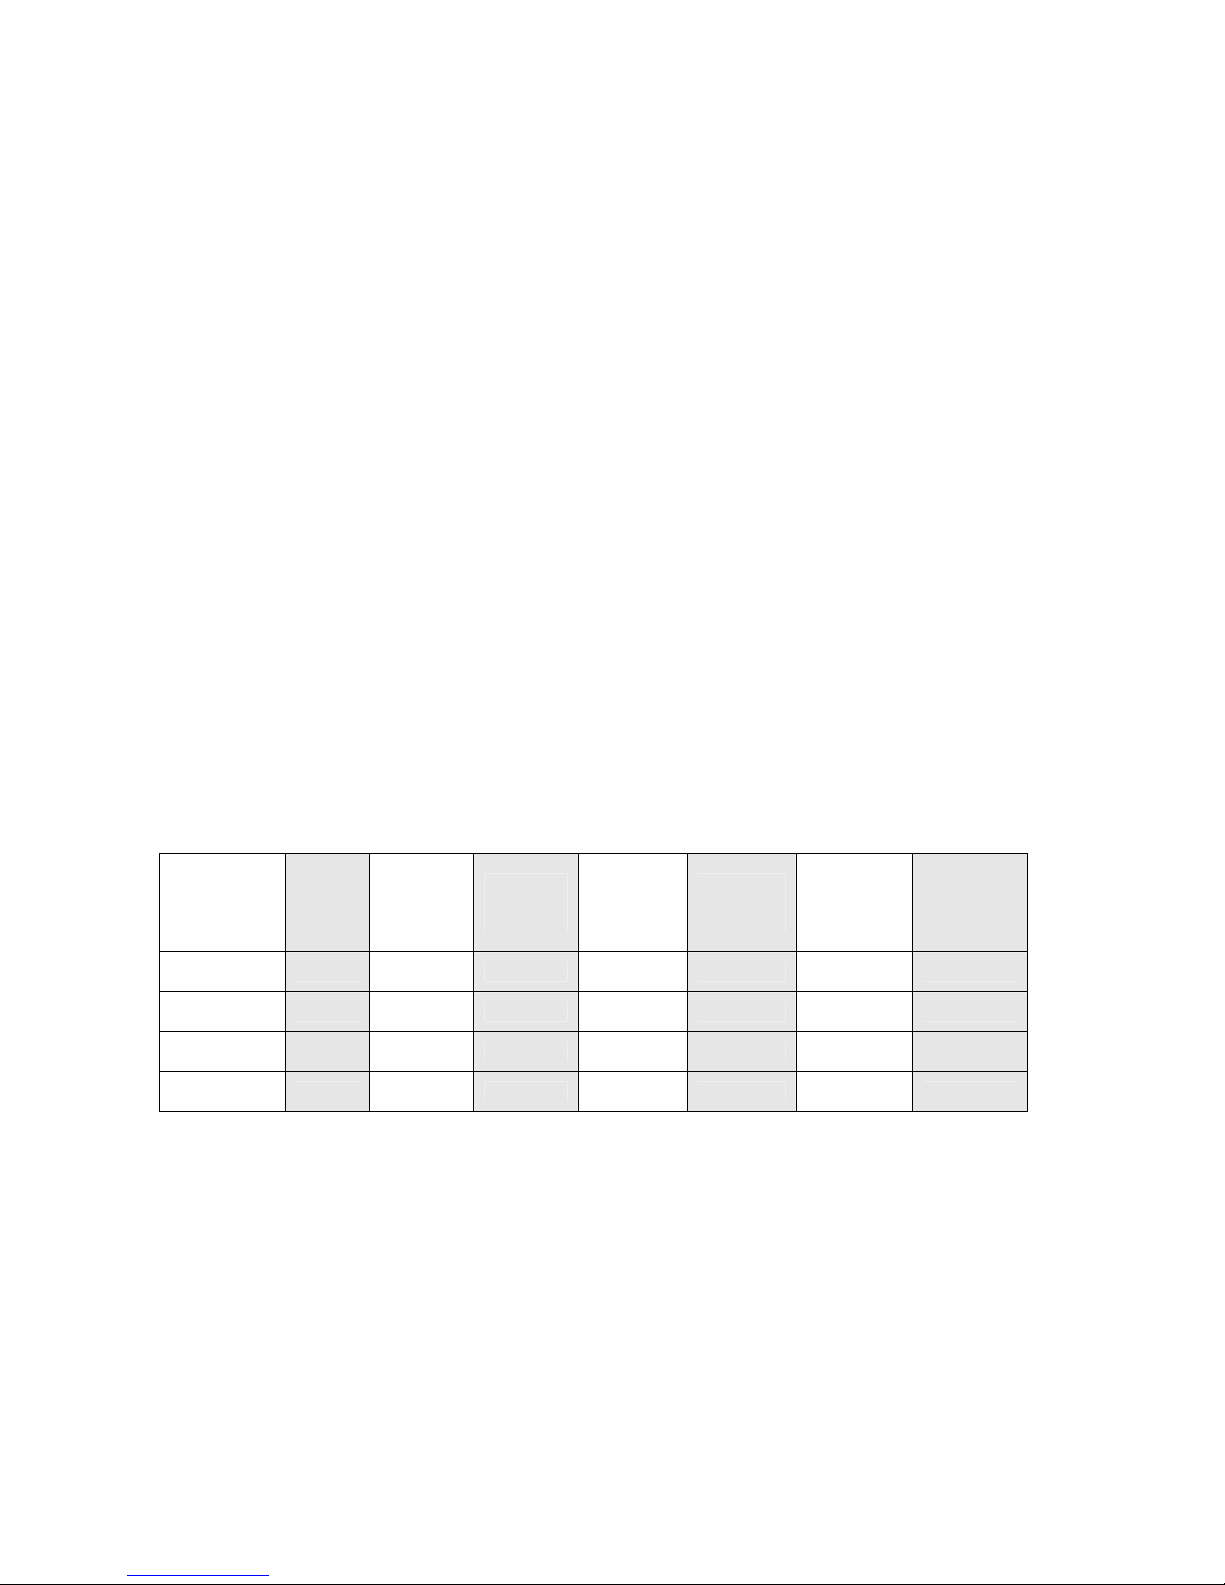
Melting Chocolate in Fountain Basin—Sephra and Montezuma
Chocolate
(16 lbs)
Dark 8 45
Milk 7 60
White 7 60
Heat Setting
Approx. Melting
Time (mins)
Melting Chocolate in Fountain Basin—Aztec and Cortez
Chocolate
(10 lbs)
Dark 8 35
Milk 7 45
White 7 45
Heat Setting
Approx. Melting
Time (mins)
*CAUTION: The heat setting should never be higher than 7 when melting White
chocolate. Overheating White or Milk chocolate causes it to thicken or become clumpy
and it will not flow properly. If this happens, see “TROUBLESHOOTING” item #2.
5
STARTING THE FOUNTAIN
BEFORE STARTING THE FOUNTAIN:
1. Ensure that the fountain is on a sturdy, LEVEL surface.
2. The fountain itself must be level in order to operate and curtain properly. Please
see “F
OUNTAIN ASSEMBLY
” for instructions on leveling the fountain.
3. Check to see that the fountain basin is securely tightened.
4. Ensure that the fountain vent holes and the bottom of the base housing are not
covered. These areas allow heat to escape from the motor and heating element
during use. Obstruction of the air flow will cause damage to the motor and
internal electrical components.
5. Fill the basin with chocolate according to the “CHOCOLATE PREPARATION”
instructions.
ONCE THE CHOCOLATE IS MELTED:
6. Place the auger with the stabilizer into the cylinder and turn it clockwise to check
that it is locked in place over the center square pin. Place the crown on top of the
cylinder.
7. Press the toggle switch to START. The auger will turn and carry the chocolate up
through the cylinder, causing it to flow over the crown and tiers and back into the
basin. As the cylinder fills with chocolate, there may be a brief knocking noise
from the auger spinning against the cylinder. This noise will go away quickly as
the auger is coated with the chocolate.
Recommended Chocolate (or Fondue) Amounts
Suggested
Amt. to
Begin
Event
(lbs)
Fountain
Model
Sephra
(CF 44)
Montezuma
(CF 34)
Aztec
(CF 27)
Cortez
(CF 23)
Guests
Served
100+ 14 6 20 8.75 16 7
100+ 12 5.25 20 8.75 16 7
<100 8 3.5 11 5 10 4.5
<100 6 2.5 10 4.5 9 3.75
Minimum
Choc.
(lbs)
Minimum
Fondue
(qts)
Maximum
Choc.
(lbs)
Maximum
Fondue
(qts)
Adding Additional Chocolate to the Fountain
Twenty pounds of chocolate will serve approximately 200 people. Additional chocolate
can be added using the following methods:
ADDING CHOCOLATE CHIPS:
Pour chips directly on top of the fountain crown, approx. 1 cup at a time. Allow the chips
to become melted before adding more.
ADDING MELTED CHOCOLATE:
To add a large amount of chocolate, melt it prior to adding it to the basin. You can melt
it in its microwavable bags or in a double boiler.
Suggested
Amt. to
Begin
Event
(qts)
6
Chocolate Operating Temperatures
Chocolate Heat Setting
Dark 6 115-125
Milk 6 115-125
White 5 105-115
Approx. Chocolate
Temperature (°F)
Chocolate temperature may be affected by the addition of chocolate or by environmental
factors, such as operating the fountain in a cold area. In such conditions the fountain
temperature may need to be adjusted accordingly.
Generally, if White or Milk chocolate becomes too thick, decrease the temperature. If
Dark chocolate becomes too thick, increase the temperature. Scrape sitting chocolate
from the bottom of the basin and stir frequently throughout event.
CLEANING THE FOUNTAIN
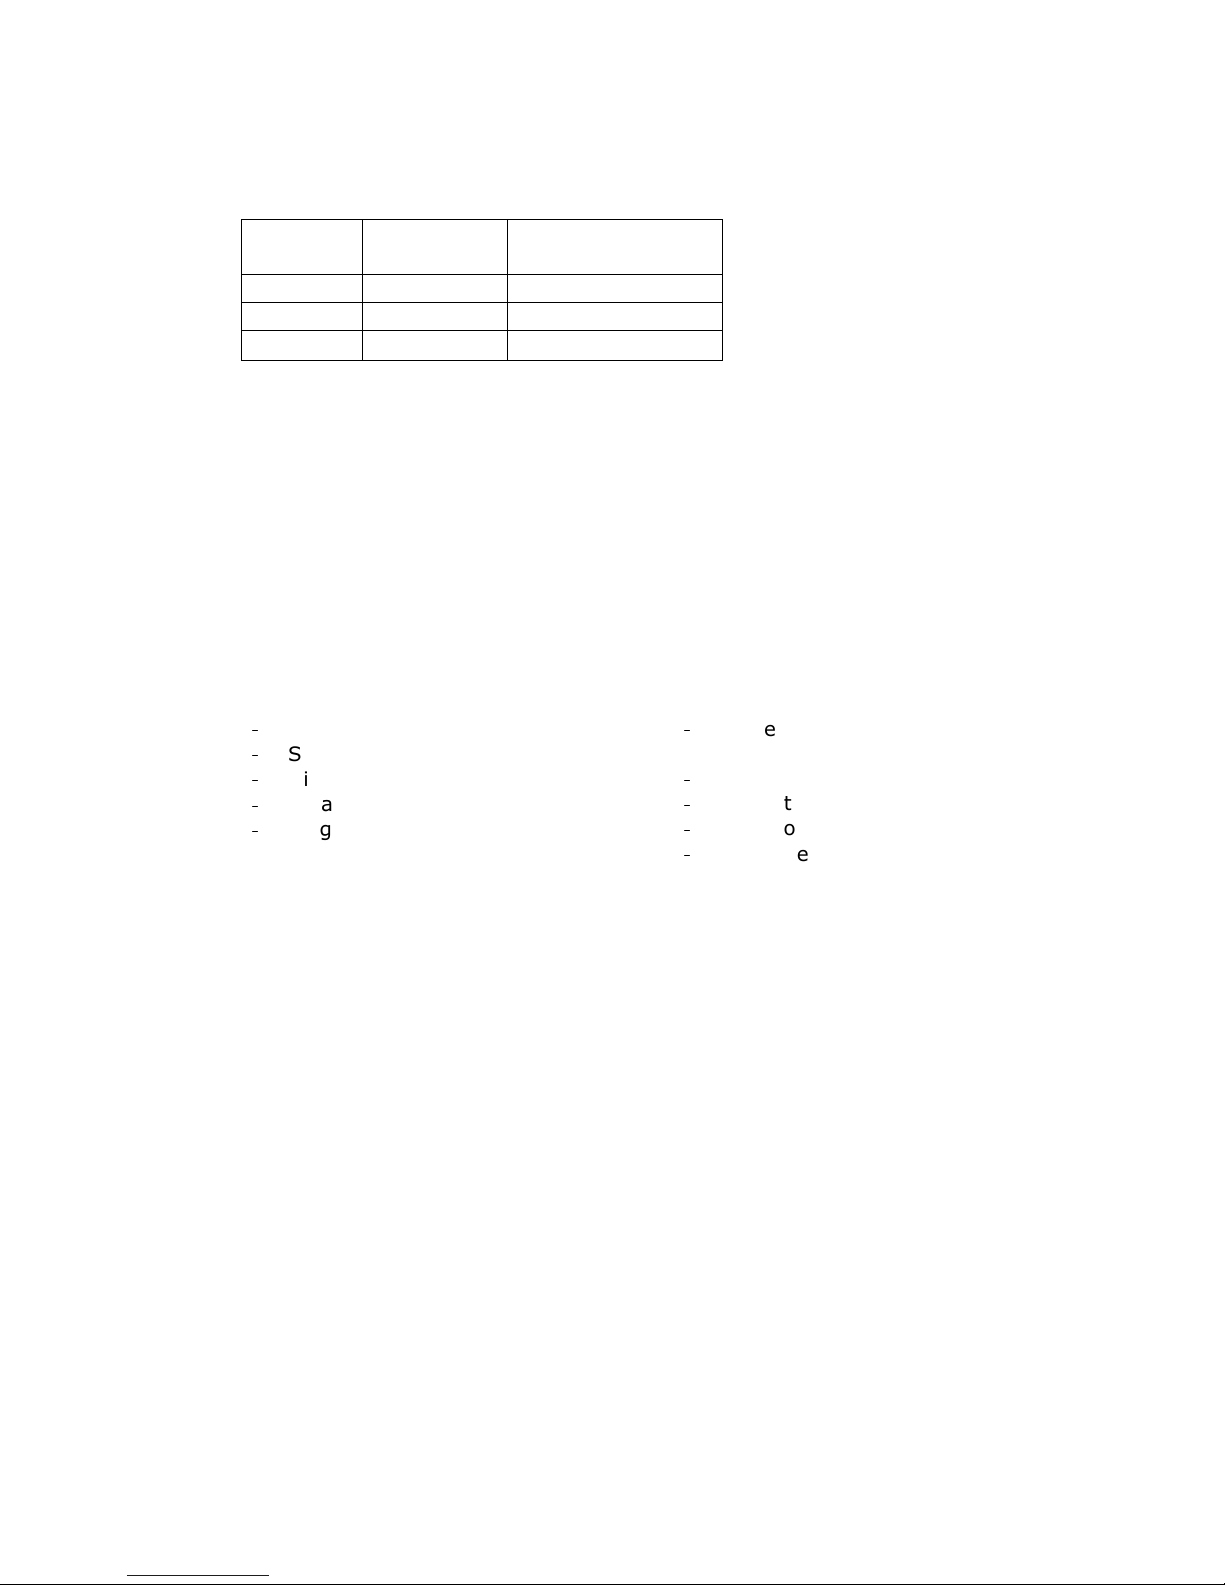
RECOMMENDED CLEANING SUPPLIES:
-
Food handler gloves
-
Spatula(s)
-
Dish soap
-
Small brush or toothbrush
-
Large sponge (grout sponge
recommended)
-
Large container or sturdy plastic
bag(s) for leftover chocolate
-
Large plastic bags for tier set parts
-
Paper towels
-
Soft cloth
-
Glass cleaner
Before cleaning:
Turn the toggle switch to OFF. Always unplug the power cord from the
electrical outlet before cleaning the fountain. Never permit the electrical cord to
come into contact with water.
Do not use abrasive scouring pads or powders to clean the stainless steel basin or
other components. Doing so will mar the finish.
Cleaning Your Sephra Chocolate Fountain:
1. Wearing food handler gloves, scrape excess chocolate from the crown and
stabilizer with a spatula. Remove crown and stabilizer and place them directly
in the sink.
2. Pull the auger out of the cylinder by its knob, scraping the excess chocolate
off with a spatula or gloved hand as you go so that it falls back into the
cylinder. Move the auger to the sink.
3. Use a spatula to scrape excess chocolate from the tiers. Remove the tiers and
cylinder and place them in the sink.
4. Twist off the removable basin and pour leftover chocolate into a bag-lined
container for easy disposal. Scrape the remaining chocolate out with a spatula
7
 Loading...