

SEOWON INTECH SWU11 Users Manual

SEOWON INTECH

Contents
1. Multi User CPE Configuration and Connection
1.1 Product Introduction ---------------------------------------- 4
1.2 Packaging Contents ---------------------------------------- 5
1.3 Description of Product Functions -------------------------- 6
1.4 Network Configuration -------------------------------------- 8
2. Multi User CPE Connection
2.1 Wired Connection -------------------------------------------- 10
2.2 WiMAX Wired Connection (CPE) ------------------------ 12
3. PC Configuration
3.1 Windows 98/ME Setup -------------------------------------- 14
3.2 Windows 2000 Setup ---------------------------------------- 18
3.3 Windows XP Setup ------------------------------------------ 22
4. MULTI USER CPE Internet Configuration with Internet
Setup Wizard
4.1 MULTI USER CPE built-in Web Server Access ------- 29
4.2 Run MULTI USER CPE Internet Setup Wizard -------- 30
5. Multi User CPE WiMAX Connection and Setup
5.1 IP Address Setup -------------------------------------------- 33
5.2 WiMAX Modem Setup ------------------------------------ 34
5.3 Modem Status Information -------------------------------- 35
6. Multi User CPE WAN Connection and Setup
6.1 IP Address Setup -------------------------------------------- 36
6.2 MAC Address Setup ---------------------------------------- 37
6.3 WAN Status Information ----------------------------------- 38

7. Multi User CPE LAN Setup
7.1 DHCP Server Setup --------------------------------------- 39
7.2 MAC Address Setup -------------------------------------- 40
7.3 LAN Status Information ---------------------------------- 41
8. Application Support Setup
8.1 Firewall Setup ---------------------------------------------- 42
8.2 Firewall regulation Setup(Filter) ------------------------ 43
8.3 Port Forwarding -------------------------------------------- 44
8.4 Port Trigger ------------------------------------------------- 45
8.5 DMZ Setup ------------------------------------------------- 46
8.6 UPnP Setup ------------------------------------------------- 47
8.7 VPN Passthrough Setup ---------------------------------- 48
8.8 QoS Setup --------------------------------------------------- 49
8.9 DDNS Setup ------------------------------------------------ 50
9. Switch Setup
9.1 Switch Basic Setup --------------------------------------- 51
9.2 Switch Advanced Setup --------------------------------- 52
9.3 Switch Status Information ------------------------------- 50
10. Administrator Function Setup
10.1 Administrator Password Setup ------------------------- 51
10.2 Setup ----------------------------------------------------- 52
10.3 Firmware Upgrade ------------------------------------- 53
11. WCM
11.1 Software Installation ----------------------------------- 54
11.2 How to use WCM -------------------------------------- 56
12. References
12.1 LAN CABLE Standard Materials ------------------- 63
12.2 IP Router PING Test Method ------------------------ 64
12.3 Product Specifications -------------------------------- 65
12.4 Troubleshooting -------------------------------------- 66
12.5 Product Warranty and Customer Support ---------- 68

1. Multi User CPE Configuration and Connection
1.1 Product Introduction
This product receives external WiMAX signals to construct in-building infrastructure on WiMAX
network and is covered by Ethernet network internally. The product serves as a relay as well as a USB
Modem and an internet router.
But the product is purposed to supply to users, focusing on a relay part rather than a modem.
It is also a wired and wireless internet router which allows several systems to use one internet address
supplied by high-speed internet service provider.
◎ Functional Features
Features
Function
Support
Support
NAT function
VPN Server function
Firewall function
VLAN function
Wave1 = DL : 10Mbps / UL : 4MbpsIEEE802.16e WiMAX
10/100Mbps wired LAN connectableIEEE802.3u Ethernet
ADSL, VDSL, Cable, LAN mode supportable to 10/100Mbps WANWAN Port
4 Port 10/100Mbps Ethernet Switch built-inLAN Port
Straight (Direct) or Cross Cable auto sensingCable Auto Sense
Possible of max. 253 wired and wireless PC connections and internet
router*
Ensures/Limits speed by PC connected to routerQoS function
Possible of VPN access to internal network inside the router from
external Internet
Simple internet connection supportInternet Wizard
Manages basic firewall and IP/Port/Mac-based access
Converts the WAN IP address of router to domain URL ** DDNS function
Possible of logically segmenting LAN, independent of physical
configuration
4

1.2 Packaging Contents
<Figure: Main Unit> <Figure: CD> <Figure: Antenna X 2>
<Figure: Quick Guide> <Figure: UTP Cable> <Figure: USB Cable>
<Figure: Adapter>
5
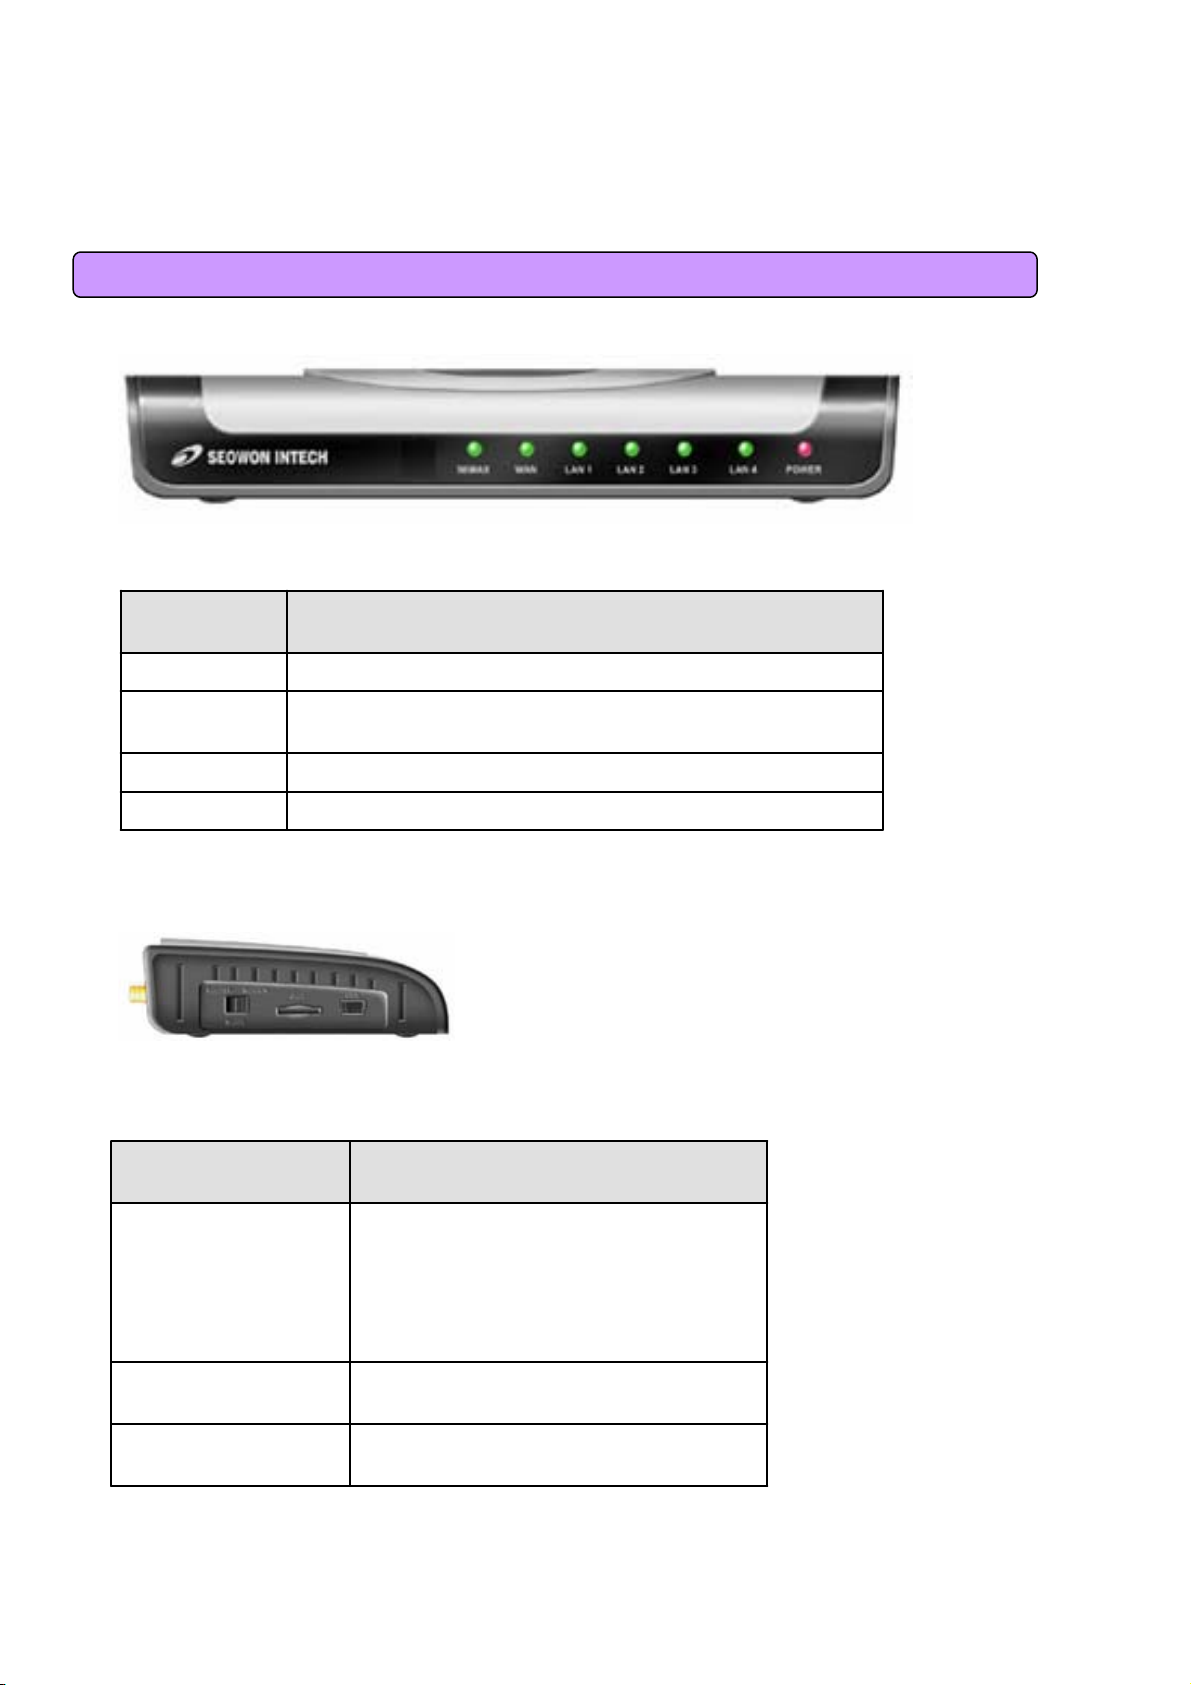
1.3 Description of Product Function
SEOWONINTECH
<Figure: MULTI USER CPE Front LED part>
LED Indicator
WiMAX
Multi User CPE Lateral side
Description
Item
Function
Power Supply status (On at Power ON) PWR
Flashing at normal operation (Repeatedly ON/OFF at 0.1 sec
intervals)
ON when connected to modem, Flashing at communicationWAN
ON when connected to PC, Flashing at communicationLAN 1~4
Details
Mode Switch
-Router
-Modem
USIM
USB
: Default Setting; Main function Mode;
Mode for WiMAX, general router function
: WiMAX Modem dedicated Mode; If MULTI
USER CPE has no Power, you can use
WiMAX Modem function by using the USB
power of external PC.
Slot for SIM Card when SIM authentication
required
Uses external PC power; Port used when
using WiMAX Modem’s sole function
6

1.3 Description of Product Function
MULTI USER CPE Rear Side
Description
Item
External
Antenna
Power S/W
[Note] If you lost LOGIN password for router or IP address after change, use the Reset switch to restore its
original Factory Default settings.
Details
ANT1: WiMAX Diversity
ANT2: WiMAX Main
Separable external antenna
User external type antenna attachable
* Antenna Classification
-5: 2.5GHz
Power On/Off Switch (On/Off by pressing right or
left)
Power Adapter connection (DC 7.5V ~ 24V)DC IN
External modem connection portWAN
PC or Hub connectionLAN 1~4
System ResetRESET
7

1.4 Network Configuration
Local Network External Network
Gateway modem
WLAN
RJ45
PC
WiMAX
Internet
<MULTI USER CPE Connection Example>
To Verify normal operation of router LEDs
You have to check if each LED of the router operates properly after connecting router, modem, and PC
with LAN cable as follows:.
SEOWONINTECH
WiMAX
WAN
LAN
Flashing at 0.1 sec interval s
in normal operation
ON when cable is connected
normally
ON when cable is connected
normally
Actions to be taken at failureNormal OperationLED
Check for adapter power failureON when connecting adapterPWR
Check if wireless module is attached
Check cable connection and modem
power supply
Check cable connection and PC
power supply
8

1.4 Network Configuration
If LED light is not in “normal operation”, check if there is any failure according to actions to be taken.
Install a router after connecting to network.
„ If normal connection between router and PC is checked, you have to set up PC and router.
„ PC setup is to control network option such as Win98/2000/XP to enable to use Internet on condition that
PC is connected to router. It is progressed by referring to Chapter II, depending on OS type.
Router setup is to connect a router to Internet, which is suitable for the Internet line type that is connected
to router. It is progressed by referring to Chapter III, depending on Internet type.
9

2. Multi User CPE Connection
2.1 Wired Connection (WAN)
1) Connecting Power Adapter
Connect Power Adapter to AC terminal and then connect DC connector.
When turning the power switch on, only Power LED keeps lighting up and all other lamps are
turned ON
for about 1 second and then OFF.
When booting is completed, WiMAX lamps of MULTI USER CPE are flashing at about 0.1 sec
intervals.
Always use the rated adapter of the product for a router. If not, it may cause malfunction and damage.
2) Connecting Modem
Connect the LAN terminal of modem (varies depending on modem) and the WAN terminal of MULTI
USER CPE.
(In case of LAN mode Internet service, there is no modem but a LAN line from wall outlet. Connect the
LAN line of wall outlet to the WAN terminal.)
In case of internal modem, contact to the Internet service provider so as to replace it with an
external
type modem.
When LAN line is normally connected, the WAN lamp is ON, and flashing if there is any
communication.
3) Connecting PC
Connect the LAN card of PC or the LAN port of motherboard to the router LAN 1~4.
When connected normally, the appropriate LAN lamp is turned ON.
4) Connecting Hub
- To connect more than 4 PCs, do through Hub.
- Connect the LAN port of HUB and one of the router LAN 1~4.
- If connected normally, the LAN lamp and the lamp of the port connected to HUB are turned ON.
[Note]
* If connected to the UP-LINK of HUB, you cannot use the next port to UP-LINK.
* HUB and router connect to one port only. They cannot be used for more than 2 connections.
* Since this product has the cable auto sensing function, direct (straight) and cross cables can be freely
used when connecting LAN or WAN port.
10
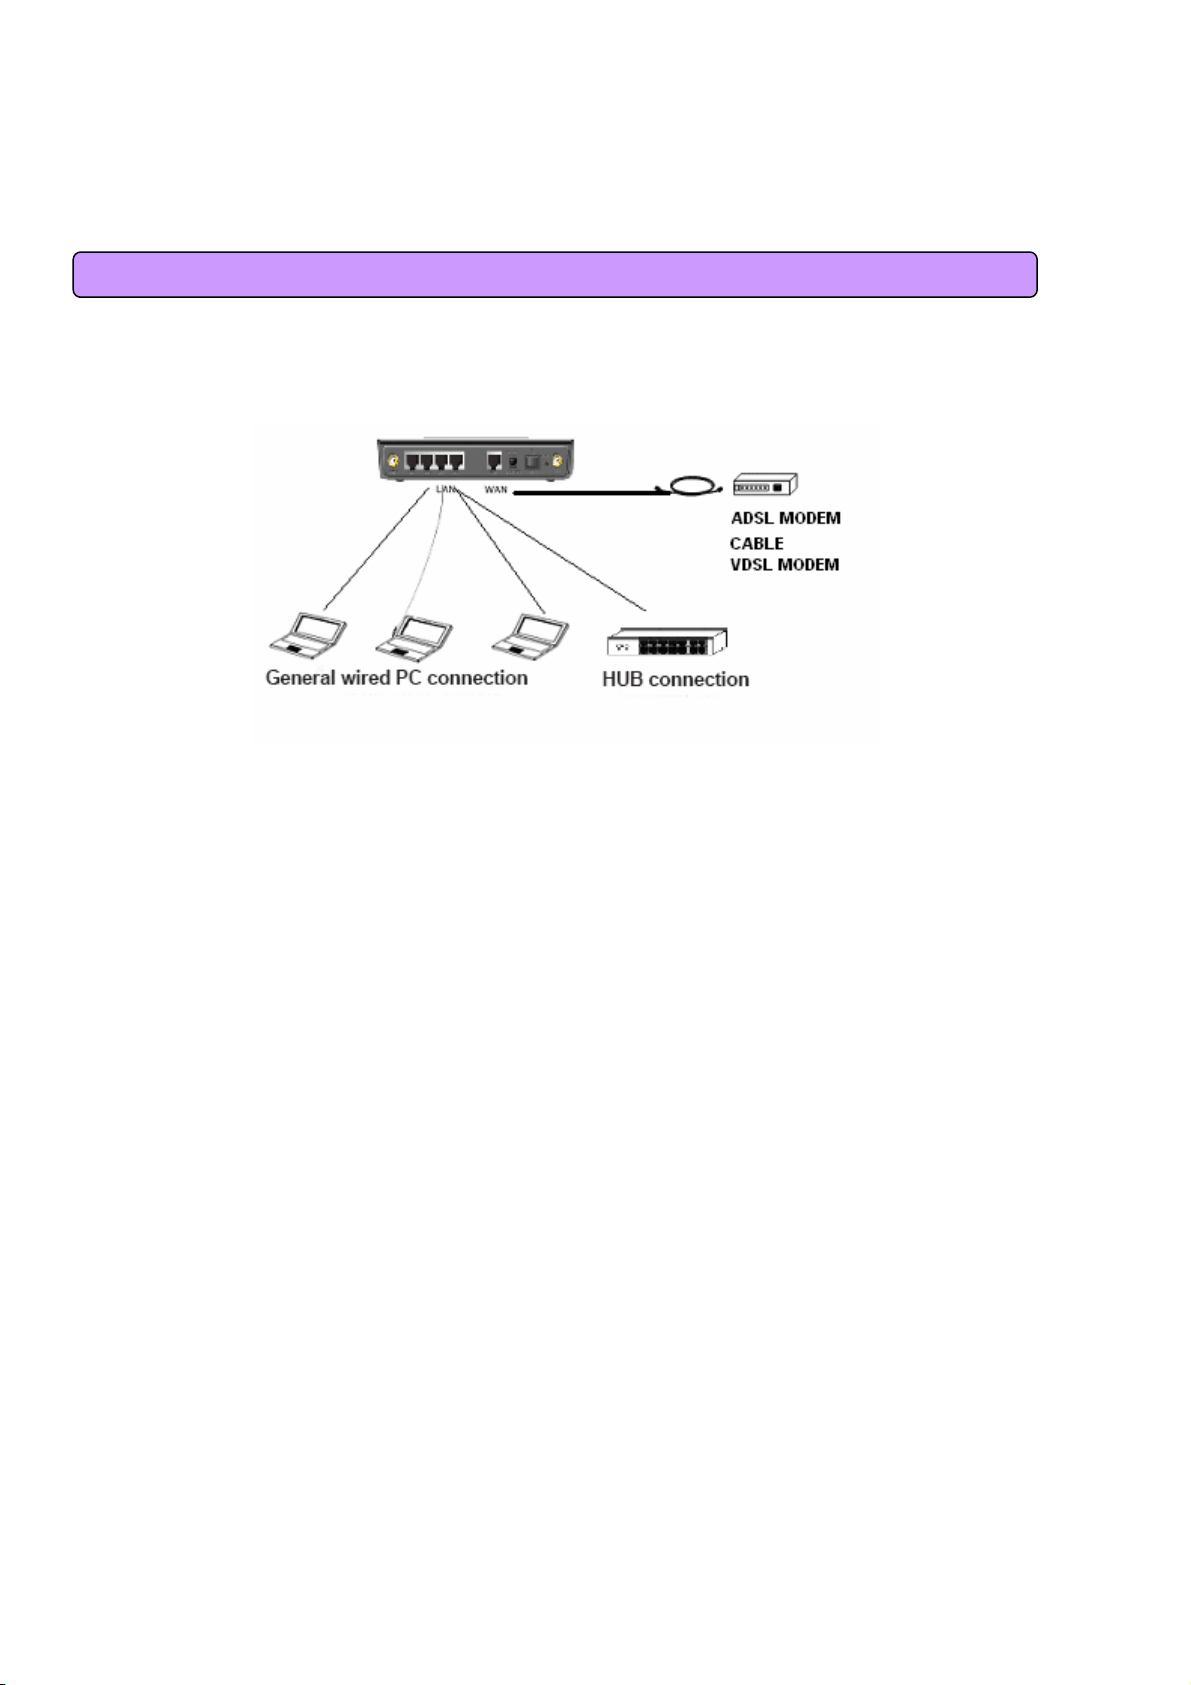
2.1 Wired Connection (WAN)
<Modem, Router, Wired (PC or HUB) connection>
11
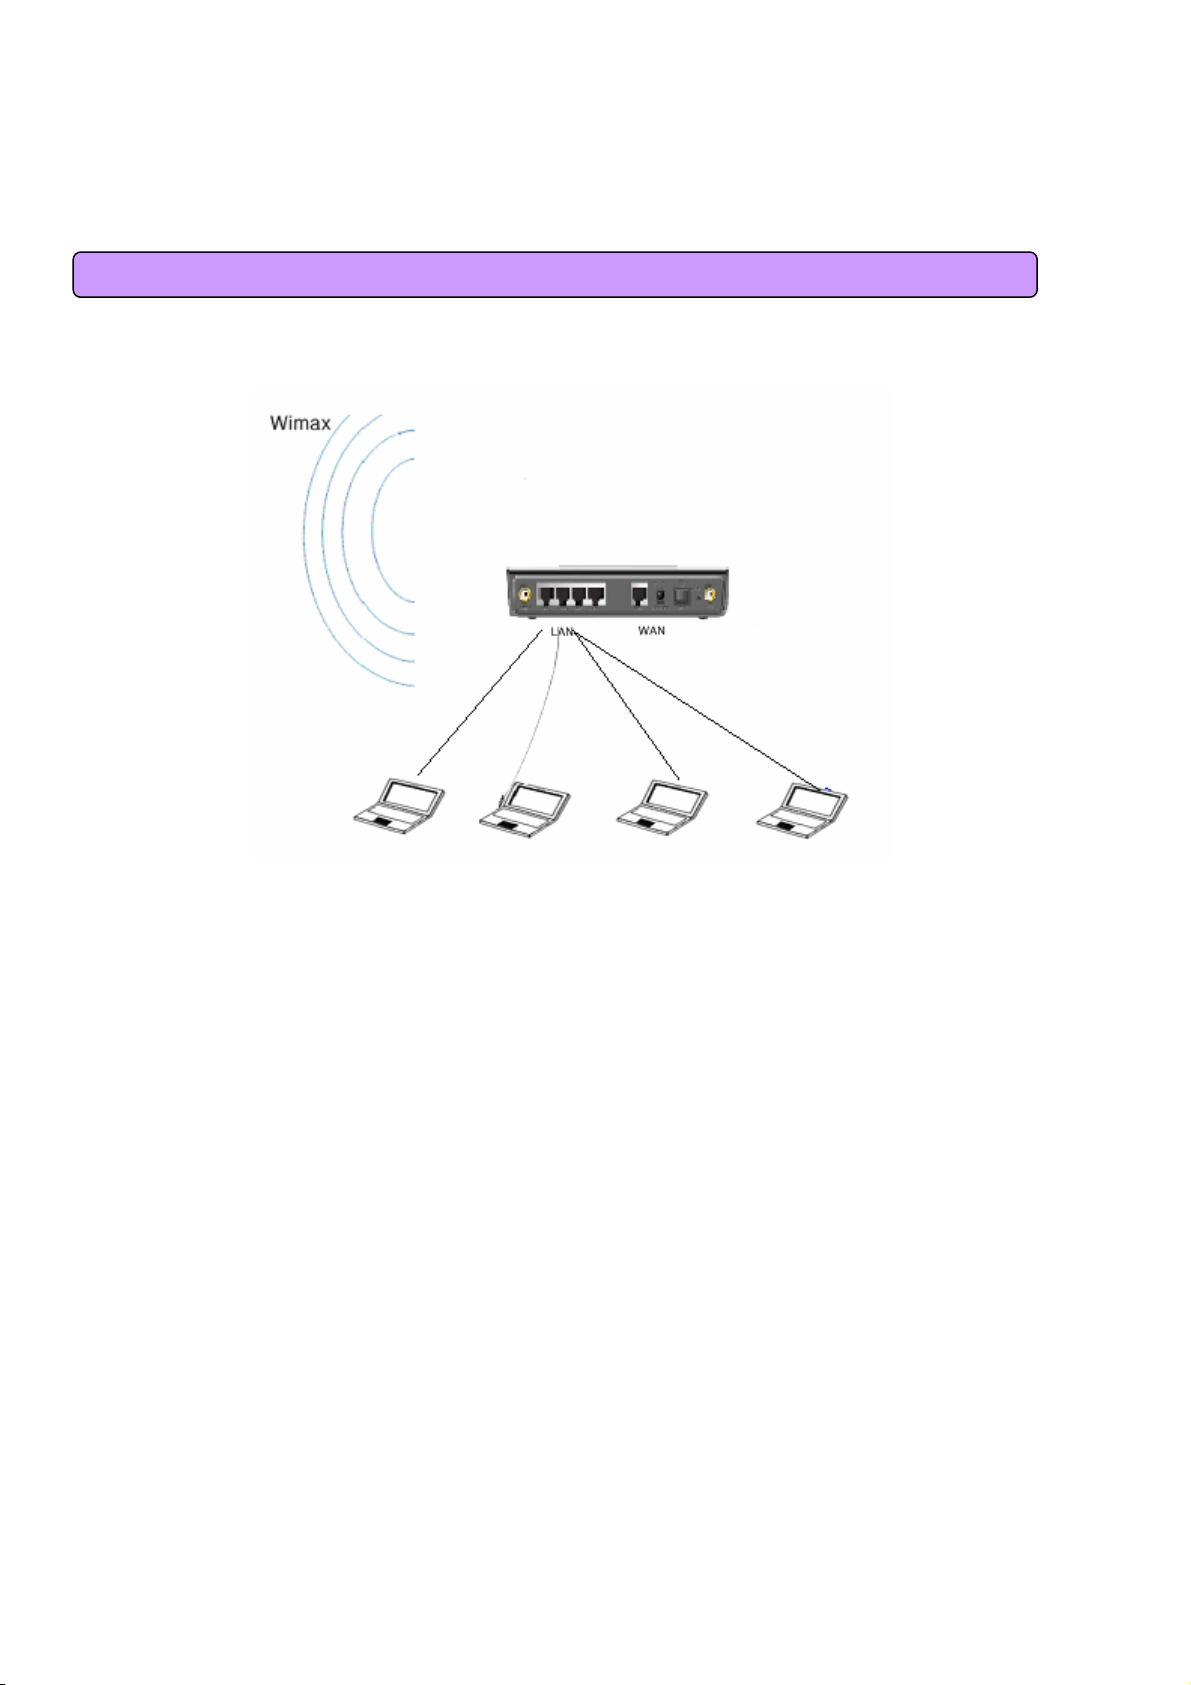
2.2 WiMAX Wired LAN Connection(CPE)
12

3. PC Configuration
This chapter describes how to set up PC network environment by connecting to MULTI USER CPE
according to Windows operating system.
To use Internet under operating system such as Windows, the protocol called ‘TCP/IP’ is required.
For normal use of MULTI USER CPE, you have to set up the TCP/IP protocol normally.
In general, the condition Windows is installed first in PC is the condition router can be used, in which no
separate TCP/IP setup is required.
As a computer used in ADSL service environment may have problem in the router environment if ADSL
access program (PPPoE access program) is installed, delete this and then set the network environment
according to the instructions of this chapter.
- In case of Windows 98/ME/2000, delete the ADSL access program installed separately
- In case of Window XP, delete the broadband connection installed
In case of the computer used in the internet service environment of LAN mode, VDSL mode, IP-ADSL mode,
and cable modem mode, you can directly connect it to a router to use without changing the Windows
configuration separately.
13
3.1 Windows 98/ME Setup
This procedure is to restore your Windows 98/ME TCP/IP settings to default values. If Windows is installed
in your PC for the first time, there is no change and check if all values are normal as the following:
After completing the TCP/IP setup of your PC, connect PC and MULTI USER CPE with a LAN cable
according to the instructions of Chapter 2 (STEP II) and turn the MULTI USER CPE on before Windows
setup in order to check if IP address is being given automatically in the MULTI USER CPE.
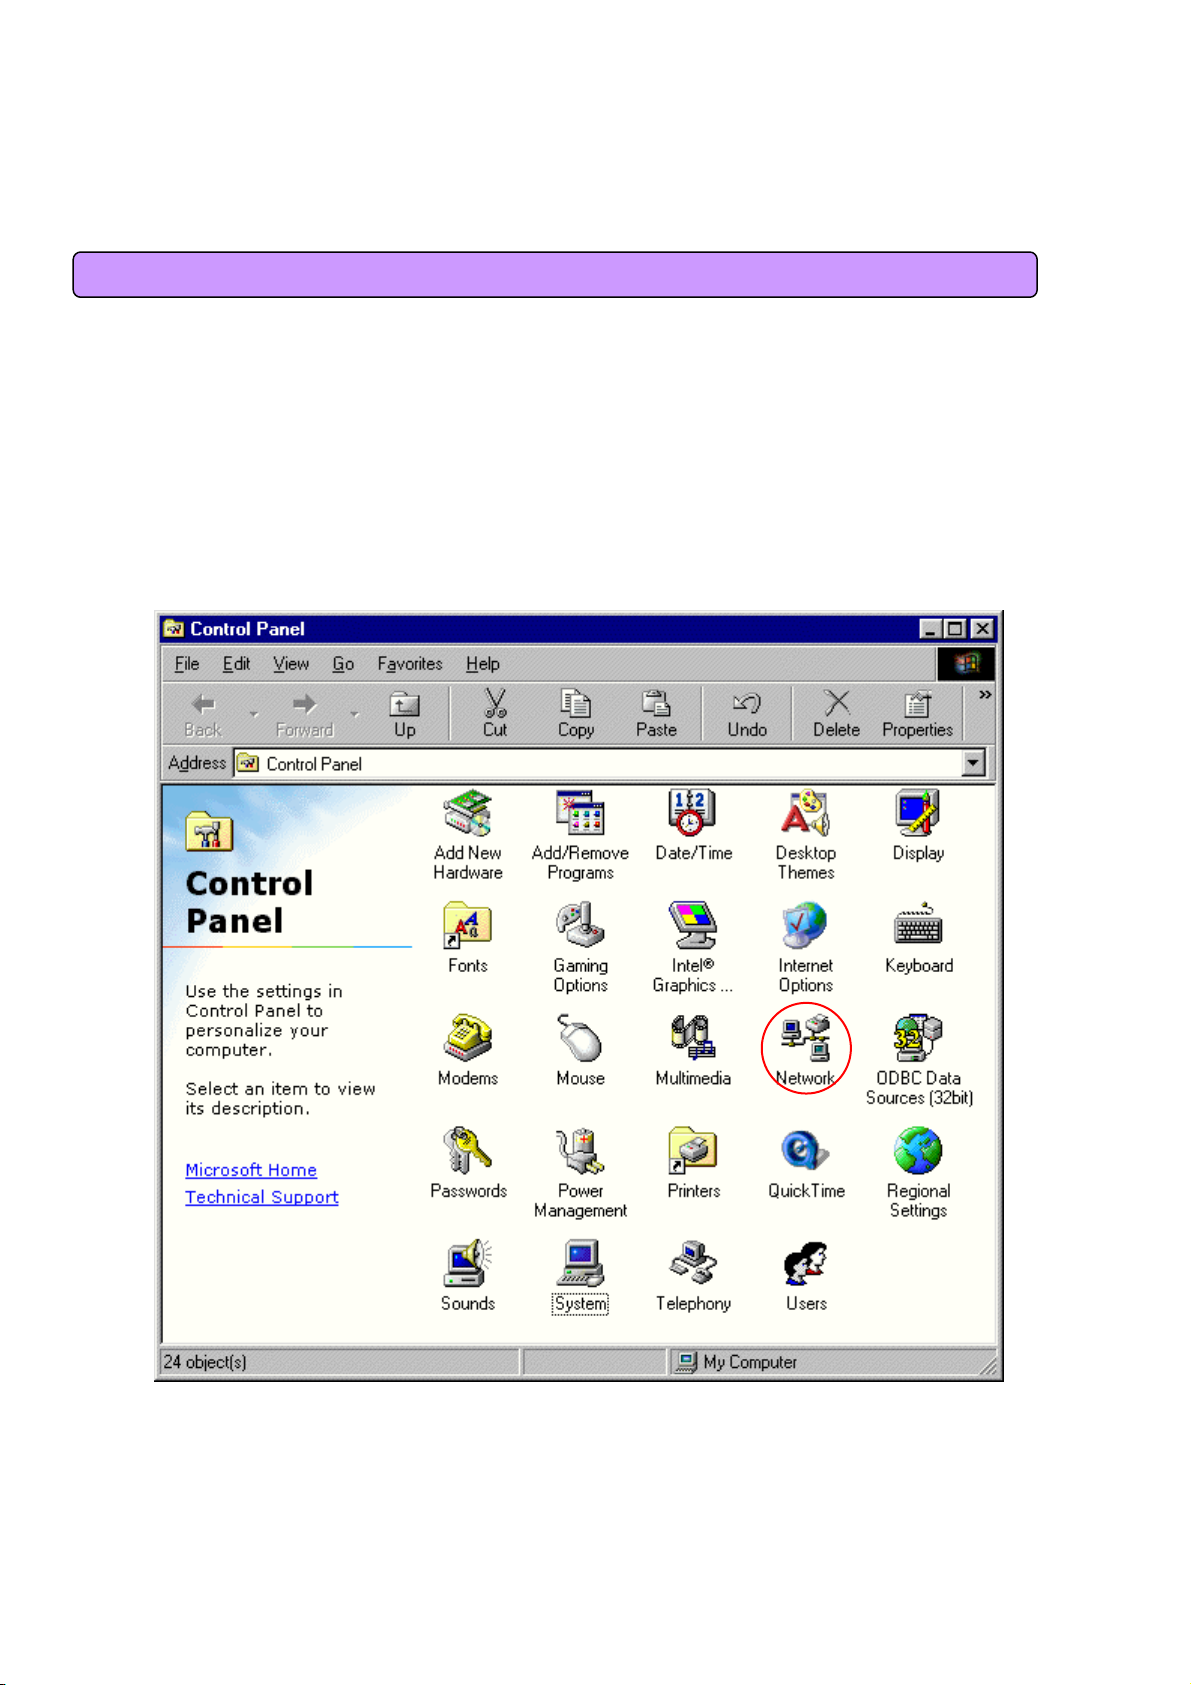
Click the Windows Start button and select Settings >> Control Panel on the menu.
Double-click the Network icon on the Control Panel window.
<Select Network Icon>
14
3.1 Windows 98/ME Setup
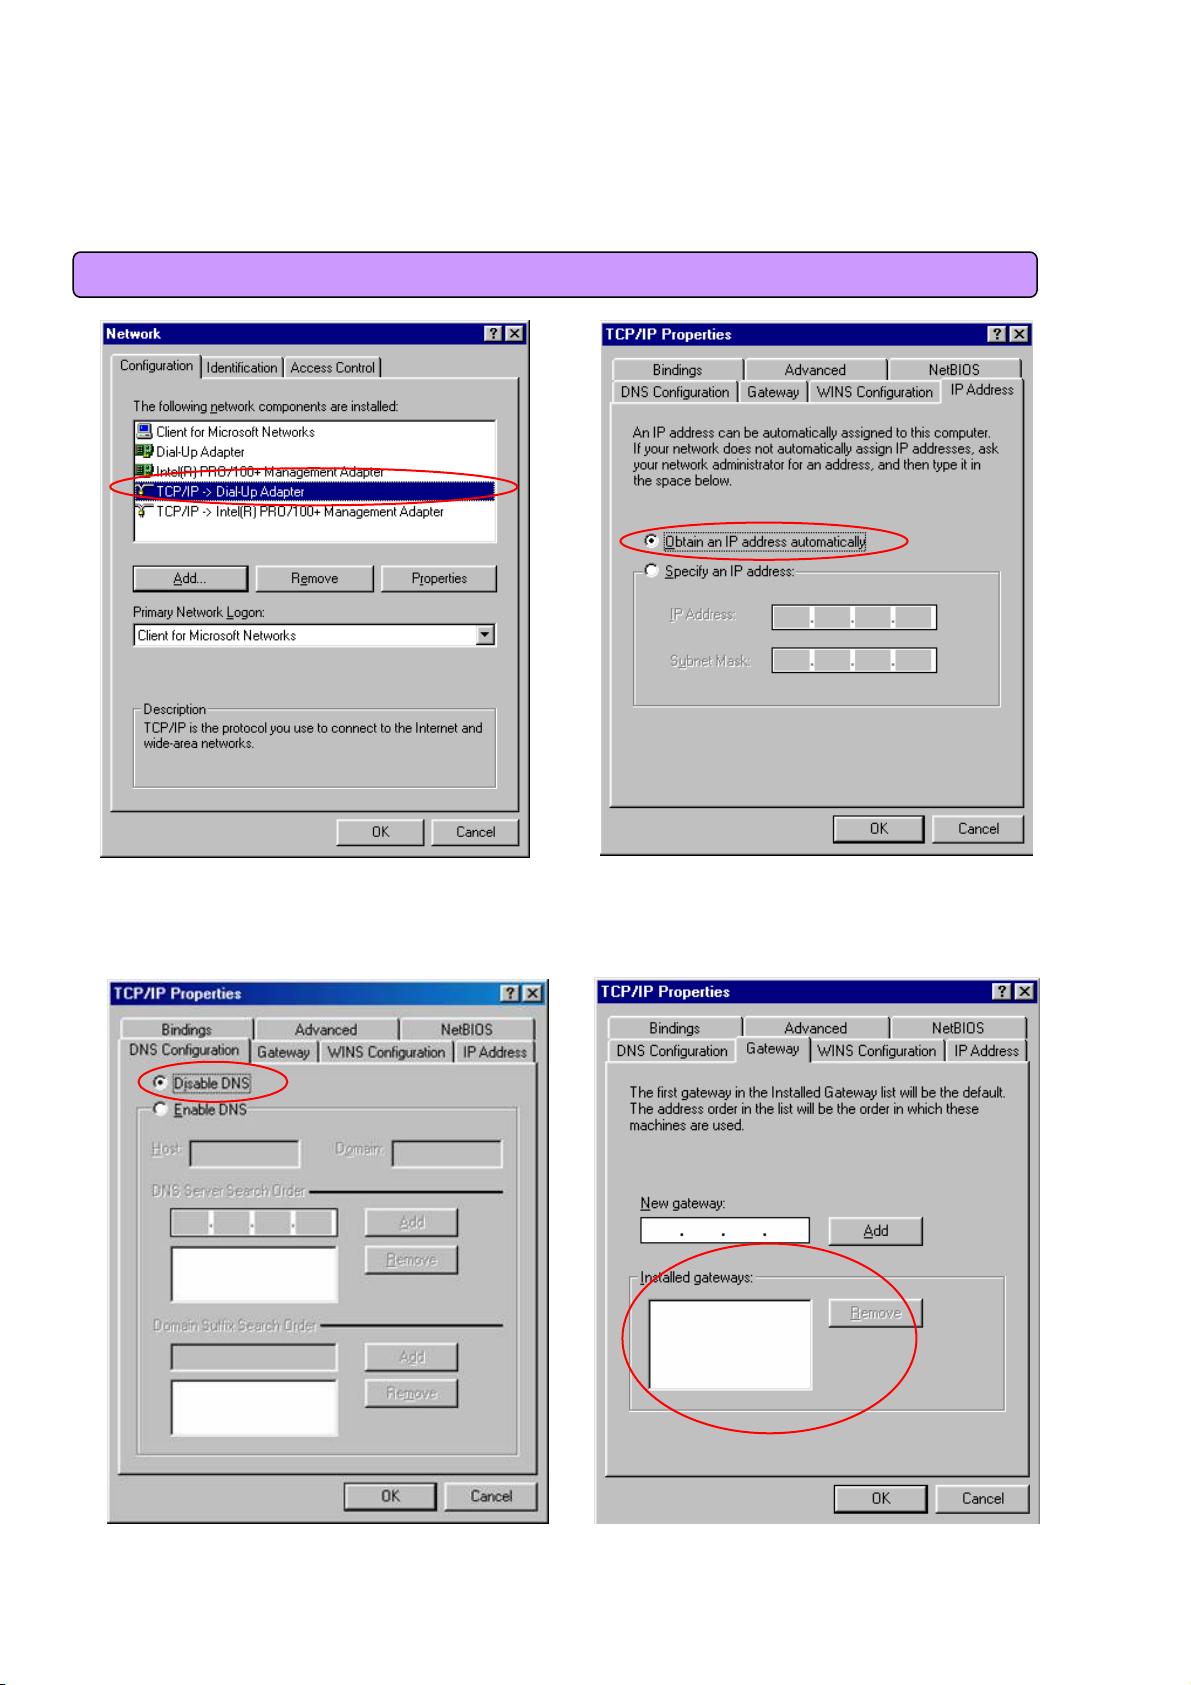
< Select TCP/IP > < Select Obtain an IP address automatically >
- Remove all gateways installed in Gateway. …
-Choose “Disable DNS” from DNS Configuration.
<Chosse ‘Disable DNS’ > <Remove all Gateway items>
15
3.1 Windows 98/ME Setup
- When IP Address, Gateway, DNS Configuration setups are completed, click on ‘OK’ to close the TCP/IP
Properties dialog box. When “Network” window is displayed, click ‘OK’ again.
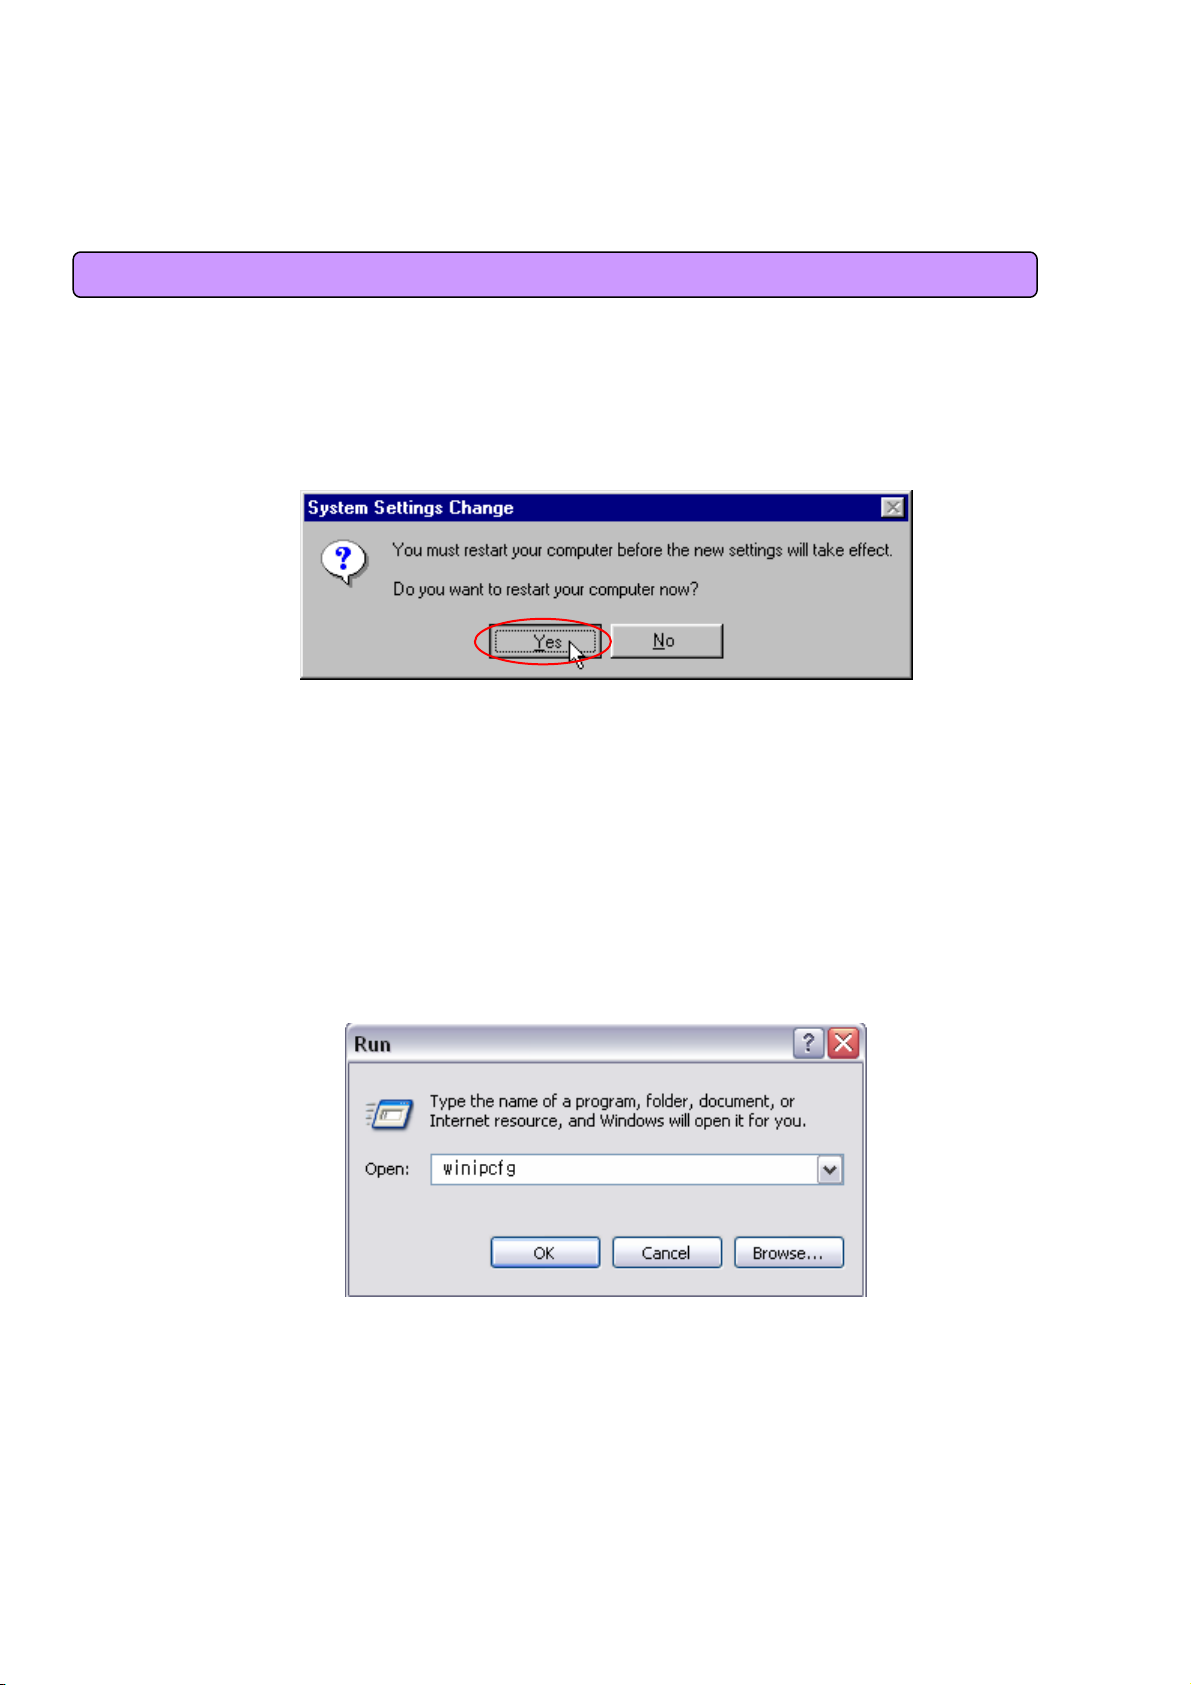
- In case of Windows 98, the system restarts automatically when network related setup is changed.
When the ‘Change System Setup’ screen pops up, click ‘Yes’ to restart Windows.
<Confirm System Restarting>
- When the PC is restarted, MULTI USER CPE assigns the IP address automatically.
For automatic assignment, PC and MULTI USER CPE should be connected by LAN cable. If cable is not
connected, connect a cable and then restart the PC.
- For automatic assignment of IP address, you can check it by using winipcfg program.
Click the Windows Start button, and then select Run menu and enter “winipcfg” in the Open box, and
click on ‘OK’ button.
<Run winipcfg >
16
3.1 Windows 98/ME Setup
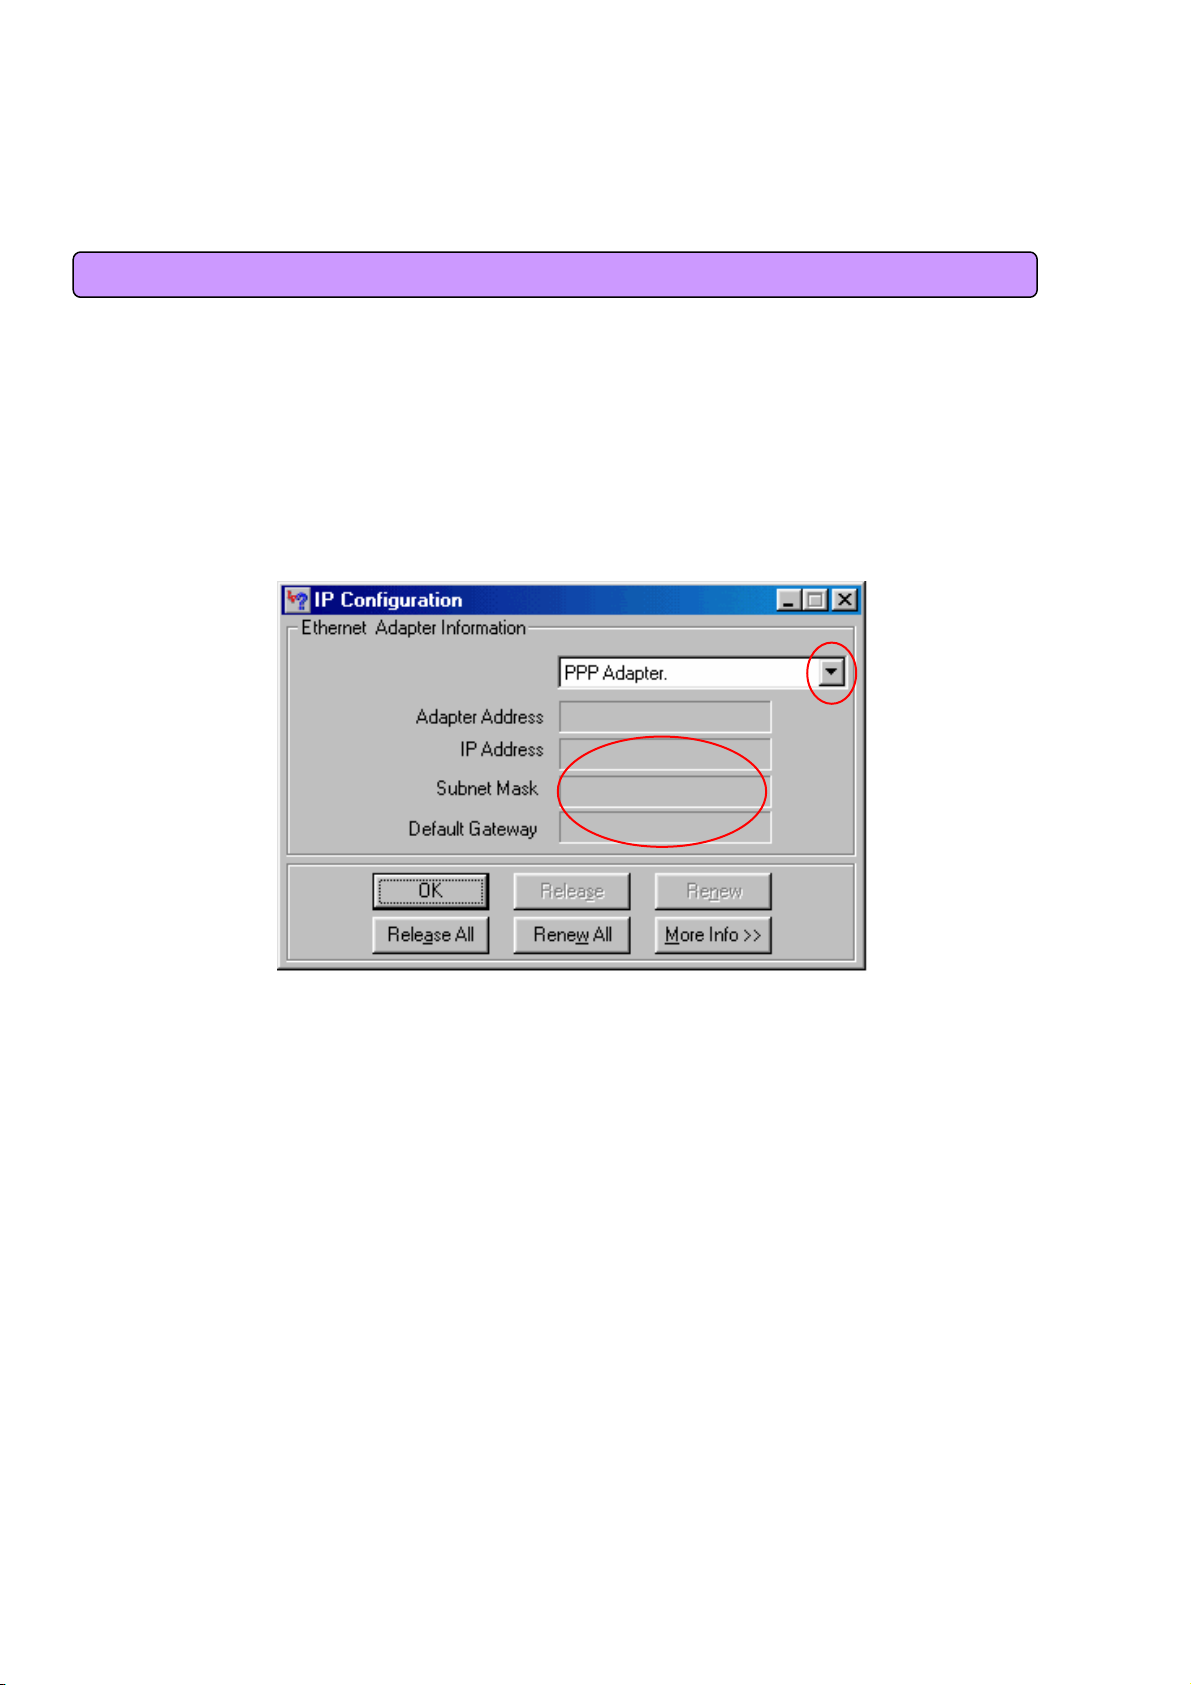
Select LAN card adapter used by connecting the router from the winipcfg IP Configuration window (Select NDIS
5.0 or the appropriate LAN card. Do not select PPP adapter) to check if the IP address of your PC is assigned to
the value between 192.168.1.10 and 192.168.1.60 automatically. If you cannot see other LAN card than PPP
adapter being used, you have to reinstall a LAN card driver. (Select LAN Card, click “Disconnect” and then “All
Create” or “All Update” button to check IP assignment.)
[Note] All PCs connected to MULTI USER CPE will get each of assigned IP addresses respectively.
00-52-00-01-19-A2
192.168.1.10
255.255.255.0
192.168.1.1
< Check IP Address >
Select LAN Card: Select NDIS 5.0 or the appropriate LAN card
Adapter Address: Different values on each adapter, ignorable
IP Address: 192.168.1.10 ~ 192.168.1.60
Subnet Mask: 255.255.255.0
Default Gateway: 192.168.1.1
[Note] If the IP address of PC is not assigned automatically, check the following and restart PC to check if the IP
address is assigned.
- Connect a LAN cable between PC and MULTI USER CPE
- Check TCP/IP setup details
Select
To use Internet after completion of PC setup, refer to Chapter IV and set the WAN port of MULTI USER CPE to
connect to the Internet. Since Internet connection setup is made by MULTI USER CPE, you don’t need to set up in
all PCs but do just once.
17
3.2 Windows 2000 Setup
This procedure is to restore Windows 2000’s TCP/IP setup to default values. If Windows is not
installed for the first time in PC or Internet is not operated properly, check all values are normal
according to the following.
After completing the TCP/IP setup of PC, to check if IP address is obtained from MULTI USER
CPE automatically, connect PC and MULTI USER CPE with a LAN cable according to the
instructions of Chapter II and keep MULTI USER CPE turned on before Windows setting up. Click
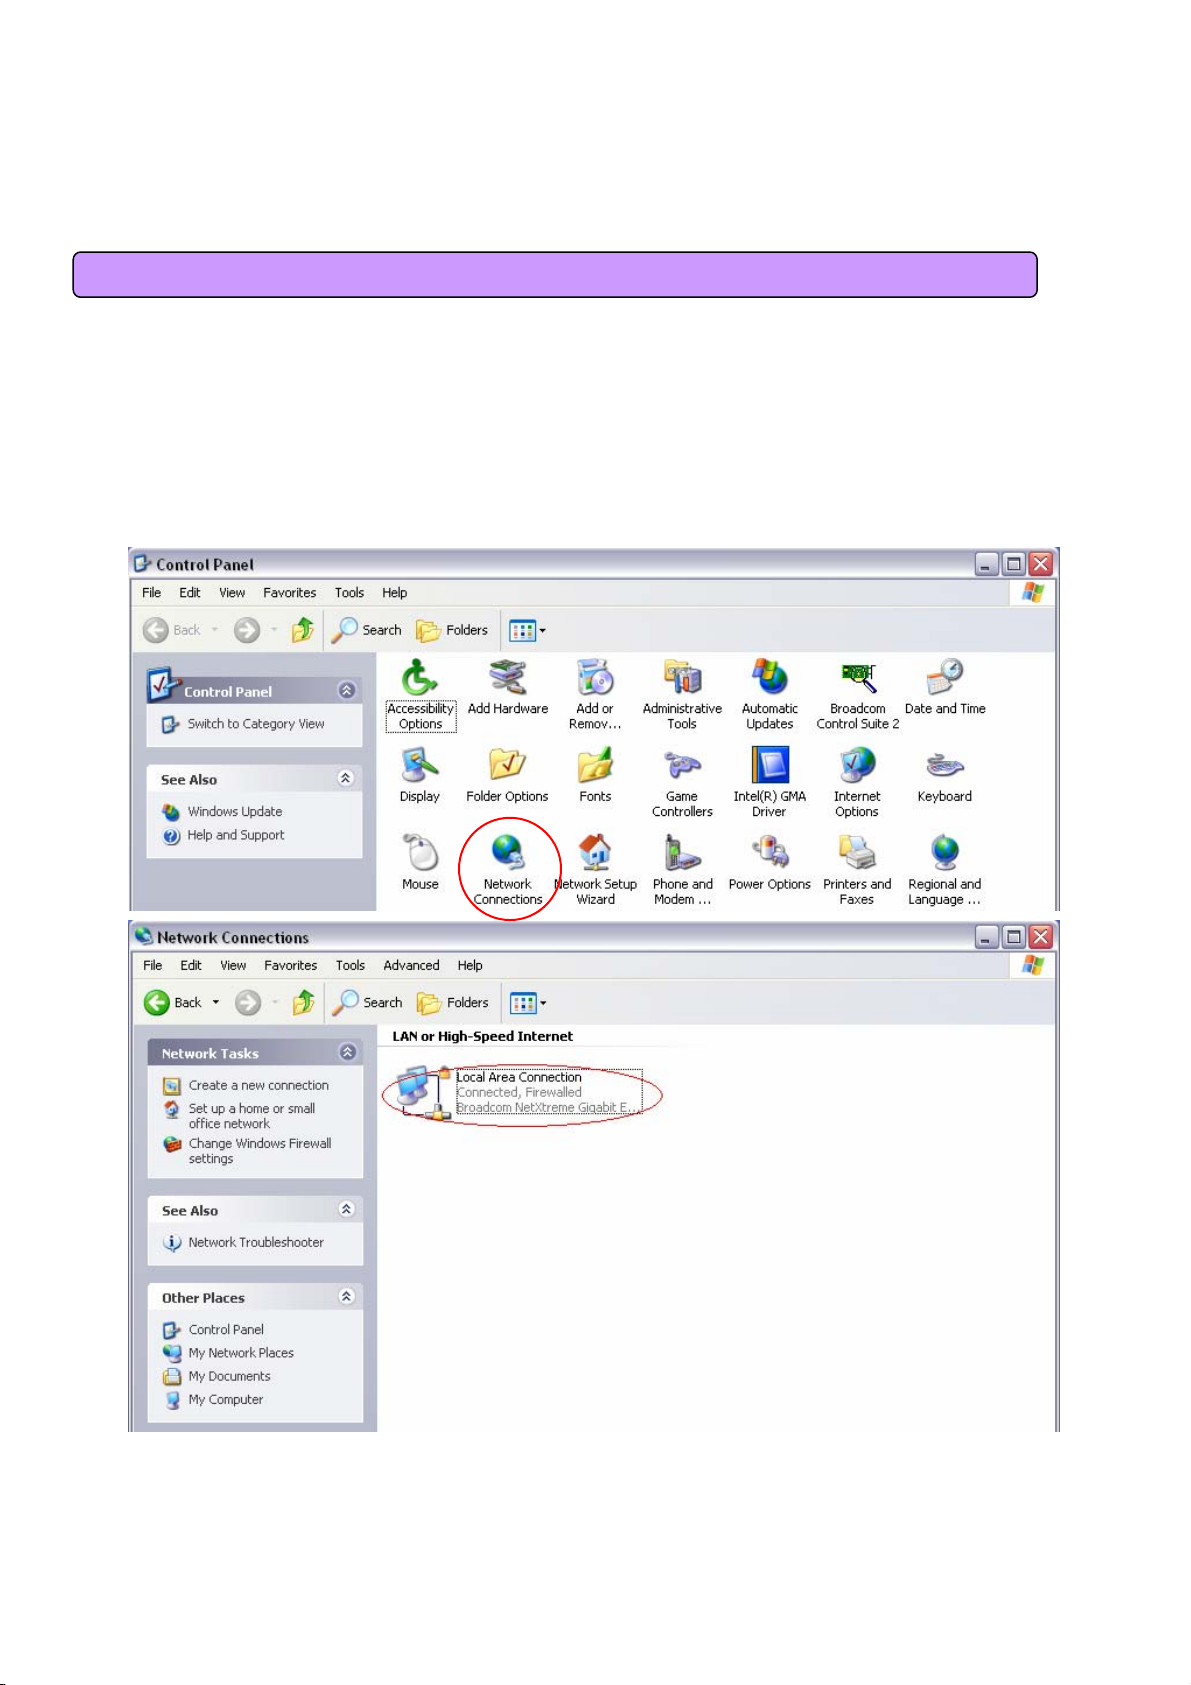
on the Windows Start button, select Settings >> Control Panel on the menu and then double-click
the “Network Connections” icon.
<Double-click the Local Area Connection >
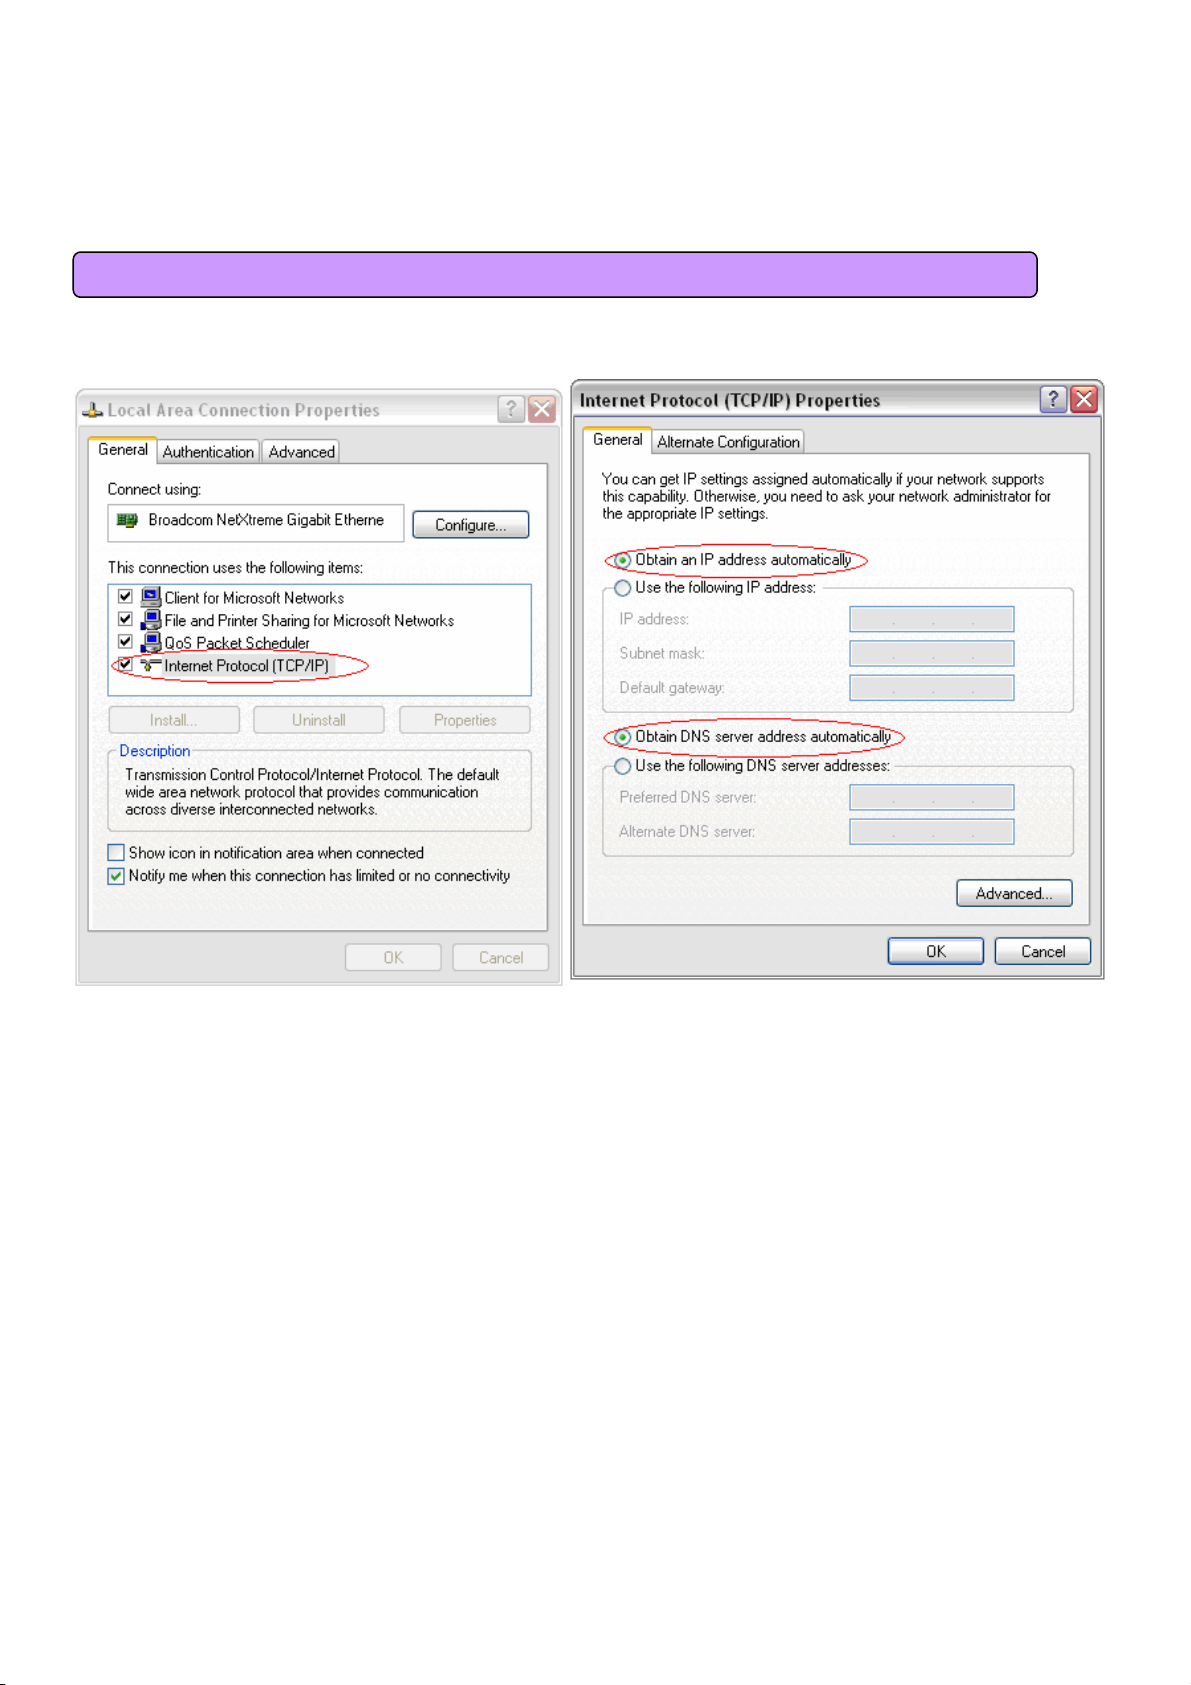
- Click Properties from the Local Area Connection window.
- Double-click Internet Protocol (TCP/IP) from the Properties window.
18
3.2 Windows 2000 Setup
<Double-click TCP/IP>
- After completion of setup, click OK button and close all of Network Connections windows.
- When TCP/IP setup is completed, IP address is automatically assigned by MULTI USER CPE. For automatic
assignment, PC and MULTI USER CPE should be connected with a LAN cable. If it is not connected with a cable,
connect the cable and restart the PC.
<Select “Obtain an IP address automatically”“Obtain
DNS server address automatically” and click OK>
19
3.2 Windows 2000 Setup
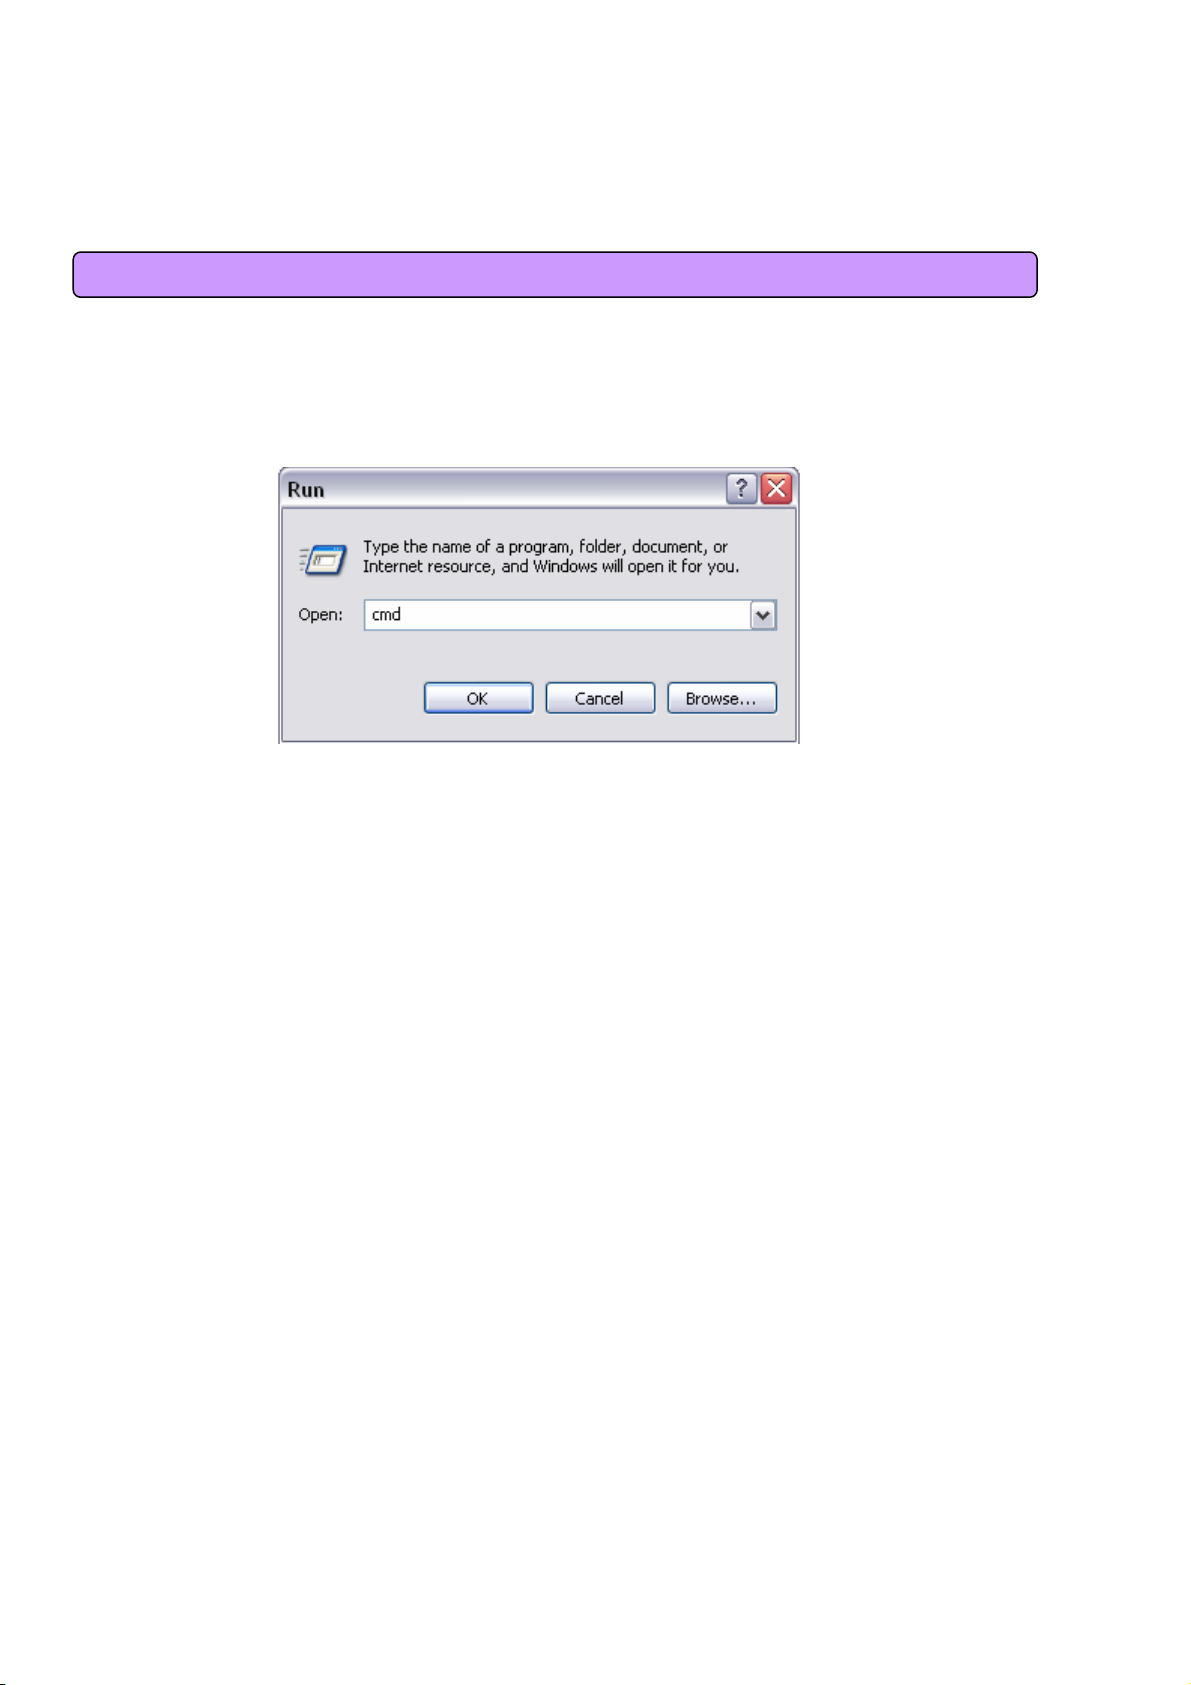
- You can check the automatic IP address assignment by using the ipconfig command from Command Prompt.
- To run the Command Prompt, click the Start button on the lower left corner of Windows screen and click Run to
enter “cmd” in the Open box, and then click OK button.
<Run cmd>
When the Command Prompt runs, enter the “ipconfig” command to verify IP address, Subnet mask, and Gateway,
which are automatically assigned to PC.
[Note] All PCs connected to MULTI USER CPE will get each of assigned IP addresses respectively.
20

3.2 Windows 2000 Setup
<Verify IP address>
IP Address: 192.168.1.10~60
Subnet Mask: 255.255.255.0
Default Gateway: 192.168.1.1
[Note] If IP address is not assigned normally, check the following and restart PC so as to check if the IP
address is assigned.
- LAN cable connection between PC and MULTI USER CPE
- Check TCP/IP setup details
- Whether or not to remove ADSL access program
To use Internet after completion of PC setup, refer to Chapter IV and set the WAN port of MULTI USER CPE
to connect to the Internet. Since Internet connection setup is made by router, you don’t need to set up in all
PCs but do just once.
21
3.3 Windows XP Setup
This procedure is to restore Windows XP’s TCP/IP setup to default values. If Windows is installed
for the first time in PC, there is no change and check all values are normal according to the
following.
After completing the TCP/IP setup of PC, to check if IP address is obtained from MULTI USER CPE
automatically, connect PC and MULTI USER CPE with a LAN cable according to the instructions of
Chapter 2 and keep MULTI USER CPE turned on before Windows setting up.
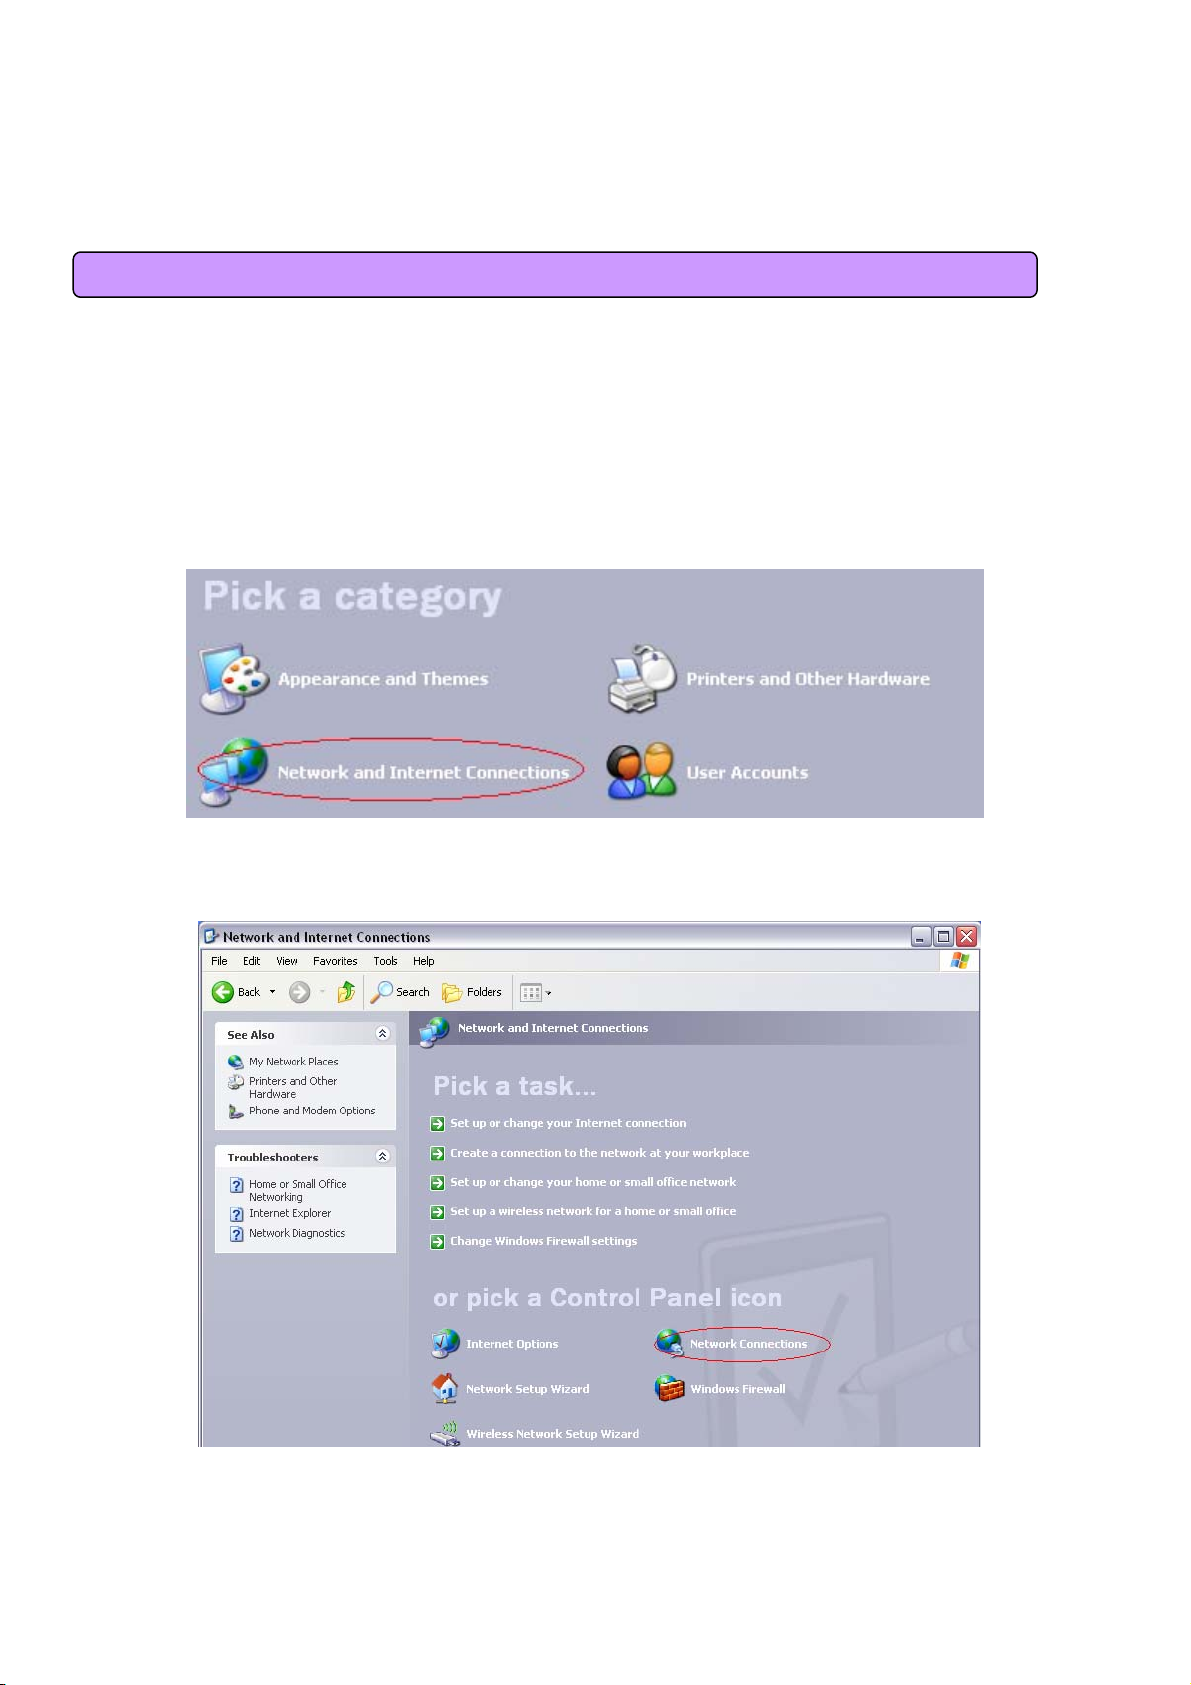
- Click on the Windows Start button, select Settings >> Control Panel on the menu.
- Double-click the “Network Connection” icon on the Control Panel.
<Double-click the Network and Internet Connections > …
<Double-click the Network Connection>
22
3.3 Windows XP Setup
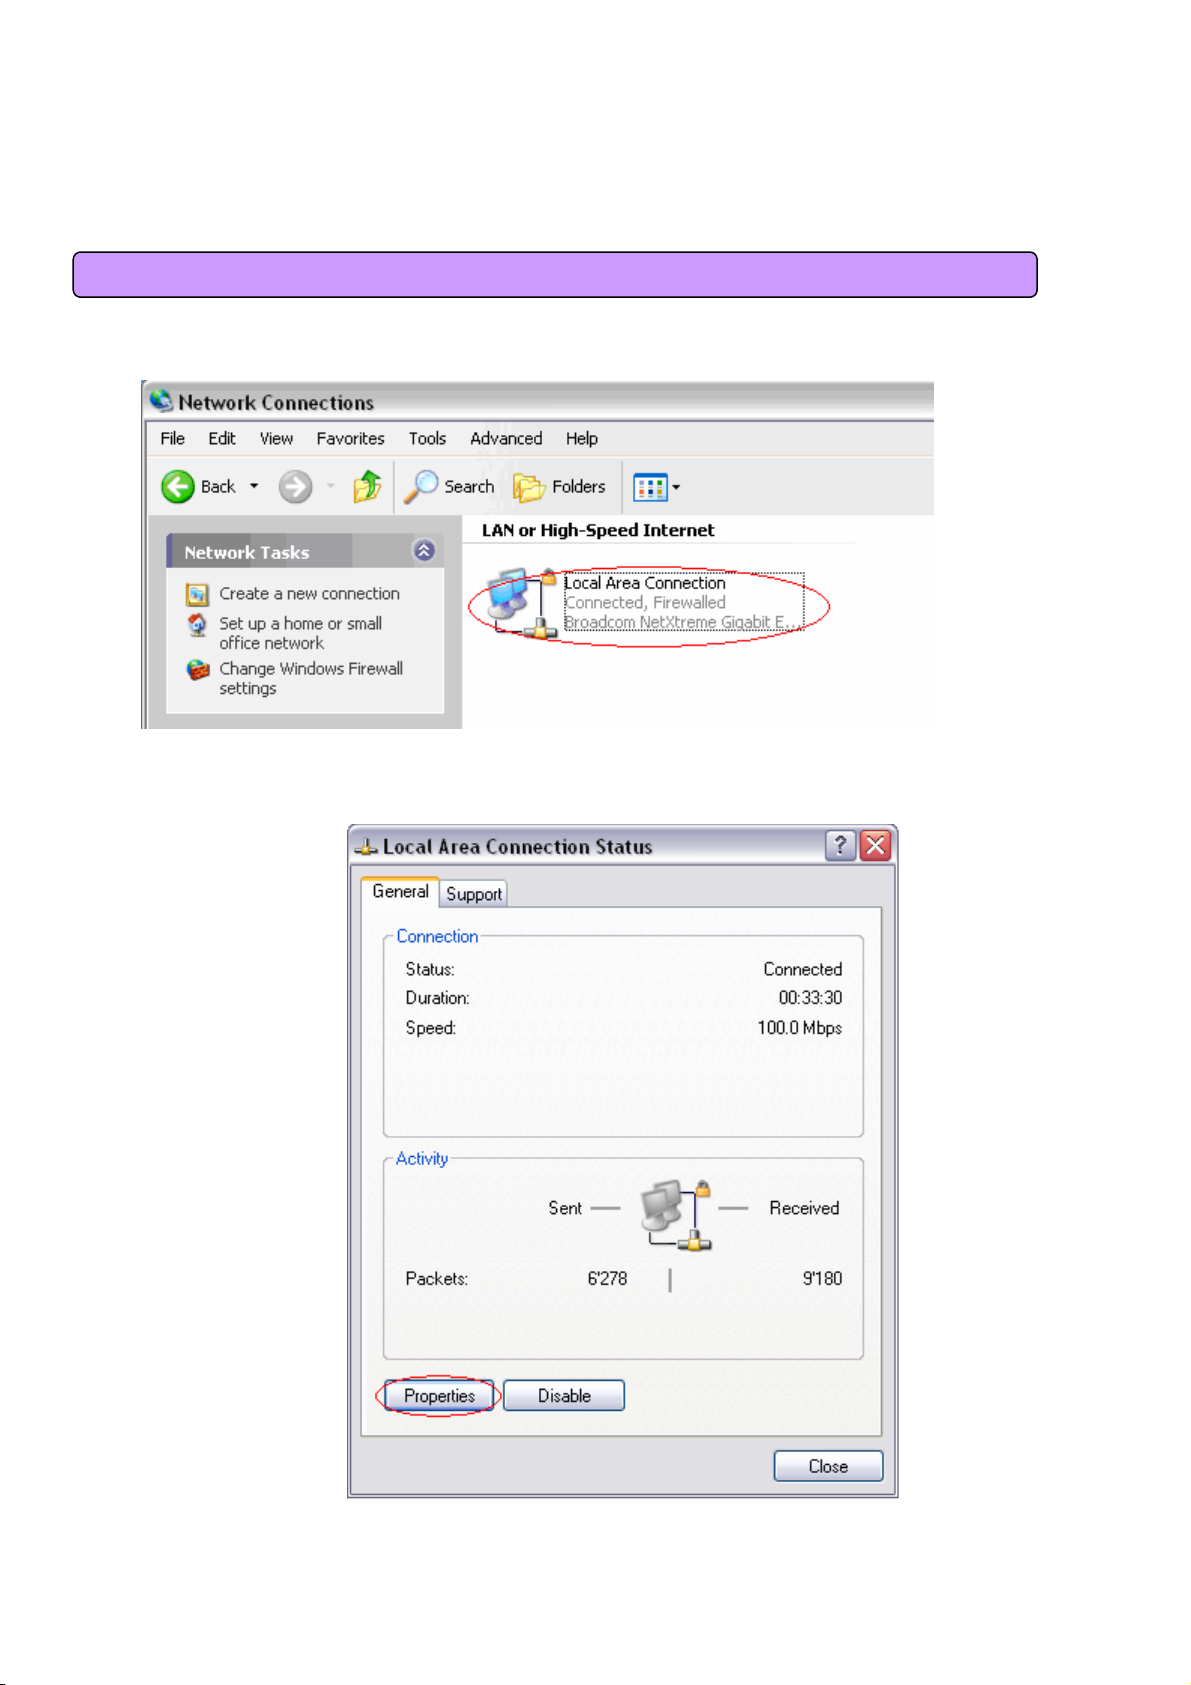
- Double-click the Local Area Connection from the Network Connection to select.
<Double-click the Local Area Connection>
- Click Properties in the Local Area Connection Status to select.
<Double-click Properties>
23
 Loading...