

Page 1

http://www.monomachines.com
http://www.monomachines.com
Fire-Safe
®
BRAND
Security Safe de la caja fuerte de
Owner’s Manual seguridad Fir
Manuel du
propriétaire
du coffre-fort de
sécurité DE MARQUE
Fire-Safe
Manual del propietario
®
e-S
®
afe
MARCA
TABLE OF CONTENTS TABLE DES MATIÈRES ÍNDICE
English . . . . . . . . . . . . . . . . . . . . . . . . . . . . . . . . . . . . . . . . . . . . . . . . . 2 -5 Anglais. . . . . . . . . . . . . . . . . . . . . . . . . . . . . . . . . . . . . . . . . . . . . . . . . . 2 -5 Inglés . . . . . . . . . . . . . . . . . . . . . . . . . . . . . . . . . . . . . . . . . . . . . . . . . . 2- 5
French. . . . . . . . . . . . . . . . . . . . . . . . . . . . . . . . . . . . . . . . . . . . . . . . . .6-10 Français . . . . . . . . . . . . . . . . . . . . . . . . . . . . . . . . . . . . . . . . . . . . . . . .6-10 Francés. . . . . . . . . . . . . . . . . . . . . . . . . . . . . . . . . . . . . . . . . . . . . . . . .6-10
Spanish . . . . . . . . . . . . . . . . . . . . . . . . . . . . . . . . . . . . . . . . . . . . . . . .11-15 Espagnol. . . . . . . . . . . . . . . . . . . . . . . . . . . . . . . . . . . . . . . . . . . . . . .11-15 Español. . . . . . . . . . . . . . . . . . . . . . . . . . . . . . . . . . . . . . . . . . . . . . . .11-15
Page 2

Thank you for purchasing this
http://www.monomachines.com
http://www.monomachines.com
Sentry Fire-Safe® product.
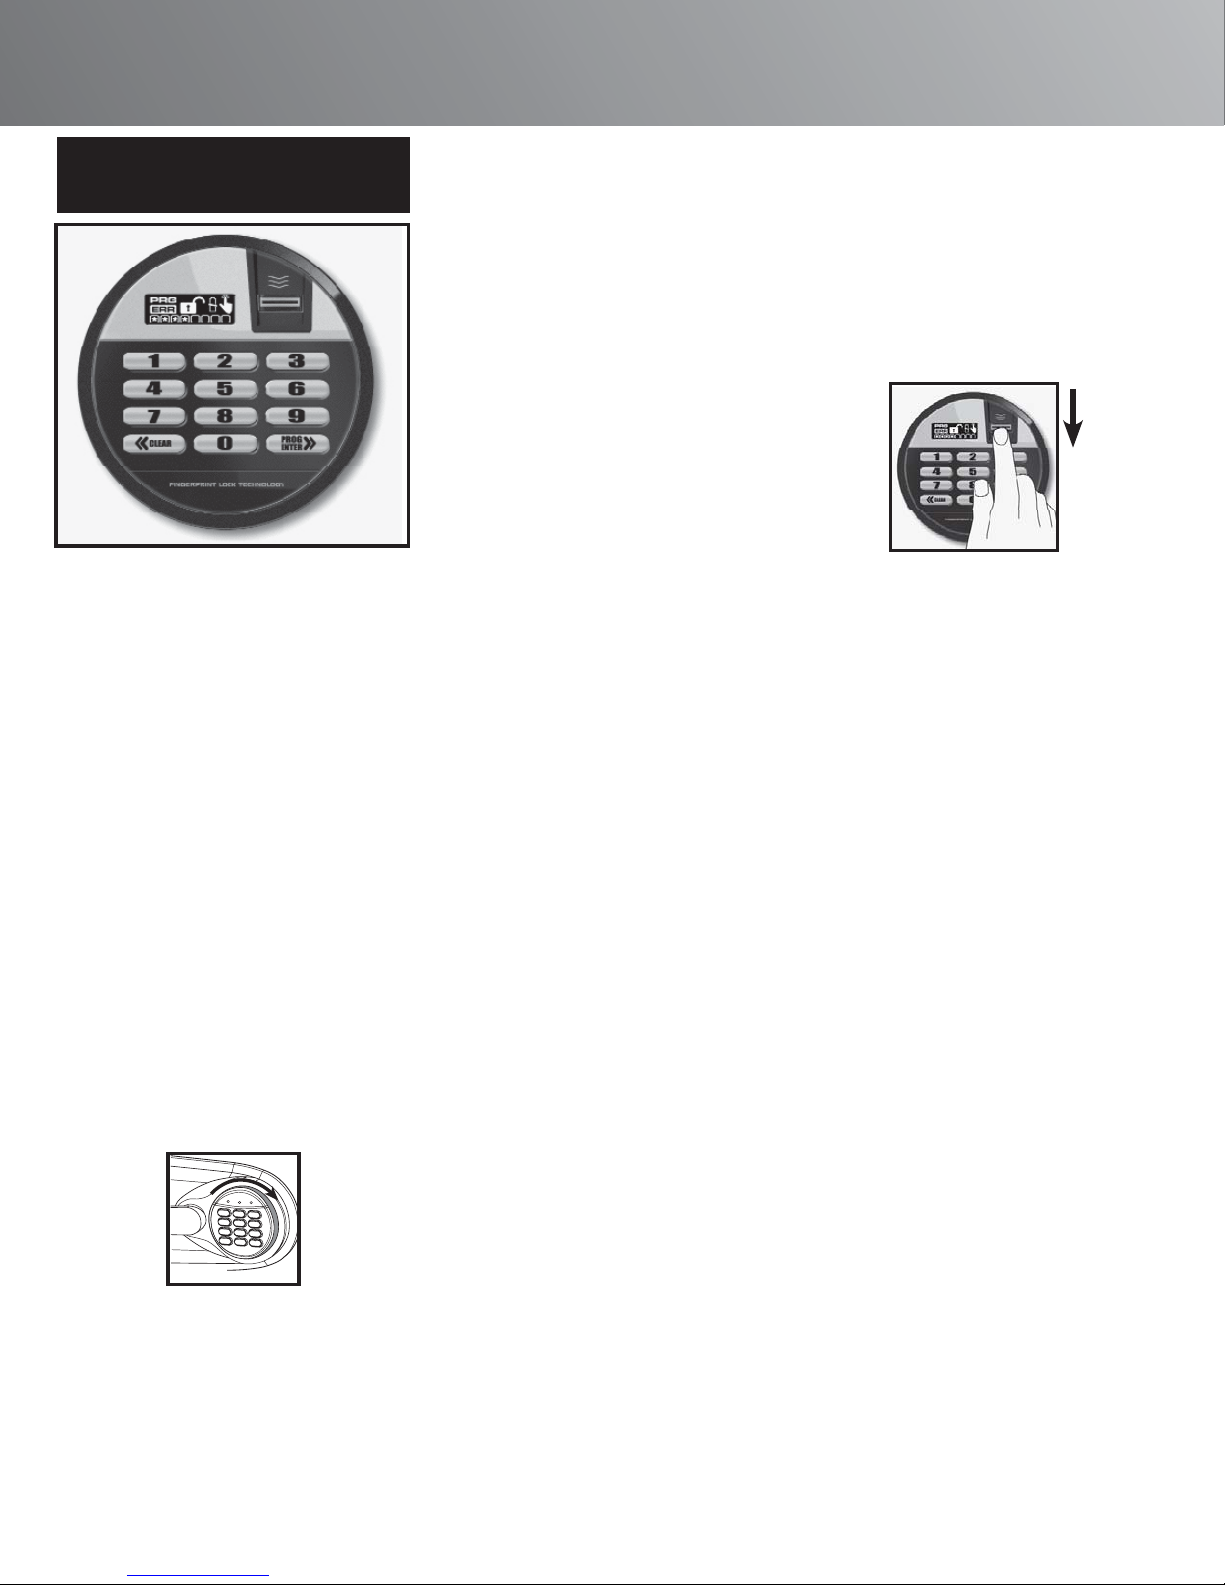
For safes with electronic lock:
Model TC8-331
Battery Installation
To power the lock, four alkaline AA batteries (not included) are
required.
NOTE: Non-alkaline and rechargeable batteries ARE
NOT RECOMMENDED.
To install batteries, turn the electronic lock case to the left and
remove. (Fig. A) Unlock door with the override key provided in
the plastic bag attached to the owner’s manual, and open the
door using the lever handle. Remove key hook plate located on
the inside back of the door by sliding the plate upward, then
pulling toward you. (Fig. B) Insert the four batteries as indicated.
Replace the key hook plate and keypad.
A
B
Model TW8-331
Battery Installation
To power the lock, four alkaline AA batteries equaling voltage:
6Vdc, (not included) are required.
NOTE: Non-alkaline and rechargeable batteries ARE
NOT RECOMMENDED.
To install batteries, turn the electronic lock case to the left and
remove. (Fig. A) Insert four new batteries as indicated, replace
the electronic lock case and turn to the right to reassemble.
For all models, test first
with door open!
(See back cover of this manual for your factory code.)
Test your combination several times with the door open.
NOTE: All electronic lock units have been provided
with an override key (skeleton key). Some
electronic units are equipped with a handle
OR electronic lock and key.
1. Insert the four-bitted key into the lock to the left of the
key pad. (Be sure key lock is turned as far left
as possible.)
2. Press the five-digit factory code. The green light will
come on.
3. For units with key, turn the key to the right.
4. Open the door.
Using the keypad
Only a light touch is needed. A green PROCEED light and a
single beep indicate that the keypad “felt” your touch. The lock
allows 5 seconds for each key press. If you pause longer, an error
signal will occur (blinking red light and three beeps), indicating
you should start over.
2
Models TC8-331 and TW8-331
Access Codes
There are three possible ways to unlock and access the safe—
by entering its preset Factory Code, your own User Code
or a Passcode.
You can always open the safe by entering the 5-digit Factory
Code. But if you prefer to use your own code, you can program
the safe to open to the 5-digit User Code of your choice. If you
wish to give someone else temporary access to the safe, you can
program a passcode that can later be erased.
Programming a user code
There are two ways to program a user code.
A 1. Press the Program key.
2. Enter the Factory Code. The green LED remains ON while
you enter the 5-digit user code of your choice. After 5 digits
are entered the green LED turns OFF.
(To enter a new User Code, repeat these steps.)
B 1. Press the red button inside the safe. The lock will “beep”
and the green LED will come on.
2. Enter a 5-digit user code.
(To enter a new User Code, repeat these steps.)
Programming a passcode
1. Press the Program key twice.
2. Enter your 5-digit User Code. The green LED remains ON.
3. Enter the 5-digit passcode of your choice (any combination
except 00000.) After 5 digits are entered, the green LED
turns OFF.
(To enter a new passcode, repeat these steps. To erase the
passcode, press Program twice, enter your User Code and then
enter 00000.)
Unlocking
To unlock the safe, you must enter a valid Factory Code,
User Code or Passcode. Once you have done this, you have
4 seconds to open the safe by turning the handle or 4-bitted key
to the unlock position. If you fail to do so in time, the lock will
reactivate.
(If you realize you have made an error while entering your code,
press the CLEAR button and start over.)
For those models with water resistance (TW models), which
have been tested by the independent testing firm ETL SEMKO
and certified to be in compliance with the manufacturer’s
specifications for water-resistant protection. Products were
immersed in up to 1’ of water for up to 72 hours and withstood
water leakage.
The supplied hardware MUST BE USED to bolt the
safe to the floor to assure the watertight seal, or the
water-resistant claim is invalid.
NOTE: It is normal to feel a slight amount of resistance
NOTE: Sentry Group is not responsible for any costs
Instructions for floor mounting
This kit contains:
• (2) lag screws
• (2) rubberized washers
• (2) masonry anchors
Required tools:
• Drill
• Wrench
• For wood anchoring: 7/16˝ (11.0 mm) drill bit
• For masonry anchoring: 7/16˝ (11.0 mm) masonry drill bit
Instructions
1. Unlock the safe and open the door.
2. Use a screw or drill bit to mark the floor through both holes.
3. Move the safe aside to clear both marked spots for drilling.
4. Drill into the floor:
• For wood: Using the 7/16˝ (11.0 mm) drill bit drill a hole
2 1/2˝(64.0 mm) deep in each marked spot.
• For masonry: Using the 7/16˝ (11.0 mm) masonry drill bit
drill a hole 2 1/2˝(64.0 mm) deep in each marked spot. Install
a masonry anchor in each hole.
5. Replace the safe in the desired position, with the holes in the
safe aligned with those in the floor.
6. Securing the safe:
• For wood: Pass each lag screw through a washer (rubber side
toward floor), then through the safe and into a hole. Tighten
with the wrench. (Fig. C)
• For masonry: Pass each lag screw though a washer (rubber
side toward floor), then through the safe and into a masonry
anchor. Tighten with the wrench. (Fig. D)
I
\'
C
TM
FloodGuard
Water-resistance protection
Water-resistant models must be bolted down.
when closing the door and locking waterresistant models.
incurred if unit is to be replaced.
ii
I
~~~I
~'I'::-"
rj._.
-'
x·-
.~:'''-
.
.:-.
-._=-
D
Page 3
For safes with a
http://www.monomachines.com
http://www.monomachines.com
fingerprint swipe lock
First time use
Open unit first, then test
with door open!
To unlock safe with numeric codes:
NOTE: Press CLEAR to remove numeric inputs.
Enter the 5-digit factory code provided on the front of the
Owner’s Manual, a pre-programmed manager code, or a preprogrammed user code and press the PROG/ENTER key. (See
the following instructions for inputting manager and user
codes.) An asterisk will light each time a digit is entered. When
the unlocked padlock icon appears you have 4 seconds to turn
the handle downward and open the safe.
To delete:
WAR NING: A manager code must be programmed to
1. Press PROG/ENTER.
2. Enter the 5-digit factory code.
3. Press PROG/ENTER.
4. Enter 0, 0, 0, 0, then the PROG/ENTER key.
To unlock safe with a fingerprint:
Press any key except the PROG/ENTER key to wake the
electronic lock. Swipe your pre-programmed finger over the
sensor. When the unlocked padlock icon appears you have
4 seconds to turn the handle downward and open the safe.
add or delete users
Enrolling manager fingerprints
IMPORTANT
For some fingerprint locks
NOTE: If you are experiencing difficulty with the
operation of the locking mechanism, DO NOT
RETURN THIS PRODUCT TO THE STORE. PLEASE
CONTACT SENTRY GROUP CUSTOMER SERVICE
at 1-800-828-1438 for assistance. Most problems
can be quickly resolved over the telephone.
It is important that you keep this Owner’s Manual in a secure
place other than IN your safe; it is your reference for the
safe’s Serial Number and Factory Code.
To open your safe for the first time
Battery installation:
To power the lock, four alkaline AA batteries, equalling voltage:
6Vdc (not included), are required.
NOTE: Non-alkaline and rechargeable batteries
ARE NOT RECOMMENDED.
To install batteries:
1. Remove and discard the screw at the base of the lock case.
2. Turn the electric lock case to the right (clockwise) from
12 o’clock to 2 o’clock and remove. Insert four new batteries
as indicated, replace the electric lock case and turn to the left
to reassemble.
To lock safe:
Close the door and return the handle to the horizontal position.
Best finger for programming
• Do not choose a finger with a cut or scar.
• Choose a finger with the tightest swirl pattern.
Swiping fingerprints
• When swiping, keep your finger flat against the
fingerprint sensor.
• Swipe in a downward motion using a consistent medium speed.
• Use a medium pressure on the sensor. Too firm or too light
will not read correctly.
• Also note where you are standing in relation to the safe.
Programming or usage at a different angle will not work well.
Skin condition
• If you have dirt on your hands, please wash them before using
the safe.
• Very dry skin will not program well. Use a skin moisturizer,
being sure to rub the moisturizer in well and remove any
excess before using the safe.
Environmental conditions
• The electronics may not work or may have a slow reaction time
in cold temperatures (50°F or less). Make sure that the safe is
at room temperature before programming and usage.
Cleaning the sensor
• For optimal accuracy and fingerprint-reading success, clean
the electronic case and fingerprint sensor periodically with a
dry, lint-free cloth.
Programming the manager code
NOTE: See page 2 for icon identification.
Low battery notice
When the battery power gets low, the battery icon will blink with
each activation of the lock until batteries are replaced.
NOTE: No codes are erased when old batteries are
removed for replacement.
NOTE: All zeros is an invalid code. The pre-programmed
To add:
1. Press PROG/ENTER.
2. Enter the 5-digit factory code.
3. Press PROG/ENTER.
4. Enter your new manager code consisting of 4-8 digits, and
then press PROG/ENTER.
Tips for fingerprint
programming and usage
factory code is also an invalid manager code.
One (1) manager code is allowed.
NOTE: The fingerprint lock stores one (1) manager and
up to six (6) users. The manager and each user
are encouraged to program two fingers,
preferably one finger from each hand.
To add:
1. Press PROG/ENTER twice.
2. Enter the 5-digit factory code.
3. Press PROG/ENTER.
4. Swipe your first finger in a downward direction over the
fingerprint sensor. Three accurate reads of the fingerprint are
necessary for successful enrollment. After each successful
swipe a beep up will sound and an asterisk will light. An
unsuccessful swipe will result in an ERR signal and a low pitch
will sound.
5. The blinking finger icon indicates that the sensor is ready
to read a fingerprint swipe. After the sensor reads a finger
swipe, the finger icon stays lit while saving the fingerprint into
memory. Wait for the finger icon to blink before proceeding
with additional finger swipes.
To delete:
1. Press PROG/ENTER twice.
2. Enter the 5-digit factory code.
3. Press PROG/ENTER.
4. Press 0, 0, 0, 0, then the PROG/ENTER key.
Errors while enrolling fingerprints:
1. A single BEEP/ERROR signal means that the sensor did not
read the fingerprint.
2. A three BEEP/ERROR signal means that the sensor read the
fingerprint but data did not meet minimum requirements.
3. The electronic lock will automatically turn off after ten
consecutive errors.
3
Page 4
Programming users
http://www.monomachines.com
http://www.monomachines.com
NOTE: You must program a manager code before
programming a user. Six (6) users are allowed.
All zeros is an invalid code. A personal 4-8 digit
user code will be programmed and then the
fingerprints will be enrolled.
To add:
1. Press PROG/ENTER.
2. Enter the 4-8 digit manager code.
3. Press PROG/ENTER.
4. Use the << and >> keys to scroll between the lighted boxes.
An empty box means it is available for a code entry. A boxed
lighted
means it is being used.
*
5. Enter your new user code consisting of 4-8 digits, and then
press PROG/ENTER.
6. When the finger icon blinks, swipe your first finger in a
downward direction over the fingerprint sensor. Three
accurate reads of the fingerprint are necessary for successful
enrollment. After each successful swipe a beep up will sound
and an asterisk will light. An unsuccessful swipe will result in
an ERR signal and a low pitch will sound.
7. With successful enrollment of the first finger the asterisk
will clear. Swipe your second finger over the sensor. Three
accurate reads are required.
To delete:
This operation will delete both the personal code and
fingerprints of users.
1. Press PROG/ENTER.
2. Enter the 4-8 digit manager code.
3. Press PROG/ENTER.
4. Use the << and >> keys to scroll to the programmed location
that you want to delete.
5. Enter 0, 0, 0, 0, then the PROG/ENTER to delete the
selected user.
To delete all programmed memory
WARNING: All manager codes, user codes and
1. Press PROG/ENTER three times.
2. Enter the 5-digit factory code.
3. Press PROG/ENTER.
4. Enter 0, 0, 0, 0, then the PROG/ENTER key to delete all
fingerprints will be deleted.
codes and fingerprints.
Beeper on/off
To turn the Beeper OFF, press the CLEAR and 0 keys at the
same time for 1 second. Beeper will beep once when it turns off.
To turn the Beeper ON, press the CLEAR and 1 keys at the
same time for 1 second.
The lock automatically enters a two-minute delay mode after an
invalid code or fingerprint has been entered three consecutive
times. In this mode, the lock cannot be activated.
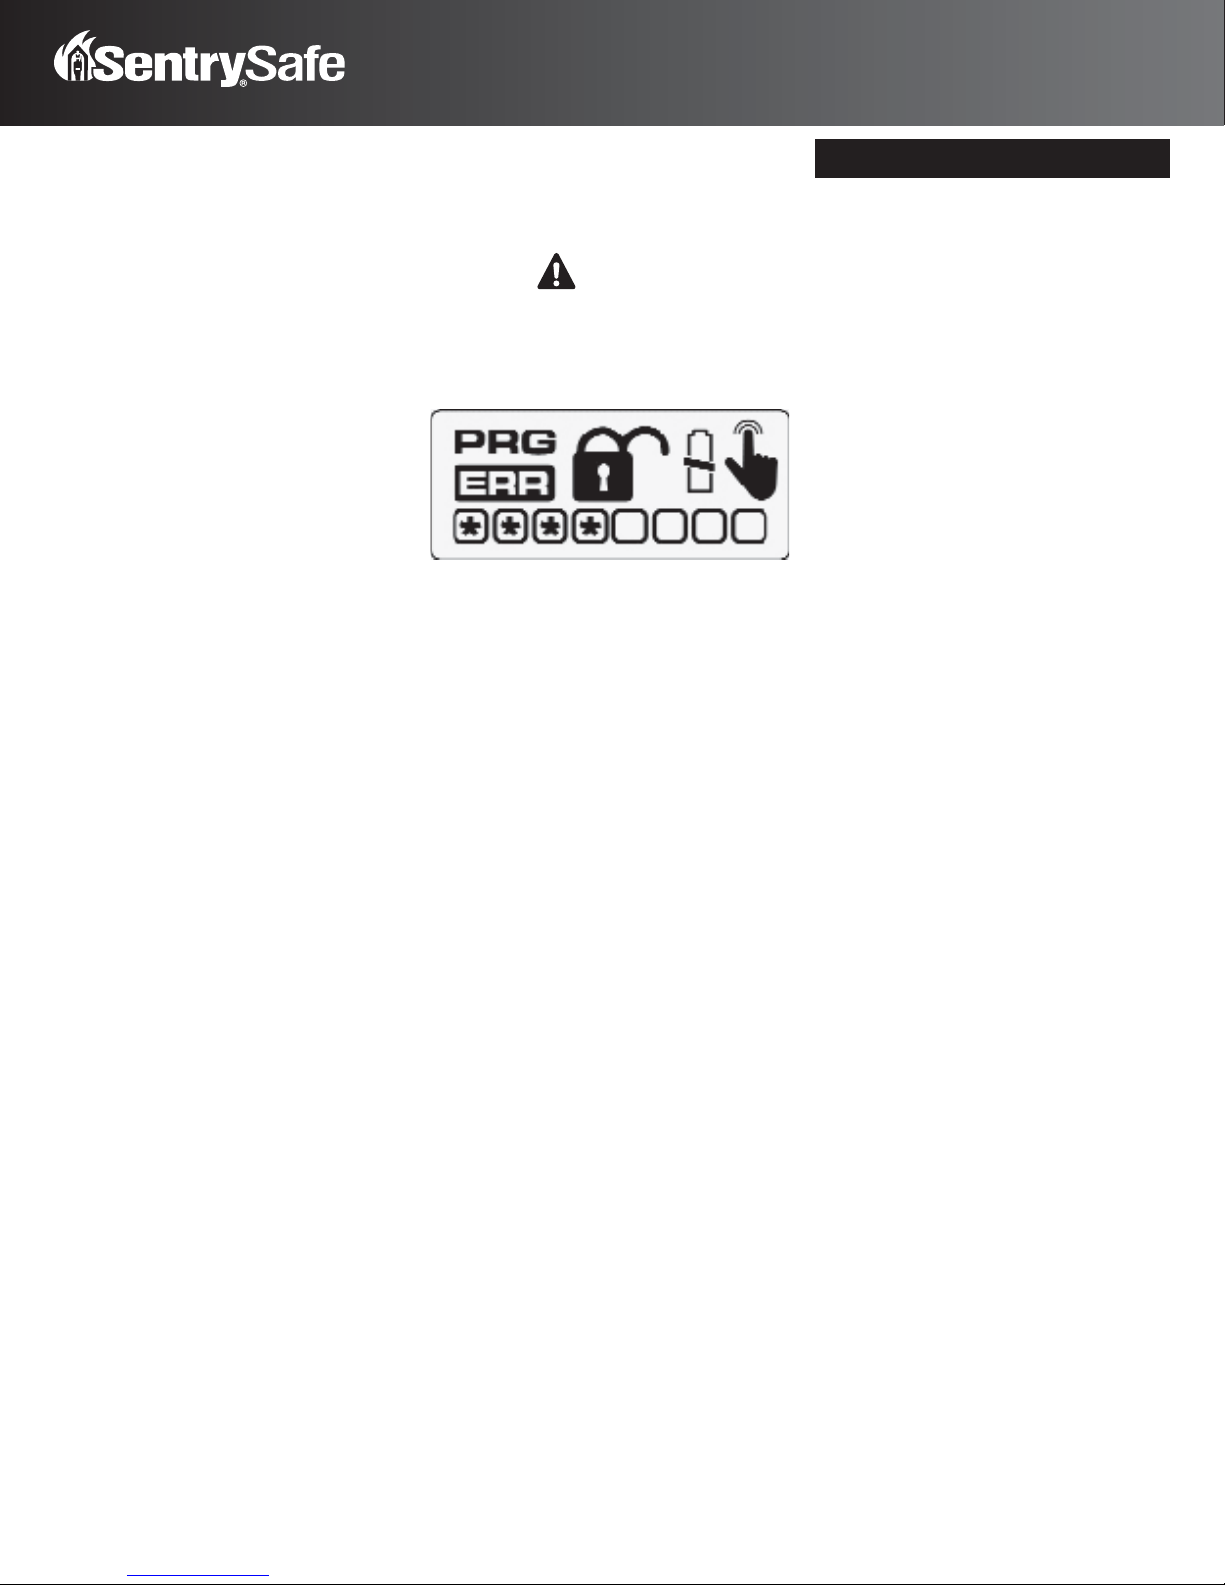
ERR (Error) indicates one of the following:
1. You have pressed PROG/ENTER key out of sequence.
2. You have entered an invalid code.
3. Sensor did not read finger swipe.
PRG (Program)
L ights after pressing the PROG/ENTER key and stays lit while
programming a manager or user code.
(Asterisk) indicates one of the following:
*
1. A number key has been pressed.
2. In Program mode, it signals a programmed code location
or a successful fingerprint swipe.
Box
L ights during programming and indicates code locations. A box
with an asterisk inside indicates a location with a programmed
code.
Padlock
L ights after three consecutive invalid codes or fingerprint scans
are input and stays lit during the 2-minute delay mode.
Unlocked Lock
L ights when a valid code is entered or a programmed finger is
swiped. Indicates that the safe is unlocked and the door can be
opened.
Battery
Blinks when batteries are low, indicating that the batteries need
to be replaced soon.
Finger
Blinks during fingerprint enrollment and when a finger can be
swiped to unlock the safe.
Delay Mode
WARNING
Do not remove batteries or press any
button. Doing so restarts the 2 minute delay.
Icon identification
For all models
Key override
If your electronic lock fails or you do not have any codes
available, you may use a key override to access this unit. Remove
the keypad by rotating the cover counterclockwise, then pull
toward you. Unlock the door by inserting the key provided into
the hole and turning clockwise. Open the door. Do not lock
override key inside of unit.
Signals
Your electronic-lock safe communicates by means of several
audio/visual signals.
Red (Error) LED + three beeps indicates
one of the following:
1. You have pressed Program key out of sequence
2. You have entered an invalid code or passcode.
3. You have let 5 seconds or more elapse between key entries.
Green (Proceed) LED + single beep occurs
1. After entering each digit of Factory or User Code, or Passcode
2. After pressing Clear key
3. After pressing Program key
Green LED only
1. Comes ON after you enter a valid code/passcode and remains
lit during the 4-second period in which the safe can be
opened.
2. Comes ON in the Program User Code mode after you enter
the Factory Code and remains lit until you have finished entering a 5-digit User Code.
3. Comes ON in the Program Passcode mode after you have
entered your User Code and remains ON until you have
entered a 5-digit passcode.
Yellow LED – Low Battery Indicator
Indicates “low battery” and will typically not turn OFF until new
alkaline batteries are installed.
Your electronic lock automatically performs a low battery test
during each lock use.
If a “low battery” condition is detected, the Yellow LED will come
ON and remain ON during each subsequent lock operation. (The
lock will continue to function in a Low Battery state, until battery
failure.) The Yellow LED will turn OFF only after three consecutive “Good Battery” readings or after the low batteries are
replaced. (Note: When the new batteries are installed, the Yellow
LED may come ON and stay ON during the first lock operation
before it returns to OFF.)
NOTE: When changing the batteries, you must use the
factory code to open. (See back cover.)
Passcode will have to be re-programmed.
Time out
During usage and programming the fingerprint lock will
automatically time out and turn off if there is no input for
30 seconds.
4
Page 5

Delay mode
http://www.monomachines.com
http://www.monomachines.com
The lock automatically enters a two-minute Delay Mode after an
invalid code has been entered three consecutive times. In this
mode, the lock cannot be activated and any key entry will
generate an ERROR signal.
This Sentry Fire-Safe® branded product has been verified by
ETL SEMKO to meet manufacturer’s specification for fire
resistance 1400°F for 30 minutes endurance 1400°F.
Lost combination or keys
IMPORTANT: Please read the following instructions
carefully. For your protection, combinations CANNOT
be issued by telephone request. To order replacement
keys and/or combinations, it is essential that you MAIL
the items listed in each category below to Sentry Group
with your order. If you need assistance in preparing
your order, or wish to purchase via credit card (Visa/
Mastercard only), please call Sentry Customer Service
toll-free Monday–Friday at 1-800-828-1438, 8:00am
- 6:00pm E.S.T.
To purchase on-line, please visit www.sentrysafe.com/
CustomerService
Lost combination: First, find your safe’s Model and Serial
Number. The Serial Number is in this packet, and is also printed
on the small label beside the door hinge (outside). Send a copy
of this, a notarized letter (last name must be different than that
of owner) stating you are the safe’s owner, and a check or money
order for $12.00* (U.S. funds) to: Sentry Group, Dept. 200,
882 Linden Avenue, Rochester, NY 14625-2784 USA.
If using a credit card (Visa/Mastercard only), call 1-800-828-1438
and fax your Model and Serial number with the notarized letter
to 585-381-2940. Credit card information is not accepted
by fax, mail or e-mail.
Lost keys: To obtain replacement keys, find your safe’s Model
and Serial Number. The Serial Number is in this packet, and is
also printed on the small label beside the door hinge (outside).
Order by Mail: Send the Model and Serial number along
with check or money order (U.S. funds) for $12.00* to:
Sentry Group, Dept. 200, 882 Linden Avenue, Rochester,
NY 14625-2784 USA.
* NOTE: Prices subject to change without prior
Express Delivery is available for keys and/or combinations
for an additional charge. Visit our website for details at www.
sentrysafe.com/customer service.
notification.
IMPORTANT: For assistance in the event of lost keys
or combination, or for information on ordering extra
organizational features, please call us toll-free Monday-Friday
(8:00am- 6:00pm E.S.T. ) at 1-800-828-1438, or visit us on-line at
www.sentrysafe.com.
Order by Internet: Visit our website at www.sentrysafe.
com. Go to our Customer Service Section.
* NOTE: Prices subject to change without prior
notification.
If a Sentry Fire-Safe® product is damaged by fire at any time
while still owned by you (the original owner), Sentry Group
will ship a replacement free of charge, if you send the following to Sentry Group, 882 Linden Avenue, Rochester, NY
14625-2784 USA:
• Your name and address;
• A description of the fire, with the model number and a
If at any time during the first ninety (90) days after the date
of purchase, you are not entirely satisfied with this Sentry
Group product, please call us toll-free at 1-800-828-1438.
Dated receipt required as proof of purchase. We’ll solve the
problem or ensure that you receive a replacement or full
refund.
--The employees of Sentry Group
This product is warranted to the original purchaser for one
year (1) from the date of purchase to be free of structural and
mechanical defects due to faulty materials or workmanship. If
a structural or mechanical defect occurs during the warranty
period, Sentry Group (also referred to as “Sentry”) will repair
or replace the defective part(s) or product, at its option, at no
charge upon proof of purchase validation.
For Warranty Service (North America only)
Please notify the Sentry Group Customer Service Department
of the problem by phone (at 1-800-828-1438 or 585-381-4900,
9 a.m. through 6 p.m. EST, M-F) or in writing to Sentry Group,
882 Linden Avenue, Rochester, New York 14625-2784, U.S.A. Do
not ship your product back to Sentry Group. The Sentry
Group Customer Service Department will decide either to have
the product returned, repaired, replaced, or refund your money.
Proof of Purchase Date
For all Sentry Group products, a dated store receipt is required
as proof of purchase.
Limitations Of Warranty
1. Sentry’s responsibility and the buyer’s exclusive remedy
2. Except as may be otherwise provided by applicable
ETL verified fire claim
Lifetime after-fire
replacement guarantee
photo of the burned unit, and a copy of the report from the
fire department, insurance or police.
100% Customer
Satisfaction Guarantee
warranty. Some states, provinces and countries do not allow
disclaimers of implied warranties or limitations on their
duration, so the above disclaimer and/or limitation may not
apply to you.
3. Sentry is not responsible for damage, defects, or malfunction
to the product incurred during shipment. The product was
packed in accordance with Interstate Commerce Commission
specifications, and with reasonable handling, should be in
good condition on arrival. Any claims for shipping damage
should be made directly to the carrier.
4. These warranties do not cover defects, damage, or malfunc-
5. No Sentry agent, employee, representative, dealer or retailer
has the authority to make or imply any representation, promise or agreement which in any way varies the terms of this
Limited Warranty.
6. This Limited Warranty shall apply to new, first quality Sentry
products and shall not apply to factory seconds or previouslyowned products, or products previously damaged by such
events including but not limited to, fire, flood, earthquake,
burglary, handling by movers or installers.
All of the provisions of this Limited Warranty are separate and
severable. If any provision is held invalid and unenforceable, such
determination shall not affect the validity or enforceability of the
other provisions. This Limited Warranty gives you specific legal
rights, and you may also have other rights which vary from state
to state, province to province, or country to country.
1 Year Limited Warranty
ETL Verified for up to 12 inches of water for up to 72 hours.
Must be bolted to ensure water-tight seal, bolt-down hardware included.
under this warranty are limited to the repair or replacement
of the defective part(s) or product, at Sentry’s option. In no
event shall Sentry be liable for any incidental or consequential
damages (including but not limited to loss or damage due to
fire, water, theft or vandalism) to persons or property resulting from the breach of this or any other express or implied
warranty applicable to the product. Some states, provinces
and countries do not allow the exclusion or limitation of incidental or consequential damages, so the above limitation or
exclusion may not apply to you.
law, Sentry disclaims any and all other covenants
and warranties, whether written or oral, express or
implied, including, but not limited to, the implied
warranties of merchantability and fitness for a
particular purpose. The implied warranty applicable to
this product shall not exceed the standard one year limited
tion caused by modification, alteration, repair or service of
the product by anyone other than Sentry or its authorized
representative, or caused by physical abuse to or misuse of
the product. Sentry specifically disclaims coverage for damage that may result from the product being bolted-down
and/or damage that may result from the improper handling of
the product during moving and/or installation.
Water-resistant
5
Page 6

Merci d’avoir acheté ce produit
http://www.monomachines.com
http://www.monomachines.com
Sentry Fire-Safe®.
Pour coffres-forts munis d’une
serrure électronique :
TC8-331 Modèle
Pour activer la serrure
Pour alimenter la serrure, il faut quatre piles alcalines AA (non
fournies).
REM ARQUE : l’utilisation de piles non alcalines ou
rechargeables N’EST PAS RECOMMANDÉE.
Pour installer les piles, tournez le boîtier de verrouillage
électronique vers la droite et retirez-le (figure A) Déverrouillez
la porte avec la clé prioritaire (fournie dans le sachet en
plastique joint au manuel d’utilisation), puis ouvrez-la à l’aide
du bouton de la poignée. Retirez la plaque porte-clés située à
l’intérieur, à l’arrière de la porte, en la faisant glisser vers le
haut, puis en la tirant vers vous. (figure B) Insérez les quatre
piles conformément aux instructions. Remettez en place la
plaque porte-clés et le clavier.
A
B
TW8-331 Modèle
Pour activer la serrure
Quatre piles alcalines AA (non incluses), d’une tension totale de
6 Vcc sont requises pour alimenter le verrou.
REM ARQUE : l’utilisation de piles non alcalines ou
Pour installer les piles, tournez le boîtier de verrouillage
électronique vers la droite et retirez-le (figure A) Insérez quatre
piles neuves tel qu’indiqué, remettez le boîtier de verrouillage
électrique en place, et tournez-le vers la gauche pour le réassembler.
(Voir le dos de la couverture de ce manuel pour votre Code Usine).
Testez plusieurs fois votre combinaison avec la porte ouverte.
REM ARQUE : toutes les unités à verrou électronique
1. Insérez la clé à quatre mors dans la serrure à gauche du clavier à touches. (Assurez-vous que le verrou est le plus
possible tourné vers la gauche.)
2. Composez le Code Usine à 5 chiffres. La DEL verte s’allume.
3. Tournez la clé vers la droite.
4. Ouvrez la porte.
6
rechargeables N’EST PAS RECOMMANDÉE.
Pour tout les modèles essayez
d’abord la combinaison avec la
porte ouverte !
sont livrées avec une clé prioritaire (clé passe-partout). Certaines unités électroniques sont équipées
d’une poignée OU d’un verrou
électronique et d’une clé.
Comment utiliser le clavier
Une très légère pression suffit. Une lumière verte
(“CONTINUER”) et un seul bip indiquent que le clavier a
“perçu” votre pression. La serrure permet une pause de
5 secondes entre chaque pression. Une pause plus longue
déclenchera un signal d’erreur (un clignotant rouge et trois
bips) indiquant qu’il faut recommencer dès le début.
TC8-331 et TW8-331 Modèles
Dans le cas des modèles résistant à l’eau (modèles TW), qui ont
été testés par la firme indépendante de test ETL SEMKO et certifiés conformes aux spécifications du fabricant dans le domaine
de la protection hydrorésistante. Les produits ont été immergés
dans une profondeur d’eau maximum de 1 pieds (30,48 cm)
pendant une durée maximum de 72 heures sans présenter
aucune fuite d’eau.
Codes d’accès
On peut déverrouiller le coffre-fort et l’ouvrir de trois manières
différentes : en composant le Code Usine, votre propre Code
Usager ou un mot de passe.
Vous pouvez toujours ouvrir le coffre-fort en composant le Code
Usine à 5 chiffres. Mais si vous préférez utiliser votre propre
code, vous pouvez programmer le coffre-fort de telle sorte qu’il
s’ouvre lorsque vous composez le Code Usager à 5 chiffres de
votre choix. Si vous voulez permettre à quelqu’un d’avoir temporairement accès au coffre-fort, vous pouvez programmer un mot
de passe qu’il vous sera possible d’effacer plus tard.
Comment programmer
un code usager
Il existe deux manières de programmer un Code Usager.
A 1. Appuyez sur la touche Program.
2. Composez le Code Usine. La DEL verte reste allumée
pendant que vous composez le Code Usager à 5 chiffres de
votre choix. Une fois que 5 chiffres ont été composés, la
DEL verte s’éteint.
( Pour composer un nouveau Code Usager, répétez
ces actions.)
B 1. Appuyez sur le bouton rouge à l’intérieur du coffre. La
serrure émettra un bip et la DEL verte s’allumera.
2. Composez un Code Usager à 5 chiffres.
( Pour composer un nouveau Code Usager, répétez
ces actions.)
Comment programmer un
mot de passe
1. Appuyez deux fois sur la touche “Program”.
2. Introduisez votre Code Personnel à 5 chiffres. La DEL verte
reste allumée.
3. Introduisez le Code Usager à 5 chiffres de votre choix
(n’importe quelle combinaison exceptée 00000.) Une fois les
5 chiffres entrés la LED verte s’éteint.
(Pour composer un nouveau code usager, répétez ces actions.
Pour effacer le code usager, appuyez deux fois sur “Program”,
composez votre Code Personnel, puis 00000.)
Déverrouillage
Vous devez entrer un code d’usine, un code d’utilisateur ou un
code d’accès valide pour pouvoir déverrouiller le coffre-fort.
Ceci effectué, vous disposez de 4 secondes pour ouvrir le coffrefort en faisant tourner la poignée ou la clé à 4 points de fermeture, afin de la mettre en position de déverrouillage. Le verrou
se réactivera si vous dépassez ce délai.
(Si vous vous apercevez que vous avez fait une erreur pendant
que vous composiez votre code, appuyez sur la touche CLEAR et
recommencez depuis le début.)
nés. Le matériel fourni DOIT ÊTRE UTILISÉ pour boulonner le coffre-fort au plancher afin d’assurer le joint
étanche ; dans le cas contraire toute plainte ayant trait
à l’hydrorésistance est invalide.
REM ARQUE : Il est normal de sentir une légère
REM ARQUE : Sentry Group ne peut être tenu
Instructions d’installation au sol
Contenu du kit :
• (2) tirefonds
• (2) rondelles caoutchoutées
• (2) ancres de maçonnerie
Outils requis :
• Perceuse
• Clé
• Pour l’ancrage dans du bois : Foret de 7/16 pouce (11,0 mm)
• Pour l’ancrage dans de la maçonnerie : Foret de maçonnerie
Instructions
1. Déverrouillez le coffre-fort et ouvrez la porte.
2. Utilisez une vis ou un foret pour marquer le sol à travers les
deux trous.
3. Mettez le coffre-fort de côté afin de dégager les deux endroits
que vous avez repérés pour les percer.
4. Percez le sol :
• Pour du bois : Utilisez un foret de 7/16 pouce (11,0 mm) pour
percer un trou d’une profondeur de 2,5 pouces
(64,0 mm) à chaque endroit repéré.
• Pour de la maçonnerie : Utilisez un foret de
maçonnerie de 7/16 pouce (11,0 mm) pour percer
un trou d’une profondeur de 2,5 pouces (64,0 mm)
à chaque endroit repéré. Installez une ancre de
maçonnerie dans chaque trou.
5. Remettez le coffre-fort dans la position désirée, les trous du
coffre-fort étant aligné sur ceux du sol.
6. Arrimer le coffre-fort :
• Pour du bois : Faites passer chaque tirefond dans une
rondelle (côté caoutchouc orienté vers le sol) et dans le coffre-fort, puis faites-le pénétrer dans un trou. Serrez avec la clé
(figure C)
• Pour de la maçonnerie : Faites passer chaque tirefond dans
une rondelle (côté caoutchouc orienté vers le sol) et dans le
coffre-fort, puis faites-le pénétrer dans une ancre de maçonnerie. Serrez avec la clé. (figure D)
I
\ I
C
Protection hydrorésistante
D
TM
I
I
\ I
de FloodGuard
Les modèles hydrorésistants doivent être boulon-
résistance en fermant la porte et en verrouillant
les modèles hydrorésisants.
responsable d’aucun des coûts encourus si
l’unité doit être remise en place.
de 7/16 pouce (11,0 mm)
I/
I
'il"
ii:~
\,
.
\:-.:.
I
! "\..
."
.'
,
/··
...01;..
-M_:_
Page 7

Pour les coffres-forts
http://www.monomachines.com
http://www.monomachines.com
REM ARQUE : Les codes ne sont pas effacés lors du
munis d’un verrou à balayage dac-
tyloscopique
IMPORTANT
Pour certains verrous dactyloscopiques
REM ARQUE : Si le fonctionnement du mécanisme de
verrouillage vous pose problème, NE RAMENEZ PAS
CE PRODUIT AU MAGASIN. VEUILLEZ CONTACTER
LE SERVICE CLIENTÈLE DU GROUPE SENTRY au
1-800-828-1438 pour assistance. La plupart des
problèmes sont faciles à résoudre par téléphone.
Il est important que vous conserviez ce manuel d’utilisation
dans un endroit sûr autre que L’INTÉRIEUR de votre
coffre-fort ; il constitue en effet votre référence pour le
numéro de série et le code d’usine du coffre-fort.
Pour ouvrir votre coffre-fort pour
la première fois
Installation des piles :
Quatre piles alcalines AA (non incluses), d’une tension totale
de 6 Vcc sont requises pour alimenter le verrou.
REM ARQUE : Les piles non alcalines et rechargeables
NE SONT PAS RECOMMANDÉES.
Pour installer les piles :
1. Retirez la vis située à la base du boîtier du verrou et jetez-la.
2. Tournez le boîtier du verrou électrique vers la droite (sens
des aiguilles d’une montre), de la position 12 heures à la
position 2 heures, puis retirez-le. Insérez quatre piles neuves
tel qu’indiqué, remettez en place le boîtier du verrou électrique, puis tournez-le vers la gauche pour le ré-assembler.
Avertissement de pile faible
Lorsque la puissance des piles commence à s’affaiblir et jusqu’à
ce que ces dernières soient remplacées, l’icône de la pile
clignote à chaque activation du verrou.
Commencez par ouvrir l’unité, puis faites
Pour déverrouiller le coffre-fort avec des codes
numériques :
REM ARQUE : Appuyez sur CLEAR (effacer) pour
Tapez le code d’usine à 5 chiffres indiqué au début du manuel
d’utilisation, un code de responsable préprogrammé ou un
code d’utilisateur préprogrammé, puis appuyez sur la touche
PROG/ENTER (programmation/entrée). (Reportez-vous
aux instructions qui suivent pour entrer les codes de responsable et d’utilisateur.) Un astérisque s’allume chaque fois qu’un
chiffre est tapé. Lorsque l’icône de cadenas ouvert apparaît, vous
disposez de 4 secondes pour tourner la poignée du coffre-fort
vers le bas et ouvrir celui-ci.
Pour déverrouiller le coffre-fort avec une
empreinte :
Appuyez sur n’importe quelle touche à l’exception de la touche
PROG/ENTER (programmation/entrée) pour activer le verrou
électronique. Faites passer votre doigt pré-programmé sur le
capteur. Lorsque l’icône de cadenas ouvert apparaît, vous disposez de 4 secondes pour tourner la poignée du coffre-fort vers le
bas et ouvrir celui-ci.
Pour verrouiller le coffre-fort :
Fermez la porte et remettez la poignée en position horizontale.
Meilleur doigt pour la programmation
• Ne choisissez pas un doigt coupé ou avec une cicatrice.
• Choisissez un doigt dont la partie spiralée de l’empreinte est
très resserrée.
Passer les empreintes de doigt
• Lorsque vous passez votre doigt, posez celui-ci à plat sur le
capteur d’empreinte.
• Faites-le passer, à vitesse moyenne régulière, en utilisant un
mouvement descendant.
• Appliquez une pression moyenne sur le capteur. Les pressions
trop fermes ou trop légères ne sont pas lues correctement.
• Notez également votre position par rapport au coffre-fort.
Le programmer ou l’utiliser sous des angles différents ne
fonctionne pas bien.
État de la peau
• Si vos mains sont sales, veuillez les laver avant d’utiliser le
coffre-fort.
• Les peaux très desséchées ne permettent pas de bien
programmer le coffre-fort. Utilisez un produit hydratant en
veillant à le faire bien pénétrer et à retirer tout excédent avant
d’utiliser le coffre-fort.
Conditions environnementales
• Il est possible que les composants électroniques fonctionnent
lentement ou pas du tout lorsqu’il fait froid (50 °F [10 ºC] ou
moins). Assurez-vous que le coffre-fort est à température
ambiante avant de le programmer et de l’utiliser.
remplacement des piles.
Première utilisation
un test avec la porte ouverte !
supprimer les entrées numériques.
Suggestions relatives à la
programmation et à l’utilisation des
fonctions dactyloscopiques
Nettoyer le capteur
• Nettoyez périodiquement le boîtier électronique et le capteur
d’empreinte avec un chiffon sec non pelucheux afin d’obtenir
la meilleure exactitude et le plus grand succès de lecture
possibles.
Programmation du
code de responsable
REM ARQUE : Reportez-vous à la page 2 pour identifier
les icônes.
REM ARQUE : Un ensemble de zéros constitue un code
invalide. Le code d’usine pré-programmé est
également invalide en tant que code de responsable. Un (1) code de responsable est autorisé.
Pour ajouter :
1. Appuyez sur PROG/ENTER (programmation/entrée).
2. Tapez le code d’usine à 5 chiffres.
3. Appuyez sur PROG/ENTER (programmation/entrée).
4. Tapez le nouveau code de responsable constitué de 4 à 8 chif-
fres, puis appuyez sur PROG/ENTER
(programmation/entrée).
Pour supprimer :
AVE RTISSEMENT : Un code de responsable doit avoir
été programmé pour pouvoir ajouter ou supprimer
des utilisateurs.
1. Appuyez sur PROG/ENTER (programmation/entrée).
2. Tapez le code d’usine à 5 chiffres.
3. Appuyez sur PROG/ENTER (programmation/entrée).
4. Tapez 0, 0, 0, 0, puis appuyez sur la touche PROG/ENTER
(programmation/entrée).
Enregistrer des empreintes
de responsable
REM ARQUE : Le verrou dactyloscopique peut enregistrer
un (1) responsable et jusqu’à six (6) utilisateurs.
Le responsable et chaque utilisateur sont encouragés à programmer deux doigts, de préférence un de
chaque main.
Pour ajouter :
1. Appuyez deux fois sur PROG/ENTER (programmation/
entrée).
7
Page 8

http://www.monomachines.com
http://www.monomachines.com
2. Tapez le code d’usine à 5 chiffres.
3. Appuyez sur PROG/ENTER (programmation/entrée).
4. Faites passer votre premier doigt sur le capteur d’empreinte
en utilisant un mouvement descendant. Trois lectures
exactes de votre empreinte sont nécessaires pour la programmation. Un bip est émis et un astérisque s’allume après
chaque passage couronné de succès. Tout passage n’ayant
pas été couronné de succès donne lieu à un signal ERR et à
un son de basse tonalité.
5. L’icône de doigt se met à clignoter pour indiquer que le
capteur est prêt à lire le passage de l’empreinte. Lorsque
le capteur a lu un passage d’empreinte, l’icône de doigt
reste allumée pendant qu’elle enregistre cette dernière en
mémoire. Attendez que l’icône de doigt se mette à clignoter
avant de passer à d’autres doigts.
Pour supprimer :
1. Appuyez deux fois sur PROG/ENTER (programmation/
entrée).
2. Tapez le code d’usine à 5 chiffres.
3. Appuyez sur PROG/ENTER (programmation/entrée).
4. Tapez 0, 0, 0, 0, puis appuyez sur la touche PROG/ENTER
(programmation/entrée).
Erreurs lors de l’enregistrement des
empreintes :
1. Un seul signal de BIP/ERREUR signifie que le capteur n’a pas
lu l’empreinte.
2. Trois signaux de BIP/ERREUR signifient que le capteur a lu
l’empreinte mais que les données n’étaient pas suffisamment
bonnes.
3. Le verrou électronique se désactive automatiquement après
dix erreurs consécutives.
Programmation des utilisateurs
REM ARQUE : Vous devez programmer un code de
responsable avant de pouvoir programmer un
utilisateur. Six (6) utilisateurs sont autorisés. Un
ensemble de zéros constitue un code invalide. Un
code personnel d’utilisateur constitué de 4 à 8 chiffres sera programmé, puis les empreintes seront
enregistrées
Pour ajouter :
1. Appuyez deux fois sur PROG/ENTER (programmation/
entrée).
2. Tapez le code de responsable constitué de 4 à 8 chiffres.
3. Appuyez sur PROG/ENTER (programmation/entrée).
4. Utilisez les touches << et >> pour basculer entre les boîtes
lumineuses. Une boîte vide signifie qu’il est possible de saisir
un code. Un
programmé.
5. Tapez le nouveau code d’utilisateur constitué de 4 à 8 chiffres,
puis appuyez sur PROG/ENTER (programmation/entrée).
6. Lorsque l’icône de doigt se met à clignoter, faites passer
votre premier doigt sur le capteur d’empreinte en utilisant
un mouvement descendant. Trois lectures exactes de
votre empreinte sont nécessaires pour la programmation. Un
bip est émis et un astérisque s’allume après chaque passage
couronné de succès. Tout passage n’ayant pas été couronné
de succès donne lieu à un signal ERR et à un son de basse
tonalité.
7. L’astérisque s’éteint dès que le premier doigt a été enregistré
avec succès. Faites passer votre deuxième doigt sur le
capteur. Trois lectures exactes sont requises.
8
encadré lumineux signifie qu’un code est
*
Pour supprimer :
Cette opération permet de supprimer à la fois le code personnel
et les empreintes d’utilisateur.
1. Appuyez deux fois sur PROG/ENTER (programmation/
entrée)
2. Tapez le code de responsable constitué de 4 à 8 chiffres.
3. Appuyez sur PROG/ENTER (programmation/entrée).
4. Utilisez les touches << et >> pour parcourir les programma-
tions que vous désirez supprimer.
5. Tapez 0, 0, 0, 0, puis appuyez sur la touche PROG/ENTER
(programmation/entrée) afin de supprimer l’utilisateur
sélectionné.
Pour supprimer toutes les données
enregistrées en mémoire
AVE RTISSEMENT : Tous les codes (responsable et util-
isateurs) et toutes les empreintes seront supprimés.
1. Appuyez trois fois sur PROG/ENTER (programmation/
entrée).
2. Tapez le code d’usine à 5 chiffres.
3. Appuyez sur PROG/ENTER (programmation/entrée).
4. Tapez 0, 0, 0, 0, puis appuyez sur la touche PROG/ENTER
(programmation/entrée) afin de supprimer tous les codes
et toutes les empreintes.
Activation/Désactivation du bipeur
Pour désactiver le bipeur, appuyez simultanément et pendant
1 seconde sur les touches CLEAR (effacer) et 0. Le bipeur
émet un bip lorsqu’il est désactivé.
Pour activer le bipeur, appuyez simultanément et pendant
1 seconde sur les touches CLEAR (effacer) et 1.
Temporisation
Pendant l’utilisation et la programmation, le verrou
dactyloscopique utilise une temporisation automatique et
se désactive si aucune touche n’est actionnée en l’espace
de 30 secondes.
Mode de délai
Le verrou se met automatiquement dans un mode de délai de
deux minutes après qu’un code ou une empreinte invalide ait été
entré(e) trois fois consécutives. Lorsqu’il est dans ce mode, le
verrou ne peut pas être activé.
PRG (programmation)
S’allume lorsque vous avez appuyé sur la touche PROG/ENTER
(programmation/entrée) et reste allumée pendant que vous
programmez un code de responsable ou d’utilisateur.
Un
*
1. Vous avez appuyé sur une touche numérotée.
2. Dans le mode de programmation, ceci indique un
emplacement de code programmé ou le passage couronné de
succès d’une empreinte.
Boîte
S’allume pendant la programmation et indique les emplacements des codes. Une boîte contenant un astérisque indique un
emplacement avec un code programmé.
Cadenas
S’allume après trois codes ou trois passages d’empreinte
invalides consécutifs et reste allumé pendant les 2 minutes du
mode de temporisation.
Verrou déverrouillé
S’allume lorsqu’un code valide est tapé ou un doigt programmé
est passé. Indique que le coffre-fort est déverrouillé et que la
porte peut être ouverte.
Pile
Clignote lorsque les piles sont faibles pour indiquer que vous
devrez bientôt les remplacer.
Doigt
Clignote pendant l’enregistrement des empreintes et lorsqu’un
doigt peut être passé pour déverrouiller le coffre-fort.
Si votre verrou électronique ne fonctionne pas ou si vous
ne disposez d’aucun des codes, vous pouvez utiliser la clé
prioritaire pour accéder à l’unité. Retirez le clavier en faisant
tourner le couvercle dans le sens inverse des aiguilles d’une
montre, puis en le tirant vers vous. Déverrouillez la porte en
insérant la clé (fournie) dans l’orifice et en la tournant dans le
sens des aiguilles d’une montre. Ouvrez la porte. N’enfermez
pas la clé prioritaire à l’intérieur de l’unité.
Votre coffre-fort à serrure électronique communique à l’aidede
plusieurs signaux audiovisuels.
DEL rouge (Erreur) + trois bips indiquent l’une
Ne retirez pas les piles et n’appuyez sur aucun bouton.
Ceci relancerait un délai de 2 minutes.
Identification des icônes
ERR (erreur) indique l’une des situations suivantes :
1. Vous avez appuyé sur la touche PROG/ENTER
(programmation/entrée) sans respecter la séquence.
2. Vous avez tapé un code invalide.
3. Le capteur n’a pas lu le passage du doigt.
AVERTISSEMENT
1. Vous avez appuyé hors séquence sur la touche “Program”.
2. Vous avez composé un code erroné ou un code usager erroné.
3. Vous avez attendu 5 secondes ou plus entre l’introduction de
deux chiffres.
DEL verte (Continuer) + un seul bip se produit
1. Après l’introduction de chaque chiffre d’un Code Personnel,
Code Usine ou Code Usager
2. Après avoir a appuyé sur la touche CLEAR
3. Après avoir a appuyé sur la touche “Program”
1. S’allume après que vous avez composé un code ou code usag-
er et reste allumée durant les 4 secondes pendant lesquelles
le coffre-fort peut être ouvert.
2. S’allume en mode Programmation Code Personnel une fois
que vous avez composé le Code Usine et reste allumée
jusqu’à ce que vous ayez fini de composer un Code Personnel
à 5 chiffres.
(astérisque) indique l’une des situations suivantes :
Pour tout les modèles
Clé prioritaire
Signaux
des situations suivantes :
DEL verte seulement
Page 9

http://www.monomachines.com
http://www.monomachines.com
3. S’allume en mode Programmation Mot de passe une fois que
vous avez composé votre Code Personnel et reste allumée
jusqu’à ce que vous ayez fini de composer un Code usager
à 5 chiffres.
DEL jaune – Indicateur de pile faible
Indique “Niveau faible de la pile” et en conséquence ne se mettra pas sur OFF avant que de nouvelles piles alcalines soient
installées.
Chaque fois qu’elle est utilisée, votre serrure électronique
exécute automatiquement un test de décharge.
Lorsqu’une faiblesse des piles est détectée, la DEL jaune
s’allume et reste allumée pendant chacune des opérations
subséquentes associées au fonctionnement de la serrure.
(La serrure continuera à fonctionner même si les piles sont
faibles, jusqu’à ce que celles-ci soient épuisées). La DEL jaune
s’éteindra seulement après trois lectures “Piles en bon état”
ou après que les piles faibles ont été remplacées. (Remarque
: quand de nouvelles piles sont installées, la LED jaune peut se
mettre sur ON et rester sur ON pendant la première man?uvre
de fermeture avant de revenir sur OFF).
REM ARQUE : il es recommandé de remplacer les piles
après deux ans, ou lorsque la DEL jaune reste allumée. (Voir le dos de la couverture). Un Code Usager
devra être reprogrammé.
Mode d’attente
La serrure entre automatiquement en mode d’attente de deux
minutes lorsqu’un code invalide a été composé trois fois de
suite. Dans ce mode, la serrure ne peut pas être activée et
l’introduction de tout chiffre déclenchera un signal d’ERREUR
(ERROR).
Si vous perdez la combinaison
Si vous utilisez une carte de crédit (Visa/Mastercard uniquement), composez le 1-800-828-1438 et envoyez par télécopie le
modèle et le numéro de série de votre coffre-fort ainsi que la
lettre notariée à 585-381-2940. Les informations des cartes
de crédit ne sont pas acceptées par télécopie, courrier
ou courrier électronique.
En cas de perte des clés : pour obtenir le remplacement
des clés, trouver vos numéros de modèle et de série. Le numéro
de série est joint à ce paquet ; il est aussi imprimé sur la petite
étiquette à côté du gond de la porte (à l’extérieur).
Commande par courrier : Adresser la avec un chèque ou
un mandat de de 12,00* dollars US (fonds des États-Unis):
Sentry Group, Dept. 200, 882 Linden Avenue, Rochester, NY
14625-2784 USA.
* REM ARQUE : Les prix peuvent être modifiés sans
IMPORTANT : veuillez nous appeler au 1-800-828-1438 (appel
gratuit, du lundi au vendredi, de 8 h 00 à 18 h 00 heure de l’est)
ou nous rendre visite, en ligne, à l’adresse www.sentrysafe.
com si vous désirez assistance pour une combinaison ou des
clés égarées, ou encore pour obtenir des informations supplémentaires sur la commande des options d’organisation
supplémentaires.
Commande par Internet : visitez notre site Web à www.
sentrysafe.com. Allez à la section du service clientèle.
* REM ARQUE : Les prix peuvent être modifiés sans
Moyennant des frais supplémentaires, les livraisons expresses
sont disponibles pour les clés et/ou les combinaisons. Visitez
notre site Web à l’adresse www.sentrysafe.com/customer service
pour obtenir des détails supplémentaires.
ou les clés
IMPORTANT : veuillez lire attentivement les instructions
suivantes. Pour votre protection, de nouvelles clés
PEUVENT, et combinaisons NE PEUVENT PAS, être
fournies lors de requêtes téléphoniques. Pour commader des clés de rechange et/ou des combinaisons, il
est essentiel que vous POSTIEZ les éléments listés dans
chaque catégorie ci-dessous, à Sentry Group, avec votre
commande. Si vous avez besoin d’assistance pour
préparer votre commande ou si vous désirez régler votre
achat par carte de crédit (Visa/Mastercard uniquement), veuillez contacter le service clientèle de Sentry
(appel gratuit) en composant le 1-800-828-1438, de
8h00 à 18h00 (heure de la côte est), du lundi
au vendredi.
Vous pouvez également effectuer vos achats en ligne.
Veuillez visiter www.sentrysafe.com/CustomerService.
En cas de perte de la combinaison : tout d’abord, trouver
vos numéros de modèle et de série. Le numéro de série est joint
à ce paquet ; il est aussi imprimé sur la petite étiquette à côté du
gond de la porte (à l’extérieur). Envoyez une copie de ce document, une lettre notariée (le nom de famille doit être différent
de celui du propriétaire) indiquant que vous êtes le propriétaire
du coffre-fort, et un chèque ou un mandat de 12,00* dollars US
(fonds des États-Unis) à : Sentry Group, Dept. 200,
882 Linden Avenue, Rochester, NY 14625-2784, États-Unis.
préavis.
préavis.
9
Page 10

Déclaration relative aux incendies
http://www.monomachines.com
http://www.monomachines.com
vérifiée ETL
Ce produit Sentry Fire-Safe® a été vérifié par ETL SEMKO
et prouvé conforme aux spécifications du fabricant pour la
résistance aux incendies pendant 30 minutes à 760 ºC (1400
°F) et la résistance à une température de 760 ºC (1400 °F).
Garantie à vie de remplacement
après l’incendie
à quelque moment que ce soit pendant que vous (l’acheteur
initial) en êtes encore propriétaire, Sentry Group vous enverra
un remplacement gratuitement si vous faites parvenir ce qui
suit à Sentry Group, 882 Linden Avenue, Rochester, NY 146252784 USA :
• vos nom et adresse ;
• une description de l’incendie, accompagnée du numéro de
modèle et d’une photographie du produit brûlé, et une copie
du rapport du service de pompiers, de l’assurance ou de la
police.
Garantie de la satisfaction
de la clientèle à 100 %
Si à tout moment pendant les quatre-vingt-dix (90) jours suivant la date de l’achat vous n’êtes pas entièrement satisfait de
ce produit Sentry Group, veuillez composer le 1-800-828-1438
(appel gratuit). Un ticket de caisse daté est requis comme
preuve d’achat. Nous résoudrons le problème ou veillerons à
ce que vous receviez soit un produit de remplacement soit un
remboursement intégral.
-- Les salariés de Sentry Group
Ce produit est garanti à l’acheteur d’origine pendant un (1) an à
compter de la date d’achat, contre tout défaillance structurelle ou
mécanique due à des vices de matériau ou de fabrication. Si une
défaillance structurelle ou mécanique se produit pendant la période de garantie, Sentry Group (également désigné par “ Sentry”)
réparera ou remplacera gratuitement, à son choix, la(les)
pièce(s) défectueuse(s) ou le produit accompagné(e)(s) d’une
preuve d’achat.
Service après-vente (Amérique du Nord seulement)
Veuillez indiquer le problème au service clientèle de Sentry Group
en le contactant par téléphone (au 1-800-828-1438 ou au
585-381-4900, du lundi au vendredi, de 9h00 à 18h00 [heure de
l’est]) ou par écrit en envoyant votre courrier à Sentry Group,
882 Linden Avenue, Rochester, New York 4625-2784, États-Unis.
Ne renvoyez pas votre produit à Sentry Group. Le service clientèle
de Sentry Group décidera si le produit doit être renvoyé, réparé,
remplacé ou remboursé.
Preuve de la date d’achat
Un ticket de caisse daté est requis en tant que preuve d’achat
pour tous les produits de Sentry Group.
Limitations de garantie
1. La responsabilité de Sentry et le recours exclusif de l’acheteur
aux termes de cette garantie sont limités à la réparation ou
au remplacement, au choix de Sentry, de la (des) pièce(s)
défectueuse(s) ou du produit. En aucun cas Sentry ne sera
tenu responsable de tout dommage indirect ou consécutif
(incluant, sans toutefois s’y limiter, les pertes ou dommages
dus aux incendies, à l’eau, au vol ou au vandalisme) de personne ou de bien résultant de l’inobservation de la présente
garantie ou de toute autre garantie expresse ou implicite
applicable au produit. Certain(e)s états, provinces et pays
n’autorisant pas l’exclusion ou la limitation de dommages
indirects ou consécutifs, il est possible que la limitation susmentionnée ne vous soit pas applicable.
2. Sauf stipulation contraire de la loi applicable, Sentry décline
chacune et l’ensemble des conventions et garanties, qu’elles
soient écrites ou orales, expresses ou implicites, et incluant,
sans toutefois s’y limiter, les garanties implicites de commerciabilité et d’adaptation à un objectif particulier. La garantie
implicite applicable à ce produit ne doit pas dépasser la garantie limitée standard de un an. Certain(e)s états, provinces et
pays n’autorisant pas les exclusions de garanties limitées ou
de limitations sur leur durée, il est possible que l’exclusion
susmentionnée ne vous soit pas applicables.
3. Sentry n’est pas responsable des dommages, défaillances ou
dysfonctionnements encourus par le produit au cours de
Garantie Limitée de 1 An
l’expédition. Le produit a été emballé conformément aux
spécifications de la Commission du commerce interétats
(Interstate Commerce Commission), et moyennant une
manipulation raisonnable, il devrait arriver en bon état. Toute
réclamation concernant des dommages d’expédition doit être
effectuée directement auprès du transporteur.
4. Ces garanties ne couvrent pas les défaillances, les dommages
ou les dysfonctionnements provoqués par une modification,
un changement, une réparation ou un entretien du produit
effectué(e) par toute personne autre que Sentry ou son
représentant agréé ou encore pro-voqués par un abus physique
ou une utilisation incorrecte du produit. Sentry décline tout
particulièrement la couverture des dommages pouvant résulter
du boulonnage du produit et/ou des dommages pouvant
résulter de la manipulation incorrecte du produit au cours de
son déplacement et/ou de son installation.
5. Aucun agent, salarié, représentant, distributeur ou revendeur
de Sentry n’a l’autorité d’effectuer ou d’insinuer quelque
déclaration, promesse ou accord que ce soit pouvant diverger
de quelque manière que ce soit des conditions de la présente
garantie limitée.
6. La présente garantie limitée s’applique aux produits Sentry
neufs, de toute première qualité, et n’est applicable ni aux
produits de qualité inférieure ou d’occasion, ni aux produits
précédemment endommagés par des événements tels que,
sans toutefois s’y limiter, un incendie, une inondation, un
tremblement de terre, etc.
Toutes les clauses de la présente garantie limitée sont séparées
et dissociables. Si l’une quelconque de ces clauses est jugée
invalide et inapplicable, ladite détermination n’affectera ni la
validité ni le caractère exécutoire des autres clauses. La présente
garantie limitée vous donne des droits légaux spécifiques. Il est
possible que vous ayez d’autres droits qui varient d’état à état, de
province à province ou de pays à pays.
Hydrorésistant
Vérifié par l’ETL pour une hauteur maximum de 12 pouces
(30,48 cm) d’eau et une durée maximum de 72 heures. Doit
être boulonné pour assurer l’étanchéité ; matériel de
boulonnage inclus.
10
Page 11

producirá una señal de error (una luz roja parpadeante
http://www.monomachines.com
http://www.monomachines.com
Gracias por comprar este producto
Fire-Safe® de Sentry.
y tres pitidos), indicando que debe volver a empezar.
TC8-331 y TW8-331 Modelos
Para cajas fuertes con cerradura
electrónica:
TC8-331 Modelo
Instalación de las pilas
Para accionar el cierre se necesitan cuatro baterías
alcalinas “AA” (no incluidas). Voltaje: 6 V cc
NOTA: NO SE RECOMIENDAN las baterías no alcalinas ni
las recargables.
Para instalar las pilas, quite el teclado, girando la tapa hacia la
izquierda y luego halándola hacia usted (Figura A). Abra la puerta
con la llave de anulación provista en la bolsa plástico incluida con
el manual del dueño y luego abra la puerta usando la palanca.
Quite la placa de enganche de llaves situada en el interior de la
puerta, deslizando la placa hacia arriba y luego halándola hacia
usted (Figura B). Inserte las cuatro baterías según se indica.
Reponga la placa de enganche de llaves y el teclado.
A
B
TW8-331 Modelo
Instalación de las pilas
Se requieren 4 pilas alcalinas “AA”, voltaje: 6 V cc (no incluidas),
para activar la cerradura.
NOTA: NO SE RECOMIENDAN las baterías no alcalinas ni
las recargables.
Para instalar las pilas, gire el estuche electrónico del candado
hacia la izquierda y quítelo. (Figura A). Coloque cuatro pilas
nuevas según las indicaciones, vuelva a colocar el estuche de
la cerradura electrónica y gire hacia la izquierda para volver a
ensamblar.
¡Para todos modelos haga primero
una prueba con la puerta abierta!
(Vea en la contraportada de este manual su código de fábrica)
Pruebe su combinación varias veces con la puerta abierta.
NOTA: Todas las unidades con cerradura electrónica
cuentan con una llave de anulación (llave maestra). Algunas unidades electrónicas cuentan con
una manija O un cerradura electrónica y llave.
1. Inserte la llave de ranurado cuádruple en a cerradura a la
izquierda del teclado. (Asegurese que la cerradura de
llave se haya girado hasta la posición más a la izquierda posible.)
2. Oprima el código de fábrica de cinco dígitos. Se encenderá
la luz verde.
3. Gire la llave hacia la derecha.
4. Abra la puerta.
Sólo se necesita un toque ligero. Una luz verde de PROSEGUIR
y un solo pitido indican que el teclado ha “sentido” su toque.
La cerradura permite que transcurran 5 segundos para cada
pulsación de teclado. Si usted hace una pausa más larga, se
Uso del teclado
Hay tres maneras posibles de abrir una caja fuerte y tener
acceso a la misma: introduciendo el código preestablecido
de fábrica, el propio código de usuario o un código temporal.
Siempre puede abrir la caja fuerte introduciendo el código de
fábrica de 5 dígitos. Pero si prefiere usar su propio código, usted
puede programar la caja fuerte para que se abra con el código de
usuario de 5 dígitos de su elección. Si desea dar a alguien acceso
temporal a la caja fuerte, puede programar un código que puede
borrarse más tarde.
Hay dos maneras de programar un código de usuario.
A 1. Oprima la tecla “Program”.
2 . Entre el código de la fábrica. El INDICADOR verde
permanece ENCENDIDO mientras usted entra el código de
usuario de 5 dígitos de su elección. Después de entrar los
5 dígitos, el INDICADOR verde SE APAGA
(Para entrar un nuevo código de usuario, repita estos pasos.)
B 1. Oprima el botón rojo adentro de la caja fuerte. La cerra-
dura emitirá un pitido y el INDICADOR verde se encenderá.
2. Entre un código de usuario de 5 dígitos.
(Para entrar un nuevo código de usuario, repita estos pasos.)
Programación de una contraseña
1. Oprima dos veces la tecla “Program”.
2. Entre su código de usuario de 5 dígitos. El INDICADOR verde
permanece ENCENDIDO.
3. Entre la contraseña de 5 dígitos de su elección (cualquier
combinación excepto por 00000). Después de entrar5 dígitos,
el INDICADOR verde se apaga.
(Para entrar una contraseña nueva, repita estos pasos. Para borrar la contraseña, oprima dos veces la tecla Programar, entre su
Para abrir la caja fuerte, debe entrar un código de fábrica, código
de usuario o contraseña válido. Una vez que lo haya hecho, tiene
4 segundos para abrir la caja fuerte, girando la manija o llave de
ranrura cuadruple a la posición de abrir. Si no lo hace a tiempo,
el cerradura se reactivará.
(Si se da cuenta de que ha cometido un error al introducir
su código, pulse el botón de borrar (CLEAR) y comience
nuevamente.)
La empresa independiente ETL
Para aquellos modelos resistentes al agua (modelos TW), que
han sido comprobados por la agencia ETL SEMKO independiente,
en complimiento con las especificaciones del fabricante de protección a prueba de agua. Los productos que fueron sumergidos
en hasta 60 m de agua hasta por 72 horas y resistieron el agua.
Códigos de acceso
Programación de un
código de usuario
código de usuario y luego entre 00000.)
Cómo abrir la caja fuerte
Protección a prueba de agua
Los modelos resistentes a agua deben quedar
atornillados en su lugar. El fabricante ha provisto
material de fijación Y DEBE USARSE para atornillar
la caja fuerte al suelo para asegurar que tenga un
sello hermético, o quedará inválida la cláusula a
prueba de agua.
NOTA: Es normal que se sienta una cierta cantidad de
resistencia cuando cierre la puerta de los
modelos resistentes a agua.
NOTA: La empresa Sentry Group no se hace responsable
por gastos incurridos si la unidad deberá ser
reemplazada.
Instrucciones para fijar al suelo
Este material incluye:
• (2) tornillos con cabeza hexagonal
• (2) rondanas encauchadas
• (2) anclas para ladrillo
Herramientas requeridas:
• Taladro
• Llave inglesa
• Para anclar a Madera: Broca de 7/16” (11,0mm)
• Para anclar a Concreto: Broca de 7/16” (11,0mm)
Instrucciones
1. Abra la puerta de la caja fuerte.
2. Utilice un tornillo o una broca hacer una marca en el suelo a
través de ambos hoyos.
3. Haga la caja fuerte a un lado para mostrar ambas marcas y
poder usar el taladro para hacer los hoyos.
4. Taladre el suelo:
• Para madera: Utilizando una broca de 7/16” (11,0mm),
taladre un hoyo de 2 1/2”(64 mm) de profundidad, usando
cada marca como guía.
• Para concreto: Utilizando una broca de 7/16” (11,0mm),
taladre un hoyo de 2 1/2”(64 mm) de profundidad, usando
cada marca como guía. Instale un ancla en cada hoyo.
5. Coloque la caja fuerte en la posición deseada, alineando los
hoyos de la caja fuerte con aquellos del suelo.
6. Para fijar la caja fuerte:
• Para madera: Pase cada tornillo a través de una rondana
(el lado encauchado hacia el suelo), pasando posteriormente
a través de la caja fuerte y un hoyo. Apriete con una llave
inglesa. (Figura C)
• Para concreto: Pase cada tornillo a través de una rondana
(el lado encauchado hacia el suelo), pasando posteriormente
a través de la caja fuerte y finalmente por un ancla para
concreto. Apriete con una llave inglesa. (Figura D)
C
D
11
Page 12

Para cajas fuertes con
http://www.monomachines.com
http://www.monomachines.com
cerradura dactiloscópico
IMPORTANTE
Para algunas cerraduras dactiloscópicas
NOTA: Si está teniendo dificultad con la operación
del mecanismo de cierre, NO DEVUELVA
ESTE PRODUCTO A LA TIENDA. POR FAVOR
COMUNÍQUESE CON SERVICIO A CLIENTES DE
SENTRY GROUP. Debe marcarse un código de
acceso antes de marcar el número 800. Es un
proceso de 2 pasos.
Paso 1: marque 01 800 112 2020 ó 001 800 658
5454
Paso 2: a la indicación marque 1-800-451-0821
La mayoría de los problemas pueden resolverse
rápidamente por teléfono.
Es importante que guarde su Manual del Dueño es un sitio que
no sea DENTRO de su caja fuerte; es su referencia para el
Número de Serie y Código de Fábrica de la caja fuerte.
Para abrir su caja fuerte
por primera vez
Instalación de las pilas:
Para accionar la cerradura se requieren 4 pilas alcalinas AA,
voltaje equivalente: 6Vdc (no incluidas).
NOTA: NO SE RECOMIENDAN pilas no alcalinas ni
recargables.
Para instalar las pilas:
1. Quite y deseche el tornillo en la base de la caja de
la cerradura.
2. Gire la caja de la cerradura eléctrica hacia la derecha (en
sentido de las manecillas de reloj), desde la posición de las
12 en punto hasta las 2 en punto y remueva. Inserte cuatro
pilas nuevas según se indica, reponga la caja de la cerradura
eléctrica y gírela hacia la izquierda para reensamblar
12
Aviso de pilas débiles
Cuando la energía se está agotando, el icono de pila parpadeará
con cada activación de la cerradura hasta que se reemplacen
las pilas.
NOTA: Los códigos no se borran cuando se remueven las
pilas viejas para reemplazarlas.
Uso por primera vez
¡Primero abra la unidad, después haga
una prueba con la puerta abierta!
Para abrir la caja fuerte usando códigos numéricos:
NOTA: Oprima CLEAR para remover las entradas
numéricas.
Entre el código de fábrica de 5 dígitos presentado en el frente
del Manual del Dueño, un código preprogramado del administrador o un código preprogramado de usuario y oprima la
tecla PROG/ENTER. (Vea las siguientes instrucciones para
el ingreso de los códigos del administrador y de usuario.) Cada
vez que se entra un dígito se iluminará un asterisco. Cuando el
icono de candado abierto aparece, usted tiene 4 segundos para
girar la manija hacia abajo y abrir la caja fuerte.
NOTA: Vea la página 2 para identificación de iconos.
NOTA: Todo ceros es un código inválido. El código de
Para añadir:
1. Oprima PROG/ENTER.
2. Entre el código de fábrica de 5 dígitos.
3. Oprima PROG/ENTER.
4. Entre su nuevo código del administrador compuesto de
4 a 8 dígitos y luego oprima PROG/ENTER.
Para borrar:
ADVE RTENCIA: El código del administrador debe estar
1. Oprima PROG/ENTER.
2. Entre el código de fábrica de 5 dígitos.
3. Oprima PROG/ENTER.
4. Oprima 0, 0, 0, 0, 0 y luego oprima la tecla PROG/ENTER.
Para abrir la caja fuerte con una huella dactilar:
Oprima cualquier tecla excepto la tecla PROG/ENTER para
activar la cerradura electrónica. Pase su dedo preprogramado
sobre el sensor. Cuando el icono de candado abierto aparece,
usted tiene 4 segundos para girar la manija hacia abajo y abrir
la caja fuerte.
Para cerrar la caja fuerte:
Cierre la puerta y regrese la manija a la posición horizontal.
Consejos para programación
y uso de la huella dactilar
Mejor dedo para la programación
• No seleccione un dedo que tenga una cortada o cicatriz.
• Seleccione un dedo que tenga el patrón de remolino más
compacto.
Pase de las huellas dactilares
• Cuando pase el dedo, manténgalo plano contra el sensor
dactiloscópico.
• Pase el dedo con un movimiento hacia abajo a una velocidad
mediana y uniforme.
• Use una presión mediana sobre el sensor. Si es demasiado
fuerte o demasiado ligera no se registrará correctamente.
• Asimismo, note dónde usted está parado en relación con la
caja fuerte. La programación o uso a un ángulo diferente no
dará buenos resultados.
Condición de la piel
• Si tiene suciedad en las manos, láveselas antes de usar
la caja fuerte.
• La piel muy seca no programará bien. Use un humectante de
piel, cerciorándose de frotar bien el humectante y remover
cualquier exceso antes de usar la caja de seguridad.
Condiciones ambientales
• Los componentes electrónicos pueden que no trabajen o
tener un tiempo de reacción lento en temperaturas frías (50ºF
o menos). Cerciórese que la caja fuerte esté a temperatura
ambiente antes de programar y usar.
Limpieza del sensor
• Para óptima precisión y éxito en la lectura de huellas digitales,
limpie periódicamente la caja electrónica y el sensor
dactiloscópico con un paño seco libre de pelusas.
NOTA: La cerradura dactiloscópica almacena un (1)
Para añadir:
1. Oprima PROG/ENTER dos veces.
2. Entre el código de fábrica de 5 dígitos.
3. Oprima PROG/ENTER.
4. Pase su primer dedo con un movimiento hacia abajo
sobre el sensor dactiloscópico. Se necesitan tres lecturas
exactas de la huella dactilar para una inscripción exitosa.
Después de cada pase exitoso se escuchará un pitido y se
iluminará un asterisco. Un pase no exitoso producirá una
señal ERR (error) y se escuchará un tono bajo.
5. El icono de dedo parpadeante indica que el sensor está listo
para leer un pase de huella dactilar. Después que el sensor
lea un pase de dedo, el icono de dedo se mantiene encendido
mientras almacena la huella dactilar en la memoria. Espere a
que el icono de dedo parpadee antes de proseguir con pases
adicionales de dedos.
Para borrar:
1. Oprima PROG/ENTER dos veces.
2. Entre el código de fábrica de 5 dígitos.
3. Oprima PROG/ENTER.
4. Oprima 0, 0, 0, 0, y luego oprima la tecla PROG/ENTER.
Programación del código
del administrador
fábrica preprogramado también es un código del
administrador inválido. Se permite un (1) código
del administrador.
programado para añadir o borrar usuarios.
Inscripción de huellas
digitales del administrador
administrador y hasta seis (6) usuarios. Se
recomienda que el administrador y cada usuario
programen dos dedos, preferiblemente un dedo
de cada mano.
Page 13

Errores durante la inscripción de huellas
http://www.monomachines.com
http://www.monomachines.com
dactilares:
1. Un sólo PITIDO/señal de ERROR significa que el sensor no
leyó la huella dactilar.
2. Tres PITIDOS/señal de ERROR significa que el sensor
puede leer la huella dactilar pero que los datos no satisfacen
los requisitos mínimos.
3. La cerradura electrónica se apagará automáticamente
después de diez errores consecutivos.
ADV ERTENCIA. Todos los códigos del administrador,
1. Oprima PROG/ENTER tres veces.
2. Entre el código de fábrica de 5 dígitos.
3. Oprima PROG/ENTER.
4. Entre 0, 0, 0, 0, y luego oprima PROG/ENTER para borrar
todos los códigos y huellas dactilares.
Programación de usuarios
NOTA: Usted debe programar un código del administra-
dor antes de programar un usuario. Se
permiten seis (6) usuarios. Todo ceros es un
código inválido. Se programará un código de
usuario personal de 4 a 8 dígitos y luego se
inscribirán las huellas dactilares
Para añadir:
1. Oprima PROG/ENTER.
2. Entre el código del administrador de 4 a 8 dígitos.
3. Oprima PROG/ENTER.
4. Use las teclas << y >> para desplazar entre las casillas
iluminadas. Una casilla vacía significa que está disponible para
una entrada de código. Una casilla de
que se está usando.
5. Entre su nuevo código de usuario compuesto de 4 a 8 dígitos
y luego oprima PROG/ENTER.
6. Cuando el icono de dedo parpadee, pase su primer dedo
con un movimiento hacia abajo sobre el sensor
dactiloscópico. Se necesitan tres lecturas exactas de la huella
dactilar para una inscripción exitosa. Después de cada pase
exitoso se escuchará un pitido y se iluminará un asterisco.
Un pase no exitoso producirá una señal ERR (error) y se
escuchará un tono bajo.
7. Con la inscripción exitosa del primer dedo el asterisco se
despejará. Pase su segundo dedo sobre el sensor. Se requieren tres lecturas exitosas.
Para borrar:
Esta operación borrará el código personal y las huellas dactilares
de los usuarios.
1. Oprima PROG/ENTER.
2. Entre el código del administrador de 4 a 8 dígitos.
3. Oprima PROG/ENTER.
4. Use las teclas << y >> para desplegar hasta el sitio
programado que desea borrar.
5. Oprima 0, 0, 0, 0, y luego oprima PROG/ENTER para borrar
el usuario seleccionado.
iluminado significa
*
Encendido/apagado del beeper
Para APAGAR el beeper, oprima las teclas CLEAR y cero al
mismo tiempo por 1 segundo. El beeper pitará una vez cuando
se apagaf.
Para ENCENDER el beeper, oprima las teclas CLEAR y 1 al
mismo tiempo por 1 segundo.
Durante el uso y programación la cerradura dactiloscópica se
desactivará y apagará automáticamente si no hay ninguna entrada
por 30 segundos.
La cerradura entra automáticamente una demora de dos minutos
después de haberse entrado tres veces consecutivas un código
no válido o una huella dactilar no válida. En este modo, la
cerradura no puede activarse.
No quite las pilas ni oprima ningún botón. Si se hace,
ERR (Error) indica uno de los siguientes:
1. Usted ha oprimido la tecla PROG/ENTER fuera de secuencia.
2. Usted ha entrado un código no válido.
3. El sensor no leyó el pase de dedo.
Para borrar toda
la memoria programada
códigos de usuario y huellas dactilares quedarán
eliminados.
Desactivación
Modo de Demora
ADVERTENCIA
la demora de 2 minutos comienza de nuevo.
Identificación de iconos
Casilla
Se ilumina durante la programación e indica sitios de códigos.
Una casilla con un asterisco adentro indica un sitio con un
código programado.
Candado
Se ilumina después de tres entradas consecutivas de códigos o
lecturas de huellas dactilares no válidos y se mantiene iluminado
durante el modo de demora de 2 minutos.
Candado Abierto
Se ilumina cuando se entra un código válido o se pasa un dedo
programado. Indica que la caja fuerte no está cerrada y que la
puerta puede abrirse.
Pila
Parpadea cuando las pilas se están agotando, indicando que
deben reemplazarse pronto.
Dedo
Parpadea durante la inscripción de huella dactilar y cuando un
dedo puede pasarse para abrir la caja fuerte.
PRG (Programar)
Se ilumina después de oprimir la tecla PROG/ENTER y se mantiene iluminada mientras programa un código del administrador
o de usuario.
(Asterisco) indica uno de los siguientes:
*
1. Se ha oprimido una tecla de número.
2. En el modo de Programar, señala un sitio de código
programado o un pase exitoso de huella dactilar.
13
Page 14

Para todos modelos
http://www.monomachines.com
http://www.monomachines.com
Anulación con llave
En caso de falla de su cerradura electrónica o si no tiene
códigos disponibles, podrá usar la llave de anulación para acceso
a esta unidad. Quite el teclado, girando la tapa hacia la izquierda
y luego halándola hacia usted. Abra la puerta, insertando la llave
provista en el agujero y girándola hacia la derecha. Abra la
puerta. No encierre la llave de anulación dentro de la unidad.
Señales
Su caja fuerte con cerradura electrónica se comunica mediante
varias señales audiovisuales.
El INDICADOR rojo (error) y tres pitidos indican
una de las cosas siguientes:
1. Ha pulsado la tecla de programa fuera de secuencia
2. Ha introducido un código no válido o una contraseña.
3. Ha dejado transcurrir 5 segundos o más entre pulsaciones
de tecla.
El INDICADOR verde (proseguir) se enciende y se
escucha un solo pitido
1. Después de introducir cada dígito de un código de fábrica, un
código de usuario o una contraseña.
2. Después de pulsar la tecla de borrar (Clear).
3. Después de pulsar la tecla de programa.
1. Se enciende después de introducir un código válido o una
2. Se enciende en el modo de programación de código de usu-
3. Se enciende en el modo de programación de contraseña
INDICADOR amarillo – Indicador de carga baja
Indica “carga baja de las baterías” y normalmente no se APAGARÁ
hasta que se instalen nuevas baterías alcalinas. La cerradura
electrónica realiza automáticamente una prueba de carga baja
de las baterías durante cada uso de la cerradura. Si se detecta
una situación de “carga baja de las baterías”, el INDICADOR
amarillo se encenderá y permanecerá encendido durante cada
operación posterior. (La cerradura seguirá funcionando en una
situación de carga baja de las baterías hasta que éstas fallen.) El
INDICADOR amarillo se apagará solamente después de tres lecturas consecutivas de “baterías cargadas” o después de cambiar
las baterías gastadas. (NOTE: Cuando se instalen las nuevas baterías, el INDICADOR amarillo podrá ENCENDERSE y mantenerse
ENCENDIDO durante la primera operación de la cerradura antes
de volver a APAGADO).
NOTA: Se recomienda cambiar las baterías después de
INDICADOR verde solamente
contraseña y permanece encendido durante el período de 4
segundos en que la caja fuerte puede abrirse.
ario después de introducir el código de fábrica y
permanece encendido hasta que se ha terminado de
introducir un código de usuario de 5 dígitos.
después de introducir el código de usuario y permanece
encendido hasta que se ha introducido una contraseñade
5 dígitos.
de las baterías
dos años o cuando el INDICADOR amarillo permanezca encendido. (Véase la contraportada).
La cerradura entra automáticamente en un modo de demora
de dos minutos después de introducir un código no válido tres
veces consecutivas. En este modo, la cerradura no puede
activarse y todas las pulsaciones de tecla generarán una
señal de ERROR.
IMPORTANTE: Sírvase leer cuidadosamente las
siguientes instrucciones. Para su protección, No
pueden emitirse llaves y combinaciones nuevas
mediante solicitud telefónica. Para pedir llaves y/o
combinaciones de reemplazo, es esencial que ENVÍE
POR CORREO los artículos indicados en cada categoría
abajo a Sentry Group con su pedido. Si necesita ayuda
para preparar su pedido, o desea comprar con tarjeta
de crédito (Visa o Mastercard únicamente), sírvase
llamar gratis a Servicio al Cliente de Sentry de lunes
a viernes, de 8 am a 6 pm, hora del Este (E.U.A.). Debe
marcarse un código de acceso antes de marcar el
número 800. Es un proceso de 2 pasos.
Paso 1: marque 08 800 112 2020 ó 001 800 658 5454
Paso 2: a la indicación marque 1-800-451-0821
También se puede adquirir en Internet. Favor de
visitarnos en www.sentrysafe.com/CustomerService
Primero, localice el modelo y el número de serie de la
caja fuerte. El número de serie se encuentra en este
folleto y también está impreso en la pequeña etiqueta
ubicada al lado de la bisagra (en el lado externo).
Envíe una copia de éste, una carta notariada (el
apellido debe ser diferente al del propietario)
indicando que Usted es el dueño de la caja fuerte, y
un cheque u orden de pago por la cantidad de $12.00
(dólares de E.U.A.) a: Sentry Group, Dept. 200,
882 Linden Avenue, Rochester, NY 14625-2784 USA.
Si utiliza una tarjeta de crédito (Visa o Mastercard
únicamente), debe marcarse un código de acceso
antes de marcar el número 800. Es un proceso
de 2 pasos.
Paso 1: marque 08 800 112 2020 ó 001 800 658 5454
Paso 2: a la indicación marque 1-800-451-0821
No se acepta información de tarjeta de crédito por fax,
correo postal ni por correo electrónico.
Modo de demora
Combinación o llaves perdidas
Llaves perdidas: Para obtener un juego de llaves de repuesto,
debe tener el modelo de la caja fuerte y el número de serie. El
número de serie se encuentra en este folleto y también está
impreso en la pequeña etiqueta ubicada al lado de la bisagra,
en el lado externo.
Pedidos por correo: Envíe este código junto con un cheque
u orden de pago (en moneda estadounidense) por $12.00*,
a: Sentry Group, Dept. 200, 882 Linden Avenue, Rochester,
NY 14625-2784 - USA.
* NOTA: Precios sujetos a cambio sin notificación
Pedidos por el Internet: Visite nuestra página de internet al www.
sentrysafe.com. Marque Sección de Servicio a Clientes.
* NOTA: Precios sujetos a cambio sin notificación
Disponemos de entrega Express para llaves y/o números de combinación por un cargo adicional. Visite nuestra página de Internet
para mas detalles en www.sentrysafe.com/customer service.
previa.
IMPORTANTE: FPara asistencia en el evento de que pierda
las llaves o la combinación, o para información y pedidos de
características para organización adicionales, favor de llamar
de lunes a viernes, de 8:00 a.m. a 6:00 p.m., hora del Este
(E.U.A.). Debe marcarse un código de acceso antes demarcar
el número 800. Es un proceso de 2 pasos.
Paso 1: marque 08 800 112 2020 ó 001 800 658 5454
Paso 2: a la indicación marque 1-800-451-0821
O visítenos en Internet en www.sentrysafe.com.
previa.
14
Page 15

Reclamo de fuego verificado ETL
http://www.monomachines.com
http://www.monomachines.com
ETL SEMKO ha verificado que este producto de marca Sentry
®
Fire-Safe
cumple la especificación del fabricante para resistencia a 1400° F durante 30 minutos, resistencia de peligro de
explosión a 1400°F.
Garantía de reemplazo de por
vida después de fuego
Si un producto Fire-Safe® de Sentry resulta dañado por un
incendio en cualquier momento mientras le siga perteneciendo a usted (el dueño original), el Grupo Sentry le enviará un
reemplazo gratuitamente si usted envía lo siguiente el Grupo
Sentry, 882 Linden Avenue, Rochester, NY 14625-2784 USA:
• Su nombre y dirección;
• Una descripción del incendio junto con el número de modelo, una foto de la unidad quemada y una copia del informe
del departamento de bomberos, la compañía de seguros o la
policía.
Garantía de Satisfacción al 100%
Si en cualquier momento durante los primeros noventa
(90) días después de la fecha de compra, Usted no está
completamente satisfecho con este producto de Sentry
Group, por favor llámenos sin costo en E.U.A. al 1-800-828-
1438. Un recibo de compra con fecha se requiere como comprobante de compra. Nosotros resolveremos el problema o
nos aseguraremos de que Usted reciba un reemplazo o un
reembolso completo.
--Los empleados de Sentry Group
Este producto está garantizado al propietario original durante un
(1) año a partir de la fecha de compra de estar libre de defectos
estructurales y mecánicos debidos a materiales defectuosos o
trabajo de mala calidad. Si ocurre un defecto estructural o
existe un defecto mecánico durante el periodo de garantía,
Sentry Group (también nombrado como “Sentry”) reparará o
reemplazará la(s) parte(s) defectuosas o el producto, a la opción
de Sentry Group, sin costo alguno con la validación de su comprobante de compra.
Para Servicio de Garantía
(América del Norte únicamente)
Por favor notifique al departamento de Servicio al Cliente de
Sentry Group del problema por teléfono. Debe marcarse un
código de acceso antes de marcar el número 800. Es un proceso
de 2 pasos.
Paso 1: marque 01 800 112 2020 ó 001 800 658 5454
Paso 2: a la indicación marque 1-800-451-0821
(8 am a 6 pm, hora oficial del este de los EE.UU., de lun es a
viernes) o por escrito a: Sentry Group, 882 Linden Avenue,
Rochester, New York 14625-2784, U.S.A. No envíe su producto a
Sentry Group. El Departamento de Servicio al Cliente de Sentry
Group decidirá si el producto se devolverá, se reparará, se reemplazará o se si reembolsará su dinero.
Fecha del comprobante de compra
Para todos los productos de Sentry Group, un recibo de compra
de la tienda con fecha se requiere como comprobante de compra.
Limitaciones de la garantía
1. La responsabilidad de Sentry y el remedio exclusivo del
comprador bajo esta garantía están limitados a la reparación o
el reemplazo de la(s) parte(s) defectuosas o del producto, a
la opción de Sentry. En ningún caso será responsable Sentry
por cualquier daño incidental o consecuencial (incluyendo
pero no limitado a la pérdida o al daño causados por incendio,
agua, robo o vandalismo) a personas o propiedad resultando
de la violación de esta o cualquier otra garantía expresa o
implicada aplicable al producto. Algunos estados, provincias
y países no permiten la exclusión o la limitación de daños
incidentales o consecuenciales, así es que la limitación o
exclusión anterior pudiera no aplicarle a Usted.
2. Excepto como puede ser previsto de otra manera por ley
aplicable, Sentry niega cualesquiera y todos los convenios y
garantías, sean escritas u orales, expresas o implícitas, inc
luyendo, pero sin limitarse, a las garantías de comercialización
y capacidad para un propósito particular. La garantía implícita
aplicable a este producto no excederá la garantía limitada
estándar de un año. Algunos estados, provincias y países no
permiten la negación de garantías implícitas o limitaciones en
Garantía de 1 Año Limitada
la duración, así es que la negación y/o la limitación anterior
pudiera no aplicarle a Usted.
3. Sentry no se responsabilizará por daños, defectos o el
malfuncionamiento del producto incurridos durante su
transporte. El producto se empacó de acuerdo a las
especificaciones de la Comisión de Comercio Interestatal,
y con un manejo razonable, deberá estar en buenas condiciones cuando se reciba. Cualquier reclamo debido a daños
ocasionados durante el transporte del producto se deberá
hacer directamente con el transportista.
4. Estas garantías no cubren defectos, daños, o el malfunciona-
miento del producto causados por la modificación, alteración,
reparación o servicio del producto efectuados por cualquier
otra empresa o persona con la excepción de Sentry o sus
representantes autorizados, o aquellos causados por abuso
físico o mal uso del producto. Sentry niega específicamente
la cobertura por daños que pueden resultar si el producto es
empernado y/o daños que pueden resultar del mal manejo del
producto al moverlo y/o durante la instalación.
5. Ningún agente, empleado o representante de Sentry, ni un
distribuidor o tienda de menudeo, tiene la autorización de
hacer o implicar cualquier representación, promesa o acuerdo
en el cual se varía de cualquier forma de los términos de esta
Garantía Limitada.
6. Esta Garantía Limitada aplicará a productos nuevos, de prim-
era calidad de Sentry y no se aplicará a productos de fabrica
de segunda calidad o aquellos previamente usados, o a productos dañados previamente por eventos que incluyen, pero
no se limitan, a incendios, inundaciones, temblores, etc.
Todas las previsiones de esta Garantía Limitada son separadas y
separables. Si cualquier previsión se toma como inválida y no
enforzable, dicha determinación no afectará la validez o
enforzabilidad de otras previsiones. Esta Garantía Limitada
de brinda derechos legales específicos, y Usted pudiera tener
otros derechos, que varía de estado a estado, de provincia a
provincia, o de país a país.
Resistente al agua
Verificado por ETL para un máximo de 12 pulgadas de agua
hasta 72 horas.Debe apernarse para asegurar un sello
hermético. Herrajes de apernar incluidos.
15
Page 16

Model No.
http://www.monomachines.com
http://www.monomachines.com
Modèle n°
No. de modelo
Serial No.
N° de série
N°¯ de serie
Combination
Combinaison
Combinación
Key No.
N° de clé
No. de llave
Factory Code
(Electronic Lock Models)
(Pour les modèles à serrure électronique)
Code de fabricant
Código de fábrica
(Los modelos con cierre electrónico)
Sentry Group
900 Linden Avenue
Rochester, New York 14625-2784 USA
Telephone: 585-381-4900
Customer Service: 1-800-828-1438
(8:00am–6:00pm E.S.T., Mon. – Fri.)
Fax: 585-381-2940
www.sentrysafe.com
El Departmento de Servicio al Cliente:
Debe marcarse un código de acceso antes de marcar el número 800. Es un proceso de 2 pasos.
Paso 1: marque 01 800 112 2020 ó 001 800 658 5454
Paso 2: a la indicación marque 1-800-451-0821
(8 am a 6 pm, hora oficial del este de los EE.UU., de lunes a viernes)
400093
 Loading...