

Page 1
OWNERS MANUAL
®
Fire-Safe
TABLE OF CONTENTS
Combination lock ................................................................. 1
Electronic lock ...................................................................... 1
First class customer care ....................................................... 2
Testing ................................................................................. 2
Safes
MANUEL DU PROPRIÉTAIRE
Coffres-forts Fire-Safe
TABLE DES MATIÈRES
Verrou à combinaison .......................................................3
Verrou électronique............................................................. 3
Service clientèle de toute première classe ............................ 4
Essais ...............................................................................4
®
MANUAL DEL USUARIO
Cajas fuertes Fire-Safe
ÍNDICE
Cerradura de combinación .................................................... 5
Cerradura electrónica ........................................................... 5
Servicio a Clientes de Primera Clase ..................................... 6
Pruebas............................................................................6
®
•••IMPORTANT•••
DO NOT RETURN SAFE TO THE STORE!
If you experience
any
problems
or challenges with your safe, please
contact us. Many issues can be
resolved quickly
without
the
product being returned.
www.sentrysafe.com
Customer Service: 1-800-828-1438
Fax: 585-381-2940
900 Linden Avenue / Rochester, New York / 14625-2784 USA
•••IMPORTANT•••
NE RETOURNEZ PAS LE COFFRE FORT
Á LA MAGASIN!
Si vous rencontrez
des
problèmes
ou des difficultés avec votre coffre-fort,
veuillez nous contacter. De nombreux
problèmes peuvent être résolus
sans
rapidement
avoir à retourner
le produit.
•••IMPORTANTE•••
NO VUELVA LA CAJA FUERTE
A LA TIENDA.
Si llega a tener
algún
problema
o dificultad con su caja fuerte, favor
de contactarnos. Muchos asuntos
se pueden resolver rápidamente
sin
tener que hacer una devolución
del producto.
El Departmento de Servicio al Cliente:
Debe marcarse un código de acceso antes de marcar el
número 800. Es un proceso de 2 pasos.
Paso 1: marque 01 800 112 2020 ó 001 800 658 5454
Paso 2: a la indicación marque 1-800-451-0821
➧
Model No.
Modèle Nº
Modelo No.
➧
Serial No.
Nº de série
No. de serie
➧
Dial Combination (Not All Models)
Combinaison du cadran (pas tous
les modèles)
Combinación del disco (No todos
los modelos)
➧
Key No. (Not All Models)
Clé Nº (pas tous les modèles)
Llave No. (No todos los modelos)
➧
Factory Code (Not All Models)
Code d’usine (pas tous les modèles)
Código de fábrica (No todos los
modelos)
©2011
514472
Page 2
Getting started
Congratulations on your purchase of a Sentry®Safe product. SentrySafe is the world’s leader in fire/water-resistant and security storage. This guide describes how to easily set up your safe.
Gain entry with the combination lock
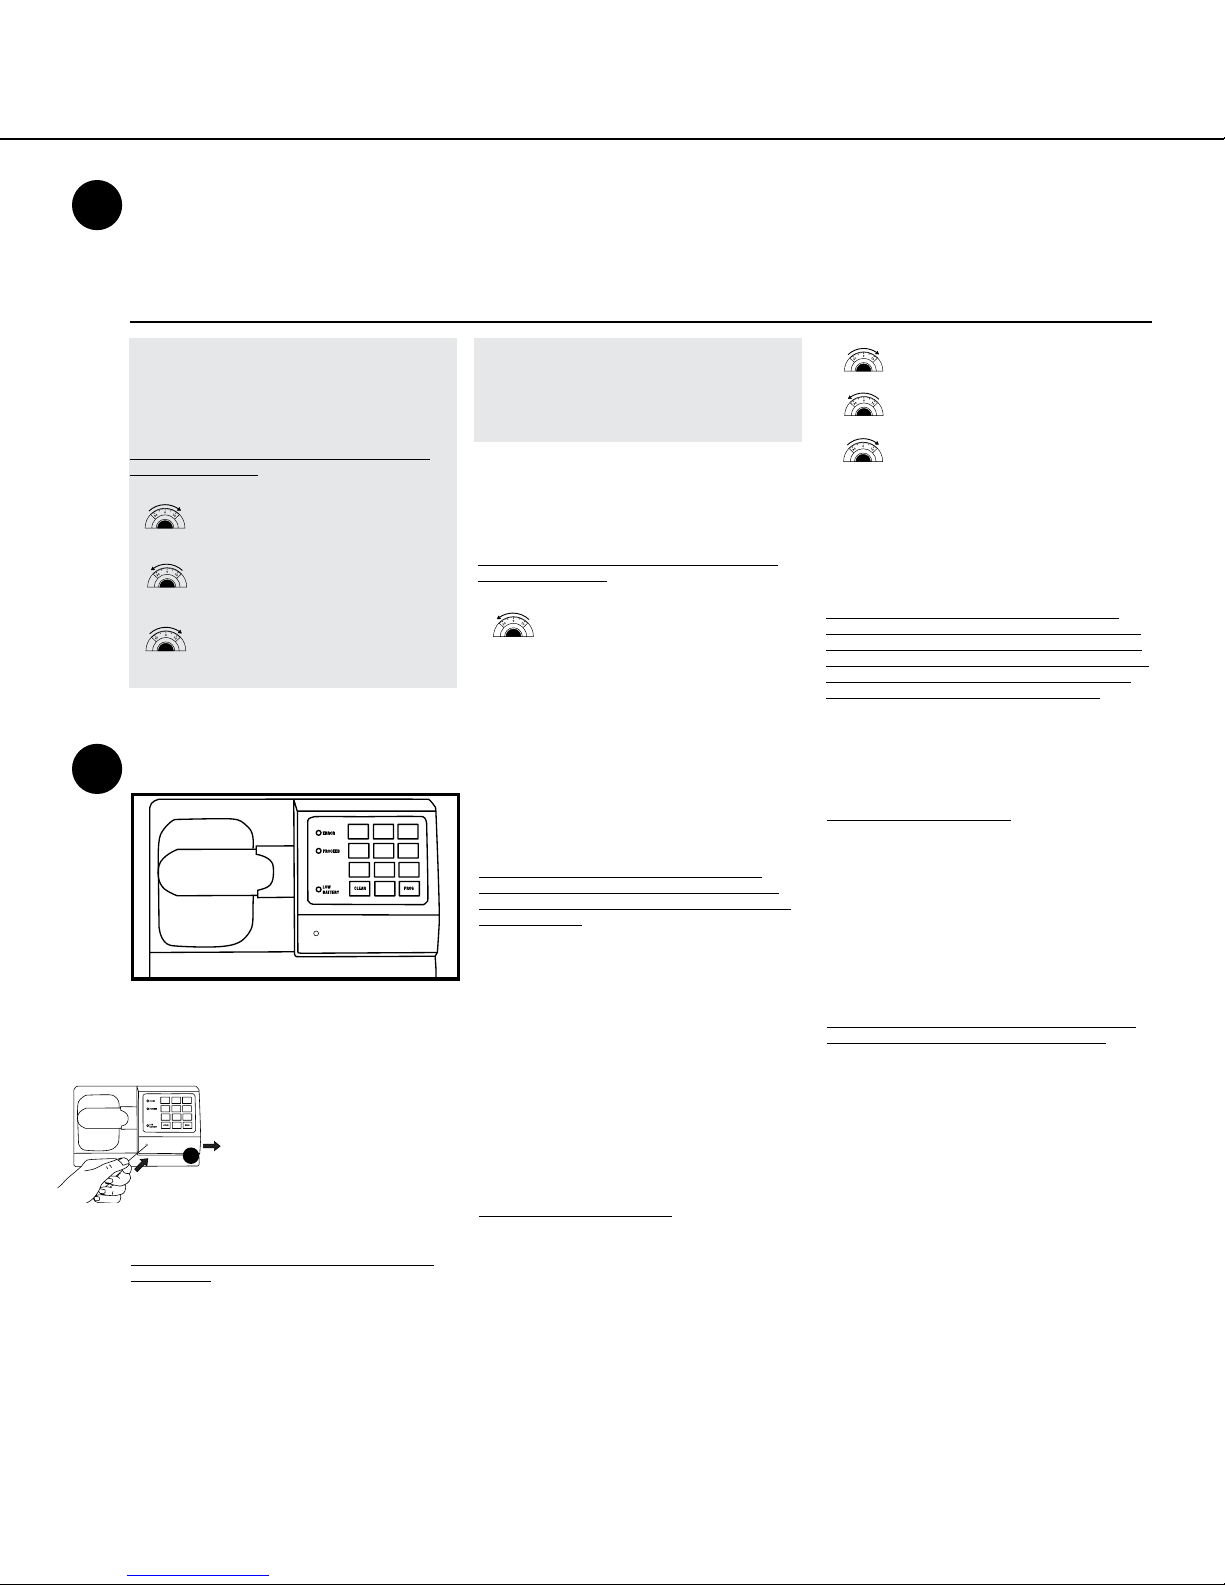
1
Opening your safe for the first time (keep door open during setup):
The handle should be all of the way UP, in the horizontal position before attempting to dial out safe.
Testing your combination: Your safe’s combina tion is printed on the front of this owner’s manual. You will have
a 3-number or 4-number combination depending upon the model purchased.
3-NUMBER COMBINATION (Cannot be changed)
1. To unlock and open
Before dialing your combination, simply insert the key
(if equipped) in the lock and turn until the plunger
pops out. Remove key.
NOTE: The safe will lock if key lock cylinder is pressed
in with or without key.
A. Start the dial at zero.
Turn the dial to the right. Make sure ZERO
B.
passes the pointer at least THREE times. Then stop
at the first number of your combination.
Turn the dial to the left. Stop the SECOND
C.
time you reach the second number of your
combination.
Turn the dial to the right. Stop the FIRST
D.
time the pointer reaches the third number of your
combination.
Gain entry with the basic electronic lock
2
123
4 5 6
789
0
2. To close and lock
You can relock the safe in two ways. With the door
closed, depress the key lock (if equipped) with your
finger, or spin the combination dial one full turn.
For greatest security, do both. (Make sure the door
handle is in the horizontal position.)
4-NUMBER COMBINATION
1. To unlock and open
Before dialing your combination, simply insert the key
(if equipped) in the lock and turn until the plunger pops
out. Remove key.
NOTE: The safe will lock if key lock cylinder is pressed
in with or without key.
A. Start the dial at zero.
B.
passes the pointer at least FOUR times. Then stop
at the first number of your combination.
To lock safe:
Close the door and return the handle to the horizontal
position. For greatest security, depress the key lock
(if equipped) with your finger.
NOTE: If your unit is equipped with a water-resistant
gasket additional pressure to the left corner of the door
may be required before the handle can be returned to the
horizontal position.
Access codes
There are 3 possible ways to unlock and access the safe:
The handle should be all of the way UP, in the
horizontal position before attempting to open safe.
Opening your safe for the first time (keep door
open during setup):
123
4 5 6
789
• Reconnect the battery holder and put back into proper
position. Slide battery cover back in place.
1. Insert a paper clip or pen point into
the small hole of the battery cover located
directly below the keypad. Push in while
0
sliding cover to the right (Fig. B).
B
2. Disconnect and remove battery holder.
• Insert 4 new AA batteries (not included)
to power this lock.
NOTE: The yellow LED will light when the batteries need
to be replaced.
3.
Simply insert the key (if equipped) in the lock and
turn until the plunger pops out. Remove key.
4. Enter the factory code (printed on the first page of this
guide). When the green light appears, you have four
seconds to turn the handle down to open. Try this several
times before proceeding to the next step.
To unlock safe:
Enter the 5-digit factory code, a pre-programmed user code,
or a pre-programmed user pin (programming instructions
to follow). When the green LED lights you have 4 seconds
to turn the handle and open the safe.
1. Factory code
(Found on the front cover of this guide.) You can always
open the safe by entering the pre-set 5-digit factory code.
This code cannot be deleted.
2. User code
If you prefer to employ your own code, you can program
the safe to open using a 5-digit user code of your choice.
3. User pin
If you wish to give someone else temporary access to the
safe, you can program a 5-digit user pin that can later
be erased.
Programming the user code
NOTE: One (1) user code is allowed.
To add:
1. Press the Prog key , then enter the 5-digit factory code.
2. Enter the 5-digit user code of your choice.
To delete:
1. Press the Prog key.
2. Enter the 5-digit factory code twice.
Turn the dial to the left. Make sure ZERO
C. Turn the dial to the right. Stop the THIRD time
you reach the second number of your combination.
Turn the dial to the left. Stop the SECOND time
D.
you reach the combination’s third number.
Turn the dial to the right. Stop the FIRST time
E.
you reach the last number of your combination.
2. To close and lock
You can relock the safe in two ways. With the door
closed, depress the key lock (if equipped) with your
finger, or spin the combination dial one full turn.
For greatest security, do both. (Make sure the door
handle is in the horizontal position.)
Note: Changing the combination voids your warranty.
To reinstate your Limited 1-Year Warranty, (valid purchase
dated receipt required) you must contact Sentry Customer
Service to document your new combination. If Sentry is not
notified of the combination change during the Warranty
period, locksmith service fees will NOT be covered.
Programming user pin
NOTE: One (1) user pin is allowed.
To add:
1. Press the Prog key 2 times.
2. Enter your 5-digit user code.
3. Enter the 5-digit user pin of your choice.
To delete:
1. Press the Prog key 2 times.
2. Enter your 5-digit user code.
3. Enter 0, 0, 0, 0, 0.
NOTE: If your safe does not appear to be working, please
check batteries before calling Sentry Customer Care.
Signals
Your electronic-lock safe communicates by means of several
audio/visual signals.
Red (Error) LED + three beeps indicates one
of the following:
1. You have pressed Program key out of sequence.
2. You have entered an invalid code or user pin.
3. You have let 5 seconds or more elapse between
key presses.
4. Lights after three consecutive invalid codes are input
(2-minute delay mode).
Green LED only:
1. Comes ON after you enter a valid code and remains
lit during the 4-second period in which the safe can be
opened.
2. Comes ON in the Programming mode and remains
lit until you have finished entering a 5-digit code.
Yellow LED only:
1. Comes ON when the batteries need to be replaced.
1
Page 3

Sentry®Safe First-Class Customer Care
Troubleshooting
• If electronics are not functioning, replace batteries first
(behind battery cover) as described on page one of this
guide.
• If electronics are functioning and you cannot get into safe:
- Pull handle up
- Follow instructions for opening your lock.
• You must use both the key (if equipped) and the electronic
code to open the safe if the key lock cylinder is pushed in.
Delay mode
Enters a two-minute delay mode after an invalid code
has been entered three consecutive times. In this mode,
the lock cannot be activated and any key entry will generate
an ERROR signal.
Floor mount (optional)
For additional security your safe may be bolted to
the floor. For instructions, please visit our website at
www.sentrysafe.com.
DO NOT store delicate items directly in your safe.
SentrySafe products which offer fire protection have a proprietary
insulation that has a high moisture content. In addition the SentrySafe
WARNING
If you lose your combination/keys or need accessories, we can help!
Visit our website at www.sentrysafe.com
Please note: Your safe’s serial number is required
to obtain replacement combination/keys. The serial
number can be found near the door hinge as shown
or at the beginning of this guide.
Registration: To be eligible for warranty coverage, the original purchaser must register the product online
at www.sentrysafe.com or complete and return to Sentry Group the enclosed registration card.
advanced safes close airtight to offer water resistance, which may also
cause moisture to accumulate inside your safe. The desiccant packet
included in your safe during shipment, should be left in your safe.
DO NOT DISCARD IT. It is intended to help absorb moisture which
may accumulate inside your safe. Please open your unit periodically to
avoid moisture accumulation.
If you choose to store delicate items such as jewelry with working
parts, watches, stamps, or photos in your safe, we recommend putting
them in an air-tight container, prior to placing them in the safe
for storage.
NOTE: Sentry Group will not be responsible for any damage or loss
of items placed in the unit due to moisture.
In the event of a fire, potential damage to delicate pearls occurs
at temperatures much lower than the 350°F interior performance
measure which the UL classification performance standard indicated
guarantees. Therefore, DO NOT store pearls in your SentrySafe product.
No computer disks, audio-visual media or photo negatives.
This product is not intended to protect computer floppy or diskettes,
cartridges and tapes, audio or video cassettes or photo negatives.
For fire-resistant storage of these materials, ask your retailer for the
SentrySafe Fire-Safe Media storage products.
DO NOT store pearls in this safe unit.
WARNING
WARNING
Rigorous testing ensures this product meets our specifications
Fire Endurance Explosion Hazard Fire Impact Data Protection
1-Hour
Models
1-hour
2.0 Cu. Ft.
Models
2-Hour
Models
Subjected to temperatures up
to 1700°F (927°C) for duration of 1-hour,
the safe interior will remain below 350°F
(177°C). This enables your safe to withstand
even high temperature exposure, as the
hottest part of a fire moves through a
building.
Subjected to temperatures up
to 1700°F (927°C) for duration of 1-hour,
the safe interior will remain below 350°F
(177°C). This enables your safe to withstand
even high temperature exposure, as the
hottest part of a fire moves through a
building.
Subjected to temperatures up to
1850°F (1010°C) for duration of 2-hours,
the safe interior will remain below 350°F
(177°C). This enables your safe to withstand
even high temperature exposure, as the
hottest part of a fire moves through a
building.
Subjected to flash fire in a
2000°F (1093°C) furnace for 30 minutes,
the unit will not explode or rupture.
Subjected to flash fire in a
2000°F (1093°C) furnace for 30 minutes,
the unit will not explode or rupture.
Subjected to flash fire in a
2000°F (1093°C) furnace for 30 minutes,
the unit will not explode or rupture.
After being heated to 1550°F
(843°C) the safe is dropped 15 feet onto
rubble, then cooled, inverted and reheated to
1550°F (843°C) for 30 minutes.
After being heated to 1550°F
(843°C) the safe is dropped 30 feet onto
rubble, then cooled, inverted and reheated to
1550°F (843°C) for 30 minutes.
After being heated to 1638°F
(892°C), the safe is dropped 30 feet onto
rubble, then cooled, inverted and reheated to
1638°F (892°C) for 45 minutes.
1-hour fire protection of CD’s, DVD’s,
memory sticks, and USB drives up to 1700°F
(927°C).
1-hour fire protection of CD’s, DVD’s,
memory sticks, and USB drives up to 1700°F
(927°C).
2-hour fire protection of CD’s, DVD’s,
memory sticks, and USB drives up to 1850°F
(1010°C).
ETL Verified Water-Resistance Protection (if equipped) Tested up to 8 inches of water for up to 24 hours.
effectively, the safe door must be closed with the handle fully horizontal. When you move the handle, the compression of the gasket will require slightly more force than you would use with a safe
that does not have a gasket.
Note: Maximum allowable leakage is 170 grams. For the gasket to work
2
Page 4

Pour commencer
Nous vous félicitons d’avoir acheté un produit Sentry®Safe. SentrySafe est le principal fabricant au monde de produits résistant aux incendies et à l’eau ainsi que de dispositifs sécuritaires de
stockage. Ce guide décrit comment installer facilement votre coffre-fort.
Obtenez l’entrée avec le verrou à combinaison
1
Ouvrir votre coffre-fort pour la première fois (gardez la porte ouverte pendant l’installation) :
Vérifiez que la poignée est entièrement tournée vers le HAUT, en position horizontale, avant d’essayer de
composer la combinaison de votre coffre-fort.
Essayez votre combinaison : La combinaison de votre coffre-fort est imprimée à l’avant de ce manuel de l’utilisateur.
Votre combinaison est à 3 ou 4 chiffres selon le modèle acheté.
REMARQUE : Vous devrez peut-être appuyer sur le bouton
à boulon pour que celui-ci mette les boulons en position
verrouillée lorsque la porte est ouverte (figure A).
COMBINAISON À 3 CHIFFRES (Ne peut pas être changée)
1. Pour déverrouiller et ouvrir
Avant de composer votre combinaison, insérez simplement
la clé (si votre coffre-fort en est équipé) dans le verrou
et tournez jusqu’à ce que le piston sorte. Retirez la clé.
REMARQUE : Le coffre-fort se verrouille lorsque le barillet du
verrou à clé est enfoncé, que ce soit avec ou sans la clé.
A. Commencez le cadran sur zéro.
Tournez le cadran vers la droite. Vérifiez que le
B.
ZÉRO passe devant le pointeur au moins TROIS fois. Arrêtez
vous ensuite sur le premier numéro de votre combinaison.
Tournez le cadran vers la gauche. Arrêtez-vous la
C.
DEUXIÈME fois où vous atteignez le deuxième numéro
de votre combinaison.
Tournez le cadran vers la droite. Arrêtez-vous la
D.
PREMIÈRE fois où le pointeur atteint le troisième numéro
de votre combinaison.
Obtenez l’entrée avec le verrou électronique de base
2
123
4 5 6
789
0
Vérifiez que la poignée est entièrement tournée vers le
HAUT, en position horizontale, avant d’essayer d’ouvrir
de votre coffre-fort.
Ouvrir votre coffre-fort pour la première fois (gardez la
123
4 5 6
789
pour alimenter ce verrou.
• Remettez le boîtier du verrou électronique en place et
tournez-le vers la gauche (jusqu’à la position 12 heures)
pour le réassembler.
REMARQUE : La DEL jaune s’allume lorsqu’il faut remplacer
les piles.
3. Tournez la clé (si votre coffre-fort est équipé d’un verrou
à clé) vers la droite de manière à ce que le barillet du
verrou sorte.
4. Tapez le code d’usine (imprimé sur la première page de ce
guide). Lorsque le témoin vert apparaît, vous disposez de
quatre secondes pour tourner la poignée du coffre-fort vers
le bas et l’ouvrir. Essayez ceci plusieurs fois avant de passer
à l’étape suivante.
porte ouverte pendant l’installation) :
1. Insérez un trombone ou la pointe d’un
crayon dans le petit trou du couvercle du
0
compartiment à pile situé juste en dessous
du pavé de touches. Poussez tout en faisant
glisser le couvercle vers la droite (fig. B).
B
2. Déconnectez et retirez le support de pile.
• Insérez 4 piles AA neuves (non incluses)
2. Pour fermer et verrouiller
Vous pouvez reverrouiller le coffre-fort de deux manières.
La porte étant fermée, appuyez sur le verrou à clé (si votre
coffre-fort en est équipé) avec votre doigt ou tournez le
cadran de combinaison un tour complet. Pour une plus
grande sécurité, faites les deux. (Vérifiez que la poignée
de la porte est en position horizontale.)
COMBINAISON À 4 CHIFFRES
1. Pour déverrouiller et ouvrir
Avant de composer votre combinaison, insérez simplement
la clé (si votre coffre-fort en est équipé) dans le verrou et
tournez jusqu’à ce que le piston sorte. Retirez la clé.
REMARQUE : Le coffre-fort se verrouille lorsque le barillet du
verrou à clé est enfoncé, que ce soit avec ou sans la clé.
A. Commencez le cadran sur zéro.
Tournez le cadran vers la gauche. Vérifiez que le
B.
ZÉRO passe devant le pointeur au moins QUATRE fois.
Arrêtez vous ensuite sur le premier numéro de votre
combinaison.
Tournez le cadran vers la droite. Arrêtez-vous
C.
la TROISIÈME fois où vous atteignez le deuxième
numéro de votre combinaison.
Pour déverrouiller le coffre-fort :
Tapez le code d’usine à 5 chiffres, un code d’utilisateur
préprogrammé ou un NIP d’utilisateur préprogrammé
(instructions de programmation à la suite). Lorsque la DEL verte
s’allume, vous disposez de 4 secondes pour tourner la poignée
du coffre-fort et l’ouvrir.
Pour verrouiller le coffre-fort :
Fermez la porte et remettez la poignée en position horizontale.
Pour une plus grande sécurité, appuyez sur le verrou à clé
(si votre coffre-fort en est équipé) avec votre doigt.
REMARQUE : Si votre unité est équipée d’un joint
hydrorésistant, une pression supplémentaire sur le coin gauche
de la porte peut s’avérer nécessaire pour pouvoir remettre
la poignée en position horizontale.
Codes d’accès
Il existe 3 manières différentes de déverrouiller le coffre-fort
et d’y accéder :
1. Code d’usine
(Il se trouve à la première page de ce guide) Vous pouvez
toujours ouvrir le coffre-fort en tapant le code à 5 caractères
qui a été préprogrammé en usine. Ce code ne peut pas être
effacé.
2. Code d’utilisateur
Si vous préférez utiliser votre propre code, vous pouvez
programmer le coffre-fort afin qu’il s’ouvre à l’aide du code
d’utilisateur à 5 chiffres de votre choix.
3. NIP d’utilisateur
Si vous désirez accorder à d’autres personnes l’accès temporaire
au coffre-fort, vous pouvez programmer un NIP d’utilisateur
à 5 chiffres qui peut être effacé ultérieurement.
Programmer le code d’utilisateur
REMARQUE : Un (1) code d’utilisateur est autorisé.
Pour ajouter :
1. Appuyez sur la touche Prog (programmation), puis tapez
le code d’usine à 5 chiffres.
2. Tapez le code d’utilisateur à 5 chiffres de votre choix.
Pour supprimer :
1. Appuyez sur la touche Prog (programmation).
2. Tapez deux fois le code d’usine à 5 chiffres.
D. Tournez le cadran vers la gauche. Arrêtez-vous
la DEUXIÈME fois où vous atteignez le troisième numéro
de votre combinaison.
Tournez le cadran vers la droite. Arrêtez-vous
E.
la PREMIÈRE fois où vous atteignez le dernier numéro
de votre combinaison.
2. Pour fermer et verrouiller
Vous pouvez reverrouiller le coffre-fort de deux manières. La
porte étant fermée, appuyez sur le verrou à clé (si votre coffrefort en est équipé) avec votre doigt ou tournez le cadran de
combinaison un tour complet. Pour une plus grande sécurité,
faites les deux. (Vérifiez que la poignée
de la porte est en position horizontale.)
REMARQUE : Changer la combinaison annule votre garantie.
Si vous désirez rétablir votre garantie limitée de 1 an (reçu
d’achat daté valide requis), vous devez appeler le service
clientèle de Sentry afin de documenter votre nouvelle
combinaison. Si Sentry n’est pas averti du changement de
combinaison pendant la période de garantie, les frais des
services de serrurier NE seront PAS couverts.
Programmer un NIP d’utilisateur
REMARQUE : Un (1) NIP d’utilisateur est autorisé.
Pour ajouter :
1. Appuyez 2 fois sur la touche Prog (programmation).
2. Tapez votre code d’utilisateur à 5 chiffres.
3. Tapez le NIP d’utilisateur à 5 chiffres de votre choix.
Pour supprimer :
1. Appuyez 2 fois sur la touche Prog (programmation).
2. Tapez votre code d’utilisateur à 5 chiffres.
3. Tapez 0, 0, 0, 0, 0.
REMARQUE : Si votre coffre-fort paraît ne pas fonctionner,
veuillez vérifier les piles avant d’appeler le service clientèle
de Sentry.
Signaux
Votre coffre-fort à verrou électronique communique au moyen
de divers signaux audiovisuels.
DEL rouge (erreur) + trois bips indique l’un des cas
suivants :
1. Vous avez appuyé sur la touche Program (programmation)
sans respecter la séquence.
2. Vous avez tapé un code ou un NIP d’utilisateur invalide.
3. Après avoir appuyé sur une touche, vous avez laissé au
moins 5 secondes s’écouler avant d’appuyer à nouveau
sur une touche.
4. S’allume après trois codes invalides consécutifs (les
2 minutes du mode de delai).
DEL verte uniquement :
1. S’allume après que vous ayez tapé un code valide et reste
allumée tout au long des 4 secondes pendant lesquelles
le coffre-fort peut être ouvert.
2. S’allume, en mode de programmation de code, et reste
allumée jusqu’à ce que vous ayez terminé de taper un code
à 5 chiffres.
DEL jaune :
1. S’allume lorsqu’il faut remplacer les piles.
3
Page 5

Service clientèle de toute première classe de
Sentry®Safe
Dépannage
• Si les composants électroniques ne fonctionnent pas, com-
mencez pas remplacer les piles (derrière le boîtier du verrou
électronique) tel que décrit dans l’étape un de ce guide.
• Si les composants électroniques ne fonctionnent pas et si
vous ne parvenez pas à ouvrir le coffre-fort :
- Tirez la poignée vers le haut.
- Suivez les instructions permettant d’ouvrir
votre type de verrou.
• Vous devez utiliser à la fois la clé (si votre coffre-fort en est
équipé) et le code électronique pour ouvrir le coffre-fort si le
barillet du verrou à clé est enfoncé.
Mode de délai
Entre en général dans un mode de délai de deux minutes après
qu’un code invalide ait été entré trois fois consécutives. Dans
ce mode, le verrou ne peut pas être activé et toute pression sur
l’une des touches génère un signal d’ERREUR.
Installation au sol (en option)
Vous pouvez boulonner votre coffre-fort au sol pour rehausser la
NE rangez PAS directement des articles délicats
Les produits SentrySafe offrant une protection contre les incendies
AVERTISSEMENT
dans votre coffre-fort.
Si vous perdez votre combinaison/vos clés ou avez besoin d’accessoires, nous pouvons vous aider !
Visitez notre site Web à
Enregistrement :
produit en ligne à
sécurité. Veuillez visiter notre site web, à l’adresse
www.sentrysafe.com, pour obtenir des instructions.
contiennent un matériau isolant à la teneur en humidité élevée. De plus,
les coffres-forts avancés SentrySafe se fermant hermétiquement pour
résister à l’eau, ceci peut provoquer l’accumulation d’humidité à l’intérieur
du coffre-fort. Le paquet déshydratant inclus dans votre coffre-fort pour
l’expédition doit rester dans celui-ci. NE LE JETEZ PAS. Il permet d’aider
à absorber l’humidité qui peut s’accumuler à l’intérieur de votre coffrefort. Veuillez ouvrir périodiquement votre unité pour éviter l’accumulation
d’humidité.
Si vous choisissez de ranger des articles délicats tels que bijoux contenant
des pièces mobiles, montres, tampons ou photos dans votre coffre-fort, nous
vous recommandons de les placer dans des boîtes fermées hermétiquement
avant de les ranger dans le coffre-fort.
REMARQUE : Sentry Group ne sera tenu responsable d’aucun(e) dommage
ou perte provoqué(e) par l’humidité d’un article placé dans l’unité.
Pour pouvoir bénéficier de la couverture de garantie, l’acheteur d’origine doit enregistrer le
www.sentrysafe.com
ou remplir et renvoyer la carte d’enregistrement jointe à Sentry Group.
www.sentrysafe.com
Veuillez noter :
coffre-fort est nécessaire pour pouvoir obtenir une
combinaison/des clés de remplacement. Le numéro
de série se trouve à côté de la charnière de la porte
(tel qu’indiqué) ou au début de ce guide.
En cas d’incendie, les perles, délicates, peuvent être endommagées
à des températures nettement inférieures à la mesure de performance
intérieure de 350 °F (177 °C) garantie par la norme de performance
de la classification UL. Par conséquent, NE rangez PAS de perles dans
votre produit.
Ce produit n’est pas destiné à protéger les disquettes informatiques ou
de 2 pouces 1/4, les cassettes, les bandes, les cassettes audio ou vidéo ou
encore les négatifs photographiques. Si vous désirez protéger ces matériaux
contre les incendies, demandez à votre détaillant des renseignements sur
les produits de rangement de médias SentrySafe Fire-Safe.
Le numéro de série de votre
NE rangez PAS de perles dans ce coffre-fort.
Aucun disque informatique, support audiovisuel
AVERTISSEMENT
AVERTISSEMENT
ou négatif photographique.
Des tests rigoureux garantissent que ce produit est conforme à nos spécifications
Endurance contre les incendies Risque d’explosion Impact de Feu Protection des données
Modèles
de 2 heure
1 heure,
modèles
de 56,63 l
(2,0 pieds
cu.)
Modèles
de 2 heure
Soumis à des températures maximums
de 1700°F (927°C) pendant 1 heure, l’intérieur
du coffre-fort demeure à une température
inférieure à 350 °F (177 °C). Ceci permet à votre
coffre-fort de résister à des températures encore
plus élevées, car la partie la plus chaude d’un
incendie se déplace dans un bâtiment.
Soumis à des températures maximums
de 1850°F (1010°C) pendant 2 heures, l’intérieur
du coffre-fort demeure à une température
inférieure à 350 °F (177 °C). Ceci permet à votre
coffre-fort de résister à des températures encore
plus élevées, car la partie la plus chaude d’un
incendie se déplace dans un bâtiment.
Soumis à un embrasement éclair
dans un four de 2000 ºF (1093 ºC) pendant
30 minutes, l’unité n’explose pas et ne se
divise pas en plusieurs parties.
Soumis à un embrasement éclair
dans un four de 2000 ºF (1093 ºC) pendant
30 minutes, l’unité n’explose pas et ne se
divise pas en plusieurs parties.
Soumis à un embrasement éclair
dans un four de 2000 ºF (1093 ºC) pendant
30 minutes, l’unité n’explose pas et ne se
divise pas en plusieurs parties.
Après avoir été chauffé à 1550 °F
(843 °C), le coffre-fort est lâché de 15 pieds
(4,6 m) sur des blocailles, puis refroidi, inversé
et chauffé à nouveau à 1550 °F (843°C)
pendant 30 minutes.
Après avoir été chauffé à 1550 °F
(843 °C), le coffre-fort est lâché de 15 pieds
(4,6 m) sur des blocailles, puis refroidi, inversé
et chauffé à nouveau à 1550 °F (843°C)
pendant 30 minutes.
Après avoir été chauffé à 1638 °F
(892 °C), le coffre-fort est lâché de 30 pieds
(9,1 m) sur des blocailles, puis refroidi, inversé
et chauffé à nouveau à 1638 °F (892°C)
pendant 45 minutes.
Protection de 1 heure contre les
incendies, à une température maximum
de 1700 °F (927 °C), des CD, DVD,
bâtonnets de mémoire et clés USB.
Protection de 1 heure contre les
incendies, à une température maximum
de 1700 °F (927 °C), des CD, DVD,
bâtonnets de mémoire et clés USB.
Protection de 2 heure contre les
incendies, à une température maximum
de 1850 °F (1010°C), des CD, DVD,
bâtonnets de mémoire et clés USB.
Protection hydrorésistante vérifiée par l’ETL (si le coffre-fort en est équipé) Testé pour un maximum de 8 pouces (20,32 cm) d’eau, pendant une durée maximum de 24 heures.
fuite maximum autorisée est de 170 grammes. La porte doit être fermée, la poignée parfaitement horizontale, pour que le joint puisse fonctionner efficacement. Lorsque vous déplacez la poignée, la
compression du joint nécessite légèrement plus de force que celle qui devrait être utilisée pour un coffre-fort non pourvu de joint.
Remarque : La
4
Page 6

Los primeros pasos
Felicitaciones por su compra de un producto Sentry®Safe. SentrySafe es el líder del mundo en el almacenamiento resistente a incendios/agua y de seguridad. Esta guía describe cómo configurar
su caja fuerte con facilidad.
Obtenga acceso con la cerradura de combinación
1
Cómo abrir su caja fuerte por primera vez (mantenga la puerta abierta durante la configuración):
La manija debe estar totalmente hacia ARRIBA, en la posición horizontal antes de intentar marcar la
combinacíon de la caja fuerte.
Prueba de su combinación: La combinación de su caja fuerte aparece impresa en la portada de este manual del usuario.
Usted tendrá una combinación de 3 números o 4 números, dependiendo del modelo que compró.
COMBINACIÓN DE 3 NÚMEROS (No puede cambiarse)
1. Para desbloquear y abrir
Antes de marcar su combinación, simplemente inserte
la llave (si la caja fuerte está dotada de una) dentro de
la cerradura y gírela hasta que salga el émbolo. Saque
la llave.
NOTA: La caja fuerte no se cerrará si se oprime hacia dentro
el cilindro de cerradura con o sin la llave.
A. Empiece con el disco en cero.
B. Gire el disco hacia la derecha. Cerciórese de que
CERO pase la flecha por lo menos TRES veces. Luego
pare en el primer número de su combinación.
C. Gire el disco hacia la izquierda. Pare la
SEGUNDA vez que llegue al segundo número de su
combinación.
D. Gire el disco hacia la derecha. Pare en la
PRIMERA vez que la flecha llegue al tercer número de su
combinación.
Obtenga acceso con la cerradura electrónica básica
2
123
4 5 6
789
0
La manija debe estar totalmente hacia ARRIBA,
en la posición horizontal antes de intentar abrir
su caja fuerte.
123
4 5 6
789
Cómo abrir su caja fuerte por primera
vez (mantenga la puerta abierta
durante la configuración):
0
1.
Introduzca un sujetapapeles o la
punta de un bolígrafo adentro del
B
orificio pequeño ubicado en la tapa del
compartimiento de las pilas (abajo del
teclado). Presione mientras desliza la tapa
hacia la derecha (Fig. B).
2. Desconecte y saque el sujetador de la pilas.
• Inserte 4 pilas AA nuevas (no incluidas) para operar
la cerradura.
• Reponga la caja de cerradura electrónica y gírela hacia
la izquierda (hasta las 12:00) para rearmar.
NOTA: El LED amarillo se encenderá cuando es necesario
reemplazar las pilas.
3. Gire la llave (si su caja fuerte está dotada de una
cerradura de llave) hacia la derecha para que salga
el cilindro de la cerradura.
4. Entre el código de fábrica (impreso en la primera página
de esta guía). Cuando aparece la luz verde, usted tiene
cuatro segundos para bajar la manija para abrir la caja.
Pruebe esto varias veces antes de proceder
al siguiente paso.
2. Para cerrar y bloquear
Usted puede cerrar y bloquear la caja fuerte de dos
maneras. Con la puerta cerrada, oprima la cerradura de
llave (si la caja fuerte está dotada de una) con el dedo, o
gire el disco de combinación una vuelta completa. Para
mayor seguridad, haga ambos. (Cerciórese que la manija
de la puerta se encuentre en la posición horizontal).
COMBINACIÓN DE 4 NÚMEROS
1. Para desbloquear y abrir
Antes de marcar su combinación, simplemente inserte
la llave (si la caja fuerte está dotada de una) dentro de
la cerradura y gírela hasta que salga el émbolo. Saque
la llave.
NOTA: La caja fuerte no se cerrará si se oprime hacia dentro
el cilindro de cerradura con o sin la llave.
A. Empiece con el disco en cero.
B. Gire el disco hacia la izquierda. Cerciórese que
la flecha pase CERO por lo menos CUATRO veces. Luego
pare en el primer número de su combinación.
Para desbloquear la caja fuerte:
Entre el código de fábrica de 5 dígitos, un código de usuario
preprogramado, o un PIN de usuario preprogramado
(Instrucciones de programación a continuación). Cuando se
enciende el LED verde, usted tiene 4 segundos para girar la
manija y abrir la caja fuerte.
Para bloquear la caja fuerte:
Cierre la puerta y devuelva la manija a la posición
horizontal. Para mayor seguridad, oprima la cerradura de
llave (si la caja fuerte está dotada de una) con el dedo.
NOTA: Si su unidad está dotada de una empaquetadura
resistente a agua es posible que se necesite presión
adicional en la esquina izquierda de la puerta antes de
poder devolver la manija a la posición horizontal.
Códigos de acceso
Hay 3 maneras posibles de desbloquear y obtener acceso
a la caja fuerte:
1. Código de fábrica
(Indicado en la primera página de esta guía) Usted siempre
podrá abrir la caja fuerte entrando el código de fábrica
de 5 dígitos prefijado. Este código no puede borrarse.
2. Código de usuario
Si usted prefiere usar su propio código, podrá programar
la caja fuerte para abrirse usando un código de usuario de
5 dígitos de su elección.
3. PIN de usuario
Si desea dar a otra persona acceso temporal a la caja
fuerte, podrá programar un PIN de usuario de 5 dígitos
que luego podrá borrarse.
Programación del código de usuario
NOTA: Se permite un (1) código de usuario.
Para añadir:
1. Oprime la tecla de programación, luego entre el código
de fábrica de 5 dígitos.
2. Entre el código de usuario de 5 dígitos de su elección.
C. Gire el disco hacia la derecha. Pare la TERCERA
vez que llegue al segundo número de su combinación.
D. Gire el disco hacia la izquierda. Pare la SEGUN-
DA vez que llegue al tercer número de su combinación.
E. Gire el disco hacia la derecha. Pare la PRIMERA
vez que llegue al último número de su combinación.
2. Para cerrar y bloquear
Usted puede cerrar y bloquear la caja fuerte de dos
maneras. Con la puerta cerrada, oprima la cerradura de
llave (si la caja fuerte está dotada de una) con el dedo, o
gire el disco de combinación una vuelta completa. Para
mayor seguridad, haga ambos. (Cerciórese que la manija
de la puerta se encuentre en la posición horizontal).
NOTA: Su garantía quedará inválida al cambiar la combinación.
Para restablecer su garantía limitada de 1 año, (requiere recibo
de compra válido con fecha) deberá contactar al departamento
de servicio al cliente de Sentry para documentar su
combinación nueva. Si no le notifica a Sentry que ha cambiado
su número de combinación durante el plazo de la garantía, los
costos de un cerrajero no serán cubiertos
Para borrar:
1. Oprime la tecla de programación.
2. Entre el código de fábrica de 5 dígitos dos veces.
Programación del PIN de usuario
NOTA: Se permite (1) PIN de usuario.
Para añadir:
1. Oprime la tecla de programación 2 veces.
2. Entre su código de usuario de 5 dígitos.
3. Entre el PIN de usuario de 5 dígitos de su elección.
Para borrar:
1. Oprime la tecla de programación 2 veces.
2. Entre su código de usuario de 5 dígitos.
3. Entre 0, 0, 0, 0, 0.
NOTA: Si parece que su caja fuerte no está funcionando,
compruebe las pilas antes de llamar a Servicio a Clientes
de Sentry.
Señales
Su caja fuerte con cerradura electrónica se comunica
mediante varias señales audiovisuales:
LED rojo (Error) + tres pitidos indica uno de los
siguientes:
1. Usted ha oprimido la tecla de programación fuera
de secuencia.
2. Usted ha entrado un código o PIN de usuario inválido.
3. Usted ha dejado transcurrir 5 segundos o más entre
entradas de teclado.
4. Se enciende después de entrar tres códigos inválidos
consecutivos y permanece encendido durante (el modo
de período de demora de 2 minutos).
LED verde solamente:
1. Se ENCIENDE después que entre un código válido
y permanece encendido durante el período de
4 segundos durante el cual puede abrirse la caja fuerte.
2. Se ENCIENDE en el modo de Programación de Código
después y permanece encendido hasta que haya
terminado de entrar un código de 5 dígitos.
LED amarillo:
1. Se ENCIENDE cuando es necesario reemplazar las pilas.
para reembolso.
5
Page 7

Servicio a Clientes de Primera Clase de Sentry®Safe
Localización de averías
• Si los equipos electrónicos no están funcionando, primero
reemplace las pilas (detrás de la caja de cerradura
electrónica), según se describe en el paso uno de
esta guía.
• Si los equipos electrónicos están funcionando y usted
o puede obtener acceso al interior de la caja fuerte:
- Hale la manija hacia arriba.
- Siga las instrucciones para desbloquear su tipo
de cerradura.
• Usted debe usar tanto la llave (si la caja fuerte está
dotada de una) y el código electrónico para abrir
la caja fuerte si el cilindro de la cerradura de llave
está presionada hacia dentro.
Modo de período de demora
Entra un modo de demora de dos minutos después de haber
entrado tres veces consecutivos un código in válido. En este
modo, no puede activarse la cerradura y el acceso por llave
generará una señal de ERROR.
NO guarde artículos delicados directamente en su caja fuerte
Los productos SentrySafe que ofrecen la protección contra incendios
cuentan con un aislamiento privilegiado con un elevado contenido de
humedad. Adicionalmente, las cajas fuerte avanzadas de SentrySafe se
cierran herméticamente para ofrecer resistencia al agua, lo que podrá
ADVERTENCIA
Si usted pierde su combinación/llaves o necesita accesorios, ¡podremos ayudar!
Visite nuestro sitio de Internet en
Registración: Para ser elegible para la cobertura bajo garantía, el comprador original debe registrar el producto en línea
en www.sentrysafe.com o completar y devolver a Sentry Group la tarjeta de registración adjunta.
Para Fijar al Suelo (opcional)
Para seguridad adicional puede fijar su caja fuerte al
suelo. Véase las instrucciones en nuestra página web en
www.sentrysafe.com
ocasionar la acumulación de humedad dentro de su caja fuerte. El
paquete de desecante incluido en su caja fuerte durante el envío debe
dejarse dentro de su caja fuerte. NO LO DESECHE. Está diseñado para
ayudar a absorber la humedad que podrá acumularse dentro de su
caja fuerte. Abra su unidad periódicamente para evitar la acumulación
de humedad.
Si elige guardar artículos delicados, tales como joyería con piezas
funcionales, relojes, estampillas o fotografías dentro de su caja fuerte,
recomendamos ponerlos en un envase hermético antes de colocar
dentro de la caja fuerte para almacenamiento.
NOTA: Sentry Group no será responsable por daños y perjuicios
o pérdidas de artículos colocados dentro de la unidad debido a
humedad.
www.sentrysafe.com
Sírvase tomar nota: Se requiere el número de serie
de su caja fuerte para obtener el reemplazo de la
combinación/llaves. El número de serie se encuentra
cerca de la bisagra de la puerta según se muestra o al
comienzo de esta guía.
NO guarde perlas en esta unidad de caja fuerte
En caso de un incendio, ocurren potenciales daños a las perlas
delicadas a temperaturas muy por debajo del parámetro de
desempeño interior de 350° F (176º C) garantizado por la norma de
desempeño de clasificación UL indicada. En consecuencia, NO guarde
perlas en su producto SentrySafe.
No debe guardarse discos de computadora, medios
Este producto no está diseñado para la protección de discos flexibles
o disquetes, cartuchos y cintas de computadora, o casetes de audio o
vídeo ni negativos fotográficos. Para el almacenamiento resistente a
incendios de estos materiales, pregunte a su minorista acerca de los
productos de almacenamiento de Medios a Prueba de Incendios de
SentrySafe.
audiovisuales o negativos fotográficos.
ADVERTENCIA
ADVERTENCIA
Las pruebas rigurosas aseguran que este producto cumple nuestras especificaciones
Resistencia contra incendios Peligro de explosión Impacto de incendios Protección de datos
Modelos
de 1 hora
Modelos
de 1 hora,
2.0 pies
cúbicos
Modelos
de 2 horas
Al someterse a temperaturas hasta
1700° F (927° C) durante 1 hora, el interior
de la caja fuerte permanecerá por debajo de
350° F (177° C). Esto permite que su caja fuerte
resista inclusive la exposición a temperaturas
altas, a medida que la parte más caliente de
un incendio atraviesa un edificio.
Al someterse a temperaturas hasta
1700° F (927° C) durante 1 hora, el interior
de la caja fuerte permanecerá por debajo de
350° F (177° C). Esto permite que su caja fuerte
resista inclusive la exposición a temperaturas
altas, a medida que la parte más caliente de
un incendio atraviesa un edificio.
Al someterse a temperaturas hasta
1850° F (1010° C) durante 2 horas, el interior
de la caja fuerte permanecerá por debajo de
350° F (177° C). Esto permite que su caja fuerte
resista inclusive la exposición a temperaturas
altas, a medida que la parte más caliente de
un incendio atraviesa un edificio.
Al someterse a incendio
instantáneo en un horno a 2000° F
(1093° C) durante 30 minutos, la unidad
no explotará ni se reventará.
Al someterse a incendio
instantáneo en un horno a 2000° F
(1093° C) durante 30 minutos, la unidad
no explotará ni se reventará.
Al someterse a incendio
instantáneo en un horno a 2000° F
(1093° C) durante 30 minutos, la unidad
no explotará ni se reventará.
Después de calentarse a
1550° F (843° C), la caja fuerte
se deja caer 15 pies sobre basura,
luego se enfría, se invierte y se
recalienta a 1550° F (843° C)
durante 30 minutos.
Después de calentarse
a 1550° F (843° C), la caja fuerte
se deja caer 15 pies sobre basura,
luego se enfría, se invierte y se
recalienta a 1550° F (843° C)
durante 30 minutos.
Después de calentarse
a 1638° F (892° C), la caja fuerte
se deja caer 30 pies sobre basura,
luego se enfría, se invierte y se
recalienta a 1638° F (892° C)
durante 45 minutos.
Protección de incendios de 1 hora para
CD, DVD, memorias portátiles y unidades USB
hasta 1700° F (927° C).
Protección de incendios de 1 hora para
CD, DVD, memorias portátiles y unidades USB
hasta 1700° F (927° C).
Protección de incendios de 2 horas para
CD, DVD, memorias portátiles y unidades USB
hasta 1850° F (1010° C).
Protección de resistencia al agua verificada por ETL (si la caja fuerte está dotada de la misma) Probada hasta en 8 pulgadas de agua durante hasta 24 horas.
permisible máxima es 170 gramos. Para que la empaquetadura funcione eficazmente, la puerta de la caja fuerte debe estar cerrada con la manija en posición plenamente horizontal. Cuando
mueve la manija, la compresión de la empaquetadura necesitará ligeramente más fuerza de la que usaría con una caja fuerte que no tiene una empaquetadura.
NOTA: La fuga
6
Page 8

 Loading...