

Page 1

Executive Safes
Owner’s Manual
EF3428E
EF4738E
Page 2
2
Warnings
WARNING
SentrySafe recommends that you do not store loaded guns in this unit.
This is a California-approved firearm safety device that meets the requirements of Penal Code
section 23655 and the regulations issued thereunder.
WARNING
DO NOT store delicate items directly in your safe.
SentrySafe products which offer fire protection have a proprietary insulation that has a high
moisture content. In addition, the SentrySafe advanced safes close airtight to offer water resistance,
which may also cause moisture to accumulate inside your safe. The desiccant packet included in
your safe during shipment should be left in your safe. DO NOT DISCARD IT. It is intended to help
absorb moisture which may accumulate inside your safe. Please open your unit once every two
weeks to avoid moisture accumulation.
If you choose to store delicate items such as jewelry with working parts, watches, stamps, or
photos in your safe, we recommend putting them in an air-tight container, prior to placing them in
the safe for storage.
NOTE: SentrySafe will not be responsible for any damage or loss of items placed in the unit due
to moisture.
WARNING
DO NOT store pearls in this safe.
In the event of a fire, potential damage to delicate pearls occurs at temperatures much lower
than the 350°F interior performance measure which the UL classification performance standard
indicated guarantees. Therefore, DO NOT store pearls in your SentrySafe product.
WARNING
No computer disks, audio-visual cassettes or photo negatives.
This product is not intended to protect computer floppy or diskettes, cartridges and tapes, audio or
video cassettes or photo negatives.
WARNING
Your safe is only part of your total security protection.
SentrySafe recommends that you store your safe in closets, offices, basements, bedrooms and any
other locations that are convenient for you but out of direct line of sight from prying eyes. The
location of the safe does not affect the safe’s ability to protect your valuables inside.
WARNING
If children live of visit your home, do not leave your Executive safe open and unattended. Children
at play could accidently be locked inside the safe. Keep your safe closed and locked at all times.
Page 3

3
English
Table Of Contents
REGISTRATION
www.sentrysafe.com/customercare/register_your_product
Reasons to register: By registering your SentrySafe Product you can easily retrieve forgotten
codes and combinations, which would otherwise require a notary letter and payment.
Thank you for your purchase of a SentrySafe Product. SentrySafe is committed to securing,
organizing and protecting your most important documents, valuables and keepsakes.
Français ........................................................................................................................11
Español ......................................................................................................................... 21
English
Warnings ......................................................................................................................2
Registration ..................................................................................................................3
Bolt-down instructions .................................................................................................4
Lock instructions ...........................................................................................................5
Troubleshooting ............................................................................................................7
SentrySafe Customer Care .............................................................................................8
If you experience any problems or challenges with your safe, please contact us.
Many issues can be resolved quickly without the product being returned.
•••IMPORTANT•••
DO NOT RETURN SAFE TO THE STORE!
Page 4

4
To provide water-resistance this safe must be bolted down. (hardware supplied)
Bolt down kit contents:
2 Lag screws
2 Washers
Tools needed to bolt safe to a surface:
Drill
Wrench
9/32" (7.2 mm) drill bit – for drilling into wood
3/8" (9.5 mm) drill bit – for drilling into masonry
Select a suitable and convenient location for your safe. Set the
safe in place and use the holes provided in the bottom or back
of the safe to mark the location of the holes to be drilled in the
floor.
Move the safe away and drill holes of the appropriate diameter
and depth for the type of hardware and the mounting surface
being used (2 each – bolts, washers and masonry anchors).
Place the safe back over the holes and install the fasteners as
required. If a water resistant unit was purchased, rubberized
washers are provided. Assure that the area around the safe
hole opening is clean using a damp cloth. Place the rubber side
of the washer facing down against the safe floor and install
the fastener.
NOTE: SentrySafe is not responsible for any costs incurred if unit is to be replaced.
Bolt-down instructions
Bolt-down instructions
1
3
2
Page 5
5
English
To activate lock:
Four alkaline AA batteries, Voltage: 6Vdc, (not included) are required to activate the keypad.
NOTE: Do not use rechargeable batteries or any other type of non-alkaline battery. Do not mix
old and new batteries. Do not mix alkaline and standard batteries.
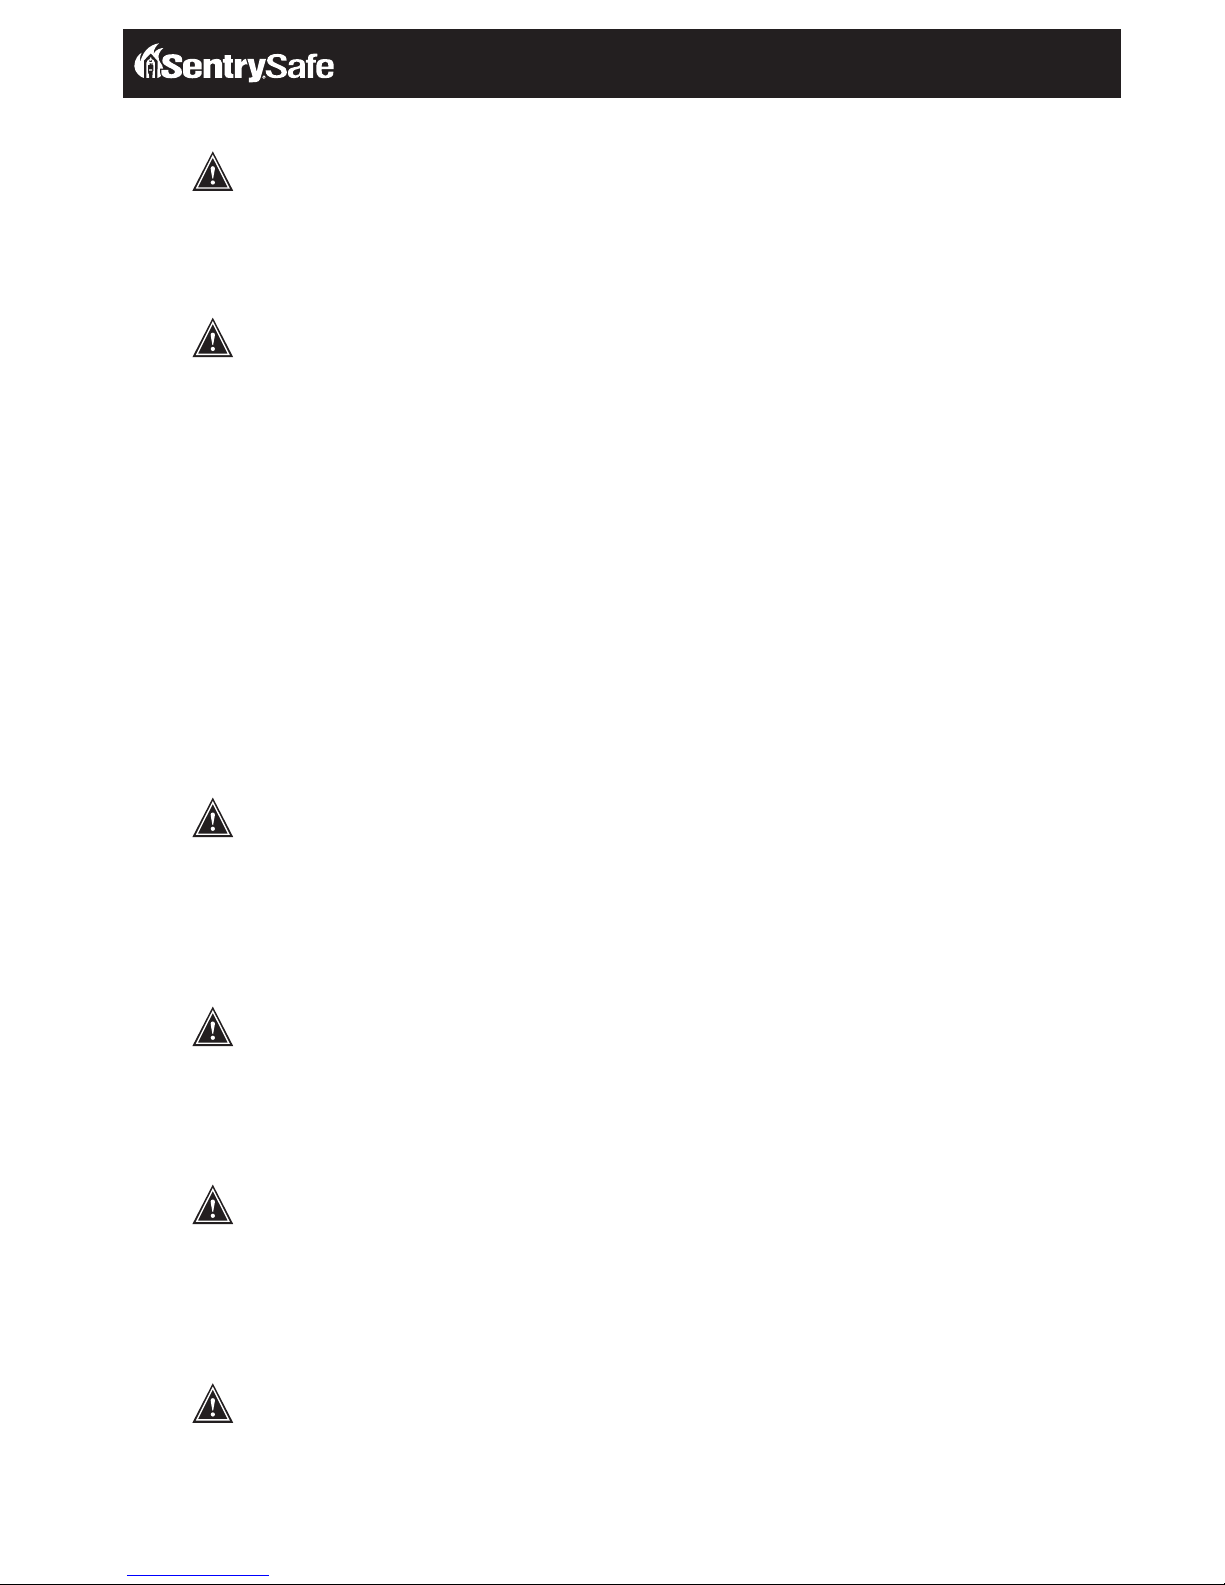
Using two hands, hold the keypad, thumbs down, on its left and
right sides. Push up the keypad with your thumbs, and disconnect
it from the safe by pulling it towards you.
Let the disengaged keypad hang by its wires. This will expose the
battery holder.
Install four alkaline AA batteries as illustrated on the back of the battery holder.
Reconnect the keypad by inserting the keypad’s four posts into the matching holes.
Push down to snap into place.
WARNING
Test first with door open!
(See back cover of this manual for your factory code.)
There are three possible ways to unlock and access the safe—by entering
its preset Factory Code, your own User Code or a User PIN (Personal
Identification Number).
You can always open the safe by entering the 5-digit Factory Code. This
code cannot be deleted.
But if you prefer to use your own code, you can program the safe to open
to the 5-digit User Code of your choice. If you wish to give someone else
temporary access to the safe, you can program a User PIN that can later
be erased.
Standard Electronic Lock
To install batteries
Access codes
3
4
5
CONFIDENTIAL
Lock instructions
1
2
Page 6
6
Lock instructions
There are two ways to program a user code.
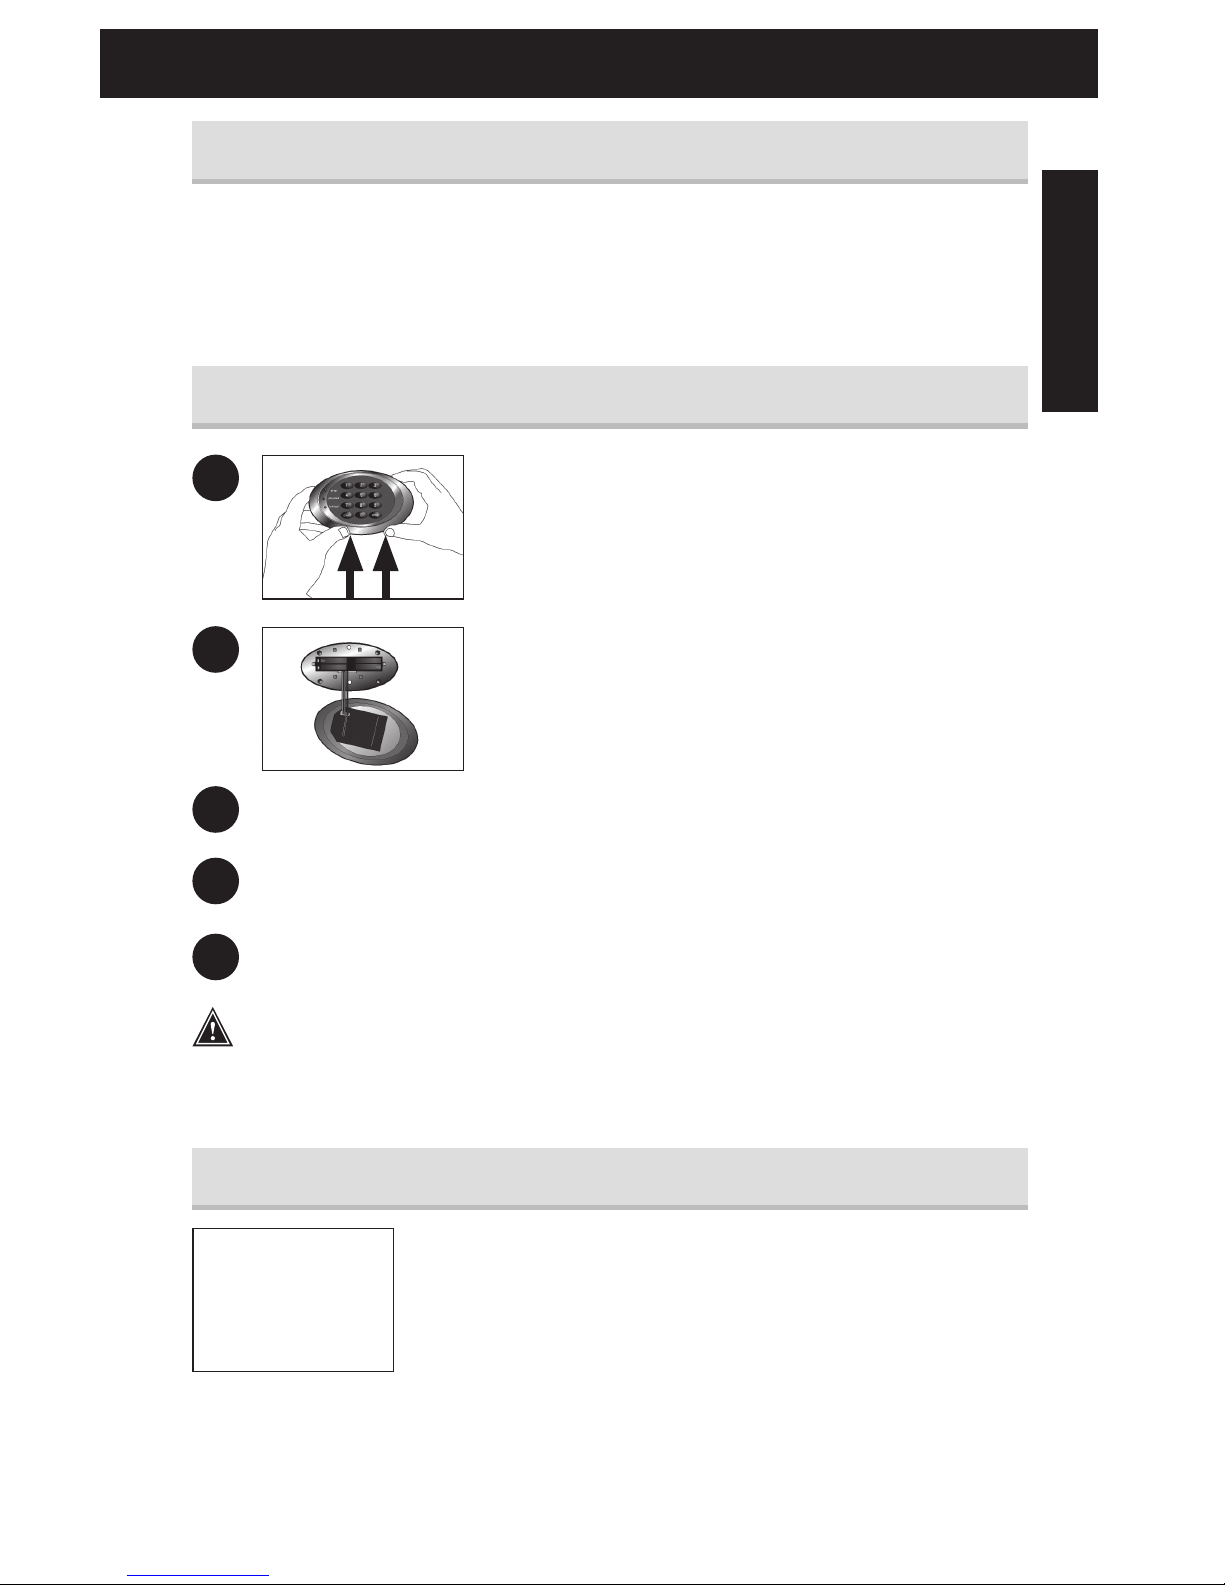
Press the Program button. (Prog).
Enter the Factory Code. The green LED remains ON while you
enter the 5-digit user code of your choice. After 5 digits are
entered the green LED turns OFF.
(To enter a new User Code, repeat these steps.)
–OR–
Press
the red button on inside of door (hinge side). The lock will
“beep” and the green LED will come on.
Enter a 5-digit user code.
(To enter a new User Code, repeat these steps.)
Keep your new user code secure
For your records, please copy it here:
Press the Program button
.
Press it a second time
.
Enter your 5-digit User Code. The green LED remains ON
.
Enter the 5-digit User PIN of your choice (any combination except 00000.) After 5 digits
are entered, the green LED turns OFF
.
(To enter a new User PIN, repeat these steps. To erase the User PIN, press Program twice,
enter your User Code and then enter 00000.)
If your electronic lock fails or you do not have any codes available, you may use the
override key that comes with the unit.
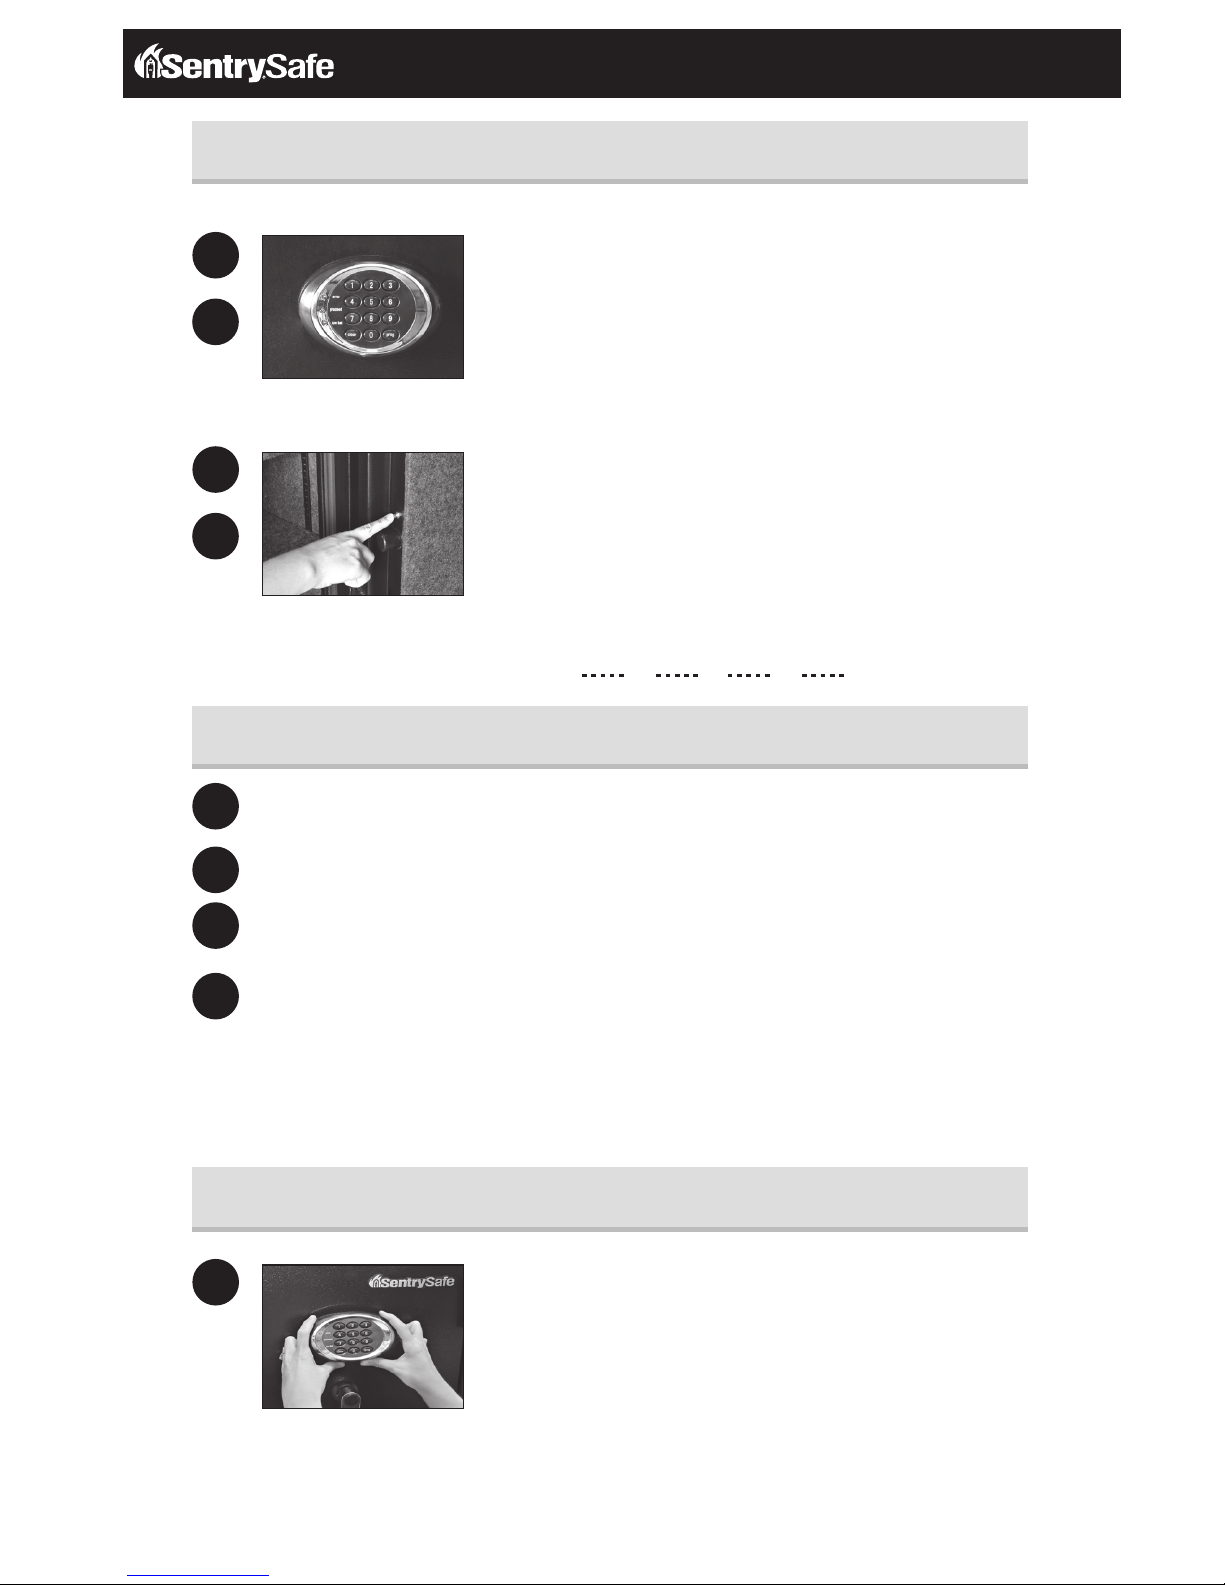
Using two hands, hold the keypad, thumbs down, on its left and
right sides. Push up the keypad with your thumbs, disconnect
and remove the battery holder.
Programming a user code
Programming a user PIN
Key override
1
1
1
1
2
2
2
3
4
Page 7
7
English
Troubleshooting
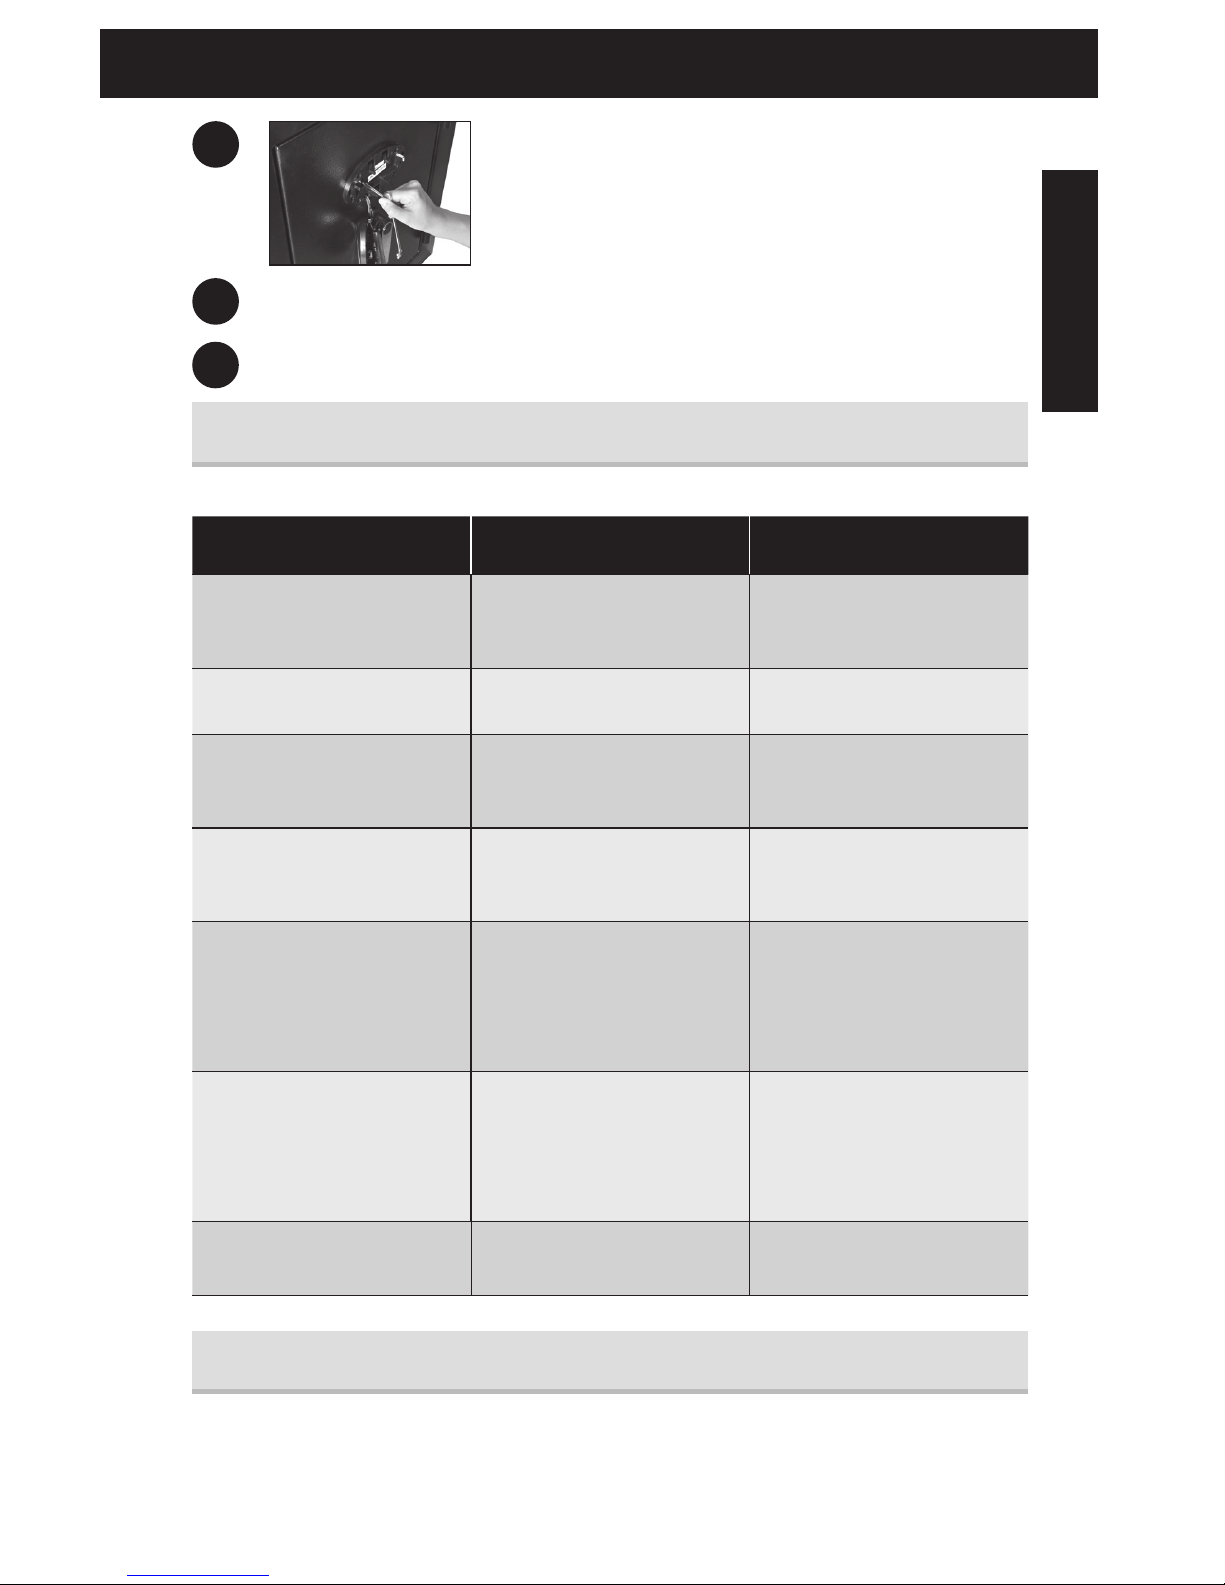
Insert the skeleton key into the key hole inside the opening for
the battery.
Turn the key to the right.
Open the door.
Your electronic-lock safe communicates by means of several audio/visual signals.
The lock automatically enters a 2-minute Delay mode after an invalid code has been entered three
consecutive times. In this mode, the lock cannot be activated and any key entry will generate an
ERROR signal.
Signals
Delay mode
2
3
4
The Problem: Why It Is Happening: The Solution:
Red (Error) LED + three
beeps indicates one of the
following
You have pressed Program
key out of sequence.
Verify the code and re-enter
or reprogram
You have entered an invalid
code or user pin.
Verify the code and re-enter
or reprogram
You have let 5 seconds or
more elapse between key
presses.
Lights after three consecutive
invalid codes are input
(2-minute delay mode).
Green LED only Comes ON after you enter
a valid code and remains lit
during the 4-second period
in which the safe can be
opened.
Comes ON in the
Programming mode and
remains lit until you have
finished entering a 5-digit
code.
Yellow LED only Yellow light comes ON Batteries need to be
replaced.
Page 8
8
SentrySafe Customer Care
Using the keypad on electronic safes
Peril Protection
Customer Service
www.sentrysafe.com
Phone Number: 1-800-828-1438
Fax: 1-585-381-2940
882 Linden Avenue / Dept. 200 / Rochester, New York / 14625-2784 USA
Caution
Liquids can damage the keypad!
Caution
Pen points or other sharp objects can puncture the keypad membrane!
Fire Protection
Verified by ETL SEMKO to meet manufacturer’s specification for fire resistance
1400°F (760°C) for 30 minutes endurance.
WARNING
If children live or visit in your home, do not leave your SentrySafe Executive Safe open
and unattended. Children at play could accidentally be locked inside the safe.Keep your safe closed
and locked at all times.
Page 9

9
English
How to obtain a replacement key
1
Please go to our website www.sentrysafe.com to find the necessary replacement form. If
you are unable to use a computer, then please call the number above or fax us for a copy of
the replacement form.
2
Find your safe’s Serial Number and model number. The Serial Number and model number are
printed on the small label on the back of the safe by hinge and in the owner’s manual.
3
Please fill out the form in its entirety.
4
Send the following to SentrySafe: check or money order and replacement form. For current
pricing, please go to www.sentrysafe.com/customercare. If you are unable to use a
computer, then please call the number above or fax us.
5
Mail to: SentrySafe, 882 Linden Avenue, Dept. 200, Rochester, NY 14625-2784, USA
-OR- fax statement (notary seal must be legible) to 1-585-381-2940.
Paying by credit card:
Payment may also be made using your credit card, by phone only.
Call 1-800-828-1438 to make a credit card payment. Do not fax credit card information.
NOTE: Prices subject to change without prior notification.
NOTE: Key orders may be placed on a Saturday or Sunday. However, those orders will not be
processed until the following business day. Our Customer Service center is open Monday
through Friday, 8:00 a.m. until 6:00 p.m. E.S.T.
(Customer Service hours subject to change.)
Page 10

10
Page 11

Manuel du propriétaire
coffre-fort pour gestionnaire
EF3428E
EF4738E
Page 12

12
Avertissements
AVERTISSEMENT
SentrySafe recommande de ne pas entreposer une arme chargée dans ce coffre-fort.
C’est un dispositif de sécurité pour arme à feu approuvé par l’État de Californie qui satisfait aux
exigences de la section 23655 du Code pénal de Californie et des règlements qui en découlent.
AVERTISSEMENT
N’ENTREPOSEZ PAS d’objets délicats directement dans votre coffre-fort.
Les produits SentrySafe offrant une protection contre l’incendie disposent d’une isolation brevetée
caractérisée par une teneur élevée en humidité. En outre, les coffres-forts avancés de SentrySafe se
ferment de façon hermétique afin d’offrir une résistance à l’eau, ce qui peut également faire en sorte
que l’humidité s’accumule à l’intérieur de votre coffre-fort. Le sachet de déshydratant, inclus dans votre
coffre-fort pendant le transport, doit demeurer dans votre coffre-fort. NE LE JETEZ PAS. Il est conçu pour
aider à absorber l’humidité susceptible de s’accumuler à l’intérieur de votre coffre-fort. Veuillez ouvrir
votre coffre-fort une fois toutes les deux semaines afin d’éviter l’accumulation d’humidité.
Si vous décidez d’entreposer des objets délicats tels que des bijoux avec des pièces mobiles, des montres,
des timbres ou des photos dans votre coffre-fort, nous vous recommandons de les placer dans un
récipient étanche à l’air avant de les ranger dans le coffre-fort.
REMARQUE : SentrySafe ne pourra être tenu responsable de tout dommage ou toute perte d’objets
placés dans le coffre-fort causé par l’humidité.
AVERTISSEMENT
N’ENTREPOSEZ PAS de perles dans ce coffre-fort.
En cas d’incendie, les dommages potentiels causés à des perles délicates se produisent à des
températures très inférieures à la mesure de performance intérieure de 177 °C (350 °F) garantie par la
norme de performance indiquée dans le cadre de la classification UL. Par conséquent, N’ENTREPOSEZ
PAS de perles dans votre coffre SentrySafe.
AVERTISSEMENT
N’entreposez pas de disques informatiques, de supports audiovisuels ou de négatifs
photographiques.
Ce produit n’est pas destiné à protéger des minidisques ou des disquettes, des cartouches et des bandes
magnétiques, des cassettes audio ou vidéo ou des négatifs photographiques.
AVERTISSEMENT
Votre coffre-fort ne représente qu’une partie de votre système de protection.
SentrySafe vous recommande de ranger votre coffre-fort dans un placard, un bureau, un sous-sol,
une chambre ou tout autre endroit qui vous convient, mais en dehors de la vue directe et des regards
indiscrets. L’emplacement du coffre-fort n’affecte pas la capacité de ce dernier à protéger vos objets de
valeur qui se trouvent à l’intérieur.
AVERTISSEMENT
Si vous avez des enfants ou si des enfants vous rendent visite, ne laissez pas le coffre-fort pour
gestionnaire de SentrySafe ouvert et sans surveillance. Des enfants qui jouent pourraient être enfermés
accidentellement à l’intérieur du coffre-fort. Gardez votre coffre-fort fermé et verrouillé en tout temps.
Page 13

13
Français
ENREGISTREMENT
www.sentrysafe.com/customercare/register_your_product
Raisons pour enregistrer votre produit : en enregistrant votre produit SentrySafe, vous pouvez
facilement récupérer les codes et les combinaisons oubliés, ce qui, autrement, nécessiterait une lettre de
notaire et un paiement.
Nous vous remercions d’avoir acheté un produit SentrySafe. SentrySafe s’engage à sécuriser, organiser et
protéger vos documents, objets de valeur et souvenirs les plus importants.
Français
Avertissements ................................................................................................................................... 12
Enregistrement ................................................................................................................................... 13
Instructions pour boulonner votre coffre-fort ...................................................................................... 14
Instructions pour la serrure ................................................................................................................. 15
Dépannage ........................................................................................................................................ 17
Assistance à la clientèle SentrySafe ..................................................................................................... 18
En cas de problèmes ou de difficultés avec votre coffre-fort, contactez-nous.
De nombreux problèmes peuvent être résolus rapidement sans que le produit soit
retourné.
•••IMPORTANT •••
NE PAS RETOURNER LE COFFRE-FORT AU MAGASIN !
Table des matières
Page 14

14
Pour être résistant à l’eau, ce coffre-fort doit être boulonné au sol. (matériel fourni)
Contenu de la trousse pour boulonner au sol :
2 vis tirefond
2 rondelles
Outils nécessaires pour boulonner le coffre-fort à une surface :
Perceuse
Clé plate
Mèche de 7,2 mm (9/32 po) – pour le perçage dans le bois
Mèche de 9,5 mm (3/8 po) – pour le perçage dans le briquetage
Sélectionnez un emplacement pratique et approprié pour votre
coffre-fort. Mettez-le à cet endroit et utilisez les trous percés au
fond ou à l’arrière du coffre-fort pour marquer l’emplacement des
trous que vous percerez dans le sol.
Retirez le coffre-fort et percez des trous d’un diamètre et d’une
profondeur appropriés pour le type de matériel utilisé et la surface de
montage (2 de chacun — boulons, rondelles et pièces d’ancrage de
maçonnerie).
Remettez le coffre-fort dans sa position d’origine et installez les
attaches selon les exigences. Si vous avez acheté un coffre-fort
résistant à l’eau, des rondelles caoutchoutées sont fournies.
Utilisez un chiffon humide afin de vous assurer que la zone autour
de l’ouverture du trou du coffre-fort est propre. Placez la face
caoutchoutée de la rondelle vers le bas contre le plancher du
coffre-fort et installez l’attache.
REMARQUE : SentrySafe ne peut être tenu responsable des frais engagés si le coffre-fort doit être remplacé.
Instructions pour boulonner votre coffre-fort
Instructions pour boulonner votre coffre-fort
1
2
3
Page 15

15
Français
Pour activer la serrure :
Quatre piles alcalines AA d’une tension de 6 Vdc (non comprises) sont nécessaires pour activer le pavé numérique.
REMARQUE : N’utilisez pas de piles rechargeables ou tout autre type de piles non alcalines. Ne mélangez
pas des piles neuves et usagées. Ne mélangez pas des piles alcalines et standard.
En utilisant vos deux mains, tenez le pavé numérique de façon à
ce que vos pouces soient vers le bas, sur le côté gauche et le côté
droit. Poussez le pavé numérique vers le haut avec vos pouces et
déconnectez-le du coffre-fort en tirant vers vous.
Laissez le pavé numérique déconnecté pendre par ses fils.
Cela permettra de voir le porte-piles.
Installez quatre piles alcalines AA, tel qu’illustré à l’arrière du porte-piles.
Reconnectez le pavé numérique en insérant les quatre tiges du pavé numérique dans leur trou
respectif.
Poussez vers le bas pour qu’il s’enclenche.
AVERTISSEMENT
Testez tout d’abord en laissant la porte ouverte!
(Consultez la couverture arrière de ce manuel pour trouver votre code d’usine.)
Il y a trois façons de déverrouiller votre coffre-fort et d’y accéder : en entrant le
code d’usine prédéfini, en entrant votre propre code d’utilisateur ou en entrant
un NIP (numéro d’identification personnel) d’utilisateur.
Vous pouvez toujours ouvrir le coffre-fort en entrant le code d’usine à 5 chiffres.
Ce code ne peut pas être supprimé.
Par contre, si vous préférez utiliser votre propre code, vous pouvez programmer
le coffre-fort de façon à ce qu’il s’ouvre lorsque vous entrez le code d’utilisateur
à 5 chiffres de votre choix. Si vous voulez donner un accès temporaire au coffrefort à une autre personne, vous pouvez programmer un NIP d’utilisateur qui
pourra être supprimé plus tard.
Serrure électronique standard
Mise en place des piles
Codes d’accès
CONFIDENTIEL
Instructions pour la serrure
1
2
3
4
5
Page 16

16
Instructions pour la serrure
Il y a deux façons de programmer un code d’utilisateur.
Appuyez sur le bouton Program (programmer). (Prog).
Entrez le code d’usine. La DEL verte reste allumée pendant que vous
entrez le code d’utilisateur à 5 chiffres de votre choix. Une fois que
vous avez entré les 5 chiffres, la DEL verte s’éteint.
(Pour entrer un nouveau code d’utilisateur, répétez ces étapes.)
–OU–
Appuyez
sur le bouton rouge qui se trouve sur le côté intérieur de la porte
(côté de la charnière). La serrure émettra un « bip » et la DEL verte s’allumera.
Entrez un code d’utilisateur à 5 chiffres.
(Pour entrer un nouveau code d’utilisateur, répétez ces étapes.)
Gardez votre nouveau code d’utilisateur secret
Écrivez-le ici pour vos dossiers :
Appuyez sur le bouton Program (programmer)
.
Appuyez sur ce bouton une deuxième fois
.
Entrez votre code d’utilisateur à 5 chiffres. La DEL verte reste allumée
.
Entrez le NIP d’utilisateur à 5 chiffres de votre choix (toute combinaison sauf 00000). Une fois
que vous avez entré les 5 chiffres, la DEL verte s’éteint
.
(Pour entrer un nouveau NIP d’utilisateur, répétez ces étapes. Pour effacer le NIP d’utilisateur, appuyez
sur le bouton Program (programmer) deux fois, entrez votre code d’utilisateur et entrez 00000).
Si votre serrure électronique ne fonctionne plus ou si vous n’avez aucun code disponible, vous
pouvez utiliser le passe-partout fourni avec le coffre-fort.
En utilisant vos deux mains, tenez le pavé numérique de façon à
ce que vos pouces soient vers le bas, sur le côté gauche et le côté
droit. Poussez le pavé numérique vers le haut avec vos pouces puis
déconnectez et enlevez le porte-piles.
Programmation d’un code d’utilisateur
Programmer un NIP d’utilisateur
Outrepasser le code à l’aide de la clé
1
1
1
1
2
2
2
3
4
Page 17

17
Français
Insérez le passe-partout dans le trou de la serrure qui se trouve
à l’intérieur de l’ouverture pour la pile.
Tournez la clé vers la droite.
Ouvrez la porte.
Votre coffre-fort à serrure électronique communique à l’aide de plusieurs signaux audio et visuels.
La serrure entre automatiquement dans un mode délai de 2 minutes lorsqu’un code invalide a été
entré trois fois consécutives. Dans ce mode, la serrure ne peut être activée et toute touche enfoncée
entraînera un signal d’ERREUR.
Signaux
Mode délai
2
3
4
Le problème :
Pourquoi cela
se produit-il?
La solution :
DEL rouge (Erreur) + trois
bips indiquent l’une des
situations suivantes
Vous avez appuyé sur la touche
Program (programmer) sans
suivre l’ordre des numéros.
Vérifiez le code et entrez-le à
nouveau ou reprogrammez-le.
Vous avez entré un code ou
un NIP d’utilisateur incorrect.
Vérifiez le code et entrez-le à
nouveau ou reprogrammez-le.
Vous avez attendu 5 secondes
ou plus avant d’appuyer sur
les différentes touches.
S’allume lorsque vous entrez
trois codes invalides consécutifs
(mode délai de 2 minutes).
DEL verte seulement S’allume lorsque vous entrez
un code valide et reste allumée
pendant toute la période
de 4 secondes au cours de
laquelle le coffre-fort peut être
ouvert.
S’allume dans le mode
programmation et reste
allumée jusqu’à ce que vous
ayez entré un code à 5 chiffres.
DEL jaune seulement Le voyant jaune s’allume. Les piles doivent être
remplacées.
Dépannage
Page 18

18
Service à la clientèle
www.sentrysafe.com
Numéro de téléphone : 1-800-828-1438
Télécopieur : 1-585-381-2940
882 Linden Avenue / Dept. 200 / Rochester, New York / 14625-2784, États-Unis
Attention
Les liquides peuvent endommager le pavé numérique !
Attention
La pointe d’un stylo ou d’autres objets pointus peuvent percer la membrane du pavé
numérique !
Protection contre l’incendie
Vérifié par ETL SEMKO afin de respecter les exigences du fabricant en matière de
résistance au feu à 760 °C (1 400 °F) pendant 30 minutes.
AVERTISSEMENT
Si vous avez des enfants ou si des enfants vous rendent visite, ne laissez pas le coffre-fort
pour gestionnaire de SentrySafe ouvert et sans surveillance. Des enfants qui jouent pourraient être
enfermés accidentellement à l’intérieur du coffre-fort. Gardez votre coffre-fort fermé et verrouillé en tout
temps.
Assistance à la clientèle SentrySafe
Utilisation du pavé numérique sur les coffres-forts électroniques
Protection contre les risques
Page 19

19
Français
Obtention d’une clé de remplacement
1
Veuillez consulter notre site www.sentrysafe.com; vous y trouverez le formulaire de
remplacement nécessaire. Si vous n’êtes pas en mesure de consulter notre site sur un ordinateur,
veuillez appeler au numéro de téléphone mentionné ci-dessus ou envoyez-nous une demande par
télécopie pour obtenir un formulaire de remplacement.
2
Trouvez le numéro de série et le numéro de modèle de votre coffre-fort. Le numéro de série et
le numéro de modèle sont imprimés sur la petite étiquette à l’arrière du coffre-fort, près de la
charnière, et dans le manuel du propriétaire.
3
Veuillez remplir le formulaire dans son intégralité.
4
Envoyez les documents suivants à SentrySafe : un chèque ou un mandat et le formulaire de
remplacement. Pour obtenir les prix en vigueur, veuillez consulter
www.sentrysafe.com/
customercare
. Si vous n’êtes pas en mesure de consulter notre site sur un ordinateur, veuillez
appeler au numéro de téléphone mentionné ci-dessus ou envoyez-nous une télécopie.
5
Envoyez les documents à : SentrySafe, 882 Linden Avenue, Dept. 200, Rochester, NY
14625-2784, États-Unis
-OU- envoyez la déclaration par télécopie (le sceau de notaire doit être lisible) au
1-585-381-2940
.
Paiement par carte de crédit :
Le paiement peut également être fait par carte de crédit, mais uniquement par téléphone.
Appelez au
1-800-828-1438 pour effectuer un paiement par carte de crédit. N’envoyez pas de
renseignements de carte de crédit par télécopieur.
REMARQUE : Les prix peuvent être modifiés sans avis préalable.
REMARQUE : Les commandes de clés peuvent être effectuées le samedi ou le dimanche.
Ces commandes ne seront cependant pas traitées avant le jour ouvrable suivant.
Notre centre du service à la clientèle est ouvert du lundi au vendredi, de 8 h à 18 h,
heure normale de l’Est.
(L’horaire du service à la clientèle est sujet aux changements.)
Page 20

20
Page 21

Manual del propietario
de cajas fuertes Executive
EF3428E
EF4738E
Page 22

22
Advertencias
ADVERTENCIA
SentrySafe recomienda no guardar armas cargadas en esta unidad.
Este es un dispositivo de seguridad para armas de fuego aprobado por el estado de California que
cumple con los requisitos de la sección 23655 del Código Penal y las reglamentaciones emitidas en
virtud del mismo.
ADVERTENCIA
NO almacene artículos delicados directamente en su caja fuerte.
Los productos SentrySafe que ofrecen protección contra incendios, poseen aislamiento patentado que
tiene un elevado contenido de humedad. Además, las cajas fuertes de avanzada SentrySafe se cierran
herméticamente para ofrecer resistencia al agua, lo que también podría provocar acumulación de humedad dentro de la caja fuerte. El paquete de desecante incluido en la caja fuerte durante el embarque
debe permanecer dentro de esta. NO LO DESECHE. Tiene el propósito de ayudar a absorber la humedad
que puede acumularse dentro de la caja fuerte. Abra la unidad una vez cada dos semanas para evitar la
acumulación de humedad.
Si opta por guardar artículos delicados, como alhajas con piezas móviles, relojes, estampillas o
fotografías en la caja fuerte, recomendamos colocarlos en un envase hermético, antes de guardarlos en
la caja fuerte.
NOTA: SentrySafe no se responsabilizará por los daños ocasionados por la humedad a los artículos que
se coloquen en la unidad, o por la pérdida de ellos.
ADVERTENCIA
NO guarde perlas en esta caja fuerte.
En caso de un incendio, las perlas delicadas pueden sufrir daños a temperaturas mucho más bajas que
el parámetro de desempeño interior de 177 °C (350 °F) que garantiza la norma de desempeño de
clasificación UL indicada. Por lo tanto, NO guarde perlas en el producto SentrySafe.
ADVERTENCIA
No guarde discos de computadora, casetes audiovisuales o negativos fotográficos.
Este producto no está diseñado para proteger discos flexibles o disquetes de computadora, cartuchos y
cintas, casetes de audio o video ni negativos fotográficos.
ADVERTENCIA
Su caja fuerte sólo forma parte de su protección de seguridad total.
SentrySafe recomienda que guarde la caja fuerte en un armario, oficina, sótano, dormitorio o cualquier
otro lugar que le resulte conveniente, pero fuera de la vista de miradas indiscretas. La ubicación de la
caja fuerte no afecta la capacidad de la caja de proteger los objetos de valor que contiene.
ADVERTENCIA
Si hay niños que viven en su casa o la visitan, no deje su caja de seguridad SentrySafe Executive abierta
o desatendida. Los niños al jugar pueden encerrarse por accidente dentro de la caja fuerte. Mantenga su
caja fuerte cerrada y trabada en todo momento.
Page 23

23
Español
Índice
REGISTRO
www.sentrysafe.com/customercare/register_your_product
Razones para registrarse: Al registrar su producto SentrySafe puede recupere con facilidad códigos y
combinaciones olvidados, que de otra manera podrían requerir la carta de un notario y de un pago.
Gracias por la compra de su producto SentrySafe. SentrySafe asume el compromiso de asegurar,
organizar y proteger sus documentos, artículos de valor y recuerdos más importantes.
Español
Advertencias ...................................................................................................................................... 22
Registro ............................................................................................................................................. 23
Instrucciones de empernado .............................................................................................................. 24
Instrucciones de cierre ........................................................................................................................ 25
Resolución de problemas .................................................................................................................... 27
Atención al cliente de SentrySafe ........................................................................................................ 28
Si experimenta problemas o dificultades con la caja fuerte, comuníquese con nosotros.
Muchos problemas pueden resolverse rápidamente sin devolver el producto.
•••IMPORTANTE •••
¡NO DEVUELVA LA CAJA FUERTE A LA TIENDA!
Page 24

24
Para brindar resistencia al agua esta caja fuerte debe estar empernada (se suministran los accesorios).
El conjunto de empernado contiene:
2 tornillos de fijación
2 rondanas
Herramientas necesarias para empernar la caja fuerte a una superficie:
Taladro
Llave inglesa
Broca de 7,2 mm (9⁄32 pulg) para perforar un piso de madera
Broca de 9,5 mm (3/8 pulg) para perforar un piso de hormigón
Seleccione una ubicación adecuada y cómoda para su caja de
seguridad. Coloque la caja de seguridad en su lugar y utilice los
agujeros provistos en la parte inferior o posterior de la caja de
seguridad para marcar la ubicación de los agujeros a taladrar en
el suelo.
Quite la caja de seguridad y taladre los agujeros del diámetro y
profundidad apropiados para el tipo de accesorio y la superficie de
montaje a utilizar (2 de cada uno: pernos, rondanas y anclajes de
mampostería).
Coloque la caja fuerte sobre los agujeros e instale los tornillos
de fijación según se requiera. Si compró una unidad resistente al
agua, se suministrarán rondanas recubiertas de goma. Asegure
el área alrededor del agujero de la caja fuerte usando un trapo
húmedo. Coloque el lado de goma de la rondana hacia abajo
contra el piso de la caja fuerte e instale el tornillo de fijación.
NOTA: SentrySafe no se responsabiliza de los gastos en los que se incurriera si la unidad debiera
reemplazarse.
Instrucciones de empernado
Instrucciones de empernado
1
3
2
Page 25

25
Español
Para activar la cerradura:
Se requieren cuatro baterías alcalinas AA, Voltaje: 6 Vcc (no se incluyen) para activar el teclado.
NOTA: no utilice baterías recargables ni ningún otro tipo de batería no alcalina. No combine las
baterías antiguas con las nuevas. No mezcle baterías alcalinas con no alcalinas.
Usando dos manos, sostenga el teclado, con los pulgares abajo, de
sus lados izquierdo y derecho. Empuje hacia arriba el teclado con sus
pulgares, y desconéctelo de la caja fuerte jalándolo hacia usted.
Deje que el teclado extraído cuelgue de sus cables. Eso expondrá el
soporte de la batería.
Instale cuatro baterías alcalinas AA según se ilustra en la parte posterior del soporte de baterías.
Reconecte el teclado insertando sus cuatro postes en los agujeros correspondientes.
Empuje hacia abajo para que encaje en su lugar.
ADVERTENCIA
¡Pruebe primero con la puerta abierta!
(En la contratapa de este manual encontrará el código de fábrica.)
Hay tres maneras posibles de destrabar y acceder a su caja fuerte: ingresando
el código de frábrica preestablecido, su código de usuario o un PIN (número de
identificación personal según su siglas en inglés) de usuario.
Siempre podrá abrir la caja fuerte ingresando el código de fábrica de 5 dígitos.
Este código no puede eliminarse.
Pero si prefiere utilizar su propio código, puede programar la caja fuerte para
que se abra con el código de usuario de 5 dígitos de su elección. Si desea darle
a otra persona acceso temporal a su caja fuerte, puede programar un PIN de
usuario que después se puede borrar.
Cerradura electrónica estándar
Para instalar baterías
Códigos de acceso
3
4
5
CONFIDENCIAL
1
2
Instrucciones de cierre
Page 26

26
Instrucciones de cierre
Hay dos maneras de programar un código de usuario.
Presione el botón Programar. (Prog).
Ingrese el código de fábrica. La luz LED verde se mantiene encendida
mientras ingresa el código de usuario de 5 dígitos que haya elegido.
Después de ingresar los 5 dígitos, la luz LED verde se apaga.
(Para ingresar un nuevo código de usuario, repita estos pasos.)
–O–
Presione
el botón rojo dentro de la puerta (del lado de la bisagra).
La cerradura emitirá un “bip” y la luz LED verde se encenderá.
Ingrese el código de usuario de 5 dígitos.
(Para ingresar un nuevo código de usuario, repita estos pasos.)
Mantenga en sitio seguro su nuevo código de usuario
Para sus registros, cópielo aquí:
Presione el botón Programar
.
Presiónelo una segunda vez
.
Ingrese su código de usuario de 5 dígitos. La luz LED verde se mantendrá encendida
.
Ingrese el PIN de usuario de 5 dígitos de su elección (cualquier combinación excepto 00000).
Después de ingresar los 5 dígitos, la luz LED se apagará
.
(Para ingresar un nuevo PIN de usuario, repita estos pasos. Para borrar el PIN de usuario,
presione la tecla Programa dos veces, ingrese su código de usuario y después ingrese 00000.)
Si la cerradura electrónica falla o si no tiene ningún código disponible, puede utilizar la tecla de
anulación que viene con la unidad.
Usando dos manos, sostenga el teclado, con los pulgares abajo, de
sus lados izquierdo y derecho. Empuje hacia arriba el teclado con los
pulgares, desconecte y quite el soporte de la batería.
Programación de un código de usuario
Programación de un PIN de usuario
Llave de anulación
1
1
1
1
2
2
2
3
4
Page 27

27
Español
Inserte la llave esqueleto en el agujero de la llave dentro
de la apertura para la batería.
Gire la llave a la derecha.
Abra la puerta.
Su caja fuerte de cerradura electrónica se comunica mediante diversas señales audiovisuales.
La cerradura entra automáticamente en un modo de Demora de 2 minutos después de que se haya
ingresado un código inválido tres veces consecutivas. En este modo, la cerradura no puede ser
activada y la introducción de cualquier llave generará una señal de ERROR.
Señales
Modo demora
2
3
4
El problema: ¿Por qué sucede?: La solución:
LED roja (Error) + tres
pitidos indican una de las
siguientes opciones
Ha presionado la clave del
Programa fuera de secuencia.
Verifique el código y vuelva
a ingresarlo, o reprograme
Ha ingresado un código o pin
de usuario no válido.
Verifique el código y vuelva
a ingresarlo, o reprograme
Ha dejado que pasen
5 segundos o más entre las
presiones a las teclas.
Se enciende después de que se
hayan ingresado tres códigos
inválidos consecutivos (modo
de demora de 2 minutos).
Sólo LED verde Se enciende después de que
ingrese un código válido y
permanece encendida durante
un período de 4 segundos en
que la caja fuerte se puede abrir.
Se enciende en el modo
Programación y permanece
encendida hasta que haya
terminado de ingresar un código
de 5 dígitos.
Sólo LED amarilla Se enciende la luz amarilla Es necesario reemplazar las
baterías.
Resolución de problemas
Page 28

28
Servicio de atención al cliente
www.sentrysafe.com
Teléfono: 1-800-828-1438
Fax: 1-585-381-2940
882 Linden Avenue / Dept. 200 / Rochester, New York / 14625-2784 USA
Precaución
¡Los líquidos pueden dañar el tablero!
Precaución
¡Las puntas de lápices u otros objetos afilados pueden perforar la membrana del teclado!
Protección contra fuego
Verificado por ETL SEMKO para el cumplimiento de especificaciones del fabricante
para resistencia a fuego de 760 °C (1400 °F) durante 30 minutos.
ADVERTENCIA
Si hay niños que viven en su casa o la visitan, no deje su caja de seguridad SentrySafe
Executive abierta o desatendida. Los niños al jugar podrían quedar accidentalmente encerrados dentro
de la caja de seguridad. Mantenga su caja de seguridad cerrada y bloqueada en todo momento.
Atención al cliente de SentrySafe
Uso del teclado en cajas de seguridad electrónicas
Protección contra peligros
Page 29

29
Español
Cómo obtener una llave de reemplazo
1
Vaya a nuestro sitio web www.sentrysafe.com para encontrar el formulario de reemplazo
necesario. Si no puede usar una computadora, llame al número anterior o envíenos un fax para
recibir una copia del formulario de reemplazo.
2
Busque el número de serie y el número de modelo de la caja fuerte. El número de serie y el número
de modelo aparecen impresos en la etiqueta pequeña ubicada en la parte trasera de la caja de
seguridad, cerca de la bisagra, y en el manual del propietario.
3
Complete el formulario íntegramente.
4
Envíe a SentrySafe: un cheque o giro y el formulario de reemplazo. Para obtener información actual
sobre precios, visite
www.sentrysafe.com/customercare. Si no puede usar una computadora,
llame al número anterior o envíenos un fax.
5
Envíe por correo a: SentrySafe, 882 Linden Avenue, Dept. 200, Rochester, NY 14625-2784, USA
-O- su declaración por fax (el sello del notario público debe ser legible) al 1-585-381-2940.
Pago con tarjeta de crédito:
El pago también puede realizarse con su tarjeta de crédito, por teléfono únicamente.
Llame al
1-800-828-1438 para realizar un pago con tarjeta de crédito. No envíe por fax información
sobre tarjetas de crédito.
NOTA: los precios están sujetos a cambios sin previo aviso.
NOTA: se pueden realizar pedidos de llaves los sábados y domingos. No obstante, esos pedidos no se
procesarán sino hasta el siguiente día hábil. Nuestro Servicio de Atención al Cliente está abierto
de lunes a viernes, de 8:00 a.m. a 6:00 p.m. hora del este (el horario de atención al cliente está
sujeto a cambios).
Page 30

Model No.
Modèle Nº
Modelo No.
Serial No.
Nº de série
No. de serie
Dial Combination (Not All Models)
Combinaison du cadran
(pas tous les modèles)
Combinación del disco
(No todos los modelos)
Key No. (Not All Models)
Clé Nº (pas tous les modèles)
Llave No. (No todos los modelos)
Factory Code (Not All Models)
Code d’usine (pas tous les modèles)
Código de fábrica
(No todos los modelos)
➧
➧
➧
➧
➧
401830
www.sentrysafe.com
Sentry Group
900 Linden Avenue
Rochester, New York 14625-2784 USA
Telephone: 585-381-4900
Customer Service: 1-800-828-1438
(8:00 a.m. – 6:00 p.m. E.S.T., Mon. – Fri.)
Fax: 585-381-2940
Téléphone : 585-381-4900
Service à la clientèle : 1-800-828-1438
(De 8 h à 18 h, HNE, du lundi au vendredi)
Télécopieur : 585-381-2940
Teléfono: 585-381-4900
Servicio a clientes: 1-800-828-1438
(8:00 am-6:00 pm hora del Este, lun., - vier.)
Fax: 585-381-2940
 Loading...