

Page 1
OWNERS MANUAL
Depository Safes
TABLE OF CONTENTS
Battery installation ......................................................................1
Programming the lock codes .......................................................1
Dual user mode ..........................................................................2
Time delay mode .........................................................................2
Floor mount ................................................................................2
Customer care.............................................................................3
MANUEL DU PROPRIÉTAIRE
Coffres-forts de Dépôt
TABLE DES MATIÈRES
Installation des piles ...................................................................3
Programmation des codes de verrouillage ..................................3
Mode à double utilisateur .......................................................... 4
Mode temporisé .........................................................................4
Installation au sol ......................................................................5
Service clientèle .........................................................................5
MANUAL DEL USUARIO
Cajas Fuertes de Depósito
ÍNDICE
Instalación de las pilas ................................................................6
Programación de los códigos de cierre ........................................6
Modo de usuario doble ...............................................................7
Modo de retardo .........................................................................7
Montaje en el piso ......................................................................7
Servicio a clientes.............................................................8
•••IMPORTANT•••
DO NOT RETURN SAFE TO THE STORE!
If you experience
any
problems
or challenges with your safe, please
contact us. Many issues can be
resolved quickly
without
the
product being returned.
www.sentrysafe.com
900 Linden Avenue / Rochester, New York / 14625-2784 USA
Customer Service: 1-800-828-1438
Fax: 585-381-2940
•••IMPORTANT•••
NE RETOURNEZ PAS LE COFFRE FORT
Á LA MAGASIN!
Si vous rencontrez
des
problèmes
ou des difficultés avec votre coffre-fort,
veuillez nous contacter. De nombreux
problèmes peuvent être résolus
rapidement
sans
avoir à retourner
le produit.
•••IMPORTANTE•••
NO REVUELVA LA CAJA FUERTE
A LA TIENDA.
Si llega a tener
algún
problema
o dificultad con su caja fuerte, favor
de contactarnos. Muchos asuntos
se pueden resolver rápidamente
sin
tener que hacer una devolución
del producto.
El Departmento de Servicio al Cliente:
Debe marcarse un código de acceso antes de marcar el
número 800. Es un proceso de 2 pasos.
Paso 1: marque 01 800 112 2020 ó 001 800 658 5454
Paso 2: a la indicación marque 1-800-451-0821
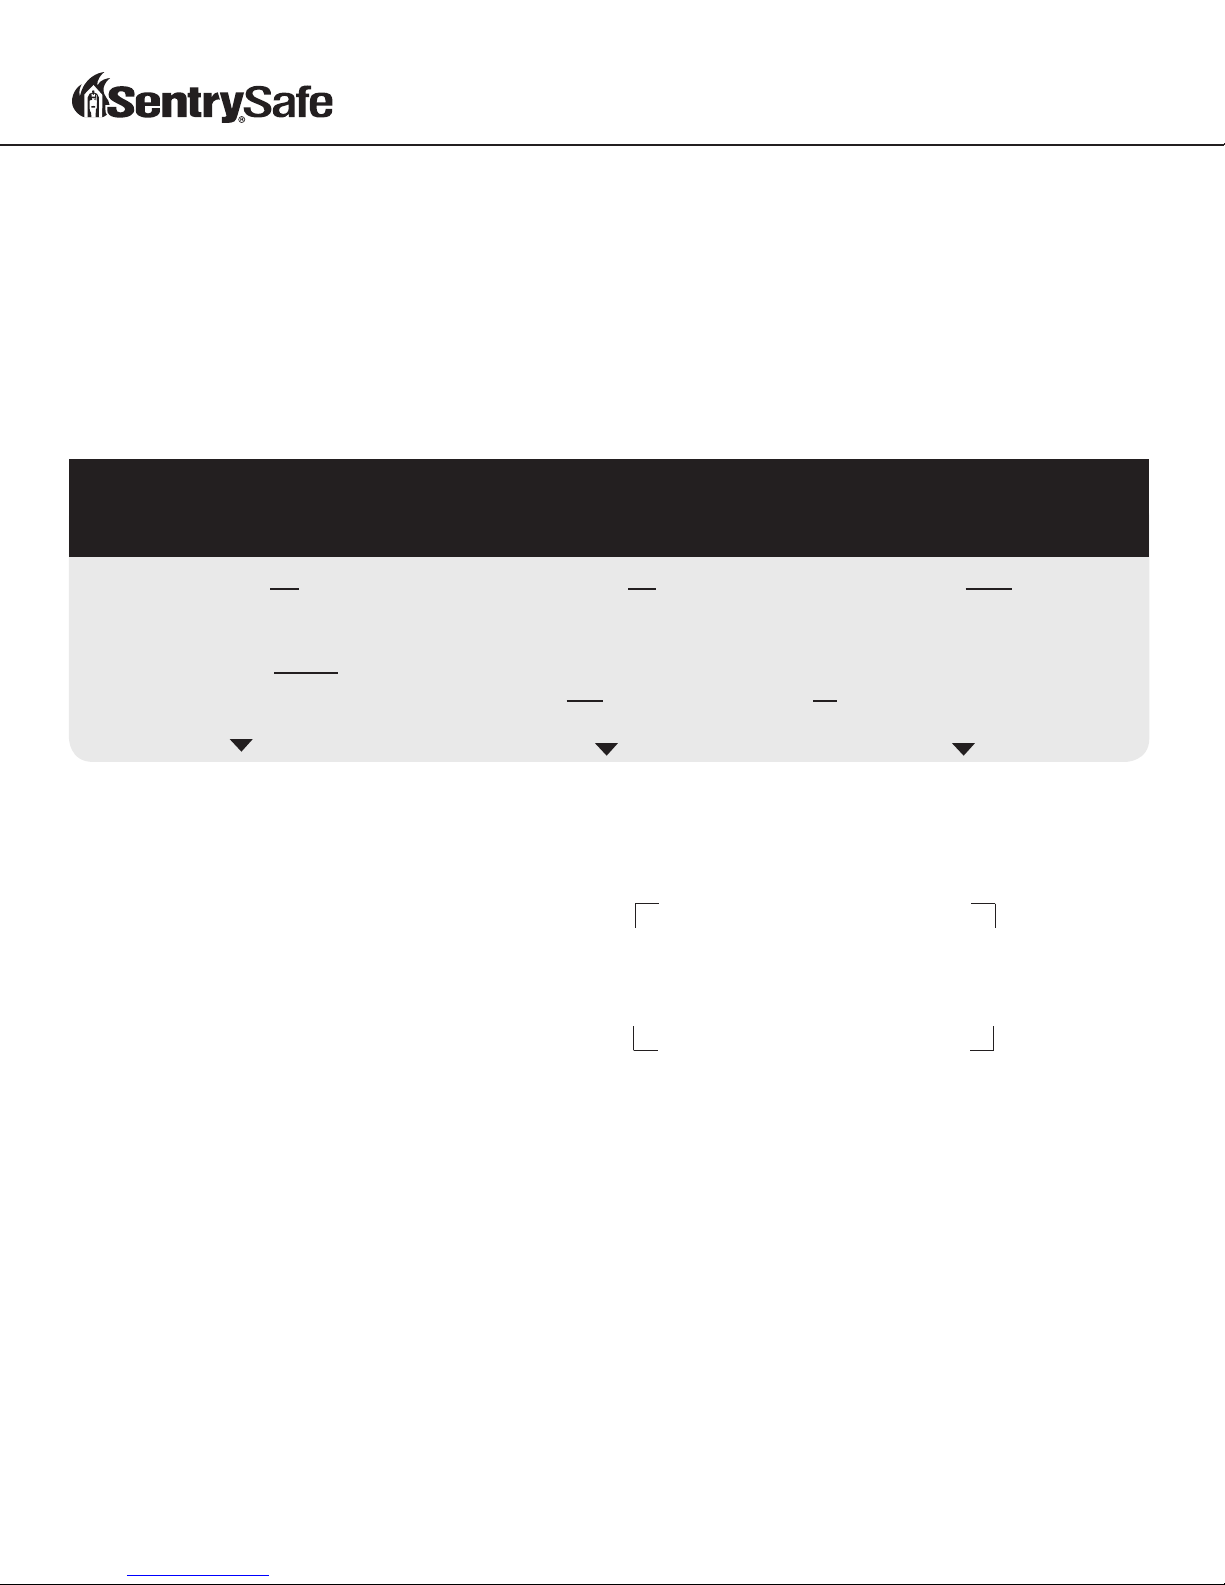
Serial No.
➧
Nº de série
No. de serie
©2012
777777
0000
Master Code
➧
Code de principal
Código maestro
Manager Code
➧
Code de responcable
Código de administrador
401587
Page 2

Depository Safe
Thank you for purchasing this security safe from Sentry®Safe. This guide is designed to maximize the user and security features of this product.
Getting started
1
Installation of the batteries
(keep door open during setup):
1. Turn the keypad housing counter clockwise
and carefully pull away from the mounting
plate to expose battery compartment.
2. Install four new AAA Alkaline batteries
(factory installed batteries may be included
with some models).
keypad housing to avoid pulling wires.
Programming your lock codes
2
Caution: Hold onto the
Note: Do not use rechargeable batteries or any
other type of non-alkaline battery. Do not mix
old and new batteries. Do not mix alkaline and
standard batteries.
3. Carefully position the keypad into the
inserts on the mounting plate and turn
clockwise. Ensure that there are no wires or
cables trapped between the keypad and the
mounting plate. Pinched cables result in a
short circuit.
4. Enter: * - Master or Manager Code (from
front of booklet) - #
The lock will indicate a valid code entry with
a single signal and the open light will stay
green for five (5) seconds.
5. Turn the handle clockwise before the green
light disappears.
The SentrySafe electronic lock is shipped with a
factory set master & manager code (see front of
booklet). You should set the lock to your own
unique master & manager code immediately.
Please keep your codes in a secure location.
You may also register your codes on our
website at www.sentrysafe.com.
A single signal (LED flashes and beeps once)
response from the lock indicates valid entry.
A double signal (LED flashes and beeps
twice) response from the lock indicates an
invalid entry.
• If three incorrect entries are entered in a
row, the keypad will shut down for a period
of five minutes. During this shut down period
you will not get a response from the keypad.
Changing the Master Code
(Code length: 1 to 10 digit code)
perform this operation with the door open.
1. Enter: # - Existing Master Code - #
2. The set light will stay orange for ten (10)
seconds.
3. Enter: 1 - * - New Master Code - # - New
Master Code - #, before the orange light
disappears.
If a mistake is made during the change, wait
thirty (30) seconds and repeat steps 1 thru 3.
Test the new code several times before closing
the door: Enter: * - Code - #
• The lock will indicate a valid code change
with a single signal.
• The lock will indicate an invalid code change
with a double signal and the old code is still
valid.
Always
Changing the Manager Code
(Code length: 1 to 10 digit code)
perform this operation with the door open.
1. Enter: # - Master Code or Manager Code - #
2. The set light will stay orange for ten (10)
seconds.
3. Enter: 2 - * - New Manger Code - # - New
Manager Code - #, before the orange light
disappears.
If a mistake is made during the change, wait
thirty (30) seconds and repeat steps 1 thru 3.
Test the new code several times before closing
the door: Enter: * - Code - #
• The lock will indicate a valid code change
with a single signal.
• The lock will indicate an invalid code change
with a double signal and the old code is still
valid.
Activate user codes
(Code length: 1 to 10 digit code)
perform this operation with the door open.
1. Enter: # - Master Code or Manager Code - #
2. The set light will stay orange for ten (10)
seconds.
3. Enter: User ID Number (3-7) - * - New User
Code - # - New User Code - #, before the
orange light disappears.
If a mistake is made during the activation, wait
thirty (30) seconds and repeat steps 1 thru 3.
• The lock will indicate a valid code entry with
a single signal.
• The lock will indicate an invalid code entry
with a double signal and the old code is still
valid.
Always
Always
1
Example: # - Master Code or Manger Code - #
- 5 - * - New User Code - # - New User Code #. This will activate User Five (5).
Changing the user code
Always perform this operation with the door
open
1. Enter: # - User Code - #
2. The set light will stay orange for ten (10)
seconds.
3. Enter: New User Code - # - New User Code #, before the orange light disappears.
If a mistake is made during the change, wait
thirty (30) seconds and repeat steps 1 thru 3.
Test the new code several times before closing
the door: Enter: * - Code - #
• The lock will indicate a valid code change
with a single signal.
• The lock will indicate an invalid code change
with a double signal and the old code is still
valid.
The Master and Manager can also change
the user codes by following the “Activate user
codes” section steps 1 thru 3.
Deleting user codes
Always perform this operation with the door
open.
1. Enter: # - Master Code or Manager Code - #
2. The set light will stay orange for ten (10) seconds.
3. Enter: User ID Number (3-7) - * - # - #
Page 3

Dual user mode
3
For additional security set your safe to dual user mode. This feature requires one user to enter their code and within sixty (60) seconds, a second user must
enter thier code to unlock the safe.
Always perform this operation with the door open.
Any Code + Any Code to unlock
1. Enter: # - Master Code - # - 1 - # - 1 - #
2. The lock will indicate a valid setting change
with a single signal.
Master or Manager Code + User Code to
unlock
1. Enter: # - Master Code - # - 2 - # - 2 - #
2. The lock will indicate a valid setting change
with a single signal.
Time delay mode
4
Always perform this operation with the door open.
Activate time delay
1. Enter: # - Master Code - # - (01-99) - # -
(01-99) - #
2. The lock will indicate a valid setting change
with a single signal.
Example: # - Master Code - # - 05 - # - 05 - #,
this will set a five (5) minute time delay.
3. Press * or # to initiate the Time Delay.
Opening your safe in dual user mode
1. Enter: * - 1st Code - # - 2nd Code - #
2. The lock will indicate a valid code entry with
a single signal and the open light will stay
green for five (5) seconds.
3. Turn the handle clockwise before the green
light disappears
This function will delay both the opening and programming of the lock.
When time delay is set
(During the time delay period the keypad will
not respond to any entries)
The lock will flash once every five (5) seconds
during time delay and will flash once every
second during the last ten (10) seconds of the
time delay ending with a double signal.
The lock will flash twice every five (5) seconds
during the open period. The open period length
is two (2) minutes.
Returning to single user mode
(Single code to unlock)
1. Enter: # - Master Code - # - 0 - # - 0 - #
2. The lock will indicate a valid setting change
with a single signal.
During the open period you can unlock or
program your safe.
Deactivate time delay
1. Enter: # - Master Code - # - 00 - # - 00 - #
2. The lock will indicate a valid setting change
with a single signal.
Floor Mount (optional)
5
This kit contains:
• Four (4) Masonry Anchors
Required tools:
• Safety Glasses
• Powered Drill
• Adjustable Wrench
• 1/2 in. (M12) Masonry Drill
Instructions:
1. Unlock safe and open door.
2. Remove safe floor carpet.
3. Look on the bottom of safe for four (4)
holes with cap plugs.
4. Remove the cap plugs.
5. Position the safe in the desired location.
6. From inside the safe mark the location of
the four (4) bolt down holes.
7. Move the safe aside to the clear marked
spots for drilling.
8. Using the ½ in. masonry drill, drill a 4 in.
deep hole in the marked locations.
9. Replace the safe in the desired location
with the holes in the safe aligned with the
drilled holes in the floor.
10. Pass each masonry anchor through the safe
floor into the drilled holes; making contact
with the safe floor.
11. Tighten each masonry anchor with the
adjustable wrench.
12. Replace safe floor carpet.
2
Page 4

6
Sentry
®
Group Customer Care
Troubleshooting
Low battery warning
The green LED light will signal in red when
opening your safe. The lock is giving you a valid
signal but is not unlocking.
Changing your batteries
1. Turn the keypad housing counterclockwise
and carefully pull away from the mounting
plate to expose battery compartment.
2. Remove the four AAA Alkaline batteries
and replace.
housing to avoid pulling wires.
3. Carefully position the keypad into the inserts
Caution: Hold onto the keypad
Ensure that there are no wires or cables
trapped between the keypad and the
mounting plate.
The lock has no response
(no flash, no beeps)
• Make sure the wires in the keypad housing
are not pinched and are securely connected.
• Check to make sure the batteries are
correctly and securely inserted into the
battery compartment.
• Lock can possibly be in the lockout penalty,
wait five (5) minutes, and check if the lock
responds.
• Replace the existing batteries with new ones.
The lock is responding but does
not unlock
• Make sure you are getting a valid response.
• Make sure you get a signal with every key
stroke.
• Make sure you are not in time delay mode.
(See “time delay mode” on page 2)
• Replace the existing batteries with new ones.
• If the lock still does not open, contact
Sentry Group Customer Care:
1-800-828-1438 or 585-381-4900
(Available Mon - Fri, 8:00 am - 6:00 pm EST).
on the mounting plate and turn clockwise.
Coffre-fort de dépôt
Nous vous remercions d’avoir acheté ce coffre-fort sécuritaire auprès de Sentry®Safe. Ce guide est conçu afin d’optimiser les caractéristiques générales et sécuritaires de ce produit.
Pour commencer
1
Installation des piles
(laissez la porte ouverte pendant
l’installation) :
1. Tournez le boîtier du pavé de touches dans le sens
inverse aux aiguilles d’une montre et retirez le
avec soin de la plaque de montage afin d’exposer
le compartiment à piles.
2. Installez quatre piles alcalines AAA neuves
(des piles installées en usine sont incluses pour
certaines modèles).
pavé de touches pour éviter de tirer des fils.
Remarque : Ne pas utiliser des piles rechargeables
ou aucun autre type de piles non alcalines. Ne pas
mélanger des piles usagées avec des piles neuves.
Ne pas mélanger des piles alcalines avec des
piles standard.
3. Positionnez avec soin le pavé de touches dans
les montants de la plaque de montage et tournez
dans le sens des aiguilles d’une montre. Vérifiez
Attention : tenez le boîtier du
qu’aucun fil ou câble n’est coincé entre le pavé
de touches et la plaque de montage. Des câbles
pincés peuvent entraîner un court-circuit.
4. Entrez : * - code de principal ou de responsable
(indiqué au début du livret) - #
La serrure indique une entrée de code valide par
un signal unique et le témoin d’ouverture reste
allumé en vert pendant cinq (5) secondes.
5. Tournez la poignée dans le sens des aiguilles
d’une montre avant que le témoin vert s’éteigne.
Programmation des codes de verrouillage
2
La serrure électronique SentrySafe est pourvue
d’un code de principal et d’un code de responsable
préconfigurés en usine (voir au début du livret). Vous
devriez configurer immédiatement la serrure avec vos
propres codes de principal et de responsable.
Veuillez conserver vos codes dans un endroit sûr.
Vous pouvez également enregistrer vos codes sur
notre site Web à l’adresse www.sentrysafe.com.
Un signal unique (la DEL clignote une fois et émet
un bip) de la serrure indique une entrée valide.
Un signal double (la DEL clignote deux fois et émet
deux bips) de la serrure indique une entrée invalide.
• Si trois entrées incorrectes sont effectuées
successivement, le pavé de touches s’éteint
pendant cinq minutes. Pendant cet arrêt vous
n’obtiendrez aucune réponse du pavé de touches.
Changement du code de principal
(Longueur du code : code de 1 à 10 chiffres)
Effectuez toujours cette opération lorsque la porte
est ouverte.
1. Entrez : # - code de principal existant - #
2. Le témoin de configuration reste allumé en orange
pendant dix (10) secondes.
3. Entrez : 1 - * - nouveau code de principal - # nouveau code de principal - # avant que le témoin
orange s’éteigne.
Si vous faites une erreur au cours de cette procédure,
attendez (30) secondes puis répétez les étapes 1 à 3.
Testez le nouveau code plusieurs fois avant de fermer
la porte : Entrez : * - code - #
• La serrure indique un changement de code valide
par un signal unique.
3
• La serrure indique un changement de code
invalide par un signal double ; l’ancien code reste
valide.
Changement du code de responsable
(Longueur du code : code de 1 à 10 chiffres)
Effectuez toujours cette opération lorsque la porte
est ouverte.
1. Entrez : # - code de principal ou code de
responsable - #
2. Le témoin de configuration reste allumé en orange
pendant dix (10) secondes.
3. Entrez : 2 - * - nouveau code de responsable - #
- nouveau code de responsable - # avant que le
témoin orange s’éteigne.
Si vous faites une erreur au cours de cette procédure,
Page 5

Programmation des codes de verrouillage
2
attendez (30) secondes puis répétez les étapes 1 à 3.
Testez le nouveau code plusieurs fois avant de fermer
la porte : Entrez : * - code - #
• La serrure indique un changement de code valide
par un signal unique.
• La serrure indique un changement de code
invalide par un signal double ; l’ancien code reste
valide.
Activer les codes d’utilisateur
(Longueur du code : code de 1 à 10 chiffres)
Effectuez toujours cette opération lorsque la porte
est ouverte.
1. Entrez : # - code de principal ou code de
responsable - #
2. Le témoin de configuration reste allumé en orange
pendant dix (10) secondes.
3. Entrez : Numéro d’ID de l’utilisateur (3-7) - * nouveau code d’utilisateur - # - nouveau code
d’utilisateur - # avant que le témoin orange
s’éteigne.
Si vous faites une erreur au cours de cette procédure,
attendez (30) secondes puis répétez les étapes 1 à 3.
• La serrure indique une entrée de code valide par
un signal unique.
• La serrure indique une entrée de code invalide par
un signal double ; l’ancien code reste valide.
Exemple : # - code de principal ou code de
responsable - # - 5 - * - nouveau code d’utilisateur
- # - nouveau code d’utilisateur - #. Ceci permet
d’activer l’utilisateur cinq (5).
Changement d’un code d’utilisateur
Effectuez toujours cette opération lorsque la porte
est ouverte
1. Entrez : # - code d’utilisateur - #
2. Le témoin de configuration reste allumé en orange
pendant dix (10) secondes.
3. Entrez : nouveau code d’utilisateur - # - nouveau
code d’utilisateur - # avant que le témoin orange
s’éteigne.
Si vous faites une erreur au cours de cette procédure,
attendez (30) secondes puis répétez les étapes 1 à 3.
Testez le nouveau code plusieurs fois avant de fermer
la porte : Entrez : * - code - #
• La serrure indique un changement de code valide
suite
par un signal unique.
• La serrure indique un changement de code invalide
par un signal double ; l’ancien code reste valide.
Le principal et le responsable peuvent également
changer les codes d’utilisateur en suivant les
étapes 1 à 3 de la section « Activer les codes
d’utilisateur ».
Suppression des codes d’utilisateur
Effectuez toujours cette opération lorsque la porte
est ouverte.
1. Entrez : # - code de principal ou code de
responsable - #
2. Le témoin de configuration reste allumé en orange
pendant dix (10) secondes.
3. Entrez : numéro d’ID de l’utilisateur (3-7) - * - # #
Mode à double utilisateur
3
Réglez le coffre-fort sur le mode à double utilisateur si vous désirez rehausser sa sécurité. Avec cette fonction, un utilisateur doit entrer son code et un autre utilisateur doit
entrer le sien au cours des soixante (60) secondes suivantes pour déverrouiller le coffre-fort.
N’importe quel code + n’importe quel
code pour déverrouiller
1. Entrez : # - code de principal - # - 1 - # - 1 - #
2. La serrure indique un changement de
configuration valide par un signal unique.
Code de principal ou de responsable +
code d’utilisateur pour déverrouiller
1. Entrez : # - code de principal - # - 2 - # - 2 - #
Mode temporisé
4
Effectuez toujours cette opération lorsque la porte est ouverte.
Activer le mode temporisé
1. Entrez : # - code de principal - # - (01-99) - #
-(01-99) - #
2. La serrure indique un changement de
configuration valide par un signal unique.
Exemple : # - code de principal - # - 05 - # - 05 - #
permet de configurer une temporisation de cinq (5)
minutes.
3. Appuyez sur * ou sur # pour initier la fonction de
temporisation.
2. La serrure indique un changement de
configuration valide par un signal unique.
Ouverture du coffre en mode à double
utilisateur
1. Entrez : * - premier code - # - second code - #
2. La serrure indique une entrée de code valide par
un signal unique et le témoin d’ouverture reste
allumé en vert pendant cinq (5) secondes.
Cette fonction temporise l’ouverture et la programmation de la serrure.
Lorsque le mode temporisé est utilisé
(le pavé de touches ne répond à aucune entrée
pendant la temporisation)
La serrure clignote toutes les cinq (5) secondes
pendant la temporisation et toutes les secondes
pendant ses dix (10) dernières secondes, en achevant
par un double signal.
La serrure clignote toutes les cinq (5) secondes
pendant la période ouverte. La durée de la période
ouverte est de deux (2) minutes.
Effectuez toujours cette opération lorsque la porte est ouverte.
3. Tournez la poignée dans le sens des aiguilles
d’une montre avant que le témoin vert s’éteigne
Retourner en mode à utilisateur unique
(un seul code pour déverrouiller)
1. Entrez : # - code de principal - # - 0 - # - 0 - #
2. La serrure indique un changement de
configuration valide par un signal unique.
Vous pouvez déverrouiller ou programmer votre
coffre-fort pendant la période ouverte.
Désactiver le mode temporisé
1. Entrez : # - code de principal - # - 00 - # - 00 - #
2. La serrure indique un changement de
configuration valide par un signal unique.
4
Page 6

Installation au sol (facultative)
5
Contenu du kit :
• Quatre (4) ancres de maçonnerie
Outils requis :
• Lunettes de protection
• Perceuse électrique
• Clé ajustable
• Foret de maçonnerie de 1/2 pouce (M12)
Instructions :
1. Déverrouillez le coffre-fort et ouvrez la porte.
2. Retirez la moquette du plancher du coffre-fort.
Service clientèle de Sentry® Group
6
Dépannage
Avertissement de piles déchargées
Le témoin à DEL vert s’allume en rouge lorsque le
coffre-fort est ouvert. La serrure vous fournit un
signal valide mais ne se déverrouille pas.
Remplacement des piles
1. Tournez le boîtier du pavé de touches dans le sens
inverse aux aiguilles d’une montre et retirez le
avec soin de la plaque de montage afin d’exposer
le compartiment à piles.
2. Retirez les quatre piles alcalines AAA et remplacez
les.
Attention : tenez le boîtier du pavé de touches
pour éviter de tirer des fils.
3. Positionnez avec soin le pavé de touches dans
les montants de la plaque de montage et tournez
dans le sens des aiguilles d’une montre.
Vérifiez qu’aucun fil ou câble n’est coincé entre le
pavé de touches et la plaque de montage.
3. Repérez au fond du coffre-fort quatre (4) orifices
recouverts de capuchons protecteurs.
4. Retirez les capuchons protecteurs.
5. Positionnez le coffre-fort à l’endroit désiré.
6. Depuis l’intérieur du coffre-fort, marquez
l’emplacement des quatre (4) trous pour les
boulons.
7. Mettez le coffre-fort de côté afin de dégager les
points marqués et de les percer.
8. Utilisez le foret de maçonnerie de 1/2 pouce
pour percer un trou d’une profondeur de 4
La serrure ne répond pas (pas de
clignotement, pas de bip)
• Vérifiez que les fils du boîtier du pavé de touches
ne sont pas pincés et qu’ils sont solidement
connectés.
• Vérifiez que les piles sont insérées correctement et
qu’elles sont bien calées dans le compartiment à
piles.
• Il est possible que la serrure soit dans la période
de pénalisation de verrouillage ; attendez cinq (5)
minutes et vérifiez si elle répond.
• Remplacez les piles installées par de nouvelles
piles.
pouces dans chaque endroit marqué.
9. Remettez le coffre-fort à l’endroit désiré en
alignant ses orifices sur les trous percés dans le
sol.
10. Faites passer les ancres de maçonnerie dans le
plancher du coffre-fort pour les mettre dans les
trous que vous avez percés ; entrez en contact
avec le plancher du coffre-fort.
11. Serrez chaque ancre de maçonnerie avec la clé
ajustable.
12. Remettez la moquette sur le plancher du coffrefort.
La serrure répond mais ne se
déverrouille pas
• Vérifiez que vous obtenez une réponse valide.
• Vérifiez que vous obtenez un signal pour chaque
touche actionnée.
• Vérifiez que vous n’êtes pas en mode temporisé.
(Reportez-vous à la section « Mode temporisé »
de la page 2)
• Remplacez les piles installées par de nouvelles
piles.
• Si la serrure ne s’ouvre toujours pas, contactez
le service clientèle de Sentry Group : 1-800-8281438 ou 585-381-4900 (disponible du lundi au
vendredi, de 8 h 00 à 18 h 00, heure de l’Est).
5
Page 7

Caja fuerte de depósito
Gracias por su compra de esta caja fuerte de seguridad de Sentry®Safe. Esta guía está diseñada para maximizar las características del usuario y de seguridad de este producto.
Los primeros pasos
1
Instalación de las pilas
(mantenga la puerta abierta durante
la configuración):
1. Gire la caja del teclado hacia la izquierda y aléjala
cuidadosamente de la placa de montaje para
exponer el compartimiento de pilas.
2. Instale cuatro pilas alcalinas AAA nuevas (algunos
modelos pueden incluir pilas instaladas en
fábrica).
Precaución: Sostenga en la mano la caja
del teclado para evitar halar los alambres.
Programación de sus códigos de cierre
2
La cerradura electrónica de SentrySafe se envía con
un código maestro y de administrador establecido
en fábrica (consulte el frente del folleto). Usted debe
programar la cerradura con su propio y exclusivo
código maestro y de administrador inmediatamente.
Guarde sus códigos en un lugar seguro. También
podrá registrar sus códigos en nuestro sitio de
Internet en www.sentrysafe.com.
Una respuesta de señal única (el LED parpadea y
emite un pitido una vez) de la cerradura indica una
entrada válida.
Una respuesta de señal doble (el LED parpadea y
emite un pitido dos veces) de la cerradura indica una
entrada inválida.
• Si se entran tres códigos incorrectos consecutivos,
el teclado se parará durante un período de cinco
minutos. Durante este período de paro, no recibirá
una respuesta del teclado.
Cómo cambiar el código maestro
(Largo del código: código de 1 a 10 dígitos).
realice esta operación con la puerta abierta.
1. Entre: # - Código Maestro Existente - #
2. La luz de programación permanecerá de color
naranja durante diez (10) segundos.
3. Entre: 1 - * - Código Maestro Nuevo - # Código
Maestro Nuevo - # antes de que desaparezca la
luz anaranjada.
Si comete un error durante el cambio, espere treinta
(30) segundos y repita los pasos 1 al 3.
Pruebe el código nuevo varias veces antes de cerrar
la puerta: Entre * - Código - #
• La cerradura indicará un cambio de código válido
con una señal única.
• La cerradura indicará un cambio de código
inválido con una señal doble y el código viejo
permanece válido.
Siempre
Nota: No utilice pilas recargables o cualquier otro
tipo de pila no alcalina. No mezcle pilas viejas con
nuevas. No mezcle pilas alcalinas con pilas estándar.
3. Posicione cuidadosamente el teclado dentro de
las muescas en la placa de montaje y gírelo hacia
la derecha. Asegúrese de que no haya alambres
o cables atrapados entre el teclado y la placa de
montaje. Los cables pellizcados conducen a un
corto circuito.
4. Entre: * - Código Maestro o de Administrador (del
frente del folleto) - #
Cómo cambiar el código de administrador
(Largo del código: código de 1 a 10 dígitos).
realice esta operación con la puerta abierta.
1. Entre: # - Código Maestro o Código de
Administrador - #
2. La luz de programación permanecerá de color
naranja durante diez (10) segundos.
3. Entre: 2 - * - Código de Administrador Nuevo - # Código de Administrador Nuevo - # antes de que
desaparezca la luz anaranjada.
Si comete un error durante el cambio, espere treinta
(30) segundos y repita los pasos 1 al 3.
Pruebe el código nuevo varias veces antes de cerrar
la puerta: Entre * - Código - #
• La cerradura indicará un cambio de código válido
con una señal única.
• La cerradura indicará un cambio de código
inválido con una señal doble y el código viejo
permanece válido.
Siempre
Activación de códigos de usuario
(Largo del código: código de 1 a 10 dígitos).
realice esta operación con la puerta abierta.
1. Entre: # - Código Maestro o Código de
Administrador - #
2. La luz de programación permanecerá de color
naranja durante diez (10) segundos.
3. Entre: Número de ID de Usuario (3 – 7) - * Código de Usuario Nuevo - # Código de Usuario
Nuevo - # antes de que desaparezca la luz
anaranjada.
Si comete un error durante el cambio, espere treinta
(30) segundos y repita los pasos 1 al 3.
• La cerradura indicará un cambio de código válido
con una señal única.
• La cerradura indicará un cambio de código
inválido con una señal doble y el código viejo
permanece válido.
Siempre
La cerradura indicará una entrada de código
válido con una señal única y la luz de abrir
permanecerá verde durante cinco (5) segundos.
5. Gire la manija hacia la derecha antes de que
desaparezca la luz verde.
Ejemplo: # - Código Maestro o Código de
Administrador - # - 5 - * - Código de Usuario Nuevo
- # - Código de Usuario Nuevo - #. Esto activará el
Cinco de Usuario (5).
Cómo cambiar el código de usuario
Siempre realice esta operación con la puerta abierta.
1. Entre: # - Código de Usuario - #
2. La luz de programación permanecerá de color
naranja durante diez (10) segundos.
3. Entre: Código de Usuario Nuevo - # - Código de
Usuario Nuevo - #, antes de que desaparezca la
luz anaranjada.
Si comete un error durante el cambio, espere treinta
(30) segundos y repita los pasos 1 al 3.
Pruebe el código nuevo varias veces antes de cerrar
la puerta: Entre * - Código - #
•● La cerradura indicará un cambio de código válido
con una señal única.
•● La cerradura indicará un cambio de código
inválido con una señal doble y el código viejo
permanece válido.
El Maestro y Administrador también podrán cambiar
los códigos de usuario siguiendo los pasos 1 al 3 de
la sección “Activación de códigos de usuario”
Eliminación de códigos de usuario
Siempre realice esta operación con la puerta abierta.
1. Entre: # - Código Maestro o Código de
Administrador - #
2. La luz de programación permanecerá de color
naranja durante diez (10) segundos.
3. Entre: Número de ID de Usuario (3 – 7) - * - # - #
6
Page 8

Modo de usuario doble
3
Para seguridad adicional, programe su caja fuerte en el modo de usuario doble. Esta característica exige que un usuario entre su código y dentro de sesenta (60) segundos un
segundo usuario entre el código para abrir la caja fuerte.
Siempre realice esta operación con la puerta abierta.
Cualquier Código + Cualquier Código
para abrir
1. Entre: # - Código Maestro - # - 1 - # - 1 - #
2. La cerradura indicará un cambio de programación
válido con una señal única.
Código Maestro o de Administrador +
Código de Usuario para abrir
1. Entre: # - Código Maestro - # - 2 - # - 2 - #
2. La cerradura indicará un cambio de programación
válido con una señal única.
Modo de retardo
4
Siempre realice esta operación con la puerta abierta.
Cómo activar el retardo
1. Entre: # - Código Maestro - # - (01-99) - # - (01-
99) - #
2. La cerradura indicará un cambio de programación
válido con una señal única.
Ejemplo: # - Código Maestro - # - 05 - # - 05 - #,
esto programará un retardo de cinco minutos.
3. Presione * o # para iniciar el Retardo.
Cómo abrir su caja fuerte en el modo de
usuario doble
1. Entre: * - 1er código - # - 2do código - #
2. La cerradura indicará la entrada válida de un
código con una señal única y la luz de abrir
permanecerá verde durante cinco (5) segundos.
3. Gire la manija hacia la derecha antes de que
desaparezca la luz verde.
Esta función retardará la abertura y la programación de la cerradura.
Cuando el retardo está programado
(Durante el período del retardo, el teclado no
responderá a entradas).
La cerradura parpadeará una vez cada cinco (5)
segundos durante el retardo y parpadeará una vez
cada segundo durante los últimos diez (10) segundos
del retardo, terminando con una señal doble.
La cerradura parpadeará dos veces cada cinco (5)
segundos durante el período de abrir. La duración del
período de abrir es dos (2) minutos.
Regreso al modo de usuario único
(Código único para abrir)
1. Entre: # - Código Maestro - # - 0 - # - 0 - #
2. La cerradura indicará un cambio de programación
válido con una señal única.
Durante el período de abrir, usted podrá abrir la
cerradura o programar su caja fuerte.
Cómo desactivar el retardo
1. Entre: # - Código Maestro # – 00 - # - 00 - #
2. La cerradura indicará un cambio de programación
válido con una señal única.
Montaje en el piso (opcional)
5
Este conjunto contiene:
• Cuatro (4) anclajes de mampostería
Herramientas requeridas:
• Anteojos de seguridad
• Taladro eléctrico
• Llave ajustable
• Broca de mampostería de ½ plg. (M12)
Instrucciones
1. Abra la cerradura de la caja fuerte y abra la
puerta.
2. Quite la alfombra del piso de la caja fuerte.
3. Mire el fondo de la caja fuerte para localizar
cuatro (4) agujeros con tapones.
4. Quite los tapones.
5. Posicione la caja fuerte en el lugar deseado.
6. Desde el interior de la caja fuerte, marque el
lugar de los cuatro (4) agujeros de apernar.
7. Ponga la caja fuete de un lado para despejar los
puntos marcados para taladrar.
8. Usando la broca de mampostería de ½ plg.,
taladre un agujero de 4 plg. de profundidad en
los lugares indicados.
9. Reponga la caja fuerte en el lugar deseado, con
los agujeros de la caja fuerte alineados con los
agujeros taladrados en el piso.
10. Pase cada anclaje de mampostería a través del
piso de la caja fuerte dentro de los agujeros
taladrados; haciendo contacto con el piso de la
caja fuerte.
11. Apriete cada anclaje de mampostería con la
llave ajustable.
12. Reinstale la alfombra del piso de la caja fuerte.
7
Page 9

Servicio a Clientes de Sentry® Group
6
Detección y solución de problemas
Advertencia de pila baja
La luz LED verde se encenderá en rojo cuando abre
su caja fuerte. La cerradura le está dando una señal
válida pero no se está abriendo.
Cómo cambiar las pilas
1. Gire la caja del teclado hacia la izquierda y
sepárela cuidadosamente de la placa de montaje
para exponer el compartimiento de pilas.
2. Saque las cuatro pilas alcalinas AAA y
reemplácelas.
caja del teclado para evitar halar los alambres.
3. Posicione cuidadosamente el teclado dentro de las
muescas en la placa de montaje y gírelo hacia la
derecha (sentido del reloj). Asegúrese de que no
haya alambres o cables atrapados entre el teclado
y la placa de montaje.
Precaución: Sostenga en la mano la
La cerradura no da respuesta (no
parpadea, no emite pitidos)
• Cerciórese que los alambres en la caja del
teclado no están pellizcados y están conectados
firmemente.
• Compruebe para asegurar que las pilas estén
insertadas correcta y firmemente dentro del
compartimiento de pilas.
• Es posible que la cerradura se encuentre en el
bloqueo de sanción, espere cinco (5) minutos y
compruebe si la cerradura responde.
• Reemplace las pilas existentes con pilas nuevas.
La cerradura responde pero no se abre
• Cerciórese que está obteniendo una respuesta
válida.
• Cerciórese que recibe una señal con cada
movimiento de teclado.
• Cerciórese que no se encuentra en el modo de
retardo. (Véase “Modo de retardo”) en la página
2.
• Reemplace las pilas existentes con otras nuevas.
• Si la cerradura todavía no se abre, comuníquese
con Servicio a Clientes de Sentry Group:
marcarse un código de acceso antes de marcar el
número 800. Es un proceso de 2 pasos. Paso 1:
marque 01 800 112 2020 ó 001 800 658 5454.
Paso 2: a la indicación marque 1-800-451-0821
Debe
8
 Loading...