

Page 1

Dealer Access Website
Acknowledgements:
SentryNet would like to thank everyone that played a role with the release of
NetConnect v2.1.
To the SentryNet employees and our contract programmers that spent many hours of
editing, de-bugging and programming – thank you for a job well done!
Also, we thank the dealers who spent valuable time helping to “de-bug” the beta version
and reviewing this manual. Your input helped us create a superior product. Your time
and effort is greatly appreciated! And a special thank you to Tom G. for your time and
great ideas.
Contributing Dealers:
Advanced Design Technologies Garden State Fire & Security
Advanced Security NET Systems
All Safe Technologies OmniTech Communications
Atlantic Detection Systems SCT Systems
Florida Fire & Sound Security Engineering
Updates to this manual will be available for download from the NetConnect website.
Page 2

PAGE INTENTIONALLY BLANK
Page 3
Dealer Access Website
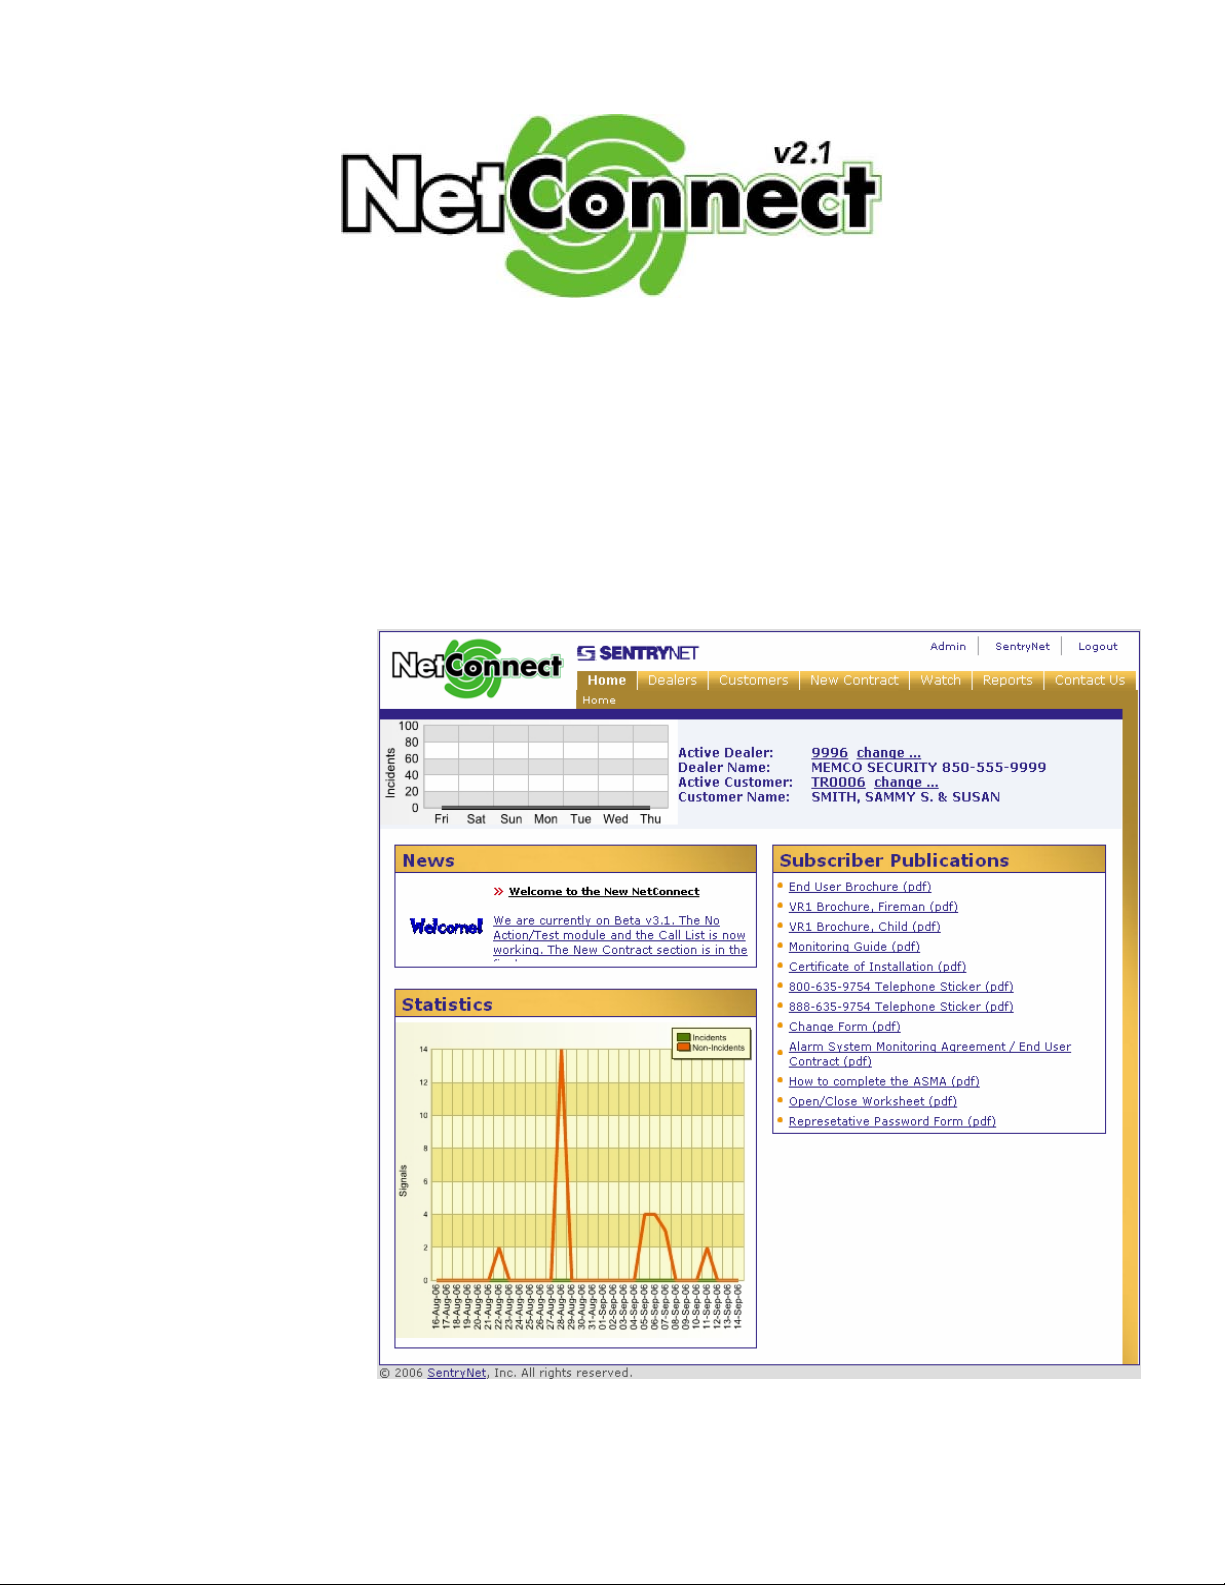
SENTRYNET is proud to release the newest version of NetConnect. With a dramatic new look,
NetConnect v2 now allows dealers much more control in maintaining their dealer and subscriber
information. New features include – multiple user IDs for dealer employees, management of “On
Call” technician list and technician passcodes, updating subscriber zone information and
open/close schedules and much more. The history report for individual accounts now allows date
range and other filtering options.
We have also
enhanced the Contract
Entry pages for new
subscribers and added
a Watch Scroll utility
to monitor subscriber
activity. In addition to
these new features, a
Report Manager has
been added, allowing
dealers many more
reporting options.
Categories can be
used for reports on
“chain” accounts.
Custom reports can
be created and saved
along with several
standard reports.
This manual will
overview the new
functions of
NetConnect v2 and
will provide a useful
guide in using
NetConnect v2 daily.
Updated versions of
the manual will be
made available for download from the website.
Page 4

PAGE INTENTIONALLY BLANK
Page 5

Table of Contents
1. LOGIN
2. Dealer Home Page
3. Dealer Information Page
………………………………... 1
………………….. 3
……………. 5
a. Technician Pass Codes
b. On Call Tech
i. Reorder Call List
c. Messages
d. Categories
e. Contacts
f. Defaults
4. Customer Information Page
a. Search Page
b. Passcode
c. Call List
d. No Action / Test
e. Category Page
………… 15
f. Related Accounts
g. Zone Descriptions
h. Open/Close Schedule
i. Test Schedule
j. History Report
5. New Contract Page
a. Adding Zones
b. Adding Phone Numbers
6. Watch Scroll
7. Reports Page
………………………… 31
………………………... 33
a. Custom Reports
b. Report Formats
8. Contact Us
…………………………... 37
………………….. 27
Page 6

PAGE INTENTIONALLY BLANK
Page 7
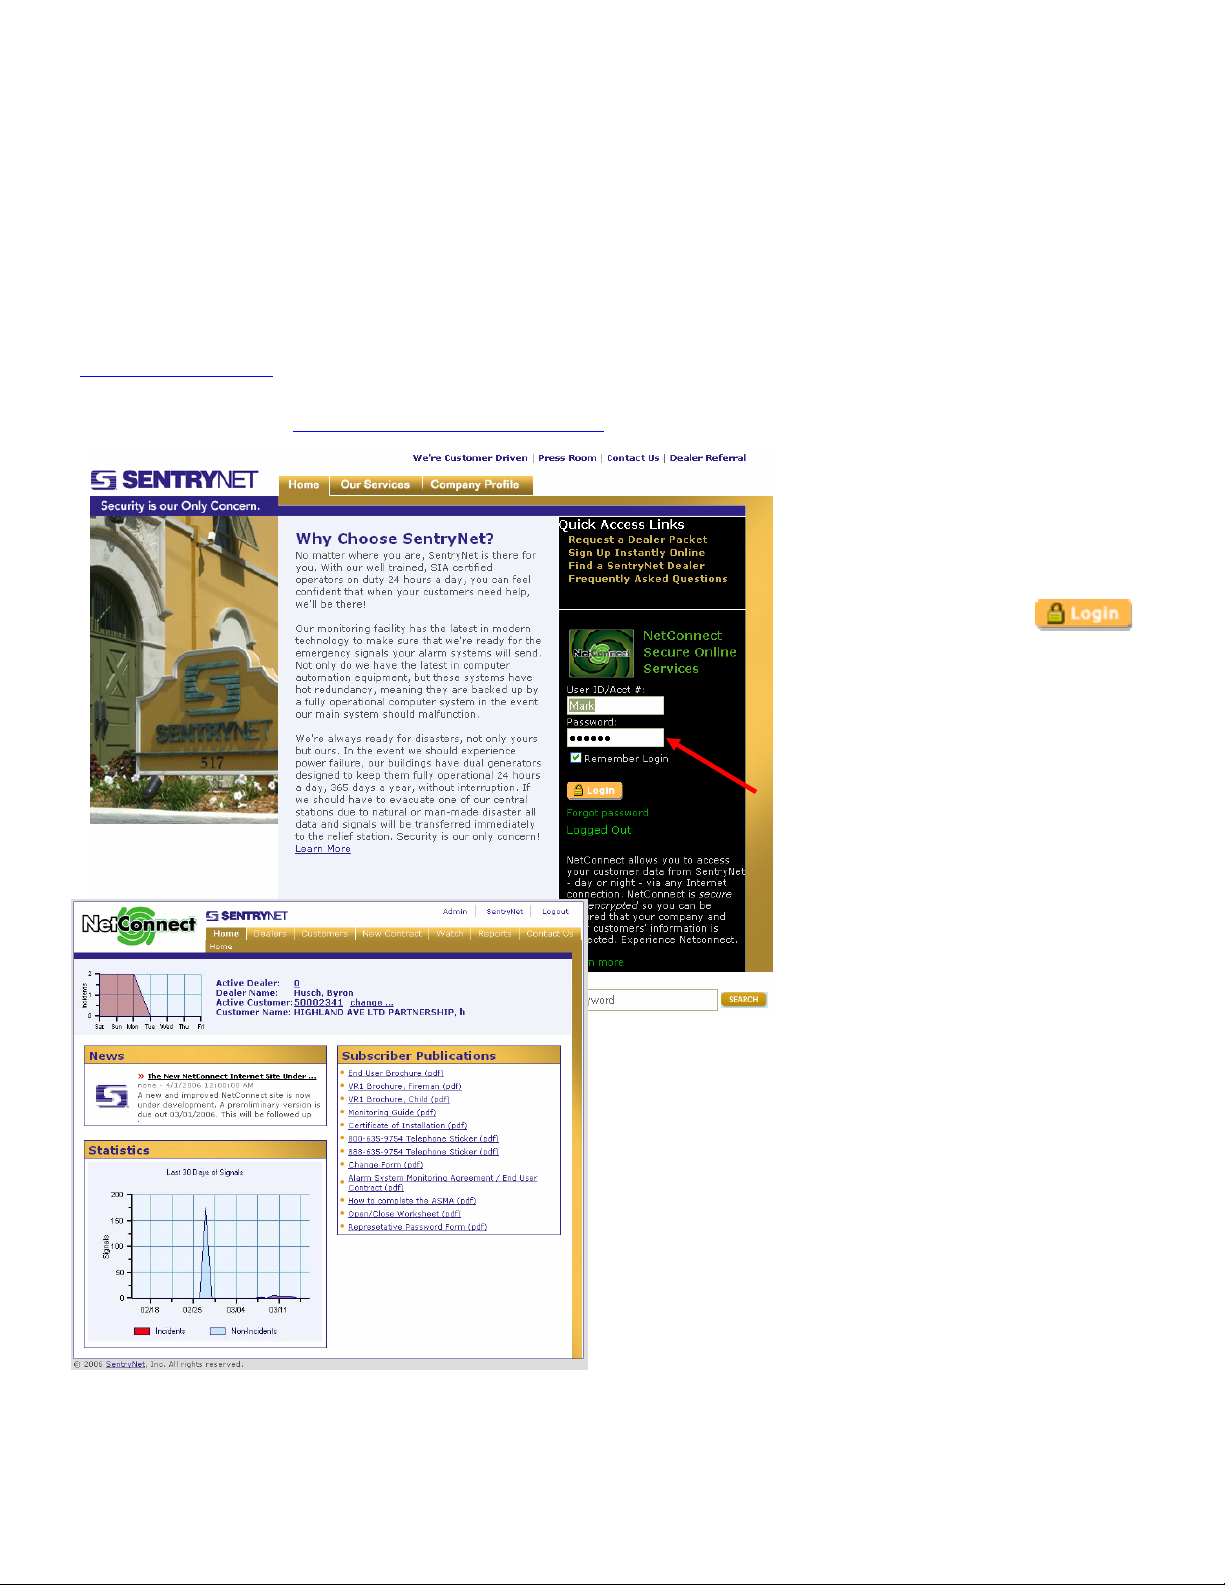
1… NetConnect v2 Login
A User ID or Account number and password is required for access. IDs currently used for NetConnect v1.x will
not work on version 2. To obtain a user ID and password call the data entry department of your “home” central
station.
The initial access to the secure URL will display a mirror image of the SentryNet commercial site.
(www.sentrynet.com)
The URL for access is https://netconnect.sentrynet.com.
On the right hand side of this page
are the login boxes. Enter your
assigned user ID/Acct# in the top
box and your password in the box
below. Then click on the
button.
Subsequent returns will take you
back to the login page. If the
“Remember Login” box is checked
the user name and password will be
“remembered.” This can save some
time but also may provide a security
risk because anyone that accesses the
site from this computer will be able
to login using the “remembered”
information. It is recommended that
this box be unchecked if there is any
chance that an unauthorized person
can access the computer in which the login
information is saved.
After the user has logged in, the Dealer Home Page
will be displayed.
©SENTRYNET, Inc, All Right Reserved 2006 Page 1
Page 8

PAGE INTENTIONALLY BLANK
©SENTRYNET, Inc, All Right Reserved 2006 Page 2
Page 9
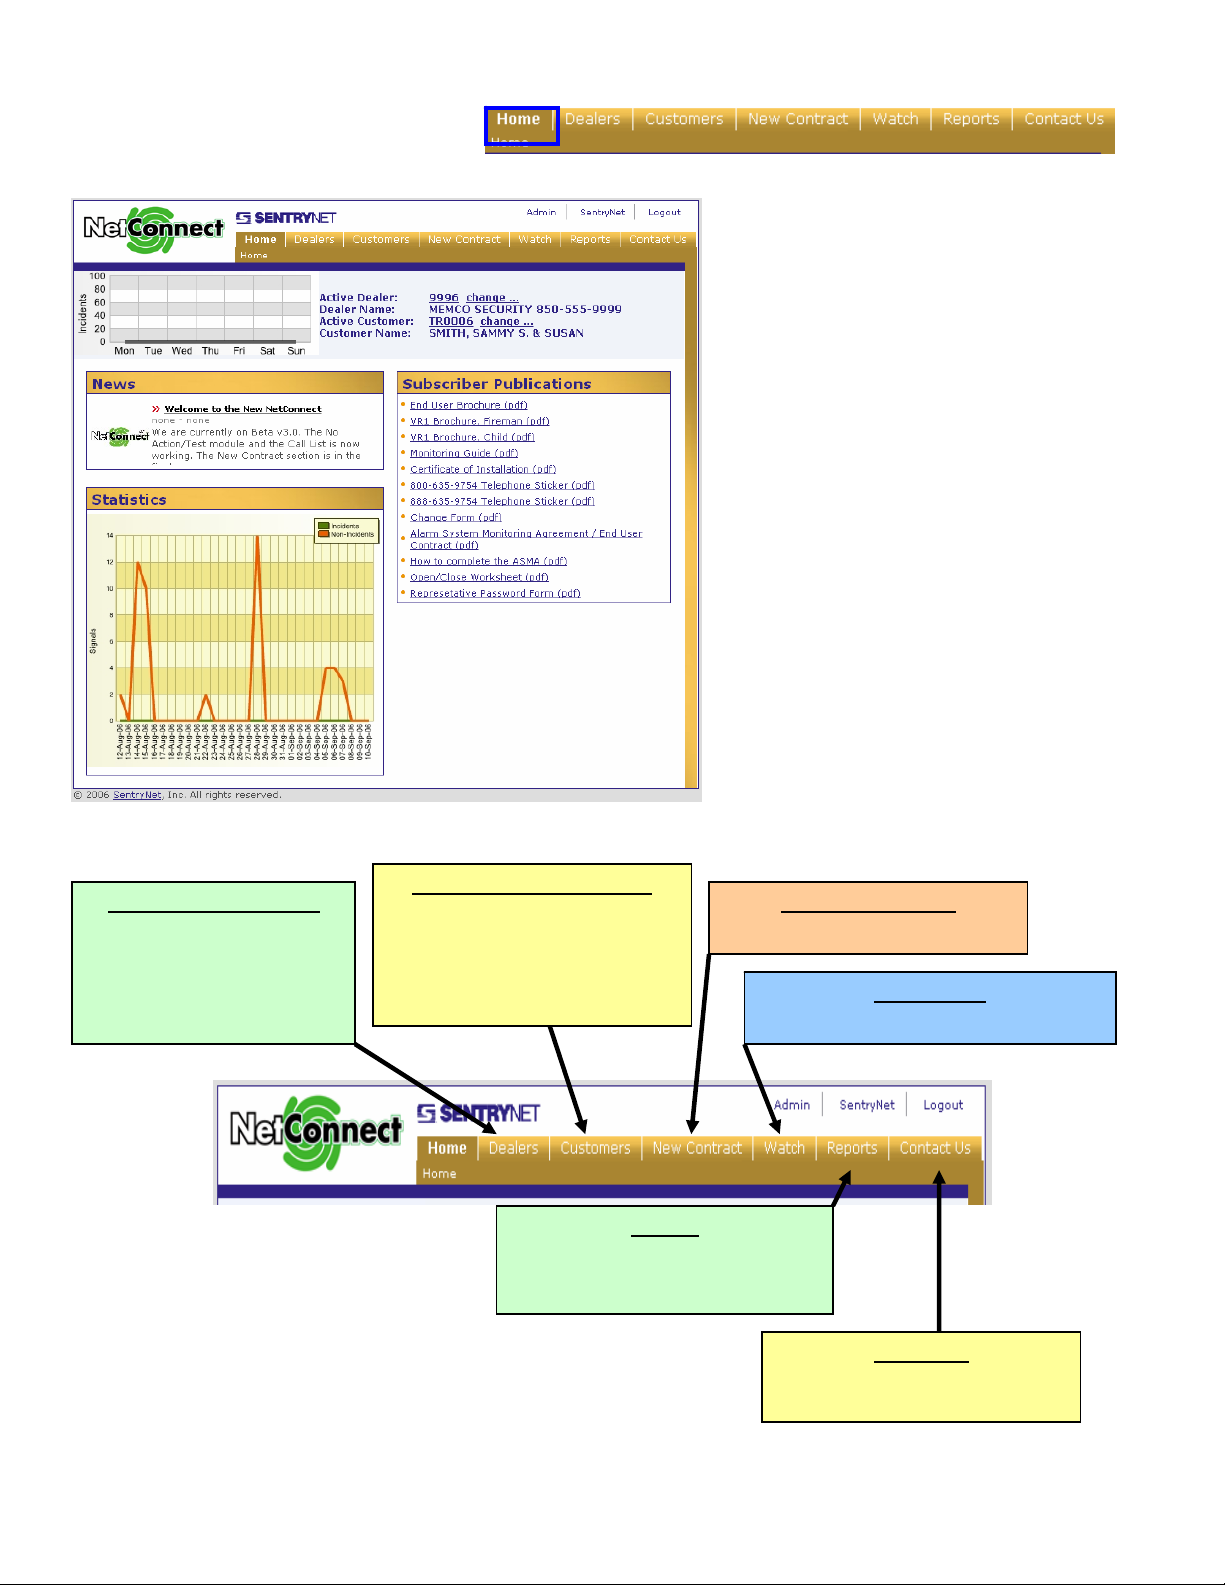
2… Dealer Home Page
The Dealer Home Page is the starting location for NetConnect.
This page will display…
• Statistics for account incidents
• New account totals
• General news topics
• Commonly used publications
• Active Subscriber
Using the menu options across the top of the
page you are able to access the other
sections of the site.
Dealer Information Page
Tech pass codes, on-call tech
list, internal and answering
service messages, subscriber
categories, user and contact
maintenance
Customer Information Page
Maintain pass codes, call list, zones
place account on test
add account to categories
view open/close, test schedules
quick access to history
Reports
Expanded list of standard reports and
the ability to create custom reports
using dealer created categories
New Contract Entry
Improved new contract entry
Watch Scroll
Watch your account’s activity real time
Contact Us
E-mail addresses, Instant
Messenger and phone numbers
©SENTRYNET, Inc, All Right Reserved 2006 Page 3
Page 10

PAGE INTENTIONALLY BLANK
©SENTRYNET, Inc, All Right Reserved 2006 Page 4
Page 11
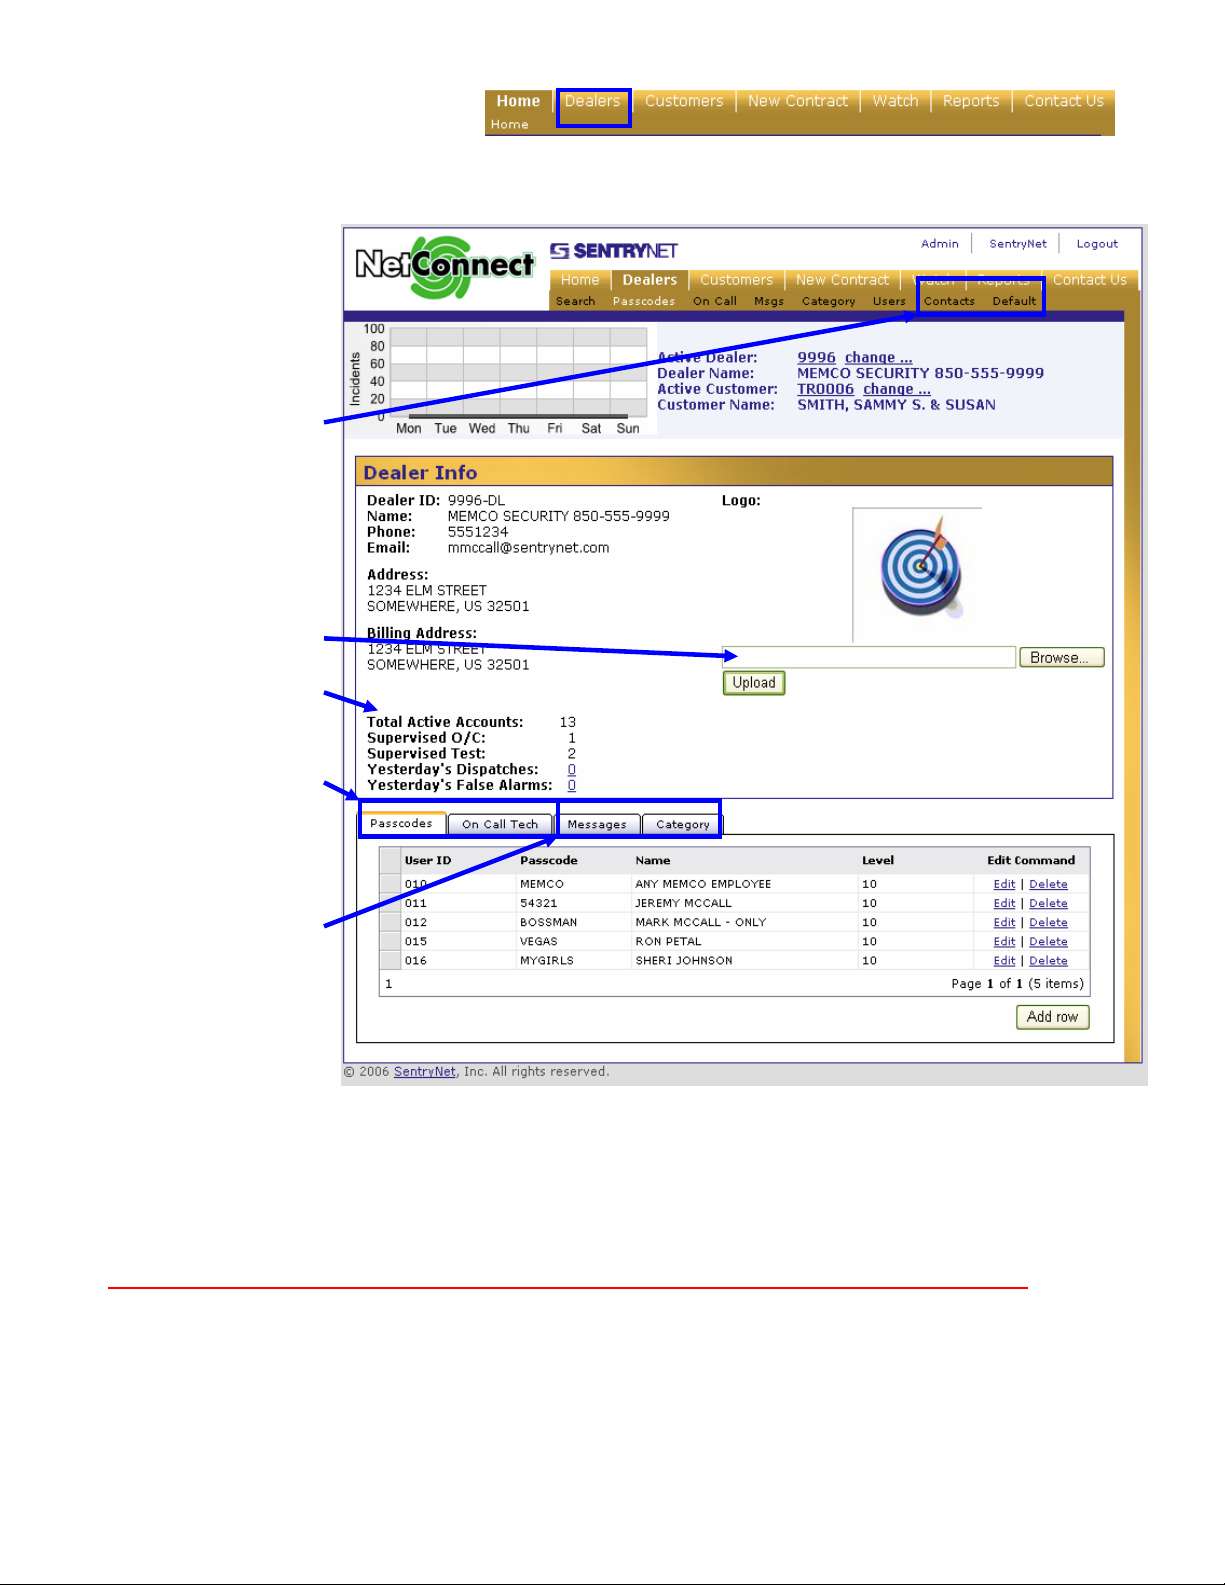
3…Dealer Information Page
The Dealer Information
Page allows dealers to
perform several common
and important tasks.
The Contacts page allows
dealers to manage IDs
that receive reports and
how they are delivered.
The Default page allows
the viewing of the
templates used to create
dealer accounts.
Dealers can upload their
Logo and can view
summary information for
Account Activity.
Updates to Technician
Pass Codes and the On
Call Tech list can be
easily accessed.
Also, Categories can be
created for custom
reports and Florida
dealers can retrieve
Answering Service
Messages any time.
Four commonly used tasks are at the bottom of the screen – Passcodes, On Call Tech, Messages, and
Category. Other tasks are accessed from the buttons at the top of the screen – Users, Contacts, and
Defaults.
Updates for these fields should be written to the live database within two to three minutes.
©SENTRYNET, Inc, All Right Reserved 2006 Page 5
Page 12
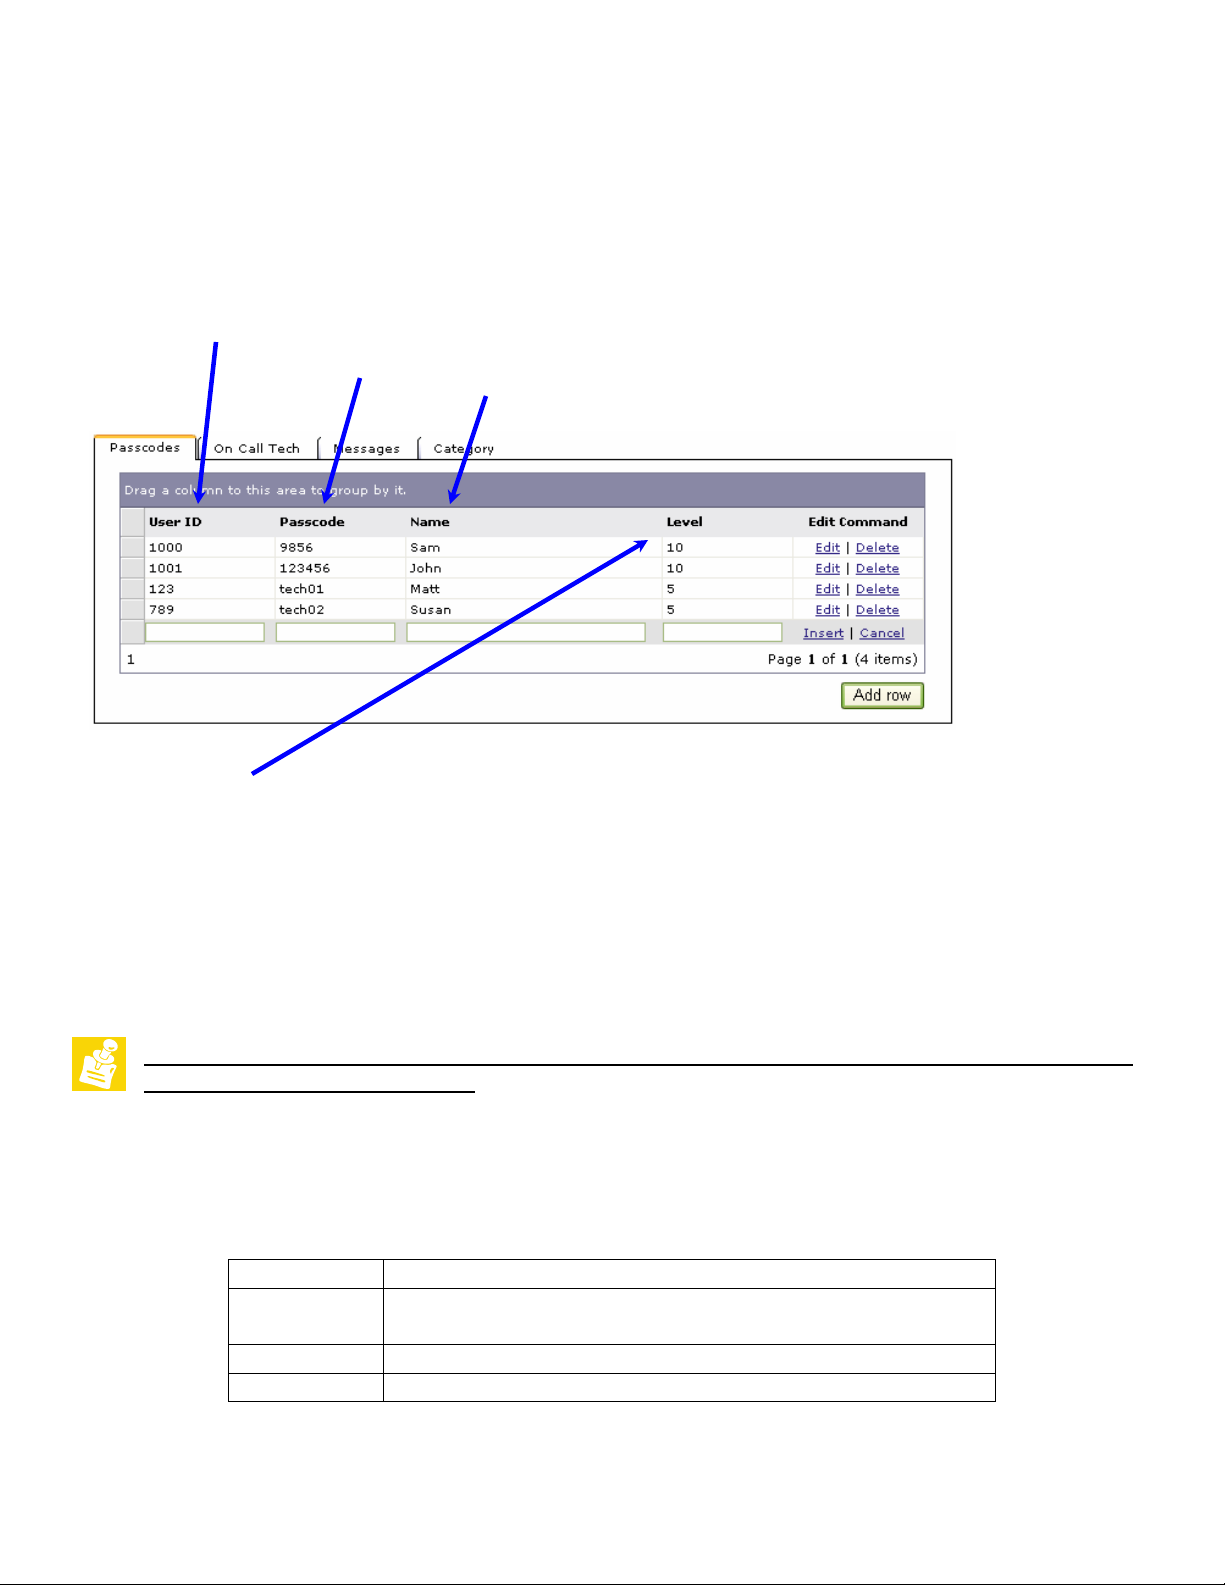
3.a) Technician Pass Codes
Pass codes are used for placing accounts on test and retrieving account activity/account details. As many
entries can be added as necessary. We encourage one pass code for each employee.
There are four fields that are to be completed when adding a pass code.
¾ The User ID can be any alpha/numeric entry.
¾The Passcode can be any 2-10 character alpha/numeric entry. (No profanity)
¾Name(s)
¾ The “Level” for passcodes will allow the dealer to determine who in the company can perform certain tasks
when they call the central station.
These tasks include…
• Adding temporary data
• Modifying Open/Close schedules
• Checking account history
• Placing account on test
(IMPORTANT NOTE: This setting DOES NOT grant levels of access within NetConnect . “Web
Users” are set up by SentryNet.)
Setting the access level to “10” will allow the user to perform all above and future tasks when calling into the
central station. “10” is the highest level and is the most common selection. This option may be expanded over
time to take advantage of the different levels. Currently, however, we are keeping this simple.
Set level to: Allows:
10 Place account on test, Check account history, Make
temporary time adjustments, Add temporary data
5 Cannot place accounts on test – can do other listed tasks
1 Will disable passcode
©SENTRYNET, Inc, All Right Reserved 2006 Page 6
Page 13
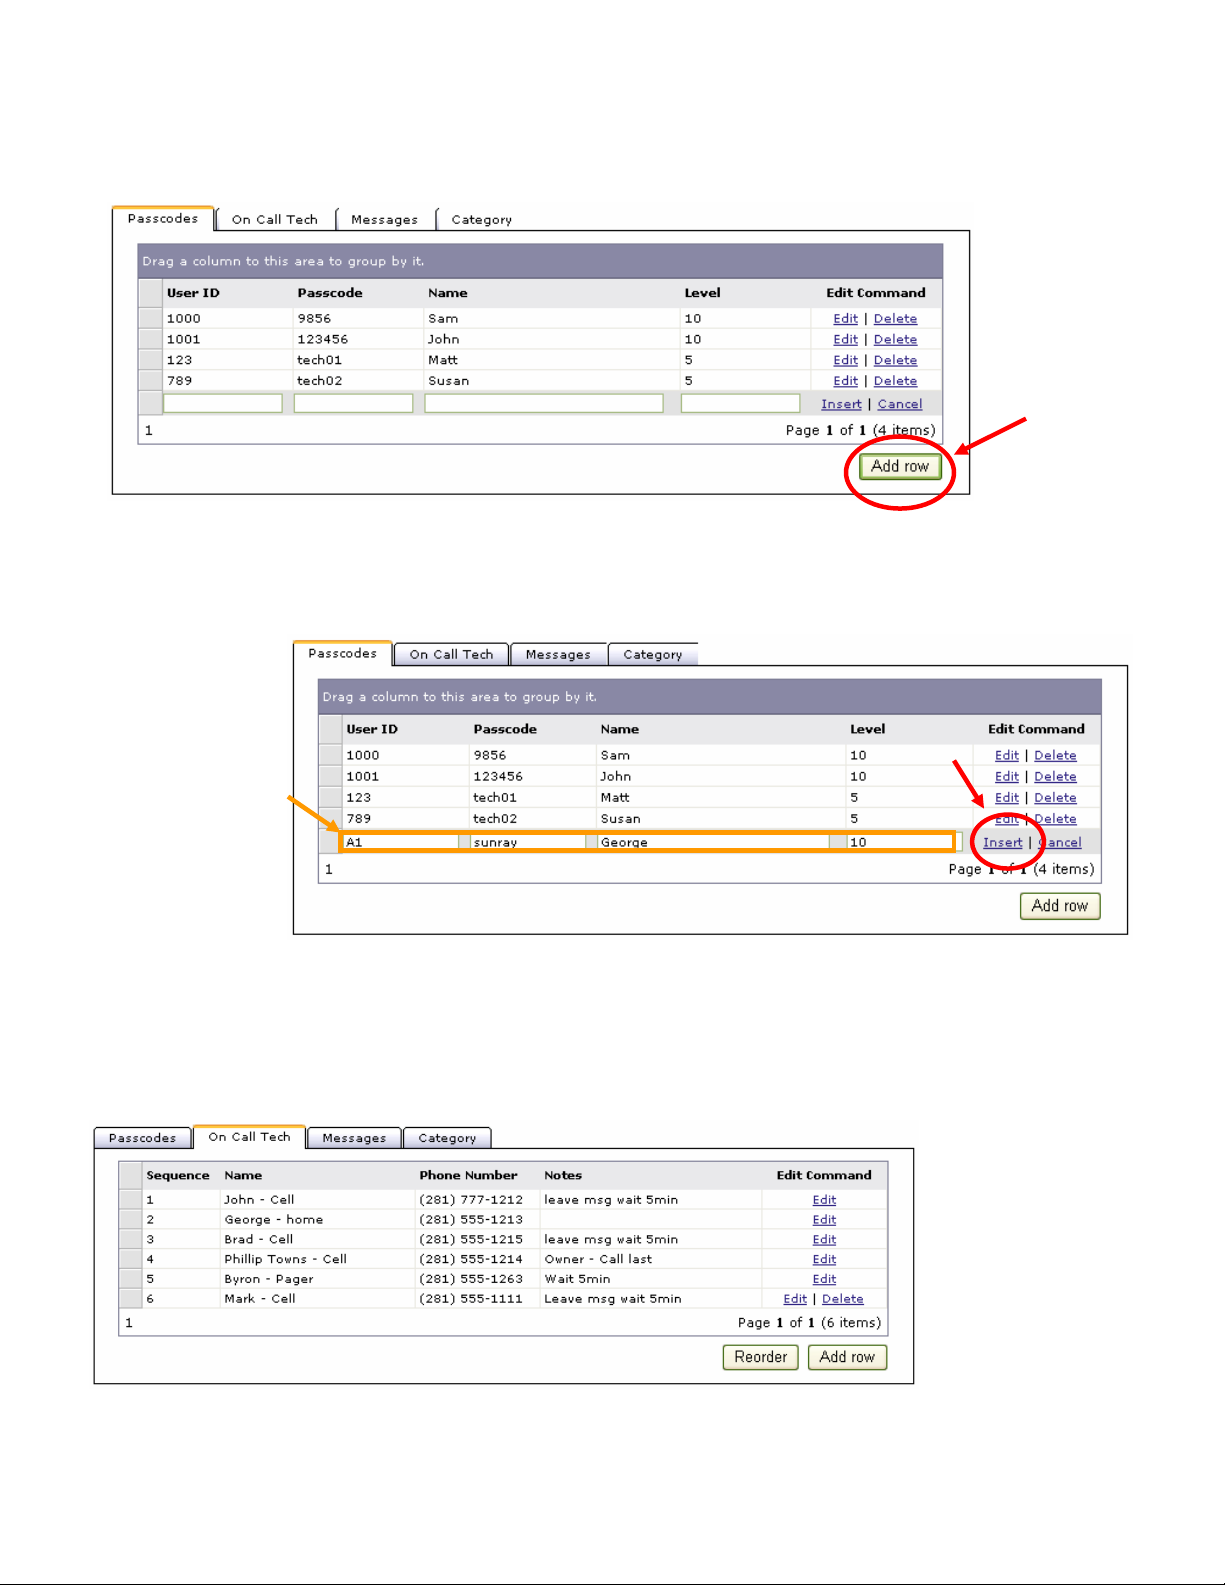
3.a.1) Adding Technician Pass Codes
To add a
technician’s
passcode click
on the “Add
row” button.
A new line will appear allowing you to enter the data. (Remember, this is for those who need to call into the
central station and is not for NetConnect Users.) The User ID can be any alpha/numeric entry and the
passcode must be at least 2 characters and no more than 10 characters long. (No profanity) Enter the name of
the technician, or if
more than one
person will use the
passcode you can
enter multiple
names, or “Any
Person.”
Enter the proper
“Level,” then click
“Insert” and repeat
as needed for your
technician/employee list.
3.b) On Call Tech
The “On Call Tech” section allows dealers to maintain the list of people that are to be contacted by the station operators when subscribers require service after business hours. This list should contain only those who are to
be called for service.
©SENTRYNET, Inc, All Right Reserved 2006 Page 7
Page 14

The On Call list can be added to, edited and reordered. SENTRYNET operators will call the list in order – top to
bottom. To add to the list, click on the Add Row button and enter the new information, then click Insert. The
phone number can be
entered as shown; the
program will format the
number automatically.
3.b.1) Reorder Call List
In this example Phillip Towns is to be called
last. His entry needs to be moved to the
bottom of the list. Click on the Reorder
button and the “Reorder Call List” window
will appear. Highlight the entry to be
moved – Phillip Towns – then click the
Bottom button to move the entry to the
bottom of the list. Then click Ok.
Other entries can be reordered using the same
process – highlight the entry then click the
appropriate position buttons.
©SENTRYNET, Inc, All Right Reserved 2006 Page 8
Page 15

3.c) Messages
The Messages page displays messages taken for dealers who subscribe to the Answering Service feature in the Florida Central Station. (This will be available for the Mississippi Central Station at some point in the future.)
Dealers can View, Print,
Print All and Delete
their messages at any
time.
Messages displayed in the BOLD font have not been viewed.
Click View to display the message…
The Print and Print All options will
launch Adobe Reader and export the
message as a PDF file. (Adobe Reader
can be downloaded for free from
Adobe’s website – www.adobe.com.)
To delete the message click Delete.
©SENTRYNET, Inc, All Right Reserved 2006 Page 9
Page 16

3.d) Category
Categories give you the ability to group similar accounts. The groupings may be schools, stores, or government
accounts. For example, if you monitor security accounts for ACME Storage, Inc. and there are 7 locations in the
chain, a category called “ACME” can be created. Then, once the category has been assigned to the 7 accounts,
(done in the Customer Information pages) custom reports can be created for just those “ACME” accounts.
These reports may be Open/Close, Activity, Call List, etc.
There will be some standard categories created for you (Residential and Commercial for example), but you will
have the ability to create as many additional custom categories as needed.
The Category screen looks like…
(This section discusses how to create the category. Applying the category to an account is discussed in Section 4.e)
To add a category, click on the “Add row” button and a new line will appear. Enter a name for the new
category and a description. Then click “Insert.” The new category is now available to add to any account,
which can be added
in the Customer
Information menus.
©SENTRYNET, Inc, All Right Reserved 2006 Page 10
Page 17

3.e) Contacts
The Contact page allows dealers to manage who can receive reports from the central station and how reports are
transmitted. Reports generated automatically use this list and station operators can select from this list when
sending reports manually. There are five (5) different report types that can be transmitted f rom the central
station. The reports are in Rich Text File (RTF) format and can be viewed using any Windows text editor. The
margins for the document should be set to ¼ to ½ inch for proper layout. (These samples are sent directly from
the automation system and will be formatted differently than reports generated from NetConnect.)
1. Activity Reports
2. Incident Reports
©SENTRYNET, Inc, All Right Reserved 2006 Page 11
Page 18

3. Account Details
4. Account Statements
5. Text Messages – Can be sent to E-mail capable cellular phones and PDAs.
©SENTRYNET, Inc, All Right Reserved 2006 Page 12
Page 19

3.e.1) Adding Contacts
The Dealer Contacts page lists all current entries and their report options. Also, you have the ability to search
and select the number of items displayed per page if there are several entries.
Important notes regarding report options:
o Select only ONE entry for incident reporting (Inc Rpt)
If more than one e-mail address is required for incidents you may want to set up a
distribution list with your e-mail provider.
o Faxed reports may be an extra cost and will be billed accordingly.
o The text messages are small and designed to work with cellular phones and PDAs with character
limitations. The other reports contain attachments and may not work with these devices
Search by name,
E-mail, fax number or
report type
Click “Filter” to start
search
Click “add Contact” to add
entry, then key in information
and select appropriate
report options
Select the number of
records to display
per page
To edit entry
click “edit”
.
©SENTRYNET, Inc, All Right Reserved 2006 Page 13
Page 20

3.f) Defaults
The Default page will allow dealers to view the default tables (templates) used to create their accounts. In
general, dealers will be able to view 4x2 conversions, zone descriptions, and signal/zone instructions. We will
update this manual as this section is completed. Updated versions of the manual will be available for download
from the NetConnect website.
©SENTRYNET, Inc, All Right Reserved 2006 Page 14
Page 21

4…Customer Information Page
The Customer Information Page will allow dealers to view, edit, and maintain much more of their subscribers’ account details.
The main page displays basic
information for the subscriber,
with most fields being editable.
At the top of the page the “Active
Customer” is displayed and can
be changed by clicking on the
“Change…” link.
The Premise and “Enhanced Call
Verification” phone numbers are
displayed. (Changes here will be
displayed in any incident for this
subscriber.)
Installation Date can be viewed
from this page and Cancellations
can be requested. (Remember:
accounts still sending signals are
considered active.)
Changes to the Comments and
Special Instructions can be
viewed, but not changed. Changes
will need to be sent to data entry.
Information in these fields is
protected because it is used by the
dispatch operators for processing
incidents.
Also, at the bottom of the page are
tabs for the most frequently
changed data for subscribers. In
addition to these options, Zone
Descriptions, Open/Close and
Test Schedules and active account
History Reports can be accessed
using the menu options at the top
of the page.
Updates for most of these fields should be written to the live database within two to three minutes. Exceptions are
items that require data entry approval – Zone Descriptions, O/C Schedule and Test Frequency. Changes to these
items are dependent on operational hours for data entry and may take several hours.
©SENTRYNET, Inc, All Right Reserved 2006 Page 15
Page 22

4.a) Search Page
The dealer name and active customer are displayed just below the menu buttons. When the “Active Customer”
needs to be changed, click on the “change” option to access this window.
The account base can be searched
using four search options. Complete
or partial entries can be entered for
the account number, subscriber
name, subscriber address and
premise phone number.
To search for Sam Smith’s account
– enter “SMITH” into the Name
field, click “Filter” and click on
“View” to change the account.
©SENTRYNET, Inc, All Right Reserved 2006 Page 16
Page 23

4.b) Passcode Maintenance
The passcode maintenance
for subscribers works in the
same way as technician
passcodes. (See Section 3.a.1
for detailed explanation.)
As with the technician
passwords, we will start by
keeping the levels simple. Also, the levels will allow subscribers the same access as technician passcode levels.
Subscribers that are granted a level 10 will be able to place an account on test, check account history, make
temporary time adjustments, and add temporary data. (Permanent changes must be submitted by the dealer as
usual.) Subscribers with a level 5 access will only be able to verbally cancel an incident.
Set level to: Allows:
10 Place account on test, Check account history, Make
temporary time adjustments, Add temporary data
5 Cannot place accounts on test – can do other listed tasks
1 Will disable passcode
4.c) Call List Maintenance
This is the call list that operators will call for dispatch and for notification when an incident occurs. The first
three numbers are the AHJ (Authority Having Jurisdiction) phone numbers and are not editable by dealers.
Any changes required with these numbers will be done by the data entry department.
Entries 4 and 5 are for the
physical location or
Premise and the ECV,
Enhanced Call
Verification, numbers.
These are required fields
and can be edited by
dealers but not deleted.
Additional contacts start with line 6 and can be edited and deleted as necessary. To add contacts, simply click
on the Add Row button, and to reorder entries click on the Reorder button. For detailed instructions on adding
contacts and reordering the call list, see sections 3.b
Print. Adobe Reader will launch containing the Call List that may be printed locally.
IMPORTANT NOTES:
1. Excessively long Call List may result in additional charges
2. Entries 1-5 cannot be reordered
and 3.b.1. To print the Call List for the subscriber click
©SENTRYNET, Inc, All Right Reserved 2006 Page 17
Page 24

4.d) No Action / Test Page
The No Action / Test Page
allows dealers to put accounts in
a no action state at the central
station. Accounts can be placed
on test for up to four hours.
Using the entries created in the
“Contacts – Section 3.e.1” page,
the signals can be directed to a
text capable device, such as a cellular phone. Entries can be added manually by typing in the E-mail address of
the device into the “Text Msg Address” field. The “Requestor’s Name” field can be used to track the name of
the person requesting the account be put into test mode. This may be a dealer employee or the name of the
subscriber. The name will show up in the “Resolution/Desc.” column on activity reports.
To complete the process…
1) Click the correct radio
button for the amount of
time to put the account on
test
2) Select the proper text
device if required, then
3) Enter the requester’s
name, if needed
4) Click the “Set No Action” button
A confirmation window will appear indicating the process was completed
and display the end date and time for the No Action/Test period. Also, the
Current Status in the No Action page will change to display the end time.
IMPORTANT NOTES:
1. If longer than 4 hours is required, call the central station as normal.
2. If the confirmation window does not appear, the No Action process did not complete – call the central
station.
©SENTRYNET, Inc, All Right Reserved 2006 Page 18
Page 25

4.e) Category Page
As stated in Section 3.d), categories give you the ability to group similar accounts for activity reports. The
categories must be created in the dealer section first, and once created they will be available to p ick from the
Customer account.
Here is another example
of categories created in
the Dealer account…
Notice that there are
several different
categories that have been
created in addition to the
two standard categories,
Commercial and
Residential, and are now
available in the Customer
account.
To add categories to
an account, highlight
the appropriate entry
and click the Update
button. If multiple
categories apply to
the account,
Commercial and
Hilltop Equipment
Chain for example,
hold the “CTRL” key on the keyboard and click with the mouse on the appropriate entries, and then click the
Update button.
4.f) Related Accounts
This page lists all accounts that are linked to the primary or main customer account. Generally linked accounts
are cellular backup
accounts. Once an
account is linked, history
will log only to the
primary account.
©SENTRYNET, Inc, All Right Reserved 2006 Page 19
Page 26

4.g) Zone Descriptions
The Zone Descriptions
Page is accessed using
the menu options
located at the top of the
Customer Page.
Current entries will be
displayed and dealers
have the ability to
Add/Delete/Modify
zone information.
Important
Note:
• Please note that all changes to zone information will be placed in a PENDING status until checked by
Data Entry. All modified entries will be indicated by a RED text color until posted by Data Entry.
To add a new zone to the
account, click on the Add
Zone button.
A blank line will appear, then enter
a Zone number (1), choose a signal
type or select the blank space (2),
enter a zone description (3) and
then click Insert (4).
2
1
3
©SENTRYNET, Inc, All Right Reserved 2006 Page 20
4
Page 27

4.h) Open/Close Schedule
Supervised Open/Close accounts can now be maintained by the dealer. PLEASE TAKE NOTE: Some
schedules can be difficult to set up, especially when the closing occurs after midnight. For these more
difficult schedules, it is recommended that the initial setup be done by SENTRYNET’s Data Entry
department to ensure proper entry. After the initial setup, most accounts can be easily maintained by the
dealer.
Here is an example of a common schedule…
Allowance entries are formatted hh:mm.
The example shows allowances
of…
1 hour for Early Open
15 min for Late Open
30 min for Late Close
The schedule (Blue Box) is set
for openings Monday – Friday at
9AM and closings are at 6PM
(18:00). On Saturday the location
should open at 8AM and close at
noon and on Sunday the location
is closed. (No entry for Sunday.)
The Green Box shows the supervisory settings for the account. The automation system will be monitoring for
“Unauthorized Opening,” “Fail to Open,” “Fail to Close,” and NOT for “Late Open.”
The automation system will generate “Unauthorized Opening” signals if the site is opened (disarmed) when
the system expects it to be closed (armed). “Fail to Open” signals are generated if the site is not opened by the
Open Time plus the Allowance – 9:15AM M-F in this example. Likewise, “Fail to Close” signals are
generated if the site is not closed (armed) by the Closing Time plus the Allowance – 6:30PM M-F. Finally, the
system generates a “Late Open” signal if the site opens after the Open Time plus the Late Open Allowance
and before the Close Time plus the Late Close Allowance.
Important Notes:
• SENTRYNET does not monitor for Early Closings.
• Times must be entered in military time (2400 format)
©SENTRYNET, Inc, All Right Reserved 2006 Page 21
Page 28

4.h) Open/Close Schedule (cont’d)
To modify any of the allowances for a supervised account, simply type over the existing allowance and click on
the Update button. Make sure to use the hh:mm format. In the example there is an Early Open Allowance of 1
hour and a Late Close Allowance of 30 minutes.
Next, for our example, the client wants to extend their hours for Saturdays AND they want to add hours for
Sundays. Currently they are open on Saturdays from 8AM to noon and are closed on Sundays. They want to 1)
change the closing on Saturdays to 5PM and 2) add Sunday hours from 9AM until 4PM.
Original Allowances
New Allowances:
30 minutes for Early
Open and 15 minutes
for Late Close.
Click Update to save
Changing Times
1. Click “Edit” for day 6
2. The Edit O/C Schedule
window appears
3. Edit Close Time: 17:00
4. Click “Ok”
©SENTRYNET, Inc, All Right Reserved 2006 Page 22
Page 29

Adding a day
1. Click on “Add Row”
2. The Add O/C Schedule
window appears.
3. From the Day box select
the proper day
4. Enter the open/close times
1
5. Select the supervised
options.
6. Click “Ok”
2
4 3
5
6
Once all the entries and selections have been made the new schedule looks like…
©SENTRYNET, Inc, All Right Reserved 2006 Page 23
Page 30

4.i) Test Schedule
SENTRYNET’s automation system can supervise test signals from customer panels based on number of days or
hours or can use any signal from the panel as a test signal. Dealers now have the ability to update the
Supervised Test Schedule in the automation system if the frequency of the Test Signal changes. This also
works for accounts that have not had a supervised test schedule and the dealer wants to add one.
considered a test signal select
If no schedule exists for the subscriber the page will default to a Frequency Type of “hourly,” the Frequency
will be “blank,” and “Are all signals a test?” will be set to “No.” With the selections above, the automation
system will be monitoring for a true Test signal every 30 days. If no Test signal is received on the expected
date, the system will generate a “No Test Received” incident that will be processed according to the dealer’s
instructions.
Important Notes:
• This procedure will NOT change the frequency in which the panel sends the test signal.
• If the schedule is new, a Test signal MUST be sent from the panel before the automation will start the
supervision. This has to be done after the schedule is activated.
• Billing for supervised test signals is based on the frequency of the signal received at the central station
and not based on the setting entered on the Test Schedule page.
Use the mouse to select the
proper radio button for an
Hourly or Daily frequency.
Enter the frequency in
Hours or Days.
If ANY signal is to be
Click “update” when finished.
the “Yes” radio button.
©SENTRYNET, Inc, All Right Reserved 2006 Page 24
Page 31

4.j) History Report
The History page gives dealers quick access to the active customer’s history. Several new search, or filter,
options have been added from the previous version of NetConnect. Also, any incident can be viewed, allowing
dealers to read incident details and operator notes.
Filter Options:
By Date
By Signal Type
(i.e. Fire)
By Description
(i.e. Burg)
By Time
By Zone #
By Incidents Only
Print Options:
Click Print All to
print filtered
history.
View Incidents
The incident may be viewed by
clicking on the “Yes” link on
©SENTRYNET, Inc, All Right Reserved 2006 Page 25
the line of the incident to be
viewed.
Once the “View Incident”
window appears use the scroll
bar to the right of the window
to view the complete incident.
Page 32

PAGE INTENTIONALLY BLANK
©SENTRYNET, Inc, All Right Reserved 2006 Page 26
Page 33

5… New Contract Entry
New customer account information can be entered in this section. With the New Contract Entry page, The
dealer can provide the Central Station with all necessary information to process incidents for the new account.
To access the New Contract Entry page, simply click on the New Contract link at the top of the NetConnect
page. The Alarm System Monitoring Agreement page will be loaded.
The dealer name and number
automatically populate the appropriate
fields.
The remaining required fields are
indicated with a red asterisk. (*)
Field Notes:
• The Account Prefix is the Line
Card identifier.
• The Billing Address is generally
not used. If the account is set up for
subscriber billing, and the billing
address is different it will be used.
• For Signal Format enter Contact ID
(CID), SIA, 4x2, etc.
• Communicator Type is the panel
type or model, Vista 20 for
example.
• Enter directions, medical
information, access information,
etc, in the Special Instructions field
and any other type of information
in the Additional Comments
section.
Once the basic information has been
entered, the phone numbers for the
police, fire and medical dispatch should
be entered along with the premise phone
and ECV number. These records are
already listed and to edit them click on
the Edit button in the proper row, or
double-click the row to edit. When Edit
is clicked the row will be activated and
can be edited. To add contact numbers to
the call list, click on the Add Row button. If the account is a Commercial Fire account, click the “Commercial Fire”
box. When this box is checked the ECV number is not required.
©SENTRYNET, Inc, All Right Reserved 2006 Page 27
Page 34

5.a) Adding Phone Numbers
When the Add Row
button is clicked a new
blank line will appear.
Enter the new contact’s
name, phone number
and a brief note if
necessary.
Then click
Insert.
A complete call list might look something like this…
©SENTRYNET, Inc, All Right Reserved 2006 Page 28
Page 35

5.b) Adding Zones
To add zones for the new account click on the Zone tab next to the Call List tab. An empty Zone Description
window will appear.
To add zone information
click on the Add Row
button.
A blank line appears
allowing Zone number, Signal type and zone Description to be added, along with how the zone is to be
processed by the station operators. If no instruction box is checked the zone will be handled according to the
dealer’s default instructions.
The Signal box is a “pop-up” that
lists several common signal types.
By clicking on the down arrow
( ∨ ) dealers may select from one
of the common entries or select the
blank entry at the top of the box.
In either case, the zone description
can be edited.
Click Insert to complete adding
the zone.
To complete the New Contract Entry, the name of the person entering the contract must by entered and then the
Submit button can be clicked. If any entry errors are detected, a message will be generated.
©SENTRYNET, Inc, All Right Reserved 2006 Page 29
Page 36

PAGE INTENTIONALLY BLANK
©SENTRYNET, Inc, All Right Reserved 2006 Page 30
Page 37

6… Watch Scroll
Dealers now have the ability to view near real-time activity for their accounts using the Watch utility. To
access the Watch utility click the link at the top of the NetConnect page.
Using the Display Options, the
number of rows to be displayed and
the refresh rate can be set. We
suggest leaving the Display Rows
at 25. The Refresh Rate should be
set based on the volume of signals
generated by the dealer’s accounts.
The Refresh button manually
refreshes the display and the
Launch button will load a new
window with the Watch utility.
The View link displays action
details of COMPLETED incidents.
When clicked the View Incident
window is opened.
The Categories legend identifies the signal type by Fire,
Duress, and Medical, Alarm (Burglary), Equipment and Other
(Supervisory, Automation, Restore)
©SENTRYNET, Inc, All Right Reserved 2006 Page 31
Page 38

PAGE INTENTIONALLY BLANK
©SENTRYNET, Inc, All Right Reserved 2006 Page 32
Page 39

7… Reports
The report options for NetConnect v2 have been greatly improved. Several report templates for common
reports are already defined and are available to users. In addition to the “standard” reports, users have the
ability to add custom reports. Custom reports can be for the entire subscriber base, single accounts or accounts
within a category. (Restaurant Accounts for example.)
Activity Report
Features:
1. Template Name:
Used to give names
to custom reports
2. Sys/Acct ID: If left
blank the activity
report will include
ALL accounts. Or use
a specific account
number
3. Categories: Created
in Dealer Info,
assigned in Customer
Info and used here for
custom reports
4. Incident?: If set to
YES, only incidents
will be reported.
5. Date (Timeframe):
Options are 24 hrs, 3
days, 1 week, 30 days
and previous month.
6. Signal Occurrence:
Useful in researching
problem accounts
7. Signal Type: Allows
specific signals to be
reported
8. Page Break?: If checked, each account’s activity will be on individual pages.
9. Show Incidents Details?: If checked, reports will include operator action/notes details
10. Click on the PDF or Excel icon to download the report. Once downloaded, the report can be printed locally.
11. Use the SAVE button to modify an existing report. Use the SAVE AS button to create a new report.
12. The CLEAR button will reset report settings and the DELETE button will delete the selected report.
13. The DEFAULT button will restore and/or reset all standard reports. All standard reports will be reloaded with original
settings.
13
Important Notes:
• All reports can be downloaded in either Adobe PDF or Microsoft Excel format. Once downloaded a
report can be printed to a local printer. The Report Manager will not print directly to a local printer.
Adobe Reader can be downloaded for free at www.adobe.com
• Categories are created in the Dealer Information Page / Categories (Section 3.d). They are assigned to
customer accounts in the Customer Information / Categories (Section 4.e) and used by Report Manager
for custom reports
1
2
3
4
5 & 6
7
8 & 9
11 & 1210
.
©SENTRYNET, Inc, All Right Reserved 2006 Page 33
Page 40

7.a) Creating Custom Reports
Custom reports can be created using several different parameters: categories, whether or not an incident exists,
timeframes, accounts that generated more than a certain number of signals during the timeframe, fire alarms only,
troubles only, etc, etc, etc. All of these custom reports can be saved for future use.
To create a custom report, first select the standard report that most closely matches the desired parameters. For this
example, let’s assume that we
need an activity report of our
RESTAURANT accounts for
the past WEEK and we want
to save the report for future
use.
First, select the “History Last
Seven Days” report from the
list. (A)
automatically set the
timeframe (Date) to 1 week.
Then type in the name of the
report. (B)
activity for our
RESTAURANT accounts
only, click the appropriate
CATEGORY. (C)
This report should show
details for any incidents that
occurred, so check the “Show
Incident Details” box. (D)
To save the custom report,
click “Save As” and the
report will be saved with the
name provided. (E)
This will
Since we want
The number of
F
B
C
A
D
E
Once saved, your new report will be in the list of Activity Reports. (F)
reports that can be created and saved is unlimited.
The added use of Categories for custom reports gives dealers a powerful tool to use for
their subscribers. The Report Manager also allows the printing of Call List, Passcodes
and Zone Descriptions.
Examples of reports can be viewed on the following two pages.
©SENTRYNET, Inc, All Right Reserved 2006 Page 34
Page 41

7.b) Sample Reports
Here is the custom report we created using the filter options on the previous page.
©SENTRYNET, Inc, All Right Reserved 2006 Page 35
Page 42

History report with incident details
No activity – 30 days
©SENTRYNET, Inc, All Right Reserved 2006 Page 36
Page 43

8… Contact Us
The Contact Us page can be used to launch a local E-mail application. Simply click the person’s name you wish to contact, on the Contact List and Locations page, and the default E-mail application on the local computer will load. If the computer does not have an E-mail program, this section will not work.
The Contact Us Online page will
work, however. Complete the form and
click Send.
©SENTRYNET, Inc, All Right Reserved 2006 Page 37
Page 44

PAGE INTENTIONALLY BLANK
©SENTRYNET, Inc, All Right Reserved 2006 Page 38
 Loading...