

Sentry RP-IP5330IR-1.3MP, RP-IP831-VP-1.3MP, RP-IP5304IR-2MP, RP-IP831IR-VP-VF-2MP Quick Start Installer Manual
Page 1
Sentry RP- IP Camera
Quick Start Installer Guide
Page 2

Page 3
Sentry RP IP Camera Models
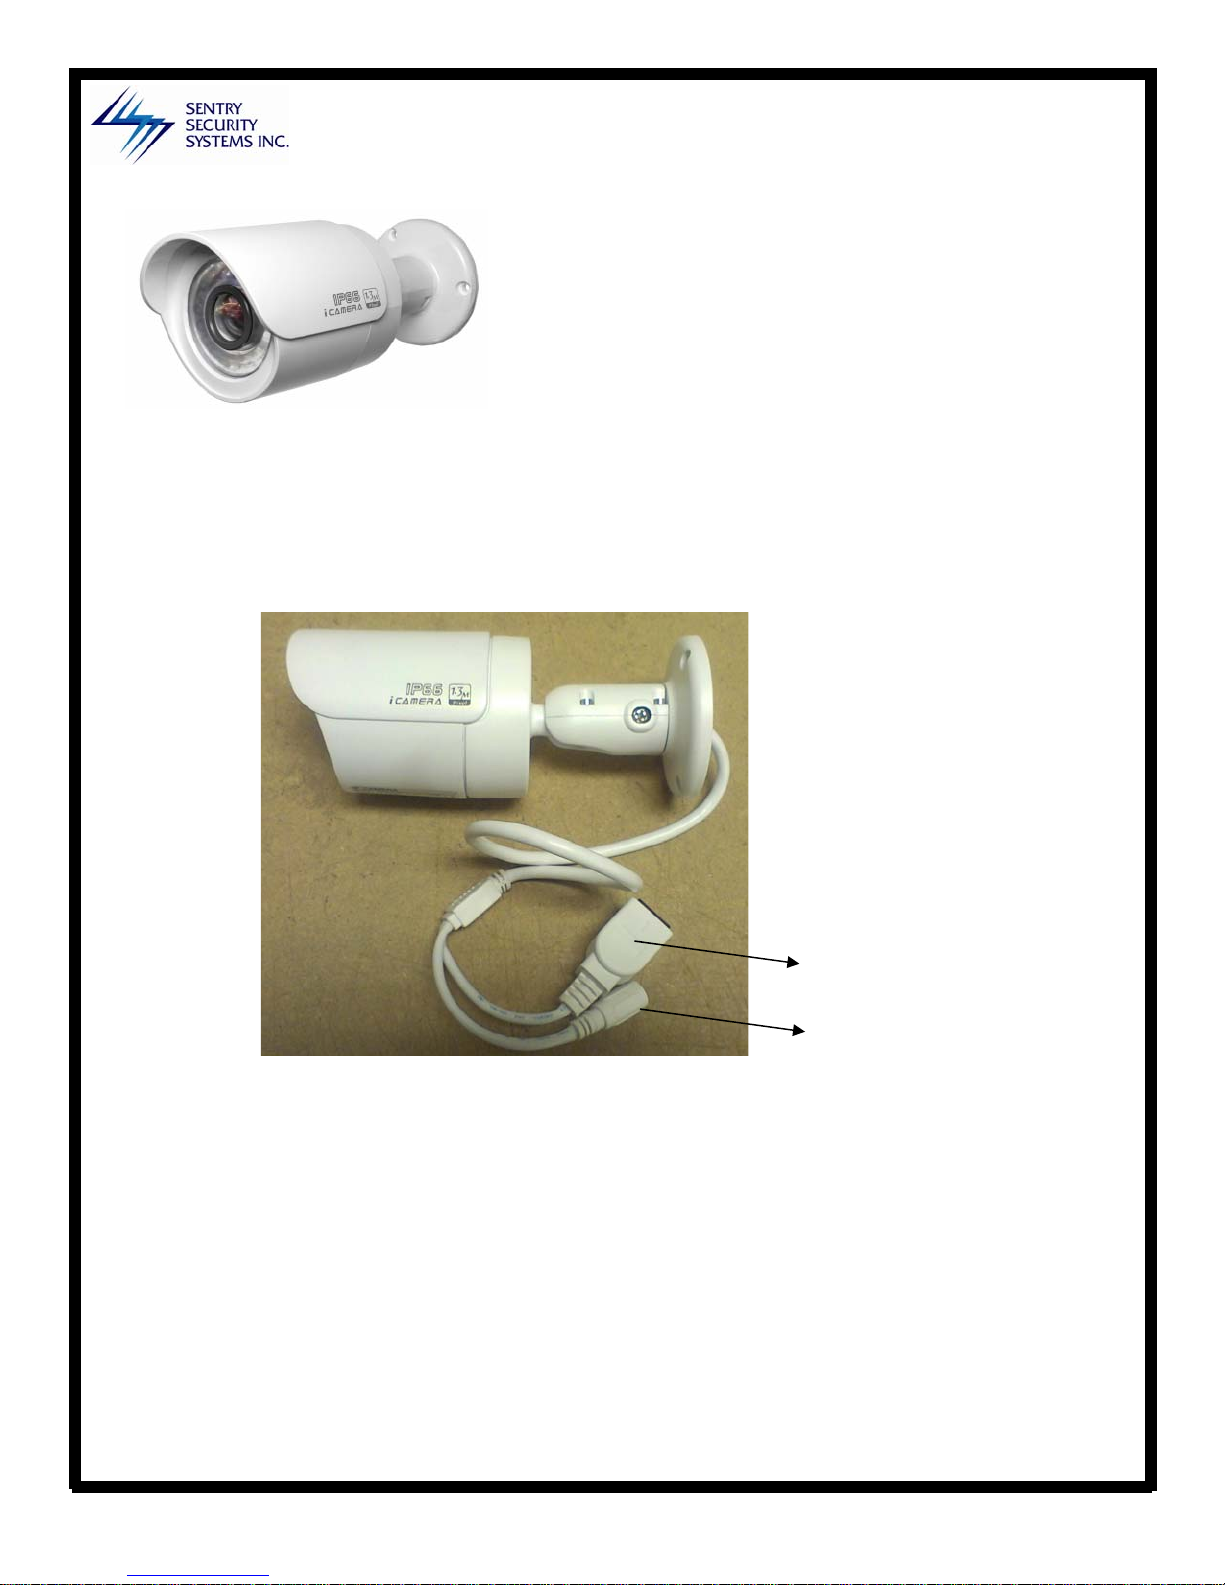
RP-IP5330IR-1.3MP
• 1.3 Megapixel IP Camera
• Outdoor Camera
• 3.6mm Fixed Lens
• PoE Power Option with 12V DC
• Compatible with Sentry RP Series Systems
Network Connection (PoE)
DC 12V Power
Page 4

RP-IP831-VP-1.3MP
Sentry RP IP Camera Models
• 1.3 Megapixel IP Camera
• Indoor Camera
• Vandalproof
• 3.6mm Fixed Lens
• PoE Power Option with 12V DC
• Compatible with Sentry RP Series Systems
Network Connection (PoE)
DC 12V Power
Page 5

Sentry RP IP Camera Models
RP-IP5304IR-2MP
Network Connection
• 2.0 Megapixel IP Camera
• Indoor/Outdoor Camera
• 5-15mm Vari-Focal Lens
• 4 High Power IR LEDs (150’/50m Range)
• H.264, MJPEG and MPEG4
• Compatible with Sentry RP Series Systems
Inputs
• Alarm In
• Alarm Out (A/B)
• RS485+ / RS485-
Audio Out (White)
Audio In (Yellow)
DC 12V Power
How to Adjust the Camera Lens
1. Push the top cover backwards.
2. Remove the front cover by turning it counter-clockwise.
3. Loosen the 2 focusing screws (do not remove them), adjust the lens to the required
length then tighten them when finished.
4. Turn the cover clockwise to re-attach it and push the top cover forwards.
Page 6

Sentry RP IP Camera Models
RP-IP831IR-VP-VF-2MP
Network Connection
• 2.0 Megapixel IP Camera
• Indoor/Outdoor Camera
• PoE Capable
• 21 IR LEDs
• H.264, MJPEG and MPEG4
• Compatible with Sentry RP Series Systems
DC 12V Power
Page 7

Setting up an RP-IP Camera to connect to an RP Series System
1. From the main window, click on the Menu button, and click on Add/Del IP Camera from the
pop up menu.
2. On the IP Camera Device List page, click on the Add DG IPC
Select DG Series IPC for: Select DH Series IPC for:
• RP-IP5304IR-2MP
• RP-IP831IR-VP-VF-2MP
• RP-IP5330IR-1.3MP
• RP-IP831-VP-1.3MP
button.
All RP-IP Cameras found on the network will automatically appear in this window. If none appear, click Update IP List” to scan for connected cameras.
4. Write down the IP address of the camera you want to configure as it appears on the screen, then click
.
Exit
3. Minimize the software by clicking and open Internet Explorer. Type in the IP Address of the IP camera
into the URL field.
Please call Sentry Security Systems Inc. at 1.866.736.8796 for Technical Support
Page 8

Once the Internet Explorer page has loaded, you might have to login to access the camera.
The default log-in is username: admin, pw: admin. Click Submit
. You will now see the internal settings
of the IP Camera.
4. On the left hand side of the menu in the IP Camera Setup, select Network Set
and then LAN to set the
required IP address and default
gateway.
5. Click Save
to save the settings.
*If you wish to set-up more IP cameras,
repeat steps 1 through 5.*
Once the RP-IP camera network configuration is complete you can return to the system software to
change the IP Address and basic settings, rather than accessing it through Internet Explorer.
1. Click the Menu
2. Double click on the camera you would like to modify - listed under Server Name.
button on the Software, then from the pop-up menu click on Add/Del IP Camera.
A window will now
pop up, allowing you to modify the IP Camera.
Please call Sentry Security Systems Inc. at 1.866.736.8796 for Technical Support
Page 9

Configuring an RP-IP Camera’s Video Settings
Configuring an RP-IP Camera’s video settings allows its various settings such as camera re solution,
video compression and audio options to be modified.
1. Access the Video Settings by entering the IP Address of your camera into the URL field in Internet
Explorer. Default login is user: admin, pw: admin then click Submit
2. In the menu on the left, click on Video Settings
the video settings of your IP camera. Remember to click Save
changes you may have made.
, then Video Coding. This will now give you access to
at the bottom of the window to save any
.
Please call Sentry Security Systems Inc. at 1.866.736.8796 for Technical Support
Page 10

Configuring an RP-IP Camera’s Motion Detection Settings
To configure an RP-IP camera to detect motion:
1. Log into the camera settings by entering the IP Address of your camera into the URL field in
Internet Explorer.
2. Click on Alarm Settings
Detection in the left hand navigation
bar.
3. Check the box next to Motion
Detection Setting
sensitivity level from the drop down
menu (5 being the highest).
4. Check the box underneath Time 1
5. Click Area Set
entire camera view, or click and drag a square in the image box to set the desired area.
6. Remember to click Save
, then select the
under Detection Area, followed by the All button to set motion detection for the
, then Motion
under
and then enter 0:0 - 23:59 (by default)
at the bottom of the page to save any changes you may have made.
Please call Sentry Security Systems Inc. at 1.866.736.8796 for Technical Support
 Loading...