

Page 1

Group II Lock
Owner’s Manual
Serrure de Groupe II
Manuel de l’utilisateur
Cerradura Grupo II
Manual del Propietario
Serial No.
➧
Combination
➧
(Not All Models)
N° de série
➧
Combinaison
➧
(Pas pour tous les modèles)
No. de serie
➧
Combinación
➧
(No todos los modelos)
TABLE OF CONTENTS
English . . . . . . . . . . . . . . . . . . . . . . . . . . . . . . . . . . . . . . . . . . . . . . . . . . . . . .2
French . . . . . . . . . . . . . . . . . . . . . . . . . . . . . . . . . . . . . . . . . . . . . . . . . . . . . .3
Spanish . . . . . . . . . . . . . . . . . . . . . . . . . . . . . . . . . . . . . . . . . . . . . . . . . . . . .4
TABLE DES MATIÈRES
Anglais . . . . . . . . . . . . . . . . . . . . . . . . . . . . . . . . . . . . . . . . . . . . . . . . . . . . . .2
Français . . . . . . . . . . . . . . . . . . . . . . . . . . . . . . . . . . . . . . . . . . . . . . . . . . . . .3
Espagnol . . . . . . . . . . . . . . . . . . . . . . . . . . . . . . . . . . . . . . . . . . . . . . . . . . . .4
ÍNDICE
Inglés . . . . . . . . . . . . . . . . . . . . . . . . . . . . . . . . . . . . . . . . . . . . . . . . . . . . . . .2
Francés . . . . . . . . . . . . . . . . . . . . . . . . . . . . . . . . . . . . . . . . . . . . . . . . . . . . .3
Español . . . . . . . . . . . . . . . . . . . . . . . . . . . . . . . . . . . . . . . . . . . . . . . . . . . . .4
Left
Gauche
Izquierda
Right
Droite
Derecha
Left
Gauche
Izquierda
Security-Safe/Coffre-fort de sécurité/Caja fuerte de seguridad
®
Page 2
Thank you for purchasing
this Sentry Security-Safe product.
Opening Instructions
IMPORTANT: The lock on this safe is in the open
position. DO NOT operate the combination until
first reading and understanding the following
instructions.
The combination for this safe has been randomly selected and
appears below. It is important that you keep this Owner’s Manual
in a secure place other than IN your safe; it is your reference
for both the safe’s combination and Serial Number. Compare the
Serial Number below with the number found on the lower right
side of the safe. If the numbers do not match, do not
attempt to operate the combination and contact Sentry.
(Phone number below under “Questions?”.)
Lock Test
Test first with door open!
Test your new UL Listed combination lock several times with the
door open. First turn the dial to the right until it stops at 87, then
turn the safe handle clockwise until it stops. Open the door as far
as it will go and turn the safe handle counterclockwise until it
stops and the chrome locking bolts are extended. Carefully follow
the instructions below.
NOTE: The dial will not turn past zero unless the bolts are in the
locked position with the handle vertical.
Accurate alignment of the lock with the opening index (the
vertical line at the top-center of the dial) is essential for successfully operating your combination. Dial your combination slowly and
carefully to avoid passing the desired numbers. Should you dial
past the correct number, the entire combination will need to be
re-entered. To avoid damaging the lock mechanism, never spin the
dial back and forth rapidly.
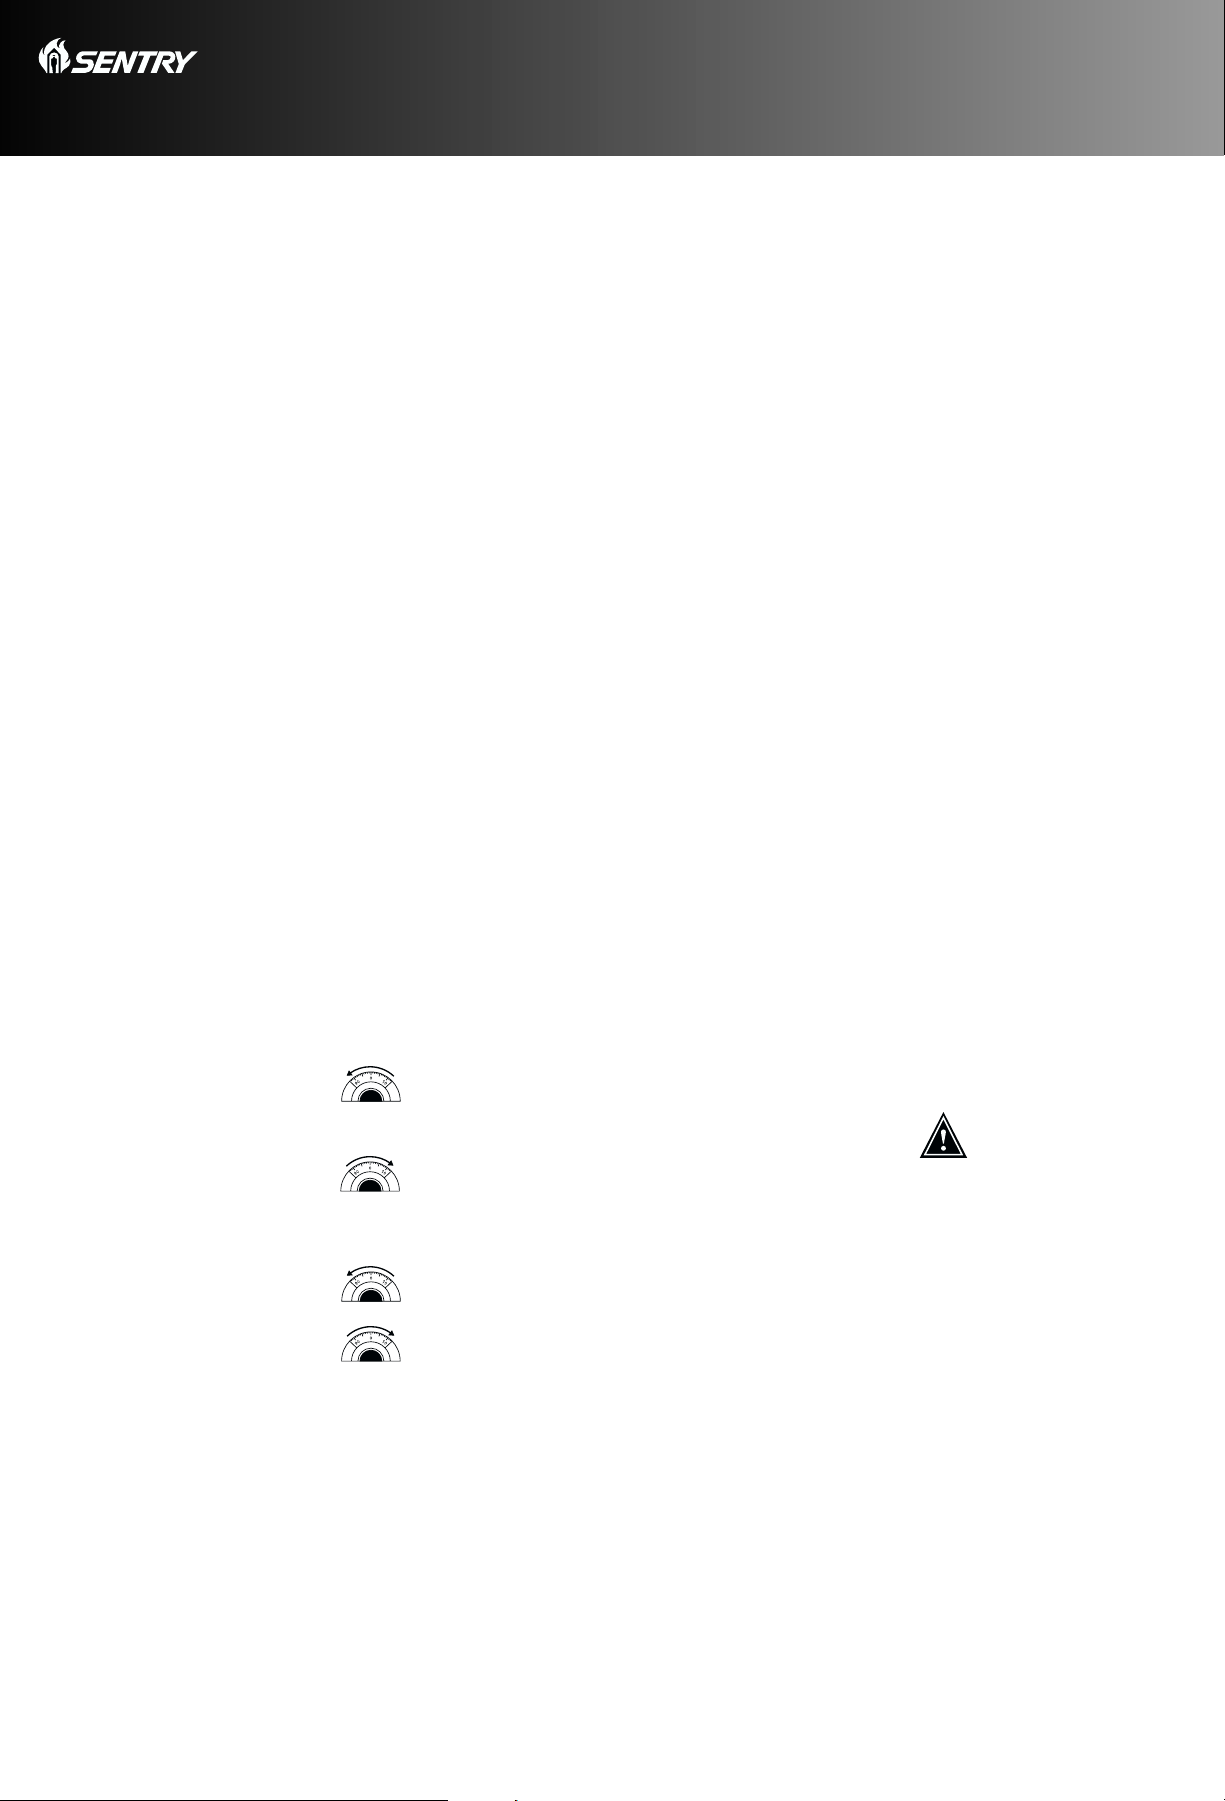
COMBINATION:
1. Start with dial on ZERO.
2. Turn the dial to the LEFT (counterclockwise).
Pass the first number of the combination three
times. Stop on the first number of the
combination the fourth time.
3. Change the direction you are dialing. Going
RIGHT (clockwise), pass the second number
of the combination two times and stop on the
second number the third time.
4. Change directions again. Turning LEFT
(counterclockwise), pass the third number of the
combination once and then continue around in
the same direction, stop on the third number of
the combination.
5. Change directions again, turning RIGHT until
the dial stops completely and will not move.
6. Turn safe handle upward, to the left (clockwise)
and open the door.
To Close and Lock
With the door closed, turn the handle counterclockwise to secure
the locking bolts, then spin the combination dial to the left at least
four times to scramble the combination.
Lost Combination
Preset Combination: First, find your safe’s Serial Number. The
Serial Number is printed on the small label on the right side of
safe (outside). Send this, a notarized letter stating you are the
safe’s owner, and a check or money order for $6.00 (U.S. funds) to:
Sentry Group, 882 Linden Avenue, Rochester, NY 14625-2784, USA.
Personal Combination: Changing the combination requires
specialized tools and, to prevent damage to the lock, must be done
by a professional locksmith. When the preset combination is
changed, it is permanently lost. Should you lose or forget the new
combination, it will be necessary to have a locksmith open the safe.
Questions?
Call Sentry Customer Service: 1- 800-828-1438 or 585- 381-4900
8 am – 9 pm E.S.T., M – F.
Placing and securing your safe
To help deter theft
No safe is theft-proof. With the right tools, time and skill, any safe
can be opened. Therefore, for greater security:
✪
Place your safe with the hinge away from the wall and
the door opening next to the wall. This makes it harder
to pry open.
✪
If possible, conceal your safe.
✪
Keep your safe closed and locked when not in use.
✪
You should bolt your safe to the floor, using the materials
provided and the instructions included in this information.
✪
Don’t keep your combination near the safe, and don’t tell
it to others.
✪
Don’t tell other people where you keep your your safe.
Bolt-down Instructions
1. Select a suitable and convenient location for your safe. Set the
safe in place and use the holes provided in the bottom of the
safe to mark the location of the holes to be drilled in the floor.
2. Move the safe away and drill holes of the appropriate
diameter and depth for the type of hardware being used and
the mounting surface.
3. Place the safe back over the holes and install the fasteners
as required.
Maintenance
This Sentry safe has been designed to provide years of service —
following these easy instructions will help keep it working like new
for a lifetime.
It is advisable to have the lock examined by a certified locksmith
annually. The locking mechanism located inside the door is lubricated and should require no maintenance. The chrome locking
bolts located on the side of the door may occasionally need
lubrication. With the door in the fully open position, turn the
handle counterclockwise until it stops and the bolts are extended.
Wipe a small amount of grease under each bolt.
Warranty
This product was inspected thoroughly before leaving the factory
and is warranted to the original retail purchaser, and, where
required by law, to any person who acquires the product from the
original consumer, for the period of three years from the date of
purchase to be free of structural and mechanical defects due
to faulty materials or workmanship. In jurisdictions requiring
terms of warranty longer than three years, this product shall
be warranted for that period of time required by law.
In the event that any product fails to conform to Sentry’s
warranty, Sentry will repair or replace that product at no charge
to the customer.
Sentry Group guarantees to repair or replace, free of charge, any
Sentry model, with a UL Listed Lock, that is forcibly entered during
the lifetime of the original purchaser. The safe must be returned
to Sentry Group, 900 Linden Avenue, Rochester, NY 14625, USA, by
prepaid freight. A copy of the original purchase receipt and a copy
of a report by the investigating authorities must be included. The
repaired Sentry product or a new safe will be returned to the
owner, freight collect, within 6- 8 weeks from receipt of
guarantee claim.
The foregoing warranty is Sentry’s sole warranty with respect
to the product, and all other warranties, terms and conditions,
express or implied, including any implied warranties of
merchantability or fitness for any particular purpose are
hereby disclaimed and excluded.
Some jurisdictions do not allow the exclusion of certain
warranties, so some of the foregoing exclusions may not
apply to you.
WARNING!
If children live or visit in your home, do not leave your
Sentry Gun Safe open and unattended. Children at play
could accidentally be locked inside the safe. Keep your
safe closed and locked at all times.
2
Security-Safe
®
Page 3

Merci d’avoir fait
l’acquisition d’un produit
coffre-fort Sentry de sécurité.
Instructions concernant l’ouverture
IMPORTANT : la serrure de ce coffre-fort est en
position ouverte. NE faites PAS fonctionner la
combinaison avant d’avoir lu et compris les
instructions suivantes.
La combinaison de ce coffre-fort a été choisie au hasard et celle-ci
figure en bas. Il est important que vous conserviez ce manuel de
l’utilisateur dans un endroit sûr plutôt que DANS votre
coffre-fort ; celui-ci est votre source de référence à la fois
pour la combinaison du coffre-fort et pour le numéro de série.
Comparez le numéro de série ci-dessous avec le numéro figurant
sur le coté droit inférieur du coffre-fort. Si les numéros ne
sont pas identiques, ne tentez pas de faire fonctionner
la combinaison et prenez contact avec Sentry. (Numéro
de téléphone ci-dessous sous “ Des questions ? ”).
Test de fermeture
Essayez d’abord la combinaison
avec la porte ouverte !
Testez votre nouvelle serrure à combinaison homologuée UL
plusieurs fois avec la porte ouverte. D’abord, tournez la roue vers
la droite jusqu’à ce qu’elle s’arrête sur 87, puis tournez la poignée
du coffre-fort dans le sens des aiguilles d’une montre jusqu’à ce
qu’elle s’arrête et que les pênes de fermeture chromés soient
allongés. Suivez attentivement les instructions ci-dessous.
REMARQUE : la roue ne tournera pas au-delà du zéro tant que les
pênes de fermeture sont en position fermée avec
la poignée verticale.
Un alignement précis de la serrure avec l’indice d’ouverture (la
ligne verticale en haut au centre de la roue) est essentiel pour
faire fonctionner votre combinaison avec succès. Composez votre
combinaison lentement et en faisant attention pour éviter de
passer au-delà des numéros désirés. Pour le cas où votre roue
dépasserait le bon chiffre, il vous serait nécessaire d’entrer à
nouveau la combinaison entière. Enfin d’éviter de causer des
dommages au mécanisme de la serrure, ne faites jamais tourner
la roue rapidement dans un sens puis dans un autre.
COMBINAISON :
1. Commencez par mettre la roue sur ZÉRO.
2. Tournez la roue vers la GAUCHE (sens contraire des
aiguilles d'une montre). Passez le premier chiffre
de la combinaison trois fois. Arrêtez-vous sur
le premier chiffre de la combinaison lors de
la quatrième fois.
3. Changez de direction de tour de roue. Allez vers
la DROITE (sens des aiguilles d'une montre),
passez le deuxième chiffre de la combinaison
deux fois et arrêtez-vous sur le deuxième
chiffre la troisième fois.
4. Changez à nouveau de direction. En tournant vers la
GAUCHE (sens contraire des aiguilles d'une montre),
passez le troisième chiffre de la combinaison une
fois, et ensuite continuez en tournant dans la même
direction, arrêtez-vous sur le troisième chiffre
de la combinaison.
5. Changez encore de direction, en tournant vers la
DROITE jusqu'à ce que la roue s'arrête
complètement, pour ne plus bouger.
6. Faites remonter la poignée du coffre vers la gauche (sens des
aiguilles d'une montre) et ouvrez la porte.
Fermeture et verrouillage
Avec la porte fermée, tournez la poignée dans le sens contraire
des aiguilles d’une montre pour sécuriser les pênes de fermeture,
puis faites tourner la roue à combinaison vers la gauche, au moins
quatre fois pour brouiller la combinaison.
Combinaison oubliées
Combinaison prédéfinie : commencez par rechercher le
numéro de série de votre coffre-fort. Celui-ci est imprimé sur
la petite étiquette située à droite du coffre-fort (sur la paroi
extérieure). Envoyez ce numéro et une lettre certifiée conforme
indiquant que vous êtes le propriétaire de ce coffre-fort ainsi
qu'un chèque ou un mandant de 6 dollars (monnaie américaine)
à : Sentry Group, 882 Linden Avenue, Rochester, NY 14625-2784,
États-Unis.
Combinaison personnelle : le changement de la combinaison
demande des outils spécialisés et, afin de parer à tout dommage
de la serrure, doit être exécuté par un serrurier professionnel.
Lorsque la combinaison prédéfinie est changée, celle-ci est à
jamais perdue. Pour le cas où vous perdriez votre nouvelle
combinaison ou vous l’oublieriez, il vous serait nécessaire
de faire intervenir un serrurier pour ouvrir le coffre-fort.
Des questions ?
Appelez le Service à la clientèle de Sentry au 1-800-828-1438
ou au 585-381-4900 (du lundi au vendredi, de 8 h à 21h, heure
normale de l’est).
Mise en place et fixation
du coffre-fort
Pour dissuader les voleurs
Aucun coffre-fort n’est inviolable : ce n’est qu’une question
d’outillage, de temps et d’habileté. Par conséquent, pour accroître
la sécurité :
✪
Placez le coffre-fort de telle sorte que la charnière soit
éloignée du mur et que l’ouverture de la porte se fasse
près du mur. Cela rendra le coffre plus difficile à forcer.
✪
Dans la mesure du possible, dissimulez le coffre-fort.
✪
Veillez à ce que le coffre-fort soit toujours fermé
et verrouillé lorsqu’on ne l’utilise pas.
✪
Vous pouvez boulonner votre coffre-fort au sol, à l’aide
des pièces fournies et des instructions incluses dans
cette brochure.
✪
Ne conservez pas la combinaison à proximité du coffre-fort
ne la confiez à autrui.
✪
Ne parlez pas du coffre-fort à autrui.
Instructions de boulonnage
1. Choisissez un emplacement pratique et approprié pour votre
coffre-fort. Mettez-le en place et utilisez les trous ménagés au
fond du coffre-fort pour marquer l’emplacement des trous à
percer dans le sol.
2. Poussez le coffre de côté et percez des trous d’un diamètre et
d’une profondeur appropriés pour le type de matériel utilisé
ainsi que la surface de montage.
3. Replacez le coffre-fort sur les trous et installez les attaches
comme indiqué.
Entretien
Ce coffre-fort Sentry a été conçu de manière à procurer des
années de service — le fait de suivre ces simples directives
contribuera à le maintenir en état de marche comme s’il était
neuf et ce pour la vie.
Il est recommandable de faire examiner une fois par an le
coffre-fort par un serrurier certifié. Le mécanisme de fermeture
situé à l’intérieur de la porte est lubrifié et ne devrait nécessiter
aucun entretien. Les pênes de fermeture chromés situés sur
le côté de la porte peuvent de temps à autre nécessiter une
lubrification. Avec la porte en position totalement ouverte,
tournez la poignée dans le sens contraire des aiguilles d’une
montre jusqu’à ce qu’elle s’arrête et que les pênes soient
allongés. Appliquez un petit peu de graisse sous chaque pêne.
Garantie
Ce produit a été soigneusement inspecté avant de quitter l'usine ;
il est garanti à son acquéreur d'origine et, lorsque ceci est requis
par la législation, à toute personne l'achetant à son acquéreur
d'origine, et ce pendant trois ans à compter de la date d'achat,
contre tout défaut mécanique ou de structure dû à des vices de
matériau ou de fabrication. Ce produit est d'autre part garanti
pendant la durée requise par la législation dans les juridictions
exigeant des durées de garantie supérieures à trois ans.
Sentry réparera ou remplacera gratuitement tout produit non
conforme à sa garantie.
Sentry Group garantit de réparer ou de remplacer, sans aucun
frais, tout modèle Sentry, muni d’une serrure homologuée UL,
qui a subi une ouverture par force pendant la durée de vie de
l’acheteur d’origine. Le coffre-fort doit être retourné à Sentry
Group, 900 Linden Avenue, Rochester, NY 14625, USA, en fret
prépayé. Un double du reçu d’achat originel et un double du
rapport établi par les autorités enquêtrices doivent être inclus.
Le produit Sentry réparé ou un nouveau coffre-fort sera renvoyé
au propriétaire, fret en port dû, dans un délai de 6 à 8 semaines
à partir de la date de réception de la réclamation de garantie.
Ladite garantie est l'unique garantie concernant ce produit, et
toutes les autres garanties, ainsi que les termes et conditions,
explicites ou implicites, et ce y compris les garanties implicites
de valeur marchande ou d'adaptation à tout objectif particulier,
sont rejetés et exclus par la présente.
Certaines juridictions n'autorisant pas l'exclusion de certaines
garanties, certaines des exclusions de la présente peuvent ne
pas s'appliquer à votre situation.
ATTENTION!
Si des enfants vivent chez vous ou s’ils vous rendent
visite, ne laissez pas votre coffre-fort Sentry pour armes
à feu ouvert ou sans surveillance. Des enfants en train
de jouer pourraient accidentellement s’enfermer à
l’intérieur du coffre. Fermez et verrouillez votre
coffre à tout moment.
3
Coffre-fort de sécurité
®
Page 4

SENTRY, the Sentry Logo, FIRE-SAFE and the trade dress of the product and
packaging are trademarks of Sentry Group. As trademarks, neither the Sentry Logo
nor FIRE-SAFE represents specific fire or other safety ratings. Any such ratings are
otherwise described on the product packaging and/or in the accompanying literature.
SENTRY, le logo Sentry, FIRE-SAFE et la présentation du produit et de l'emballage
sont des marques de commerce de Sentry Group. En tant que marques de commerce,
ni le logo Sentry ni FIRE-SAFE ne représentent une homologation spécifique contre
les incendies ou autre de sécurité. Ces homologations sont décrites autrement sur
l’emballage du produit et/ou dans la documentation jointe.
SENTRY, el logotipo de Sentry, FIRE-SAFE y la imagen comercial del producto y su
empaque son marcas comerciales de Sentry Group. Como marcas, el logotipo de
Sentry ni FIRE-SAFE representan clasificaciones especificas de fuego o de seguridad
de cualquier otro tipo. Cualquier clasificación de este tipo, es descrita en el empaque
del producto y/o los documentos anexos.
Gracias por haber adquirido
este producto caja fuerte de
seguridad de Sentry.
Instrucciones para abrir
IMPORTANTE: La cerradura de esta caja fuerte
está en posición abierta. NO usar la combinación
antes de haber leído y entendido las siguientes
instrucciones.
La combinación de esta caja fuerte ha sido seleccionada al azar
y es la que aparece abajo en este manual. Es importante conservar
este Manual del Propietario en un lugar seguro que no sea la
caja fuerte, ya que es el documento de consulta de la combinación de la caja fuerte y del Número de Serie. Compare el
número de serie que aparece abajo con el número que se encuentra en el lado inferior derecho de la caja. Si los números no
coinciden, no use la combinación y comuníquese con
Sentry (Número de teléfono en la sección ¿Preguntas?).
Prueba de la cerradura
¡Haga primero una prueba
con la puerta abierta!
Pruebe la nueva cerradura con combinación (aprobada por UL)
varias veces con la puerta abierta. Primero, gire el indicador
numérico hacia la derecha y detenerlo en el 87, después gire la
manija en sentido de las manecillas del reloj hasta que se detenga.
Abra la puerta completamente y gire la manija en sentido contrario
a las manecillas del reloj hasta que se detenga y hayan salido los
pasadores cromados de la cerradura. Siga atentamente las
instrucciones proporcionadas a continuación:
NOTA: El indicador numérico no girará después de cero a
menos que los pasadores se encuentren en la posición
cerrada, con la manija en posición vertical.
El uso correcto de la cerradura con combinación dependerá en
gran medida de la correcta alineación de la cerradura con la guía
de apertura (la línea vertical arriba del centro del indicador
numérico). Marque la combinación lenta y cuidadosamente
sin pasarse de los números deseados. Si se pasa de los números,
debe marcarse toda la combinación nuevamente. Para no dañar el
mecanismo de la cerradura, nunca gire velozmente el indicador
numérico en direcciones contrarias.
COMBINACIÓN:
1. Empiece con el indicador numérico en CERO.
2. Gire el indicador numérico hacia la IZQUIERDA.
Pase el primer número de su combinación tres
veces. Pare en el primer número de la
combinación la cuarta vez.
3. Cambie la dirección del indicador numérico hacia
la DERECHA, pase el segundo número de su
combinación dos veces y pare en el segundo
número de su combinación la tercera vez.
4. Cambie la dirección del indicador numérico nuevamente.
Girando hacia la IZQUIERDA, pase el tercer número
de su combinación una vez y luego continúe girando
en la misma dirección parando en el tercer número
de su combinación.
5. Cambie la dirección del indicador numérico nuevamente,
girando hacia la DERECHA hasta que el indicador
se detenga totalmente y no permita moverse.
6. Gire la manija de la caja fuerte hacia arriba, a la izquierda
y abra la puerta.
Para Cerrar con Llave
Con la puerta cerrada, gire la manija en sentido contrario a las
manecillas del reloj para asegurar que los pasadores de la
cerradura estén acoplados, luego gire el indicador numérico
hacia la izquierda al menos cuatro veces para sacar la cerradura
de combinación.
Combinación Perdida
Combinación preestablecida: Primero, localice el número de
serie de su caja fuerte. El número de serie se encuentra impreso
en la pequeña etiqueta del lado derecho (afuera) de la caja fuerte.
Envíe este número, una carta notarizada declarando que usted es
el propietario de la caja fuerte, y un cheque o giro postal por
$6.00 (moneda de E.U.A.) a: Sentry Group, 882 Linden Avenue,
Rochester, NY 14625-2784, E.U.A.
Combinación personal: El cambio de combinación exige
herramientas especiales y es necesario que el trabajo lo efectúe
un cerrajero profesional para evitar la posibilidad de dañar la
cerradura. Cuando la combinación preestablecida se cambia,
no se puede recuperar más. Si se le olvida o pierde la nueva
combinación, deberá abrir la caja fuerte con un cerrajero.
¿Preguntas?
Llame al departamento de Servicio al Cliente de Sentry al
1-800-828-1438 ó al 585-381-4900 de 8 am a 9 pm, hora oficial
del este de los E.U.A., de lunes a viernes.
Ubicación y fijación de la caja fuerte
Para ayudar a disuadir los robos
Ninguna caja fuerte es a prueba de robos. Con las herramientas
adecuadas, tiempo y destreza, se puede abrir cualquier caja fuerte.
Por lo tanto, para lograr mayor seguridad:
✪
Coloque la caja fuerte con la bisagra alejada de la pared y la
abertura de la puerta junto a la pared. Esto hace más difícil
abrir la caja haciendo palanca.
✪
Si es posible, oculte la caja fuerte.
✪
Mantenga la caja fuerte cerrada y bloqueada cuando no
se esté utilizando.
✪
Puede fijar su caja fuerte al suelo, utilizando los materiales
provistos y las instrucciones incluidas en esta información.
✪
No guarde la combinación cerca de la caja fuerte y no se la
diga a otras personas.
✪
No diga a otras personas donde tiene la caja fuerte.
Instrucciones de fijación
1. Una vez que haya seleccionado una ubicación conveniente para
la caja fuerte, colóquela en su lugar y utilice los agujeros de la
base para marcar los agujeros que se deben taladrar en el piso.
2. Retire la caja fuerte y haga los agujeros del diámetro
correspondiente y de la profundidad necesaria para el tipo
de tornillos utilizados y el tipo de superficie de fijación.
3. Coloque la caja fuerte nuevamente en posición y ajuste
los tornillos.
Mantenimiento
Esta caja fuerte Sentry ha sido diseñada para proveerle años de
servicio - la observación de las siguientes instrucciones ayudará
a que la caja fuerte funcione como nueva de por vida.
Es aconsejable hacer revisar la cerradura con combinación por un
cerrajero, una vez por año. El mecanismo interno de la cerradura
de la puerta es lubricado y no requiere mantenimiento. Los
pasadores cromados de la cerradura ubicados al lado de la puerta
podrían necesitar lubricación de vez en cuando. Con la puerta
totalmente abierta, gire la manija en sentido contrario a las
manecillas del reloj hasta que se detenga y los pasadores de la
cerradura estén salidos. Aplique una pequeña cantidad de grasa
en cada pasador.
Garantía
Este producto ha sido inspeccionado detenidamente antes de salir
de la fábrica y está garantizado al comprador menudista original y,
cuando así sea requerido por ley, a cualquier persona que adquiera
el producto del consumidor original, por un período de tres años
a partir de la fecha de compra, contra defectos estructurales y
mecánicos debido a defectos de materiales o hechura. En las
jurisdicciones que exigen plazos de garantía de más de tres años,
este producto estará garantizado por el período exigido por ley.
En caso de que cualquier producto no conformara con la garantía
ofrecida por Sentry, Sentry reparará o reemplazará dicho producto
sin cargo al cliente.
Sentry Group garantiza la reparación o el reemplazo sin cargo
de cualquier modelo Sentry con cerradura normalizada UL, que
haya sido abierta forzadamente durante el tiempo de vida del
comprador original. En tal caso, la caja fuerte debe ser enviada a
Sentry Group, 900 Linden Avenue, Rochester, NY 14625, E.U.A., con
los costos de envío pagados. Se debe incluir con la caja fuerte,
una copia del recibo de compra original y una copia de la denuncia
policial del robo. El propietario recibirá la caja fuerte Sentry
reparada o una unidad nueva, con los costos de envío a cargo del
usuario, y en un período de 6 a 8 semanas a partir de la recepción
del reclamo de garantía.
La garantía que antecede es la exclusiva garantía ofrecida por
Sentry con respecto al producto, y por este medio se niegan y se
excluyen todas y cualquier otra garantía, términos y condiciones,
expresos o implícitos, incluso cualquier garantía implícita de
comerciabilidad o propiedad para algún propósito específico.
Algunas jurisdicciones no permiten la exclusión de ciertas
garantías, y en consecuencia es posible que algunas de las
exclusiones que anteceden no se apliquen a usted.
¡ADVERTENCIA!
Si viven o visitan menores en su hogar, no deje
abierta y sin supervisión su Caja Fuerte para Armas
de Fuego Sentry. Menores jugando pudieran quedar
encerrados bajo llave dentro de la caja fuerte. Mantenga
cerrada y bajo llave su caja fuerte en todo momento.
®
© 2002 Sentry Group
Printed in China
172097
Caja fuerte de seguridad
®
Sentry Group
900 Linden Avenue
Rochester, New York 14625-2784 USA
Telephone: 585-381-4900
Customer Service: 1-800-828-1438 (8:00 am–9:00 pm E.S.T., Mon. – Fri.)
Fax: 585-381-2940
www.sentrysafe.com
 Loading...