

Page 1

GRAPHIC SCIENTIFIC CALCULATOR
• The contents of this manual are subject to change without
notice.
• No part of this manual may be reproduced in any form
without the express written consent of the manufacturer.
• In no event will the manufacturer and its suppliers being
liable to you or any other person for any damages,
expenses, lost profits, lost savings or any other damages
arising out of use of or inability to use this calculator or
manual.
• In no event will the manufacturer and its suppliers being
liable to you or any other person for any damages,
expenses, lost profits, lost savings or any other damages
arising out of loss of data and/or formulas caused by use
of this calculator or manual.
• Due to limitations imposed by printing processes, the
displays shown in this manual are only approximations
and may differ somewhat from actual displays.
Introduction
Thank you for purchasing the Graphic Scientific
Calculation.
This unit is a totally new type of advanced programmable
calculator. Besides versatile scientific functions, graph
functions also make it possible to produce a wide variety of
useful graphs.
Manual calculations can be easily performed following
written formulas (true algebraic logic). A replay function is
provided that allows confirmation or correction when key
operation errors occur. Programs can also be input by
following true algebraic logic, so repeat and/or complex
calculations are simplified.
All of this power built into a compact configuration that folds
up to slip right into your pocket.
Be sure to carefully read this manual and keep it handy for
future reference.
Important–Reset your calculator before using it for the
first time!––––––––––––––
Important––Always back up data!––––––
This product features electronic memory that is capable of
storing large volumes of data. You must also remember
1
S6600G-ENG-A 8/30/04, 11:05 AMPage 1 Adobe PageMaker 6.5C/PPC
Page 2

that your data is safely stored as long as power is being
supplied to the memory. Data stored in memory will be
irreparably damaged or lost entirely if you let battery power
become too low, if you make a mistake while replacing
batteries, or if power is cut off. Data can also be damaged
by strong impact or electrostatic charge, or by
environmental extremes. Once data is damaged or lost, it
cannot be recovered, so we strongly recommend that you
back up all important data.
Contents
About the Power Supply ................................ 7
Battery replacement ..............................................................7
Auto Power Off function ......................................................... 7
Reset operation ...................................................................... 7
Handling Precautions ................................................ 8
1.General Guide ............................................... 9
1-1 Key Markings ............................................................... 9
1-2 How to Read the Display ........................................... 9
Display indicators ......................................................... 9
About the display layout ...............................................10
Exponential display ...................................................... 11
Special display formats ................................................12
1-3 Key Operations ...........................................................13
Special operation keys ................................................ 13
Numeric/Decimal point/Exponent input keys ............18
Calculation keys ................................................. 19
Graph keys ........................................................ 21
Function keys ..................................................... 21
Contrast adjustment ............................................ 25
1-4 Before Beginning Calculations .....................26
Calculation priority sequence .............................. 26
Number of stacks .............................................. 27
Calculation modes ............................................. 28
Number of input/output digits and Calculation
digits ................................................................ 29
Overflow and errors ........................................... 30
Number of input characters ................................. 31
Graphic and text displays .......................................... 31
Corrections ....................................................... 32
Memory ............................................................ 33
Memory expansion ............................................ 35
2. Manual Calculations ................................ 37
2-1 Basic Calculations ............................................ 37
Arithmetic operations .......................................... 37
Parenthesis calculations ..................................... 38
Memory calculations .......................................... 39
Specifying the number of decimal places,
the number of significant digits and the exponent
display ................................................................ 40
2
S6600G-ENG-A 8/30/04, 11:05 AMPage 2-3 Adobe PageMaker 6.5C/PPC
3
Page 3

2-2 Special Functions ............................................ 42
Answer (Ans) function ........................................ 42
Continuous calculation function ........................... 44
Replay function.................................................. 45
Error position display function .............................. 46
Multistatement function .......................................46
2-3 Functional calculations ............................... 47
Angular measurement units ............................... 47
Trigonometric functions and inverse
trigonometric functions ....................................... 49
Logarithmic and exponential functions .................. 50
Hyperbolic functions and inverse hyperbolic
functions .......................................................... 51
Coordinate transformation .................................. 52
Other functions ................................................. 53
Fractions ......................................................... 55
2-4 Binary, Octal, Decimal, Hexadecimal Calculations 57
Binary, octal, decimal, hexadecimal conversions .... 59
Negative expressions ......................................... 59
Basic arithmetic operations using binary, octal,
decimal and hexadecimal values ........................ 60
Logical operations ............................................ 61
2-5 Statistical Calculations ............................... 62
Standard deviation ............................................ 62
Regression calculation ....................................... 64
Linear regression .............................................. 66
Logarithmic regression ...................................... 67
Exponential regression ...................................... 69
Power regression ............................................. 70
3. Graphs .............................................. 71
3-1 Built-in Function Graphs ............................. 71
Overdrawing built-in function graphs .................... 71
3-2 User Generated Graphs .............................. 72
Range parameters ............................................ 72
User generated function graphs .......................... 77
Function graph overdraw ................................... 77
Zoom function .................................................. 78
Trace function .................................................. 81
Plot function ..................................................... 84
Line function .................................................... 84
Graph scroll function ......................................... 86
3-3 Some Graphing Examples .......................... 88
4
4. Program Calculations .......................... 89
4-1 What is a Program? ..................................... 89
Formulas .......................................................... 89
Programming .................................................... 89
Program storage ................................................ 90
Program execution .............................................92
4-2 Program Checking and Editing .................... 93
(Correction, Addition, Deletion) ............................ 93
Formulas .......................................................... 94
Programming .................................................... 94
Program editing ................................................. 94
Program execution ............................................. 95
4-3 Program Debugging(Correcting Errors) ....... 97
Debugging when an error message is generated ....97
Error messages ................................................. 97
Checkpoints for each type of error ........................ 98
4-4 Counting the Number of Steps ........................99
4-5 Program Areas and Calculation Modes ...... 100
Program area and calculation mode specification
in the WRT mode ..............................................101
Cautions concerning the calculation modes ...........102
4-6 Erasing Programs ......................................102
Erasing a single program .................................. 102
Erasing all programs ........................................ 103
4-7 Convenient Program Commands ............... 104
Jump commands ............................................. 104
Unconditional jump ........................................... 104
Conditional jumps ........................................... 105
Count jumps .................................................... 108
Summary ........................................................ 111
Subroutines ..................................................... 112
4-8 Array-Type Memories ................................ 114
Using array-type memories ............................... 115
Cautions when using array-type memories .......... 115
Application of the array-type memories ............... 117
4-9 Displaying Alpha-Numeric Characters and
Symbols .........................................................119
Alpha-numeric characters and symbols ................119
4-10 Using the Graph Function in Programs ..... 121
Function Reference .................................123
Error Message Table ................................130
5
S6600G-ENG-A 8/30/04, 11:05 AMPage 4-5 Adobe PageMaker 6.5C/PPC
Page 4
Input Ranges of Functions ....................... 132
Specifications ....................................... 135
6
Battery Replacement
If the display becomes dim, replace the battery with new
one according to the following procedures.
Battery: CR2032 x 1
1. Turn off the Graphic Scientific Calculator.
2. With a screwdriver, remove the screws of back cover.
3. Remove the old battery and insert the new one
immediately (+ side must be UP).
4. Replace the back cover.
Auto Power Off function
The power of the unit is automatically switched off
approximately 6 minutes after the last key operation
(except during program calculations). Once this occurs,
power can be restored by pressing the key. (Numeric
values in the memories, programs or calculation modes are
unaffected when power is switched off.)
Reset operation
• Strong external electrostatic charges can cause this
calculator to malfunction. Should this happen,
perform the following procedure to reset the
calculator.
The following procedure clears all data from the memory of
the calculator and cannot be undone! To avoid the loss of
important data, be sure to always keep written backup
copies.
1.Press the RESET button on the back of the calculator
with a thin, pointed object.
Following the reset procedure described above, the
calculator is initialized as follows:
1.RUN mode
2.COMP mode
3.DEG mode
4.NORM1 mode
5.Decimal mode (for BASE-N calculations)
6.Variable memories cleared
7.Defm 0 (400 program steps)
8.Answer memory clear
7
S6600G-ENG-A 8/30/04, 11:05 AMPage 6-7 Adobe PageMaker 6.5C/PPC
Page 5
9.Program clear
10.Input buffer clear
11.Replay memory clear
* Never press the RESET button while internal
operations are being performed. Doing so can cause
irreparable damage to the memory of your calculator.
Handling precautions
• Avoid dropping your calculator and subjecting it to other
strong impacts.
• Do not store the calculator or leave it in areas exposed to
high temperatures, or humidity, or large amounts of dust.
when exposed to low temperatures, the calculator may
require more time to display results and may even fail to
operate. Correct operation will resume once the
calculator is brought back to normal temperature.
• The display will go blank and keys will not operate during
calculations. When you are operating the keyboard, be
sure to watch the display to make sure that all your key
operations are being performed correctly.
• Avoid using volatile liquids such as thinner or benzine to
clean the unit. Wipe it with a soft, dry cloth, or with a cloth
that has been dipped in a solution of water and a neutral
detergent and wrung out.
• Be sure that the power is off when replacing batteries.
• If the calculator is exposed to a strong electrostatic
charge, its memory contents may be damaged or the
keys may stop working. In such a case, perform the
Reset operation to clear the memory and restore normal
key operation.
• Note that strong vibration or impact during program
execution can cause execution to stop or can damage
the calculator's memory contents.
• Before assuming malfunction of the unit, be sure to
carefully reread this manual and ensure that the problem
is not due to insufficient battery power, programming or
operational errors.
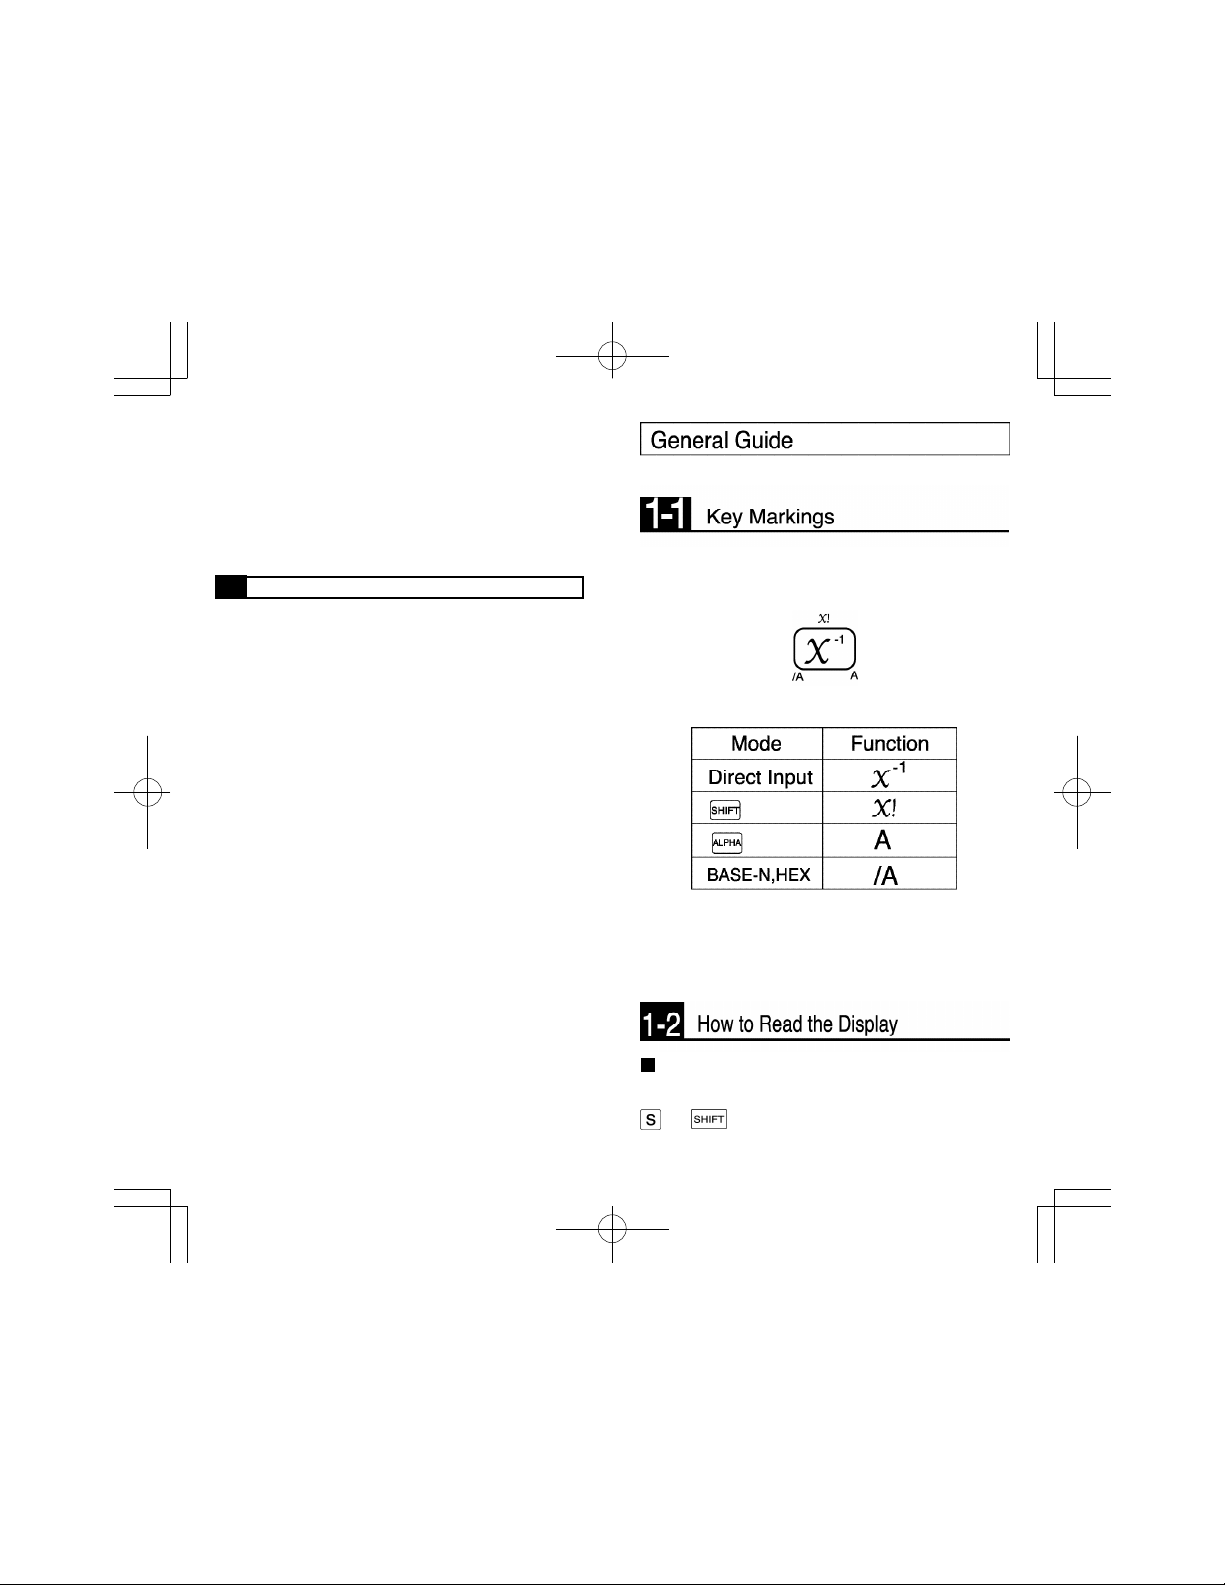
The keys of this unit perform a number of different
functions. The key illustrated below, for example, is used to
perform 4 different functions:x-1, x!, A, /A.
Note the following, concerning the key illustrated above.
The keys of this calculator can perform a number of
different functions. The keyboard is color-coded to help you
quickly determine the key sequence you have to perform
for each function.
Display indicators
The following indicators appear on the display to show you
the current status of the calculator at a glance.
: key pressed.
8
S6600G-ENG-A 8/30/04, 11:05 AMPage 8-9 Adobe PageMaker 6.5C/PPC
9
Page 6
: key pressed.
: key pressed.
Sci: Number of significant digits specified.
Fix: Number of decimal places specified.
hyp: key pressed.
: Degrees specified at the unit of angular
measurement.
: Radians specified at the unit of angular
measurement.
: Grads specified at the unit of angular
measurement.
WRT : Program write mode ( ) specified.
PCL : Program clear mode ( ) specified.
X= : Indicates current x-and y-coordinate location of
Trace function pointer.
: Indicates display consists of more than 12
characters " " indicates extra characters run
off left side of display, " " indicates characters
run off right side.
: Indicates displayed value is intermediate result.
About the display layout
The display consists of a dot area for graphing, as well as
an area for indicators and characters. You can monitor the
status of the calculator and programs by viewing the
display.
Graph Display
Program WRTT mode
Exponential display
During normal calculation, this unit is capable of displaying
up to 10 digits. Values that exceed this limit, however, are
automatically displayed in exponential format. You can
choose between 2 different types of exponential display
formats.
NORM 1 mode: 10-2(0.01)> , 10
NORM 2 mode: 10-9(0.000000001)> , 10
10
10
Selection of these modes can be carried out by pressing
when no specification has been made for the
number of decimal places or significant digits. The present
status is not displayed, so it is necessary to perform the
following procedure to specify either display format:
Calculation Display
(All of the examples in this manual show calculation results
using the NORM 1 mode.)
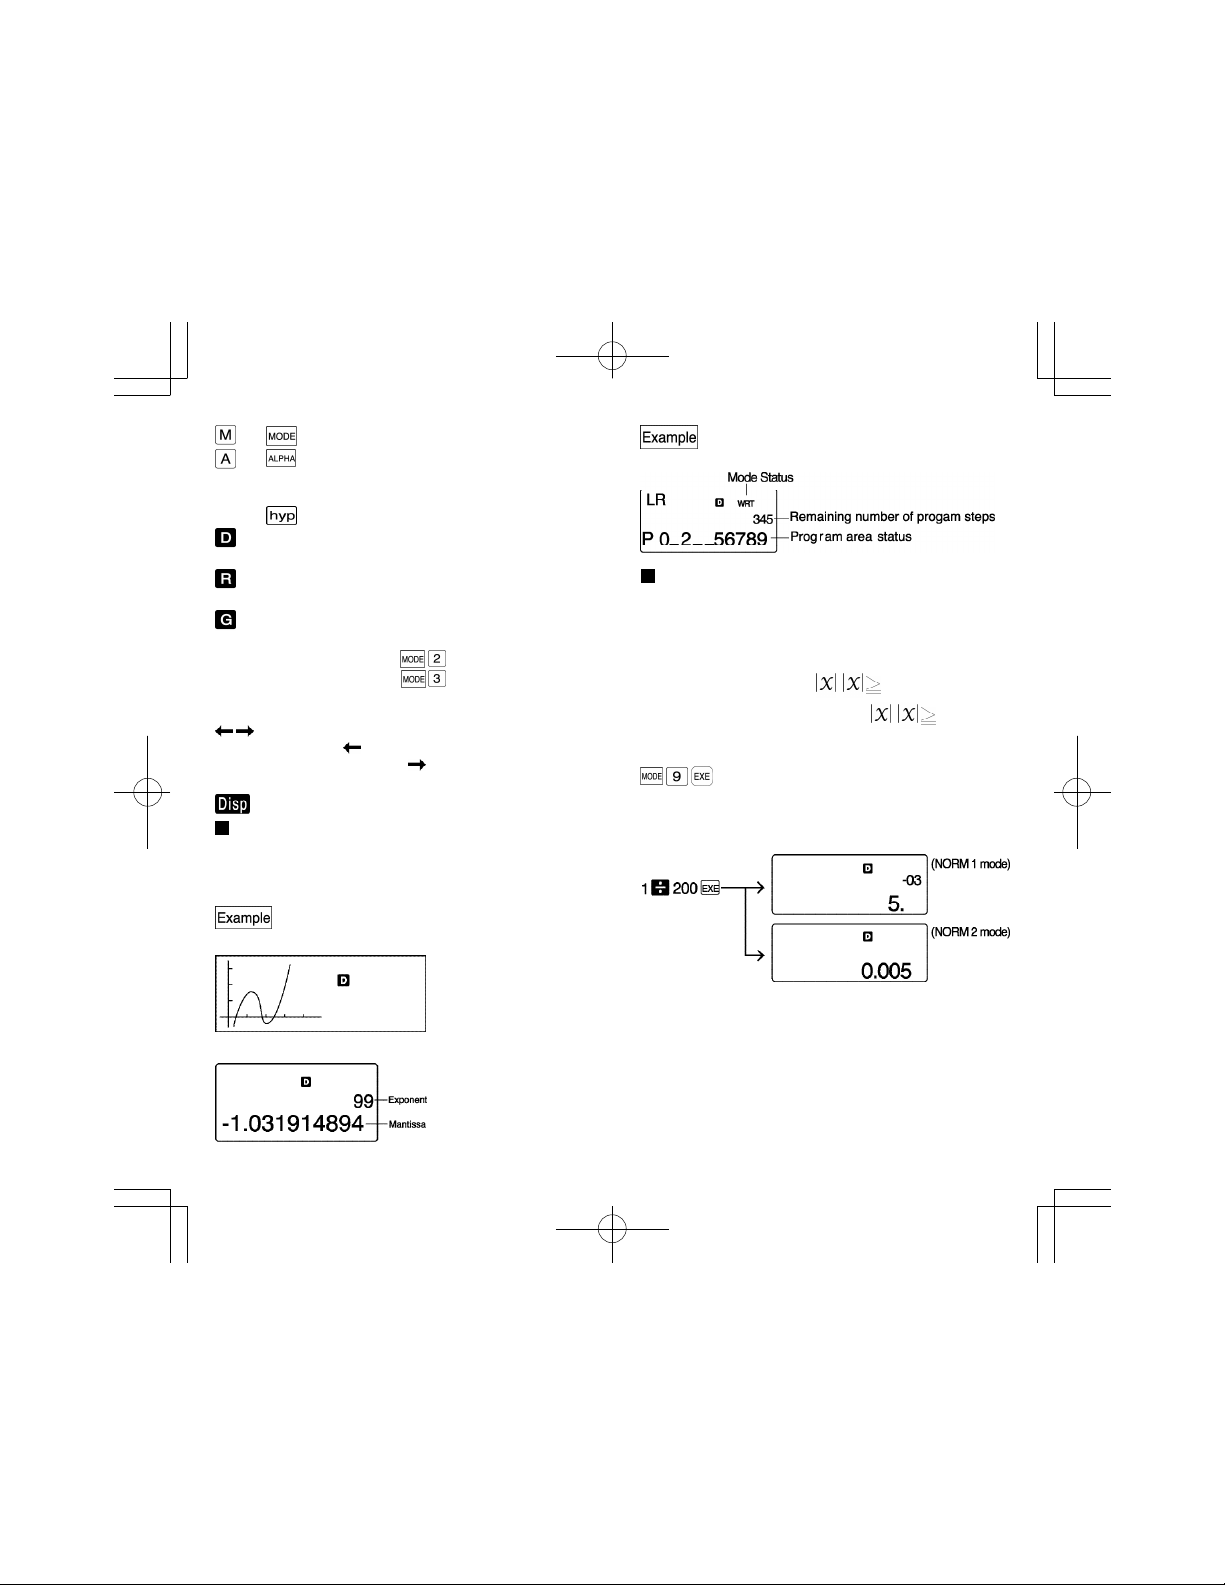
How to interpret exponential format
Mode Status Display
S6600G-ENG-A 8/30/04, 11:05 AMPage 10-11 Adobe PageMaker 6.5C/PPC
10
11
Page 7
111
1.2x10
. 120,000,000,000
1.211 indicates that the result is equivalent to 1.2x10¹¹. This
means that you should move the decimal point in 1.2
eleven places to the right, since the exponent is positive.
This results in the value 120,000,000,000.
1.2x10⁻³. 0.0012
-03
1.2
indicates that the result is equivalent to 1.2x10⁻³. This
means that you should move the decimal point in 1.2 three
places to left, since the exponent is negative. This results in
the value 0.0012.
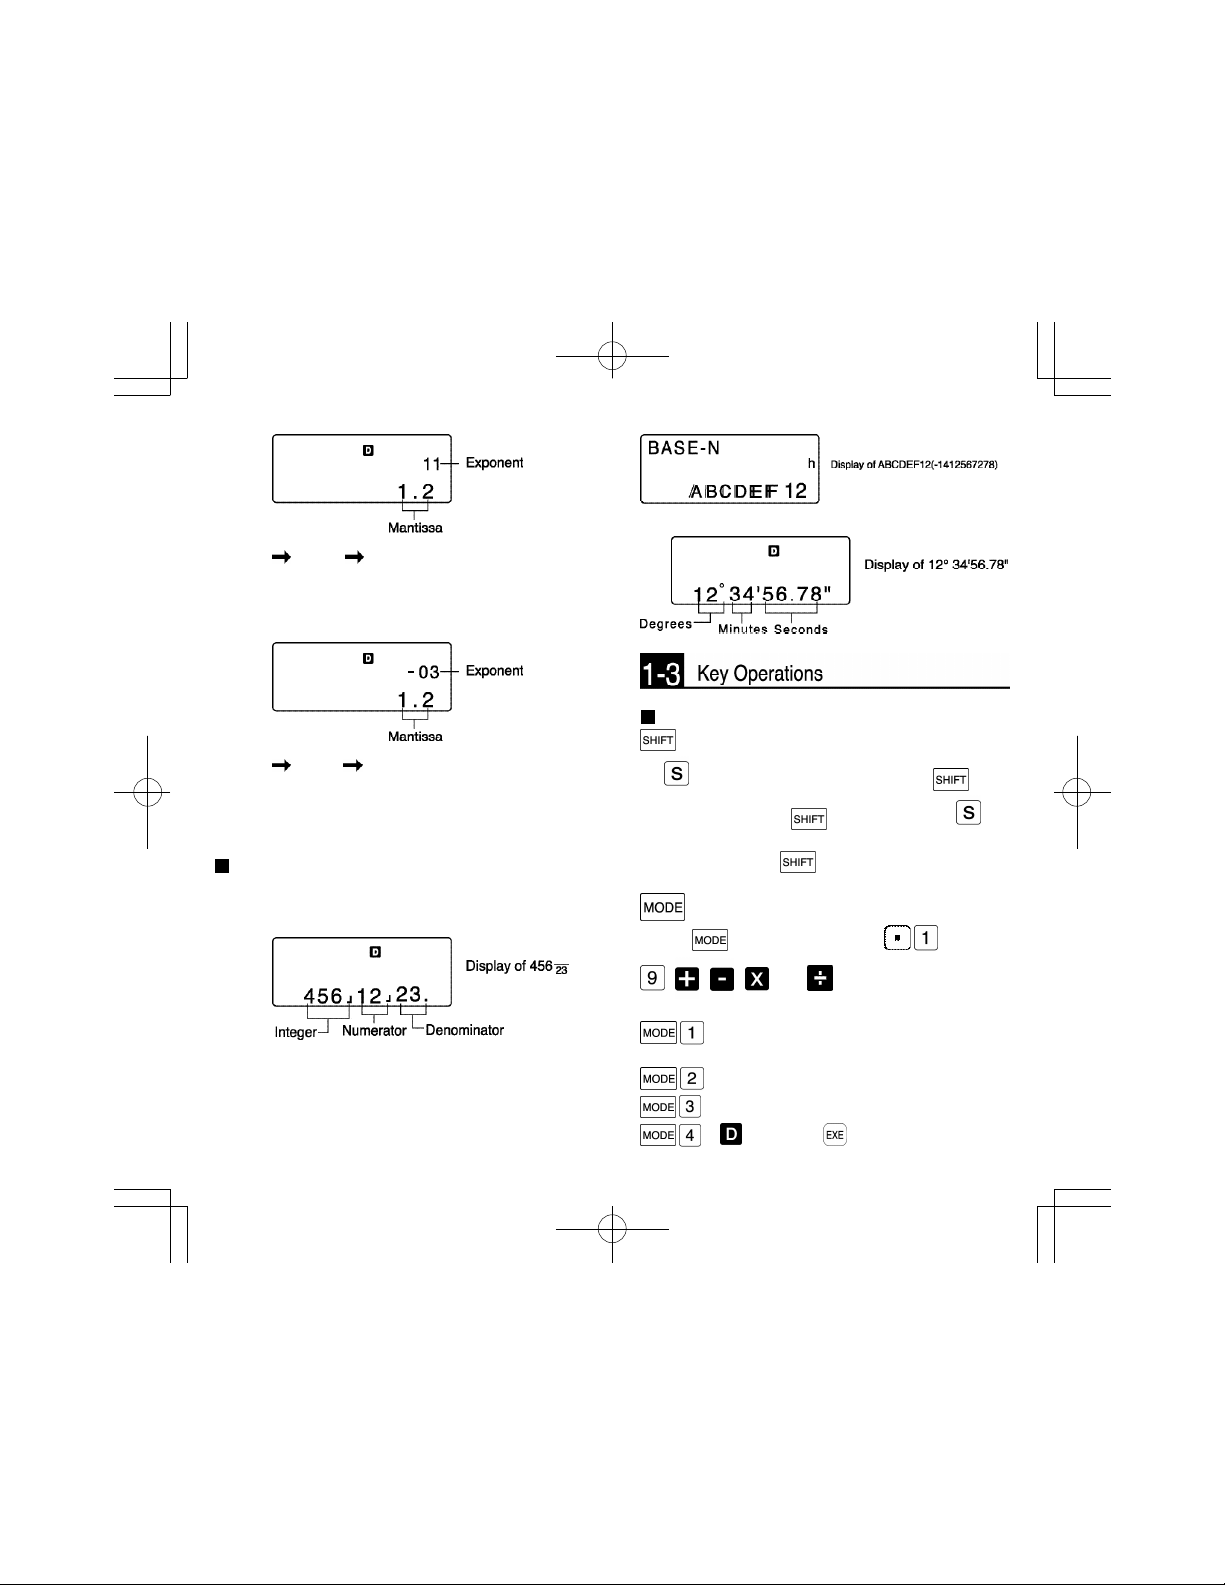
Special display formats
Special display formats are used for the representation of
fraction, hexadecimal, and sexagesimal values.
• Fraction value display
12
• Hexadecimal value display
• Sexagesimal value display
Special operation keys
Shift key
An will blink on the display to indicate that has
been pressed. Pressing again will cause the to
disappear form the display and the unit to return to the
status it was in before was originally pressed.
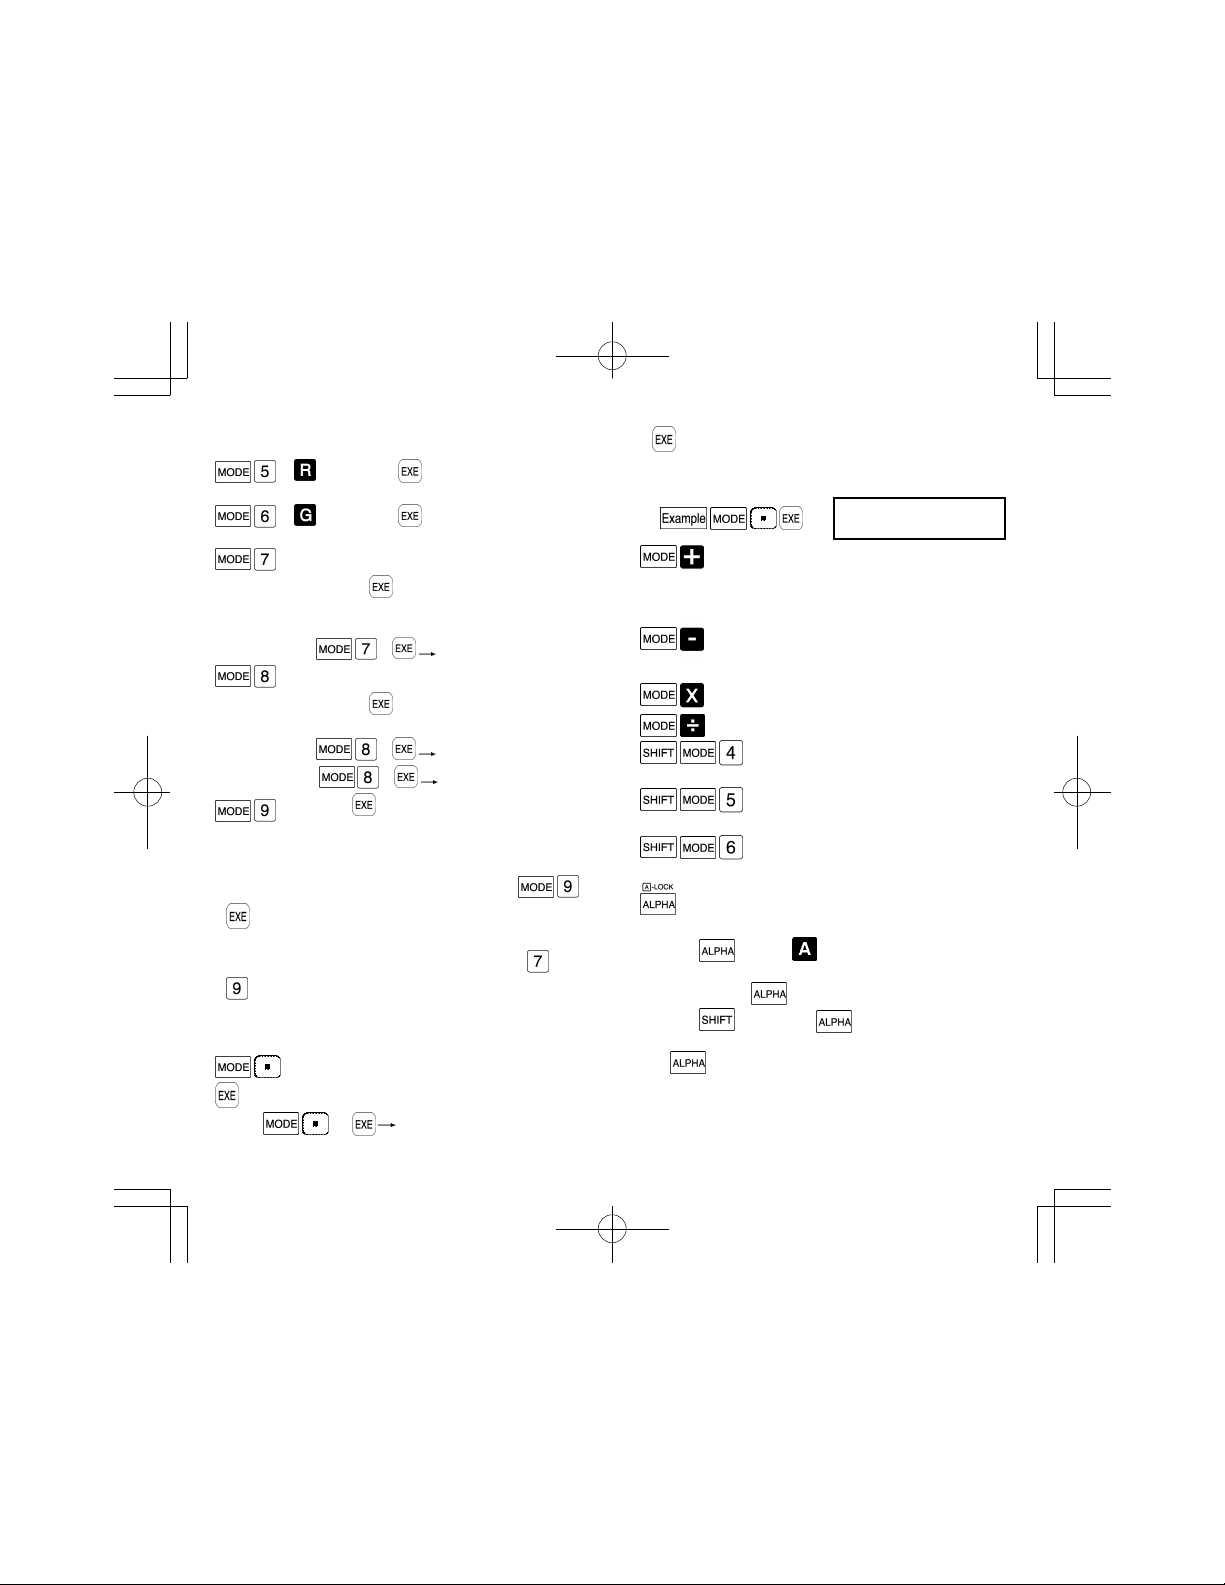
Mode key
Use the key in combination with through
, , , , and to specify the calculation
mode and the unit of angular measurement.
...For manual calculations and program
execution (RUN mode).
...WRT displayed. For writing or checking programs.
... PCL displayed. For clearing programs.
... displayed. If is pressed, unit of
12
S6600G-ENG-A 8/30/04, 11:05 AMPage 12-13 Adobe PageMaker 6.5C/PPC
13
Page 8
angular measurement is specified as
degrees.
... displayed. If is pressed, unit of
angular measurement is specified as radians.
... displayed. If is pressed, unit of
angular measurement is specified as grads.
... Fix displayed. Entering a value from 0 to 9
followed by will specify the number of
decimal places according to the value
entered.
Ex. 3 Three decimal places
... Sci displayed. Entering a value from 0 to 9
followed by will specify the number of
significant digits from 1 to 10.
Ex. 5 5 significant digits
0 10 significant digits
... Pressing will cancel the specified number
of decimal places or the specified number of
significant digits.
* If you have not specified the number of decimal places or
the number of significant digits, you can press
and then change the range of the exponential
display. (NORM 1/NORM 2)
* With the exception of the BASE-N mode, modes ~
can be used in combination with the manual
calculation modes.
* The mode last selected is retained in memory when the
unit's power is switched off.
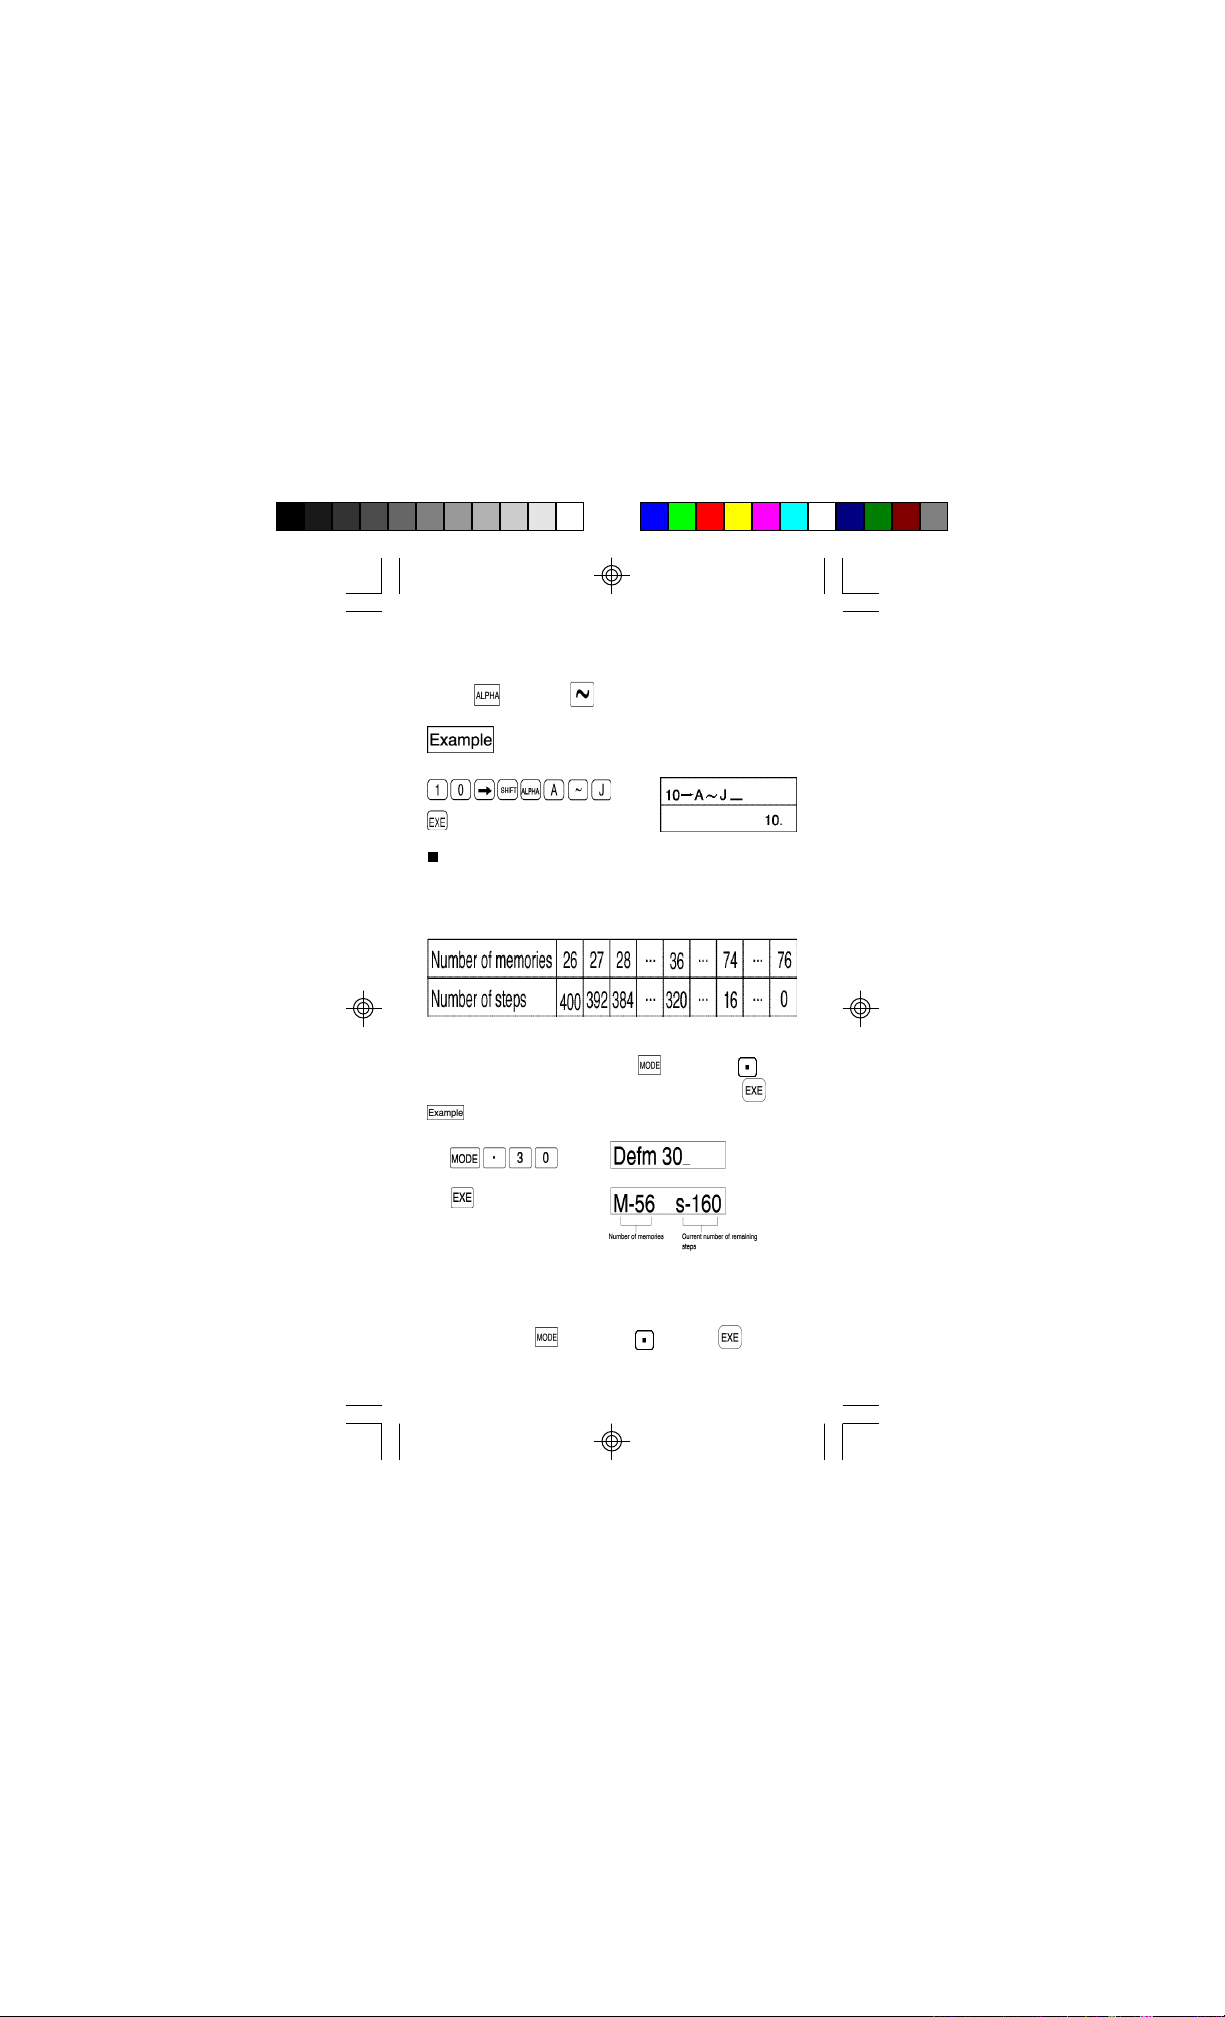
... Defm displayed. Entering a value followed by
will specify the number of memories available.
Ex. 10 Number of memories
available increased by 10.
14
If is pressed without entering a value, the current
number of memories available and remaining steps will be
displayed .
... Specifies COMP mode for arithmetic
calculation or function calculation (program
execution possible).
... For binary, octal or hexadecimal calculations/
conversions (BASE-N mode).
... For standard deviation calculations (SD mode).
... For regression calculations (LR mode).
...Pressed after a numeric value
representing degrees (0) is input.
...Pressed after a numeric value
representing radians (r) is input.
...Pressed after a numeric value
representing grads (g) is input.
Alphabet key
Press to input alphabetic characters or special characters.
Pressing displays and allows the input of only
one character. After that, the unit returns to the status it
was in before the key was originally pressed.
Pressing followed by will lock the until in this
mode and allow consecutive input of alphabetic characters
until is pressed agian.
M-26 S-320
15
S6600G-ENG-A 8/30/04, 11:05 AMPage 14-15 Adobe PageMaker 6.5C/PPC
Page 9
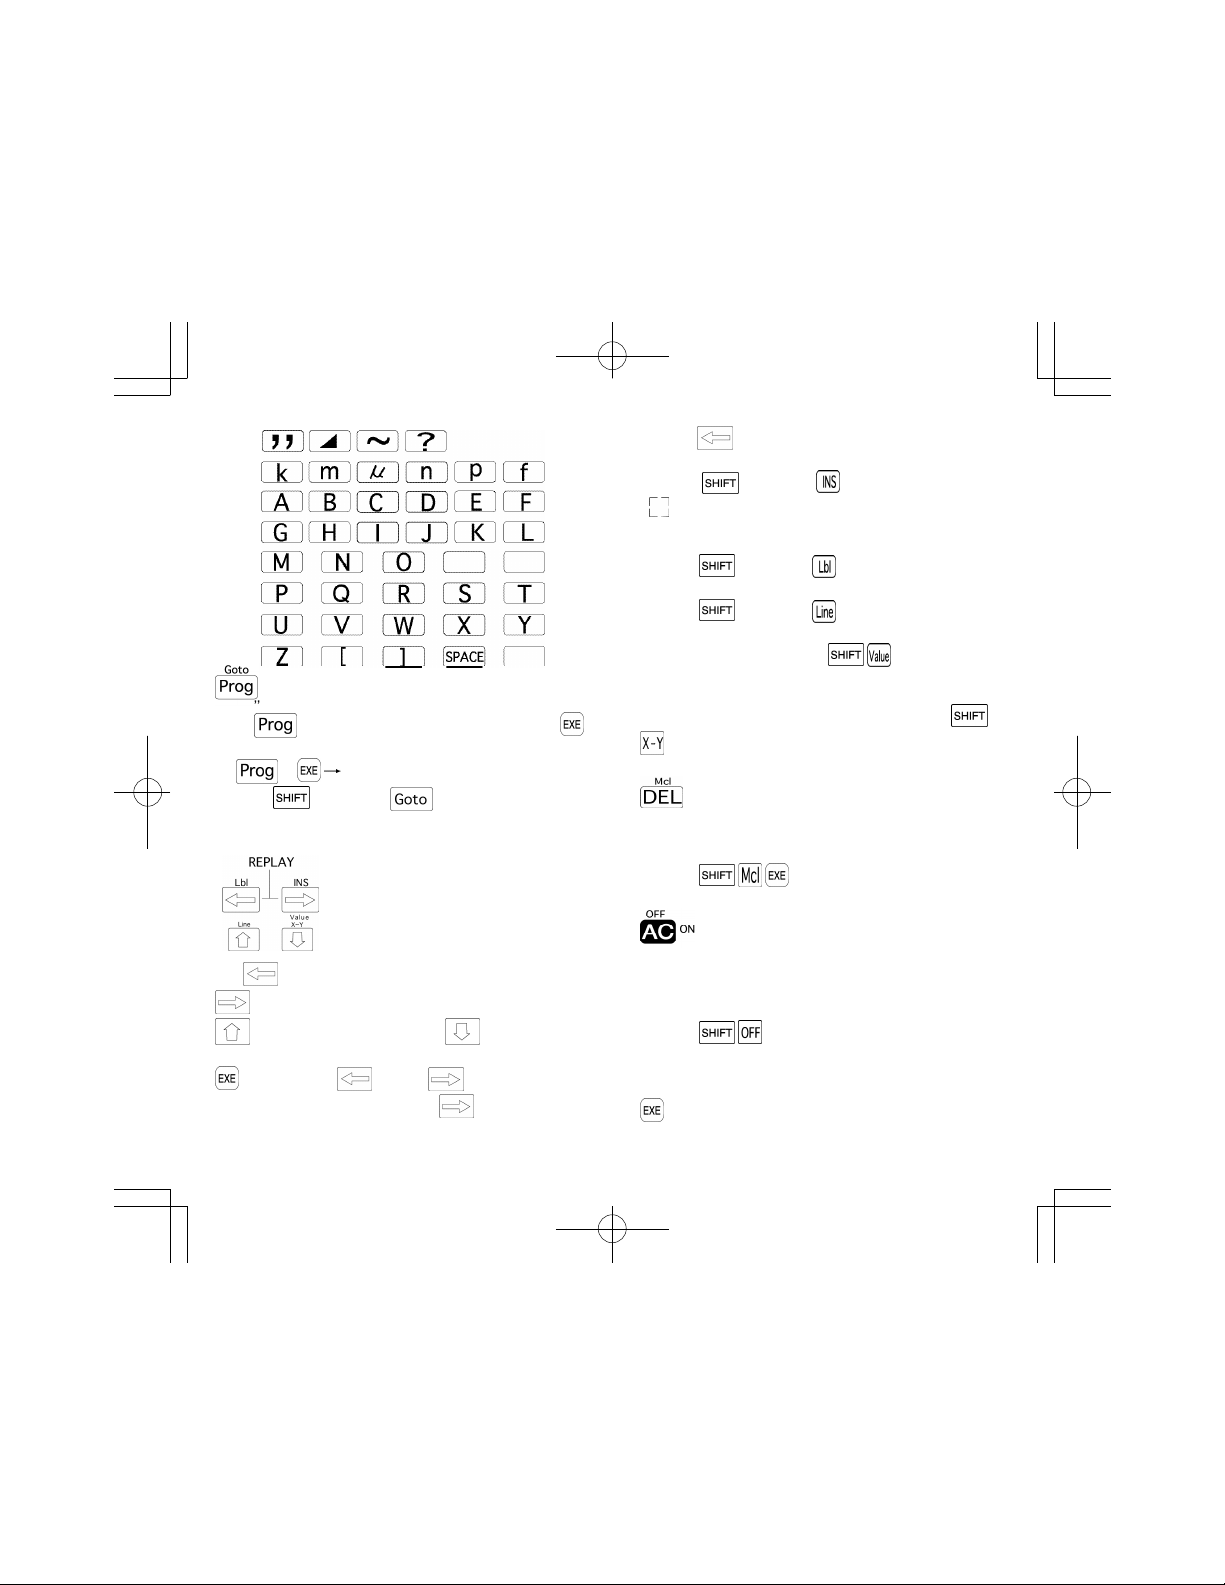
Program/Goto key
Press , enter a value from 0 to 9 and then press
to execute a program.
Ex. 1 Execution of Program 1 begins
Pressing followed by will cause Goto to
appear on the display. This is a jump command used in
programs.
pressing displays it from the end. This allows the
formula to be executed again by changing the values.
Pressing followed by displays the insert cursor
( ). Entering a value while the insert cursor is displayed
inserts the value in the position immediately preceding the
insert cursor location.
Pressing followed by enters the "Lbl" (Label)
command.
Pressing followed by makes it possible to
produce line graphs or regression lines.
After you draw a graph, press to display a value
that shows the x-coordinate for the current location of the
pointer on the graph. You can switch between display of
the x-coordinate and the y-coordinate by pressing
.
Delete key
Press to delete the character at the current position of the
cursor. When the character is deleted, everything to the
right of the cursor position will shift one space to the left.
Pressing will clear the memory contents.
Cursor/Replay keys
All clear/Power ON/Power OFF key
Press to clear all input characters or formulas. You can also
The key moves the cursor (blinking "_" ) to the left
moves the cursor to the right. In the Plot function, the
key moves the pointer up, and moves the
pointer down. Once a formula or numeric value is input and
is pressed, the key and key become
"replay" keys. In this case, pressing displays the
formula or numeric value from the beginning, while
use this key to clear the Error message from the display.
Press to switch the power of the calculator on (even if
power was switched off by the Auto Power Off function).
Pressing switches the power of the calculator
off. Note that mode setting and memory contents are
protected even when power is turned off.
Execute key
Press to obtain the result of a calculation or to draw a
graph. pressed after data input for a programmed
16
S6600G-ENG-A 8/30/04, 11:05 AMPage 16-17 Adobe PageMaker 6.5C/PPC
17
Page 10
calculation or to advance to the next execution after a
calculation result is obtained.
Answer/Minus key
Pressing followed by will recall the last calculation
result. When used during program execution, the last result
calculated is recalled.
Press following key to entering a numeric value to
make that value negative.
Ex. -123 123
Press following key to input a space.
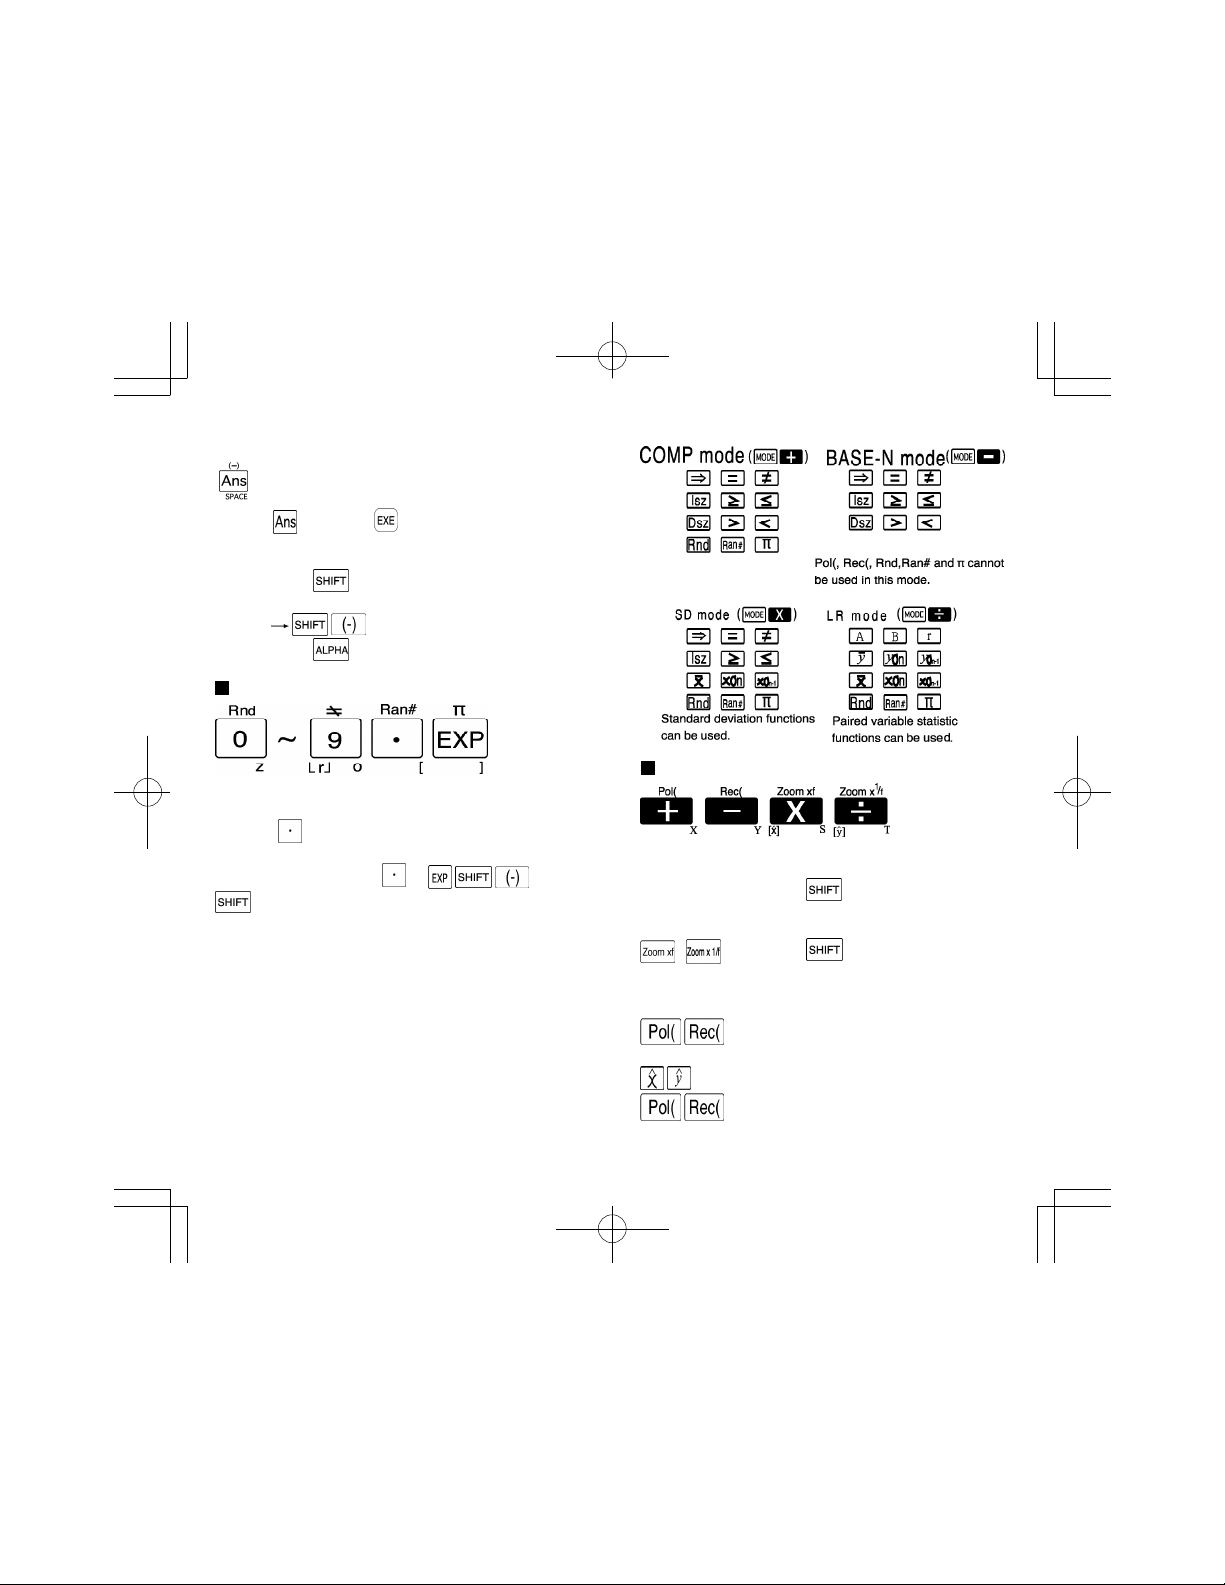
Numeric/Decimal point/Exponent input keys
Calculation keys
When entering numeric values, enter the number in order.
Press the key to enter the decimal point in the desired
position.
To input 1.23x10⁻⁶, press 1 23 6.
key combinations for the various modes are as
follows:
operation keys
For addition, subtraction, multiplication and division, enter
the calculation as it reads. key combinations for the
various modes are as follows:
COMP mode
Arithmetic
, ... Following , this key causes the
graph currently shown on the display to be enlarged or
reduced in accordance with the factor setting.
COMP mode or SD mode
... Coordinate transformation
LR mode
...Estimated value calculation of x and y
...Coordinate transformation
18
S6600G-ENG-A 8/30/04, 11:05 AMPage 18-19 Adobe PageMaker 6.5C/PPC
19
Page 11
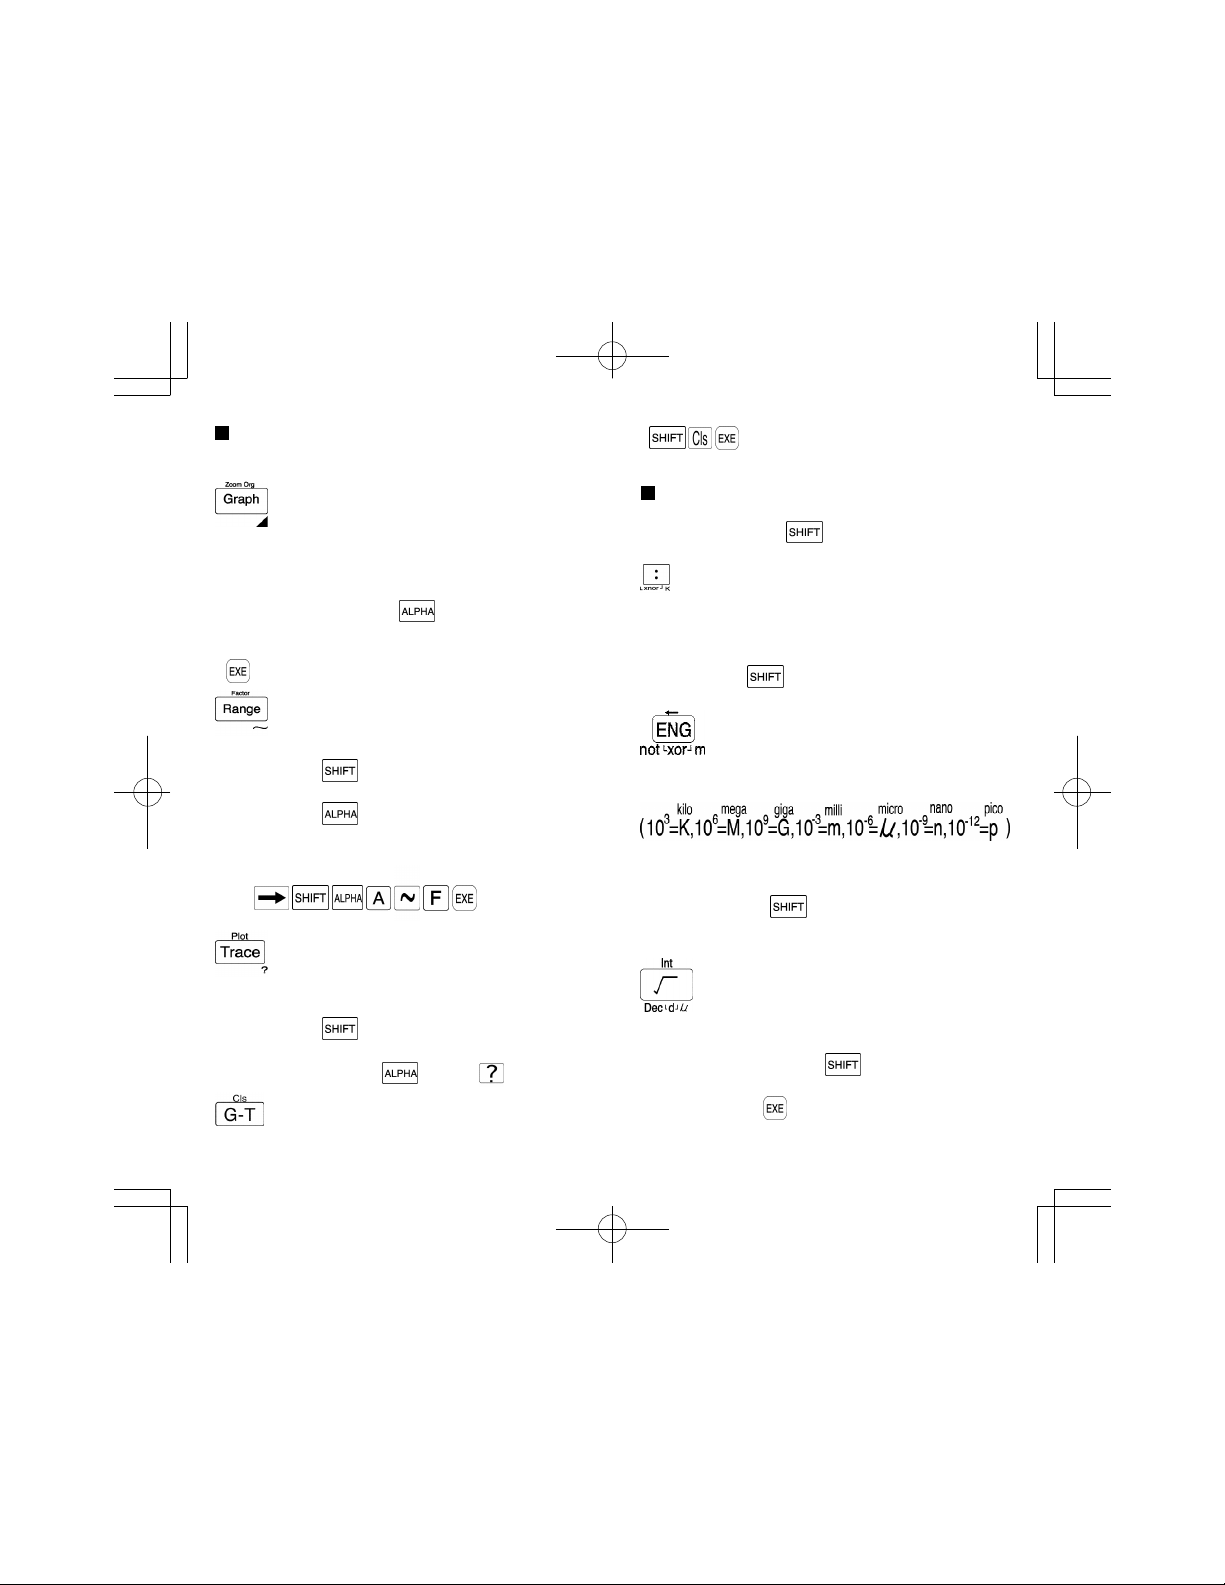
Graph keys
Used to produce a variety of graphs.
These keys cannot be used in the BASE-N mode.
Graph/Original zoom key
• Press before entering a formula to be used for a graph
("Graph Y = " appears on the display).
• Press to return an enlarged or reduced graph to its
original size.
• When pressed following the key, the results of each
section of the programmed calculations or consecutive
calculations are sequentially displayed with each press of
.
Range/Factor key
• Used to confirm or set the range and size of graphs.
• Press following to magnify or reduce the upper and
lower ranges of graphs.
• Press following in order to assign the same value to
more than one memory.
Ex. To store the value 456 to memories A through F.
456
Trace/Plot key
• Used to trace over an existing graph and display the x or
y coordinate value.
• Press following to plot a point on the graph screen.
• To indicate data input within a programmed calculation or
repeat calculation, press and then .
Graph-text/Clear screen key
• Switches between the graph display and text display .
• clears the graph display (" done" is
displayed).
Function keys
Press for functional calculation. Various uses are available
in combination with the key, and/or depending on the
mode being used.
Multistatement key
• Press to separate formulas or commands in programmed
calculations or consecutive calculations.
The result of such combinations is known as a
multistatement .
• Press following in the BASE-N mode to enter the
logical operation for negation of logical sums (xnor).
Engineering/Negation key
• Press to convert a calculation result to an exponential
display whose exponent is a multiple of three.
• When obtaining logical negation for a value in the BASEN mode , press prior to entering the value.
• Press following the key in the BASE-N mode to
obtain the exclusive logical sum.
Square root/Integer key
• Press prior to entering a numeric value to obtain the
square root of the value.
• When pressed following the key, the integer portion
of a value can be obtained.
• Press followed by in the BASE-N mode to specify the
decimal calculation mode.
20
S6600G-ENG-A 8/30/04, 11:05 AMPage 20-21 Adobe PageMaker 6.5C/PPC
21
Page 12
• When pressed following the key in the BASE-N
mode, the subsequently entered value is specified as a
decimal value.
• When pressed following the key in the BASE-N
mode,the subsequently entered value is specified as an
octal value.
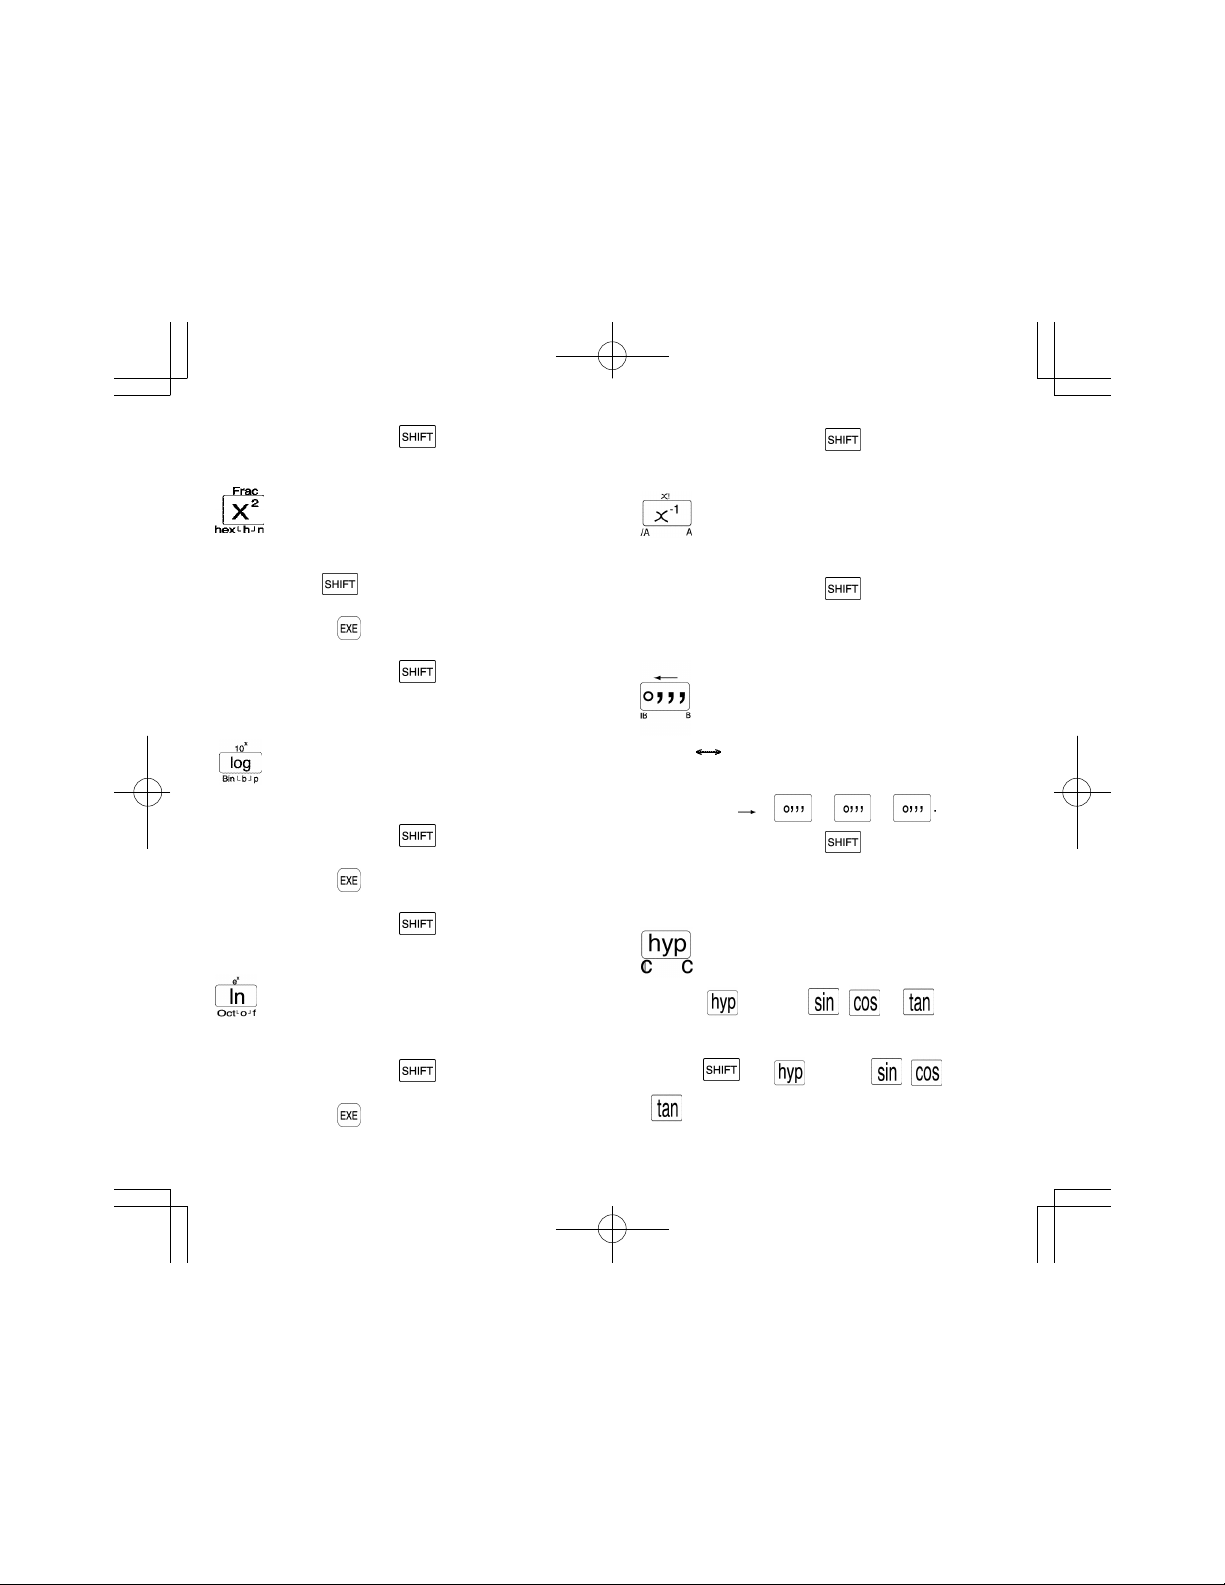
Square/Fraction key
• Press after a numeric value is entered to obtain the
square of that value.
• Press following key prior to inputting number in
order to obtain fraction part of that number.
• Press followed by in the BASE-N mode to specify the
hexadecimal calculation mode.
• When pressed following the key in the BASE-N
mode, the subsequently entered value is specified as a
hexadecimal value.
Common logarithm/Antilogarithm key
• Press prior to entering a value to obtain the common
logarithm of that value.
• When pressed following the key, the subsequently
entered value becomes an exponent of 10.
• Press followed by in the BASE-N mode to specity the
binary calculation mode.
• When pressed following the key in the BASE-N
mode,the subsequently entered value is specified as a
binary value.
Natural logarithm/Exponential key
• Press prior to entering a value to obtain the natural
logarithm of that value.
• When pressed following the key, the subsequently
entered value becomes an exponent of e.
• Press followed by in the BASE-N mode to specify the
octal calculation mode.
Reciprocal/Factorial key
• Press after entering a value to obtain the reciprocal of that
value.
• When pressed following the key, the factorial of a
previously entered value can be obtained.
• Press in the BASE-N mode to enter A (10
hexadecimal value.
10
) of a
Degree/minute/second key (decimal
sexagesimal key)
• Press to enter sexagesimal value (degree/minute/second
or hour/minute/second).
Ex. 78°45'12" 78 45 12
• When pressed following the key, a decimal based
value can be displayed in degrees/minutes/seconds
(hours/ minutes/seconds).
• Press in the BASE-N mode to enter B (1110) of a
hexadecimal value.
Hyperbolic key
• Pressing , and then , ,or prior to
entering a value produces the respective hyperbolic
function (sinh, cosh, tanh) for the value.
• Pressing , then , and then, , , or
prior to entering a value produces the respective
inverse hyperbolic function (sinh-1, cosh-1, tanh-1) for the value.
22
S6600G-ENG-A 8/30/04, 11:05 AMPage 22-23 Adobe PageMaker 6.5C/PPC
23
Page 13
• Press in the BASE-N mode to enter C (1210) of a
hexadecimal value.
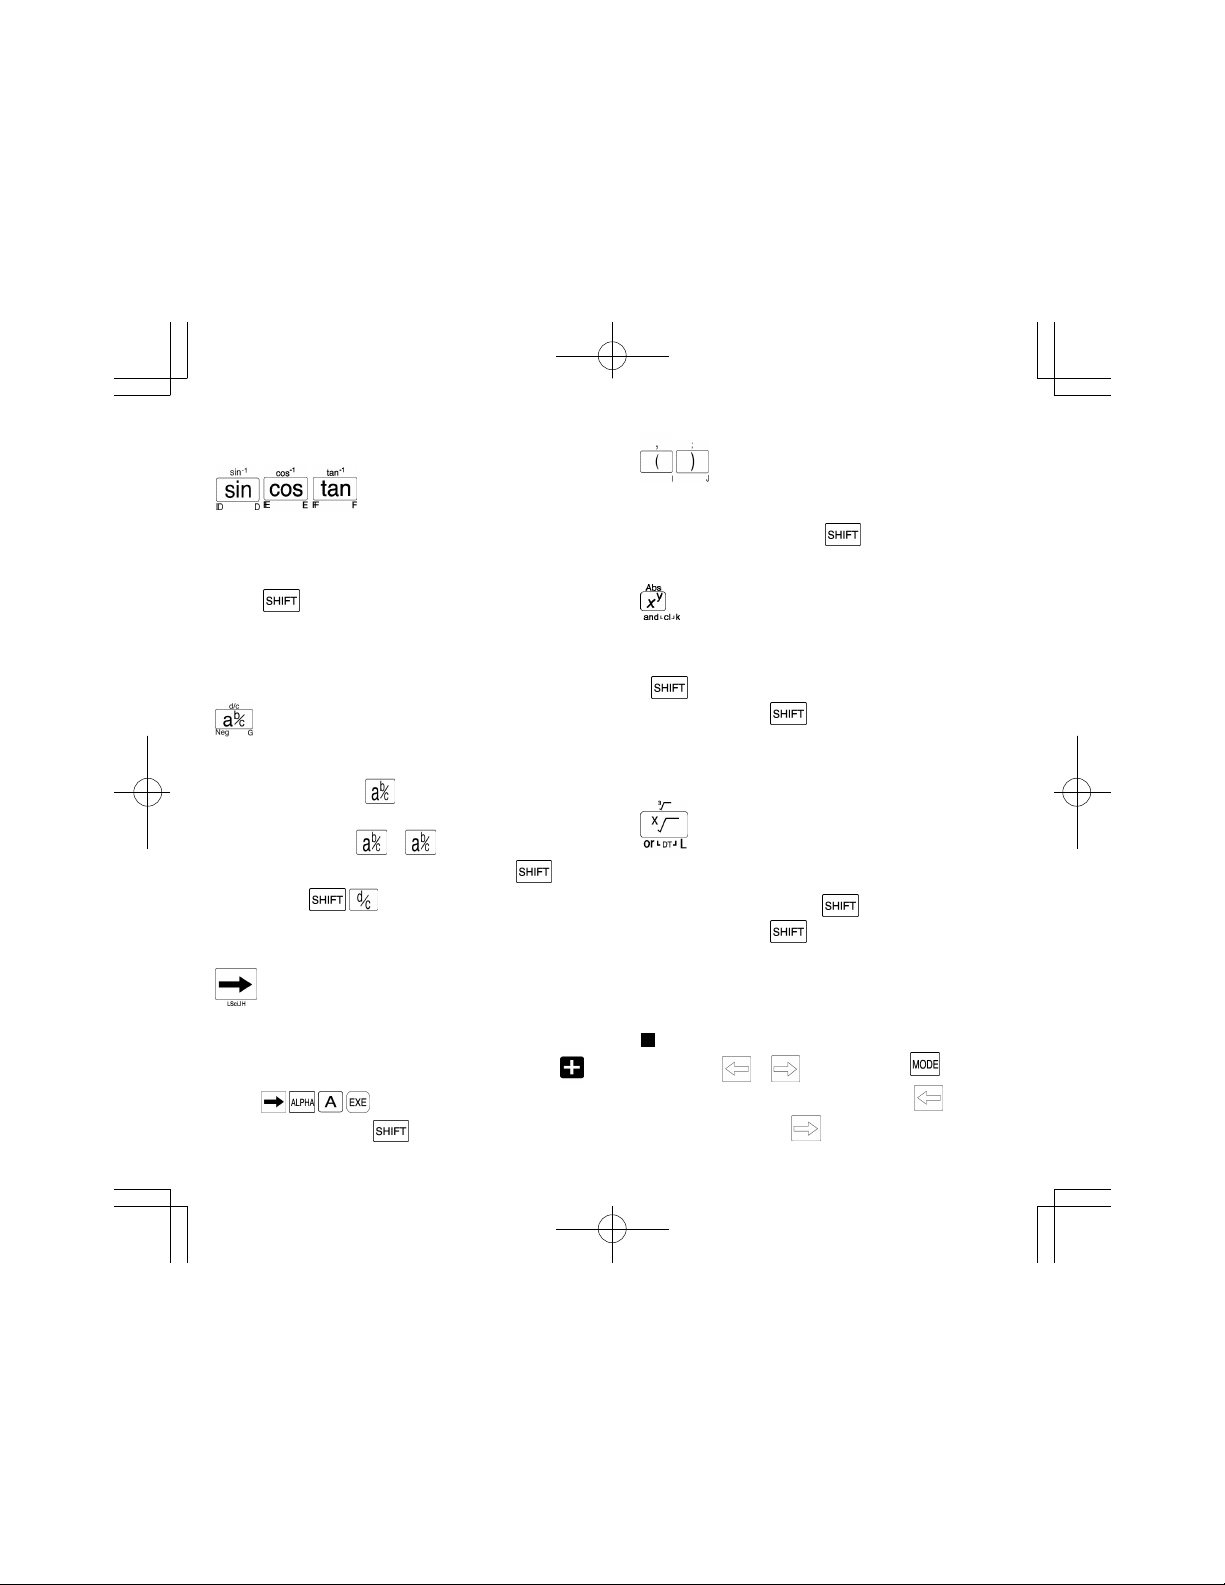
Trigonometric function/
Inverse trigonometric
function keys .
• Press one of these keys prior to entering a value to obtain
the respective trigonometric function for the value.
• Press and then one of these keys prior to entering
a value to obtain the respective inverse trigonometric
function for the value.
• Press in the BASE-N mode to enter D, E, F (1310,1410,
1510) of a hexadecimal value.
Fraction/Negative key
• Use this key for input of simple fractions and mixed
fractions.
Ex. To input 23/45: 23 45
Parenthesis keys
• Press the open parenthesis key and the closed
parenthesis key at the position required in a formula.
• When pressed following the key, a comma or
semicolon can be inserted to separate the arguments in
coordinate transformation or consecutive calculations.
Power/Absolute value key
• Enter x (any number), press this key and then enter y
(any number) to compute x to the power of y. In the SD or
LR mode, this function is only available after pressing the
key.
• Press following the key to obtain the absolute value
of a subsequently entered numeric value.
• Press in the BASE-N mode to obtain a logical product
("and").
• Press in the SD or LR mode to delete input data.
To input 2-3/4: 2 3 4
• For improper fractions, press this key following
(indicated by in this manual).
• Press in the BASE-N mode prior to entering a value to
obtain the negative of that value. The negative number is
the two's complement of the value entered.
Assignment key
• Press prior to entering a memory to assign the result of a
calculation to that memory.
Ex. To assign the result of 12 + 45 to memory A: 12
45 .
• Press this key following to clear all data from the
statistical memories.
24
S6600G-ENG-A 8/30/04, 11:05 AMPage 24-25 Adobe PageMaker 6.5C/PPC
Root/Cube root key
• Enter x, press this key and then enter y to calculate the
xth root of y. In the SD or LR mode, this function is only
available after pressing the key.
• Press following the key to obtain the cube root of a
subsequently entered numeric value.
• Press in the BASE-N mode to obtain a logical sum ("or").
• Used as a data input key in the SD or LR mode.
Contrast adjustment
Pressing the or key following the key
adjusts the contrast of the display. Pressing makes
the screen lighter, while makes it darker.
25
Page 14
Pressing any other key besides , , or (as
well as , ) cancels contrast adjustment.
* If the display becomes dim and difficult to read, even if
you increase contrast, it probably means that battery
power is getting low. In such a case, replace batteries as
soon as possible.
* Contrast adjustment is impossible during range display
using the key or during factor display using the
key .
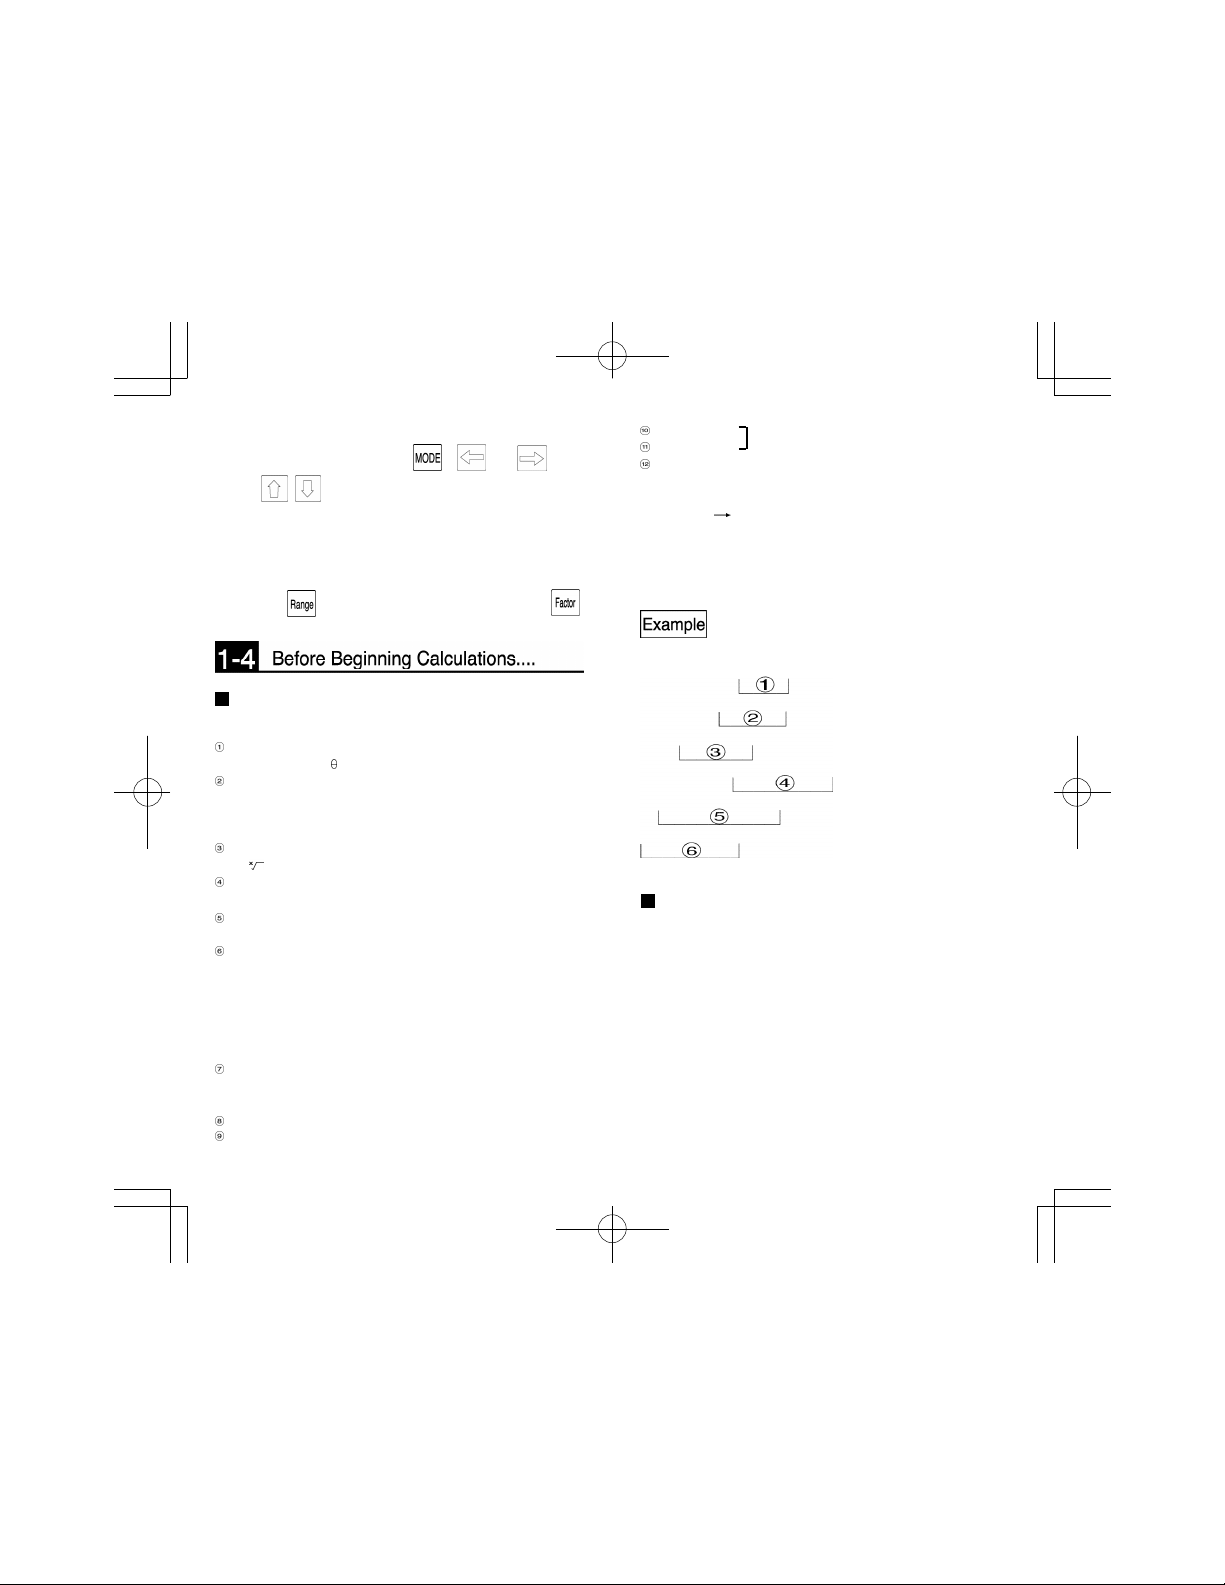
Calculation priority sequence
This calculator employs true algebraic logic to calculate the
parts of a formula in the following order:
Coordinate transformation
Pol (x,y), Rec (r, )
Type A functions
With these functions, the value is entered and then the
function key is pressed.
x2, x-1, x!, º , r, g,
o'
"
Power/root
xy,
Fractions
b/c
a
Abbreviated multiplication format in front of π, memory or
parenthesis 2π, 4R, etc.
Type B functions
With these functions, the function key is pressed and
then the value is entered.
√, 3√ , log, In, ex, 10x,sin, cos, tan, sin-1, cos-1, tan-1, sinh,
cosh, tanh, sinh-1, cosh-1, tanh-1, (-), Abs, Int, Frac,
parenthesis, (following in BASE-N calculations only) d,
h,b, o, Neg, Not
Abbreviated multiplication format in front of Type B
functions
2√3, A log2, etc.
x, ÷
+, –
and
or, xor, xnor
BASE-N calculations only.
Relational operators < , > , = , ≠ , ≤ , ≥
* When functions with the same priority are used in series,
execution is performed from right to left.
exIn√120 ex {In(√120)}
Otherwise, execution is from left to right.
* Compound functions are executed from right to left.
* Anything contained within parentheses receives highest
priority.
2 + 3 x (log sin2π 2 + 6.8)=22.07101691 (in the
"Rad" mode)
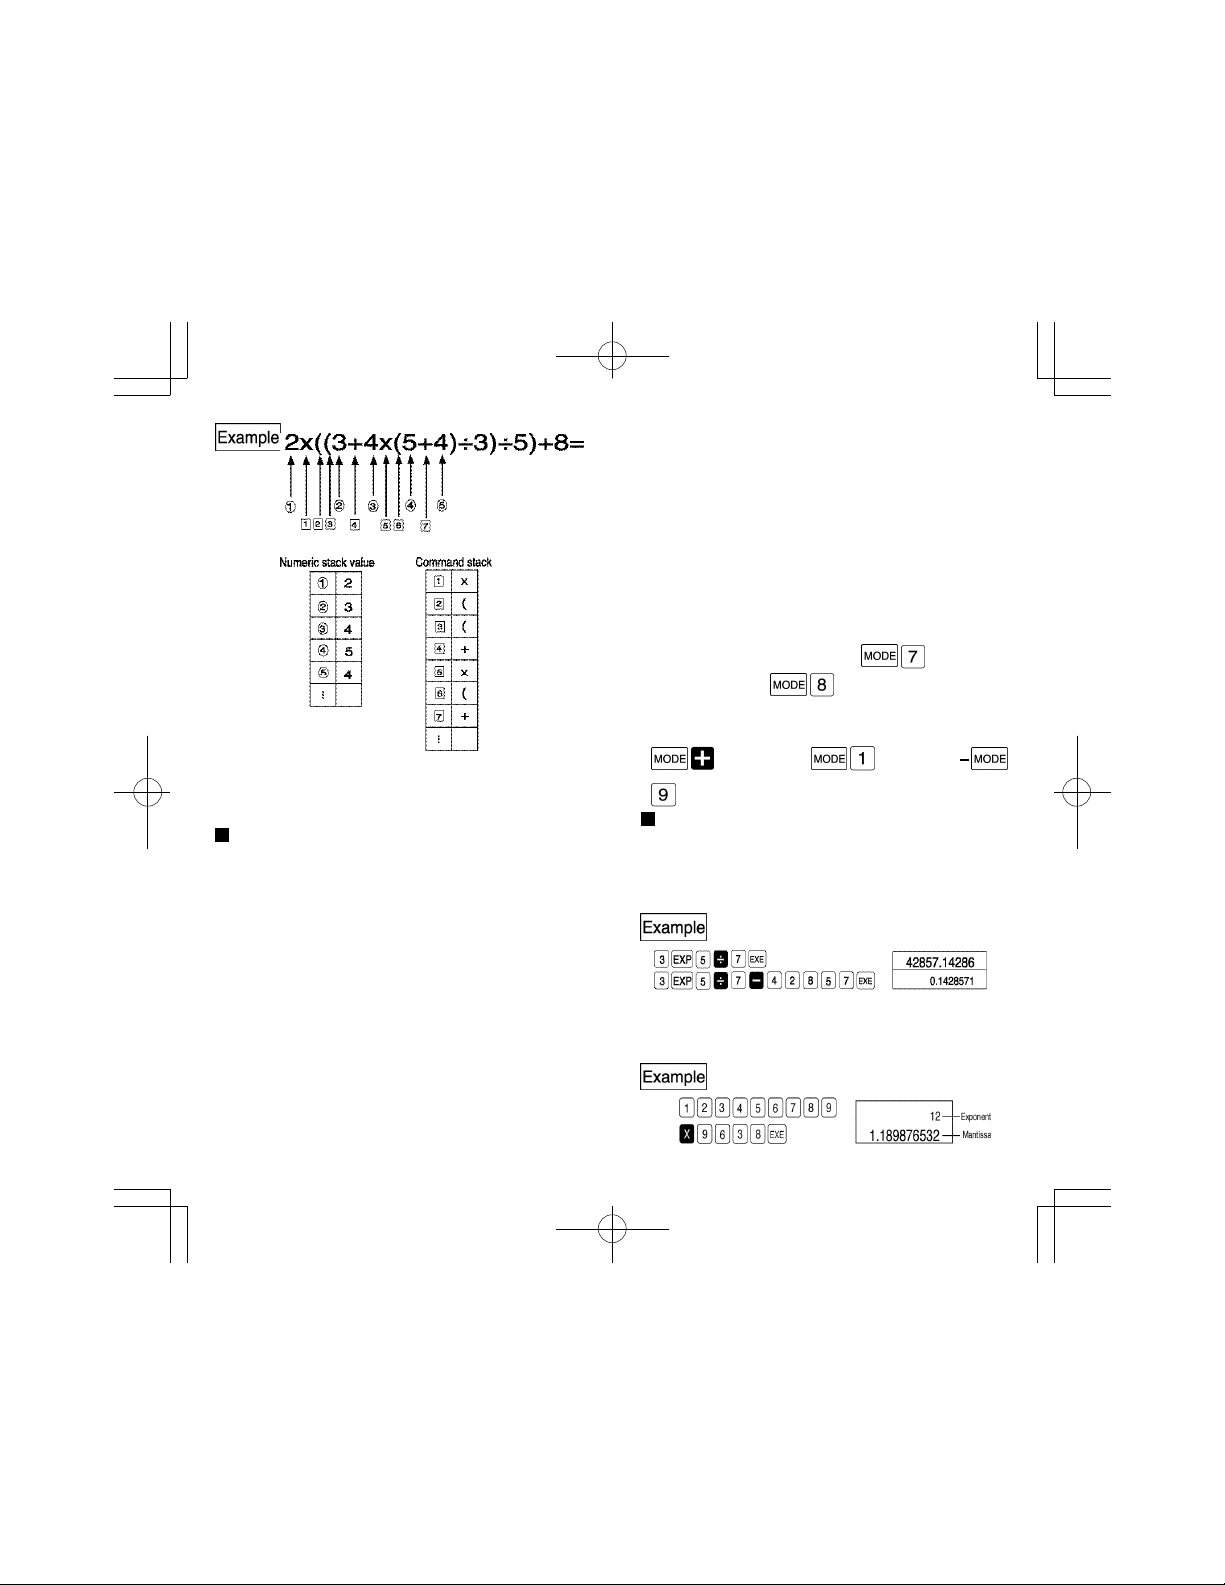
Number of stacks
This calculator uses a memory known as a "stack" for
temporary storage of low priority numeric values and
commands (functions, etc.). The numeric value stack has
10 levels, while the command stack has 24. If a formula
exceeds the stack space available, a stack error (Stk
ERROR) message appears on the display.
26
S6600G-ENG-A 8/30/04, 11:05 AMPage 26-27 Adobe PageMaker 6.5C/PPC
27
Page 15
Binary, octal, decimal, hexadecimal conversion and
calculations, as well as logical operations. Function
calculations and graph drawing cannot be performed.
3.SD mode
Standard deviation calculation (single-variable statistics).
4. LR mode
Regression calculation (paired-variable statistics).
With so many modes available, calculations should always
be performed after confirming which mode is active.
* IMPORTANT: When the power of the unit is switched off
(including Auto Power Off), the current system mode is
cancelled, and the unit will be set to the RUN mode when
switched on again. However, the calculation mode,
number of decimal place setting ( n), number
of significant digits( n), and angle unit (Deg,
Rad, Gra) will be retained in memory.
* To return to standard operation ( initialized state) press
* Calculations are performed in sequence, with the highest
(COMP mode) (RUN mode)
priority operation first. Once a calculation is executed, it is
cleared from the stack.
Calculation modes
This unit features modes for manual calculations, storing
programs, and modes for general as well as statistical
calculations. The proper mode to suit calculational
requirements should be employed.
• Operation modes
There are a total of three operation modes.
(Norm mode).
Number of input/output digits and calculation digits
• The allowable input/output range (number of digits) of this
unit is 10 digits for a mantissa and 2 digits for an
exponent. Calculations, however, are internally
performed with a range of 12 digits for a mantissa and 2
digits for an exponent.
3 x 10⁵ ÷ 7 =
1. RUN mode
Graph production as well as manual calculations and
program executions.
2. WRT mode
Program storage and editing.
3. PCL mode
Deletion of stored programs.
• Calculation modes
There are a total of six calculation modes which are
employed according to the type of calculation.
1. COMP mode
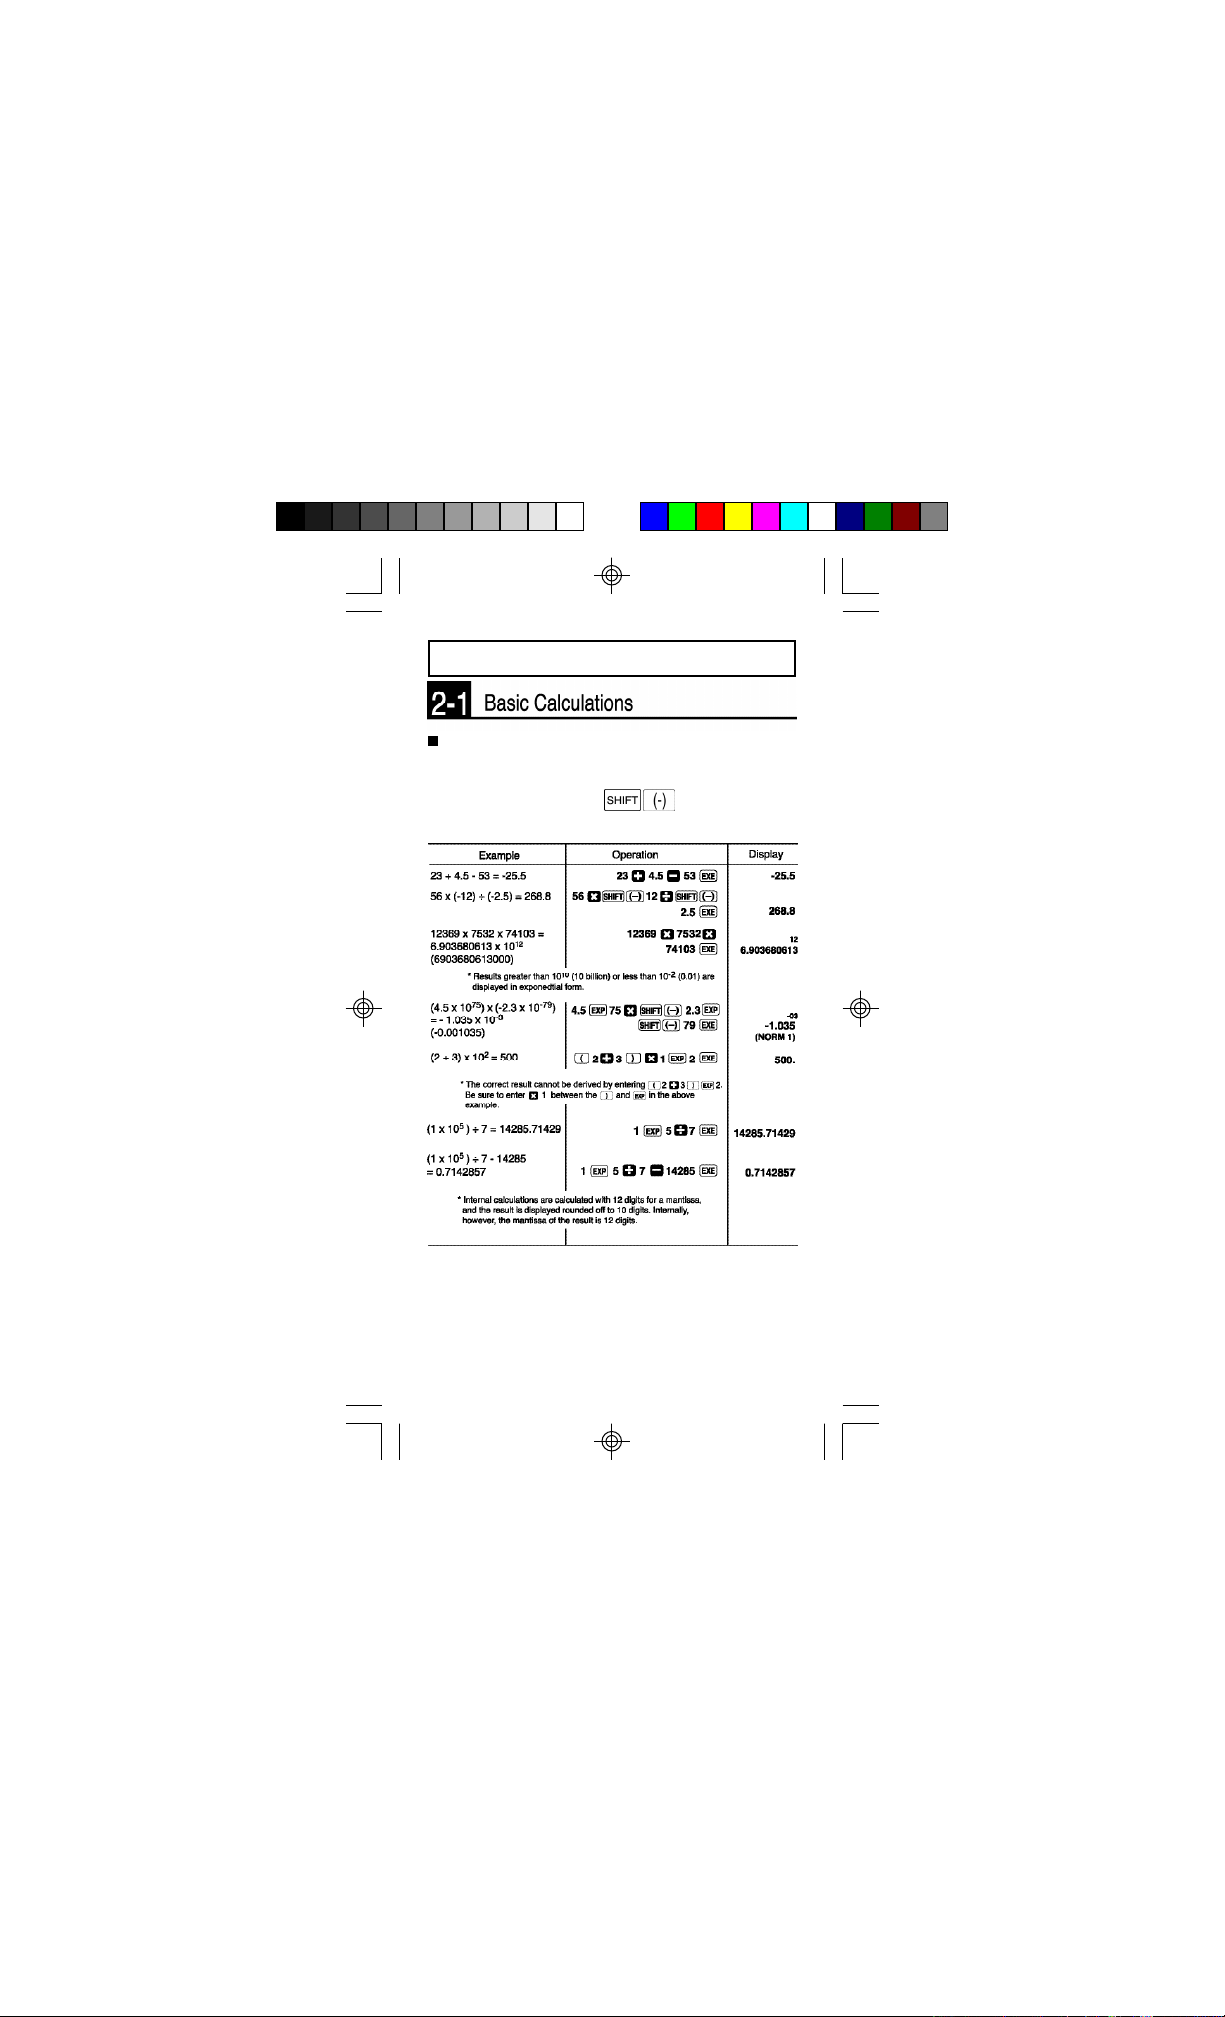
* Calculation results greater than 1010 ( 10 billion) or less
than 10-2 (0.01) are automatically displayed in exponential
form.
123456789 x 9638 =
General calculations, including functional calculations.
2. BASE-N mode
28
S6600G-ENG-A 8/30/04, 11:05 AMPage 28-29 Adobe PageMaker 6.5C/PPC
Once a calculation is completed, the mantissa is rounded off to
29
Page 16
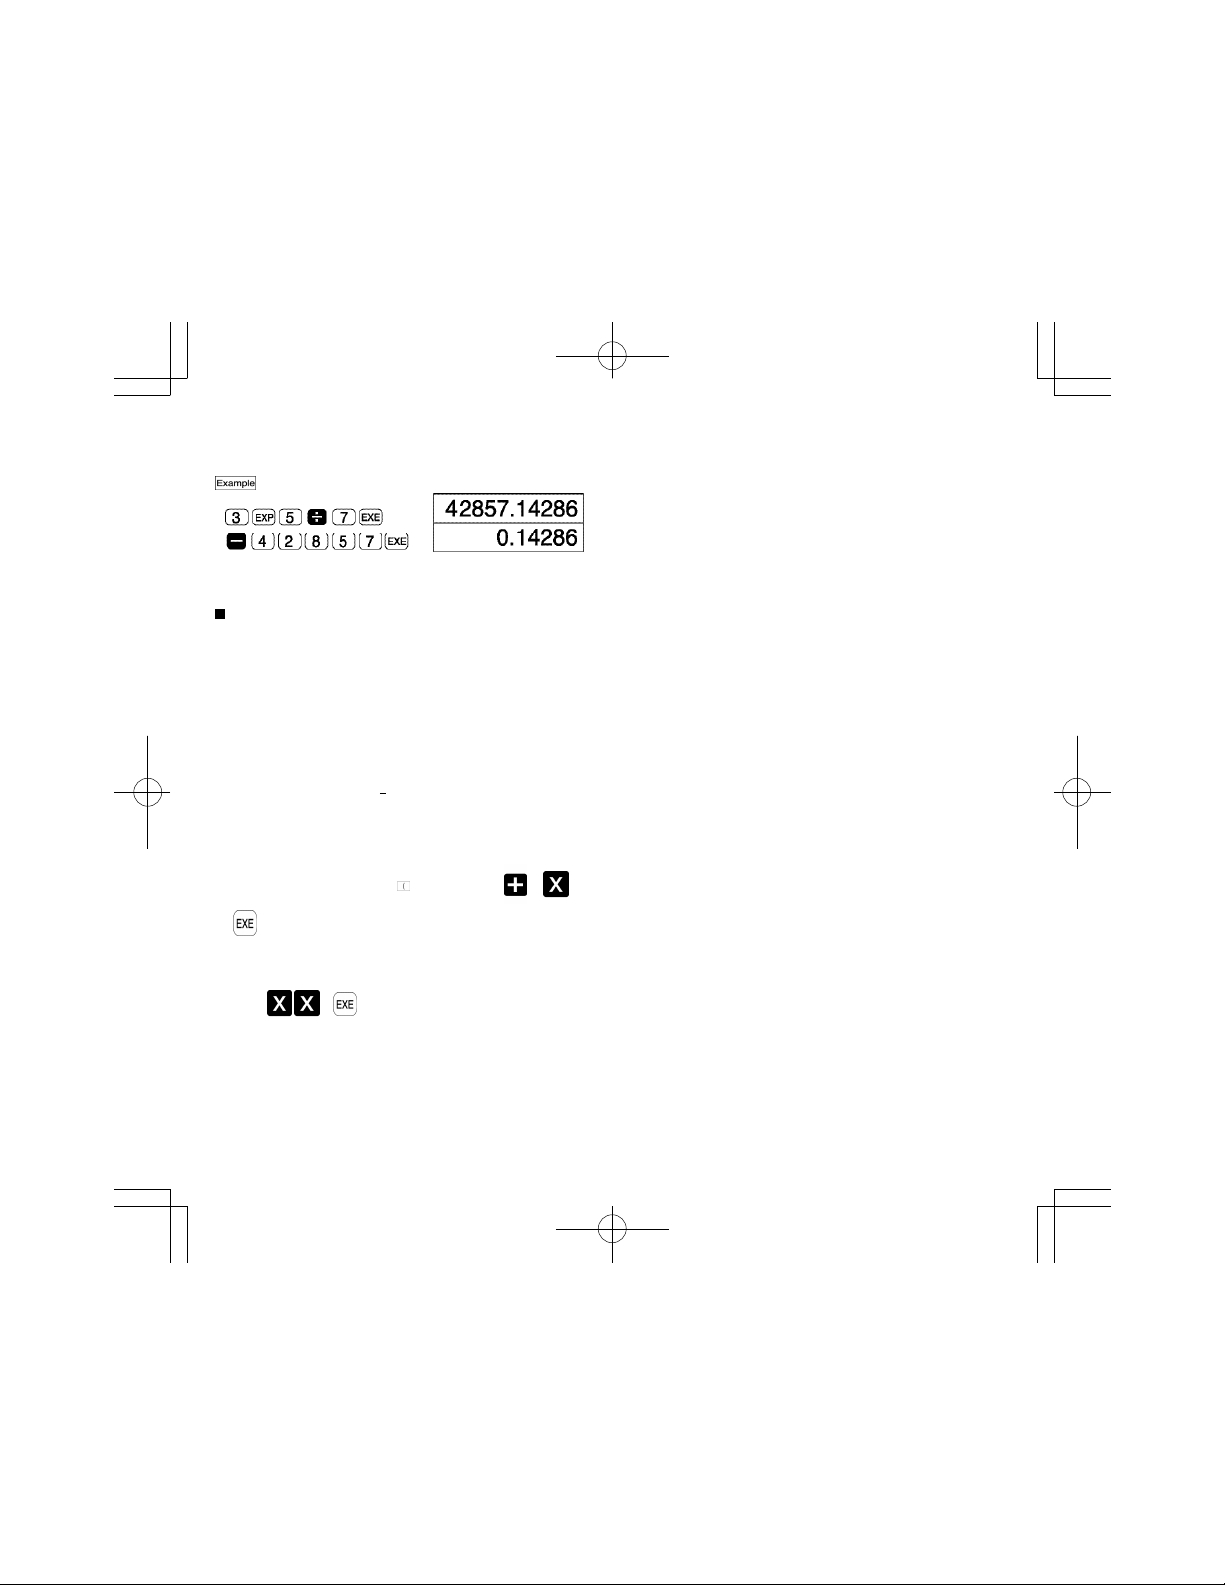
10 digits and displayed. And the displayed mantissa can be
used for the next calculation.
3 x 10 5 ÷ 7 =
* Values are stored in memory with 12 digits for the
mantissa and 2 digits for the exponent.
Overflow and errors
If the calculation range of the unit is exceeded, or incorrect
inputs are made, an error message will appear on the display
window and subsequent operation will be impossible. This is the
error check function. The following operations will result in
errors:
(1) The answer, whether intermediate or final, or any value
in memory exceeds the value of ±9.999999999x1099.
(2) An attempt is made to perform functional calculations
that exceed the input range.
(3) Improper operation during statistical calculations.
(Ex. Attempting to obtain X or xÓn without data
input.)
(4) The capacity of the numeric value stack or the
command stack is exceeded.
(Ex. Entering 23 successive 's followed by 2 3 4
)
(5) Even though memory has not been expanded, a
memory name such as Z [2] is used.
(6) Input errors are made.
(Ex.5 3 )
(7) When improper arguments are used in commands or
functions that require arguments. (i.e. Input of an
argument outside of the range of 0 ~ 9 for Sci or Fix.)
The following error messages will be displayed for the
operations noted above:
(1) ~ (3) Ma ERROR
(4) Stk ERROR
30
S6600G-ENG-A 8/30/04, 11:05 AMPage 30 Adobe PageMaker 6.5C/PPC
Page 17

(5) Mem ERROR
(6) Syn ERROR
(7) Arg ERROR
Besides these, there are a "Ne ERROR" (nesting error)
and a "Go ERROR". These errors mainly occur when using
programs.
Number of input characters
This unit features a 127-step area for calculation execution.
One function comprises one step. Each press of numeric or
, , and keys comprise one step. Though
such operations as require two key operations,
they actually comprise only one function and, therefore,
only one step. These steps can be confirmed using the
cursor. With each press of the or key the
cursor is moved one step.
Input characters are limited to 127-steps. Usually the
cursor is represented by a blinking "_", but once the 121st
step is reached the cursor changes to a blinking " " . If
the " " appears during a calculation, the calculation
should be divided at some point and performed in two
parts.
* When numeric values or calculation commands are input,
they appear on the display window from the left.
Calculational results, however, are displayed from the
right.
Graphic and text displays
This unit has a graph display for production of graphs, as
well as a text display for production of formulas and
commands. These two types of display contents are stored
independently of each other.
Switching between graph and text diplays is performed
using the key. Each press of switches from the
current type of display to the other.
31
Page 18
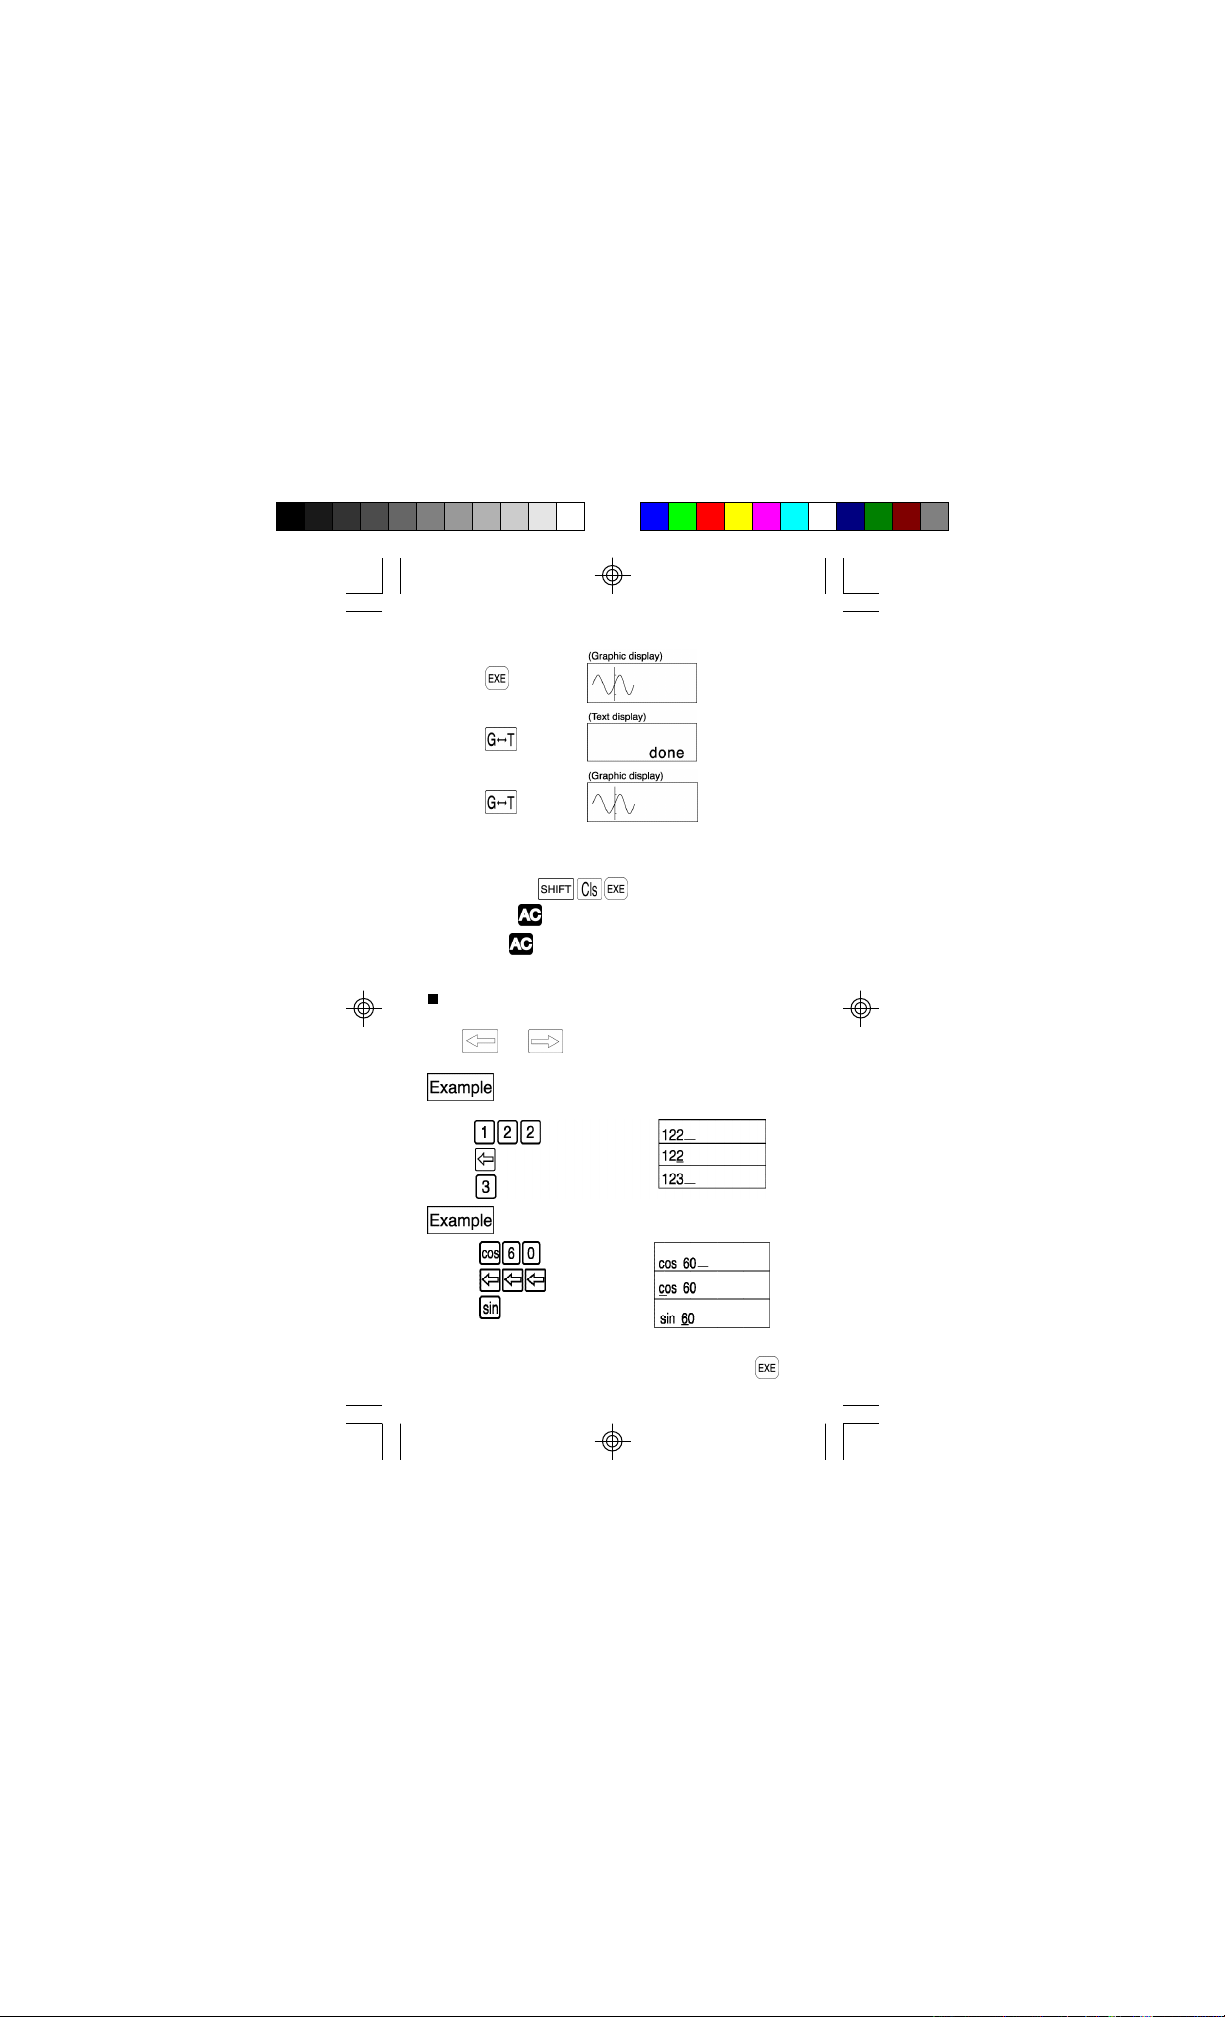
Operations to clear the display depend upon the type of
display being shown:
Graphs:
Text:
Pressing the key causes a cleared text display to
appear if pressed during a graph display.
Corrections
• To make corrections in a formula that is being input, use
the and keys to move to the position of the
error and press the correct keys.
To change an input of 122 to 123:
To change an input of cos60 to sin60:
* If, after making corrections, input of the formula is
complete, the answer can be obtained by pressing .
32
Page 19
If, However, more is to be added to the formula, advance
the cursor using the key to the end of the formula
for input.
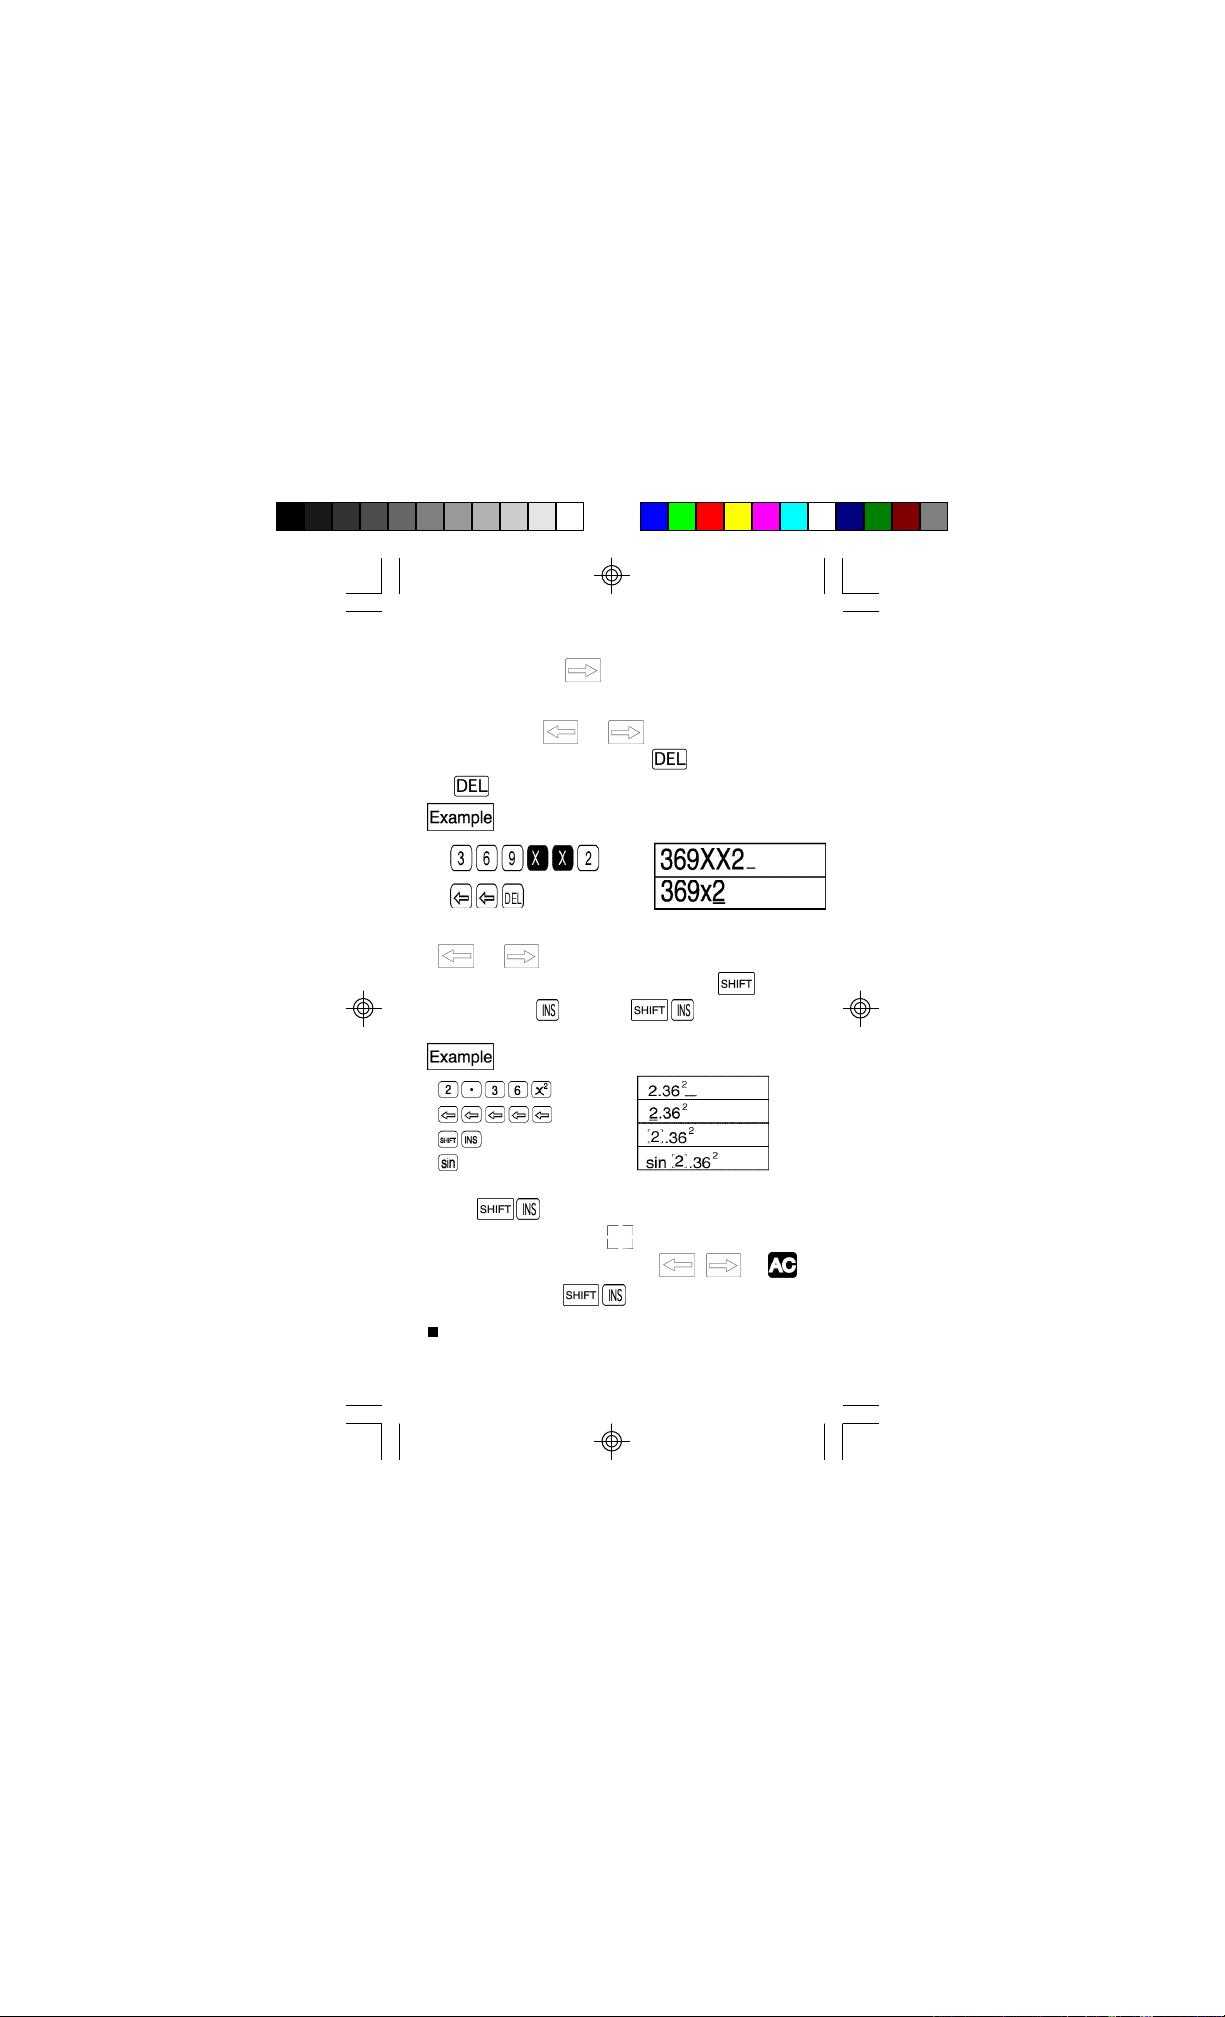
• If an unnecessary character has been included in a
formula, use the and keys to move to the
position of the error and press the key. Each press
of will delete one command (one step).
To correct an input of 369 x x 2 to 369 x 2:
* If a character has been omitted from a formula, use the
and keys to move to the position where the
character should have been input, and press
followed by the key. Press and insertions
can be subsequently performed as desired.
To correct an input of 2.362 to sin2.362:
* When are pressed, the letter at the insertion
position is surrounded by " " and blinks.The insert
function is activated until you press , , or
or until you perform again.
Memory
This unit contains 26 standard memories. Memory names
are composed of the 26 letters of the alphabet. Numeric
33
Page 20
values with 12 digits for a mantissa and 2 digits for an
exponent can be stored.
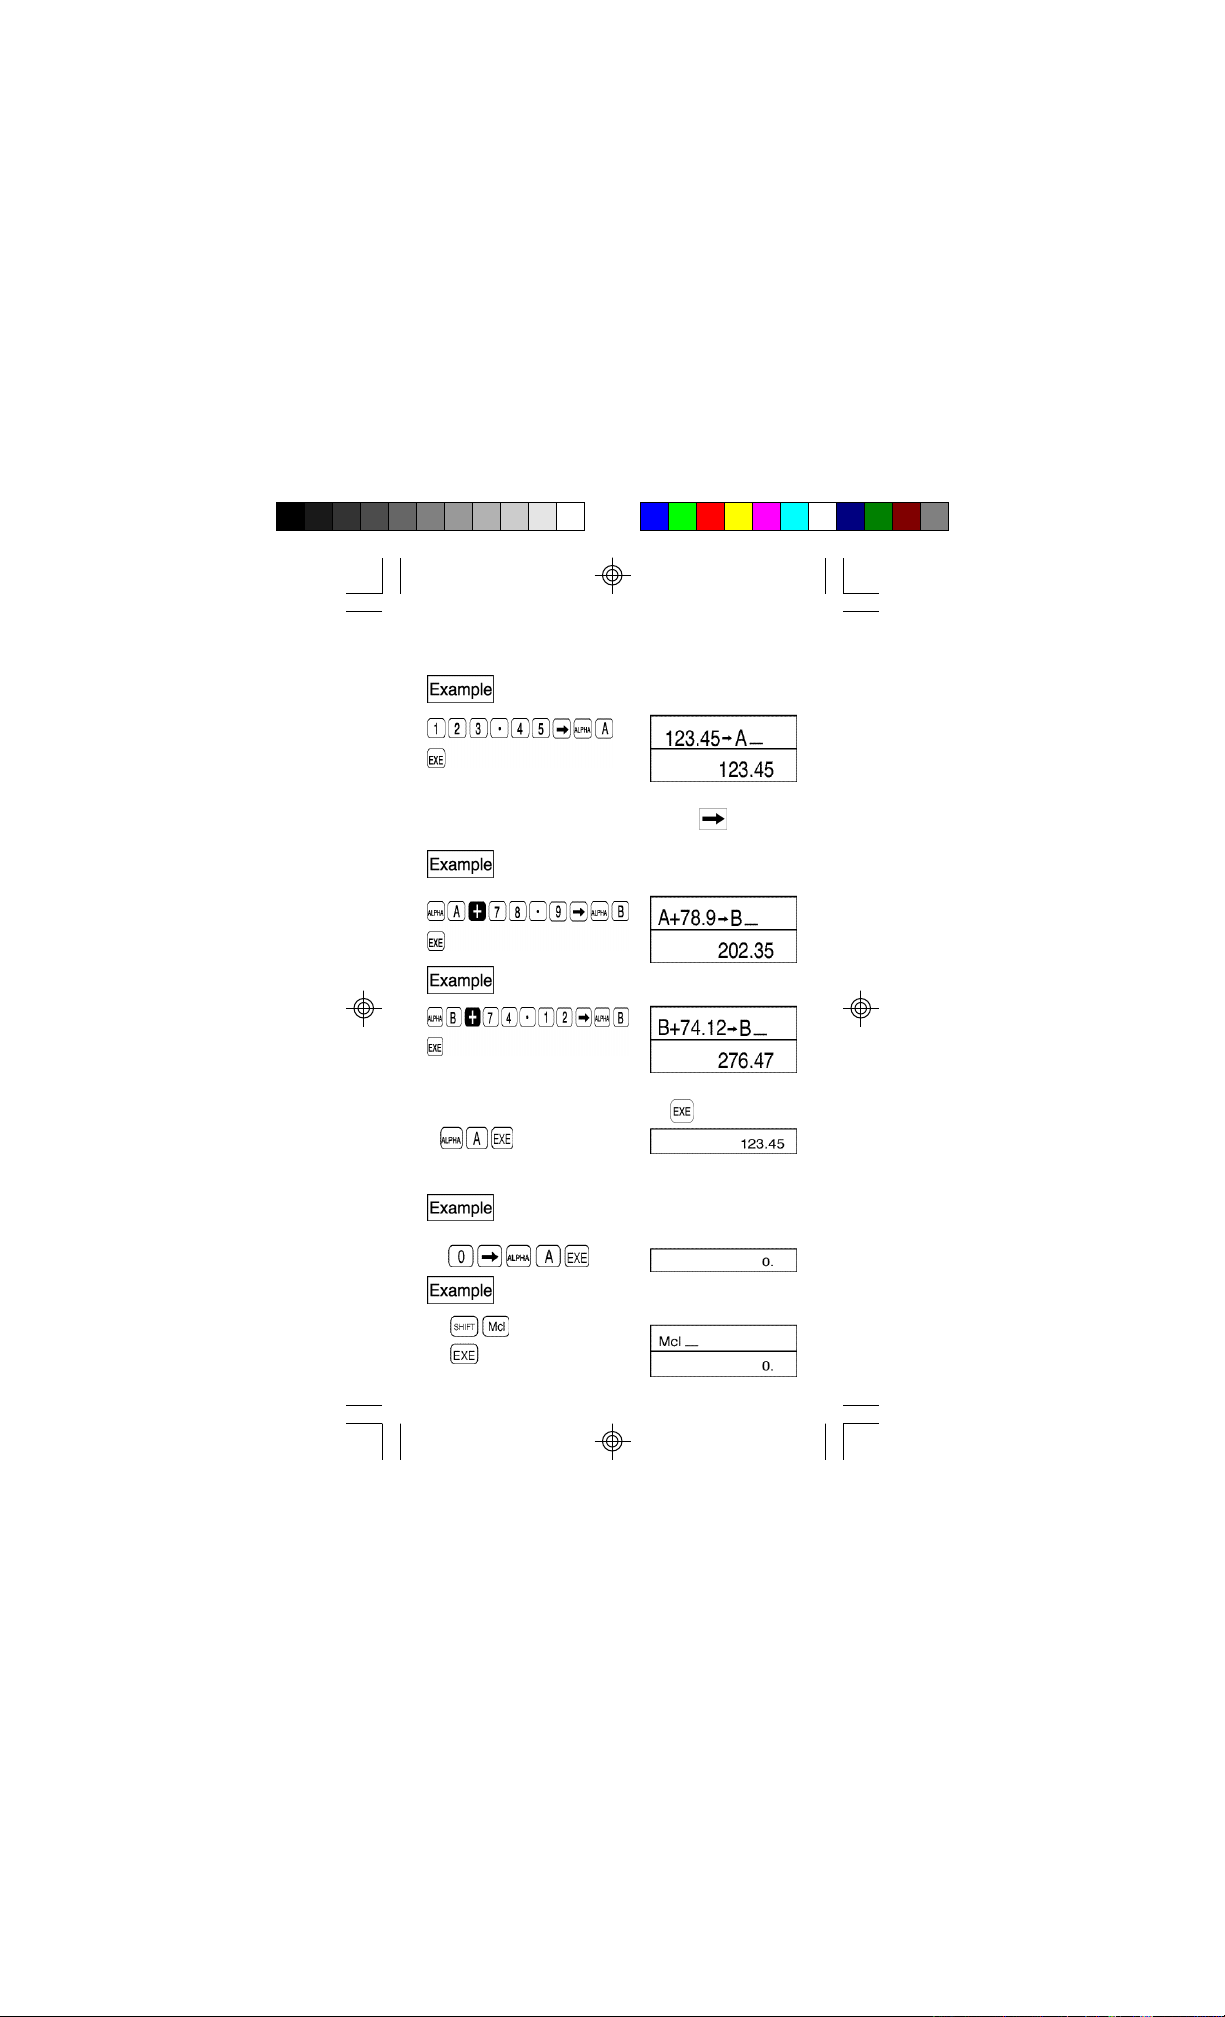
To store 123.45 in memory A :
Values are assigned to a memory using the key
followed by the memory name.
To store the sum of memory A + 78.9 in
memory B :
TO add 74.12 to memory B :
•To check the contents of a memory , press the name of
the memory to be checked followed by .
•To clear the contents of a memory (make them 0), proceed
as follows:
To clear the contents of memory A only:
To clear the contents of all the memories:
34
Page 21
• To store the same numeric value to multiple memories,
press followed by .
To store a value of 10 in memories A through
J:
Memory expansion
Though there are 26 standard memories, they can be
expanded by changing program storage steps to memory.
Memory expansion is performed by converting 8 steps to
one memory.
Memory is expanded in units of one. A maximun of 50
memories can be added for a maximum total of 76 (26+50).
Expansion is performed by pressing , followed by , a
value representing the size of the expansion, and then ..
To expand the number of memories by 30 to bring
the total to 56:
The number of memories and number of remaining steps
are displayed. The number of remaining steps indicates the
current unused area, and will differ according to the size of
the program stored. To check the current number of
memories, press ,followed by ,and then .
35
Page 22
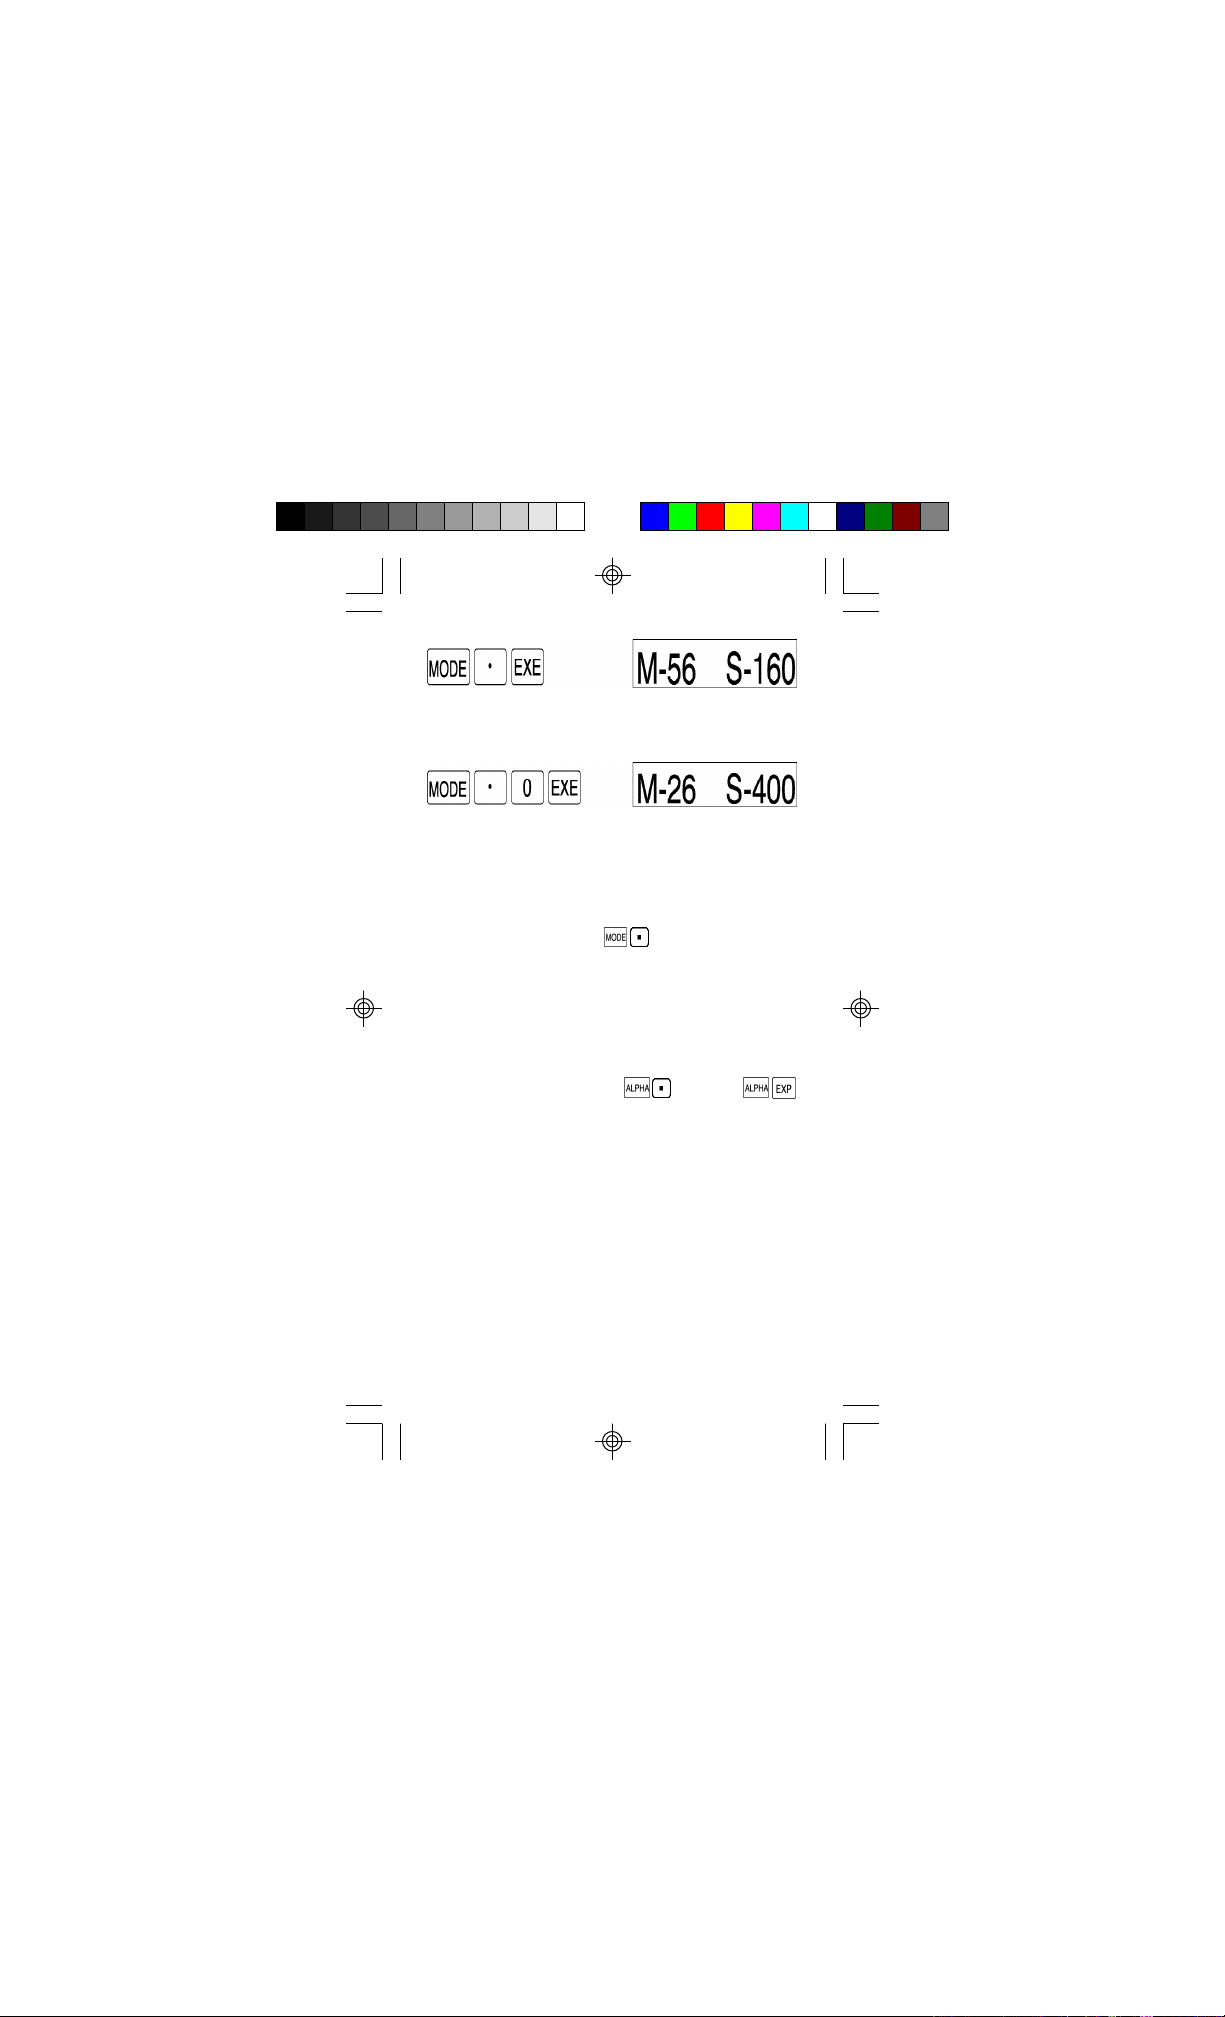
To initialize the number of memories (to return the number
to 26), enter a zero for the value in the memory expansion
sequence outlined above.
* Though a maximum of 50 memories can be added, if a
program has already been stored and the number of
remaining steps is less than the desired expansion, an
error will be generated. The size of the memory
expansion must be equal to or less than the number of
steps remaining.
* The expansion procedure ( expansion value) can
also be stored as a program.
Using expanded memories
•
Expanded memories are used in the same manner as
standard memories, and are referred to as Z[1], Z[2], etc.
The letter Z followed by a value in brackets indicating the
sequential position of the memory is used as the memory
name. (Brackets are formed by for "[" and
for "]".) After the number of memories has been expanded
by 5, memories Z[1] through Z[5] are available. The use of
these memories is similar to that of a standard computer
array, with a subscript being appended to the name.
36
Page 23
Manual Calculations
Arithmetic operations
• Arithmetic operations are performed by pressing the keys
in the same sequence as in the formula.
• For negative values, press before entering the
value.
• For mixed arithmetic operations, multiplication and
division are given priority over addition and subtraction.
37
Page 24
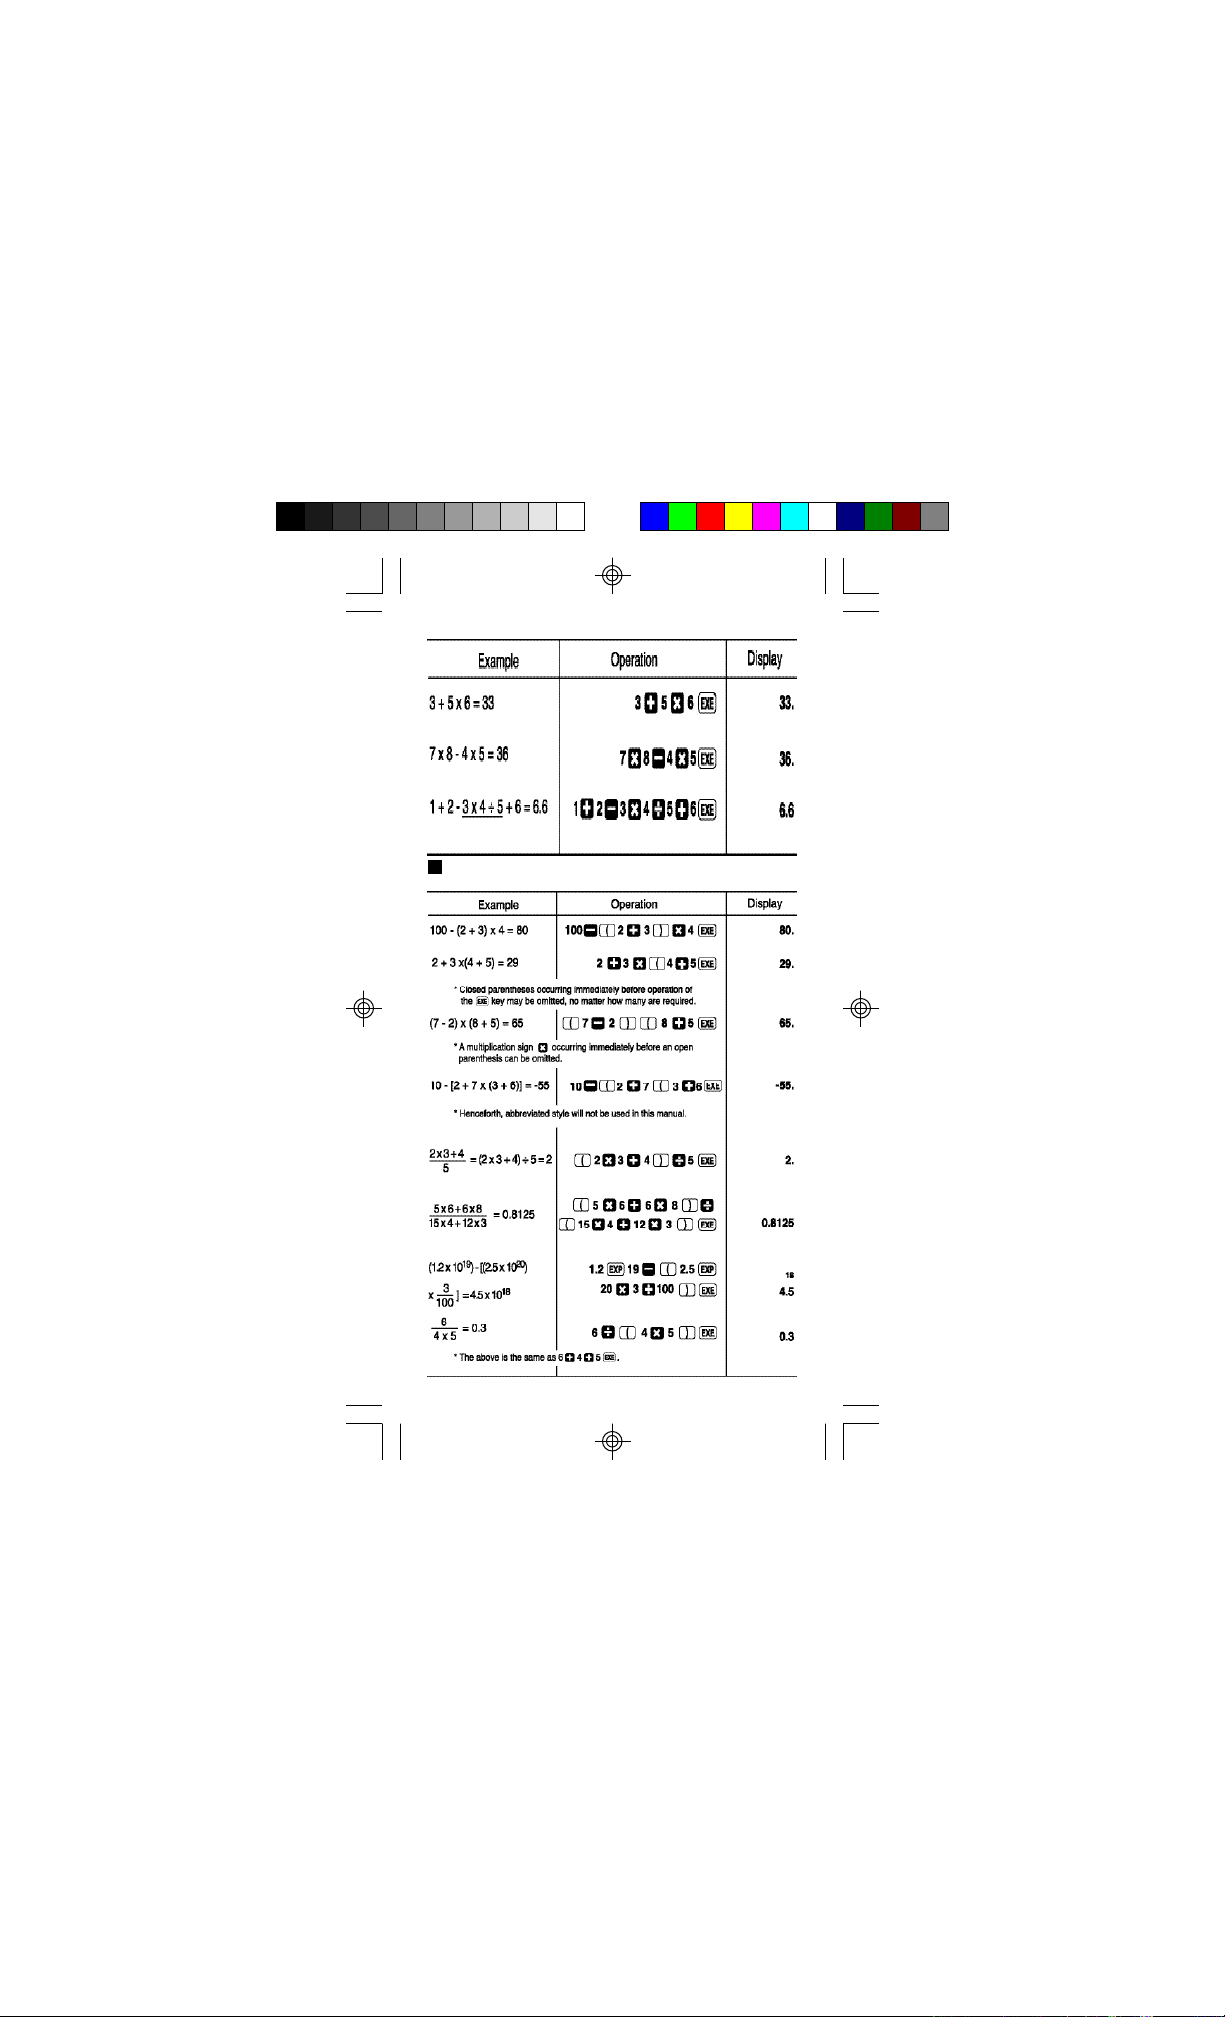
Parenthesis calculations
38
Page 25
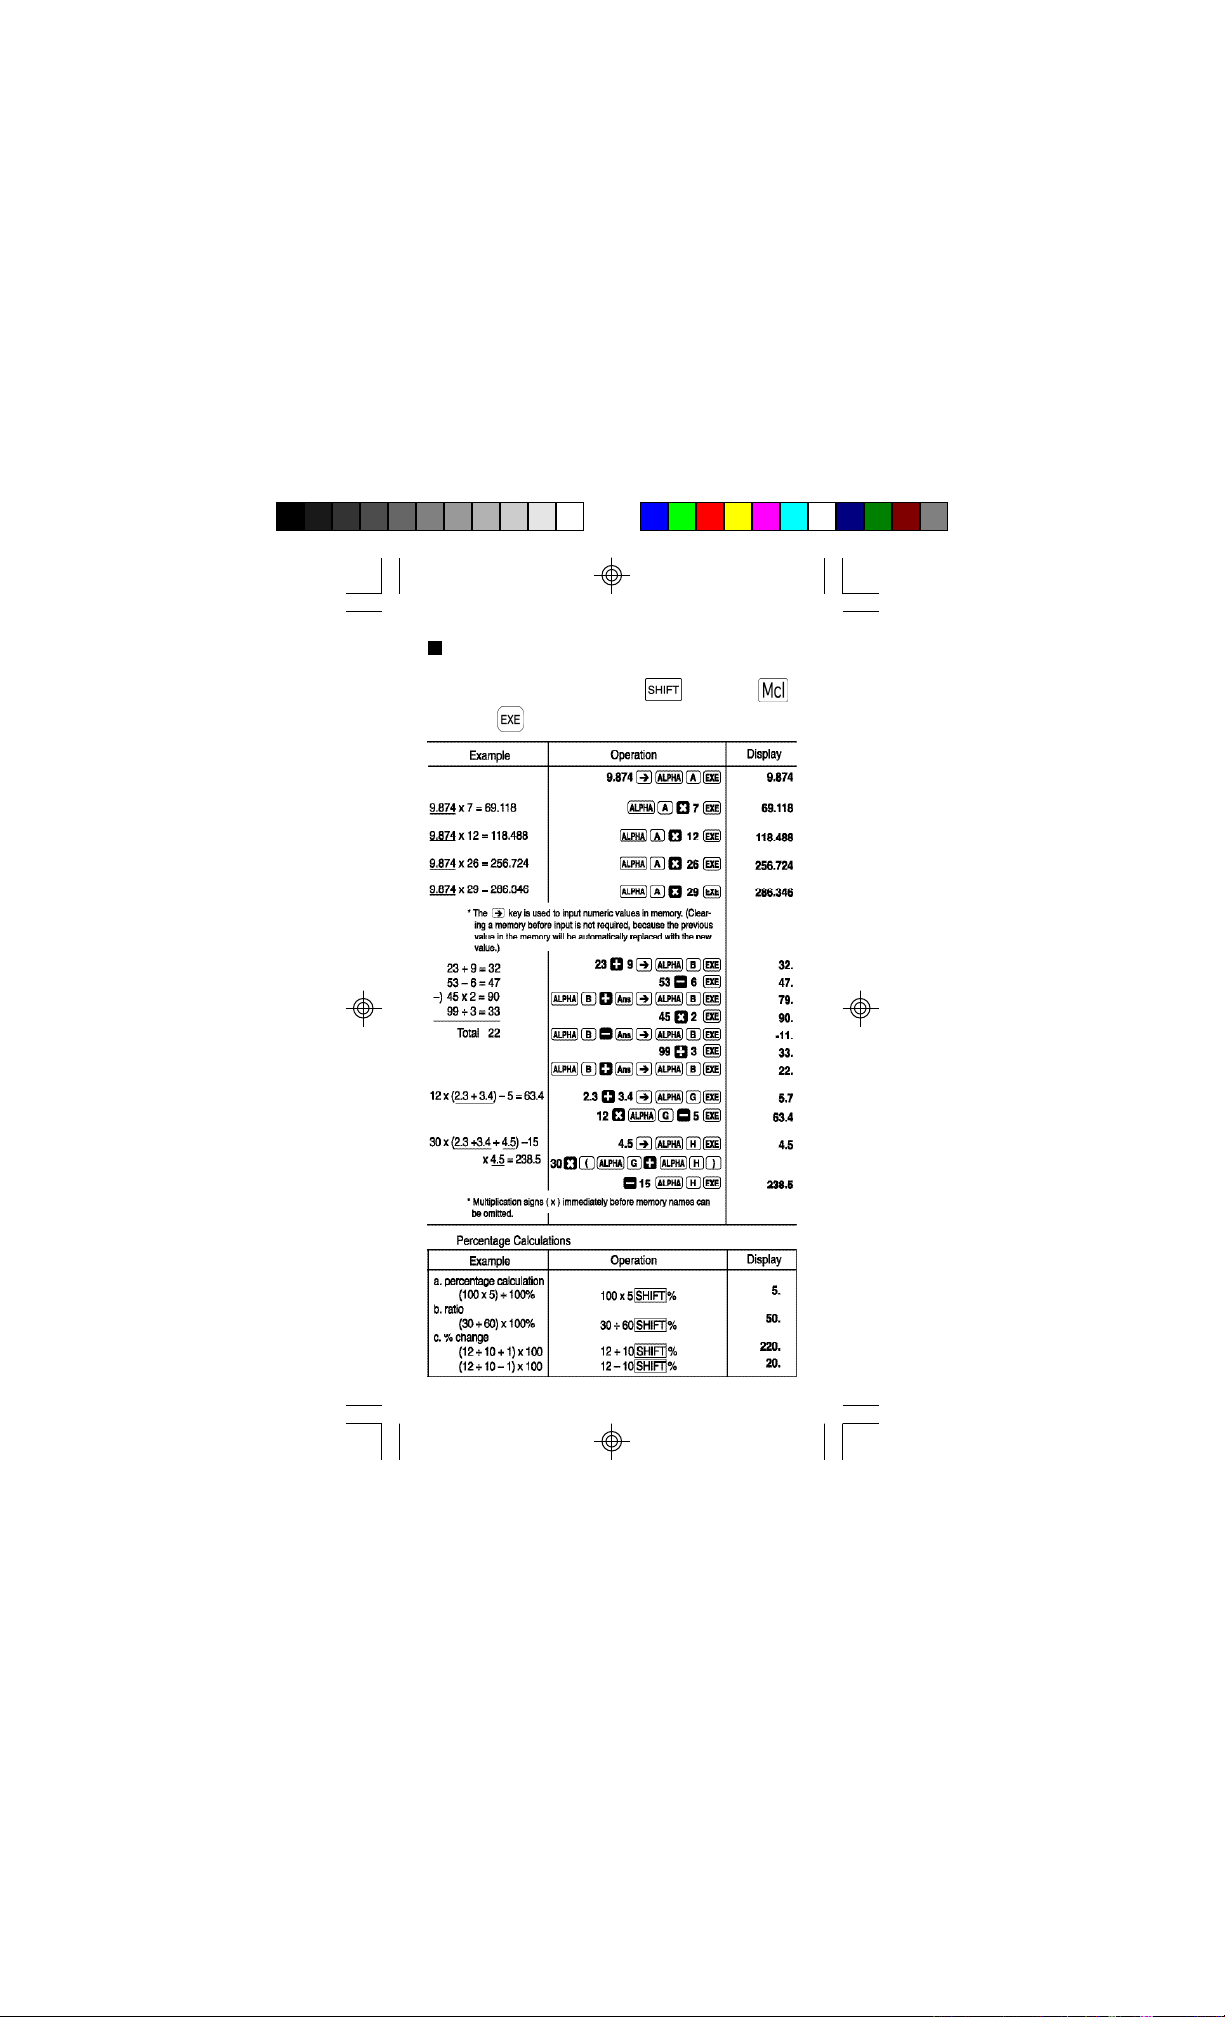
Memory calculations
• The contents of memories are not erased when power is
off. They are cleared by pressing followed by
and then
39
Page 26
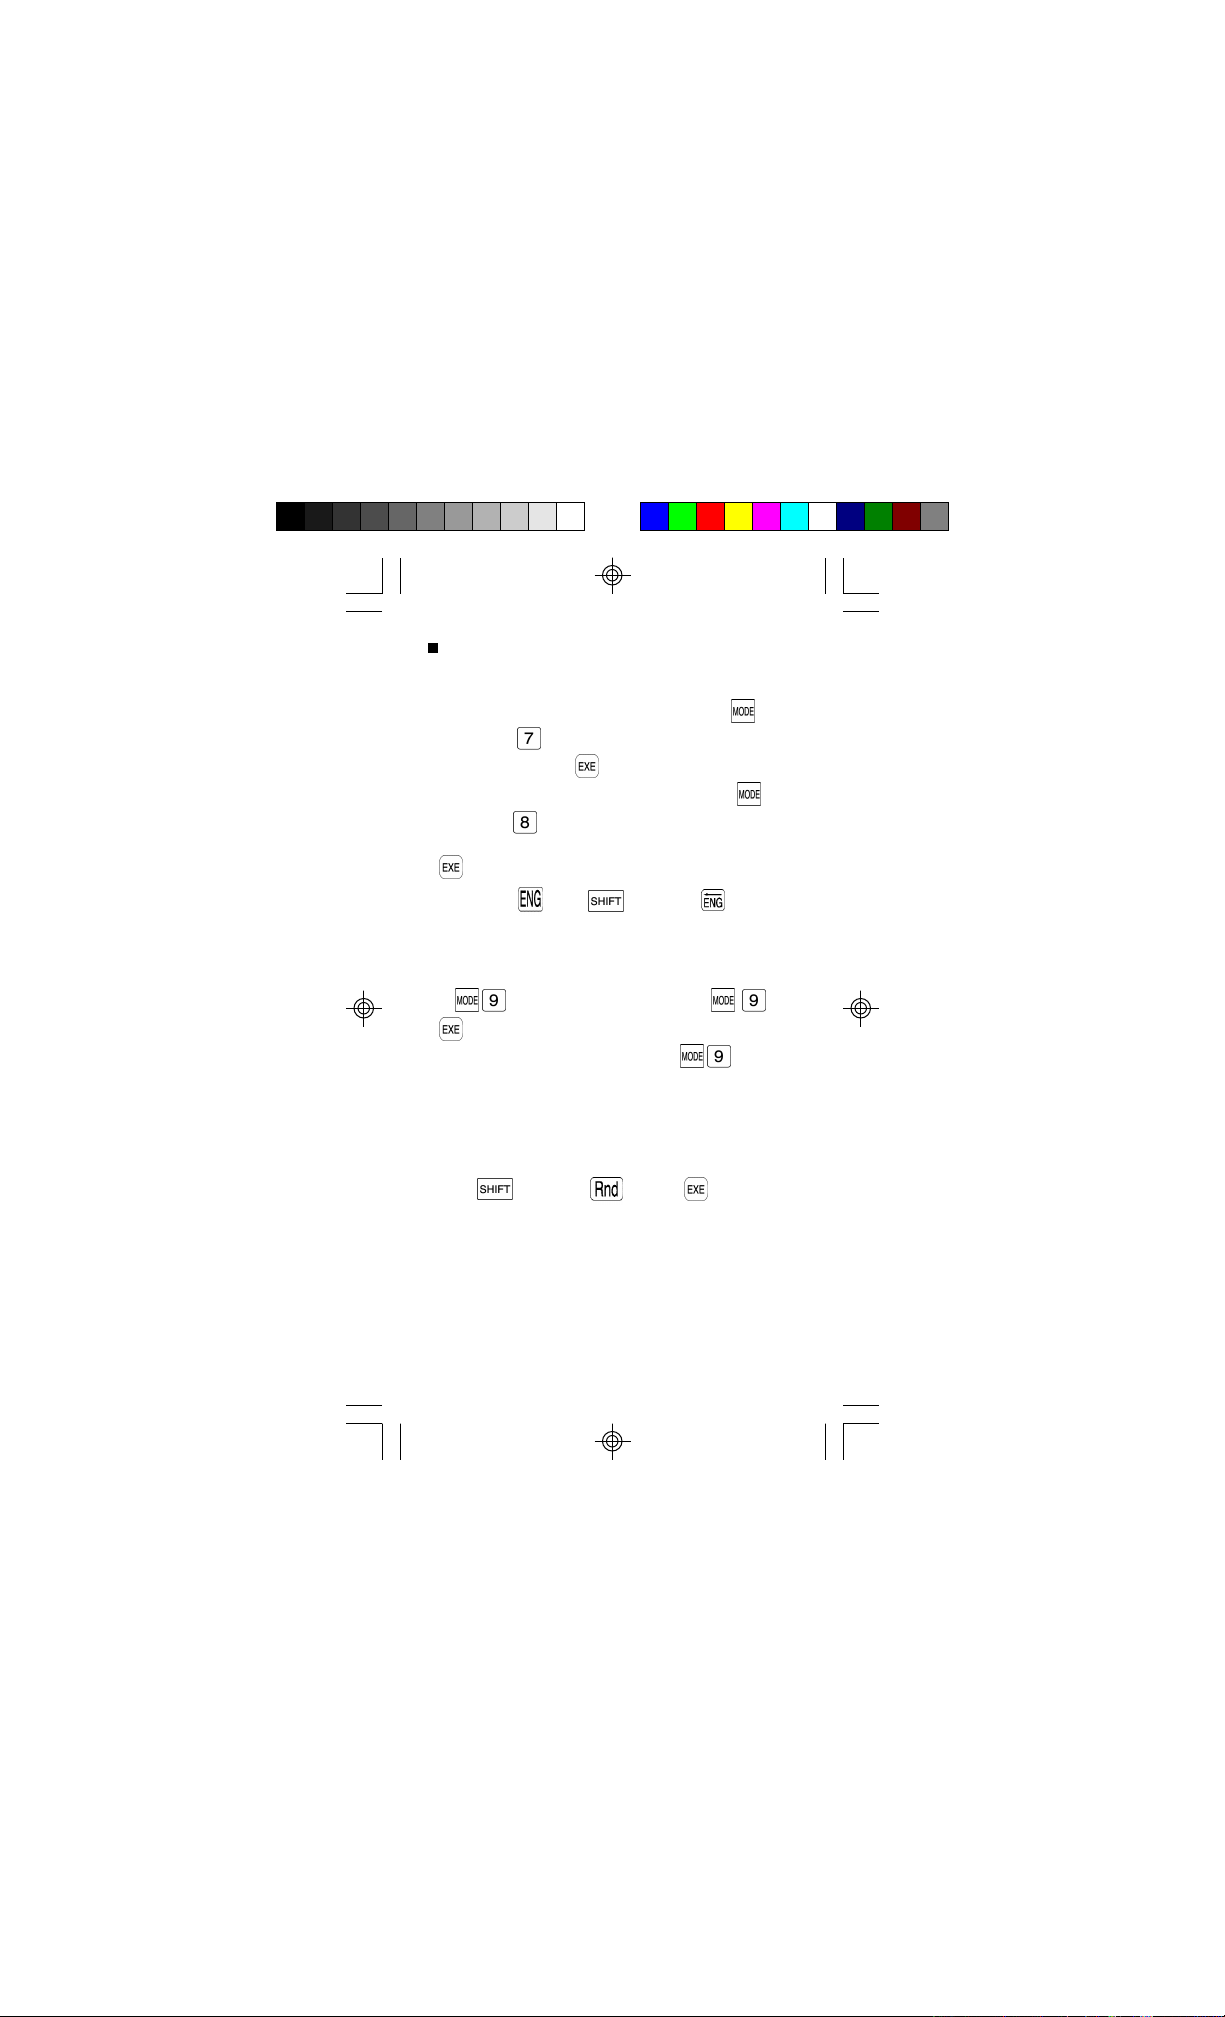
Specifying the number of decimal places, the
number of significant digits and the exponent
display
• To specify the number of decimal places, press
followed by , a value indicating the number of
places (0-9) and then .
• To specify the number of significant digits, press
followed by , a value indicating the number of
significant digits (0-9 to set from 1 to 10 digits) and then
.
• Pressing the key or followed by will cause
the exponent display for the number being displayed to
change in multiples of 3.
• The specified number of decimal places or number of
significant digits will not be cancelled until another value
or is specified using the sequence: , ,
.(Specified values are not cancelled even if power is
switched off or another mode (besides ) is
specified.)
• Even if the number of decimal places and number of
significant digits are specified, internal calculations are
performed in 12 digits for a mantissa, and the displayed
value is stored in 10 digits. To convert these values to the
specified number of decimal places and significant digits,
press followed by and then .
* You cannot specify the display format (Fix, Sci) while the
calculator is in the BASE-N mode. Such specifications
can only be made if you first exit the BASE-N mode.
40
Page 27

41
Page 28

Answer function
The Answer function stores the result of the most recent
calculation. Once a numeric value or numeric expression is
entered and is pressed, the result is stored by this
function.
To recall the stored value, press the key. When is
pressed, "Ans" appears on the display along with the
Answer function value. The value can be used in
subsequent calculations.
* Since the "Ans" function works just like any other
memory,it will be referred to as "Ans memory" throughout
this manual.
42
Page 29

123+456 = 579
789-579 = 210
Numeric values with 12 digits for a mantissa and 2 digits
for an exponent can be stored in the Ans memory. The Ans
memory is not cleared even if the power of the unit is
turned off. Each time is pressed, the value in the Ans
memory is replaced with the value produced by the new
calculation. When execution of a calculation results in an
error, however, the Ans memory retains its current value.
When a value is stored to another memory using the
key, that value is not stored in the Ans memory.
Perform calculation 78 + 56 = 134, then store the
value 123 to memory A:
The Ans memory can be used in the same manner as the
other memories, thus making it possible to use it in
calculation formulas. In multiplication operations, the
immediately before can be omitted.
15x3=45
78x45 -23=3487
43
Page 30

Continuous calculation function
Even if calculations are concluded with the key, the
result obtained can be used for further calculations. Such
calculations are performed with 10-digit mantissa of the
displayed value.
To calculate ÷ 3.14 after 3 x 4 = 12:
To calculate 1 ÷ 3 x 3 =:
This function can be used with memory and Type A
functions ( x2, x-1, x!, °’ ”, °, r, g, ), +, –, xy, and x.
To store the result of 12 x 45 in memory C:
To square the result of 78 ÷ 6 = 13:
44
Page 31

Replay function
This function stores the latest formula executed. After
execution is complete, pressing either the or
key will display the formula.
Pressing will display the formula from the beginning,
with the cursor located under the first character. Pressing
will display the formula from the end, with the cursor
located at the space following the last character. After this,
use and to move the cursor, to check the
formula. You can edit numeric values or commands for
subsequent execution.
* As with the number of input steps, the replay function can
accept input of up to 127 steps.
45
Page 32

Error position display function
When an ERROR message appears, press or
to display the calculation with the cursor located at the step
that caused the error. You can also clear an error by
pressing and then reenter the values and formulas from
the beginning.
14 ÷ 0 x 2.3 mistakenly input instead of 14 ÷ 10
x 2.3:
Multistatement function
• The multistatement function available in program
calculations can also be used in manual calculations.
• With the multistatement function, multiple statements are
linked together with a colon ( ) separating them.
• Pressing the key after a multistaterment is entered
causes the entire chain of statements to be executed
from left to right.
• Using " " ( ) in place of a colon display the
calculation result up to the point that " " is encountered.
6.9 x 123 = 848.7
123 ÷ 3.2 = 38.4375
46
Page 33

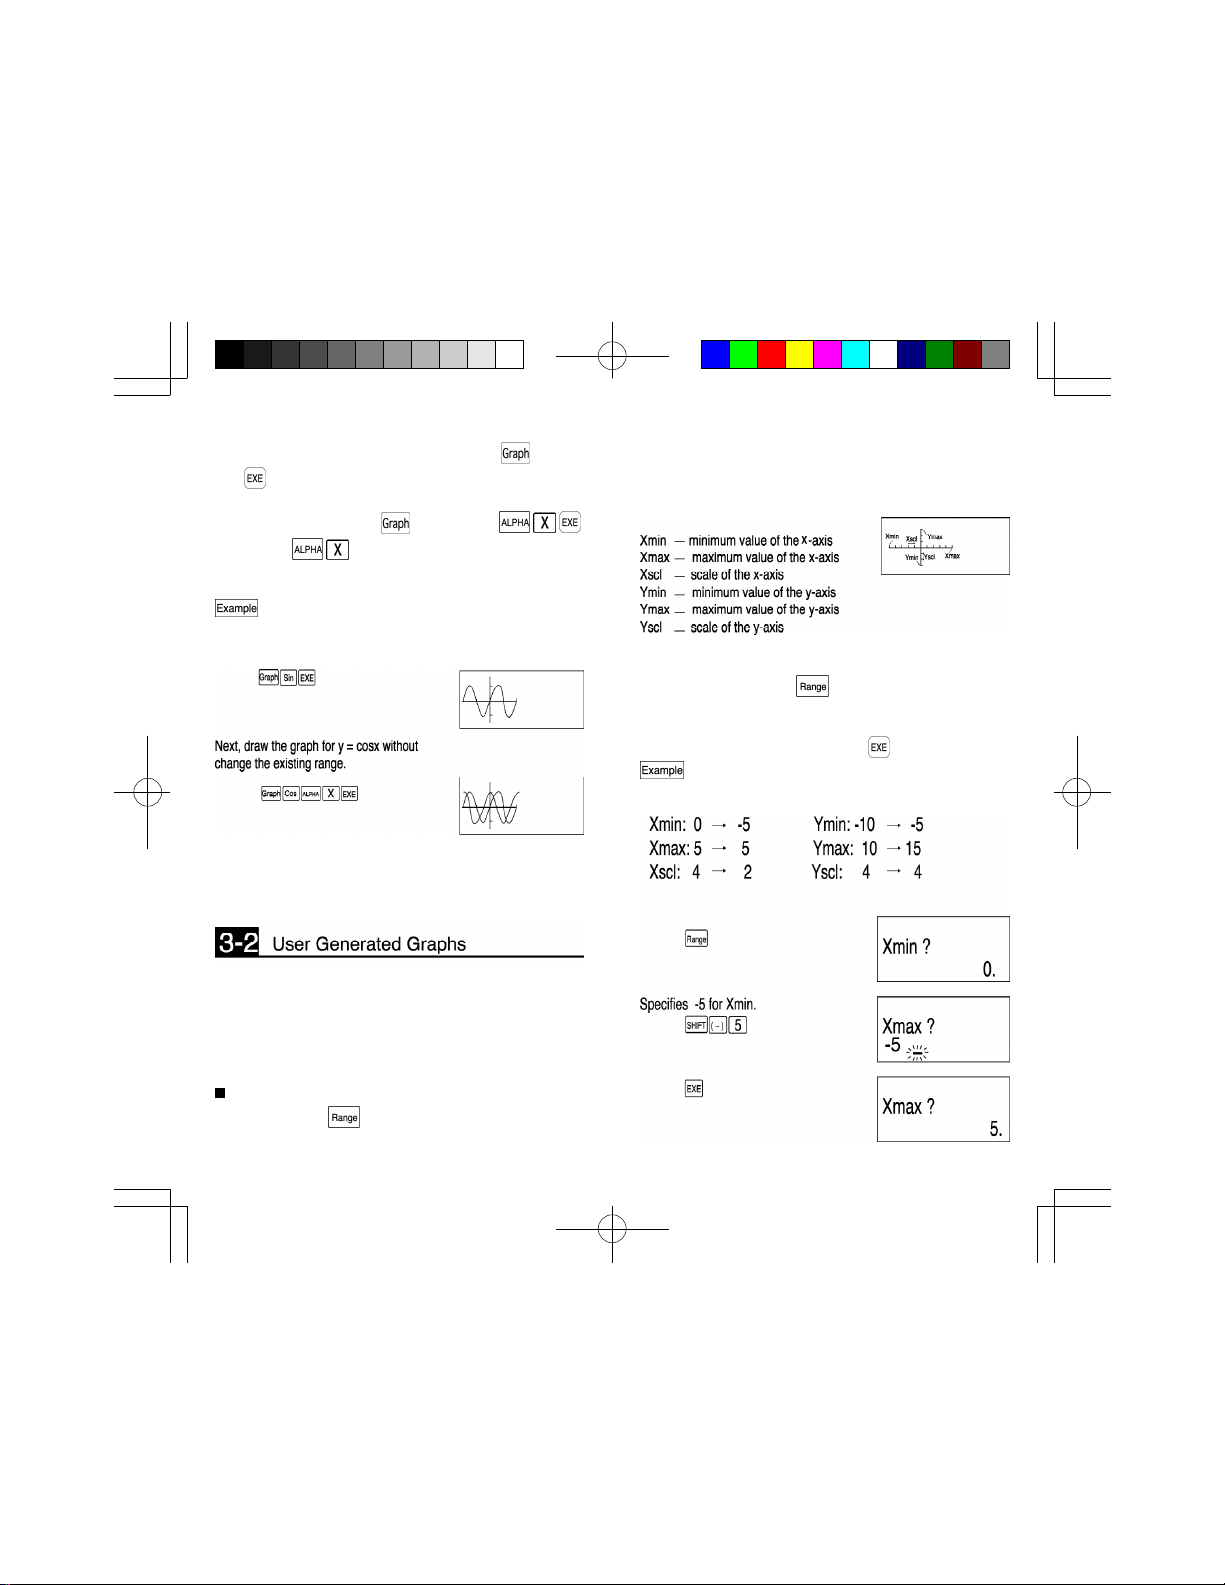
* The final result of a multistatement is always displayed,
regardless of whether a " " symbol is input at the end of
the last statement in the chain.
* Consecutive calculations contained in multistatements
cannot be performed.
Angular measurement units
• The unit of angular measurement (degrees, radians,
grads) is set by pressing followed by a value from 4
through 6 and then .
• The numeric value from 4 through 6 specifies degrees,
radians and grads respectively.
• Once a unit of angular measurement is set, it remains in
effect until a new unit is set. Settings are not cleared
when power is off.
• You cannot specify the unit of angular measurement
(degrees, radians, grads) while the calculator is in the
BASE-N mode. Such specifications can only be made if
you first exit the BASE-N mode.
47
Page 34

48
Page 35

Trigonmetric functions and inverse trigonometric
functions
• Be sure to set the unit of angular measurement before
performing trigonometric function and inverse
trigonometric function calculations.
• The operations noted below cannot be performed in the
BASE-N mode.
49
Page 36
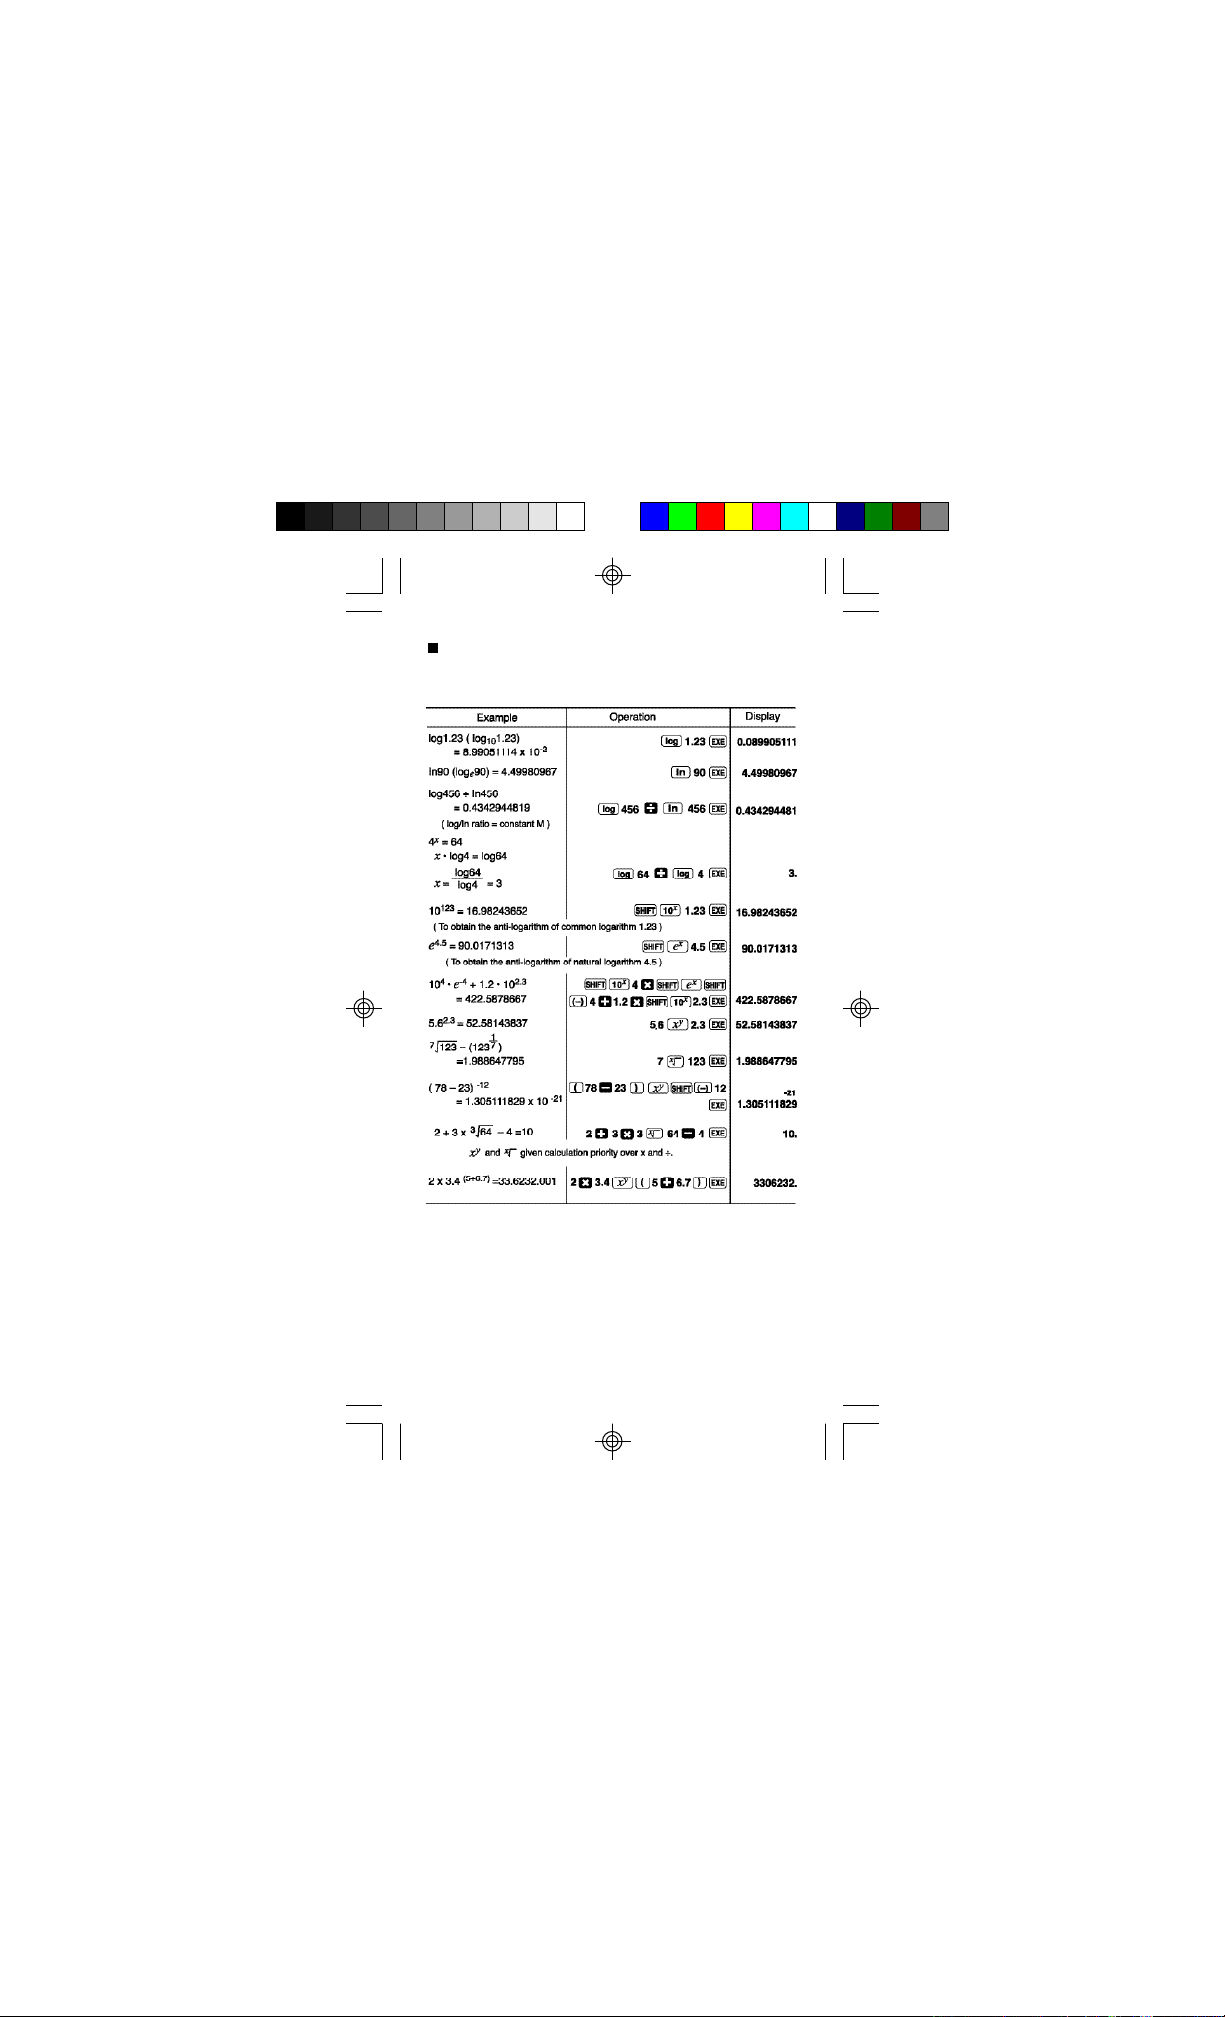
Logarithmic and exponential functions
• The operations noted below cannot be performed in the
BASE-N mode.
50
Page 37

Hyperbolic funcitions and inverse hyperbolic
functions
• The operations noted below cannot be performed in the
BASE-N mode.
51
Page 38

Coordinate transformation
• Your calculator lets you convert between rectangular
coordinates and polar coordinates.
•Rectangular coordinates •Polar coordinates
• Calculation results are stored in variable memory I and
variable memory J. Contents of variable memory I are
displayed first. To display contents of memory J, press
.
• With polar coordinates, can be calculated within a range
of -180° < 180°.
The calculation range is the same for radians and grads.
• The operations noted below cannot be performed in the
BASE-N mode.
52
Page 39

Other functions ( ,x2 , x
-1
,x! ,3 ,Ran# , Abs, Int ,
Frac )
• The operations noted below cannot be performed in the
BASE-N mode.
53
Page 40

54
Page 41

Fractions
• Fractions are input and displayed in the following order :
integer, numerator,denominator.
55
Page 42

56
Page 43

• Binary, octal, decimal and hexadecimal calculations,
conversions and logical operations are performed in the
BASE-N mode (press ).
• The number system (2,8,10,16) is set by respectively
pressing or followed by . AA
corresponding symbol "b", "o", "d", or "h" appears on the
display.
• Number systems are specified for specific values by
pressing , then the number system designator (b,
o, d,or h), immediately followed by the value.
• General function calculations cannot be performed in the
BASE-N mode.
• Only integers can be handled in the BASE-N mode. If a
calculation produces a result that includes a decimal
value, the decimal portion is cut off.
• The total range of numbers handled in this mode is 0, 1,
2, 3, 4, 5, 6, 7, 8, 9, A, B, C, D, E, F. If values are not
valid for the particular number system to be used, attach
the corresponding designator (b, o, d or h), or an error
message will appear.
57
Page 44

• Negative numbers in binary, octal and hexadecimal are
expressed as two's complements.
• To distinguish the A, B, C, D, E and F used in the
hexadecimal system from standard letters, they appear
as shown in the chart below.
Binary Positive : 1111111111 x 0
Negative : 1111111111 x 1000000000
Octal Positive : 777777777 x 0
Negative: 7777777777 x 4000000000
Decimal 2147483647 x -2147483648
Hexadecimal Positive : 7FFFFFF x 0
Negative: FFFFFFFF x 80000000
• You cannot specify the unit of angular measurement
(degrees, radians, grads) or the display format (Fix,
Sci) while the calculator is in the BASE-N mode. Such
specifications can only be made if you first exit the
BASE-N mode.
58
Page 45

Binary, octal, decimal, hexadecimal
conversions
Negative expressions
59
Page 46

Basic arithmetic operations using binary,
octal,decimal and hexadecimal values
60
Page 47

Logical operations
Logical operations are performed through logical products
(and), logical sums (or), negation (Not), exclusive logic
sums (xor), and negation of exclusive logical sums (xnor).
60
61
Page 48

Standard deviation
• Standard deviation calculations are performed in the SD
mode ( ). "SD" appears on the display.
• Before beginning calculations, the statistical memories
are cleared by pressing followed by and then
.
• Individual data are input using .
• Multiple data of the same value can be input either by
repeatedly pressing or by entering the data, pressing
,followed by , that represents the number of
times the data is repeated, and then .
• Standard Deviation
• Mean
* The values for n, ∑x, and ∑x2 are stored in memories W,
V, and U respectively, and can be obtained by pressing
followed by the memory name and then (i.e.
).
62
63
Page 49
* Erroneous data clearing/correction I (Correct data
operation: 51 )
If 50 is entered, enter correct data after pressing
.
If 49 was input a number of entries previously,
enter correct data after pressing 49 .
* Erroneous data clearing/correction II (correct data
operation: 130 31 )
If 120 is entered, enter correct data after
pressing .
If 120 31 is entered, enter correct data after
pressing .
If 120 30 is entered, enter correct data
after pressing .
If 120 30 was entered previously, enter
correct data after pressing 120 30 .
Regression calculation
• Regression calculations are performed in the LR mode (
). "LR" appears on the display.
• Before beginning calculations, the tabulation memories
are cleared by pressing followed by and then
.
• Individual data are entered as x data y data
• Multiple data of the same value can be entered by
repeatedly pressing . This operation can also be
performed by entering x data y data
followed by a value representing the number of times the
data is repeated, and then .
64
• If only x data is repeated (x data having the same value),
enter y data or y data
followed by a value representing the number of times the
data is repeated, and then .
• If only y data is repeated (y data having the same value),
enter x data or x data followed by a
value representing the total number of times the data is
repeated, and then .
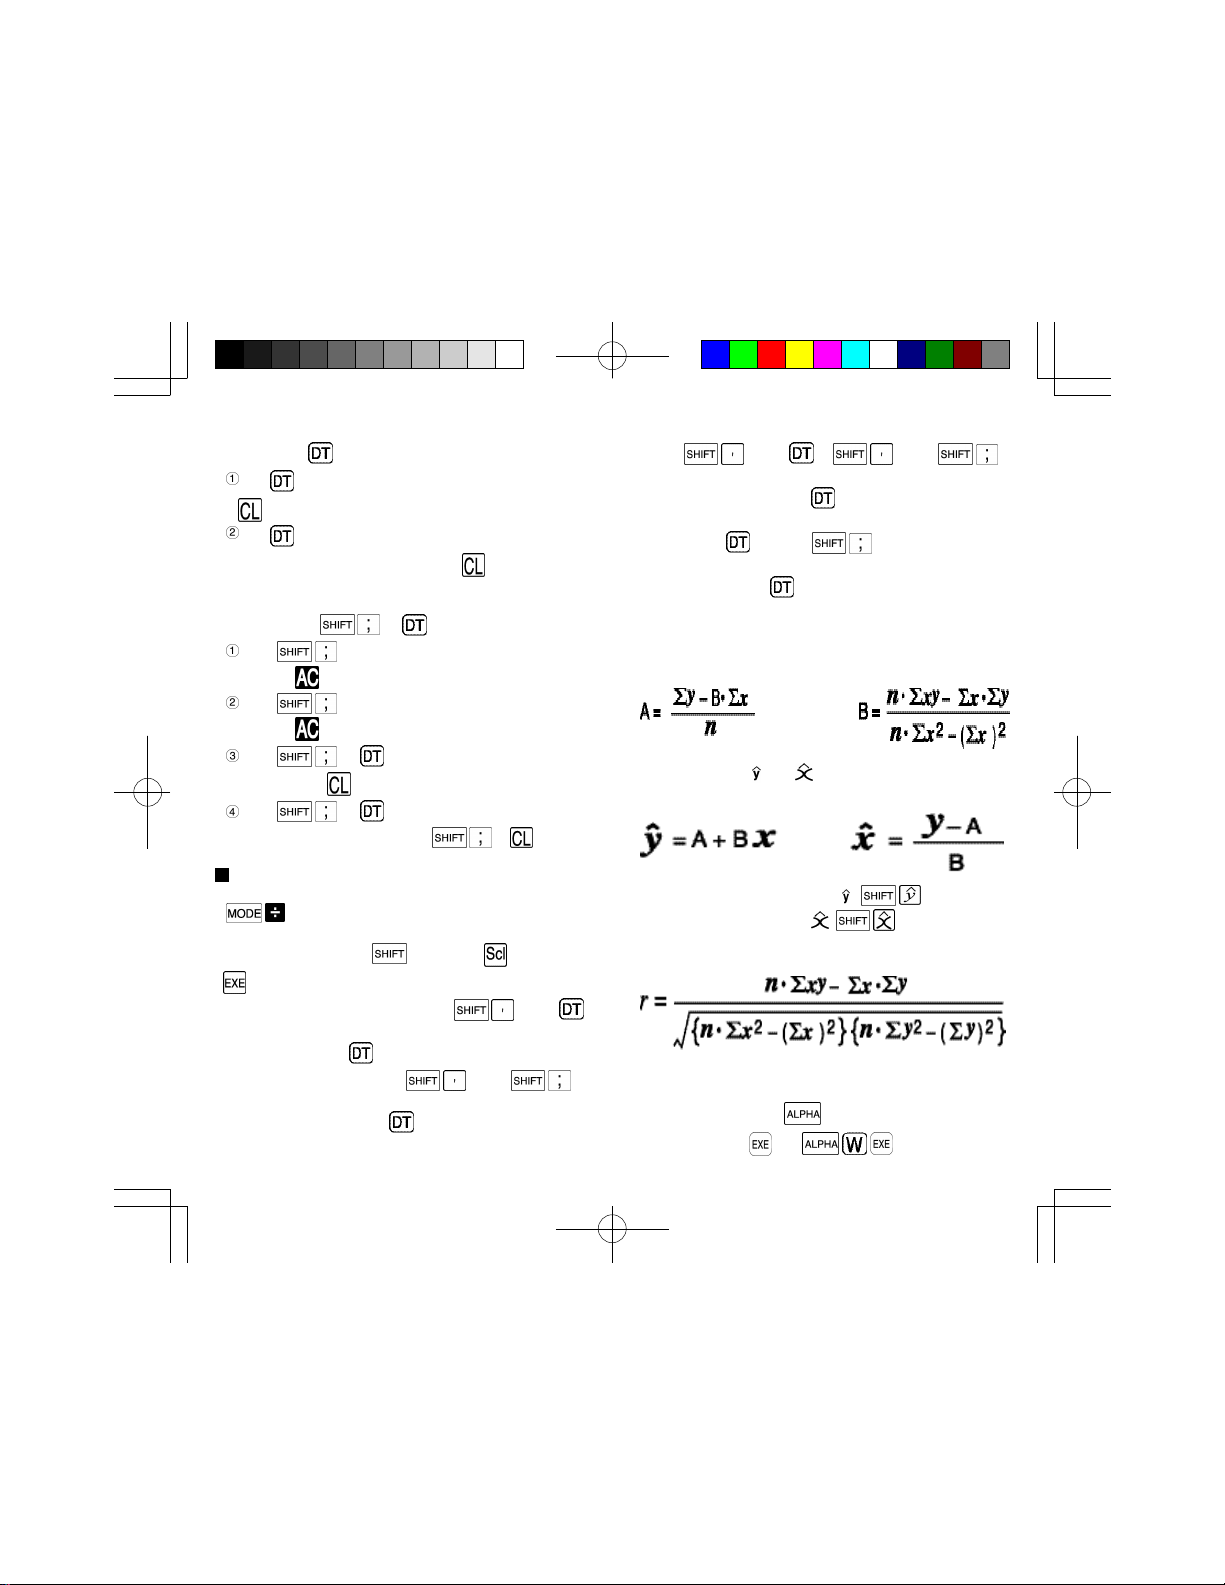
• Regression
The following are the formulas the unit uses to calculate
constant term A and regression coefficient B for the
regression formula y = A + Bx.
• Estimated value , and based on the regression
formula can be calculated using the following formulas:
(To obtain the estimated value , is used, and
to obtain estimated value , is used.)
• The correlation coefficient r for input data can be
calculated using the following formula:
* The values for n, ∑x, ∑x2, ∑xy,∑y, and ∑y2 are stored in
memories W, V, U, R, Q and P respectively, and can be
obtained by pressing followed by the memory
name and then (i.e. ).
65
Page 50

Linear regression
* Erroneous data clearing/correction ( correct data
operation: 10 1003 )
If 11 1003 is entered, enter correct data after
pressing .
If 11 1003 is entered, enter correct data
after pressing .
If 11 1003 was entered previously, enter
correct data after pressing 11 1003 .
Logarithmic regression
• The regression formula is y = A + B•Inx. Enter the x data
as the logarithm (In) of x, and the y data inputs the same
as that for linear regression.
• Estimated values ,and based on the regression
formula can be calculated using the following formulas:
• The same operation as with linear regression can be used
to obtain the regression coefficient and for making
corrections. To obtain the estimated value , x
, Is used, and to obtain estimated value , y
, is used.
Furthermore, ∑x, ∑x2 and ∑xy are obtained by ∑Inx, ∑
(Inx)2, and ∑lnx•y respectively.
66
67
Page 51

Exponential regression
• The regression formula is y = A•e
B•x
(Iny = InA + Bx).
Enter the y data as the logarithm of y(ln), and the x data
the same as that for linear regression.
• Estimated values , and based on the regression
formula can be calculated using the following formulas:
• Correction is performed the same as in linear regression.
Constant term A is obtained by ,
estimated value is obtained by x
, and estimated value is obtained by y
. ∑y, ∑y2 and ∑xy are obtained by ∑Iny, ∑(Iny)
and ∑x•Iny respectively.
2
68
69
Page 52

Power regression
• The regression formula is y=A•xB (lny=InA + BInx). Enter
both data x and y as logarithms (In).
• Estimated values , and based on the regression
formula can be calculated using the following formulas:
• Correction is performed the same as in linear regression.
Constant term A is obtained by ,
estimated value is obtained by x
and estimated value is obtained by
y ,∑x,∑x2, ∑y, ∑y2 and ∑xy
are obtained by ∑Inx, ∑(Inx)2, ∑Iny, ∑ (Iny)2 and ∑Inx•Iny
respectively.
3 Graphs
The COMP mode of the RUN mode should be used when
graphing functions. Some graphs can be produced in the
SD and LR modes, but certain graphs cannot be produced
in these modes. The BASE-N mode cannot be used for
graphs. This unit contains a total of 20 built-in graphs
making it possible to produce the graphs of basic functions.
Any time a built-in graph is executed, the ranges are
automatically set to their optimum values, and any graph
previously on the display is cleared.
Overdrawing built-in function graphs
Two or more different built-in function graphs can be
drawn together on the same display. Since the range for
the first graph is automatically set, all subsequent
graphs on the same display are produced according to
70
71
Page 53
the range of the first graph. The first graph is produced
by using the previously mentioned operation ( function
key] ).
Subsequent graphs are produced using the
variable X in the operation [function key]
By inputting after the function key, the range is
unchanged and the next graph is produced without clearing
the existing display.
Overdraw the graph for y=cos x on the graph for
y=sin x.
First, draw the graph for y=sin x.
(Note)
Built-in function graphs cannot be used in multistatements
and cannot be written into programs.
Built-in function graphs can also be used in combination
with each other. Graphing a formula such as y=2x2 + 3x -5
makes it possible to visually represent the solution.
Unlike built-in functions, the ranges of user generated
graphs are not set automatically, so graphs produced
outside of the display range do not appear on the display.
each axis, as well as their scales (distance between
hash marks). Before drawing a graph, you should first
specify range parameters to set the size of the graph.
• Range parameter types
Range parameters consist of the following:
•Specifying range parameters
Whenever you press the key (except in the BASE-N
mode), the range parameter setting screen appears on the
display. Enter the value you want to specify for the
displayed parameter and then press .
Change the range parameters on the left to
those on the right.
Range parameters
After pressing the key, you can look up and specify
the range parameters for the x- and y- coordinates. Range
parameters consist of maximum and minimum values for
72
73
Page 54
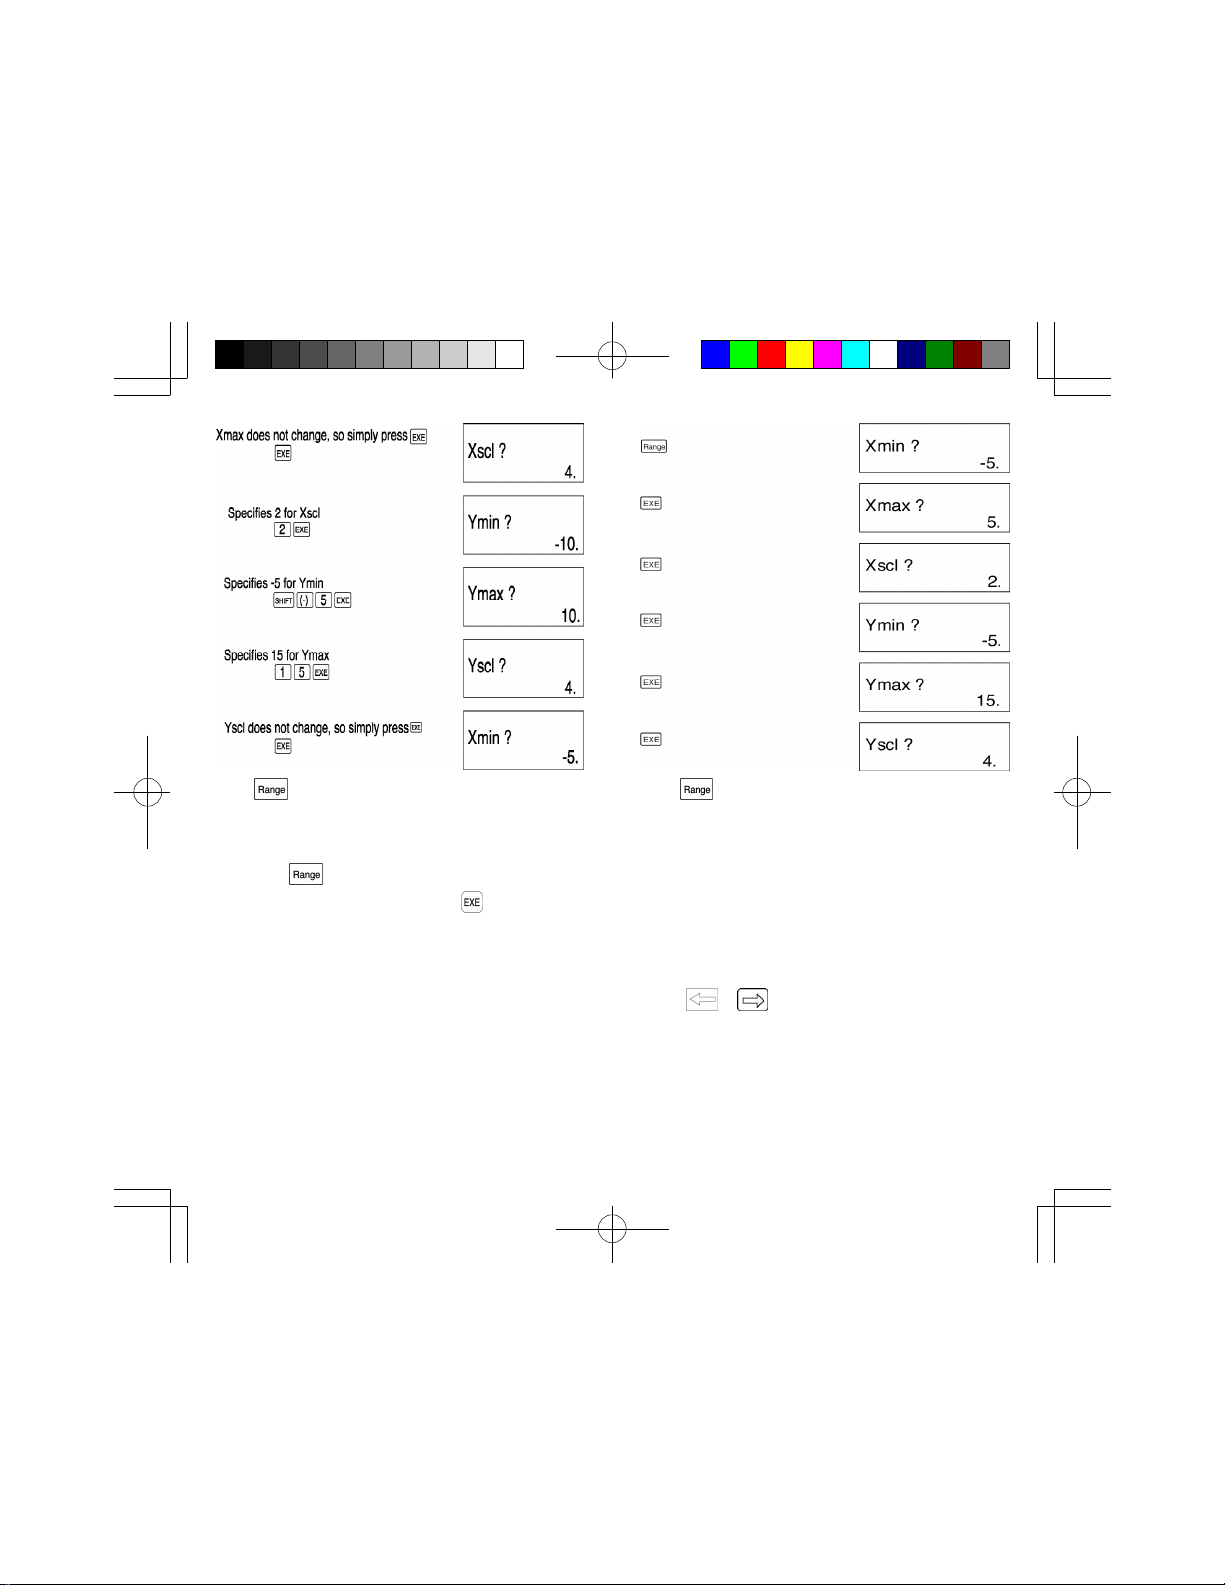
Press to return to the display that was shown before
entering the range display.
• Checking range parameters
Press the key and the range parameter setting
screen appears on the display. Press to scroll
through the range parameter settings without changing
them.
Press to return to the display that was shown before
entering the range display.
You can input range parameters as expressions (such as
2π) and these expressions are automatically converted to
the values.
* The input range for graph ranges is -9.999999999E + 97
through 9.999999999E + 97.
* If you enter a value that is outside the allowable range or
if you try to perform some other illegal operation, an error
message appears on the display. When this happens,
press or to display the place in the calculation
that caused the error (Replay function) and make the
necessary corrections.
* Inputting 0 for Xscl or Yscl does not set any scale.
* Inputting a maximum value that is less than the minimum
value will reverse the respective axis.
74
75
Page 55

* If the maximum and minimum values of an axis are equal,
and error (Ma ERROR) will be generated when an
attempt is made to produce a graph.
* When a range setting is used that does not allow display
of the axes, the scale for the y-axis is indicated on either
the left or right edge of the display, while that for the x axis is indicated on either the top or bottom edge. (In both
cases, the location of the scale is the edge which is
closest to the origin (0,0)).
* When range values are changed (reset), the graph
display is cleared and the newly set axes only are
displayed.
* Range settings may cause irregular scale spacing.
* If the range is set too wide, the graph produced may not
fit on the display.
* Points of deflection sometimes exceed the capabilities of
the display with graphs that change drastically as they
approach the point of deflection.
* An Ma ERROR is generated when ranges are extremely
narrow.
• Range reset
Range values are reset to their initial values by pressing
during range display.
The initial values are as follows.
Xmin: -3.8 Ymin: -2.2
Xmax: 3.8 Ymax :2.2
Xscl :1 Yscl: 1
(Reference)
Range settings are performed within programs using the
following format:
Xmin value, Xmax value, Xscl value, Ymin value,
Ymax value, Yscl value. Up to six data items are
programmed after the command. When less than six
items are programmed, range setting is performed in the
order from the beginning of the above format.
76
User generated function graphs
After performing range settings, user generated graphs can
be drawn simply by entering the function (formula) after
pressing .
Here, let's try drawing a graph for y=2x2 + 3x -4.
Set the ranges to the values shown below.
Xmin: -5 Ymin: -10
Xmax: 5 Ymax :10
Xscl: 2 Yscl: 4
Input the functional formula after pressing the key.
The result produces a visual representation of the formula.
Function graph overdraw
Two or more function graphs can be overdrawn, which
makes it easy to determine intersection points and
solutions that satisfy all the equations.
Here, let's find the intersection points of the
previously used
y=2x2 +3x -4 and y=2x + 3.
First, clear the graph screen in preparation for the first
graph.
In this way it can be easily seen that there are two
intersections for the two function graphs. The approximate
coordinates for these two intersections can be found using
the Zoom function and the Trace function described in the
following section.
77
Page 56

* Be sure to input variable X ( ) into the formula
when using built-in graphs for overdraw.
If variable X is not included in the second formula, the
second graph is produced after clearing the first graph.
Zoom function
This function lets you enlarge or reduce the x - and
y-coordinates. If you use the Trace or Plot function to
locate the pointer at a specific point on the graph, the
enlargement/reduction is performed using the pointer
location as the center point.
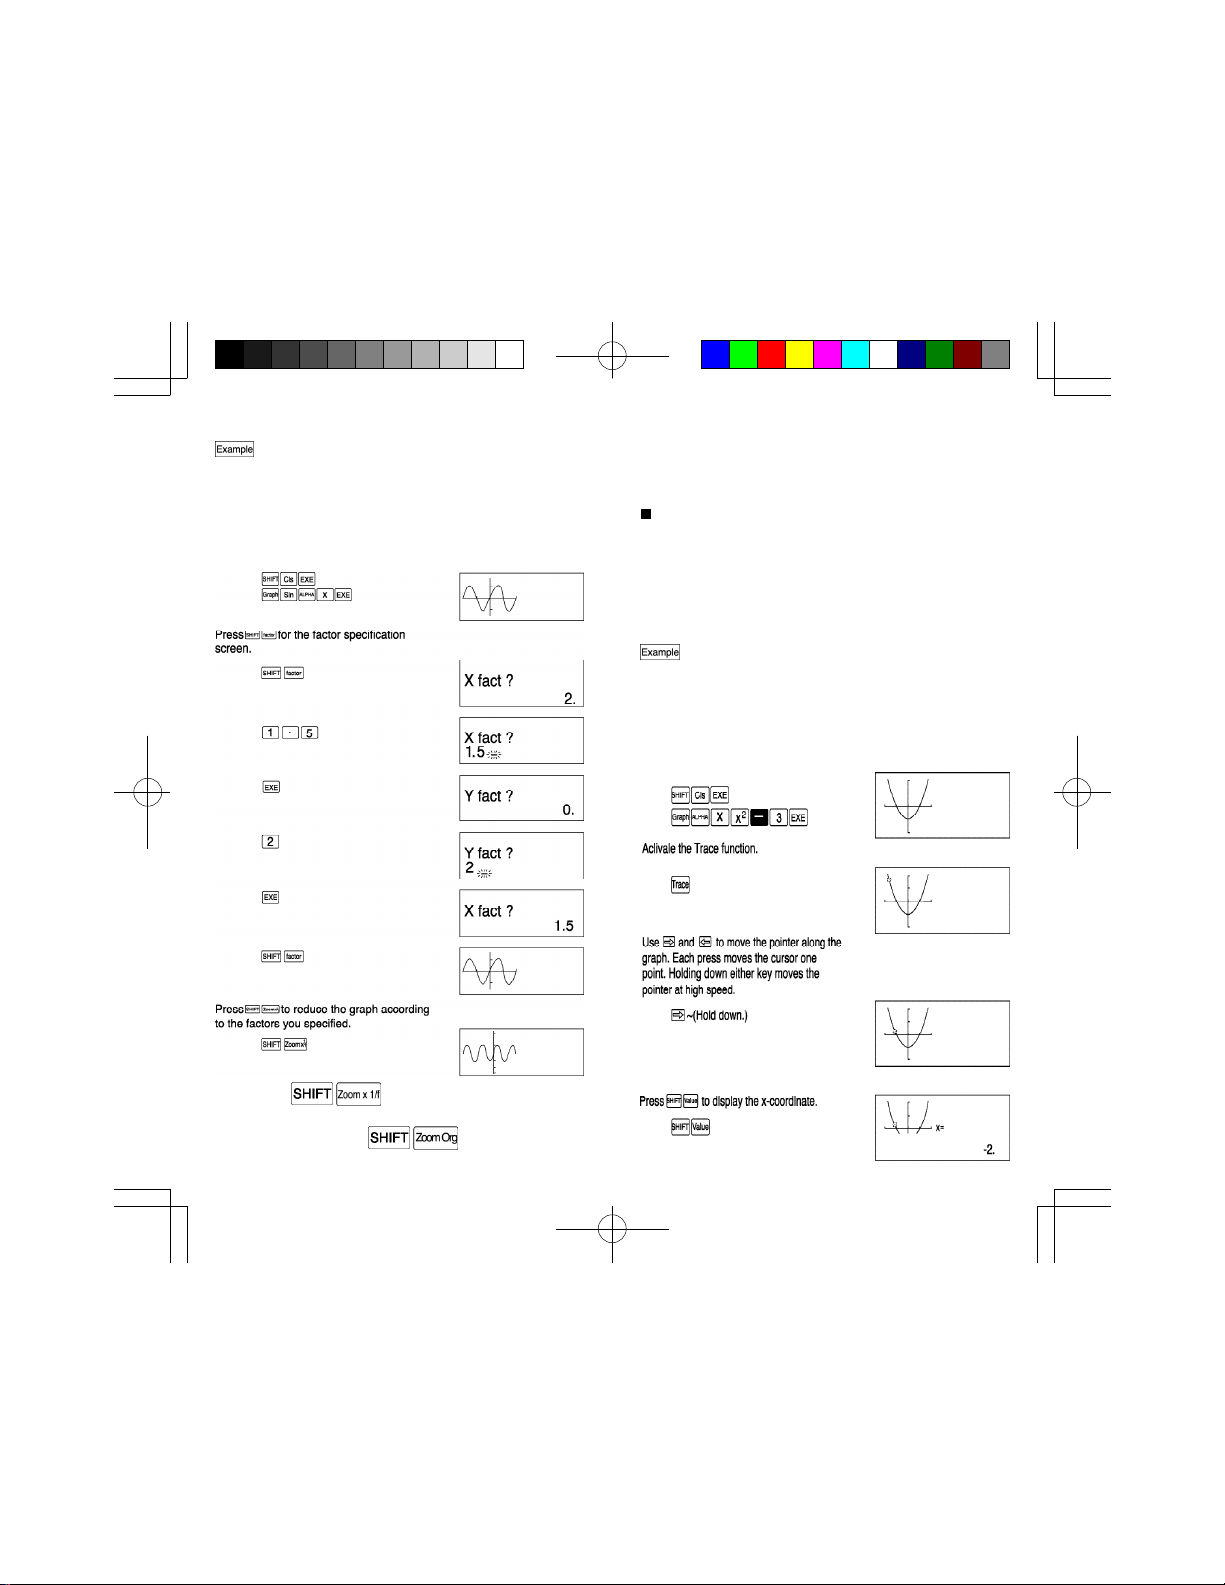
•Enlarging a graph
To enlarge the graph for y=sinx by a factor of 1.5
on the x-axis and 2.0 on the y-axis. Use the following
range parameters for the original graph.
Xmin: -360 Ymin: -1.6
Xmax: 360 Ymax : 1.6
Xscl:180 Yscl: 1
78
79
Page 57
• Reducing a graph
To reduce the graph for y=sinx by a factor of 1.5 on
the x-axis and 2.0 on the y-axis. Use the following
range parameters for the original graph.
Xmin: -360 Ymin: -1.6
Xmax: 360 Ymax : 1.6
Xscl:180 Yscl: 1
After specifying the range parameters, graph y=sinx.
• To specify the zoom factors within a program
Use the following formal to specify the zoom factors in a
program.
Factor (Xfactor), (Yfactor)
Trace function
This function lets you move a pointer around a graph and
display the x- and y- coordinates of the current pointer
location. You enlarge or reduce the x- and y-coordinates.
You can display the coordinates using either seven digits or
eleven digits (including negative sign).
•Using the trace function
To use the Trace function in combination with the
Zoom function to analyze the graph for y=x2-3. Use
the following range parameters for the original graph.
Xmin: -4 Ymin: -8
Xmax: 4 Ymax : 8
Xscl:2 Yscl: 4
After specifying the range parameters, graph y=x2-3.
If you press again, the graph is reduced
once more by the factors you specified. To return the graph
to its original size. press .
80
81
Page 58

first
82
83
Page 59

As you can see above, the Trace and Zoom functions can
be used to locate the pointer at an approximate point, and
then produces a readout of the coordinates.
To return the graph to its original size, press
(Important)
The pointer does not move at fixed intervals. It follows the
dots on the display. Because of this, the values provided
for coordinates are approximate.
* The Trace function can only be used immediately after a
graph is drawn. This function cannot be used if other
calculations or operations (except and
have been employed after a graph has been drawn.
* The Trace function cannot be written into a program.
* When the format: " formula formula " is
executed and a graph is drawn by pressing directly
after executing the Trace function during halt status, the
previous coordinate value remains on the display. After
the Trace function is executed and the text display is
brought up using the key, pressing causes the
next graph to appear and the coordinate value to clear.
Examine the above using
2 5.
Plot function
The Plot function is used to mark a point on the screen of a
graph display. The point can be moved left, right, up and
down using the cursor keys, and the coordinates for the
graph displayed can be read. Two points can also be
connected by a straight line .
Press and specify the x-and y-coordinates after
the "Plot" message.
Line function
The Line function makes it possible to connect two points
84
(including the blinking pointer ) created with the Plot
function with a straight line. With this function, user
generated lines can be added to graphs to make them
easier to read.
Draw perpendiculars from point (2,0) on the x-
axis to its intersection with the graph for y=3x.
Then draw a line from the point of intersection
to the y-axis.
The range values for the graph are as follows:
Xmin: -2 Ymin: -2
Xmax: 5 Ymax : 10
Xscl: 1 Yscl: 2
Clear the graph display and draw the graph for y=3x .
85
Page 60

Next, a perpendicular will be drawn from the same point on
the graph to the y-axis. First, plot the point on the graph
and use the cursor key ( ) to move the pointer to the yaxis. This can be accomplished using Plot X,Y since the x-y
coordinates of the point on the graph are stored in the X
and Y memories.
* The Line function can only be used to draw lines
between the blinking pointer and a fixed point created
using the Plot function.
Graph scroll function
Immediately after you have drawn a graph,you can scroll it
on the display.Use the cursor keys to scroll the graph left,
right,up and down.
•To scroll the graph on the display
To draw the graph for y=0.25(x+2)(2x+1)(2x-5)
and then scroll it.
Xmin : -5 Ymin : -8
Xmax : 5 Ymax : 8
Xscl : 1 Yscl : 2
• Press to return the graph to its original
position after scroll operations.
86
87
Page 61

The following examples are presented to show you some
ways that the graphing functions can be used effectively.
To graph the function y=x3-9x2+27x+50
Use the following range parameters.
Xmin : -5 Ymin : -30
Xmax : 10 Ymax : 150
Xscl : 2 Yscl : 20
Program Calculations
This unit has a built-in program feature that facilitates
repeat calculations. The program feature is used for the
consecutive execution of formulas in the same way as the
"multistatement" feature is used in manual calculations.
Programs will be discussed here with the aid of illustrative
To graph the function y=x4+4x3-36x2-160x+300
and determine its minimum and maximum
Use the following range parameters.
Xmin : -10 Ymin : -600
Xmax : 10 Ymax : 600
Xscl : 2 Yscl : 200
88
Find the surface area and volume of a regular
octahedron when the length of one side is given.
Formulas
For a surface area S,volume V and one side A,S and V
for a regular octahedron are defined as:
Programming
Creating a program based on calculation formulas is
known as "programming".Here a program will be created
based upon the formulas given above.The basis of a
program is manual calculation,so first of all,consider the
operational method used for manual calculation.
Surface area (s):2 3 Numeric value A A
Volume (V ): 2 3 Numeric value A A 3
In the above example,numeric value A is used twice,so it
should make sense to store it in memory A before the
calculations.
Numeric value A
89
Page 62

With this unit,the operations performed for manual
calculations can be used as they are in a program.Once
program execution starts,it will continue in order without
stopping.Therefore,commands are required to request the
input of data and to display results.The command to
request data input is "?",while that to display results is " " .
A "?" within a program will cause execution to stop temporarily
and a "?" to appear on the display as the unit waits for data
input.This command cannot be used independently,and is
used together with as memory name".
To store a numeric value in memory A,for example:
? A
When "?" is displayed,calculation commands and numeric
values can be input within 127 steps.
The command causes program execution to stop
temporarily and the latest formula result or alphanumeric
characters and symbols to be displayed.
This command is used to mark positions in formulas where
results are to be displayed. Since programs are ended and
their final results displayed automatically,this command can
be omitted at the end of program.However,if the BASE-N
mode is specified for base conversion during a program,do
not omit final " ".
Here these two commands will be used in the previously
presented procedure:
Now the program is complete.
Program storage
The storage of programs is performed in the WRT mode
which is specified by pressing .
When are pressed,the system mode changes to
the WRT mode.Then,the number of remaining steps is
indicated.The number of remaining steps is decreased
when programs are input or when memories are expanded.
If no programs have been input and the number of
memories equals 26(the number of memories at
initialization),the number of usable steps should equal 400.
The larger figures located below indicate the program
areas .If the letter "p" is followed by the numbers 0 through
9,it indicates that there are no programs stored in areas P0
through P9.The blinking zero here indicates the current
program area is P0.
Areas into which programs have already been stored are
indicated by"_" instead of numbers.
Here the previously mentioned program will be stored to
program area P0 (indicated by the blinking zero):
90
91
Page 63

After these operations are complete,the program is stored.
*After the program is stored,press to return to the
RUN mode.
Program execution
Programs are executed in the RUN mode .The
program area to be executed is specified using the
key.
To execute P0: 0
To execute P3: 3
To execute P8: 8
Here the sample program that has been stored will be
executed.The surface (S) and volume (V) for the regular
octahedron in the sample problem are calculated as:
* Program calculations are performed automatically with
each press of when it is pressed after data is input or
after the result is read.
* Directly after a program in P0 is executed by pressing
0 as in this example,the Prog 0 command is stored by
the replay function.Therefore,subsequent executions of
the same program can be performed by simply pressing
.
Operation 0 (P0 program execution)
10 (Input 10 for A)
(Display V when A = 10)
(Reexecute)
7 (Input 7 for A )
(Display V when A = 7 )
.
.
.
Recalling a stored program can be performed in order to
verify its contents.After specifying the desired program
area using or in the WRT mode ( ),the
program contents will be displayed by pressing the key.
Once the program is displayed,the (or ) key is
used to advance the program one step at a time for
verification.
When the program has been improperly stored,editing can
also be performed by adding to it or erasing portions.Here
a new program will be created by checking and editing the
previous sample program (the surface area and volume of
a regular octahedron).
Find the surface area and volume of a regular
tetrahedron when the length of one side is given.
92
93
Page 64

Formulas
For a surface area S,volume V and one side A, S and V for
a regular tetrahedron are defined as:
Programming
As with the previous example,the length of one side is
stored in memory A and the program then constructed.
Numeric value A
The octahedron program can be changed to a tetrahedron
program by deleting the parts marked with wavy lines,and
changing those that are marked with straight lines.
In actual practice,this would be performed as follows:
Program editing
First, a comparison of the two programs would be
helpful.
94
Program execution
Now this program will be executed.
95
Page 65
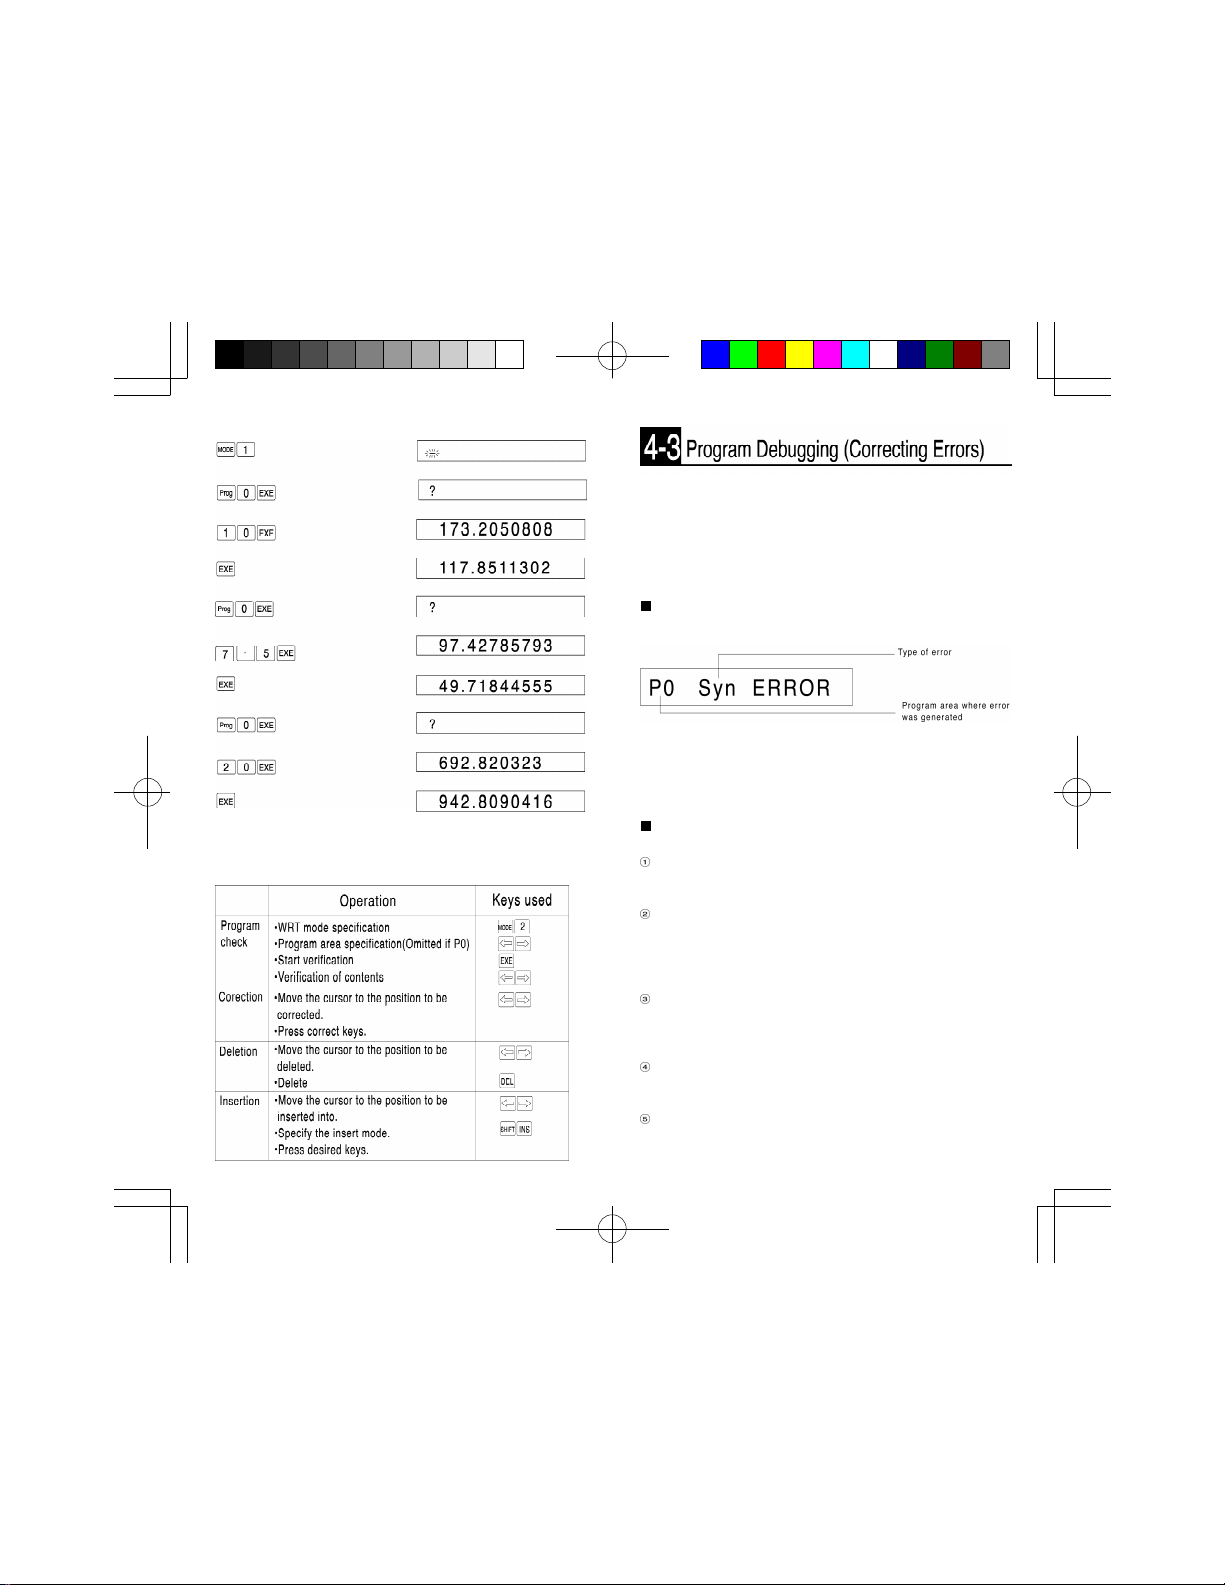
< Summary >
After a program has been created and input,it will
sometimes generate error messages when it is executed,or
it will produce unexpected results.This indicates that there
is an error somewhere within the program that needs to be
corrected. Such programming errors are referred to as
"bugs", while correcting them is called "debugging".
Debugging when an error message is generated
An error message is displayed as follows:
The error message informs the operator of the program
area (P0 to P9) in which the error was generated. It also
states the type of error,which gives an idea of the proper
countermeasure to be taken.
Error messages
There are a total of seven error messages.
Syn ERROR (Syntax error)
Indicates a mistake in the formula or a misuse of program
commands.
Ma ERROR (Mathematical error)
Indicates the calculation result of a numeric expression
exceeds 10
zero), or the input of an argument that exceeds the input
range of the function.
100
, an illogical operation (e.g. division by
Go ERROR (Jump error)
Indicates a missing Lbl for the Goto command , or that
the program area for the Prog command does not contain
a program.
Ne ERROR (Nesting error)
Indicates a subroutine nesting overflow by the Prog
command .
Stk ERROR (Stack error)
Indicates the calculation performed exceeds the capacity
of the stack for numeric values or for commands
96
97
Page 66

Mem ERROR (memory error)
Indicates the attempt to use a memory name such as Z
[5] without having expanded memories.
Arg ERROR ( Argument error)
Indicates the argument of a command or specification in
a program exceeds the input range (e.g. Sci 10, Goto 11)
Further operation will become impossible when an error
message is displayed.
Press , or to cancel the error.
Pressing cancels the error and new key input becomes
possible.
With this operation, the RUN mode is maintained.
Pressing or cancels the error and changes the
system mode to the WRT mode. The cursor is positioned at
the location where the error was generated to allow
modification of the program to eliminate the error.
Checkpoints for each type of error
The following are checkpoints for each type of error:
Syn ERROR
Verify again that there are no errors in the program.
Ma ERROR
For calculations that require use of the memories, check
to see that the numeric values in the memories do not
exceed the range of the arguments. This type of error
often occurs with division by 0 or the calculation of
negative square roots.
Go ERROR
Check to see that there is a corresponding Lbl n when
Goto n is used. Also check to see that the program in P n
has been correctly input when Prog n is used.
Ne ERROR
Check to ensure that the Prog command is not used in
the branched program area to return execution to the
original program area.
Stk ERROR
Check to see that the formula is not too long thus causing
a stack overflow. If this is the case ,the formula should be
divided into two or more parts.
Mem ERROR
Check to see that memories were properly expanded
using " n (Defm). When using array-type
memories , check to see that the subscripts are correct.
98
Arg ERROR
Check whether values specified by (Sci) or
(Fix) are within the range of 0~9. Also check whether
values specified by Goto, Lbl, or Prog commands are
within 0-9.Also ensure that memory expansion using
(Defm) is performed within the remaining number of
steps and that the value used for expansion is not
negative.
The program capacity of this unit consists of a total of 400
steps.
The number of steps indicates the amount of storage
space available for programs, and it will decrease as
programs are input. The number of remaining steps will
also be decreased when steps are converted to memories.
There are two methods to determine the current number of
remaining steps:
When are pressed in the RUN mode, the
number of remaining steps will be displayed together with
the number of memories.
Specify the WRT mode ( ), and the number of
remaining steps will appear. At this time the status of the
program areas can also be determined.
Basically, one function requires a single step, but there are
some commands where one function requires two steps.
• One function/one step: sin, cos, tan, log,(,). :, A, B, 1, 2, 3, etc.
• One function/two steps: Lbl 1, Goto 2, Prog 8, etc.
Each step can be verified by the movement of the cursor:
99
Page 67

At this time, each press of a cursor key or will
cause the cursor to move to the next sequential step, For
example:
This unit contains a total of 10 program areas (P0 through
P9) for the storage of programs. These program areas are
all utilized in the same manner, and 10 independent
programs can be input .One main program (main routine)
and a number of secondary programs(subroutines) can
also be stored. The total number of steps available for
storage in program areas P0 through P9 is 400 maximum.
Specification of a program area is performed as follows:
RUN mode: Press any key from 0 through 9 after pressing
the key. Then press .
P0
P8
* In this mode, program execution begins when is
pressed.
WRT mode: Use or to move the cursor under
the program area to be specified and press .
Only the numbers of the program areas that do not yet
contain programs will be displayed. "-" symbols indicate
program areas which already contain programs.
100
Program area and calculation mode
specification in the WRT mode
Besides normal function calculations, to perform binary,
octal, decimal and hexadecimal calculations and
conversions, standard deviation calculations, and
regression calculations in a program, a calculation mode
must be specified. Program mode specification and
program area specification are performed at the same time.
First the WRT mode is specified ( ), and then a
calculation mode is specified. Next, the program area is
specified, and, when is pressed, the calculation mode is
memorized in the program area.
Henceforth, stored programs will be accompanied with the
calculation mode.
Memorizing the BASE-N mode in P2
As shown above, the calculation mode will be memorized
into a program area.
101
Page 68

Cautions concerning the calculation modes
All key operations available in each calculation mode can
be stored as programs, but, depending on the calculation
mode, certain commands of functions cannot be used.
BASE-N mode
• Function calculations cannot be performed.
• Units of angular measurement cannot be specified.
• All program commands can be used.
• Be sure to include a " " at the final result output to return
to the previous calculation mode when a program
execution is terminated. Failure to do so may result in a
decimal display or an error.
SD mode
• Among the functions, Abs and
3
√ cannot be used.
• Among the program commands, Dsz, > and < cannot be
used.
LR mode
• Among the functions, Abs and 3√ cannot be used.
• Among the program commands, , =, ≠, lsz, ≥, ≤, Dsz,
> and < cannot be used.
Erasing of programs is performed in the PCL mode. Press
to specify the PCL mode . There are two
methods used to erase programs: erasing a program
located in a single program area, and erasing all programs.
Erasing a single program
To erase a program in a single program area, specify the
PCL mode and press the key after specifying the
program area.
Erase the program in P3 only.
Erasing all programs
To erase all programs stored in program areas 0 through 9,
specify the PCL mode and press and then .
Erase the programs stored in P0 , P4 , P8 , and P9.
102
103
Page 69

The programs for this unit are made based upon manual
calculations. Special program commands, however, are
available to allow the selection of the formula, and
repetitive execution of the same formula.
Here, some of these commands will be used to produce
more convenient programs.
Jump commands
Jump commands are used to change the flow of program
execution.
Programs are executed in the order that they are input
(from the lowest step number first ) until the end of the
program is reached. This system is not very convenient
when there are repeat calculations to be performed or
when it is desirable to transfer execution to another
formula. It is in these cases, however, that the jump
commands are very effective. There are three types of
jump commands: a simple unconditional jump to a branch
destination, conditional jumps that decide the branch
destination by whether a certain condition is true or not,
and count jumps that increase or decrease a specific
memory by one and then decide the branch destination
after checking whether the value stored equals zero or not.
Unconditional jump
The unconditional jump is composed of “Goto “ and “Lbl” .
When program execution reaches the statement “ Goto n ”
(where n is a number from 0 through 9),execution then
jumps to “Lbl n”(n is the same value as Goto n ). The
unconditional jump is often used in simple programs to
return execution to the beginning for repetitive calculations,
or to repeat calculations from a point within a program .
Unconditional jumps are also used in combination with
conditional and count jumps,
The previously presented program to find the
surface area and volume of a regular
tetrahedron will be rewritten using “Goto 1”
and “Lbl 1 ” to allow repeat calculations.
The previous program contained:
?, , A , : ,√ , 3 , x, A,x
2 ,
,
√ , 2, ÷ , 1, 2, x , A , xy ,3 19 steps
104
* Hereinafter, commas (,) will be used to separate steps for
the sake of clarity,
Add “Goto 1” to the end of the program, and add “Lbl 1”to
the beginning of program as the branch destination.
If this is simply left the way it is , however, the volume will
not be displayed and execution will move immediately to
the input of one side at the beginning, To prevent this
situation , insert a display command " " in front of the
“Goto 1”.
The complete program with the unconditional jump added
should look like this :
Lbl , 1, : ,?, , A , : ,√ , 3 , x, A,x
√ ,2, ÷ , 1, 2, x , A , x
y ,
3 , ,Goto , 1 25 steps
2 ,
,
Now let’s try executing this program.
* Henceforth , the displays will only show calculation result
output.
Since the program is in an endless loop, it will continue
execution, To terminate execution, press .
Besides the beginning of the program , branch destinations
can be designated at any point within the program.
105
Page 70

Calculate y=ax+b when the value for x
changes each time , while a and b can also
change depending upon the calculation.
?, , A , : ,?, ,B, : ,Lbl, 1,: ,?, , X,:,
A ,x, X, +, B , Goto , 1 23 steps
When this program is executed, the values for a and b are
stored in memories A and B respectively. After that, only
the value for x can be changed .
In this way an unconditional jump is made in accordance
with “Goto “and “Lbl”, and the flow of program execution is
changed. When there is no “Lbl n “ to correspond to a
“Goto n “ , an error (Go ERROR) is generated.
Conditional jumps
The conditional jumps compare a numeric value in memory
with a constant or a numeric value in another memory. If
the condition is true, the statement following the is
executed, and if the condition is not true, execution skips
the statement and continues following the next “:” or “ ”,
Conditional jumps take on the following form :
Relational
Left side
operator
Right side Statement { }* Statement
* Anyone can be used.
One memory name (alphabetic character from A through Z
), constant numeric values or calculation formulas (Ax2, DE, etc.) are used for “left side “ and “right side “,
The relational operator is a comparison symbol. There are
6 types of relational operators: = , ≠ , ≥ , ≤ , > , < .
Left side = right side (left side equals right side )
Left side ≠ right side (left side does not equal right side )
Left side ≥ right side (left side is greater than or equal
to right side )
Left side ≤ right side (left side is less than or equal to right
side )
Left side > right side (left side is greater than right side )
Left side < right side (left side is less than right side )
The “ ” is displayed when are pressed. If the
106
condition is true, execution advances to the statement
following
following
.
If the condition is not true,the statement
.
is skipped and execution jumps to the
statement following the next “ : ” or “ ”.
A statement is a calculation formula ( sin A x 5, etc.) or a
program command (Goto ,prog, etc.), and everything up to
the next “ : ” or “ ” is rgarded as one statement.
If an input numeric value is greater than or
equal to zero, calculate the square root of
that value. If the input value is less than zero,
reinput another value.
Program
Lbl , 1, : ,?, , A , : ,A , ≥ , 0, ,√ , A , ,Goto , 1 16 steps
In this program, the input numeric value is stored in
memory A , and then it is tested to determine whether it is
greater than, equal to or less than zero. If the contents of
memory A are greater than or equal to 0 (not less than zero
), the statement (calculation formula) located between “ ”
and “ ” will be executed, and then Goto 1 returns
execution to Lbl 1. If the contents of memory A are less
than zero, execution will skip the following statement to the
next “ ” and return to Lbl 1 by Goto 1.
Calculate the sum of input numeric values. If
a 0 is input, the total should be displayed.
Program
0, ,B,: ,
Lbl , 1, : ,? ,A , : ,A , = , 0, ,Goto , 2,:,
A,+,B, ,B,:,Goto,1,:,
Lbl ,2 ,:,B 31 steps
In this program, a 0 is first stored in memory B to clear it for
calculation of the sum. Next, the value input by “? A ” is
stored in memory A by “A=0 ” and it is determined
whether or not the value stored in memory A equals zero. If
A = 0 , Goto 2 causes execution to jump to Lbl 2. If
memory A does not equal 0 , Goto 2 will be skipped and
the command A+ B B which follows “:” is executed, and
107
Page 71

then Goto 1 returns execution to Lbl 1.
Execution from Lbl 2 will display the sum that has been
stored in memory B. Actually, the display command “ ” is
inserted following B , but here it can be omitted.
The following illustration shows the flow of the program:
Count jumps
The count jumps cause the value in a specified memory to
be increased or decreased by 1. If the value does equal 0,
the following statement is skipped, and the statement
following the next “:” or “ ” is executed. The “lsz” command
is used to increase the value in memory by 1 and decide
the subsequent execution, while the “Dsz” command is
used to decrease the value by 1 and decide.
lsz
Dsz
Increase memory A by one............Isz AA
Decrease memory B by one ..........Dsz B
Determine the average of 10 input
numeric values.
Program
1,0, ,A,:, 0 , ,C,:,
Lbl, 1,:,?, ,B,:,B,+,C, ,C,:,
Dsz, A,:,Goto,1,:,C,÷,1,0 32 steps
In this program, first 10 is stored in memory A , and 0 is
stored in memory C . Memory A is used as the “counter”
and countdown is performed the specified number of times
by the Dsz commmand. Memory C is used to store the sum
of the inputs, and so first must be cleared by inputting a 0.
The numeric value input in response to “ ? ” is stored in
memory B, and then the sum of the input values is stored
in memory C by “ B+C C”.
The statement Dsz A then decreases the value stored in
memory A by 1. If the result does not equal 0 , the following
statement, Goto 1 is executed. If the result equals 0, the
following Goto 1 is skipped and “C ÷ 10” is executed.
108
109
Page 72

Determine the altitude at one-second intervals
of a ball thrown into the air at an initial
velocity of Vm/ sec and an angle of S °.
The formula is expressed as: h=Vsin t-1/2gt2,
with g=9.8, with the effects of air resistance
being disregarded.
Program
Deg , : ,0, , T ,: , ? , ,V,: ,?, , S, :,
Lbl , 1, : ,lsz , T, : ,V , x ,sin , S, x, T,-,
9,•,8,x,T,x2, ÷, 2, ,Goto, 1 38 steps
In this program the unit of angular measurement is set and
memory T is first initialized (cleared).Then the initial
velocity and angle are input into memories V and S
respectively.
Lbl 1 is used at the beginning of the repeat calculations.
The numeric value stored in memory T is counted up
(increased by 1) by Isz T . In this case, the Isz command is
used only for the purpose of increasing the value stored in
memory T, and the subsequent jump does not depend
upon any comparison or decision. The Isz command can
also be used in the same manner as seen with the Dsz
command for jumps that require decisions, but, as can be
seen here, it can also be used to simply increase values. If,
in place of the Isz command, another method such as “T+
1 T “ is used, five steps are required instead of the two
for the(Isz T ) method shown here. Such commands are
convenient ways of conserving memory space. Each time
memory T is increased, calculation is performed according
to the formula, and the altitude is displayed. It should be
noted that this program is endless, so when the required
value is obtained, are pressed to terminate the
program.
<Summary>
110
111
Page 73
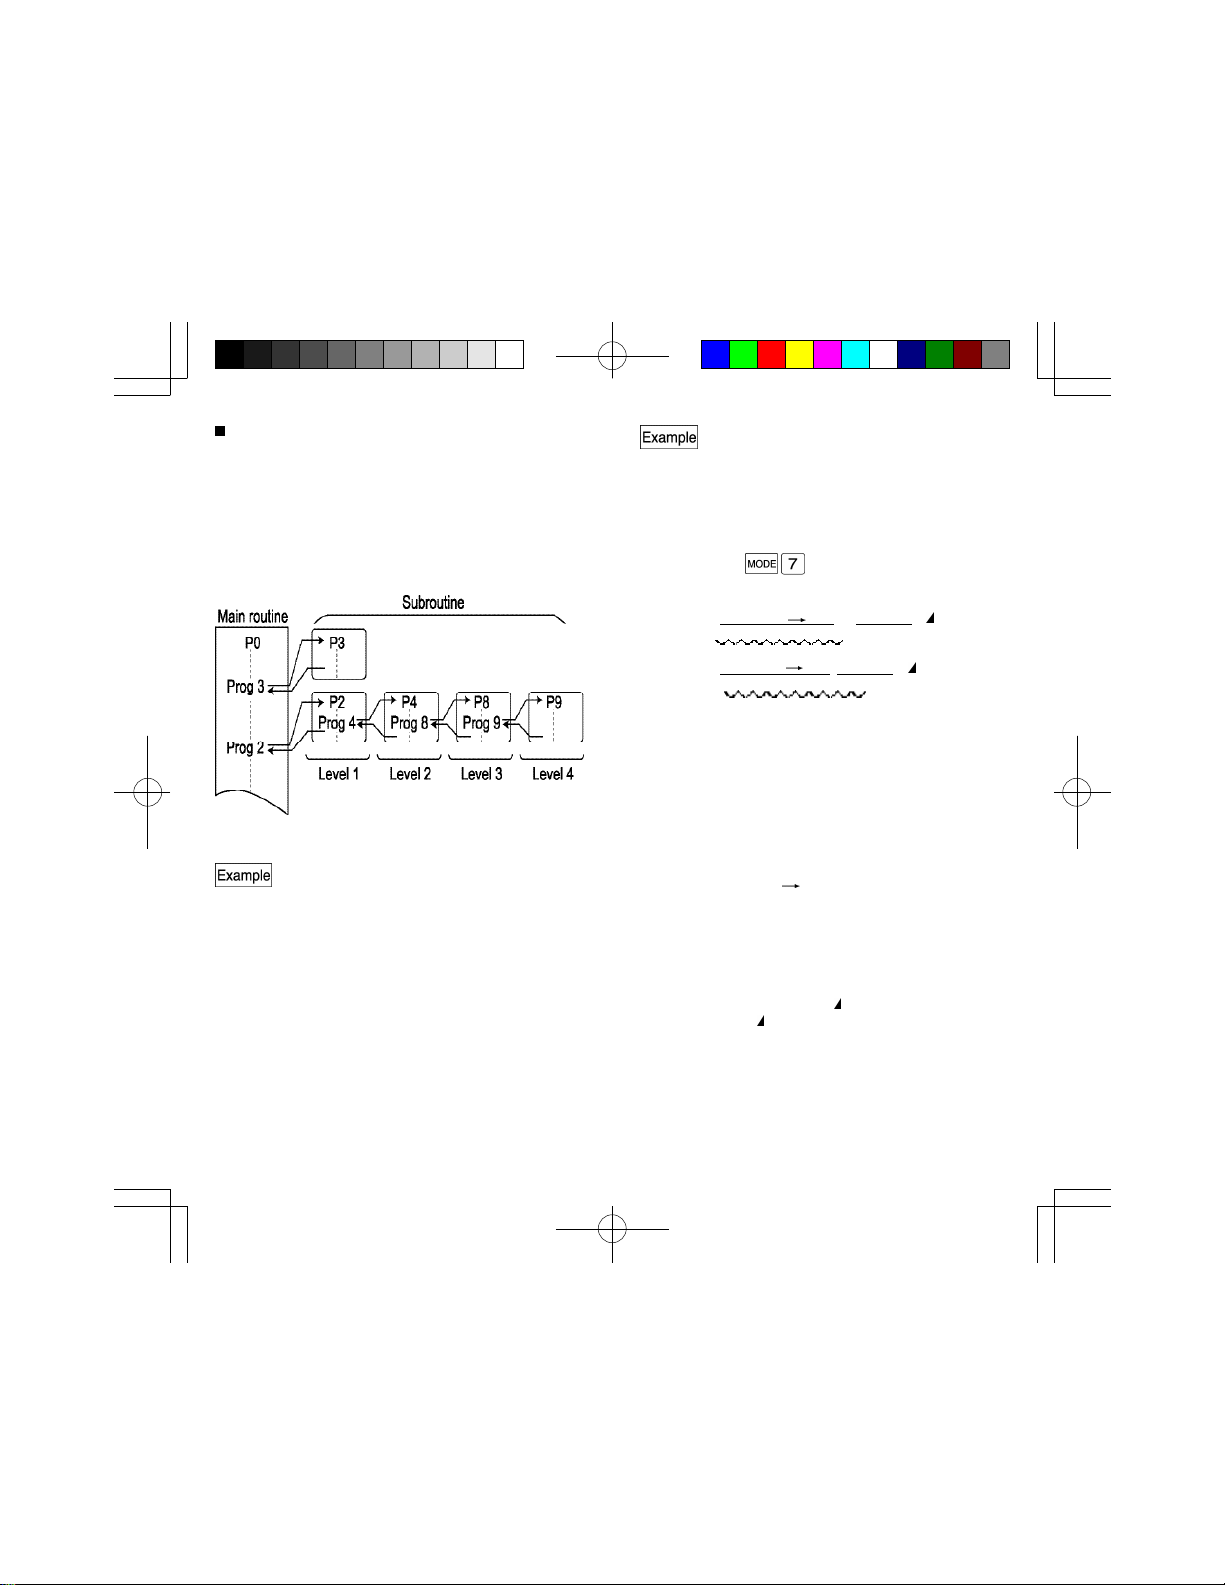
Subroutines
A program contained in a single program area is called a “
main routine” .
Often used program segments stored in other program
areas are called “ subroutines”.
Subroutines can be used in a variety of ways to help make
calculations easier.
They can be used to store formulas for repeat calculations
as one block to be jumped to each time , or to store often
used formulas or operations for call up as required.
The subroutine command is “ Prog “ followed by a number
from 0 through 9 which indicates the program area.
Prog 0 .......... Jump to program area 0
Prog 2 .......... Jump to program area 2
After the jump is performed using the Prog command,
execution continues from the beginning of the program
stored in the specified program area. After execution
reaches the end of the subroutine, the program returns to
the statement following the Prog n command in the original
program area. Jumps can be performed from one
subroutine to another, and this procedure is known as
“nesting “, Nesting can be performed to a maximum of 10
levels, and attempts to exceed this limit will cause an error
(Ne ERROR) to be generated. Attempting to use Prog to
jump to a program area in which there is no program stored
will also result in an error (Go ERROR).
*A Goto n contained in a subroutine will jump to the
corresponding Lbl n contained in that program area.
112
Simultaneously execute the two previously
presented programs to calculate the surface
areas and volumes of a regular octahedron
and tetrahedron.
Express the result in three decimal places.
This example employs two previously explained programs,
and the first step is to input the specified number of
decimal places ( 3 ).
Now let’s review the two original programs.
Regular octahedron
P0 Fix, 3 ,: ,?, ,A,:,2,x,√ ,3,x,A,x2, ,
√ , 2 ,÷ ,3,x,A ,xy ,3 23 steps
Regular tetrahedron
P1 Fix, 3 ,: ,?, ,A,: ,√ ,3,x,A,x
2 ,
,
√ , 2 ,÷ , 1,2 ,x,A ,xy ,3 22 steps
Total 45 steps
If the two programs are compared, it is evident that the
underlined portions are identical. If these portions are
incorporated into a common subroutine, the programs are
simplified and the number of steps required is decreased.
Furthermore, the portions indicated by the wavy line are
not identical as they stand, but if P1 is modified to: √ , 2, ÷ ,
y,
3 , x, A, x
, 3 , ÷ , 4 , the two portions become identical.
Now the portions underlined by the straight line will be
stored as an independent routine in P9 and those
underlined with the wavy line will be stored in P8.
P9 Fix , 3 , : , ? , , A , : , √ , 3 , x , A ,x2 12 steps
P8 √ , 2 , ÷ , 3 ,x , A , xy , 3 8 steps
After the common segments have been removed, the
remainder of the regular octahedron formula is stored in
P0, and that of the regular tetrahedron is stored in P1 Of
course, the “Prog 9” and “Prog 8” must be added to jump
to subroutines P9 and P8.
P0 Prog, 9, :, Ans, x , 2, , Prog, 8 9 steps
P1 Prog, 9, , Prog, 8, :, Ans, ÷, 4 9 steps
Total 38 steps
With this configuration execution jumps to program P9 at
the beginning of programs P0 and P1, three decimal
places are specified, the value for one side is entered, and
the surface area of the tetrahedron is calculated. The
expression “2x “ of the original octahedron formula was
omitted in P9, so when execution returns to P0 , “Ans x 2”
is used to obtain the surface of the octahedron. In the case
113
Page 74

of P1, the result of P9 needs no further modification and so
is immediately displayed upon return to P1.
Calculation of the volumes is also performed in a similar
manner. After a jump is made to P8 for calculation,
execution returns to the main routines, In P0, the program
ends after the volume of the octahedron is displayed . In
P1 , however, the result calculated in P8 is divided by four
to obain the volume of the tetrahedron.
By using subroutines in this manner, steps can be
shortened and programs become neat and easy to read.
The following illustration shows the flow of the program just
presented.
By isolating the common portions of the two original
programs and storing them in separate program areas,
steps are shortened and programs take on a clear
configuration.
Using array-type memories
Up to this point all of the memories used have been
referred to by single alphabetic characters such as A, B, X,
or Y.
With the array-type memory introduced here, a memory
name (one alphabetic character from A through Z ) is
appended with a subscript such as [1] or [2].
Brackets are input by and .
Standard memory Array-type memory
A A[0] C [-2]
B A[1] C [-1]
C A[2] C [0]
D A[3] C [1]
E A[4] C [2]
114
Proper utilization of subscripts shortens programs and
makes them easier to use.
Negative values used as subscripts are counted in relation
to memory zero as shown above.
Input the numbers 1 through 10 into
memories A through J .
Using standard memories
1, ,A,:,2 , ,B,: ,3 , ,C , : , 4 , ,D, : ,
5, ,E,:,6 , ,F,: ,7 , ,G , : , 8 , ,H, : ,
9, ,I,:,1 ,0, ,J, 40 steps
Using array-type memories
0, ,Z,:,Lbl ,1 ,: ,Z ,+,1 , ,A , [ , Z, ] , : ,
Lsz,Z ,:,Z ,<,1,0 , ,Goto, 1 26 steps
In the case of using standard memories, inputting values
into memories one by one is both inefficient and time
consuming. What happens, if we want to see a value
stored in a specific memory ?
Using standard memories
Lbl , 1 , : , ? , , Z , : ,
Z, = , 1 , , A , , Z , = , 2 , , B , ,
Z, = , 3 , , C , , Z , = , 4 , , D , ,
Z, = , 5 , , E , , Z , = , 6 , , F , ,
Z, = , 7 , , G , , Z , = , 8 , , H , ,
Z, = , 9 , , I, , Z , = , 1 , 0 , , J , , 70 steps
Goto, 1
Using array-type memories
Lbl , 1 , : , ? , , Z , : , A , [ , Z , - , 1 , ] , ,
Goto, 1 16 steps
The difference is readily apparent. When using the standard
memories, the input value is compared one by one with the
value assigned to each memory (e.g.A=1 B = 2,..) .
With the array-type memories, the input value is immediately stored in the proper memory determined by “ [Z-1],
Formulas (Z-1 ,A+10, etc.) can even be used for the
subscript.
Cautions when using array-type memories
When using array-type memories, a subscript is appended
to an alphabetic character that represents a standard
memory from A through Z.
Therefore, care must be taken to prevent overlap of
memories.
The relation is as follows:
115
Page 75

A [0] A[1] A[2] A[3] A[4] A[5] A[6] A [23] A[24] A[25] A[26] A[27]
B[-1] B [0] B[1] B[2] B[3] B[4] B[5] B[22] B[23] B[24] B[25] B[26]
C[-2] C[-1]C[0] C[1] C[2] C[3] C[4] C[21] C[22] C[23] C[24] C[25]
G[-6] G[-5] G[-4] G[-3] G[-2] G[-1] G[0] G[17] G[18] G[19] G20] G[21]
. .
. .
. .
.
.
.
X [0] X[1] X[2] X[3] X[4]
Y[-1] Y [0] Y[1] Y[2] Y[3]
Z[-2] Z[-1] Z [0] Z[1] Z[2]
The following shows a case in which array-type memories
overlap with standard format memories. This situation
should always be avoided.
Store the numeric values from 1 through 5 in
memories A[1] though A [5] respectively.
5, , C , : , Lbl, 1 , : , C , , A , [ , C , ] , : ,
Dsz , C , : , Goto , 1 , : ,
A , [ , 1 , ] , , A , [ , 2 , ] , , A , [ , 3 , ] , ,
A , [ , 4 , ] , , A , [ , 5 , ] 44 steps
In this program, the values 1 through 5 are stored in the
array-type memories A[1] through A [5] , and memory C is
used as a counter memory. When this program is
executed, the following results are obtained:
As can be seen, the second displayed value (which should
be 2) in A[2] is incorrect. This problem has occurred
because memory A[2] is the same as memory C.
116
A B C D E F
A[1] A[2] A[3] A[4] A[5]
The content of memory C (A[2]) is decreased from 5 to 0
in steps of 1.
Therefore, the content of memory A[2] is displayed as 0.
Application of the array-type memories
It is sometimes required to treat two different types of data
as a single group. In this case, memories for data
processing and those for data storage should be kept
separate.
Store data x and y in memories. When a x
value is input, the corresponding y value is
displayed . There will be a total of 15 pieces of
data.
Example program 1
Memory A is used as the data control memory, and
memory B is used for temporary storage of the x data. The
x data are stored in memories C[1] (memory
D) through C [15] (memory R), and the y data are stored in
memories C[16] (memory S) through C[30] (memory Z (7)).
1, , A , : , Defm , 7 , : ,
Lbl , 1 , : , ? , , C , [ , A , ] , : ,
? , , C , [ , A ,+ ,1 ,5, ] , : ,
Lsz , A , : , A , = , 1 , 6 , , Goto ,2 , : ,Goto , 1 , : ,
Lbl, 2 , : ,1 , 5 , , A , : , ? , , B , : ,
B , = , 0 , , Goto , 5 ,: ,
Lbl , 3, :, B . = , C , [ , A , ] , , , Goto , 4 , :,
Dsz, A , : , Goto , 3 , : , Goto , 2 , : ,
Lbl , 4 , : ,C, [ , A , + , 1 , 5 , ], , Goto , 2 ,: ,
Lbl , 5 98 steps
In this program, memories are used as follows :
x data
C[1] C[2] C[3] C[4] C[5] C[6] C[7] C[8]
D E F G H I J K
C[9] C[10] C[11] C[12] C[13] C[14] C[15]
L M N O P Q R
y data
C[16] C[17] C[18] C[19] C[20] C[21] C[22] C[23]
S T U V W X Y Z
C[24] C[25] C[26] C[27] C[28] C[29] C[30]
Z(1) Z(2) Z(3) Z(4) Z(5) Z(6) Z(7)
117
Page 76

Example program 2
The same memories are used as in Example 1, but two
types of memory names are used and the x and y data
kept separate.
1, , A , : , Defm , 7 , : ,
Lbl , 1 , : , ? , , C , [ , A , ] , : ,
? , , R , [ , A , ] , : ,
Lsz , A , : , A , = , 1 , 6 , , Goto ,2 , : ,Goto , 1 , : ,
Lbl, 2 , : ,1 , 5 , , A , : , ? , , B , : ,
B , = , 0 , , Goto , 5 ,: ,
Lbl , 3, :, B , = , C , [ , A , ] , , , Goto , 4 , :,
Dsz, A , : , Goto , 3 , : , Goto , 2 , : ,
Lbl , 4 , : , R , [ , A , ] , , Goto , 2 ,: ,
Lbl , 5 92 steps
Memories are used as follows:
x data
C[1] C[2] C[3] C[4] C[5] C[6] C[7] C[8]
D E F G H I J K
C[9] C[10] C[11] C[12] C[13] C[14] C[15]
L M N O P Q R
y data
R[1] R[2] R[3] R[4] R[5] R[6] R[7] R[8]
S T U V W X Y Z
R[9] R[10] R[11] R[12] R[13] R[14] R[15]
Z(1) Z(2) Z(3) Z(4) Z(5) Z(6) Z(7)
In this way, the memory names can be changed. However,
since memory names are restricted to the letters from A
through Z , the expanded memories ( )
can only be used as array-type memories.
The memory expansion command (Defm) can be used in a
program.
Expand the number of memories by 14 to
make a total of 40 available.
Defm, 1, 4, :, ......
118
Alphabetic characters, numbers, calculation command
symbols, etc, can be displayed as messages. They are
enclosed in quotation marks ( ).
Alphanumeric characters and symbols
• Characters and symbols displayed when pressed
following :
[,], k , m, , n, p, f, space,
A, B, C, D, E, F, G, H, I, J, K, L, M, N,
O, P , Q, R, S, T, U, V, W, X, Y, Z
•Other numbers, symbols, calculation commands,
program commands
0 1, 2, 3, 4, 5, 6, 7, 8, 9,
(,), √, E, +, -, X, ÷, ...
sin, cos, tan, log, ln, ...
=, ≠, ≥, ≤, >, <, ...
/A , IB, , ID, , , d, h, b, o
Neg, Not, and, or , xor
, , , ......
º ( ), r ( ) ,g (
)
*All of the above noted characters can be used in the same
manner as the alphabetic characters.
In the preceding example requiring an input of two types of
data (x,y ), the prompt “ ? ” does not give any information
concerning the type of input expected. A message can be
inserted before the “ ? ”, to verify the type of data required
for input.
Lbl, 1, : ,?, ,X,:,?, ,Y,:,...
The message “ x =” and “ y=” will be inserted into this
program.
Lbl, 1, :,",X,=,",?, ,X,:,
",Y,=,",?, ,Y,:,...
If messages are included as shown here, the display is as
follows:
(Assuming that the program is sorted in P1)
119
Page 77

Messages are also convenient when displaying result in
program calculations .
Lbl, 0, : , " , N , = , " , ? , , B , ~ , C , : ,
0 , ,A , : ,
Lbl , 1 , : ,C , ÷ , 2 , , C ,: ,Frac ,C ,≠ ,0 , ,Goto ,3 ,
: , Isz , A , : ,C ,= ,1 , ,Goto ,2 ,: ,Goto , 1 ,: ,
Lbl , 2 , : , " , X ,= ," , , A , , Goto ,0 ,: ,
Lbl , 3 ,: ," ,N ,O , " , , Goto , 0 , 70 steps
This program calculates the x power of 2. A prompt of “N
=? ” appears for data input. The result is displayed by
pressing while “x=” is displayed . When an input data is
not the x power of 2, the display “ NO “ appears and
execution returns to the beginning for reinput .
Always follow a message with a whenever a formula
follows the message.
Assuming that the program is stored in P2:
The display is capable of showing up to 12 alpha
characters at one time. For messages that are longer than
12 characters, use (Disp) to divide the message.
Using the graph function within programs makes it possible
to graphically represent long. complex equations and to
overwrite graphs repeatedly. All graph commands (except
the trace function) can be included in programs. Range
values can also be written into the program.
Generally, manual graph operations can be used in
programs without modification.
Graphically determine the number of
solutions (real roots) that satisfy both of
the following two equations.
y=x4 - x3-24x2+4x+80
y=10x -30
The range values are as follows.
Xmin : -10 Ymin : -120
Xmax : 10 Ymax : 150
Xscl : 2 Yscl : 50
120
121
Page 78

Program the equation for the first graph.
Graph, X, Xy,4, -, X, xy,3,-,2,4,X,x2,+, 4, X, +,8,0
Finally program the equation for the second graph.
Graph, 1, 0, X, -,3, 0 Total 27 steps
When inputting this program, press after input of the
first equation.
The following should appear on the display when the
program is executed:
A “ ” can be input after the first equation to suspend
execution after the first graph is produced. To continue
execution to the next graph, press .
The procedure outlined above can be used to produce a
wide variety of graphs.The library of this manual includes a
number of examples of graph programming.
Function Reference
Manual Calculations
122
123
Page 79

124
125
Page 80

126
127
Page 81

Program Calculations
128
129
Page 82
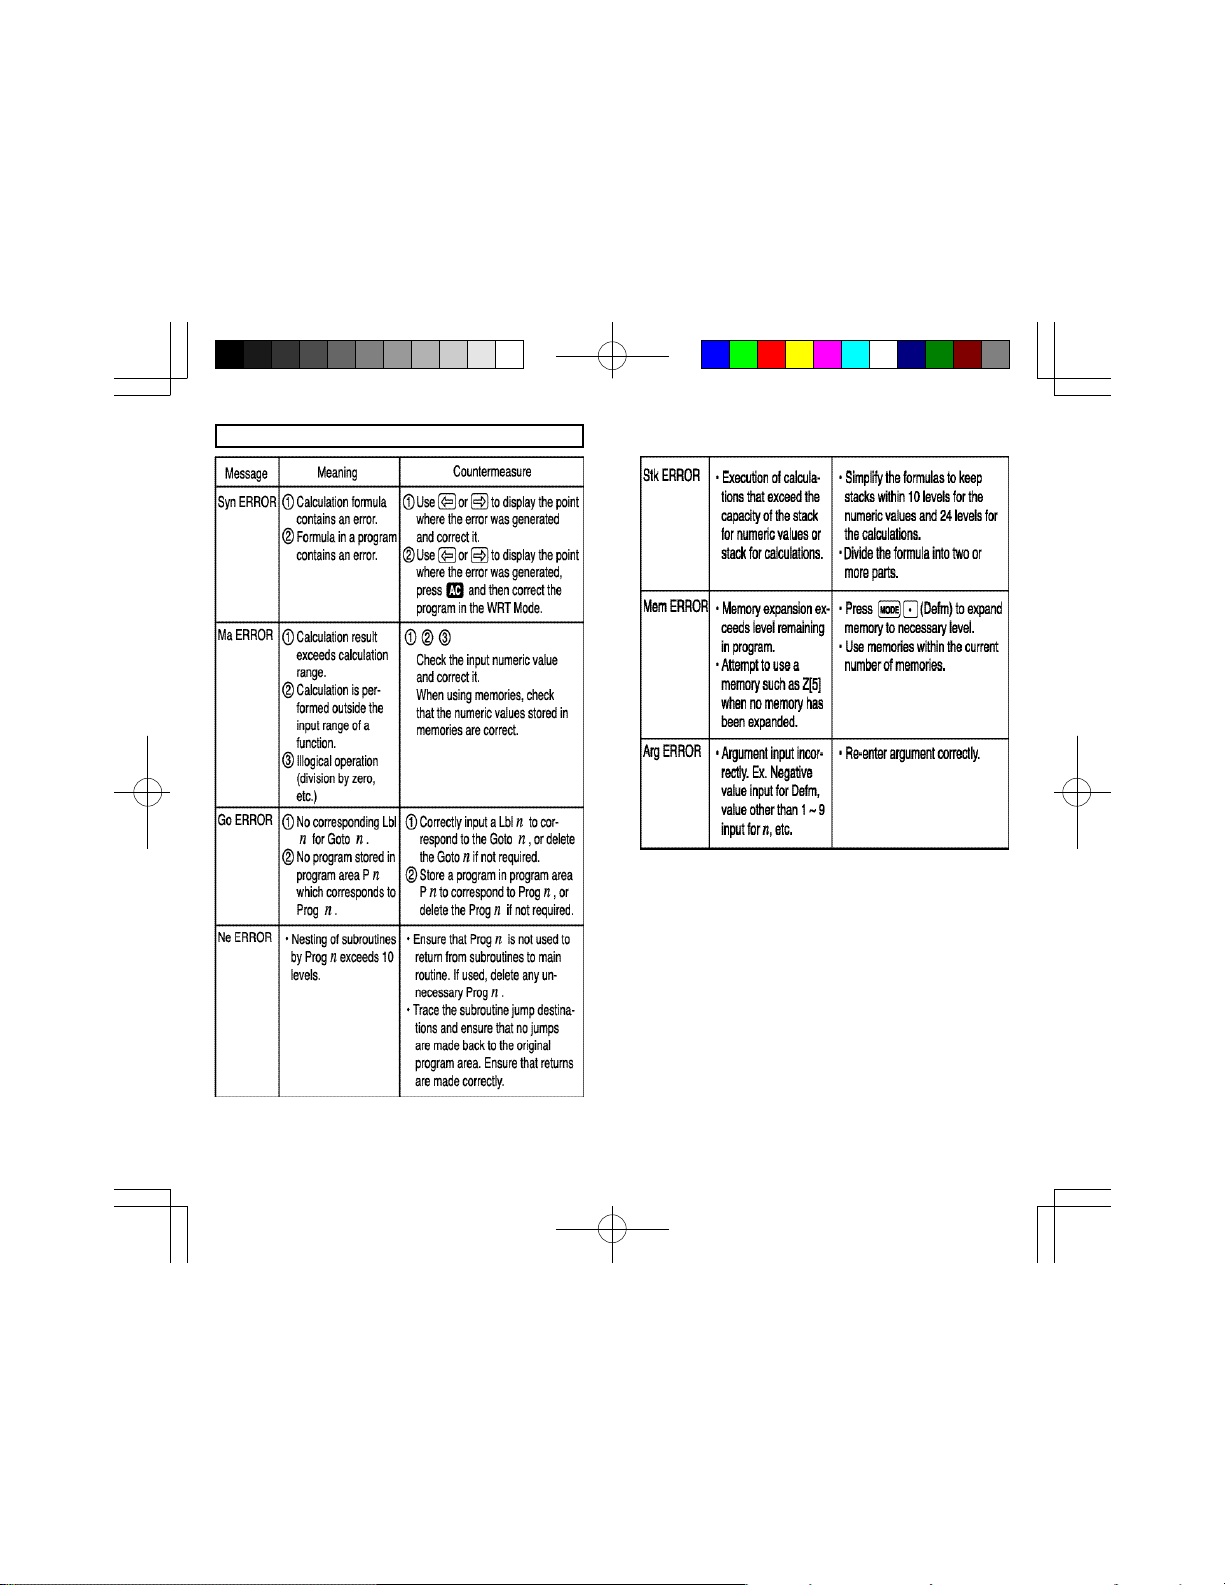
Error Message Table
130
131
Page 83

Input Ranges of Functions
132
133
Page 84

Errors may be cumulative with internal continuous
calculations such as x
y , x
√y ,x! ,3√x ,sometimes affecting
accuracy .
Specifications
Graph functions
Built-in function (20 types) sin, cos, tan, sin-1,
graphs: cos-1, tan-1, sinh, cosh, tanh,
sinh-1, cosh-1, tanh-1, log, In,
10x, ex, x2, √, 3√, x-1.
Types of graphs: User generated function graphs
Rectangular coordinates
Graph functions: Range specification, Overdraw,
Trace, Zoom (xf,x1/f , factor,
original (resume)), plot, Line,
Scroll
Calculations
Basic calculation functions:
Built-in scientific
functions:
• Statistics: Standard deviation - number of
Negative numbers, exponents,
parenthetical addition/subtraction/
multiplication/division(with priority
sequence judgement function true algebraic logic).
Trigonometric/inverse trigonometric
functions (units of angular
measurement: degrees, radians,
grads), hyperbolic/inverse
hyperbolic functions, logarithmic/
exponential functions,
reciprocals, factorials, square
roots, cube roots, powers, roots,
squares, decimal-sexagesimal
conversions, binary-octalhexadecimal calculations,
coordinate transformations, π,
random numbers,absolute
values, integers, fractions.
data, sum, sum of squares,
mean, standard deviation .
134
135
Page 85

Linear regression - number of data,
sum of x , sum of y, sum of squares
of x, sum of squares of y, mean of
x, mean of y, standard deviation of
x , standard deviation of
y , constant term, regression
coefficient, correlation
coefficient, estimated value of x,
estimated value of y.
Special functions: Insert, delete, replay functions,
substitution (=), multistatement (:
and ).
Memories: 26 standard (maximum 76), Ans
Calculation range: ±1 x 10
-99
~9.999999999 x 10
99
memory.
and 0. Internal operation uses 12digit mantissa.
Rounding: performed according to the
specified number of significant
digits or the number of specified
decimal places.
Exponential display:Norm 1 - 10
Norm 2 - 10
-2
> , 10
-9
> , 10
10
10
Program function
Number of steps: 400 maximum
Jump functions: Unconditional jump (Goto), 10
maximum Conditional jump (=, ≠, >,
<, , , ) Count jumps (Isz, Dsz)
Subroutines: 9 levels
Number of stored
programs: 10 maximum (p0 to p9)
Check functions: program checking, debugging,
deletion, addition, insertion, etc.
General
Power supply: lithium battery (CR2032)
Auto power off: Power is automatically switched off
Ambient
temperature range: 0°C ~ 40ºC (32ºF~104ºF)
approximately 6 minutes after last
operation.
136
137
 Loading...