

Page 1
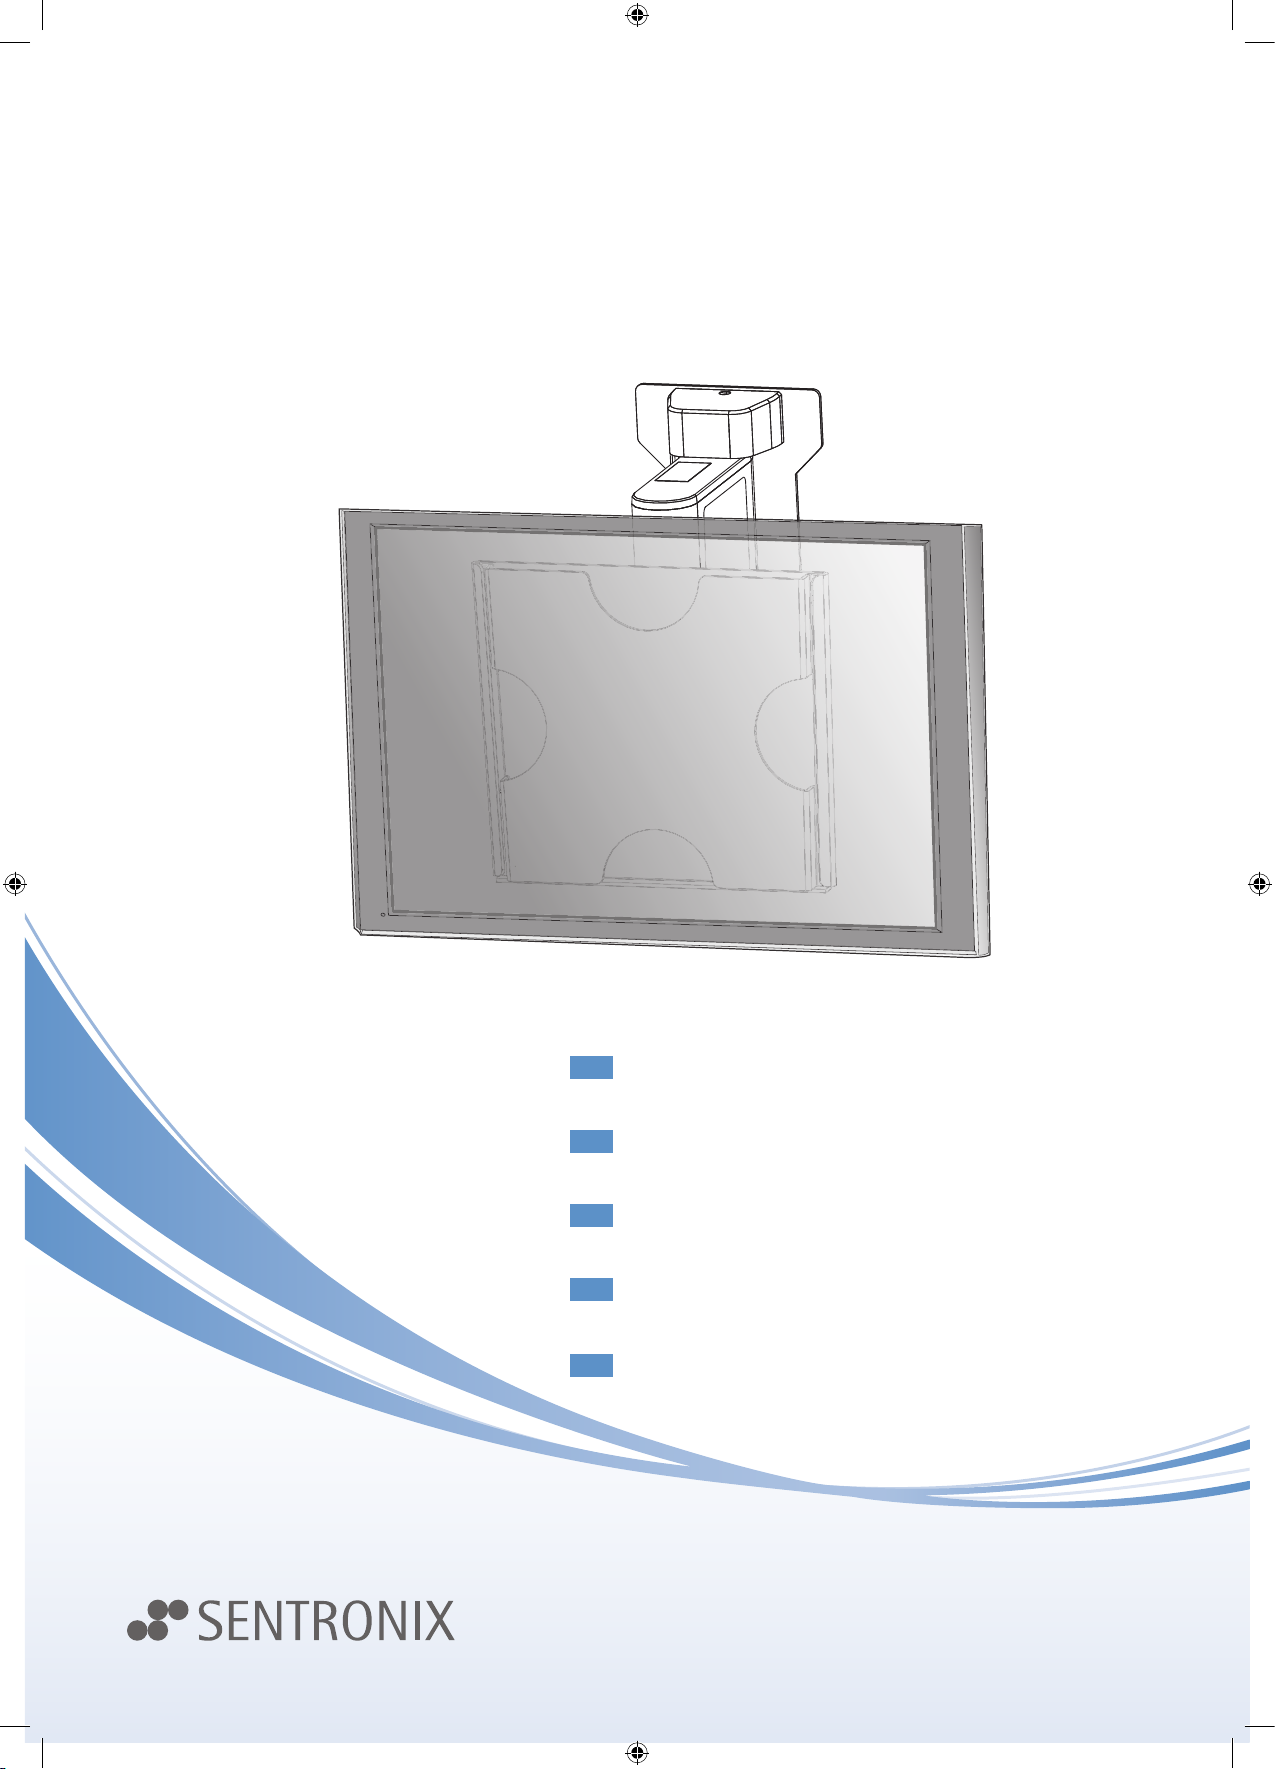
Small Auto Wall Mount
『Instruction Manual』
DE
Kleine automatische Wandhalterung
『Bedienungsanleitung』
ES
Soporte automático pequeño para montaje en pared
『Manual de instrucciones』
IT
Supporto a parete automatico piccolo
『Manuale d’uso』
FR
Petit support mural à fixation automatique
『Manuel d’instructions』
NL
Kleine elektrische muursteun
『Handleiding』
Model: MGMPDW343EU
Page 2
Page 3
3
Small Auto Wall Mount Instruction manual
DE
ES
FR
NL
Sicherheitshinweise Instructions de sécurité
IT
Istruzioni disicurezza
Normas de seguridad Veiligheids instructies
Safety Instructions
• If you install the product by using an improper method, it may cause a severe personal injury or product damage.
• If you do not understand the installation method, contact with a professional installer.
• Do not install the product if any parts or components of the product are damaged or missing.
• This product has been designed for use on a vertical wall constructed of solid concrete, solid blocks or bricks.
• Do not use this product for other purposes.
• For safe installation, the wall must maintain four times of the total load (including the wall mount and TV itself).
• Do not exceed the maximum weight load for this product.
• The maximum load of TV is 30kg (66 lbs) and the VESA standard 200×200mm max.
• If you do not observe the maximum weight, please do not try to install the wall mount.
• Remove unnecessary attachments on the wall where you will install the wall mount.
EN
• Wenn Sie das Produkt nicht ordnungsgemäß montieren, besteht das Risiko von Verletzungen oder einer Beschädigung des Produkts.
• Wenn Sie dieses Montageverfahren nicht verstehen, ziehen Sie bitte einen ausgebildeten Fachmann zu Rate.
• Montieren Sie auf keinen Fall das Produkt oder dessen Teile oder Komponenten, wenn das Produkt beschädigt ist oder irgendwelche
Teile oder Komponenten des Produktes beschädigt sind oder fehlen.
• Dieses Produkt wurde zur Verwendung auf einer vertikalen Wand konstruiert, die aus Massivbeton, soliden Blöcken oder Backsteinen
errichtet wurde.
• Verwenden Sie dieses Produkt nicht zu anderen Zwecken.
• Für eine sichere Montage muss die Wand der vierfachen Gesamtlast standhalten können (einschließlich der Wandbefestigung und
dem Fernsehgerät selbst.).
• Überschreiten Sie bei diesem Produkt auf keinen Fall das maximale Gewicht.
• Das maximale Gewicht des Fernsehgeräts beträgt 30kg und die VESA-Norm ist 200×200mm max.
• Wenn das maximale Gewicht überschritten wird, versuchen Sie bitte nicht, die Wandhalterung zu montieren.
• Entfernen Sie unnötige Aufhängungen von der Wand, wo Sie die Wandhalterung montieren möchten.
DE
•
Si vous installez le produit en utilisant une méthode incorrecte, ceci peut entraîner des blessures graves ou gravement endommager le produit.
• Si vous ne comprenez pas la méthode d’installation, contactez un installateur professionnel.
• N’installez pas le produit si certaines parties ou certains composants du produit sont endommagé(e)s ou manquant(e)s.
• Ce produit a été conçu pour être utilisé sur un mur vertical en béton plein, en blocs pleins ou en briques pleines.
• N’utilisez pas ce produit à d’autres fins.
•
Pour assurer la sécurité de l’installation, le mur doit supporter 4 fois la charge totale (incluant la fixation murale et le téléviseur lui-même).
• N’excédez pas la charge totale pour ce produit.
• La charge maximale du téléviseur est de 30 Kg et la norme VESA est de 200×200 mm maximum.
• Si vous ne respectez pas la charge maximale, veuillez ne pas tenter d’installer la fixation murale.
• Retirez les fixations inutiles du mur sur lequel vous souhaitez installer la fixation murale.
FR
• Se il prodotto viene installato in modo scorretto, può causare gravi lesioni personali o danni al prodotto.
• In caso di dubbi sul metodo di installazione, contattare un installatore professionista.
• Non installare il prodotto in caso di parti mancanti o danneggiate.
• Il prodotto è stato progettato per l’uso su una parete verticale in cemento armato o mattoni.
• Non utilizzare il prodotto per altri scopi.
•
Per una installazione sicura, la parete deve essere in grado di sostenere quattro volte il carico totale (considerando supporto e televisore)
• Non superare il carico massimo del prodotto.
• Il carico massimo per un televisore è di 30 kg, lo standard VESA è di 200x200 mm max.
• Nel caso il limite massimo di peso venga superato, non installare il supporto a parete.
• Rimuovere elementi superflui dal muro dove si intende installare il supporto a parete.
IT
• Si instala el producto siguiendo un método inadecuado, podrían producirse graves daños personales o en el producto.
• Si no comprende el método de instalación, póngase en contacto con un instalador profesional.
• No instale el producto si alguna de las piezas o componentes de dicho producto presentan daños o faltan.
• Este producto se ha diseñado para ser utilizado en una pared vertical construida con hormigón macizo, bloques macizos o ladrillos.
• No utilice este producto para otros fines.
• Para que la instalación sea segura, la pared debe poder sostener una carga equivalente a cuatro veces el peso total del equipo
(incluido el soporte para montaje en pared y el propio TV).
• No debe superarse el peso máximo que soporta este producto.
• El peso máximo del TV es de 30 kg (66 lb) y el estándar VESA es de 200 × 200 mm como máximo.
• Si se supera el peso máximo, no intente instalar el soporte para montaje en pared.
• Retire todos los accesorios innecesarios de la pared en la que va a instalar el soporte para montaje en pared.
ES
• Als u het product op onjuiste wijze plaatst, kan dit ernstig persoonlijk letsel of schade aan het product veroorzaken.
• Als u de installatie niet begrijpt, neem dan contact op met een professionele installateur.
• Installeer het product niet als onderdelen van het product beschadigd zijn of ontbreken.
• Dit product is ontworpen voor gebruik met een vertikale muur van beton, stenen of bakstenen.
• Gebruik dit product niet voor andere doeleinden.
• Voor veilige installe moet de muur tenminste vier keer de totale last kunnen dragen (inclusief de muursteun en de TV zelf).
• Overschrijdt het maximale gewicht voor dit product niet.
• Het maximale gewicht van de TV is 30kg en de VESA-standaard 200x200mm.
• Als u niet let op het maximale gewicht, probeer dan de muursteun niet te installeren.
• Verwijder onnodige zaken aan de muur waar u de muursteun wilt plaatsen.
NL
Page 4
4
Small Auto Wall Mount Instruction manual
DE
ES
FR
NL
IT
Inhaltsverzeichnis Table des matières Indice
Índice Inhoudsopgave
Safety Instructions ………………………………… 3
Contents of the product …………………………… 5
Tools ………………………………………………… 6
Installation …………………………………………… 7
Swivel/Tilt the Wall mount and TV ……………… 18
Initial set-up ……………………………………… 19
Wall Limit Right …………………………………… 20
Wall Limit Left …………………………………… 21
Using the Memory(Optional) …………………… 22
Product Specifications …………………………… 24
Dimensions ……………………………………… 25
EN
Sicherheitshinweise ………………………………… 3
Bestandteile des Produkts ………………………… 5
Werkzeuge …………………………………………… 6
Montage ……………………………………………… 7
Schwenken/Neigen der Wandhalterung mit dem
Fernsehgerät ………………………………… 18
Originaleinstellungen …………………………… 19
Wandbegrenzung rechts ………………………… 20
Wandbegrenzung links ………………………… 21
Verwendung der Speicherfunktion(Optional) … 22
Produktspezifikationen …………………………… 24
Abmessungen …………………………………… 25
DE
Instructions de sécurité …………………………… 3
Contenu du produit ………………………………… 5
Outils ………………………………………………… 6
Installation …………………………………………… 7
Pivotement de la fixation murale et du téléviseur
… 18
Configuration initiale ……………………………… 19
Limite droite du mur ……………………………… 20
Limite gauche du mur …………………………… 21
Utilisation de la mémoire (facultatif) …………… 22
Caractéristiques du produit ……………………… 24
Dimensions ……………………………………… 25
FR
Istruzioni disicurezza ……………………………… 3
Contenuti del prodotto ……………………………… 5
Strumenti …………………………………………… 6
Montaggio …………………………………………… 7
Rotazione/inclinazione del supporto e della TV 18
Configurazione iniziale …………………………… 19
Limite parete destra ……………………………… 20
Limite parete sinistra …………………………… 21
Uso della memoria (facoltativo) ………………… 22
Specifiche tecniche ……………………………… 24
Dimensioni ………………………………………… 25
IT
Normas de seguridad ……………………………… 3
Contenido del producto …………………………… 5
Herramientas ………………………………………… 6
Instalación …………………………………………… 7
Girar o inclinar el soporte para montaje en
pared y el TV ………………………………… 18
Configuración inicial ……………………………… 19
Límite derecho de la pared ……………………… 20
Límite izquierdo de la pared …………………… 21
Utilización de la memoria (opcional) …………… 22
Especificaciones del producto ………………… 24
Dimensiones ……………………………………… 25
ES
Veiligheids instructies ……………………………… 3
Inhoud van het product …………………………… 5
Gereedschap ………………………………………… 6
Installatie …………………………………………… 7
Draaien/kantelen van muursteun en TV ……… 18
Eerste instelling …………………………………… 19
Bereik rechts ……………………………………… 20
Bereik links ……………………………………… 21
Gebruik van geheugen (naar keuze) …………… 22
Productspecificaties ……………………………… 24
Afmetingen………………………………………… 25
NL
Table of contents
Page 5
5
Small Auto Wall Mount Instruction manual
DE
ES
FR
NL
IT
Bestandteile des Produkts Contenu du produit Contenuti del prodotto
Contenido del producto Inhoud van het product
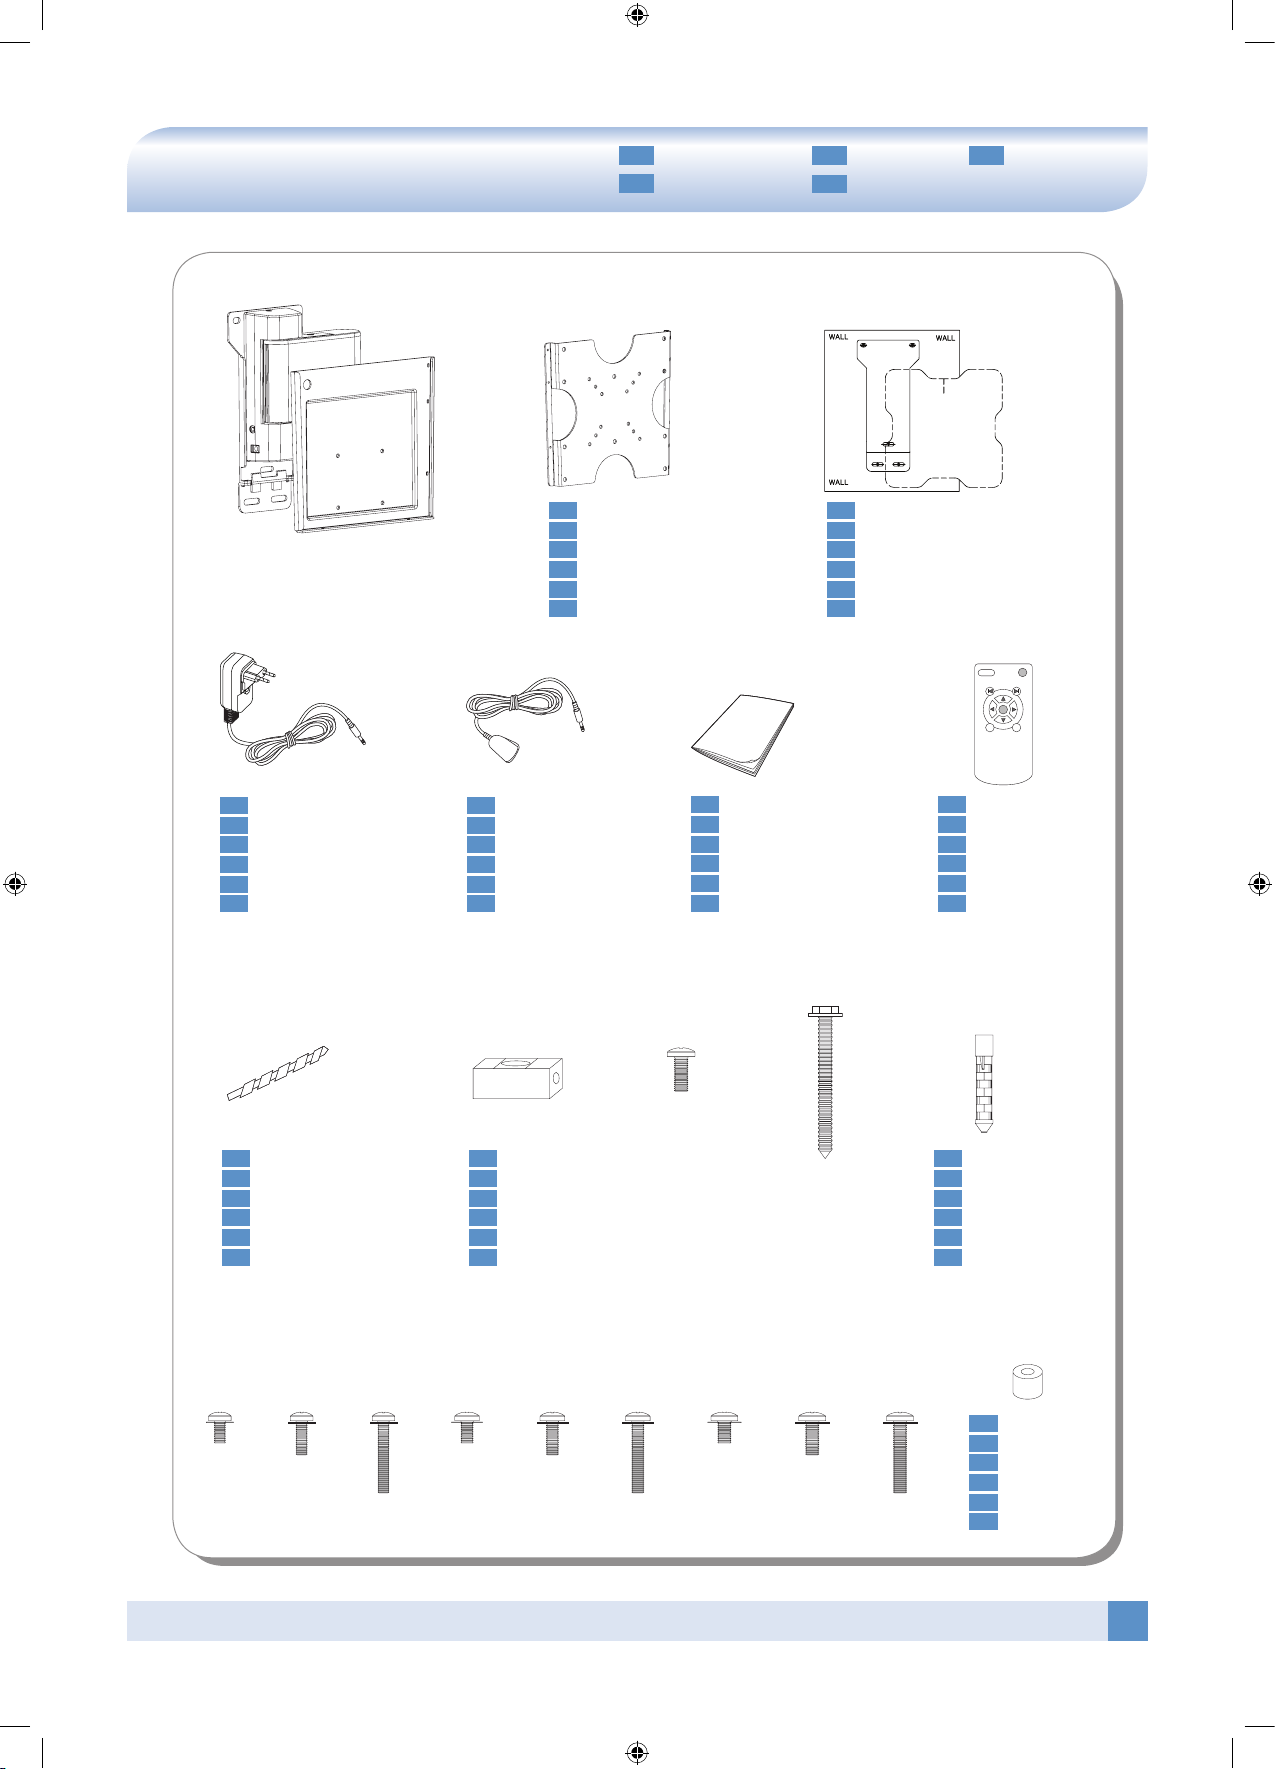
Contents of the product
M8×65mm
W-A
4EA
M4×15mm
4EA
M4×25mm
4EA
M-A M-B
M4×40mm
4EA
M-C
M5×15mm
4EA
M-D
M5×25mm
4EA
M-E
M5×40mm
4EA
M-F
M6×15mm
4EA
M-G
M6×25mm
4EA
M-H
M6×40mm
4EA
M-I
TV Plate
EN
TV-Platte
DE
Plaque du téléviseur
FR
Piastra TV
IT
Placa del TV
ES
TV-plaat
NL
Wall Template
EN
Wandschablone
DE
Modèle mural
FR
Sagoma a parete
IT
Plantilla de pared
ES
Muursjabloon
NL
SetUP
Mem1
Home
Mem2
Remote Control
EN
Fernbedienung
DE
Télécommande
FR
Telecomando
IT
Mando a distancia
ES
Afstandsbediening
NL
Instruction Manual
EN
Bedienungsanleitung
DE
Manuel d’instructions
FR
Manuale d’uso
IT
Manual de instrucciones
ES
Handleiding
NL
Power Adaptor
EN
Strom-Adapter
DE
Adaptateur secteur
FR
Alimentatore
IT
Adaptador de potencia
ES
Stroomadapter
NL
IR Receiver
EN
IR-Empfänger
DE
Récepteur IR
FR
Ricevitore IR
IT
Receptor de IR
ES
IR-ontvanger
NL
Spacer
EN
Abstandsstück
DE
Distanziatore
IT
Separador
ES
Opvulring
NL
Butée d’espacement
FR
M-J
(Φ8×Φ20×14.5mm)
8EA
Leveler
EN
Wasserwaage
DE
Livella
IT
Nivel
ES
Waterpas
NL
Niveau
FR
P-B
P-A
Φ5(1/5˝)
Wood Drill Bit
EN
Holz-Bohrspitze
DE
Mèche de percement du bois
FR
Punta per legno
IT
Barrena para madera del taladro
ES
Houtboor
NL
M8
W-B
4EA
Anchor
EN
Verankerung
DE
Fermo
IT
Anclaje
ES
Plug
NL
Cheville
FR
P-C
M6×10mm
Page 6
6
Small Auto Wall Mount Instruction manual
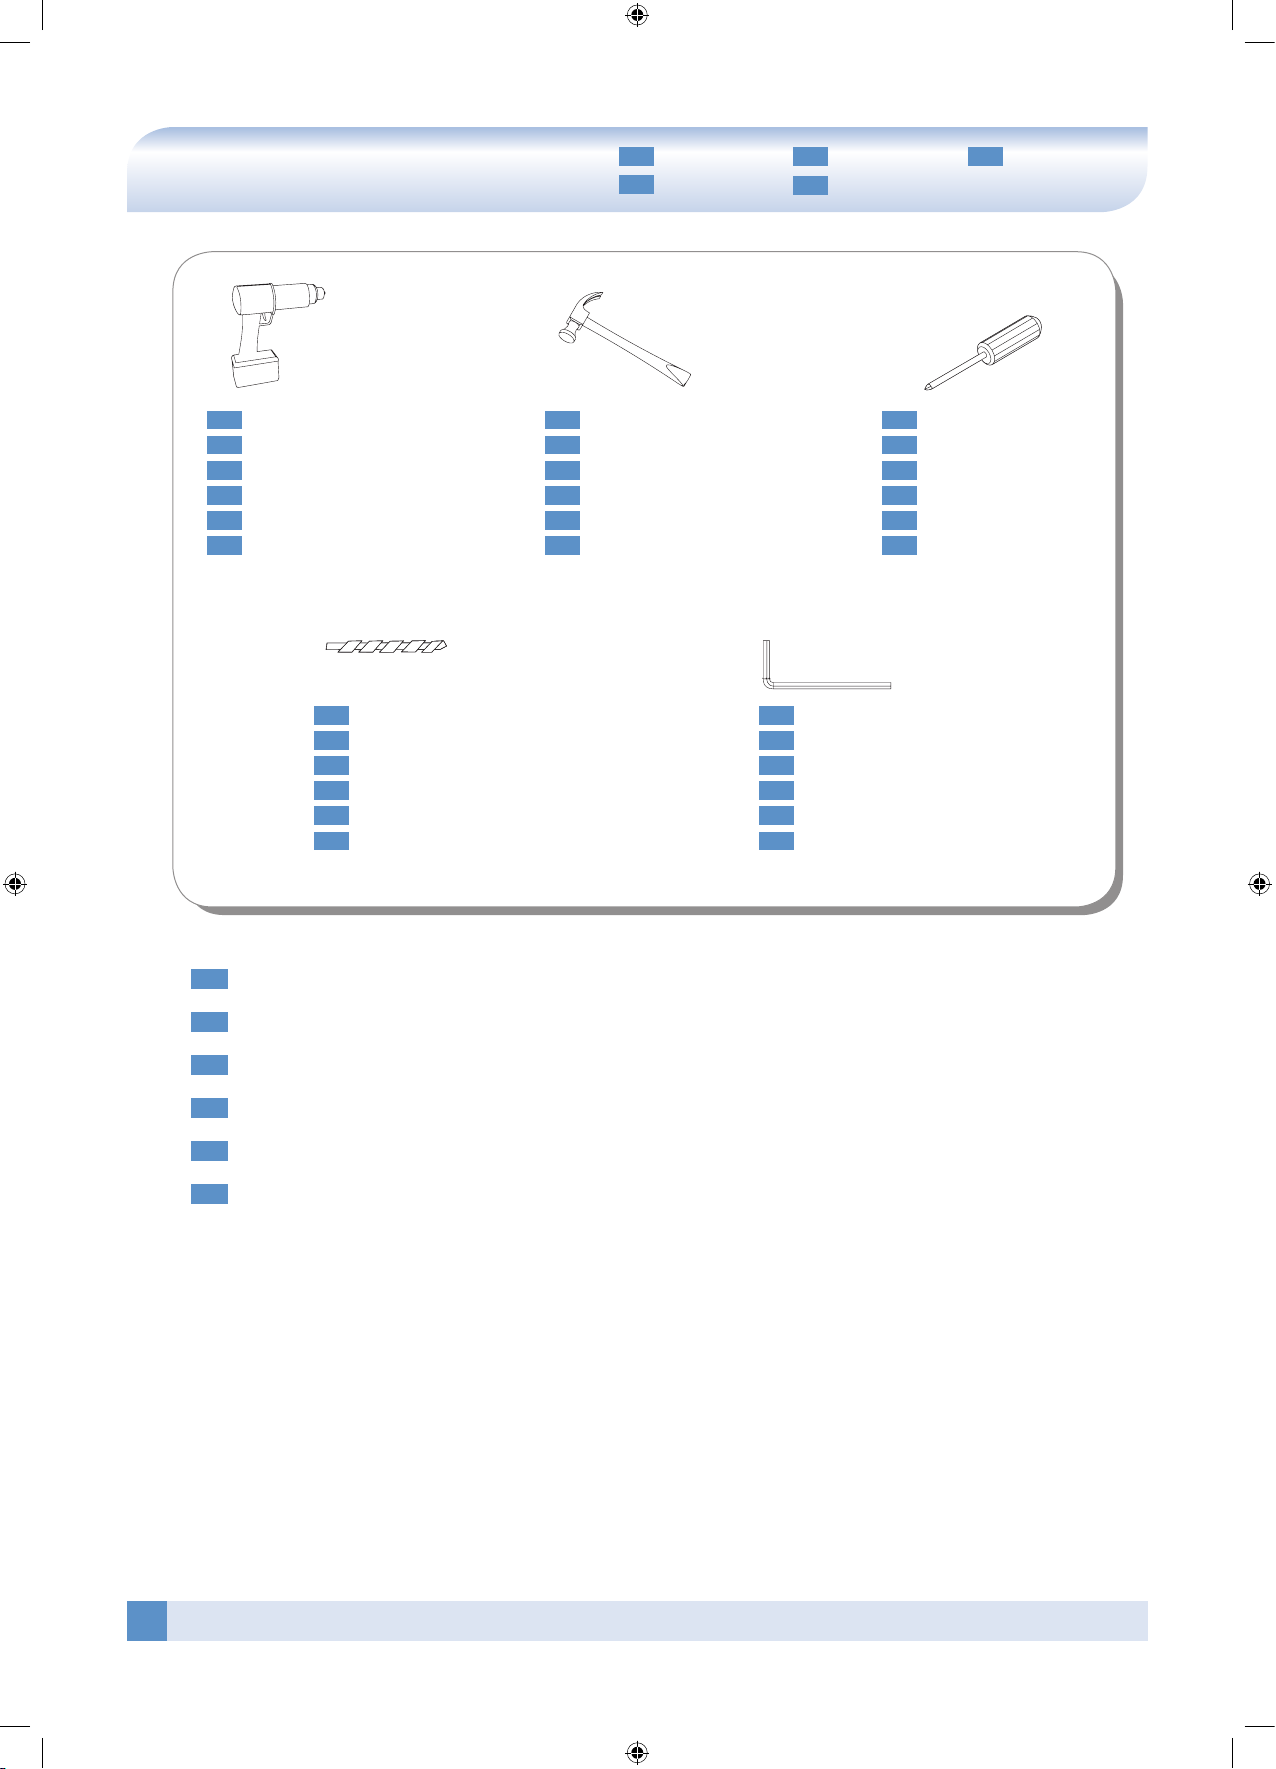
Tools (Optional)
DE
ES
FR
NL
IT
Werkzeuge Outils Strumenti
Herramientas Gereedschap
EN
To be prepared by installer – Not Included
DE
Vom Monteur bereitzustellen – nicht im Lieferumfang enthalten
FR
À préparer par l’installateur – non fournis
IT
A cura dell’installatore, non inclusi
ES
Debe prepararlas el instalador: no están incluidas
NL
Door installateur te leveren, niet meegeleverd
Power drill
EN
Bohrmaschine
DE
Perceuse
FR
Trapano elettrico
IT
Taladro eléctrico
ES
Boormachine
NL
Hammer
EN
Hammer
DE
Marteau
FR
Martello
IT
Martillo
ES
Hamer
NL
Screw driver (+)
EN
Schraubenzieher (+)
DE
Tournevis cruciforme
FR
Cacciavite a croce
IT
Destornillador (+)
ES
Schroevendraaier (+)
NL
Steenboor
NL
Barrena de albañilería del taladro
ES
Punta per muratura
IT
Mèche de percement de la maçonnerie
FR
Mauer-Bohrspitze
DE
Masonry Drill Bit
EN
Φ10(2/5˝)
L-Wrench
EN
L-Kreuzschlüssel
DE
Clé coudée
FR
Brugola
IT
Llave Allen
ES
Inbussleutel
NL
Page 7
7
Small Auto Wall Mount Instruction manual
DE
ES
FR
NL
IT
Montage Installation Montaggio
Instalación Installatie
90°
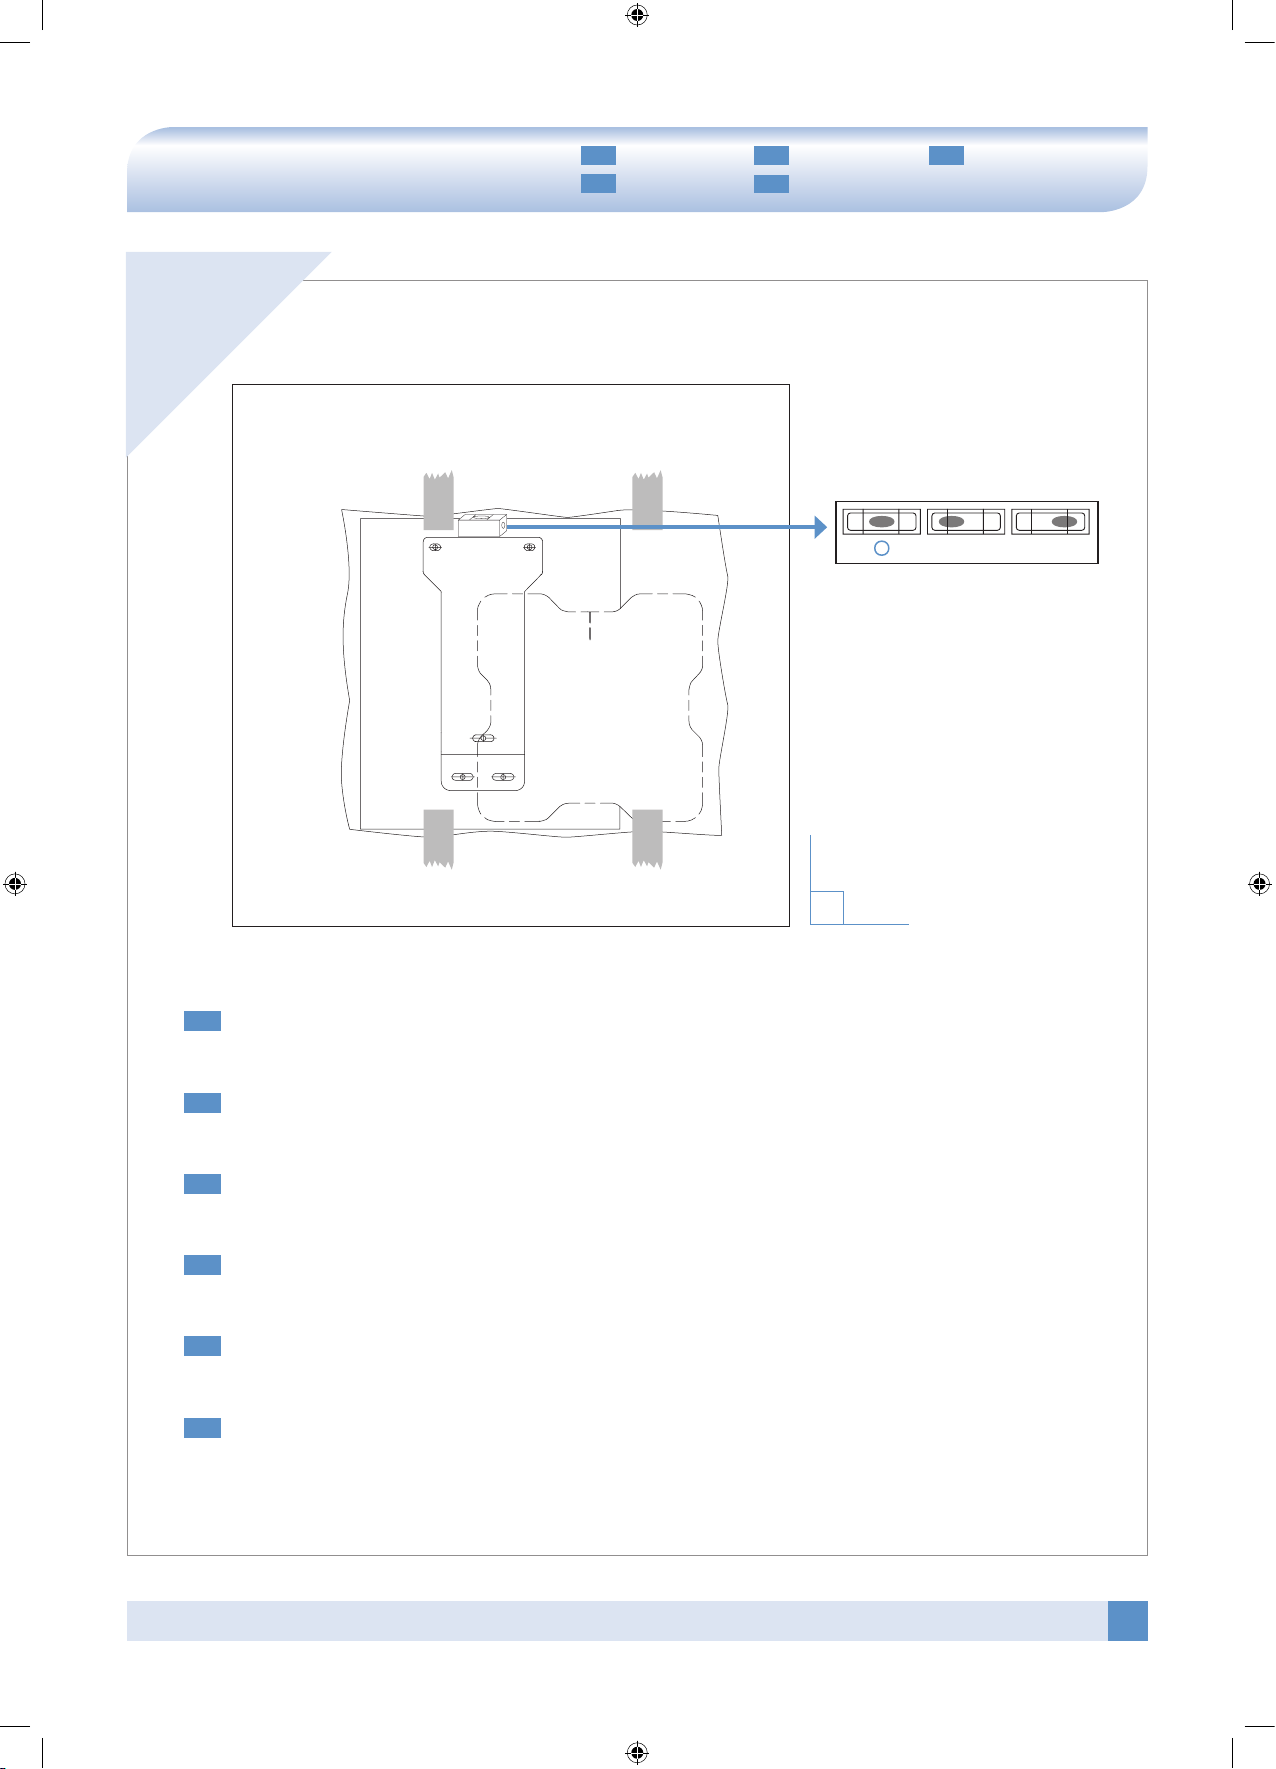
Installation
1
Wall
Leveler(P-B)
ϧ ϧ
EN
Attach the wall template to the wall with a tape for installing the wall mount. And check horizontality by using a
leveler(P-B).
DE
Befestigen Sie die Wandschablone mit Klebestreifen an der Wand, um die Wandhalterung zu montieren.
Überprüfen Sie die waagerechte Ausrichtung mit einer Wasserwaage(P-B).
FR
Fixez le modèle mural sur le mur avec du ruban adhésif afin d’installer la fixation murale. Vérifiez l’horizontale à
l’aide du niveau(P-B).
IT
Fissare la sagoma al muro con del nastro per l’installazione del supporto. Usare la livella per verificare che
l’allineamento orizzontale sia corretto(P-B).
ES
Pegue la plantilla de pared a la pared con cinta adhesiva para instalar el soporte para montaje en pared.
Asegúrese de que quede totalmente horizontal utilizando un nivel(P-B).
NL
Bevestig het muursjabloon met plakband aan de muur waar u de muursteun wilt plaatsen. Controleer dat deze vlak
hangt met een waterpas(P-B).
Page 8
8
Small Auto Wall Mount Instruction manual
2
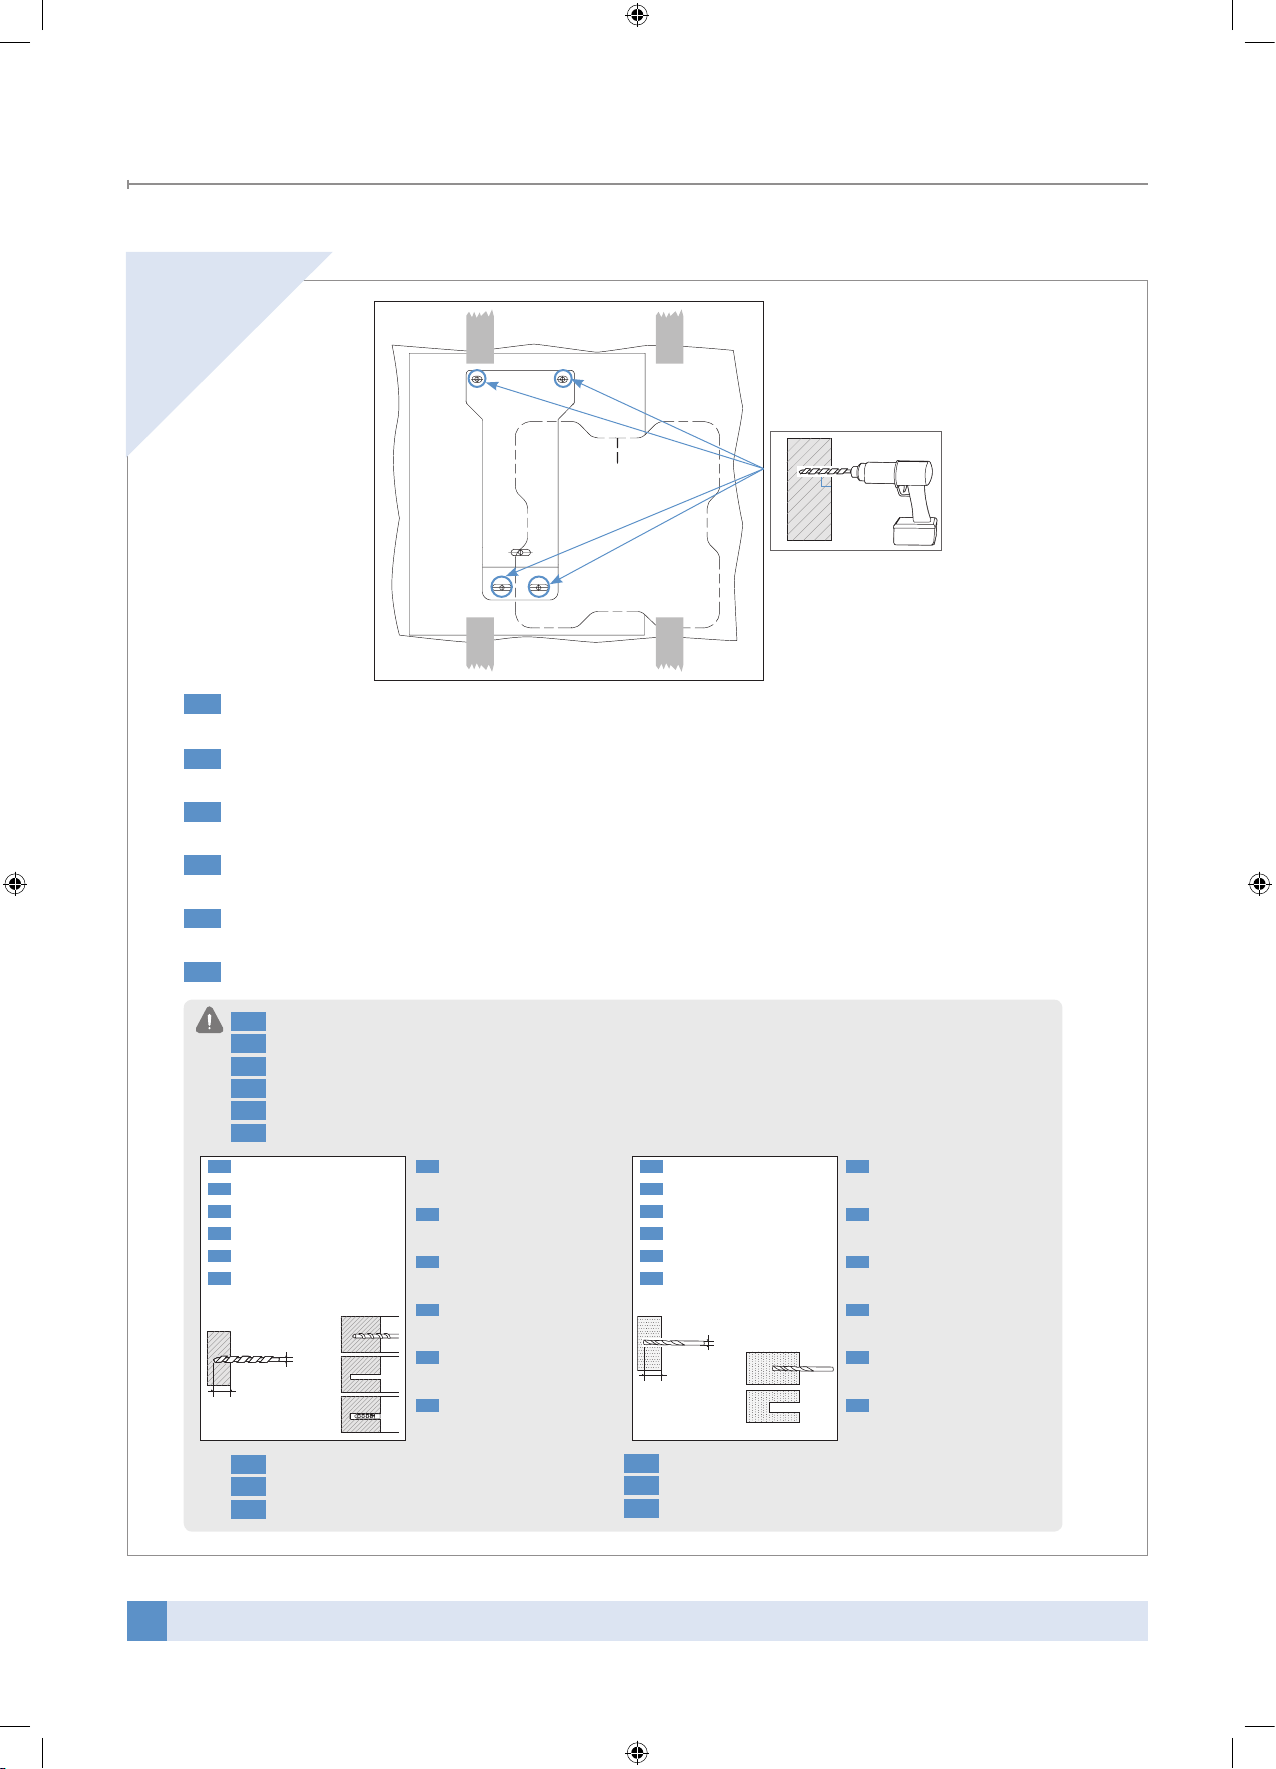
EN
Drill the four holes using the wood drill bit(P-A) in case of wooden wall, or using masonry drill bit(Φ10) in case of
Masonry wall.
Ⰼ
Wall
DE
Bohren Sie die vier Löcher entweder mit der Holz-Bohrspitze(P-A) bei einer Holzwand oder mit einer Mauer-
Bohrspitze(Φ10) bei Mauerwerk
FR
Percez les 4 trous à l’aide de la mèche de percement du bois(P-A) si le mur est en bois, ou de la mèche de perce-
ment de la maçonnerie(Φ10) si le mur est en maçonnerie.
IT
Effettuare quattro fori usando la punta per legno(P-A) se la parete è in legno, o la punta per muratura(Φ10) se la
parete è in muratura.
ES
Haga los cuatro agujeros utilizando la barrena para madera del taladro(P-A) si la pared es de madera, o utilizando
la barrena de albañilería del taladro(Φ10) si la pared es de albañilería.
NL
Boor vier gaten met de houtboor(P-A) als de muur van hout is, of gebruik een steenboor(Φ10) bij een stenen muur.
The hole size and drilling method differ depending on the wall type as follows:
EN
Die Bohrungsgröße und –methode sind unterschiedlich und hängen von der Art der Wand ab, wie im Folgenden dargestellt:
DE
La taille du trou et la méthode de percement diffèrent selon le type de mur :
FR
Le dimensioni dei fori e il metodo di foratura variano in base al tipo di muro, come descritto di seguito:
IT
El tamaño de los agujeros y el método de taladrado variarán dependiendo del tipo de pared, tal como se indica a continuación:
ES
De grootte en de manier van boren is verschillend, afhankelijk van het soort muur:
NL
a)
b)
c)
60mm
Φ10(2/5")
Geval 1) Stenen muur
NL
Caso 1) Pared de albañilería
ES
Caso 1) Parete in muratura
IT
Cas 1) Mur en maçonnerie
FR
Fall 1) Mauerwerk
DE
Case 1) Masonry Wall
EN
a) Gaten boren
b) Gaten schoonmaken
c) Plaats de pluggen (W-B)
NL
a) Cómo hacer los agujeros
b) Cómo limpiar los agujeros
c) Cómo colocar los anclajes (W-B)
ES
a) Esecuzione dei fori
b) Pulizia dei fori
c) Inserimento dei fermi (W-B)
IT
a) Percement des trous
b) Nettoyage des trous
c) Insertion des chevilles (W-B)
FR
a) Bohren der Löcher
b) Säuberung der Bohrungen
c) Befestigung der Verankerungen(W-B)
DE
a) Drilling the holes
b) Cleaning the holes
c) Inserting the anchors(W-B)
EN
Remove the wall template after the drilling.
EN
Entfernen Sie nach dem Bohren die Wandschablone von der Wand.
DE
Retirez le modèle mural après avoir effectué les percements.
FR
Dopo aver effettuato i fori, rimuovere la sagoma dalla parete.
IT
Retire la plantilla de pared después de hacer los agujeros.
ES
Verwijder het sjabloon na het boren.
NL
Φ5(1/5")
60mm
a)
b)
Geval 2) Houten muur
NL
Caso 2) Pared de madera
ES
Caso 2) Parete in legno
IT
Cas 2) Mur en bois
FR
Fall 2) Holzwand
DE
Case 2) Wooden Wall
EN
a) Gaten boren
b) Gaten schoonmaken
NL
a) Cómo hacer los agujeros
b) Cómo limpiar los agujeros
ES
a) Esecuzione dei fori
b) Pulizia dei fori
IT
a) Percement des trous
b) Nettoyage des trous
FR
a) Bohren der Löcher
b) Säuberung der Bohrungen
DE
a) Drilling the holes
b) Cleaning the holes
EN
Installation
Page 9
9
Small Auto Wall Mount Instruction manual
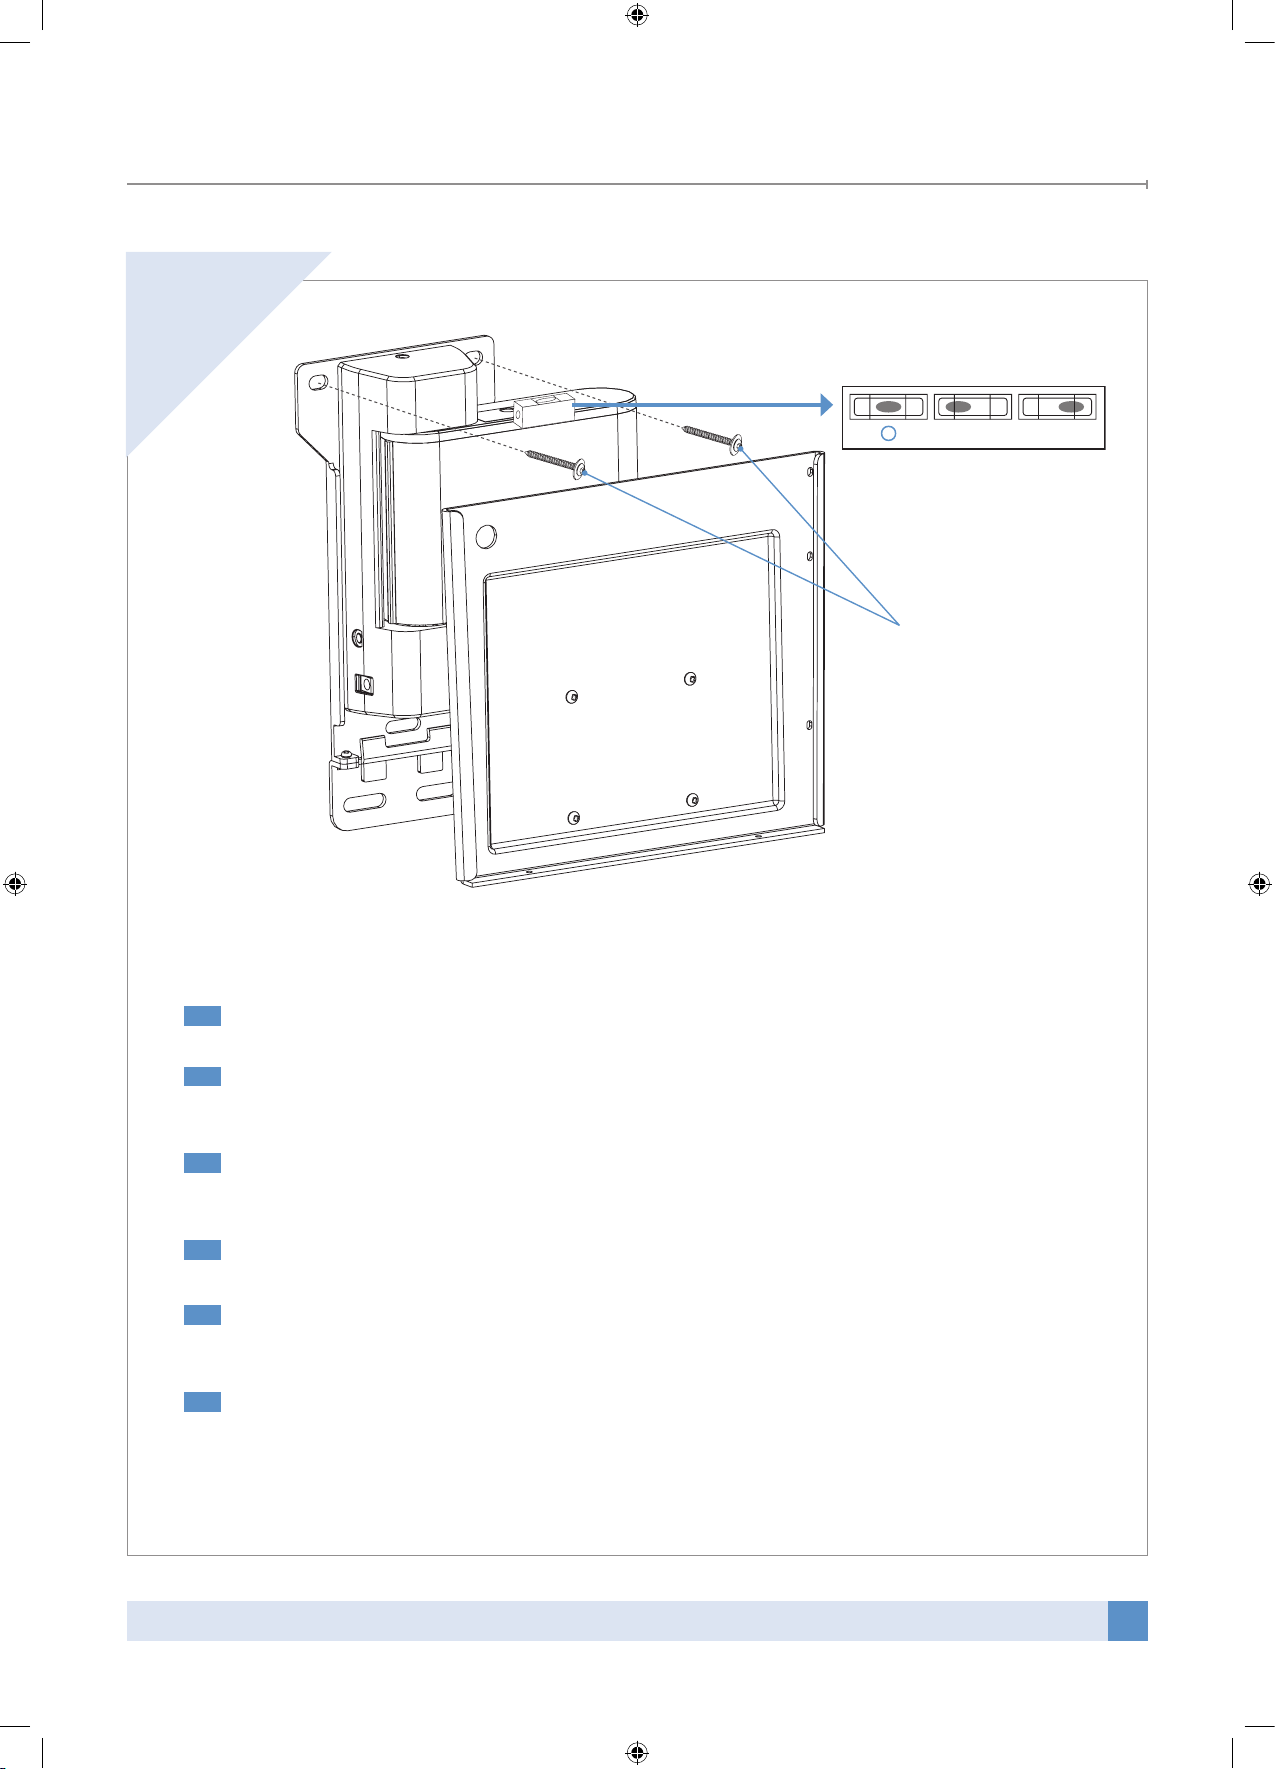
3
Leveler (P-B)
ϧ ϧ
W-A
M8×65mm
EN
Align the wall mount with the base hole for horizontality by using a leveler and fasten two screws (W-A).
DE
Richten Sie die Wandhalterung und die untere Bohrung gegeneinander aus und benutzen Sie eine Wasserwaage,
um die waagerechte Position zu gewährleisten. Befestigen Sie die Wandhalterung mit zwei Schrauben (W-A).
FR
Alignez la fixation murale avec les percements du mur, en vérifiant l’horizontale à l’aide du niveau, puis fixez deux
vis (W-A).
IT
Allineare orizzontalmente il supporto a parete con il foro base usando la livella e serrare le due viti (W-A).
ES
Sitúe el soporte para montaje en pared de modo que coincida con los agujeros de la base asegurándose de que
quede totalmente horizontal utilizando un nivel y, a continuación, coloque dos tornillos (W-A).
NL
Houdt de muursteun tegen het onderste gat om deze horizontaal op te hangen met een waterpas en draai twee
schroeven aan (W-A).
Installation
Page 10
10
Small Auto Wall Mount Instruction manual
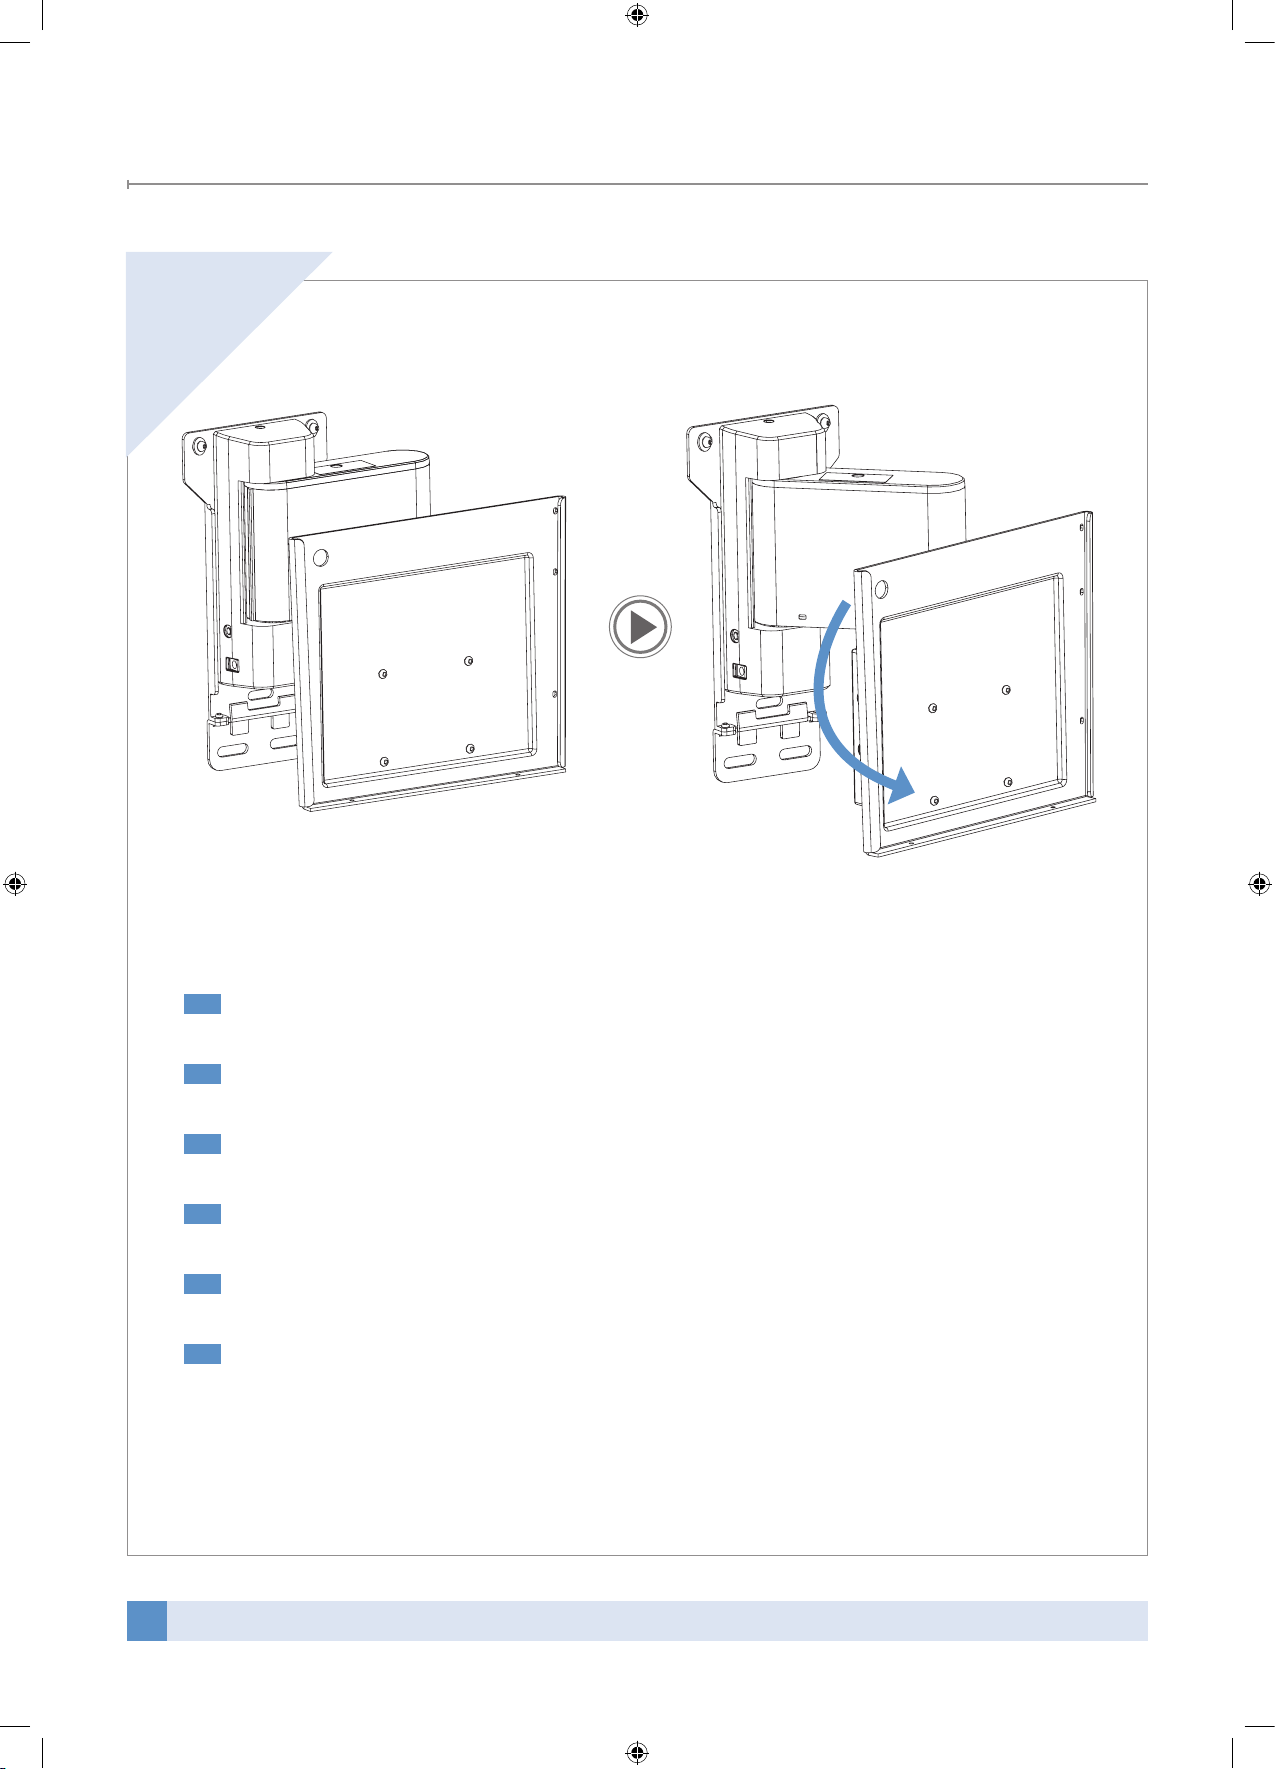
4
EN
Grab the plate of the wall mount with two hands and move to the right.
DE
Greifen Sie die Platte der Wandhalterung mit beiden Händen und bewegen Sie sie nach rechts.
FR
Prenez la plaque de la fixation murale à deux mains et déplacez-la vers la droite.
IT
Afferrare la piastra del supporto a parete con due mani e spostarla a destra.
ES
Sostenga la placa del soporte para montaje en pared con las dos manos y desplácela hacia la derecha.
NL
Pak de plaat van de muursteun met beide handen en verplaats deze naar rechts.
Installation
Page 11
11
Small Auto Wall Mount Instruction manual
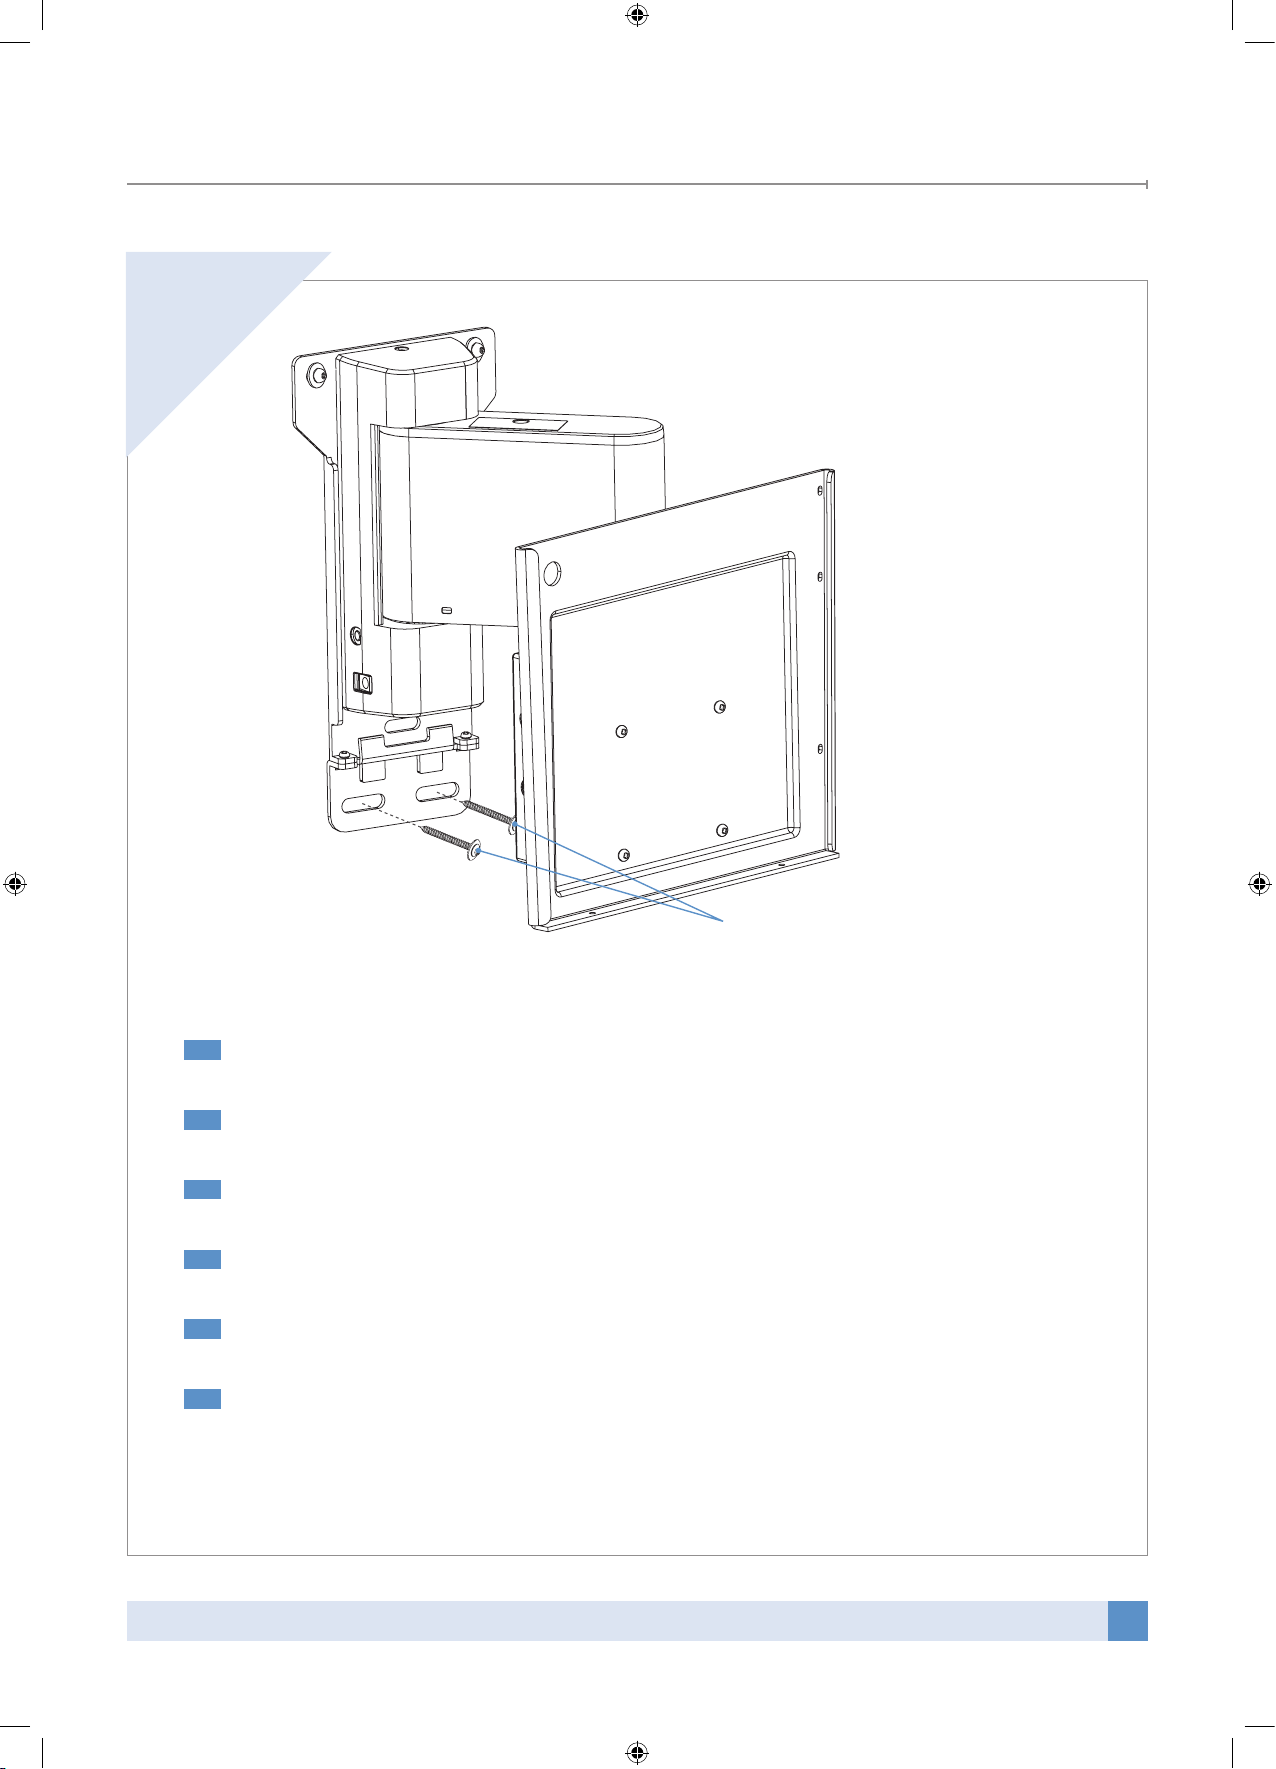
5
W-A
M8×65mm
EN
Fasten two screws (W-A) located at the bottom of the wall mount.
DE
Ziehen Sie die beiden Schrauben (W-A) am Boden der Wandhalterung an.
FR
Fixez deux vis (W-A) dans les emplacements situés en bas de la fixation murale.
IT
Serrare due viti (W-A) ubicate al fondo del supporto a parete.
ES
Apriete los dos tornillos (W-A) situados en la base del soporte para montaje en pared.
NL
Draai de twee schroeven (W-A) aan de onderkant van de muursteun aan
Installation
Page 12
12
Small Auto Wall Mount Instruction manual
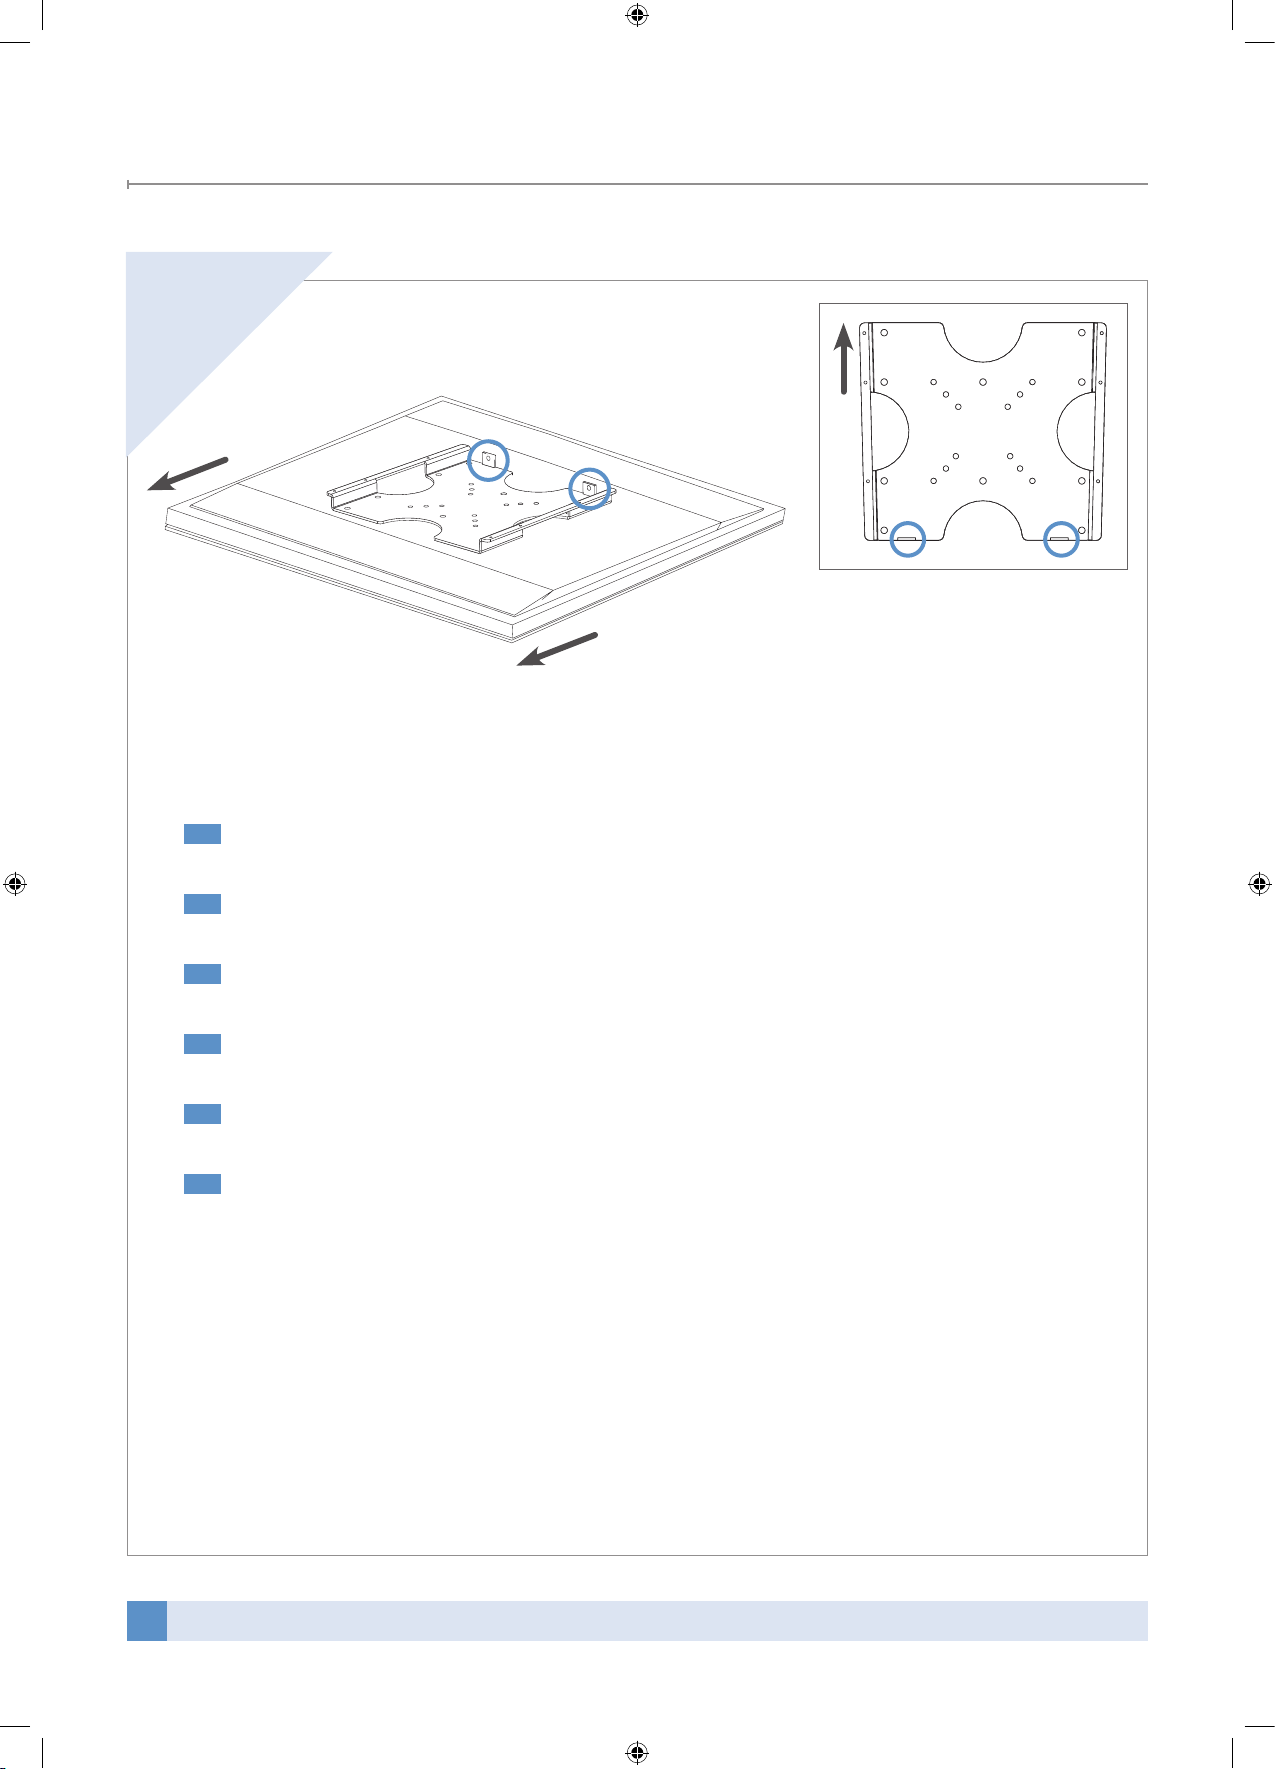
6
EN
Place the TV plate on the rear panel of TV.
DE
Verbinden Sie die TV-Platte mit der Rückwand des Fernsehgeräts.
FR
Placez la plaque du téléviseur à l’arrière de celui-ci.
IT
Posizionare la piastra TV sul pannello posteriore della TV.
ES
Coloque la placa del TV en el panel posterior del TV.
NL
Plaats de TV-plaat op de achterzijde van de TV.
Installation
Page 13
13
Small Auto Wall Mount Instruction manual
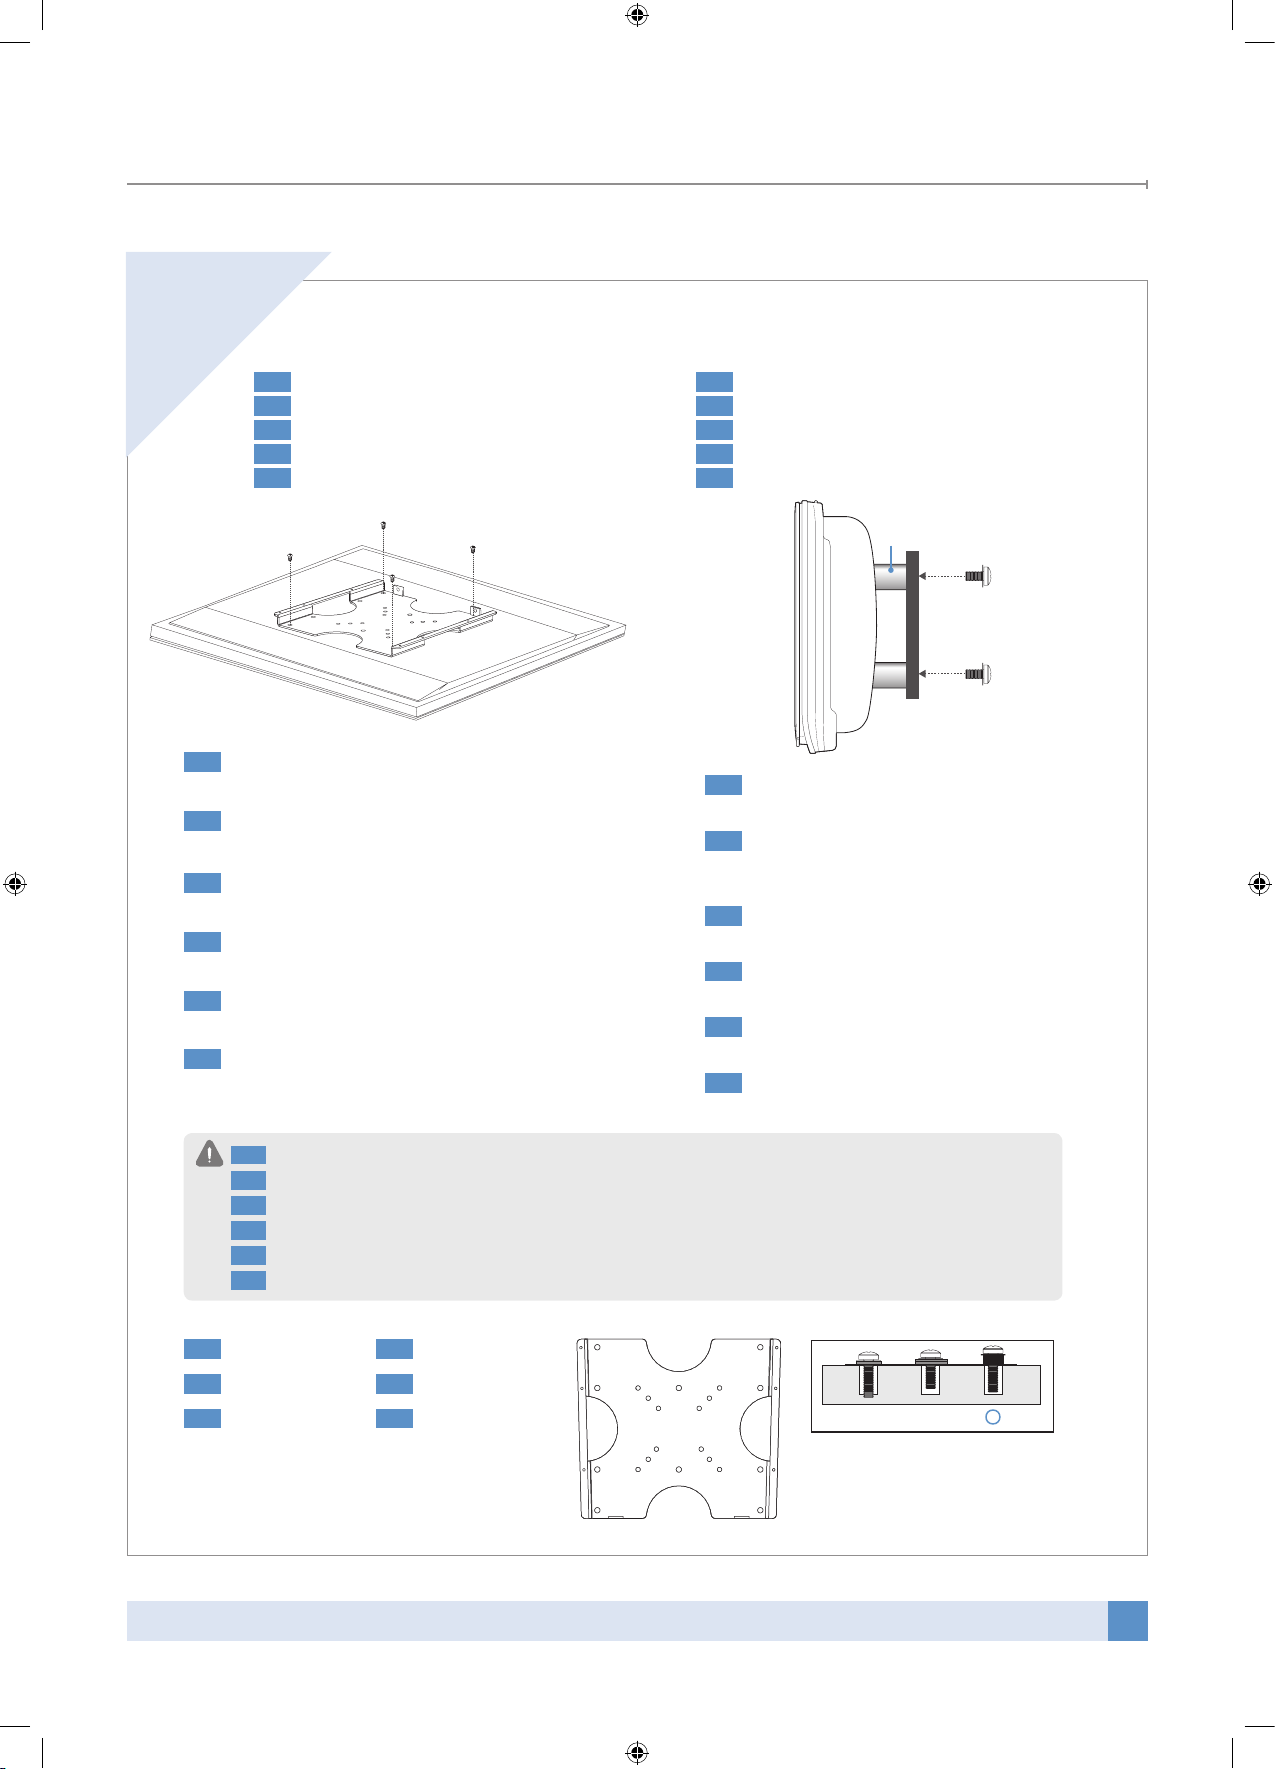
7
ϧϧ
M-J
EN
Fix the TV plate by using one of TV screw sets
from M-A to M-I.
DE
Befestigen Sie die TV-Platte mit einem der TVSchraubensets von M-A bis M-I.
FR
Fixez la plaque du téléviseur à l’aide de l’un des
jeux de vis pour le téléviseur, de M-A à M-I.
IT
Fissare la piastra TV usando uno dei set di viti
per TV da M-A a M-I
ES
Fije la placa del TV utilizando uno de los juegos
de tornillos del TV, de M-A a M-I.
NL
Bevestig de TV-plaat met één van de TV-schroeven uit de zakjes MA- tot M-I.
EN
Insert a spacer(M-J) between the TV plate and
TV and Fix the screw.
DE
Legen Sie ein Abstandsstück(M-J) zwischen die
TV-Platte und das Fernsehgerät und ziehen Sie
die Schraube an.
FR
Insérez une butée d’espacement (M-J) entre la
plaque du téléviseur et le téléviseur et fixez les vis.
IT
Inserire il distanziatore (M-J) tra la piastra della
TV e la TV, quindi serrare la vite.
ES
Coloque un separador (M-J) entre la placa del TV
y el TV y apriete los tornillos.
NL
Plaats een opvulring (M-J) tussen de TV-plaat en
de TV en draai de schroef aan.
When you fix the TV plate, do not over tighten screw not to damage the TV panel.
EN
Achten Sie bei der Befestigung der TV-Platte darauf, die Schrauben nicht zu fest anzuziehen, um eine Beschädigung der TV-Fläche zu vermeiden.
DE
Lorsque vous fixez la plaque du téléviseur, prenez garde de ne pas trop visser les vis afin de ne pas endommager le panneau du téléviseur.
FR
Durante il fissaggio della piastra TV, non serrare eccessivamente per non danneggiare il pannello della TV.
IT
Cuando fije la placa del TV no apriete demasiado los tornillos, pues podría dañar el panel del TV.
ES
Als u de TV-plaat vastmaakt, draai dan de schroeven niet te strak aan om de TV niet te beschadigen.
NL
EN
VESA Patterns
• 50mm x 50mm
• 75mm x 75 mm
• 100mm x 100mm
• 200mm x 100mm
• 200mm x 150mm
• 200mm x 200mm
DE
VESA-Muster
FR
Normes VESA
IT
Schemi VESA
ES
Normas VESA
NL
VESA-verdeling
DE
Bei Fernsehgeräten mit einer flachen Rückseite
FR
Dans le cas où l’arrière du téléviseur est de type plat
IT
Se il retro della TV è di tipo piatto
ES
Si la parte posterior del TV es plana
NL
Als de achterkant van de TV vlak is
• In case the rear of TV is a flat type
DE
Bei Fernsehgeräten mit einer gerundeten Rückseite
FR
Dans le cas où l’arrière du téléviseur est de type arrondi
IT
Se il retro della TV è di tipo arrotondato
ES
Si la parte posterior del TV es redondeada
NL
Als de achterkant van de TV rond is
• In case the rear of TV is a round type
Installation
Page 14
14
Small Auto Wall Mount Instruction manual
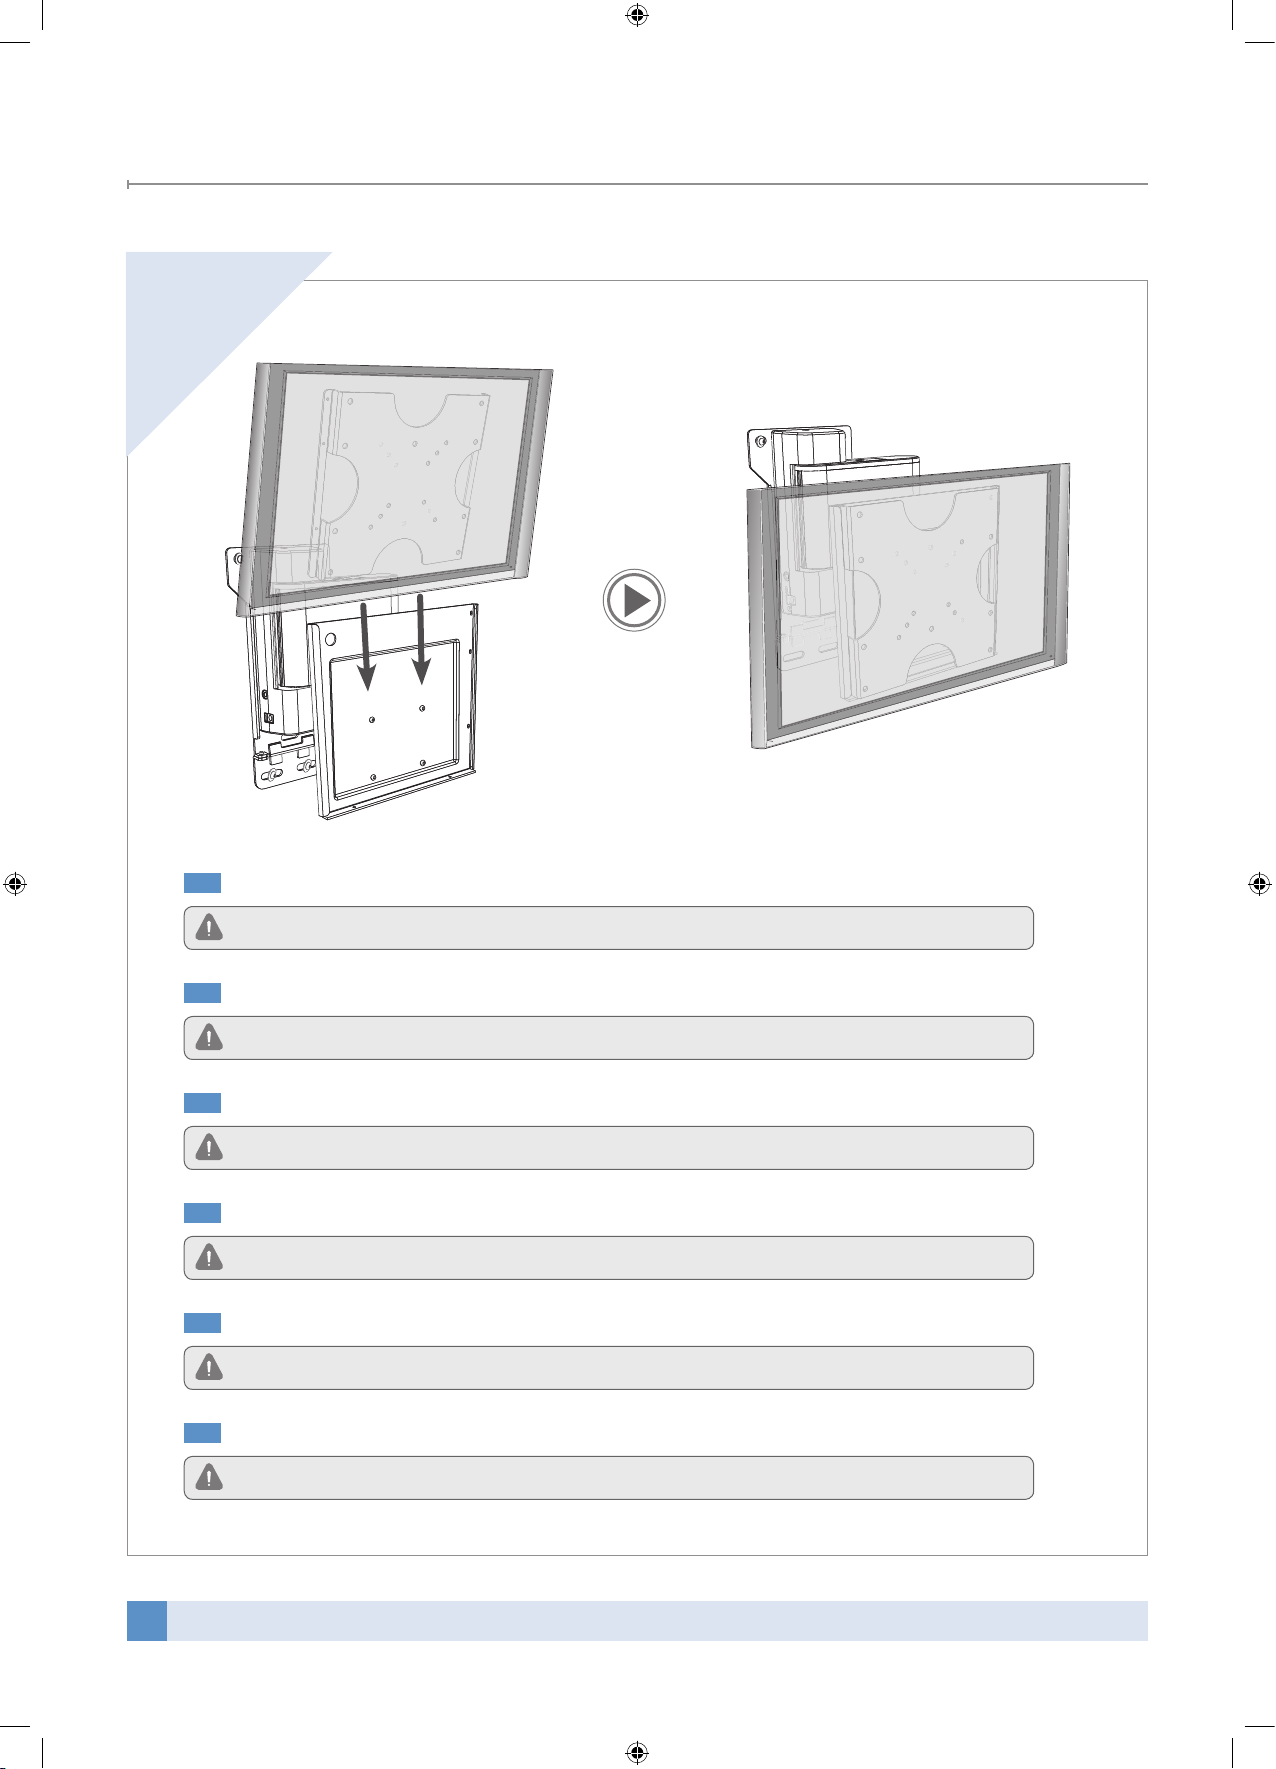
8
EN
Insert the TV plate into the front plate of the wall mount in top to bottom direction.
This step must be done at least by two people to avoid an possible personal injury.
DE
Schieben Sie die TV-Platte von oben nach unten in die Frontplatte der Wandhalterung.
Dieser Arbeitsschritt muss von mindestens zwei Personen ausgeführt werden, um möglichen Verletzungen vorzubeugen.
FR
Insérez la plaque du téléviseur dans la plaque avant de la fixation murale du haut vers le bas.
Cette étape doit être effectuée par deux personnes au moins, ceci afin d’éviter de vous blesser.
IT
Inserire la piastra della TV nella piastra anteriore del supporto a parete dall’alto verso il basso.
Questa operazione deve essere eseguita da almeno due persone per evitare possibili lesioni personali.
ES
Coloque la placa del TV en la placa anterior del soporte para montaje en pared moviéndola de arriba abajo.
Se necesitan al menos dos personas para este paso, pues de lo contrario podrían producirse daños personales.
NL
Plaats de TV-plaat in de voorplaat van de muursteun, van boven naar beneden.
Deze stap dient door twee personen uitgevoerd te worden om letsel te voorkomen.
Installation
Page 15
15
Small Auto Wall Mount Instruction manual
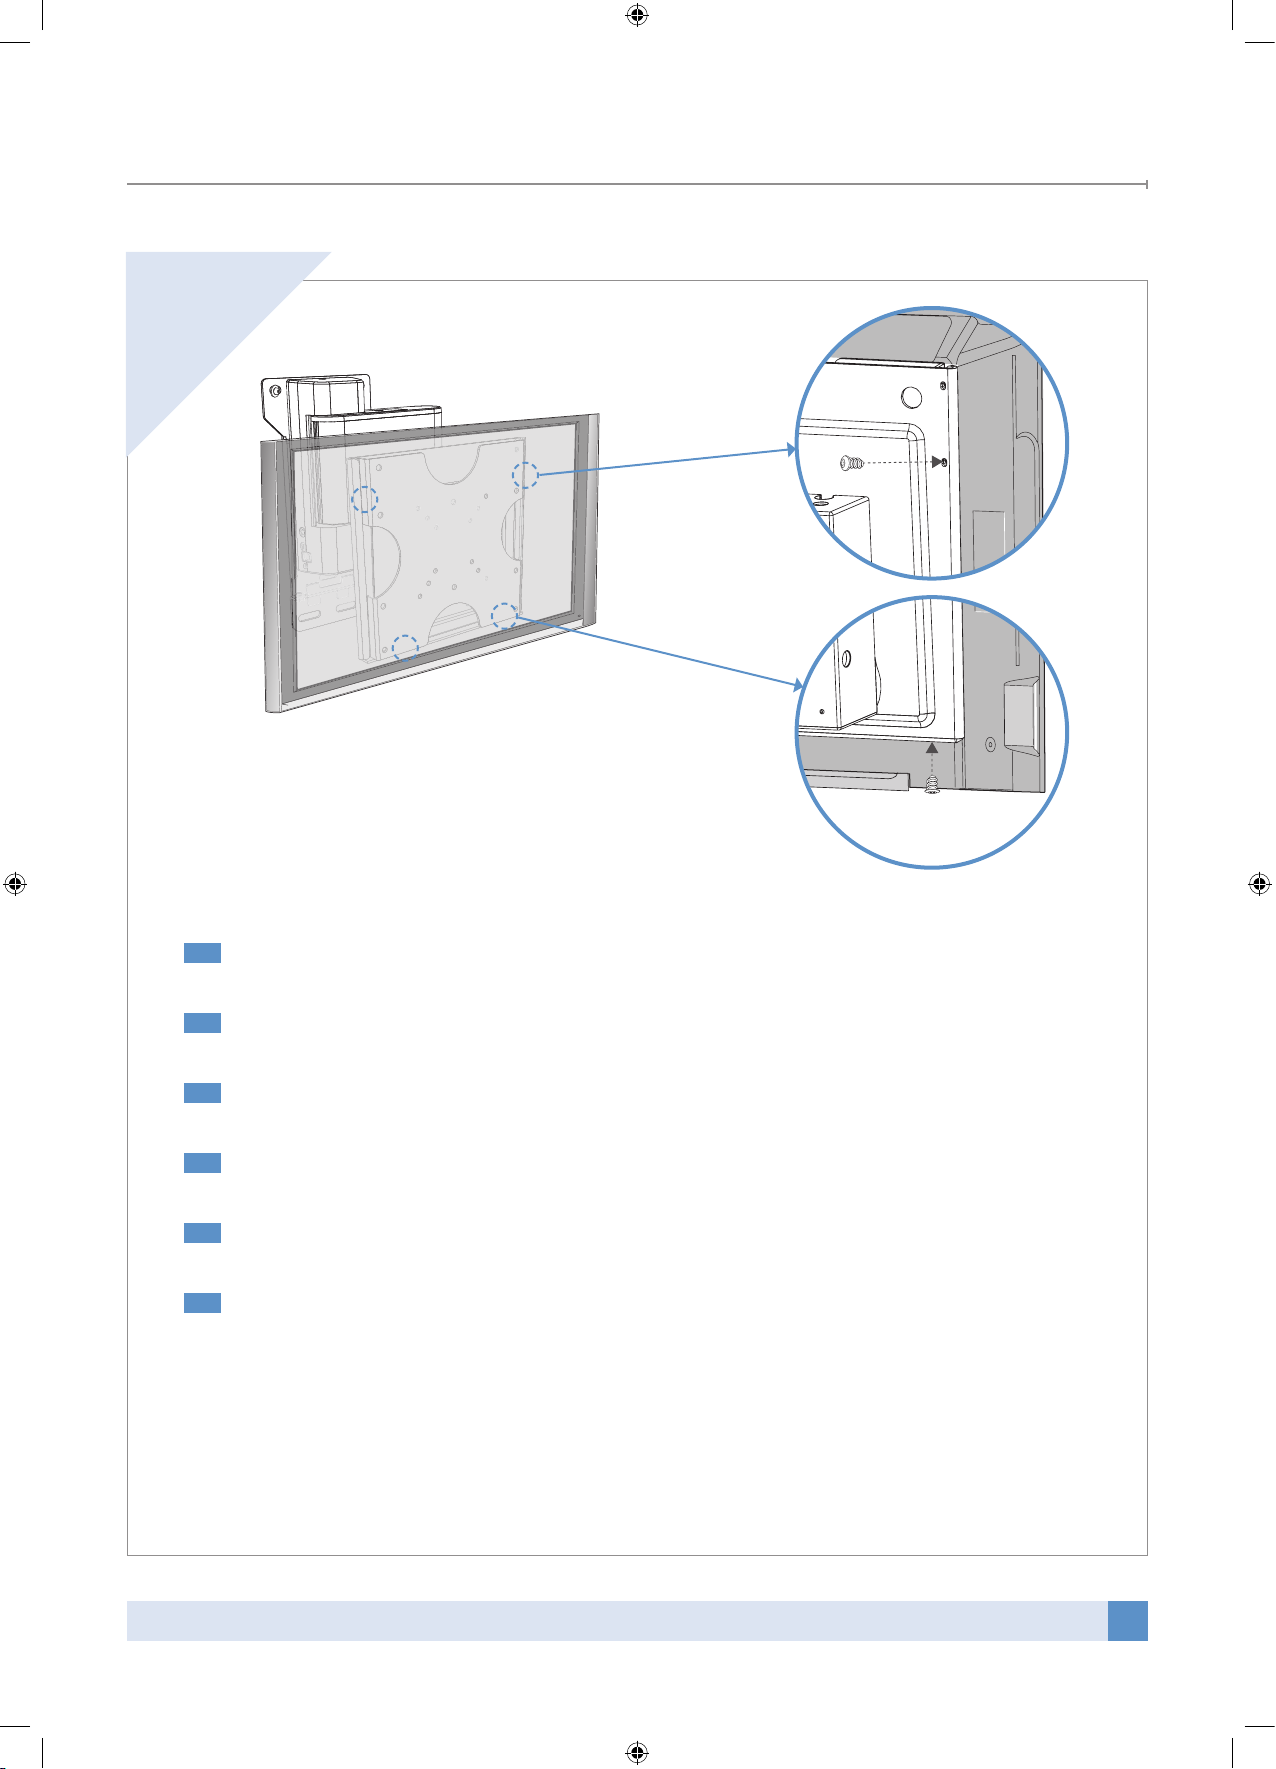
9
EN
Fix the four screws between front plate and TV plate.
DE
Befestigen Sie die vier Schrauben zwischen Frontplatte und TV-Platte.
FR
Fixez les 4 vis sur la plaque avant et la plaque du téléviseur.
IT
Serrare le quattro viti tra la piastra anteriore e la piastra della TV.
ES
Fije los cuatro tornillos que unen la placa anterior y la placa del TV.
NL
Draai de vier schroeven tussen de voorplaat en de TV-plaat aan.
Installation
Page 16
16
Small Auto Wall Mount Instruction manual
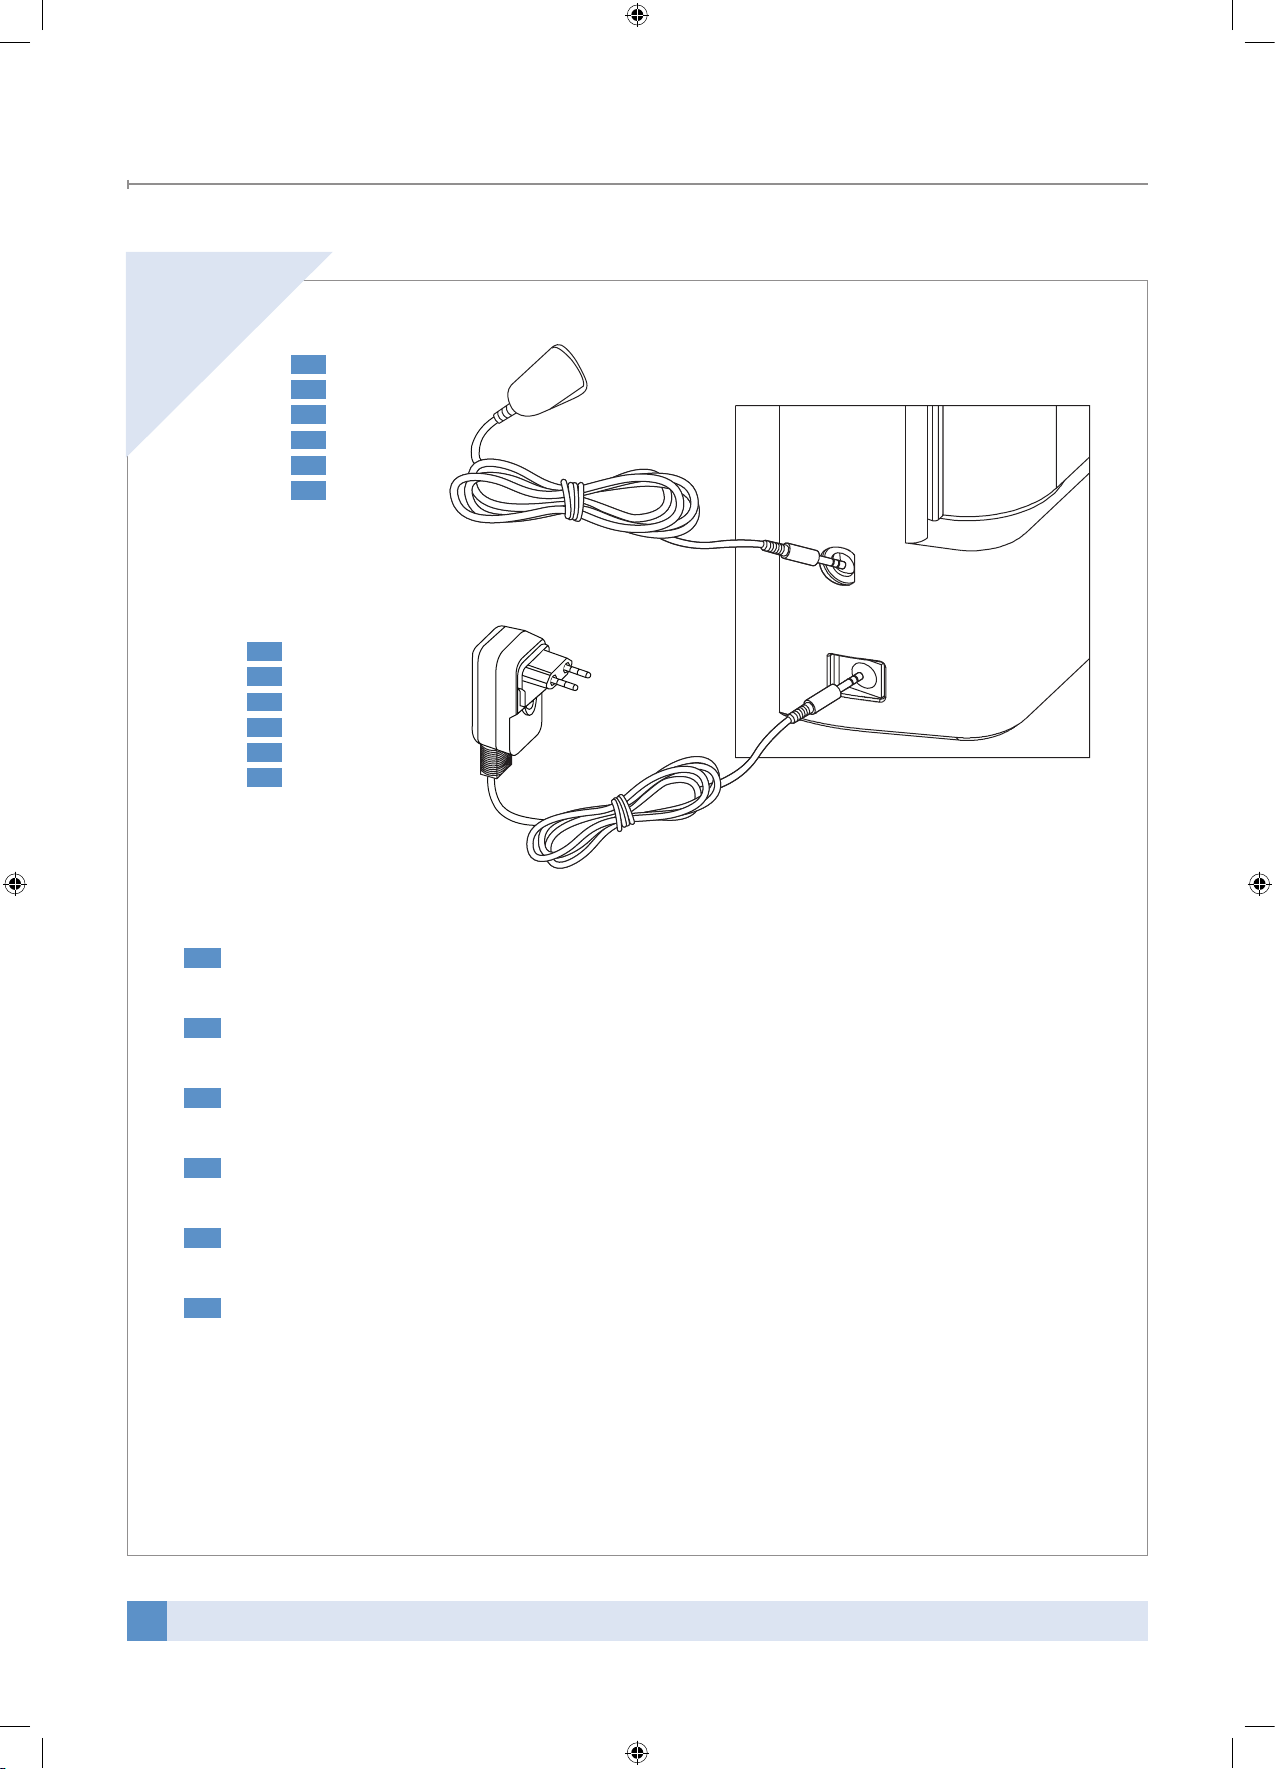
10
IR
PWR
EN
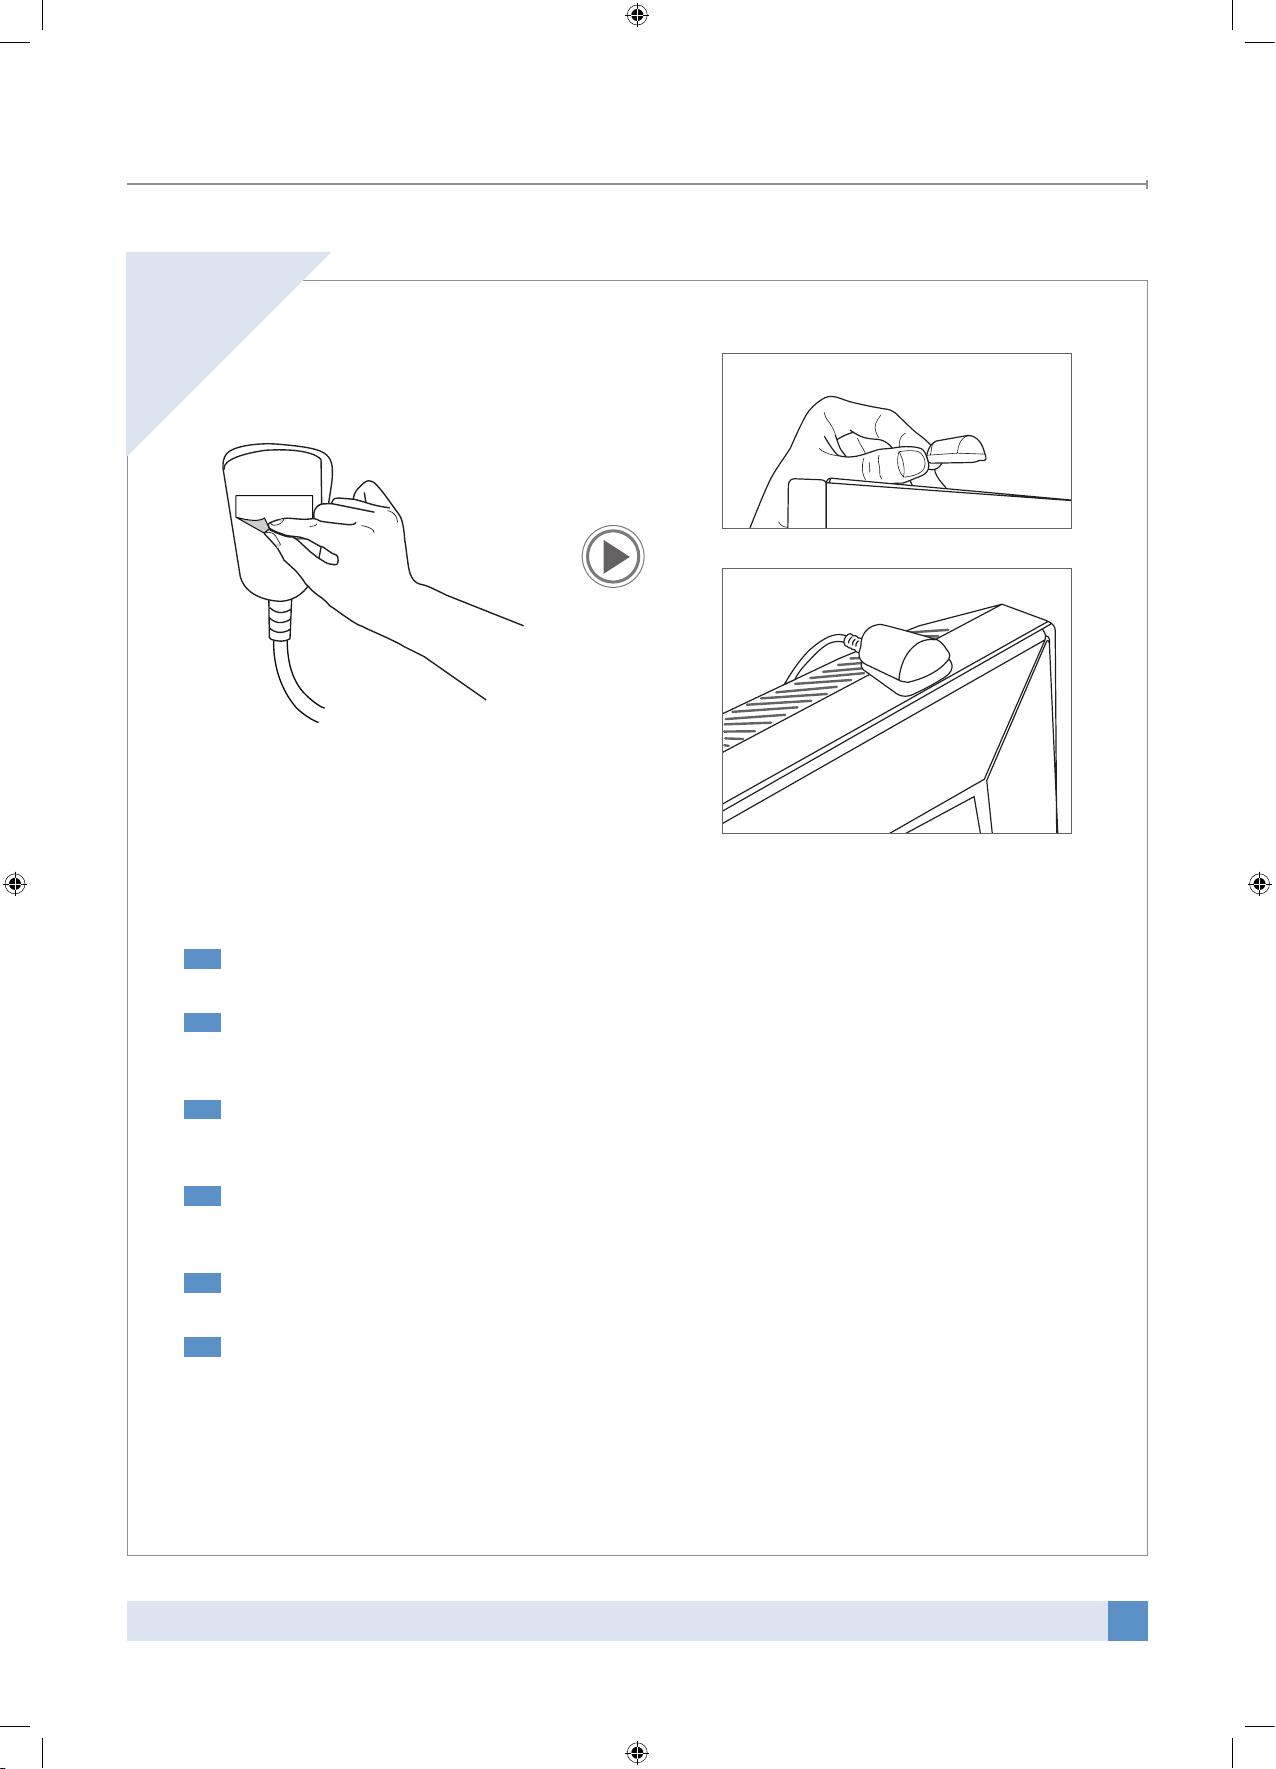
Connect the IR receiver and the power adapter.
DE
Verbinden Sie den IR-Empfänger und den Strom-Adapter.
FR
Branchez le récepteur IR et l’adaptateur secteur.
IT
Collegare il ricevitore IR e l’alimentatore.
ES
Conecte el receptor de IR y el adaptador de potencia.
NL
Sluit de IR-ontvanger en de voedingsadapter aan.
IR Receiver
EN
IR-Empfänger
DE
Récepteur IR
FR
Ricevitore IR
IT
Receptor de IR
ES
IR-ontvanger
NL
Power Cable(220V)
EN
Netzkabel(220V)
DE
Câble d’alimentation (220 V)
FR
Cavo di alimentazione (220V)
IT
Cable de alimentación (220 V)
ES
Netsnoerkabel (220V)
NL
Installation
Page 17
17
Small Auto Wall Mount Instruction manual
11
EN
Detach the tape cover on the rear of IR receiver and attach the IR receiver on the top of TV.
DE
Nach der Entfernung der Bandabdeckung des IR-Empfängers befestigen Sie den Empfänger auf der Oberseite
des Fernsehgeräts.
FR
Après avoir retiré la protection de l’adhésif situé sur la partie inférieure du récepteur IR, collez ce dernier sur le
haut du téléviseur.
IT
Dopo aver rimosso il nastro protettivo sulla parte posteriore del ricevitore IR, collegare lo stesso sulla parte superiore della TV.
ES
Tras retirar la cubierta de la parte posterior del receptor de IR, conecte el receptor a la parte superior del TV.
NL
Nadat de beschermingstap van de achterkant van de IR-ontvanger heeft verwijderd, bevestigt u de ontvanger
bovenop de TV.
Installation
Page 18
18
Small Auto Wall Mount Instruction manual
DE
NL
IT
Schwenken/Neigen der Wandhalterung mit dem Fernsehgerät
FR
Pivotement de la xation murale et du téléviseur
Rotazione/inclinazione del supporto e della TV
ES
Girar o inclinar el soporte para montaje en pared y el TV
Draaien/kantelen van muursteun en TV
Swivel/Tilt the Wall mount and TV
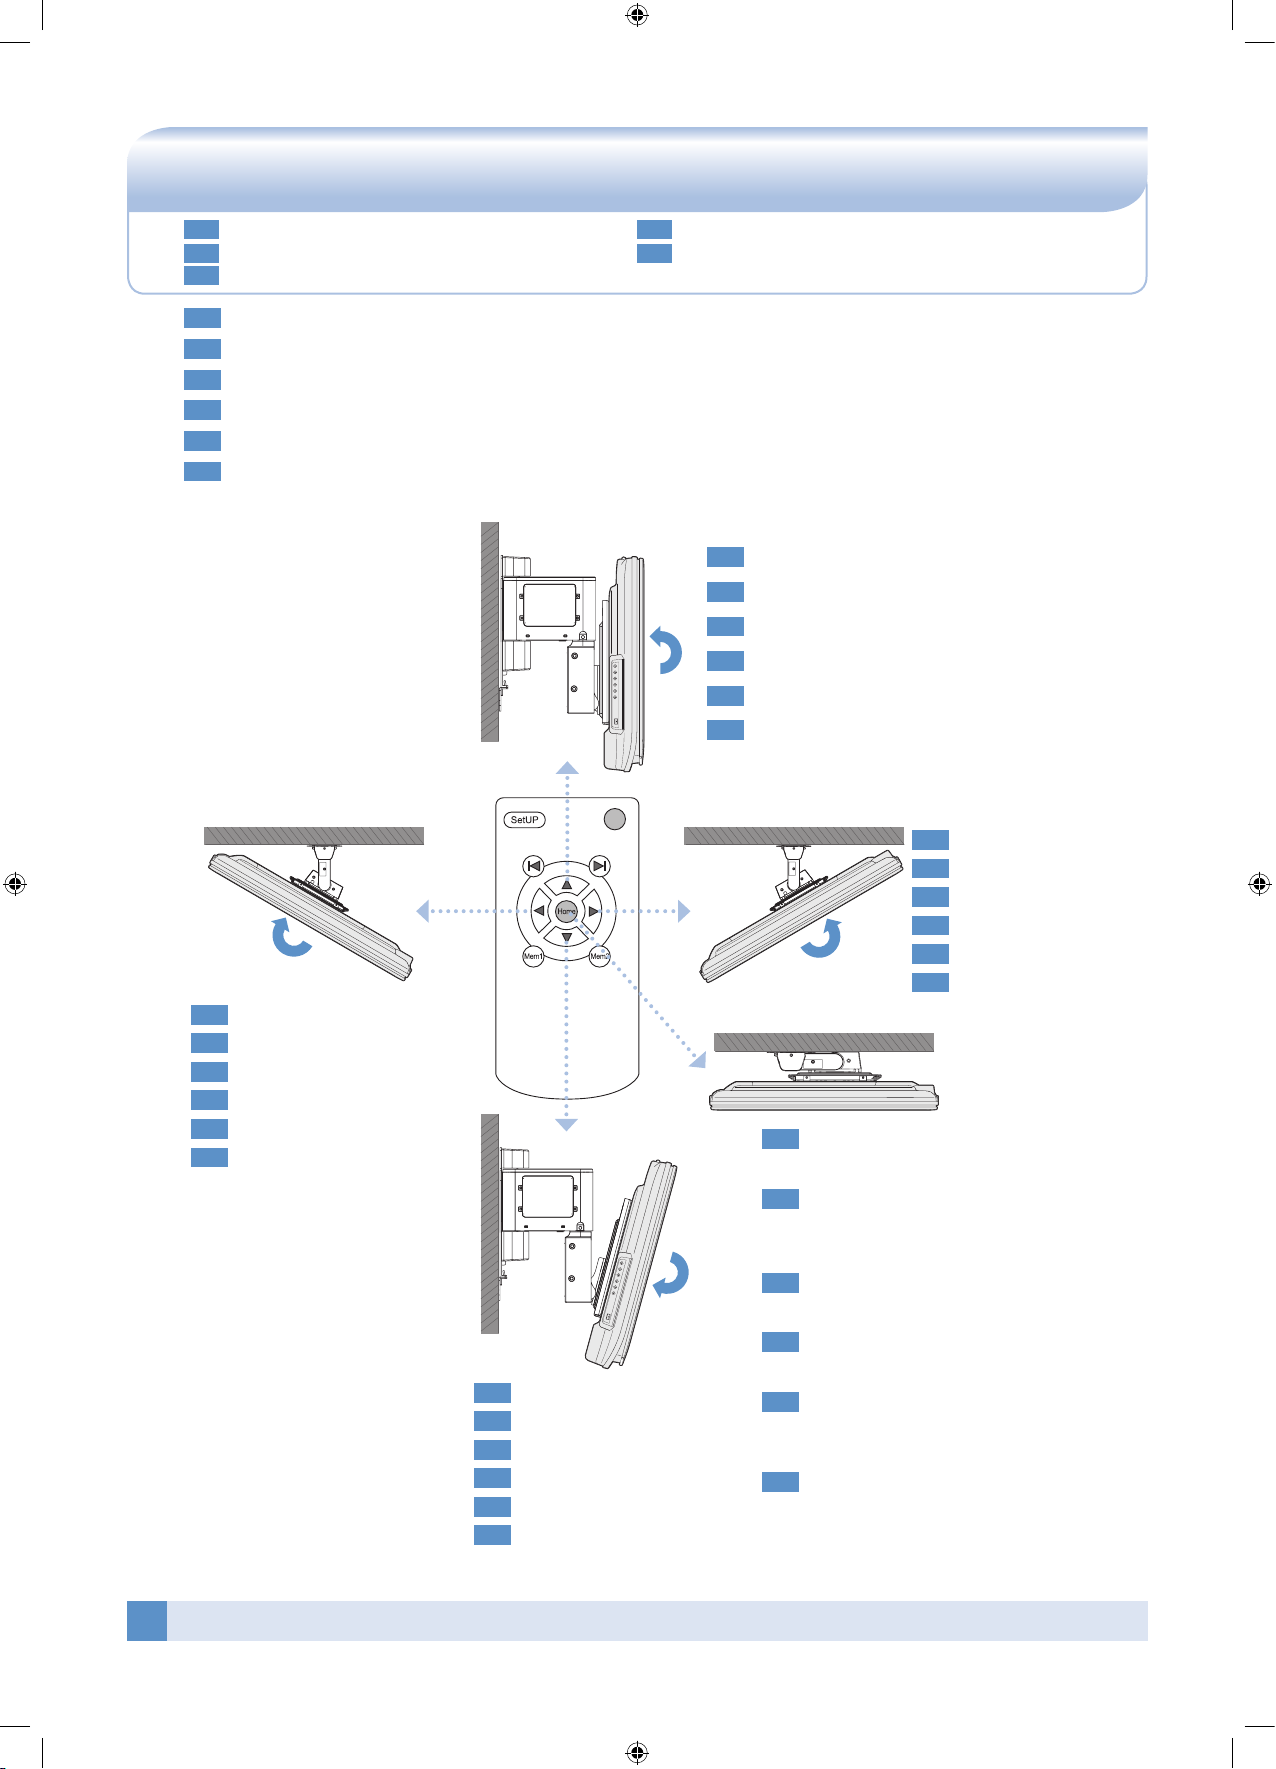
You can adjust the direction of TV by using the direction buttons on the remote control.
EN
Mit den Richtungstasten auf der Fernbedienung können Sie die Richtung des Geräts verstellen.
DE
Vous pouvez régler la direction du téléviseur à l’aide des touches directionnelles de la télécommande.
FR
È possibile regolare la direzione della TV usando i tasti direzionali sul telecomando.
IT
Puede ajustar la dirección del TV utilizando los botones de dirección del mando a distancia.
ES
U kunt de richting van de TV wijzigen met de knoppen op de afstandsbediening.
NL
This will bring the wall mount back to the wall
of HOME position that user setup
EN
Tilt up
EN
Neigung nach oben
DE
Pivotement vers le haut
FR
Inclinazione in alto
IT
Inclinar hacia arriba
ES
Omhoog kantelen
NL
Diese Funktion bewegt die Wandhalterung in
die vom Benutzer eingestellte Ausgangsposition an der Wand
DE
Ceci remettra la fixation murale dans la position définie par l’utilisateur
FR
Questo tasto riporterà il supporto alla
posizione di partenza impostata dall’utente
IT
Así devolverá el soporte para montaje en
pared a la posición INICIAL definida por el
usuario
ES
Hiermee gaat de muursteun terug naar de
door de gebruiker ingestelde beginstand.
NL
Right swivel
EN
Schwenk nach rechts
DE
Pivotement vers la droite
FR
Rotazione a destra
IT
Girar hacia la derecha
ES
Rechts draaien
NL
Left swivel
EN
Schwenk nach links
DE
Pivotement vers la gauche
FR
Rotazione a sinistra
IT
Girar hacia la izquierda
ES
Links draaien
NL
Tilt down
EN
Neigung nach unten
DE
Pivotement vers la gauche
FR
Inclinazione in basso
IT
Inclinar hacia abajo
ES
Omlaag kantelen
NL
Page 19
19
Small Auto Wall Mount Instruction manual
FR
NL
ITDE
Originaleinstellungen Conguration initiale Congurazione iniziale
Eerste instelling
ES
Conguración inicial
Initial set-up
EN
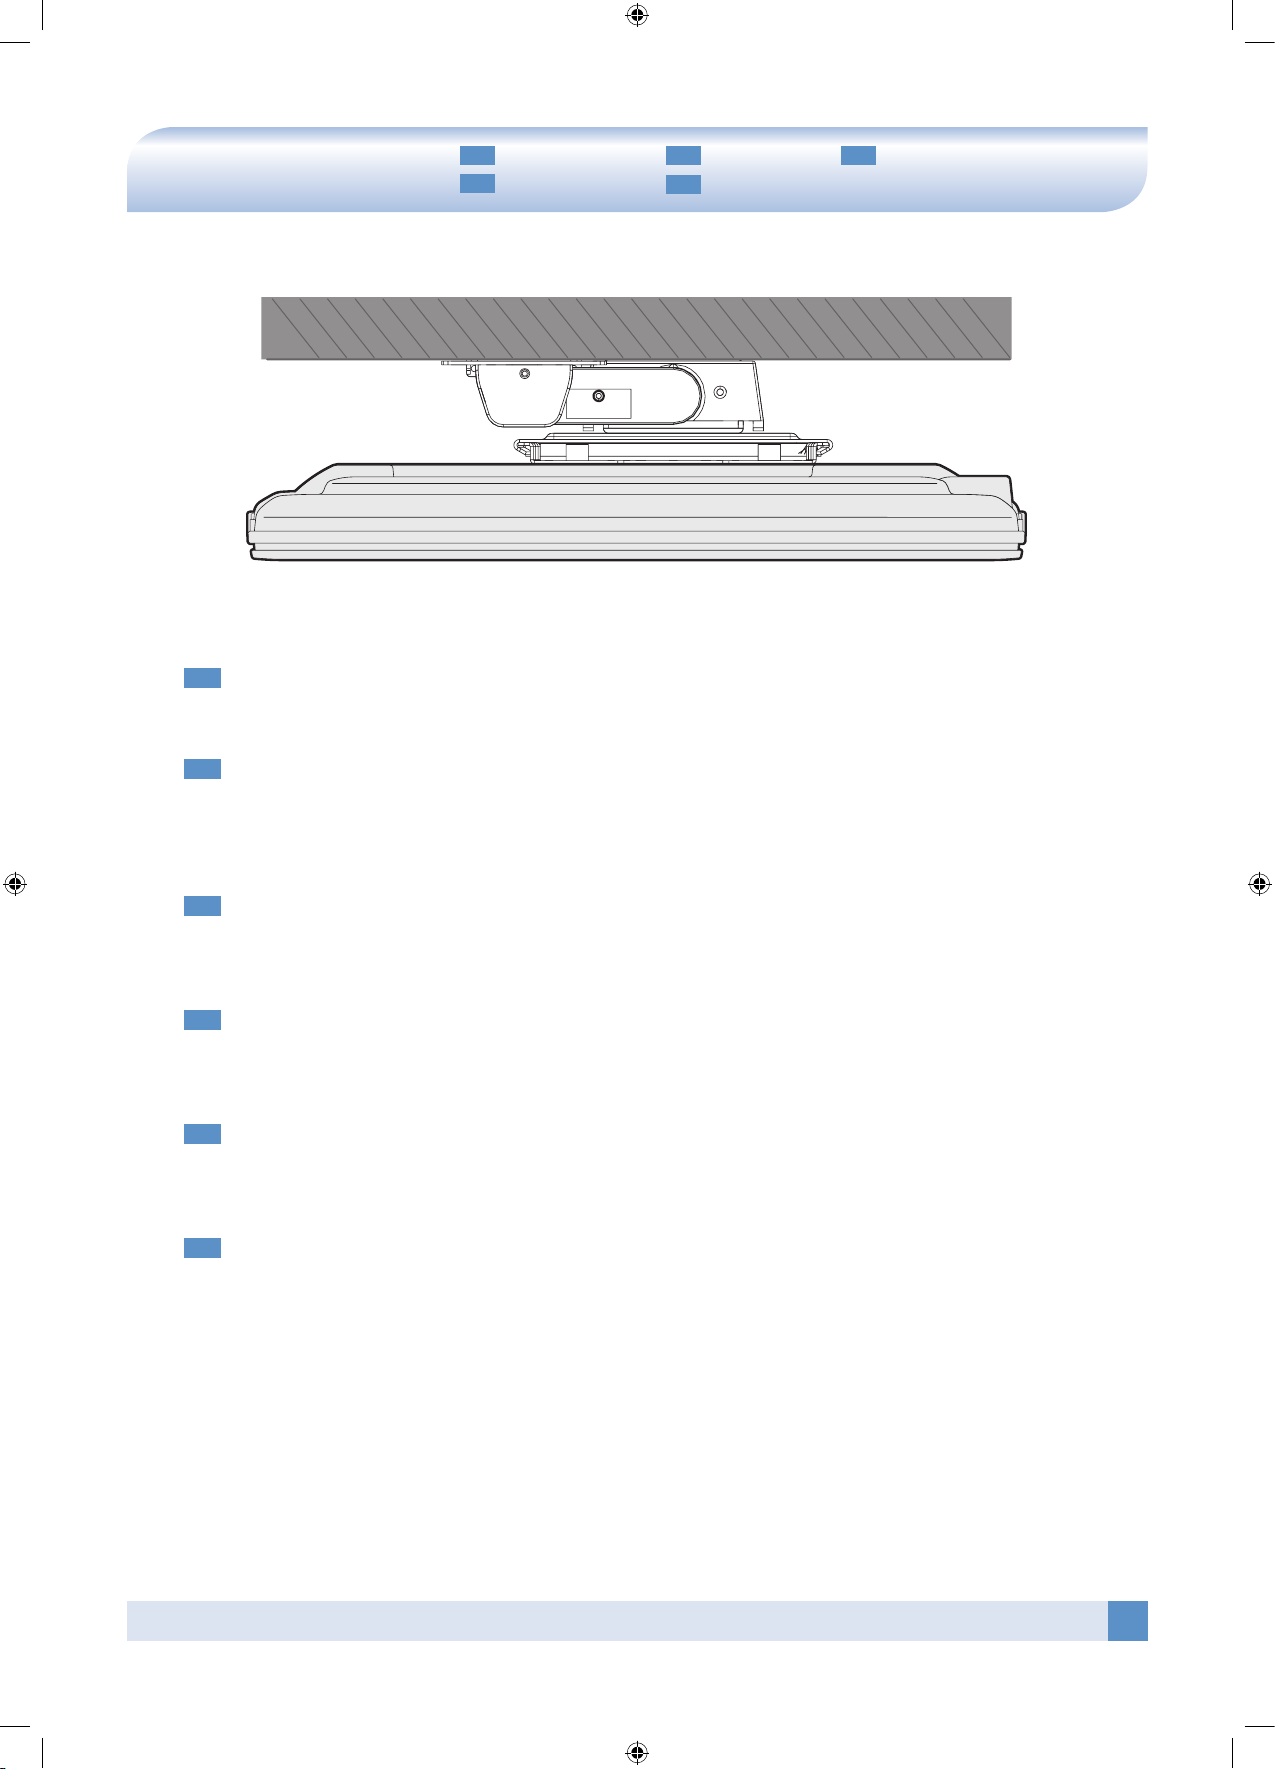
Hold both ends of TV with your hands and push the TV in the direction to the wall to the end.
And, press and hold the set-up button for 5 seconds to set the home position until LED turns on continuously.
DE
Halten Sie das Fernsehgerät an beiden Seiten mit Ihren Händen fest und drücken Sie das Gerät in Richtung Wand
bis zum Anschlag.
Jetzt drücken und halten Sie zur Herstellung der Ausgangsposition die Einstellungstaste 5 Sekunden lang, bis die
LED-Leuchte ständig aufleuchtet.
FR
Saisissez les deux côtés du téléviseur avec les mains et poussez ce dernier complètement vers le mur.
Ensuite, maintenez enfoncée la touche de configuration pendant 5 secondes pour définir la position de départ
(Home) jusqu’à ce que la LED s’allume en continu.
IT
Afferrare entrambe le estremità della TV con le mani e spingere a fondo la TV in direzione del muro.
Tenere quindi premuto il tasto Set-Up per 5 secondi per impostare la posizione Home finché il LED non sarà acceso fisso.
ES
Sostenga los dos extremos del TV con las manos y empuje el TV en dirección a la pared hasta el tope.
A continuación, mantenga pulsado el botón de configuración durante 5 segundos para definir la posición inicial,
hasta que el LED se quede encendido.
NL
Houd beide kanten van uw TV met uw handen vast en druk de TV helemaal tot aan de muur.
Houd de instelknop 5 seconden ingedrukt om de beginstand in te stellen tot de LED blijft branden.
Page 20
20
Small Auto Wall Mount Instruction manual
DE
ES
FR
NL
IT
Wandbegrenzung rechts Limite droite du mur Limite parete destra
Límite derecho de la pared Bereik rechts
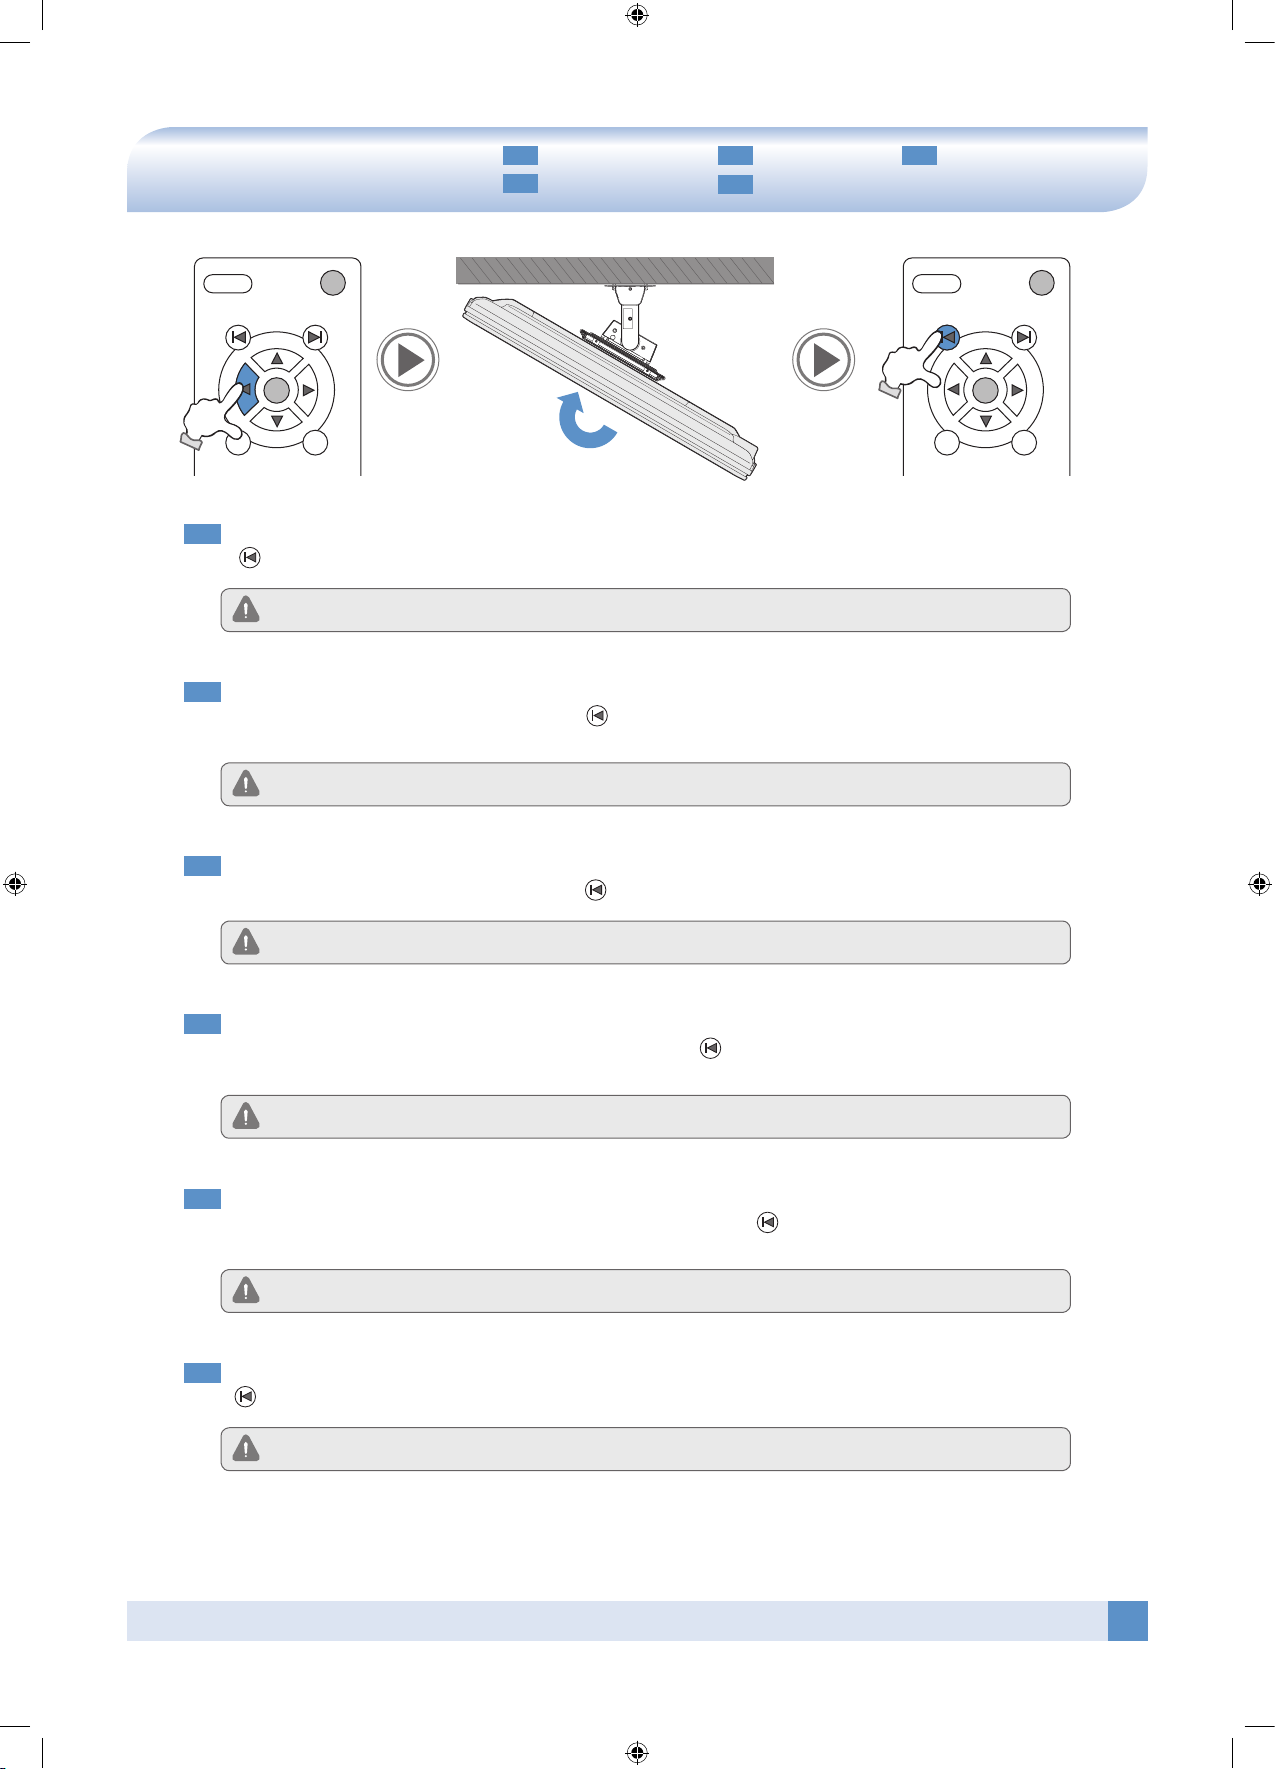
Wall Limit Right
SetUP
Mem1
Home
Mem2
SetUP
Mem1
Home
Mem2
NL
Gebruik de pijl naar rechts (►) om de TV naar rechts te verplaatsen, tot de TV bijna de muur raaks en druk 5
seconden op de knop Bereik rechts ( ) tot de LED blijft branden.
Als u deze stap niet uitvoert, kan uw TV de muur raken tijdens het draaien.
LED knippert : Signaal verzonden
ES
Utilice el botón con la flecha que indica hacia la derecha (►) del mando a distancia para mover su TV hasta que
el lado derecho del TV llegue muy cerca de la pared, y pulse el botón Límite derecho de la pared ( ) durante 5
segundos, hasta que el LED se quede encendido.
Si se salta este paso, el TV puede golpear la pared cuando lo gire.
LED parpadeando : transmitiendo señal
IT
Usare la freccia destra (►) sul telecomando per spostare la TV sulla destra finché questa non giunge in prossimità
del muro, quindi premere il pulsante Limite parete destra ( ) per 5 secondi, finché il LED non sarà acceso fisso.
Se questa operazione non viene effettuata, la TV può colpire il muro durante la normale rotazione.
LED lampeggiante : Trasmissione segnale
FR
Utilisez la touche droite (►) de la télécommande pour faire pivoter le téléviseur vers la droite au plus près du mur, puis
maintenez enfoncée la touche Limite droite du mur ( ) pendant 5 secondes jusqu’à ce que la LED s’allume en continu.
Si vous n’effectuez pas cette opération, le téléviseur peut toucher le mur lors du pivotement normal.
LED clignotante : Transmission du signal
DE
Benutzen Sie die rechte Pfeiltaste (►) auf der Fernbedienung, um Ihr Fernsehgerät zu bewegen, bis sich die
rechte Seite des Geräts sehr nahe zur Wand befindet, und drücken Sie die Taste Wandbegrenzung rechts ( )
für 5 Sekunden, bis die LED-Leuchte ständig aufleuchtet.
Wenn Sie diesen Arbeitsschritt unterlassen, kann das Fernsehgerät während eines normalen Schwenkvorgangs an die Wand schlagen.
Blinkende LED-Leuchte : Signal wird übertragen
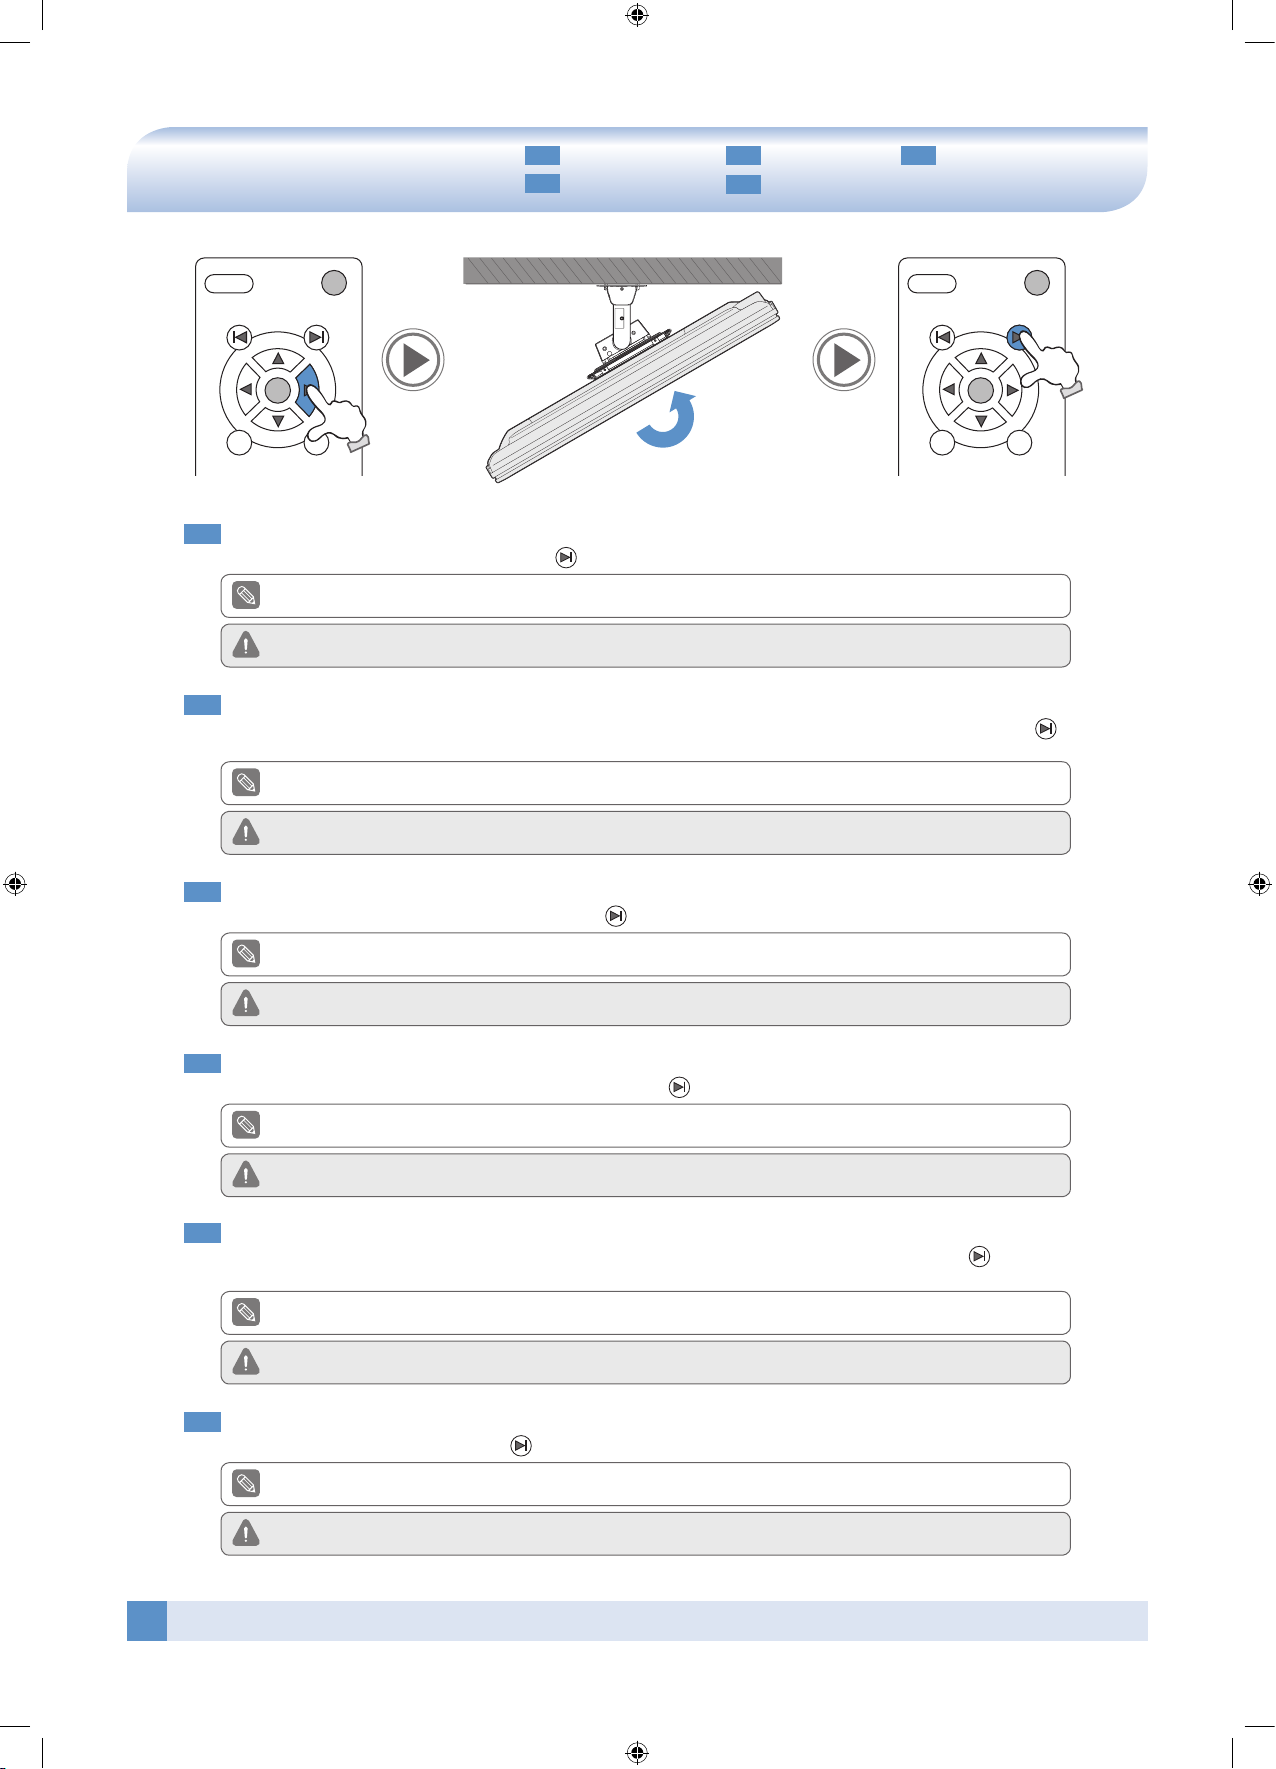
If you do not perform this step, TV can hit the wall during your normal swivel operation.
LED Blinking : Transmitting Signal
EN
Use the right arrow (►) button on the remote control to move your TV until the right side of TV reaches very close
to the wall, and press the Wall Limit Right ( ) button for 5 seconds, until LED turns on continuously.
Mem1 Mem2
Page 21
21
Small Auto Wall Mount Instruction manual
DE
ES
FR
NL
IT
Wandbegrenzung links Limite gauche du mur Limite parete sinistra
Límite izquierdo de la pared Bereik links
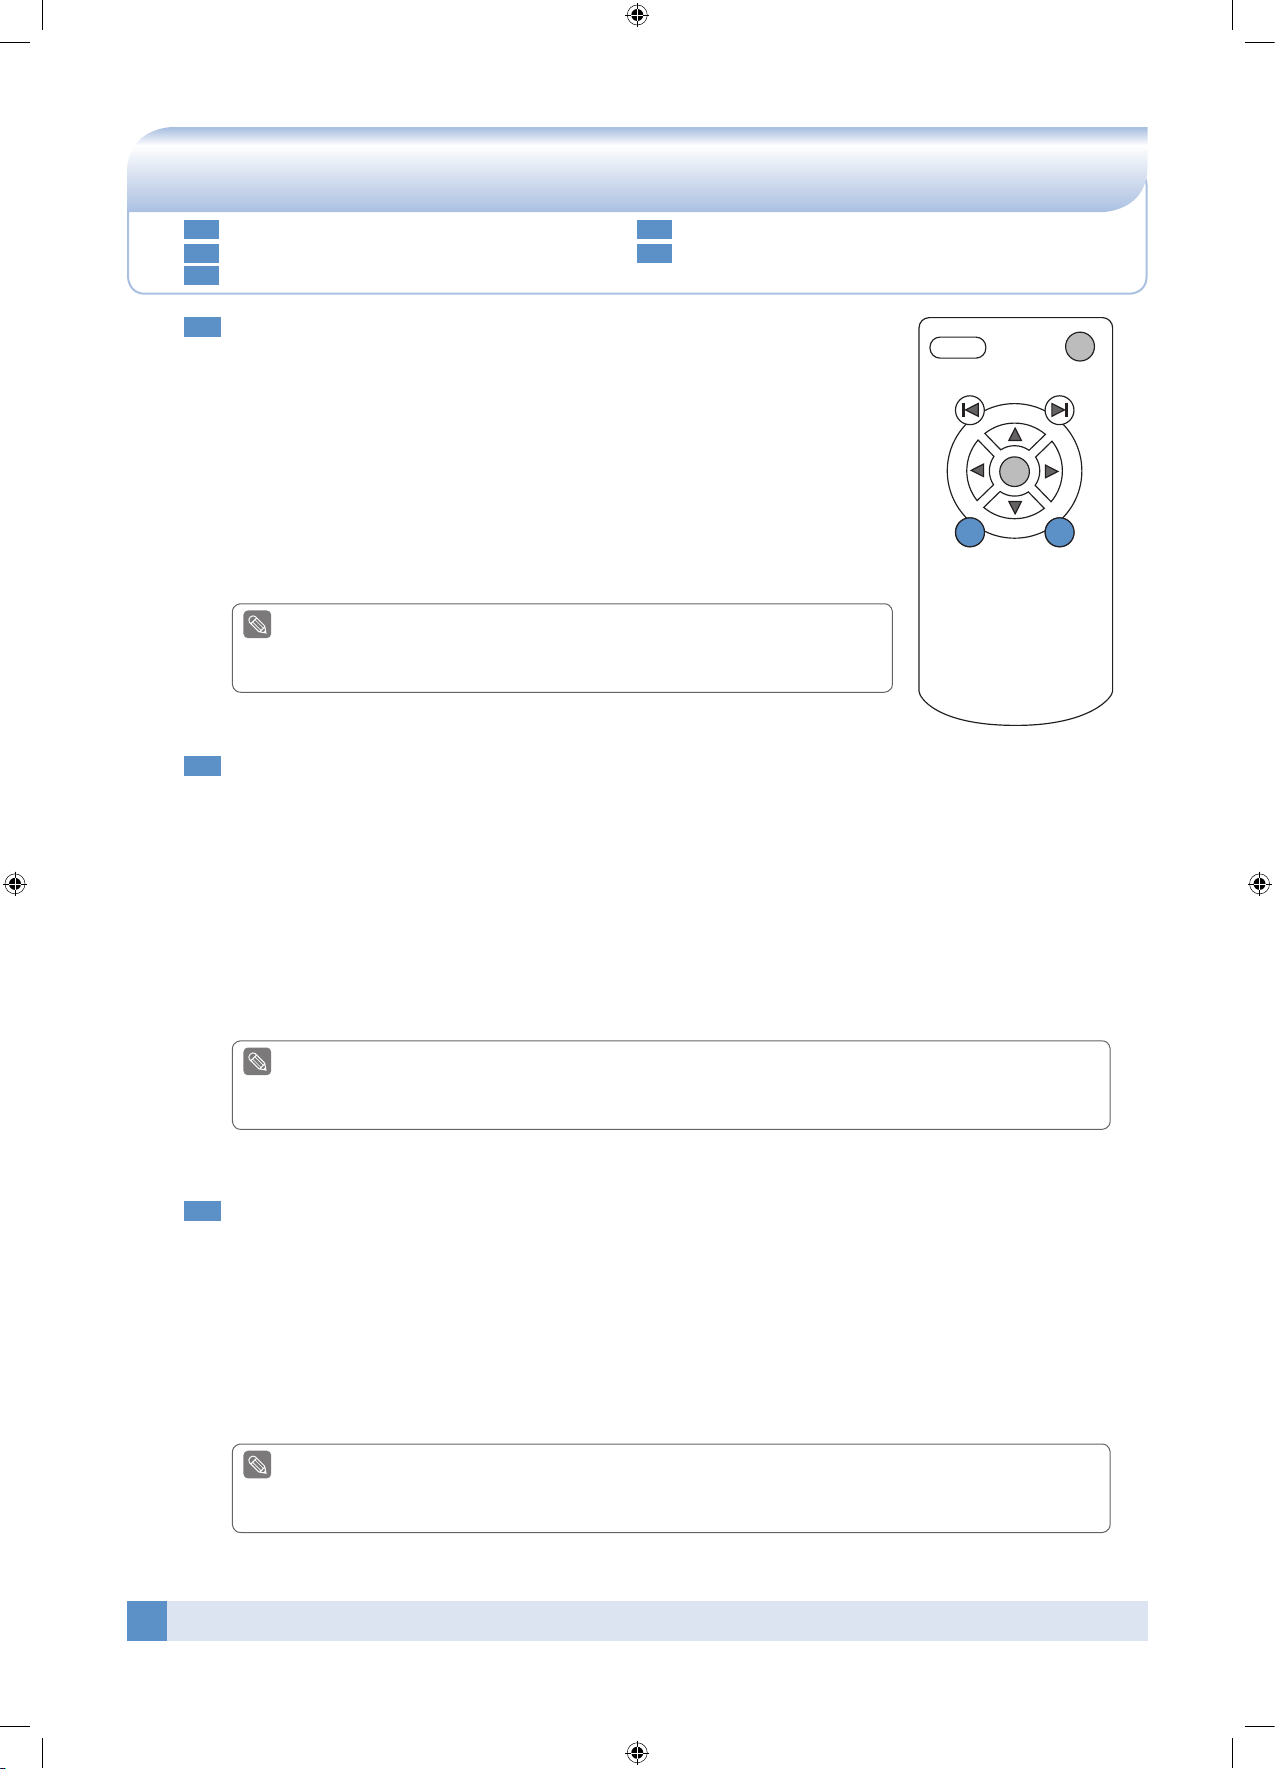
Wall Limit Left
SetUP
Mem1
Home
Mem2
SetUP
Mem1
Home
Mem2
ES
Utilice el botón con la flecha que indica hacia la izquierda (◄) para mover el TV hasta que su lado izquierdo llegue
muy cerca de la pared, y pulse el botón Límite izquierdo de la pared ( ) del mando a distancia durante 5 se-
gundos, hasta que el LED se quede encendido.
Si se salta este paso, el TV puede golpear la pared cuando lo gire.
Als u deze stap niet uitvoert, kan uw TV de muur raken tijdens het draaien.
NL
Gebruik de pijl naar links (◄) tot de linkerkant van uw TV bijna de muur raakt, druk 5 seconden op Bereik links
( ) van de afstandsbediening tot de LED blijft branden.
IT
Usare la freccia sinistra (◄) sul telecomando per spostare la TV sulla sinistra finché questa non giunge in prossimità del muro, quindi premere il pulsante Limite parete sinistra ( ) per 5 secondi, finché il LED non sarà acceso
fisso.
Se questa operazione non viene effettuata, la TV può colpire il muro durante la normale rotazione.
FR
Utilisez la touche gauche (◄) de la télécommande pour faire pivoter le téléviseur vers la gauche au plus près du mur,
puis maintenez enfoncée Limite gauche du mur
( )
pendant 5 secondes jusqu’à ce que la LED s’allume en continu.
Si vous n’effectuez pas cette opération, le téléviseur peut toucher le mur lors du pivotement normal.
DE
Benutzen Sie die linke Pfeiltaste (◄), bis sich die linke Seite des Fernsehgeräts sehr nahe zur Wand befindet, und
drücken Sie die Taste Wandbegrenzung links ( ) 5 Sekunden lang auf der Fernbedienung, bis die LED-Leuchte
ständig aufleuchtet.
Wenn Sie diesen Arbeitsschritt unterlassen, kann das Fernsehgerät während eines normalen Schwenkvorgangs an die Wand schlagen.
If you do not perform this step, TV can hit the wall during your normal swivel operation.
EN
Use the left arrow (◄)button until the left side of TV reaches very close to the wall, and press Wall Limit Left
( ) button on the remote control for 5 seconds until LED turns on continuously.
Mem1 Mem2
Page 22
22
Small Auto Wall Mount Instruction manual
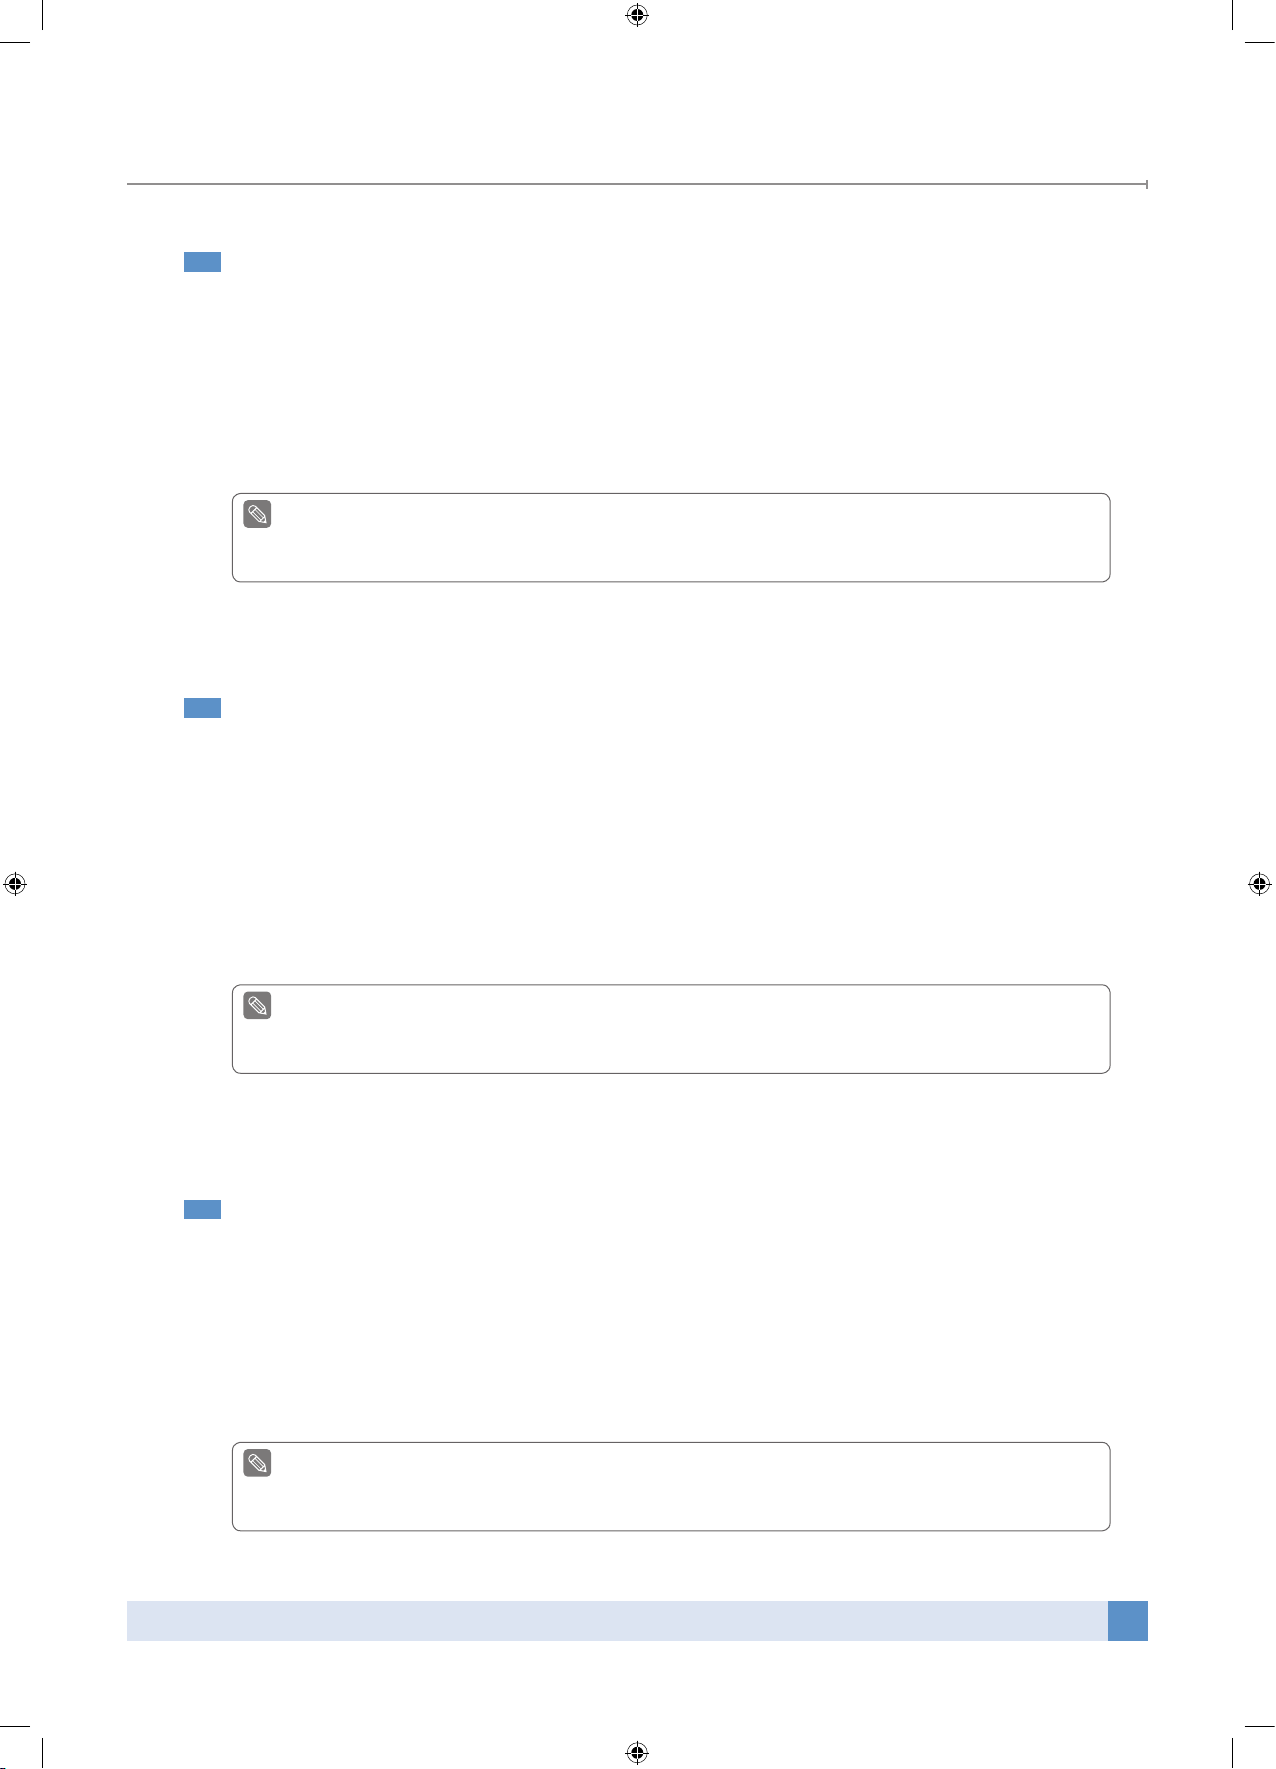
Using the Memory(Optional)
A. Memory 1
Swivel/Tilt to the desired position by using the direction buttons, press and hold the
Mem1 button for 5 seconds until LED turns on, then the memory 1 is set.
�• If you press the Mem1 button, the wall mount is moved to the position saved
on Memory 1.
B. Memory 2
Swivel/Tilt to the desired position by using the direction buttons, press and hold the
Mem2 button for 5 seconds until LED turns on, then the memory 2 is set.
�• If you press the Mem2 button, the wall mount is moved to the position saved
on Memory 2.
EN
LED Blinking : Transmitting Signal
If you perform Initial set-up, new home position is set. In addition, Memory 1 and 2 already
memorized will be also automatically erased.
Blinkende LED-Leuchte : Signal wird übertragen
Wenn Sie Initial set-up (Originaleinstellungen) wählen, wird eine neue Ausgangsposition eingestellt. Darüber hinaus werden
die bereits gespeicherten Memory 1 und 2 automatisch gelöscht.
A. Speicherfunktion 1
Schwenken/Neigen Sie das Gerät mithilfe der Richtungstasten in die gewünschte Position, drücken und halten Sie
die Mem1-Taste 5 Sekunden lang, bis die LED-Leuchte aufleuchtet, dann ist die erste Einstellung, also Memory 1,
gespeichert.
�• Wenn Sie die Taste Mem1 drücken, bewegt sich die Wandhalterung in die unter Memory 1 gespeicherte Position.
B. Speicherfunktion 2
Schwenken/Neigen Sie das Gerät mithilfe der Richtungstasten in die gewünschte Position, drücken und halten Sie
die Mem2-Taste 5 Sekunden lang, bis die LED-Leuchte aufleuchtet, dann ist die zweite Einstellung, also Memory 2,
gespeichert.
�• Wenn Sie die Taste Mem2 drücken, bewegt sich die Wandhalterung in die unter Memory 2 gespeicherte Position.
DE
LED clignotante : Transmission du signal
Si vous effectuez la configuration initiale, une nouvelle position de départ est définie. De plus, les positions 1 et 2 déjà
mémorisées seront automatiquement effacées.
A. Mémoire 1
Faites pivoter le téléviseur dans la position désirée à l’aide des touches directionnelles, puis maintenez enfoncée la
touche Mem1 pendant 5 secondes jusqu’à ce que la LED s’allume : la position 1 est alors mémorisée.
�• Si vous appuyez sur la touche Mem1, la fixation murale pivote dans la position 1 mémorisée.
B. Mémoire 2
Faites pivoter le téléviseur dans la position désirée à l’aide des touches directionnelles, puis maintenez enfoncée la
touche Mem2 pendant 5 secondes jusqu’à ce que la LED s’allume : la position 2 est alors mémorisée.
�• Si vous appuyez sur la touche Mem2, la fixation murale pivote dans la position 2 mémorisée.
FR
DE
NL
IT
Verwendung der Speicherfunktion(Optional)
FR
Utilisation de la mémoire (facultatif)
Uso della memoria (facoltativo)
ES
Utilización de la memoria (opcional)
Gebruik van geheugen (naar keuze)
SetUP
Mem1
Home
Mem2
Mem1 Mem2
A B
Page 23
23
Small Auto Wall Mount Instruction manual
Using the Memory(Optional)
LED knippert : Signaal verzonden
Als u de eerste instelling nogmaals uitvoert, wordt een nieuwe beginstand ingesteld. Daarnaast worden de geheugenstan-
den 1 en 2 ook automatisch gewist.
A. Geheugen 1
Draai/kantel naar de gewenste positie met de richtingsknoppen, druk de Mem1-knop 5 seconden in tot de LED blijft
branen, dan staat de eerste geheugenplaats ingesteld.
�• Als u op de Mem1-knop drukt, draait de muursteun naar de in Geheugen 1 opgeslagen stand.
B. Geheugen 2
Draai/kantel naar de gewenste positie met de richtingsknoppen, druk de Mem2-knop 5 seconden in tot de LED blijft
branen, dan staat de tweede geheugenplaats ingesteld.
�• Als u op de Mem2-knop drukt, draait de muursteun naar de in Geheugen 2 opgeslagen stand.
NL
LED parpadeando : transmitiendo señal
Cada vez que realice una configuración inicial se definirá una nueva posición inicial. Además, Memoria 1 y Memoria 2, ya
memorizadas, también se borrarán automáticamente.
A. Memoria 1
Gire o incline el soporte hasta alcanzar la posición deseada utilizando los botones de dirección y, a continuación,
mantenga pulsado el botón Mem1 durante 5 segundos, hasta que el LED se encienda: entonces se habrá definido la
memoria 1.
�• Si pulsa el botón Mem1, el soporte para montaje en pared adoptará la posición guardada en Memoria 1.
B. Memoria 2
Gire o incline el soporte hasta alcanzar la posición deseada utilizando los botones de dirección y, a continuación,
mantenga pulsado el botón Mem2 durante 5 segundos, hasta que el LED se encienda: entonces se habrá definido la
memoria 2.
�• Si pulsa el botón Mem2, el soporte para montaje en pared adoptará la posición guardada en Memoria 2.
ES
LED lampeggiante : Trasmissione segnale
Se si effettua la configurazione iniziale, sarà impostata una nuova posizione Home. Inoltre, le posizioni Memoria 1 e
Memoria 2 impostate saranno cancellate.
A. Memoria 1
Ruotare/inclinare la TV nella posizione desiderata usando i tasti direzionali. Tenere premuto il pulsante Mem 1 per 5
secondi. Quando il LED si accende, la memoria 1 è stata impostata.
�• Se si preme il pulsante Mem1, il supporto si muoverà nella posizione salvata in Memoria 1.
B. Memoria 2
Ruotare/inclinare la TV nella posizione desiderata usando i tasti direzionali. Tenere premuto il pulsante Mem 2 per 5
secondi. Quando il LED si accende, la memoria 2 è stata impostata.
�• Se si preme il pulsante Mem2, il supporto si muoverà nella posizione salvata in Memoria 2.
IT
Page 24
24
Small Auto Wall Mount Instruction manual
DE
ES
FR
NL
IT
Produktspezikationen Caractéristiques du produit Speciche tecniche
Especicaciones del producto Productspecicaties
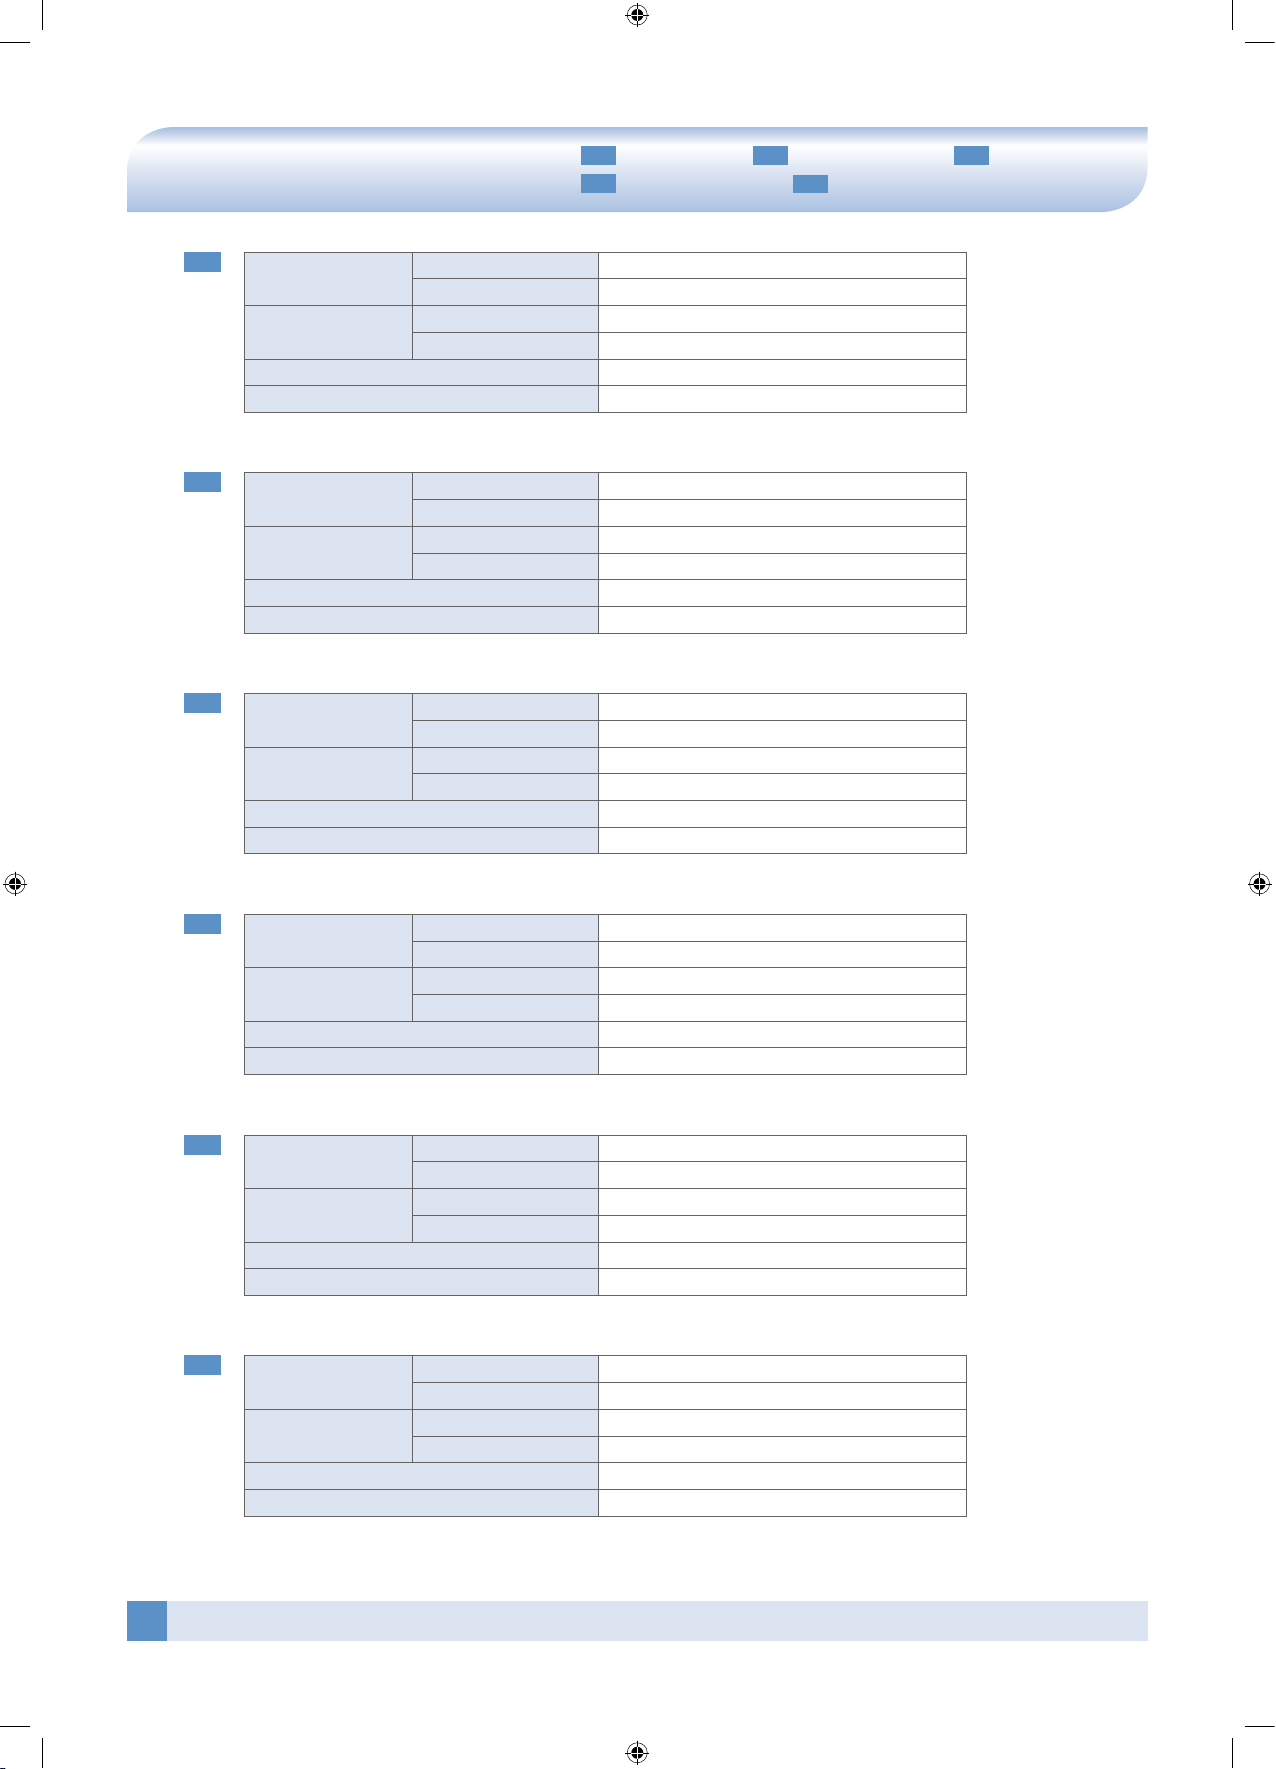
Product Specifications
Weight
Net 6 kg
Gross 8 kg
Operation angle
Swivel Typical 20°
Tilt down Typical 15°
Max. Load 30kg(66lbs)
Applicable TV
VESA Standard Max 200×200mm
EN
Gewicht
Netto 6kg
Brutto 8kg
Betriebs-winkel
Schwenk Typischerweise 20°
Neigung nach unten Typischerweise 15°
Max. Belastung 30kg(66lbs)
Geeignete TV-Geräte
VESA-Norm Max. 200×200mm
DE
Poids
Net 6kg
Brut 8kg
Angle opérationnel
Pivot droite/gauche Généralement 20°
Pivotement vers le bas Typical 15° Généralement 15°
Charge maximale 30kg(66lbs)
Téléviseur applicable
Norme VESA Max. 200×200 mm
FR
IT
ES
NL
• The operation angle may differ depending on the TV type.
• Der Betriebswinkel kann je nach Typ des Fernsehgerät varrieren.
• L’angle opérationnel peut différer selon le type de téléviseur.
Peso
Netto 6kg
Lordo 8kg
Angolo operativo
Rotazione Tipicamente 20°
Inclinazione in basso Tipicamente 15°
Carico massimo 30kg(66lbs)
TV compatibili
Standard VESA Max 200×200mm
• L’angolo operativo può cambiare il base al tipo di TV.
Peso
Neto 6kg
Bruto 8kg
Ángulo de operación
Giro Normalmente, 20°
Inclinación hacia abajo Normalmente, 15°
Carga máxima 30kg(66lbs)
TV compatibles
Estándar VESA de 200 × 200 mm como máximo
• El ángulo de operación puede variar dependiendo del tipo de TV.
Gewicht
Netto 6kg
Bruto 8kg
Bereik
Draaien Normaal 20°
Omlaag kantelen Normaal 15°
Maximaal gewicht 30kg(66lbs)
Toepasbare TV
VESA-standaard Max 200×200mm
• Het bereik hangt af van het model TV.
Page 25
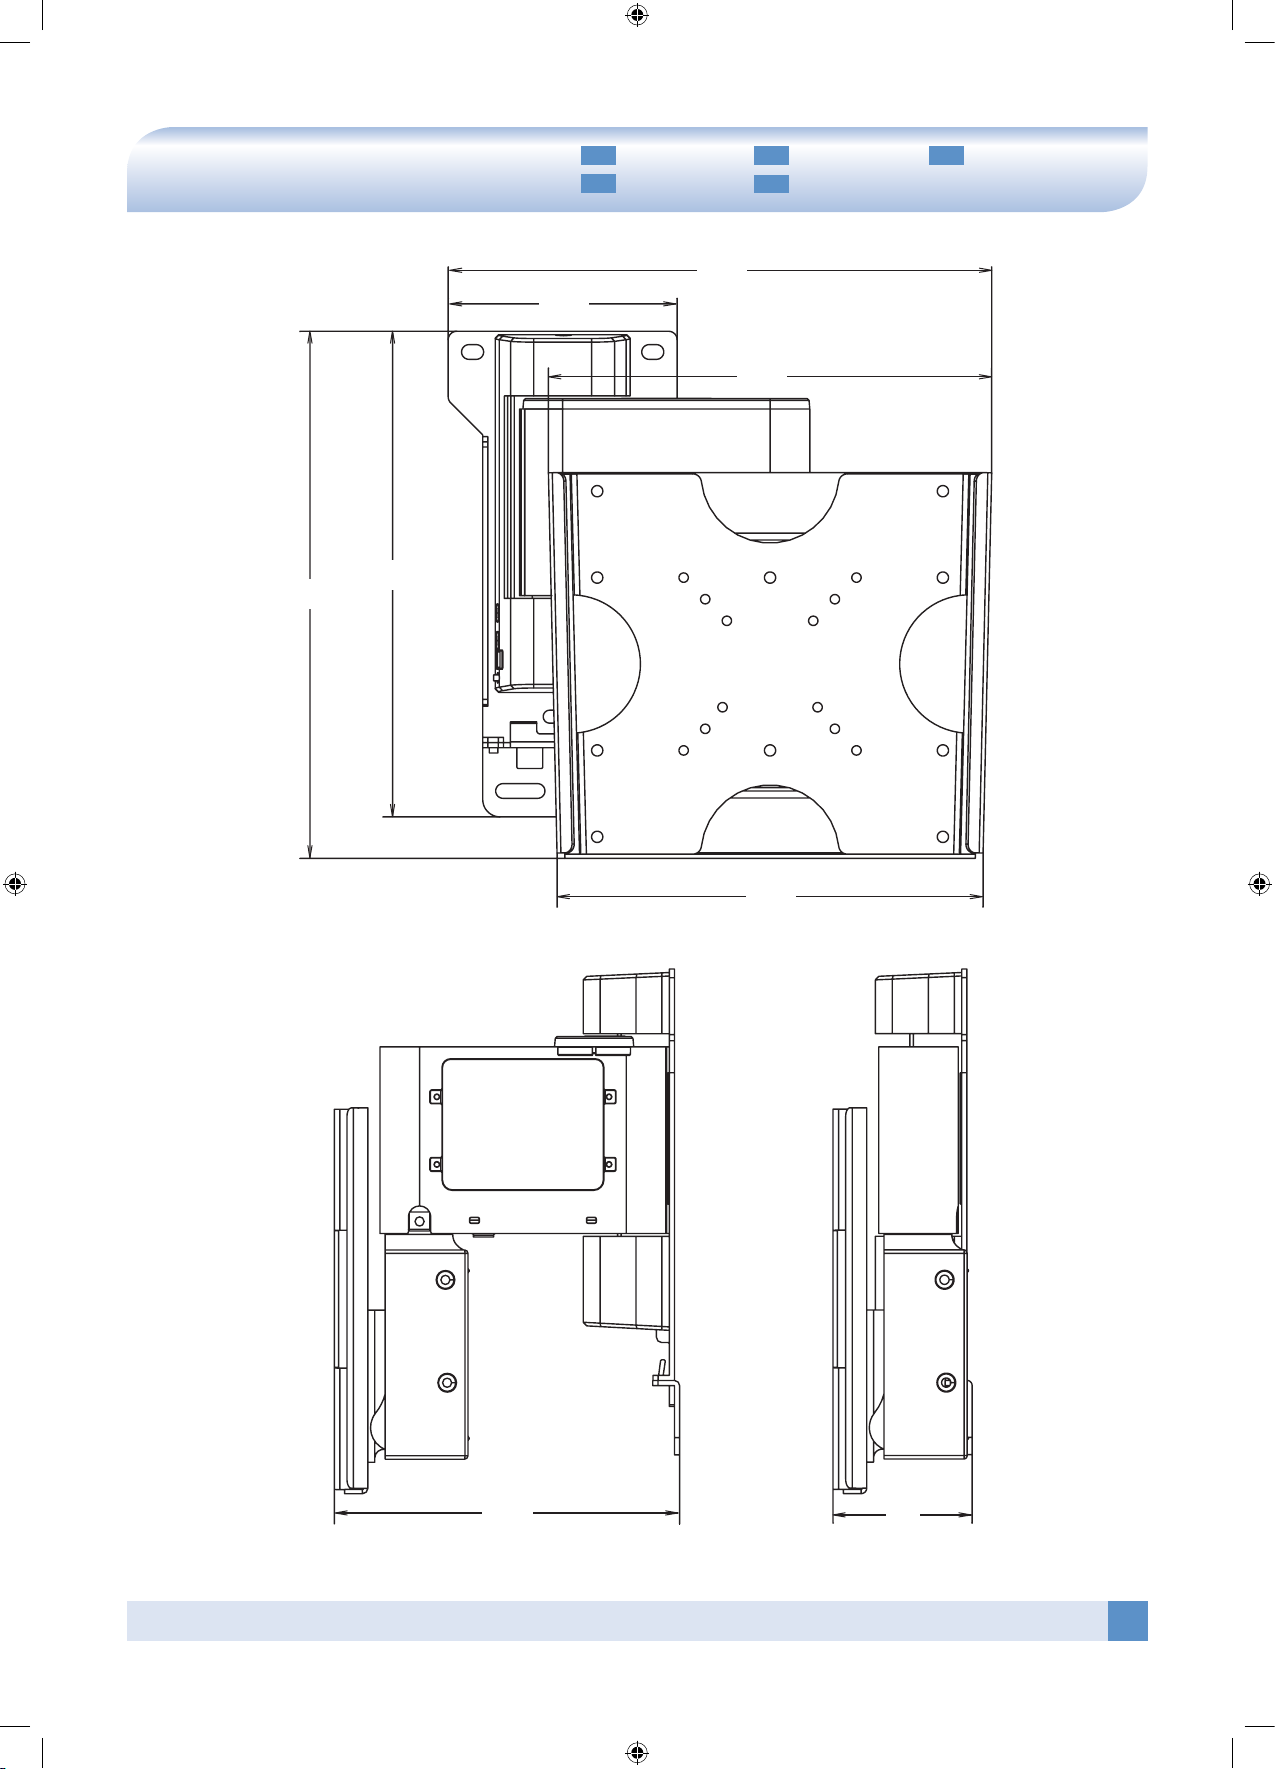
25
Small Auto Wall Mount Instruction manual
(mm)
DE
ES
FR
NL
IT
Abmessungen Dimensions Dimensioni
Dimensiones Afmetingen
Dimension
Page 26
MEMO
Page 27
Page 28
•
Address : SENTRONIX Co., Ltd, #301, New Joong-Ang Bldg., 1011-6,
Gwonsun-dong, Kwonsun-gu, Suwon-si, Gyunggido, Korea,
441-822
•
Tel : 82-31-233-0461
•
Fax : 82-31-233-0462
 Loading...