

Sentrol ZXLED8, ZXLED12 User Manual
How to Use Your
Moose Security System
ZXLED8/ ZXLED12
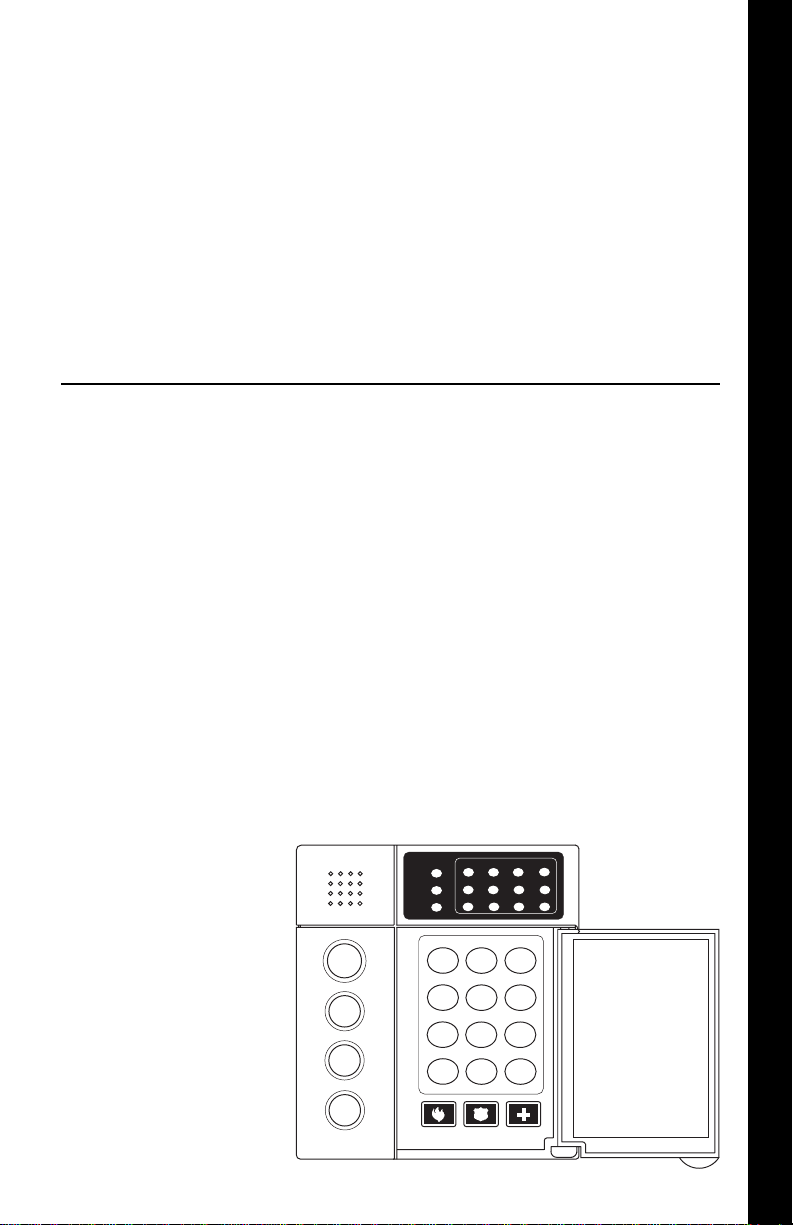
Control Station
OFF
D
CANCEL
AWAY
STAY
NIGHT
1
READY
TROUBLE
5678
FIRE
VIEW INFO ALM MEM
1
23
DELAY ARM
BYPASS CHIME
4
56
RST SMOKE TEST PROGRAM
7
89
QUIT ACCESS INSTANT
CLEAR
0
HOME NEXT
A
B
1
(ZXLED12 shown)
234
11 12109
EVENT LOG
ENTER
C
PREV

INTRODUCTION
Thank you for choosing the ZX200/ZX210 or ZX400/ZX410 Security Control. This
control will provide you with years of reliable operation when properly installed and
maintained.
To maximize the benefits of your Security System, it is important to carefully read
the entire contents of this manual and become familiar with all control operations.
Your Security Company Representative has recorded confidential information about
your system in this manual, therefore, you should store it in a secure place. Contact
your Security Company Representative immediately with any questions.
It is important to note however, that no security system provides total protection
over life or property, nor can it detect intrusion or other conditions in all circumstances. Ask your Security Company Representative to fully review the features of
your system, indicate areas of potential risk, and detail recommendations for future
upgrades to the system.
The following is a list of general precautions you should follow to maximize the
benefits of your security system:
1. The system must be tested at least once per week to ensure proper operation.
Contact your Security Company Representative for testing procedures and
scheduling of a regular maintenance program.
2. If the system is malfunctioning, have it serviced by a qualified professional as
soon as possible.
3. If the electrical system of the building is altered, be sure that the changes do
not create an interruptible power supply to the control panel.
4. If the telephone system is serviced, test the security system to ensure that
communication to the Central Station is intact.
5. Motion detectors are designed to detect specific types of motion within a
defined area. Be sure that you understand which areas are protected and
under what conditions the system is active (temperature and time variations,
etc.).
6. Smoke detection devices cannot detect all types of fire under all circumstances.
Have your Security Company Representative explain the limitations of your fire
system. Have smoke detectors cleaned and tested on a regular basis.
7. Security systems rely upon electrical power as a primary power source. When
the electrical power fails, the control is powered by a standby battery. The
standby battery is automatically checked by the system and should be replaced
by a qualified service technician at regular intervals.
8. If upon returning to the building, you discover that an alarm has occurred, DO
NOT ENTER THE PREMISES. Immediately contact the proper authorities.
9. Be sure to inform your neighbors that a security system has been installed.
Also explain the meanings of the various audible signals and ask them to
contact the appropriate authorities upon activation of an alarm.
10. The ZX200/ZX210 and the ZX400/ZX410 Security Controls are UL Listed for
Grade A Household Burglary and UL requires that audible burglar alarms be
sounded by a bell and fire alarms by a horn. For combination burglar and fire
alarm systems, the sounder will emit a temporal tone for fire alarms and a
steady tone for burglar alarms. The fire alarm signal takes priority over the
burglar bell.
11. UL requires that exit times not exceed 60 seconds. Entrance times may not
exceed 45 seconds. Cutoff time for siren/bell cannot be less than 4 minutes for
residential fire and burglary and 15 minutes for commercial burglary.
2

Table of Contents
Operating Your System .................................................. 5
The LED Control Station.................................................. 5
The Control Station Keys ................................................. 6
The Control Station Display ............................................ 8
Turning Your System ON.................................................9
Turning Your System OFF ................................................ 9
Silencing Alarms ............................................................ 10
System Not Ready ......................................................... 10
Changing The Security Level ......................................... 10
Chime ...........................................................................11
Printing The Event Log .................................................. 11
Optional Features ......................................................... 12
Bypass ...........................................................................12
Group Bypass ................................................................12
Selective Bypass/Unbypass ............................................13
Removing Bypass .......................................................... 13
Force-Arming ................................................................ 14
Turning Your System ON Using Two Button/Double Press 14
Exit-ON .........................................................................14
Automatic-ON...............................................................15
Delay Automatic-ON ..................................................... 15
Keyswitch Operation .....................................................15
Access Output ............................................................... 16
Duress ...........................................................................16
Panic Keys .....................................................................16
User On Premise............................................................17
Secondary Function Keys .............................................. 17
Alarm Conditions .......................................................... 19
Alarm Memory ..............................................................19
Trouble Conditions ....................................................... 20
Silencing Trouble........................................................... 20
Identifying Trouble Conditions ......................................20
Testing Your System ..................................................... 21
Walk Test .......................................................................21
Battery Test ...................................................................22
Bell Test.........................................................................22
Communicator Test ....................................................... 23
Keypad Test...................................................................23
RF Signal Strength......................................................... 24
TABLE OF CONTENTS
3

TABLE OF CONTENTS
ZX200/ZX210 Programming ........................................ 25
Remote Connect ........................................................... 25
Programming the User Passcodes ................................. 25
ZX400/ZX410 Programming ........................................ 27
Remote Connect ........................................................... 27
Set Clock .......................................................................28
Programming the Automatic-ON Feature ..................... 29
Programming the Latch Key Feature .............................33
Programming the User Passcodes ................................. 38
Cancelling the Automatic-ON for Today ....................... 39
Cancelling Exit-ON for Today ........................................39
Multi-Area Operation ................................................... 40
Fire Detection ............................................................... 41
Introduction .................................................................. 41
When an Alarm Occurs ................................................. 41
Resetting Smoke Detectors............................................41
Developing An Evacuation Plan ..................................... 42
Fire Prevention And Escape ........................................... 43
Know Fire Hazards.........................................................43
In Case Of Fire...............................................................43
Be Prepared ................................................................... 44
Fire Supervisory & Fire Trouble......................................44
Glossary ......................................................................... 45
Index ............................................................................. 47
System Reference Guide............................................... 49
Protection Zones........................................................... 51
Owner’s Insurance Premium Credit Requested ........... 59
FCC Compliance............................................................ 61
4
OPERATING YOUR SYSTEM
Operating Your System
Introduction
Read these instructions carefully to familiarize yourself with the
system. Your system has been customized to meet your specific
requirements. Some features discussed are optional and may not be
programmed in your particular system. If you have questions concerning the features on your system, consult your Security Company
Representative.
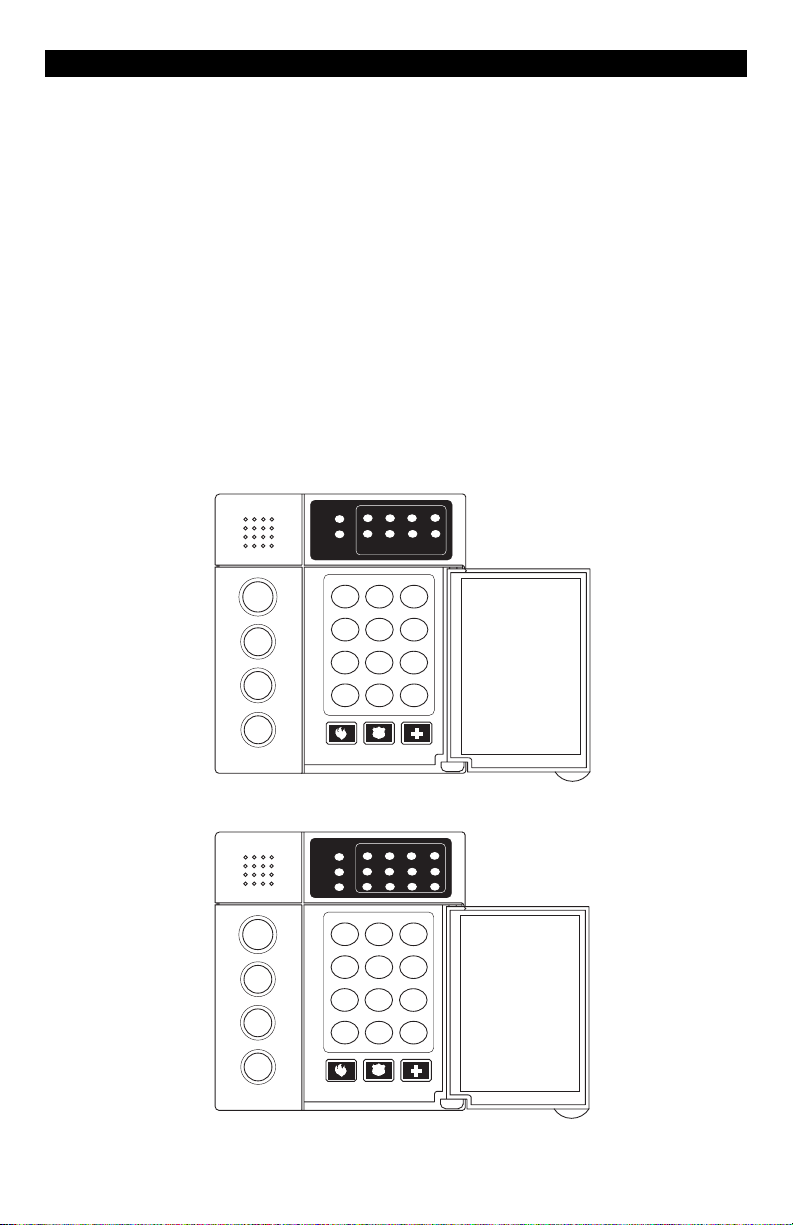
The LED Control Station
1
234
READY
TROUBLE
5678
OFF
CANCEL
AWAY
STAY
NIGHT
OFF
CANCEL
AWAY
STAY
NIGHT
D
VIEW INFO ALM MEM
BYPASS CHIME
RST SMOKE TEST PROGRAM
CLEAR
HOME NEXT
A
EVENT LOG
1
23
DELAY ARM
4
56
7
89
QUIT ACCESS INSTANT
ENTER
0
B
C
PREV
ZXLED8
1
234
READY
TROUBLE
5678
FIRE
D
VIEW INFO ALM MEM
1
BYPASS CHIME
4
RST SMOKE TEST PROGRAM
7
QUIT ACCESS INSTANT
CLEAR
HOME NEXT
A
11 12109
EVENT LOG
23
DELAY ARM
56
89
ENTER
0
B
C
PREV
ZXLED12
5

OPERATING YOUR SYSTEM
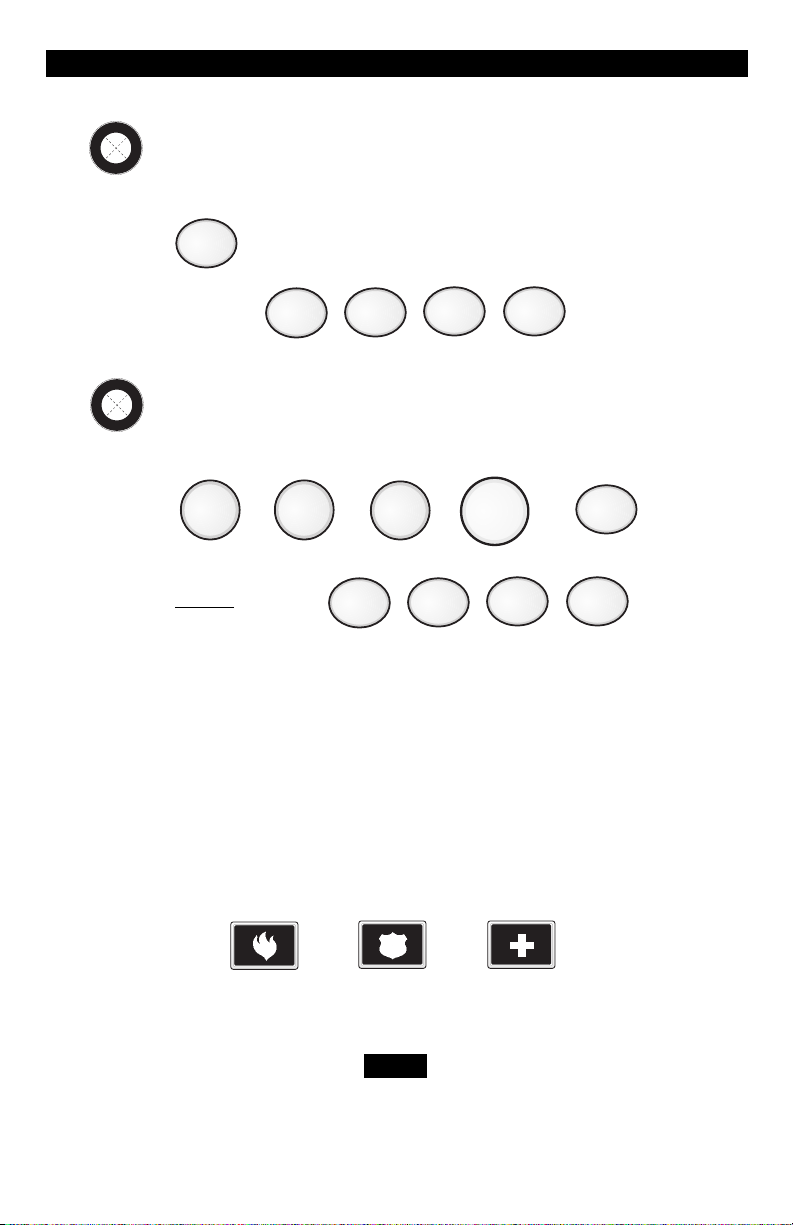
The Control Station Keys
1
2
3
4
5
6
7
8
VIEW INFO KEY
This key is used to view system information.
ALARM MEMORY KEY
Allows you to display the most recent zones where an
alarm occurred.
EVENT LOG KEY (ZX400/ZX410 only)
If a printer is attached, you may print the recorded activities.
BYPASS KEY
Allows you to turn your system ON with one or more
zones intentionally left unprotected until the system is
turned OFF.
DELAY ARM KEY (ZX400/ZX410 only)
Extends or postpones the Automatic-ON by one hour.
CHIME KEY
Turns the door/window monitor ON or OFF.
RESET SMOKE KEY
Resets all smoke detectors in alarm.
TEST KEY
Allows you to perform system testing.
9
0
CLEAR
ENTER
OFF
CANCEL
PROGRAM KEY
Used to enter the programming mode.
ACCESS KEY
Used to activate a door strike or other access output
function.
QUIT KEY
Used to reset any entry error and to allow you to exit out
of an operation.
INSTANT KEY
Used in programming to store entered data. May also be
used to disable the entry and exit countdown time when
pressed during the countdown time when turning the
system ON with STAY or NIGHT.
OFF CANCEL KEY
Used to turn OFF, silence, or cancel conditions.
6

OPERATING YOUR SYSTEM
ARMED STATUS INDICATOR
These keys, followed by your passcode, are used to turn
your system ON. Each key corresponds to a different level
of security.
AWAY
STAY
NIGHT
No one at home; total protection; all sensors are ON.
Building is occupied; selected door and window sensors are
ON.
Bedtime; selected door, window and interior sensors are
ON.
PANIC KEYS
When enabled, these keys activate the auxiliary alarms (Fire,
Police, Medical). Consult with your Security Company
Representative for details.
Fire Police
(Hold Up)
Medical
(Auxiliary)
7

OPERATING YOUR SYSTEM
The Control Station Display
READY
TROUBLE
FIRE
1
234
5678
11 12109
TROUBLE
READY
FIRE
1
234
5678
11 12109
ZXLED8 ZXLED12
Ready Light Illuminates when the system is ready to be
turned ON. If not illuminated, one or more
zones have not been secured. See Operating
Your System - System Not Ready.
Trouble Light Illuminates when system troubles (AC power
failure, low battery, or communication
failure), zone troubles, and Burglar Tamper
conditions have occurred. (Burglar Tamper is
not available with the ZX200/ZX210).
Zone Status Lights Indicates the condition of zones 1 through 12
(Normal, Faulted, Bypassed, Trouble, and
Alarm). They may also display system trouble
conditions.
Fire Light Illuminates when a smoke or heat detector
goes into alarm or trouble if this option is
enabled. (ZX400/ZX410 only).
8

OPERATING YOUR SYSTEM
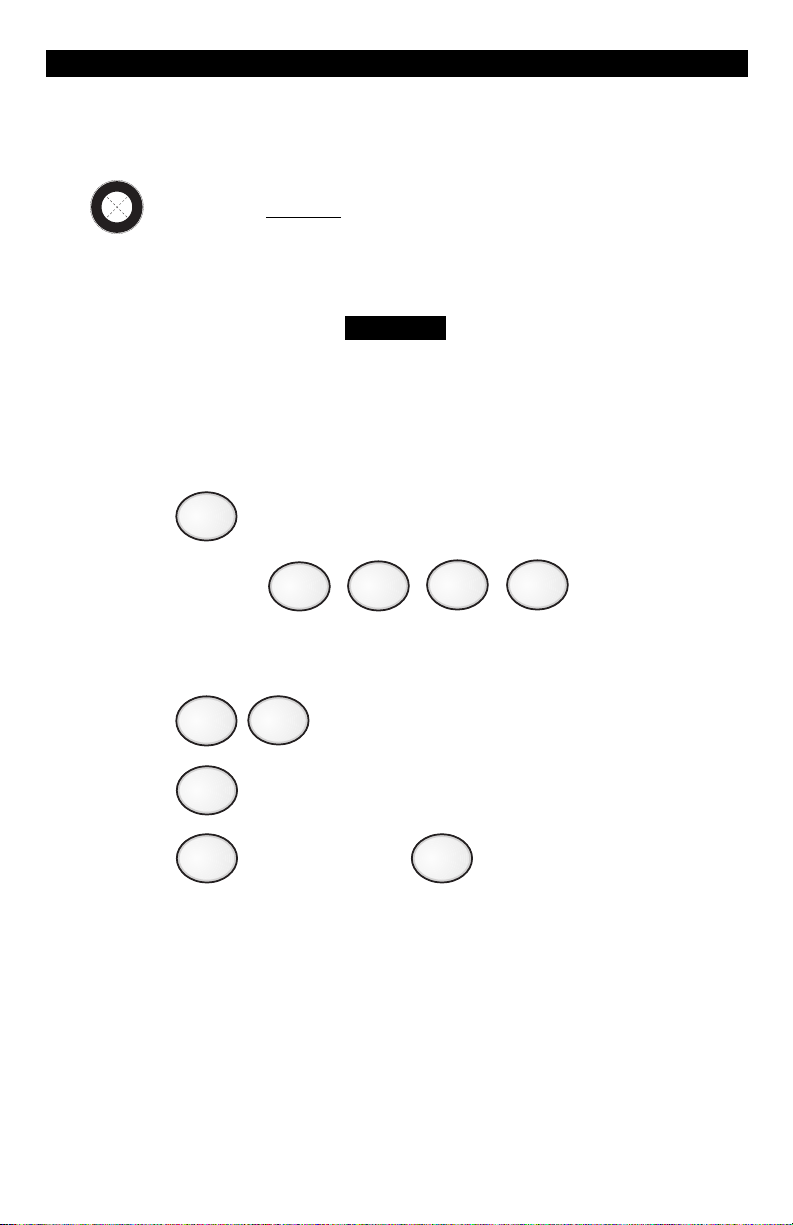
Turning Your System ON
1. Close all doors and windows.
2. Check for a Ready light on the Control Station. If you do not see it,
see Operating Your System - System Not Ready.
3. Press , or .
4. Enter passcode: .
5. The button pressed in step 3 will go ON steady and the other 2
buttons will flash indicating exit countdown time. It is safe to exit
the building during the exit countdown time. If you exit during
the last 10 seconds of countdown time, the timer will restart the
countdown once. If you turn your system ON in the AWAY mode
and you do not exit, the countdown will begin again only once so
that you may exit.
When turning your system ON in the STAY or NIGHT
mode, you may press the ENTER key during the
countdown time to cancel the countdown and turn
your system ON instantly. When you cancel the
countdown time, the entry time is also disabled. If
your front door is opened while your system is turned
ON, an alarm will occur immediately.
NIGHTSTAYAWAY
NOTE
Turning Your System OFF
1. Press .
2. Enter passcode: .
The Armed Status Indicator light will turn OFF.
OFF
CANCEL
9

OPERATING YOUR SYSTEM
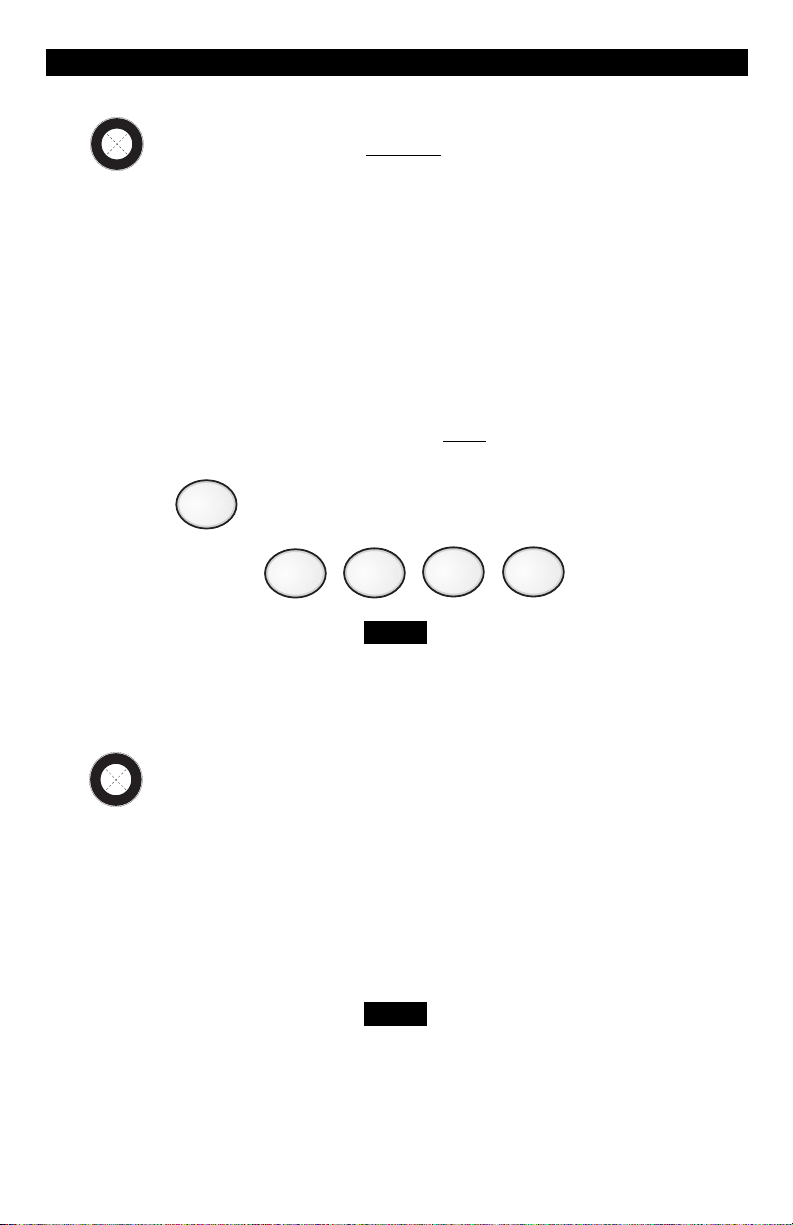
Silencing Alarms
To silence an alarm:
1. Press .
2. Enter passcode: .
Silencing an alarm quickly may prevent a false alarm from being
reported to the authorities. If the Armed Status Indicator light is
flashing, you can stop the false alarm from being reported. If the
Armed Status Indicator light is flashing, then the false alarm has been
reported and you need to contact the Central Station. When you
silence an alarm that has been reported, the Control Station will go
into Alarm Memory mode (see Alarm Conditions - Alarm Memory).
OFF
CANCEL
NOT
System Not Ready
1. Identify zones not ready. The LEDs for zones not ready are lit. See
Protection Zones for a list of zone locations.
2. Secure zones not ready. If you cannot secure a zone or do not
want to secure a zone, you may still turn the system ON by
bypassing the zone. See Optional Features - Bypass and Force
Arming.
Changing The Security Level
From the STAY or NIGHT mode
1. Press , or .
2. Enter passcode: .
3. The button pressed in step 1 will go ON steady and the other
NIGHTS TAYAWAY
10

OPERATING YOUR SYSTEM
2 buttons will flash indicating exit countdown time. It is safe to
exit the building during the exit countdown time. If you exit
during the last 10 seconds of countdown time, the timer will
restart the countdown once. If you turn your system ON in the
AWAY mode and you do not exit, the countdown will begin again
only once so that you may exit.
NOTE
When the system is turned ON in the STAY or NIGHT
mode, you can switch between these modes as often
as you wish without turning your system OFF. When
the system is turned ON in the AWAY mode, you must
turn your system OFF first before you can change
security levels.
Chime
To enable or disable a “Chime” sound whenever an exterior window or
door zone is opened:
1. Press .
2. Enter passcode: .
6
Printing The Event Log - (ZX400/ZX410 only)
The Event Log is a record of the activities of your security system. You
may print the Event Log if you have a printer attached.
To print the Event Log:
1. Press .
2. Enter passcode: .
3
11
OPTIONAL FEATURES
Optional Features
I
T
O
P
N
O
E
D
Bypass - (DO NOT enable for UL Listed Systems)
N
E
A
L
B
This feature allows you to turn your system ON with one or more zones
intentionally left unprotected until the system is turned OFF.
WARNING
Bypassed zones are unprotected and will not cause
an alarm if opened while your system is ON.
Group Bypass - (to intentionally bypass all open zones)
1. Press .
4
2. Enter passcode: .
3. The Ready and Trouble LEDs will flash.
4. Press to bypass all open zones.
5. Press .
6. Press to save changes or to cancel any changes
9
ENTER
ENTER CLEAR
9
made.
12

OPTIONAL FEATURES
ENTER
Selective Bypass/Unbypass -
1. Press .
2. Enter passcode: .
3. The Ready and Trouble LEDs will flash.
4. Enter the zone number: .
5. Press .
Repeat steps 4 & 5 for each zone. See Protection Zones for a list of
zone numbers and descriptions.
6. Press to save changes or to cancel any changes
made.
4
ENTER
(to intentionally bypass/unbypass
a specific zone)
CLEAR
Removing Bypass
1. Press .
2. Enter passcode: .
3. The Ready and Trouble LEDs will flash.
4. Press to unbypass all bypassed zones.
5. Press .
6. Press to save changes or to cancel changes.
4
0
ENTER
ENTER CLEAR
13

OPTIONAL FEATURES
I
T
O
P
N
O
E
D
Force-Arming - (DO NOT enable for UL Listed Systems)
N
E
A
L
B
When you turn the system ON with Force-Arming, the system will not
turn ON any zones that are not ready. Once the zone is secured, that
zone is automatically turned ON and will cause an alarm if it is violated.
The LED of a zone that is not ready will be lit. See Protection Zones for
a list of zone locations.
1. Press , , or .
NIGHTS TAYAWAY
2. Enter passcode: .
3. Within 5 seconds, press the same key that was pressed in Step 1
above.
I
T
O
P
N
Turning Your System ON Using Two Button/
O
E
D
N
E
A
L
B
Double Press
Your system may be programmed to quickly turn ON using either the
two button method or the double press method.
The two button method allows you to quickly turn your system ON by
pressing the AWAY, STAY, or NIGHT key and then pressing the Enter
key.
The double press method allows you to quickly turn your system ON by
pressing the AWAY, STAY, or NIGHT key twice.
I
T
O
P
N
O
E
Exit-ON (ZX400/ZX410 only)
D
N
E
A
L
B
This feature allows your system to turn ON automatically ten (10)
minutes after you leave the premises and no other activity is detected.
Your Control Station will sound an audible warning at two (2) minutes
and one (1) minute before the system turns ON. See ZX400/ZX410
Programming - Cancelling Exit-ON For Today for instructions on how
to cancel this feature for the day.
14
OPTIONAL FEATURES
I
T
O
P
N
O
E
D
N
Automatic-ON - (DO NOT enable for UL Listed Systems)
E
A
L
B
(ZX400/ZX410 only)
This feature turns your system ON at a scheduled time daily. Your
Control Station will sound an audible warning each minute starting at
ten (10) minutes before the system turns ON. See ZX400/ZX410
Programming - Programming the Automatic-ON Feature and Cancelling Automatic-ON For Today.
Delay Automatic-ON (ZX400/ZX410 only)
To postpone Automatic-ON for one hour after the audible warning
begins:
1. Press .
5
2. Enter passcode: .
NOTE
You cannot extend the Automatic-ON time past
midnight.
I
T
O
P
N
O
E
D
Keyswitch Operation
N
E
A
L
B
To turn your system ON/OFF or to silence an alarm:
1. Insert key.
2. Turn key and hold for a second.
3. Remove key.
NOTE
If key is used to turn the system ON, the system will
be turned ON in the AWAY mode only.
15
OPTIONAL FEATURES
OFF
CANCEL
I
T
O
P
N
O
E
N
Access Output (This system is not UL Listed for Access Control)
D
E
A
L
B
To activate an access output device or door strike:
1. Press .
0
2. Enter passcode: .
I
T
O
P
N
O
E
D
Duress
N
E
A
L
B
To send a silent alarm signal:
1. Press , , , or .
2. Enter
AWAY STAY
NIGHT
0
Duress Passcode: .
Panic Keys
To activate a panic key, you must press and hold the panic key for three
(3) seconds. On the ZX400/ZX410, you have the option of pressing the
panic key twice within 1 second. Double press is not available on the
ZX200/ZX210. Ask your Security Company Representative how your
panic keys are enabled. See System Reference Guide for a listing of
which Control Stations have the panic keys enabled and the sound for
each key.
Fire Police
(Hold Up)
Medical
(Auxiliary)
NOTE
An audible alarm may result. To silence the alarm,
press the Off Cancel key and then enter your
passcode.
16

OPTIONAL FEATURES
I
T
O
P
N
O
E
D
User On Premise
N
E
A
L
B
When a User On Premise passcode is used to activate in access output,
disarm, or silence an alarm, notification will be reported to the Central
Station or to a pager. See your Security Company Representative for
more details.
I
T
O
P
N
O
E
D
Secondary Function Keys (ZX400/ZX410 only)
N
E
A
L
B
Your system may have secondary function keys available. See your
Security Company Representative for complete details. To activate:
Press then to turn the Lamp Trigger OFF/ON.
Press then to turn the Universal Output OFF/ON.
Press then for quick access.
Press then to turn an output OFF/ON (ex: room
ENTER
ENTER
ENTER
ENTER
1
2
3
4
light).
Press then to turn an output OFF/ON (ex: basement
ENTER
5
light).
Press then to turn an output OFF/ON (ex: lamp or
ENTER
6
television).
(Continued on Next Page)
17

OPTIONAL FEATURES
Below is the description of what your secondary functions keys are
programmed to do:
ENTER
ENTER
ENTER
ENTER
ENTER
ENTER
1
2
3
4
5
6
18

Alarm Conditions
Alarm Memory
To view zones that went into alarm:
OPTIONAL FEATURES
ALARM CONDITIONS
1. Press .
2. Enter passcode: .
3. All zones that went into alarm will light briefly and the Ready and
Trouble LED will flash.
2
19
TROUBLE CONDITIONS
Trouble Conditions
When your system detects a trouble condition, the LED Control Station
lights the TROUBLE light.
Silencing Trouble
To silence the trouble sounder:
1. Press .
OFF
CANCEL
2. Enter passcode: .
Identifying Trouble Conditions
After you silence the trouble sounder, the trouble light will remain ON.
To view which zone(s) caused the zone condition, press the View Info
key (Key #1). The zone(s) that caused the condition will light steadily.
Bypassed zone(s) will flash.
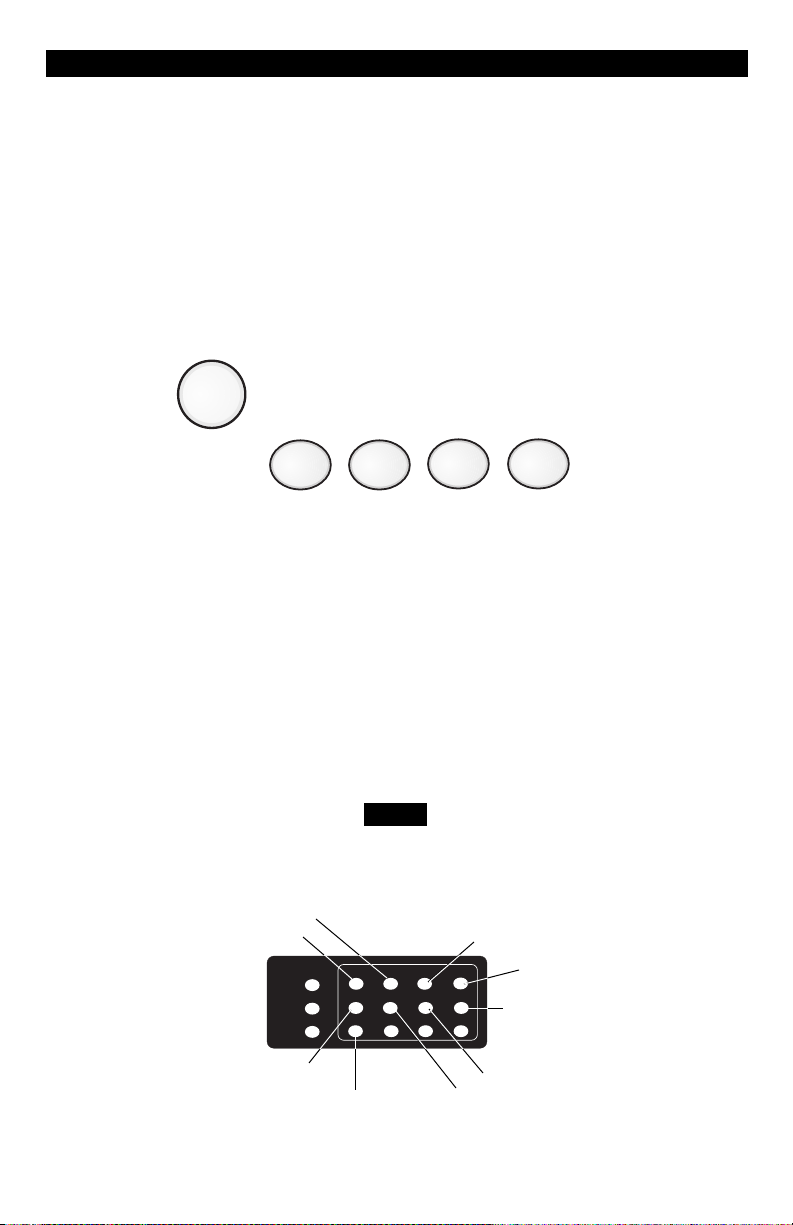
To identify the cause of a system trouble, press the View Info key (Key
#1) a second time. The following diagram displays the type of trouble
for each light that is illuminated.
NOTE
If a trouble condition light does not turn OFF, contact
your Security Company Representative.
Panel Low Battery
11 12109
Memory Error
Communication
Failure
Phone Line Failure
AC Failure
READY
TROUBLE
FIRE
1
234
5678
Missing Keypad
Bell Fault
RF JammingCall RPM Failure
20
 Loading...