

Page 1

IMPORTANT SERVICE INFORMATION
Read this manual before attempting to setup or use this instrument. It contains important information
regarding safe installation and use. Keep this manual for future reference. Also save the carton, packing
and proof of purchase
(800) 888-8990 between 8:00 a.m. and 4:30 p.m. Pacific Standard Time, Monday through Friday. You can
also visit our web site at http://www.nwbphones.com
products.
to simplify and accelerate any needed action. If you need assistance or service, call
for technical support and information on our other
WARNING
To prevent fire or shock hazard, do not expose this product to rain or any type of excess moisture. If
accidentally dropped into water, the AC adapter should immediately be unplugged from the wall along
with the telephone line cord.
THIS SYMBOL IS INTENDED TO ALERT THE USER OF THE PRESENCE OF
IMPORTANT OPERATING AND MAINTENANCE (SERVICING) INSTRUCTIONS IN
THE OWNER'S MANUAL.
041604A-1 1
Page 2

• Excursion
• Rechargeable Ni-Cd Battery Pack
• Telephone Line Cord(Short and Long)
• AC Adaptor
• User’s Manual
• Warranty Card
• Accessory Order Form
Excursion®36288
CARTON CONTENTS
®
36288 Base and Handset
2 041604A-1
Page 3

SAVE THESE INSTRUCTIONS
IMPORTANT SAFETY
INSTRUCTIONS
When using your telephone equipment, basic safety precautions should always be followed to reduce the
risk of fire, electric shock, and injury to persons, including the following:
1. Read and understand all instructions.
2. Follow all warnings and instructions marked on the product.
3. Unplug this product from the wall outlet before cleaning. Do not use liquid cleaners or aerosol
cleaners. Use a damp cloth for cleaning.
4. Do not use this product near water, for example, near a bathtub, wash bowl, kitchen sink, or laundry
tub, in a wet basement or near a swimming pool.
5. Do not place this product on an unstable cart, stand, or table. The product may fall, causing serious
damage to the product.
6. Slots and openings in the cabinet and the back or bottom are provided for ventilation, to protect it
from overheating. These openings should never be blocked or covered. The openings should never
be blocked by placing the product on the bed, sofa, rug, or other similar surface. This product
should never be placed near or over a radiator or heat register. This product should not be placed in
a built-in installation unless proper ventilation is provided.
7. This product should be operated only from the type of power source indicated on the marking label.
If you are not sure of the type of power supply to your home, consult your dealer or local power
company.
8. Do not allow anything to rest on the power cord. Do not locate this product where the cord will be
abused by persons walking on it.
9. Do not overload wall outlets and extension cords as this can result in the risk of fire or electric
shock.
041604A-1 3
Page 4

10. Never push objects of any kind into this product through cabinet slots as they may touch dangerous
voltage points or short out parts that could result in a risk of fire or electric shock. Never spill liquid
of any kind on the product.
11. To reduce the risk of electric shock, do not disassemble this product, but take it to a qualified service
contractor when some service or repair work is required. Opening or removing covers may expose
you to dangerous voltages or other risks. Incorrect reassembly can cause electric shock when the
appliance is subsequently used.
12. Unplug this product from the wall outlet and refer servicing to qualified service personnel under the
following conditions:
A. When the power supply cord or plug is damaged or frayed.
B. If liquid has been spilled into the product.
C. If the product has been exposed to rain or water.
D. If the product does not operate normally by following the operating instructions. Adjust only
those controls that are covered by the operating instructions. Improper adjustments of other
controls may result in damage and will often require extensive work by a qualified technician
to restore the product to normal operation.
E. If the product has been dropped or the cabinet has been damaged.
F. If the product exhibits a distinctive change in performance.
13. Avoid using a telephone (other than a cordless type) during an electrical storm. There may be a
remote risk of electric shock from lightning.
14. Do not use the telephone to report a gas leak in the vicinity of the leak.
INSTALLATION
PRECAUTIONS
1. Never install telephone wiring during a lightning storm.
2. Never install telephone jacks in wet locations unless the jack is specifically designed for wet
4 041604A-1
Page 5

locations.
3. Never touch uninsulated telephone wires or terminals unless the telephone line has been
disconnected at the network interface.
4. Use caution when installing or modifying telephone lines.
MAINTENANCE
1. Use a damp cloth to clean the plastic cabinet. A mild soap will help to remove grease or oil. Never
use polish, solvents, abrasives or strong detergents since these can damage the finish.
2. Your phone should be situated away from heat sources such as radiators, heaters, stoves or any other
appliance that produces heat.
CAUTION
Risk of explosion if battery is replaced by an incorrect type. Dispose of used batteries according to the
instruction. read and follow these instructions:
1. Use only the 3.6V, 450mAh, Ni-Cd battery pack .
2. Do not dispose of the battery in a fire. The cell may explode. Check with local codes for possible
special disposal instructions.
3. Do not open or mutilate the battery. Released electrolyte is corrosive and may cause damage to the
eyes or skin. It may be toxic if swallowed.
4. Exercise care in handling the battery in order not to short the battery with conducting material such
as rings, bracelets and keys. The battery or conductor may overheat and cause burns.
5. Recharge only the battery provided with or identified for use with this product. The battery may leak
corrosive electrolyte or explode if it is not the correct type.
6. Do not attempt to rejuvenate the battery provided with or identified for use with this product by
041604A-1 5
Page 6

heating them. Sudden release of the battery electrolyte may occur causing burns or irritation to eyes
or skin.
7. When inserting the battery into this product, the proper polarity or direction must be observed.
Reverse insertion of batteries can cause charging that may result in leakage or explosion.
8. Do not store this product, or the battery provided with or identified for use with this product, in
high-temperature areas. Batteries that are stored in a freezer or refrigerator for the purpose of
extending shelf life should be stabilized at room temperature prior to use after cold storage.
9. Disconnect telephone lines before installing batteries
SAVE THESE INSTRUCTIONS
FCC NOTICE
The FCC requires that you be advised of certain requirements involving the use of this telephone.
1. This telephone is hearing aid compatible.
2. This equipment complies with 47 CFR Part 68 requirement. On the bottom of this equipment is a
label that contains, among other information, the ACTA registration number and Ringer Equivalence
Number (REN) for this equipment. If requested, provide this information to your telephone
company.
3. The REN is useful to determine the quantity of devices you may connect to your telephone line and
still have all of those devices ring when your number is called. In most, but not all areas, the sum of
the RENs of all devices should not exceed five (5.0). To be certain of the number of devices you
may connect to your line, as determined by the REN, you should call your local telephone company
to determine the maximum REN for your calling area.
4. If your telephone causes harm to the telephone network, the telephone company may discontinue
your service temporarily. If possible, they will notify you in advance. But if advance notice is not
practical, you will be notified as soon as possible. You will be advised of your right to file a
6 041604A-1
Page 7

complaint with the FCC.
5. Your telephone company may make changes to its facilities, equipment,
operations or procedures that could affect the proper operation of your equipment. If they do, you
will be given advance notice so as to give you an opportunity to maintain uninterrupted service.
6. If you experience trouble with the telephone, please contact VTC Service & Manufacturing Co., Inc
at (800) 888-8990 or write to: VTC Customer Service, 16988 Gale Ave., City of Industry, CA 91745
for repair/warranty information. The telephone company may ask you to disconnect this equipment
from the network until the problem has been corrected or you are sure that the equipment is not
malfunctioning.
7. This equipment may not be used on coin service provided by the telephone company. Connection to
party lines is subject to state tariffs. (Contact your state public utility commission or corporation
commission for information.).
8. USOC jack type is RJ11C and the compatible jack is part 68 compliance.
NOTICE: If your home has specially wired alarm equipment connected to the telephone line, ensure the
installation of this [equipment ID] does not disable your alarm equipment. If you have questions about
what will disable alarm equipment, consult your telephone company or a qualified installer.
041604A-1 7
Page 8
r
This device complies with Part 15 of the FCC Rules. Operation is subject to the following two
conditions: (1) This device may not cause harmful interference, and, (2) his device must accept
any interference received, including interference that may cause desired operation. Privacy of
communications may not be ensured when using this phone.
Changes or modifications not expressly approved in writing by Northwestern Bell Phones may
void the user's authority to operate this equipment.
Some cordless phones operate at frequencies that may cause interference to nearby TVs and VCRs;
to minimize or prevent such interference, the base of the cordless phone should not be placed nea
or on top of a TV or VCR; and, if interference is experienced, moving the cordless telephone
farther away from the TV or VCR will often reduce or eliminate the interference.
AC ADAPTOR:
Use only with Class 2 Transformer, 12 VDC output ,
500mA, center pin positive.
8 041604A-1
Page 9
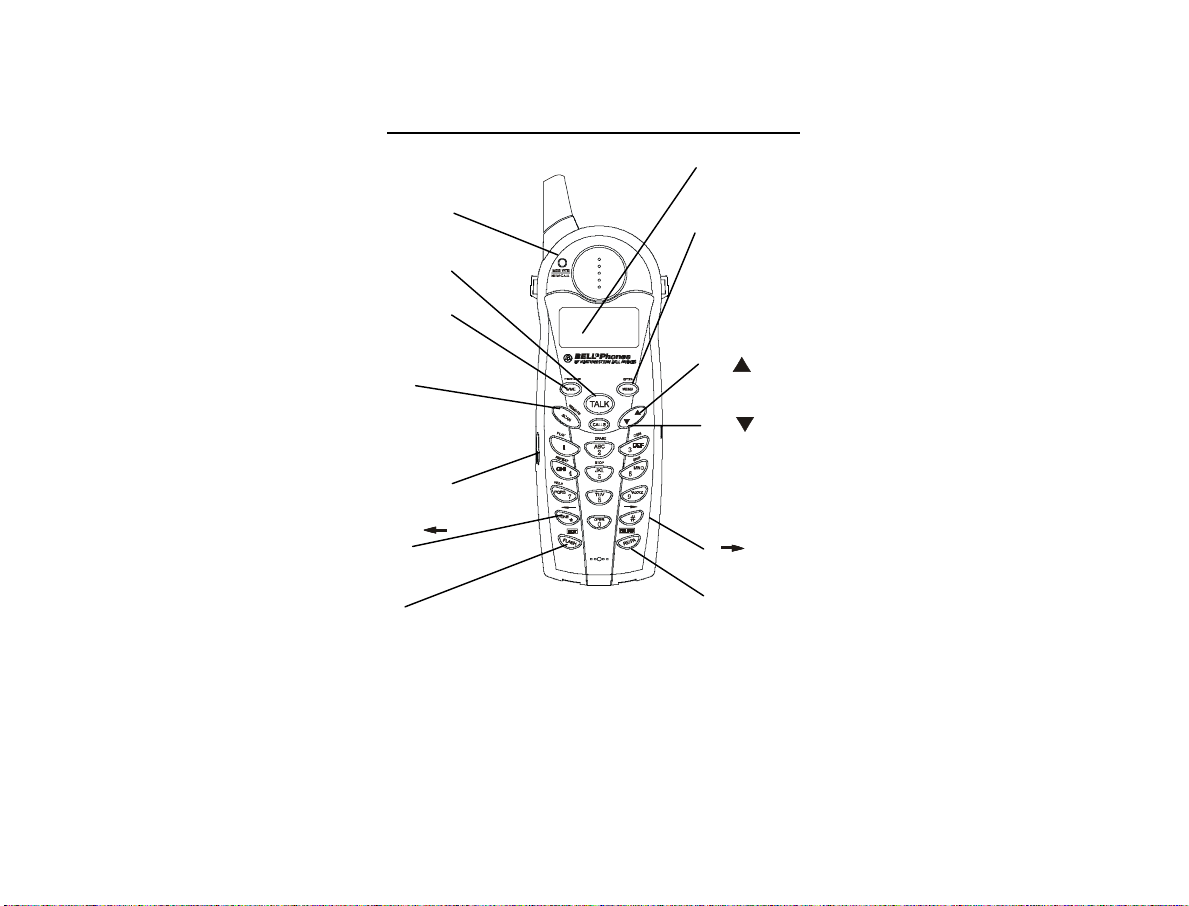
Excursion® 36288 CONTROLS DIAGRAM
N
MSG WTG/
EW CALL
LED Indicator
TALK Button
SAVE/PHONE
BOOK Button
SCAN/REMOTE
Button
Handset Jack
TONE(*)/
Button
FLASH/EDIT
Button
LCD Display
MENU/OPTION
Button
UP
Button
DN
Button
# /
Button
RE/PA/DELETE
Button
041604A-1 9
Page 10
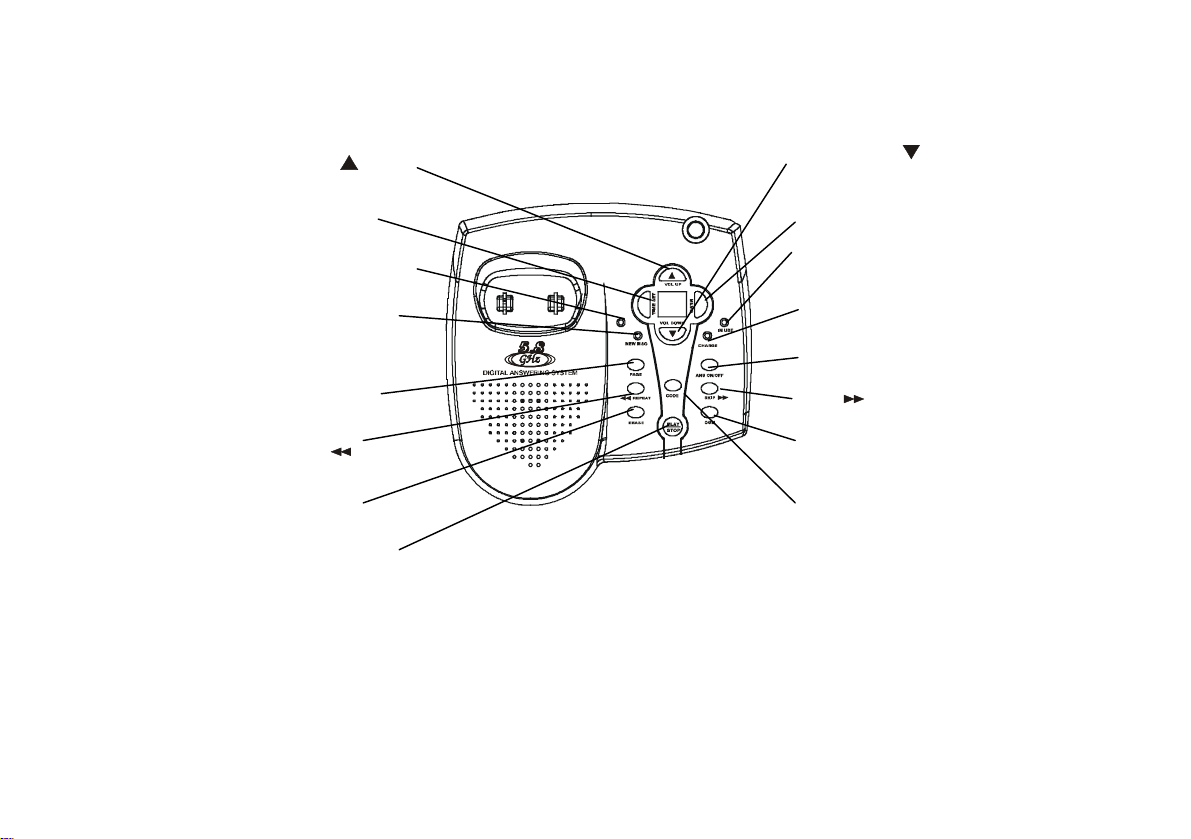
N
VOL
UP Button
Time Set Button
Power LED Indicator
EW MSG LED
Indicator
PAGE Button
Repeat
Erase Button
Play/Stop Button
Button
Base Unit
(RearView)
POWER
VOL DOWN
Button
MEMO Button
IN USE LED Indicator
CHARGE LED
Indicator
ANS ON/OFF Button
SKIP
Button
OGM Button
CODE Button
10 041604A-1
Page 11
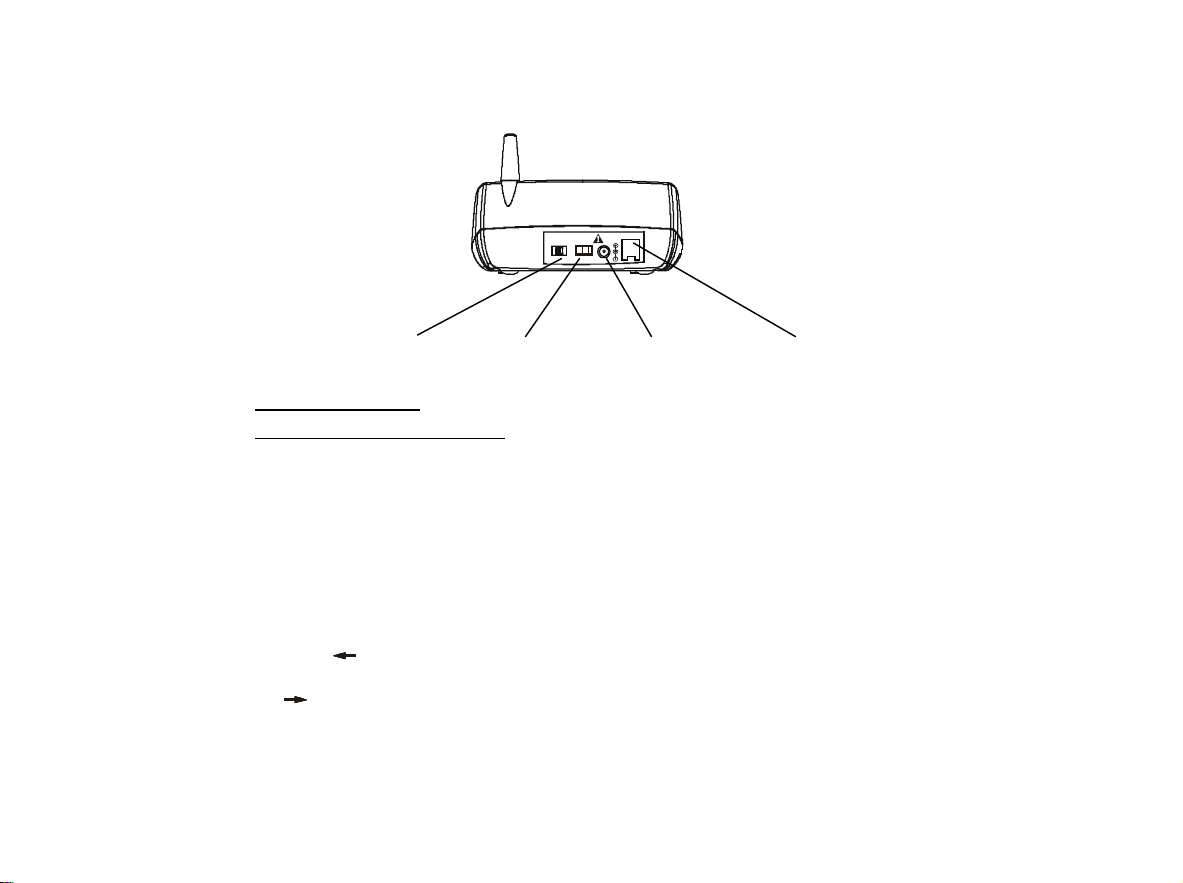
LINE
DC 12V
TS/5R /3R
500mA
TONE PULSE
TS/5R/3R Switch TONE/PULSE Switch DC 12V Jack LINE Jack
DESCRIPTIONS
Handset Controls-Cordless Telephone
LCD Display - Shows call information, phone status, prompts and Phonebook items.
MSG WTG /NEW CALL In dicator - Red LED blinks when you have new message(s) and call(s).
TALK Button - Press this button to place a call, answer a call, or end a call.
SAVE/PHONE BOOK Button – Allows you to retrieve a memory(name and phone number)for the
personal Phonebook (up to 20 memories). Saves the changes on the listed items.
TONE * /
# /
041604A-1 11
Button - Press to move left on the large LCD Display.
Button - Press to move right on the large LCD Display.
Page 12

FLASH/EDIT Button - (FLASH)Momentarily hangs up the phone to access custom calling features
such as Call waiting or Three-way calling provided by you local phone company. (EDIT) Press to edit
listed items.
UP
/DN Button - Allows you to adjust the handset volume(3 steps) in TALK mode. It also allows
you to view the caller list or /and Phone.
Microphone - Used for speaking with callers.
Headset Jack – A jack located on the side of the handset used for connecting your headset to enjoy a
hands-free communication.
RE/PA/DELETE(Redial/Pause/Delete) Button – (Redial)Press to redial the last number you
dialed.(Pause)Press to insert pause while dialing. (Delete)Press and hold down to delete items.
Calls Button - Press to see the caller list.
SCAN Button – It is used to manually select one of the 40 operating channels when you experience
interference on the handset.
MENU/OPTION – While in standby mode, this button allows you to set the handset in Programming
mode. During you view the caller list, press to place a long distance call or to place a local call.
Receiver – Allows you to hear calls.
Handset Controls-Answering System
12 041604A-1
Page 13
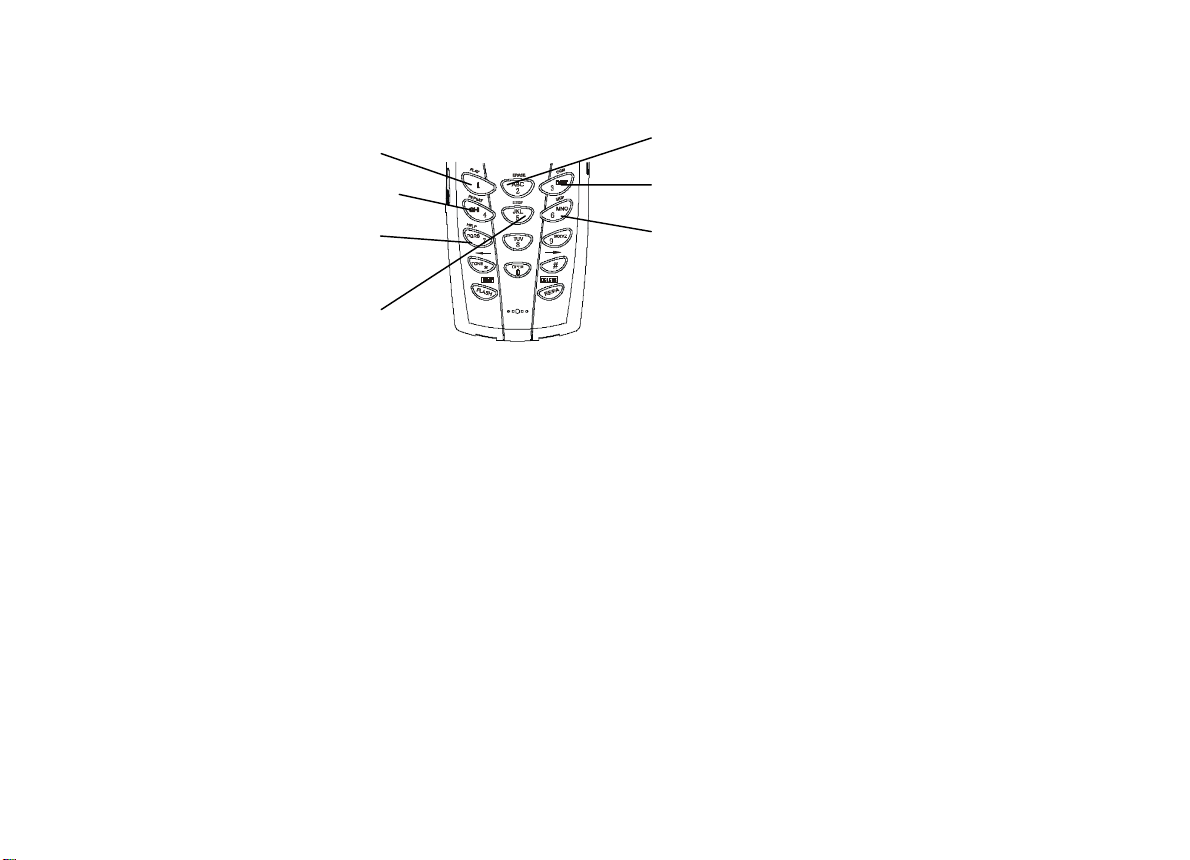
Play Button
Repeat Button
Help Button
Stop Button
OGM REC Button - Press to record Outgoing Message (OGM).
PLAY Button - Press to playback incoming Message(s) (ICM) or MEMO Message(s).
REPEAT Button - Press to skip to the previous message during playback.
SKIP Button - Press to skip to the next message during playback.
STOP Button - Press to stop current activity.
ERASE Button - Press to erase message
Erase Button
OGM Button
SKIP Button
041604A-1 13
Page 14

REMOTE Button – Allows you to access most of the Excursion®36288’s functions away from the base
unit using the handset. Also press to listen to the caller leave their incoming Message (ICM) in order to let
you decide if you want to answer the call.
HELP Button - Press to access voice help menu
.
BASE UNIT CONTROLS:
Base Antenna - A fixed antenna.
Base Unit Charge Terminals - Used for charging handset batteries. We recommend that you clean these
contacts periodically with an alcohol-moistened cloth or cotton swab.
IN USE Indicator -Lights up steadily when the phone is in talk mode and turns off when the handset is
not in use.
CHARGE LED Indicator – Lights up steadily when paging the handset. Lights up steadily when the
handset is being charged on the base and turns off when the handset is removed from its cradle.
NEW MSG LED Indicator – Flashes rapidly if the system has new call message(s) and have message(s)
in your voice mailbox. Lights up to indicate the presence of Memo message and blinks if there are new
Memo messages(s). Lights up to indicate the presence of incoming Message(ICM) and blinks if there are
new incoming Message(s) (ICM).
PAGE Button - Allows you to locate the handset when it is not on the base, or to alert the person near the
handset.
14 041604A-1
Page 15

Volume Control UP /DN Button -Adjusts the base unit speaker volume level..
PLAY/STOP Button – Press to play back the incoming Message(s)(ICM) and Memo message(s) or to
stop current activity.
ANS. ON/OFF – Press to activate or deactivate answer function.
REPEAT
SKIP
ERASE Button – Press to erase a single message or all messages in order to conserve message space in
memory.
Memo Button – Press to record Memo message.
OGM Button – Press to record Outgoing Message(OGM).
TIME SET Button – Press to set the day and time stamp.
CODE Button – Press to set the password for remote operation.
Ring (TS/5R/3R) Switch -Allows you to select the appropriate dialing service. TONE for tone dialing or
PULSE for rotary service..
TONE/PULSE Switch - A switch located on the rear of the base unit, which allows you to set the dialing
Button – Press to skip to the previous message during playback.
Button – Press to skip to the next message during playback.
041604A-1 15
Page 16
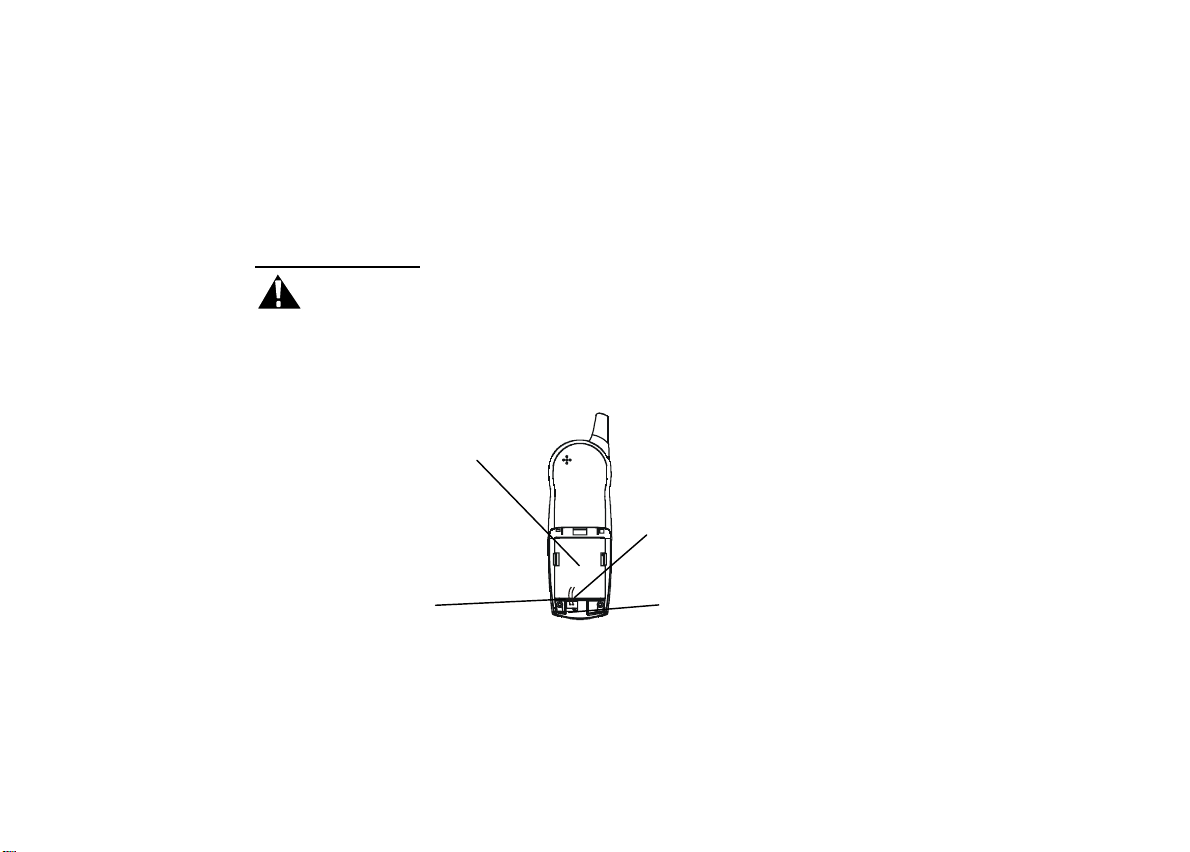
mode to either Tone dialing or Pulse(rotary) dialing.
DC 12V jack - A jack located on the rear side of the base unit used for connecting the AC adaptor to the
base unit.
TEL LINE jack – Accepts line cord to make connection with modular type telephone outlet.
INSTALLATION
CAUTION: USE ONLY THE NICKEL CADMIUM(Ni-Cd) BATTERY TYPE INCLUDED
WITH THIS UNIT. USE OF OTHER BATTERY TYPES MAY CAUSE INJURIES OR DAMAGE.
1. Remove the battery compartment cover of the handset by pressing the top of the cover and sliding it
down.
2. Connect the Ni-Cd battery pack plug along the slot into the handset’s battery connector as shown
below.
Handset
Battery
Compartment
Red
wire
(Figure 1)
16 041604A-1
Black
Wire
Battery
Connector
Page 17
3. Insert the Ni-Cd battery into the battery compartment.
k
4. Replace the battery compartment cover by sliding it up towards the handset.
NOTE: Use the type and size of Ni-Cd battery pack, 3.6V, 450mAh. It is recommended that the Ni-Cd
battery pack should be fully charged overnight prior to initial use.
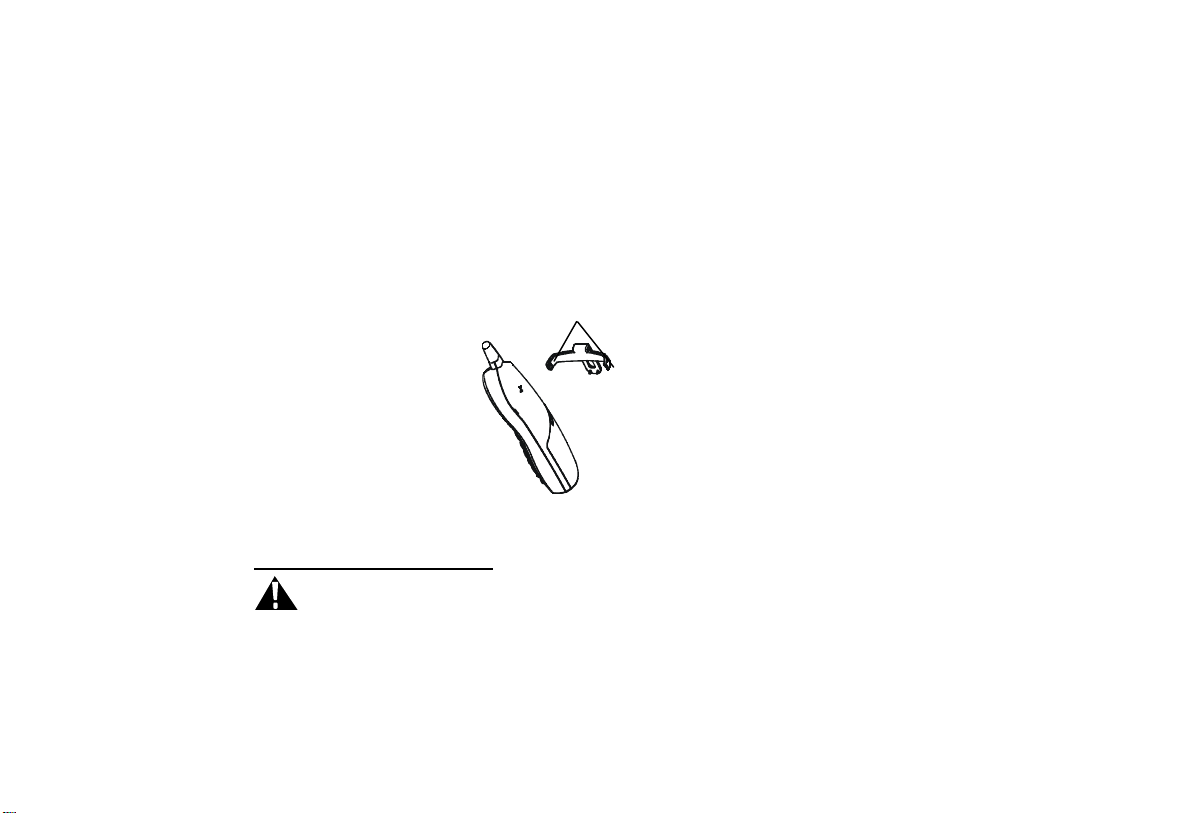
Belt Clip Installation
With the back of handset facing up, insert one side of the belt clip hook into the matching slots at the top
side of handset as shown in Figure2. Slide the other hook until it locks into place from the opposite side
of the handset.
Belt clip hoo
(Figure 2)
POWER CONNECTION
CAUTION: You must use a Class II, 120 Volt AC/12 Volt DC adaptor that delivers at least 500mA.
The center tip must be positive and the plug must correctly fit the unit’s DC 12V jack.
1. Plug the AC adaptor into a standard AC outlet.
041604A-1 17
Page 18
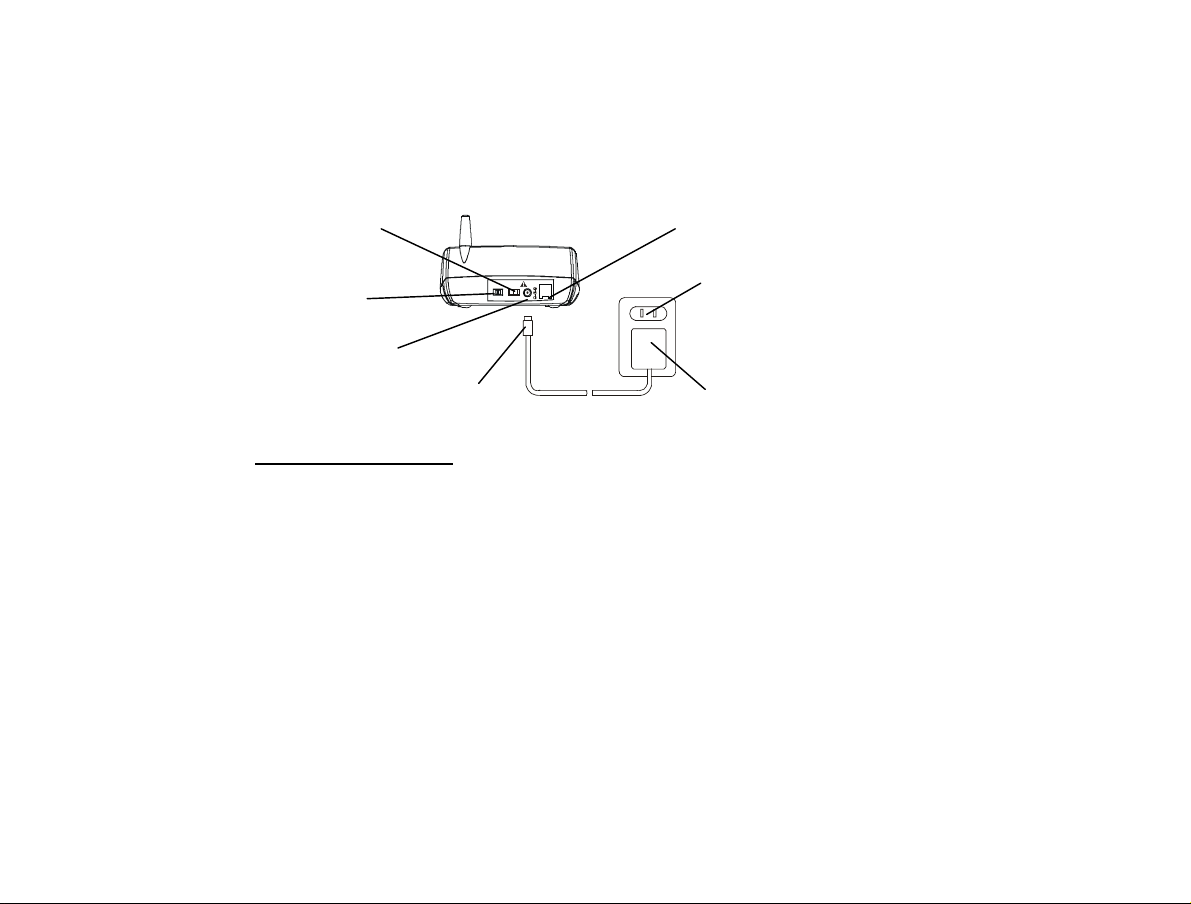
2. Insert the small plug inot the DC 12V jack on the rear of the base unit as shown in Figure 3.
t
r
Tone/Pulse
Switch
TS/5R/3R
Switch
Telephone Line Jack
LINE
DC 12V
500mA
TONE PULSE
TS/5R/3R
AC Outle
HEADSET CONNECTION
One of the special features of your phone is that your handset could utilize a headset(not included) for
hands-free communication. Insert the small plug at the end of your headset cord to the headset jack at the
side of the handset as shown in Figure 4. Follow the procedures discussed in “Placing a Call” when to
place and receive a call.
Note: The headset jack of your cordless telephone is compatible with 2.5mm headset plugs only. When
you plug in the headset into the headset jack, it automatically mutes the microphone and speaker of the
handset. Unplug the headset to return the handset to normal use.
DC 12V Jack
AC Adaptor
Plug
AC Adapto
(Figure 3)
18 041604A-1
Page 19
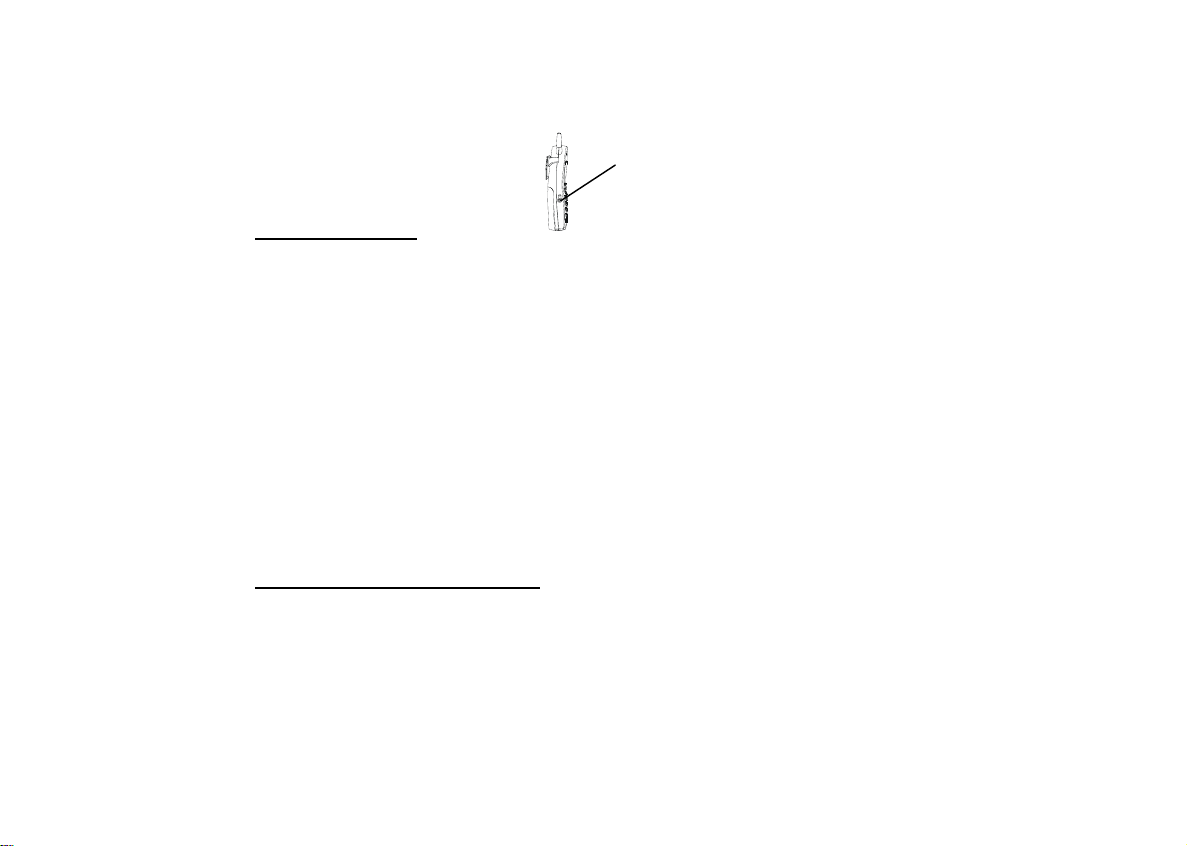
k
(Figure 4)
Handset Jac
INITIAL SETUP
Please follow these steps before using the cordless telephone for the first time.
1. Ensure that the handset battery pack is installed and charged fully for at least 14 hours.
2. Ensure that all connections(line cord and adaptor cord) are properly inserted into rear of the base
unit.
SETTING THE TONE/PULSE MODE
Select the appropriate dialing service by moving the TONE/PULSE switch at the rear of the base unit:
· TONE for Tone service , or
· PULSE for Rotary service.
SETTING THE HANDSET RINGER ON/OFF MODE
The handset must be set to ring ON mode in order to ring when receiving an incoming call. See Programs
Operation section on “RING ON/OFF SETTING”.
TELEPHONE OPERATION
PLACE A CALL
1. Pick up the handset and press the TALK button. The Call Timer starts to count. The base unit IN
USE LED indicator will light up.
2. Listen for a dial tone.
041604A-1 19
Page 20

3. Dial the telephone number. The phone numbers appear on the LCD Display as you enter the
number.
4. When finished with your call, press the TALK button or place the handset on the base unit. The base
IN USE LED indicator will turn off.
NOTE: The call timer will start to count once you press the TALK button.
RECEIVE A CALL
NOTE: If you are expecting incoming calls, the handset must be programmed to RING ON mode.
If the handset is on the base
1. When the phone rings, simply pick up the handset from the base cradle if the unit is set to
auto-answer ON mode. If the unit is set to auto-answer OFF mode, press the TALK button. See the
“AUTO ANSWER ON/OFF SETTING” section to set auto-answer mode. The LCD Display will
show “TALK”.
2. Start your conversation.
3. To end your conversation, either press the TALK button or place the handset on the base unit. The
base IN USE LED indicator will turn off.
If the handset is out of the base:
1. When the phone rings, press the TALK button on the handset. The LCD Display will show “ TALK”
and the base unit IN USE LED will light up.
2. Start your conversation.
3. To end your conversation, either press the TALK button or place the handset on the base unit. The
base IN USE indicator will turn off.
LAST NUMBER REDIAL
A. AFTER HEARING A BUSY TONE WHEN PLACING A CAL.
1. If you get a busy tone, press handset TALK button to hang up.
2. Press the handset TALK button again and listen for a dial tone.
:
20 041604A-1
Page 21

3. Press the handset RE/PA/DELETE button. This will automatically redial the last telephone number
you called (up to 32 digits).
4. When finished with your call, press the TALK button or place the handset on the base unit. The base
IN USE LED indicator will turn off.
B. WHEN THE HANDSET IS OFF THE BASE UNIT AND IN STANDBY MODE
1. Press the TALK button on the handset and listen for a dial tone.
2. Press the RE/PA/DELETE button. This will automatically redial the last telephone number you
called (up to 32 digits).
3. When finished with your call, press the TALK button or place the handset on the base unit. The base
IN USE LED indicator will turn off.
SAVING IN THE PHONEBOOK
1. Press the SAVE/PHONE BOOK button.
2. Press the FLASH/EDIT button.
3. Use the TELEPHONE KEYPAD button(0-9) to enter the name, (see the “TELEPHONE KEYPAD
CHARACTERS SETTING” section ) you can store up to 15 characters.
4. Press the
5. Enter the telephone number using the TELEPHONE KEYPAD button(0-9). You can store up to 16
digits.
6. Press the SAVE/PHONE BOOK button to save into memory
7. Press the SAVE/PHONE BOOK button to go back to standby mode.
NOTE: If there are no memory locations left in the phonebook, the unit will display “ MEMORY FULL”.
To continue with memory programming, you must delete or edit existing speed dial numbers.
If no active buttons are pressed for 20 seconds, the LCD Display will automatically return to STANDBY
mode. It will not save a duplicate telephone number or a name without the corresponding telephone
number in the Phonebook.
button once.
041604A-1 21
Page 22
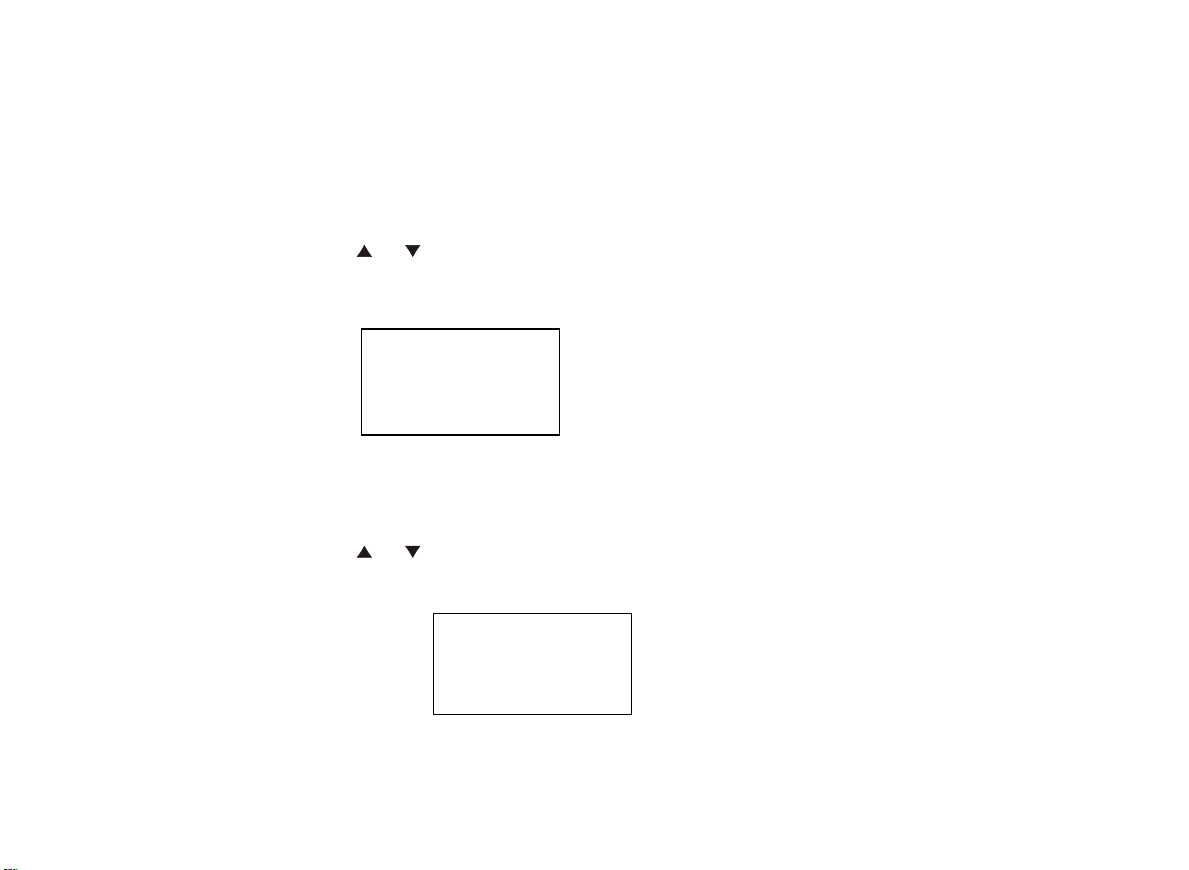
A. PREFERRED CALLS(VIP)
You an assign PREFERRED CALL which will generate a special ringer sound at start of the second ring
to any welcome caller in the Phonebook.
1. Press the SAVE/PHONE BOOK button.
2. Press the
3. Press the MENU/OPTION button once. The LCD Display will show “VIP”.
4. Press the SAVE/PHONE BOOK button to save the preferred call and go back to STANDBY mode.
B. BLOCKED CALLS
You can assign a BLOCKED CALL which will disable the ringer sound from the second ring to any
caller in the Phonebook.
1. Press the SAVE/PHONE BOOK button.
2. Press the
3. Press the MENU/OPTION button twice. The LCD Display will show “REJ”.
4. Press the SAVE/PHONE BOOK button to save the preferred call and go back to STANDBY mode.
or button to find the one you need.
VIP
JOHN SMITH
888-555-1212
#
1 TOTAL20
or button to find the one you need.
REJ
JOHN SMITH
888-555-1212
#
2 TOTAL20
22 041604A-1
Page 23

TELEPHONE KEYPAD CHARACTERS
The TELEPHONE KEYPAD buttons(0-9) are used to enter the characters when entering names. Press
the appropriate KEYPAD button to get the following characters.
For example, If you want to enter the character “C” , press the “2” KEYPAD button, the first character
displayed will be “A” . Press the “2” button again to display “B”, and press again to display the letter “C”.
To enter the next character, press the appropriate button. If ,however , the next character is on the same
button as the previous character, you will first need to press the SHIFT RIGHT
the SHIFT RIGHT
you can go back to the incorrect character by pressing the SHIFT LEFT
character inside the cursor “
KEYPAD
BUTTON
1 Space &
2 A B C 2
3 D E F 3
4 G H I 4
5 J K L 5
6 M N O 6
7 P Q R S 7
8 T U V 8
9 W X Y Z 9
0 0
button a second time will produce a space. If you want to change any character,
CHARACTERS
,
( ) * . 1
button. Pressing
button. To delete the
”, press the RE/PA/DELETE button.
041604A-1 23
Page 24
N
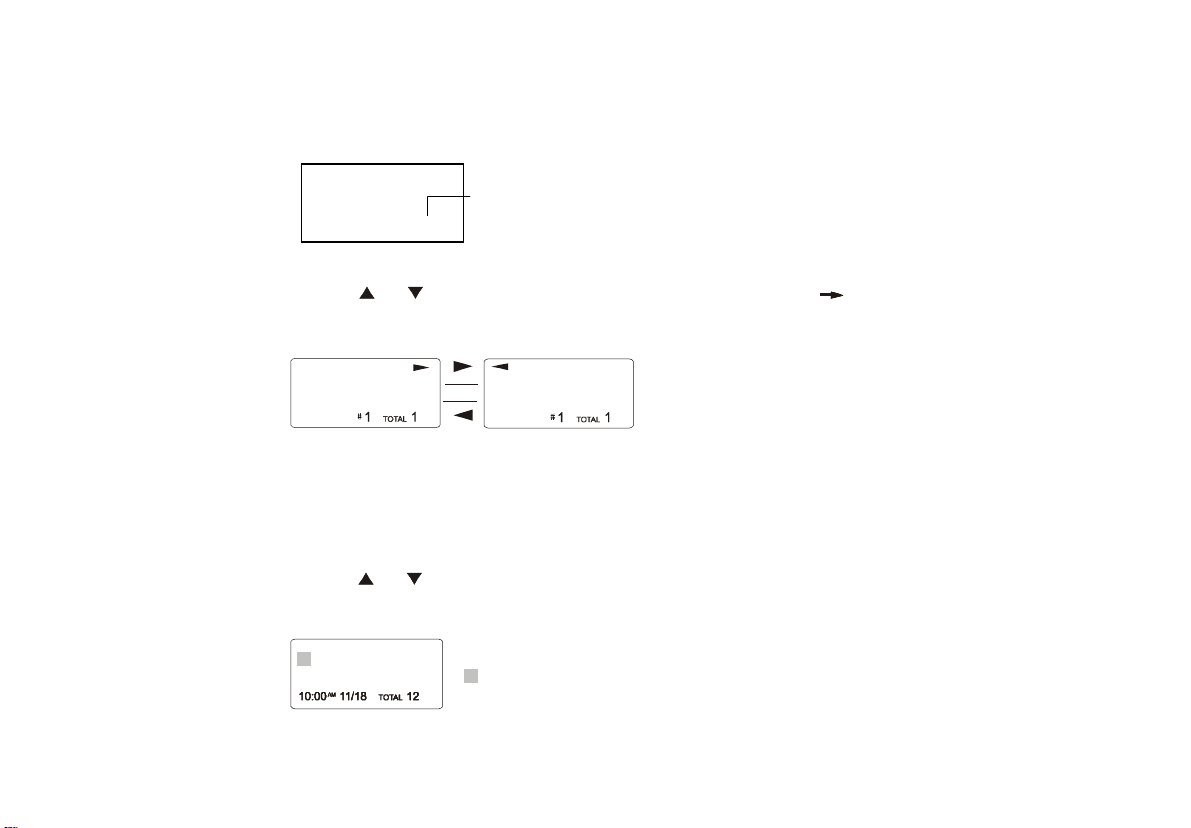
VIEWING THE PHONEBOOK
This Phonebook lets you scroll through the list to find the person you need for one touch dialing. You can
store up to 20 names and telephone numbers in the Memory.
PHONE BOOK
TOTAL 20
o. of memory store
1. Press the SAVE/PHONE BOOK button.
2. Press the
or button to find the one you need , press the SHIFT RIGHT button if the
name or telephone number is more than 11 digits.
ALEX BROWIN
6045551212
ALEX BROWIN
6045551212
NOTE: To exit the Phonebook at anytime, Press the SAVE/PHONE BOOK button.
EDITING NAME AND NUMBER IN THE PHONEBOOK
1. Press the SAVE/PHONE BOOK button.
2. Press the
or button to find the one you want to edit.
3. Press the FLASH/EDIT button to edit the name.
24 041604A-1
ALEX BROWIN
6045551212
cursor is blinking
Page 25
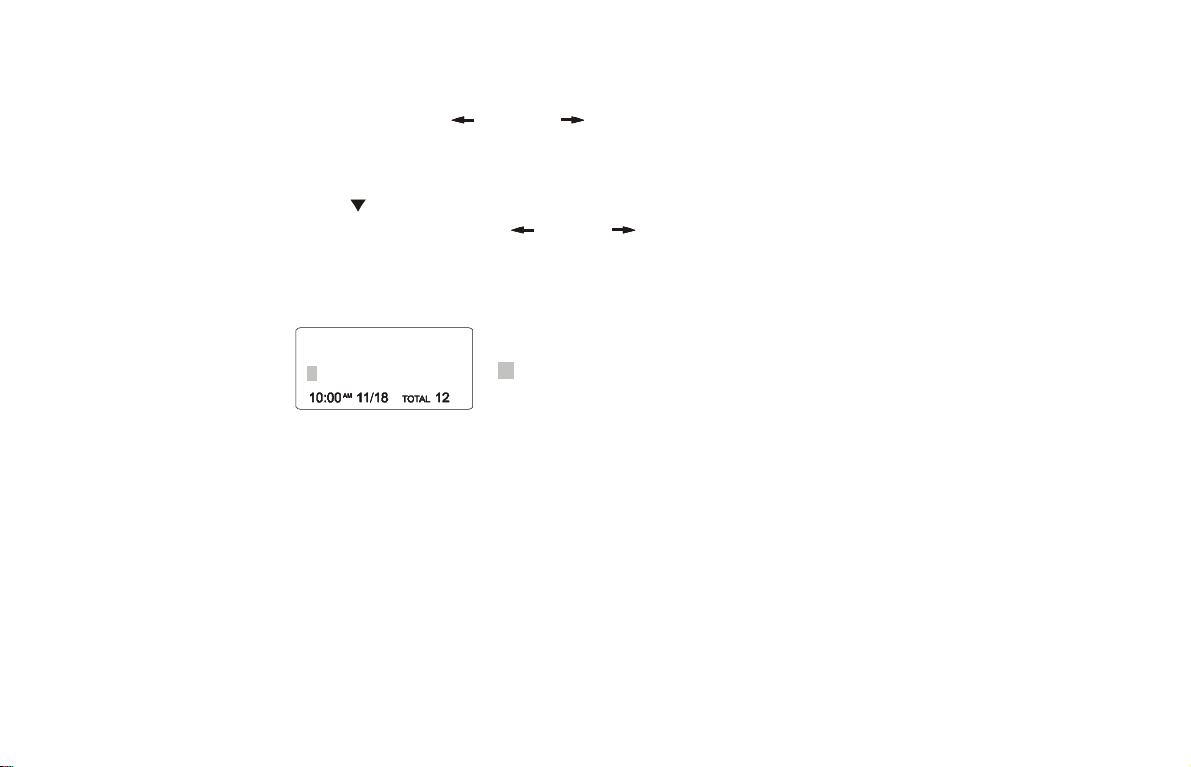
4. Press the SHIFT LEFT
want to change.
To erase, press the RE/PA/DELETE Button
To add, use the TELEPHONE KEYPAD buttons(0-9).
5. Press the
6. Press and hold the SHIFT LEFT
want to change.
To erase, press and hold the RE/PA/DELETE button.
To add, use the TELEPHONE KEYPAD buttons(0-9).
ALEX BROWIN
6045551212
7. Press the SAVE/PHONE BOOK button to confirm.
IMPORTANT: It is not advisable to save a telephone number without the corresponding name in the
Phonebook. This will lead to improper displays on Private and Out of Area calls.
NOTE: When no active buttons are pressed for 20 seconds, the LCD Display will automatically return to
STANDBY mode.
PLACING CALLS FROM THE PHONEBOOK
button to edit the number.
or RIGHT button to move the cursor to the letter or number you
or RIGHT button to move the cursor to the number you
cursor is blinking
041604A-1 25
Page 26
1. Press the SAVE/PHONE BOOK button.
2. Press the
or button to find the one you want to call.
3. Press the TALK button to dial out the telephone number.
4. Start your conversation.
5. To end your conversation, either press the TALK button or place the handset on the base unit.
NOTE: Be sure to check that the line is not in use by another extension.
DELETING A STORED NUMBER
1. Press the SAVE/PHONE BOOK button.
2. Press the
or button to find the one you want to delete.
3. Press the RE/PA/DELETE button. The unit will ask you to delete the selected telephone number and
the LCD Display will show “EARSE ITEM?”.
ERASE ITEM?
604-555-1212
#
1
20
TOTAL
4. Press again the “RE/PA/DELETE button to delete. The LCD Display will show “ERASED”.
5. Press the SAVE/PHONE BOOK button to return to STANDBY mode.
MIXED MODE DIALING (Temporary Pulse to Tone Dialing)
1. If you only have pulse (rotary dialing) service in your area and want to access Tone services (Bank
by Phone , etc.), ensure that the Tone/Pulse switch on the rear of the base unit is set to the Pulse
position.
2. Press the TONE(*) button once to switch from Pulse to Tone dialing temporarily. Pulse dialing
mode resumes when the call is ended.
26 041604A-1
Page 27

PAUSE FUNCITON
• In some cases, such as PABX or long distance service, a pause may be needed in the dialing
sequence. Pressing the handset RE/PA/DELETE button inserts the programmed time interval
between dialed numbers.
FLASH FUCTION
• Used to access custom calling features such as Call Waiting or Three-Way Calling provided by your
local phone company. Flash can also be used to restore a dial tone to make a new call.
CHANNEL SELECTION(40 Channels)
• Your cordless telephone lets you select a channel from the 40 frequencies available to transmit
signals between the base unit and handset. If the existing channel becomes noisy or starts having
interference, you can either move closer to the base unit or press the SCAN/REMOTE button on the
handset until a better reception is found.
OUT OF RANGE WARNING
• The handset and base unit communicate up to a certain maximum range. The distance can be
affected by weather, power lines, or even other cordless telephone.
• If you are far away from the base unit, the handset beeps and “ OUT RNAGE” is shown on the LCD
Display to warn you that the background noise level is too high for proper communication between
the handset and the base unit.
• When you hear this sound and see the “OUT RANGE” display, you should move closer to the base
unit. Otherwise, the call will automatically cut off after 20 seconds.
LOW BATTERY WARNNIG
041604A-1 27
Page 28

• When the handset battery voltage level is low, the handset LCD Display shows “LOW BATTERY”.
• Return the handset on the base cradle to charge.
PAGING FUNCTION
• If you have misplaced the handset or need to alert person nearly the handset, press the PAGE button
on the base unit. Each press of this button will activate the handset to beep for 20 seconds and LCD
Display shows “PAGING” while it is being paged by the base unit.
NOTE: Even if the handset is in RING OFF mode, the base unit can page the handset.
CALLER ID OPERATION
GETTING TO KNOW YOUR NEW PHONE
IMPORTANT: Subscription to Caller ID (CID)/Call Waiting ID services from your local phone
company is required for using the Caller ID/Call Waiting ID features of the Excursion
Excursion
Caller ID and Call Waiting ID.
If this is your first cordless telephone, you will soon discover that your cordless is similar to regular
telephones, except without the cord. If you have owned a cordless in the past, you will discover that the
Excursion
on the market, some key features are:
Unlike regular telephones, your cordless telephone does not work during power failures. We do not
recommend you to use a cordless telephone as the only phone in your residence
®
36288 telephone gives you the ultimate in cordless telephone sound quality with the luxury of
®
36288 telephone is the most powerful and full-functioned Call Waiting ID cordless telephone
• 40 name and number Caller ID/Call Waiting ID memory(Call List)
• 20 name and number programmable memory (Phonebook)
• Hearing – aid compatibility
• Automatic or manual selection of the clearest of 40 channels
®
36288. Your new
28 041604A-1
Page 29
INTRODUCTION TO CALLER ID AND CALL WAITING ID
The Excursion
®
36288 Caller ID/Calling Waiting ID devices allow you to take advantage of the Caller
identification delivery service offered by your local telephone company. For more information, you can
refer to the following Question and Answer table:
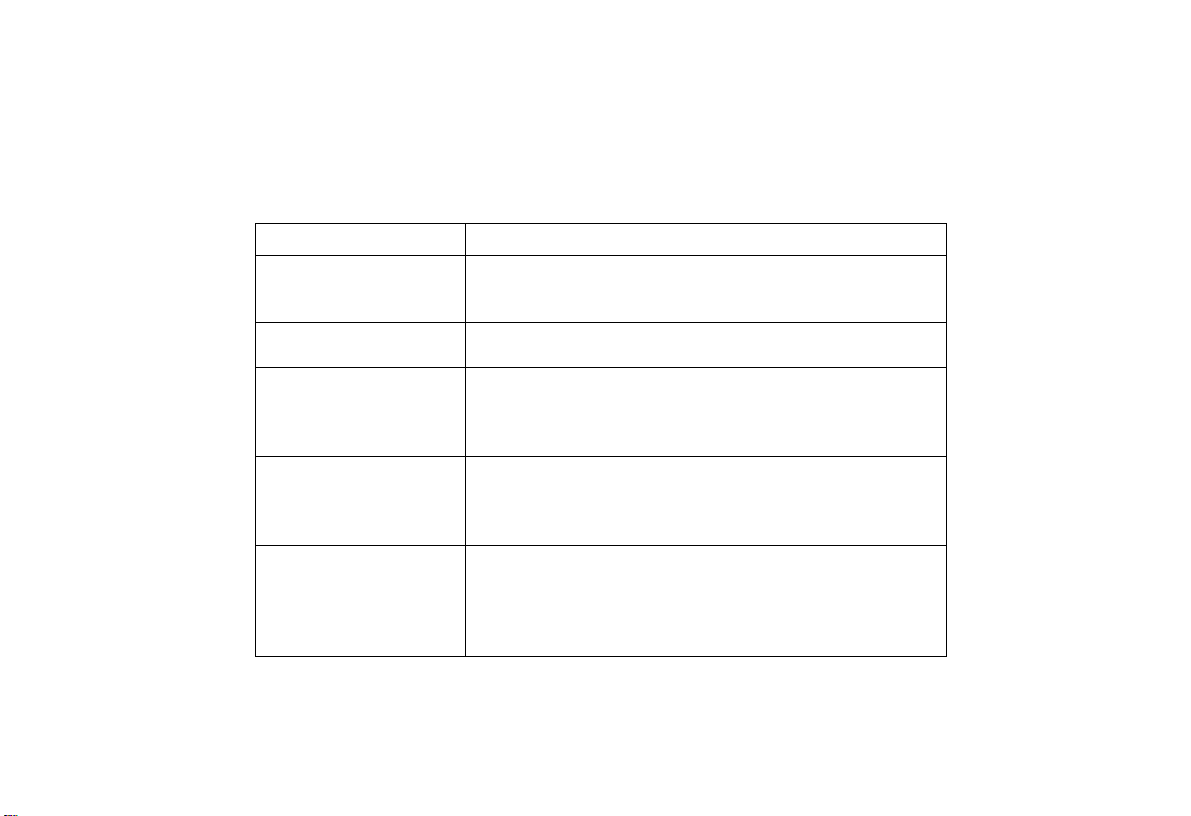
QUESTIONS ANSWERS
What is Caller ID? Caller ID is a device that identifies the calling party before you answer
a call. This device can be used to screen unwanted calls and eliminate
harassment from annoying calls.
What is Caller Waiting ID? Call Waiting ID is a device that can also identifies the call waiting
party before you answer a call.
How does Caller ID and
Call Waiting ID work?
When used with Caller ID/Call Waiting service, the Caller ID/Call
Waiting ID device displays the name(if available), and the telephone
number (if available) of the person calling before you answer your
telephone.
Who provides Caller ID
service?
Your local telephone company. However, not all local telephone
companies provide Caller ID service. Please call you local phone
company to confirm that the service is available before you install the
device.
How can I activate my
Caller ID?
For you Caller ID unit to function, you must first arrange with your
local telephone company to have Caller ID/Call Waiting ID service
installed on you line. There is an extra charge added to your monthly
telephone bill for this service. Before using this unit, please read this
instruction manual carefully.
041604A-1 29
Page 30
N
RECEIVING NEW CALL
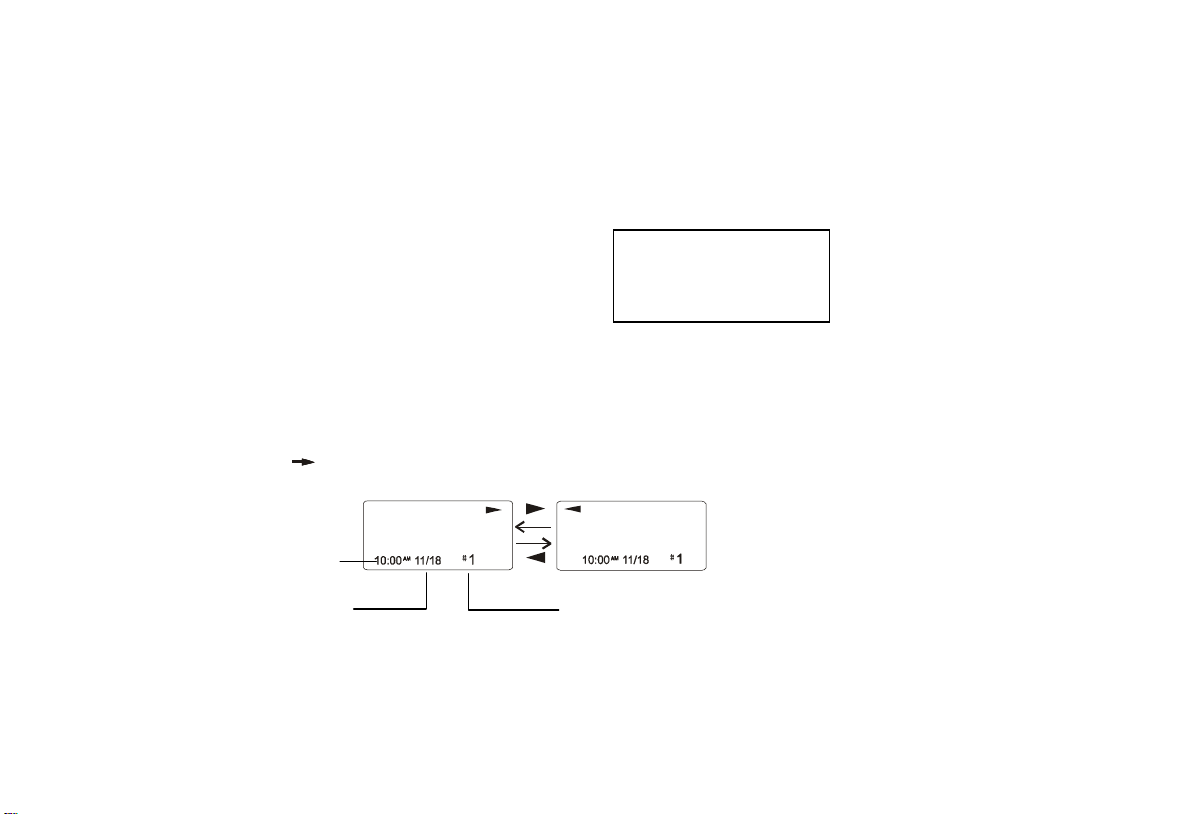
• When you receive a new call, the call information is stored under CALLER ID List. The “NEW”
segment of LCD Display and MSG WTG/NEW CALL LED indicator will flash if there is new
call(s).
• When you receive a call, the system displays the caller information sent by the telephone company,
called a Call Record. The Call Record consists of the following information:
a. The caller’s name(if available)
b. The caller’s telephone number
c. The time and date of a call
JOHN SMITH
555-555-1212
AM
10:00
12/15
NEW
#8
d. A call record number
• If there is no call records, the LCD display shows “NO CALLS”.
VIEWING THE CALLER ID LIST
1. In standby mode, press CALLS button to enter Caller ID list. If there is new call(s), the new call(s)
will be displayed at first. If the name or number is more than 11 characters, press the SHIFT RIGHT
button to view the rest of the display.
Month/Date
ALEX BROWIN
6045551212
Time
ALEX BROWIN
6045551212
umber of calls recorded
30 041604A-1
Page 31
2. Press or button to scroll to the next call. The button will go through the calls from the
f
8:05
38
m
last call received to the first. The
button will allow you to view the calls from the first call
received to the last.
3. Press CALLS button to finish.
NOTE: If no active buttons are pressed for 20 seconds, the LCD Display will automatically return to
STANDBY mode.
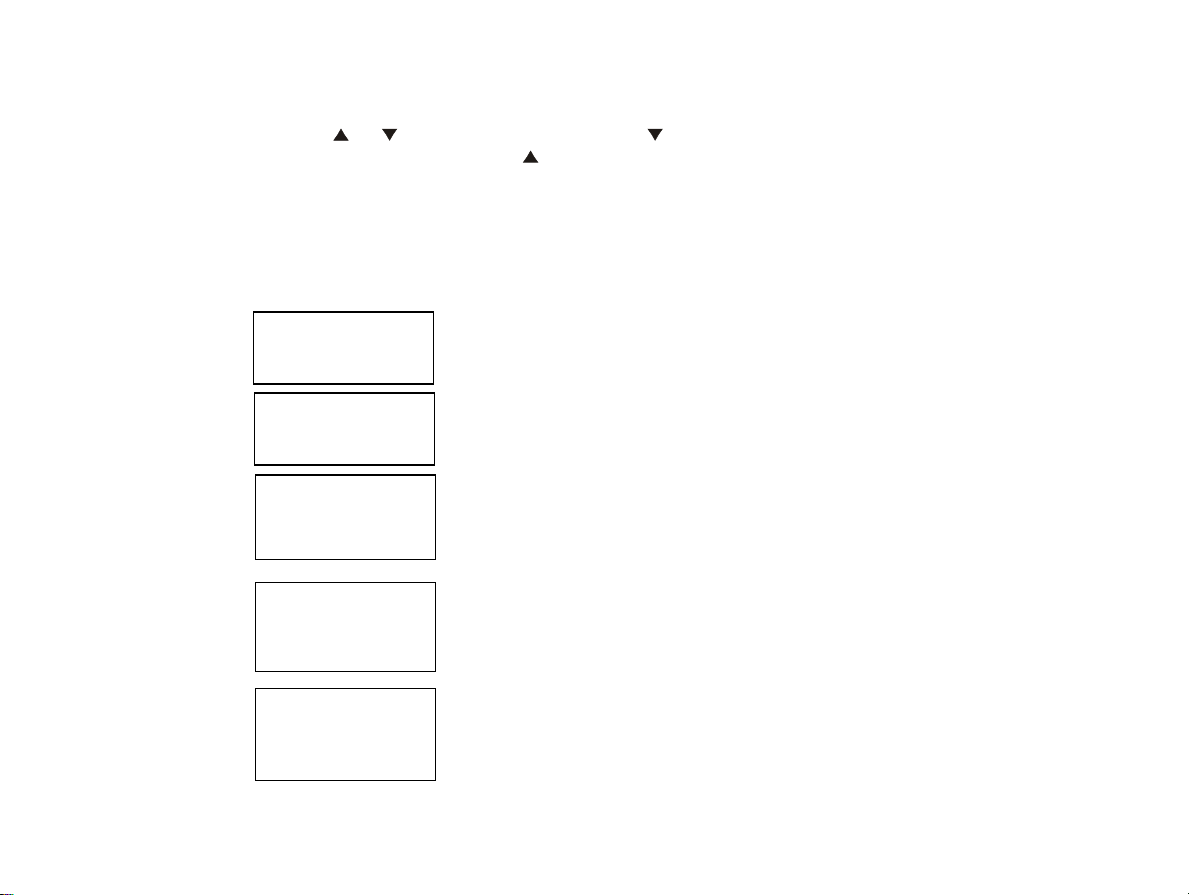
CALLER ID DISPLAY
JOHN SMITH
555-555-1212
AM
12/25
555-555-1212
8:05AM 12/25 #38
UNAVAILABLE
----------------------------
11:2 3AM 12/25
#
PRIVATE
----------------------------
11:2 3AM 12/25
#
ERROR
041604A-1 31
AM
9:07
12/25
2
NEW
TOTAL
LCD Display shows name and number, time and date o
the call.
#
LCD Display shows number-only service.
“ U N AVA I L A B L E ” will be displayed when Caller ID
information is not available. This call was made from a
telephone company that does not offer Caller ID
20
services(including international calls).
“PRIVATE” will be shown when a call is received fro
a blocked number. For privacy reasons, some states
allow callers the option to prevent their telephone data
from being displayed on the other party’s Caller ID
40
display.
Display shows when the Caller ID information was
received incorrectly or only part of the data was
received.
8
NOTE: When an error is received, none of the date from
This call is saved in memory
Page 32

p
d
MSG
RING: ON
9:07AM 12/25
VIP
JOHN SMITH
9:07AM 12/25
NO CALLS
9:07AM 12/25
0
NEW
TOTAL
888-555-1212
NEW1 TOTAL
0
NEW
TOTAL
Display shows when a voice mail message has been
received and is stored by message waiting service
39
rovided by the phone company.
Display shows when the incoming call is a priority call.
10
This is displayed when CALLS button is pressed an
0
there is no Caller ID date stored.
NOTE: If a call is received from the same number more than once since the records were last viewed, no
new entry is made, but the repeat call icon “RPT” and the number of repeat calls is displayed.
CALL WAITING
When you subscribe to Call Waiting service from your local telephone Company, this telephone will
display the name and number of the second caller while you are having a conversation.
1. When a second call comes in while you are having a conversation, you will hear a notification tone
from the handset and volume is momentarily muted. The LCD Display will automatically shows the
32 041604A-1
Page 33
name and number of the second caller.
2. Press the FLASH/EDIT button to answer the second caller. The first caller’s name and number will
be displayed.
3. When you have finished, press the FLASH/EDIT button to continue with your conversation with the
first caller.
JIM CARRY
800-2-10-8950
00
MIN
18
SEC
ALEX BROWN
800-2-10-8950
00
MIN
18
SEC
2’ND CALLER
1’ST CALLER
MESSAGE WAITING
If you have subscribed to Voice Mail message service and if you have requested Visual Message
Indication from your local telephone company, the MSG WTG/NEW CALL LED indicator will blink and
the LCD Display will show “MSG” when there is voice message(s) for you from your telephone company.
To remove the MESSAGE WAITING indicator, see the “ Message Waiting Setting” section.
MSG
RING: ON
9:07AM 12/25
NEW
0
TOTAL
39
PLACING A CALL FROM THE CALLER LIST
1. Press the CALLS button.
2. Press the
button or button to select the call record you wish to call back.
3. If the number displayed is not correct(needing 7,10,11 digits), press the OPTION button to select
041604A-1 33
JOHN SMITH
555-555-1212
9:07AM 12/25 #8
Page 34
call number.
4. Press TALK button to dial out or press CALLS button to cancel dialing.
5. To end you conversation, either press the TALK button or place the handset on the base unit.
SAVING THE NAME AND NUMBER FROM THE CALLER LIST INTO PHONE BOOK
1. Press the CALLS button.
2. Press the
3. Press SAVE/PHONE BOOK button. The LCD Display shows “SAVE”.
4. Press CALLS button to return to standby mode.
NOTE: When call records with 10 digits is stored in the phonebook, a “1” is inserted in front of the
number. If you must dial out a 10-digit number for local calls, you must edit the number to exclude that
digit to dial out correctly.
button or button to scroll to the call record you wish to store into the phonebook.
Press OPTION button
JOHN SMITH
15555551212
9:07AM 12/25 #8
Press OPTION button
JOHN SMITH
555-1212
9:07AM 12/25 #8
34 041604A-1
Page 35
SELECTIVE DELETING IN THE CALLER LIST
1. Press the CALLS button
2. Press the
3. Press RE/PA/DELETE button. The LCD Display will show “ERASE ITEM?”
ERASE ITEM?
10:00AM 12/25 #6
4. To delete the selected call record, press RE/PA/DELETE button.
5. Press the CALLS button to return to STANDBY mode.
DELETING ALL RECORDS IN THE CALLER LIST
1. Press the CALLS button.
2. Press and hold RE/PA/DELETE button. The LCD Display will show “ ERASE ALL?”
3. To delete all Caller ID records, press RE/PA/DELETE button. The LCD Display will show “ERASE
ALL” and return to standby mode.
ERASE ALL?
10:00AM 12/25 #6
PROGRAMS OPERATION
This unit contains the following special Programs:
A. LANGUAGE
B. FIRST RING ON/OFF
C. TIME SET
041604A-1 35
D. AREA CODE
E. CONTRAST
or button to scroll to the call record you wish to delete.
555-1212
555-1212
F. MSG WAITING
G. AUTO ANSWER ON/OFF
H. PRIVATE RING ON/OFF
I. UNAVAILABLE RING ON/OFF
J. RING ON/OFF
Page 36
A. LANGUAGE
This telephone offers English, Spanish and French languages for your convenience.
1. Press and hold the MENU/OPTION button.
2. Press the TELEPHONE KEYPAD #1 button.
3. Press the FLASH/EDIT button.
4. Press the
5. Press the SAVE/PHONE BOOK button to save the setting.
6. Press the MENU/OPTION button to go back to standby mode.
or button to select the language you desire. English is the preset language.
ENGLISH
#
1
10
TOTAL
B. FIREST RING ON /OFF
You can turn off the first ring of the telephone so that it does not ring until caller ID
information has been displayed.
1. Press and hold the MENU/OPTION button.
2. Press the TELEPHON KEYPAD #2 button.
FIRST RING
On
#
2
TOTAL
10
3. Press the FLASH/EDIT button.
4. Press the
or button to select the ON or OFF. FIRST RING ON is the preset mode.
5. Press the SAVE/PHONE BOOK button to save the setting.
6. Press the MENU/OPTION button to go back to standby mode.
C. TIME SET
Set the date and time.
1. Press and hold the MENU/OPTION button.
2. Press the TELEPHONE KEYPAD #3 button.
36 041604A-1
TIME SET
AM
10:03
12/25 #3
10
TOTAL
Page 37

3. Press the FLASH/EDIT button.
4. Use the TELEPHONE KEYPAD button to enter the month, date, hour and minute.
The cursor moves automatically after entering each item.
Press the TELEPHONE KEYPAD #1 for AM setting, or
Press the TELEPHONE KEYPAD #2 for PM setting.
5. When the final setting is programmed, the time and date are automatically saved.
6. Press the MENU/OPTION button to go back to STANDBY mode.
NOTE: The date and time will automatically set, if you have subscribed to the Caller ID service
from your local telephone company.
D. AREA CODE
1. Press and hold the MENU/OPTION button.
2. Press the TELEPHON KEYPAD #4 button.
AREA CODE
#
4
TOTAL
- - -
10
3. Press the FLASH/EDIT button.
4. Use the TELEPHONE KEYPAD buttons to enter the three digit area code.
5. Press the SAVE/PHONE BOOK button to save the setting.
6. Press the MENU/OPTION button to go back to standby mode.
E. CONTRAST
This unit enables you to select 3 brightness levels for the Large LCD Display.
1. Press and hold the MENU/OPTION button.
2. Press the TELEPHON KEYPAD #5 button.
3. Press the FLASH/EDIT button.
4. Press the
brightness.
041604A-1 37
or button to adjust the brightness of the display. Level 2 is the preset
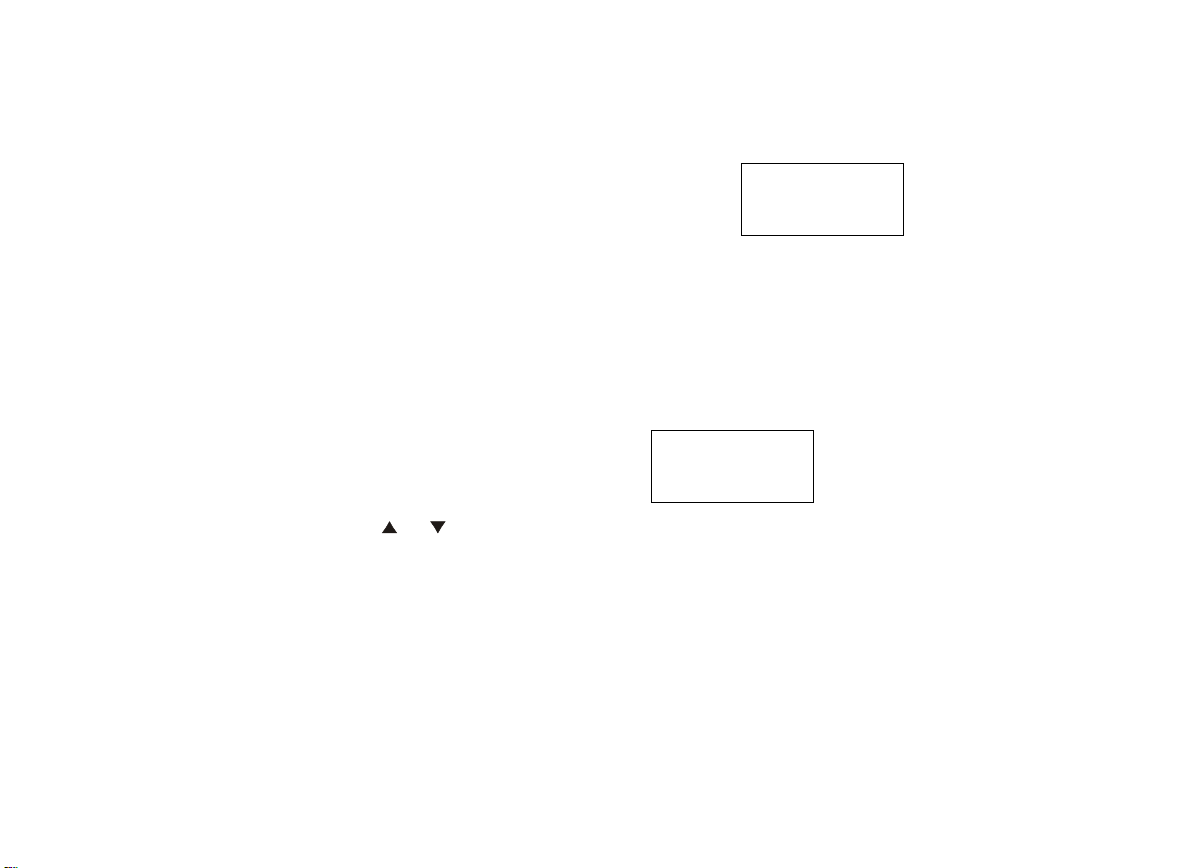
CONTRAST
2
#
5
10
TOTAL
Page 38
5. Press the SAVE/PHONE BOOK button to save the setting.
R
6. Press the MENU/OPTION button to go back to standby mode.
F. MSG WAITING (Message Waiting)
To turn off the Message Waiting LCD/LED indicator.
1. Press and hold the MENU/OPTION button.
2. Press the TELEPHON KEYPAD #6 button.
MSG WAITING
delete
#
6
10
TOTAL
3. Press the FLASH/EDIT button.
4. Press the SAVE/PHONE BOOK button, the Message Waiting LCD/LED indicator turn off.
5. Press the MENU/OPTION button to go back to STANDBY mode.
IMPORTANT: Message Waiting LCD/LED indicator will automatically turn on, If you have
subscribed to Voice Mail message service and if you have Visual Message indication from your
local telephone company.
G. AUTO ANSWER ON/OFF
Turn on or off the auto answer feature. When in on mode, the phone will automatically answer an
incoming call if the handset is lifted from the base unit.
1. Press and hold the MENU/OPTION button.
2. Press the TELEPHON KEYPAD 7 button.
3. Press the FLASH/EDIT button.
4. Press the
or button to select ON or OFF.
AUTO ANSWER ON is the preset mode.
5. Press the SAVE/ PHONE BOOK button to save the setting.
6. Press the MENU/OPTION button to go back to STANDBY mode.
H. PRIVATE RING ON/OFF
AUTO ANSWE
On
#
7
TOTAL
10
38 041604A-1
Page 39
Turn on or off ring or all calls where the caller has blocked their caller ID.
1. Press and hold the MENU/OPTION button.
2. Press the TELEPHON KEYPAD 8 button
3. Press the FLASH/EDIT button.
4. Press the
or button to select ON or OFF.
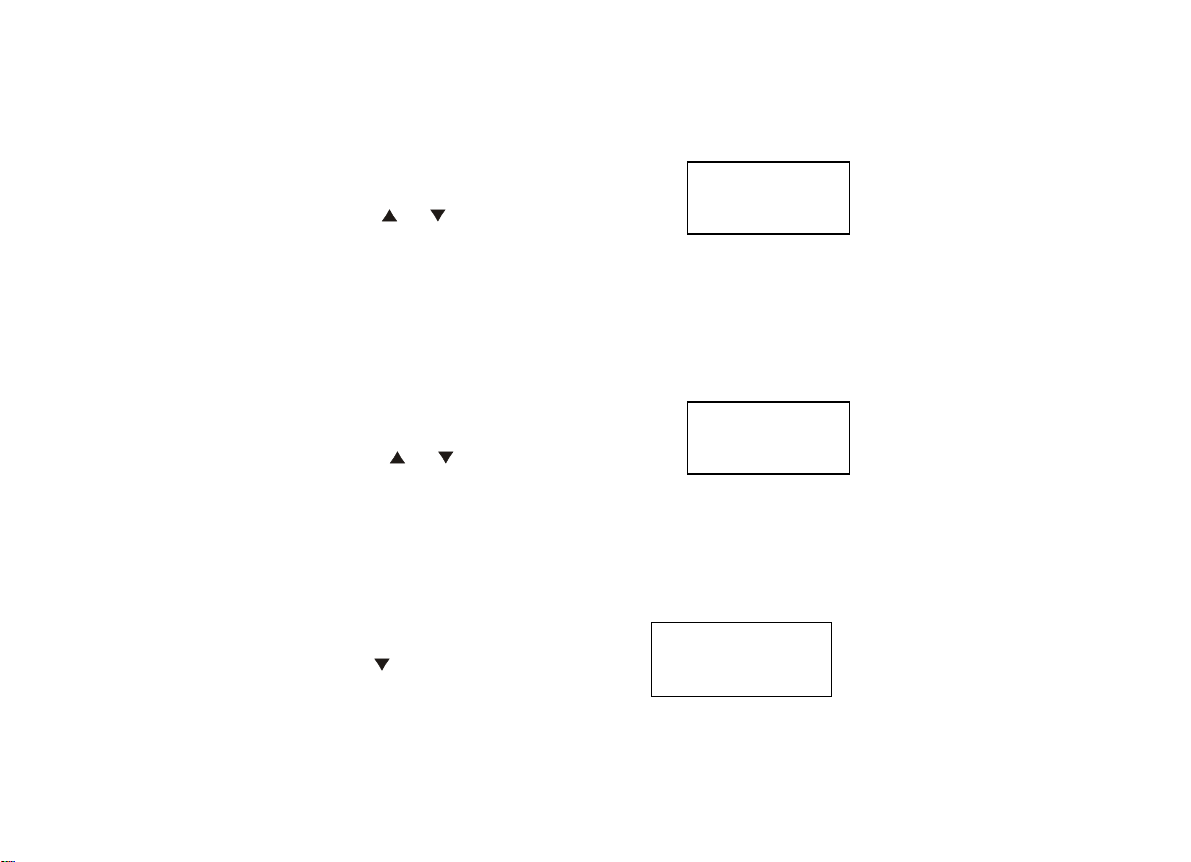
RRIVATE RNG
On
#
8
10
TOTAL
PRIVATE RING ON is the preset mode.
5. Press the SAVE/PHONE BOOK button to save the setting.
6. Press the MENU/OPTION button to go back to standby mode.
NOTE: The phone will ring once when set to OFF mode unless first ring is set to OFF mode.
I. UNAVAILABLE RING ON/OFF
Turn on or off ring or all calls where the caller has blocked their caller ID.
1. Press and hold the MENU/OPTION button.
2. Press the TELEPHON KEYPAD 9 button
3. Press the FLASH/EDIT button.
4. Press the
or button to select ON or OFF.
UNAVAIL RNG
On
#
9
TOTAL
10
UNAVAIL RING ON is the preset mode.
5. Press the SAVE/PHONE BOOK button to save the setting.
6. Press the MENU/OPTION button to go back to standby mode.
NOTE: The phone will ring once when set to OFF mode unless first ring is set to OFF mode.
J. RING ON/OFF
To turn on or off the ringing sound.
1. Press and hold the MENU/OPTION button.
2. Press the
button once.
RING
#
10
ON
TOTAL
10
041604A-1 39
Page 40

3. Press the FLASH/EDIT button.
4. Press the
or button to select ON or OFF. RING ON is the preset mode.
5. Press the SAVE/PHONE BOOK button to save the setting.
6. Press the MENU/OPTION button to go back to standby mode.
ANSWERING MACHINE OPERATION
The Excursion
®
36288 features a sophisticated Digital Answering System. Incoming Messages(ICMs),
Outgoing Message(OGM) and Memo messages are stored electronically into digital memory. Messages
are accessed instantly and arranged compactly in this memory. The Excursion
®
36288 can store 15
minutes of message(ICMs, OGM and Memos Combined).
NOTE: The maximum incoming Message(ICM) recording time is 1 minutes.
VOICE MENU SYSTEM
A sophisticated Voice Menu System has been designed and pre-programmed into the Excursion
®
36288.
This system will verbally guide you through key operational procedures.
TIME/DAY STAMP
ICMs and Memo messages are automatically voice-stamped with the current time and day.
NOTE: After power failure, the time/day stamp will be lost. In this case, the time will be incorrect. Please
refer to the INITIAL SETUP section on how to set the system time and day.
SETTING ANSWER ON/OFF
The unit defaults to Answer ON automatically after power up.
A. TO TURN ANSWER MODE OFF
1. In standby mode, press the ANS. ON/OFF button on the base unit until you hear “Answering machine
is on.”.
2. The Excursion
NOTE: The Excursion
®
36288 will announce “Answering machine is off.”
®
36288 will answer after the 11th ring if the Answering Mode is OFF.
40 041604A-1
Page 41

B. TO TURN ANSWER MODE ON
1. In standby mode, press the ANS. ON/OFF button until you hear “Answering machine is on.”
C. TO TURN ANSWER MODE A
1. In standby mode, press the ANS. ON/OFF button until you hear “Answering machine is A.”
Note: THE Excursion
®
36288 will automatically ring a beep, And then will automatically hang up after
seven seconds.
SETTING THE RINGS SWITCH(TS/5R/3R)
The number of rings before the answering system answers a call be selected by setting the RINGS switch
on the base unit to :
TS – Toll Saver
5 - Five rings
3 - Three rings
Toll Saver lets you avoid unnecessary toll charges when calling long distance to remotely retrieve your
messages.
The Excursion
ring by setting the RINGS switch on the Toll Saver (TS) position. If your Excursion®36288 fails to
answer on the 3
®
36288 can be set to answer the first call on the 5th ring, and all subsequent calls on the 3
rd
ring , then you know that you do not have any new incoming Message(s)(ICM). You can
hang up before the unit answers and save the cost of the call.
SETTING TIME/DAY
1. Press “TIME SET” button. You will hear current Time/Day setting the time and day.
2. Press and hold “TIME SET” button for about 3 seconds. You will hear “Sunday”.
3. Press “SKIP
” or “REPEAT ” button (on the base) until the correct day is announced.
4. Press “TIME SET” button to confirm and then set the hours. You will hear “12” as the “12” is
displayed in message counter.
5. Press “SKIP
” button to advance or “REPEAT ” button to reverse the hour show in the display.
6. Press “TIME SET” button to confirm and then set the minutes, you will hear “00” as the “00” is
displayed in message counter.
041604A-1 41
rd
Page 42

7. Press “SKIP ” button to increment or “REPEAT ” button to decrement the minute in the
display.
8. Press “ TEME SET” button to confirm. You will hear “AM”.
9. Press “SKIP
” or “REPEAT ” button. You will hear “PM”. Press “SKIP” OR “REPEAT”
button again to go back to “AM”.
10. Press “TIME SET” button to confirm. The new day and time will announced.
SETTING REMOTE CODE
1. Press CODE button(on the base). Then you will hear the current setting, “one, two, three”.
2. Press and hold “code” button for about 3 seconds.
3. Press Skip
or Repeat button (on the base) to select the first digit you desired.
4. Press the CODE button to confirm.
5. Press Skip
or Repeat button to select the second digit you desired.
6. Press the CODE button to confirm.
7. Press Skip
or Repeat button to select the third digit you desired.
8. Press the CODE button to confirm.
You will hear the newly programmed 3-digit security code.
OUTGOING MESSAGE (OGM)
This is the announcement callers will hear when Excursion
®
36288 answers a call. The Excursion®36288
also has a default OGM(factory preset) which is active when there is no OGM present.
Default OGM: “Please record your message after the beep.”
RECORDING THE OUTGOING MESSAGE(OGM)
Outgoing Message(OGM) is recorded remotely on the handset. The maximum recording time is 30
seconds.
1. In standby mode, press the REMOTE button on the handset. The Excursion
2. Press 3 button. The Excursion
®
36288 will prompt “Please record your announcement after the beep.
®
36288 will prompt .
42 041604A-1
Page 43

3. After hearing a long beep, begin your announcement.
4. Press 5 button to stop recording and the Excursion
®
36288 will playback once automatically for your
review.
5. Press the REMOTE button to exit the remote mode. Otherwise, the unit will automatically turn off if
not in use for 8 seconds.
Outgoing Message(OGM) is recorded on the base unit. The maximum recording time is 30 seconds.
1. In standby mode, Press the OGM button.
2. Press and hold the OGM button.
3. Record your greeting after you hear a beep tone.
4. Release the OGM button after you finish recording your greeting. Your recorded greeting will be
played after releasing the button for user’s confirmation.
CHECKING THE OUTGOING MESSAGE (OGM)
1. In standby mode, press the OGM button on the base unit to hear your previously recorded OGM.
2. You can stop OGM playback anytime during playback by pressing the PLAY/STOP button.
RECORDING A MEMO
Memo message(s) is recorded on the base unit. The maximum recording time is 1 minutes.
1. In standby mode, Press the MEMO button.
2. Press and hold the MEMO button.
3. Record your greeting after you hear a beep tone.
4. Release the MEMO button after you finish recording your greeting.
PLAYING BACK MESSAGE
If the NEW/MSG LED indicator is on, it indicates that you have Memo or ICM message(s). If it is
blinking, it indicates that there is new message(s). The blinking counts mean the number of new
messages.
041604A-1 43
Page 44

A. PLAYING MESSAGES
In standby mode, press the PLAY/STOP button on the base unit. The Excursion
®
36288 will announce
“You have (number)(Memo) message.” And begins playing the first message to the end. It will announce
the message number before each message.
B. SKIPPING MESSAGES
Press the SKIP
button on the base unit during message playback to skip forward to the next
message.
C. PREVIOUS MESSAGES
Press REPEAT
button once on the base unit during message playback to skip backward one
message.
D. STOP MESSAGE PLAYBACK
Press the PLAY/STOP button to stop message playback.
ERASING MESSAGES
A. SELECTIVE ERASING
1. Press the ERASE button on the base unit during message playback.
2. The Excursion
®
36288 will announce “ (Message)(Memo)(Number) erased.” And then start the next
message.
NOTE: Erased message can not be retrieved. There is a momentary delay after erasing messages to allow
the Excursion
®
36288 to reorganize and optimize its memory space.
B. ERASING ALL ICM AND MEMO
1. In standby mode, press and hold the ERASE button for about 2 seconds.
2. The Excursion
®
36288 will announce “Message(number) erased. You have no message.”
C. ERASING OGM
1. During OGM playback, press ERASE button.
2. The Excursion
®
36288 will announce “Erase your announcement. You have no announcement .”
NOTE: After erasing messages during memory full or near memory full, you may hear a continuous beep
for several seconds indicating memory sorting of the unit.
44 041604A-1
Page 45

MEMORY FULL DETECTION
The memory full condition occurs:
. If 15 minutes of recording time is reached, or
. If 59 message (i.e. Memo, OGM, ICM) have been recorded.
If there is an incoming call, the unit will answer at the 10
th
ring and announce “Memory full”. You can
erase any or all the messages remotely after listening to them.
NOTE: Sometimes you may fail to escape from memory full condition when erasing a short message. In
this case, you must erase more messages(at least 1 minute message).
CALL SCREENING
You can listen to the caller leave their ICM and decide if you want to answer the call.
A. FROM THE HANDSET(Away From the Base Unit)
1. When the Excursion
®
36288 rings, press the REMOTE button on the handset, The Excursion®36288
will immediately answer the call. You will hear your OGM followed by the caller’s message
through the handset receiver.
2. If you decide to take the call, simply press the TALK button and begin speaking.
B. FROM THE HANDSET (In the Base Unit Cradle)
1. When the Excursion
®
36288 answers a call, you will hear your OGM followed by the caller’s
message through the base unit’s speaker.
2. If you decide to take the call, simply pick up the handset. Begin speaking and the ICM recording is
stopped. The recorded message is stored in memory and the message count is incremented by one.
C. FROM THE EXTENSION PHONE
1. When the Excursion
®
36288 answers a call, you will hear your OGM followed by the caller’s
message through the speaker.
2. If you decide to take the call, just lift the handset of the extension phone on the same line as the
Excursion
®
36288. The ICM recording is stopped and the recorded message is stored in memory
while the message count is incremented by one.
041604A-1 45
Page 46

VOX(VOICE ACTIVATED) DETECTION
During OGM, ICM or Memo recording, The Excursion
message storage space. The conditions for the Excursion
®
36288 uses VOX(voice activation) to conserve
®
36288 terminating a recording are:
. Continuous silence for seven seconds.
. Seven seconds after the caller hangs up.
REMOTE OPERATION
Allows you to access most of the Excursion®36288 functions away from the base unit using only the
handset or any touch tone phone when you call the Excursion
and stop messages in the message boxes, record an OGM.
USING THE REMOTE OPERATION FUNCTION
There are Two-Ways of using Remote Operation:
1. Handset (Remote Unit), or
2. Calling the Excursion
®
36288 from a Tone Dialing Phone
A. USING THE HANDSET
1. Press the REMOTE button to activate the remote function.
2. The base unit IN USE LED indicator will blink.
B. CALLING THE Excursion®36288 FROM A TONE PHONE
NOTE: The factory preset password for remote operation is “123”.
1. Call the Excursion
®
36288 from a tone dialing phone.
2. While the OGM is playing or during ICM recording, enter your 3 digits password.
3. After a successful password entry , the Remote Operation function is on.
Once you have activated the Remote Operation function either by handset or through a tone dialing phone
to call the Excursion
®
36288: The Excursion®36288 will announce the total number of new message(s) in
Message (MSG) box.
®
36288. You can play, repeat, skip, erase,
46 041604A-1
Page 47

REMOTE COMMANDS
A. VOICE HELP MENU
Press the 7 button for Voice Help Menu. remote commands can be entered during playback of the menu.
The following table shows the Voice Help Menu:
Key Function
1 Playback Message(ICM or Memo)
2 Erase a Message during playback
3 Record OGM Message
4 Play back Previous Message
5 Stop function
6 Skip Forward to the Next Message
7 Voice Help Menu
B. STOP FUNCTION
Press the 5 button to abort the current function.
C. OGM RECORDING
1. Press the 3 button. The unit will prompt “Please record your announcement after the beep. To
STOP, press the 5 button”.
2. After hearing a long beep, begin your announcement. The maximum recording time is 30 seconds.
3. Press the 5 button to stop recording and the Excursion
®
36288 will automatically playback once for
your review.
D. PLAYBACK MESSAGES/MEMOS
Press the 1 button for playback incoming Message (ICM)/ Memo message , the Excursion
®
36288 will
announce “ You have (number )(new)(Memo) message.”
041604A-1 47
Page 48

E. ERASE MESSAGES/MEMOS
Press the ERASE button on the handset during message playback.
65,536 Combination Security Coding
The cordless telephone have a digital coding security system to prevent unauthorized use of your
telephone line by other cordless phones nearly. The cordless telephone have 65,536 possible security code
combinations. Each combination of the code is randomly generated every time the handset is picked up.
Resetting Security Code and Channel
Communication between the handset and the base unit may not be possible in any of the following
situations:
1. After a power failure.
2. After relocating the base unit by disconnecting the AC adapter.
3. After replacing the handset battery.
4. The handset goes out of range from the base unit.
To reset, place the handset on the cradle of the base unit for five seconds.
IMPROVING CORDLESS RECEPTION
Follow these guidelines to improve cordless sound quality:
• Select an area to install the unit where it is closest to the center of your home or office. This will
improve the operating range of the unit.
• Keep the base unit away from electrical equipment. Radio Frequency Interference (RFI) is
sometimes generated by these appliances, which can cause a degradation in cordless reception.
• Keep the handset batteries charged as much as possible. Weak handset batteries can limit the range
of cordless operation.
MAXIMIZING BATTERY LIFE
48 041604A-1
Page 49

Repeated use or recharge of Ni-Cd batteries without periodic full discharge results in reduced useable
charge time. When you notice the usable charge duration decreasing, fully discharge the Ni-Cd battery
and recharge as described:
DISCHARGING
1. Unplug the telephone line cord from the Excursion
®
36288.
2. Make sure that the adapter is connected.
3. Lift the handset out of the base cradle.
4. Press the TALK button of the handset and start discharging.
Once the Symbol LOW Battery appears on LCD display, it means that the battery level is low. Let it fully
discharge for 12 hours. Once the Ni-Cd battery is fully discharged, you may now charge the battery to its
full capacity.
CHARGING
1. Make sure the adapter and telephone line cord are connected to the Excursion
®
36288.
2. Place the handset on the base cradle. The CHARGE LED indicator of the base unit will light
steadily.
3. Leave the handset charging on the base for 14 hours continuously to get a maximum charge.
4. The Excursion
®
36288 is now ready for regular use. Discharge and charge the Ni-Cd battery again
once you notice a decrease in the useable charge time.
MAINTENANCE
1. Your phone should be situated away from heat sources such as radiators, heaters, stoves or any
other appliance that produces heat.
2. Use a slightly damp cloth to clean the plastic cabinet. A mild soap will help to remove grease or oil.
Never use polish, solvents, abrasives or strong detergents since these can damage the finish.
041604A-1 49
Page 50

TECHNICAL INFORMATION
This cordless phone uses radio frequencies to allow mobility. There are certain difficulties in using radio
frequencies with a cordless telephone. While these are normal, the following could affect the operation of
your system.
NOISE: Electric pulse noise is present in most homes at one time or another. This noise is most intense
during electrical storms. Certain kinds of electric equipment such as light dimmers, fluorescent bulbs,
motors, and fans also generate noise pulses. Because radio frequencies are susceptible to these noise
pulses, you may occasionally hear them in your handset. Generally, they are minor annoyances and
should not be interpreted as defects in your system.
RANGE: Because radio frequencies are used, location of the base unit can affect operating range. Try
several locations in your home or business and pick the one that gives you the clearest signal.
INTERFERENCE: Some electronic devices operate in and/or generate interference near the operating
frequencies of your cordless telephone. While several protection circuits are used to prevent unwanted
signals, there may be periods when these unwanted signals cause interference. If interference occurs
frequently, it can be minimized or eliminated by lowering the height of your base antenna or by relocating
the base unit. You can check for interference before selecting the final base unit location by plugging in
the phone.
50 041604A-1
Page 51

041604A-1 51
Page 52

TROUBLESHOOTING
A. TELEPHONE UNIT TROUBLESHOOTING TABLE
SYMPTOM SOLUTION
No dial tone • Check the telephone line cord connectors at both ends that they are
pushed in firmly until they click.
• If you had a power failure or had unplugged the base unit, replace the
handset on the base unit for two to five seconds to reset the system.
Does not ring
No power on the
handset unit
Does not charge • Check the Ni-Cd battery pack for proper connection inside the battery
52 041604A-1
• Check the RING ON/OFF mode on the handset. Set to RING ON mode
to enable the handset ringer.
• Check the telephone line cord connectors at both ends that they are
pushed in firmly until they click.
• You may have exceeded the Ringer Equivalence Number(REN) limit of
how many phones can be connected to the same line. The REN total of
all devices(printed on the bottom label of each unit)should not exceed
five(5). Disconnect the appropriate units to lower the REN total.
• Check the Ni-Cd battery pack for proper connection inside the battery
compartment on the handset.
• The handset rechargeable Ni-Cd pack may need charging.
compartment on the handset
• The charging contacts and terminals may need cleaning with an
alcohol-dampened swab.
Page 53
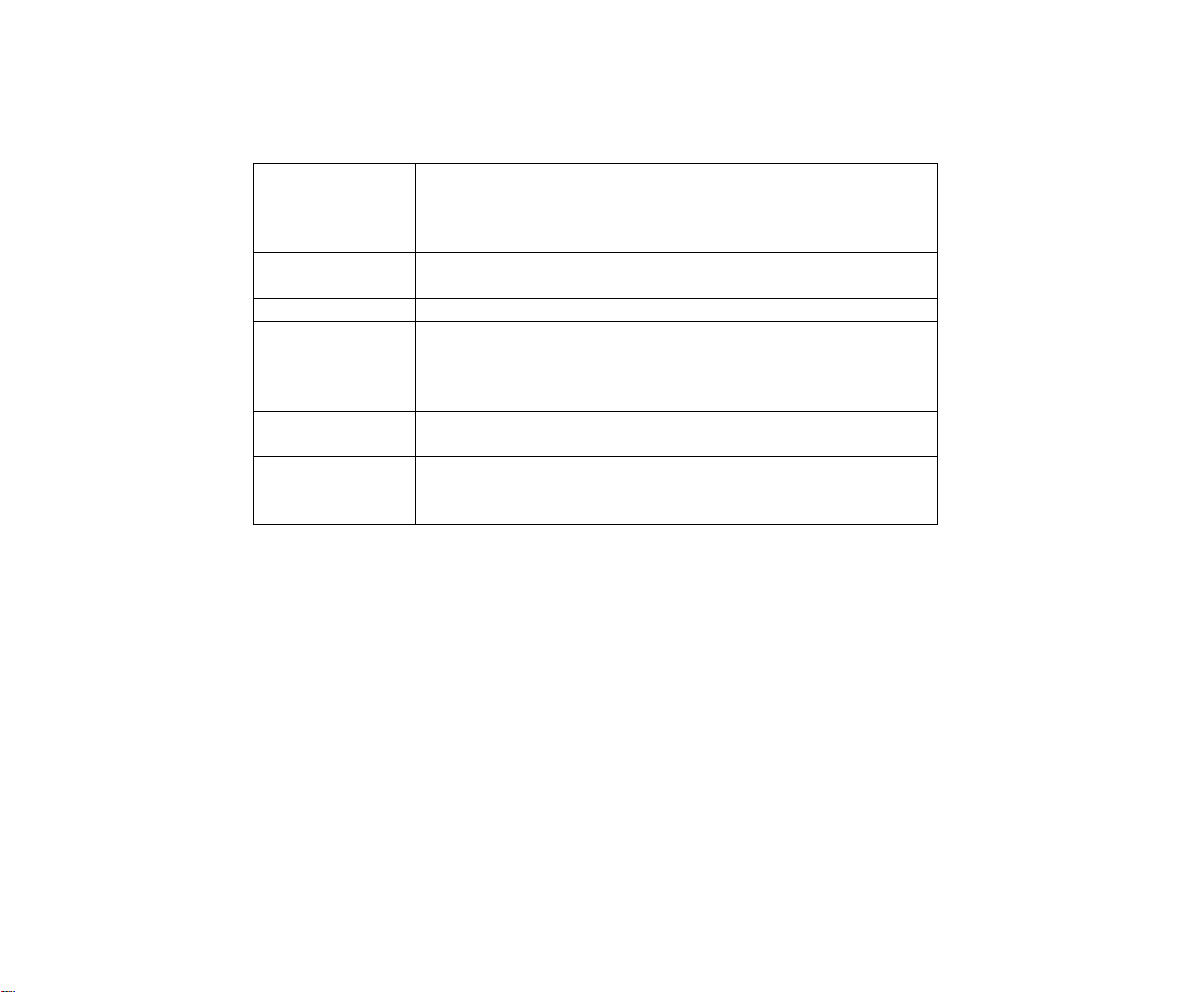
Range is limited • Move the base unit so that it is centrally located in your residence or
office and make sure that the base unit is not located near appliances.
• The handset Ni-Cd battery may be weak. Recharge the Ni-Cd battery.
• Refer to the section “ Improving Cordless Reception”.
Interference on
reception
Excessive static • Refer to the section “Improving Cordless Reception”.
Incoming
calls/Memo message
are cut off
Announces “Memory
Full”
Can not access
Remote Operation
• Choose an alternate channel using the SCAN button on the handset.
• Refer to the section “Improving Cordless Reception”.
• The Excursion®36288 will stop recording after 7 seconds of continuous
silence or 7 seconds after the caller hangs up (VOX features).
• Each incoming message recording is limited to two minutes to conserve
message storage space.
• The 15-minute recording limit may have been reached. Erase old
message to make room for new messages.
• The password you have entered may be incorrect. Enter the correct
password during OGM playback or within 7 seconds after the OGM has
finished playing.
041604A-1 53
Page 54

B. CALLER ID SYSTEM TROUBLESHOOTING TABLE
SYMPTOM SOLUTION
The Caller ID panel
is blank
The Caller ID does
not show the caller’s
name and/or phone
number
Random characters
and/or “NO DATA”
appear on the LCD
display
Cannot get call
Waiting identification
on the LCD panel
• Check the power connection.
• Check the telephone line cord connections.
• Check the batteries for proper installation.
• The Caller ID unit will not function until you have Caller ID service
provided by your local phone company. Call your local phone company
to have Caller ID installed on your telephone line.
• If you pick up the phone before the second ring, the caller information
will not be correctly received. If you have telephone answering
device(TAD) connected with the unit, set the TAD to answer after two
rings or more.
• If it is a blocked call or an out-of-area call, the caller’s name and/or
phone number will not appear on the display.
• If only the caller’s phone number appears on the display, it may be
Single Data Message Format(SDMF) call, as opposed to a Multiple
Data Message Format (MDMF) call. Please call your local phone
company to see which service you have.
• On rare occasions, the Caller ID information sent by the telephone
company may have an error in the transmission. This is not the fault of
your Caller ID unit. It can only capture and store the data that was
received.
• Subscription to Caller ID Call Waiting (CIDCW) is required from your
local phone company for the CIDCW function to operate properly. Call
you local phone company for details.
54 041604A-1
Page 55
AC ADAPTOR:USE ONLY WITH CLASS 2 POWER SOURCE, OUTPUT 12V DC,
THIS SYMBOL IS INTENDED TO ALERT THE USER OF THE PRESENCE
500mA .
OF IMPORTANT OPERATING AND MAINTENANCE (SERVICING)
INSTRUCTIONS IN THE OWNER’S MANUAL.
Distributed Exclusively Worldwide by Unical Enterprises, Inc., Industry, California, USA
36288/031804A-1 www.nwbphones.com
041604A-1 55
 Loading...