

Page 1
1/12
User’s manual
EN
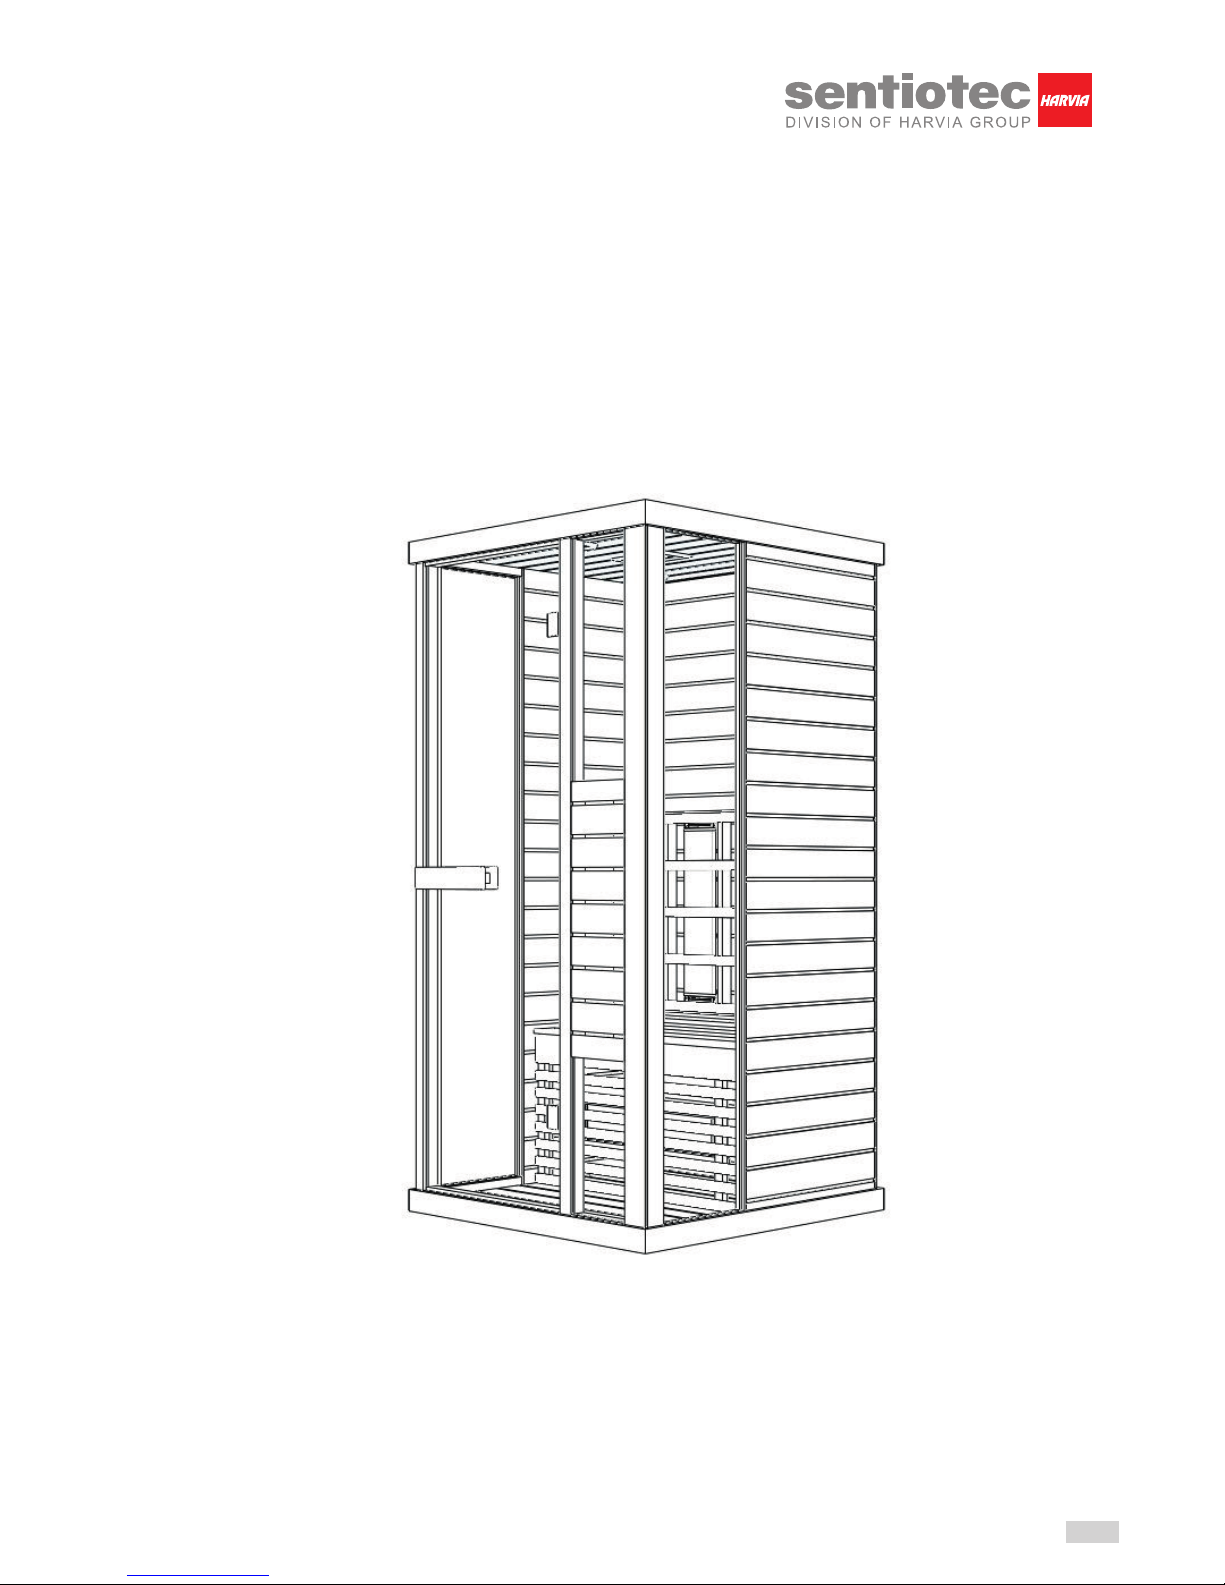
Infrared Cabin
PHÖNIX-S (1-030-313)
2017/04
Page 2
2/12
EN
PREFACE
Thank you very much for purchasing our product.
Please read this manual carefully before assembling and save it afterwards. Please write down the control box
serial number of the cabin as this number will be required in case of repair or order of spare parts.
ATTENTION
Installation and repair should only be done by a qualied electrician!
Check power supply rating and make sure the grounded outlet is correctly connected before installation.
Use original parts only. Do not share the outlet with any other appliances.
When not in use, turn off the cabin’s power unit.
Locate your cabin indoors and on a at, level and dry surface.
DANGER
Heaters shall not be subjected to water spray; shower heads shall not be installed within the infrared cabin.
Covering the radiator causes a re hazard due to overheating. Do not cover the heaters!
Keep ammable or easily combustible materials/objects (eg.towels) away from the radiator at all times.
Do not touch the radiator during and shortly after use as a burning hazard exists due to hot parts.
The light bulb heats in use. If the bulb needs to be changed, unplug the cabin and let the bulb cool down
before changing it.
Should the electrical connection get damaged, it must be replaced-either by the manufacturer or by
a licensed electrician!
WARNING
If you suffer from illness or other health-related problems, especially heart conditions or circulatory
disturbances or if you take medication, you should consult a doctor before using the infrared cabin.
Children and frail persons should never be in the cabin without supervision.
If you feel uncomfortable while using the infrared cabin, stop immediately and consult with your doctor.
Never go to a hot infrared cabin if you have taken alcohol, strong medicines or narcotics.
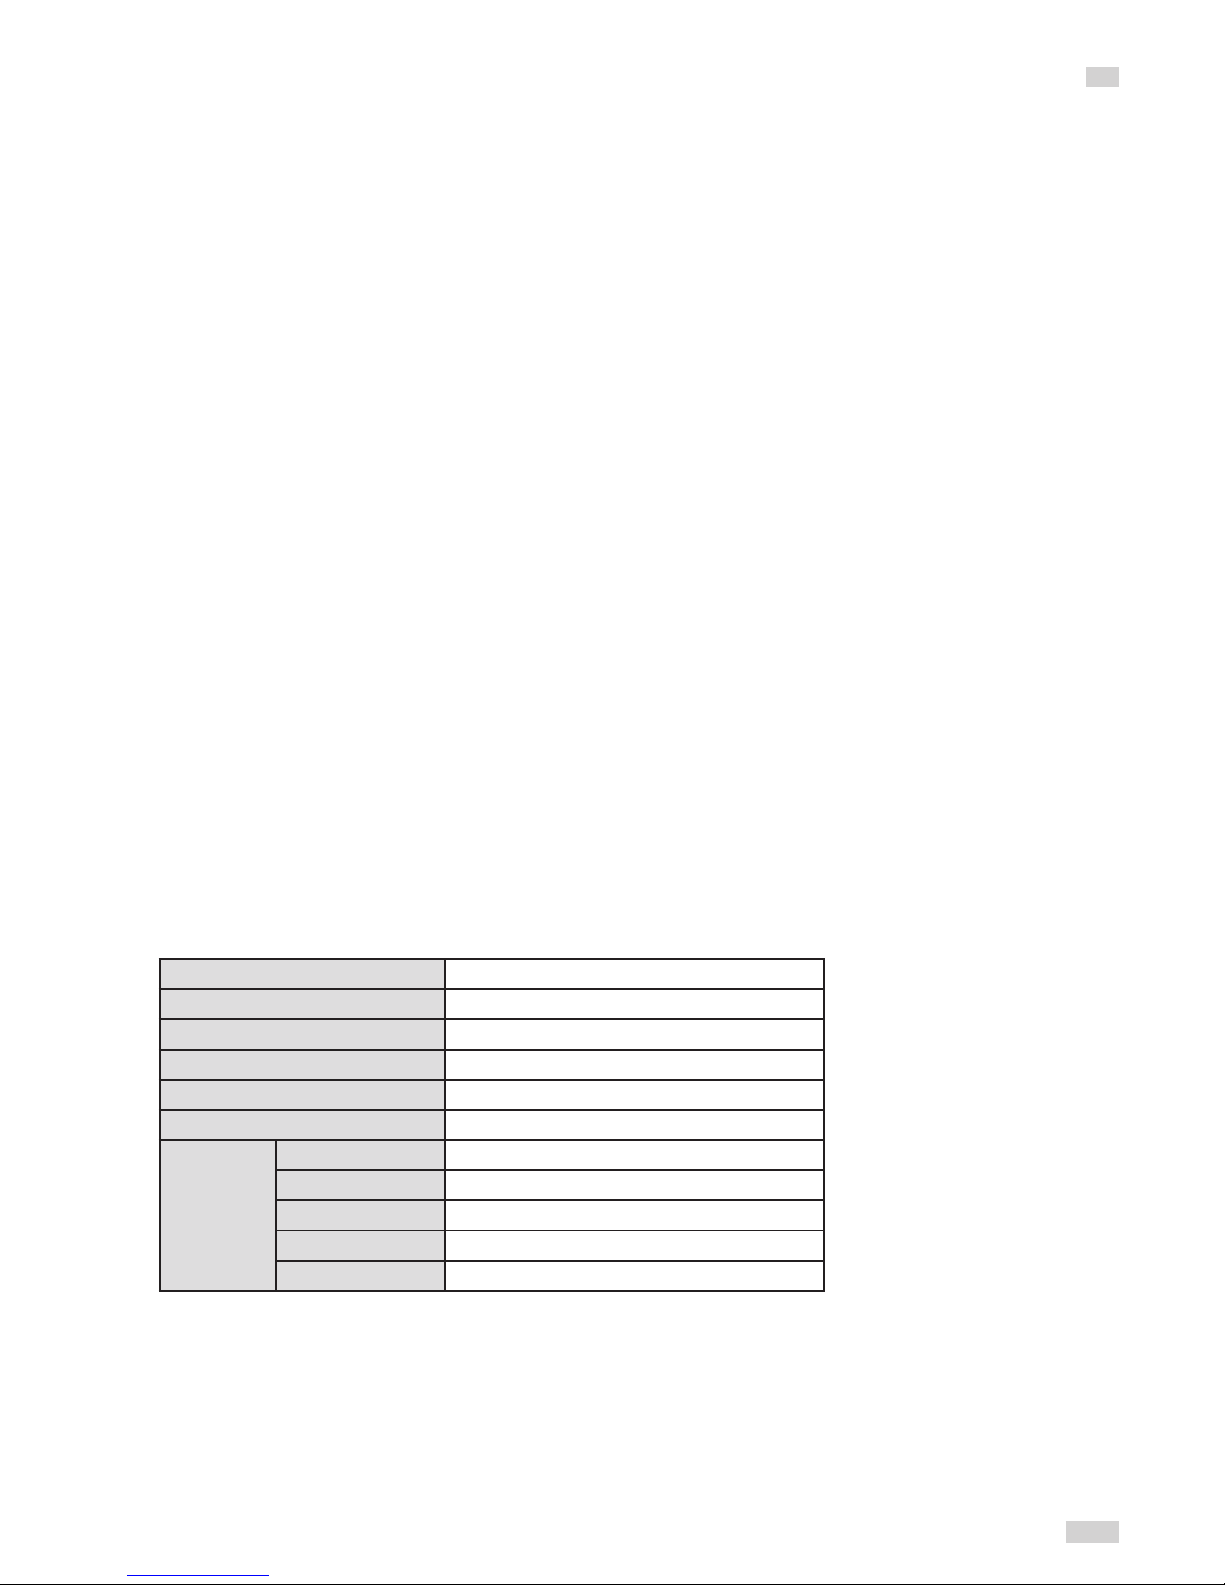
Technical data
Model PHÖNIX-S (1-030-313)
Cabin material Canadian red cedar
Length 1000 mm
Width(depth) 1020 mm
Height 2000 mm
Voltage 230volt 50Hz
Radiators Type Halogen radiators with red glass
Total output 1500W 6.5A
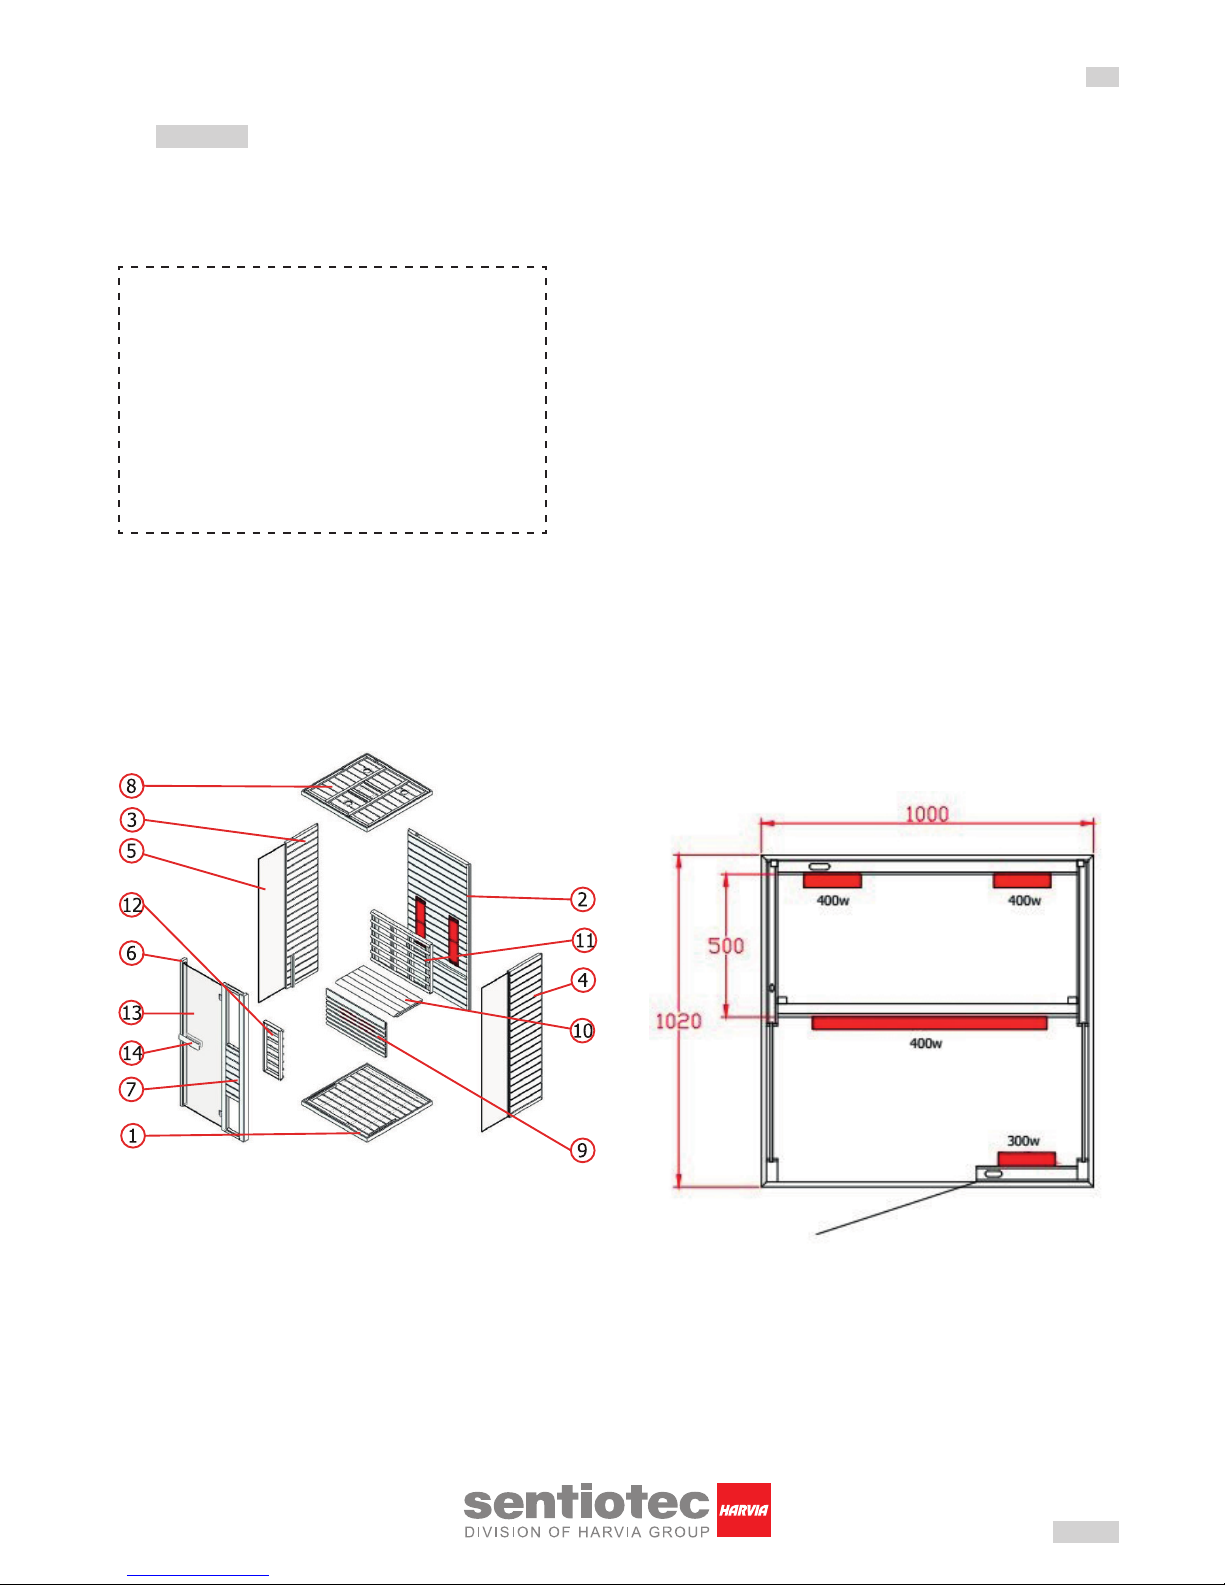
Back panel 400W x 2
Front panel 300W x 1
Calves 400W x 1
Page 3
3/12
EN
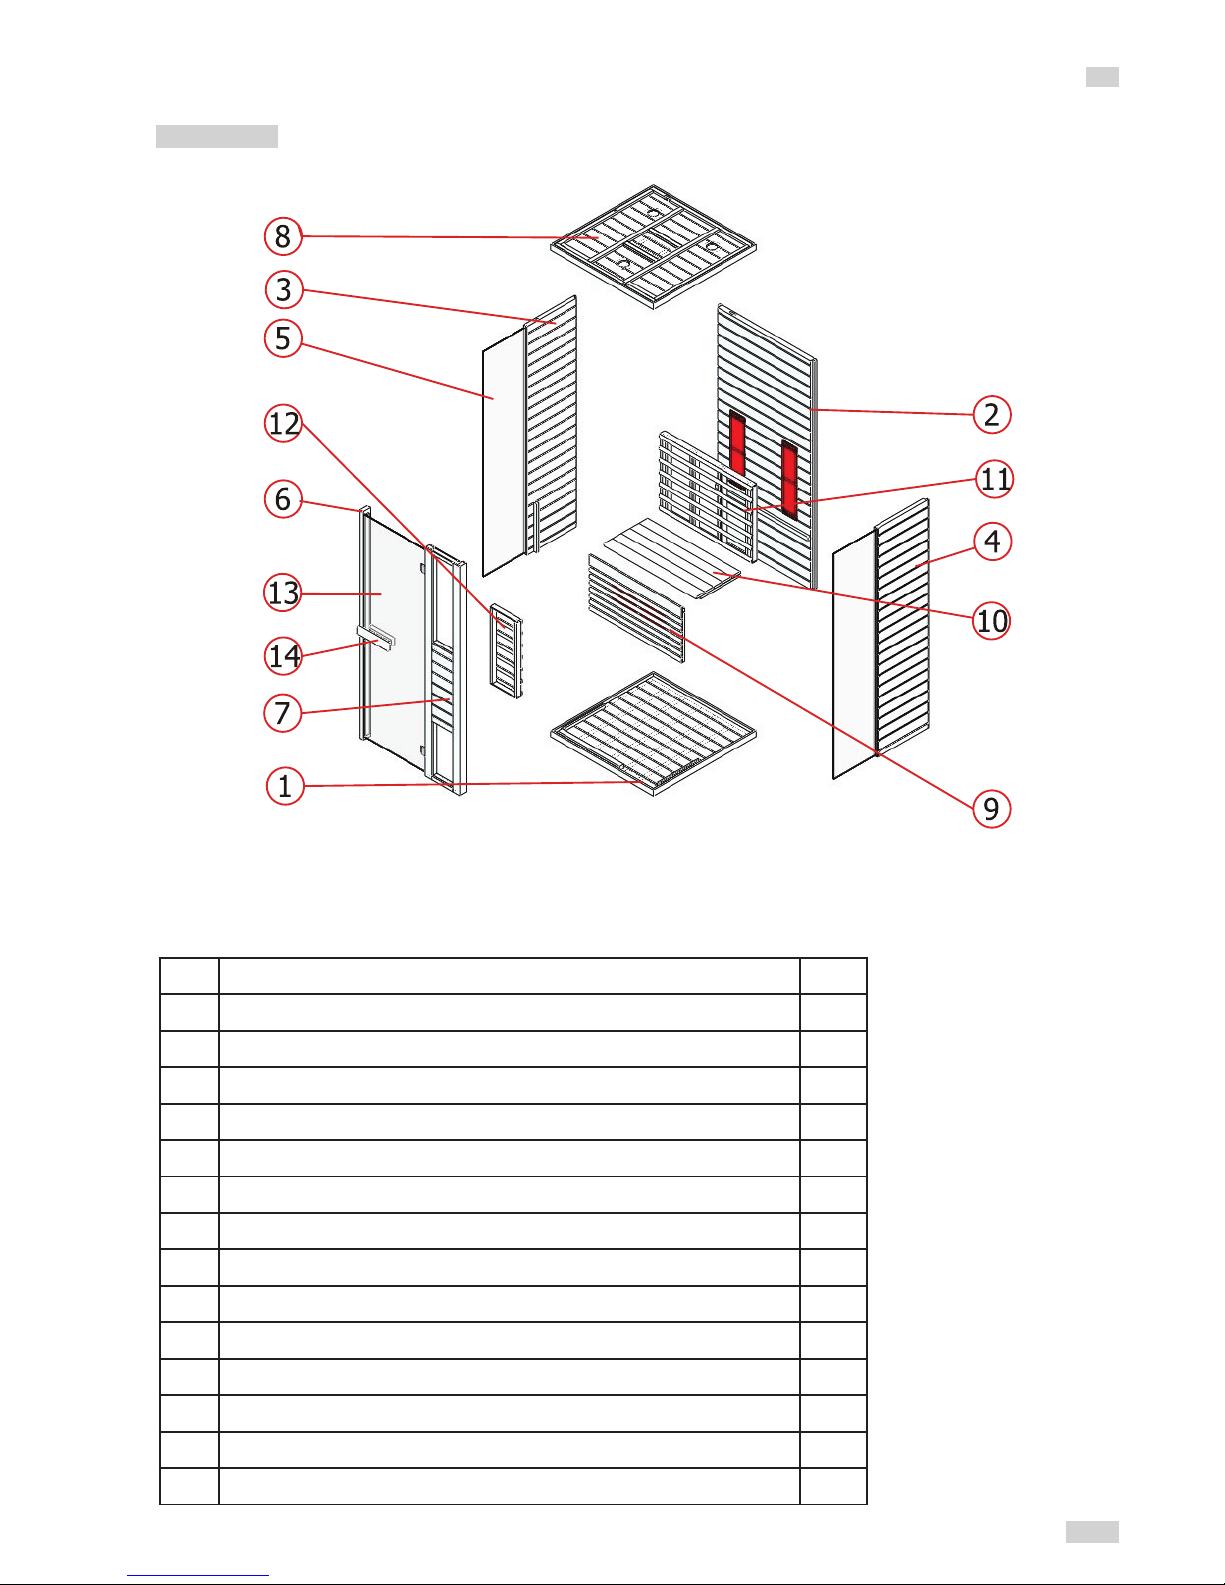
Cabin Individual parts (variations possible)
NO NAME Q’TY
1 Floor panel (1020*998*65mm) 1
2 Back panel (1927*940*43mm) 1
3 Side panel 1 (1927*593*33mm) 1
4 Side panel 2 (1927*593*33mm) 1
5 Side glass (1896*344*6mm) 2
6 Door jamb (1927*70*43mm) 1
7 Front panel with glass (1927*344*48mm) 1
8 Toppanel (1020*998*65mm) 1
9 Bench support panel (898*468*33mm) 1
10 Bench surface panel (900*500*33mm) 1
11 Guardrail 1 (898*650*54mm) 1
12 Guardrail 2 (650*260*54mm) 1
13 Glass door (1866*592*6mm) 1
14 Door handle (outside, 300*65*45mm & inside, 235*65*45mm) 2
PARTS LIST
Page 4
4/12
EN
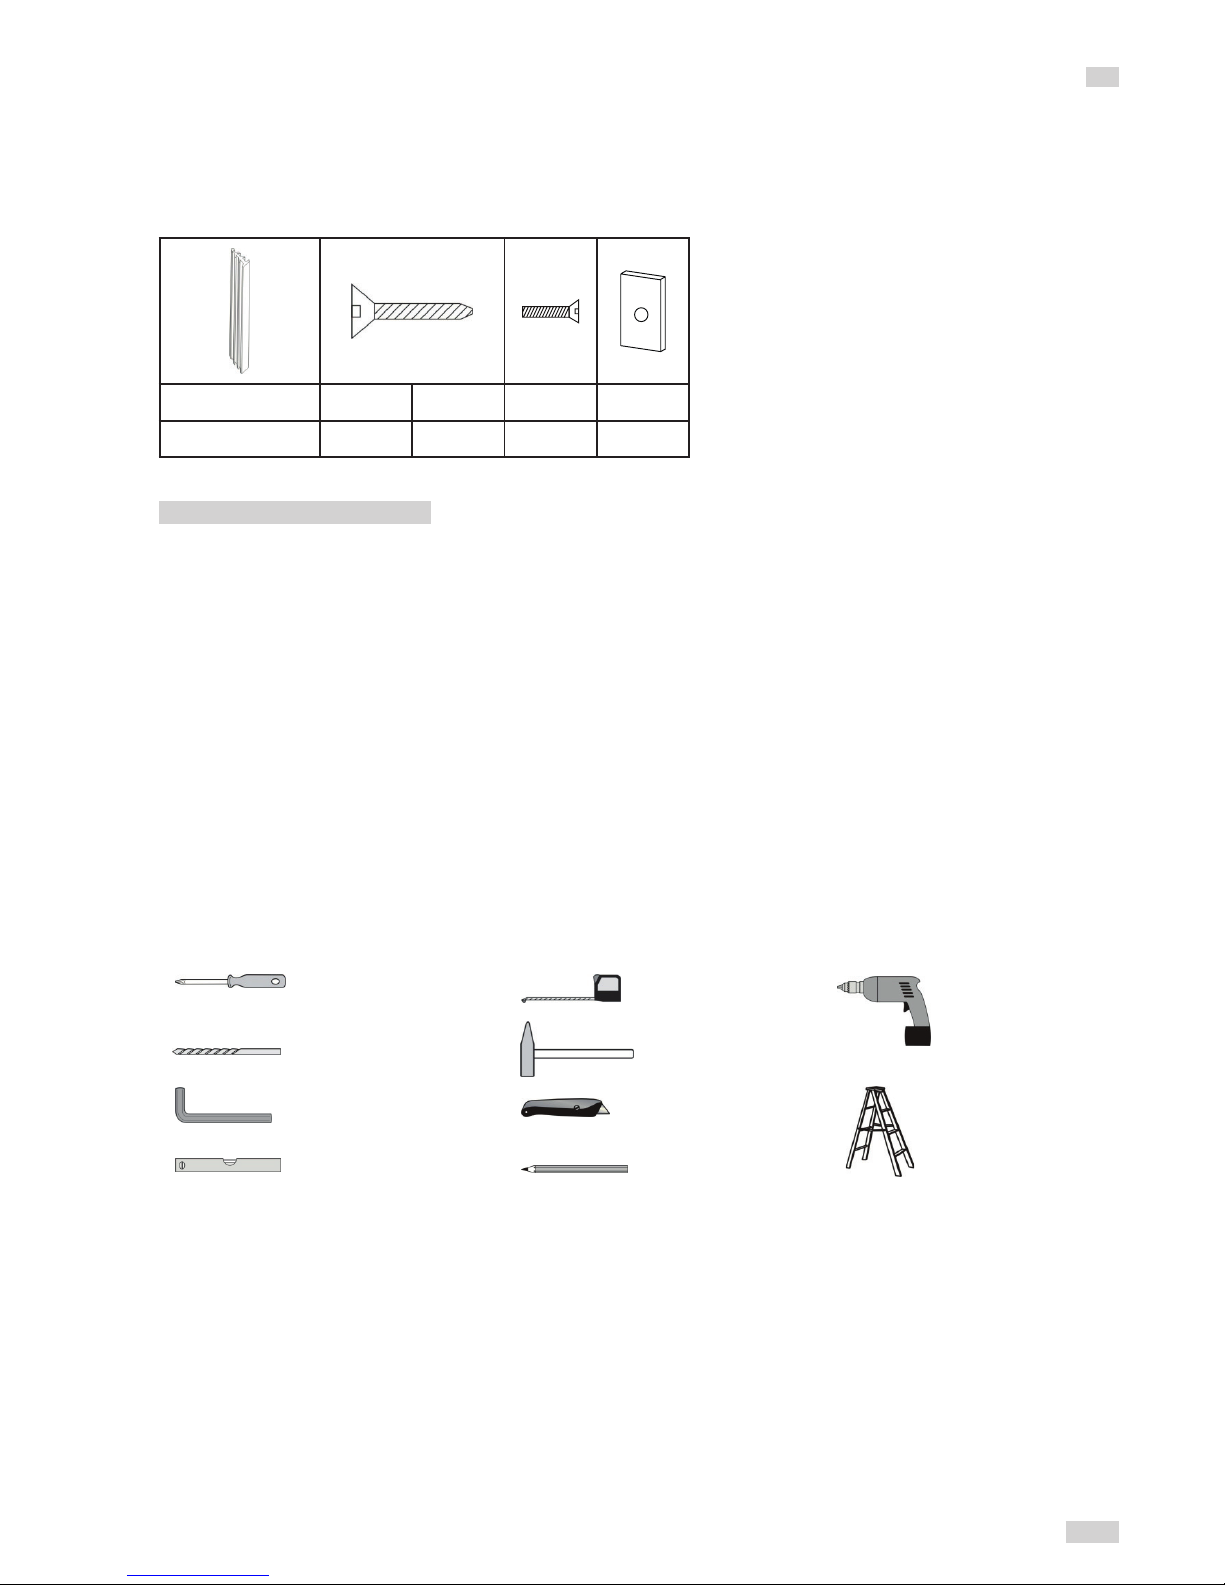
Hardware parts (variations possible)
Rubber strip Φ3*16 Φ4*45 Φ6*60 30*20*2
10m 1x 33x 2x 1x
Assemble tips
Please remove transport packaging and inspect that your infrared cabin has been delivered complete
and intact before beginning assemble.
A least 2 persons are required for assemble of the cabin
Please check the countersink and hole diameter of the drill holes to avoid damaging the wood.
The minimum room height required for installation is 2120 mm
Tools
ASSEMBLE INSTRUCTIONS
Pencil
Spirit level
Allen Wrench (kit)
Spiral drill (kit)
Screwdriver (kit)
Cutter
Hammer
Tape measure
Electric drill
Stepladder
Page 5
5/12
EN
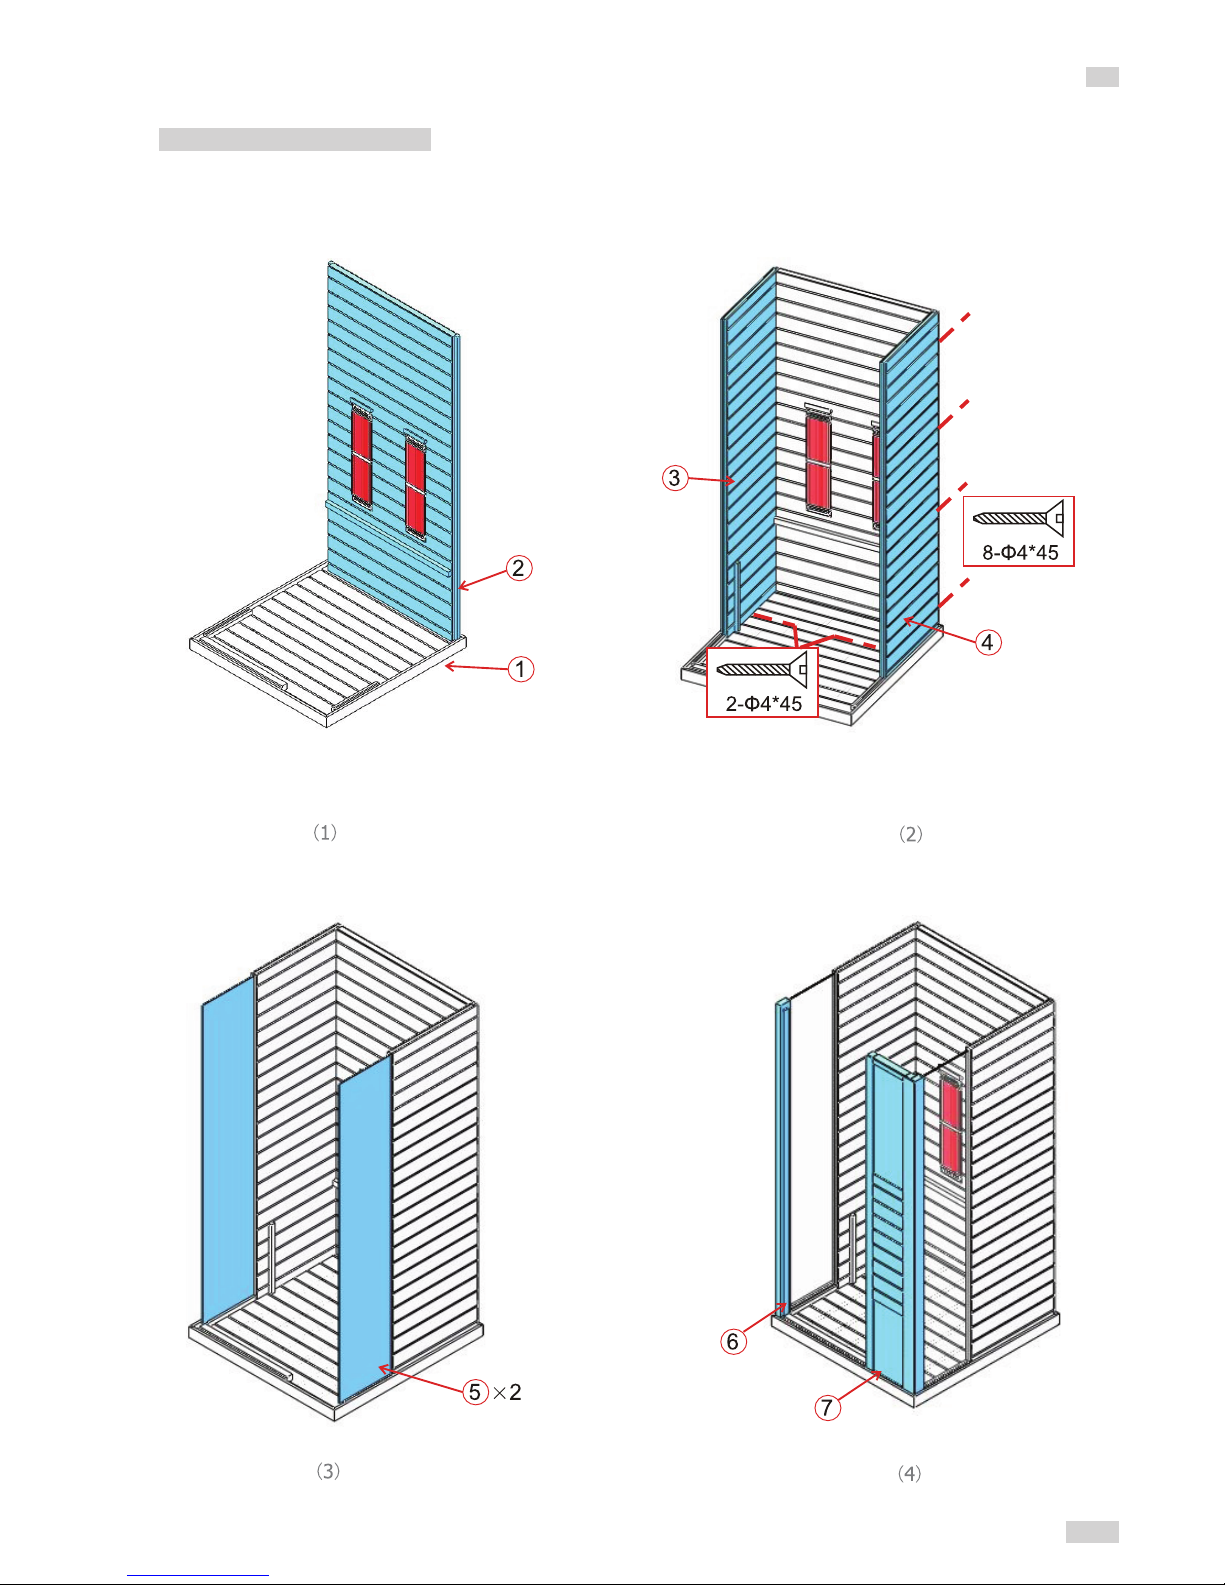
Assemble steps
ASSEMBLE INSTRUCTIONS
Note: back panel has ventilation slits
must keep 5 cm away from the next wall
Page 6
6/12
EN
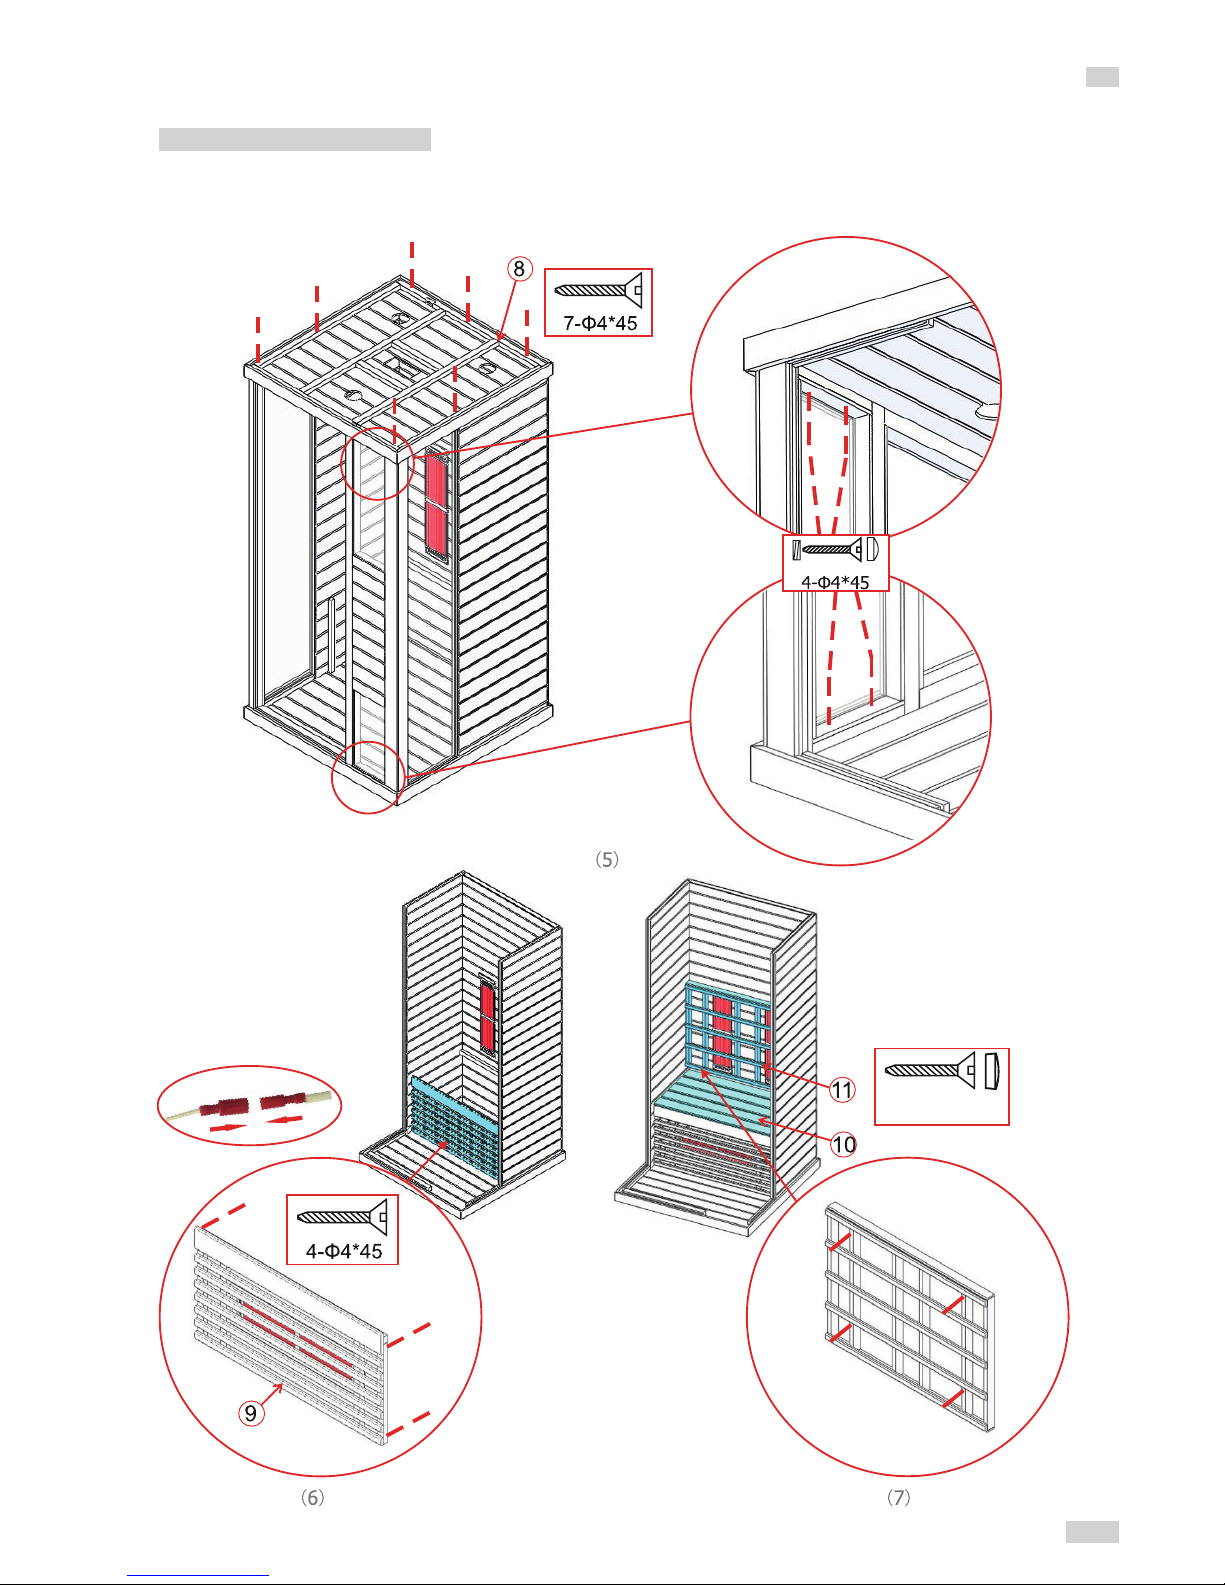
4-Φ4*45
Assemble steps
Note: connect calves
heater cable
Note: about 20mm away
from the bench panel
ASSEMBLE INSTRUCTIONS
Cap
Cap
Wood cover
Page 7
7/12
EN
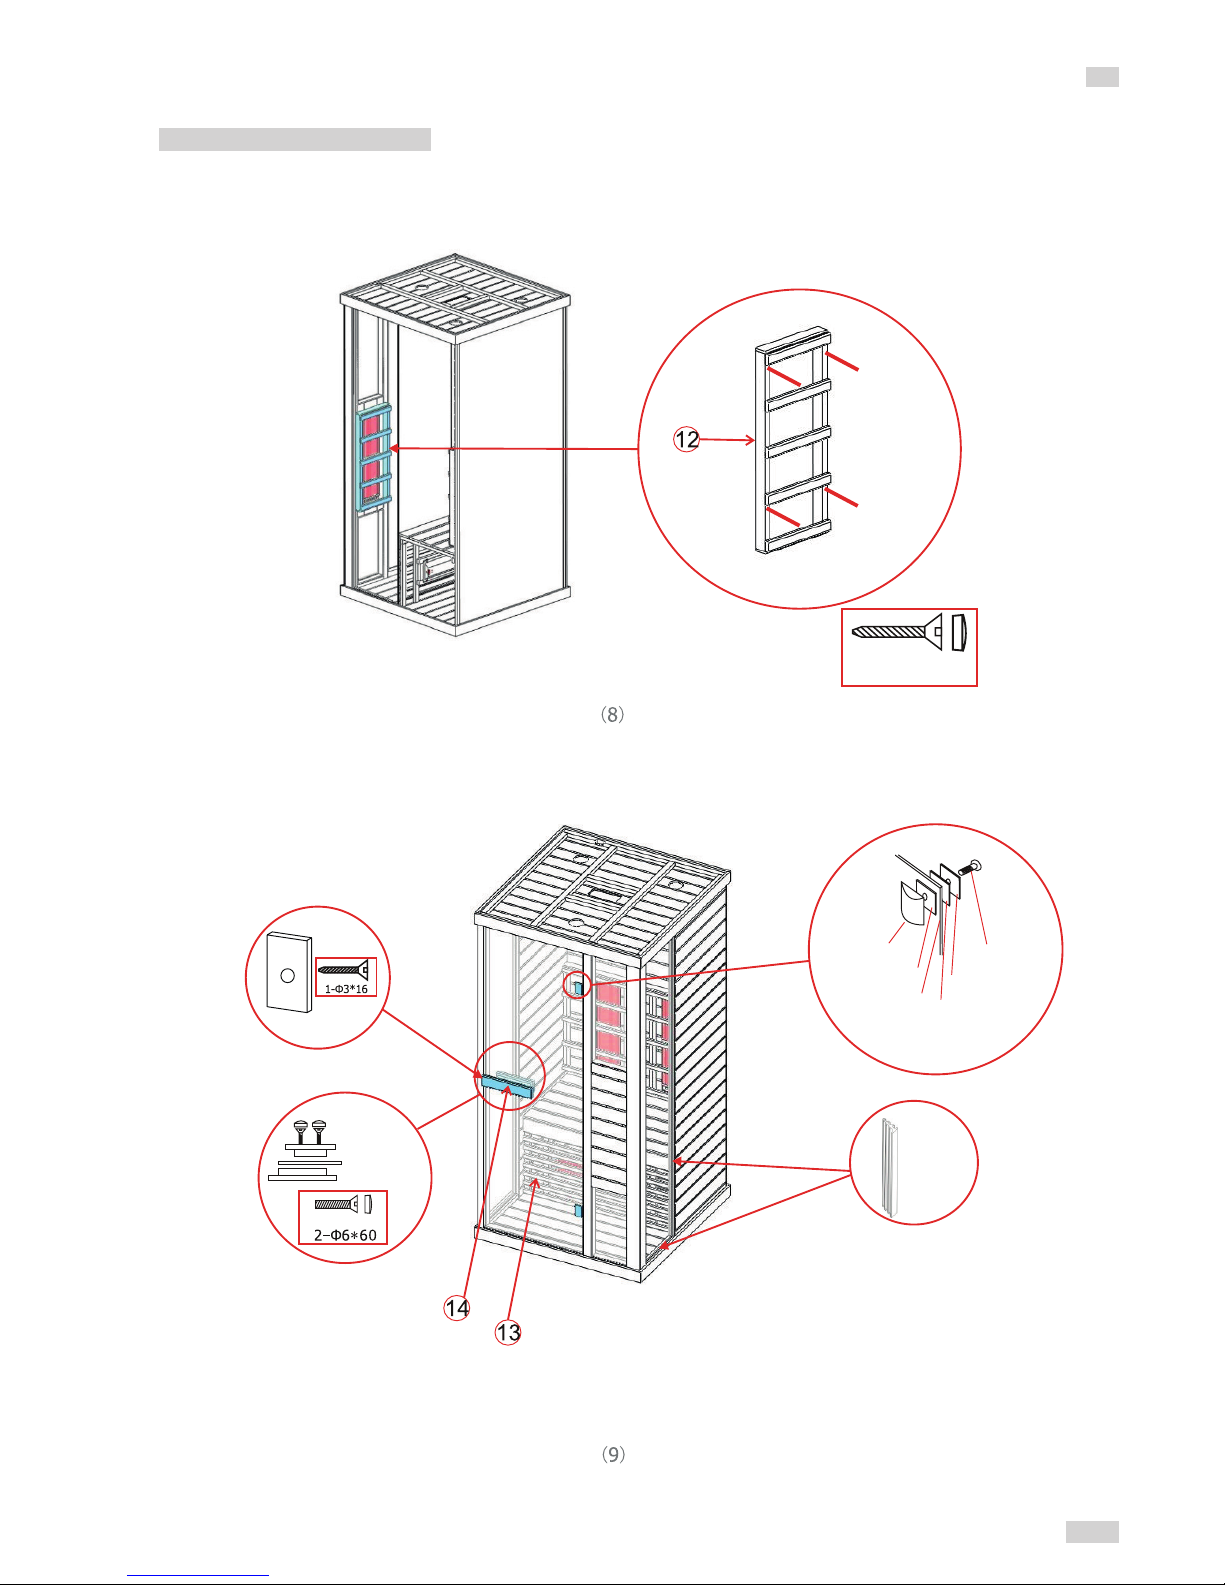
Assemble steps
Note: connect all cables on the roof of the cabin
ASSEMBLE INSTRUCTIONS
4-Φ4*45
Rubber
Strip
Hex screw
Hinge bottom
Hinge surface
Rubber tting
Rubber tting
Glass door
Handle
Glass door
Handle
Wood cover
Wood cover
Page 8
8/12
EN
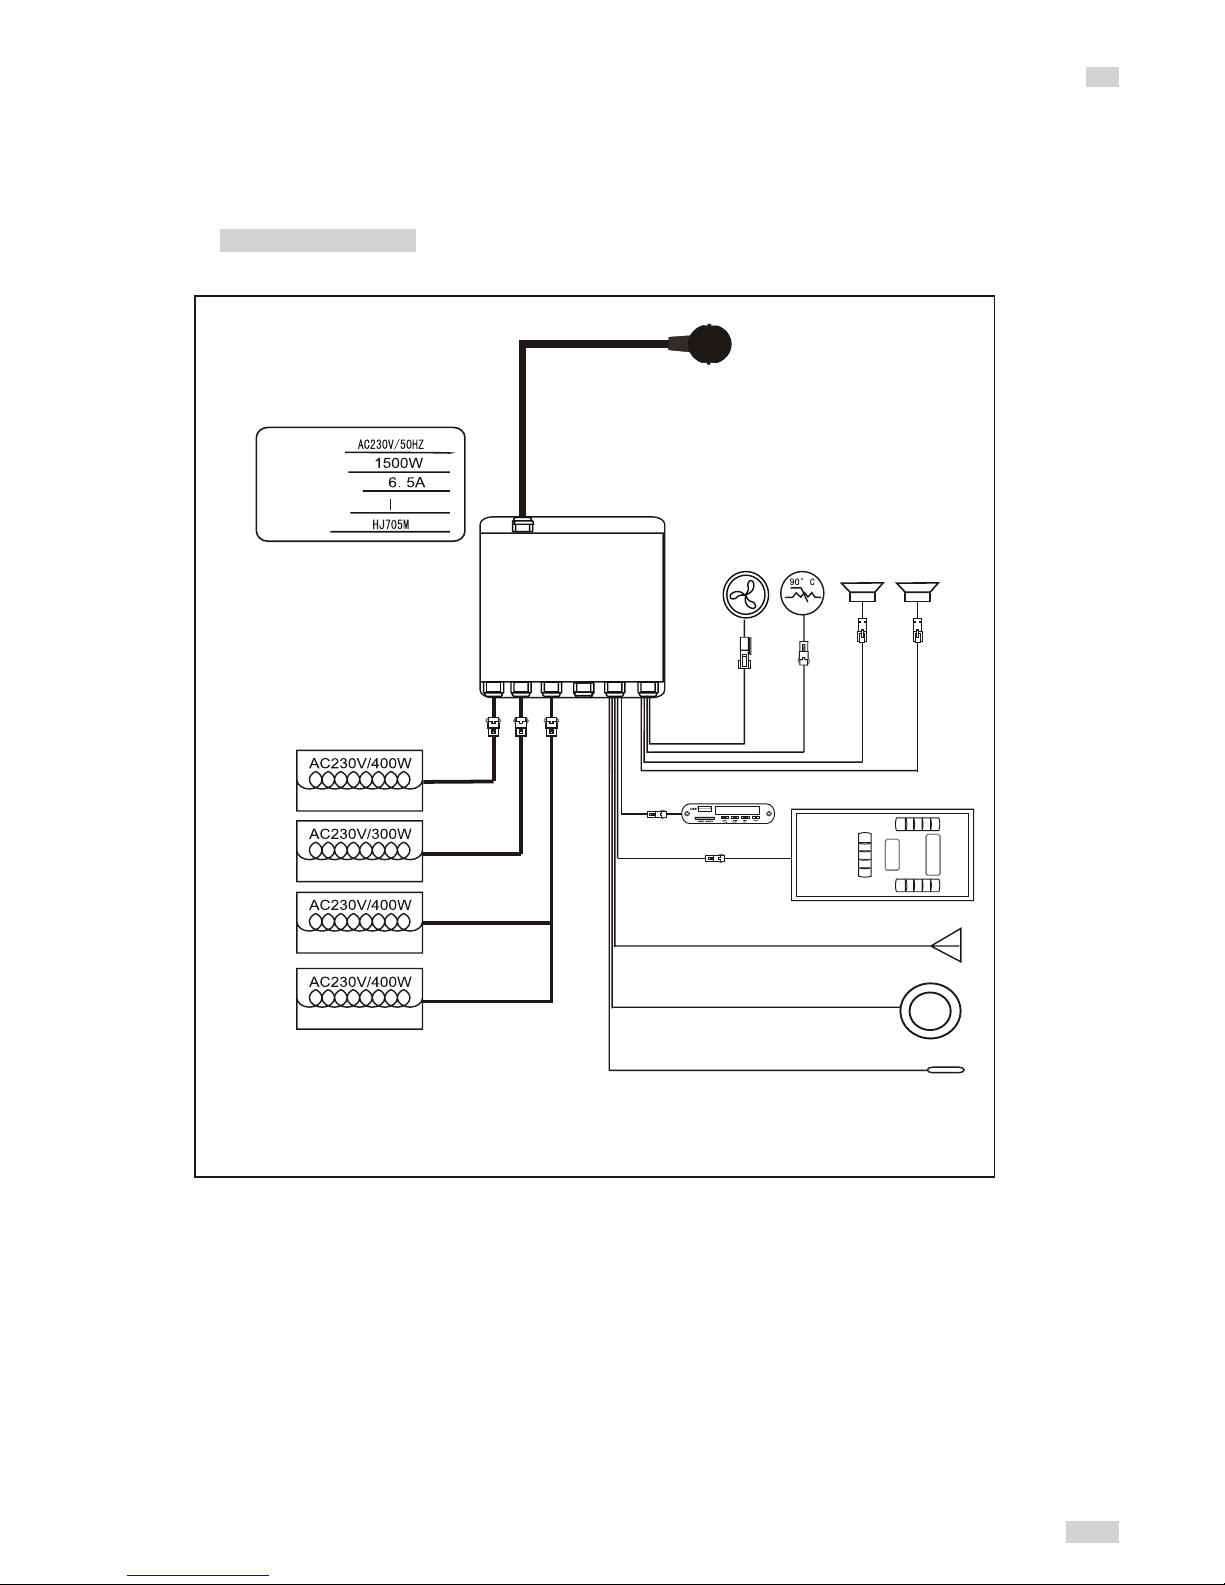
Plug
Calves
Input Voltage
Power Rating
Current Rating
Safety Grade
Model
Front
Back
Electric control box
Fan DC12V/5W
Temperature Control
Speaker 8Ω 5W
Speaker 8Ω 5W
Control panel
MP3
Antenna
Color light AC12V/7W
Temperature sensor (roof)
Note: only provide for reference
CIRCUIT DIAGRAM
Page 9
9/12
EN
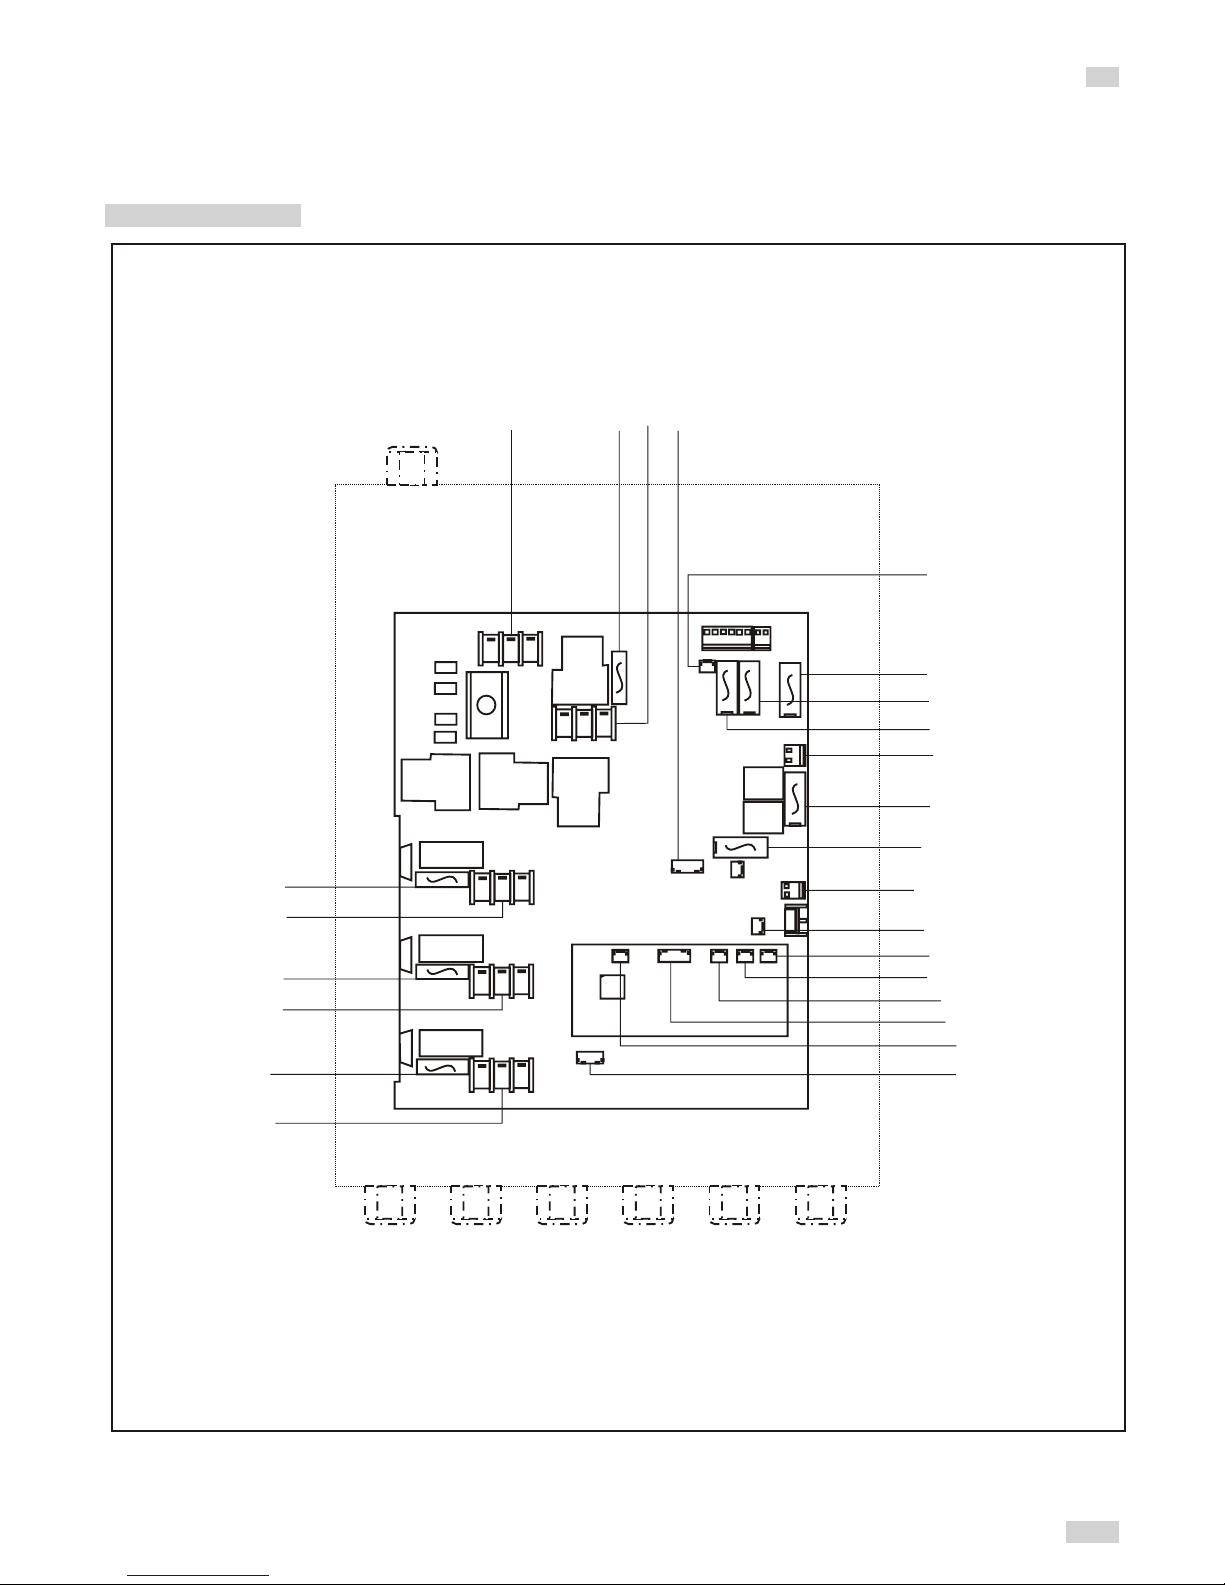
FRONT FUSE
COLOR LIGHT
FLOOR HEATER
FLOOR FUSE
MAIN POWER
(AC230V)
FRONT HEATER
BACK FUSE
BACK HEATER
CALVES HEATER
705M ELECTRIC CONTROL BOX
CONTROL PANEL
TEMP SENSOR (ROOF)
MP3
ANTENNA
SPEAKER
SPEAKER
MP3 POWER (+5v)
FAN
LIGHT FUSE
FAN FUSE
SPOTLIGHT
MAIN FUSE
MAIN FUSE
SPOTLIGHT FUSE
TEMP OVERHEAT CONTROL
(90 DEGREE)
CALVES FUSE
CIRCUIT DIAGRAM
Page 10
10/12
EN
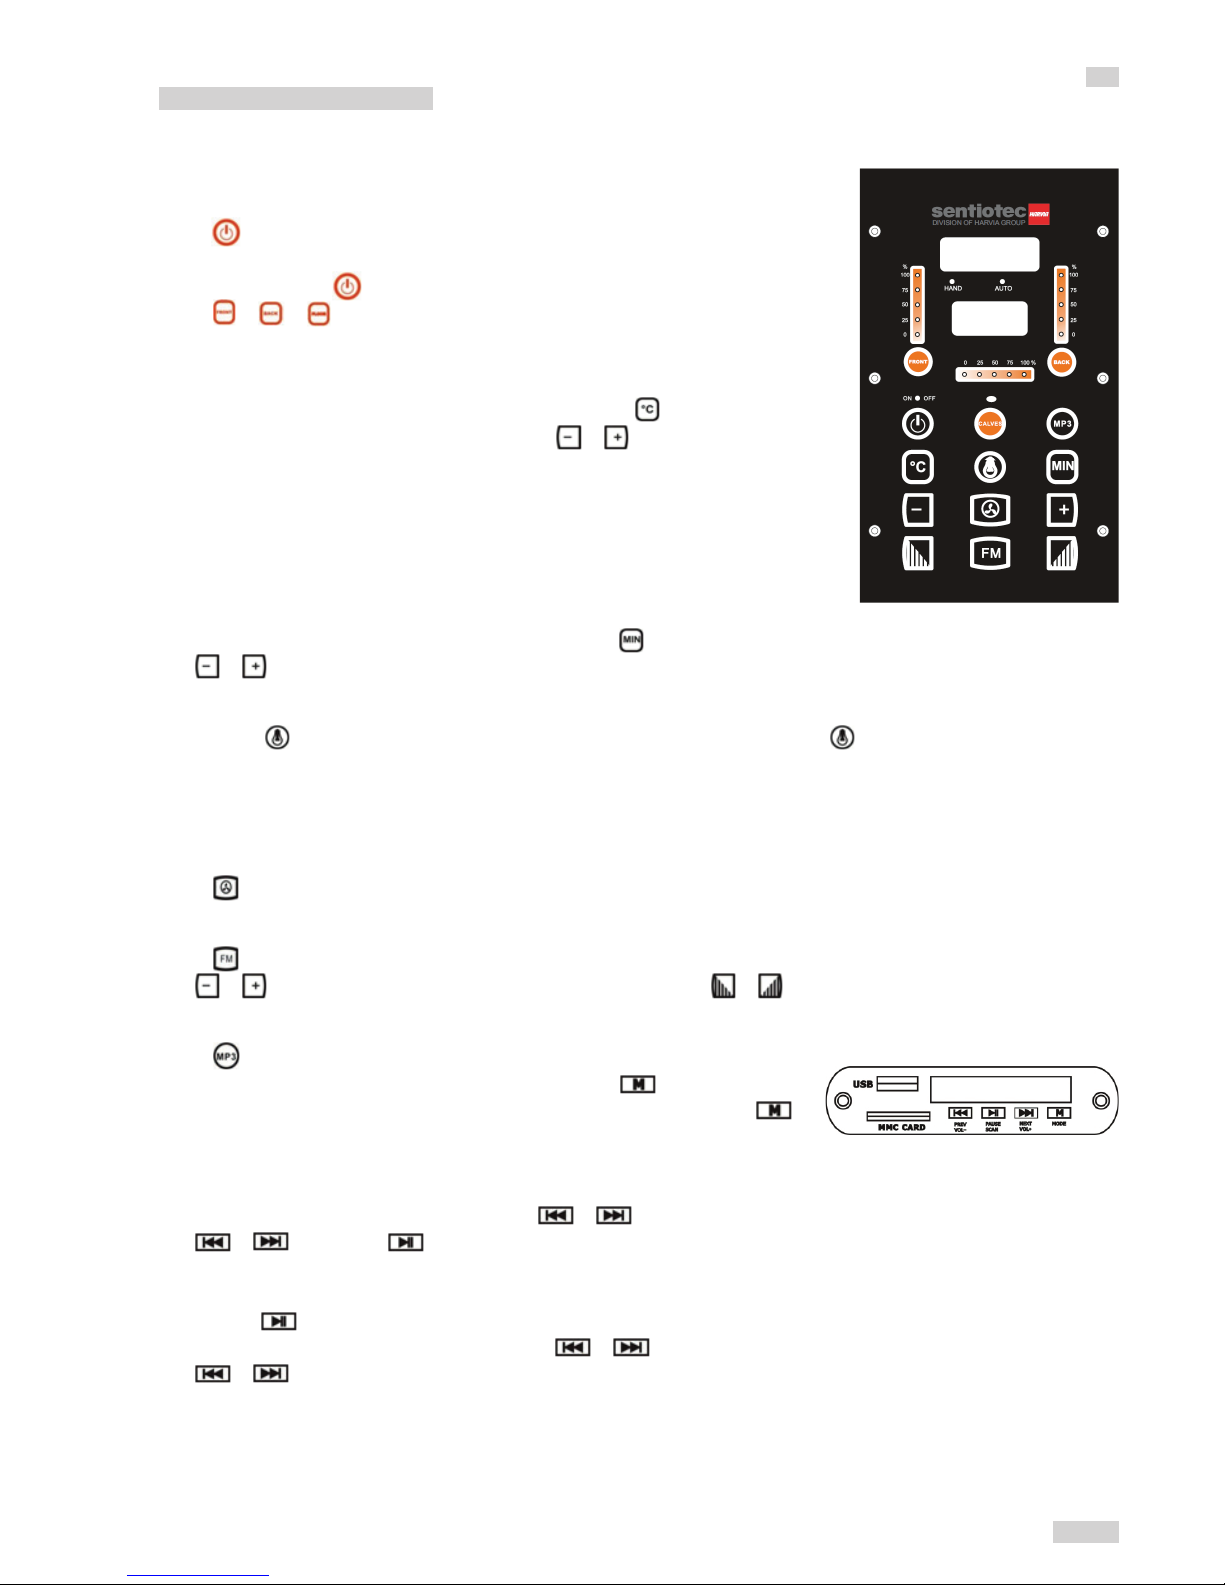
OPERATING INTRUCTIONS
Connect the power unit to wall outlet, the LED indicator will start to blink on the display. Now it is possible to
switch on the infrared heaters, the light and the music function.
1) Startup
Press
to switch on the cabin and heaters start to work, the length of time
is automatically set to 99 minutes and the air temperature inside the cabin will
be displayed. Press
again switch off the heaters.
Press
/ / separately to adjust the power intensity of front/back/
calves heaters from 100%-0%.
2) Temperature settings
The upper display refers to the air temperature. Press
, you can set
the desired temperature (35-60°C) using the
/ keys. When at this
temperature, the heaters will stop working automatically; When it fall 4°C
below this temperature, the cabin will start up automatically.
Please note: The maximum air temperature reachable in the cabin
may be lower than the desired temperature. This is dependent on
the temperature outside the cabin.
3) Time settings
The lower display refers to the length of time. Press
, you can set the desired time (5-90mins) using
the
/ keys. After this time, the heaters will shut off automatically.
4) Sky light
Short press
, you can set the desired colour (7 colors totally); Long press to go into an automatically
cycling mode, changing colour every 5 seconds.
5) Fan
The fan has three modes: automatic, manual, close. The automatic mode is present when the heaters
switch on. In automatic mode, the fan switches on when the set cabin air temperature is reached.
Press
once for manual mode, the fan switches on. Press once more for close mode, it switches off.
6) FM radio
Press
to switch on or switch off the FM radio. You can set a station (87.5MHZ-108MHZ) by pressing
the
/ keys and adjust the volume (0-8) by pressing the / keys.
7) Mp3 player
Press
to switch on or switch off the Mp3 player.
Activate the Mp3 player by pressing and holding the
on the Mp3
player.
Select the preferred mode with brief repeated presses of the
on the Mp3 player. (USB, MMC CARD, Bluetooth, FM radio)
USB/SD or Bluetooth mode:
You can select songs by short pressing the
/ keys and adjust the volume (0-32) by long pressing
the
/ keys. The key for pause.
FM radio mode:
Long press to search stations (87.5MHZ-108MHZ) automatically, the system will save all of them;
You can select stations by short pressing the
/ keys and adjust the volume (0-32) by long Pressing
the
/ keys.
8) Remote control included
Page 11
11/12
EN
SERVICE
Notes:
Use instructions
Drink plenty of liquids before and after use of the infrared cabin.
Dry yourself off completely.
The optimal cabin temperature for a pleasant session lies between 35 and 40°C.
After a heating period of an hour at the latest, the cabin should be switched off and a heating brake of
at least 30 minutes should be taken.
It is recommended to take a warm shower and relax after use.
Maintenance instructions
Clean the cabin with a damp cotton towel, dry with a clean dry towel.
Clean the glass with a window/glass cleaner and a soft cloth.
Do not pour water in the control panel or clean it with wet cloth. For cleaning purposes, use a cleaning cloth
that has been only slightly moistened with a mild soapy solvent (dish detergent).
Do not use chemical detergents to clean the cabin.
Please fasten the screws of the bench once every three months, avoid the loose or drop off.
Page 12
12/12
EN
GUARANTEE CARD
SERVICE
Control unit label
Fill in this form and make a picture of it and Email to:
______________________________________________
Date of purchase: _______________________________
Serial Number: _________________________________
Reference number: ______________________________
Name: ________________________________________
Article state (unopened, just opened or used): ________
Please encircle on picture below which heater or which panel
has a fault.
Attach pictures of the problem and send them through email.
 Loading...