

Page 1
1
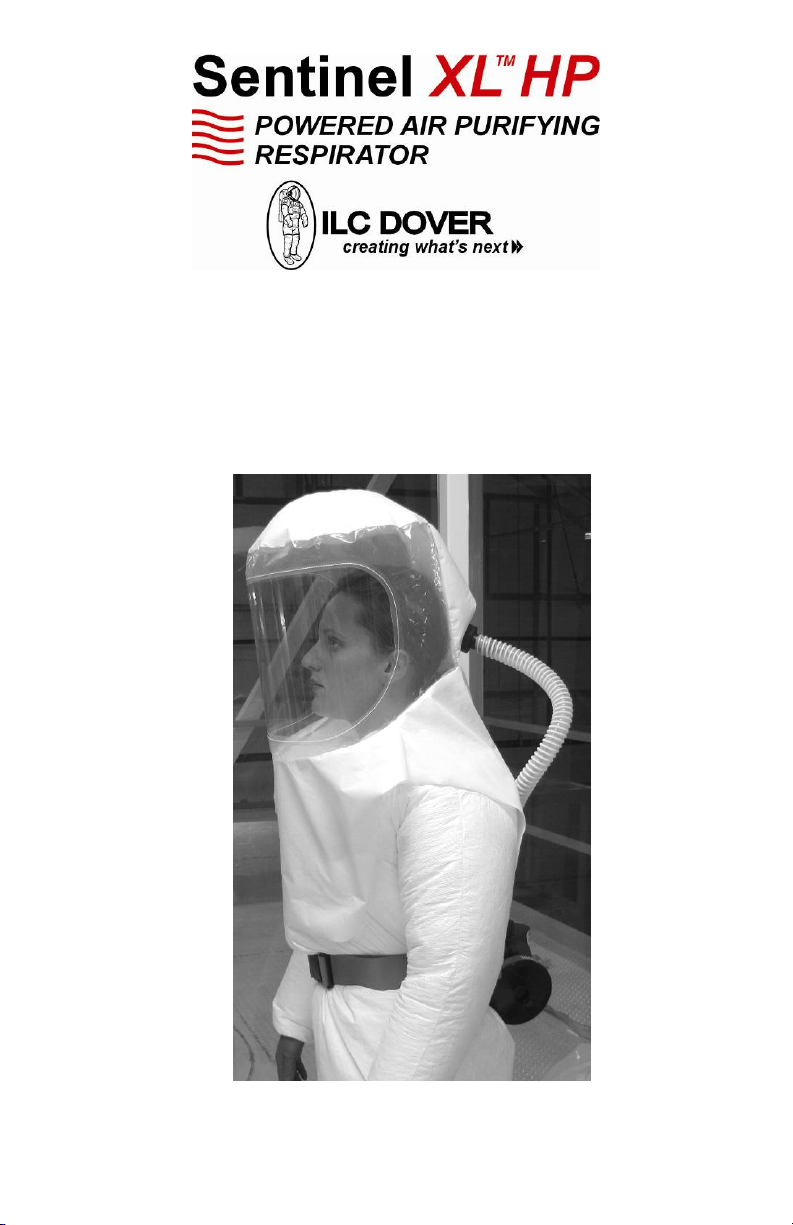
SENTINEL XL™ HP CLEAR HOOD
PAPR SYSTEM
MODEL NO. S-4000
USER INSTRUCTION MANUAL
ECO: 102-0461-01 S-4014
Rev B
Page 2

2
∆ WARNING
CONTAMINATES AND/OR UNKNOWN CONCENTRATIONS OF
CONTAMINANTS, USE WITHOUT ADEQUATE TRAINING,
DISREGARD TO THE WARNINGS AND INSTRUCTIONS CONTAINED
HEREIN AND FAILURE TO INSPECT AND MAINTAIN THIS
R IS NOT INTENDED FOR USE IN
ATMOSPHERES WHERE THE IDENTITY AND/OR CONCENTRATION
OF THE CONTAMINANT IS UNKNOWN. THIS MAY RESULT IN
RESPIRATOR DOES NOT SUPPLY OXYGEN AND
∆ WARNING
TRAINING IS REQUIRED BEFORE USE OF THIS HOOD AND
RESPIRATOR. FOLLOW THESE INSTRUCTIONS CAREFULLY. THIS
POWERED AIR PURIFYING DEVICE IS ONLY FOR USE IN SPECIFIC
DITIONS. USE OF THIS
RESPIRATOR WITHOUT PROPER TRAINING COULD RESULT IN
IMPROPER USE OF THIS HOOD AND RESPIRATOR MAY RESULT IN
PERSONAL INJURY OR DEATH. IMPROPER USE INCLUDES, BUT IS
NOT LIMITED TO, USE IN ATMOSPHERES CONTAINING UNKNOWN
RESPIRATOR.
THE HOOD AND RESPIRATO
IMMEDIATE DANGER TO PERSONNEL.
THIS HOOD AND
MUST NOT BE USED IN OXYGEN DEFICIENT ATMOSPHERES
CONTAINING LESS THAN 19.5% OXYGEN.
ATMOSPHERES AND UNDER CERTAIN CON
SERIOUS INJURY OR DEATH.
ECO: 102-0461-01 S-4014
Rev B
Page 3

3
TABLE OF CONTENTS
ITEM PAGE
DESCRIPTION ...................................................................................................... 4
GENERAL SAFETY INFORMATION ................................................................ 6
REPLACEMENT PARTS ..................................................................................... 10
ASSEMBLY AND PREPARATION FOR USE OF DECON BELT .................. 11
INSTALLING BATTERY PACK ......................................................................... 14
REMOVING THE PAPR SYSTEM ...................................................................... 26
INSPECTION ........................................................................................................ 26
CLEANING ........................................................................................................... 27
STORAGE ............................................................................................................. 28
DISPOSAL OF CARTRIDGE ELEMENTS AND BATTERIES ......................... 28
CHANGING BATTERY PACK ........................................................................... 29
INSTALLING THE ALKALINE BATTERY ADAPTER .................................. 30
REMOVING THE ALKALINE BATTERY ADAPTER ..................................... 33
CUSTOMER SERVICE ....................................................................................... 34
TROUBLESHOOTING ......................................................................................... 35
ECO: 102-0461-01 S-4014
Rev B
Page 4

4
DESCRIPTION
The ILC Dover SENTINEL XL™ HP CLEAR HOOD PAPR SYSTEM is a blower-
assisted air-purifying respirator known as Powered Air Purifying Respirator or PAPR.
The SENTINEL XL™ HP CLEAR HOOD PAPR SYSTEM is comprised of the
following components:
1. Sentinel Clear Hood, one size fits all P/N S-3101
The Sentinel XL™ Clear Hood is a loose fitting hood consisting of spun bond top
and rear panels, and a large optically clear plastic visor. The hood has two identical
skirts capable of being tucked into a single or double suit configuration, depending
on the user requirement. A third outer skirt is used to secure the hood to the upper
torso of the user through the use of four (4) tabs with integrated tape.
2. Blower P/N S-2002
The blower is comprised of an electrical motor that drives an air blower. An on/off
switch is located on top of the blower. A red LED near the on/off switch at the top
indicates when the blower is on. There is one male thread at the blower top to
connect the breathing hose. There are three female threaded inlets with rubber
gaskets at the blower sides. The blower is equipped with a self-test mechanism.
Upon starting the blower, the red LED will blink once or twice, and a buzzer will
sound one or two short beeps, followed by continuous LED light and no sound. This
indicates that the blower is functioning correctly. The blower is equipped with an
audio-visual low voltage alarm, indicating that battery voltage is starting to drop.
Alarm is given by blinking LED and successive buzzer beeps. Alarm sound is well
heard within the hood. Once the low voltage alarm has started, the user must exit the
contaminated area.
3. Battery Pack
The battery pack is integrated to the blower assembly by a snap fastener at the
blower assembly’s aft side, facing the user’s body. There are two types of battery
packs as follows:
A. Rechargeable NiMH Battery Pack P/N S-2003
The NiMH Battery can go up to 500 charge/discharge cycles and does not have
a considerable memory effect. The battery is equipped with a charging jack at
its aft side. Charging the battery can be done without disassembling from waist
belt, backpack or the blower assembly.
B. Non Rechargeable LiMnO2 Battery Pack P/N S-2004 (Optional)
High capacity Lithium Battery, capable of extended shelf life.
C. Alkaline Battery Adapter P/N S-4013 (Optional)
Adapter is capable of running approximately 8 hours. Five D-cell Duracell
batteries need to be properly installed to operate the Sentinel XL™ blower.
Batteries have a long term shelf life and are easily accessible.
ECO: 102-0461-01 S-4014
Rev B
Page 5

5
4. Cartridges P/N S-4002
ILC Dover SENTINEL XL™ HP CLEAR HOOD PAPR SYSTEM utilizes two
HE cartridges. The third blower inlet must be plugged securely with the blower
plug, either P/N S-4006 or S-4007.
5. Cartridge P/N S-4012 (Optional)
The ILC Dover SENTINEL XL™ HP FULL HOOD PAPR SYSTEM alternative
filter option utilizes three Organic Vapor/Chlorine Dioxide/Chlorine/Hydrogen
Chloride/Hydrogen Fluoride/Sulfur Dioxide/High Efficiency Particulate Air.
6. Decon and Quick Release Belt and Clip P/N S-4011
This is a blower mounting option that allows quick and easy attachment or removal
of the blower from the belt. This also facilitates the easy cleaning/disinfecting of
biological materials from the belt using standard cleaning or disinfecting materials.
Note: Do not use autoclave or other high temperature sterilization methods.
7. Backpack P/N S-2008 (Optional)
The backpack is very comfortable and supports the blower assembly on the user’s
back and waist which better dividing system’s weight on the user’s body. The
backpack can be used to store the entire system.
8. Hoses P/N S-4005 (33”) and P/N S-4003 (25”) (Optional)
The hose connects the blower unit to the hood. For use in supplying air from the
blower to the hood.
9. Fast Battery Charger P/N S-2009
A smart charger recharges NiMH Battery Pack within less than 5 hours.
10. Flow Meter P/N S-2010
Used to check the ability of the blower to provide sufficient air flow to the hood.
The air flow must be checked before each use.
11. Blower Plug P/N Standard S-4006 (with knob) or Optional S-4007 (Flat)
Can be removed for optional third filter. MAY REDUCE BATTERY LIFE.
12. Blower Flat Plug Installation and Removal Tool P/N S-4008 (Optional)
For use in installing or removing Optional S-4007 Flat Plug.
13. Sentinel XL™ HP Clear Hood User Instruction Manual P/N S-4014
ECO: 102-0461-01 S-4014
Rev B
Page 6

6
∆ WARNING
FOLLOW THESE INSTRUCTIONS CAREFULLY. THIS POWERED AIR
PURIFYING DEVICE IS ONLY FOR USE IN
SPECIFIC ATMOSPHERES
AND UNDER CERTAIN CONDITIONS. FAILURE TO FOLLOW THESE
COULD RESULT IN SERIOUS INJURY
∆ WARNING
THIS HOOD AND RESPIRATOR HELPS PROTECT AGAINST CERTAIN
AIRBORNE CONTAMINANTS. MISUSE MAY RESULT IN INJURY OR
. USE
AS DESCRIBED IN THESE USER
RESPIRATOR SYSTEM PROPERLY
AND CLEAN CONTAMINANTS FROM YOUR HANDS BEFORE
THE TROUBLESHOOTING SECTION OF THIS USER INSTRUCTION,
AND REPLACE IT WITH A NEW ONE.
RESPIRATOR PERFORMANCE AND RESULT IN SICKNESS AND
INSTRUCTIONS CAREFULLY
OR DEATH.
GENERAL SAFETY INFORMATION
Intended Use
The ILC Dover SENTINEL XL™ HP CLEAR HOOD PAPR SYSTEM can be used
as a belt mounted blower unit, connected to the hood via a flexible breathing hose. The
ILC Dover SENTINEL XL™ HP CLEAR HOOD PAPR SYSTEM must be combined
with the appropriate cartridges and battery pack. The ILC Dover SENTINEL XL™ HP
CLEAR HOOD PAPR SYSTEM systems are intended to provide respiratory protection
against certain particulate contaminants and/or Organic Vapors, Acid Gases depending
on the selected cartridge.
Note: Inspect emergency use respirators on a monthly basis.
DEATH. FOR PROPER USE, SEE SUPERVISOR, USER INSTRUCTIONS,
OR CALL ILC DOVER TECHNICAL SERVICE AT (800) 631-9567
ONLY ILC DOVER PARTS AND ACCESSORIES FOR THE ILC
SENTINEL XL™ HP PAPR SYSTEM
INSTRUCTIONS.
ALWAYS DON THE HOOD AND
AND IN AN UNCONTAMINATED AREA.
DO NOT REACH YOUR HAND INTO THE HOOD IN AREAS WHERE
THE AIR IS CONTAMINATED. LEAVE THE CONTAMINATED AREA
REACHING INSIDE THE HOOD.
IF YOU DISCOVER ANY OF THE WEAR AND DAMAGE DESCRIBED IN
DISCARD COMPONENT
FAILURE TO DO SO MAY ADVERSELY AFFECT HOOD AND
DEATH.
ECO: 102-0461-01 S-4014
Rev B
Page 7

7
BEFORE USE, THE WEARER MUST READ AND FULLY UNDERSTAND
THESE USER INSTRUCTIONS. KEEP THIS INSERT FOR FUTURE
REFERENCE.
IF YOU HAVE ANY DOUBTS ABOUT THE
RESPIRATOR SYSTEM TO
YOUR JOB SITUATION, CONSULT AN INDUSTRIAL HYGIENIST OR
∆ WARNING
THIS RESPIRATOR IS INTENDED TO BE USED ONLY IN
CONJUNCTION WITH AN ORGANIZED RESPIRATORY PROTECTION
PROGRAM WHICH COMPLIES WITH THE REQUIREMENTS OF
NATIONAL STANDARDS INSTITUTE,
11 WEST 42ND STREET, NEW YORK, N.Y. 10036, OR WITH THE
REQUIREMENTS OF OSHA STANDARD 29 CFR 1910.134 AVAILABLE
FROM THE US DEPARTMENT OF LABOR, OCCUPATIONAL SAFETY
ALTH ADMINISTRATION, OR WITH OTHER PERTINENT
BEFORE USE, THE EMPLOYER MUST ASSURE THAT EACH
RESPIRATOR USER HAS BEEN TRAINED BY A QUALIFIED PERSON
IN THE PROPER USE AND MAINTENANCE OF THE RESPIRATOR
ONS CONTAINED IN THIS USER
APPLICABILITY OF THIS HOOD AND
CALL THE ILC DOVER TECHNICAL SERVICE.
Use the ILC Dover SENTINEL XL™ HP CLEAR HOOD PAPR SYSTEM for:
Respiratory protection against certain particulate contaminants and/or Organic Vapors,
Acid Gasses, depending on the selected cartridge
Never use the ILC Dover SENTINEL XL™ HP CLEAR HOOD PAPR SYSTEM for:
Atmospheres where oxygen concentration is below 19.5%, where concentrations of
contaminants are: unknown; immediately dangerous to life or health (IDLH); exceed
applicable local standards or OSHA standards for maximum use concentrations for the
respirator; whichever is lower. Refer to additional limitations and cautions under NIOSH
Cautions and Limitations.
Respirator Selection and Training
“PRACTICES FOR RESPIRATORY PROTECTION” Z88.2-1992
AVAILABLE FROM AMERICAN
AND HE
NATIONAL RECOGNIZED STANDARDS.
ACCORDING TO THE INSTRUCTI
INSTRUCTION AND OTHER APPLICABLE USER INSTRUCTIONS.
ECO: 102-0461-01 S-4014
Rev B
Page 8

8
∆ WARNING
BEFORE USING THE ILC DOVER SENTINEL XL™ HP PAPR SYSTEM,
EACH PERSON MUST READ AND UNDERSTAND THE INFORMATION
IN THIS USER INSTRUCTION. USE OF THE RESPIRATOR SYSTEMS
IS NOT
IN ACCORDANCE WITH THESE INSTRUCTIONS, MAY ADVERSELY
∆ WARNING
THESE HOODS DO NOT PROVIDE EYE, FACE OR HEAD PROTECTION
EXPOSED TO EYE, FACE OR HEAD HAZARDS. THE
FACE AND/OR HEAD
BY UNTRAINED OR UNQUALIFIED PERSONS, OR USE THAT
AFFECT RESPIRATOR PERFORMANCE AND MAY RESULT IN INJURY
OR DEATH.
Service Life of HE or OV/CD/CL/HC/HF/SD/HE Cartridge
The useful service life of High Efficiency Particulate Filter or OV/CD/CL/HC/HF/SD/HE
cartridges will depend upon the flow rate, the specific type, volatility and concentration
of the contaminants and environmental conditions such as humidity and temperature.
Replace the cartridge in accordance with an established cartridge change schedule.
Cartridges should be changed earlier if smell, taste or irritation from the contaminant is
detected. Cartridges must be replaced if they become damaged, soiled, or if increased
breathing resistance occurs.
Eye, Face and Head Protection
WHEN
RESPIRATOR WEARER MUST WEAR EYE,
PROTECTION APPROPRIATE TO THE HAZARD. FAILURE TO DO SO
MAY RESULT IN INJURY OR DEATH.
ECO: 102-0461-01 S-4014
Rev B
Page 9

9
NIOSH APPROVAL
For a listing of the components in the ILC Dover respirator systems (ILC Dover
SENTINEL XL™ HP CLEAR HOOD PAPR SYSTEM), that are NIOSH approved
refer to the NIOSH approved label insert.
NIOSH CAUTIONS AND LIMITATIONS
A. Not for use in atmospheres containing less than 19.5 percent oxygen.
B. Not for use in atmospheres immediately dangerous to life or health (IDLH).
C. Do not exceed maximum use concentrations established by regulatory standards.
F. Do not use this respirator if airflow is less than four cfm (115 lpm) for tight-fitting
facepieces or six cfm (170 lpm) for hoods and/or helmets.
H. Follow established cartridge/canister change schedules or observe ESLI to ensure
that cartridges/canisters are replaced before breakthrough occurs.
I. Contains electrical parts which may cause an ignition in flammable or explosive
atmospheres.
J. Failure to properly use and maintain this product could result in injury or death.
L. Follow the manufacturer's instructions for changing cartridges and/or filters.
M. All approved respirators shall be selected, fitted, used, and maintained in accordance
with MSHA, OSHA, and other applicable regulations.
N. Never substitute, modify, add, or omit parts. Use only exact replacement parts in the
configuration as specified by the manufacturer.
O. Refer to user’s instructions, and/or maintenance manuals for information on use and
maintenance of these respirators.
P. NIOSH does not evaluate respirators for use as surgical masks.
S. Special or Critical User's Instructions and/or specific use limitations apply.
Refer to User's Instructions before donning.
ECO: 102-0461-01 S-4014
Rev B
Page 10

ECO: 102-0461-01 S-4014
10
REPLACEMENT PARTS
Part No.
Component
Cartridges and Plug
S-4002
HE-High Efficiency Particulate Air (2 per package)
S-4012 (Optional)
OV/CD/CL/HC/HF/SD/HE Cartridge(3 per package)
S-4006
Blower Plug (with knob); used w/ S-4002 filters only
S-4007 (Optional)
Blower Plug (flat)
S-4008 (Optional)
Blower Flat Plug Installation and Removal Tool
Battery Packs and Charger
S-2003
Rechargeable NiMH Battery Pack
S-2004 (Optional)
Non Rechargeable LiMnO2 Battery Pack
S-2009
Fast Battery Charger (with Instructions)
S-4013 (Optional)
Alkaline Battery Adapter
Blower
S-2002
Standard Blower
Breathing Hose
S-4005
33” Long Breathing Hose
S-4003 (Optional)
25” Long Breathing Hose
Hood
S-3101
Sentinel XL™ Clear Hood
Waist Belt
S-4011
Decon and Quick Release Belt and Clip
Flow Meter
S-2010
Flow Meter
Instruction Manual
S-4014
Sentinel XL™ HP Clear Hood User Instruction Manual
Rev B
Page 11
11
ASSEMBLY AND PREPARATION FOR USE OF
Decon and
and Clip
Blower
Breathing
Sentinel XL™
Battery
Flow
HE - High Efficiency
Alkaline
(Optional)
Charger
Blower
Plug
DECON AND QUICK RELEASE BELT AND CLIP
ILC DOVER SENTINEL XL™ HP CLEAR HOOD PAPR SYSTEM
HE PROTECTION
Clear Hood
Hose
Particulate Air Filters
Pack
Installation
Meter
Quick
Release Belt
Battery
Adapter
Plugs
ECO: 102-0461-01 S-4014
Rev B
Page 12

12
Breathing
OV/CD/CL/HC/HF/SD/ HE
Blower
Battery
Charger
Flow Meter
Alkaline
(Optional)
Decon and
and Clip
Sentinel XL™
Cartridges
ILC DOVER SENTINEL XL™ HP CLEAR HOOD PAPR SYSTEM
OV/CD/CL/HC/HF/SD/HE PROTECTION
Clear Hood
Quick
Release Belt
Battery
Adapter
Hose
Pack
ECO: 102-0461-01 S-4014
Rev B
Page 13

13
PREPARATION FOR USE (USING OR DECON WAIST BELT)
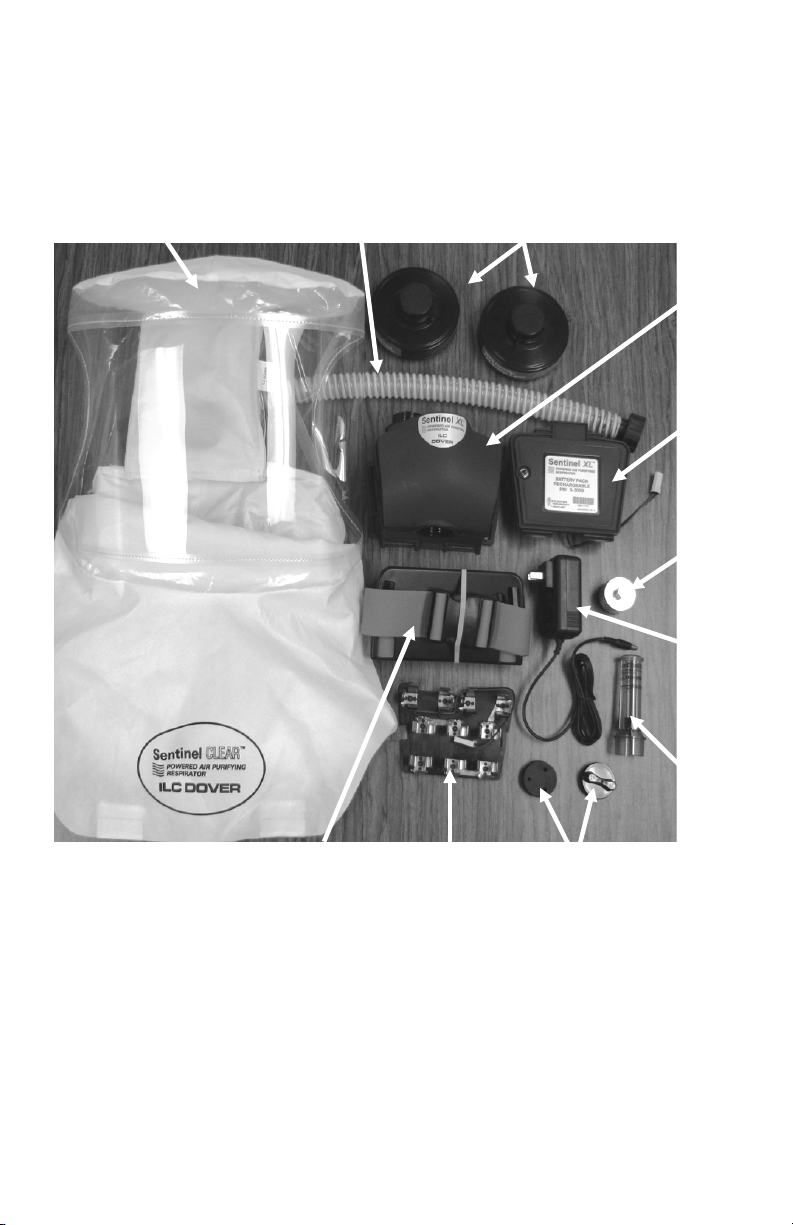
1. Open the package/box and take out the components:
*If purchased as a system, HE filters, plug and battery are already installed into the
blower.
• Sentinel XL™ HP Clear Hood Users Instruction Manual S-2012
• Cartridges 2 each HE S-4002 or Optional S-4012 OV/CD/CL/HC/HF/SD/HE
Cartridges 3 each
• Battery Charger (with Instructions) S-2009
• Rechargeable Battery Pack S-2003 or Optional Non-Rechargeable Battery Pack
S-2004 *If purchased as a system battery is already installed into blower.
• Alkaline Battery Adapter S-4013 (Optional)
• Blower S-2002
• Decon Quick Release Belt and Clip S-4011
• Clear Hood S-3101
• 33” Long Breathing Hose S-4005 or Optional 25” Long Breathing Hose
• Blower Plug S-4006 (with knob) or Optional S-4007 Flat Plug with installation /
Removal Tool
• Flow meter S-2010
2. Remove Blower from box.
• Usual packing method is for the battery pack, blower plug with knob, and HE
filters to be installed in the blower.
3. If using a rechargeable battery, remove the Battery Charger from its box. To
charge the PAPR:
• Make sure that the battery pack is assembled to the blower unit at all times. The
battery pack should be separated from the blower only for battery pack
replacement.
• Plug the battery charger to the socket at the back of the PAPR.
• Connect the battery charger to an
electrical outlet. If charger is
connected to an electrical outlet
before connecting to a battery, a solid
green LED light indicates that the
charger is operating properly. When
plugged into the battery the charger
LED will turn solid red after a short
time, indicating that charging is
underway.
• Charge the battery for approximately 5 hours.
• The charger’s LED will change from solid red to flashing green when charging
is complete. The charger will then be in a “trickle charge” mode. If the light
goes to continuous green the battery is cooling down automatically and then will
go to red and continue charging.
ECO: 102-0461-01 S-4014
Rev B
Page 14

14
• Charging is also possible when the blower is attached to the Decon Quick
Connector Slot
Latch
Battery Pack
Battery Pack Seal
Connector
Release Belt and Clip, as demonstrated in the picture above.
4. If using the Alkaline Battery Adapter please refer to page 30 for installation
instructions before moving onto step 6.
5. If purchased as a separate component, remove battery pack from box. Install
Battery pack per the following instructions.
INSTALLING BATTERY PACK
*If purchased as a system battery is already installed.
a. Connect the battery pack
connector to the blower
connector.
b. Insert the connector into its
designated slots as
demonstrated.
c. Close the battery pack. Ensure the battery leads are not pinched when closing the
battery pack.
d. Ensure you hear an audible click when the battery pack latch locks into blower.
e. Fully charge the battery then operate normally.
ECO: 102-0461-01 S-4014
Rev B
Page 15

15
∆ WARNING
USE OF THESE RESPIRATOR SYSTEMS BY UNTRAINED OR
ACCORDANCE WITH
USE OF THESE RESPIRATOR SYSTEMS MUST BE IN ACCORDANCE
WITH APPLICABLE SAFETY AND HEALTH STANDARDS,
RESPIRATOR SELECTION TABLES CONTAINED IN SUCH
1992, OR PURSUANT TO THE
MMENDATIONS OF AN INDUSTRIAL HYGIENIST. USE OF A
BE IN PLACE, WHICH IS IN ACCORDANCE WITH THE OSHA
USE, THE USER MUST BE TRAINED BY THE EMPLOYER IN
THE PROPER USE AND MAINTENANCE OF THE ILC DOVER
6. Fit the waist belt length to your waist size while
dressed in your protective garment.
7. Position the Blower on the Decon Waist Belt.
• The charging socket is accessible through the
plastic backing plate. Align the
plate so that charging port is
visible.
• For S-4011 Decon and Quick
Release Belt and Clip align the
quick don snap features as shown
below and press belt clip firmly
into place. Hole in clip aligns
with battery recharging port.
UNQUALIFIED PERSONS, OR USE NOT IN
THESE INSTRUCTIONS MAY ADVERSELY AFFECT RESPIRATOR
PERFORMANCE AND RESULT IN INJURY OR DEATH.
PUBLICATIONS AS ANSI Z88.2RECO
RESPIRATOR REQUIRES THAT A WRITTEN RESPIRATOR PROGRAM
RESPIRATORY PROTECTION STANDARD FOUND IN 29 CFR 1910.134
PRIOR TO USING ANY RESPIRATOR SYSTEM.
BEFORE
ECO: 102-0461-01 S-4014
Rev B
Page 16
16
SENTINEL XL™ CLEAR HOOD PAPR SYSTEM. SUCH TRAINING
MUST BE IN ACCORDANCE WITH THIS USER INSTRUCTION. EACH
DO SO MAY ADVERSELY AFFECT RESPIRATOR SYSTEM
IF THESE RESPIRATOR SYSTEMS FAIL ANY OF THE
NTS OF THE USER INSPECTION AND PERFORMANCE
T USE THE RESPIRATOR SYSTEM UNTIL ALL
NECESSARY REPAIRS HAVE BEEN PERFORMED AND THE
RESPIRATOR SYSTEMS PASS THE PERFORMANCE CHECKS.
FAILURE TO DO SO MAY ADVERSELY AFFECT RESPIRATOR
Note: Screw all
Note: Screw
Note: Screw
PERSON USING THESE RESPIRATOR SYSTEMS MUST FIRST READ
AND UNDERSTAND THIS ENTIRE USER INSTRUCTION. FAILURE TO
PERFORMANCE AND RESULT IN INJURY OR DEATH.
REQUIREME
CHECK, DO NO
SYSTEM PERFORMANCE AND RESULT IN INJURY OR DEATH.
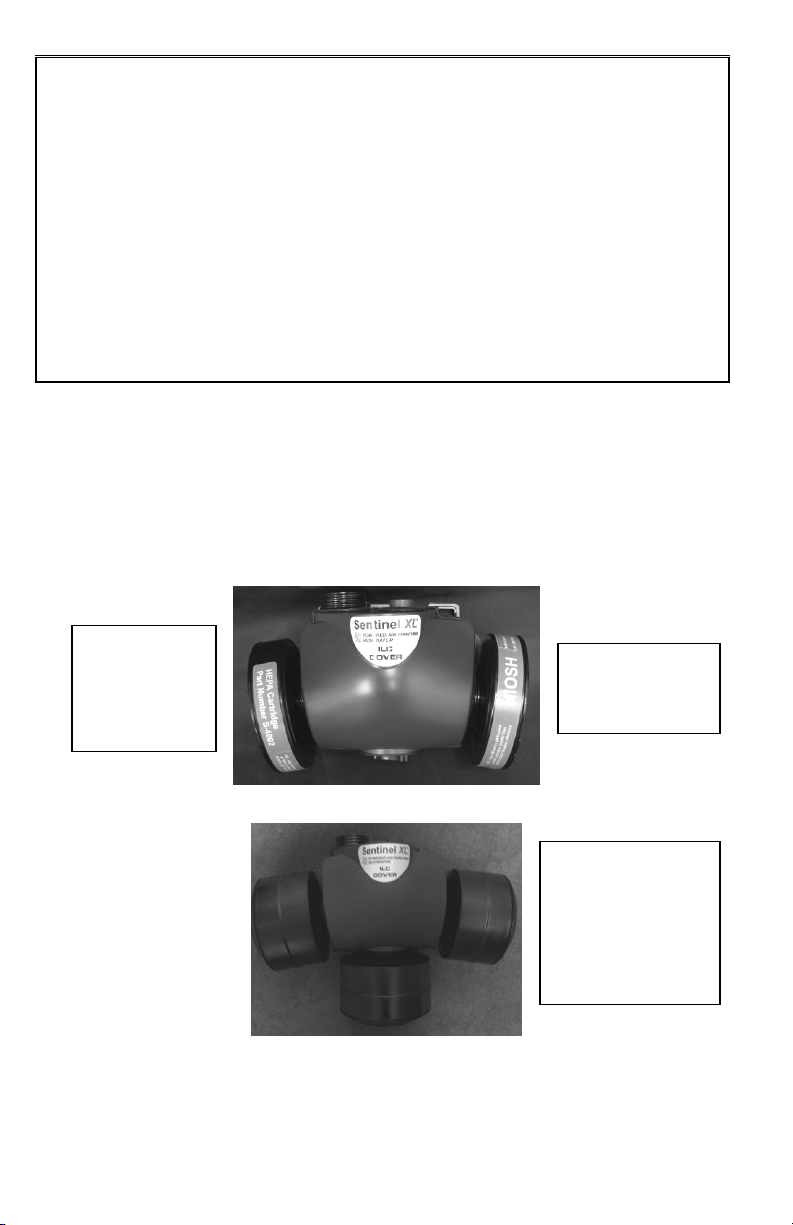
8. Cartridge Installation
The SENTINEL XL™ HP CLEAR HOOD PAPR system uses two (2) HE
cartridges that thread into the blower inlets as shown. The third blower inlet must be
plugged using the standard plug with knob (S-4006) or optional flat plug (S-4007)
per the instructions in Step 9. The optional (S-4012) SENTINEL XL™ HP
CLEAR HOOD PAPR SYSTEM uses three (3) OV/CD/CL/HC/HF/SD/HE
cartridges that thread into the blower. Refer to Figure 2.
both HE
cartridges
in hand tight
plug in hand
tight
Figure 1
three
OV/CD/CL/HC/
HF/SD/HE
cartridges
in hand tight
Figure 2
ECO: 102-0461-01 S-4014
Rev B
Page 17

17
• Verify that the cartridges are the appropriate type for the application by
∆ WARNING
DO NOT OVER TIGHTEN CARTRIDGE. OVER TIGHTENING MAY
ONTAMINATED AIR TO ENTER THE RESPIRATOR
examining the label attached to the cartridge.
• Remove the cartridges from their packaging and inspect for damages. If in
doubt do not use. Check that the connecting thread is not damaged.
• Check that the threads in the blower unit are in good condition and clear of
foreign matter.
• Check that the blower thread inlets have the black rubber gasket seals present in
the blower.
• Remove all plugs from the cartridges ends before using the system. Retain the
plugs for future use.
• Screw the cartridges into the blower threads until they are hand tight.
RESULT IN DISTORTION OR DISPLACEMENT OF THE SEAL AND
ALLOW C
HEADPIECE. RESULTING IN INJURY OR DEATH.
9. Blower Plug Installation
Optional S-4012 OV/CD/CL/HC/HF/SD/HE Cartridge
• Blower plug will not be used, for use with S-4002 Cartridges only.
Skip to step 10 (See Figure 2).
S-4006 Blower plug with knob (standard)
*Blower plug will already be installed into the blower if a HE filter system was
purchased.
• Remove blower plug from cartridge package and discard poly bag.
• Verify that the blower plug and blower inlet connection thread are not damaged.
• Screw the plug directly into bottom blower inlet ensuring a tight seal against
inlet gasket (See Figure 1 on the next page).
ECO: 102-0461-01 S-4014
Rev B
Page 18
18
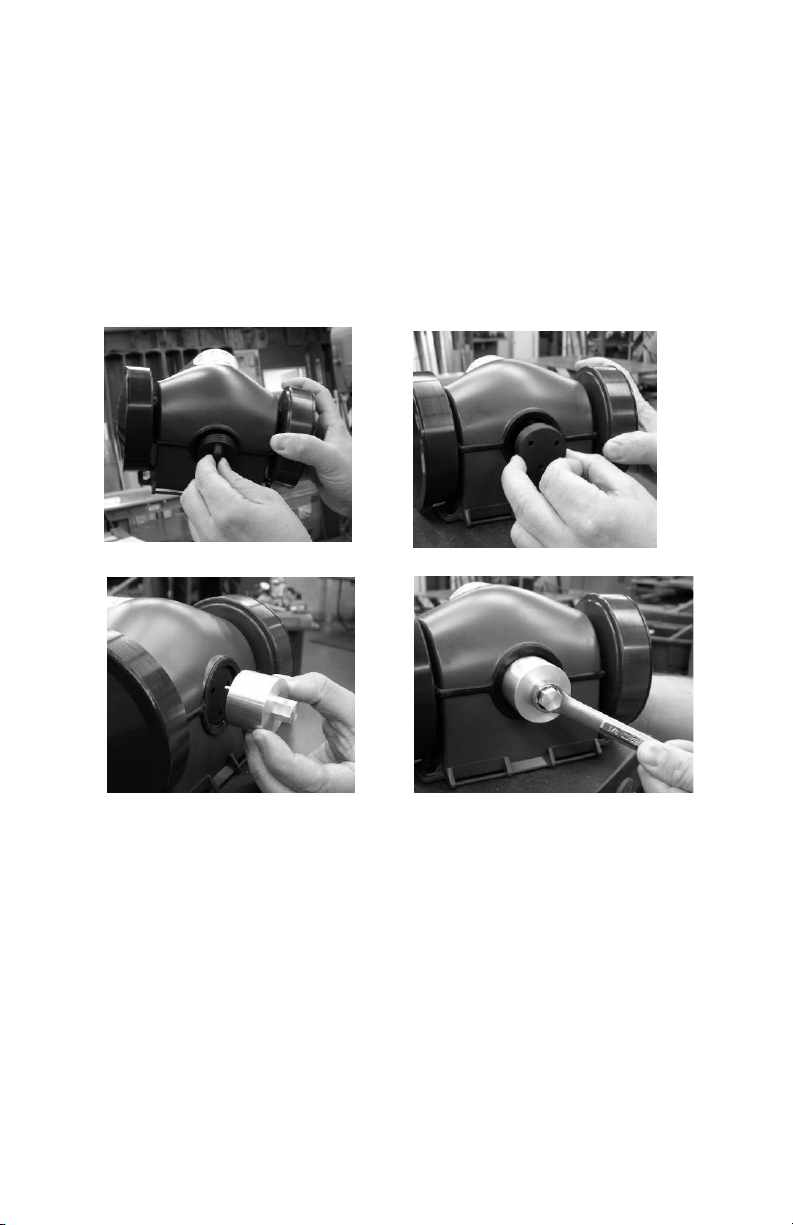
S-4007 Blower flat plug (optional)
• Remove blower plug from cartridge package and discard poly bag.
• Remove blower plug installation tool from cartridge package and discard poly
bag.
• Verify that the blower plug and blower inlet connection thread are not damaged.
• Screw the plug directly into bottom blower inlet. (See figure 2)
• Using blower flat plug installation and removal tool, align and insert tool pins
into blower plug. (See figure 3)
• Using a 1/2” box end wrench, or similar tool, secure blower plug ensuring a
tight seal against inlet gasket. (See figure 4)
Figure 1 Figure 2
Figure 3 Figure 4
10. Check the airflow with the Flow Meter
• Ensure that the cartridges are installed on the blower. The blower can be installed
on the waist belt.
• Switch the blower ON. A short beep should sound.
• Place the flow meter in the blower’s hood connector, applying light pressure to
allow a seal between the flow meter and the blower. Keep the flow meter vertical.
• The position of the upper (flat surface) black cone in the flow meter should be
above the indication line. If any part of the upper (flat surface) of the black cone is
below the line on the flow meter, DO NOT USE and check for:
o Blower malfunction.
o Clogged or damaged cartridges.
o Low battery charge or battery malfunction.
ECO: 102-0461-01 S-4014
Rev B
Page 19

19
Indication Line
Indication
Screw the Female Hose connector
Screw the Female Hose connector
Line
`
• If the upper portion of the black cone is above the indication line on the flow
meter, the system is ready for use.
11. Connect the Hood to the breathing hose and to the blower.
• Check that the breathing hose thread has the black rubber gasket seal present.
• Check that the thread in the blower unit is in good condition and clear of foreign
matter.
• Screw the end of the breathing hose into the Sentinel XL™ Clear Hood and the
blower unit until it is hand tight.
Do not over tighten!
of the Breathing Hose to Male
connector on the blower.
of the Breathing Hose to Male
connector on the hood.
ECO: 102-0461-01 S-4014
Rev B
Page 20

20
∆ WARNING
BEFORE YOU ENTER A HAZARDOUS ATMOSPHERE WEARING THIS
RESPIRATOR SYSTEM, YOU MUST INSPECT THE RESPIRATOR
SYSTEM, COMPLETE AN AIRFLOW CHECK, AND DON THE SYSTEM
ACCORDING TO THE INSTRUCTIONS IN THIS MANUAL. FAILURE
DO NOT WEAR THIS RESPIRATOR SYSTEM TO ENTER AREAS
WHERE ATMOSPHERIC CONCENTRATIONS OF CONTAMINANTS
ARE UNKNOWN. AREA MAY EXCEED THE MAXIMUM USE
LESS THAN 19.5% OXYGEN. THIS
∆ WARNING
ALWAYS DON THE RESPIRATOR IN A NON-CONTAMINATED AREA.
FAILURE TO PROPERLY DON THIS RESPIRATOR BEFORE
G A HAZARDOUS ATMOSPHERE MAY RESULT IN INJURY
∆
IF YOU HAVE ANY DOUBTS ABOUT THE APPLICABILITY OF THE
EQUIPMENT TO YOUR JOB SITUATION, CONSULT AN INDUSTRIAL
HYGIENIST OR CALL THE TECHNICAL SERVICE DEPARTMENT OF
THE AIR IS CONTAMINATED. LEAVE THE CONTAMINATED AREA
AND CLEAN CONTAMINANTS FROM YOUR HANDS BEFORE
TO DO SO MAY ADVERSELY AFFECT RESPIRATOR PERFORMANCE
AND MAY RESULT IN INJURY OR DEATH.
CONCENTRATION (MUC) FOR THE RESPIRATOR HOOD, OR
ATMOSPHERE MAY CONTAIN
MAY RESULT IN IMMEDIATE DANGER TO PERSONNEL.
ENTERIN
OR DEATH.
WARNING
ILC DOVER AT (800) 631-9567.
DO NOT REACH YOUR HAND INTO THE HOOD IN AREAS WHERE
REACHING INSIDE THE HOOD.
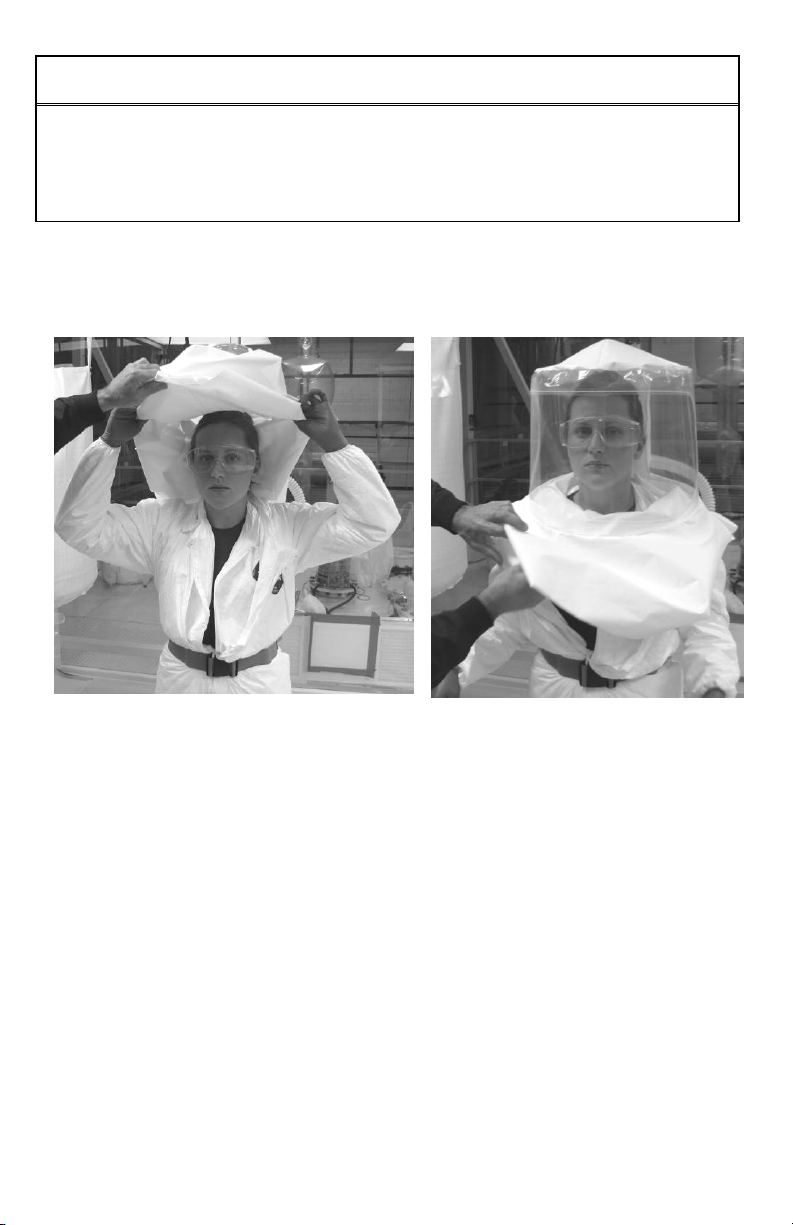
12. Donning the Hood with a Two-Suit Configuration
Don the blower and hood in a safe hazard-free area and accomplish the following:
• Adjust the blower and belt on your waist. Adjust the belt for a comfortable fit -
keeping the breathing hose and hood behind the head and shoulders.
• Switch the blower ON.
• Check that the cartridges are properly mounted on the blower unit before
donning the hood.
• With the help of another person complete the donning sequence as shown
ECO: 102-0461-01 S-4014
below.
Rev B
Page 21
21
ΔWARNING
SPECIAL OR CRITICAL USER’S INSTRUCTIONS
THIS HOOD SYSTEM IS DESIGNED FOR USE WITH COATED SPUN
BOND POLYOLEFIN LABORATORY COATS OR SUITS (e.g. TYVEK® or
CAL TO PROVIDE
PROPER PROTECTION LEVELS AND SYSTEM OPERATION.
Step 1
Step 2
suit (if using two suits).
TYCHEM® QC). PROPER INSTALLATION AND INTERFACE OF THE
HOOD SKIRTS TO THESE GARMENTS IS CRITI
Tyvek® and Tychem® QC is a registered trademark of DuPont.
Pull the Sentinel XL™ Clear
hood over your head. If
necessary, put on safety glasses
or hard hat prior to donning the
ECO: 102-0461-01 S-4014
The hood has three skirts, identical
inner and middle skirts to be tucked
into the neck opening of one or two
suits, and an outer skirt to secure the
hood to the body. Start by tucking
the inner skirt into the inner-most
Rev B
Page 22
22
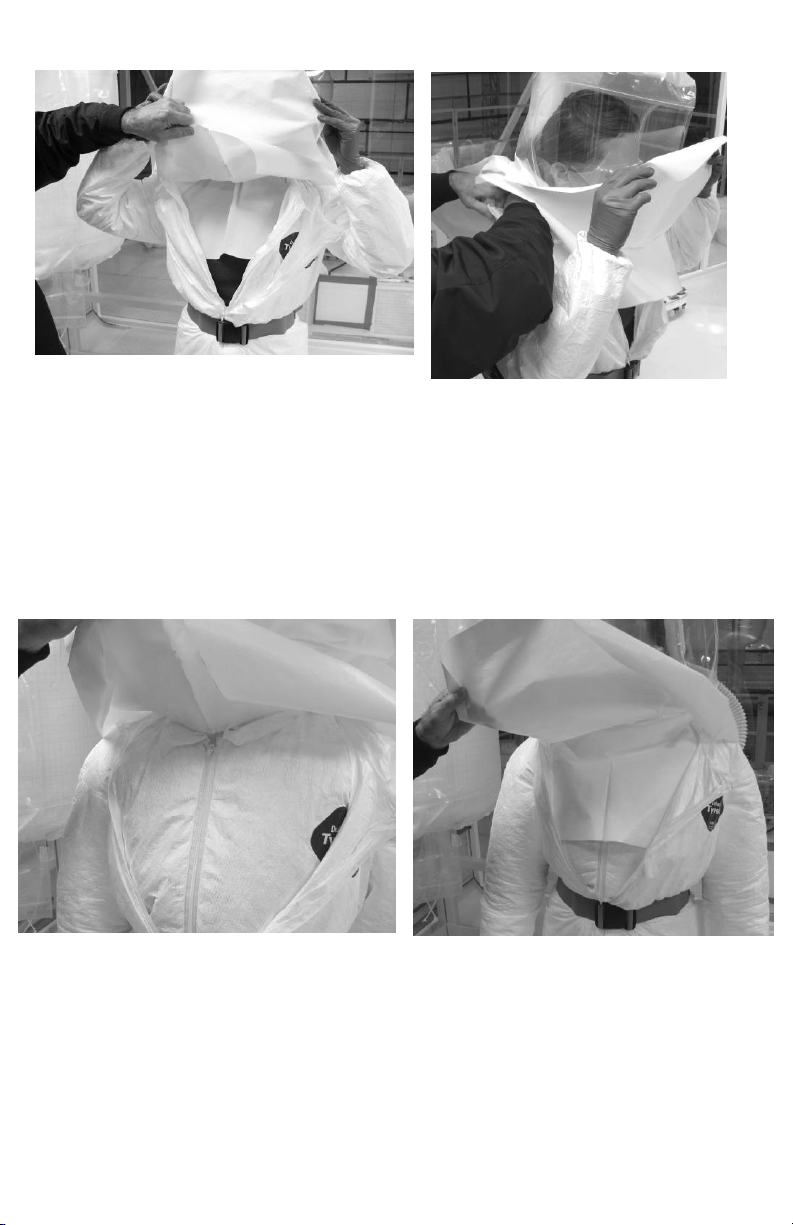
Step 3
Step 4
Step 5
Step 6
View of the completed tucking
operation for the inner skirt into the
front half of a suit. NOTE: If only
one suit is used, tuck both the
inner and middle skirts into the
neck opening of the suit, and zip
the suit closed as shown in Step 7.
Then continue to Step 8.
Zip the suit closed. The picture
above illustrates the inner skirt
fully inserted and secured
ECO: 102-0461-01 S-4014
.
Tuck the rest of the inner skirt
around the neck and shoulders
through the neck opening of the
suit.
Tuck the middle skirt into the
into the neck opening of the
second (outer-most) suit,
identically to Steps 3 and 4.
Rev B
Page 23

23
Step 7
Step 9
Step 10
Step 8
Zip the second suit closed.
Lower the outer skirt across the chest
and back. Firmly press the adhesive
material such that it adheres to the
suit or lab coat.
ECO: 102-0461-01 S-4014
Remove the adhesive backing on
the front and rear tabs. Four
total tabs, two in the front and
two in the rear.
Attach the rear adhesive tabs to
the suit or lab coat, just above
the waist belt. The adhesive tabs
may be re-positioned to provide
the best placement of the hood
on the user’s head.
Rev B
Page 24

24
∆ WARNING
DO NOT REMOVE RESPIRATOR SYSTEM WHILE YOU ARE IN A
HAZARDOUS ATMOSPHERE. DOING SO MAY RESULT IN SICKNESS
OR DEATH. CONTAMINANTS, WHICH ARE DANGEROUS TO YOUR
H, INCLUDE THOSE THAT YOU MAY NOT BE ABLE TO SEE
THE ALARM SIGNAL OF LOW BATTERY IS ON: RED LED
Step 11
sequence.
• With the respirator in operation and donned according to the instructions, enter
the contaminated area, breathing normally. Keep all the respirator system’s
components away from equipment, vehicles and other physical and chemical
hazards.
Completed picture of donning
HEALT
OR SMELL. LEAVE THE CONTAMINATED AREA IMMEDIATELY IF:
• ANY PART OF THE SYSTEM BECOMES DAMAGED.
• AIRFLOW INTO THE RESPIRATOR HOOD DECREASES OR STOPS.
•
FLASHES AND BUZZER BEEPS.
• BREATHING BECOMES DIFFICULT.
• YOU FEEL DIZZY OR YOUR VISION IS IMPAIRED.
• YOU TASTE OR SMELL CONTAMINANTS.
• YOUR FACE, EYES, NOSE OR MOUTH BECOME IRRITATED.
• YOU SUSPECT THAT THE CONCENTRATION OF CONTAMINANTS
MAY HAVE REACHED LEVELS AT WHICH THIS RESPIRATOR
SYSTEM MAY NO LONGER PROVIDE ADEQUATE PROTECTION.
ECO: 102-0461-01 S-4014
Rev B
Page 25

25
∆
USE OF THESE RESPIRATOR SYSTEMS BY UNTRAINED OR
UNQUALIFIED PERSONS, OR USE NOT IN ACCORDANCE WITH
THESE INSTRUCTIONS MAY ADVERSELY AFFECT RESPIRATOR
USE OF THESE RESPIRATOR SYSTEMS MUST BE IN ACCORDANCE
WITH APPLICABLE SAFETY AND HEALTH STANDARDS,
RESPIRATOR SELECTION TABLES CONTAINED IN SUCH
1992, OR PURSUANT TO THE
T. USE OF A
PLACE, WHICH IS IN ACCORDANCE WITH THE OSHA
RESPIRATORY PROTECTION STANDARD FOUND IN 29 CFR 1910.134
MPLOYER IN
THE PROPER USE AND MAINTENANCE OF THE ILC DOVER
SYSTEM. SUCH
TRAINING MUST BE IN ACCORDANCE WITH THIS USER
INSTRUCTION. FAILURE TO DO SO MAY ADVERSELY AFFECT
PERFORMANCE AND RESULT IN INJURY OR
IF THESE RESPIRATOR SYSTEMS FAIL ANY OF THE
REQUIREMENTS OF THE USER INSPECTION AND PERFORMANCE
L ALL
NECESSARY REPAIRS HAVE BEEN PERFORMED AND THE
ASS THE PERFORMANCE CHECKS.
FAILURE TO DO SO MAY ADVERSELY AFFECT RESPIRATOR
WARNING
PERFORMANCE AND RESULT IN INJURY OR DEATH.
PUBLICATIONS AS ANSI Z88.2RECOMMENDATIONS OF AN INDUSTRIAL HYGIENIS
RESPIRATOR REQUIRES THAT A WRITTEN RESPIRATOR PROGRAM
BE IN
PRIOR TO USING ANY RESPIRATOR SYSTEM.
BEFORE USE, THE USER MUST BE TRAINED BY THE E
SENTINEL XL™ HP CLEAR HOOD CLEAR HOOD
INSTRUCTION. EACH PERSON USING THESE RESPIRATOR SYSTEMS
MUST FIRST READ AND UNDERSTAND THIS ENTIRE USER
RESPIRATOR SYSTEM
DEATH.
CHECK, DO NOT USE THE RESPIRATOR SYSTEM UNTI
RESPIRATOR SYSTEMS P
SYSTEM PERFORMANCE AND RESULT IN INJURY OR DEATH.
ECO: 102-0461-01 S-4014
Rev B
Page 26

26
REMOVING THE PAPR SYSTEM
Remove the blower and hood in a safe hazard-free area.
• Doff the hood.
• Remove the belt and blower from your waist, (blower should be working at this
stage).
• Turn the blower OFF.
INSPECTION
After each use, inspect the hood to identify signs of damage or wear that may affect
performance of the respirator and reduce the degree of protection provided. The
Troubleshooting Section, in this manual, contains a troubleshooting guide to help you
identify the proper action to take for specific problems that may be detected.
Hood
Check that there are no tears or punctures in the Sentinel XL™ Clear Hood. Look
closely at the stitching. There should be no tears that could permit contaminated air to
enter the hood.
Visor
Look for scratches or other visual distortions that make it difficult to see through visor.
Breathing Hose
Carefully examine the entire breathing hose. Look for tears, holes or cracks. Bend the
hose to verify that it is flexible.
PAPR Blower Unit
Remove the cartridges and assure that the rubber gaskets are in place in the blower.
Examine the blower housing for cracks. Replace if cracked or damaged.
Examine the outside of the battery pack for cracks. Replace if damaged.
Cartridges
Examine cartridges for mechanical damage and deformities. Replace if damaged.
Blower Plug
Examine the plug in the blower inlet, and insure a tight seal against the internal gasket.
Re-tighten if necessary.
ECO: 102-0461-01 S-4014
Rev B
Page 27

27
∆ WARNING
IF EXCESSIVE WEAR AND/OR DAMAGE TO THE RESPIRATOR
TEM UNTIL ALL NECESSARY REPAIRS
MISUSE MAY ADVERSELY AFFECT RESPIRATOR PERFORMANCE
∆ WARNING
DO NOT CLEAN SENTINEL XL™ HP CLEAR HOOD WITH
S THAT CONTAIN LANOLIN OR OTHER OILS SINCE
DO NOT WIPE THE VISOR WITH SOLVENTS LIKE MEK, ACETONE,
OR COMPONENTS IN CLEANING
VENTS. MISUSE MAY ADVERSELY AFFECT
SYSTEM OR ITS COMPONENTS IS OBSERVED AT ANY TIME, DO NOT
USE THE RESPIRATOR SYS
HAVE BEEN PERFORMED AND THE WEARER HAS SUCCESSFULLY
COMPLETED THE USER PERFORMANCE CHECK DESCRIBED IN THE
OPERATING INSTRUCTIONS SECTION OF THIS USER INSTRUCTION.
AND MAY RESULT IN INJURY OR DEATH.
CLEANING
Solvents should not be used to clean the PAPR blower unit, battery pack, hose and hood.
Liquid solvents may chemically weaken the plastic. Wipe the PAPR blower unit, battery
pack, hose and hood with a mild cleaning solution. The decontamination solutions may
be applied via cloth, paper towels, or spraying methods. Do NOT decon the battery
charger. Wipe components dry with a soft cloth following decontamination and rinsing
with clean water, unless noted to air dry. Never submerge or immerse any Sentinel XL™
PAPR blower, filter, hose, or hood components in liquid, as this may permanently
damage the electronics, batteries, or affect the hood or hose function. Ensure all
components are completely dry before using the system or charging the battery.
Follow the hygiene practices established by your employer for the specific contaminants
to which you may have been exposed.
For the S-4011 Quick-Loc Belt, standard disinfecting solutions may be used to clean the
belt and clips.
DETERGENT
THEY MAY SOFTEN OR DISTORT THE VISOR.
TOLUENE, AS THOSE MAY DAMAGE OR DISTORT THE VISOR.
DO NOT SOAK THE CLEAR HOOD
SOLUTIONS OR SOL
RESPIRATOR PERFORMANCE AND RESULT IN INJURY OR DEATH.
ECO: 102-0461-01 S-4014
Rev B
Page 28

28
∆ WARNING
AFTER DECONTAMINATION, DISPOSE OF CARTRIDGE ELEMENTS
WITH FEDERAL, STATE AND LOCAL
ENVIRONMENTAL REGULATIONS. DO NOT THROW AWAY
ELEMENTS AS ORDINARY
∆ WARNING
DISPOSE OF DEPLETED OR DAMAGED BATTERIES IN ACCORDANCE
L ENVIRONMENTAL
REGULATIONS. DO NOT THROW AWAY DEPLETED OR DAMAGED
BATTERIES AS ORDINARY WASTE. IMPROPER HANDLING OF
DEPLETED OR DAMAGED BATTERIES MAY RESULT IN INJURY OR
STORAGE
Store your respirator at room temperature in a dry area that is protected from exposure to
hazardous contaminants.
DISPOSAL OF CARTRIDGE ELEMENTS AND BATTERIES
1. Remove used cartridge elements and dispose of properly.
• Handle cartridge elements with care. Cartridge elements may contain the
contaminant internally and externally that was in the atmosphere while the
cartridge element was being used and must be handled as a contaminated or
potentially contaminated object.
• Disposal of cartridge elements must be in accordance with state and local
environmental regulations.
IN ACCORDANCE
DAMAGED OR UNUSABLE CARTRIDGE
WASTE. IMPROPER DISPOSAL OF CONTAMINATED CARTRIDGE
ELEMENTS MAY RESULT IN EXPOSURE TO CONTAMINANTS WHICH
MAY CAUSE INJURY OR DEATH.
2. Remove the Battery and dispose of properly.
Batteries may have been contaminated by the atmosphere in which they were used
and must be handled as a contaminated or potentially contaminated object.
• Dispose of depleted or damaged batteries in accordance with state and local
environmental regulations.
• Do not throw away used cartridge elements or depleted or damaged batteries as
ordinary waste.
WITH FEDERAL, STATE AND LOCA
DEATH.
ECO: 102-0461-01 S-4014
Rev B
Page 29

29
CHANGING BATTERY PACK (P/N S-2003 and P/N S-2004)
Latch
Connector
Battery Pack
Battery Pack Seal
1. Make sure the blower is
turned off.
2. Open the battery pack
compartment by
pressing on the latch
connecting it to the
blower.
3. Disconnect the connector
parts and separate the battery
pack from the blower.
4. Connect the new battery pack.
5. Slot the connector into its designated
place in the blower as
demonstrated
6. Close the battery pack. Ensure that you
do not pinch the battery leads
when closing the battery pack.
7. Ensure you hear an audible click when
the battery pack latch locks into
place.
8. Fully charge the battery then
operate normally.
ECO: 102-0461-01 S-4014
Rev B
Page 30

30
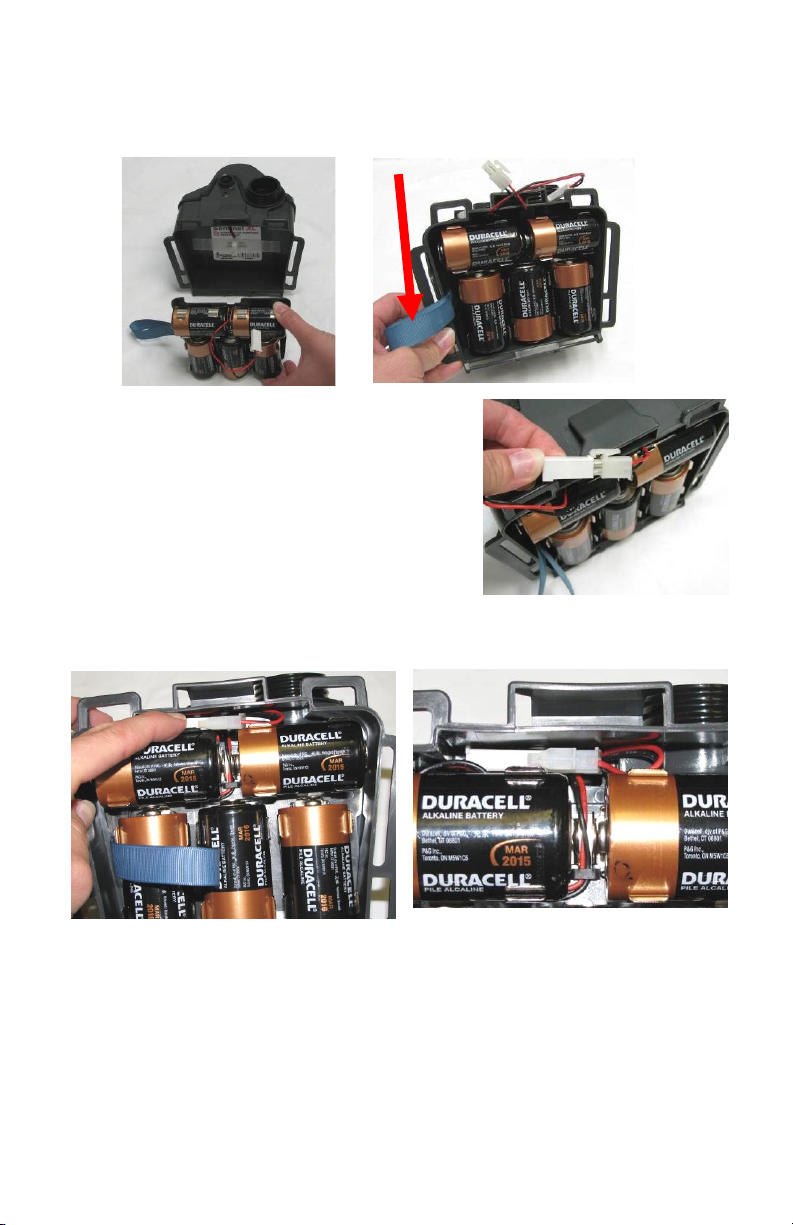
INSTALLING THE ALKALINE BATTERY ADAPTER (P/N S-4013)
Adhesive
Battery
1. Make sure the blower is turned off.
2. Open the battery pack compartment by pressing on
the latch connecting it to the blower.
3. Disconnect the battery wire connector from the
blower and separate the battery from the blower. Set
battery aside for future use.
4. Remove Alkaline Battery
Adapter from its original kit
packaging. Set aside the
battery backing plate until Step
#12.
Backing
Plate
5. Remove the adhesive backing paper on the Alkaline Battery Adapter hook and
place the adapter plate into the open cavity on the back of the blower, with metal
connectors facing
out. Note: Do not
separate Velcro
backing paper
hook from Velcro
loop on the back
of the Alkaline
Battery Adapter.
These parts need
to remain together
during assembly.
ECO: 102-0461-01 S-4014
Rev B
Page 31

31
Velcro Loop on Back of
Alkaline Battery
6. Press the adapter plate assembly firmly to ensure
the white Velcro hook adheres to the inside wall
of the blower. Then gently pull the blue fabric
strap to pull the plate assembly out of the unit.
The Velcro hook (color white) should remain
adhered to the inside of the blower. Verify that
the Velcro loop strip (black) is still firmly
attached to the back of the adapter plate.
Adapter Plate
7. Set the Alkaline Battery Adapter plate aside and
use your thumbs to apply pressure across the
Velcro hook (white) inside the blower to insure it
is securely adhered.
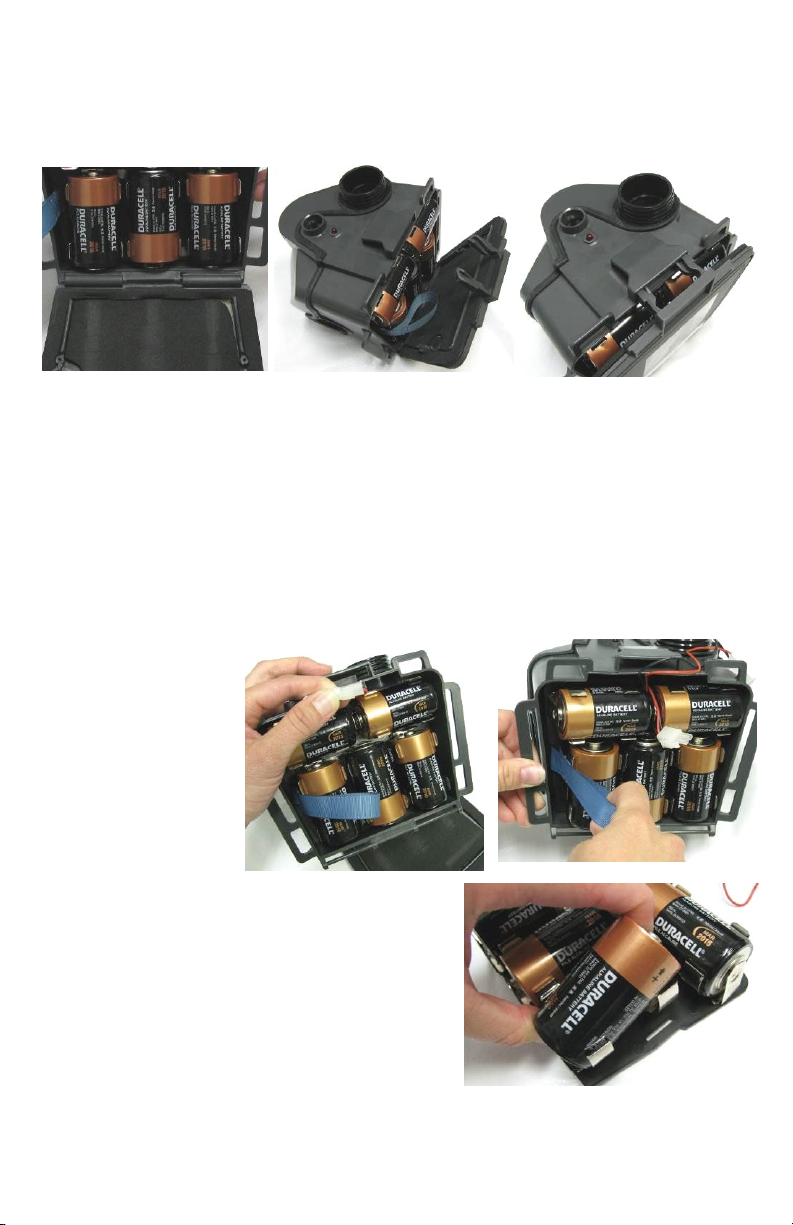
8. Install five Duracell D-Cell batteries into the
Alkaline Battery Adapter. (NOTE: USE
ONLY DURACELL D-CELL ALKALINE
BATTERIES!)
a. Only remove and install the batteries
when the Alkaline Battery Adapter Plate
is removed from the blower.
b. Be sure to pay attention to the polarity (+
or -) direction engraved into the back plate
to insure correct battery orientation. This
is very important to ensure the blower
operates properly.
Adapter with
Batteries Properly
Installed
ECO: 102-0461-01 S-4014
Rev B
Page 32
32
9. After batteries are placed into the Alkaline Battery Adapter install the part into the
Connector in stowed
position
Pull Strap
back of the blower. The pull strap should remain outside as shown below, and is used
to remove the alkaline battery pack for exchange of battery cells or replacement with
alternative battery options.
10. Connect the new battery pack to the blower.
11. Tuck the connector and wires into the open cavity at the top side of the blower as
shown in the photo below.
ECO: 102-0461-01 S-4014
Rev B
Page 33
33
12. Install the Alkaline Battery Adapter by aligning the cover hinge to the hinge pin of
the blower. Ensure that you do not pinch the battery leads or fabric loop when
closing the battery pack.
13. Ensure you hear an audible click when the battery pack latch locks into place.
14. The blower may now be operated normally, and should provide approximately 8
hours of battery life.
15. When the low voltage alarm is heard, immediately stop operation of the blower and
replace the batteries with a new set of five Duracell D-cell batteries.
REMOVING THE ALKALINE BATTERY ADAPTER (P/N S-4013)
1. Be sure to
disconnect the
battery connector
and use the fabric
pull strap to
remove the
Alkaline Battery
Pack from the
blower Velcro
hook before
removing the
batteries.
2. After removing the Alkaline Battery Pack
carefully take out each individual cell, one at a
time and set aside for disposal. Replace with
new cells as shown in Step 8 above, Installing
the Alkaline Battery Adapter.
ECO: 102-0461-01 S-4014
Rev B
Page 34

34
∆ WARNING
FOR ALKALINE BATTERY ADAPTER OPTION, P/N S-4013, USE ONLY
DURACELL BATTERIES. DO NOT USE A COMBINATION OF
CELL BATTERIES. WHENEVER
CELL BATTERIES
AT THE SAME TIME. IMPROPER BRAND SELECTION, USING A
OLTAGE ALARM IS
DURACELL OR OTHER BRANDS. IT IS IMPORTANT THAT ALL FIVE
BATTERIES ARE DURACELL DBATTERIES ARE CHANGED, CHANGE ALL FIVE D-
COMBINATION OF BATTERY BRANDS, OR NOT USING FIVE BRAND
NEW D-CELL BATTERIES AFTER THE LOW V
INDICATED MAY RESULT IN INJURY OR DEATH.
CUSTOMER SERVICE INFORMATION
If you need additional information on the Sentinel XL™ HP Clear Hood PAPR or any
ILC Dover product, consult your distributor or contact:
Customer Service
ILC Dover
One Moonwalker Road
Frederica, DE 19946-2080
Phone: 800.631.9567 OR 302.335.3911, ext. 506
Fax: 302.335.1320
www.ilcdover.com
ECO: 102-0461-01 S-4014
Rev B
Page 35

35
TROUBLESHOOTING
Problem
Possible Cause
Corrective Action
Poor visibility
Visor is coated with debris.
Wipe debris off.
new hood.
Continuous low
Battery is not charged.
installed properly.
Leave work area immediately.
the adapter with the proper polarity.
Low airflow
Battery needs charging.
PAPR blower malfunction.
Leave work area immediately; switch
Switch to a different blower unit.
Blower gasket is
defects
Gasket is not properly
Contact ILC Dover Customer Service
Blower housing is
Mishandling of the
damage
Leave work area immediately and
Dents, Tears, Holes,
Mishandling of the
damage
Leave work area immediately to
Use the table below to help identify possible causes and corrective action for
problems you may experience.
through visor
voltage alarm sounds
upon blower
activation
raised, twisted, or has
any visible surface
Visor is scratched.
Alkaline batteries are not
One or more cartridges are
loaded.
seated into the blower and
may produce a leak path
Dispose of hood and replace it with
Rechargeable Battery:
Switch to a fully charged battery, or
recharge.
Non-rechargeable Battery:
Replace Battery
Alkaline Battery Adapter:
Install 5 new Duracell D-cell batteries
Remove batteries and re-install into
to fully charged rechargeable battery,
a new non-rechargeable battery, or if
using the Alkaline Battery Adapter
replace batteries with 5 new ones.
Replace cartridges.
Department immediately
1-800-631-9567
cracked
Battery pack is
cracked
or Cracks in the
Hood or Breathing
Tube
ECO: 102-0461-01 S-4014
equipment
Improper use of the
equipment
Excessive use/and or
equipment/Improper use of
the equipment
Not following the decon
procedures properly
Excessive wear/ and or
replace with a new blower or battery
pack.
Dispose damaged blower or battery
and replace.
prevent contaminated air from
entering the hood or hose.
Dispose damaged hood or hose and
replace it with a new hood or hose.
Rev B
Page 36

36
ECO: 102-0461-01 S-4014
Rev B
 Loading...