

Page 1
www.sentinelcctv.com
SC21FD3044-161 Page 1
STEP 1
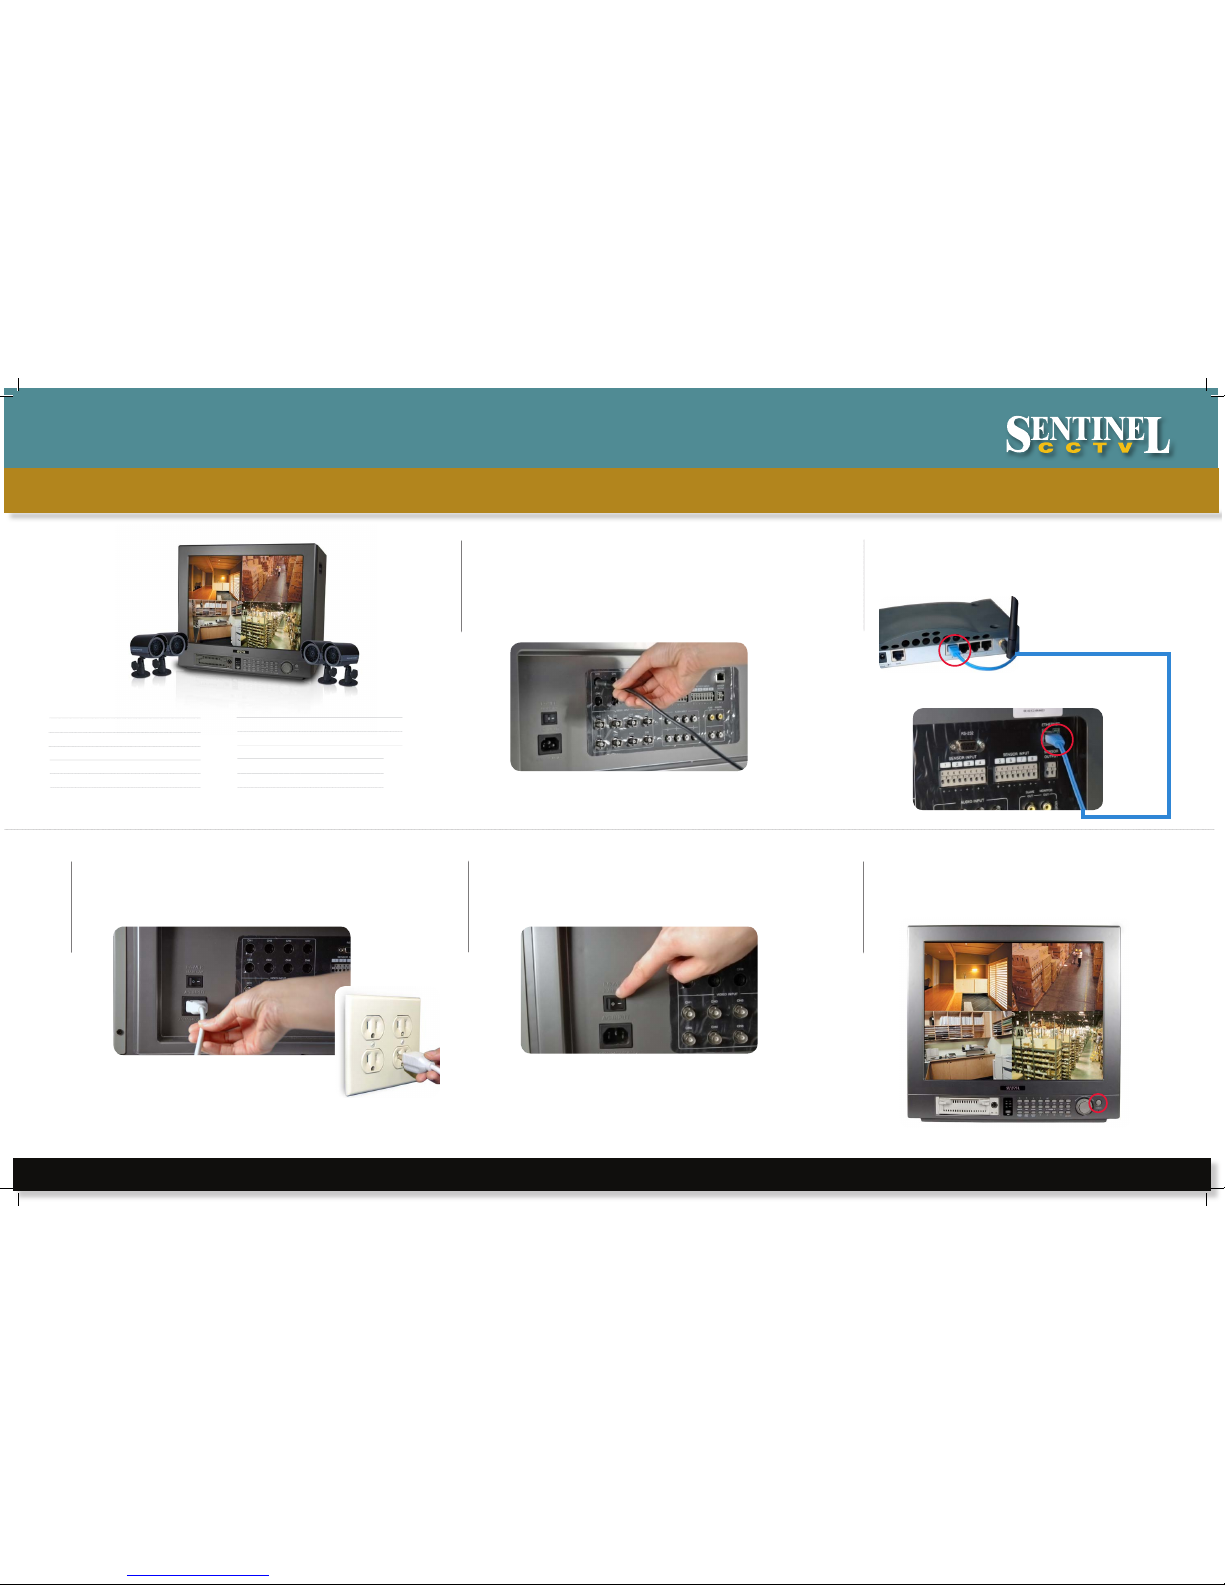
SET UP YOUR MONITOR FIRST
Package Contents
1
Connect cameras
to the monitor.
4
Turn the Master power
switch located at the back
of the monitor ‘ON’.
2
Connect one end of the ethernet cable to a broadband
router (not included) and the other end to the back of
the monitor.
5
Press the Standby
button to view picture
images.
3
Connect one end of the power cord
to the monitor, the other end to an
electrical outlet.
Information in this doc ument is subject to ch ange without notice. A s our products are subj ect to continuous impr ovement, Lorex Technol ogy and our subsidiari es reserve the right t o modify product design , specifications and pr ices, without notice a nd without incurring a ny obligation. E&OE © 2006 LOREX. All rights reserved.
1 - 21” Color Monitor with Built-in Digital Video Recorder
1 - 160 GB Hard Disk Drive (installed inside hard drive bay)
1 - Remote Control with batteries
4 - Colour cameras with sunshade housing
4 - Camera brackets with mounting screws
4 - Extension Cables for camera
1 - Ethernet network cable
1 - Set up CD Rom (placed inside the owner’s manual)
1 - Owner’s Manual
1 - Quick Installation Guide
1 - Power Cord
2 - keys (for Hard Drive Bay)
1 - Network Viewer Guide
2 - Warning Decals
1 - BROADBAND ROUTER REQUIRED - NOT INCLUDED
BACK OF THE MONITOR
BACK OF THE MONITOR BACK OF THE MONITOR
FRONT OF THE MONITOR
BACK OF THE MONITOR
ROUTER (NOT INCLUDED)
Connect the firs t camera to the
CH1 input. Foll ow the same steps
to connect the other 3 cameras to
the CH2, CH3, C H4 camera inputs
Page 2
www.sentinelcctv.com
SC21FD3044-161 Page 2
STEP 2
SET UP LOCAL VIEWING ON YOUR PC SECOND
2
Record the 12 digit IP & the 12 digit Alpha/Numeric MAC Addresses.
Information in this doc ument is subject to ch ange without notice. A s our products are subj ect to continuous impr ovement, Lorex Technol ogy and our subsidiari es reserve the right t o modify product design , specifications and pr ices, without notice a nd without incurring a ny obligation. E&OE © 2006 LOREX. All rights reserved.
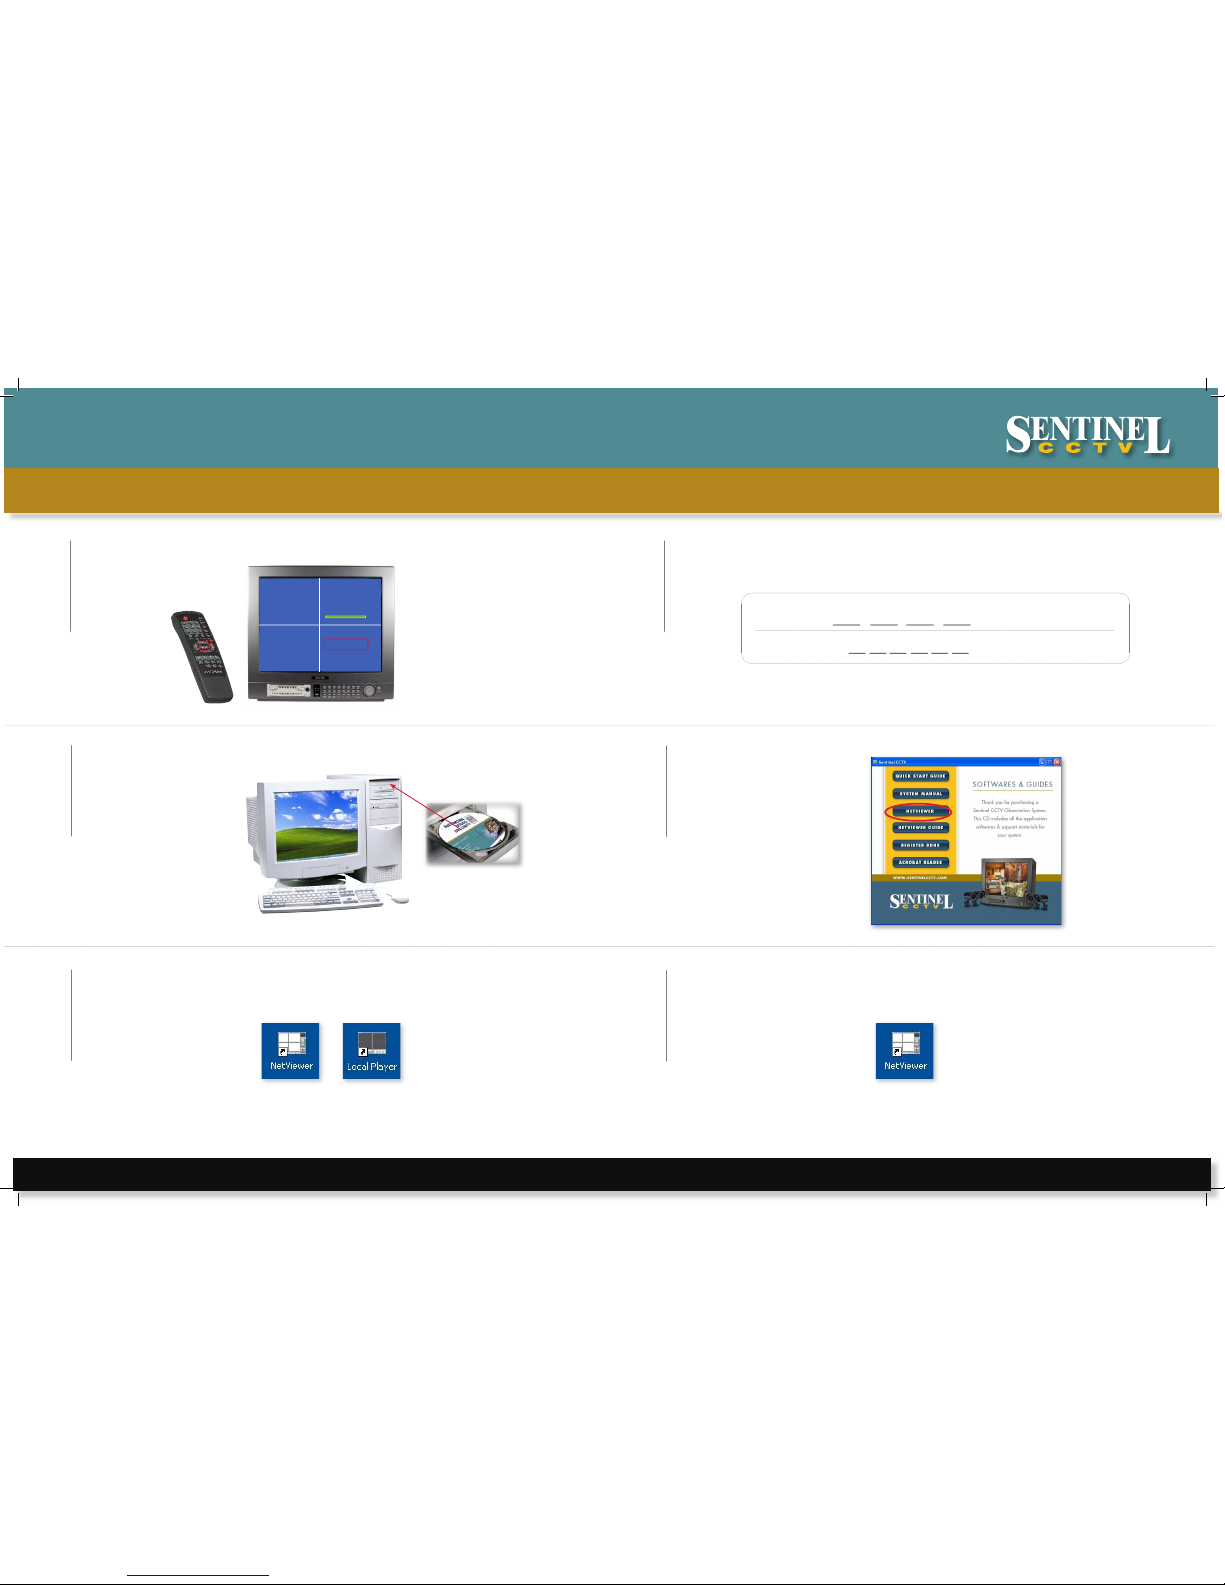
1
Press the ENTER button on
the remote control (ensure
batteries are inserted).
6
Double-click the Netviewer
icon on your desktop to
run the program.
5
Close the CD Menu
Screen. A Netviewer
icon and a Local Player
icon will appear on your
desktop.
*** NETWORK INFORMATION ***
MAC ADDRESS : XX XX XX XX XX XX
IP ADDRESS : 192 . 168 . 001 . 100
SUBNET MASK : 255 . 255 . 255 . 000
GATEWAY : 192 . 168 . 001 . 001
PORT : 5000
SYSTEM CHECK…..
DYNAMIC IP REQUEST . . OK
*** MASTER HDD DETECT ***
POWER ON CHECK _ _ _ _ _ _ _ _ _ _ _ _ _OK
HDD IDENTIFY CHECK _ _ _ _ _ _ _ _ _ _ _ OK
HDD R/W CHECK __ _ _ _ _ _ _ _ _ _ _ _ _OK
MODEL : XXXXXXXXXXXXXXXXXXXXXX
HDD LBA : XXXXXXXXXXXXXXXXXXXXXX
HDD SPACE : 160 GB
100 %
4
Select the netviewer
option and follow
instructions from
the dialog boxes to
guide you through
installation.
3
Insert the network video
CD software into the computer’s CD ROM drive.
IP ADDRESS : . . .
MAC ADDRESS :
(record the pe riod. It is part of the IP Address)
(DO NOT record the colorn (:))
COMPUTER NOT INCLUDED
Page 3

www.sentinelcctv.com
SC21FD3044-161 Page 3
STEP 2
SET UP LOCAL VIEWING ON YOUR PC SECOND - CONTINUED
8
Enter the Setup information
followed by
clicking OK.
Information in this doc ument is subject to ch ange without notice. A s our products are subj ect to continuous impr ovement, Lorex Technol ogy and our subsidiari es reserve the right t o modify product design , specifications and pr ices, without notice a nd without incurring a ny obligation. E&OE © 2006 LOREX. All rights reserved.
7
Click the Set-up icon.
NETVIEWER SCRE EN
11
View video images
from your computer.
NETVIEWER SCRE EN
10
Enter your User
Name and Password
(It is recommended that
“admin” be used for both
ID & Password) as the
default setting. Press
the OK button.
9
Click the connect
icon button.
Enter the IP Address recorded in Step 2-2.
Enter the DVR/Monitor port (5000 by default)
Enter the User ID (admin by default), max. 5 characters
Select NTSC
SET-UP ICON
NETVIEWER SCRE EN
admin
admin
Page 4

www.sentinelcctv.com
SC21FD3044-161 Page 4
STEP 3
SET UP INTERNET REMOTE SECURITY MONITORING THIRD
2
Enter ‘ddns.strategicvista.net’
in the address bar.
4
Complete New Account
information.
3
Click Create Account
option.
Information in this doc ument is subject to ch ange without notice. A s our products are subj ect to continuous impr ovement, Lorex Technol ogy and our subsidiari es reserve the right t o modify product design , specifications and pr ices, without notice a nd without incurring a ny obligation. E&OE © 2006 LOREX. All rights reserved.
1
Port Forward your Router FIRST before proceeding with the
Set-up (you must Port Forward Ports 5000, 5001, 5002, 5003).
5
An automated Registration
Confirmation email will be
sent to your email. Print
and Save this Registration
Confirmation.
6
Enter DDNS SET option on your
monitor by pressing the Menu
button on your remote control.
Use the arrow buttons to highlight
DDNS Set. Press the Enter Button.
Se rvic e P rovi der : dd ns. str ateg icv ista .ne t
Do main na me: ho use. str ateg icv ista .ne t
Us er n ame : Jo hn Doe
Pa sswo rd: <lea ve t his fie ld blan k>
Us e Pu bli c IP to Reg ist er: Yes
MAIN MENU
TIME/DATE SET
SEQUENCE SET
TITLE SET
ALARM SET
MOTION SET
SYSTEM (I)
SYSTEM (II)
HDD/REC SET
ALARM REC
SCHEDULE
MONITOR SET
FIRMWARE
DDNS SET
1. FOR PRODUCT LICENSE select the
SC21FD3044-161 option from the drop down
menu.
2. FOR PRODUCT CODE enter your computer’s
MAC address (recorded in step 2, part 2).
3. FOR URL REQUEST enter a unique URL name
(eg. Johndoe). Note: An URL name should not be
more than 8 characters.
All routers are different. To Port Forward your Router
Refer to your Router’s manual for specific instructions on port forwarding (or)
Check the Router configuration guide support document in the consumer guide section
on our website http://sentinelcctvstore.strategicvista.com/article.
aspx?aid=3 and select Router Configuration Guide
http://ddns.strategicvista.net
Create Account
1 2
3
Page 5

www.sentinelcctv.com
SC21FD3044-161 Page 5
DDNS: Select “YES’
Domain Name: Enter the Domain Name sent to you in
the registration confirmation (Section 2-5).
User Name: Enter the User Name sent to your in the
registration confirmation (Section 2-5).
User Password: Leave blank
Router: “Yes”
Scroll to return and press enter. Enter the DDNS set
option and verify that the DDNS STATUS is “OK”.
STEP 3
SET UP INTERNET REMOTE SECURITY MONITORING THIRD - CONTINUED
8
Install the Net Viewer
video CD software into
your Remote Computer.
10
Close the CD Menu
Screen. A Netviewer icon
and a Local Player icon
will appear on your desktop.
9
Select the Netviewer option
and follow the dialog boxes to
guide you through installation.
Information in this doc ument is subject to ch ange without notice. A s our products are subj ect to continuous impr ovement, Lorex Technol ogy and our subsidiari es reserve the right t o modify product design , specifications and pr ices, without notice a nd without incurring a ny obligation. E&OE © 2006 LOREX. All rights reserved.
7
Set the DDNS Settings
11
Double-click the Netviewer
icon on your desktop to
run the program.
12
Click the Set-up icon.
DDNS
DDNS: Y
DOMAIN NAME house
USER NAME John Doe
USER PASSWOR D
ROUTER Y
RETURN
EXIT
DDNS STATUS OK
Use the UP, DOWN, LEFT, RIGHT
and ENTER keys located at the front
of the monitor to set DDNS Settings.
Ensure the domain name matches
the name sent to you via email
(Note: Do not enter ‘strategicvista.
net’ extension to the user name)
SET-UP ICON
COMPUTER NOT INCLUDED
Page 6

www.sentinelcctv.com
SC21FD3044-161 Page 6
Information in this doc ument is subject to ch ange without notice. A s our products are subj ect to continuous impr ovement, Lorex Technol ogy and our subsidiari es reserve the right t o modify product design , specifications and pr ices, without notice a nd without incurring a ny obligation. E&OE © 2006 LOREX. All rights reserved.
FOR ADDI TIONA L IN FORM ATION OR TROUB LESH OOTIN G HE LP, REFER
TO Y OUR OWNER S MA NUAL FOR ASSI STANC E. Y OU CA N AL SO C ALL O R
EMAI L FO R FUR THER SUP PORT.
TO LL FR EE T EC HN ICA L SU PP OR T: 1- 88 8- 42 LO RE X (1 -88 8- 42 5- 673 9)
EM AI L S UP PO RT : SUP PO RT @L OR EXT EC HN OL OGY .C OM
WE BS ITE : WW W. SE NTI NE LC CT V. COM
It’s all on the web
Product Information
User Manuals
Quick Start Guides
Specification Sheets
Software Updates
Firmware Upgrades
13
Enter the Setup information
field followed by clicking OK.
Click the Connect icon followed by
entering the User name and Password
(admin by default). Press OK.
View the video picture remotely.
STEP 3
SET UP INTERNET REMOTE SECURITY MONITORING THIRD - CONTINUED
REFER TO YOUR OWNER’S MANUAL TO LEARN
MORE ABOUT THE DIFFERENT FEATURES AND
OPTIONS AVAILABLE WITH THIS SYSTEM
Enter the Domain Name sent
to you in the Registration
Confirmation (Section 2-5)
followed by .strategicvista.net
(eg. house.strategicvista.net)
Enter 5000 by default
Enter “admin” by default
Select NTSC by default
14
 Loading...