

Page 1

Troubleshooting & Specs CHHC-1
Amps / Volts requirements 15 amps @ 120 volts
Min / Max operating temperature 32 to 120° F
Min / Max operating Humidity 0-99% RH
Temperature Measurement range 32 to 122° F
Temperature Accuracy +/- 1.8° F
Humidity Measurement range 10 to 95% rH
Humidity Accuracy +/- 3% rH
Light Sensor sensitivity Adjustable
CO2 Measurement range 0-2500 PPM
CO2 Accuracy +/- 75 PPM
CO2 sensor warm-up time Less than 10 minutes
Computer Interface *Optional RS 232 / 9-pin D-sub
Weight / Dimensions 5lbs / 8” x 6.5” x 3.1”
Life Expectancy > 10 years
Remote sensor cable length 16ft (can be up to 100’)
Sentinel products are distributed by:
GPS / Global Product Solutions LLC.
www.growgps.com
All Sentinel Timers and
Controllers offer a
3-year warranty.
Ask your retailer for
details.
Printed in China
Instruction Manual
CHHC-1
Cooling - Heating - Humidity - CO2
Controller
Page 2

Sentinel has made controlling temperature, humidity and CO
2
PPM levels easy and affordable. The CHHC-1 combines an
accurate digital temperature & humidity sensor with a state of
the art NDIR CO
2
sensor in one reliable and easy to use
controller. By controlling supplemental CO
2
with PPM
(part-per-million) accuracy, plant growth can be accelerated by
as much as 30%.
The CHHC-1 has been designed
to maintain a specific CO
2
level.
The user can select “Fuzzy-logic”
mode when using compressed
CO2 or switch the mode to On /
Off when using a gas-fired CO2
generator.
Increasing the CO
2
from normal atmospheric level of 375
PPM to between 1250 PPM by using either compressed CO
2
or operating a combustible gas CO
2
generator has never been
easier. The CHHC-1 measures the carbon dioxide level and
automatically turns ON and OFF the CO2 device to accurately
keep the CO2 level at the desired level.
The combination remote sensor assembly is also a great
feature that allows the user to place the sensor up to 16 ft from
the controller. The combo-probe contains a highly accurate
temperature, humidity, light and CO2 sensor. The sensors are
enclosed in a shielded body and use high-quality shielded
wiring to resist electronic noise from electronic ballasts or
other EMI / EFI noise sources.
CONTENTS
A quick look at the CHHC-1
Installation of the CHHC-1
Understanding Interlocks
Operating the CHHC-1
Calibrating the CHHC-1
CO2 control Modes
Photocell sensitivity
Change display F to C
Using with electronic ballasts
Connection Examples
Troubleshooting & Specs
Troubleshooting & Specs
Problem: The unit does not power up at all.
Check and reset the circuit breaker on the bottom of the unit If the
problem continues, reduce the number of devices connected to the
unit or use a PXM to control larger amperage devices.
Problem: The CO2 outlet does not turn on.
1) There are different modes that can be selected. Refer to Understanding Interlocks to fully see how the modes affect the CO2
function.
2) The Photocell inside the combination probe may affect the CO2
function. Ensure the photocell is receiving enough light to activate it. (Green “Daytime” LED will be ON) The sensitivity of
the photocell can also be adjusted if required.
Problem: The CO2 reading does not seem to be accurate.
A quick check of the calibration of the CO2 sensor can be
performed. Refer to Calibrating CO2 to recalibrate the sensor.
Problem: The unit has scrolling 8s for more than 10 minutes.
Turn the power switch Off for 5 seconds, then turn the switch On.
After 10 minutes, the unit should complete the start-up and begin to
display conditions of the area. If it does not, contact the factory.
Problem: The device I have connected to the Temperature or
Humidity receptacle, cycles On & Off too much.
The dead-bands can be increased to reduce cycling of the device.
Refer to the Operating the CHHC-1 section.
Problem: I would like to return the unit to is default settings.
The unit can be returned to it’s original factory setpoints. Pressing
and holding the Enter / Reset
and Down pushbuttons for 2 seconds
will change the display to read f.Set. Pressing Enter / Reset
again
will return the unit to it’s factory default settings.
Problem: The digital display is frozen or changing rapidly.
Certain devices such as Electronic (Digital) Ballasts and Ozone
generators produce a huge amount of electronic “noise”. If you are
operating these other devices, locate them as far away from the
controller as possible.
Problem: The display reads Err SEn
The remote combination probe has been disconnected or is not
communicating with the unit. Check the cable and the remote sensor. If resetting (OFF / ON) the power does not help, contact the factory. (See below also)
Page 3
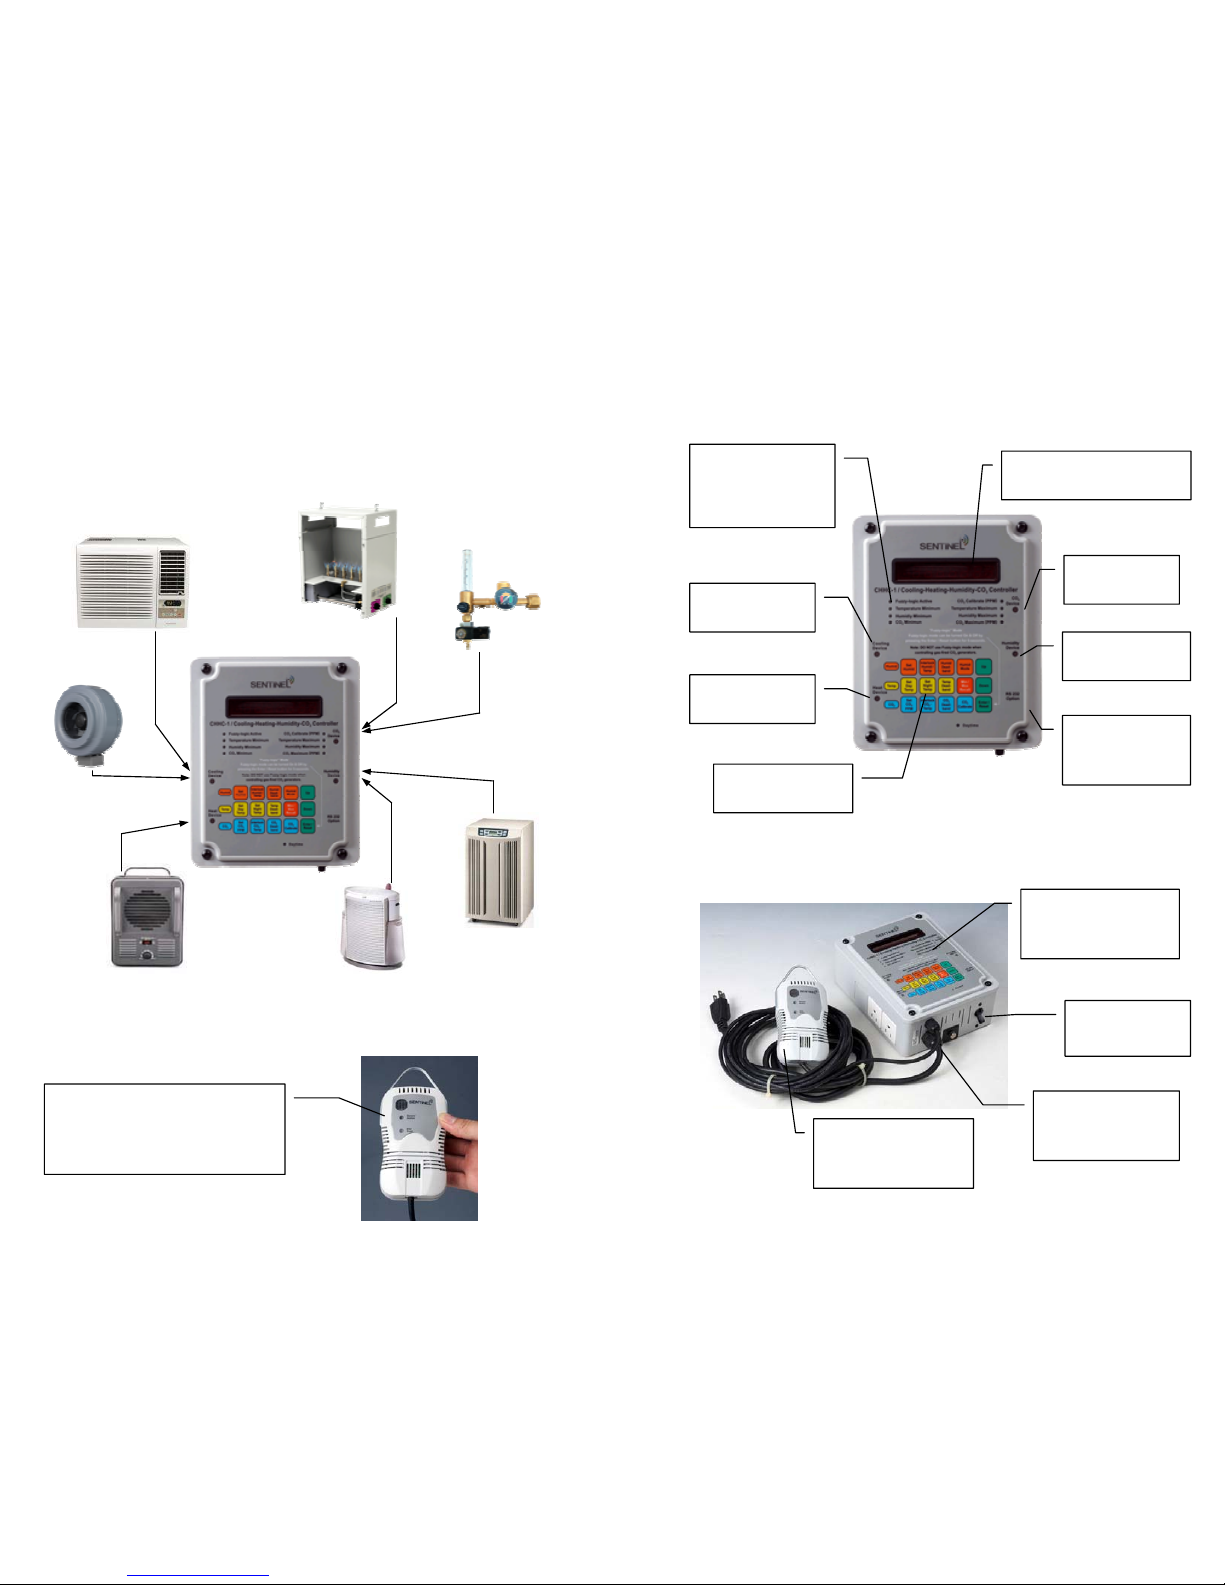
Connection examples
OR
OR
OR
Dehumidifier or a humidifier can
be connected to the Humidity
Device receptacle
For indoor growing, Cooling
devices such as ventilation
fans or air-conditioners
connect to the Cooling
Device receptacle
Heaters for cooler climate
greenhouses can be connected to
the Heat Device receptacle.
Connect your 120 volt
compressed CO2 solenoid /
regulator assembly to the
CO2 receptacle.
Hand sized remote combination
probe senses temperature,
humidity, CO2 PPM and light
levels all in one small enclosure.
A quick look at the CHHC-1…
Heavy-duty Power
cables, shielded
probe cable
Re-settable
circuit breaker
Attractive highimpact injection
molded enclosure
LED displays temperature
humidity & CO2 levels
15 button keypad
to change settings
Humidity device
connects here
CO2 device
connects here
Combination remote
probe, Temp, Humid,
CO2 & light
Cooling device
connects here
Heating device
connects here
(8) LEDs allow
user to quickly see
Min / Max
recorded values
RS232 computer
connection
* (Optional)
Page 4

Installing the CHHC-1
1) Locate a suitable location for the controller.
2) First secure the provided bracket to the wall. Next snap the controller
into place and tighten the (2) thumb-screws top & bottom.
3) Place the remote probe assembly where it can accurately sense the
environmental conditions. The sensor is NOT water proof. Do not locate
the sensor where it may get sprayed with water.
4) Hang the remote sensor probe at plant height for best accuracy. The
combination sensor is fragile and should be handled with care.
5) The controller requires a 120 volt, 15-amp power supply. Plug the
power cable into a standard Nema 5-15 wall outlet.
6) The devices that will be controlled must be 120 volt & 15-amps or less.
If larger electrical loads need to be controlled, use 1 or more PXMs to ex-
pand the power handling capability of the CHHC-1.
7) If you are using a cooling and heating device, connect the device’s
power cable into the receptacles marked Cooling and Heat.
8) If you are using a separate humidifier or dehumidifier, connect it to the
receptacle labeled Humidity Device.
9) Connect the CO2 device to the receptacle marked CO2 Device. You
can operate a CO2 generator or a compressed CO2 regulator.
10) The light sensor inside the remote probe needs to be exposed to light.
The sensitivity of the photocell is adjustable. (See Photocell sensitivity)
11) Turn the power switch to the ON position and the unit will begin to
“warm-up”. While warming up, the display will show a series of the number
8 moving across the display. Warm-up takes about 4 minutes.
NOTE:
In order for the CHHC-1 to work correctly for YOUR
application, you may need to first check and change some factory set-
points. Refer to Operating the CHHC-1 section of this manual.
NOTE:
If you are trying to connect large power hungry devices like air
conditioners or dehumidifiers, you may have to use some Power Expan-
sion Modules to provide the ability to switch higher amperage devices.
Photocell sensitivity
If necessary, the sensitivity of the photocell can be adjusted. The
factory setting normally activates “daytime” with very low light
levels required. If you need to change the sensitivity of the photocell, follow the procedure below.
Pressing and hold the Enter / Reset and UP button for 2 seconds will
bring up the current photocell setpoint. To increase the sensitivity (turn
ON Daytime mode with less light), increase the number setting.
To decrease the sensitivity (require more light to activate Daytime mode),
lower the number setting.
Changing display from F to C
The CHHC-1 can display the temperature in either in F or C. To
change the temperature display, press and hold the Up and Down
pushbuttons for 3 seconds.
Using with electronic (digital) ballasts
Warning!!!
Some electronic devices such as Electronic (Digital) HID ballasts and Ozone
generators produce large amounts of electronic noise, which can affect other
equipment. The Sentinel line of controllers and timers have been “hardened” by
using shielded cable and shielded enclosures however… some EBs do not have
proper shielding. For best results it is highly recommended to position your
controller at least 8 ft away from any EBs (Electronic Ballasts). It is also a good
idea to route the cables going from the EB to the HID lamp away from the
controller and the remote temperature probe cable attached
8 ft
minimum
Keep Electronic ballast at least 8 ft away from other electronic equipment.
Page 5

CO2 control modes
There are 2 CO2 “modes” of operation. One mode is used when
controlling CO2 generators, the other mode is used with
compressed CO2 that comes in high pressure tanks. Selecting the
appropriate mode before using the CHHC-1 is important for proper
operation. The CO2 outlet is only activated during the “daytime”.
CO2 Generators:
The default mode of operation is gEnErAt for CO2 generators. In
generator mode, the unit CO2 will be turned ON whenever the
CO2 level is below the desired setpoint. The CO2 Deadband is also
used in this mode. The deadband prevents the CO2 from turning
ON / OFF too quickly and is factory set at 50PPM. If the setpoint
is 1250 PPM, the CO2 outlet will be turned ON until it reaches
1300 PPM (1250 setpoint + 50 deadband = 1300 PPM) Once it
reaches 1300, the CO2 is turned OFF. Once the CO2 level drops
back to the setpoint of 1250 PPM, the CO2 is turned ON again and
the process repeats until the unit senses it is night time.
Compressed CO2 tanks:
The optional mode of CO2 operation is Fuzzy Logic mode
LogIcoN. It is used ONLY when using compressed CO2. This is
because the logicon mode will be turning the CO2 device connected
to the CHHC-1 ON and OFF at short intervals to attempt to keep
the CO2 level inside the growing area as close as possible to the
setpoint. When the CO2 level is close to the setpoint, the CO2
outlet will be turning ON and OFF every few seconds, this is normal. When the CO2 level is either well below or well above the setpoint, the output will remain steadier either ON or OFF.
Pressing and holding the Enter / Reset button for 5 seconds will allow
you to select generator mode gEnErAt for CO2 generators or Fuzzy
Logic mode LogIcoN when using compressed CO2. Use the Up
or
Down
buttons to change the display to the desired mode. Press Enter to
accept the change.
NOTE:
The rapid cycling of the CO2 outlet would cause problems
if a CO2 generator was connected to the CHHC-1 in LogIcoN
mode. Only
use gEnErAt mode when using CO2 generators.
There are 15 buttons on the CHHC-1 . Below is a brief description, the next sections explain all of the functions in detail.
• Set CO2 PPM: Press this button to display and change the
current CO2 Part-Per-Million setting Factory setpoint 1250 PPM.
• Interlock CO2—Temp: Press this button to select whether the
temperature and CO2 functions will be interlocked. Factory setpoint Split.
• CO2 Dead-band: Press this button to display and change
the current CO2 Dead-band. Factory setpoint 50 PPM.
• CO2 Calibrate: Press this button to re-calibrate the CO2
sensor. * Refer to the Calibration section. Factory setpoint 380 PPM.
• Set Day Temp: Press this button to set the Day Cooling and Heating
setpoint. Factory setpoint Cooling 80’F / Heating 55’F.
• Set Night Temp: Press this button to set the Night Cooling and Heating
setpoint. Factory setpoint Cooling 70’F / Heating 55’F.
• Temp Dead-band: Press this button to set the Cooling & Heating
temperature Dead-band setting. Factory setpoint 3’F heat & cool.
• Set Humid: Press this button to set the Day and Night humidity
setpoints. Factory setpoint 50 % rH.
• Interlock Humid—Temp: Press this button to select whether the humidity
& temperature functions will be interlocked. Factory setpoint Split.
• Humid Dead-band: Press this button to set the Humidity
Dead-band setting. Factory setpoint 3%.
• Humid Mode: Press this button to select either humidification (rH Incr) or
dehumidification (rH decr) modes. Factory setpoint rH decr
• Min / Max Recall: Pressing this button repeatedly will recall the stored
measurements for Temp / Humid & CO2. Pressing and holding the
Enter / Reset button while the recorded value is displayed will reset the
Min / Max values.
• UP: Press this button to display to increase the setting.
• Down: Press this button to display to increase the setting.
• Enter/Reset: Press this button accept and enter the new setpoint and also
to reset the Min / Max recorder values. (* Pressing and holding the Enter
/ Reset button also activates & deactivates the Fuzzy-Logic CO2 mode.)
Page 6

Understanding Interlocks
Understanding how the unit works is important if you are going
to get the most out of the unit.
Interlocks are used to select if certain functions will be interlocked
“linked” together or operate independently. For example, if you want
the CO2 device to be disabled while the ventilation - fan is operating,
you can select the CO2 / Temp interlock to be activated by setting the
interlock to connect
mode. See below for details.
Interlock CO2 / Temp
* Using ventilation fans for cooling.
If you are using ventilation fans to keep the growing area cool, warm
and humid air inside the growing area is being replaced by dry and
cooler outside air from outside the area. It is advisable to NOT
operate the CO2 device when a ventilation fan is in the process of
exchanging air. So is this example you would want to select to
connect
the Interlock CO2 & Temp so that the CO2 is turned OFF
when the cooling fan is activated. This will reduce the amount of CO2
being used and reduce waste.
Using air conditioning for cooling.
If you are using a recycling air conditioner to keep the growing area
cool, the air inside the growing area is NOT being exchanged with
outside air. There is no problem operating the CO2 device and the
cooling device AT THE SAME TIME. So is this example you would
want to select to split
the Interlock CO2 & Temp so that the CO2 is
controlled independently of the cooling device. If the area gets too
warm, the cooling device will operate, if the CO2 is too low, the CO2
device will operate completely independent of each other.
NOTE:
There are exceptions to this rule. If you are operating compressed
CO2, it is important to disable the CO2 while the ventilation fan is
operating, because of the high-cost of CO2. However if you are operating
an economical CO2 generator, you may choose to allow both the ventila-
tion fan and the CO2 generator to run at the same time. (see below)
NOTE:
If you are using a CO2 generator, you may want to choose to
disable the CO2 generator while the air conditioner is operating to
reduce the amount of heat it needs to remove. (see above)
Calibrating the CHHC-1
CO2 Calibrate
Even though the CHHC-1 has been designed
for many years of trouble-free operation, occasional the need
arises to re-calibrate the CO2 sensor. Calibrating the unit will
restore the sensor’s ability to accurately measure the CO2 levels.
The CO2 sensor has a lifetime of over 10 years. However, over the life
of the sensor, dust and other contaminants can accumulate on the inner
optical surfaces of the sensor cell itself. To adjust for the contamination,
the calibration feature is provided. If the unit appears to not be
measuring the CO2 levels correctly or if the unit has been dropped or
jarred severely, you should recalibrate the unit.
1) Locate an area outdoors away from people, animals and high traffic areas.
The unit must be shaded and NOT placed in direct sunlight.
2) Plug in the unit in and allow the unit to warm up for approximately 30
minutes. Note: Waiting longer (1+ hours) provides more accurate calibration.
3) Try not to exhale or breath on the unit while activating the calibration
function. Once activated, leave the unit alone for at least 10 minutes.
4) To activate the automatic calibration sequence, press the CO2 Calibrate
button. will display the “new” ambient CO2 level _380_PP. If the unit will be
calibrated in an area of high vehicular traffic, or near people, a slightly higher
calibration point should be selected.
5) The calibration level can be changed by using the UP
and Down buttons. If
you live in a highly populated city, you may increase the calibration level to 400-
475 PPM.
6) Pressing Enter / Reset
will start the calibration process. The display will
read
Co2_CAL and a small green LED will be flashing. LEAVE THE UNIT
ALONE! The process takes about 2-6 minutes. When complete, the display re-
turns to normal operation.
7) The CO2 sensor calibration can be repeated as often as necessary
NOTE:
Recalibration of the CO2 sensor must be completed away from
all animals and people OUTDOORS! Follow the procedure exactly.
NOTE:
Annual calibration is HIGHLY recommended.
Page 7

display reads HEAt_ _ F use the Up or Down buttons to change the
settings and then press Enter
to accept the new setting.
Setting the CO2 PPM level:
Set CO2 PPM To change the CO2 PPM setting, press the Set CO2
PPM button on the keypad. Use the Up or Down button to change the
setting, example 1500_PP. Press Enter
to accept the new setpoint.
Setting the CO2 / Temp Interlock:
Interlock CO2 / Temp You may choose to have the CO2 output
disabled when the Cooling output is ON, CoNNeCt, or to let them work
independently, SPLit. (See Understanding Interlocks) Pressing the Inter-
lock CO2—Temp button. will display the current setting. Use the Up or
Down
buttons to change the display to the desired mode. Press Enter to
accept the change.
Setting the CO2 Dead-band:
Set CO2 Deadband The CO2 Dead-band can be set by the user.
The dead-band is the range of measurement that the control will allow
the CO2 level to vary by. Press the CO2 Deadband
button on the keypad
to display the current setting. It is suggested to leave the setting at
0050_PP. If necessary use the Up
or Down buttons to change the display
to the desired setting. Press Enter
to accept the change.
Recalling minimum and maximum recorded values:
Min / Max Recall The user can recall the minimum and maximum
recorded values for the Temperature, Humidity and CO2 levels easily.
Press the Min / Max Recall
button on the keypad. Each time the button
is pressed, the display will advance to show in order: Max Temp / Min
Temp / Max Humid / Min Humid / Max CO2 / Min CO2. Each
recorded value is identified with a small green LED on the front of the
unit. When desired the values can be reset by pressing and holding the
Enter / Reset
button for 2-3 seconds.
Activating Fuzzy-logic CO2 mode:
Fuzzy-logic mode There is no independent button used to activate
the Fuzzy Logic mode. Pressing and holding the Enter / Reset
button
for 5 seconds will allow you to select generator mode gEnErAt for CO2
generators or Fuzzy Logic mode LogIcoN when using compressed CO2.
Use the Up
or Down buttons to change the display to the desired mode.
Press Enter
to accept the change. (See CO2 control modes section)
The second Interlock is for Humidity and Temperature. They can be
selected to be either connected together into a single control, or split
into separate controls. The Humid / Temp interlock allows the user to
decide.
Interlock Humid / Temp
* Using ventilation fans for cooling and dehumidification.
If you are using ventilation fans to keep the growing area cool and also
to remove humidity, you need to be able to activate the ventilation fan
when the temperature rises OR the humidity has increased to the setpoints. By setting the Interlock Humid / Temp to connect
, the Cooling
device will be turned ON when the temperature or humidity sensor detects a rise in EITHER of them. The warm and humid air inside the
growing area would being replaced by dry and cooler outside air from
outside the area. If you are NOT using a single ventilation fan to both
cool and the dehumidify, you would select the Interlock Humid / Temp
mode to split.
(see below)
Using separate devices for cooling and dehumidification.
If you are using a fan or air conditioner to keep the growing area cool
and a dehumidifier to remove humidity, the Cooling and Humidity
functions need to be independent. In this situation the cooling device
will be activated when the temperature rises. The humidity device will be
activated if the humidity level gets too high. By setting the Interlock Hu-
mid / Temp to split
, each device is controlled independently. The Cooling device will be turned ON when the temperature gets too warm and
the humidity device will be turned ON when humidity gets too high. If
you using a single ventilation fan or air conditioner to both cool and to
dehumidify, you would select the Interlock Humid / Temp mode to
connect.
(see above)
Using separate devices for cooling and humidification.
If you are using a fan or air conditioner to keep the growing area cool
and a humidifier to increase humidity, the Cooling and Humidity
functions need to be independent. In this situation the cooling device
will be activated when the temperature rises. The humidity device will be
activated if the humidity level gets too low. By setting the Interlock Hu-
mid / Temp to split
, each device is controlled independently. The Cooling device will be turned ON when the temperature gets too warm and
the humidity device will be turned ON when humidity gets too low. It is
unusual to have to increase humidity in a closed growing area so this
example is rarely used. (see other examples above)
Page 8

Operating the CHHC-1
The CHHC-1 has 15 pushbuttons that are used to select the settings. In
some cases, the pushbutton accesses more than one setting, other
buttons access a single setting. Pressing a button more than once will
display all of the available settings. If there is only a single setting
available, the display will return to normal operation when pressed a 2nd
time. This section explains each of the pushbutton functions in detail.
Setting the Humidity level:
Set Humid There are 2 setpoints for the humidity level, one for day-
time and one for night-time. To change the settings, press the Set Humid
button on the keypad. The display reads daY_ _rH which is the current
Daytime humidity setting. To change the setting, use the Up
or Down
buttons and then press Enter to accept the new setpoint. Pressing the Set
Humid button a 2nd time displays the current night-time humidity
setting, nit__rH. It is changed the same way as the Day humidity setting.
Setting the Humidity / Temp Interlock:
Interlock Humid / Temp Interlocks are used to select if certain
functions will be interlocked “linked” together or operate independently.
The Humidity / Temperature interlock can be set one of 2 ways. (See
Understanding Interlocks) To change the setting, press the Interlock Hu-
mid / Temp button on the keypad. The display reads either SPLit or
COnnEct which is the current setting. To change the setting, use the Up
or Down buttons and then press Enter to accept the new setpoint.
Setting the Humidity Deadband:
Humid Deadband The humidity deadband should only be changed
if the factory settings are not sufficient. (See note) To change the setting,
press the Humid Deadband
button on the keypad. The display reads
05.0_rH which is the current deadband setting. To change the setting, use
the Up
or Down buttons and then press Enter to accept the new set-
point.
Setting the Humidity Mode:
Humid Mode The Humidity Mode can be set one of 2 ways,
humidify (rh Incr) or dehumidify (rH dEcr). To change the setting, press
the Humid Mode
button on the keypad. The display reads either rH
Incr or rH dEcr which is the current setting. To change the setting, use
the Up
or Down buttons and then press Enter to accept the new
setpoint.
Setting the Temperature level (2-buttons):
There are separate settings for temperature during the Day and Night.
There is also separate settings for Cooling and Heating temperatures. This
means that during the Day, the user can set the temperature they want
their Cooling device to turn ON, and a temperature that the Heating will
turn ON. There is also a setting at night for the Cooling and Heating
temperatures. There is a total of (4) setpoints for temperature.
Set Day Temp There are 2 setpoints for the Day temperature, one
for cooling and one for heating. To change the settings, press the Set Day
Temp button on the keypad. The display reads COOL_ _F which is the
current Daytime cooling setting. To change the setting, use the Up
or
Down
buttons and then press Enter to accept the new setpoint. Pressing
the Set Day Temp
button a 2nd time displays the current Daytime
heating setting, HEAt_ _F. It is changed the same way as the Day cooling
setting.
Set Night Temp There are 2 setpoints for the Night temperature,
one for cooling and one for heating. To change the settings, press the Set
Night Temp button on the keypad. The display reads COOL_ _F which
is the current Night-time cooling setting. To change the setting, use the
Up
or Down buttons and then press Enter to accept the new setpoint.
Pressing the Set Night Temp
button a 2nd time displays the current
Night-time heating setting, HEAt_ _F. It is changed the same way as the
Night cooling setting.
Setting the Temperature Deadband:
Temp Deadband You can select separate deadband settings for
heating and cooling. To change the setting, press the Temp Deadband
button on the keypad. The display reads COOL_ _ F which is the current
deadband setting. To change the setting, use the Up
or Down buttons
and then press Enter
to accept the new setpoint and to display the heating
deadband setting. The heating deadband is set the same way. When the
NOTE:
The difference between the Day cooling and heating settings
must be more than the combined Deadband settings or else BOTH
Cooling and Heating devices could be turned on at the same time.
NOTE:
The difference between the Night cooling and heating settings
must be more than the combined Deadband settings or else BOTH
Cooling and Heating devices could be turned on at the same time.
 Loading...