

Page 1

ST308
Mobile IPDA
User Manual
V1.0
Page 2

Brief Introduction
First and foremost, thanks for buying Senter brand
ST308.
This user manual includes module introduction,
maintenance, wiring and operation as well as the solutions
to module problems. In order to guarantee the proper
operation of ST308, please read this manual in detail before
using; keep the manual in a safe and convenient place for
quick response when problems appear.
Note:
Ø Due to the continuous improvement and refinement of
the tester, please kindly forgive us not to inform you of the
modified manual.
Ø Guaranteeing the accuracy, we will try to update the
manual. If you find any mistakes, please inform us via the
contact information in the back cover.
Ø Without permission from Senter in writing, it is
forbidden to copy all or part of the manual.
Page 3

Contents
Chapter I Summary and System Structure......1
1. Summary......................................................................1
2. Checking the Package.................................................2
3. Safety Warning and Attentions....................................4
4. General Operation Standards and Attentions ............6
4.1. Operation Standards.............................................6
4.2. Attentions .............................................................7
5. Structures and Functions.............................................8
6. Instructions of Fixed Icon Display Area.....................14
7. Charging Battery Icon................................................16
8. Install TF Card...........................................................16
9. Install UIM/SIM Card..................................................17
10. Battery Usage..........................................................17
11. Main Specification of the Equipment........................20
Chapter II Specifications and Functions.......22
1. Technical Specifications.............................................22
1.1 Rf Performance Index..........................................22
Page 4

1.2. RFID High Frequency Index(optional)................22
1.3. RFID Ultrahigh Frequency Index(optional).........23
1.4. 1D Laser Scanner Index (optional).....................23
1.5. 1D Infrared Scanner Index (optional)..................23
1.6..2D Infrared Scanner Index (optional) On/Off......24
2. General Functions.....................................................24
2.1. On/Off..................................................................25
2.2. Standby and Wakeup..........................................24
2.3. Table Management..............................................25
2.4 Open / Close net card..........................................29
2.5 PPPoE dial...........................................................30
2.6 Task Manager.......................................................31
2.7 Dialer ..............................................................31
2.8 Answer the phone................................................32
2.9 Input Method........................................................33
2.10 Flashlight............................................................36
2.11 Camera...............................................................36
2.12 Breathing indicator.............................................36
Page 5

2.13 Mass storage mode............................................36
2.14 Headset..............................................................38
2.15 Vibration.............................................................38
2.16 GPSone Passive positioning..............................39
2.17 WIFI hotspot.......................................................39
Chapter III Usage of Main Functions...........41
1 RFID HF card identification........................................42
2.RFID UHF card identification......................................44
3.Read Serial.................................................................52
4. Control of the electric quality and wireless dial.........53
5. Web............................................................................55
6. Dialer..........................................................................56
7. Contacts.....................................................................57
8. Messaing....................................................................59
9. Clock..........................................................................61
10. Calendar..................................................................63
11. Settings....................................................................64
12. Camera....................................................................71
Page 6

13. Gallery......................................................................73
14. My Files....................................................................74
15. Calculator.................................................................76
16. Video........................................................................77
17. Music........................................................................78
18. Recorder..................................................................79
19. Downloads...............................................................80
20. G-Sensor Calibration...............................................80
21. How to Install and Uninstaill Software.....................82
22. How to Install the USB Driver..................................83
Chapter IV Usage and Maintenance...............84
Chapter V Faults and Solutions.....................85
Page 7

ST308 Mobile IPDA
1
Chapter I
Summary and System Structure
1. Summary
ST308 Mobile iPDA is portable and digital data acquisition
equipment with the functions of 1D /2D bar-code scanning,
RFID label, GPS positioning and PDA mobile. It can be
widely used in the area of fashion industrial, industrial
manufacturing, logistics management, assets management
and routing inspection, etc.
ST308 MOBILE IPDA has the wireless voice and
communication module, which can logon internet through
wireless network, and help you finish the work more quickly.
According to different module, user can acquire the
information of 1D bar-code, 2D bar-code, and RFID
information, and at the same time, transfer the information
through LAN, GPRS, 3G, WIFI, Bluetooth, and such
wireless more quickly and efficiently. This portable, one
hand operation ST308 can be used under any environment;
it can help simplify the working process, improve working
efficiency, and reduce the business operating cost.
ST308 adopts 480*800 TFT IPS true color LCD resistive
touch screen, and embedded with Android 4.1.2 JB
Page 8
ST308 Mobile IPDA
2
operating system. With the features of user friendly, easy to
operation, visual scanning and recognizing result, it can
meet your different needs, and transfer the data at real time,
as well as improve your working efficiency. It is really your
powerful working assist.
2. Checking the Package
Please open the packing box to make sure the accessories
are correct before operation. Once there are some incorrect
items or any need of optional accessories, please contact
with us.
Essential Components:
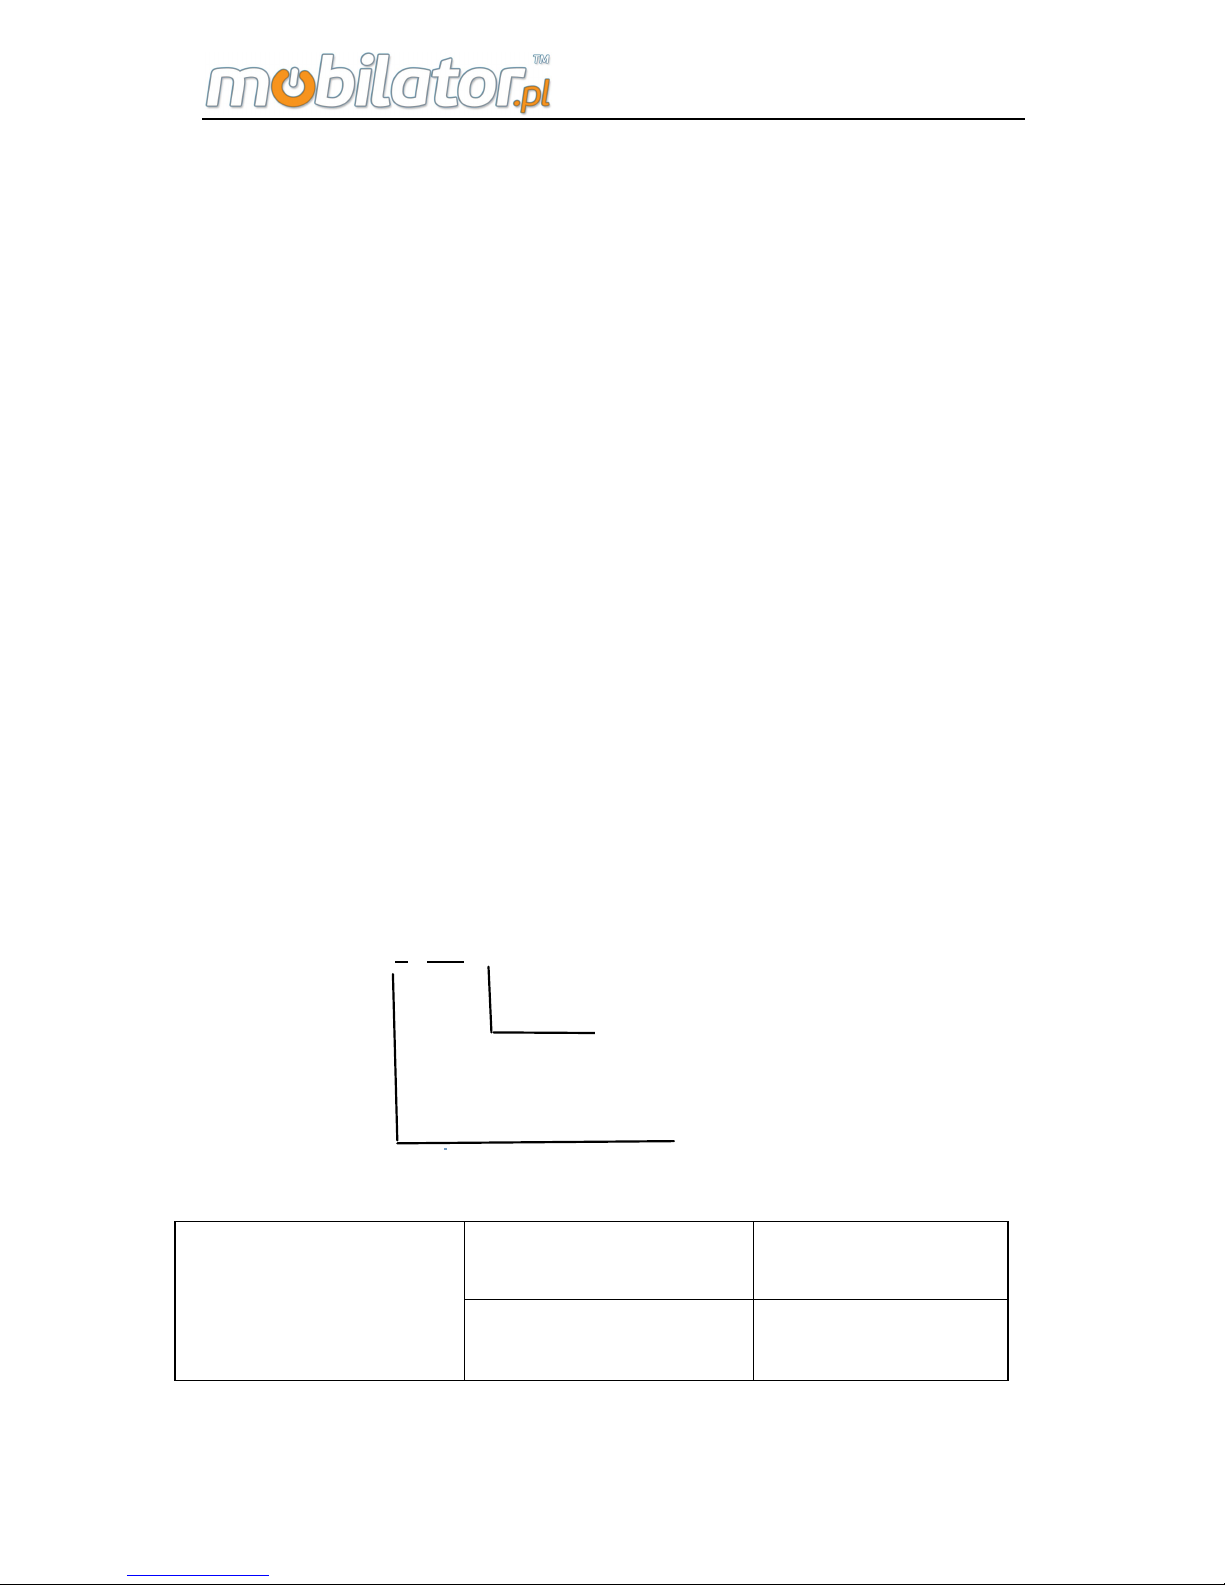
According to the following table, please check the model
name and suffix code of the name plate on the back of the
ST308.
Model ST308 *
-***
E
EVDO/CDMA
Communication
Module
W
WCDMA/GSM
Different communication
modules
Capital letter stands for different
functions modules
Page 9
ST308 Mobile IPDA
3
Function modules of ST308:
Function module
Module
code
Module classification
R
1D infrared bar code scanner
module
J 1D laser bar code scanner module
Bar code
2 2D bar code scanner module
L
Low frequency 125khz RFID
Module
H
High frequency 13.56Mhz RFID
module
RFID
U
Ultrahigh frequency 900Mhz RFID
module
GPS G GPS positioning module
For example, ST308E-RHG: EVDO module, has the
functions of 1D infrared bar code scanner, High frequency
13.56Mhz RFID, GPS positioning modules.
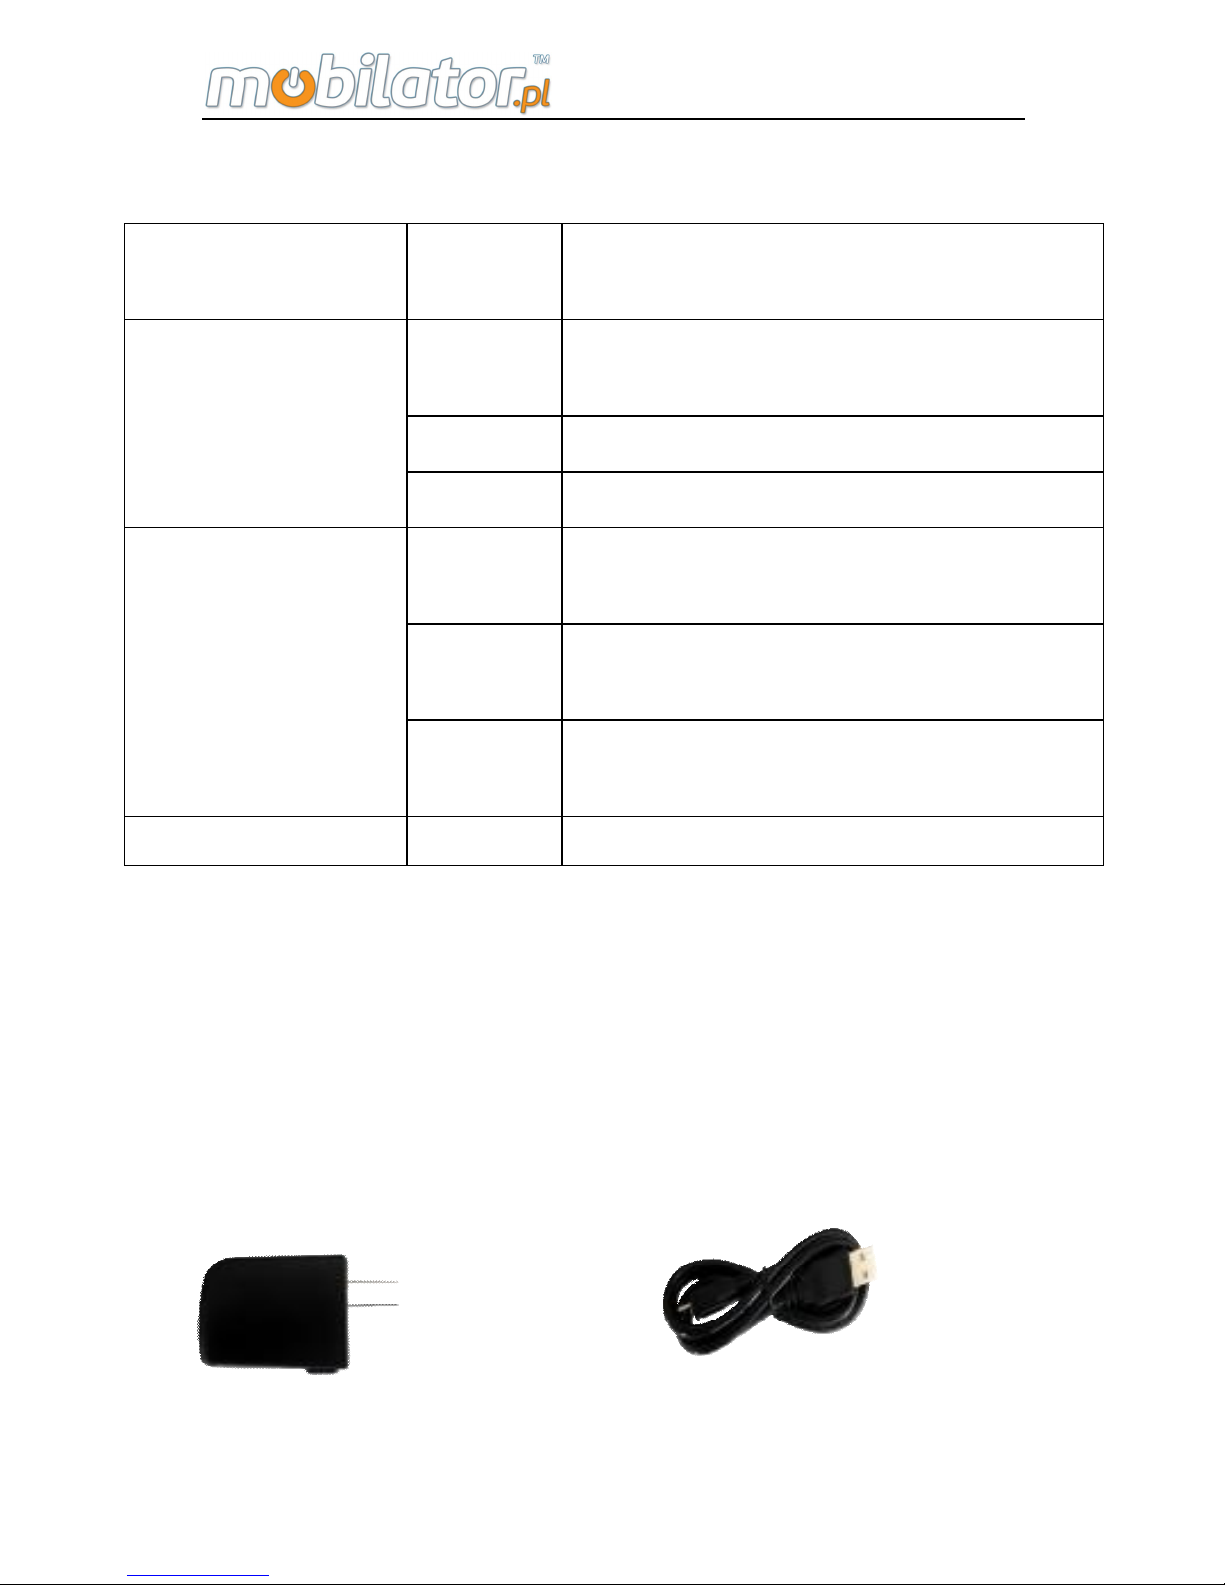
Standard Accessories:
Please make sure all the following accessories are in good
condition:
Charger USB Line
Page 10
ST308 Mobile IPDA
4
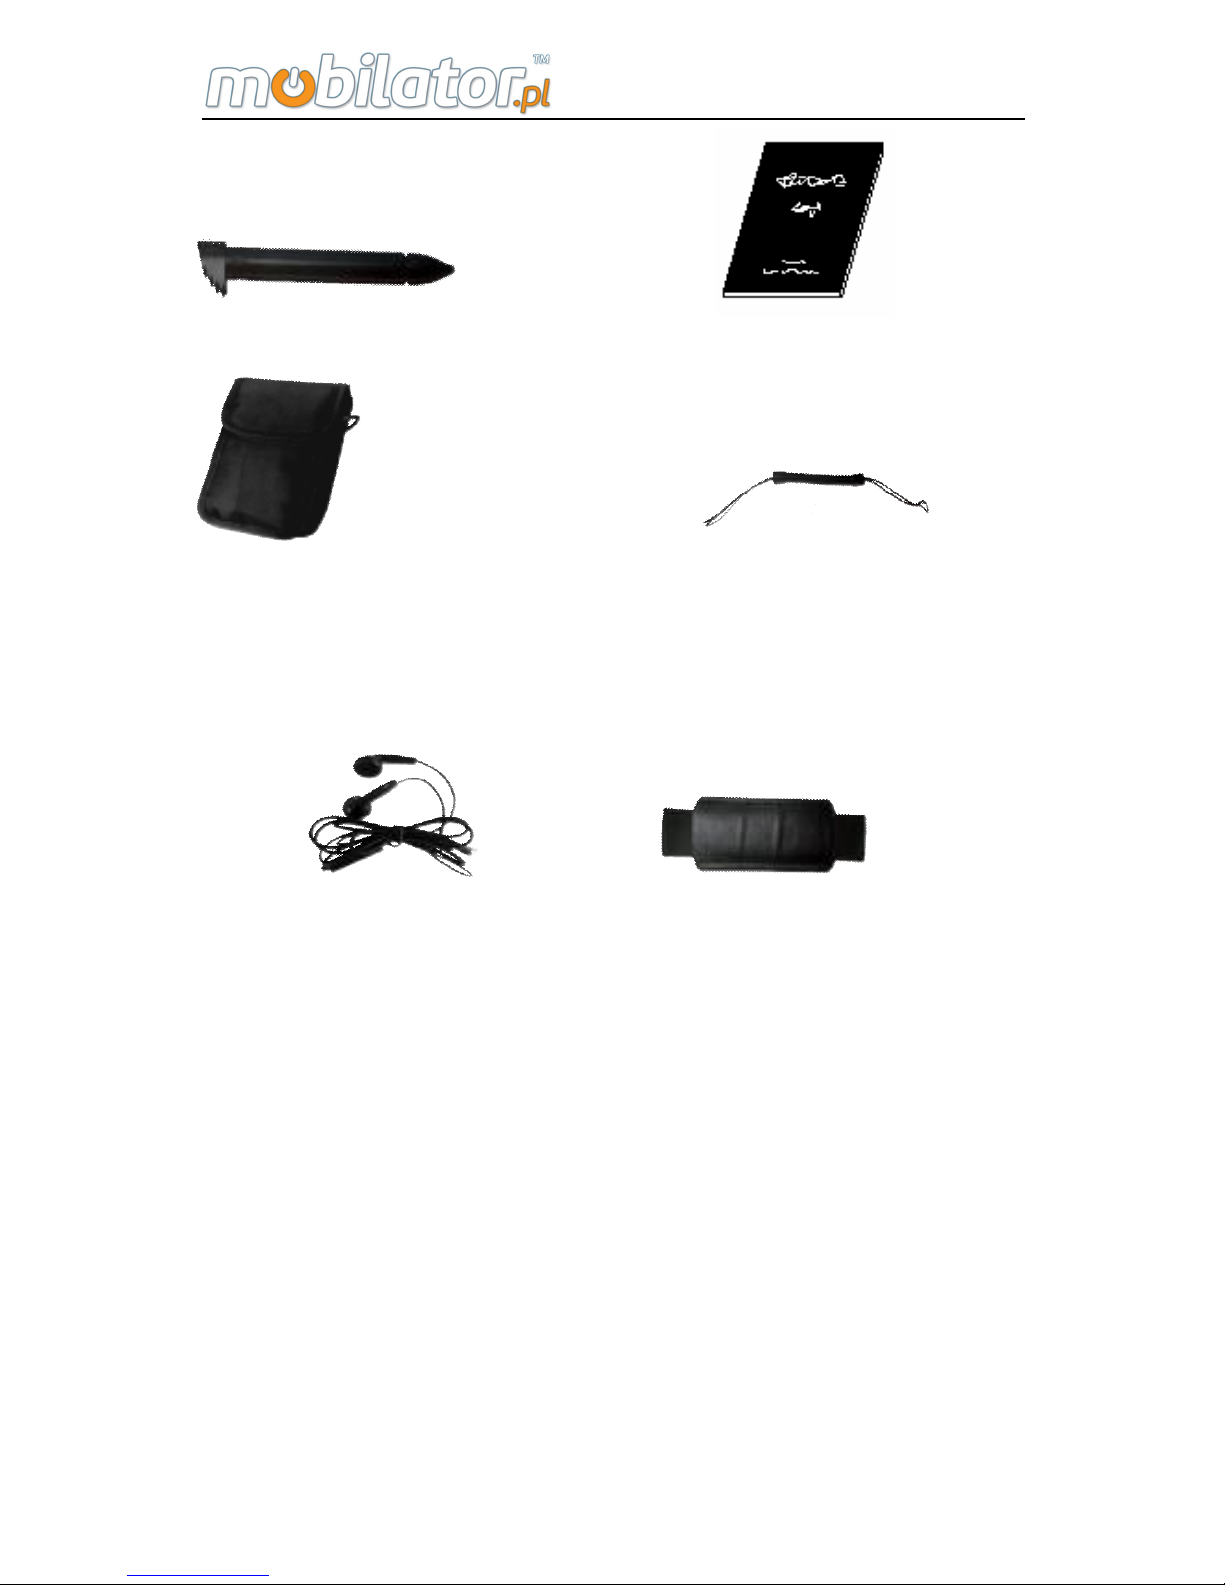
Touch Pen User Manual
Carrying Bag Earphone
Other optional Accessories:
(Users can choose according to different modules.)
Touch Pen Rope Belt
3. Safety Warning and Attentions
In order to use the tester safely and efficiently, please read
the following information before using.
Ø Please use the tester according to the rules when you
in the hospital.
Ø Please keep far away from the precision instrument
Ø Do not use chemical solvent to clean the equipment.
Ø Do not throw away the waste battery. Put it into the
battery recycling bins.
Page 11

ST308 Mobile IPDA
5
Ø Please do not use or store the equipment as well as its
accessories under the environment of high temperature, low
temperature, high humidity or dust.
Ø Please put the equipment and its battery in a safety
place and avoid strong shake and impact.
Ø When use the equipment for the first time, please
charge the battery completely.
Ø Don't disassemble the equipment by yourself. If you
need, please go to the appointed professional organization
to mend it.
Ø Please put the equipment and its accessories in the
place out of children’s reach.
Ø Please take care of the UIM card and avoid static,
scratch, as well as bending.
Ø Please use the original accessories of the product.
Ø Please use the standard battery, charger and other
accessories. We will not be responsible for anything if you
use the accessories from the third party.
Ø Same as other mobile equipment, with built-in antenna
on the bottom of the product, there is some radiation and
interface of this product. If you want to operate the product
in light-hearted, as well as take of your personal safety, any
part of your body do not too close to the antenna.
Ø Please use the equipment within network coverage
range.
Ø The LCD display effect will change a little in the
temperature severely-changed and long-time conversation
environment.
Page 12

ST308 Mobile IPDA
6
4. General Operation Standards and
Attentions
4.1. Operation Standards
Ø Test Interface
Please firstly connect the test cord to test interface and then
connect to the test line. Please don’t touch the metal pars of
clamps to avoid the high dangerous voltage.
Ø USB port
Please do not short the port with metal; otherwise the
internal circuit will be damaged.
Ø Cleaning
The shell of this instrument is mainly made of plastic, when
cleaning, use dry and soft cloth, and do not use volatile
chemicals, otherwise, it will cause discoloring and
deformation.
Ø Protecting the case and operating panel
Do not pour volatile agents on the case or operation panel,
and avoid prolonged contacting with rubber and PVC;
otherwise, it may result malfunctioning.
Ø When moving the instrument
Please make sure the power cord and connection cables
are removed before shift the instrument. And unplug all the
connecting cables from socket after using.
Ø When the instrument is unused for a long time
If the instrument is unused for a long time, the battery
Page 13

ST308 Mobile IPDA
7
characteristics may have deteriorated. And it will also take a
longer time to charger. If it take a very short time to charger
and the operating time is extremely short, please replace
the battery.
Ø Faults
If there are strange sound, smell, or smock coming from the
instrument, please turn off the instrument and unplug of the
power, and then contact with us immediately.
4.2. Attentions
Ø Please charger the battery full when using it for the first
time as well as each time.
Ø Please use touch pen and click the screen gently to
operate function keys, do not click it roughly, otherwise, the
LCD may be damaged.
Ø If there is any abnormal phenomenon during the
process of operating, please turn off and restart it.
Ø Please don’t put the instrument under the strong direct
sunlight or put it near the origin of heat. Or else, there will be
bad effect to internal circuit as well as the shell.
Ø Condensation may occur if the instrument is moved to
another place where the temperature is higher or the room
temperature change rapidly. In such situation, let the
instrument adjust to the new environment for at least one
hour before using the instrument.
Ø Using the instrument near strong magnetic field
sources will have adverse affects on the internal circuit of
the instrument. That because the electromagnetic wave
from the mobile may effect the normal identification. If you
Page 14
ST308 Mobile IPDA
8
are using a portable phone to transmit measured data,
move the portable phone at least 1m away from the
instrument.
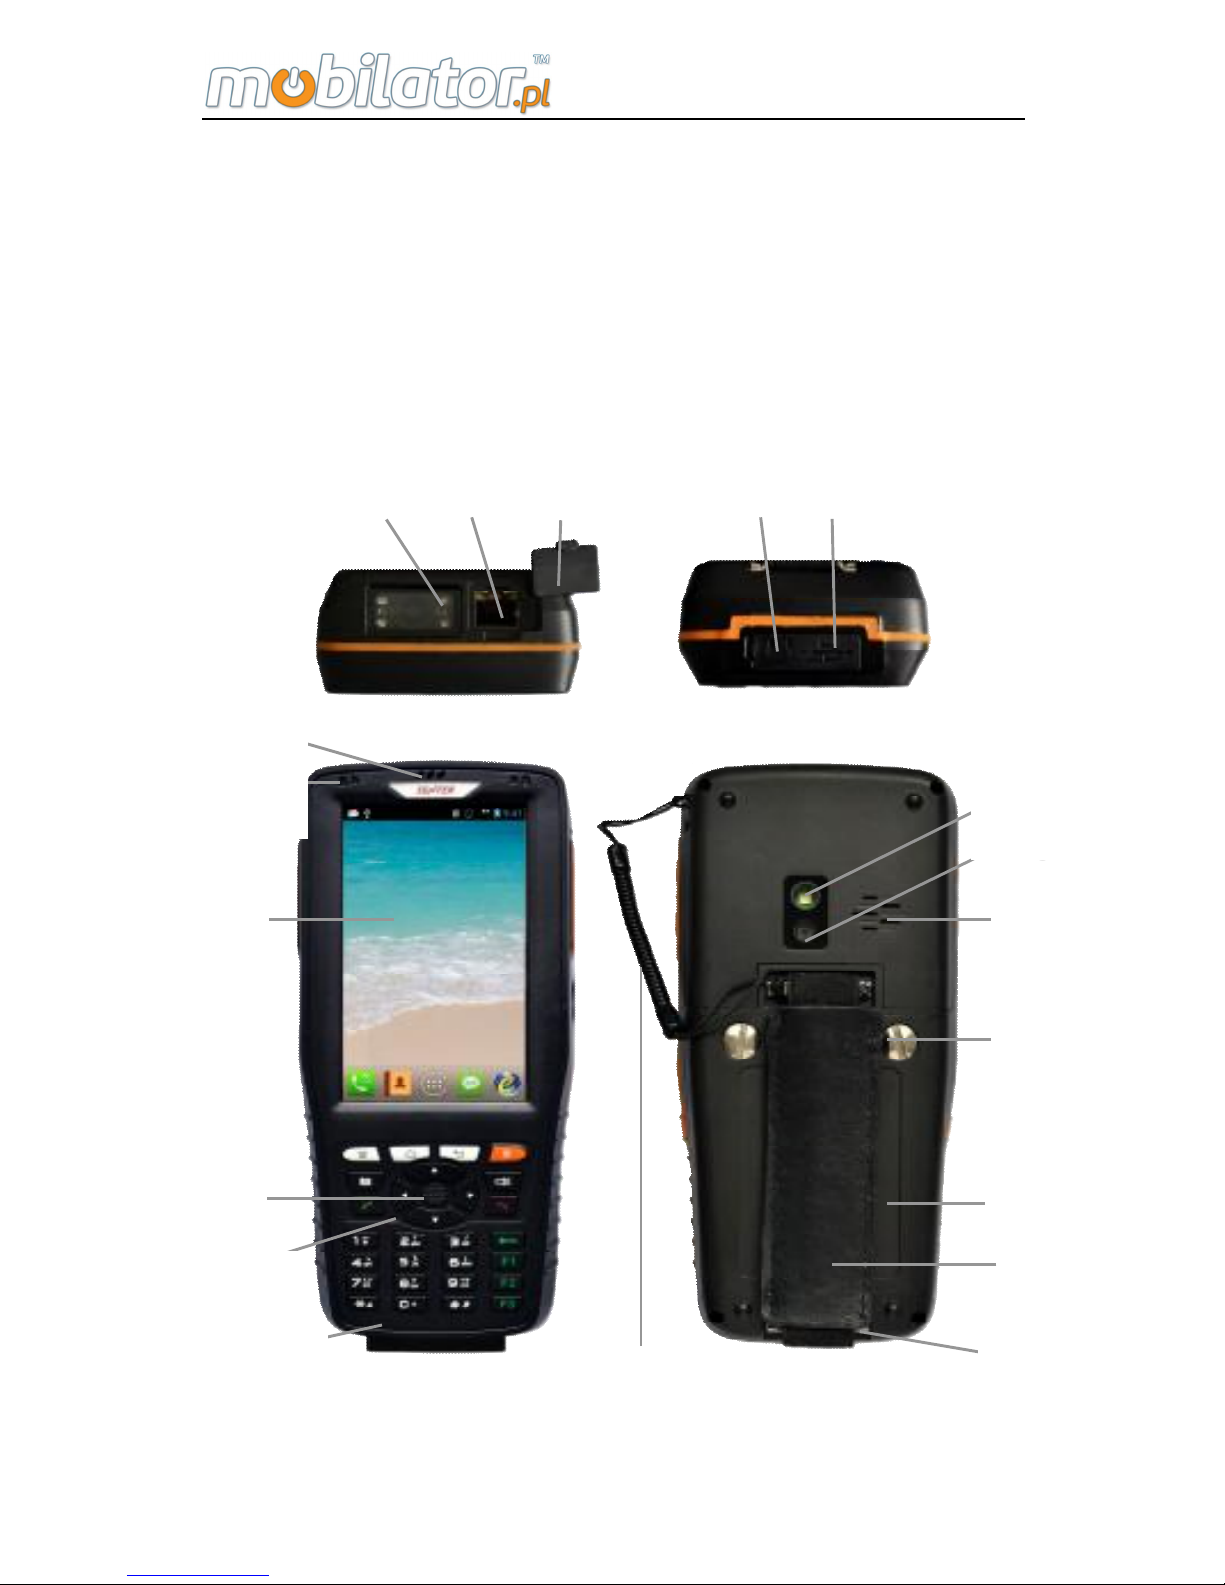
5. Structures and Functions
High Frequency Equipment Parts
1 2 3 4 5
6
11
7
8
9
10
12
13
14
15
16
17
18
19
18
Page 15
ST308 Mobile IPDA
9
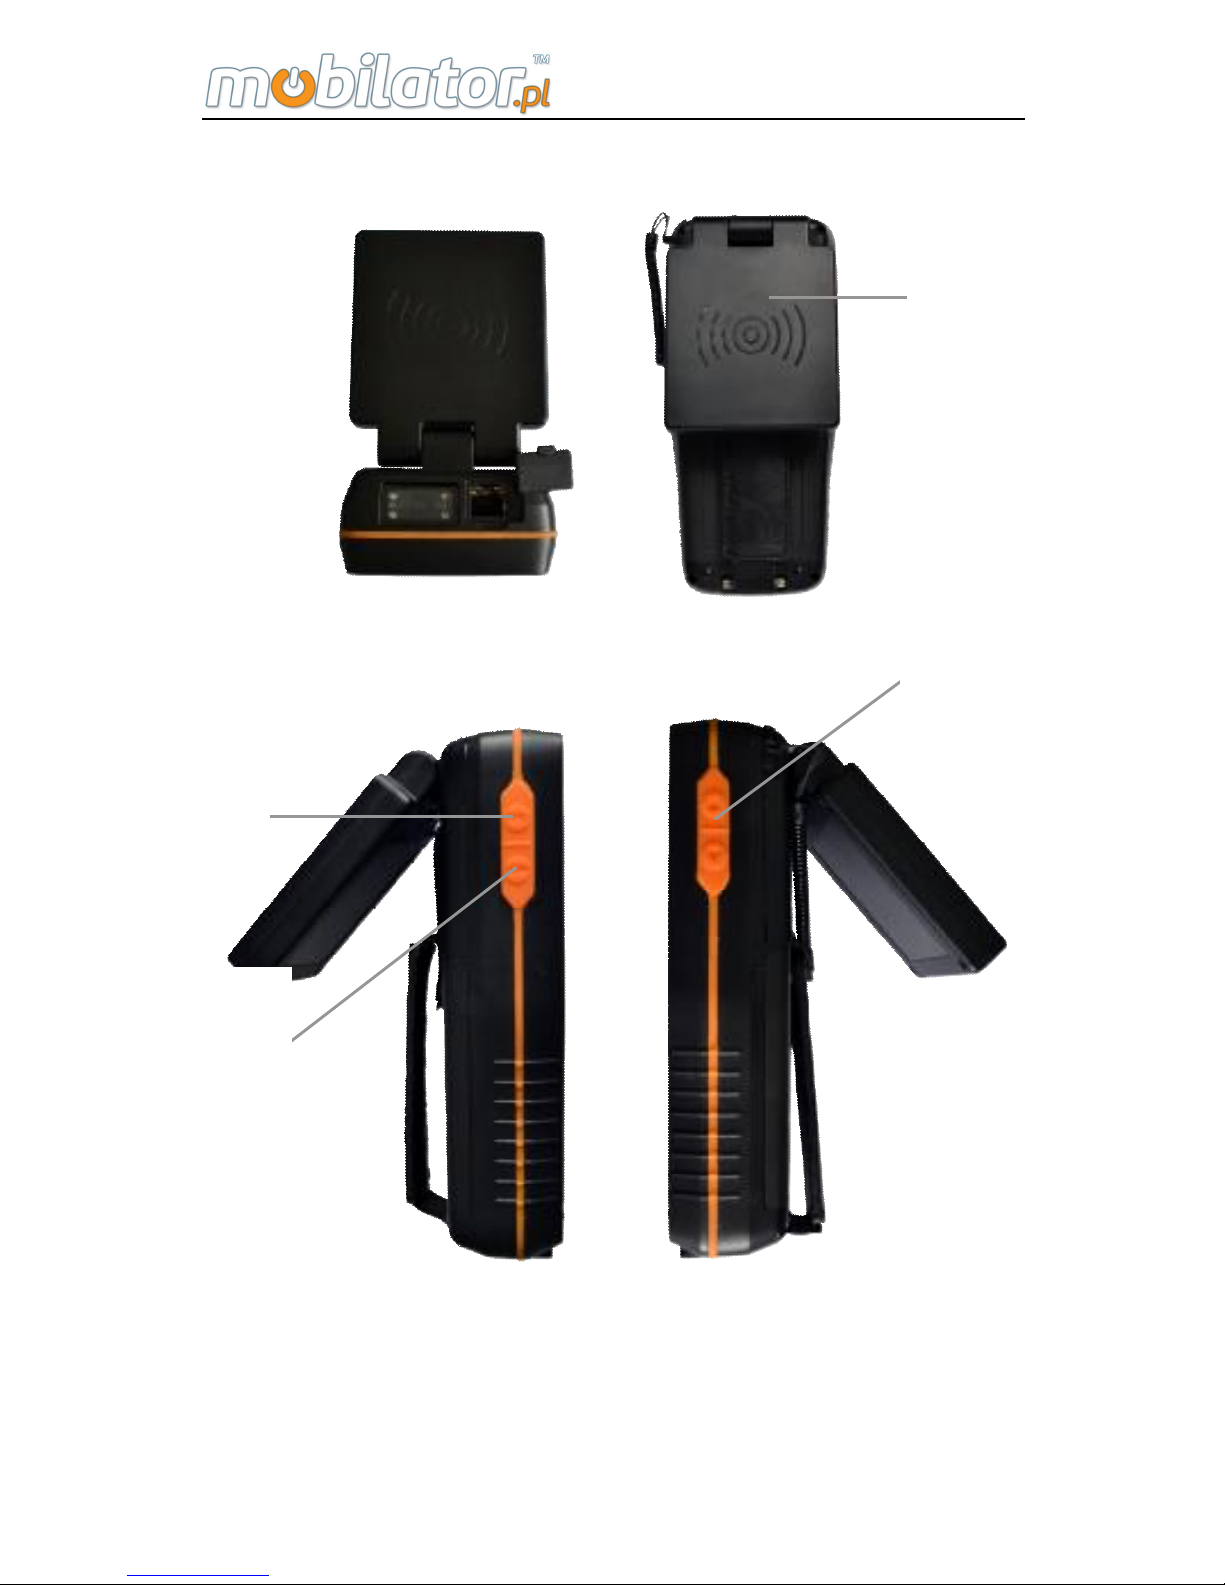
Ultrahigh Frequency Equipment Parts
20
21
22
23
Page 16
ST308 Mobile IPDA
10
NO Name Functions
1 Scanning Head
Window of bar code scanning
engine, which is used to scan the
bar codes.
2 Ethernet port The port to connect with Ethernet
3
Dust-proof cap
of Ethernet port
Protect the Ethernet port from
dust and water
4
Headphone
Jack
Connect the headphone
5 USB Port
It is used to connect with PC or for
charging
6 Indicator
It is used to indicate the
conditions of the equipment
7 Receiver Receiver of the equipment
8 Display screen Display of the screen
9 Keyboard
Please refer to the following
instructions for more details.
10 Reset Reset operation
11 MIC MIC Hole
12 Touch pen Touch pen of the equipment
13
Fixed groove of
the hand belt
It is used to fix the hand belt.
14 Hand Belt
It is used for holding the
equipment.
15 Battery Cover It is used to fix the battery
Page 17
ST308 Mobile IPDA
11
16
Battery Cover
Screw
It is used for fix or loose the
battery cover
17 Loudspeaker Loudspeaker hole
18 Camera Make a photo or video.
19 LED light
LED light also can be used as
flashlight.
20 RFID side key RFID hotkey
21 Scan side key Scan hot key
22 Volume key
Adjust volume of phone call or the
loud speaker.
23 Antenna RFID Ultrahigh Antenna
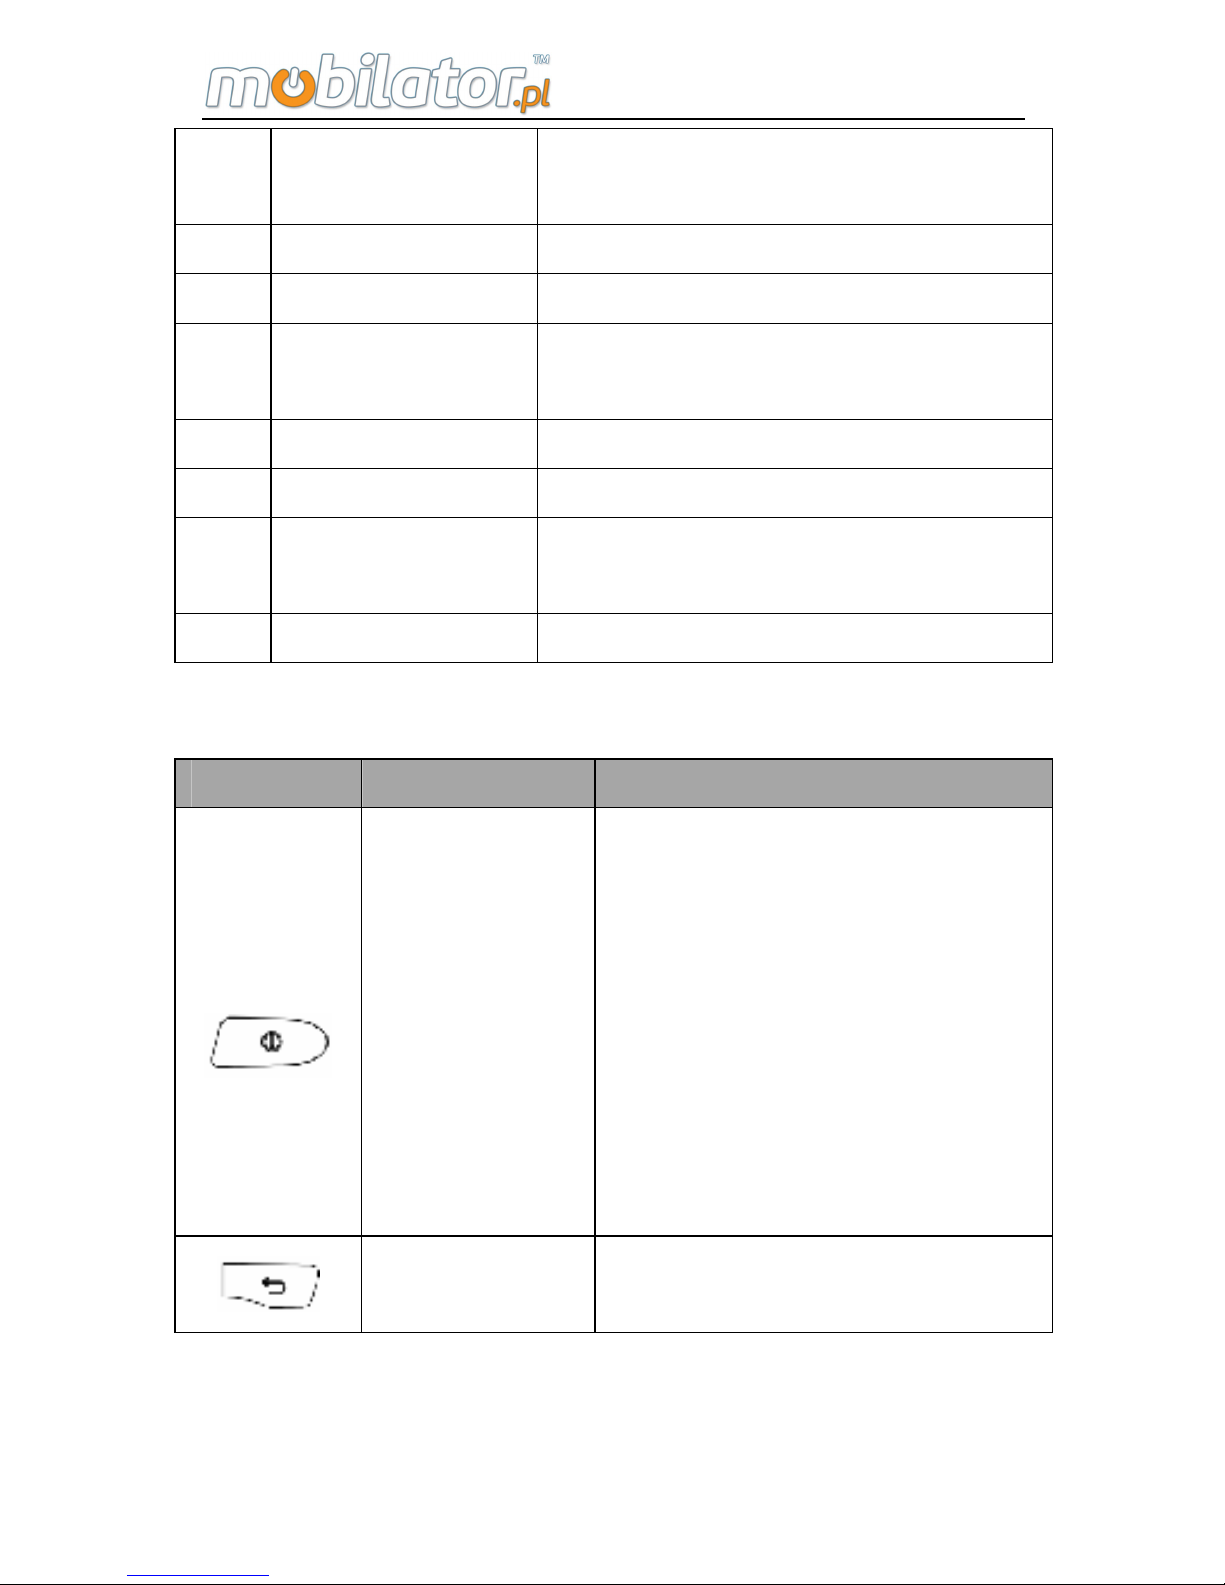
Buttons:
Buttons Name Functions
Power button
Under power-on state, shortly
pressing the button can close
or light the screen; long
pressing the button can pop
up an operating menu of
"Device Options". Under
power-on state, long pressing
the button can close the
tester.
Return Button
Return back to the previous
page.
Page 18

ST308 Mobile IPDA
12
Main Screen
Button
Pressing this button to return
back to the main screen
window.
Menu Button
Under main screen interface
and application program
interface, pressing this button
can pop up the operating
menu.
Light Button
It is used to open the
flashlight.
Camera
Button
Long pressing the button to
enter into camera interface,
and shortly pressing enter into
photo interface
Hang up
Button
When a call is coming, it can
hang up the call.
Dial/Answer
Button
Dial or answer the phone;
under standby condition,
pressing this button to enter
into call records.
Delete Button
When input text, it is used to
delete words before the
cursor.
Number
Button
It is used to input the
numbers.
Page 19
ST308 Mobile IPDA
13
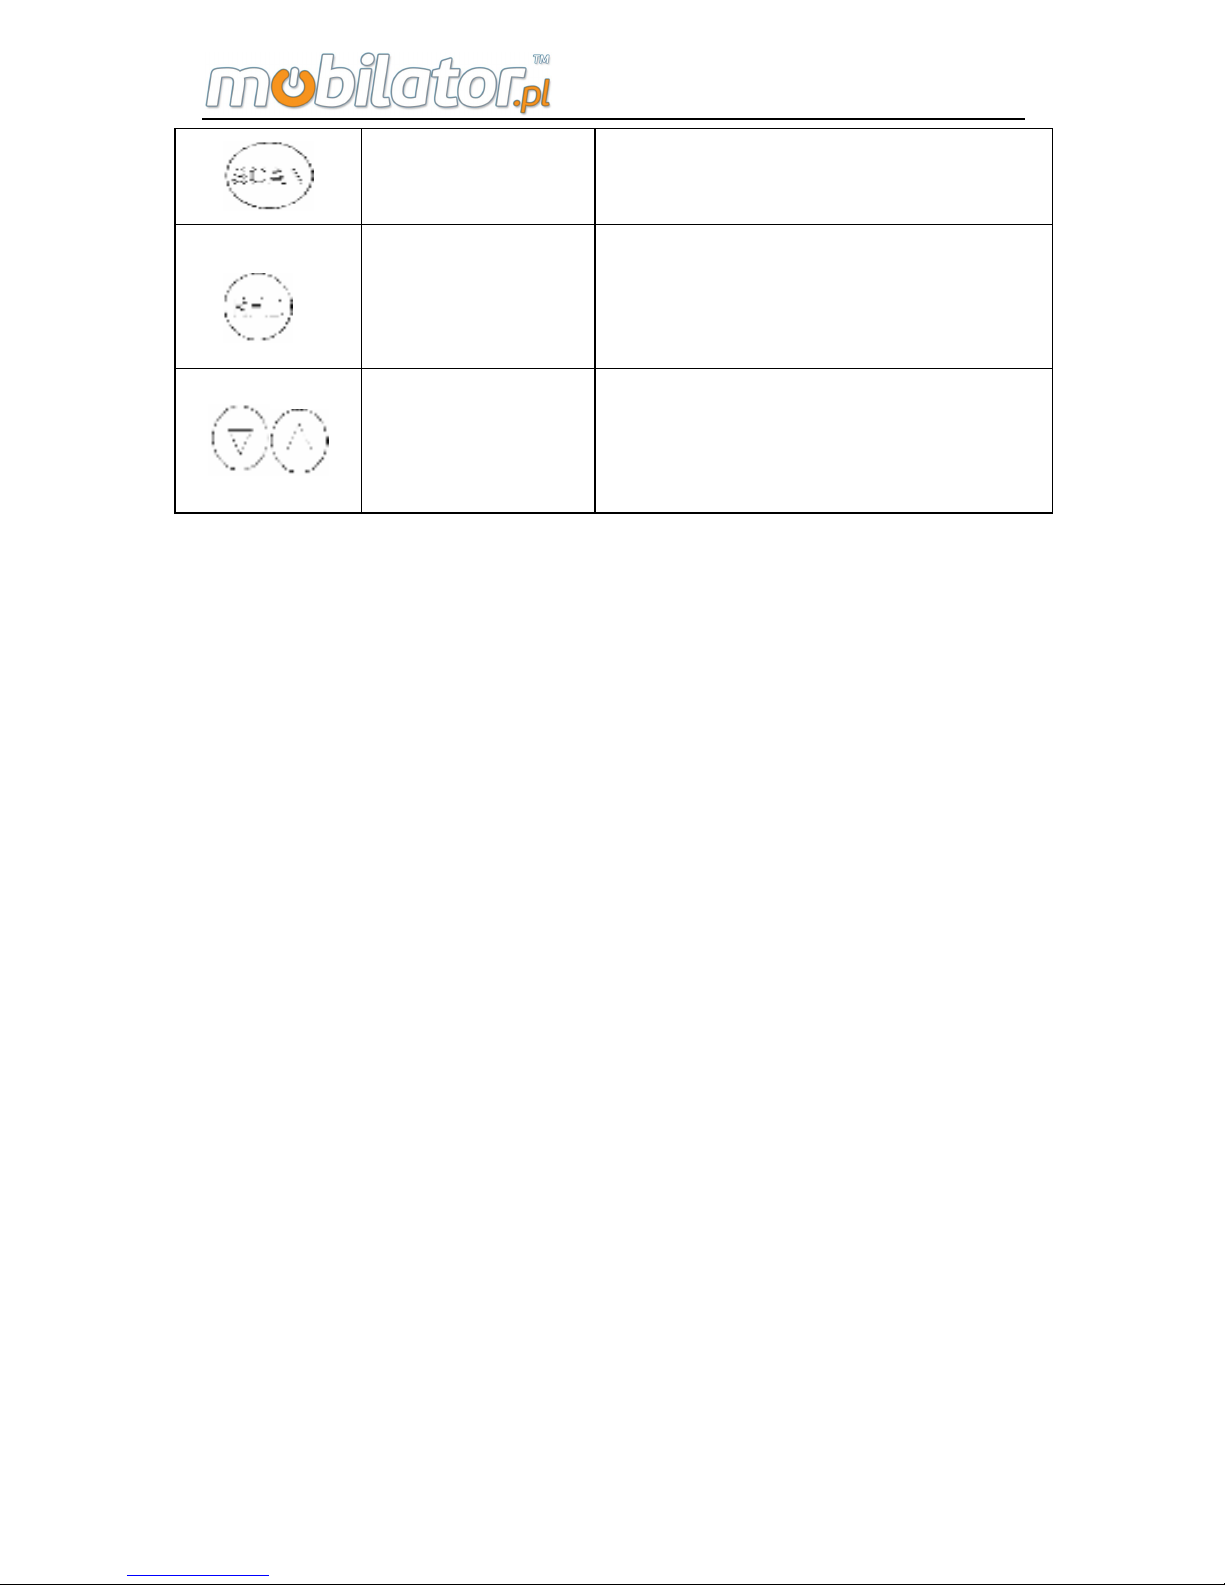
Bar Code
Scan Button
Shortly pressing the button
can start to scan the bar code.
RFID Scan
Button
Shortly pressing the button
can start to scan the RFID
label.
Volume
Adjust Button
Can adjust the volume for
calling and louder speaker; up
is louder and down is lower.
Indicator lights:
The meaning of the 4 indicator lights from left to right is as
following:
Indicator light 1: Mobile phone light, indicating the mobile
state, which have 3 glittering state.
1) Normal state: 0.5s on, 4.5s off
2) Incoming call state: 0.5s on, 0.5s off
3) Receive the message or missed call: 0.5s on, 1.5s
Indicator light 2: Unused
Indicator light 3: Unused
Indicator light 4: Unused
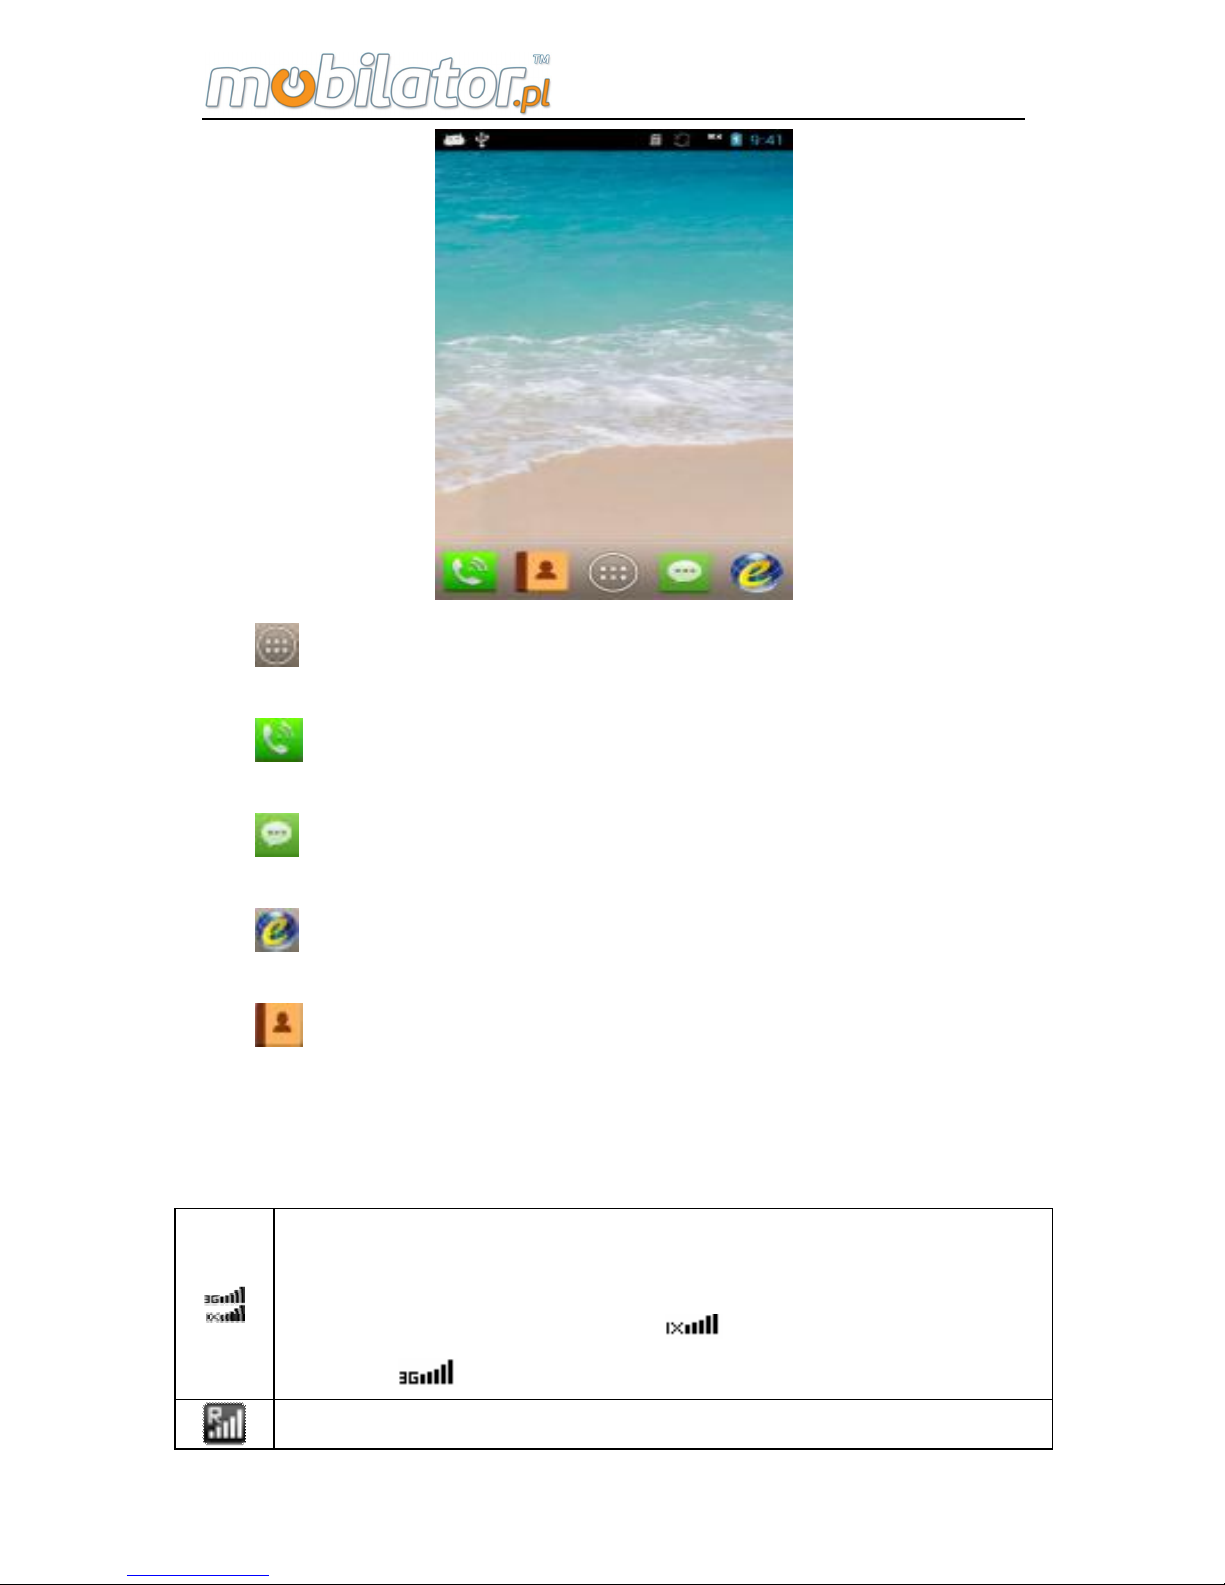
Standby shortcut icon is as following:
Page 20
ST308 Mobile IPDA
14
: Click to enter into main menu interface.
: Click to enter into dialing plate interface.
: Click to enter into message interface.
: Click to enter into browser interface.
: Click to enter into contacts
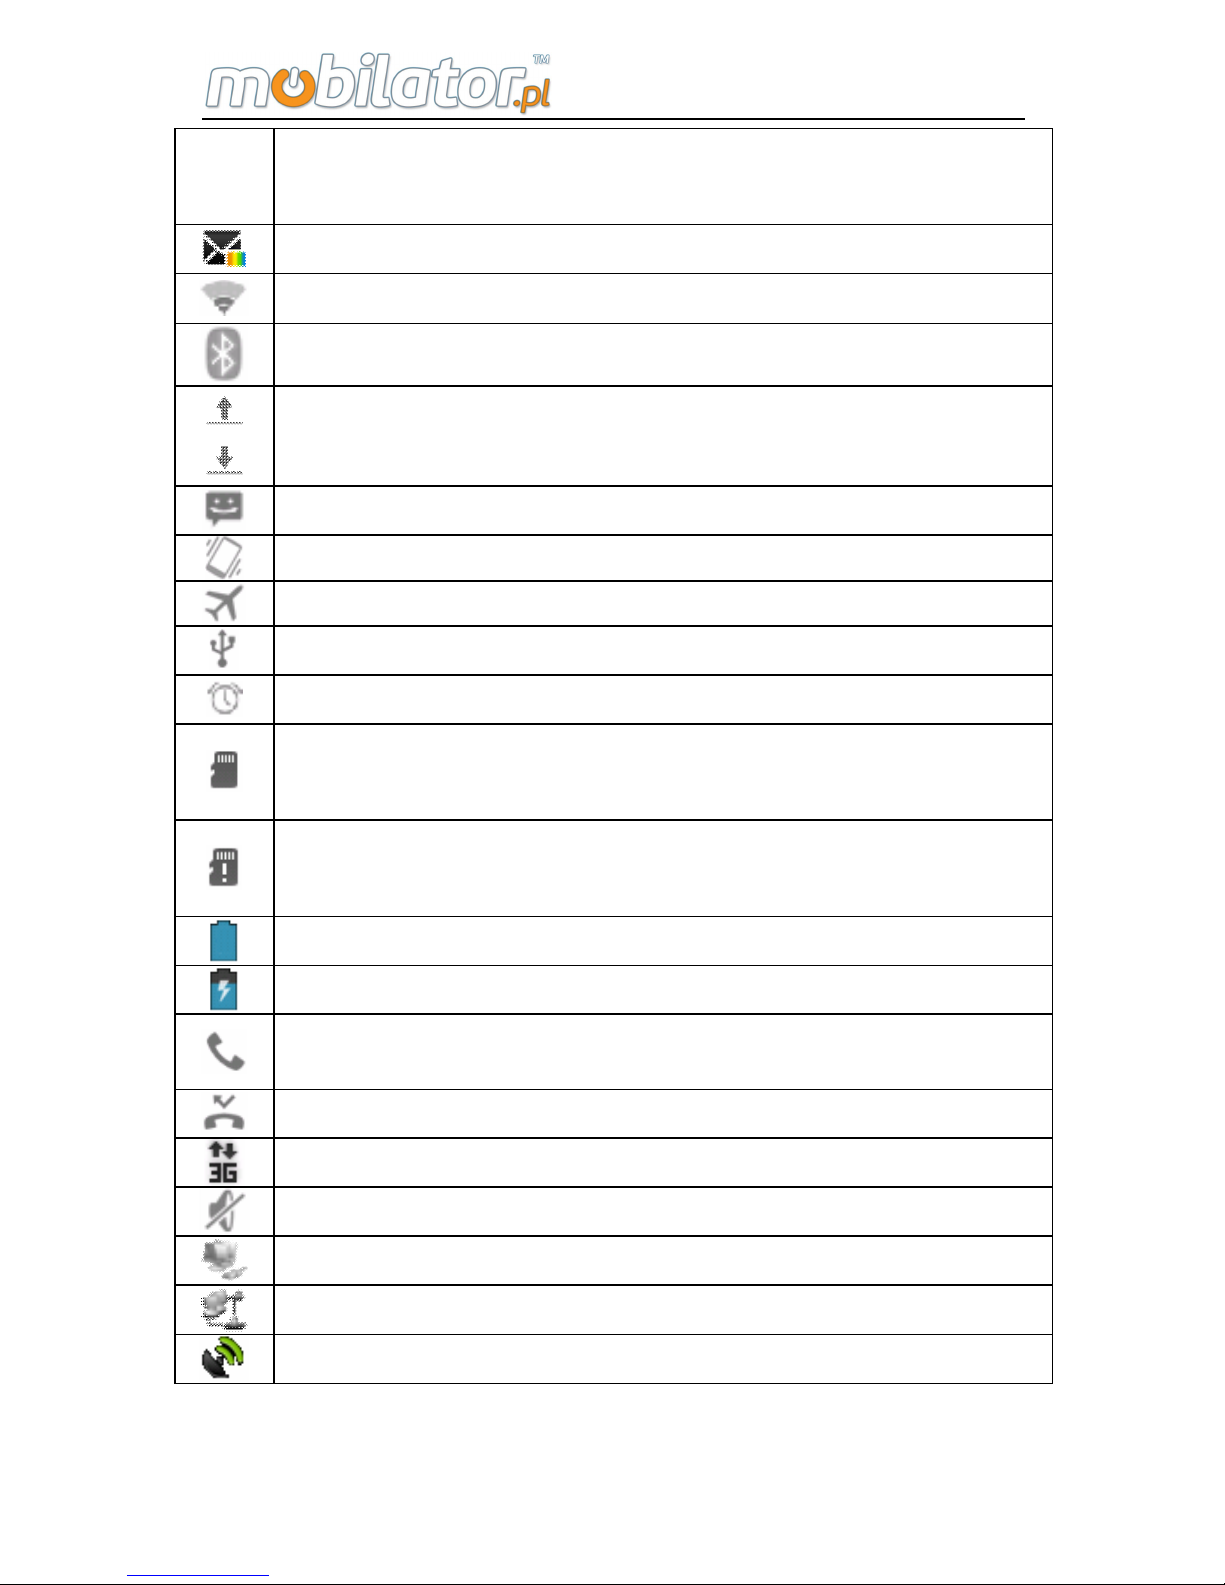
6. Instructions of Fixed Icon Display Area
Display the current signal intensity of CDMA network
and EVDO: the more column bar is, the better the
signal intensity will be;
means there is no
signal; mean the 3G signal is strong.
Display the current signal intensity under roaming
Page 21
ST308 Mobile IPDA
15
condition: the more column bar is, the better the
signal intensity will be; × means there is no signal.
Means that there is unread multimedia message
Means the signal intensity of the WLAN.
Means Bluetooth function has been opened.
Means uploading or downloading documents
Means that there is unread short message.
Means that there is unread short message.
Means it is in the flight mode.
Means the USB connection
Means that the alarm clock has been set.
Means that TF card has been inserted into the
equipment.
Means that TF card hasn't been inserted into the
equipment.
Means the current battery power.。
Means the battery is charging
Means it is on the phone
Means there is missed call.
Means it is using data service currently.
Means it is under silent mode.
Means the network card is open.
Means the PPPoE link has been built.
Means GPS is open.
Page 22
ST308 Mobile IPDA
16
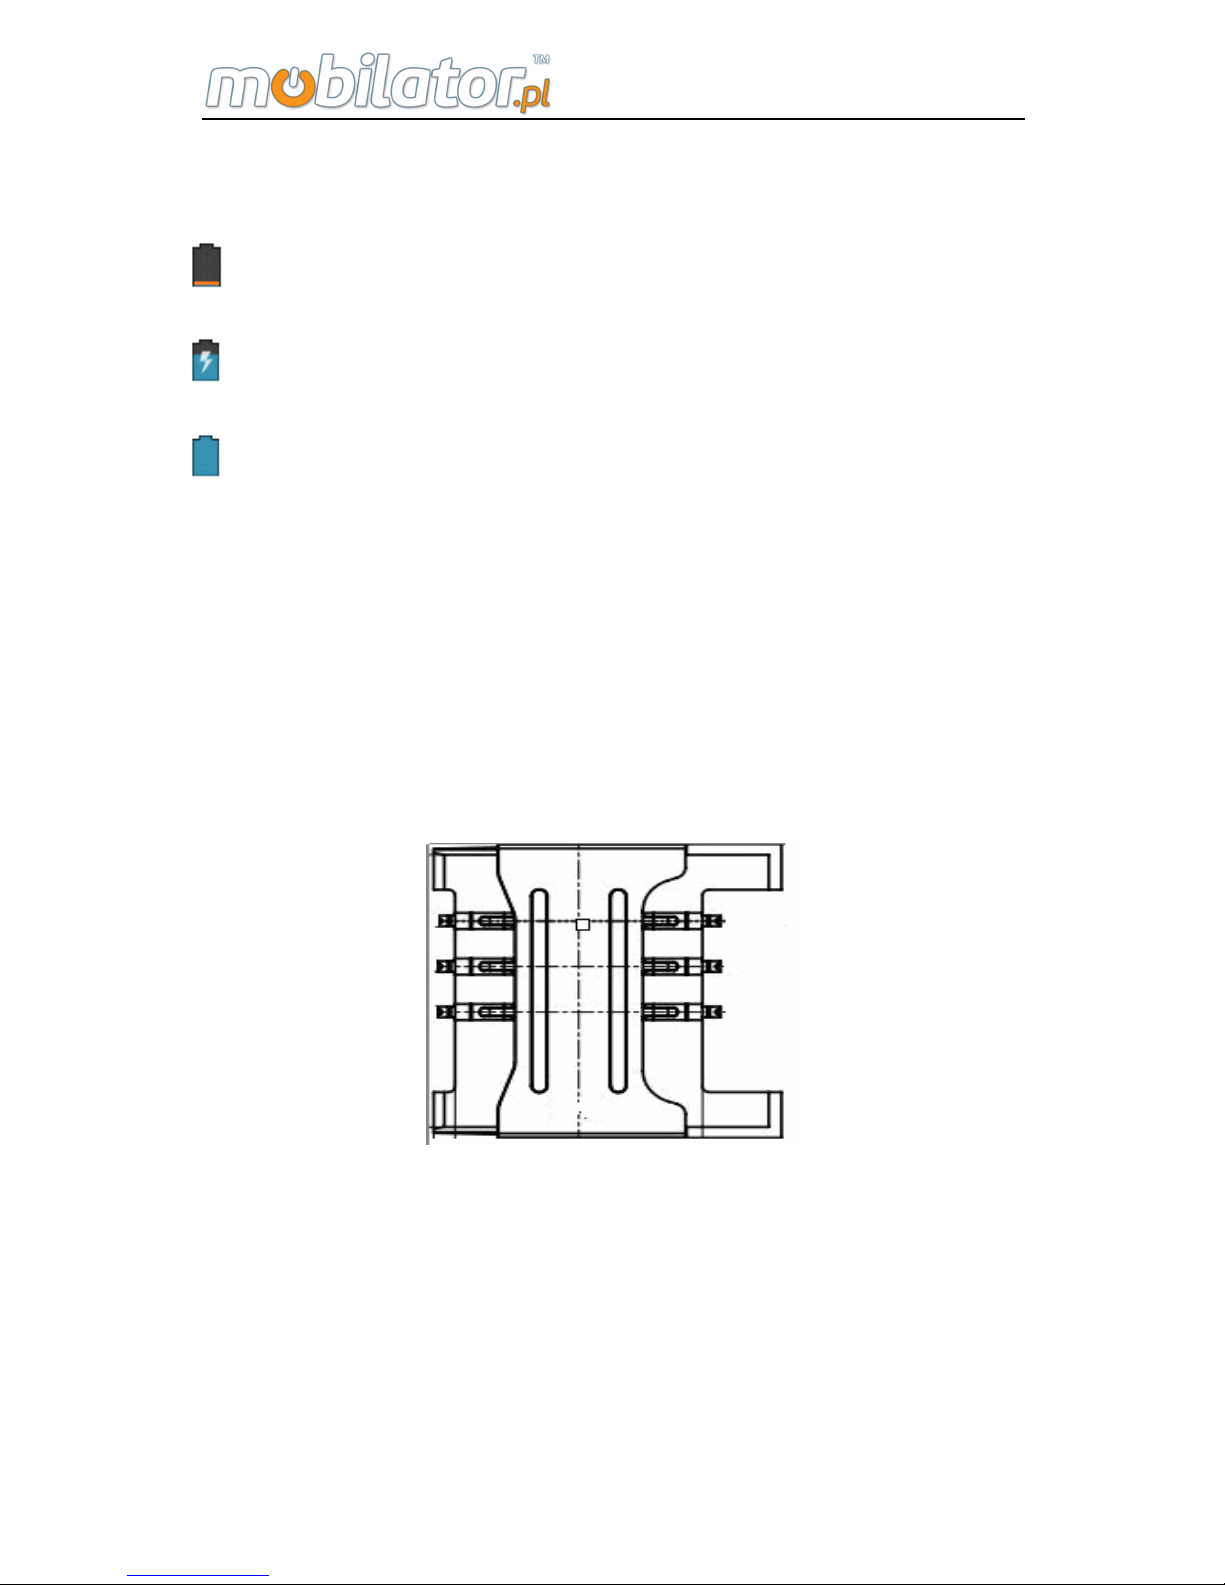
7. Charging Battery Icon
: The battery is in low power and needs to charge.
: The battery is charging and displays in motion.
: The battery has already been full.
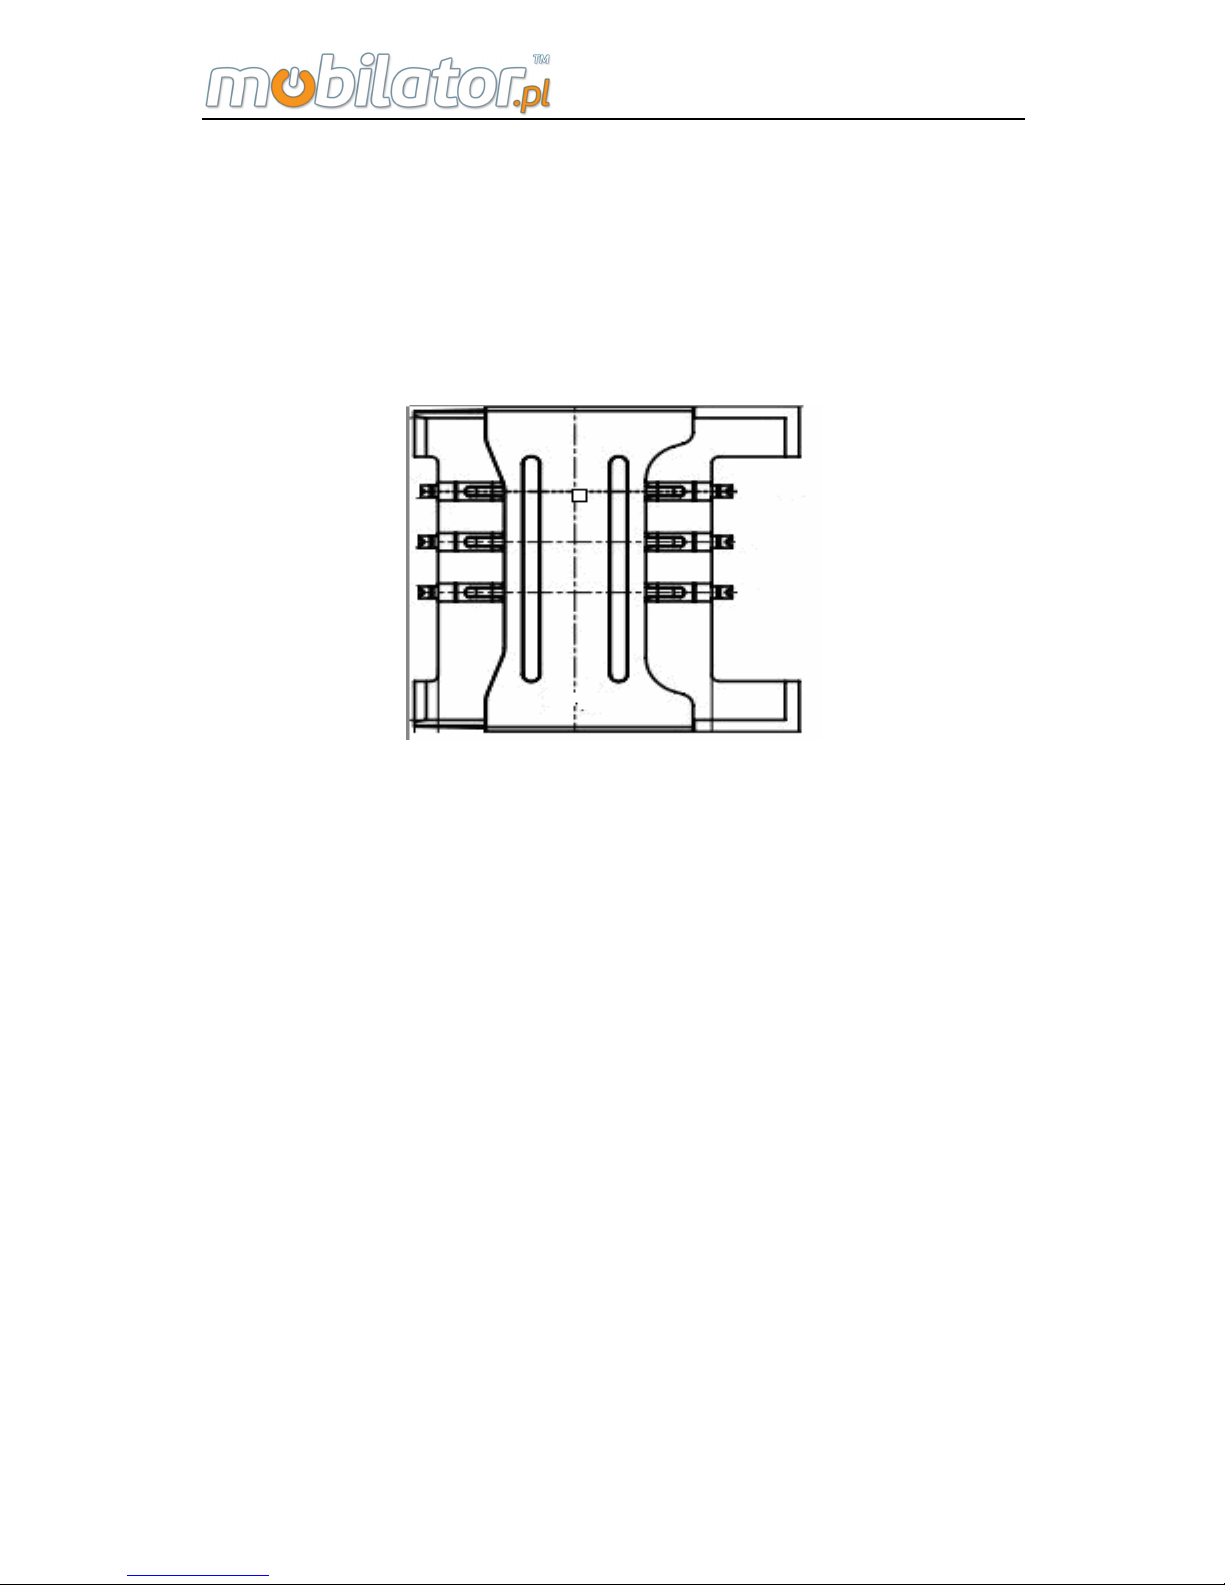
8. Install TF Card
Open the battery cover, take down the battery, and insert
the TF card into the slot, when there is a slight sound of
clicks, the buckle will seize up the card automatically, and
installation work is finished, please see the following:
Uninstall TF card: Push the TF card, when there is a slight
sound of clicks, the card buckle has loosed, and the TF card
will pop up automatically.
Page 23
ST308 Mobile IPDA
17
9. Install UIM/SIM Card
Open the battery cover, take down the battery, put the
UIM/SIM card into the top slot, make sure the chip side
down, and push it into the bottom of slot, as following:
Notice:
Insert CDMA/EVDO UIM card for EVDO edition; and
the GSM/WCDMA SIM card for WCDMA, Please insert the
corresponding card for different mode to keep the phone
function.
10. Battery Usage
Install battery
Firstly, unscrewed the two screws, remove the battery
cover;
Insert the battery and make the battery metal sheet well
connected with the contact point, and then press the lower
end of the battery.
Page 24
ST308 Mobile IPDA
18
When remove the battery, pull the scotch tape on the
battery upward, the battery can be removed easily.
Then cover the battery cover and tighten the screw with
corn or screwdriver at clockwise. The installation is finished.
Please make sure the installation of battery is right before
start the equipment.
n Notice: Please close the tester before removing the
battery.
n Please follow the above procedures.
n Please tighten the screws for the battery cover, in case
the battery fall out when the equipment is dropped.
Battery performance
The standby time will be affected by system
environment, system setting, service test, taking photos and
using data service.
Calling or opening a backlight will consume more power
than standby and standby time will shorten.
The standby time of no service area will be short than
the normal standby time.
The battery performance will change with the charging
status, temperature, local network as well as the
background light status.
6000mAh(Standard Battery)
Standby Time* About 600 hours
Talking Time* About 9 hours
More accurate time will depend on the local network
Page 25

ST308 Mobile IPDA
19
status, using conditions and equipment card.
Charging:
Insert the charger into the charger port of the
equipment.
Insert the charger into the power socket with 100~240V,
50/60Hz. When it is charging, the battery power icon on the
screen will shine; after charging finished, the battery power
icon on the screen will stop shining.
After charging finished, pull the charger out of the
equipment and then pull the charger out of the power
socket.
Charging time
If the AC voltage is very low, you should charge the
battery in a long time.
The charging time is about 7~9 hours. (More accurate
time will depend on the battery condition.)
The environment temperature of normally charging
should be 0~40. Charging under below 0 or above ℃℃℃
40, the battery performance will descend and the battery ℃
life will shorten. When charging under too high or too low
temperature for a long time, it will cause damage to the
battery. For example, the battery can't charge fully and
cause the battery inflation.
It will lengthen the charging time to use nonstandard
charger.
It will also lengthen the charging time to operate the
tester when charging.
Note:
Page 26

ST308 Mobile IPDA
20
■ You should fully charge the tester before the first usage;
please disconnect the charger in time after charging finished
because the long-time charging will damage the battery
performance.
■ Please guarantee that the battery is inside of the tester.
■ When it is not charging, please take the charger from the
outlet.
■ When it is charging in very low battery, the tester will not
start immediately and will display low battery prompt if you
do booting operation. After charging for a while, the tester
will start normally.
■ Charger is safety device, please use our specialized
charger. Meanwhile, please be careful during the usage.
11. Main Specification of the Equipment
Ø It adopts 480×800 TFT IPS true color touch screen
Ø It adopts the built-in Android 4.1.2 JB operation system.
Ø It supports CDMA 1x, EVDO Rev.A 800MHz/1900MHz;
also supports voice and data service. (ST308E)
Ø It supports WCDMA/HSDPA/HSUPA 850/1900/2100
MHz and GSM/GPRS EDGE 850/900/1800/1900MHz,
supports voice and data service. (ST308W)
Ø Rechargeable 3.7V 6000mAh polymer battery and the
max power is 3W.
Ø Can make a phone call in earphone and listen to music.
(needs earphone)
Ø Support 1D/2D infrared/laser bar code scan (optional)
Page 27

ST308 Mobile IPDA
21
Ø Support HF RFID 13.56MHz
Ø Support UHF RFID 840-960MHz (optional)
Ø Camera with 5 million pixels and support auto focus
and flash function.
Ø Support flash light function
Ø Dimension: 174*84*39mm
Ø Weight: 430g, 605g(with UHF antenna)
Page 28

ST308 Mobile IPDA
22
Chapter II
Specifications and Functions
1. Technical Specifications
1.1 RF(radio frequency )Performance Index
ST308E
Ø Frequency range: 800MHz/1900MHz
Ø Maximum transmitting power of transmission:
23dBm-30dBm
Ø Network type: EVDO Rev. A\CDMA 1X
ST308W
Ø Frequency Range:
WCDMA/HSDPA/HSUPA 850/1900/2100MHz and
GSM/GPRS/EDGE 850/900/1800/1900MHz
Ø Maximum transmitting power of transmission:
21dBm-24dBm
Ø Network type:
WCDMA/HSDPA/HSUPA\GSM/GPRS/EDGE
1.2 RFID High Frequency Index(Optional)
Ø Working frequency:13.56MHZ
Ø Profile: Support ISO/IEC 15693, ISO/IEC 14443A
profile,
Ø Support Cards:SR176, SRIX4K(TYPE-B), I- Code2, TI
RFID Tag-it HF-I, EM4034, Mifare Classic ETC
Page 29

ST308 Mobile IPDA
23
Ø Identification distance: 5cm
1.3 RFID Ultrahigh Frequency Index(Optional)
Ø Working frequency:840-960MHZ(May custom-made
according to different frequency range)
Ø Profile: Support EPC C1 GEN2/ISO 18000-6C
Ø Output power:10dBm-30dBm
Ø Identification distance:80cm/200cm
1.4 1D Laser Scanner Index(Optional)
Ø Light Source: visual laser diode
Ø Identification ability:1D
Ø Scanning speed: 104t/s±12t/s(two way scanning)
Ø Scanning distance:2.5cm-114.3cm
Ø Scanning angle:47±3°(default)/35±3°
1.5 1D Infrared Scanner Index (Optional)
Ø Scanning mode: CCD
Ø Optical resolution: 5mil
Ø Scanning speed: 50times/second
Ø Scanning distance: 5.7cm-61cm
Ø Scanning angle: 53.3° ± 3°
Ø Turning Angle from right to left: ±30°
Ø Turning Angle from front to back: ±65°
Ø Horizontal Angle: ±25°
1.6 2D Infrared Light Scanner Index (Optional)
Ø Identification ability:1D,2D.OCR
Page 30

ST308 Mobile IPDA
24
Ø Image sensor:752×480 CMOS
Ø Scanning precision:≥ 5mil
Ø Scanning angle: rotate 360°,incline±50°,deflection,±50°
Ø Field of View: Horizontal 36°,vertical 23°
Ø Depth of field: 4cm-23.5cm
Ø Exercise tolerance ability: horizontal speed 12.7cm/s
Ø Light intensity: LED 350LUX(13cm)
Ø Environmental illuminance:0 ~100,000 LUX
2. General Functions
2.1. On/Off
Open the tester
Under the "off "condition and there is electricity in the
battery, long press the power key to start the equipment.
Close the tester
Under standby interface and there is electricity in the
battery, long press the power key to pop up an option menu
and then choose "Power Off" to close the tester.
2.2. Standby and Wake up
Under the "on" condition, the system will enter into
standby state or shortly press on/off key to enter into
standby state. Under standby condition, shortly press on/off
key to wake up the system. (The time entering into standby
is relevant with the backlight time setting in setup options. If
the setting is "Light Forever", the system will not standby
automatically. But you still can realize the standby by
Page 31
ST308 Mobile IPDA
25
pressing on/off key.)
After waking up, the system will restore to the interface
before the standby and the program will restore to the state
before the standby.
2.3. Table Management
There are five default pages of the table screen and it
can display different screens by sliding with finger.
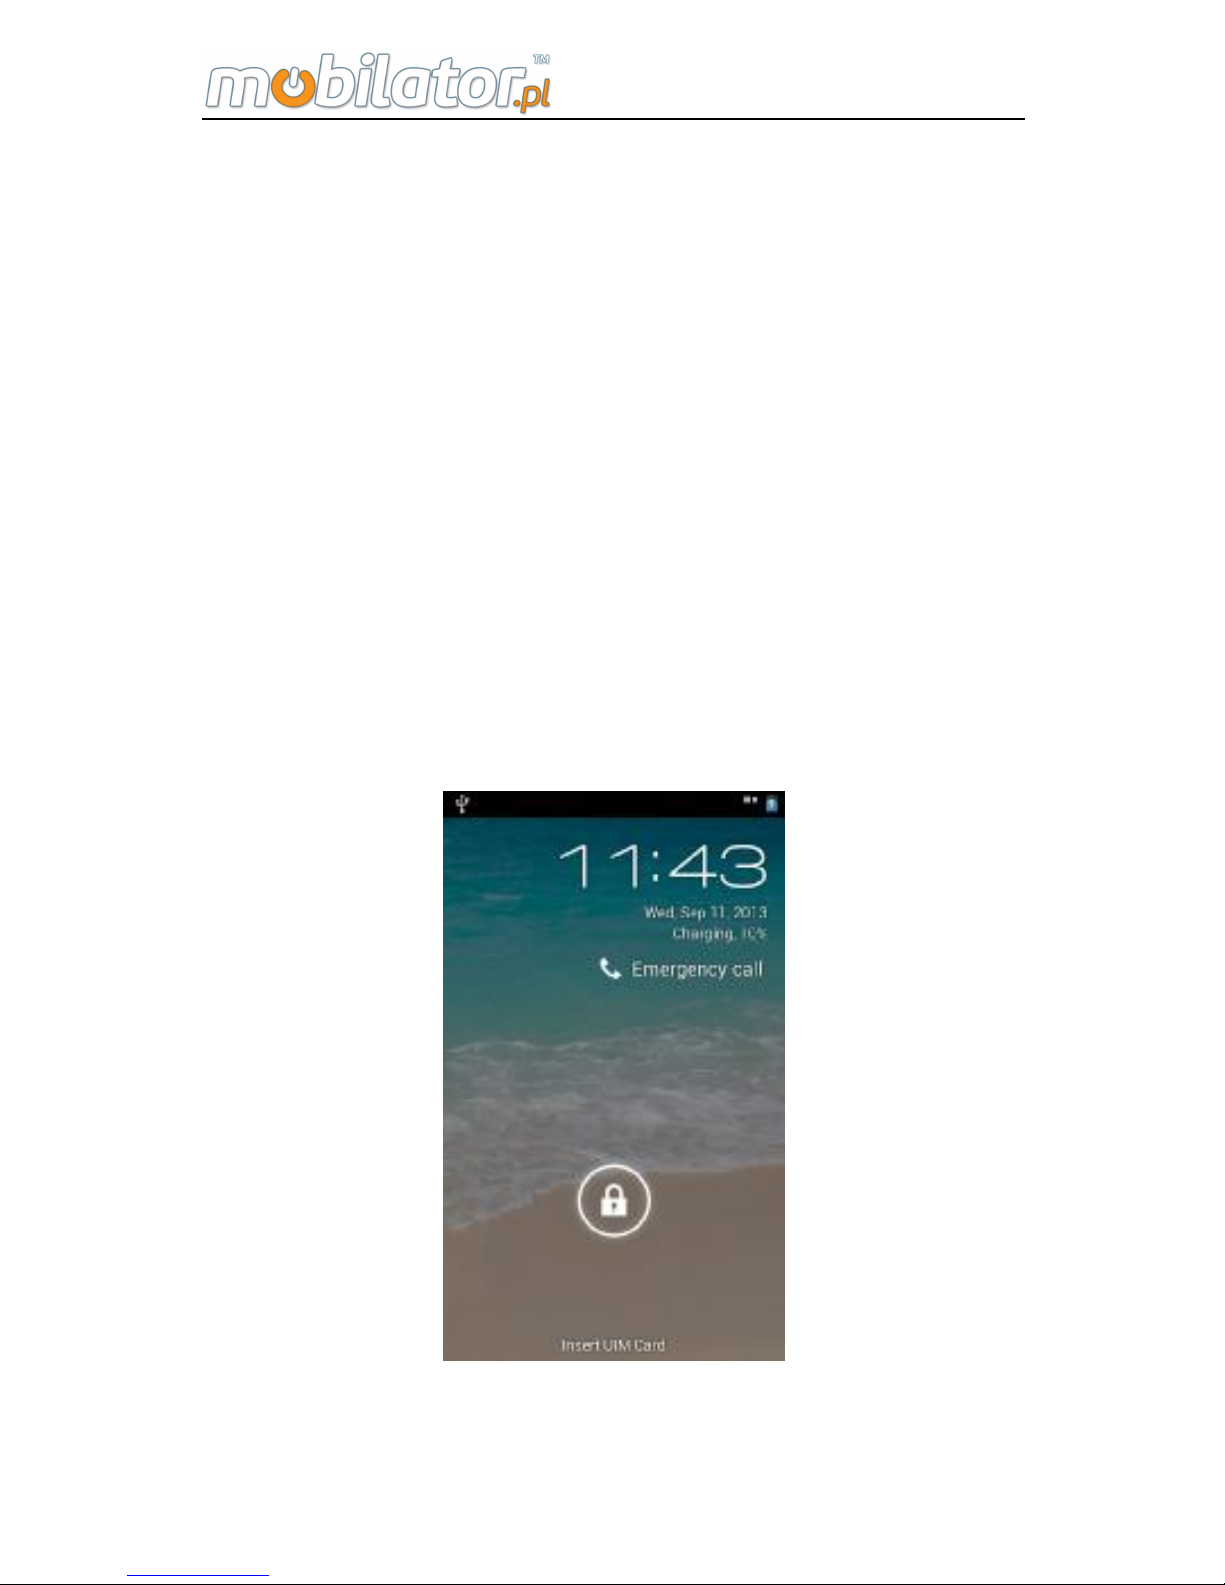
Lock or Unlock
If there is no equipment operation, after some time the
keypad will automatically locked. Press the power button to
wake up the screen, click the lock icon, you can slide in
different directions respectively, into different functional, as
shown below
In main menu "Settings> Display> Sleep" can set time
delay before the device sleep.
Page 32

ST308 Mobile IPDA
26
Add Desktop Icons
Click
to enter menu interface, find out the program
which you want to create a desktop shortcut. Keep pressing
the icon, when icon vibrate, you can move, and then drag
the icon to where you want to let go on desktop (note please
keep pressing the icon during the operate)
Delete the desktop icon
Keep pressing the desktop icon, after icon vibrate, the
top of the screen appears "× Remove", move the icon to "×
Remove" place , release after the icon turns red , the target
can be deleted.
Change Wallpaper
Keep pressing the desktop space will pop up the
following menu: Wallpaper, Live wallpaper and Gallery, you
can also set a picture as wallpaper when you browse the
pictures.
System prompt bar
System prompt bar (the top row of the screen) displays
the current notification system (such as unread messages
or missed calls, etc.).
Open the prompt bar: press the screen with a finger
drag down the status bar.
Page 33
ST308 Mobile IPDA
27
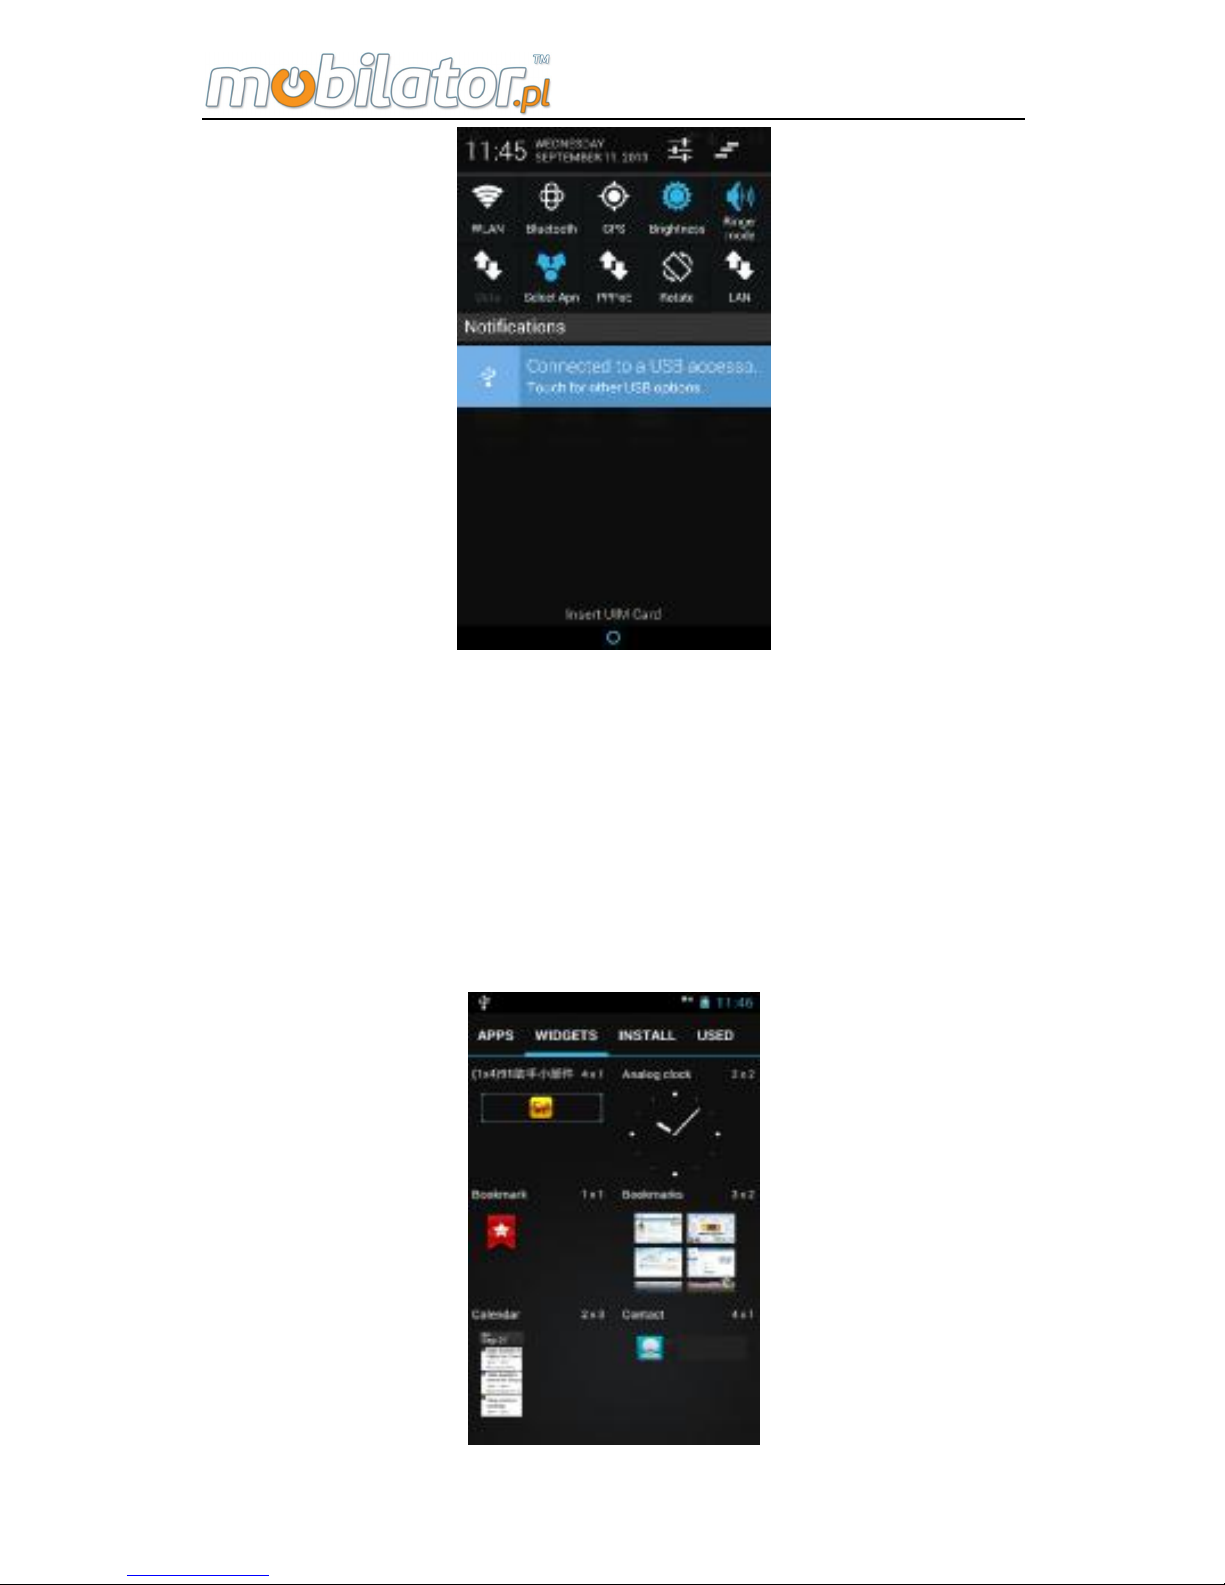
Add /Remove desktop plug
To add desktop clock and other desktop plug, you need
to enter the menu, and then click on the widgets, Keep
pressing the icon of plug-ins, plug-in icon vibrate, you can
move, and then drag the icon to your plugin want placement
can let go (note that during the operation to hold the plug-in
icon do not put). As shown below:
Page 34
ST308 Mobile IPDA
28
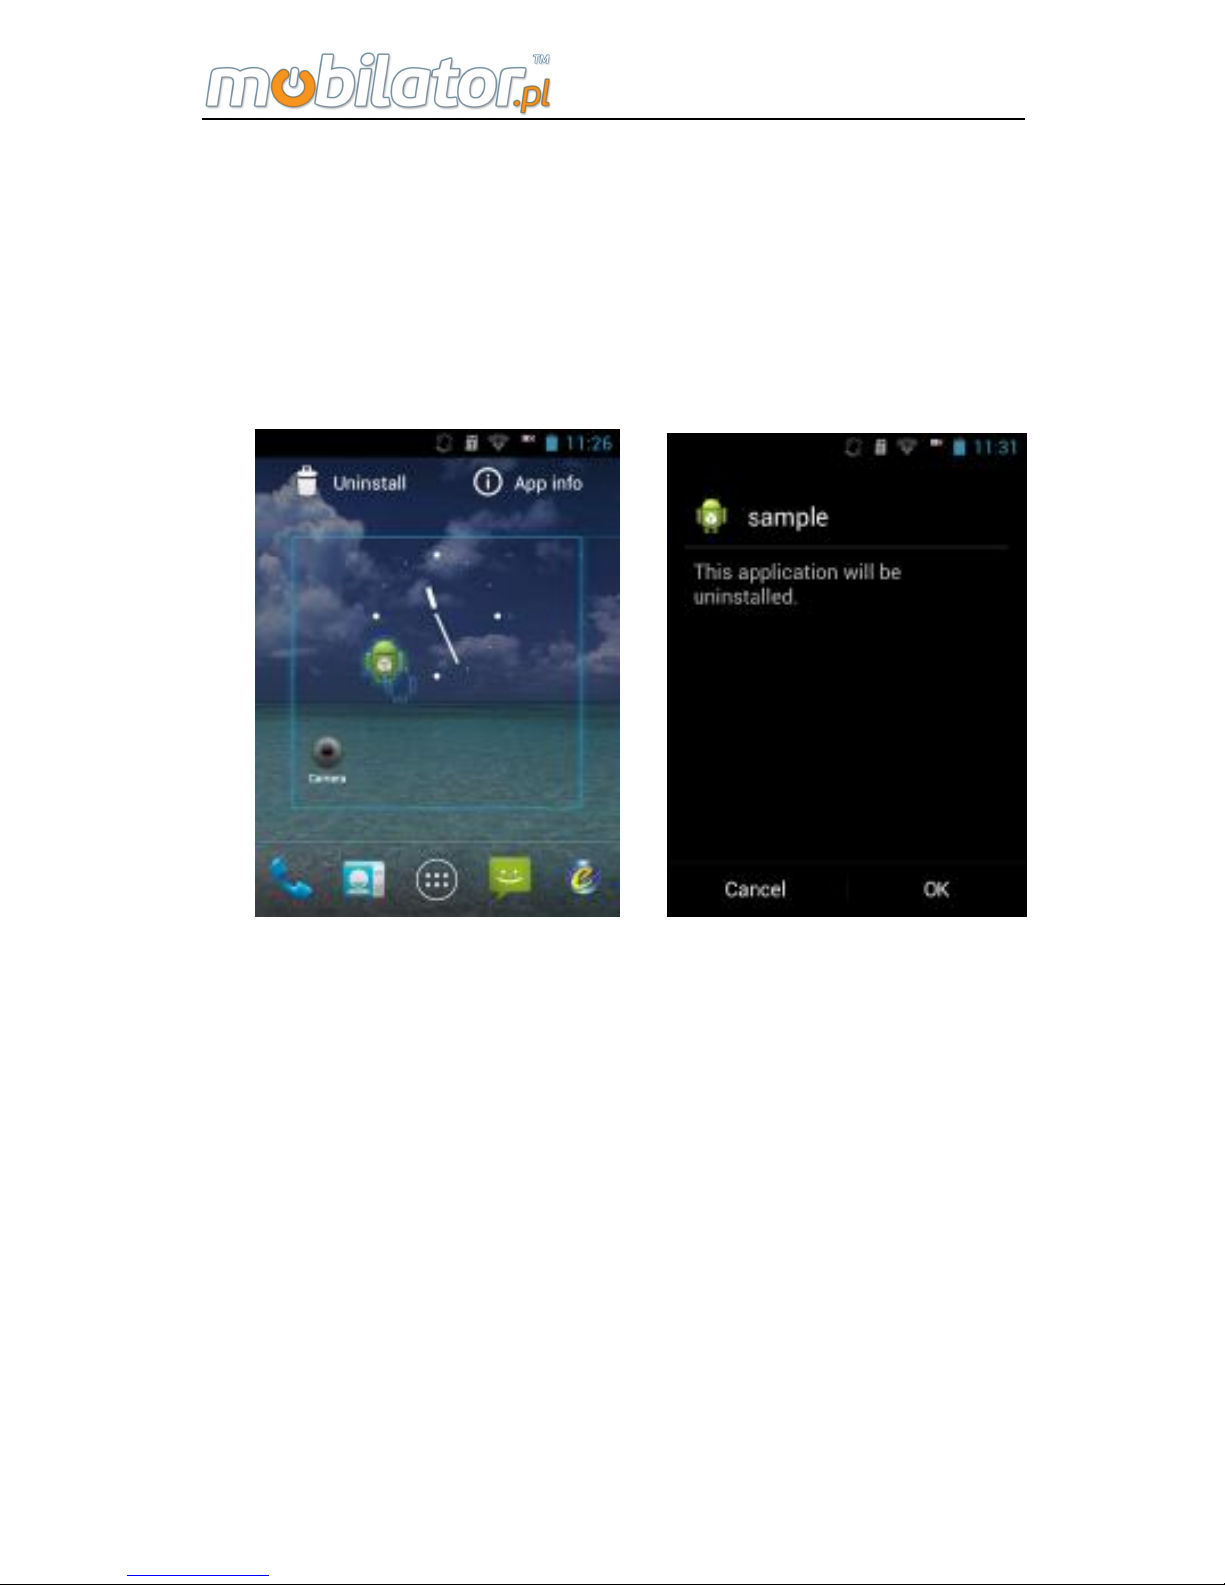
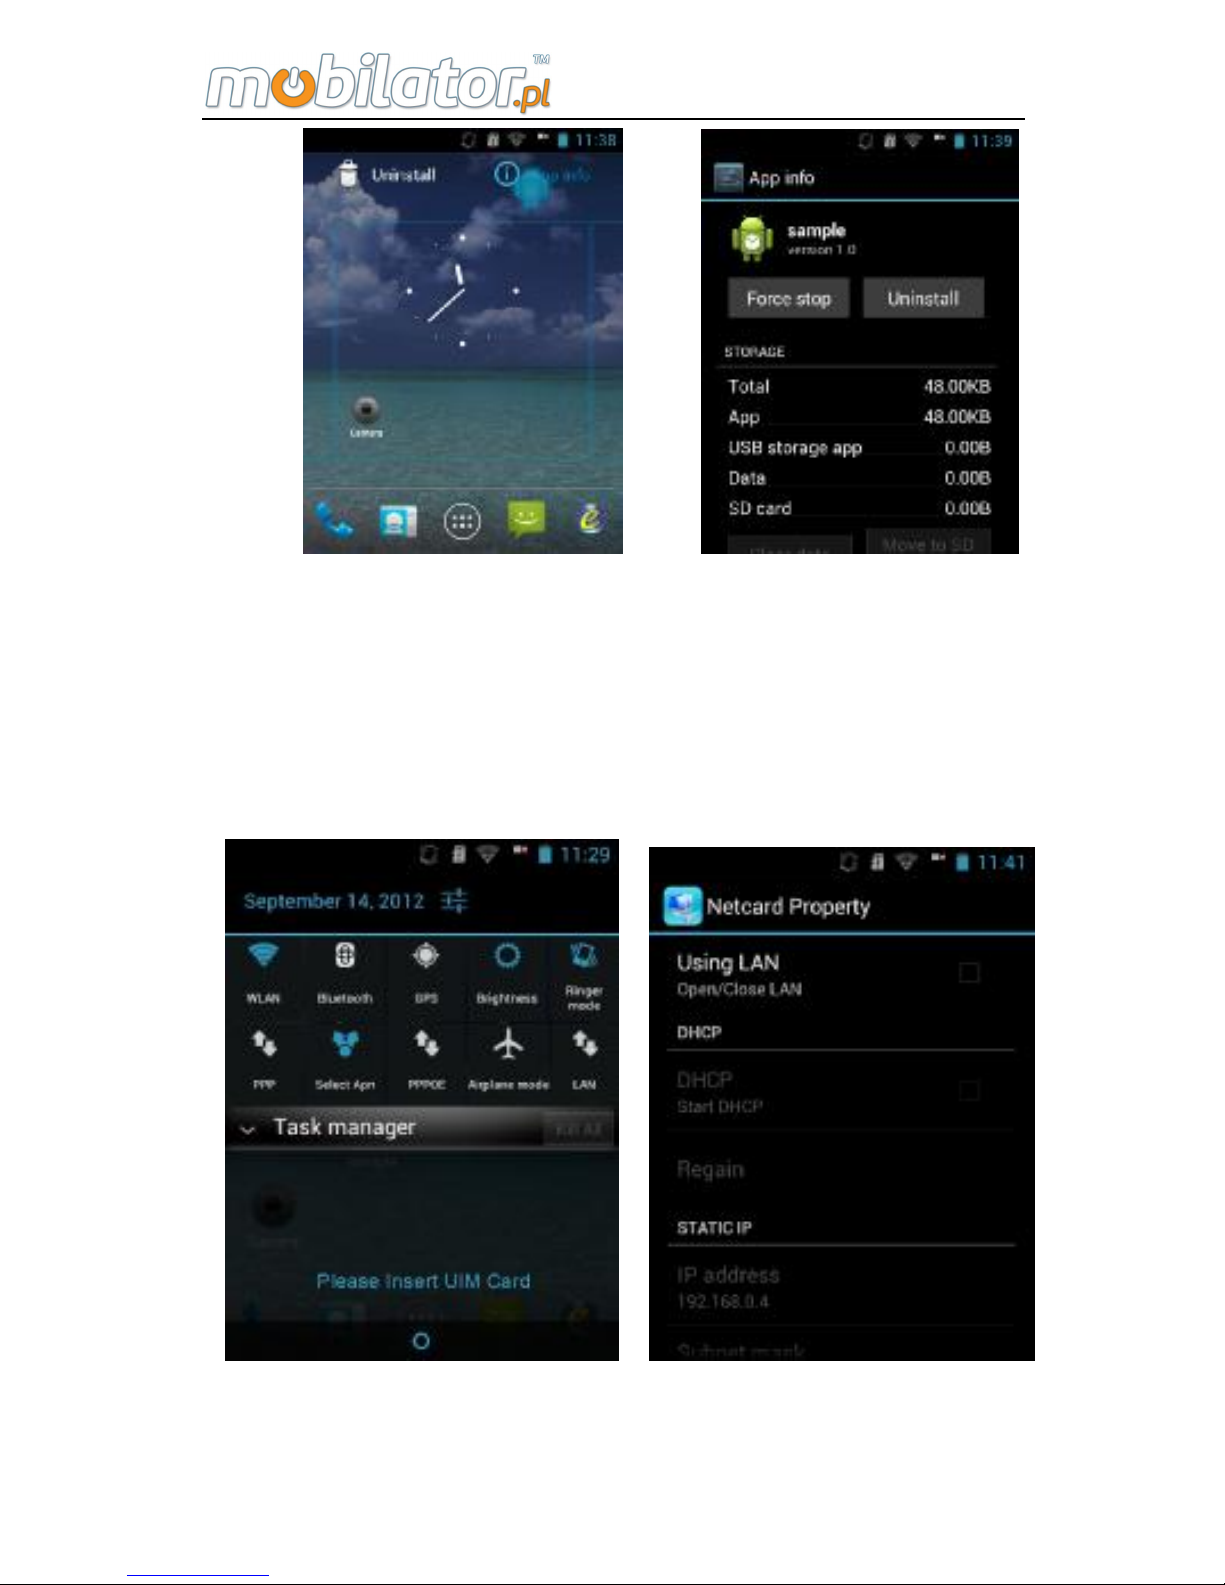
Quick Uninstall Installed Programs
Enter the menu screen, select the program icon you want to
uninstall, keep pressing the icon, icons vibrate, you can
move, move to the desktop uninstall icon will pop uninstall
interface, click OK to start the uninstall program, and then
click OK to uninstall complete.
View program information
Enter the menu screen, select the icon for the program you
want to view, keep pressing the icon, icons vibrate, you can
move, move to the desktop App info, the application will pop
up the relevant information. As shown below:
Page 35
ST308 Mobile IPDA
29
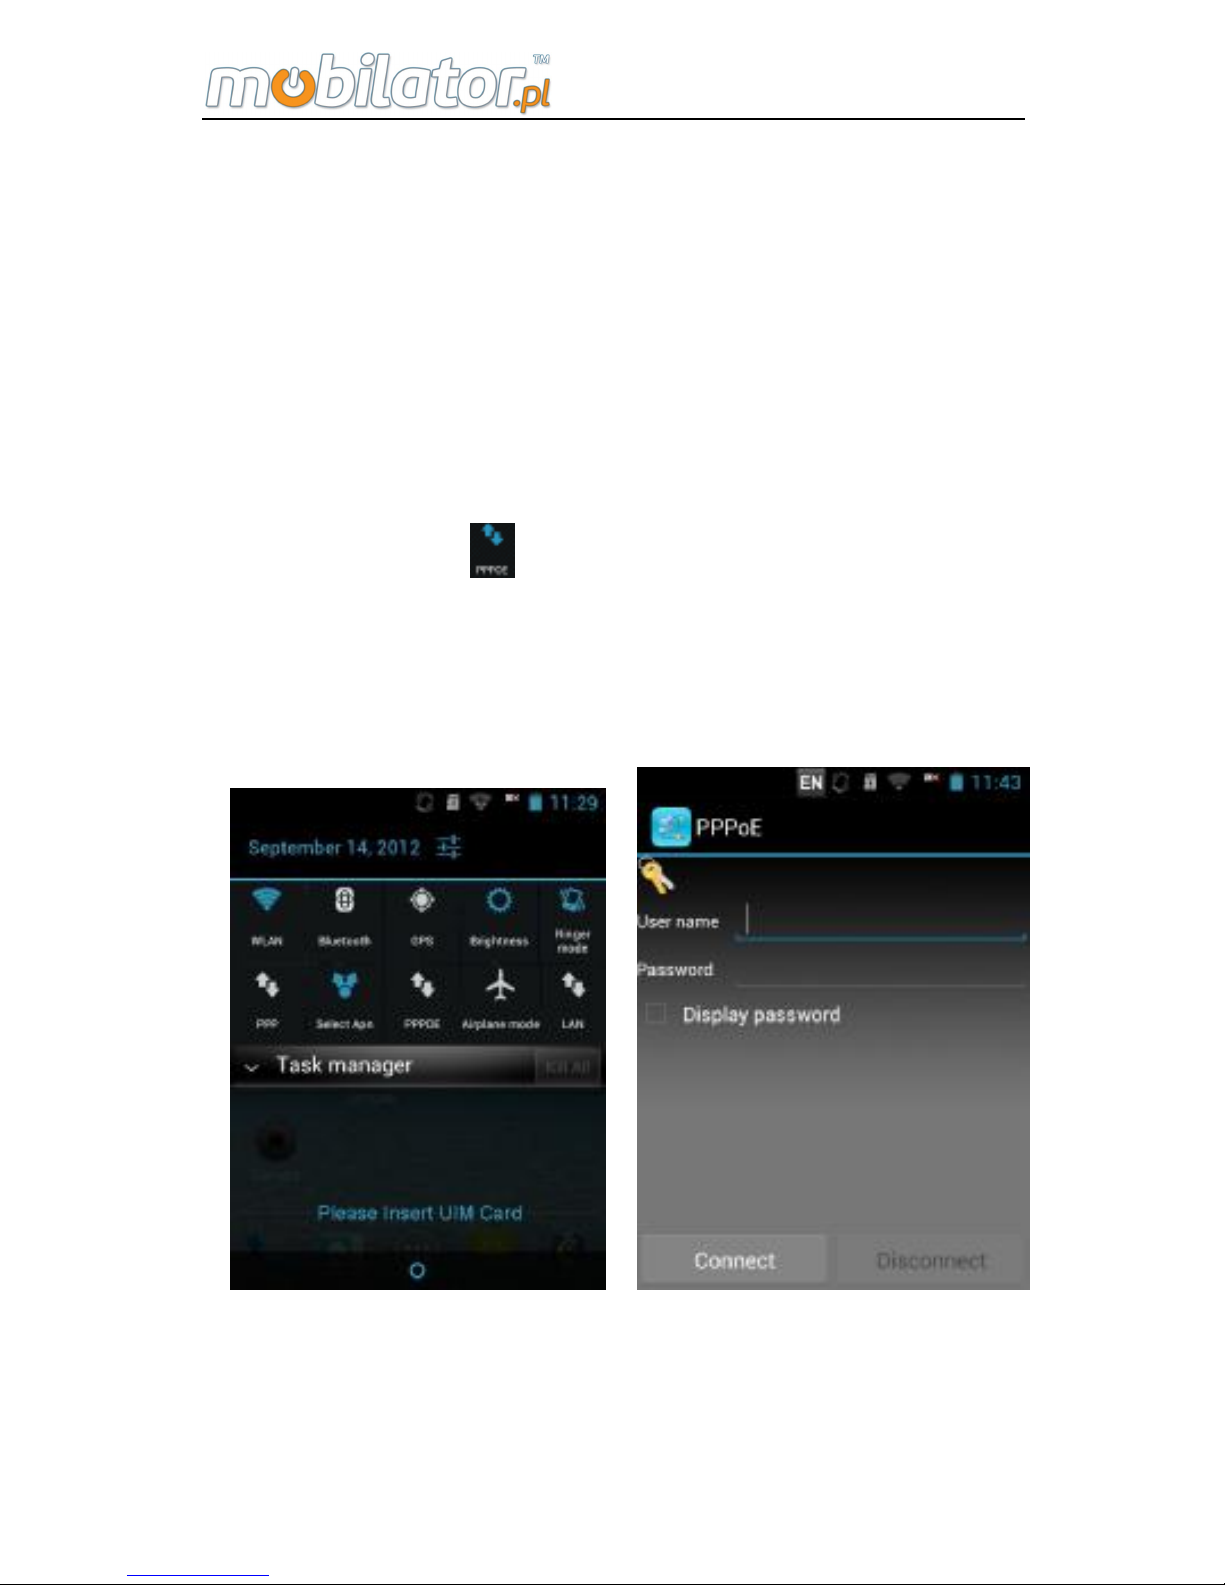
2.4 Open / Close net card
To open the device's net card, pull down the prompt bar
and click the LAN icon (the icon is blue card means turned
on, the icon is white means closed), the system pop-up card
properties window, as shown below:
Select Using LAN, you can choose to open DHCP or
fixed IP mode, the DHCP mode, you can click again to
Page 36
ST308 Mobile IPDA
30
reacquire to make the device to obtain an IP address from a
DHCP server. In the static IP status, you can modify the
NIC's IP address, subnet mask, gateway, and DNS, DNS is
divided into two, namely DNS1 and DNS2, should first set
the DNS1.
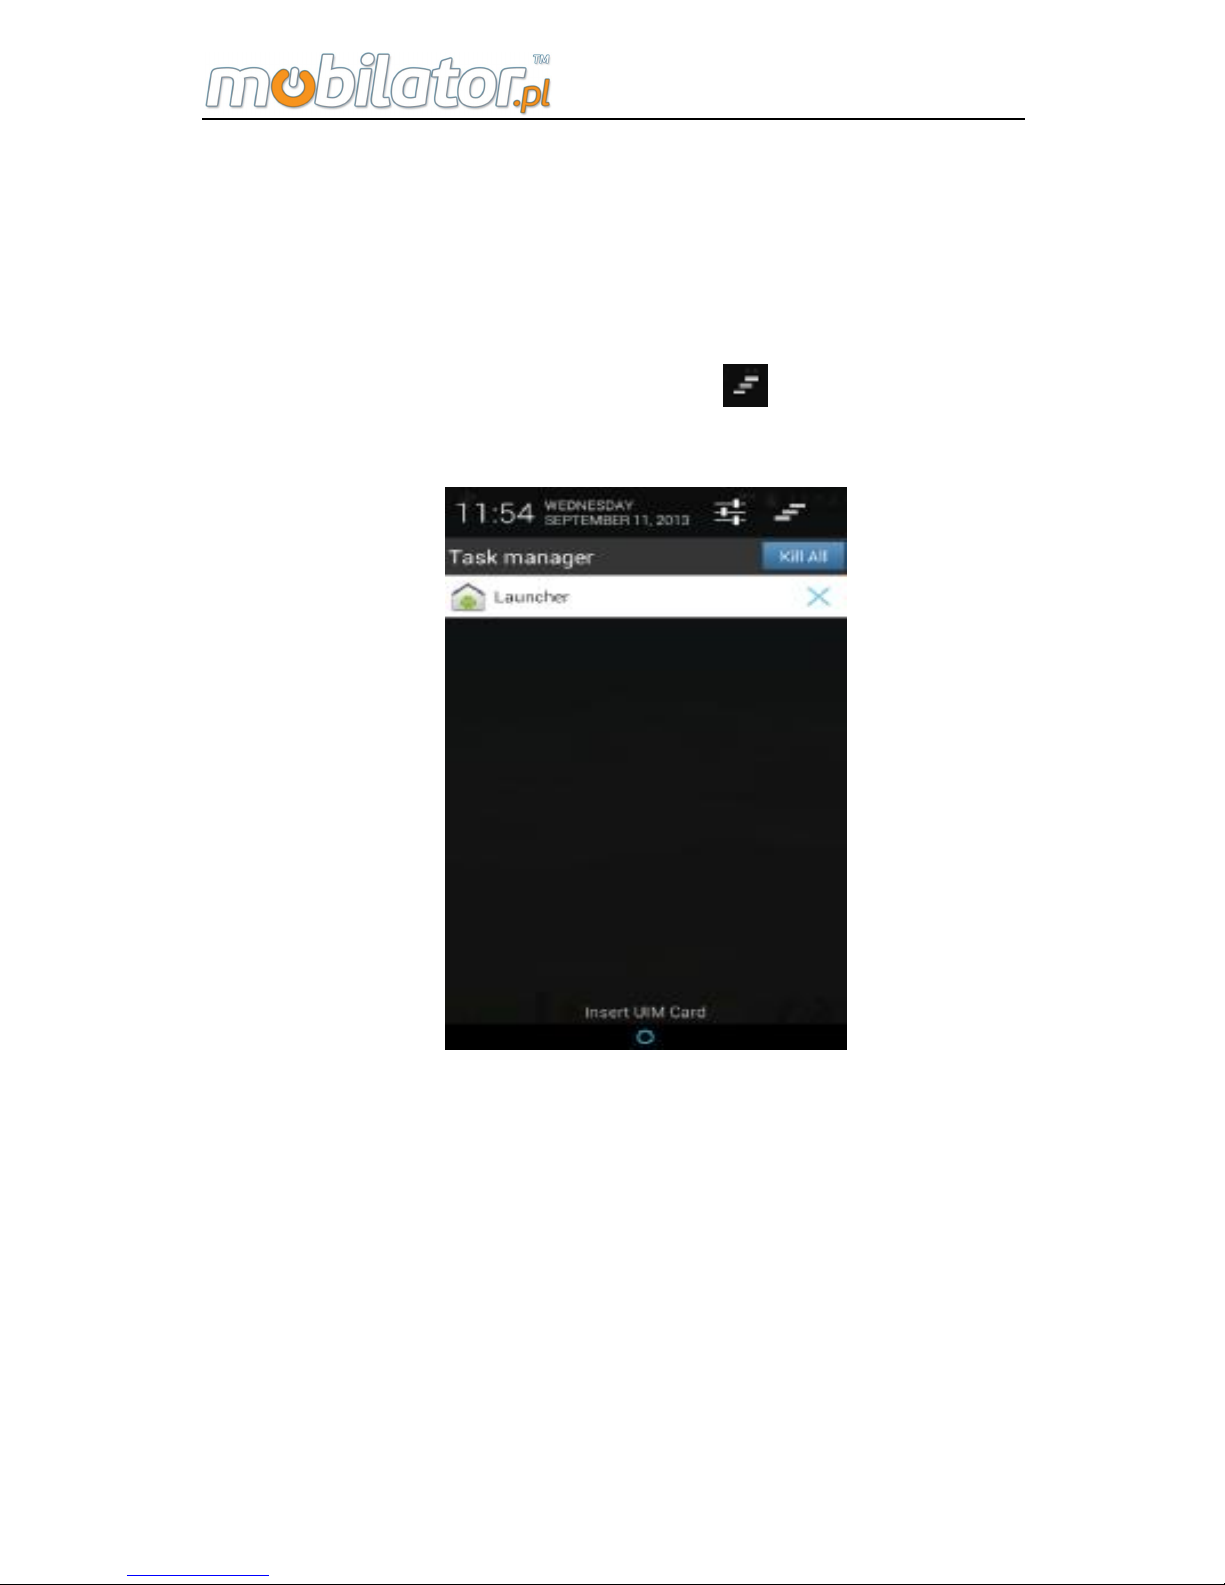
2.5 PPPoE dial
To make the network port PPPoE dial, pull-down prompt bar,
select PPPoE icon
(the icon is blue means PPPoE dial
is connected, the icon is white means PPPoE dial not
connected), PPPoE Properties window pops up, as shown
below:
In the dial-up interface to enter a user name and password,
click CONNECT can be established PPPoE link.
Page 37
ST308 Mobile IPDA
31
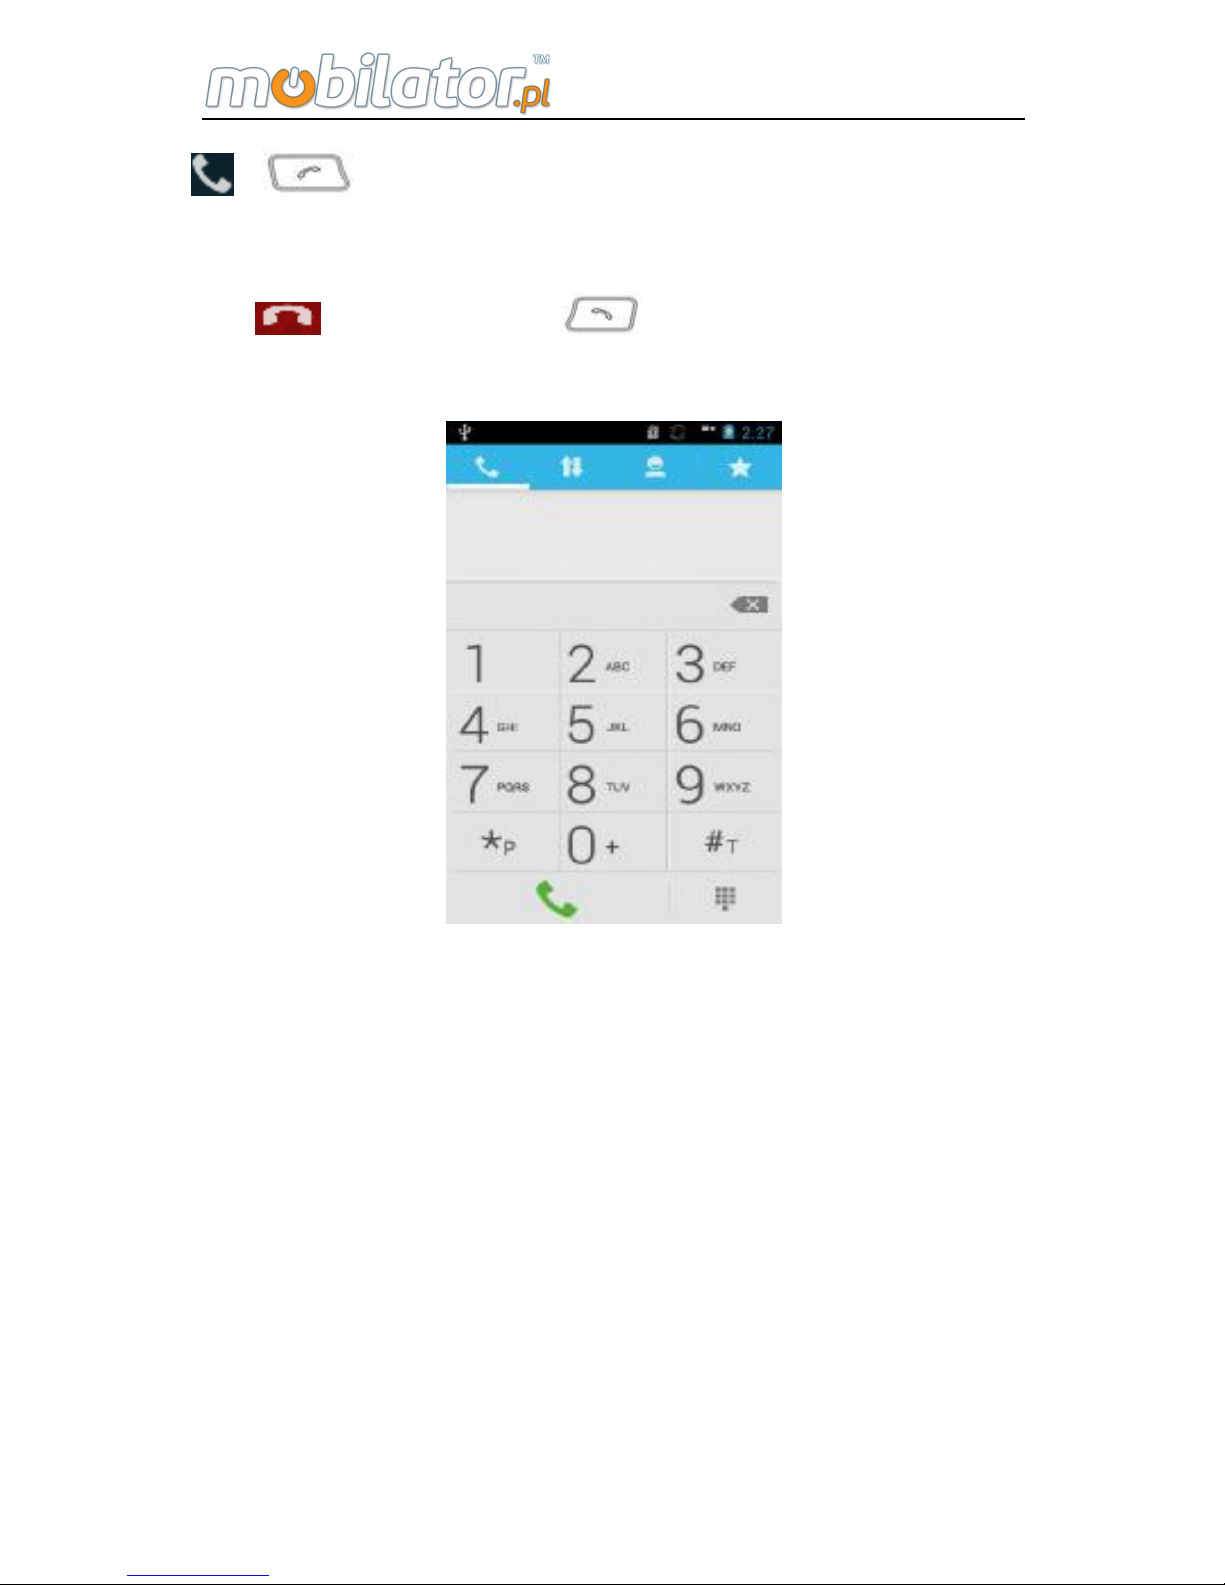
2.6 Task Manager
Equipment systems have Task Manager, you can close
opened programs to release program memory, improve
system efficiency.
Pull down prompt bar, single click , Task Manager will
appear, as shown below:
Enter into a running program menu; click on the Stop
button corresponding to the task, which can close the
current task and free the occupied memory space. (The
Launcher is desktop manager, so it can not be turned off)
2.7 Dialer
In the main menu interface or standby desktop, click the
Page 38
ST308 Mobile IPDA
32
or enter the phone number, press the call button
or dial button, you can call the number; To end the call, click
the button or press hook key to hang up. As
shown below:
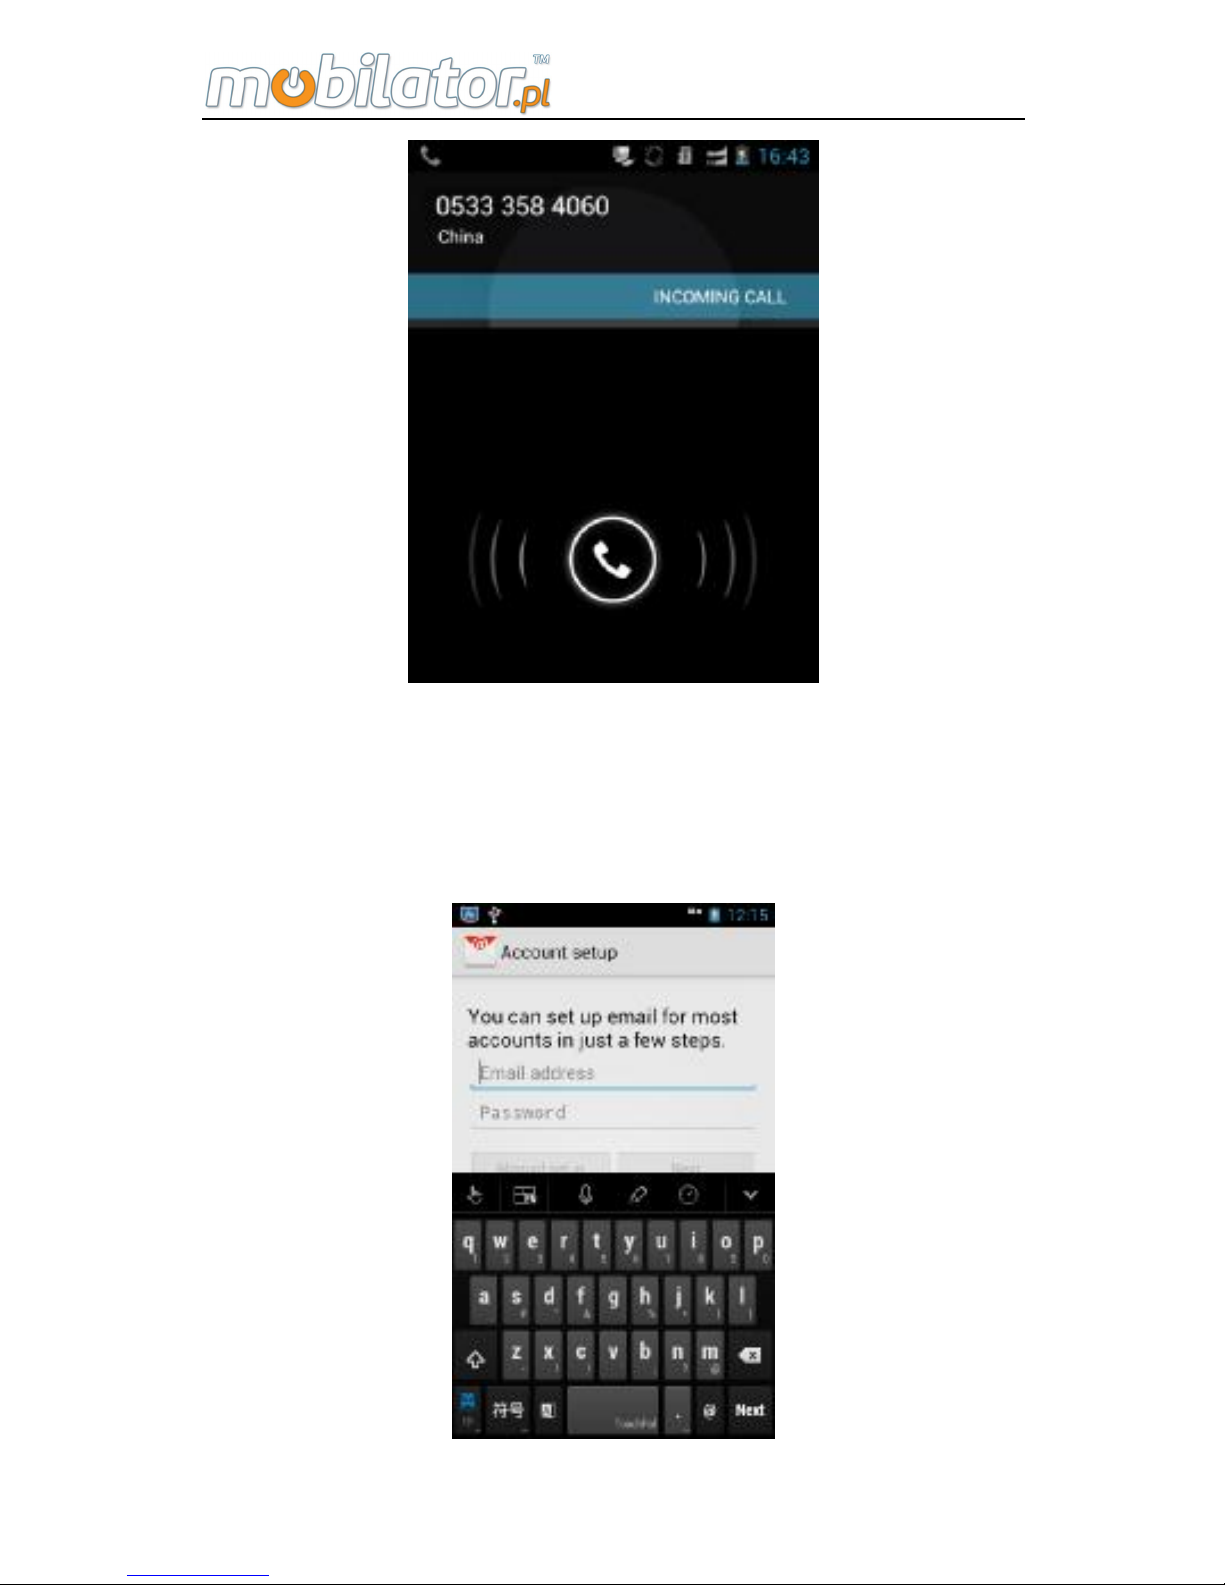
2.8 Answer the phone
The system call interface pops up in the caller interface,
slide right to the green icon to answer the call; slid left to red
icon can reject an incoming call; slide up to SMS icon can
send text messages.
Page 39
ST308 Mobile IPDA
33
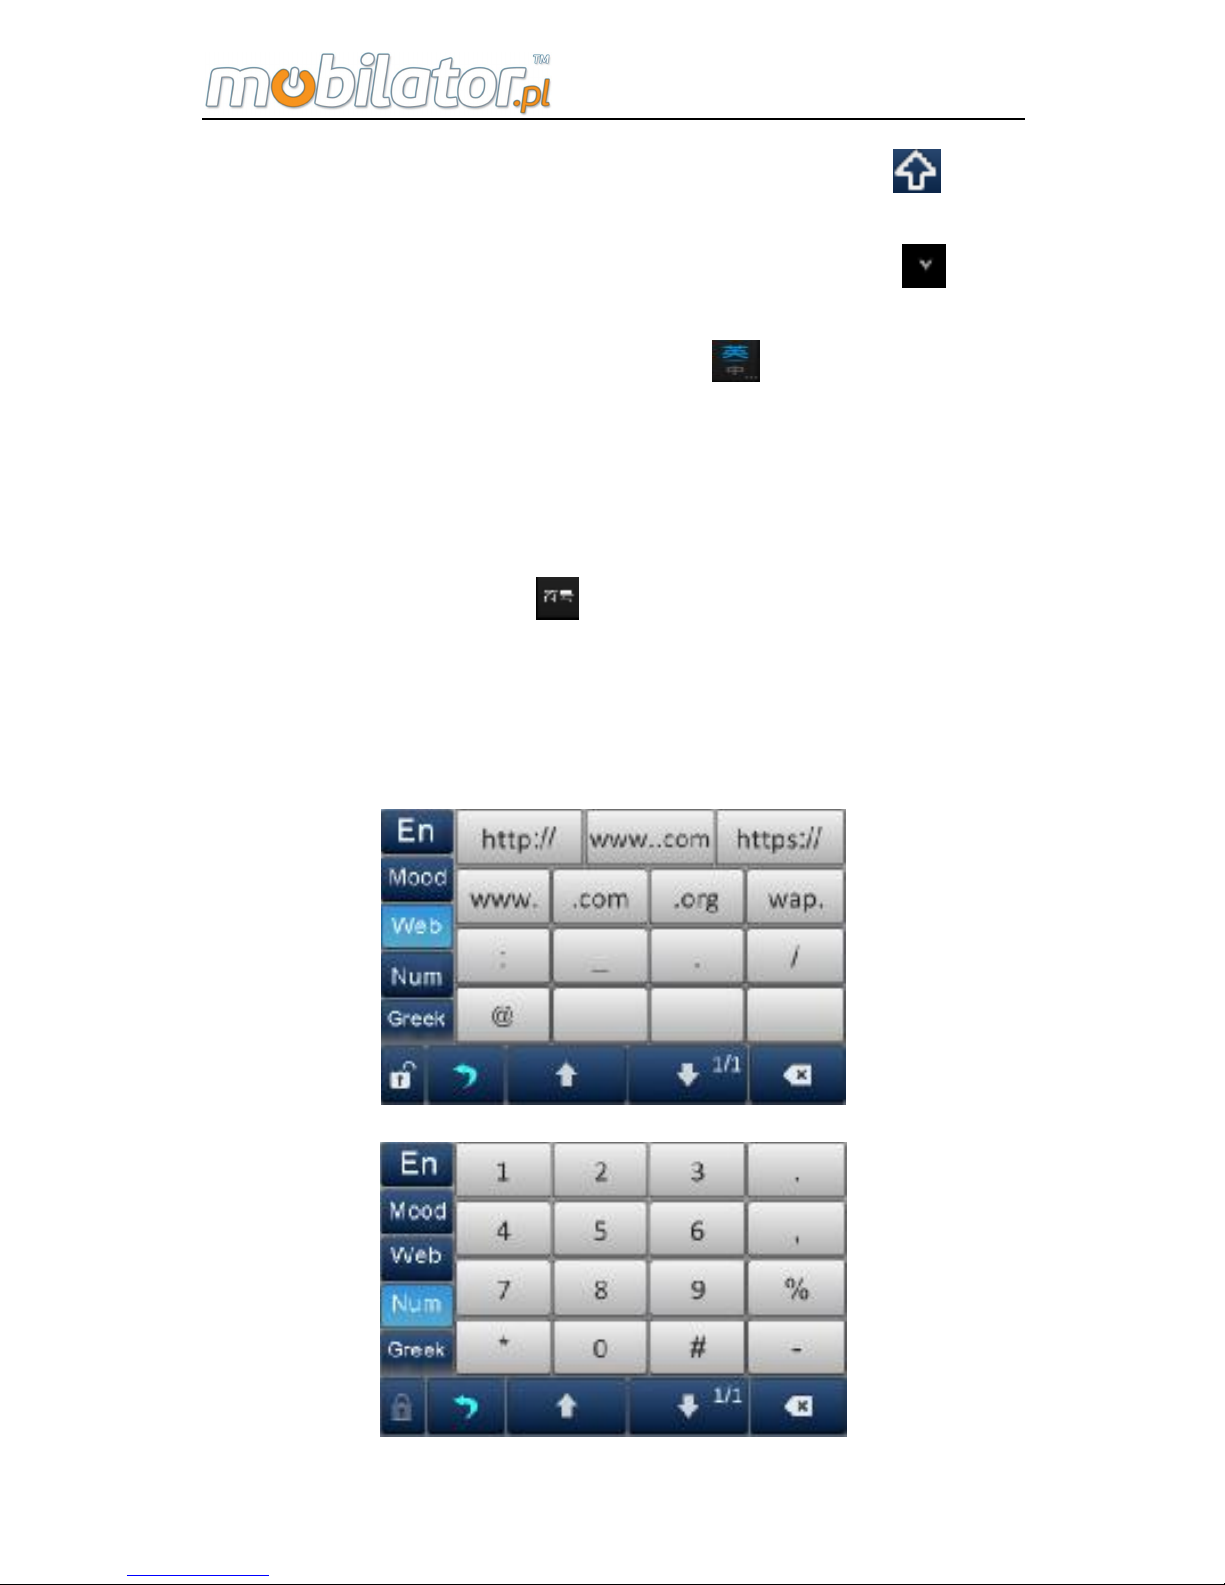
2.9 Input Method
Click the application's text box; the system will automatically
bring up the built-in input method. As shown below:
Page 40
ST308 Mobile IPDA
34
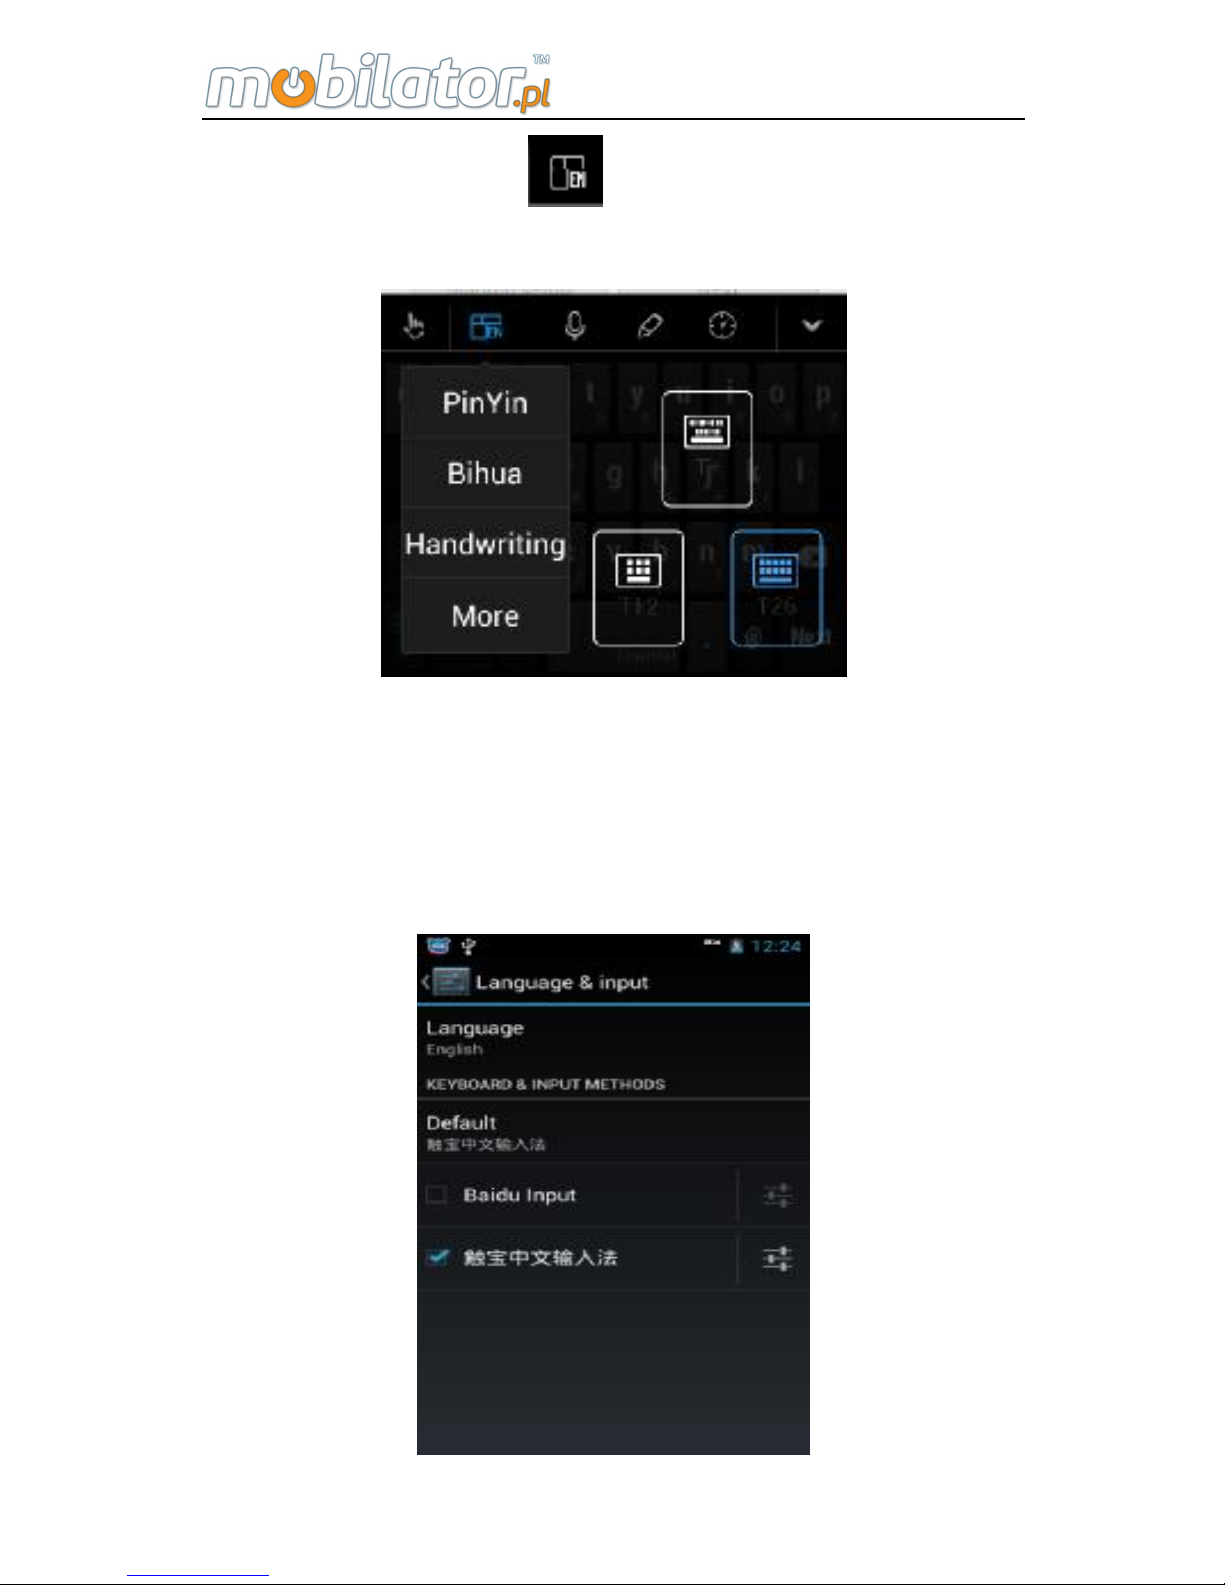
System using TouchPal input method, tap on the
keyboard to switch the input character case. Click
on the
keyboard hidden input method. Click
will switch the input
method to Pinyin input method, and then click becomes
English input method. Keep pressing the on-screen
keyboard to the left or right button; it will switch the input
keyboard layout. Click
on your keyboard to switch to
digital / character input method, which includes English
characters, facial expressions, network, digital, Greek, Latin,
mathematics and other options, as shown below:
Page 41
ST308 Mobile IPDA
35
Keep pressing the bottom left corner to switch the
input method window pops up as shown below:
Where you can select the desired input mode, (You can
also install other input methods, such as stroke, etc.)
devices also support install other input methods, such as,
Sogou input method, Baidu input method.
Change the text input method
Page 42

ST308 Mobile IPDA
36
In the system settings have language & input options.
Contains all installed input method, as shown above, you
can click the check box in front to set the default input
method.
2.10 Flashlight
This device supports flashlight, camera fill light can be
used as lighting in the boot state. Keep pressing
(2
seconds or so) can be turned on or off flashlight. (Flashlight
will remain in the standby System standby state before,
please note the close flashlight to save power)
2.11 Camera
This device has a camera shortcut key
, in the
normal state, press the camera button that can pop up
camera interface, the camera screen, press the button for
the camera operation.
2.12 Breathing indicator
When device in the boot and standby state, breathing light
gap flashes to indicate that the device is in working
condition, in calls or missed calls, received messages have
different breathing light blinking to alert customers.
2.13 Mass storage mode
Mass storage mode is USB data cable connect with the
Page 43
ST308 Mobile IPDA
37
PC, the device will be a virtual mass storage U disk, via a
PC can be copied or deleted U disk file.
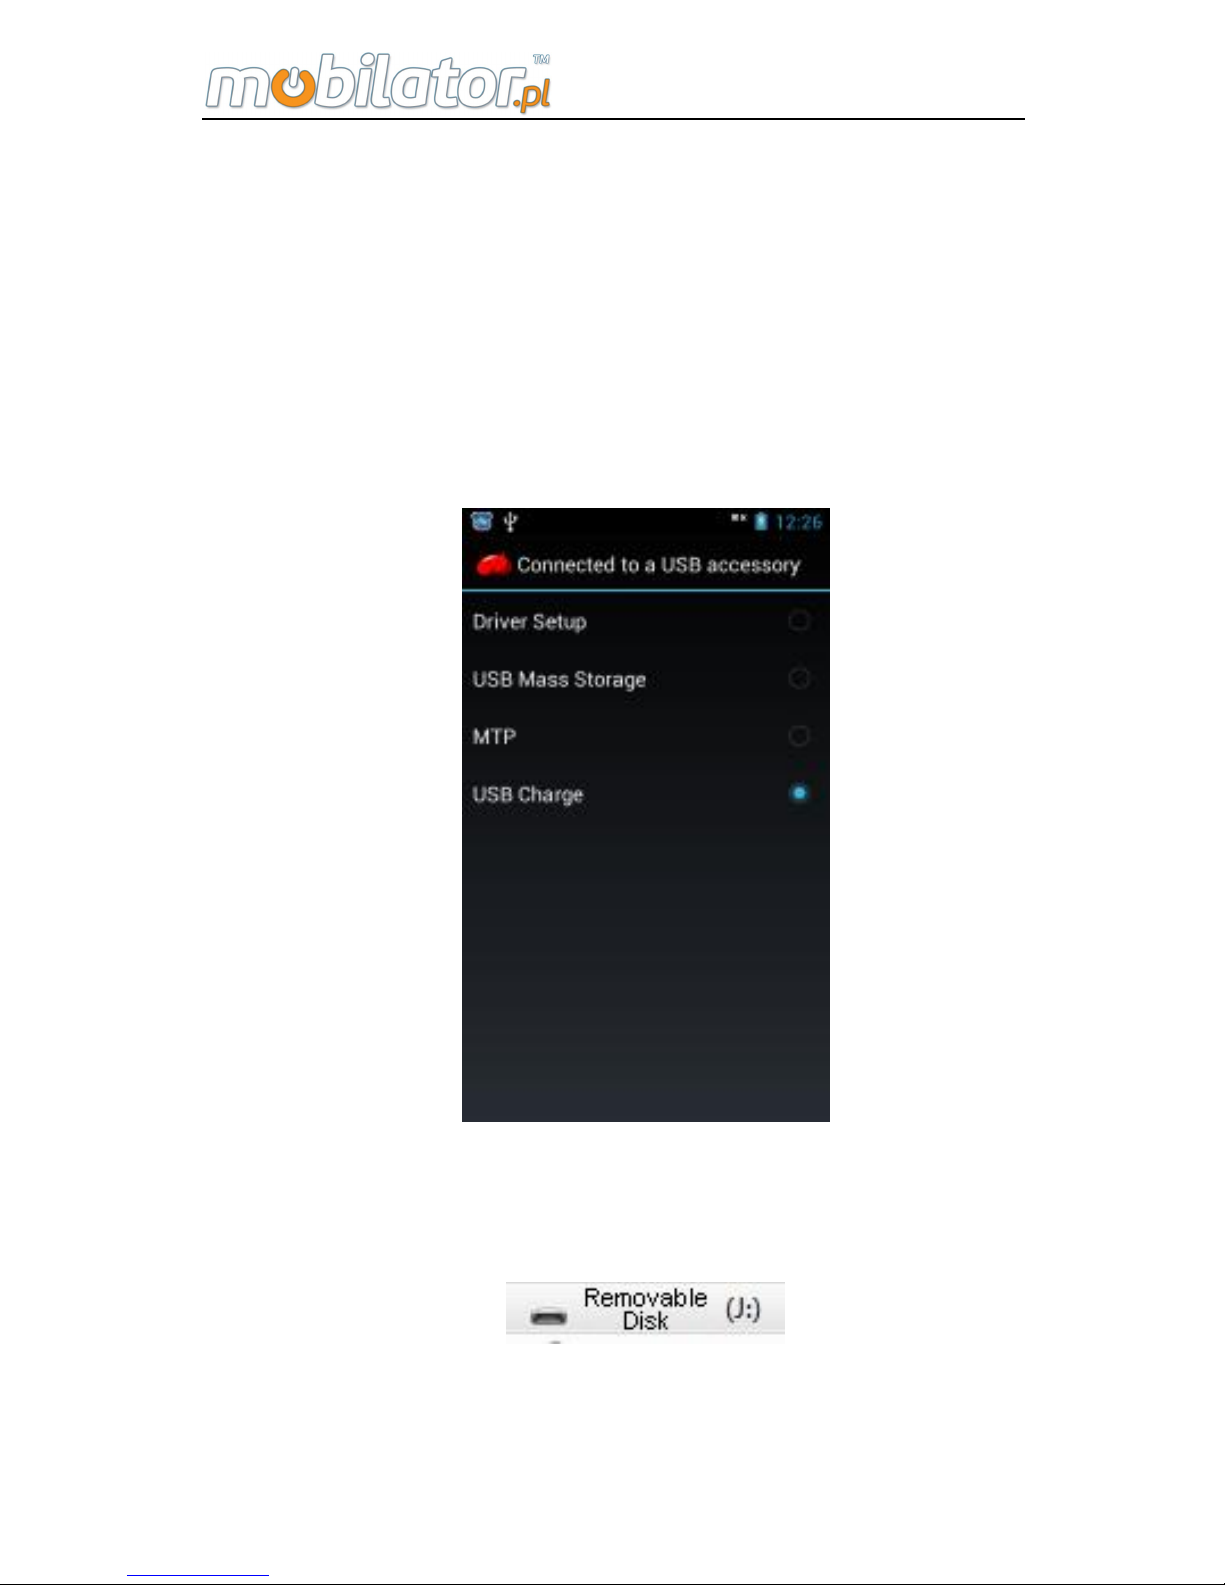
Through Mini USB data cable to connect the device
with the PC, the device prompts bar prompts a USB
connection, pull down the prompt bar, click the USB
connection, select USB Mass storage, PC machine will find
U disk, which can be operated via a PC U disk content. As
shown below:
If there is no TF card, will virtual a U disk, if have TF
card, will virtual 2 U disk. (Drive letter will vary on how many
different devices) as shown below:
Page 44
ST308 Mobile IPDA
38
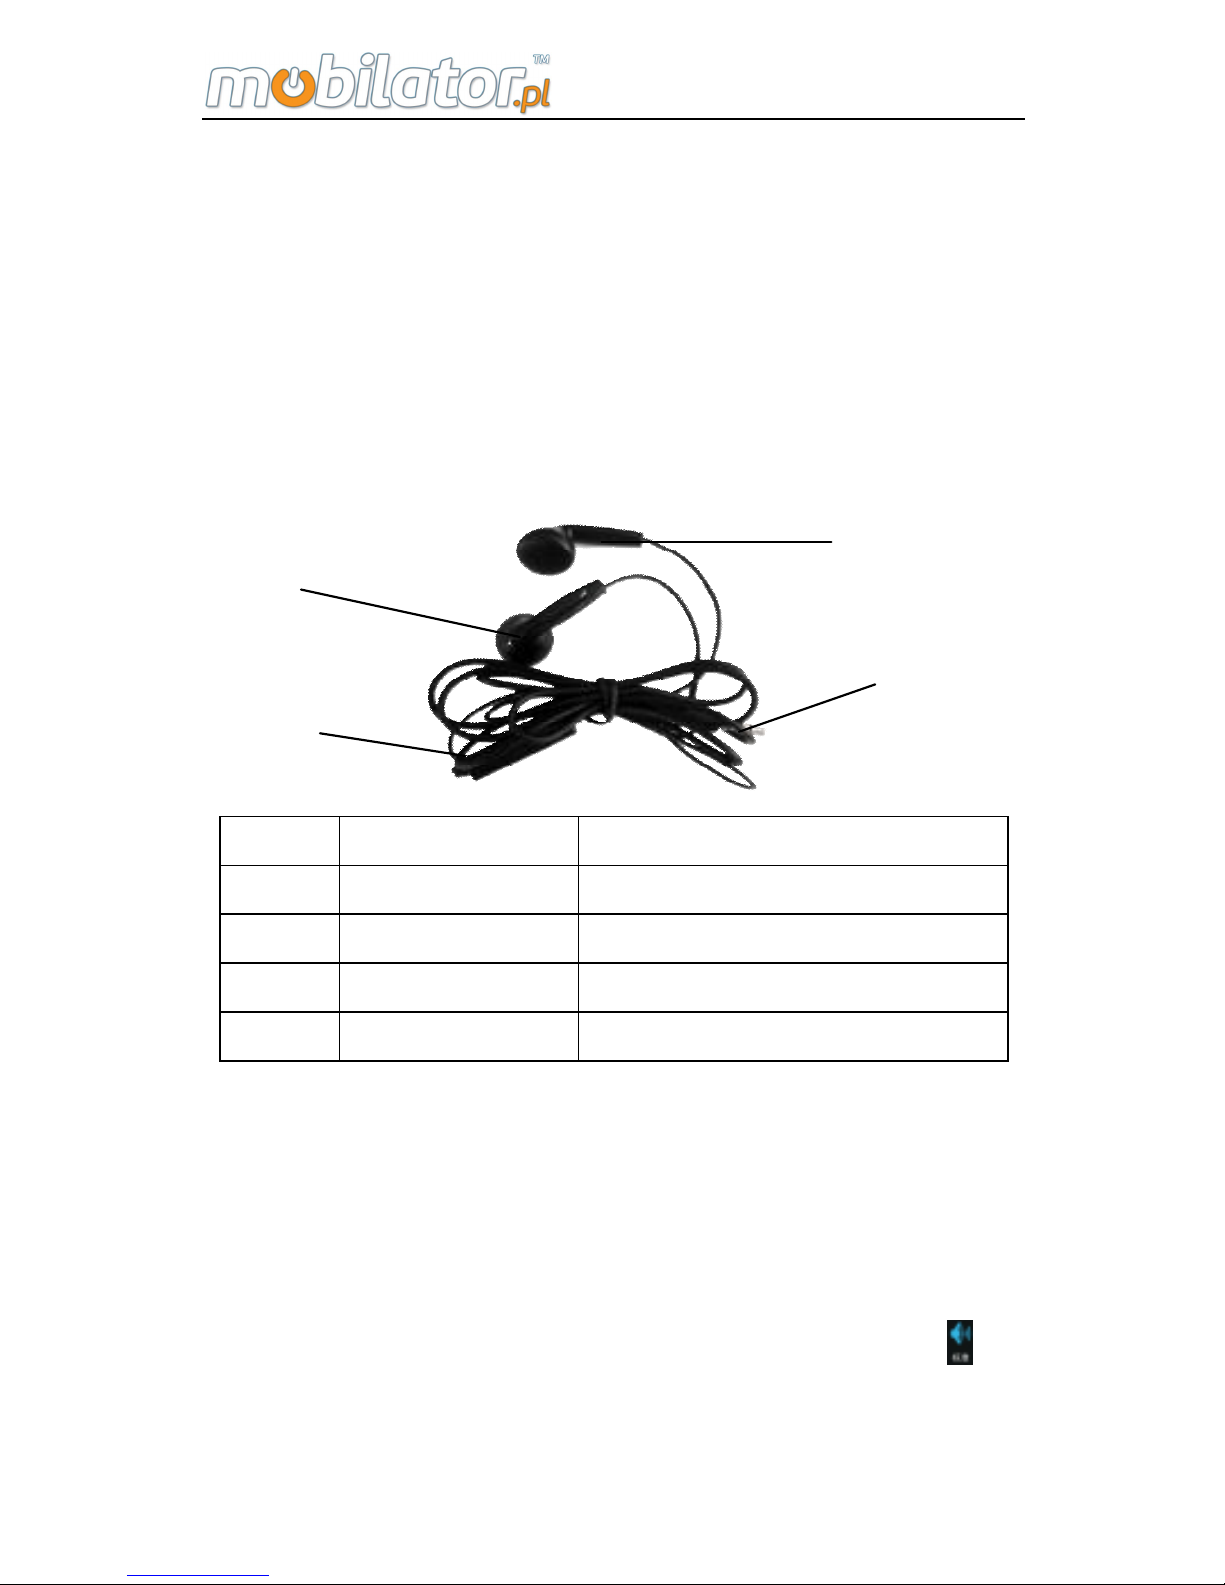
2.14 Headset
Device supports headset, listening to music, the
device's headphones as an ordinary hole, the device is
equipped with a headset plugged into the headphone jack,
that is to meet the needs of calls and listening to music, the
headset supports off-hook and on-hook operation.
(Dedicated headphone headset, other headphones may not
be used)
No Name Specification
1 plug 3.5mm
2 Hook button ABS Black
3 horn φ10 32Ω
4 shell ABS black sequins plating
2.15 Vibration
Device supports two vibration modes, one is only
vibration, the other is added ringing vibrations. Vibration
mode requires only pull down prompt bar, click
until
1
4
2
3
Page 45

ST308 Mobile IPDA
39
changes in the vibration mode only. You can also press
the power button on the pop-up screen; click the
icon
to enter the vibration modes
Ring & vibration modes need to enter the Setting>
Sound to select Vibrate and ring.
2.16 GPSone Passive positioning
Device supports GPSone passive positioning, you can
through the machine's positioning software to check latitude
and longitude information, passive positioning feature
requires phone cards opened passive location services, and
will produce a certain passive localization data traffic. Only
need to open the GPS device side support GPSone passive
position, when the GPS is turned off, the device does not
support GPSone passive location query.
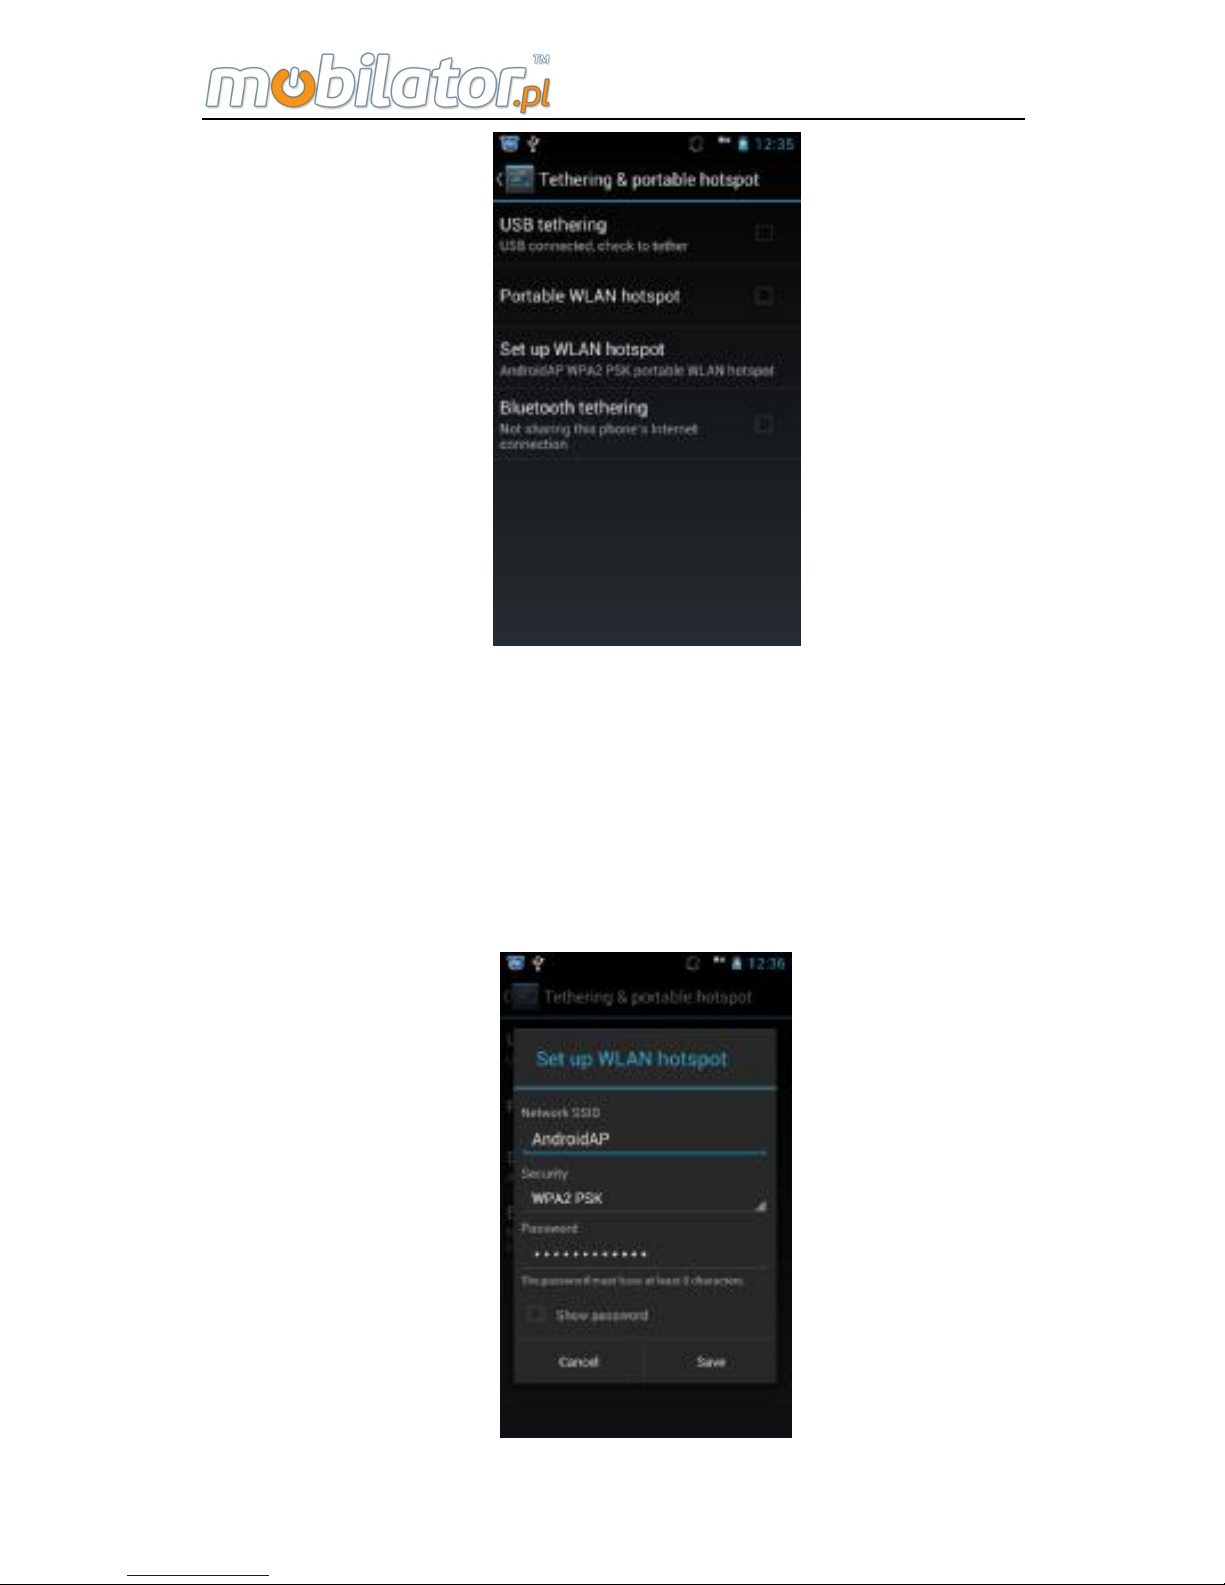
2.17 WIFI hotspot
Portable devices support WIFI hotspot, providing 3G
network links WIFI connection to other devices.
Connect 3G data connection, and then enter
Settings>more, click Tethering & portable hotspot, the
interface as shown below:
Page 46
ST308 Mobile IPDA
40
Select the Portable WLAN hotspot, which you can open
WIFI portable hotspot, through other devices with WIFI
hotspot that can search the AP and connect Login networks.
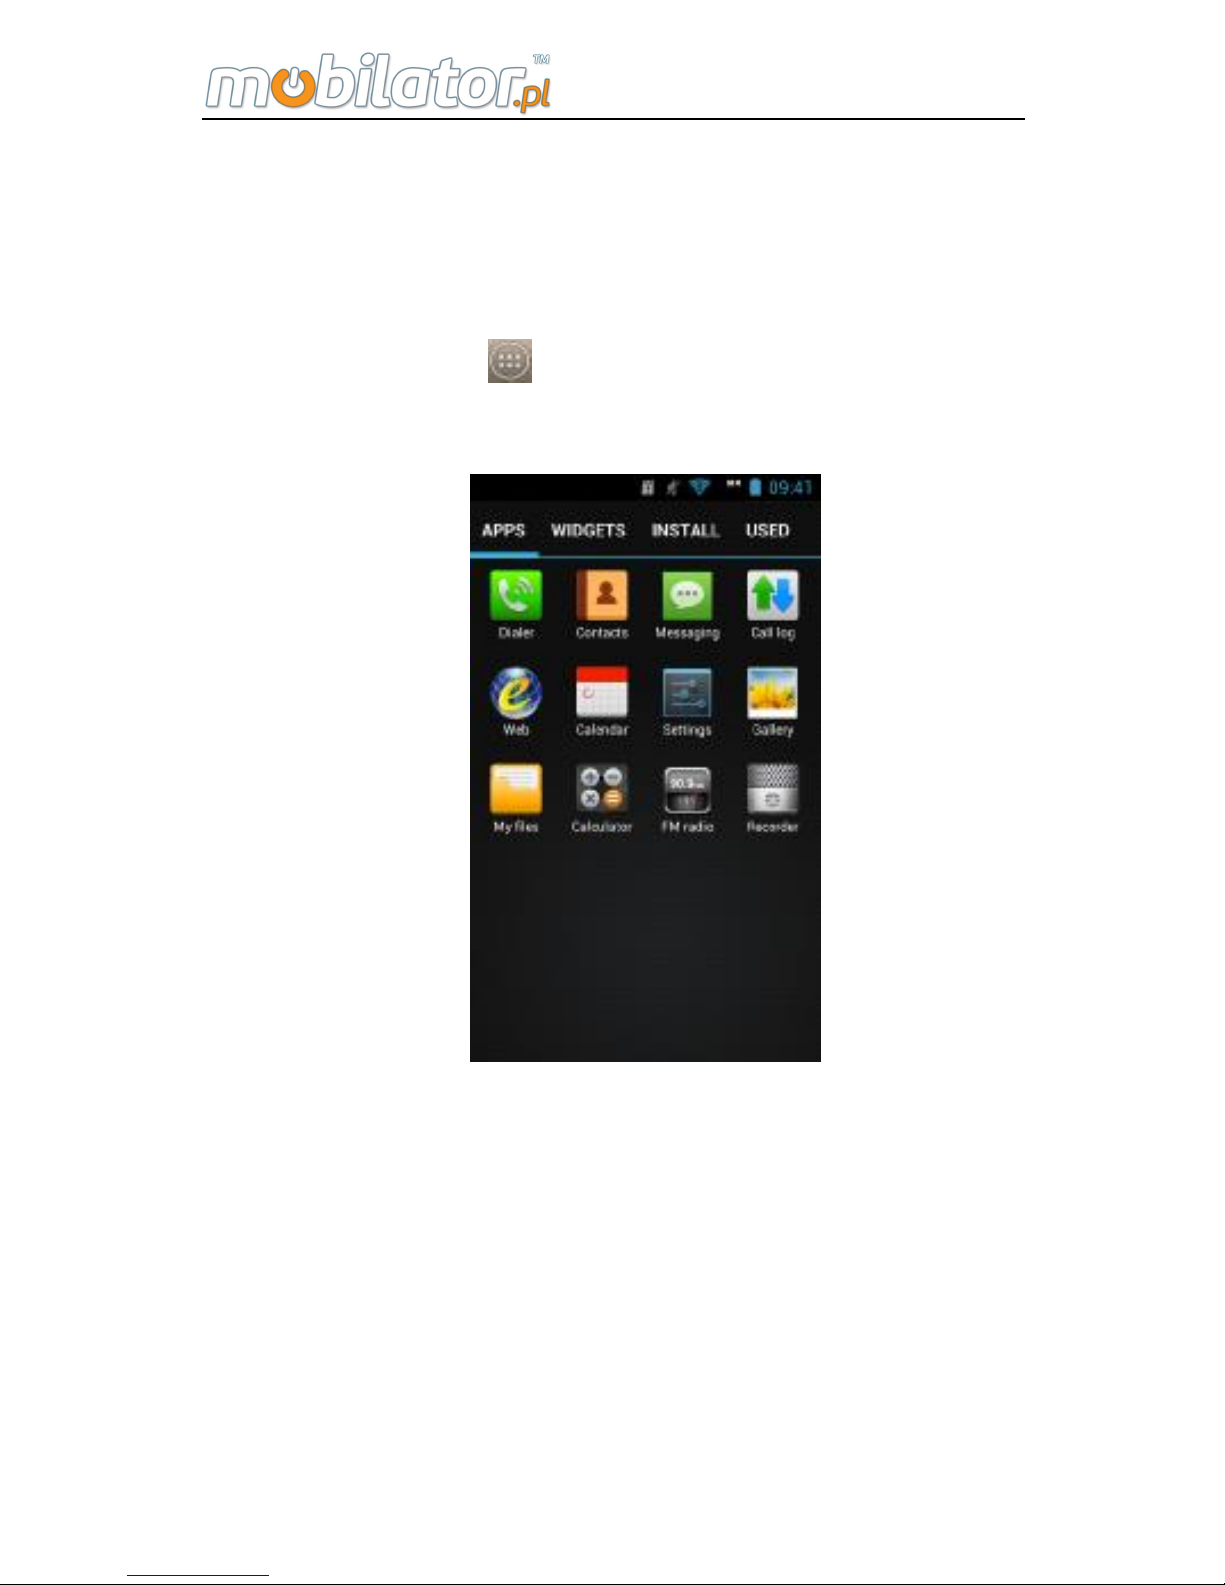
Click the set up WLAN hotspot; you can set up WIFI hotspot
SSID, security, passwords and other content, as shown
below:
Page 47
ST308 Mobile IPDA
41
Chapter III
Usage of Main Functions
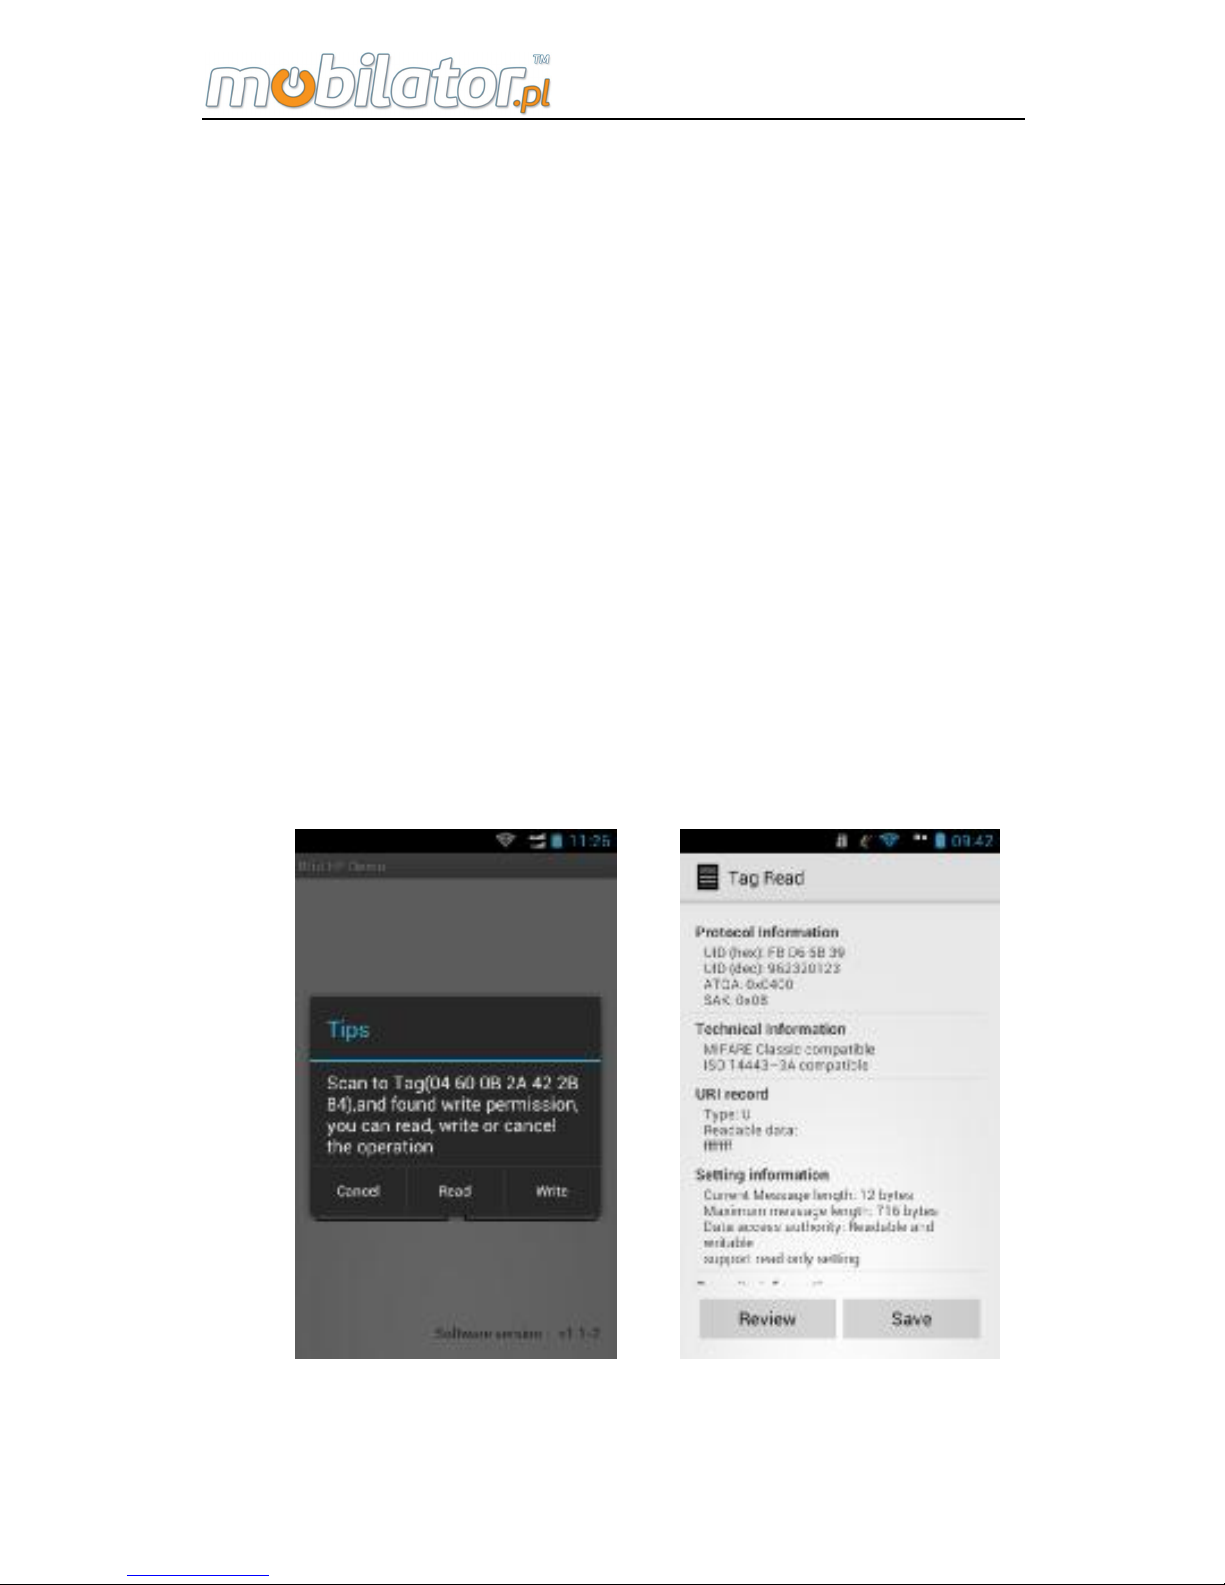
Click on the bottom of the standby screen, pop up the
main menu. As shown below:
Slide left or right to view more menu items, press the
Back button to close the main menu, you can directly click
the application or widget to switch applications and widgets
options. You can also put your own favorite features onto
the desktop, keep pressing the icon you want to move and
hold, after a brief vibration to move, drag it to where you
want the icon placement can let go (Note: during operation
to keep pressing the icon and not loose).
Page 48
ST308 Mobile IPDA
42
1. RFID HF ( High Frequency ) card
Identification (Demo Program)
Reading recognizable RFID HF card, support for
common standards such as: ISO 14443-3A, ISO 15693.
Can write to the card, and provides a convenient data
storage function, can be used for future viewing.
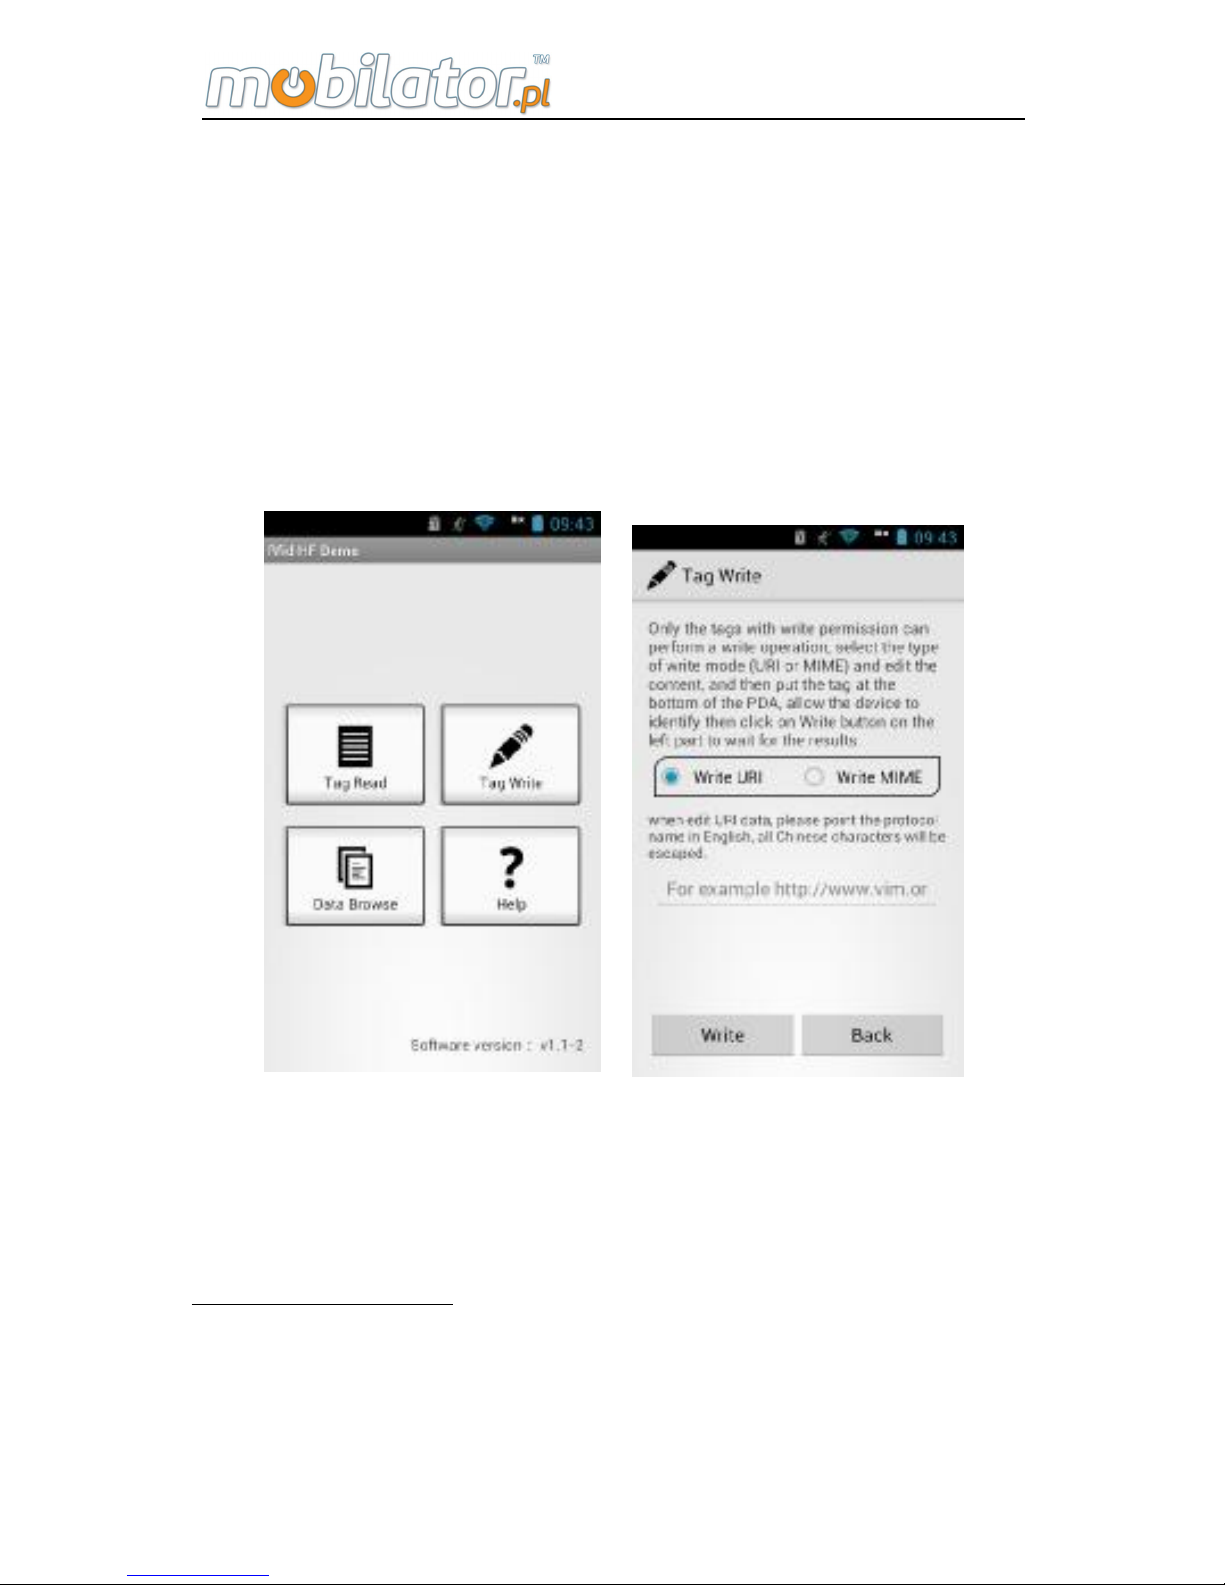
Tag Read: After installing RFID HF demo equipment
and in the System Settings> Wireless & networks> More,
you have opened the NFC feature, the card must be placed
above the keyboard device. If the device recognizes the
card, reader option will automatically pop up; select the read
and write button, Interface as shown below:
Click on "Review" to visit the software all card
Page 49
ST308 Mobile IPDA
43
information current scanned; clicking "Save" will
permanently save the current scan results to the database
for viewing the record.
Tag Write: In the main menu, click on HF demo
program, enter the Rfid HF Demo presentation interface,
and then click on the "Tag Write" into the tag write interface
or click on the Tag write button in above picture. Tag Write
interface is shown below:
After entering the interface, the user can choose to
write URI or MIME. URI type only needs to fill specific data
to support Chinese and English, in writing, please use
English URI specified protocol name such as:
http://www.vim.org
. Click the Write button to complete input;
there will be a corresponding message.
Write MIME needs to indicate the MIME type name;
name should not exceed 255 bytes; content supports in
Page 50

ST308 Mobile IPDA
44
Chinese and English, you can also directly edit the raw
bytes to facilitate the input, the decimal value of each byte is
marked with minus sign segmentation, numerical overflow
section will automatically discarded.
Raw bytes: When editing the right box, you can input
audio and other information at the bottom hexadecimal code.
Then click write to.
When the device according to the card when the card
contacts within the URI and MIME start different functions,
such as phone calls, open web pages, etc.
Note: URI is the uniform resource descriptor; MIME is
Multipurpose Internet Mail Extensions.
2. RFID UHF card record Identification
(Demo program)
RFID UHF module supports operating frequency
840-960MHZ, support for international common UHF RFID
standards, including all rate and encoding options. Users
can choose the desired configuration. Demo program
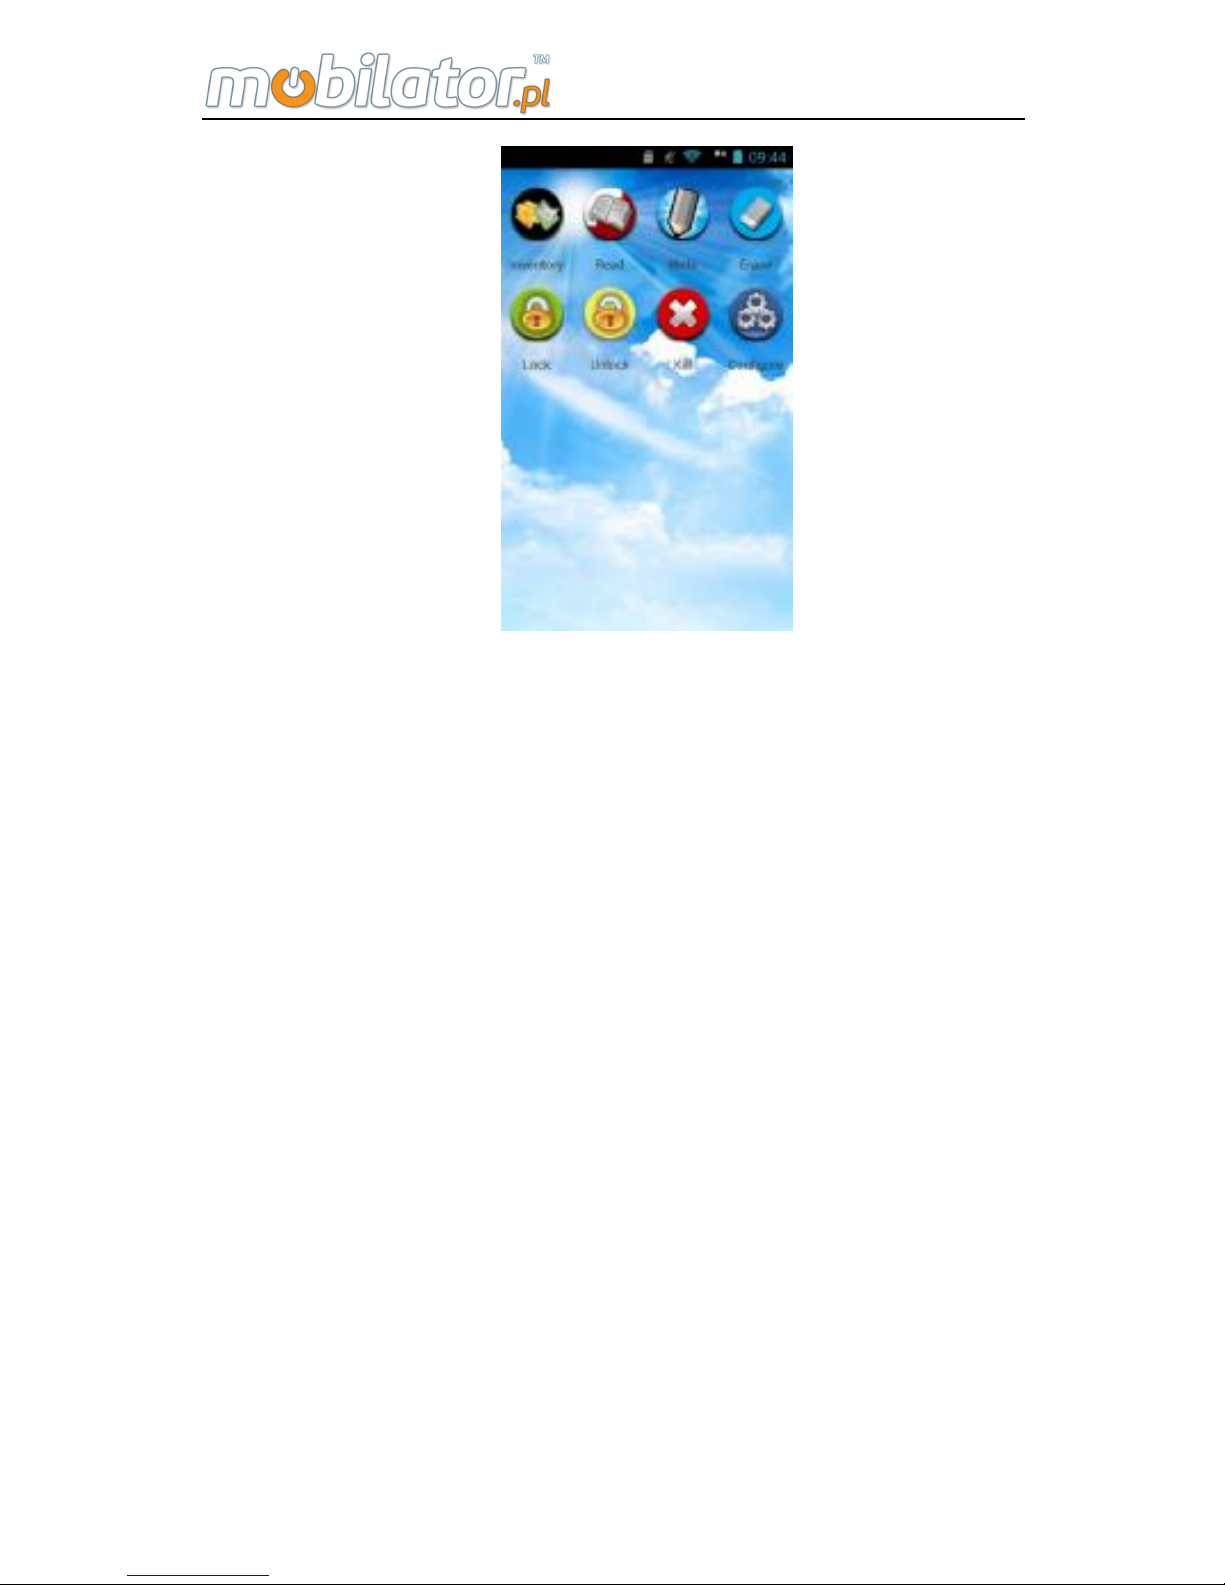
interface is as follows:
Page 51
ST308 Mobile IPDA
45
Configure Description: Card access password is eight
hexadecimal digits and letters, the program defaults to 8 0, if
the relevant area of the test label has been set read
protection, shall be provided to the measured actual label
access password. In the absence of a read-write protected
card, no real access password can also read and write data.
In addition to read and write the same password and lock
password, use the following functions, you need to specify
an arbitrary matching cards or after operational. Starting
address for the selected four BANK any address within the
read is not greater than the number of the remaining space
of the BANK. Read data word (2 bytes) for the unit.
Click read button to read the read configuration in
accordance with the information in each BANK, Reserved in
the first two bytes for the destruction of passwords, access
codes after two bytes; EPC area store EPC number; TID
area store identification label number, each TID number is
Page 52
ST308 Mobile IPDA
46
unique; User zone is a user-defined data area. Moreover
module can also be equipped with a high reading and
writing data in a BANK.
Note: Tid area can be read only, write and unlock functions
can not be operated.
Main features are described as below:
Recognition:
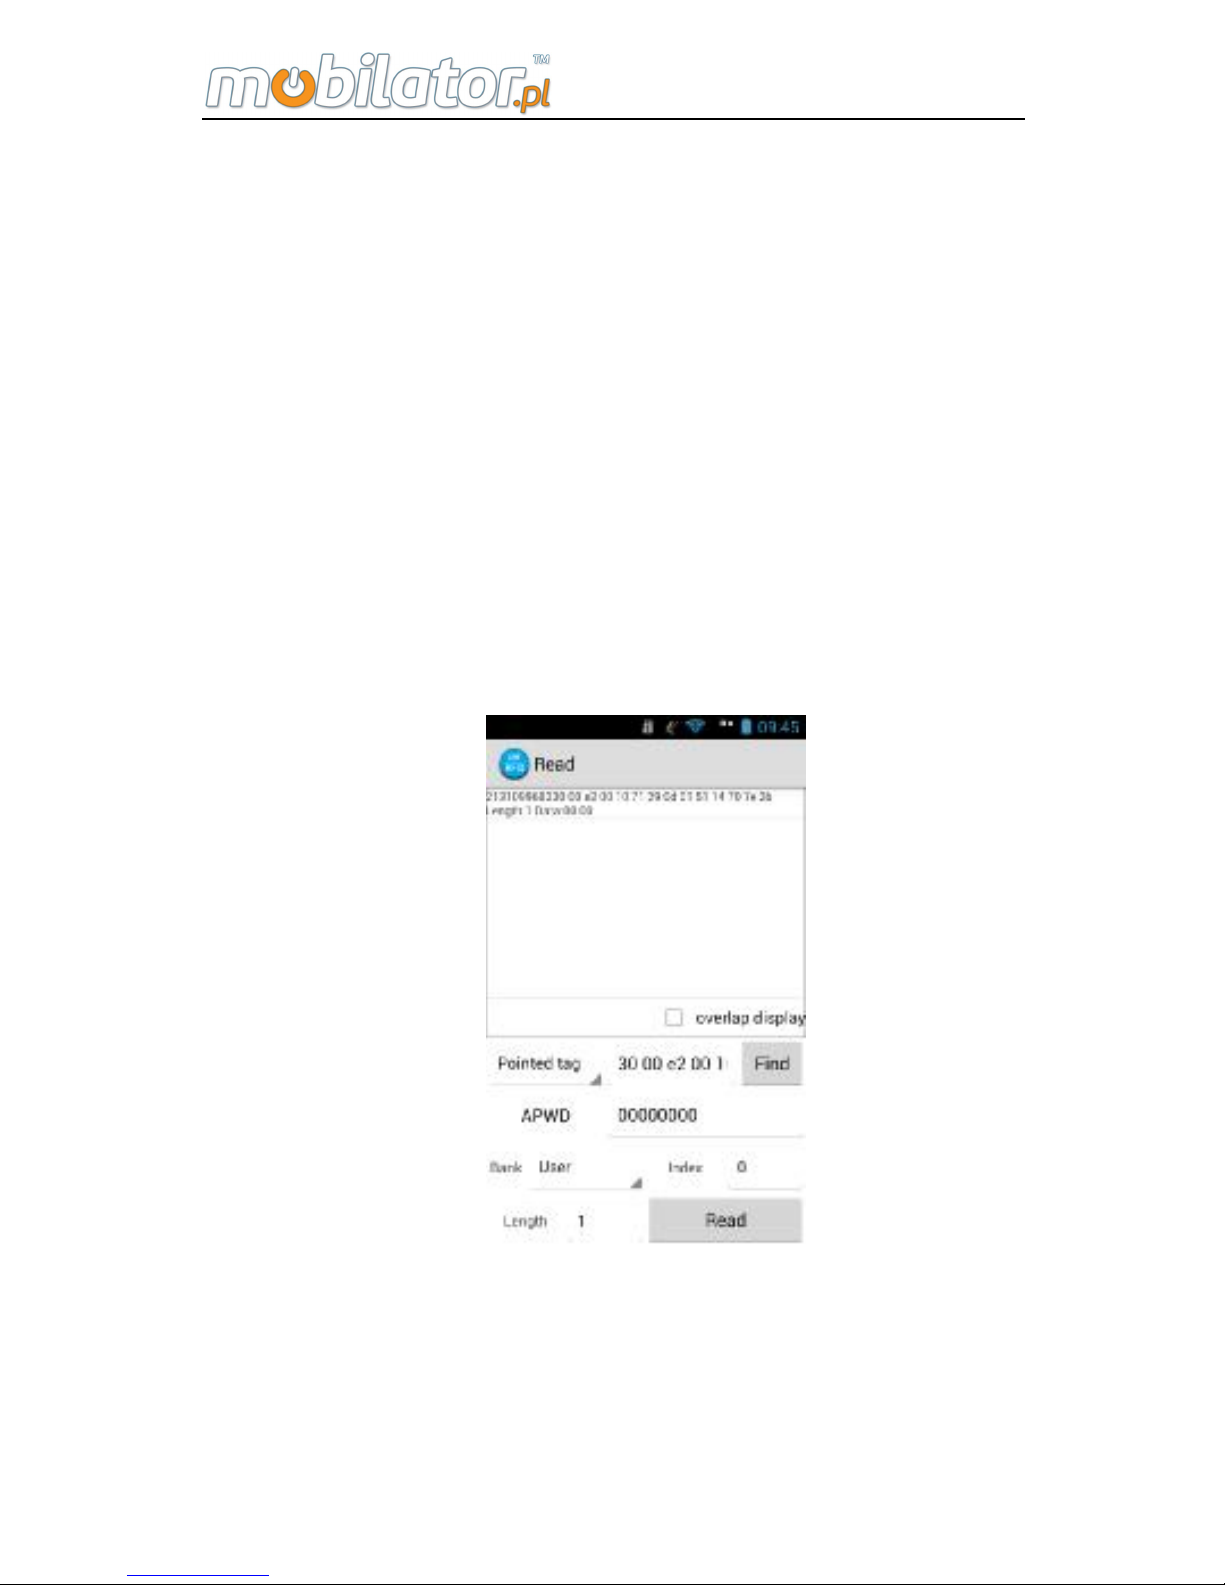
Click the "recognition", enter recognition interface, and then
click counts. When the device correctly identify the card will
display the card data. Recognition interface is as follows:
Single Tag identify and inventory one tag every time.
Single Tag Cycle identifies continuous identify labels, Anti
Collision Cycle suit for continuously inventory of more than
one label. After the user selects superimposed display, the
display area will be combined display the same information,
and gives the number of times it appears.
Page 53
ST308 Mobile IPDA
47
Data Read:
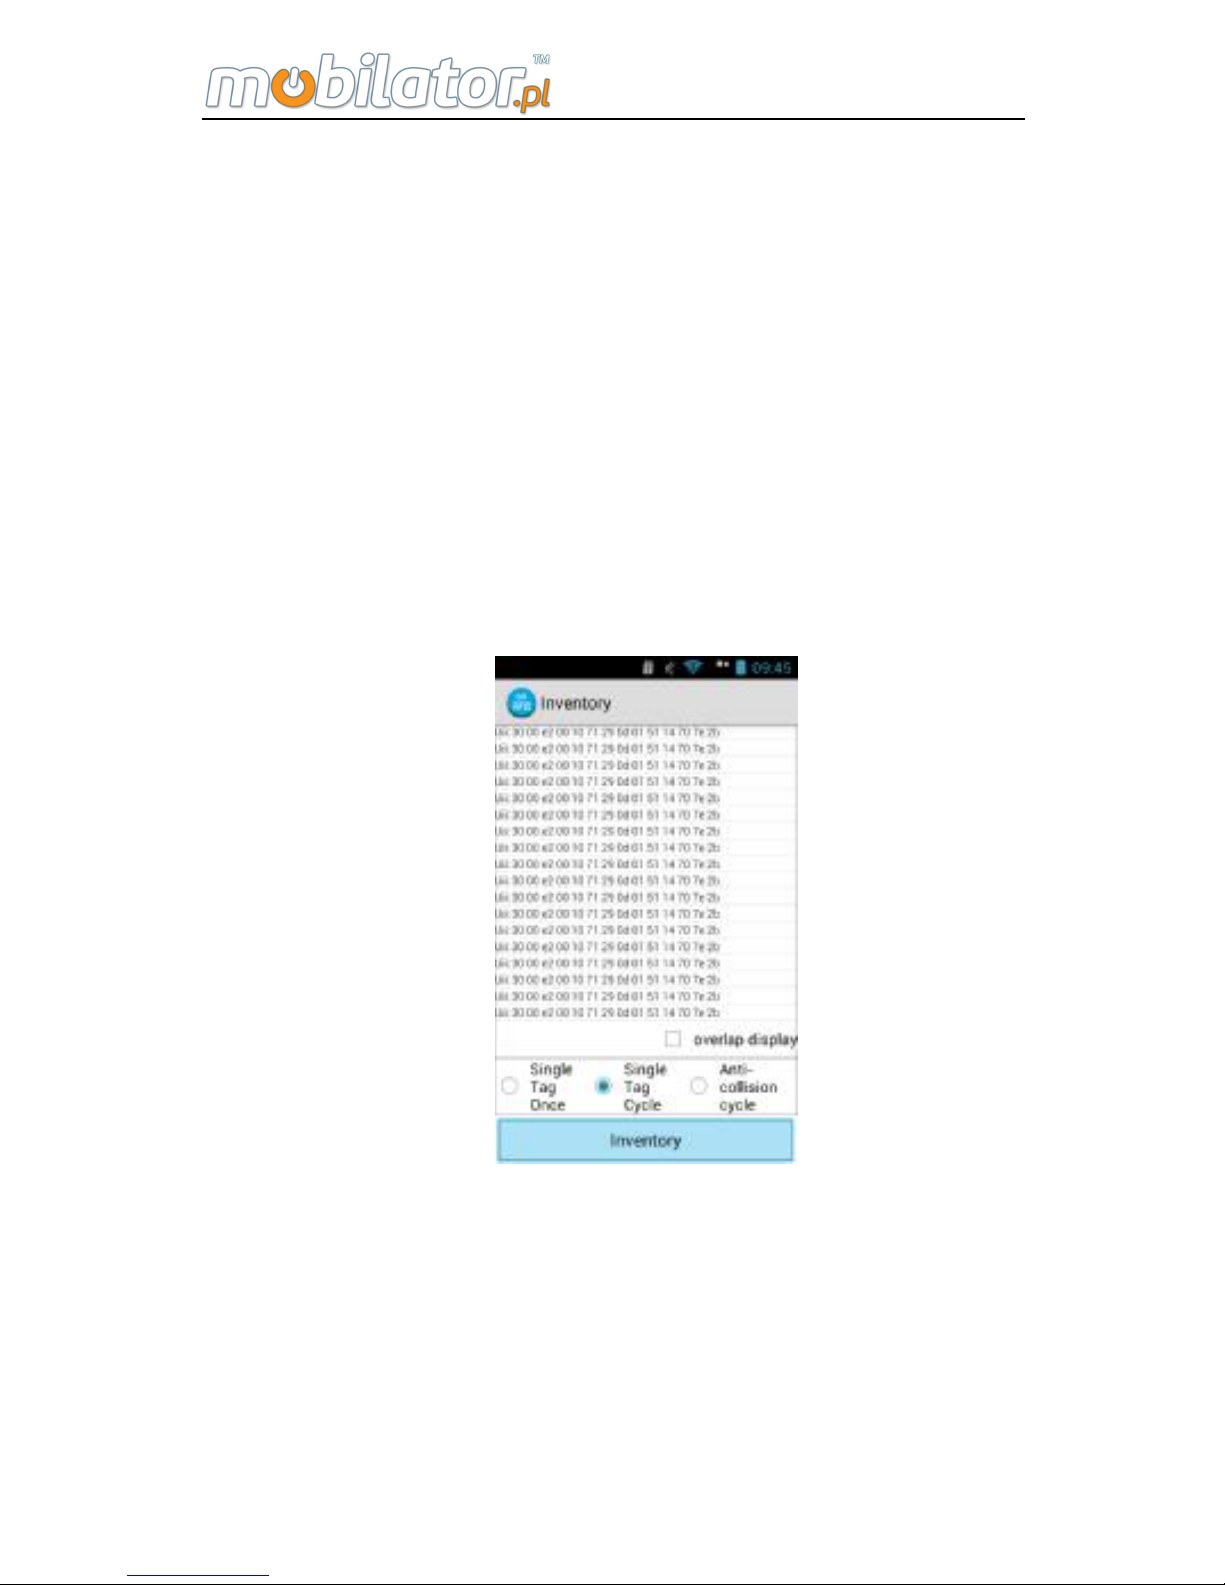
Read specified label or any label, In addition to high
distribution module can also specify the matching conditions.
Click Find, and can automatically find identification card
within the region, access password is eight hexadecimal
random numbers and combinations of numbers and letters,
initially eight zero (do not rule out a special white card with
other values). Read data in word units, set to be read Bank,
the starting position and the number of reads, you can click
the Read button to read. Data read interface as shown
below:
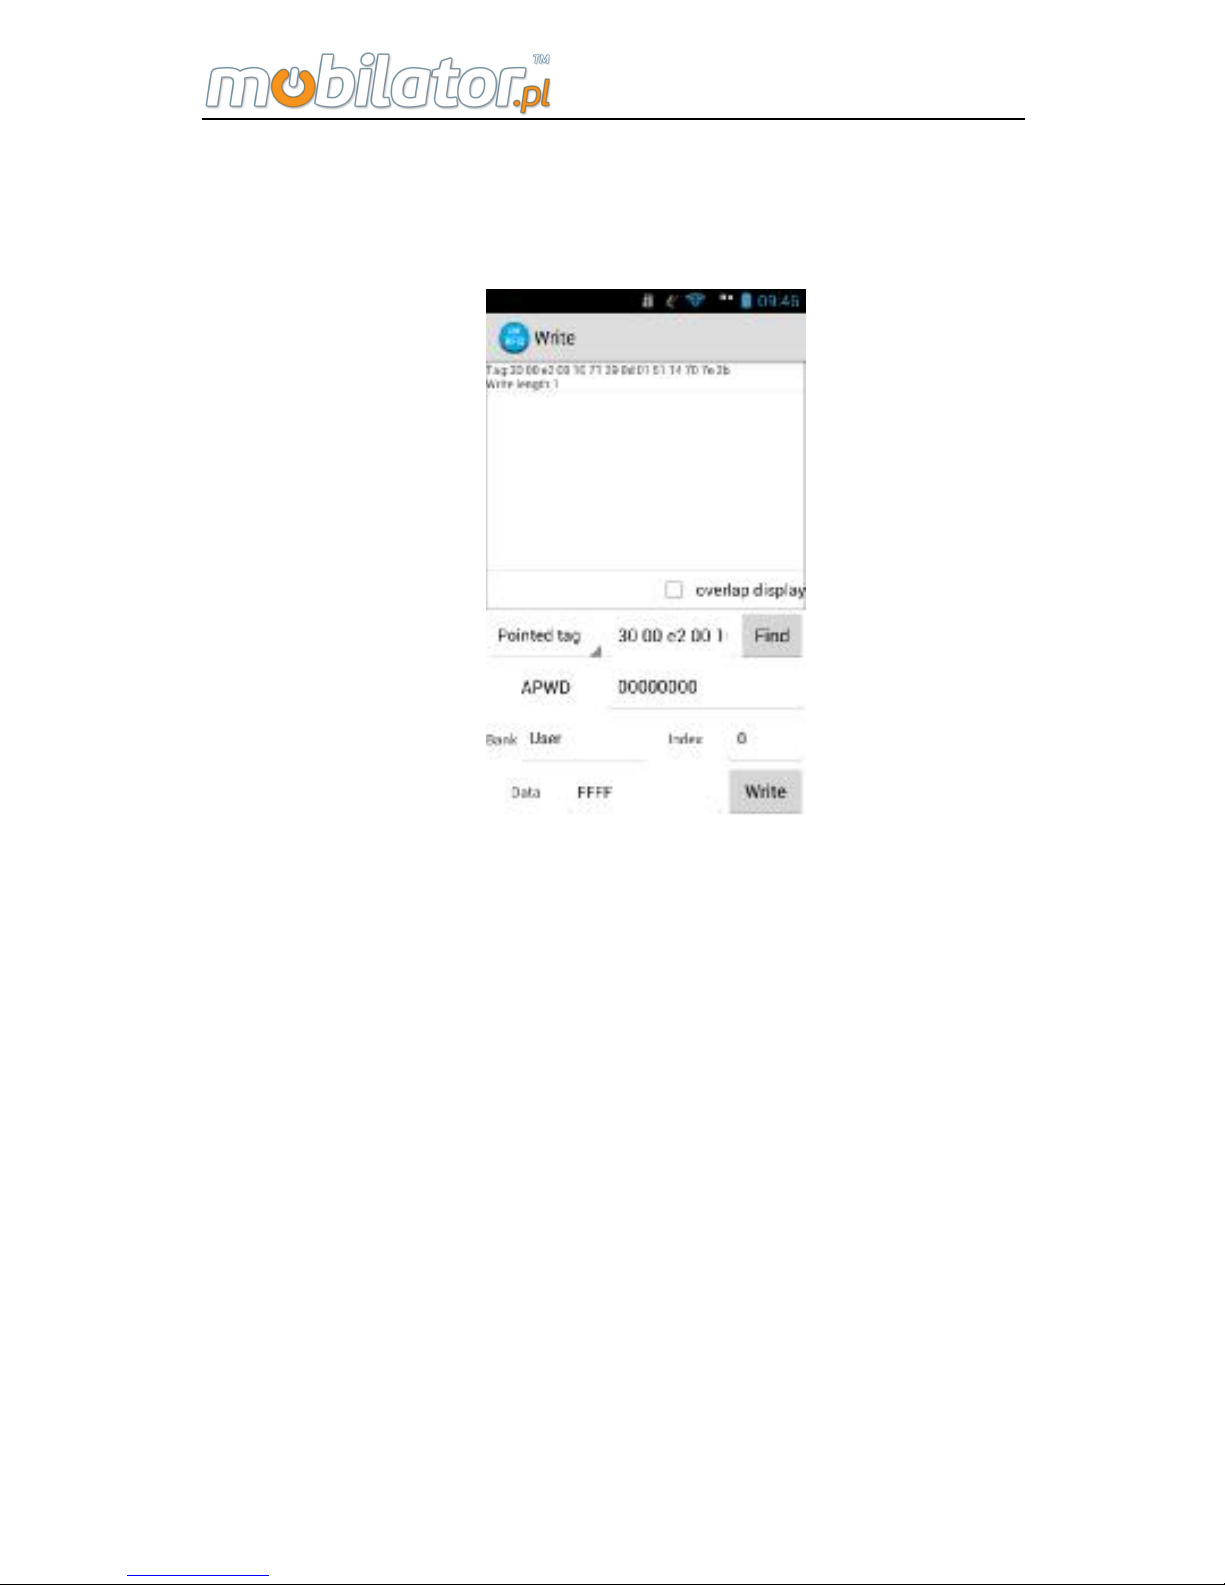
Data Write:
Input the access password after choosing the BANK to write
in. Set the starting address as the written starting word
address, the written data is the actual data to be written,
Page 54
ST308 Mobile IPDA
48
word is the units. After completing the setting, you can click
“write ” button to write. After writing successfully, the
interface is shown as below:
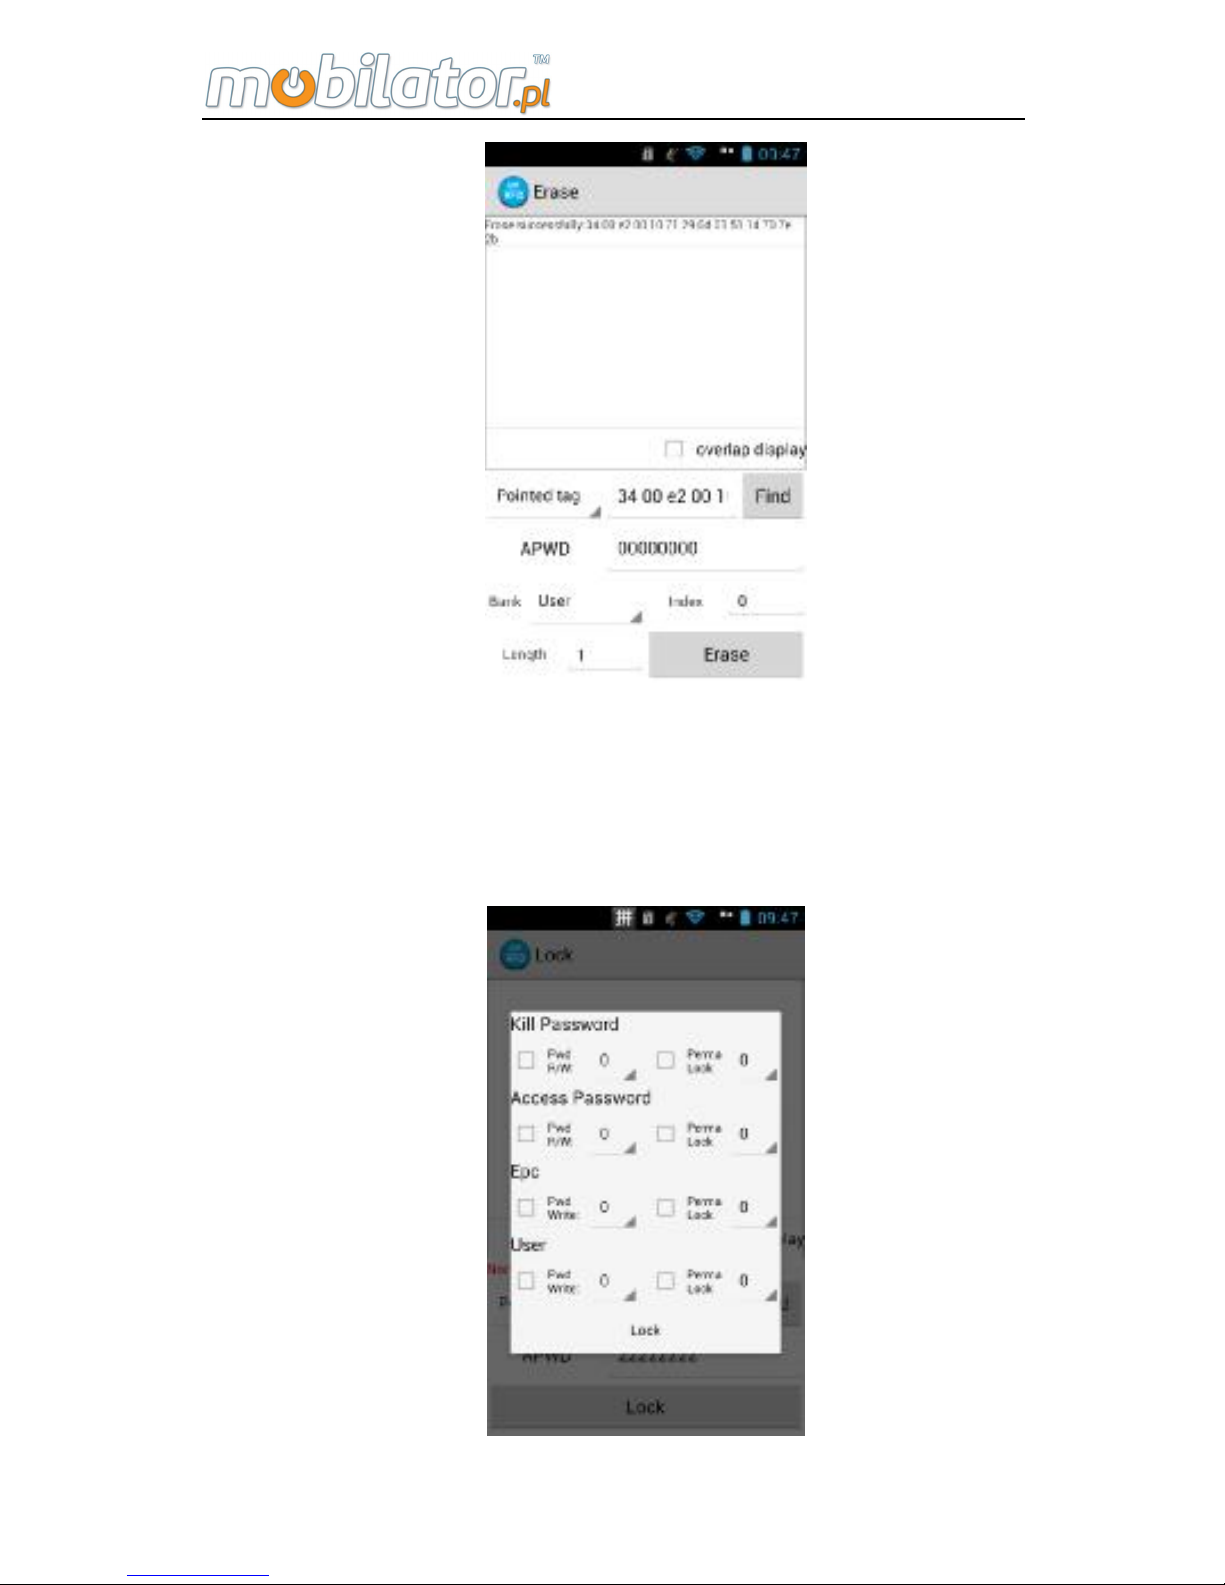
Data Erase:
After finding the tags, users can erase the data in
designated area. Generally, it can only operate in user area.
Data erasing interface as below:
Page 55
ST308 Mobile IPDA
49
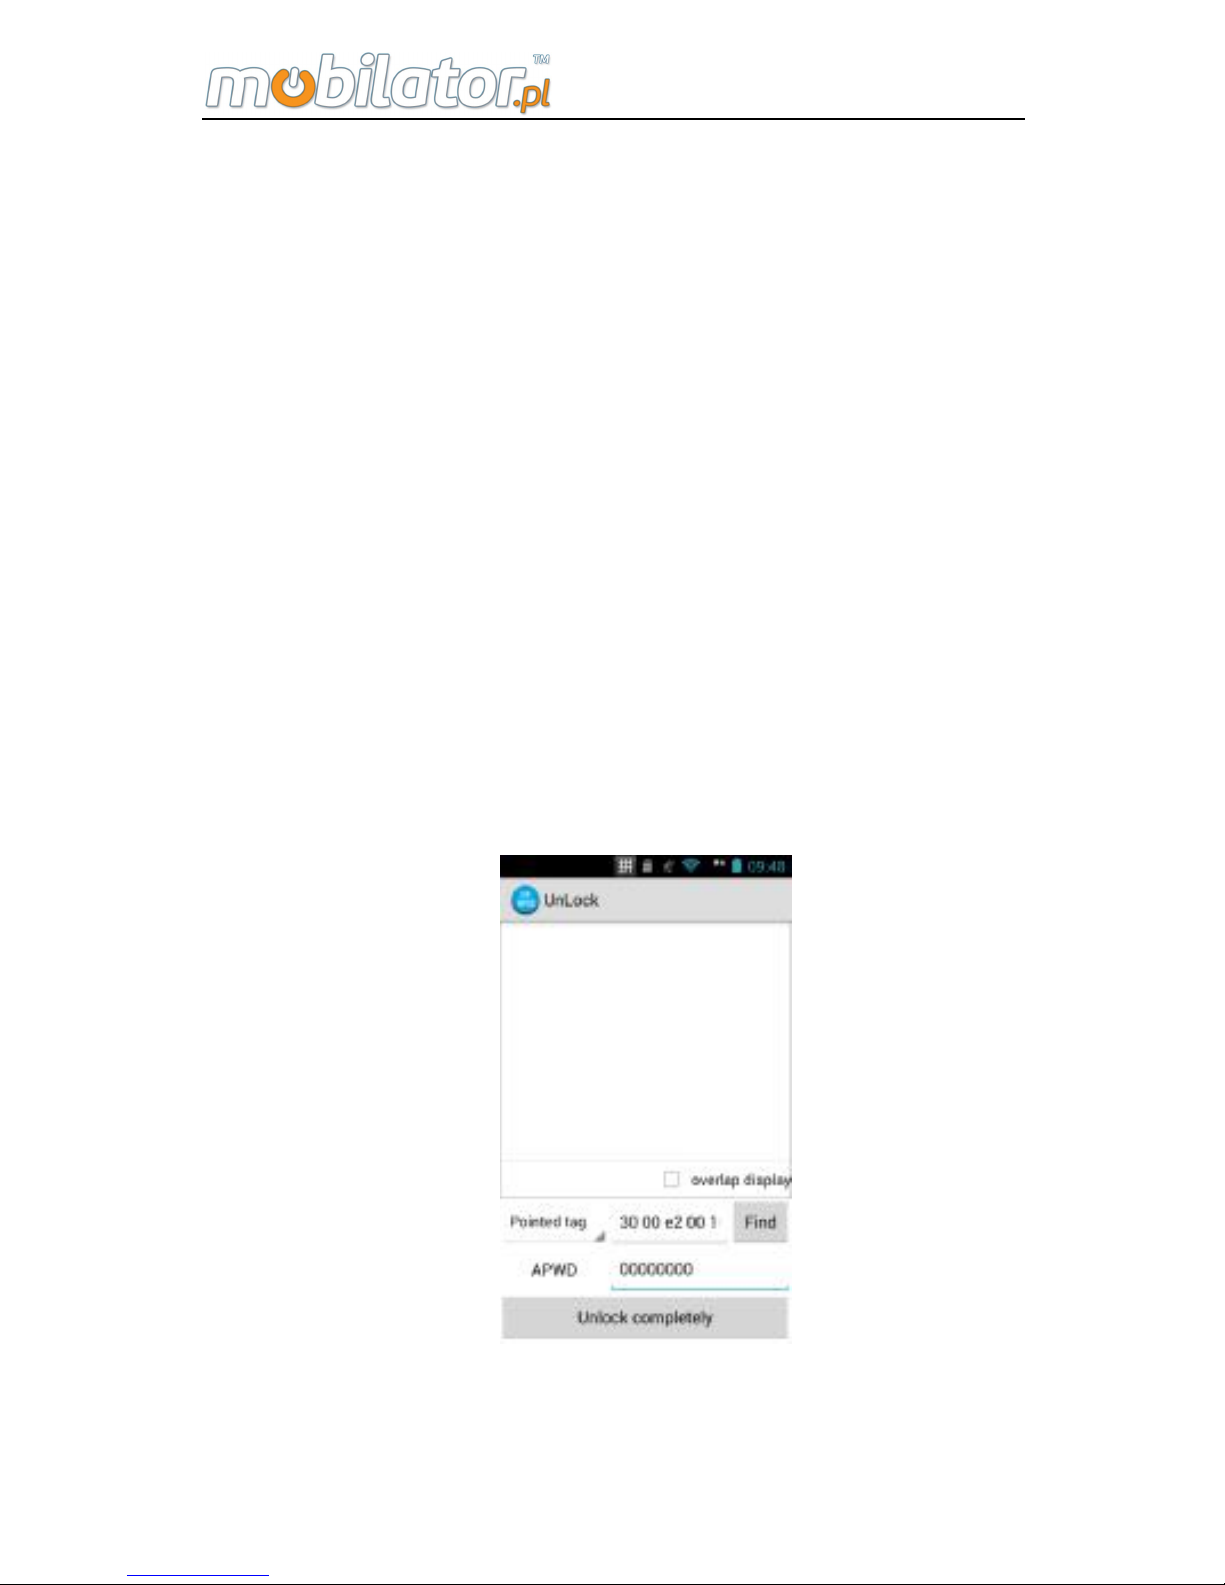
Data Lock:
The user can only specify a label to be locked. Entering the
user password to click the lock button, the lock interface
shows as below:
Page 56
ST308 Mobile IPDA
50
The user can lock one or several related areas at one
time, if a permanent lock is chosen, it will not be able to
unlock. R/W are required to provide real access password
for both read and write. Perma lock indicates permanent
lock. In the back of the check box, select 1 to click lock, then
the Bank will be locked; there will be corresponding
information after lock successfully.
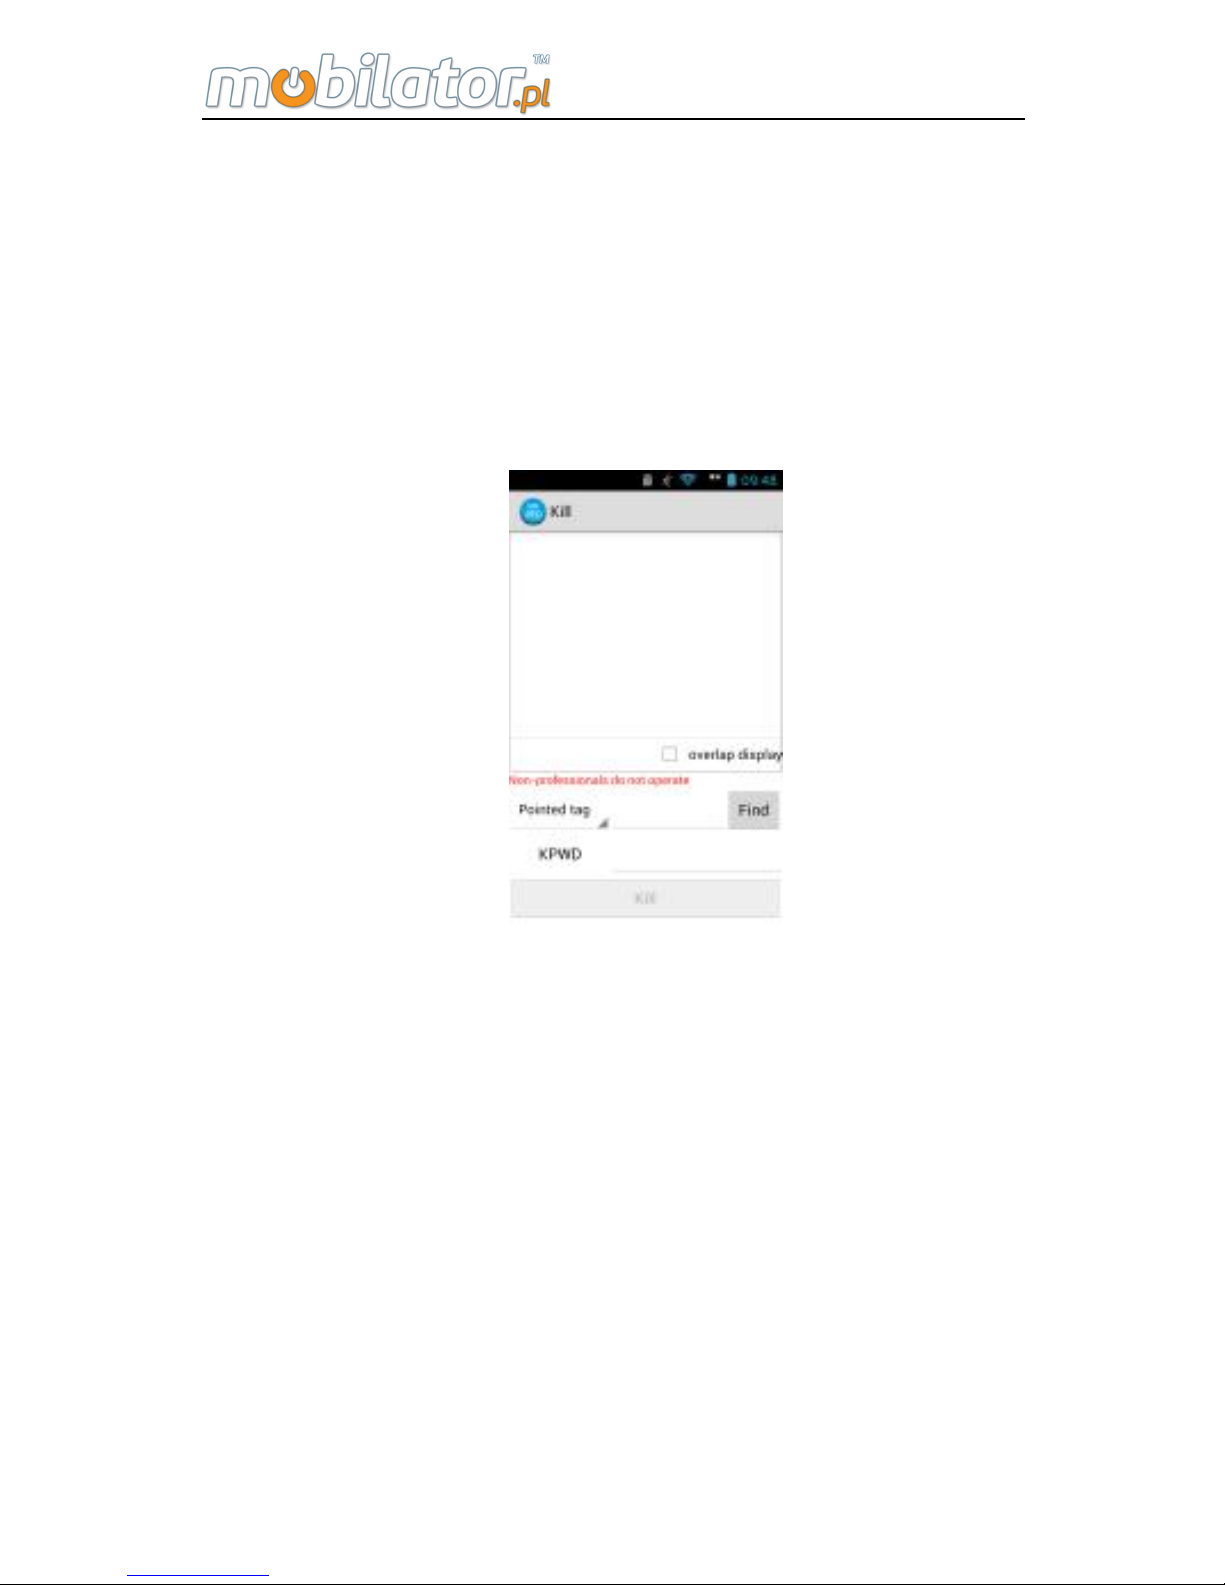
Unlock:
The user enters the data unlock interface, specify the label
and enter the real access password, click on complete
unlock, you can unlock a locked area. This demo provides
all presentations include Kill Password, Access Password,
Epc, User Area. If either of these areas has been
permanently locked, the operation will fail. The unlock
interface is shown as below:
Kill:
Kill function is to destroy discarded cards or inapplicable
Page 57
ST308 Mobile IPDA
51
cards. Also specify a label or clicking the Find function to
find the read card. Kill password is eight hexadecimal
numbers and letters, the program defaults to eight zero. In
actual operation, set to the actual kill password of the
measured label password. Enter kill password and click Kill
button you can destroy cards. Label kill interface is shown
below:
Note: The card can not be restored after destruction!
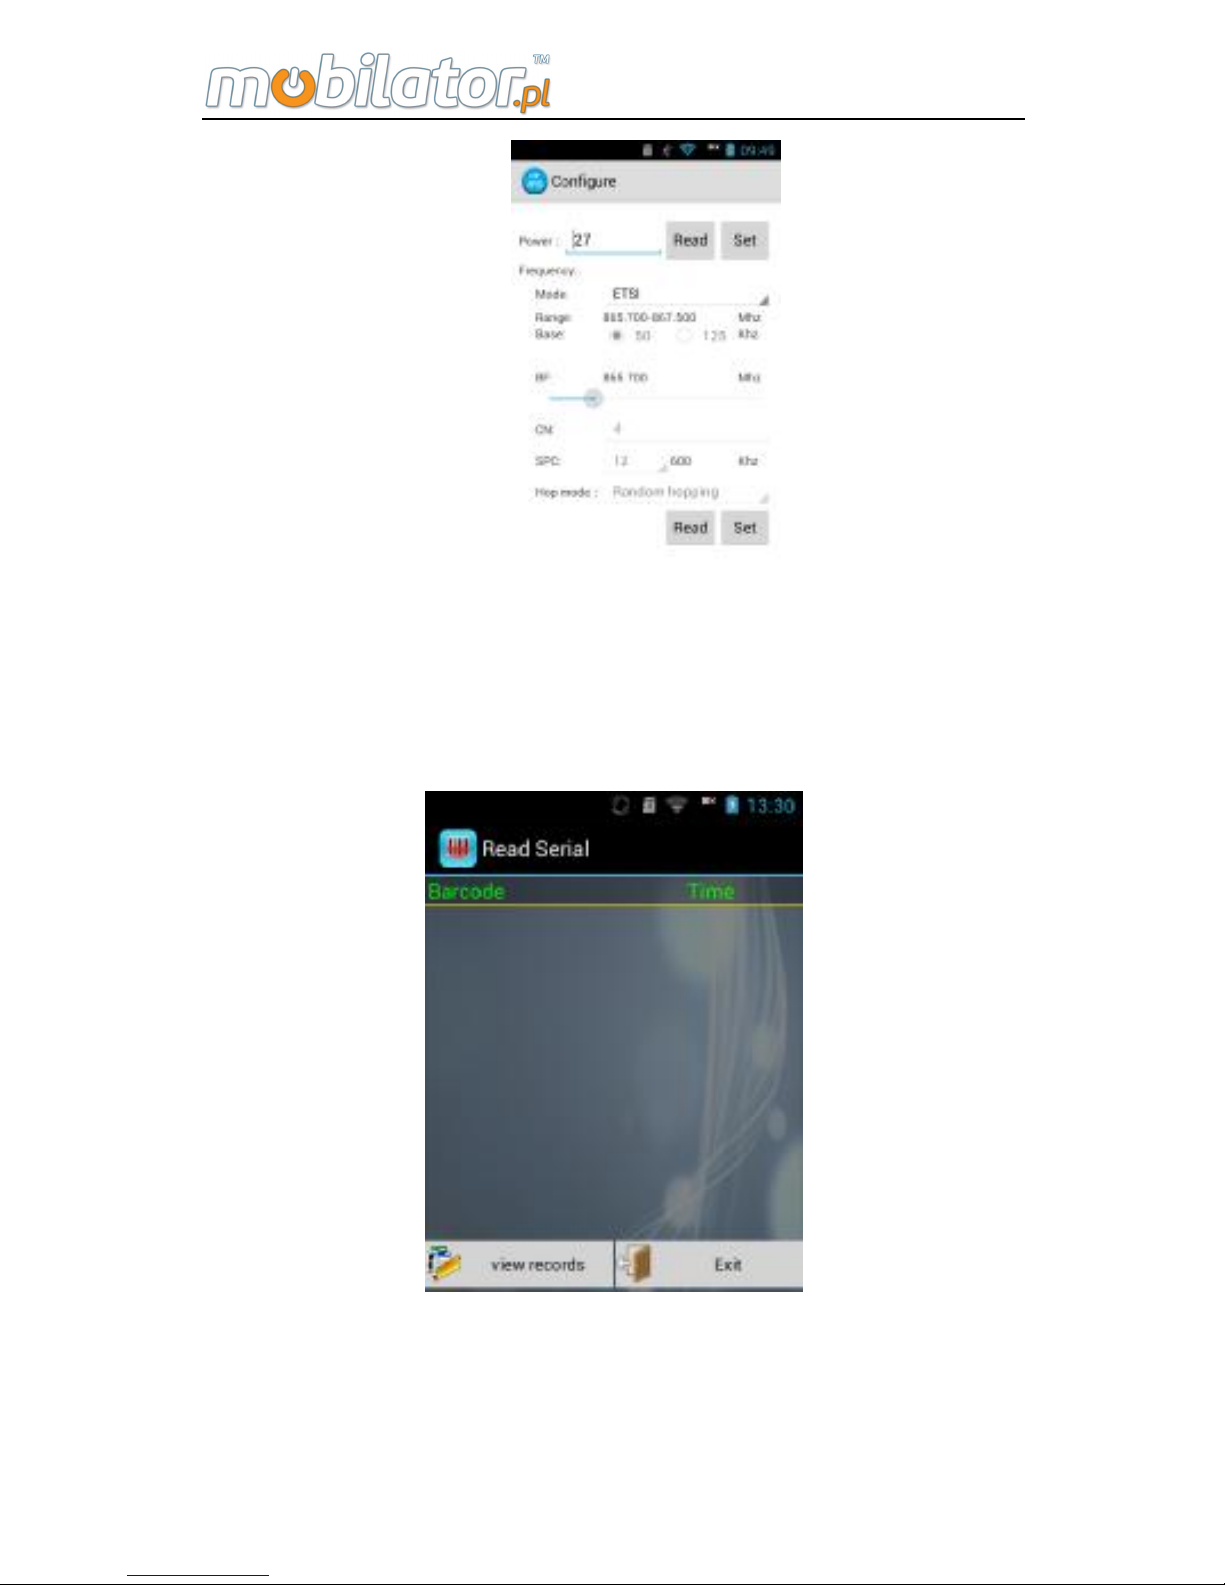
Configure options:
Power can be configured to 10-27, including high model up
to 30, working frequency should be set to match with the
operating label. Currently, it supports four standard
frequency settings and custom settings. Configure interface
is shown as below:
Page 58
ST308 Mobile IPDA
52
3. Read Serial
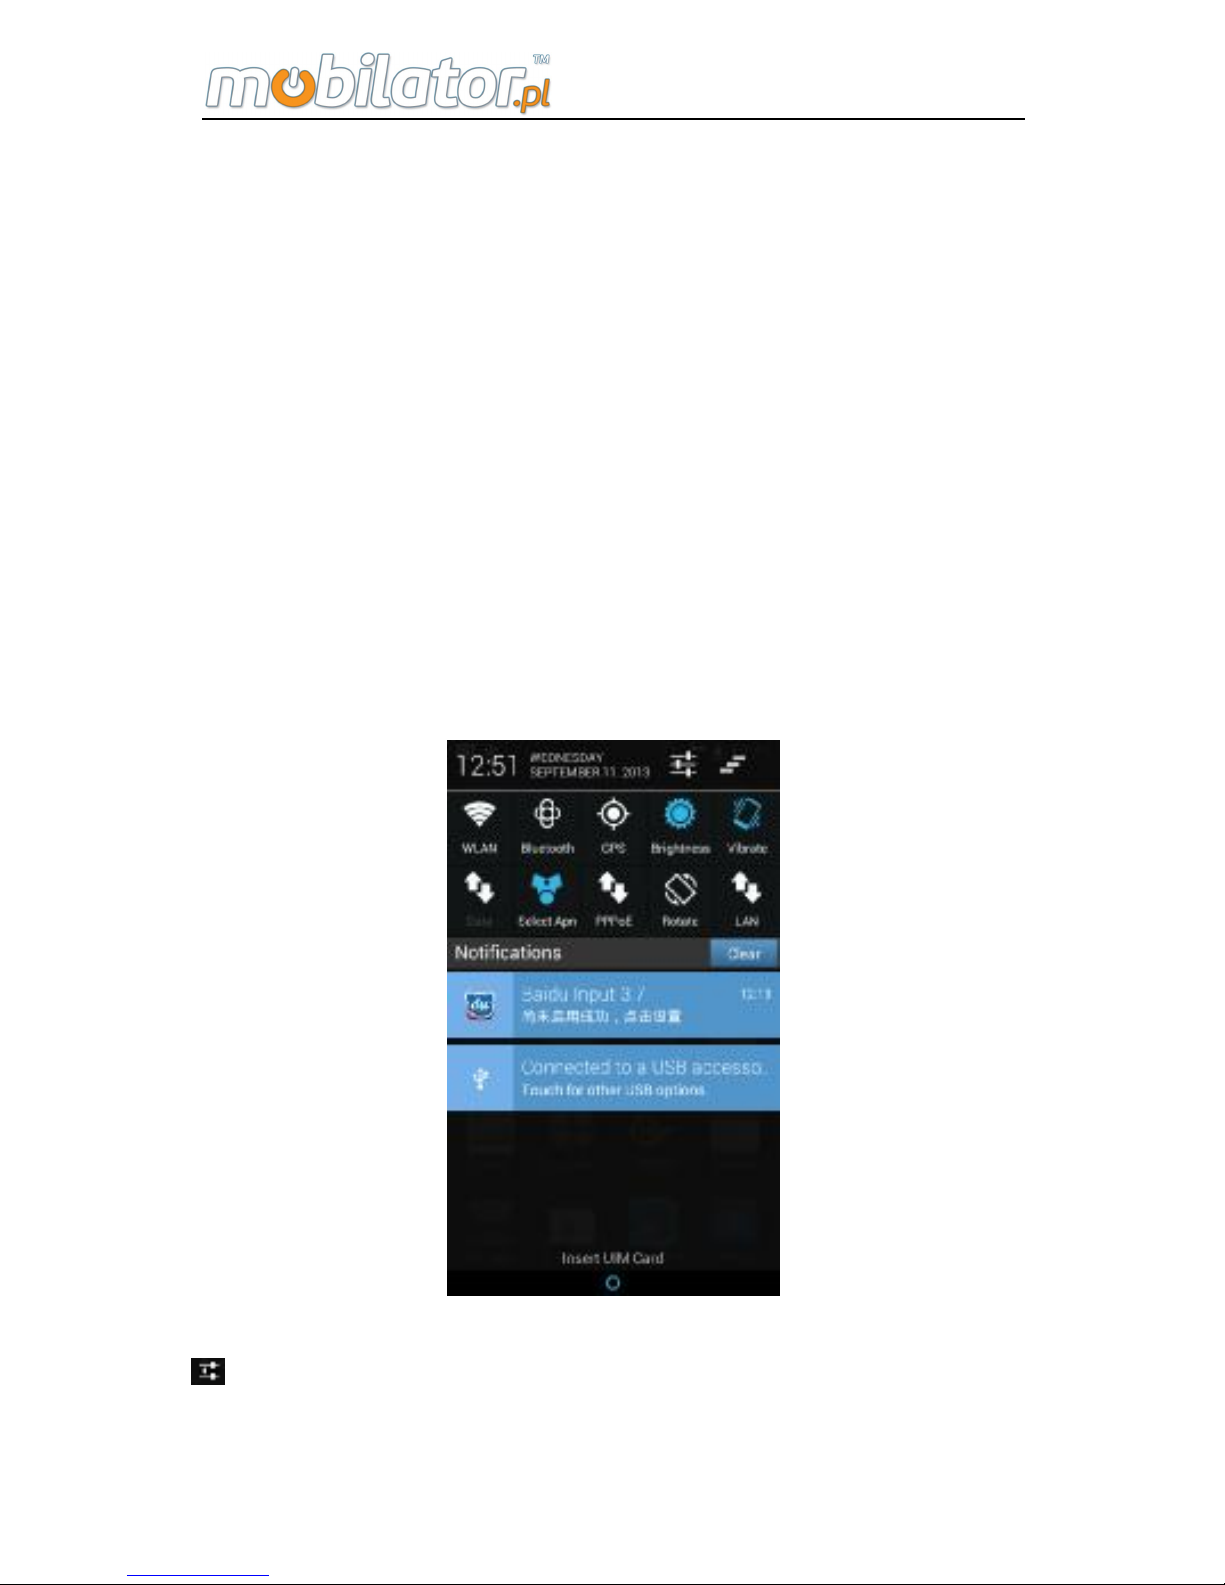
Barcode scan test interface is shown as below:
In the "Read Serial" interface, after pressing "SCAN" key on
the side, it can work. The red light just aim at bar code, the
test result will show on screen. Tester can scan continuously
Page 59
ST308 Mobile IPDA
53
and show the scan result in table, and record the scan time.
A prompt box about whether store will be pop up when exit.
4. Control of the Electric Quality and
Wireless Dial
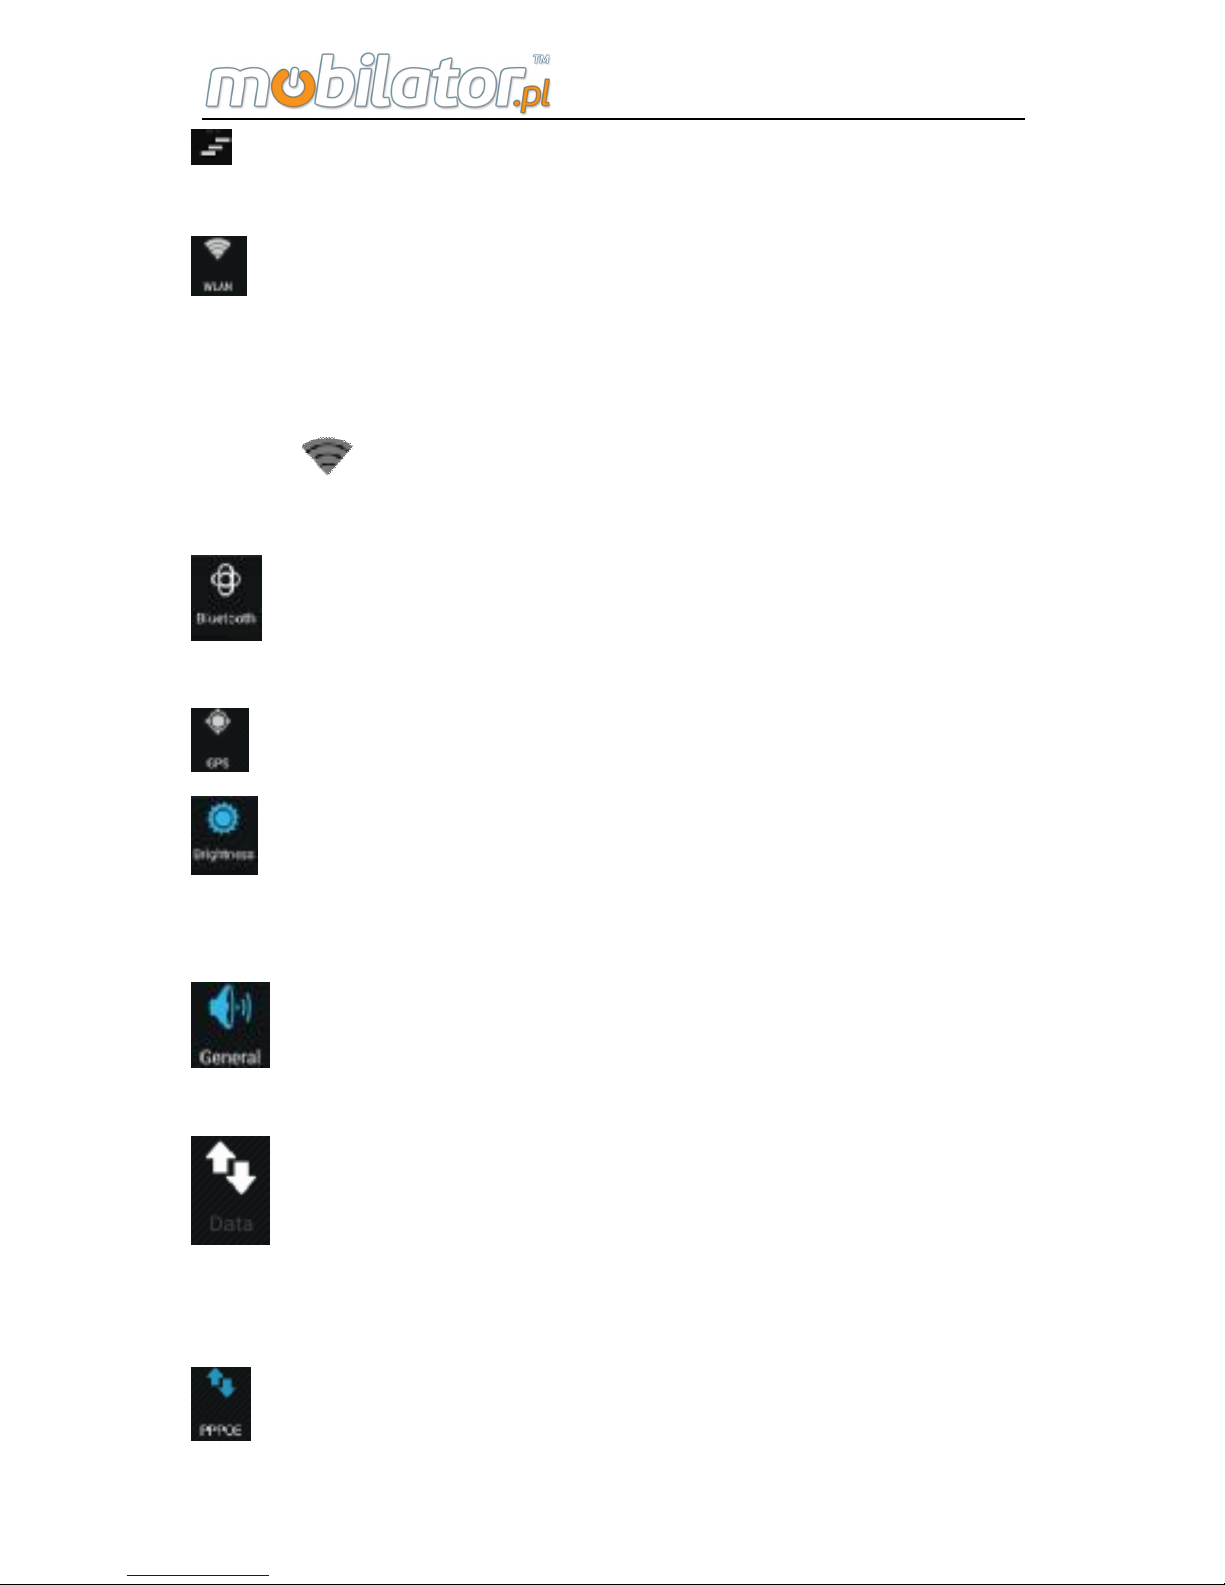
Control of the electric quality and wireless dial is in
setting, and the tester provides the quick way to control.
Pulling down the prompt column, system will display the
shortcut control icon; click the shortcut icon can open or
close the corresponding option, white is close and blue is
open. Please see the following picture:
Description of the control item is as follows:
Settings: shortcut icon of setting open, click it can
open the setting quickly.
Page 60
ST308 Mobile IPDA
54
Task Manager: Shortcut icon of task manager and click
it can open the task manager quickly.
WLAN icon: the switch for WIFI, if use a router for the
first time, user need to enter into setting, searching WIFI
router at first, and enter the password to connect with the
router.
icon will be shown in the prompt bar after
connection.
Bluetooth icon: the switch for Bluetooth, user should
search and pair with it when searching other Bluetooth user.
GPS icon: the switch for GPS
Brightness icon: Adjust the brightness of the screen,
click it to adjust the brightness, which includes low, middle,
high, user can adjust the brightness continuously in setting.
Voice icon: adjust the voice mode, which includes
voice mode, silent mode and vibration mode.
Data: switch for 3G wireless. SIM/UIM card is needed,
flow and cost will be generated after clicking, and please
close the link when do not use.
PPPoE icon: switch for PPPoE.
Page 61
ST308 Mobile IPDA
55
Rotate Icon: open or close the auto Screen revolve
mode.
LAN icon: switch for the LAN network card.
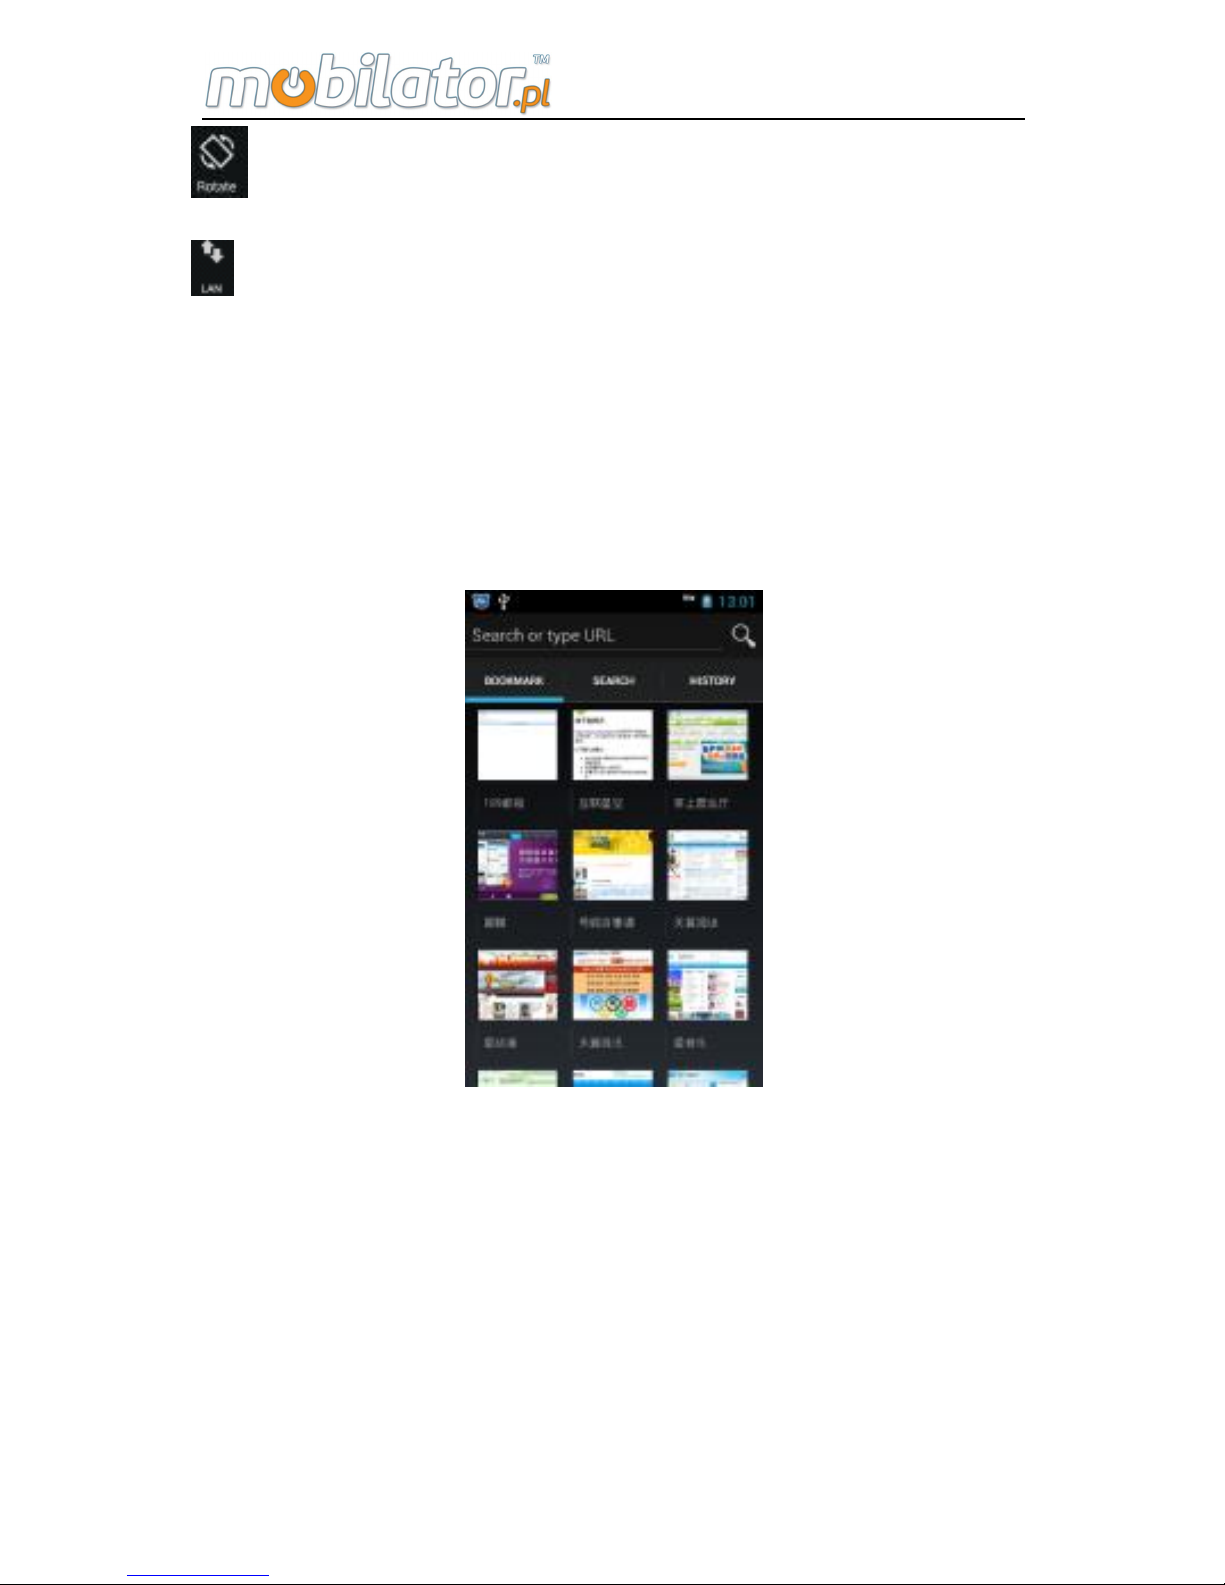
5. Web
Click web to enter into the browser interface for all functions,
and user can login the common site under the main menu.
As follows:
Enter into the website or IP address in the address bar
to login the webpage.
Internet setting menu will pop up when clicking the
menu key which includes refresh, forward, bookmarks, save
to bookmarks, share page, find on page and so on.
Click "Save to bookmark" to store the current page into
the bookmark, and then user can open the webpage quickly.
Page 62
ST308 Mobile IPDA
56
Click "Settings", the setting interface will pop up which
includes General, Privacy & Security, Accessibility,
Advanced and so on.
User can set the homepage of the browser in "General",
the tester will connect with it automatically when login.
"Settings--Advanced---Save Location" can set the
storage position of the download files, and user can store it
in the inner memorizer or SD card.
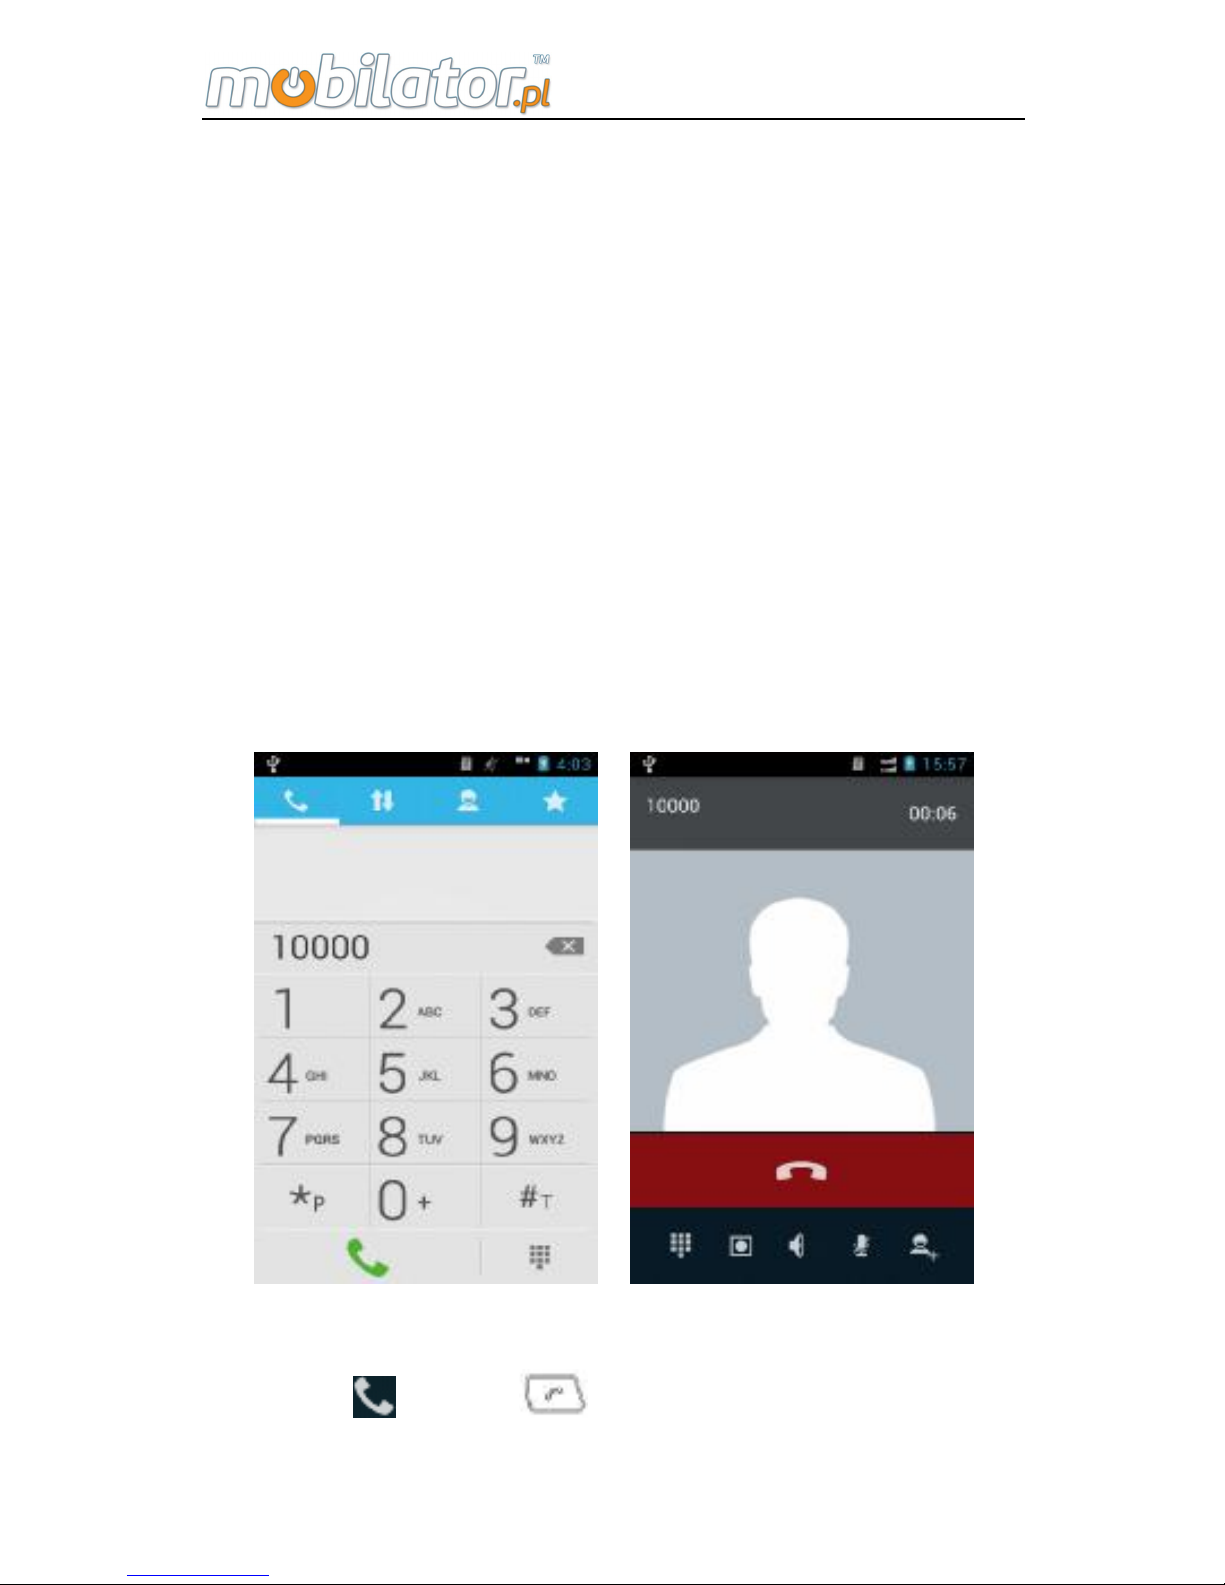
6. Dialer
Click dialing key or the number key to enter into the dial
interface. As follows:
Dial interface Call interface
Press call or dial key after input the phone
Page 63
ST308 Mobile IPDA
57
number to make a phone call; click or key to
hang up the phone. Under phone interface, user can adjust
the volume by pressing the volume key.
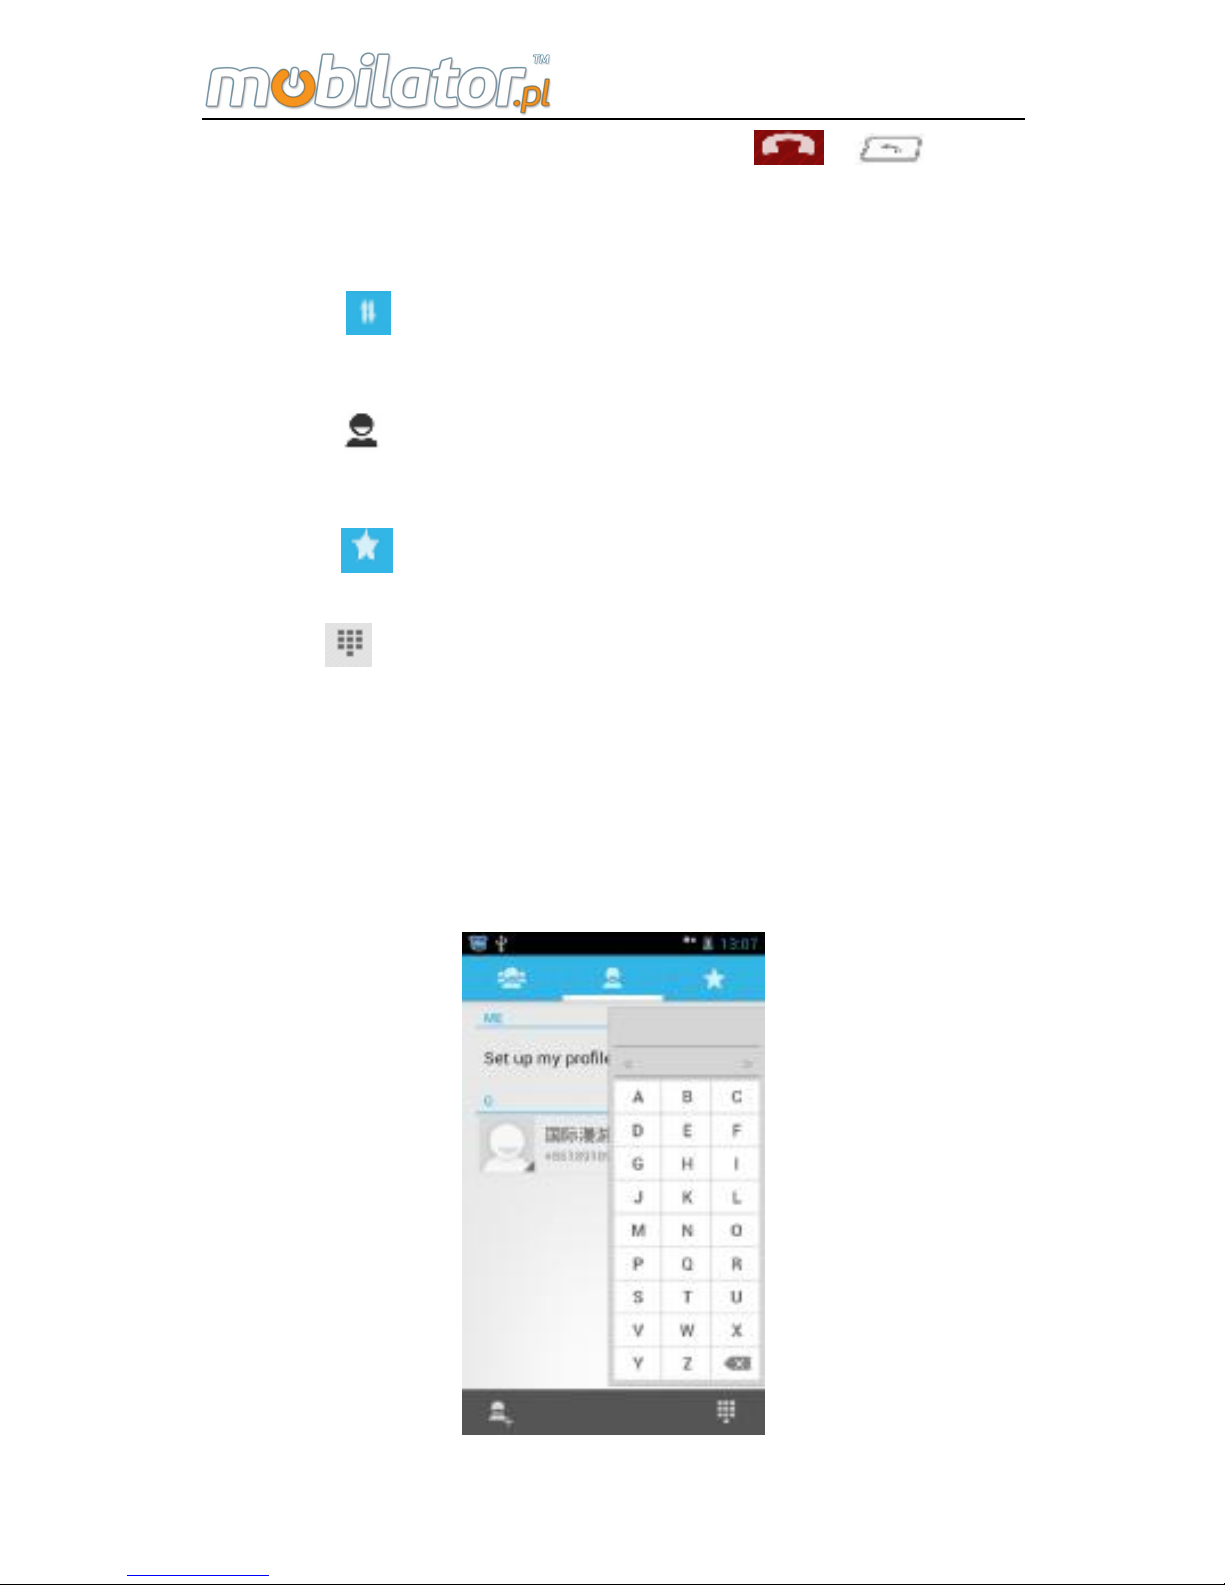
Click
to show the call records, and click the
corresponding phone icon to dial the number.
Click
to display the address, and click the contact
to dial the number.
Click to show the stored contacts.
Click to conceal the dialing keyboard.
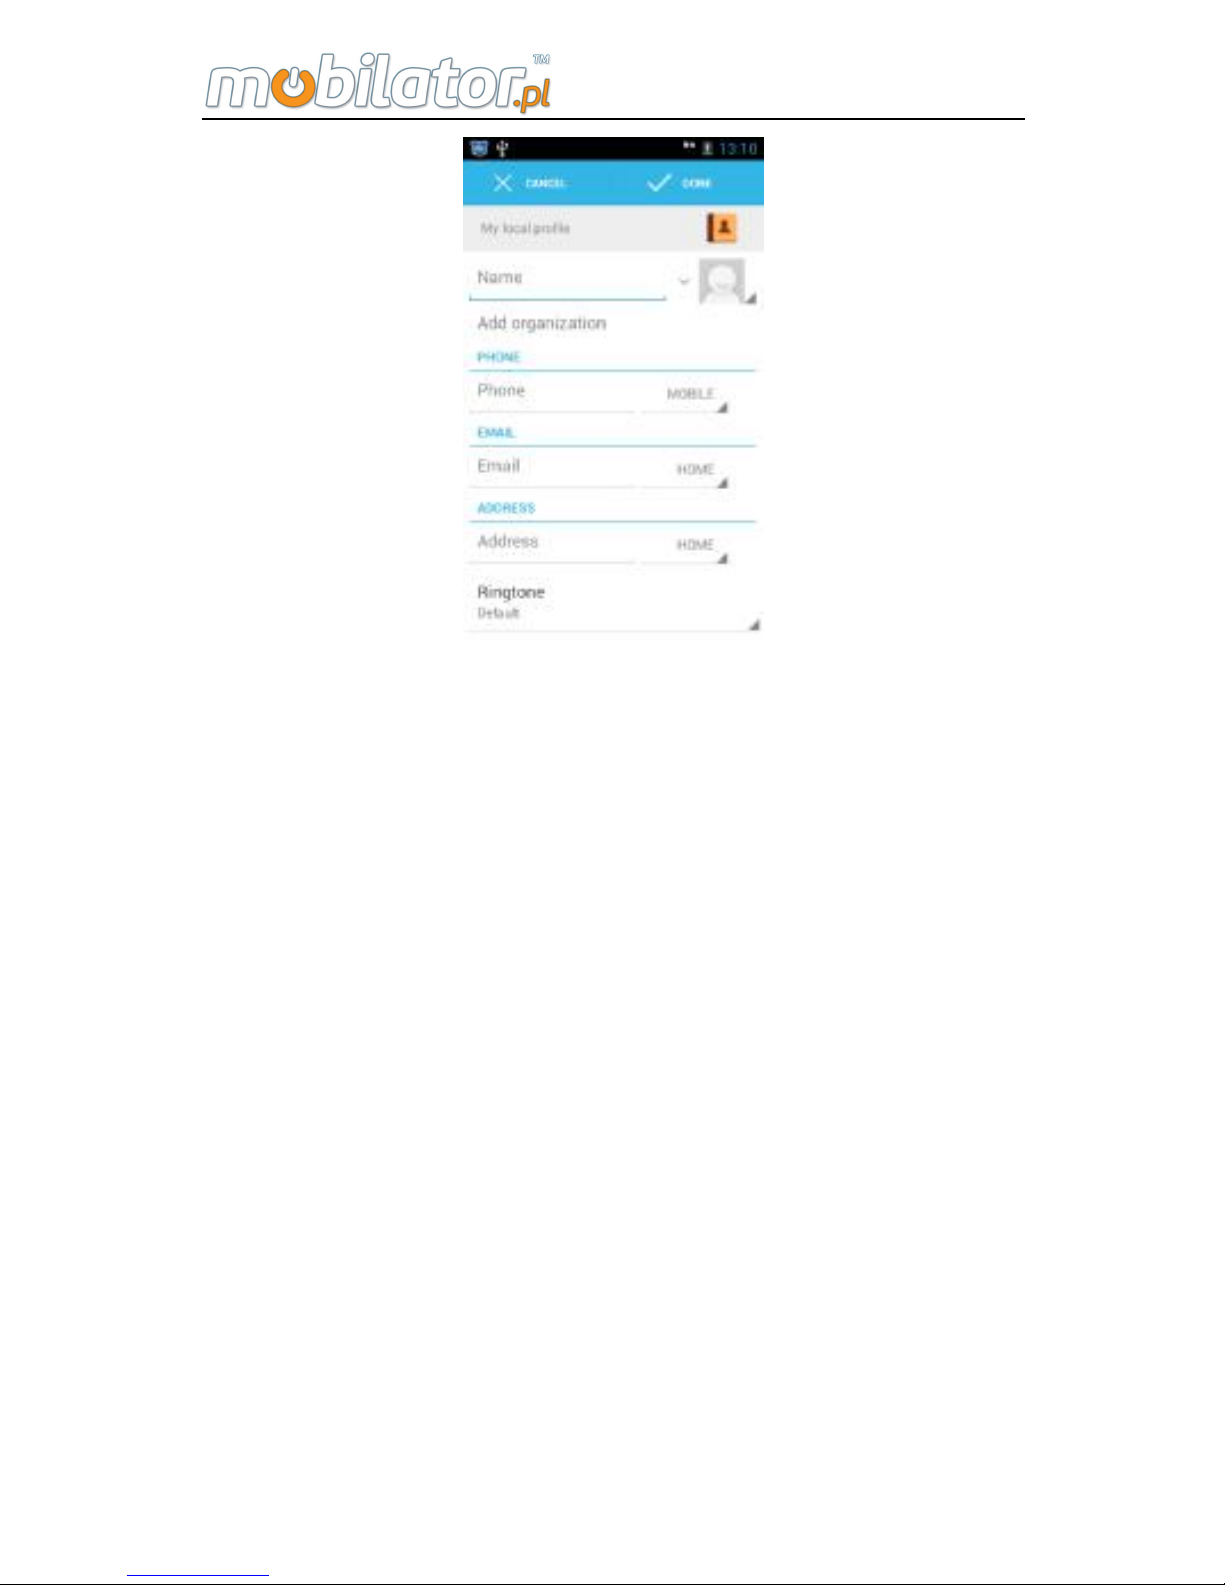
7. Contacts
Contacts are the storage information about personal and
business.
Page 64

ST308 Mobile IPDA
58
Press menu key in "Contacts" interface, can display the
contacts information and Import/Export contacts.
Note: The Import/Export contacts are in the catalogue of TF
card mnt/sdcard.
Find contacts
Input the name of the contact person in the right textbox
until you find the person you want.
Create new contact
In Contacts list interface, click "Add"
, can add contact
person into device.
Note: More contact persons will affect the system running
speed.
The operation for each contact person
Press the contact person shortly to enter into the interface
with detailed info of the contact person.
Page 65
ST308 Mobile IPDA
59
Press menu again can edit or delete the contact person
and also can set the corresponding ring. Click the pen icon
below can edit the contact person.
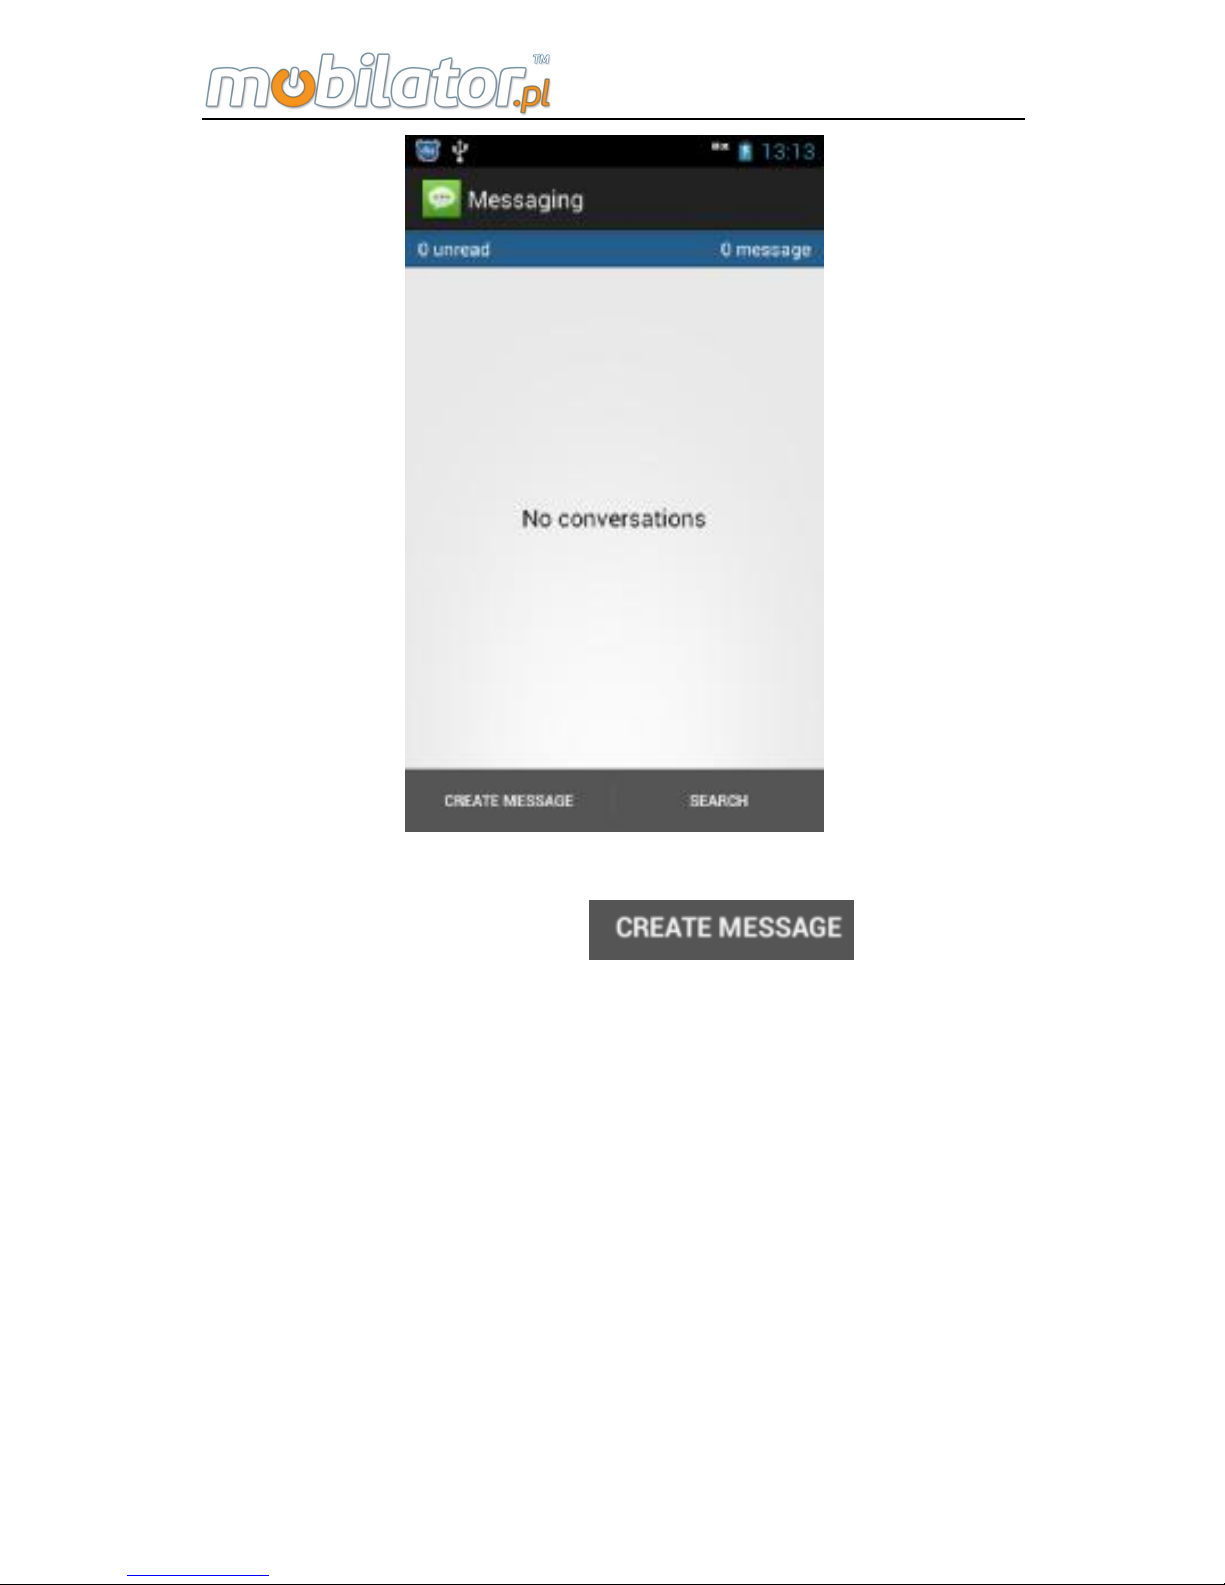
8. Messaging
In main menu interface, click "Messaging" to enter into
message list interface. Press menu key to show setting item,
delete old messages, and click "settings" can set the
content of the message. Clicking "delete " can delete all the
messages.
Page 66
ST308 Mobile IPDA
60
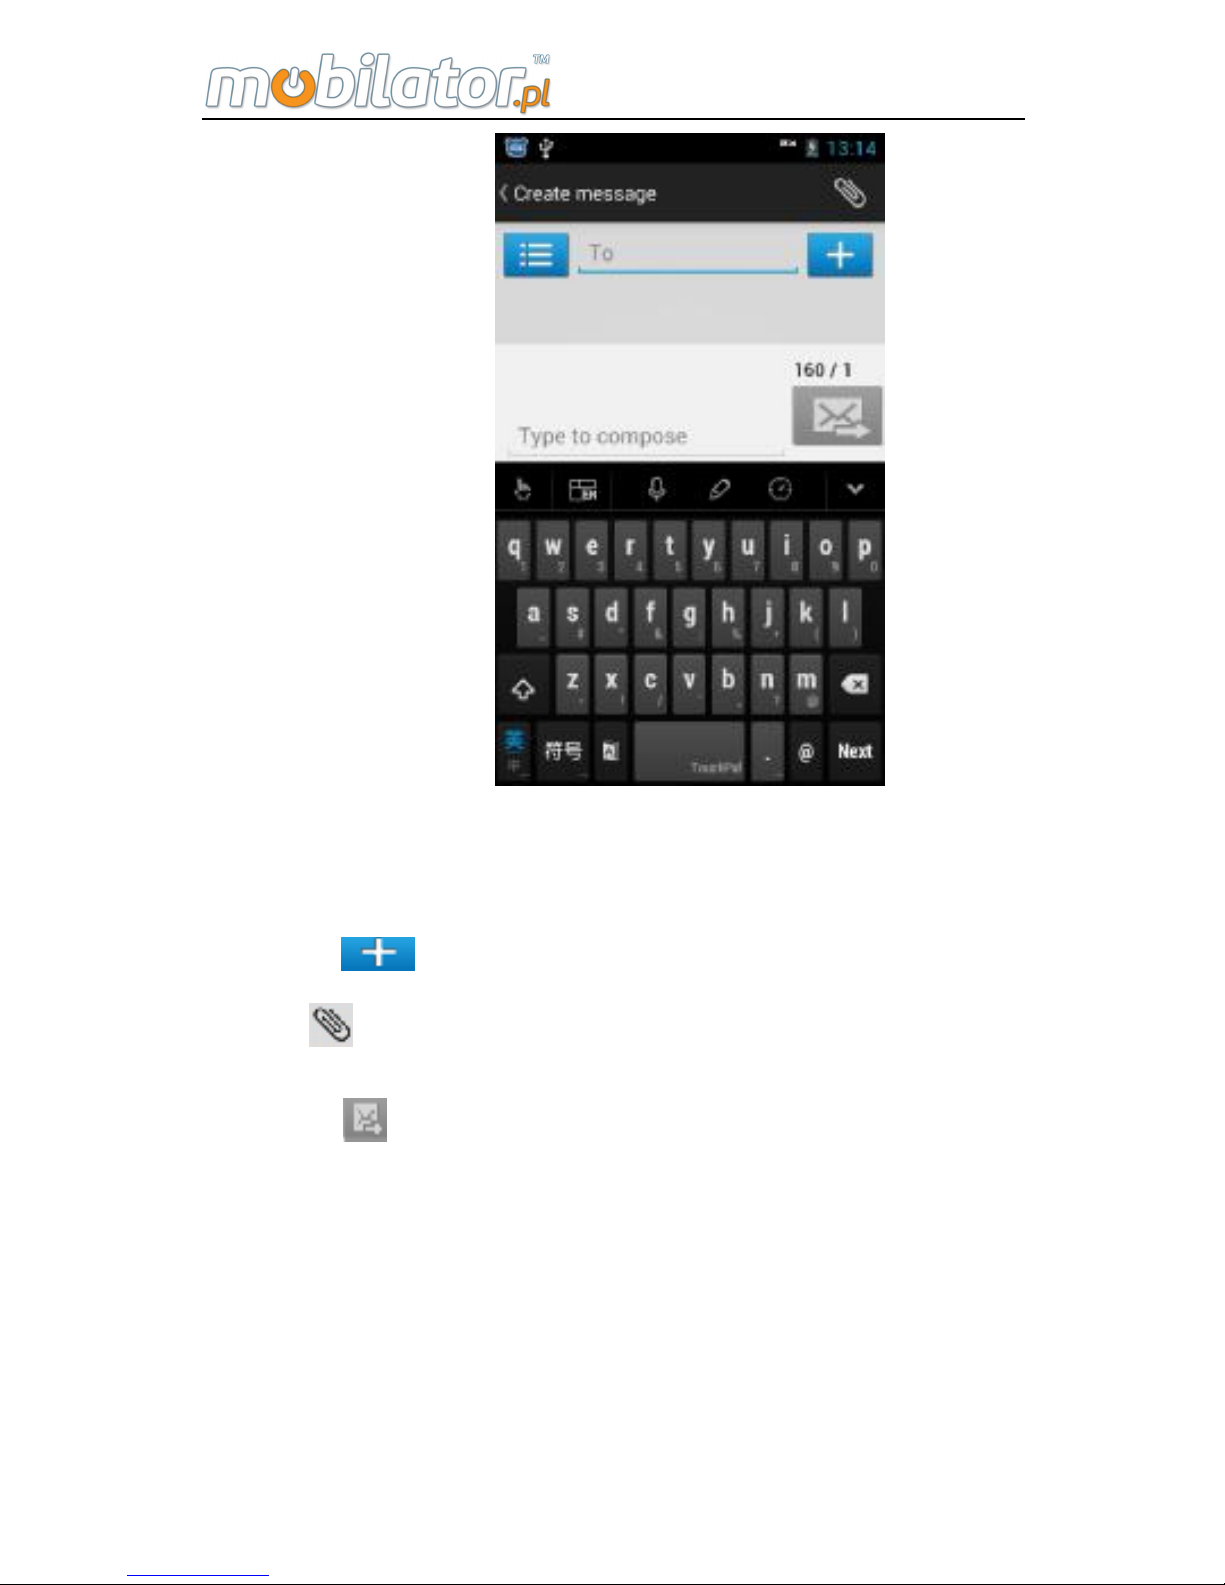
New message
In messaging interface, click
to enter into
the new message interface and it will show as follows:
Page 67
ST308 Mobile IPDA
61
Click "Receiver" to type into the number of receipts and
then type the content need to be sent in "Type Message".
Clicking number edit box can type number.
Click
to add the attachment.
Click
to add the attachment.
Click to send message.
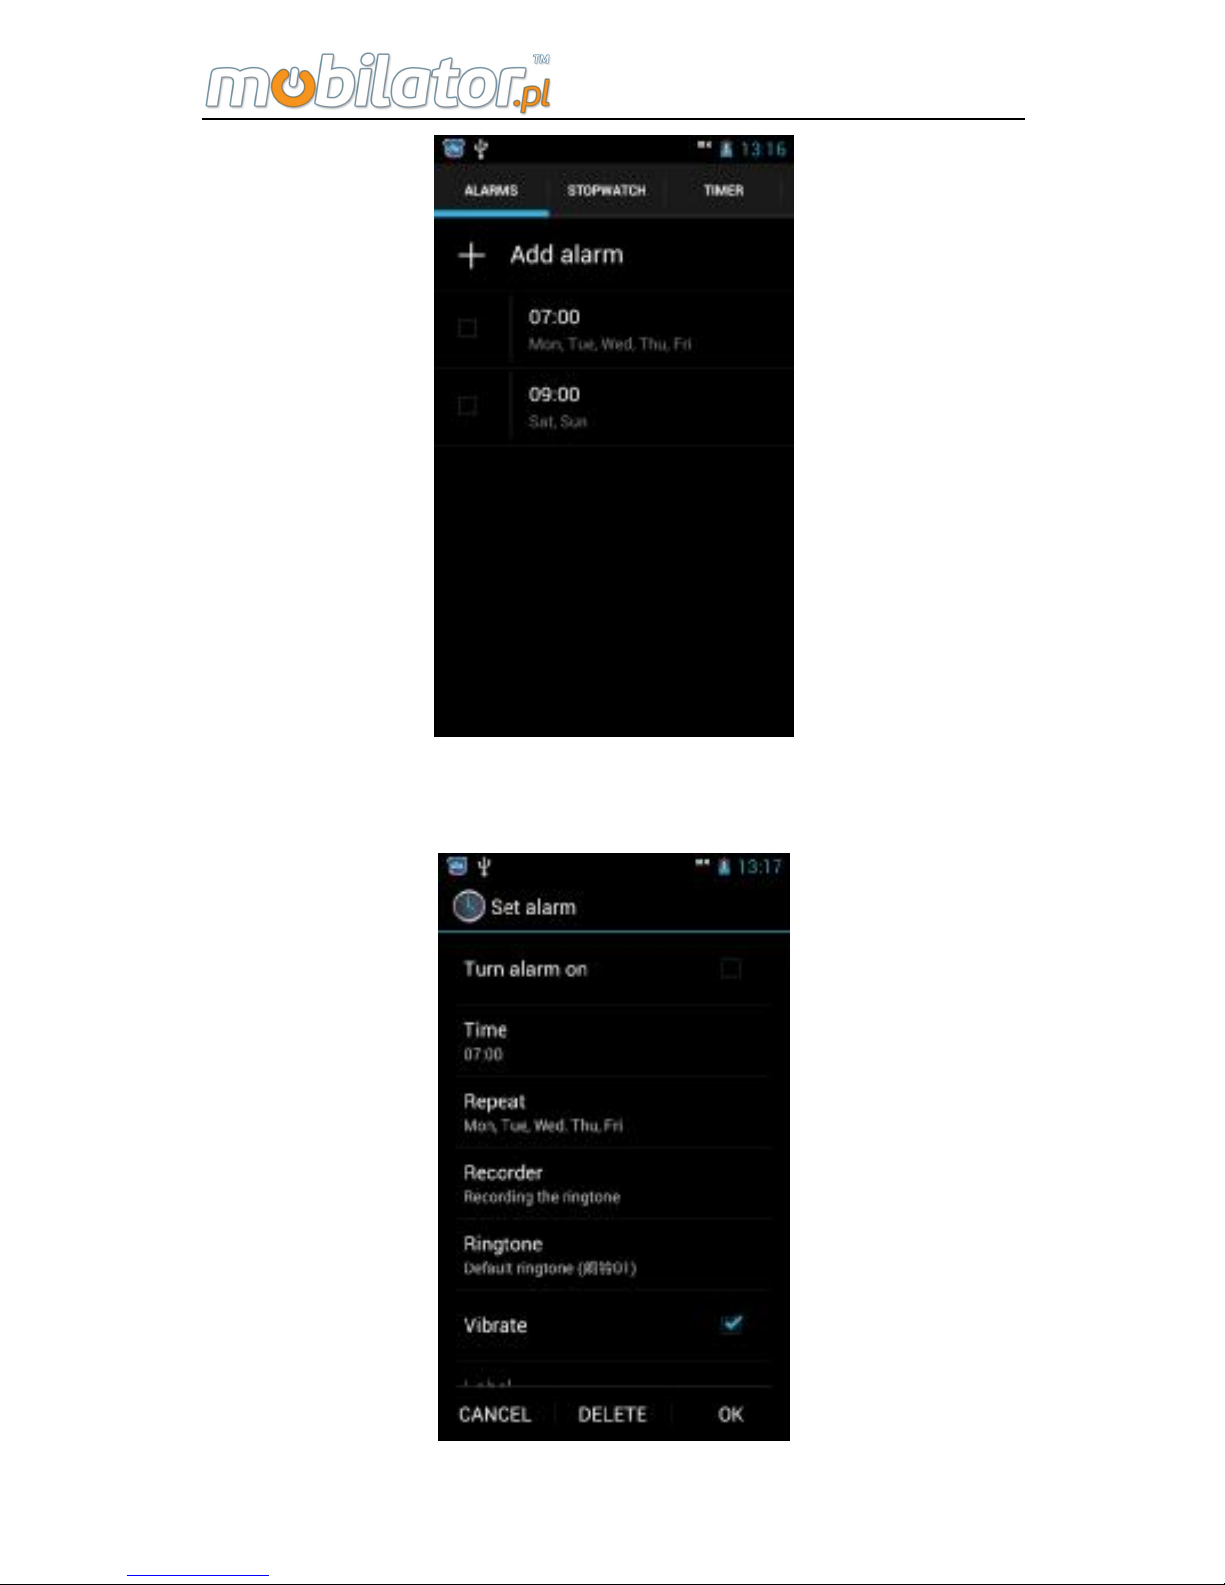
9. Clock
Click clock icon, the clock interface will pop up as follows:
Page 68
ST308 Mobile IPDA
62
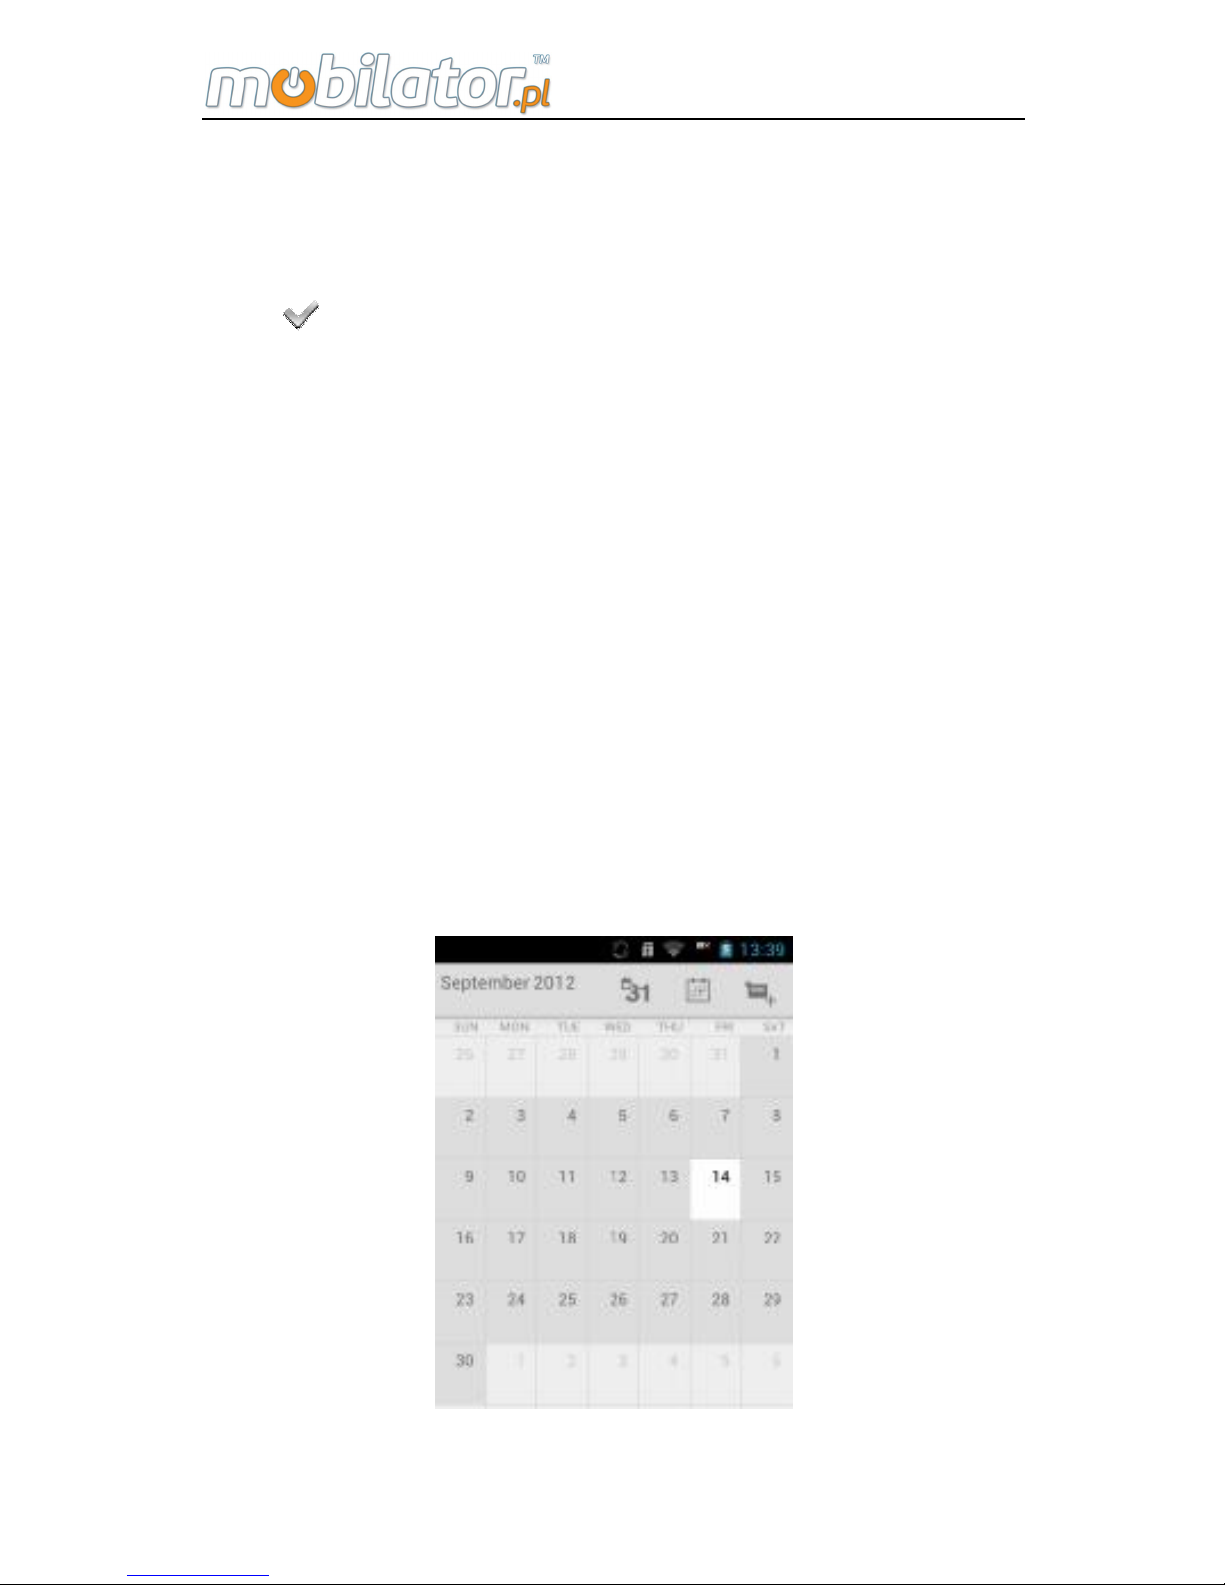
Click alarm, and then tester will enter into the alarm add
interface. As follows:
Page 69
ST308 Mobile IPDA
63
Setting: you can turn on/off the alarm, set time, repeat, ring
tone, vibrate and so on.
Open alarm
Click on the top right corner of the alarm interface and
bright display means the function is open.
Note:
In the off state, the system will automatically open and
then start the alarm service.
In order to ensure the alarm effect, please do not set
mute mode.
Please change the battery in 1 minute if needed,
otherwise the alarm, automatic switch, time and date
information may be inaccurate or missing.
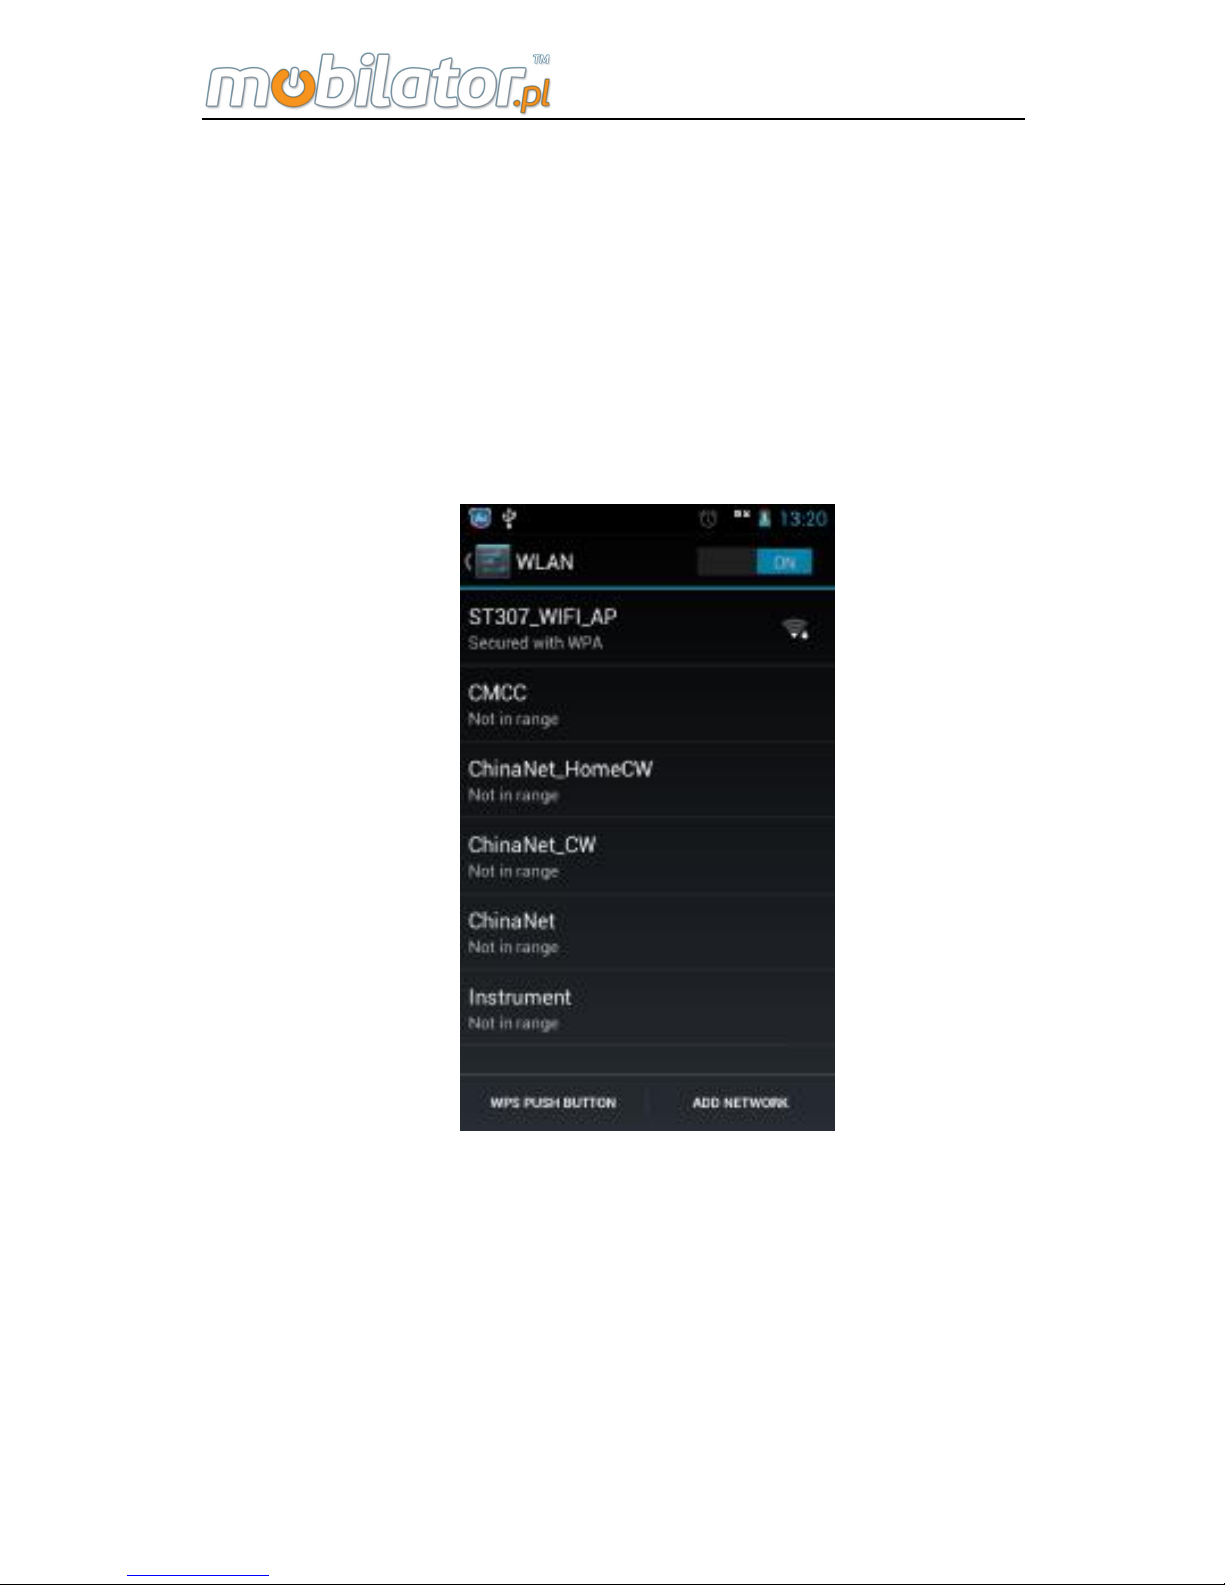
10. Calendar
Click calendar to look up the calendar as follows:
Page 70
ST308 Mobile IPDA
64
11. Settings
"Settings" includes all the content needed to be set, detail
see the following:
11.1 Wireless & Networks
WLAN
Slide the switch from left to right to open or close WLAN and
click the icon into WLAN setting, as follows:
Tester will search WLAN router automatically after
entering into WLAN setting, and the result will be shown in
list. Click the router can connect with it and some of the
connection needs password. Click “WPS Push Button” or
“Add Network” to search other internet.
Page 71
ST308 Mobile IPDA
65
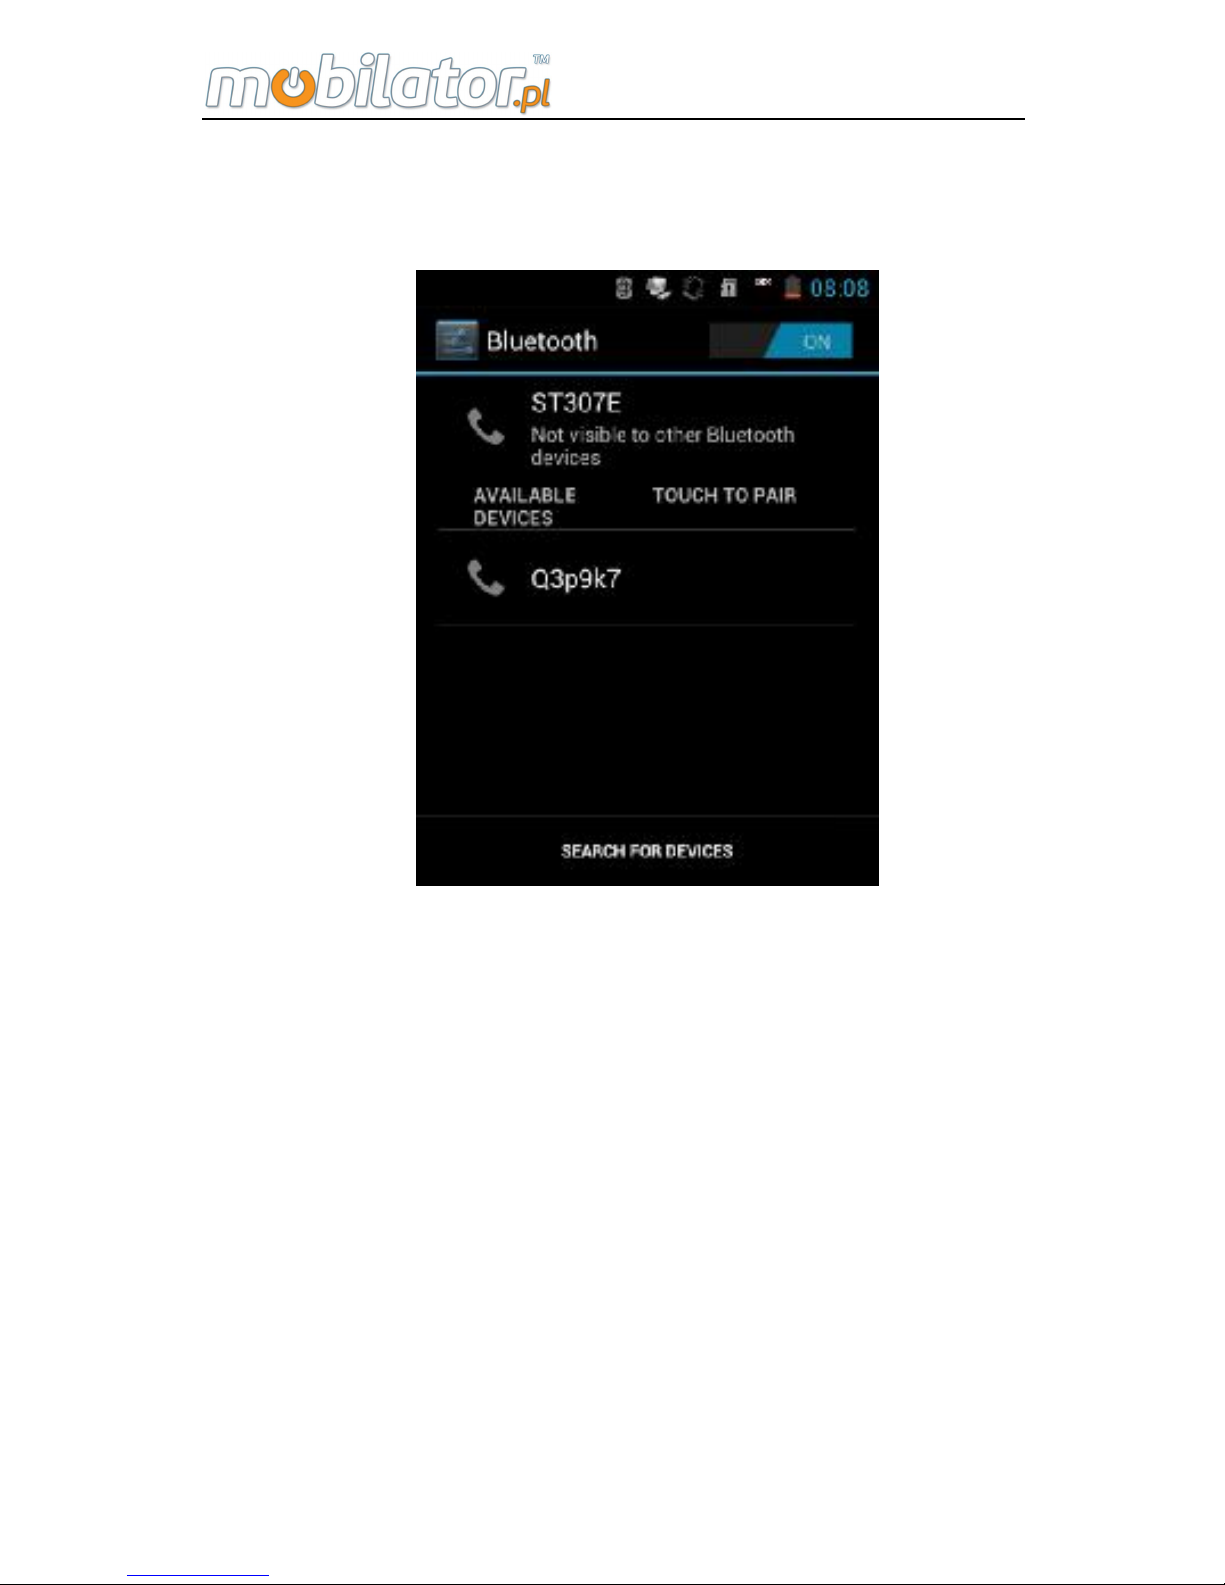
Bluetooth
Slide switch from left or right to open or close Bluetooth and
click the icon into Bluetooth setting, as follows:
When open Bluetooth, click "device name" can make
the device be found, and detect all the equipments around.
Click "Search for Devices", the device will search and show
Bluetooth list. Press to rename device, set visibility timeout,
show received files.
Data usage
Open or close the date usage function; check the usage of
data.
More:
Do the operation of airplane mode, VPN, tethering &
Page 72
ST308 Mobile IPDA
66
portable hotspot, WLAN direct, WLAN direct setting and
mobile networks.
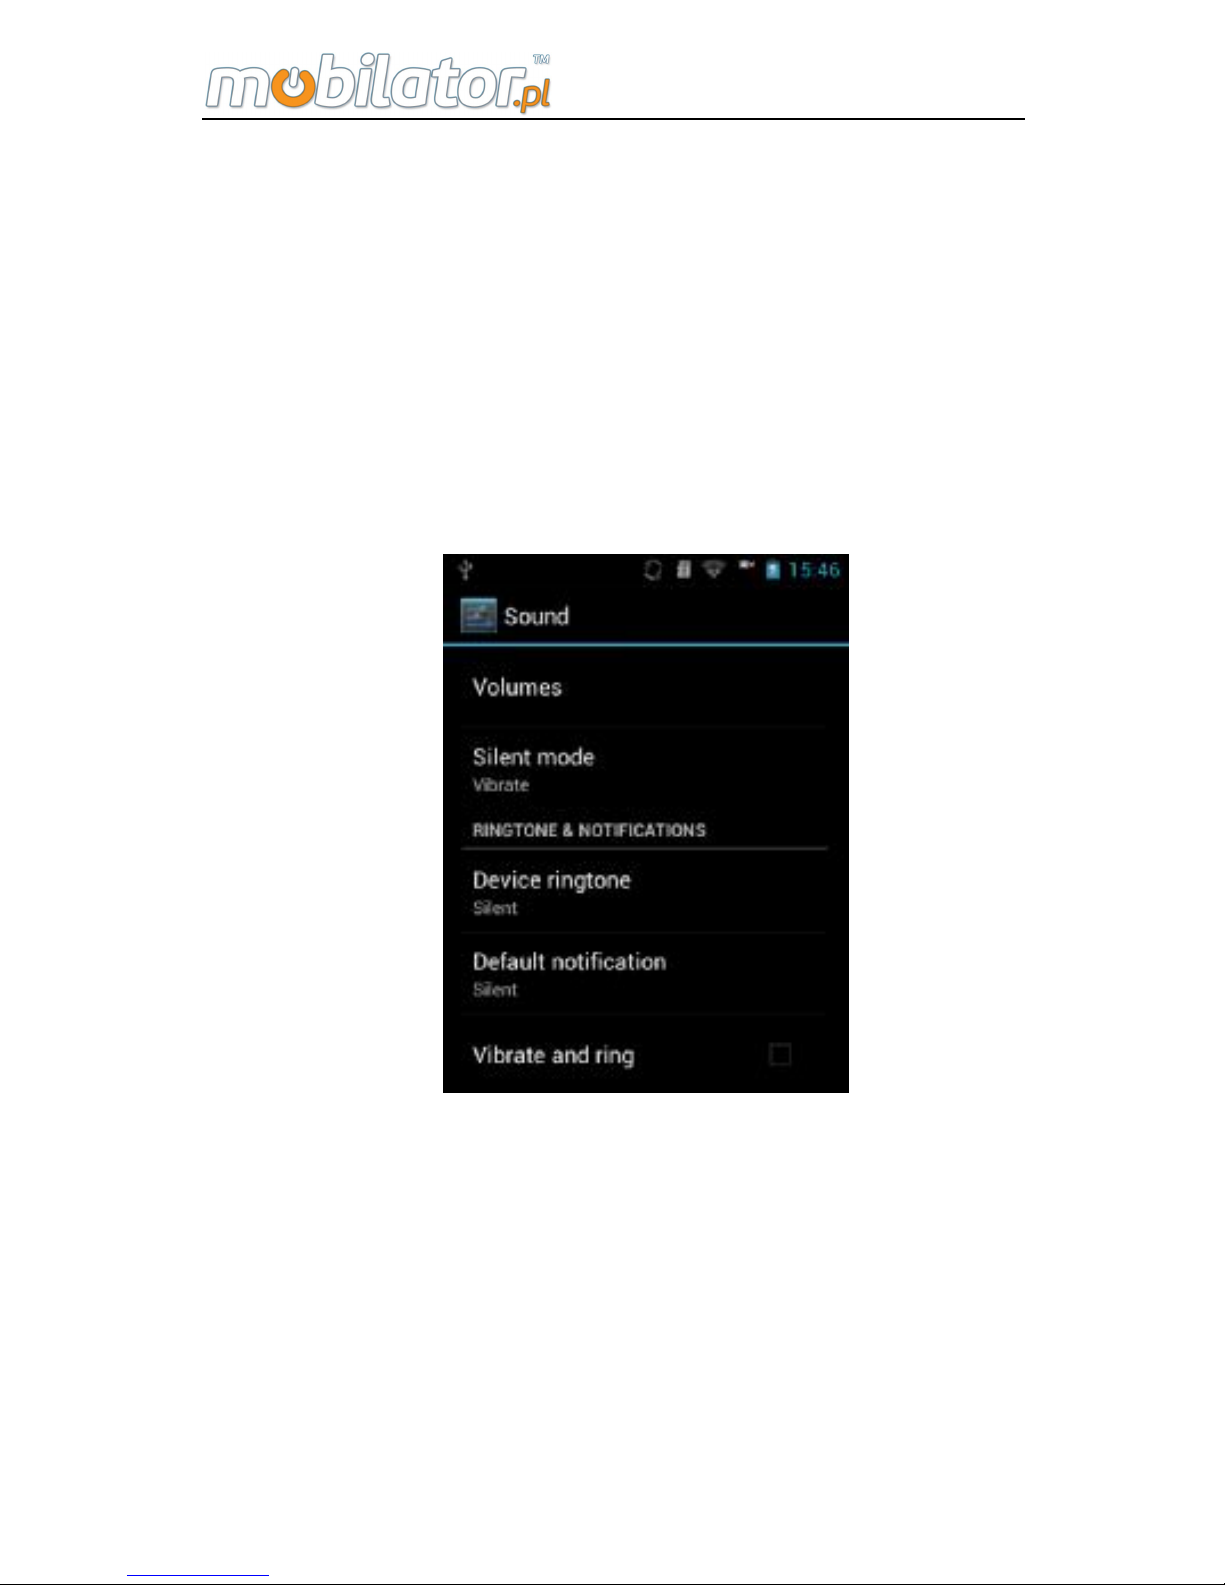
11.2 Device
Sound
Open or close the silent mode.
Set the volume, ring tone, default notification and so on.
Open or close the vibration and ring, dial pad touch
tones, touch sound, screen lock sound, vibrate on touch and
emergency tone. As follows:
Note: Adjust the volume of the loudspeaker through the up
and down key.
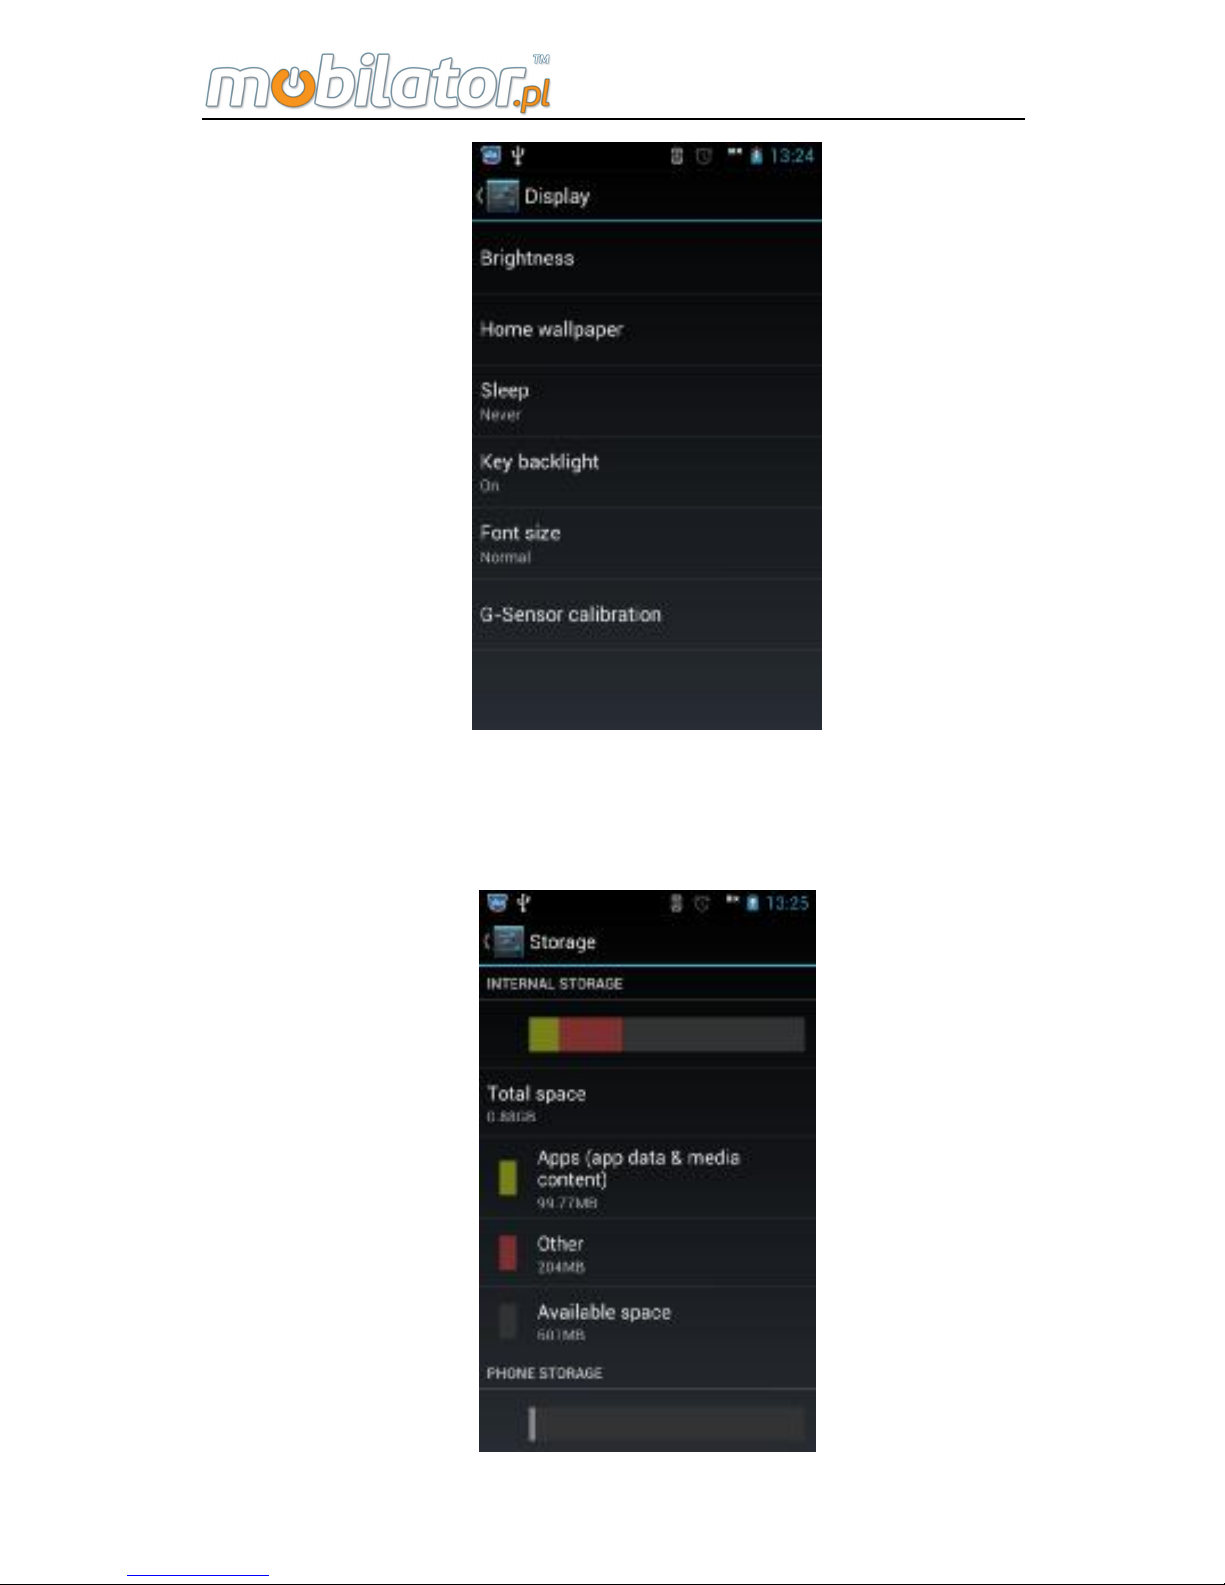
Display
Adjust screen brightness, wallpaper, sleep time and font
size. As follows:
Page 73
ST308 Mobile IPDA
67
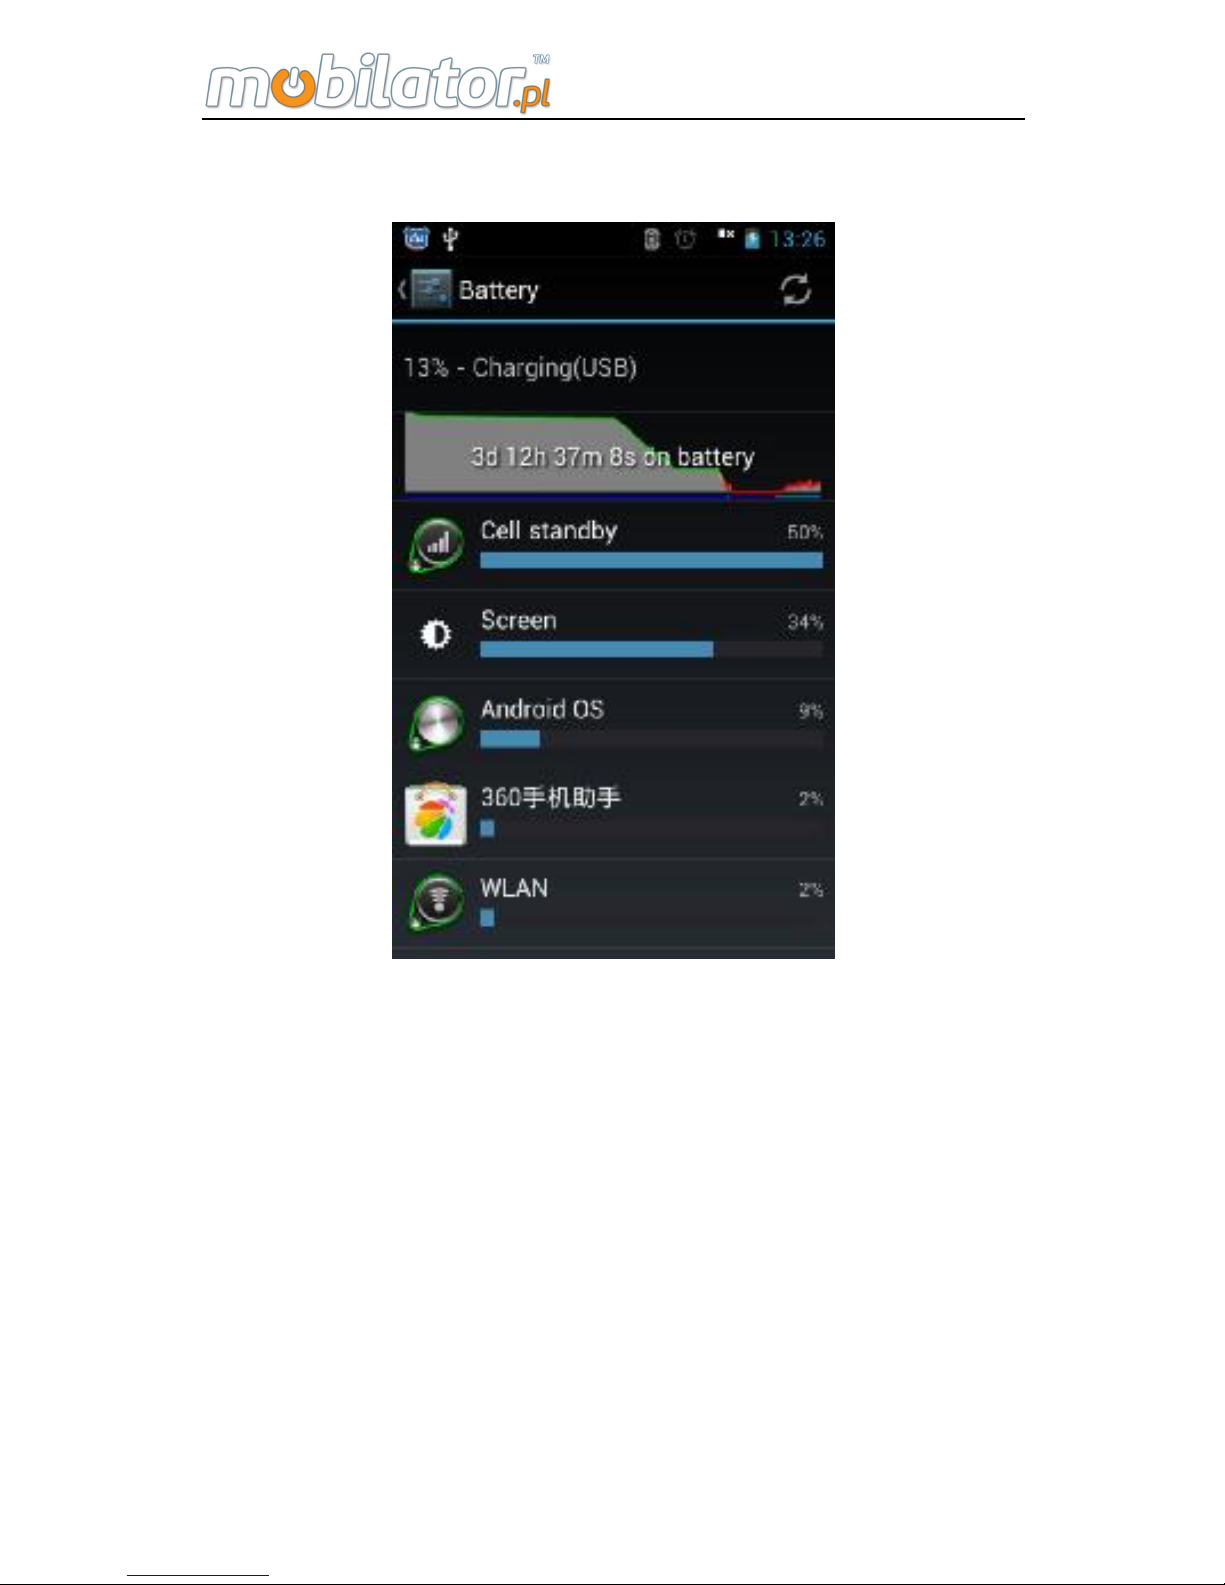
Storage
Check TF card space capacity and available system space
as follows:
Page 74
ST308 Mobile IPDA
68
Battery
Check the quantity of the electricity.
Application program
You can manage the application program.
Application management: used in managing the
installed applications including display application program
storage, permissions and other information as well as clear
data, clear default settings and forced stop.
Running service: view and control the currently running
services.
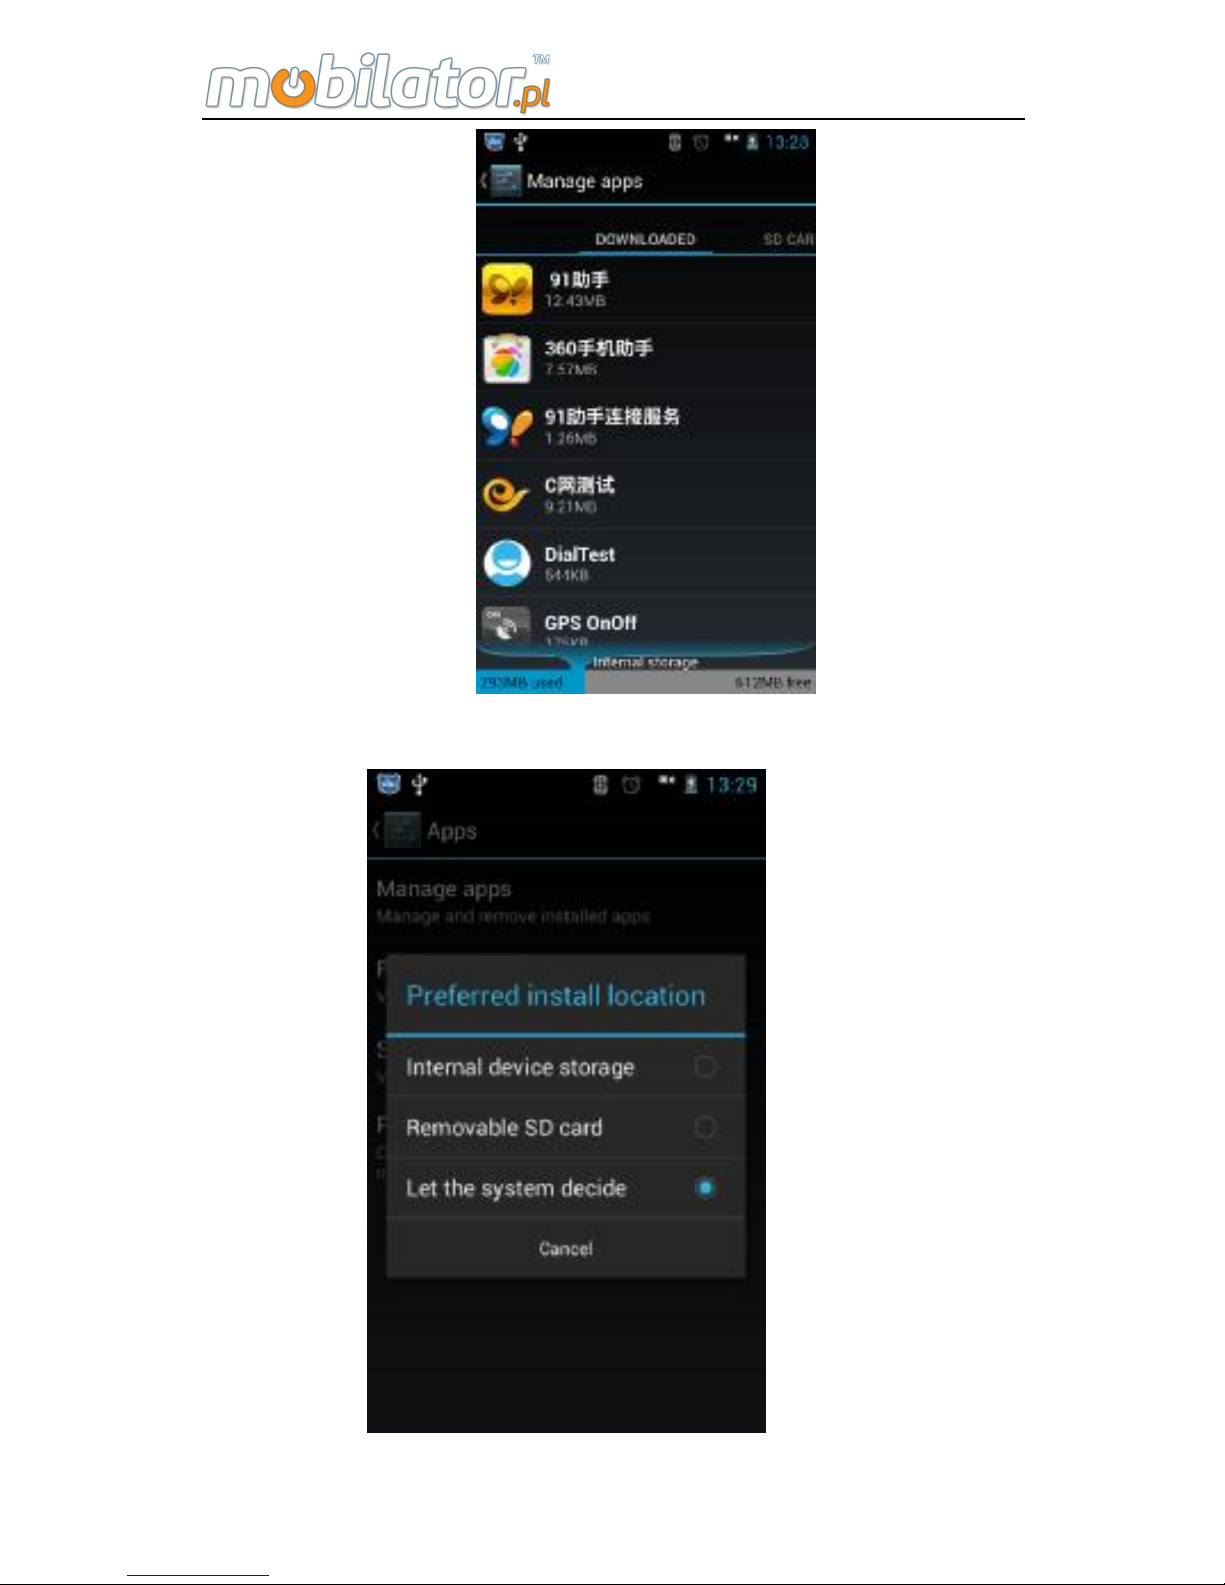
Storage: check the storage space of the application
program. As follows:
Page 75
ST308 Mobile IPDA
69
Preferred install location: it can be used to set the default
installation root of apps
Page 76

ST308 Mobile IPDA
70
11.3 Personal
Includes the settings related to personal:
Location Services:
Click to choose the different location modes such as GPS
satellite.
Security:
● Choose the screen lock mode;
● Owner info;
● Open or close the password visible function;
● Choose the device administrators;
● Set application password and the default password is
1234;
● Install the unknown sources with default password 1234
and you can change the password in "Application
Password".
● Choose the trusted evidence.
● Install from the SD card;
● Clear credentials
Language and input
● Select the display language
● Open or close the spelling correction
● Choose different input method
Factory data reset
Factory reset function will clear all the information.
Please copy the important information such as: Contacts
and message etc.
Page 77

ST308 Mobile IPDA
71
11.4 Accounts
After opening the function, add the account to keep the
synchronization of the equipment and account.
11.5 System
Date and time
● Open or close the automatic date & time which is
provided by network.
● When closed, you need to set the date, time zone and
time.
● Choose the time or date format.
Accessibility
● Press power key to end the phone call.
● Choose the touch and hold delay time.
● Choose whether install the network script or not.
Developer Options:
Choose the options for develop person.
Auto power on/off
Set the time of auto power on/off.
About device
View basic device information such as status, legal
information, model number, Android version and so on.
12 Camera
According to the camera in the device, you can easily
take photographs and make video clips.
Photograph
Page 78
ST308 Mobile IPDA
72
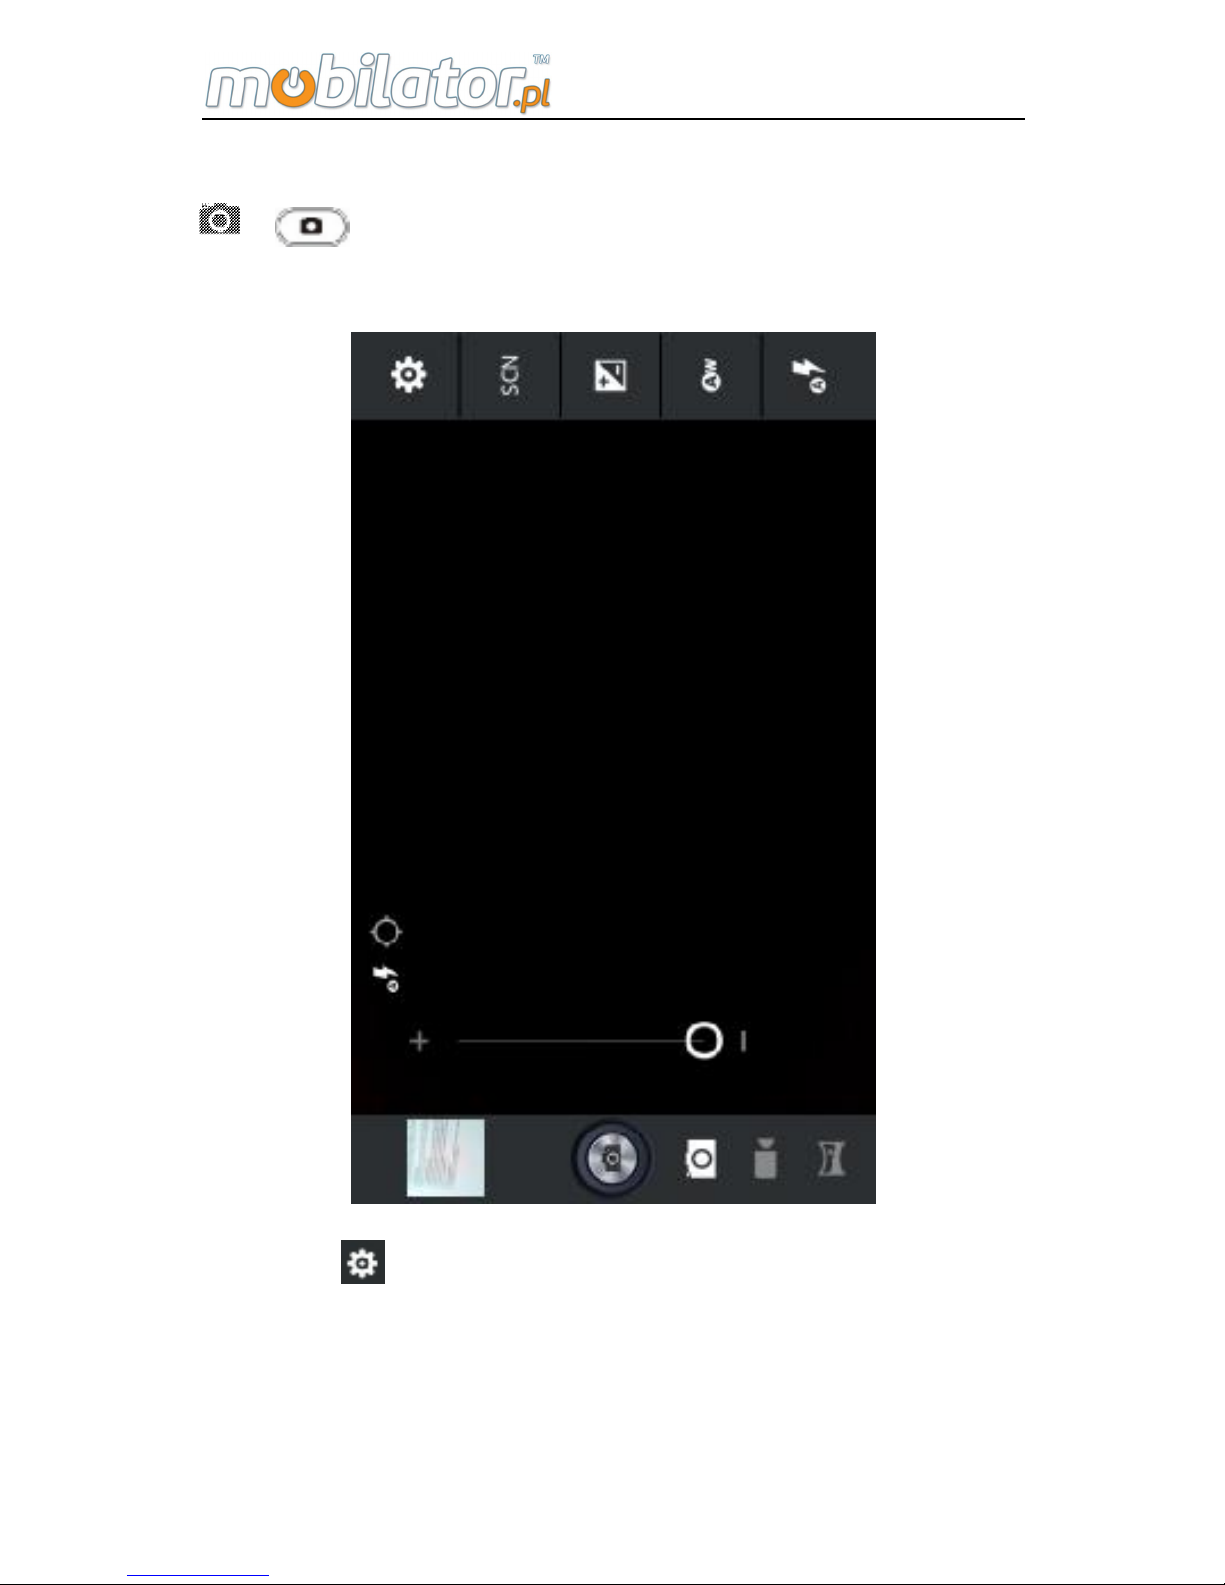
Enter the camera preview interface through pressing
or , and user can set the parameters by clicking the
icon on the menu as shown in the following picture:
Click to enter into the basic setting for the camera,
which includes select storage position, scene mode, picture
size, picture quality and so on.
“Store location” can record the geographical location
Page 79
ST308 Mobile IPDA
73
information of camera. After opening and GPS location, the
photo will have longitude and latitude information. (You can
see it during browsing photos in Gallery)
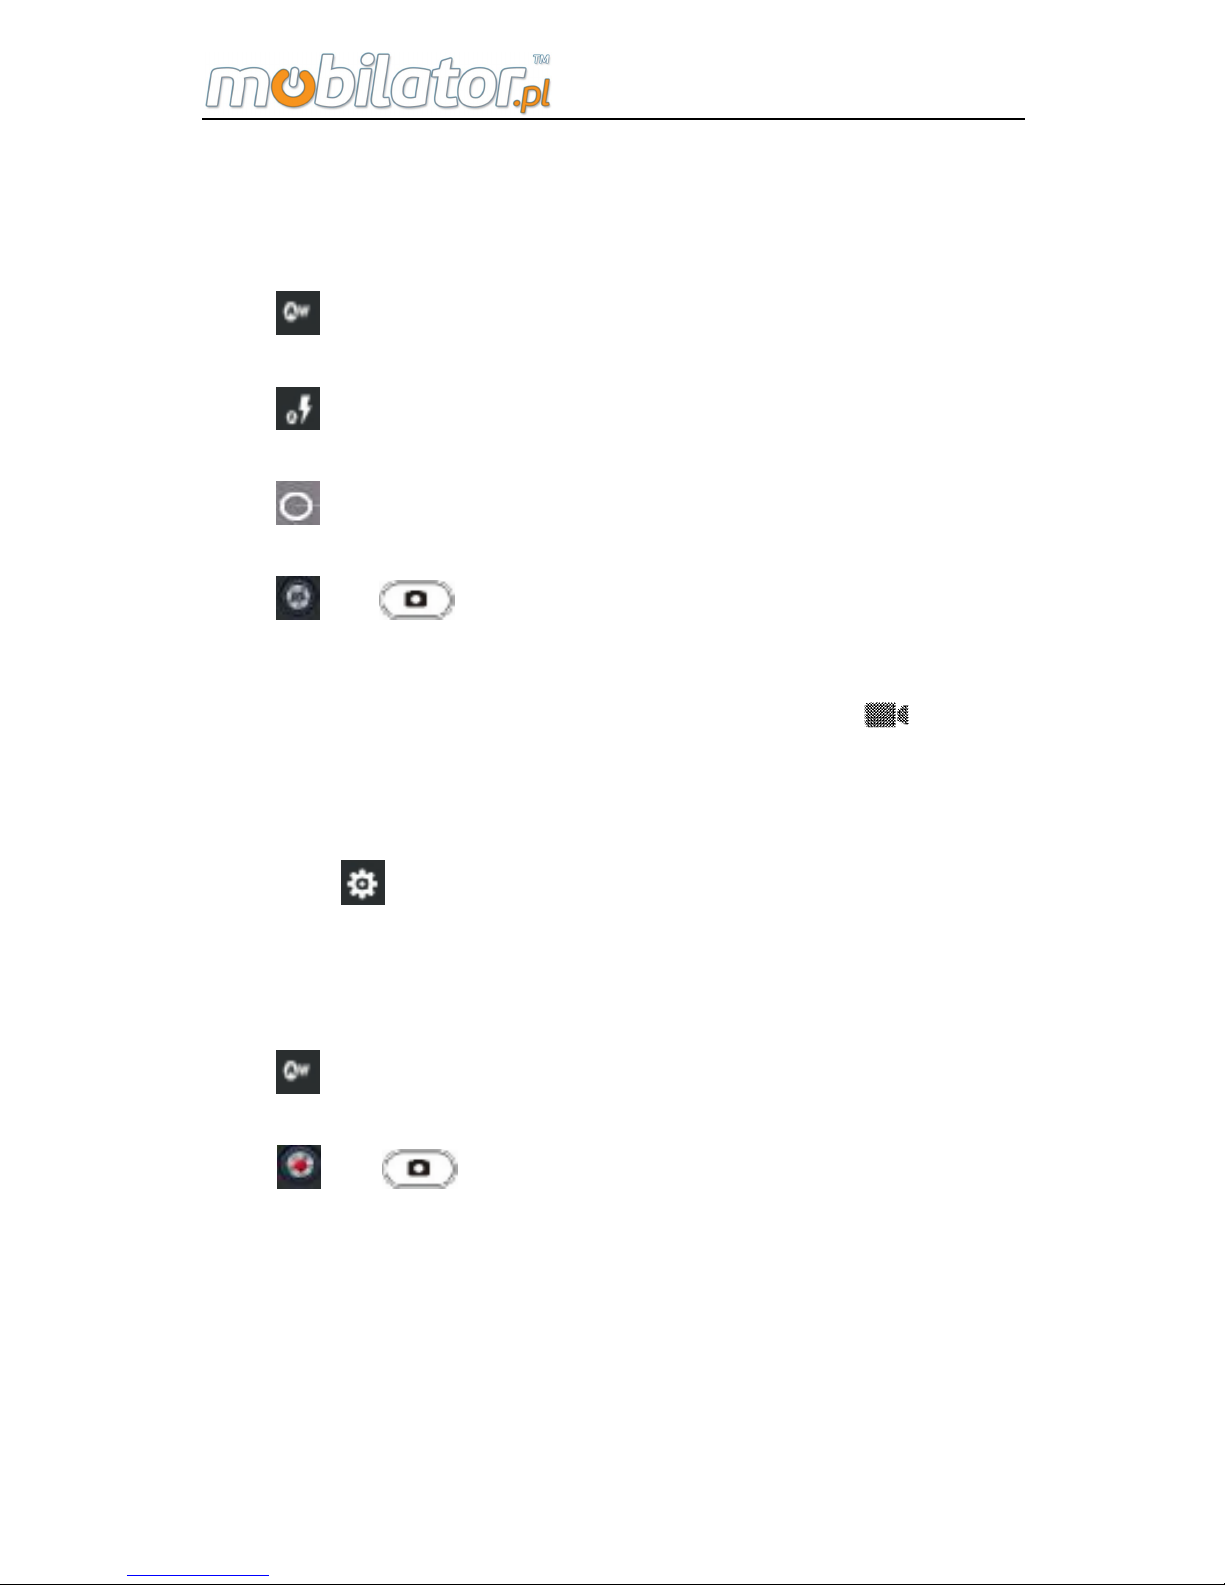
Click
to enter into white balance
Click to enter into flash mode
Click
to enter into manual adjustment setting
Click or to take photos
Video
In the camera preview interface, clicking can be
switched to the video. In video mode, the operation is as
following shows:
Click to enter into the basic setting, which includes:
select storage position, video size, video encoder, audio
encoder and so on.
Click
to enter into white balance.
Click or to shoot video and pressing again to
stop shoot.
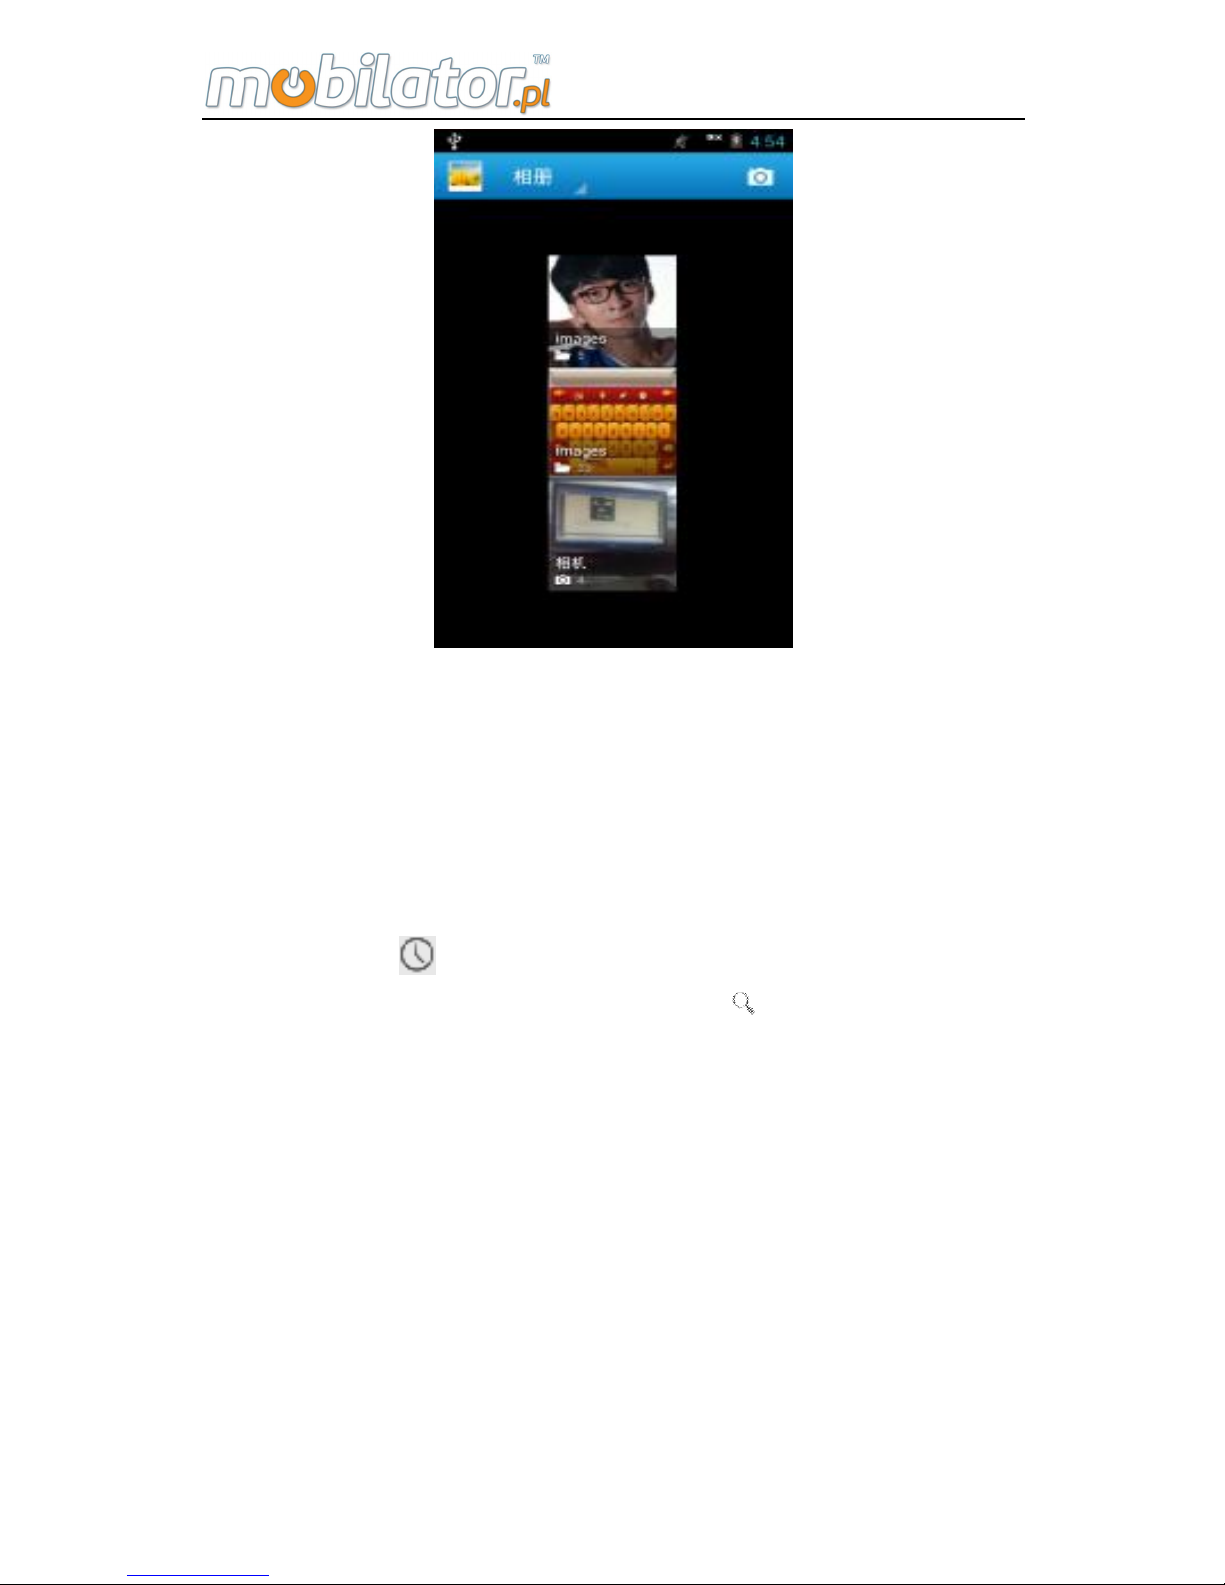
13. Gallery
View the pictures and videos stored in the SD card, as
shown in the following picture:
Page 80
ST308 Mobile IPDA
74
Click the folder to enter into the picture and video
browsing mode; sliding from left to right can browse the
pictures in the folders; and clicking the video can play it.
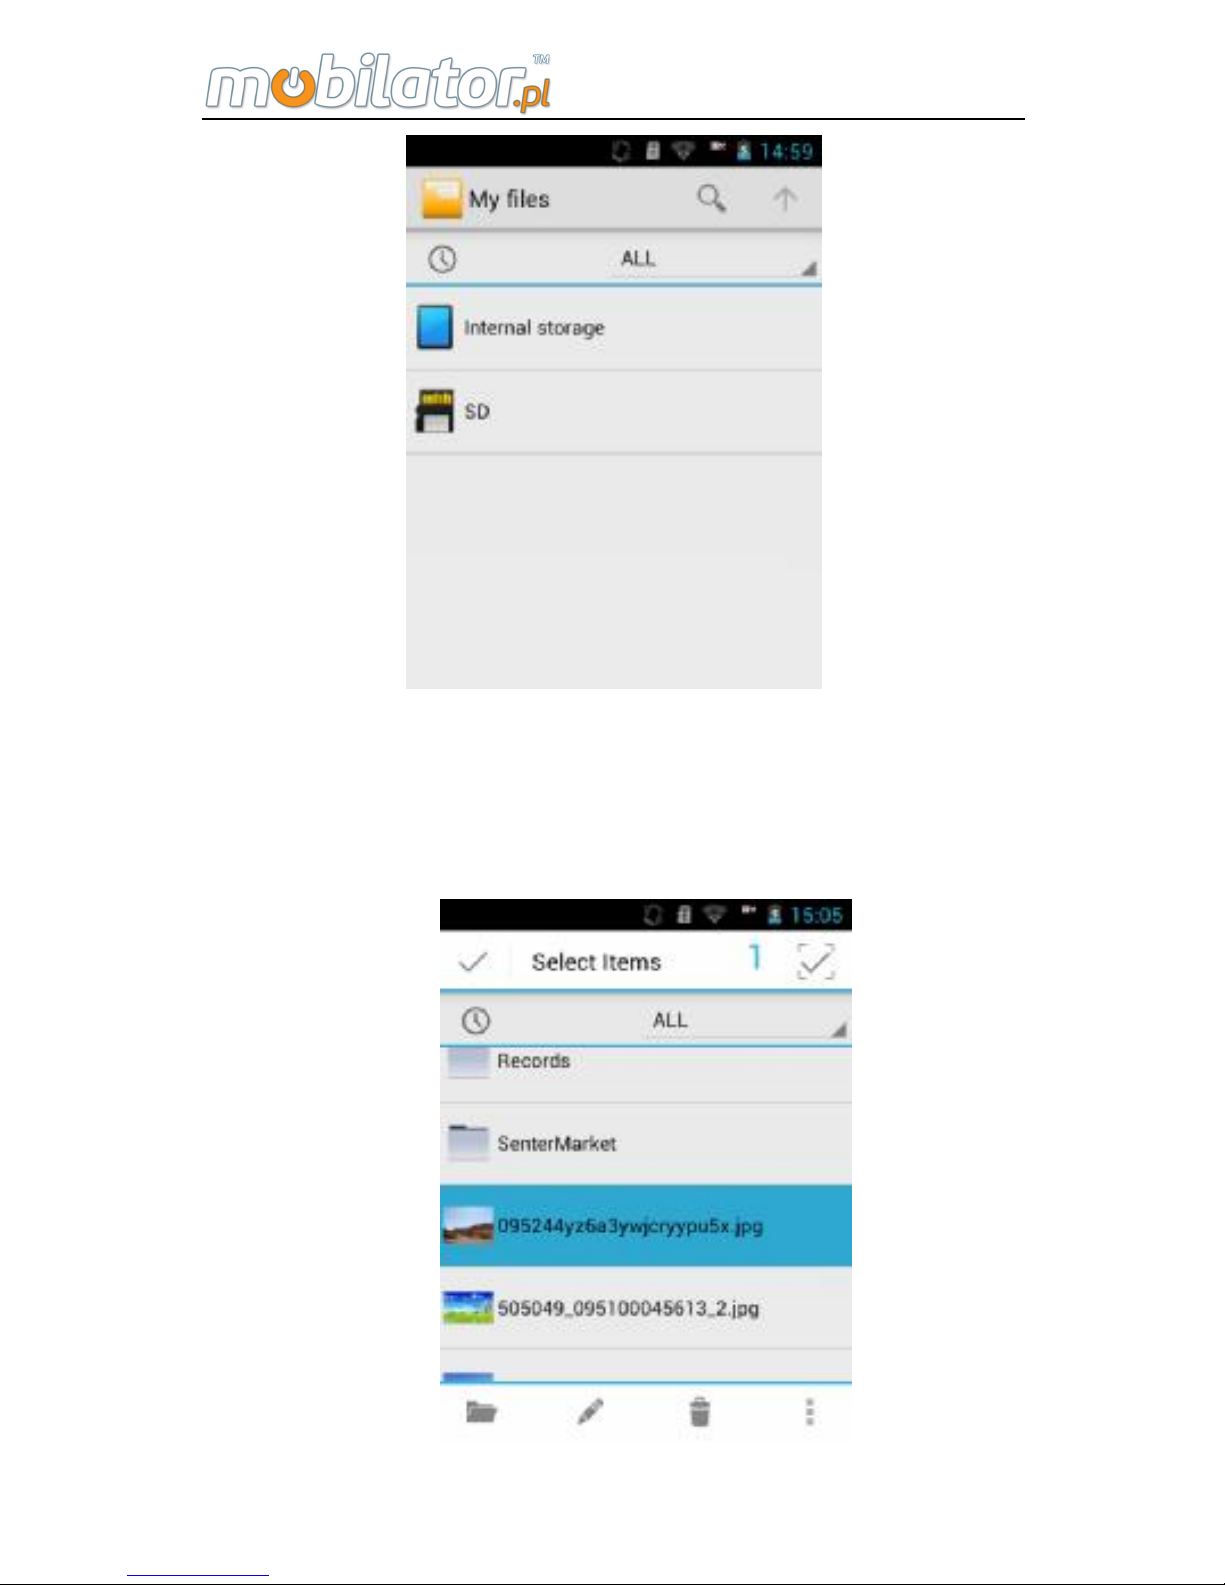
14. My files
View the files stored in the device or SD card.
Click the
icon to check the recent files; click ↑ to
return to the previous interface; click to choose locating
file. Click "ALL" to pop up the file types. As the following
picture:
Page 81
ST308 Mobile IPDA
75
From the "My Files", you can browse and manage the
files and folders on the memory card.
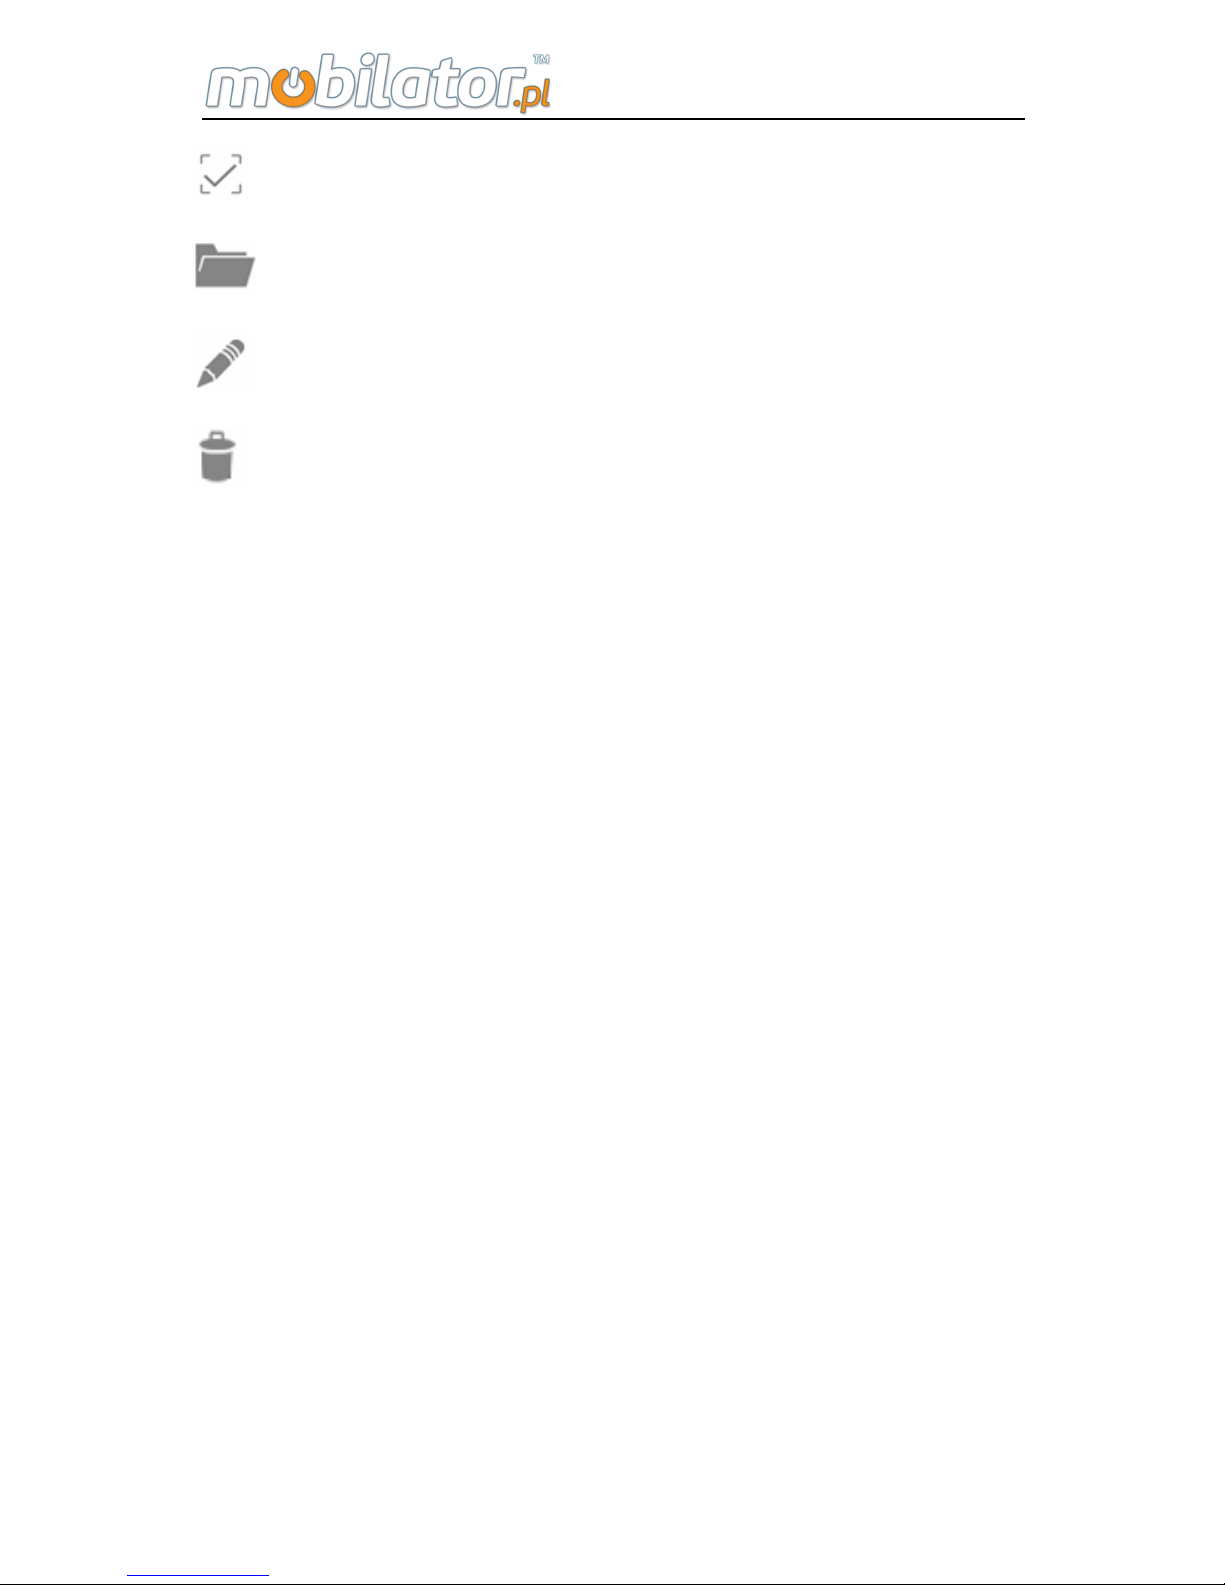
Long press the selected file icon, the following picture
will pop up:
Page 82
ST308 Mobile IPDA
76
is to choose all files.
is to open file.
is to rename.
is to delete.
Ø More operation: copy, cut, share and property.
Press menu key to pop up :
Ø New: Edit the folder name and save file.
Ø Paste: paste the copied files or folders.
Ø Setting: view change and sort change
Note:
The default storage path is as the following:
Ø Photo and video storage path is "DCIM/Camera".
Ø Download file storage path is "Download".
Ø System test record storage path is "Record".
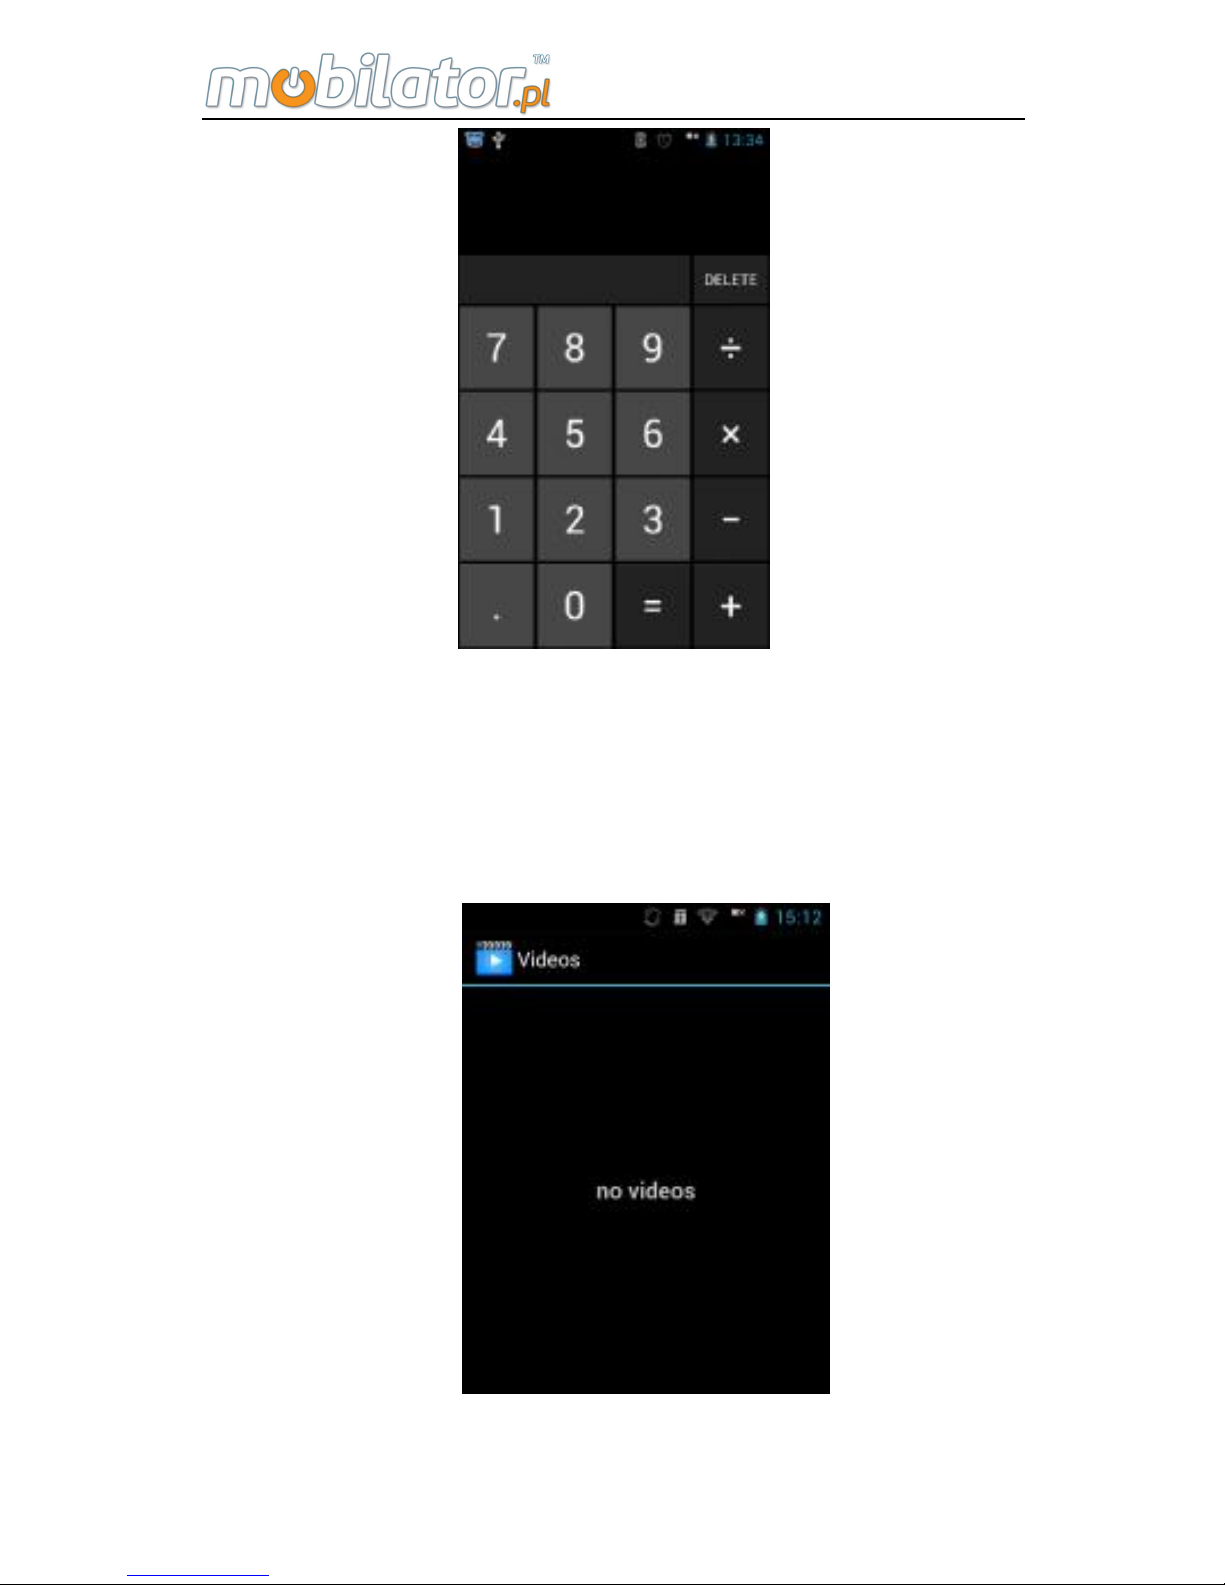
15. Calculator
Use calculator function to make simple arithmetic. You can
click the number and symbol to do corresponding
calculation, as the following picture:
Page 83
ST308 Mobile IPDA
77
Press menu key and click "advanced panel" to do more
calculating operation.
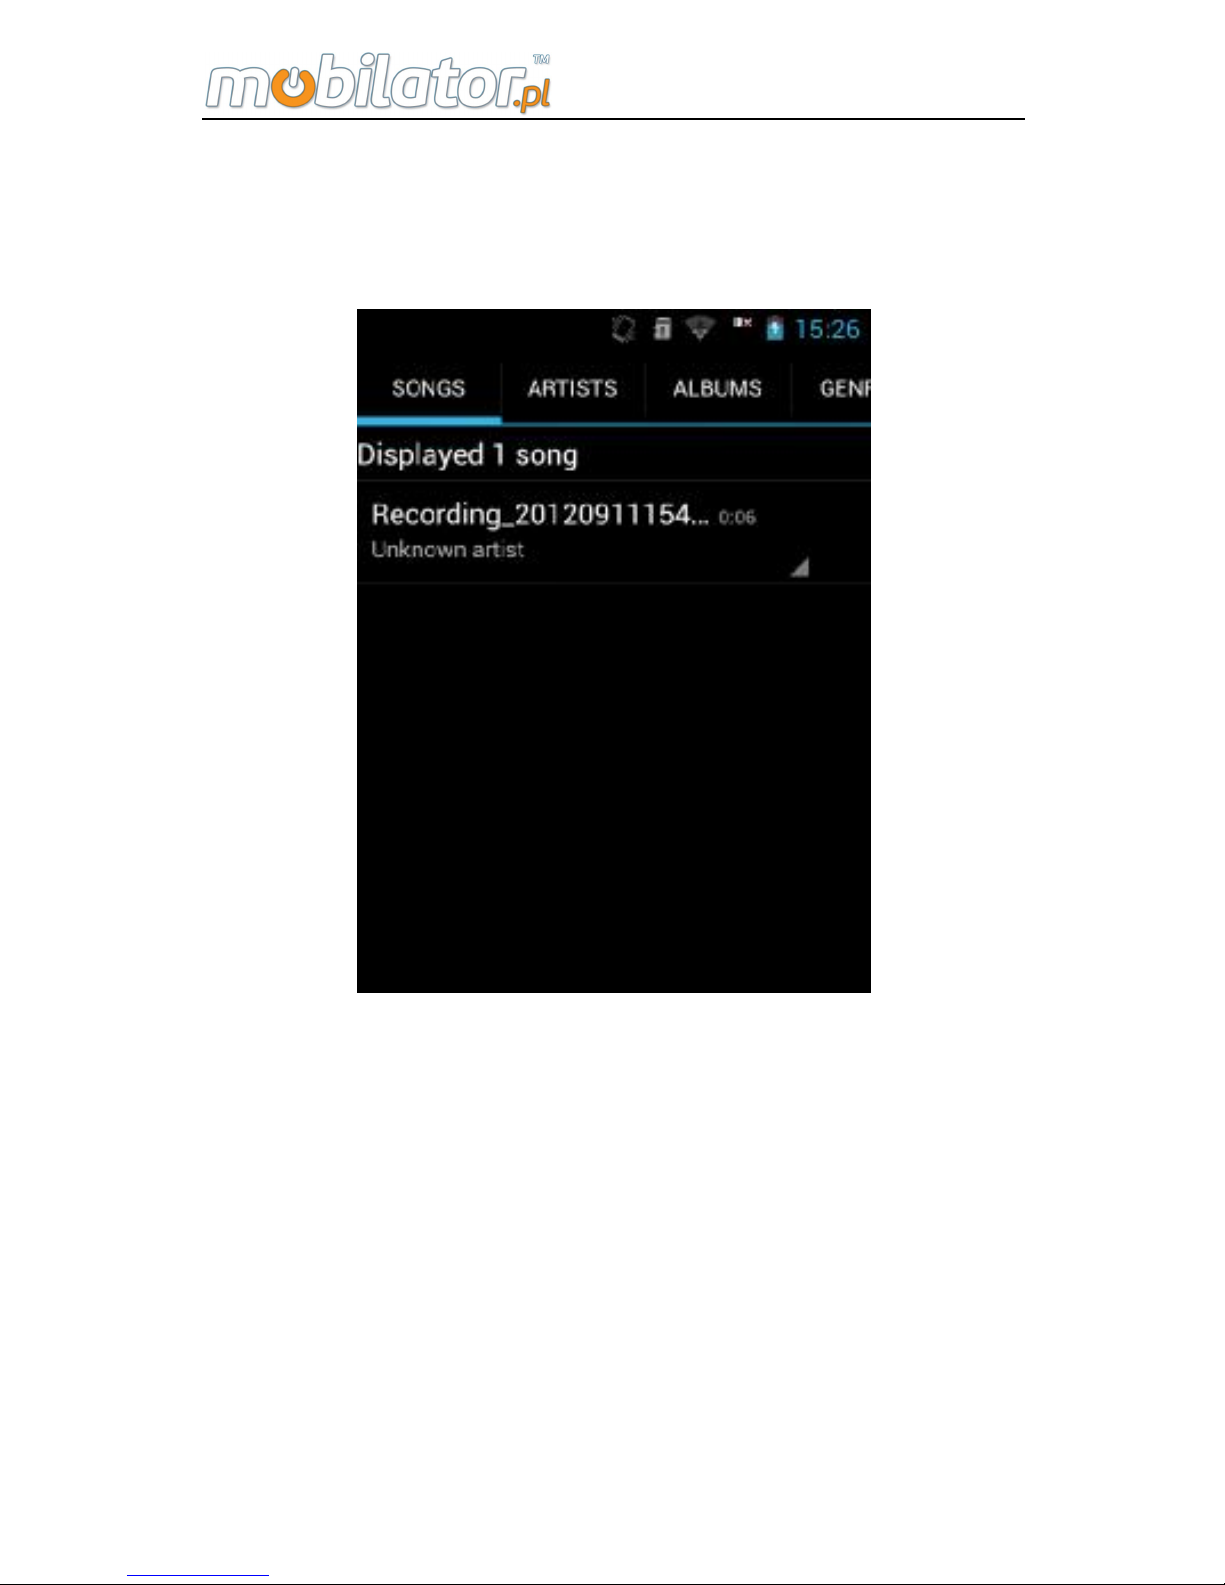
16. Video
Click "Videos" to enter into video play interface. As follows:
Note: support formats: 3gp, MP4 etc.
Page 84
ST308 Mobile IPDA
78
17. Music
Click music to show all the music types and click file to play
the music. As follows:
Ø Songs: check all the music
Ø Artist: in accordance with the artist's name to divide the
type of songs.
Ø Album: in accordance with the album name to view the
songs.
Ø Genre: check different genres
Ø Playlist: view the current playlist and pre-existing
playlist.
Page 85
ST308 Mobile IPDA
79
Press one song entered the media player interface, click
menu:
● Library: check this machine music library file.
● Add to playlist: add the songs to the playlist.
● Use as ringtone: set this song as ring.
● Share: built-in many methods to share
● Remove: remove this song.
During playing the song, you can press the side keys to
adjust the volume.
Note: support formats: MP3, AMR, WAV, mid, Ogg etc.
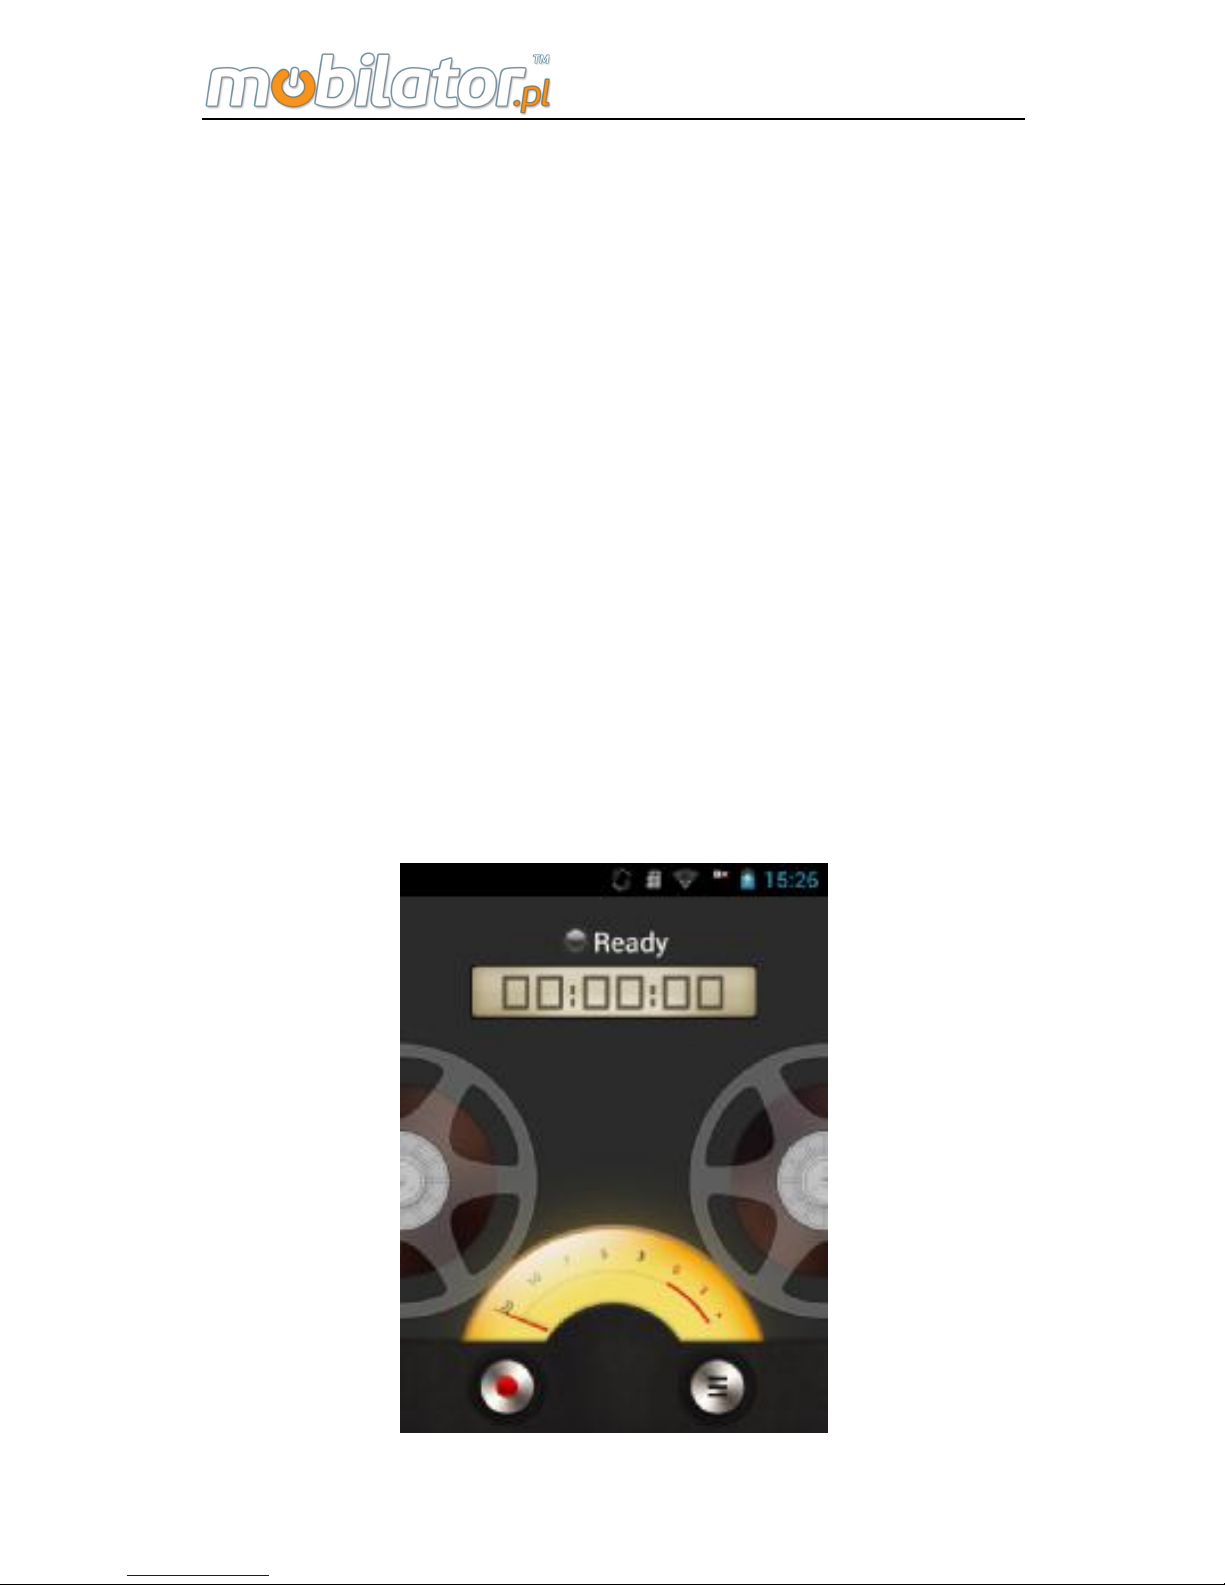
18. Recorder
The device provides a long time recording function; please
make sure that your device has enough storage space. As
shown in the following picture:
Page 86
ST308 Mobile IPDA
80
Recording method:
Ø Keep the microphone near the sound source.
Ø Click to start recording; click to end, and then
click pop up the record list to check the record file.
Ø After the recording, it will save automatically.
Ø Click menu key to choose the storage location and
choose the file type.
Tip: Using media player can directly play the recorded file.
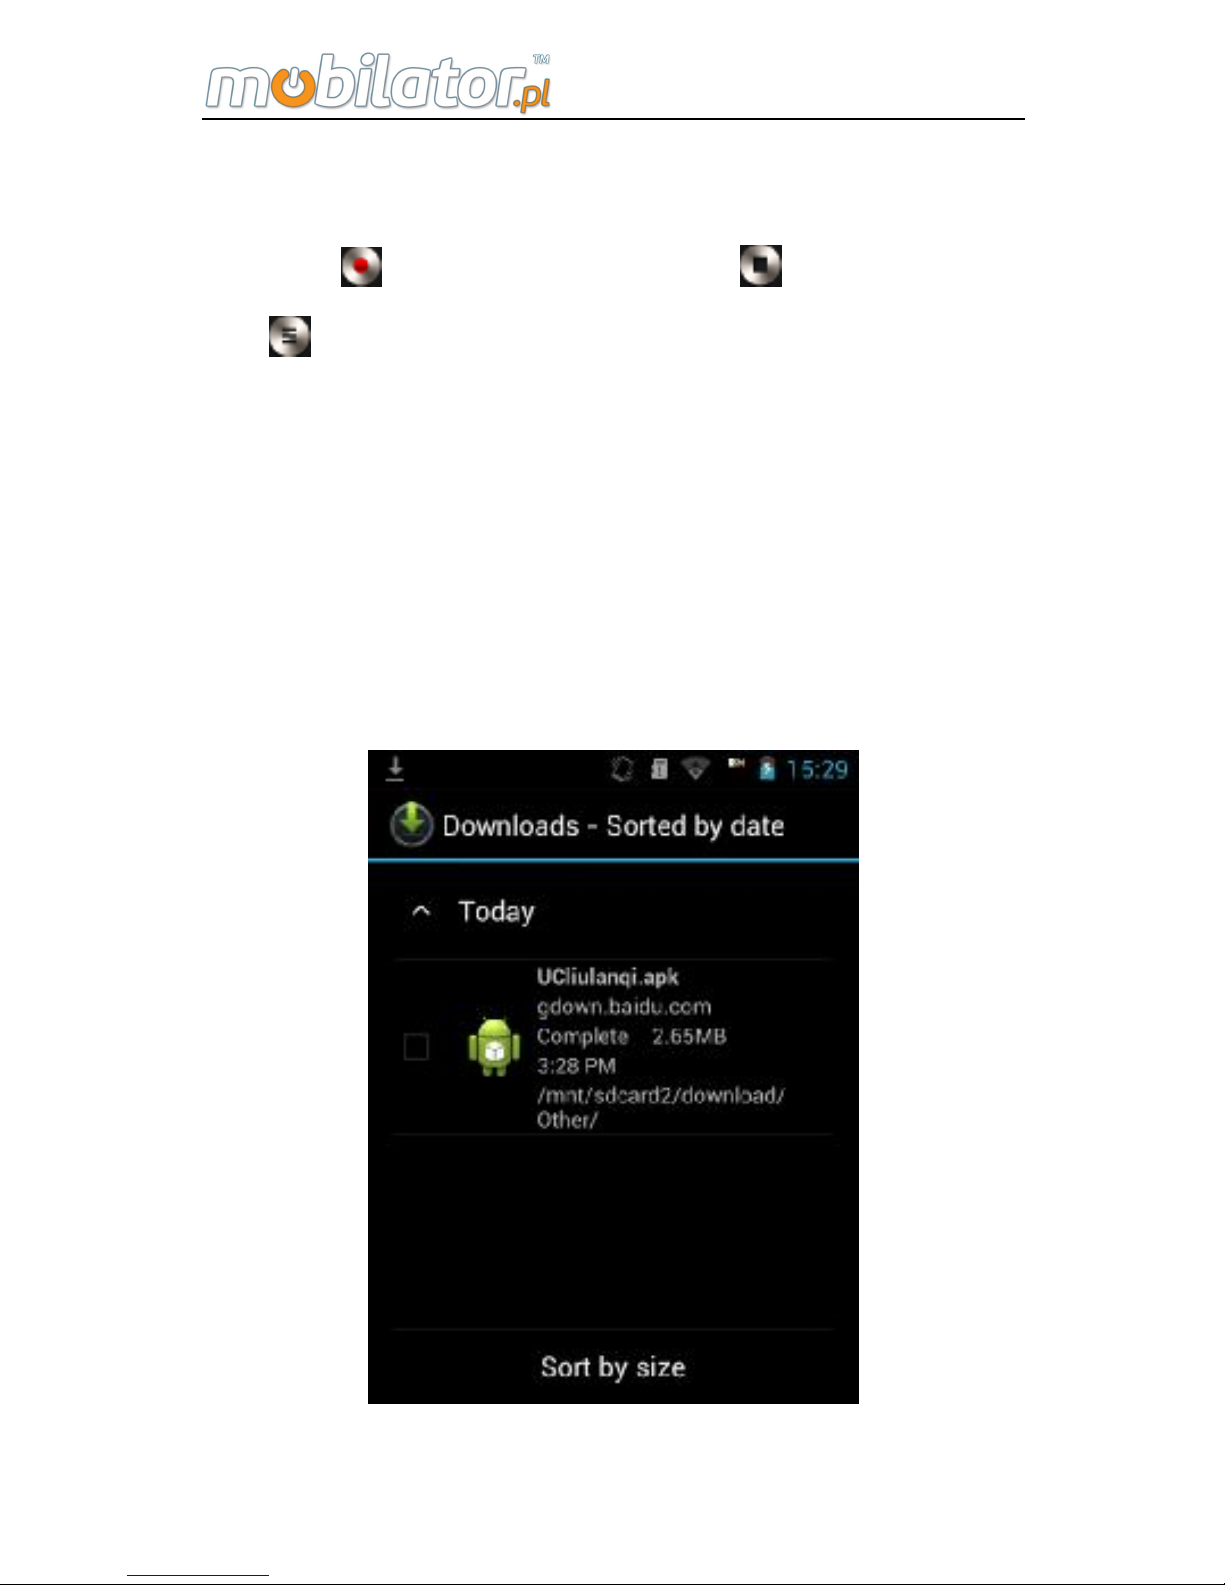
19. Downloads
The content is downloaded from the Internet. Click the
downloaded file to install. As follows:
Page 87
ST308 Mobile IPDA
81
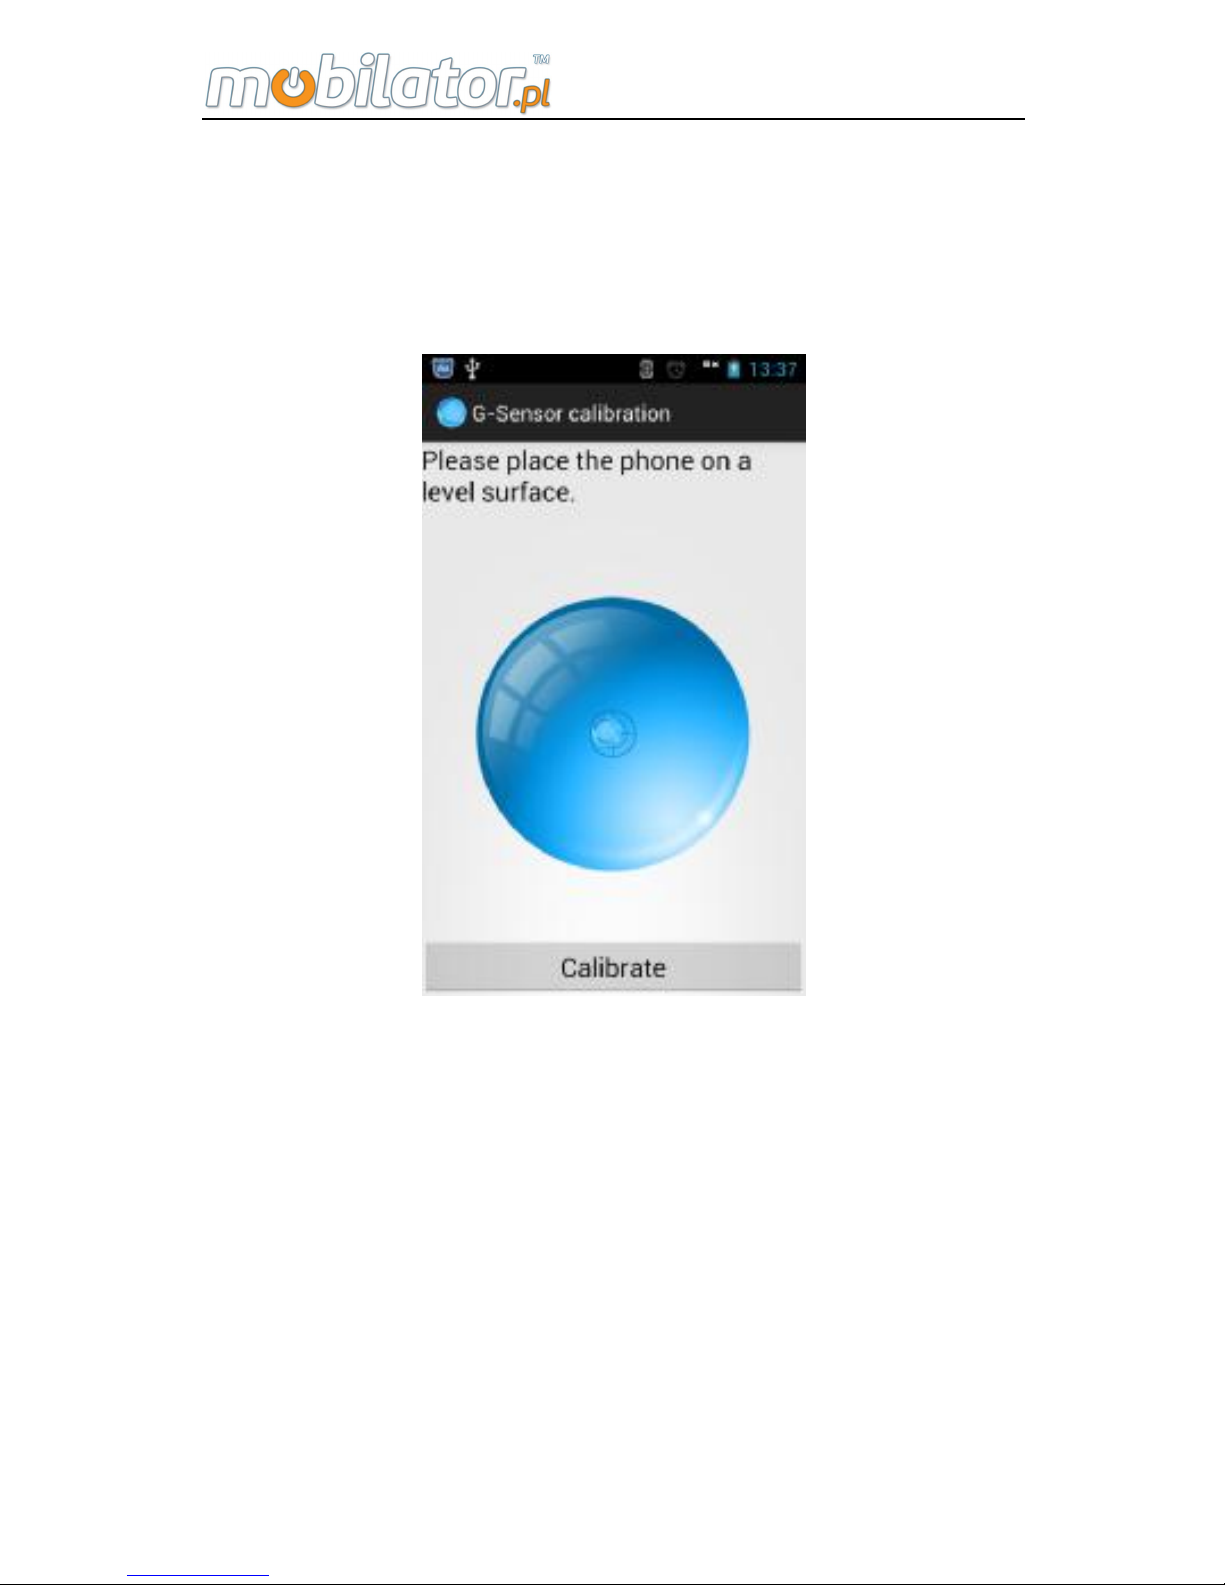
20. G-Sensor Calibration
Click Setting-Display-G-Sensor calibration to enter. Please
follow the tip on the screen to calibrate. As the following
picture shows:
Click “Calibrate” to start this program. When the water ball is
located in the cross center, the calibration has finished and
press “ok” to accomplish the calibration.
21. How to Install and Uninstall Software
Install
In the "My Files" interface, please find the downloaded
installation package (apk file).
After clicking installation package, if pop “installation is
Page 88
ST308 Mobile IPDA
82
forbidden", please following up the instruction to set: open
“Settings--Security--Unknown Sources” and then input
password (default password is 1234); then returned to the
"Settings--apps" to click "Install".
After successful installation, go back to the main menu
to run the installed application.
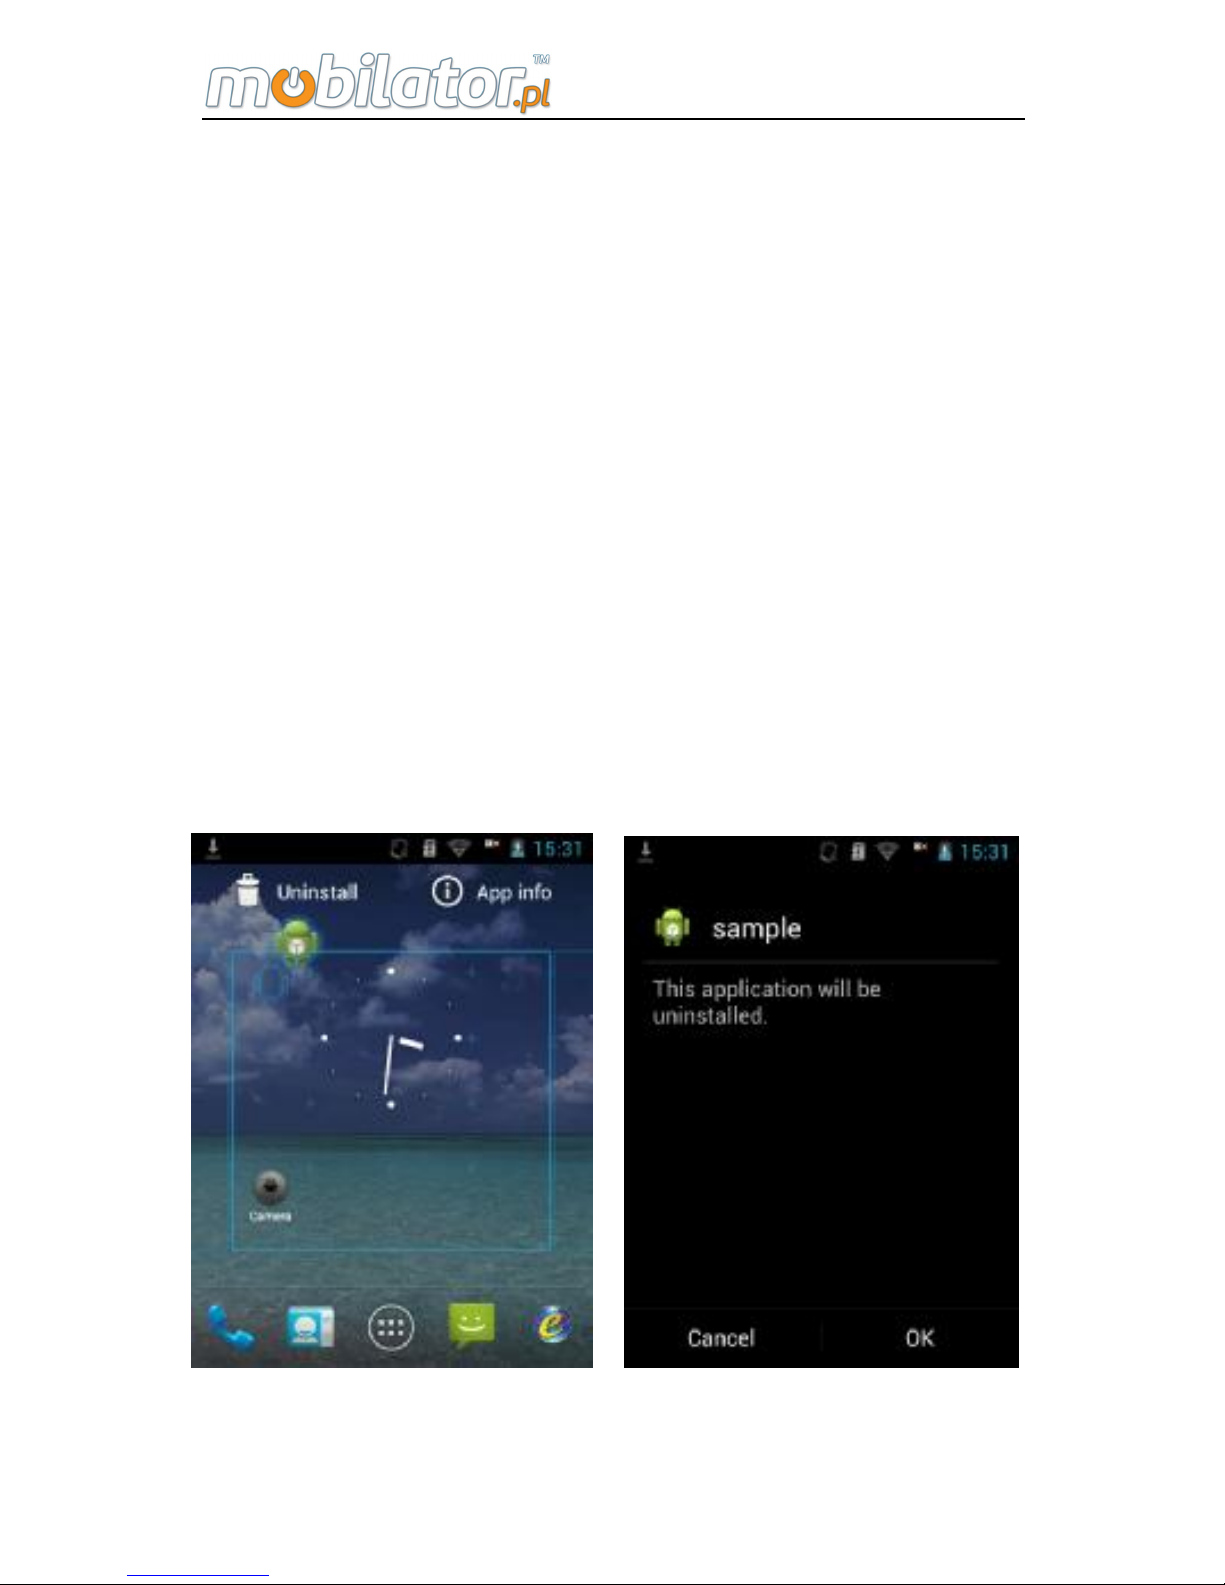
Uninstall
Enter " Settings > apps > Manage apps".
Choose the application; click "uninstall". Or enter into
the menu interface and choose the programme need to be
uninstalled and keep pressing until shake, then you can
move the icon to the desktop and a uninstalled interface will
pop up. Click "OK" to uninstall the programme, and then
click "OK" again to finish uninstall.
Note: The intelligent device has open application software;
Page 89
ST308 Mobile IPDA
83
this feature is only used by personal but not for commercial
purposes. For commercial purposes, it must need
professional adaptation and test.
22. How to Install the USB Driver
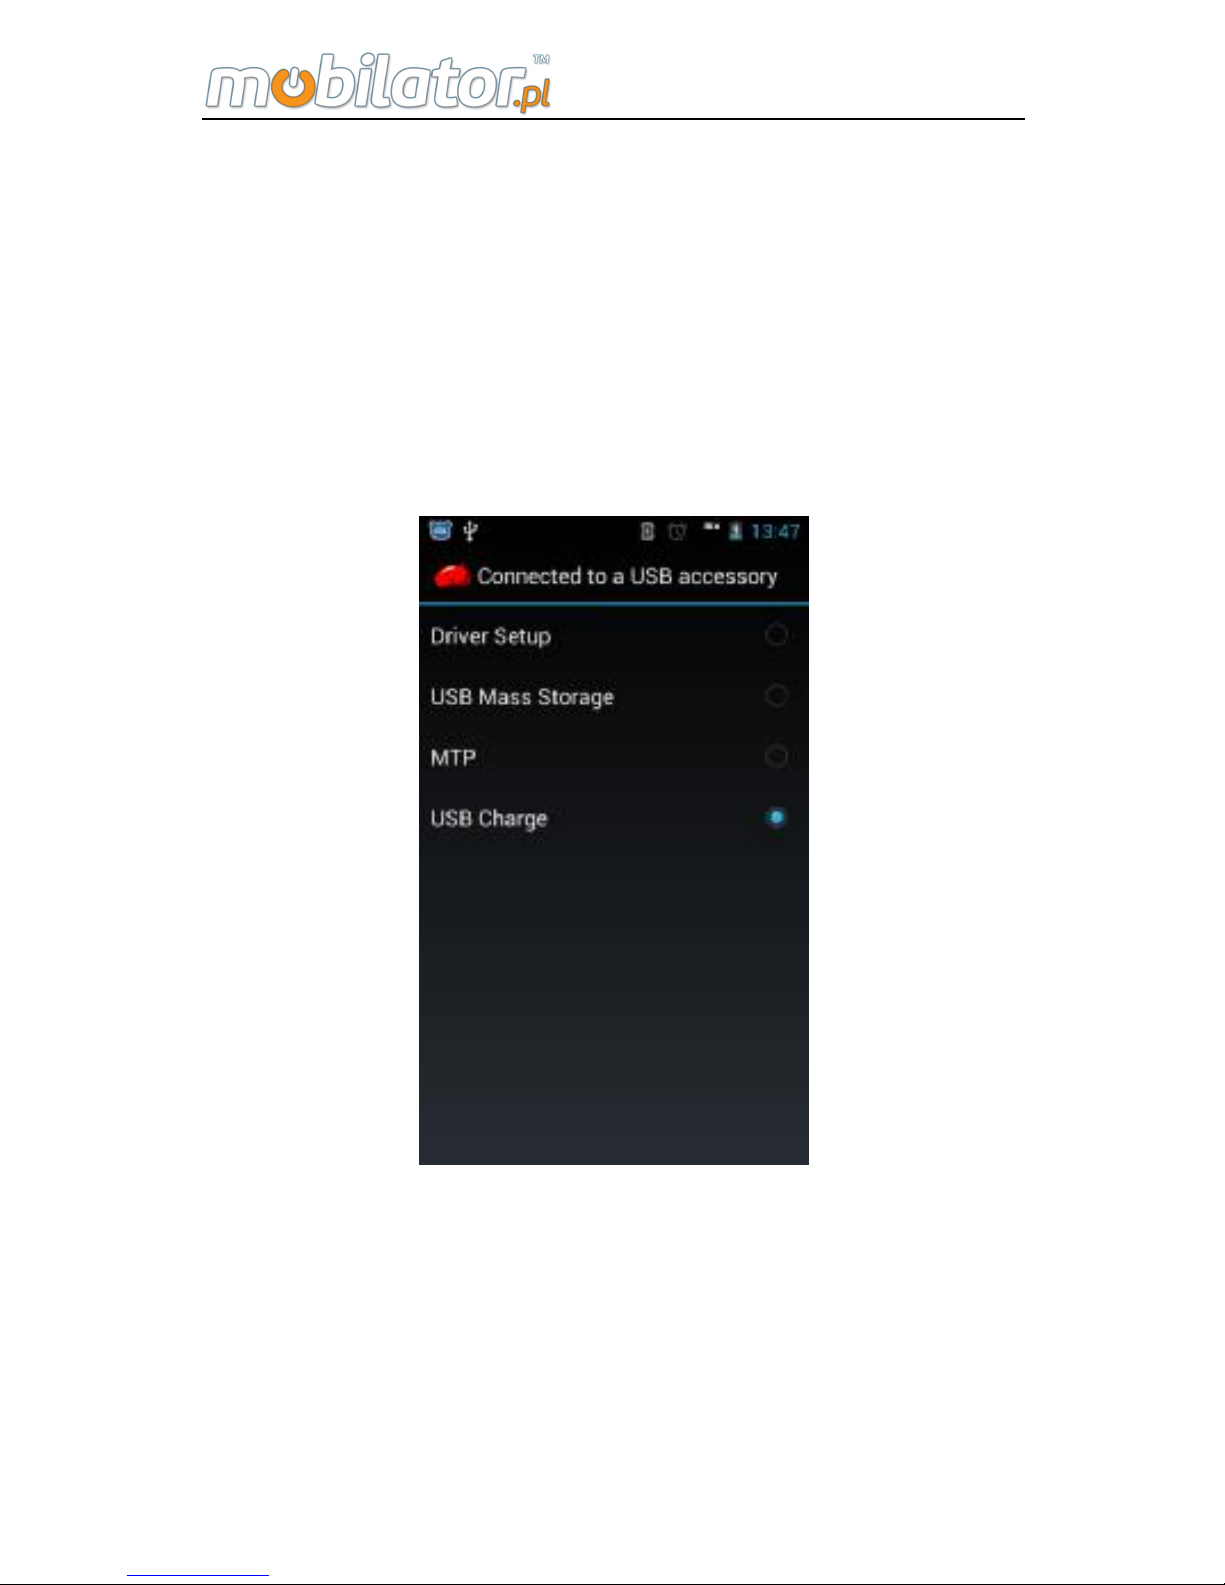
Connect the USB data cable to the tester, pull down the
prompt bar and click the “Connected to a USB accessory”,
as the following:
Page 90

ST308 Mobile IPDA
84
Chapter IV
Usage and Maintenance
The following suggestions are helpful for the users to use
and maintain this tester.
Ø Put the tester and all the accessories in the place
where the children can't reach.
Ø Please keep the equipment dry. Because there may be
mineral substance in the rain, moisture and various liquids
which can corrode the circuits.
Ø Please keep the tester far away from the magnetic
equipments like magnetic card and floppy; don't put the
tester, battery and charger in the electromagnetic field like
electromagnetic oven and microwave oven.
Ø Don't put the tester in the high temperature place.
Because the high temperature may shorten the lifespan of
the electronic equipment, damage the battery and make the
plastic accessories deform or melt.
Ø Don't put the tester in the low temperature place.
Because when you move the tester from lower temperature
place to the normal temperature place, there will be
moisture inside of the tester, which may damage the circuits
board.
Ø Please don't try to uninstall the tester because the
improper operation of the nonprofessional person may lead
to the damage of the tester.
Ø Please don't throw, hit or shake the tester because all
rude using method break the inside main board.
Page 91

ST308 Mobile IPDA
85
Ø Please don't use the irritant chemicals, irritant
cleanser or caustic cleanser to clean the tester. When
cleaning the tester, please use rag with mild soap water to
wipe gently.
Ø Please don't spread the pigment for the tester. Because
the pigment may obstruct the usage of the active
accessories.
Note: The max SAR is 2.0W/Kg, which meets the
requirement of the national standard GB 21288.
Chapter V
Faults and Solutions
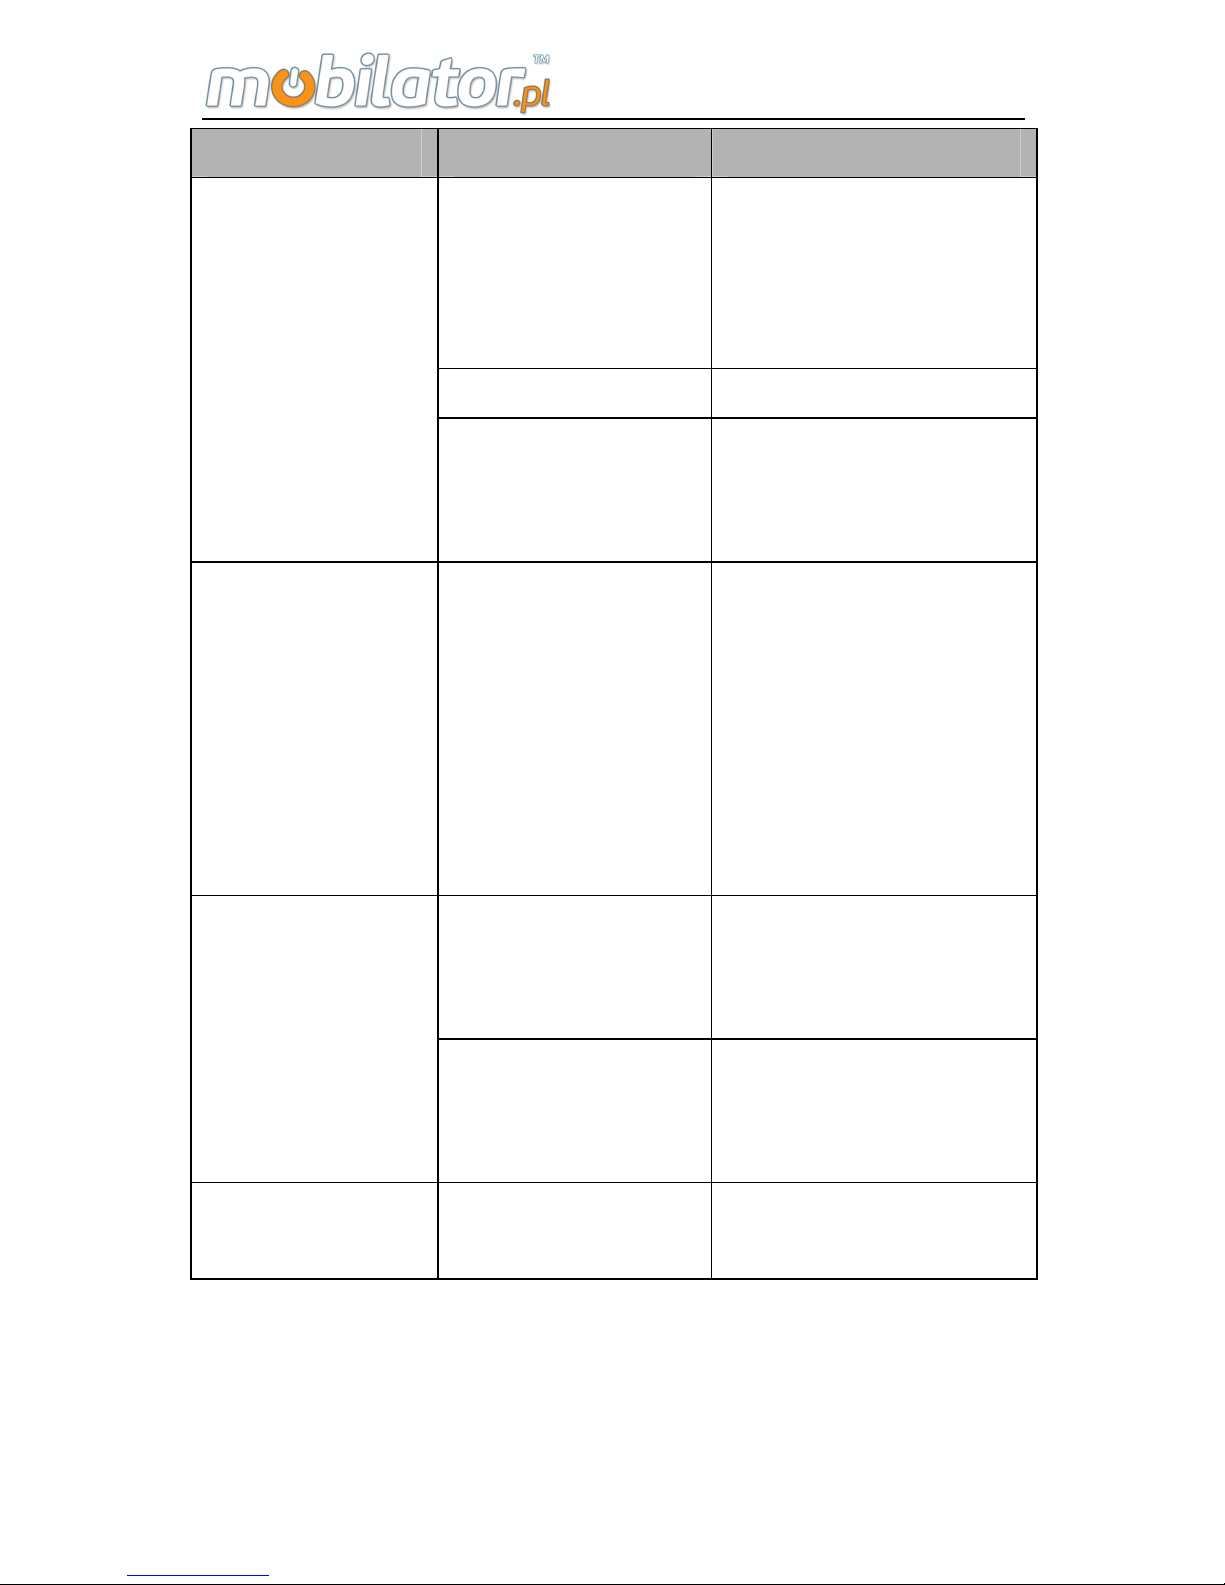
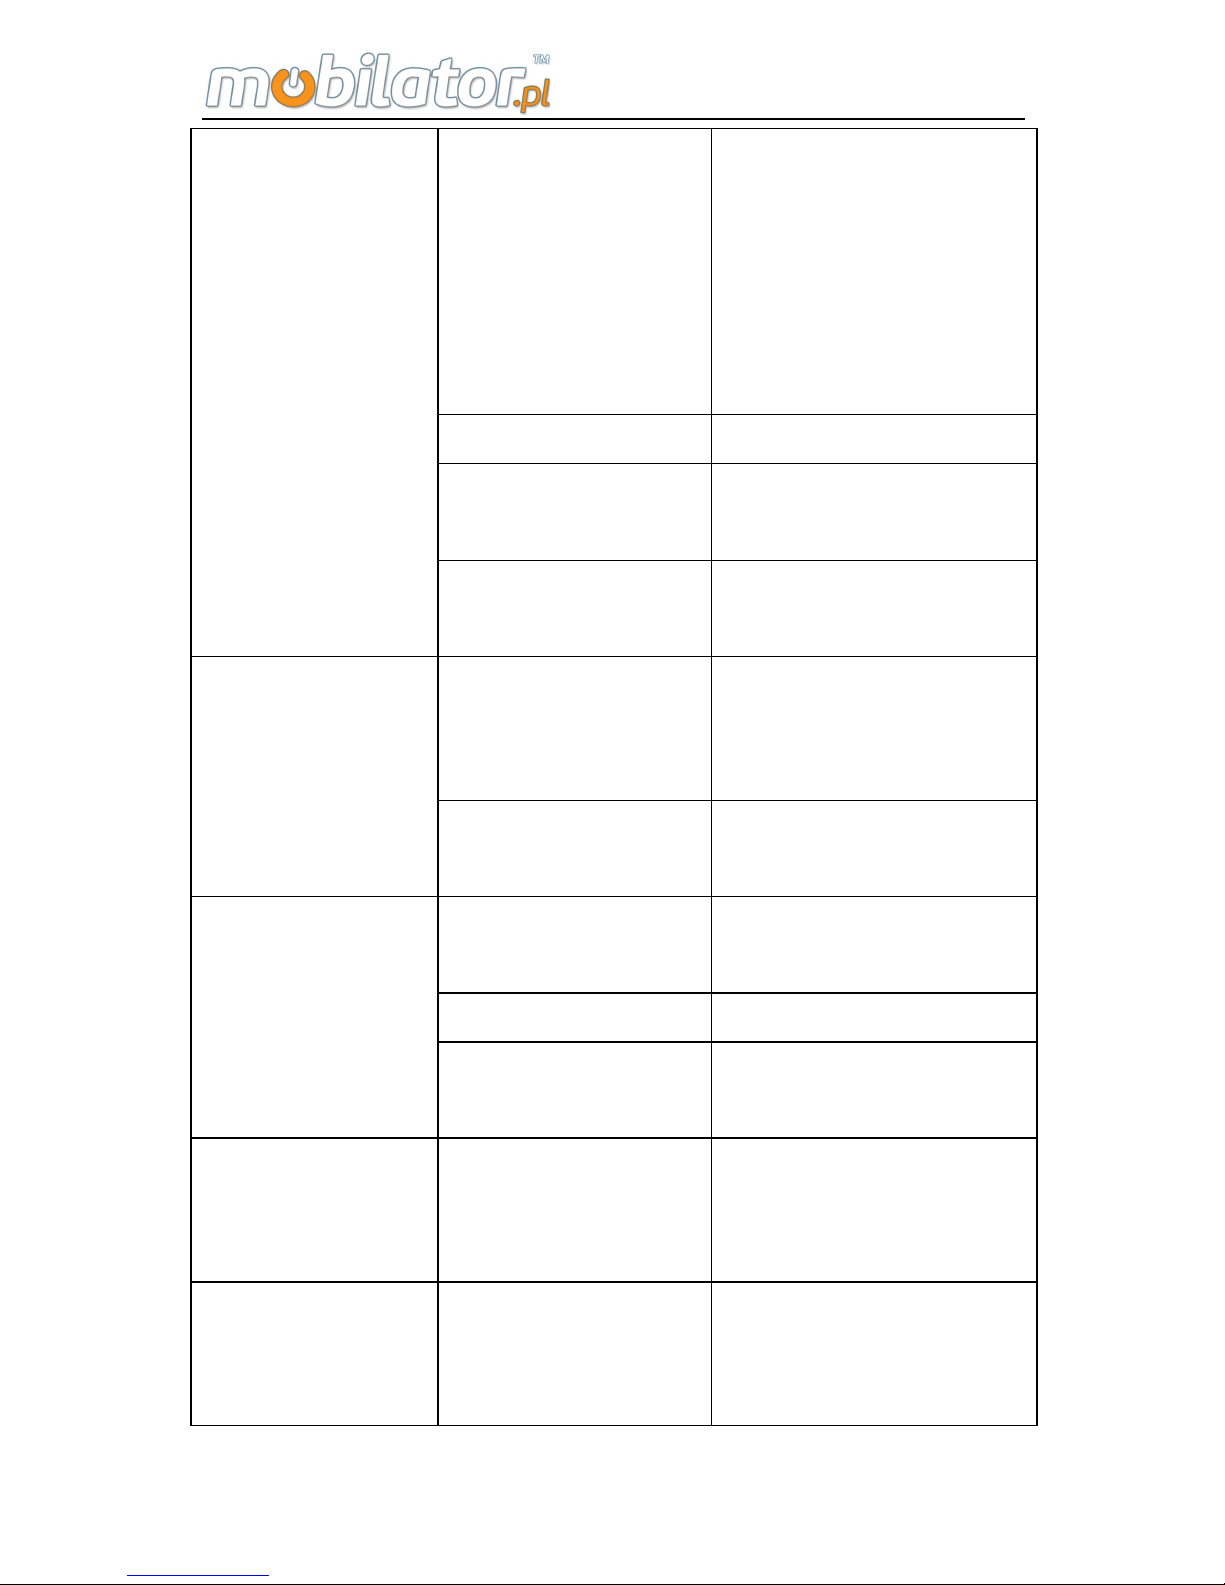
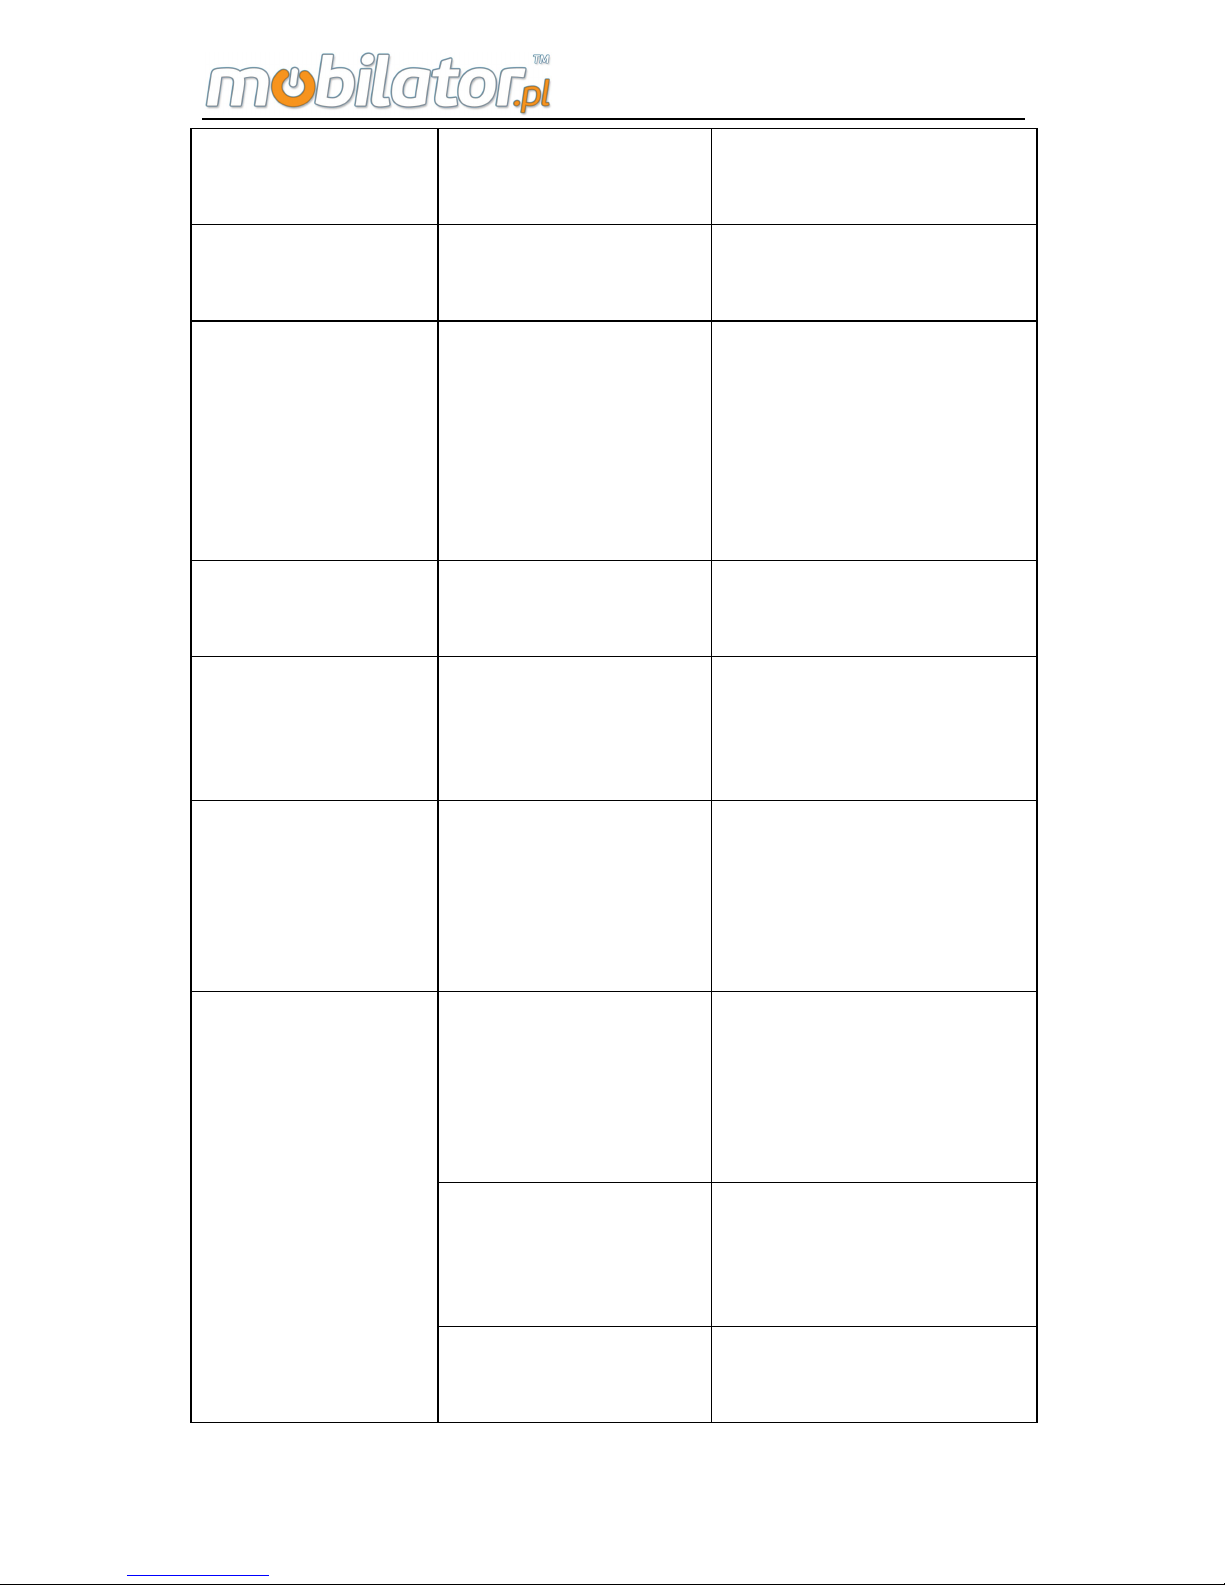
If you meet the following problems during the using process,
please try to use the "Faults and Solutions" first to do the
relative operation. If the problems still exist, please contact
the professional maintenance person.
Page 92
ST308 Mobile IPDA
86
Problem Reason Solution
The time of
pressing the
power key is not
enough.
Press the power key
for over 2 seconds
and more.
Low Battery Charge the tester
Unable to
switch on the
tester
Poor contact of
the battery
Reinstall battery or
clean the battery
contact point.
Some
programs can't
be used
normally.
The storage
space is not
enough.
Clean the messages
of built-in multimedia
promptly and other
application
programs as well as
the download
application records.
The battery
performance
declines.
Change the battery.
The standby
time is not
enough.
Play games and
music for a long
time.
Limit the time of
playing games and
music.
Charging fault
Poor contact
Check the contacts
or change plug.
Page 93
ST308 Mobile IPDA
87
Low battery
voltage.
There will be no
charging display.
Charging for about
half an hour and
then unplug it to
recharge.
Battery fault Change battery.
Wrong charger
type
Change proper
charger.
Charger fault
Change or mend the
charger.
Weak signal
Move to a wide
place and then try
again.
Can't connect
with the net.
Not in service
area.
Confirm the network
coverage.
Equipment card
fault
Check or change
equipment card.
Dialing error Redial
Can't make a
call.
Reach to the
cost limit.
Contact with the
operator.
Invalid button
operation
Get accident
interference.
Remove the battery
and then install 1
minute later.
Some calls
can't realize.
The telephone
number digits
exceed the limit.
Check the telephone
number.
Page 94
ST308 Mobile IPDA
88
Setting fault
Check whether set
"calling barring".
Can't find the
Contacts.
The equipment
card is changed.
Use the original
equipment card.
There is no
number in the
Contacts.
Wrong setting or
the battery is
long time in low
voltage or long
time no use.
The saved data
have lost due to the
long time low
voltage.
There is no call
warning tone.
The volume is
set to mute.
Reset the proper
volume.
PIN code error
Input the wrong
password for
three times.
Contact with the
operator.
Error of
automatically
locking
password
Input the wrong
password.
(forget the
password)
Please contact with
the appointed
after-sale service
center.
The battery
electricity is
severely not
enough.
Please charge.
Setting reason
Check whether
setting the auto
power-off or not.
The equipment
is
automatically
closed
Get accident
interference.
Restart
 Loading...