

Drill & Drop Bluetooth
What’s In the box?
•
Sentek Drill & Drop Bluetooth Probe
•
High current ER14505 Lithium Ion battery
What You Need To Get Started
•
Android Mobile Device (a phone!) with Bluetooth Capability*
•
Google Play Store account
Quick Start
•
Go to the Google Play Store
•
Search for the application called Sentek Connect,
•
Install the Sentek Connect App
Next Steps
•
Open the Sentek Connect application
•
Follow the steps to setup your phone and probe.
•
Install the probe in the ground using the installation guide.
•
Perform a Field Test and Start collecting data
• Mobile device must be running
Android version 4.3 or later.
• Requires Bluetooth 4 capability.
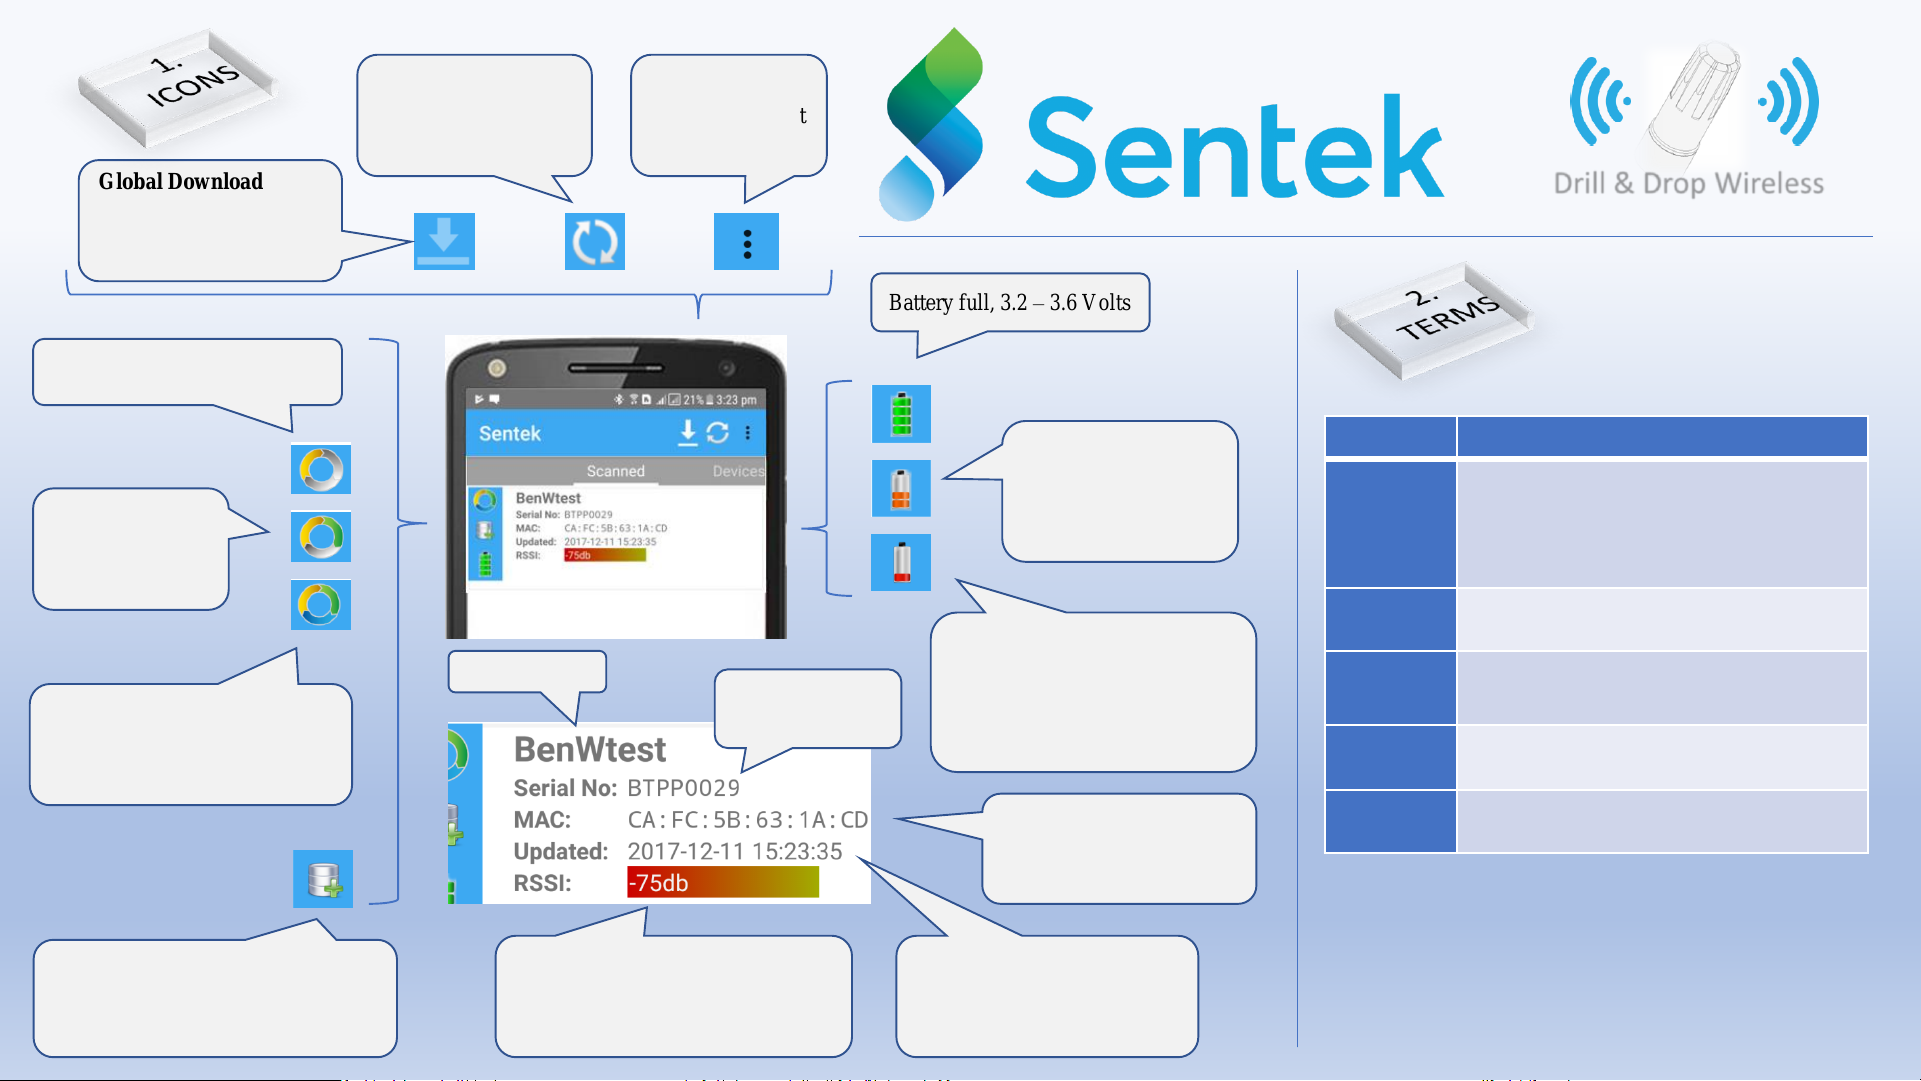
Menu button –
opens the context
sensitive menu.
Scan button – starts
scanning for probes
within range
Global Download
button – starts download
process for each probe
visible on screen.
Yellow: Factory state, no
configuration at all.
Yellow + Green:
Configured but
not deployed yet.
Yellow + Green + Blue:
Configured and field tested,
we’re in business!
When this symbol appears, there’s
new data available in the probe but
it hasn’t been download from the
probe to your mobile device.
Battery low, < 3.0 Volts. Probe
unable to take samples but will
still communicate. After battery
replacement, probe will resume
logging.
Battery low, < 3.2
Volts. Probe will still
work but battery near
end of life
Battery full, 3.2 – 3.6 Volts
RSSI – Received Signal Strength
Indication.
0dB = Strong, -110dB = very weak
Database
Probe Status
Battery Status
Probe name
Serial No: Probe
serial number
MAC: Media Access
Address, unique network
address for this probe
(Shown when Advanced Enabled)
Updated: Time and date of
the interaction with your
mobile device.
Term
Definition
APP
Application for Smartphone or mobile devices
obtainable in Google Play store (Android) or Apples’
App Store. (IOS)
BTLE
Bluetooth Low Energy Version 4 onwards (Also
known as Bluetooth smart)
Lite
This version of the Sentek “Drill & Drop Connect”
App has all probe configuration features and
firmware upgrade disabled.
Mobile Device
Any tablet or phone that runs Android OS 4.3 or
higher, with support for Bluetooth 4* or above
(*AKA Bluetooth Low Energy BTLE)
Sentek Device
Bluetooth enabled device – probe, dongle or other
future product.
Drill & Drop Wireless

I
rriMAX Live Account Enable/Disable
IrriMAX live accounts are enabled/disabled in the Configuration wizard
– after successfully establishing a connection with a probe the current state of the probe is retrieved –
the status will change
from “None” to “Enabled” and visa
-versa.
None: No IrriMAX user account has been associated with the probe – this is the default state of a new probe – or a connection wi
th
the probe has not yet been established to retrieve the account details from the probe. After successfully connecting with a probe –
the state will change to reflect the current state of the probe.
Enabled: An IrriMAX Live account has been entered in the Configuration Wizard. The Probe is able to upload to an IrriMAX account
Date: On completion of an Upload the status is change to display the date of the last successful upload.
Scanned/Device Page Filtering
The Scanned Page List and the Device list are filtered by the Group ID’s and Show Public/Other Groups slide switches in the
Settings menu
Probe
visibility is controlled by the Group ID. By default, only probes that are Public or have a known and enabled Group ID are visible.
Visibility
settings are controlled in the settings menu through the following items:
Show public devices
– Option shows public devices that have not yet had a Group ID assigned.
Show devices from
all groups – Option shows all devices that are visible to the mobile device.
Add new Group ID
– Allows the creation of additional Group IDs
Group ID List
– Allow the management of Group IDs
Note the Connect
App only allows connection to probes that are Public, have a known (and enabled) Group ID, or have been unlocked.
If a Connect App will not allow connection to a probe then it will have a dark grey background.
Settings Menus
Are context sensitive
– they will change depending on which screen in shown – e.g. when the user is connected to a probe, etc.
Main Menu
Settings
– Allows the user to customise the app settings to their own preferences, as well as enable/disable auto upload and control
what is displayed (in terms of Owners ID’s and public devices).
Download
– Will commence a global download – the mobile device will endeavour to download from all Sentek devices in the Scanned
List.
Upload
- The mobile device will endeavour to upload probe readings that have been downloaded (but not yet uploaded) to IrriMAX
Live.
For a successful upload to take place
WiFi (or Mobile data) must be enabled (and available) and an IrriMAX user account must have
already been associated.
Unlock Probe
– This feature allows users to unlock probes assigned to a Group ID they have forgotten or lost. To use this feature contact
Sentek and provide the probe Serial number along with proof of ownership
– to receive an unlock code which will unlock the probe.
About
– Provides a description of the app and details about the version of App installed on the mobile device

Probe Settings Menu
Settings
– Allows the user to customise the probe settings to their own preferences.
Clear Data
– Clears all data records stored on the probe.
Force Download
– Forces download of all data records stored on the probe regardless of whether or not they have already been
downloaded to the mobile device.
About
– Provides details regarding the version of code installed on the probe – as well as any error codes if errors have occurred. (These
need to be reported to Technical Support
.)
Settings Menu
Details of the Probe Menu settings are shown on the right.
Device Name – Allows the probe to be named –
this will also be the name of the
graph in IrriMAX live (or IrriMAX desktop).
Sample Interval set the rate at which the probe samples. A pre-selected list is
provided from 1min to 12 hours.
Select Owner ID to set –
allows the probe to be assigned to nay of the owners in
the owners ID list.
The Serial Number is set by Sentek during manufacture – it provides the probe
with a unique
identification. (This number is required should the probe need to
be unlocked.)
Transmit Signal Strength setting allows a +4dBm gain/increase to the probes
transmission level but doing so will reduce the battery life.
Enable Firmware Update Notification – when enabled will prompt the user to
upgrade whenever the app is newer than the probe. (When disabled it will not.)
Enable Advanced User – changes the options available in the probe settings
menu – allowing sensors to be configured in the “Sensor Test” page (ABCD
values and probe normalisation)
Date out of sync Warning allows the user to set how far out the time is
permitted to drift before a warning is displayed.
Add new owner ID – allows the user to enter new owner ID’s to the mobile
device’s owner IDs list.
Owner IDs List– Displays a list of all owner IDs that have been added to the
mobile devices allowing them to be selected as included/excluded from the
scanned/device lists.
Scroll Down

Drill & Drop Bluetooth
FCC Compliance Statement
This device complies with part 15 of the FCC Rules. Operation is
subject to the following two conditions:
(1) This device may not cause harmful interference, and (2) this
device must accept any interference received, including
interference that may cause undesired operation.
Information to user:
This equipment has been tested and found to comply with the
limits for a Class B digital device, pursuant to Part 15 of FCC
Rules. These limits are designed to provide reasonable
protection against harmful interference in a residential
installation. This equipment generates, uses, and can radiate
radio frequency energy. If not installed and used in accordance
with the instructions, it may cause harmful interference to radio
communications
However, there is no guarantee that interference will not occur
in a particular installation. If this equipment does cause harmful
interference to radio or television reception, which can be
determined by turning the equipment off and on, the user is
encouraged to try and correct the interference by one or more
of the following measures:
• Reorient or relocate the receiving antenna.
• Increase the distance between the equipment and the
receiver.
• Connect the equipment to outlet on a circuit different from
that to which the receiver is connected.
• Consult the dealer or an experienced radio/TV technician for
help.
Caution: Changes or modifications not expressly approved by
the party responsible for compliance could void your authority
to operate the equipment.
 Loading...