

Page 1
VXU Operator’s Manual
Invensys RadioRead System
Page 2

Metering Systems
VXU Operator’s Manual
Table of Contents
1. Components of the VXU System: ............................................................... 3
2. Setting up the VXU for Reading:................................................................. 4
3. Instructions for AutoVu:.............................................................................. 6
4. VXU System Specification and Description:............................................ 11
- 2 -
Page 3

Metering Systems
VXU Operator’s Manual
1. Components of the VXU System:
The components that make up your vehicle read system are the following:
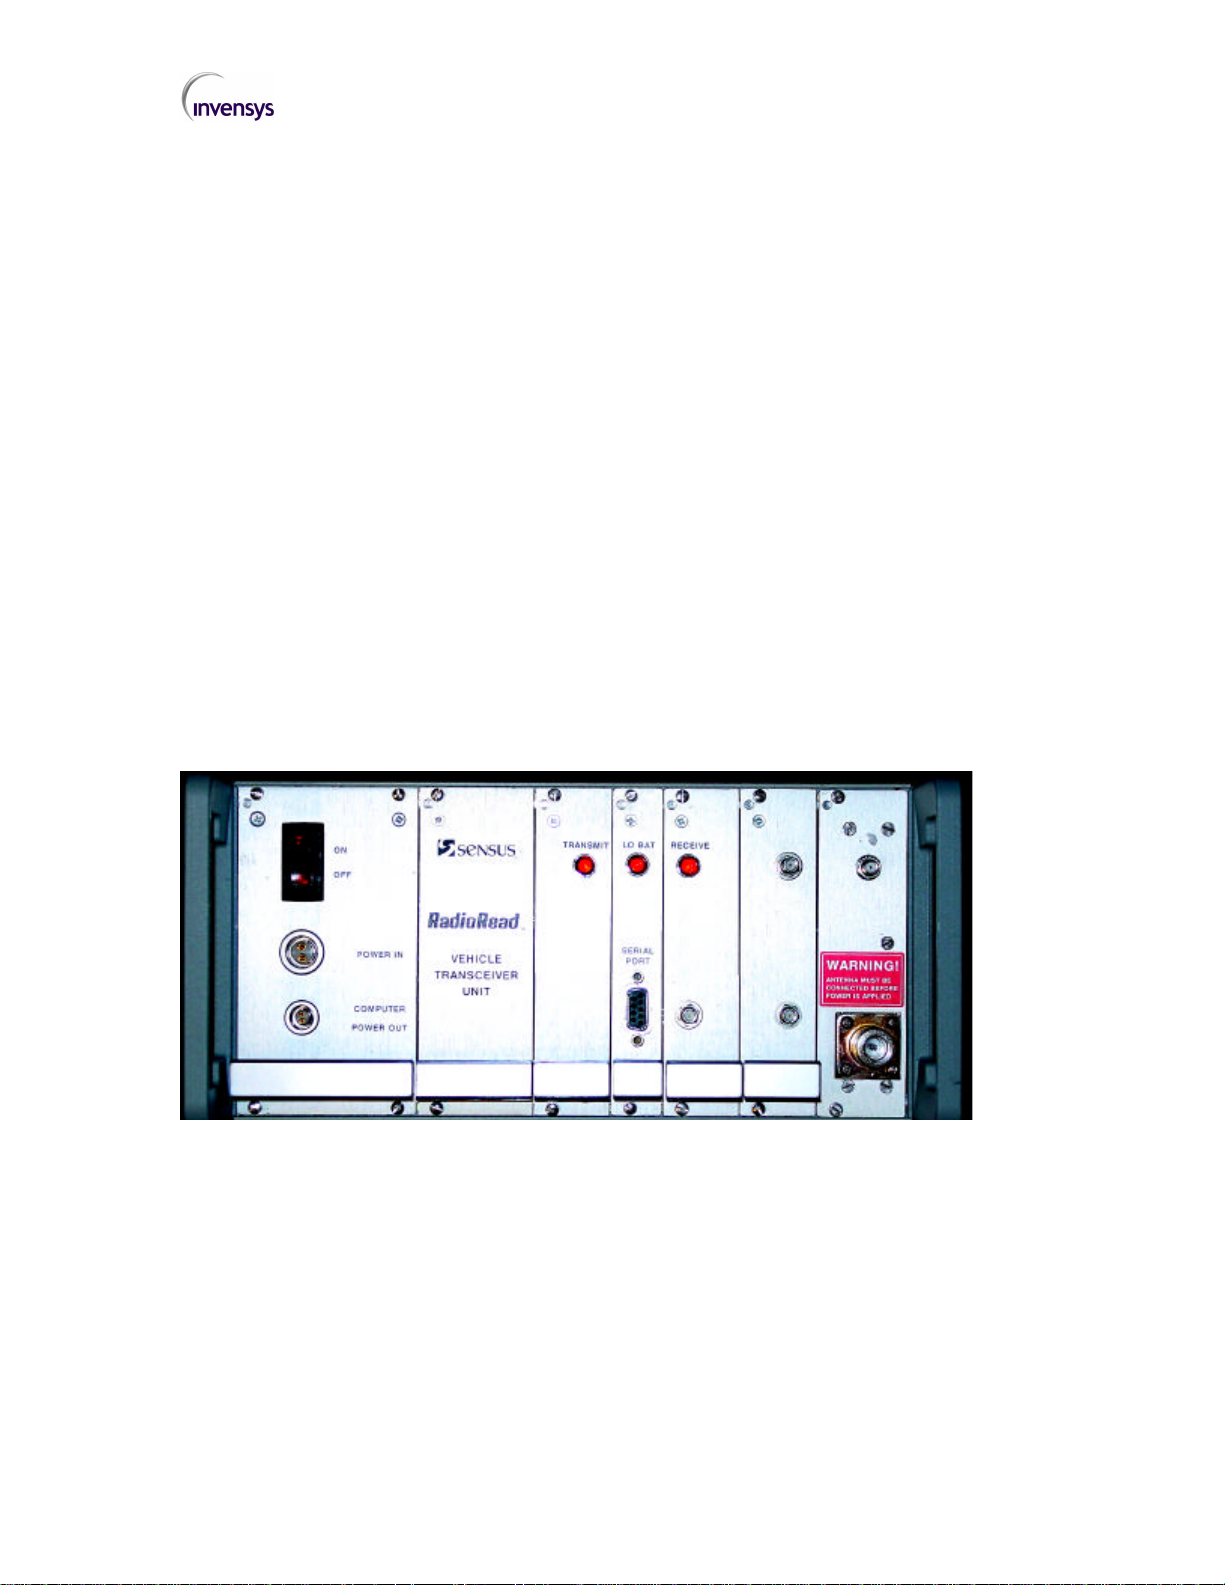
1. VXU (Vehicle Transceiver Unit). This is the big gray box with the cooling
fins and two handles on the front.
2. Laptop computer. The model of your laptop may vary, but Invensys
currently supplies the Dell™ Latitude laptop computer with the VXU system.
3. Laptop Power Supply and cables. The laptop will have two power supply
options. One set of charging cables plugs into a standard wall outlet, and the
other set is a special converter box and cable that connects directly to the
VXU chassis. For general charging when the VXU is not in use, use the
standard wall outlet charger. To keep the laptop charged while using the
VXU, use the converter and cable that connects directly to the VXU chassis.
4. Magnetic mount antenna. This antenna connects directly to the VXU and
can be mounted on the top of your vehicle.
5. Serial Cable. The serial cable connects the VXU and laptop computer, and
is used to transfer data between the VXU and laptop.
6. Attenuator cap. This cap is supplied to fit on the Antenna connector on the
VXU chassis when the VXU is not in use.
7. VXU Carrying Case. This case is designed to protect your VXU from
damage during transit, and has room for the other components in the system.
The VXU should be stored in its case, in a dry, well-ventilated place when not
in use.
Note: It is important to always begin your vehicle reading process with a fully charged laptop
battery. For this reason, it is advisable to keep your laptop plugged in to a wall outlet, using the
supplied charging pack, whenever it is not being used for meter reading. By doing so, you can
ensure that the laptop always has a full charge when you begin the reading process. The laptop
does get power from the VXU when it is properly connected to the VXU, but often the vehicle
itself cannot supply enough power to run the VXU, the laptop, and charge the battery at the same
time. By starting with a fully charged laptop battery, you can significantly lower the risk of your
laptop shutting off due to a low battery.
- 3 -
Page 4

Metering Systems
VXU Operator’s Manual
2. Setting up the VXU for Reading:
Note: It is important to always begin the reading process with a fully charged laptop battery. The
VXU system is designed to keep your laptop charged while in use, but often times the vehicle
electrical system is unable to supply enough current to adequately run the VXU, the laptop, and
charge the laptop battery at the same time. For this reason, it is recommended that you keep the
laptop plugged in to a wall outlet with the supplied charging cables, when it is not being used for
meter reading. At very least, plug in the laptop to a wall outlet for several hours prior to reading
meters, to allow time for the battery to become fully charged. This will greatly reduce the chances
of losing readings due to a laptop failure during the reading process.
Setting up the Vehicle Read system is a relatively simple process, and involves
just a few cable connections. There are a couple of important things to
remember when setting up the system, however:
A. NEVER run the VXU (interrogate or read meters) without first connecting the
antenna cable to the VXU chassis. This can seriously damage the VXU
transmitter, and may result in the VXU becoming inoperable. To avoid such
a possibility, always connect the antenna cable to the VXU chassis FIRST,
and the power to the VXU chassis LAST.
B. Place the VXU chassis in the vehicle so that the cooling fan hole (on the right
side) and the cooling fins (on the back) are not obstructed.
1. To begin setting up the Vehicle Read system, place the VXU chassis in a
convenient location inside the vehicle. Keep in mind that the power cables
will need to reach the power port on the vehicle. It is helpful for the operator
to be able to see the face of the VXU chassis when operating the system.
2. Connect the Antenna cable to the connector on the VXU chassis. This is
clearly marked with a red warning label reminding you to do this before
applying power to the VXU.
3. Connect the Serial cable to the VXU and laptop computer. The cable should
only fit one way to the VXU chassis (the male end to the VXU, the female end
to the laptop). Secure the cable with the twist screws on each side of the plug
to prevent the cable from becoming dislodged during use.
4. Connect the laptop power supply cable and transformer to the VXU and
laptop. Notice that the location of this connector on the VXU is clearly
marked “Computer Power Out”. The cable provided has a special connector
that will lock into place. This connector will only fit one way, and is a different
size than the main VXU chassis power connector. There should be a
- 4 -
Page 5
Metering Systems
VXU Operator’s Manual
transformer box and cable that connects between the VXU and laptop. There
will be a special end to the cable that connects to the back or side of the
laptop. (It is on the back of the Dell™ Latitude). Note: If your laptop computer
does not have a power cable that connects to the “Computer Power Out” port on the VXU
chassis, you should be able to purchase a cable from the computer vendor. This will allow
you to connect the laptop directly to a second power port (cigarette lighter receptacle) on the
vehicle. In some cases it can be beneficial to connect to a separate power port to power the
laptop, especially if the vehicle electrical system is weak, or cannot supply enough current
through one power port (cigarette lighter receptacle) to run the entire Vehicle Read system.
5. Connect the main VXU chassis power cable to the VXU “Power In”
connector, and connect it to the vehicle power port (cigarette lighter
receptacle). Test the power connection by turning on the VXU at the main
power switch on the face of the VXU chassis, and check that the switch glows
red. This indicates if the system is receiving power. Depending on the
vehicle, you may need to have the vehicle running in order to get current from
the power port (cigarette lighter receptacle).
6. Power up the laptop computer, and open the AutoVu ™ application. You are
now ready to retrieve the route information from the route diskette and begin
reading meters.
VXU Chassis Face
- 5 -
Page 6

Metering Systems
VXU Operator’s Manual
3. Instructions for AutoVu:
1. Obtain a route diskette that has been loaded with the meters that need to be
read. This diskette must be loaded from the AutoRead program.
2. Set up the VXU in the vehicle, and remember to connect the Antenna wire
first, and the power last. Transmitting (trying to read meters) with the
antenna wire not connected to the VXU will damage the transmitter on the
VXU.
3. Connect the laptop computer to the VXU with the serial cable. Also connect
a power source to the computer to keep it fully charged while reading meters.
It is possible to connect the laptop to the VXU for power, or in some cases, a
separate power source on the vehicle is preferable. It is a good idea to fully
charge the laptop computer from an AC outlet inside before beginning the
reading process.
4. After the VXU and other components are connected, boot up the computer
and open the AutoVu application. It should open to the screen shown below:
- 6 -
Page 7

Metering Systems
VXU Operator’s Manual
5. Your particular screen may not display the “Vxutest” route. This is a route
that is used for testing AutoVu. You can ignore this route.
6. Place the route diskette into the laptop and move the pointer up to the menu
item labeled “Route”. A drop down menu will appear. Choose “Retrieve
New Route” from this menu. The screenshot below illustrates this.
7. A window should appear which will let you choose the location and the name
of the route file you wish to retrieve. The file should be found on “3 ½ Floppy
A:". The name of the route file itself will vary, depending on the name of the
route in the AutoRead program. However, the name of the route will be
“VXU001.rte” in most cases. In any case, the file that should be selected will
have an extension of “.RTE”. See the screenshot below.
- 7 -
Page 8

Metering Systems
VXU Operator’s Manual
1. Double click on the proper route file, or click once on the file name to select it,
and then click on the button labeled “Open”. The route should then be
retrieved from the diskette to the AutoVu database. Remember that when
you retrieve a route that has been read previously with the laptop, it will erase
any other readings you had taken for that route last time.
2. Once the route is retrieved, remember to change the CYCLE to something
different than it was the last time the route was read. For example, if you
read on Cycle 7 last month, change to Cycle 6, or Cycle 8, or any other
different cycle. If the cycle is not changed, no MXUs will respond to the VXU.
To change the Cycle, move the pointer up to “Route” again and select “Edit
Cycle/Class”. Then choose a different Cycle number, and click “OK” to save
the change.
- 8 -
Page 9

Metering Systems
VXU Operator’s Manual
3. Once the class has been changed, make sure all connections are still good,
and that the VXU itself is on, and then press “CTRL + R” to begin reading
meters.
4. It is important to save the readings periodically while reading. Every 15
minutes is a good rule of thumb. To save the readings to disk, first halt the
interrogation by pressing “ESC”. Wait about 10 seconds until the
Interrogation stops. Then press “CTRL + E” to export to disk. Another
window will appear which prompts you to choose the location to save the file.
The “3 ½ inch Floppy A:” should be selected. Usually, you can just press
- 9 -
Page 10

Metering Systems
VXU Operator’s Manual
the “Enter” key on the keyboard after pressing “CTRL + E” to save the
readings to the diskette, or click the “EXPORT” button. After several
seconds, the readings will be saved to disk and you can continue with reading
meters.
5. To begin reading again, simply press “CTRL+R”. You may also begin reading
again by moving the mouse up to “Route” at the top of the screen, clicking,
and choosing “Run Route”. The interrogation will resume. Remember to
repeat step 11 (to save the readings) periodically.
6. When finished reading the route, Export the readings to disk one last time,
and take the disk back to the office for processing. You can do this by either
pressing “CTRL+E” and then “ENTER” again, or just quit AutoVu and the
Export window (shown above) should pop up automatically. After pressing
“ENTER” or clicking on “Export” AutoVu will save the readings to diskette and
AutoVu will close.
- 10 -
Page 11

Metering Systems
VXU Operator’s Manual
4. VXU System Specification and Description:
See next page.
- 11 -
Page 12

SPECIFICATIONS
RadioRead
For Automatic Meter Reading System
Mobile Radio Vehicle Transceiver Unit (VXU)
GENERAL
The following specifications describe the requirements for a radiobased automatic meter reading system as it relates to the mobile radio
Vehicle Transceiver Unit (VXU). If meters and/or other equipment are
included in the proposal or bid, that material will be covered under a
separate specification.
RADIO SYSTEM REQUIREMENTS
The radio AMR system must have the ability to read meters equipped
with absolute encoder registers using either a hand-held or mobile
interrogation unit. The encoder registers will be connected to a Meter
Transceiver Unit (MXU) that will provide the radio link from the meter to
the interrogation device.
The radio AMR system will utilize a true two-way (interrogate and
respond) communication protocol that enhances system integrity and
reliability.
Upon completion of the meter reading route, the meter reading data
from the VXU will be downloaded via a PC with radio AMR software.
The radio AMR software will prepare and format the meter reading
data for the printing of selected management reports and the transfer
of the meter reading data to the billing software for customer inv oicing.
VXU BASIC FUNCTIONS
The VXU is considered the complete package that will permit the utility
to read meters by using any vehicle in the utility’s fleet via radio signals.
The complete VXU package, as a minimum, will include the following:
●
A laptop computer connected to the VXU with the capability to handle multiple reading of radio equipped meters and the storage of
meter reading data
●
VXU radio operating software
●
A magnetic mount antenna that connects to the VXU for optimal
radio reading performance
●
A power cable capable of plugging into a 12-volt cigarette lighter to
power the VXU
●
Applicable connector cables for the computer and VXU
●
Carrying case for all VXU equipment
The VXU will have the capability to collect and store meter readings at
any time on the meter reading route via radio transmission with any
meter equipped with an encoder and MXU.
The VXU will send an alert signal to a MXU connected to a meter fitted
with an encoder register. Upon receipt of the alert, the MXU will transmit the meter reading data to the VXU . Once this data is received and if
all parameters are valid in the meter reading message, the VXU will
acknowledge the MXU that the data is valid and permit the MXU to go
into a power down mode. The VXU will be ab le to handle m ultiple readings from MXUs simultaneously.
The VXU software will periodically transfer the meter reading data to
the hard drive of the VXU computer to maintain already read meters in
case of power failure. The VXU computer will also have its own battery
in case of vehicle power system failure.
W
➀
VXUSPEC
1 of 2
The VXU will provide the capability to read the MXUs in either a geographic mode or blind mode. Geographic mode being the ability to
alert and receive transmission for a specific MXU or group of specified
MXUs. In the blind mode, the VXU will be able to alert and receive
transmission from any MXU within range of the alert signal simultaneously.
The VXU shall also hav e the capability to address MXUs on a wild card
alert basis. The wild card will be operator controlled from the VXU.
The VXU, in conjunction with the MXU will have the capability of utilizing a reading cycle code within the transmission protocol. The reading
cycle code is utility controlled and changes with each reading cycle.
Once an MXU has been successfully interrogated and powered down
using a specific reading cycle code parameter, the MXU will not alert
again until the code is changed.
For optimum performance, the VXU will have the capability to analyze
noise levels of applicable RF channels in the area and select the optimum frequency for the MXU to transmit. It will then command through
the alert signal to the MXU what frequency to transmit the meter reading back to the VXU.
The VXU shall be able to function either with or without a meter reading route. With a reading route, the VXU will be able to read the meters
in either blind or geographic reading mode and post the readings to the
proper account through the use of the MXU and encoder register identification number. Without a reading route, the VXU will be able to read
the meters in either blind or geographic reading mode. The VXU will
retain the meter readings for later posting to the billing software by
matching with the proper account through the use of the MXU and
encoder register identification number.
The VXU software will ha v e the capability to address MXUs in conjunction with the MXU class code option. The class code being an optional
utility defined code programmed into the MXU for meter reading.
VXU DATA TRANSFER
The VXU will be able to store the meter reading data either on the hard
disk of the laptop computer or on a diskette of the computer disk drive.
If stored on the computer hard drive, the meter reading data will be
able to be transferred to the computer interf acing to the billing software
through file transfer to a diskette. The VXU computer will also have the
capability to be directly linked to the interfacing computer for computer
to computer transfer. The VXU computer will have a programmable
baud rate capability for the computer transfer.
VXU POWER REQUIREMENTS
The VXU will be powered from an y v ehicle in the utility’s fleet that has a
12-volt power system. The VXU computer will have its own battery for
backup in case of the vehicle system failure . The backup battery will be
able to operate the VXU computer for at least two (2) hours with a fully
charged battery.
VXU NAVIGATION SYSTEM
The VXU will provide for an optional navigation system. The VXU
design will permit a commercially available GPS receiver to be interfaced to the VXU via an RS232 link.
Page 13

RF Exposure Notice Per FCC Rules
To meet the RF exposure requirements in 1.1307 of FCC Rules, a separation distance of
at least 53 cm (21 inches) shall be maintained from all persons during operation of the
transmitter.
SPECIFICATIONS
FCC REGULATIONS
All equipment must comply with current Federal Communications
Commission (FCC) requirements which include proper labeling of the
VXU. Modifications to transceiver equipment not authorized by Invensys
Metering Systems may void FCC equipment certification. .
FREQUENCY/MODULATION
The VXU will operate on the 956 MHz channel for the purposes of
alerting the MXU in a licensed mode. It will utilize AM modulation for
the alert tone.
The vendor will be responsible for assisting the utility in obtaining any
required license from the FCC for operation of the equipment.
CARRYING CASE
The VXU will be supplied with a portable carrying case to permit easy
storage and transportability of the VXU as one unit. The carrying case
must be able to store all components of the VXU package required for
vehicle meter reading via radio AMR.
INSTALLATION AND TRAINING
Complete installation and operating instructions will be included for all
of the supplied hardware and software equipment.
VXUSPEC
2 of 2
RadioRead
Mobile Radio Vehicle Transceiver Unit (VXU)
Proposal must include any additional costs for training and assistance
to install and begin operation of the VXU and operating software. The
vendor will also inform the customer of what pre-installation activities
are to be completed and what support materials will be needed for the
initial installation.
PERFORMANCE WARRANTIES
In evaluating bid submittals, warranty coverage will be considered. The
vendor shall be required to state its warranty and/or guarantee policy
with respect to each item of proposed equipment. The procedure for
submitting warranty claims must also be provided.
SYSTEM MAINTENANCE AND SUPPORT
In addition to initial warranty periods, vendors are required to supply
information on required or optional maintenance programs beyond the
warranty period for both hardware and software. Features of those programs shall also be included with any additional charges such as an
hourly rate for on-site and/or remote support. The location of and procedures for obtaining such support shall be stated.
®
➀
See additional specifications.
Invensys Metering Systems
P.O. Box 487
450 N. Gallatin Avenue
Uniontown, PA 15401
1-800-METER-IT
1-800-638-3748
FAX (Direct to Factory)
Local: (724) 439-7729
Toll Free: 1-800-888-2403
Web site: www.ims.invensys.com
select
Email: h2oinfo@ims.invensys.com
North American Water
AUTHORIZED INVENSYS DISTRIBUTOR
Page 14

AMR-304-R1
1 of 2
RadioRead
T
METER READING SYSTEM VEHICLE TRANSCEIVER UNIT (VXU)
ESCRIPTION
D
APPLICATION:
(VXU) is a portable radio-based meter reading device which can
be used in any vehicle providing 12-volt DC power. The operator
simply sets up the system in the vehicle, loads the desired meter
reading route into the computer and drives along the meter reading
route in proximity to the meters to be read. The meter reading data
is collected while the vehicle traverses the route. The complete VXU
package includes everything needed to read meters that are
equipped with Invensys Meter Transceiver Units.
RADIOREAD
uses two-way data communications between the VXU and Meter
Transceiver Units (MXU) connected to compatible utility meters.
When reading meters, the VXU transmits an alert signal to the
MXUs, with the operator having the option of directing the alert
signal to all MXUs within range (blind reading mode), or to
individual MXUs (geographic reading mode). When the alert signal
is received, each MXU responds by transmitting its data in direct
sequence spread spectrum modulation. The VXU receives this data
and acknowledges by sending the MXU a message to return to its
low power sleep mode.
SYSTEM RELIABILITY:
communication architecture ensures reliable meter readings. The
VXU determines clear channels in the 902-928 Mhz spread
spectrum radio frequency band. When the VXU transmits the alert
signal to the MXUs it also establishes the frequency to be used to
transmit back this meter reading data. This signal selecting and
synchronization capability provides a highly efficient meter reading
process that is reliable even in a noisy radio frequency
environment.
Meter reading is virtually error-free when using RadioRead to read
meters equipped with Invensys absolute encoder registers. The
absolute encoder registers provide readings taken from actual
positions of their odometer wheels. When readings cannot be
obtained due to damage, vandalism or tampering, the error
condition will be indicated at the time of reading. High or low
customer usage patterns can also be verified at the time of the
reading.
PORTABILITY:
the radio electronics can be packaged in a very compact
enclosure. With the addition of a portable computer, connecting
cables and antenna, the complete VXU package can be stored in
its handy carrying case, ready for fast and easy setup in any
vehicle. This portability eliminates the need to purchase and
maintain a dedicated meter reading vehicle.
The Invensys RadioRead
T
OPERATION:
Through the use of advanced miniaturized design,
The Invensys RadioRead system
The Invensys RadioRead system's
T
Vehicle Transceiver Unit
PECIFICATIONS
S
SERVICE
PHYSICAL
CHARACTERISTICS
DIMENSIONS
VXU
Computer
Carrying Case
POWER
VXU with
Portable
Computer
COMMUNICATIONS Transceiver to computer:
READING RANGE Dependent on MXU installation and RF propagation at time of
APPROVALS
US:
Canada:
Mexico:
LICENSE
REQUIREMENTS
Radio based mobile utility meter reading system
VXU in metal case with carrying handles.
Portable computer in plastic housing.
Connection cables, magnetic mount antenna and
hardside component carrying case included.
Wide: 15.10" (383.54 mm)
Deep: 11.24" (285.49 mm)
High: 5.22" (132.58 mm)
Weight: 21 lbs. (9.53 kg)
Wide: 11.8" (299.72 mm)
Deep: 8.9" (226.06 mm)
Weight: 6.64 lbs. (3.01 kg)
Wide: 19.25" (488.95 mm)
Deep: 13.78" (350 mm)
High: 11.87" (301.49 mm)
Weight: case: 11 lbs. (4.99 kg)
Complete assembly: 39 lbs. (17.69 kg)
12-volt DC
DC adapter through VXU
(with battery back-up; computer only)
Radio Transmit: 956 Mhz (AM)
Receive: 902-928 Mhz,
Direct Sequence Spread Spectrum
reading
FCC
Industry Canada
SCT
Equipment licensing requirements are coordinated by
Invensys for FCC, Industry Canada and Mexican SCT. Radio
licensing may be required by government agencies for other
countries. Users should consult their respective government
agencies for licensing requirements.
Page 15

AMR-304-R1
2 of 2
RadioRead
T
METER READING SYSTEM VEHICLE TRANSCEIVER UNIT (VXU)
The RadioRead VXU package
in its handy carrying case is
fully portable.
User Friendly Software:
Equipment System) is a software program especially designed for
operating the VXU. STRIPES features an easy to use pull-down
menu system that permits convenience and simplicity for directing
the meter reading process. STRIPES allows manual entries and
special route notes to be made by the meter reader/operator via
the portable computer's keyboard. The meter reader/operator can
also easily edit configurations in the route data when necessary.
STRIPES works in conjunction with Invensys Automatic Meter
Reading System (AutoRead
manage utility meter reading data by interfacing with a utility’s own
billing software.
STRIPES (Invensys Interface Polling
T
), a software program designed to
Because the RadioRead System works with the same absolute
encoder registers used by the Invensys PhonRead
TouchRead
and matching to meet specific needs or situations—or for planned
migrations from one system to another without requiring the meters
and registers to be exchanged. The RadioRead System is also
easily upgradeable to a fixed base meter reading system.
Carrying Case
T
System, utilities have greater flexibility such as mixing
Plug-in-and-go set-up
is fast and easy to use.
T
System and
Portable Computer
RadioRead
T
Makes Reading Utility Meters
Fast, Easy and Reliable
The RadioRead System can be used to read more meters in a
matter of minutes than a typical meter reader, using a manual entry
system, can usually read in a day. The portable RadioRead Vehicle
Transceiver Unit (VXU) plugs into a vehicle's standard 12-volt
electrical system enabling it to be used in any car or truck.
Coupled with a portable computer and AutoVu software, the VXU
package provides utilities with maximum meter reading efficiency
while requiring a minimum of operator training for operation.
Thanks to direct sequence spread spectrum modulation technology,
RadioRead also provides greater meter reading reliability with fewer
non-reads, range limitations and errors compared to other types of
radio based meter reading systems. The system’s higher reliability
produces a higher number of completed meter readings to further
enhance operating efficiency and minimize customer relations
problems.
Invensys Metering Systems
P.O. Box 487
450 N. Gallatin Avenue
Uniontown, PA 15401
1-800-METER-IT
1-800-638-3748
FAX (Direct to Factory)
Local: (724) 439-7729
Toll Free: 1-800-888-2403
Web site: www.ims.invensys.com
select
Email: h2oinfo@invensys.com
North American Water
VXU Power Cable
Computer Power Cord
AUTHORIZED INVENSYS DISTRIBUTOR
Serial Cable
Antenna
VXU
 Loading...