

Sensus Pain Management System User Manual

User Manual
GET RELIEF GET ACTIVE
GET SLEEP


SENSUS™ Pain Management User Manual
1
TABLE OF CONTENTS
Chapter 1: Overview .................................................................... 3
Introduction ................................................................................... 3
What You Should Have Received .................................................. 4
Device Components ...................................................................... 6
Chapter 2: Quick Start Instructions ........................................... 7
Chapter 3: SENSUS Device Basics ............................................ 9
Checking Battery .......................................................................... 9
Charging Battery ........................................................................... 9
Attaching Electrode ..................................................................... 11
Device Placement ........................................................................ 12
Chapter 4: Configuring SENSUS .............................................. 13
Chapter 5: Pain Therapy with SENSUS ................................... 14
Preparing for Therapy Session .................................................... 15
Starting Therapy Session ............................................................ 15
Adjusting Intensity During Therapy Session ................................ 16
Ending Therapy Session .............................................................. 17
Setting Continuous Mode ........................................................... 18
Chapter 6: Using SENSUS During Sleep ................................. 19
Chapter 7: SENSUS Electrodes ................................................ 19
Chapter 8: Skin Care.................................................................. 21

SENSUS™ Pain Management User Manual
2
TABLE OF CONTENTS CONT.
Chapter 9: Maintenance, Safety, and Service ......................... 24
Maintenance ................................................................................ 24
Cleaning ...................................................................................... 24
Device Storage ............................................................................ 24
Disposal ....................................................................................... 24
Limited Warranty ......................................................................... 24
APPENDIX A: Indicator Light .................................................... 27
APPENDIX B: Troubleshooting ............................................28-31
APPENDIX C: Frequently Asked Questions .......................32-33
APPENDIX D: Alternate Sites ................................................... 34
APPENDIX E: Technical Specifications ..............................35-37
APPENDIX F: Prescribing Information ................................38-41
APPENDIX G: Symbols .............................................................. 42
APPENDIX H: Electromagnetic Compatibility Declaration .... 43

SENSUS™ Pain Management User Manual
3
Chapter 1: Overview
Introduction
The SENSUS™ Pain Management System provides relief from
chronic pain. It consists of a device and an electrode that
attaches to the device. The device is worn on your upper calf, just
below the knee. Your doctor may prescribe one or two SENSUS
devices. If you have been prescribed two devices, they can be
used at the same time (one on each leg).
SENSUS provides pain relief by comfortably stimulating your
sensory nerves, which decreases the perception of pain. Each
therapy session lasts 60 minutes and is initiated by pressing a
button on the device. Pain relief usually begins within 15 minutes
and may last for 30 minutes after the session ends. At the end of
a session, you may either leave the device on your leg or remove
it until you are ready for another session. You may start a therapy
session anytime you need pain relief.
It is important that you use SENSUS correctly in order to gain
the most benet. You should review this User Manual carefully.
Chapter 2 provides basic instruction on how to set up and use the
device. Chapters 3–5 provide detailed instruction on device use.
Chapter 6 provides information on using the device during sleep.
Chapter 7 provides tips for taking care of the electrodes. Chapter
8 provides information on preventing skin irritation, particularly if
you have sensitive or dry skin. Appendix C provides answers to
frequently asked questions.
If you have any questions about how to use SENSUS please
contact your supplier, call NeuroMetrix customer service at
(888) 786-7287, or speak with your doctor.

SENSUS™ Pain Management User Manual
4
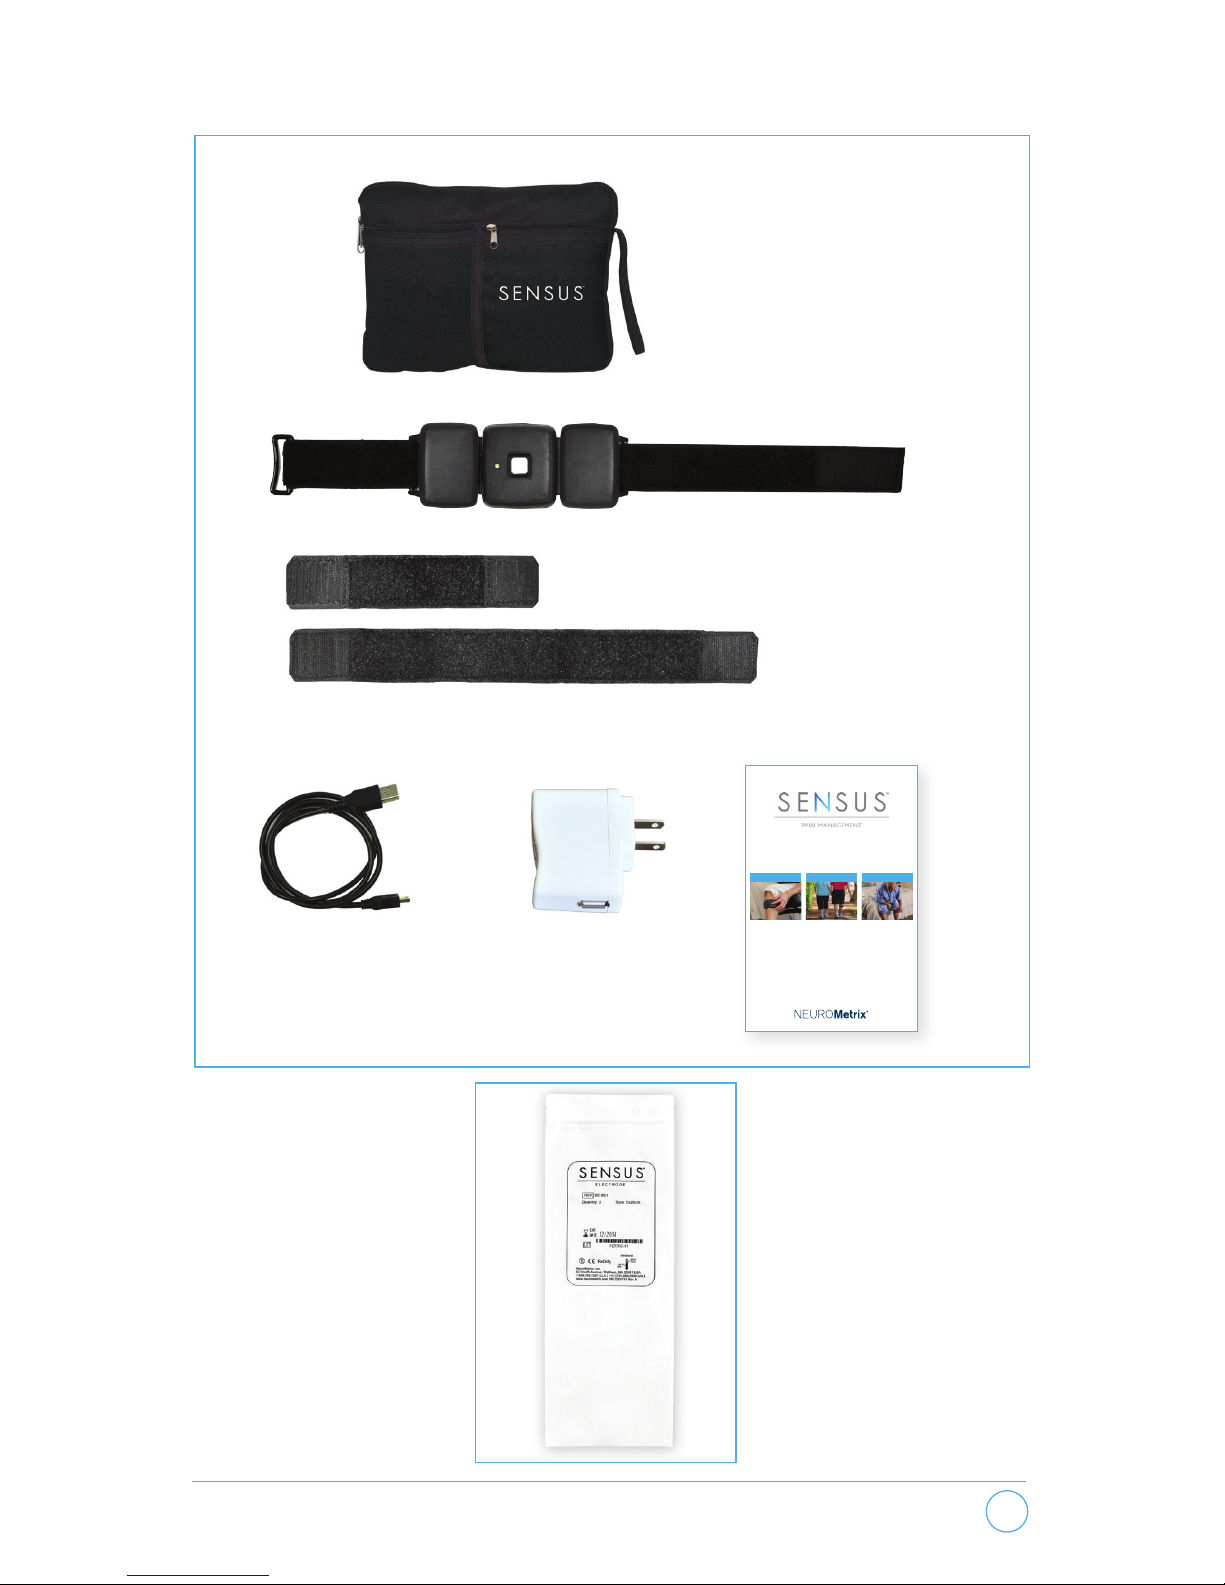
What You Should Have Received
Upon receiving your SENSUS Pain Management System you
should inspect its contents to make sure all of the following are
included and undamaged (see Figure 1).
A. SENSUS Device*
B. Small and Large Replacement Straps*
C. USB Cable*
D. AC Adapter*
E. User Manual
* Two are provided if your doctor prescribed two devices.
You may also have received 1 or more electrode packages
(Figure 2). If any of the items appear damaged, contact
your supplier.
ONLY USE SENSUS ELECTRODES MANUFACTURED
BY NEUROMETRIX, INC.
SENSUS™ Pain Management User Manual
5
Figure 2.
Figure 1.
A
B
C D
User Manual
Get Relief Get Active
Get Sleep
Carrying
Case
E
SENSUS™ Pain Management User Manual
6
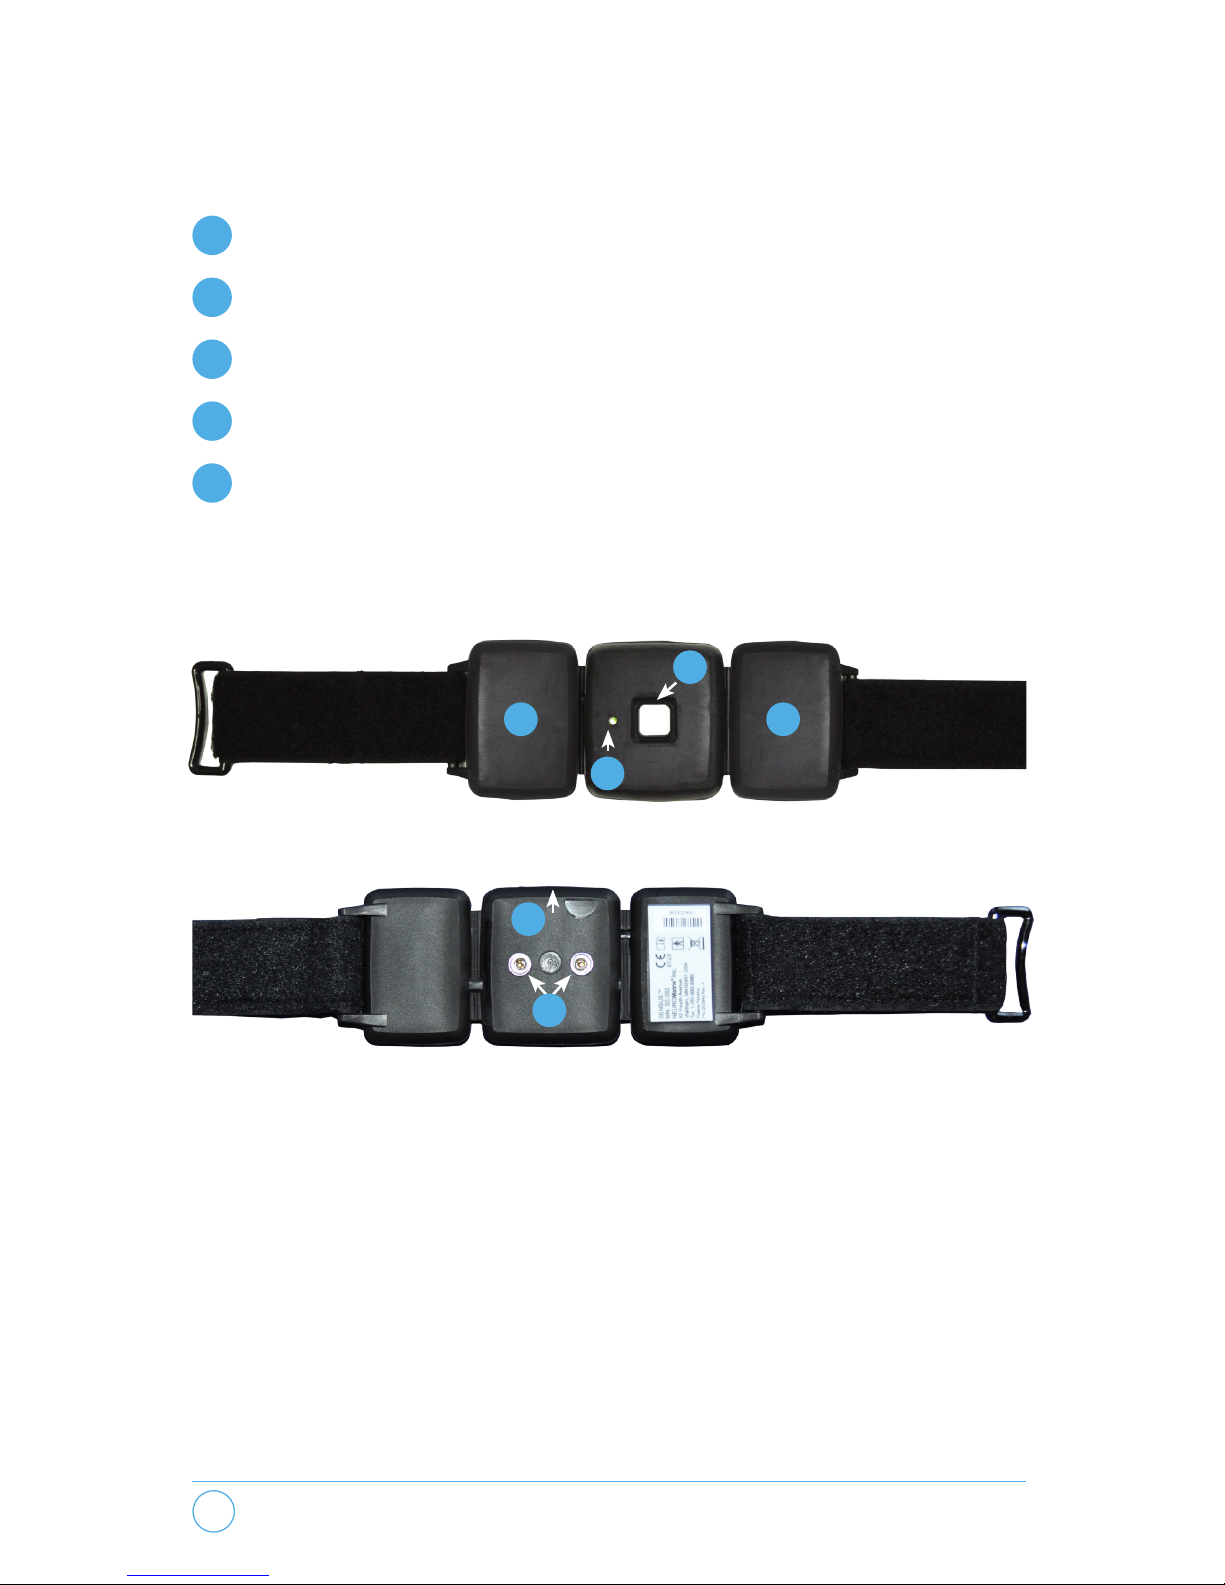
Device Components
The device has the following components:
1
Push button
2
Indicator light
3
Adjustable Velcro® strap
4
Two electrode connector snaps
5
USB port
1
3
2
3
4
5

SENSUS™ Pain Management User Manual
7
Briey press and release the button.
Indicator Light Flash
charged
recharge
Snap in a new electrode.
Step 1: Check Battery
Step 2: Attach Electrode
Chapter 2: Quick Start Instructions
Press and hold button for 10 seconds until the indicator light is
steady green. Briey press the button every time you feel a tingling
sensation under the electrode. When the light turns off, conguration is complete. This should take about 1 minute.
Step 3: Place Device
Remove liner and place the
device on your upper calf 1-2
inches below knee; the exact
position is not critical.
Step 4: Configure
The following instructions will help you start using SENSUS quickly. For
detailed instructions, please review Chapters 3-8. These instructions are
also available in video format. Please visit www.SENSUSRx.com and
click on the
Resources for Users
tab.

SENSUS™ Pain Management User Manual
8
If you need assistance, call customer service at:
1-888-786-7287
Helpful Tips
• Entire electrode should contact skin
• Every few hours and before sleep, make sure strap is snug
• Every 2-3 days or if gel is dry, run electrode under water
• Change electrode every 2 weeks
Press and hold button for a few seconds,
release the button when the indicator light
starts blinking green. Stimulation should
feel strong but comfortable.
To decrease: Briey press the button. Each
press will decrease the intensity.
To increase: Press and hold the button.
The intensity will increase while the button
is held down.
To stop therapy, tap center compartment
twice while keeping leg still.
Step 5: 60 Minute Therapy Session
Ventilate skin after wearing SENSUS for several hours and
after overnight use. Watch for skin irritation.
SENSUS™ Pain Management User Manual
9
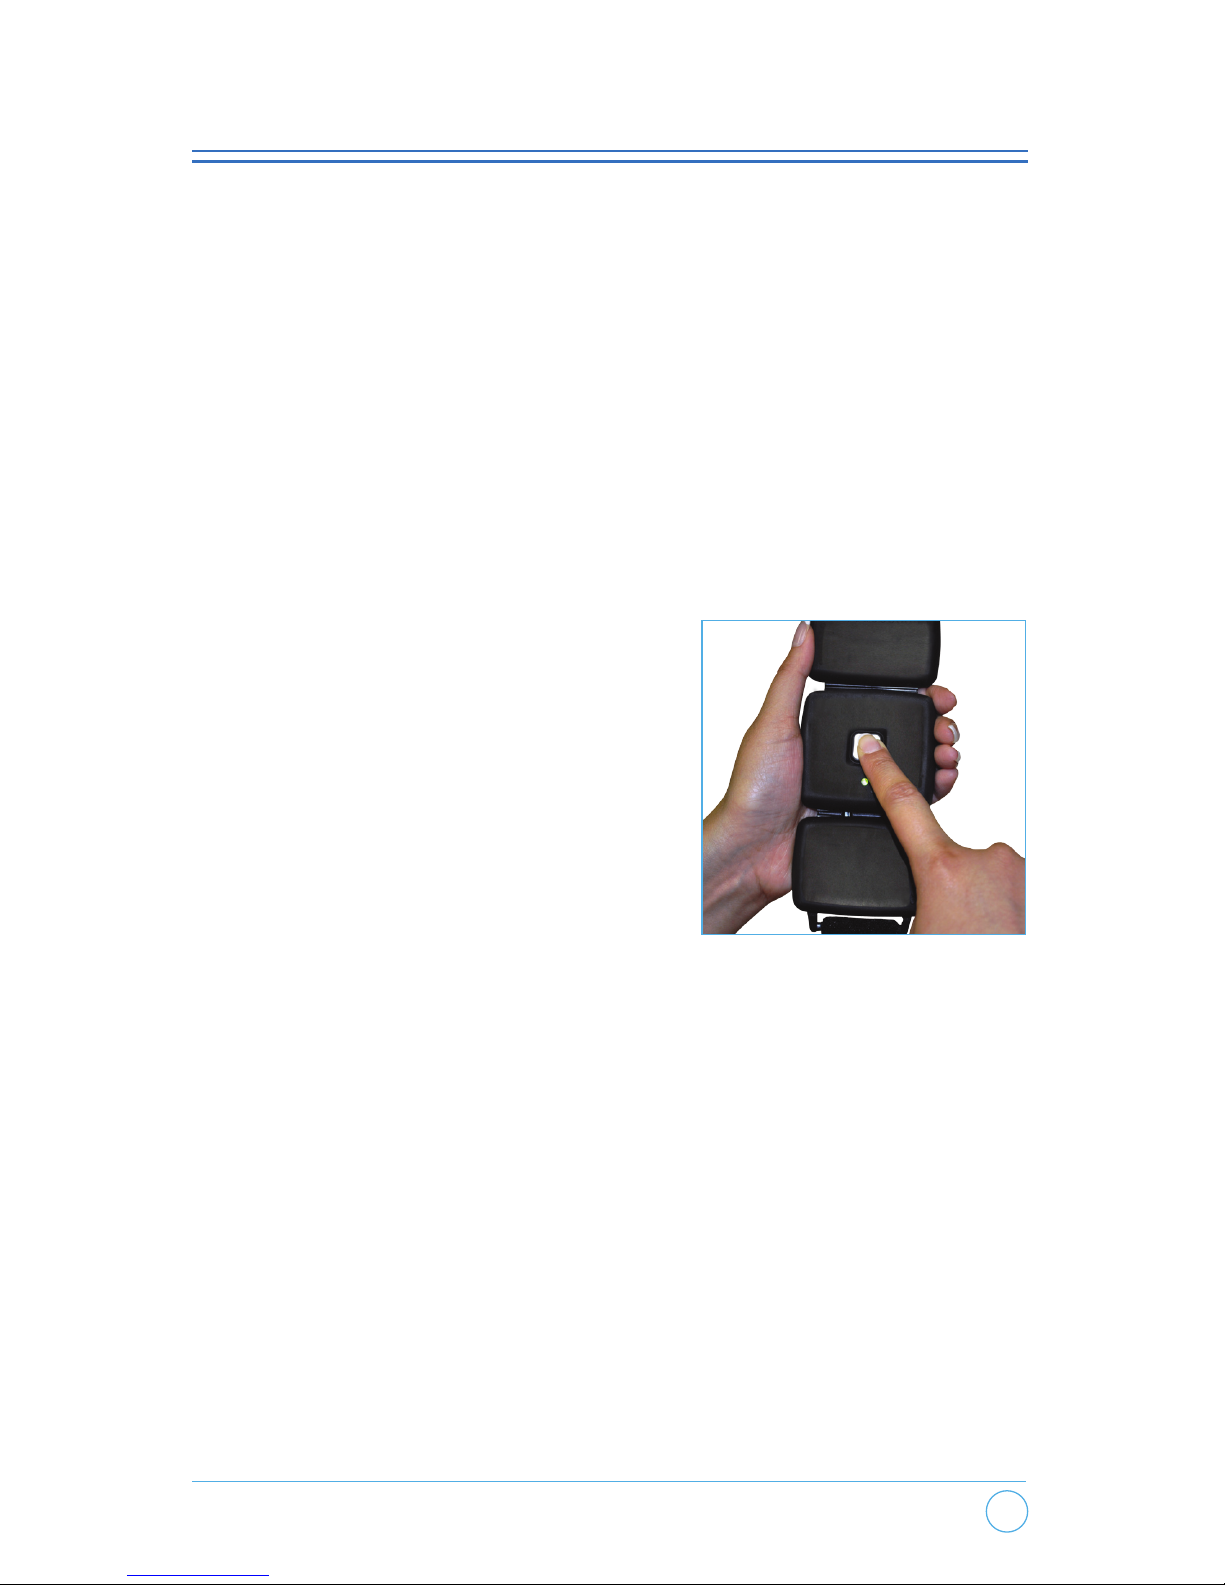
Chapter 3: SENSUS Device Basics
Checking Battery
With the device in your hand, briey press and release the button
to check the battery (Figure 3). The indicator light will ash green
if the battery has sufcient charge. If indicator light ashes red or
does not ash at all, the battery needs to be recharged (see below
for charging instructions).
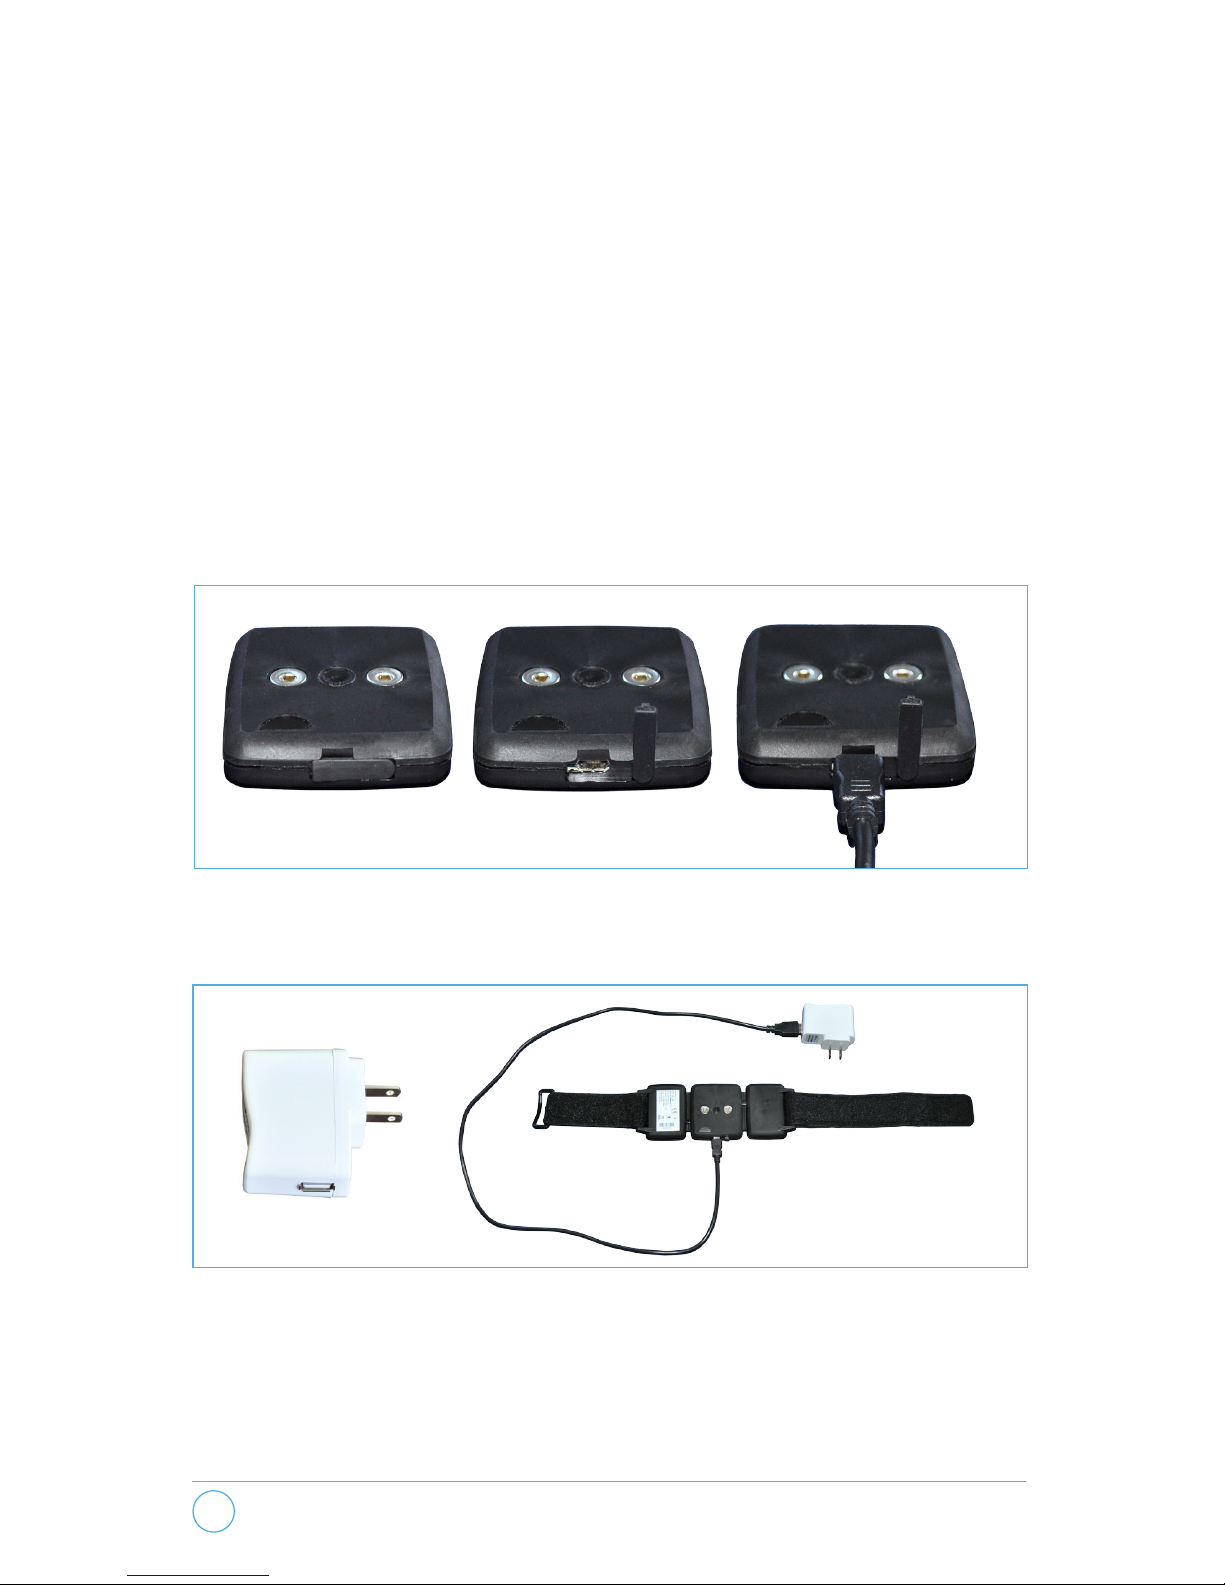
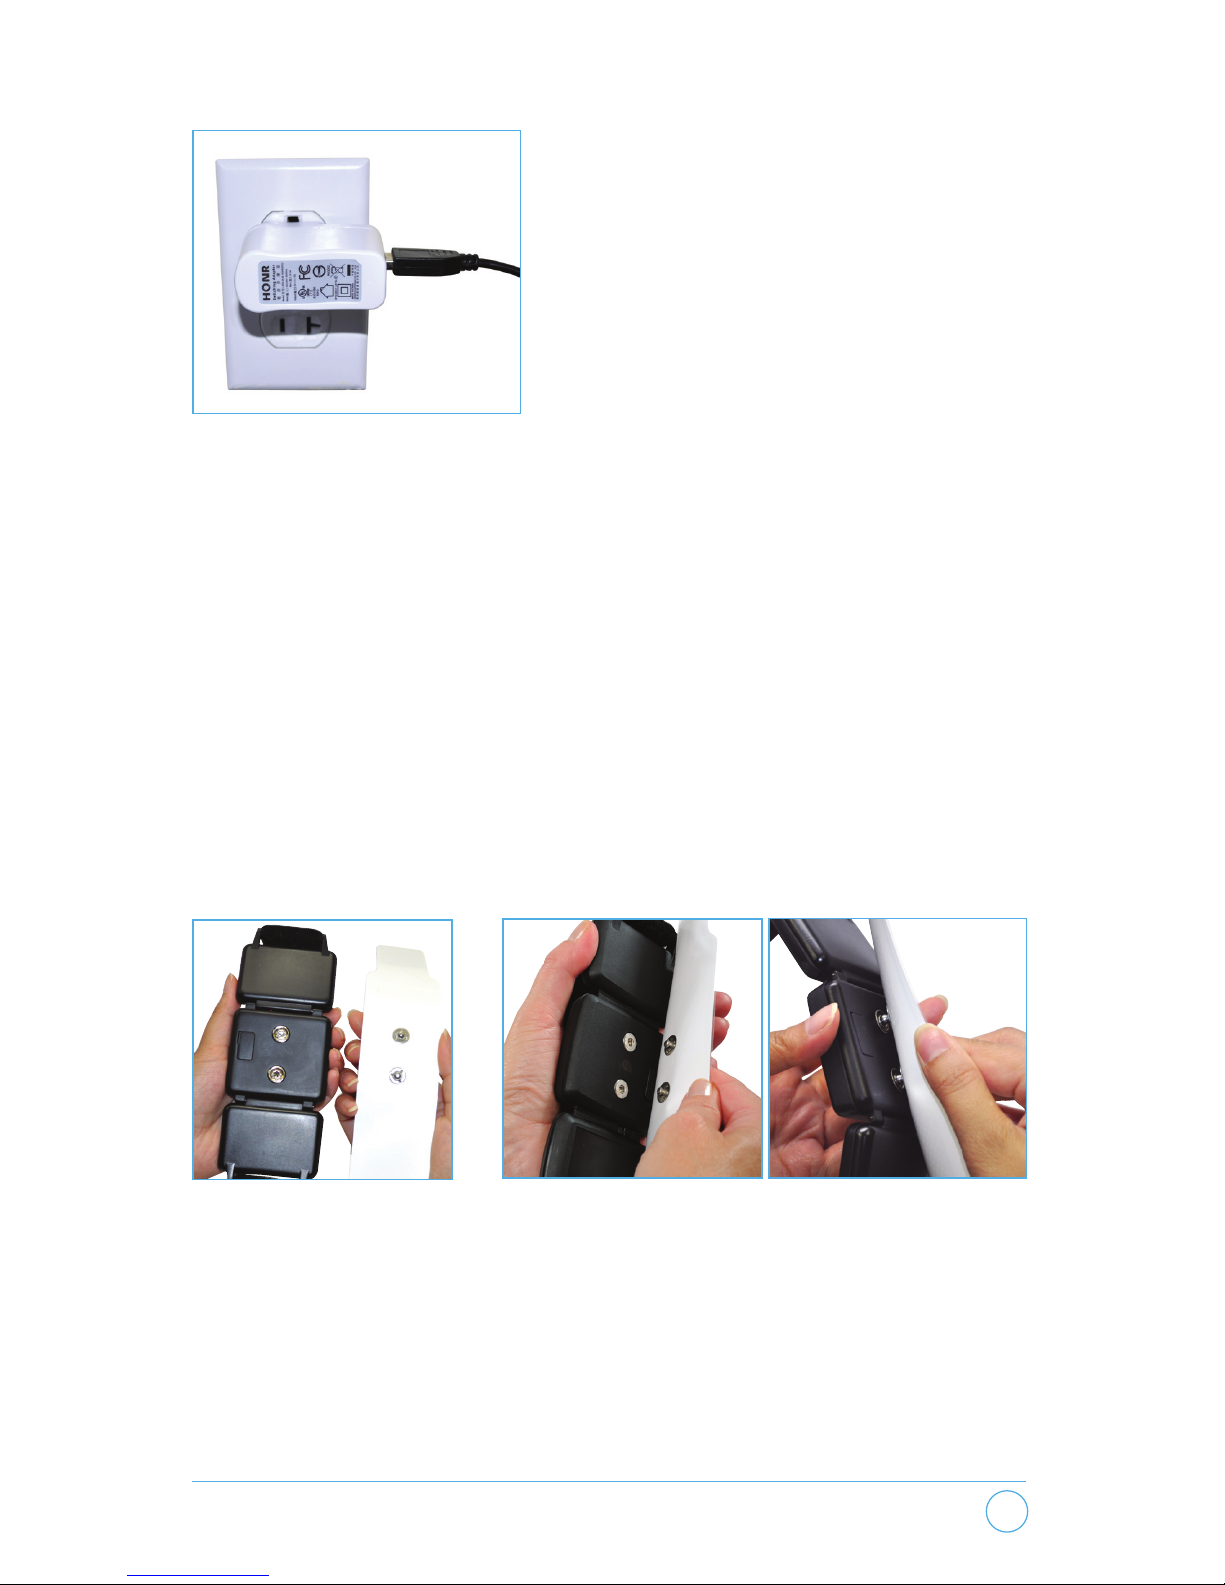
Charging Battery
A fully charged battery should provide
20-40 hours of use.
To charge the battery:
1. Plug the USB cable into the USB
port on the side of the device. The
USB port is protected by a rubber
cover. To access the USB port,
rotate the cover until the connector
is exposed (Figure 4).
2. Plug the other end of the cable into the AC Adapter
(Figure 5). The cable should not be plugged into a computer
USB port for charging.
3. The AC Adapter should then be plugged into a standard
electrical outlet (Figure 6). The indicator light will show steady
green during charging and will turn off when the battery is fully
charged. It will take approximately 3 hours to charge an empty
battery. When the battery is fully charged, unplug the cable
from the device.
Figure 3.
SENSUS™ Pain Management User Manual
10
A blinking red light indicates that charging has failed.
If the battery is too low to start a therapy session, you can
charge the device for approximately 20 minutes to provide
enough charge for a single therapy session. To conrm that it has
enough charge, disconnect the USB cable from the device and
briey press and release the button. If the indicator light ashes
green, there is enough charge. If the indicator light ashes red,
reconnect the USB cable and continue charging.
You should never use your SENSUS device with the USB
cable connected.
Figure 4.
Figure 5.
SENSUS™ Pain Management User Manual
11
Figure 6.
Attaching Electrode
You will need to attach a new electrode prior to rst use of the
device and every 2 weeks thereafter (can be extended up to
3 days if a new electrode is not available). Two electrodes are
included in each pouch. You should reseal the pouch if it contains
an electrode. To attach an electrode, snap the electrode into the
two connectors as shown in Figure 7.
ONLY USE SENSUS ELECTRODES MANUFACTURED BY
NEUROMETRIX, INC.
Remove the plastic liner covering the electrode (Figure 8) prior to
placing the device on your leg. Remember to keep the liner as it
should be re-applied to protect the electrode when not in use.
Figure 7.
Turn the device so that
the snap connectors
are visible.
Align the snaps on the electrode to the
snap connectors on the device. Insert
snaps until they are securely fastened.

SENSUS™ Pain Management User Manual
12
A white label is
afxed to each
electrode liner
(Figure 9). The
rst time you use
a new electrode,
write the date
on the label. The
electrode should be replaced 2 weeks from this date (can
be extended up to 3 days if a new electrode is not available).
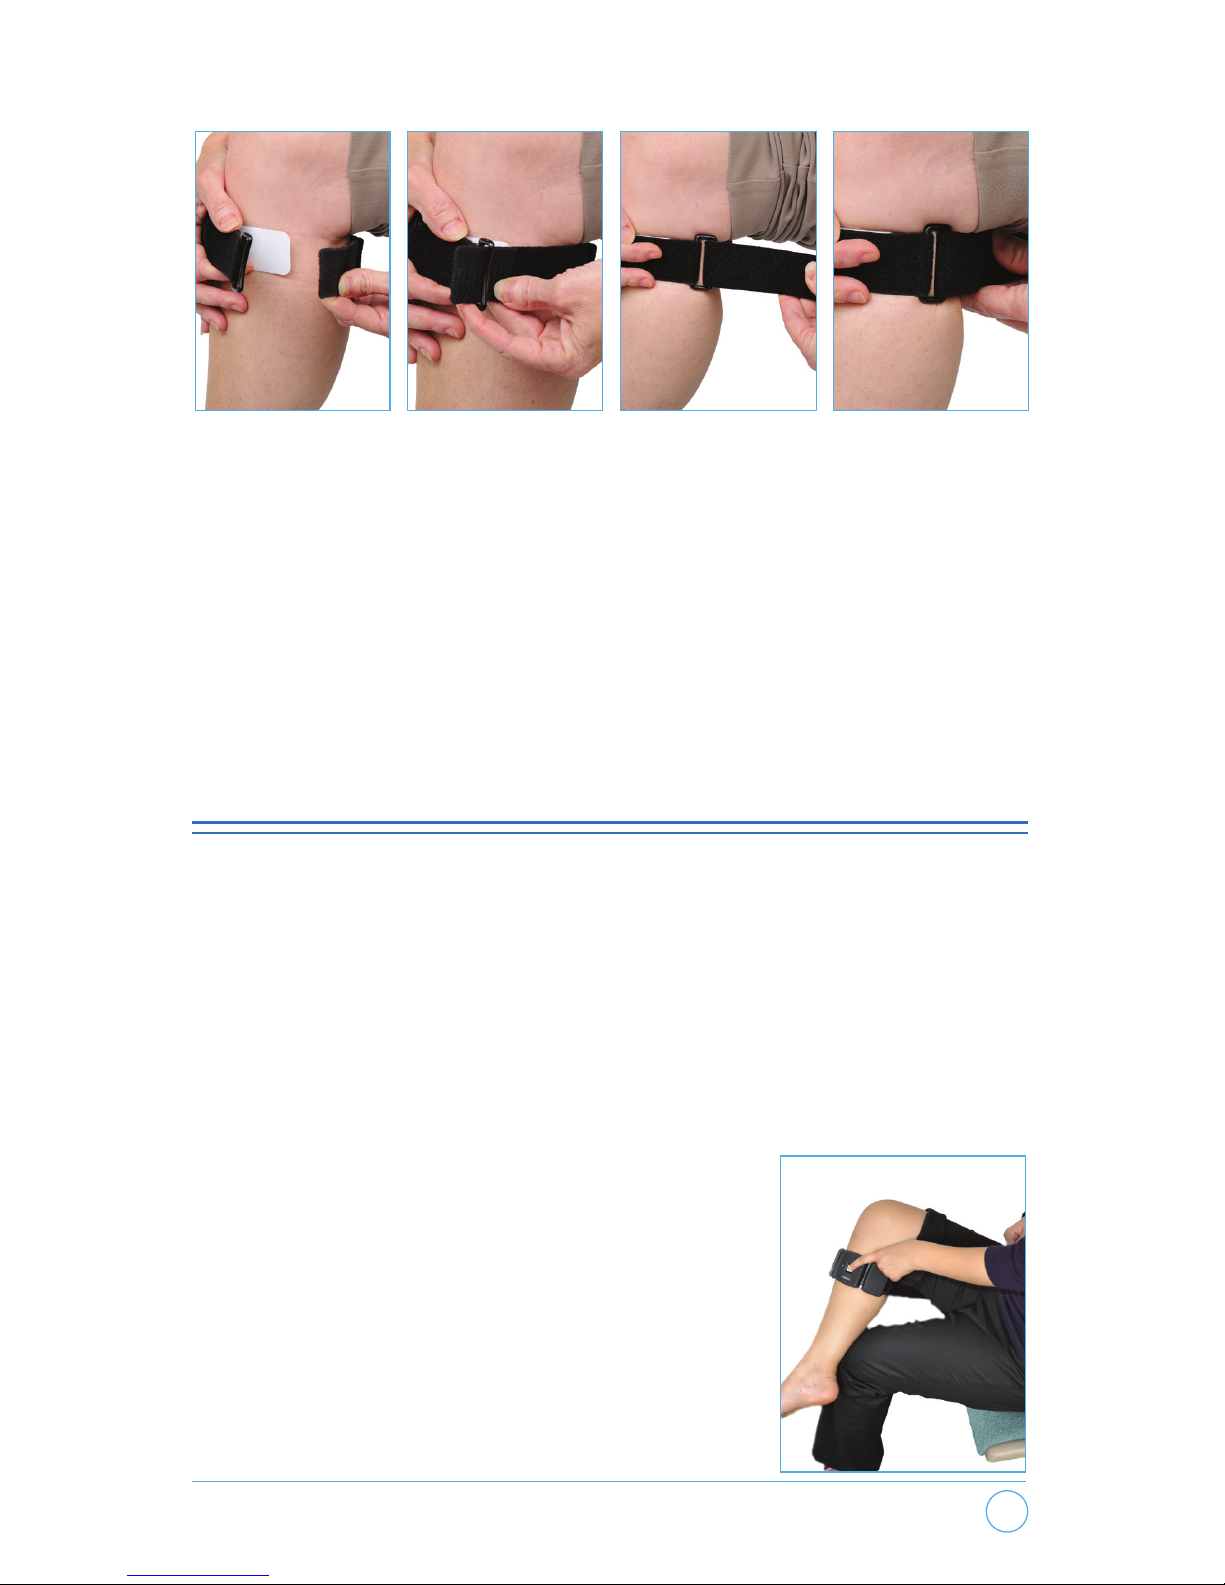
Device Placement
Place the device on your upper calf about
1-2 inches below the knee (Figure 10). Be
sure the electrode is only covering healthy
skin that is not irritated and does not have
cuts or other wounds. Position the device
so that it is comfortable, the button is
accessible, the indicator light is visible, and
stimulation does not cause discomfort. You
may position the device with the button on
the inside, outside, or back of the leg; it is your choice. However,
you should avoid placing the device on the front of the leg.
If the device cannot be placed in the standard location as shown
in Figure 10 then refer to Appendix D for alternate site options.
Loop the strap through the buckle and secure it with the Velcro®
fastener as shown in Figure 11. The device should t securely
around your leg and be comfortable to wear. The strap should
not be so tight that the device and electrode substantially indent
the skin. The electrode should make smooth contact with the
skin. If there is buckling of the electrode, loosen the strap, smooth
the electrode and re-secure the strap. It is important that each
of the four electrode pads are in contact with your skin. If the
Figure 10.
Figure 8. Figure 9.
SENSUS™ Pain Management User Manual
13
Figure 11.
pads are only partially on the skin, then the stimulation may feel
uncomfortable.
Your device comes with small, medium and large straps. It is
shipped with the medium strap attached. If you require a different
strap, remove the medium strap and attach either the small or
large strap.
Chapter 4: Configuring SENSUS
Before you begin using your device for the rst time you will need
to congure it for the right intensity level for you. You should
also re-congure your device if you feel that the intensity is no
longer providing pain relief. The conguration process consists
of placing the device on your leg, pressing the button for 10
seconds to start conguration, then briey
pressing the button every time you feel
a tingling sensation under the electrode.
Conguration should only take about one
minute.
You should carry out the conguration
process in a quiet area without distractions.
One comfortable way to congure your
Figure 12.
 Loading...