


Sensormetrix
Basingstoke Road
Spencers Wood
Reading
Berkshire RG7 1PW
UK
+44(0)118 976 9023
+44(0)118 976 9020
sales@sensormetrix.co.uk
www.sensormetrix.co.uk
sales
fax
email
web
A member of the Olancha Group Ltd
Registered in England No. 4004881
VAT Registration No. GB164 5653 45
EM01b Websensor
Instruction Manual
HVAC Monitor EM01b Websensor
(Ethernet Port Congurable)
Instruction Manual v6.5

Sensormetrix
Basingstoke Road
Spencers Wood
Reading
Berkshire RG7 1PW
UK
+44(0)118 976 9023
+44(0)118 976 9020
sales@sensormetrix.co.uk
www.sensormetrix.co.uk
sales
fax
email
web
A member of the Olancha Group Ltd
Registered in England No. 4004881
VAT Registration No. GB164 5653 45
EM01b Websensor
Instruction Manual
2
Contents
Page
Copyrights 3
Warranty 3
Introduction to the EM01b 4
How the EM01b Works 5
Websensor Inventory 8
Websensor Connection 9
Quickstart 11
Programming the IP Address 13
Default Settings 14
Units of Temperature 16
Testing the IP Address 17
Websensors Tail 19
Additional Websensor Functions 20
Contact Closure 21
Thermistor Interface 25
Measure Voltage (DC) 28
Connector Connections 29
Troubleshooting the Websensor 32
Application Information 36
Specications 36
Websensor Plug-ins 37
IP Based Facility Management Suite 37

Sensormetrix
Basingstoke Road
Spencers Wood
Reading
Berkshire RG7 1PW
UK
+44(0)118 976 9023
+44(0)118 976 9020
sales@sensormetrix.co.uk
www.sensormetrix.co.uk
sales
fax
email
web
A member of the Olancha Group Ltd
Registered in England No. 4004881
VAT Registration No. GB164 5653 45
EM01b Websensor
Instruction Manual
3
Copyrights
The information in this document is subject to change without notice and should not
be construed as a commitment by Sensormetrix. Whilst every effort has been made
to assure the accuracy of the information contained herein. Sensormetrix assumes
no liability for damages from the use of the information contained in this manual. The
conguration software described in this manual is furnished under a license and may
be used or copied only in accordance with the terms of that license.
Warranty
Warranty
Sensormetrix warranties the products to be substantially free of manufacturing
defects for a period of 1 year after purchase during which time the product will be
replaced without charge if defective.
Limitations
Sensormetrix provides no warranty, expressed or implied, as to the tness of the
products for any particular purpose. Sensormetrix will not be liable for incidental or
consequential damages arising from the use of its product.

Sensormetrix
Basingstoke Road
Spencers Wood
Reading
Berkshire RG7 1PW
UK
+44(0)118 976 9023
+44(0)118 976 9020
sales@sensormetrix.co.uk
www.sensormetrix.co.uk
sales
fax
email
web
A member of the Olancha Group Ltd
Registered in England No. 4004881
VAT Registration No. GB164 5653 45
EM01b Websensor
Instruction Manual
4
Introduction to the EM01b
Sensormetrix’s EM01b Websensor is designed to utilize the internet to transmit
temperature, relative humidity, detect contact closure, power supply voltage
information and illumination data from a remote acquisition point to a host computer
or hosted database.
The EM01b Websensor offers built-in signal conditioning and an embedded miniwebserver. Users are able to access the sensor using http: based commands.
Figure 1. Websensor EM01b returning data via a HTTP: response
Websensor
EM01b HVAC Monitor
TRANSMIT POWER
Temperature, Humidity & Illumination
www.sensormetrix.co.uk
12V DC
AUX
SENSOR
LAN
Request via HTTP:
Response via HTTP:

Sensormetrix
Basingstoke Road
Spencers Wood
Reading
Berkshire RG7 1PW
UK
+44(0)118 976 9023
+44(0)118 976 9020
sales@sensormetrix.co.uk
www.sensormetrix.co.uk
sales
fax
email
web
A member of the Olancha Group Ltd
Registered in England No. 4004881
VAT Registration No. GB164 5653 45
EM01b Websensor
Instruction Manual
5
How the EM01b Works
Simply, the Websensor’s function is to send a response (by a HTTP: message) upon
request of a central website or from the User’s PC.
The EM01b Websensor supports a user congurable IP address. Websensor’s IP
address gives it uniqueness on the Ethernet based network to which it is attached.
It is through the IP address, that the Websensor is able to take its’ place on the
Internet, becoming fully accessible to query by the user.
The Websensor consists of a base unit with two communication ports (Ethernet and
ESbus).
The ESbus combines a networked version of the SPI serial bus and RS232. The
ESbus port is used to support a variety of options available for the Websensor while
the Ethernet port is the route to the Internet and is used to congure the IP address of
the Websensor.
Available options which connect via the Esbus:
• ES01 Two Line LCD Display
• ES11 Flood Sensor
• ES bus hub - for connecting multiple displays or ood sensors to one EM01b
Periodically check www.sensormetrix.co.uk for other options as they become
available.

Sensormetrix
Basingstoke Road
Spencers Wood
Reading
Berkshire RG7 1PW
UK
+44(0)118 976 9023
+44(0)118 976 9020
sales@sensormetrix.co.uk
www.sensormetrix.co.uk
sales
fax
email
web
A member of the Olancha Group Ltd
Registered in England No. 4004881
VAT Registration No. GB164 5653 45
EM01b Websensor
Instruction Manual
6
How the EM01b Websensor works
Within the base unit are microcomputers, which handle the Internet protocol, the
communication ports, and the sensor and sensor signal conditioning. The Websensor
has no switches, keyboard or display because it functions as a sensor, not as a
computer.
Figure 2. How the Websensor works
Compatibility with earlier Websensors
Compatibility with the earlier models of Websensor has been maintained. Any version
of the Websensor will always return temperature, relative humidity and illumination
data by sending:
http://192.168.254.102/index.html?em
Websensor
EM01b HVAC Monitor
TRANSMIT POWER
Temperature, Humidity & Illumination
www.sensormetrix.co.uk
12V DC
AUX
SENSOR
LAN

Sensormetrix
Basingstoke Road
Spencers Wood
Reading
Berkshire RG7 1PW
UK
+44(0)118 976 9023
+44(0)118 976 9020
sales@sensormetrix.co.uk
www.sensormetrix.co.uk
sales
fax
email
web
A member of the Olancha Group Ltd
Registered in England No. 4004881
VAT Registration No. GB164 5653 45
EM01b Websensor
Instruction Manual
7
EM01b variations
There are three versions of the EM01b available. Each version has the standard light,
temperature and humidity sensor and they all operate in the same way. The EM01b
features an extra port that can be used for a several purposes hence the three
variations.
EM01b-STN
The standard EM01b has its extra port congured to sense switch opening and
closing such as that used to detect a door open or shut. This version comes with a
bare plug for the extra port for the user to wire up to.
EM01b-THM
The EM01b-THM features the extra port being used as an additional temperature
sensor and comes supplied with a temp sensor on the end of a 3 metre cable which
plugs into the extra port.
EM01b-VLT
The EM01b-VLT uses the extra port to measure DC voltage from 0-18V. This is most
often used to monitor UPS batteries. This version comes with a bare plug for the
extra port for the user to wire up to.
See websensor inventory page for parts included with each EM01b.
What’s included with each EM01b
Included with the EM01b Websensor are the following items:
Quantity Description
1 Websensor EM01b Module [See gure 3]
1
Wall Transformer suitable for all countries with all country adaptors and
110 – 240 VAC
1
Ethernet straight-thru cable for connection to an Ethernet Hub (Blue
cable) [See gure 5]
1
Ethernet crossover cable for direct connection to a Network Interface
Card on a PC (RED cable with YELLOW boots or solid GRAY) [See
gure 6]
1
Connector (plug) for contact closure – voltage sense versions
(EM01b-STN and EM01b-VLT) [See gure 7]
1 Quickstart guide
1
3M thermistor cable and plug for extra temperature sensor version of
EM01b only (EM01b-THM) [See gure 8]

Sensormetrix
Basingstoke Road
Spencers Wood
Reading
Berkshire RG7 1PW
UK
+44(0)118 976 9023
+44(0)118 976 9020
sales@sensormetrix.co.uk
www.sensormetrix.co.uk
sales
fax
email
web
A member of the Olancha Group Ltd
Registered in England No. 4004881
VAT Registration No. GB164 5653 45
EM01b Websensor
Instruction Manual
8
Websensor Inventory
Figure 3. EM01b Websensor Figure 4. Wall Power Supply
Figure 5. Straight Patch Cable Figure 6. Crossover Cable
Figure 7. Contact Closure Figure 8. Additional 3m Thermistor Cable
(EM01b-THM only)

Sensormetrix
Basingstoke Road
Spencers Wood
Reading
Berkshire RG7 1PW
UK
+44(0)118 976 9023
+44(0)118 976 9020
sales@sensormetrix.co.uk
www.sensormetrix.co.uk
sales
fax
email
web
A member of the Olancha Group Ltd
Registered in England No. 4004881
VAT Registration No. GB164 5653 45
EM01b Websensor
Instruction Manual
9
Websensor Connection
How to connect a Websensor directly to a PC
To congure and use a Websensor it must be connected to a PC via an Ethernet
cable as shown in either gure below.
If connecting directly to a PC, a crossover type Ethernet patch cable must be used.
A crossover type Ethernet cable has been included with the Websensor. It is a solid
GREY cable with BLACK connectors.
Figure 9. Websensor connected directly to the NIC in a PC
Connecting to a PC through a hub or directly to a LAN
If connecting to a PC through a HUB, a “straight” type Ethernet patch cable must be
used between the HUB and the Websensor. A “straight” type Ethernet patch cable is
also included with the Websensor; it is the BLUE patch cable.
Figure 10. Websensor connected through a HUB to the NIC in a PC
Websensor
EM01b HVAC Monitor
TRANSMIT POWER
Temperature, Humidity & Illumination
www.sensormetrix.co.uk
12V DC
AUX
SENSOR
LAN
Ethernet Connection
Ethernet Connection
Websensor
EM01b HVAC Monitor
TRANSMIT POWER
Temperature, Humidity & Illumination
www.sensormetrix.co.uk
12V DC
AUX
SENSOR
LAN

Sensormetrix
Basingstoke Road
Spencers Wood
Reading
Berkshire RG7 1PW
UK
+44(0)118 976 9023
+44(0)118 976 9020
sales@sensormetrix.co.uk
www.sensormetrix.co.uk
sales
fax
email
web
A member of the Olancha Group Ltd
Registered in England No. 4004881
VAT Registration No. GB164 5653 45
EM01b Websensor
Instruction Manual
10
Connecting the Websensor
The gures below depict the locations of the connectors for the Ethernet, 12VDC
power and Esbus connectors.
Figure 11. Ethernet (RJ-45) & Power Connectors
Figure 12. Esbus Connector (RJ-45)
Esbus for connecting up to 7 other accessories:
• ES11 Flood Monitor
• ES01 Visual Temp Display
• ES02 Main Power Monitor (not yet available)
• EShub – hub for connecting more than one accessory to an EM01b
Check www.sensormetrix.co.uk for specication of the above.
Figure 13. Thermistor, Voltage Measurement and
Contact Closure output connector
Figure 14. Location of RESET PUSHBUTTON

Sensormetrix
Basingstoke Road
Spencers Wood
Reading
Berkshire RG7 1PW
UK
+44(0)118 976 9023
+44(0)118 976 9020
sales@sensormetrix.co.uk
www.sensormetrix.co.uk
sales
fax
email
web
A member of the Olancha Group Ltd
Registered in England No. 4004881
VAT Registration No. GB164 5653 45
EM01b Websensor
Instruction Manual
11
Quickstart
□ Set PC Network IP address to 192.168.254.10, Subnet to 255.255.254.0 and
Gateway to 192.168.254.102
□ Connect the power supply to the Websensor
□ Connect crossover cable from the PC to Websensor Ethernet port.
□ Switch on power at mains outlet.
□ Both front face LEDs will ash twice with the amber power LED staying on
permanently and the green transmit LED going out.
□ The Websensor is now ready to communicate with the PC.
□ Test communication to the websensor by using the ‘ping’ command at an
MSDOS prompt (ping 192.168.254.102 return) and the default IP address of the
websensor.
Default IP address – 192.168.254.102
□ If unsuccessful response – press reset button on the side of the websensor for 10
seconds until the two LEDs ash twice and the amber LED stays lit with the green
LED extinguishing. Leave the Websensor for a few seconds to settle down and try
‘re-pinging’.
□ After successful communication with the ‘ping’ command try retrieving information
from the Websensor by typing in the following command on the PC’s web
browser:-
http://192.168.254.102/index.html?em
This is asking the Websensor for temperature, light and humidity information and
will show a reply string similar to image over page.
Sensormetrix
Basingstoke Road
Spencers Wood
Reading
Berkshire RG7 1PW
UK
+44(0)118 976 9023
+44(0)118 976 9020
sales@sensormetrix.co.uk
www.sensormetrix.co.uk
sales
fax
email
web
A member of the Olancha Group Ltd
Registered in England No. 4004881
VAT Registration No. GB164 5653 45
EM01b Websensor
Instruction Manual
12
TC = temp
HU = humidity
IL = illumination
Your Websensor is now fully functioning and is ready for you to programme to your
requirements. Continued below.
HELPFUL HINT: Prior to assigning the Websensor’s IP address, it may prove useful
to conrm that the IP address chosen for Websensor is not being utilized by another
device on the network. This is easily checked by pinging the selected address on the
network that the Websensor will be connected to, prior to connecting the Websensor
to the network.

Sensormetrix
Basingstoke Road
Spencers Wood
Reading
Berkshire RG7 1PW
UK
+44(0)118 976 9023
+44(0)118 976 9020
sales@sensormetrix.co.uk
www.sensormetrix.co.uk
sales
fax
email
web
A member of the Olancha Group Ltd
Registered in England No. 4004881
VAT Registration No. GB164 5653 45
EM01b Websensor
Instruction Manual
13
Programming the IP Address
Programming the IP address
Programming your chosen IP address into the Websensor is performed by using the
browser to issue the following command:
http://192.168.254.102/index.html?eipaaabbbcccddd, where aaabbbcccddd is
the new IP address of the Websensor.
For example, suppose the new address to be assigned to the Websensor is
192.168.10.20. The command to perform this change is:
http://192.168.254.102/index.html?eip192168010020
As the new address is entered, each octet must have three digits.
After programming is complete, the command to access the Websensor would be:
http://192.168.10.20/index.html?em
NOTE: Once the command to change the IP address is issued the Websensor will
automatically reset itself. After the reset process completes, the new IP address will
be in effect.
Sensormetrix
Basingstoke Road
Spencers Wood
Reading
Berkshire RG7 1PW
UK
+44(0)118 976 9023
+44(0)118 976 9020
sales@sensormetrix.co.uk
www.sensormetrix.co.uk
sales
fax
email
web
A member of the Olancha Group Ltd
Registered in England No. 4004881
VAT Registration No. GB164 5653 45
EM01b Websensor
Instruction Manual
14
Default Settings
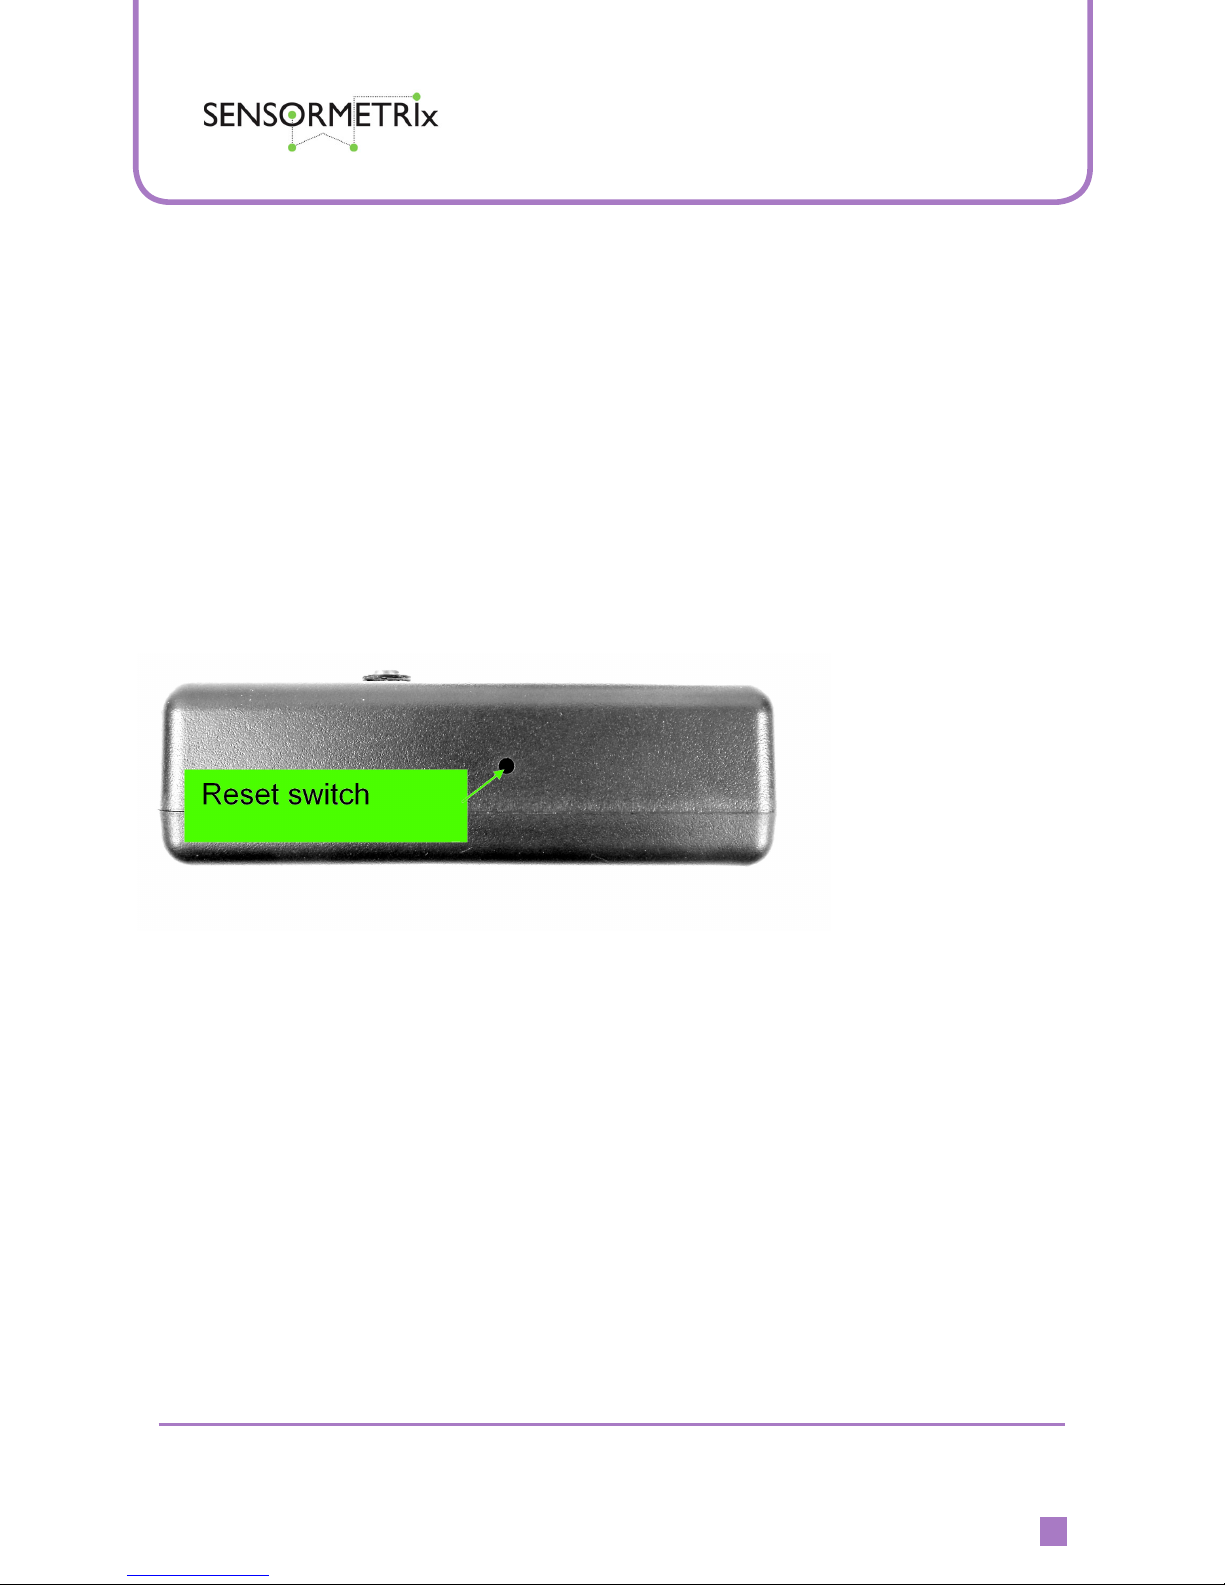
Resetting the Websensor’s settings to default
To reset the Websensor settings to the default value perform the following steps:
1. Locate the small hole on the side of the Websensor (see PIC below).
2. Use a small object like the end of a straightened paper clip to gently press the
reset button only until both LEDs on the Websensor start to ash.
Once the reset is completed the Websensor will be set to a default IP address of
192.168.254.102. From this address the User can congure the IP address of the
Websensor to the desired value.
Figure 15. Location of the RESET button on the Websensor.
How to recognize a Websensor RESET
When a Websensor resets (initializes) the following LED lighting sequence will occur:
• Only the amber POWER LED will be on for approximately 5 seconds
• Both (amber) POWER and (green) TRANSMIT LEDs will extinguish for
approximately 5 seconds.
• Both POWER and TRANSMIT LEDs will ash two (2) times as the Websensor
“resets”.
• Finally, only the POWER LED will remain ON.

Sensormetrix
Basingstoke Road
Spencers Wood
Reading
Berkshire RG7 1PW
UK
+44(0)118 976 9023
+44(0)118 976 9020
sales@sensormetrix.co.uk
www.sensormetrix.co.uk
sales
fax
email
web
A member of the Olancha Group Ltd
Registered in England No. 4004881
VAT Registration No. GB164 5653 45
EM01b Websensor
Instruction Manual
15
Programming the IP Address
NOTE: To address concerns over security issues, the IP address can be changed
only one (1) time per RESET. The address can be changed multiple times, but only
once after pressing the RESET BUTTON. For example, if the User changes the IP
address from the default value to another value such as 192.168.10.20, it will be
necessary to press the RESET button and restore the default value before a different
IP address can be entered.
FAQs regarding IP address changes
:Q What if I forget what IP address is programmed into a Websensor, is there anyway
to retrieve it?
:A There is no command that can be issued to a Websensor that will cause the
Websensor to reveal its assigned IP address. If the assigned IP address is
forgotten, the only recourse is to press the reset button for ten seconds, thus
restoring the default IP address of 192.168.254.102.
:Q Why can’t I read the Websensor’s new programmed IP address?
:A The most likely reason is that the IP address on the NIC (network interface card)
on the PC used to programme the Websensor is outside the IP address Class of
the new IP address programmed into the Websensor.
For example, if 192.168.254.102 (default IP address) is used to program the
Websensor and the new IP address is something like 141.123.6.10, it would be
necessary to change the IP address of the NIC card to the 141.123.X.X subnet.
Once the IP address used by the PC is changed to the same subnet/class as the
Websensor, there should be no problems communicating with the Websensor.

Sensormetrix
Basingstoke Road
Spencers Wood
Reading
Berkshire RG7 1PW
UK
+44(0)118 976 9023
+44(0)118 976 9020
sales@sensormetrix.co.uk
www.sensormetrix.co.uk
sales
fax
email
web
A member of the Olancha Group Ltd
Registered in England No. 4004881
VAT Registration No. GB164 5653 45
EM01b Websensor
Instruction Manual
16
Units of Temperature
Selecting units of temperature to be reported
To establish the units in which temperature is reported, either Fahrenheit or Celsius,
perform the following:
For temperature in Fahrenheit use the browser to send this command,
http://192.168.254.102/index.html?etpF
For temperature in Celsius use the browser to send this command,
http://192.168.254.102/index.html?etpC
NOTE: The temperature unit selection setting applies to both the temperature sensor
provided with the Websensor and the thermistor temperature readings.

Sensormetrix
Basingstoke Road
Spencers Wood
Reading
Berkshire RG7 1PW
UK
+44(0)118 976 9023
+44(0)118 976 9020
sales@sensormetrix.co.uk
www.sensormetrix.co.uk
sales
fax
email
web
A member of the Olancha Group Ltd
Registered in England No. 4004881
VAT Registration No. GB164 5653 45
EM01b Websensor
Instruction Manual
17
Testing the IP Address
Once the Websensor has been congured, it is a good idea to conrm the IP address
selected during the conguration process has been properly entered. One way to do
this is to “ping” it.
Connect the Websensor to a PC via an Ethernet cable as shown on Page 9.
Open a Window with an MSDOS “Command Prompt”.
START > ACCESSORIES > COMMAND PROMPT
In the “Command Window” type the IP address you entered in conguration Step 1.
In this example we are using the websensor default address 192.168.254.102
ping 192.168.254.102
The IP address shown in the example is only for example. The IP address entered
during conguration should be used for this test. See the Command Window.
Figure 16. Command Window
Sensormetrix
Basingstoke Road
Spencers Wood
Reading
Berkshire RG7 1PW
UK
+44(0)118 976 9023
+44(0)118 976 9020
sales@sensormetrix.co.uk
www.sensormetrix.co.uk
sales
fax
email
web
A member of the Olancha Group Ltd
Registered in England No. 4004881
VAT Registration No. GB164 5653 45
EM01b Websensor
Instruction Manual
18
Testing the Websensor’s IP address
If the IP address has been congured and is working properly, the replies received
should look like those shown in the “Command Prompt Window”.
If the response shown in the command prompt screen is “not received”, please refer
to the “Troubleshooting Websensor” section in the appendices.
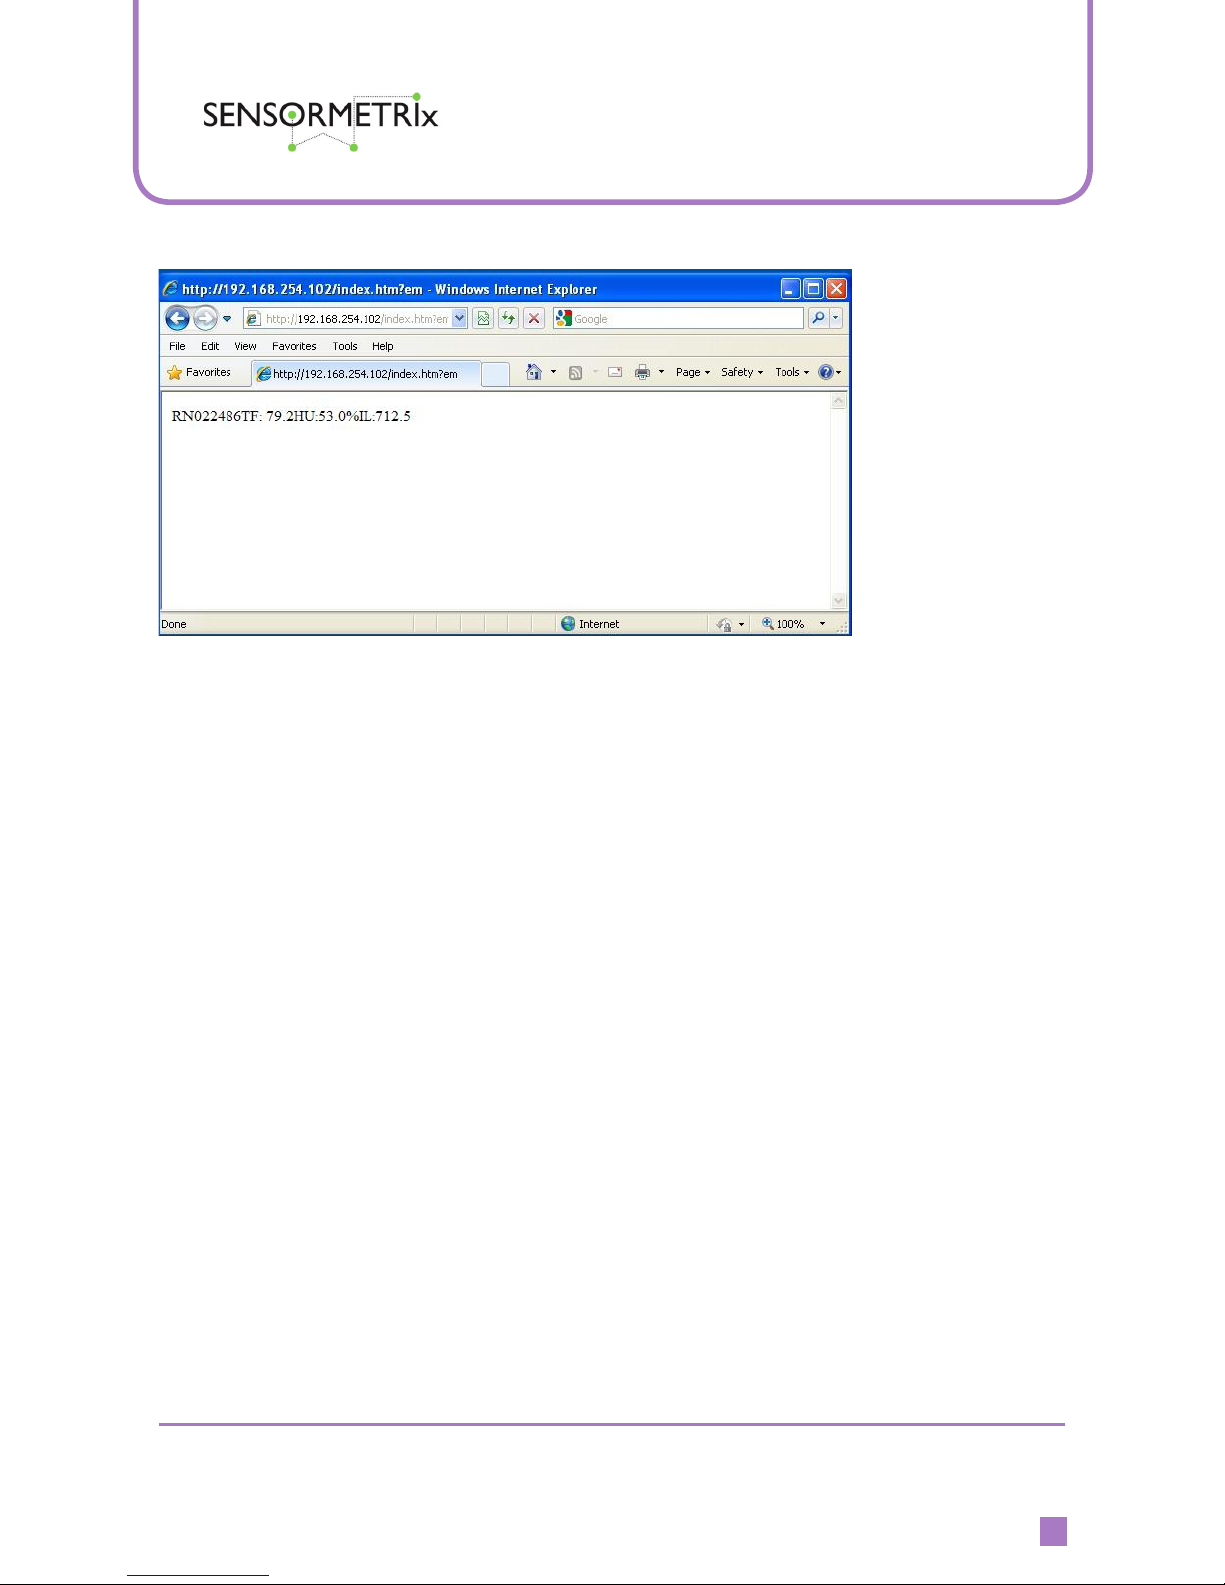
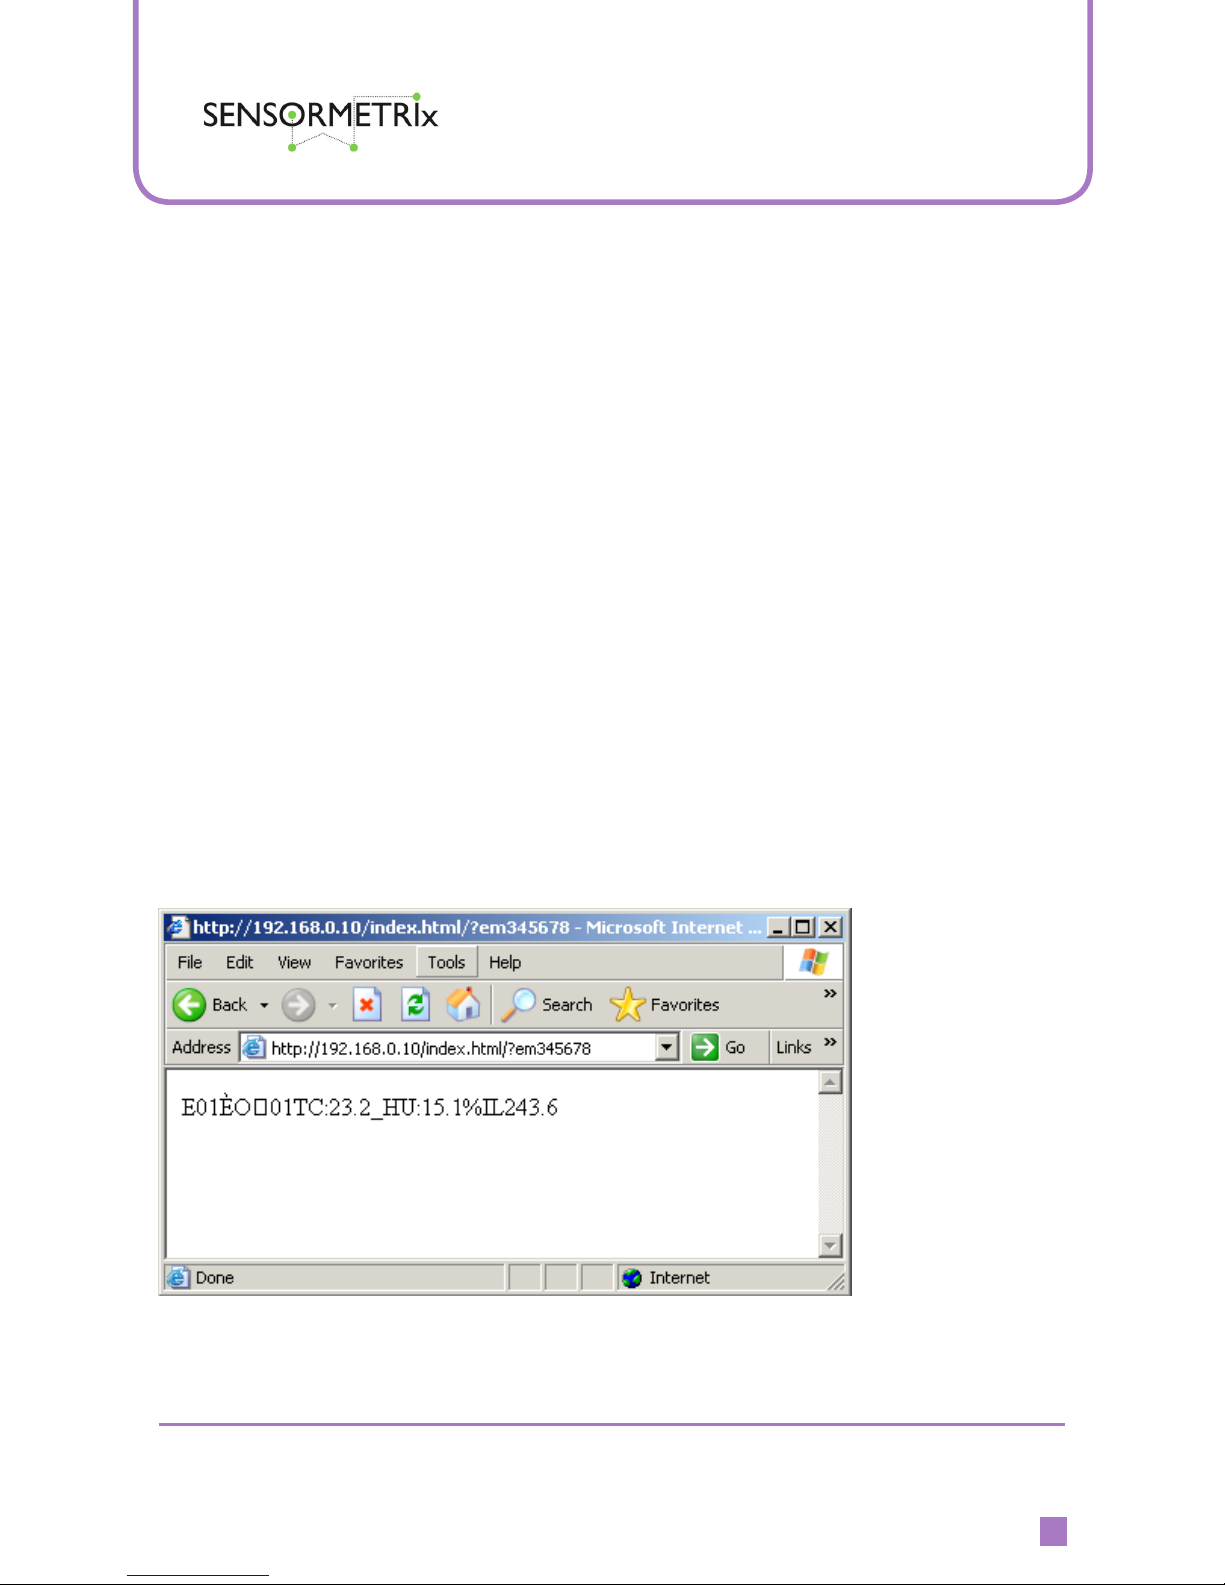
Testing the Websensor’s IP address
Once you are able to successfully “ping” the Websensor, it is time to try a http:
request for some “live” data. To issue a request, start your internet browser (Internet
Explorer / Netscape). In the URL address eld enter the following address:
http://192.168.254.102/index.html?em
Note: For purposes of explanation the IP address 192.168.254.102 is being used.
However, the USER should enter the IP address that was programmed into the
Websensor during the conguration step.
Once the URL is entered, press the “ENTER” key and the Websensor should
acknowledge with a response. The response you see will be similar to what is shown
on the browser screen depending on which features are enabled (see below). The
information returned starts with “E01” signifying that the response is from an EM01b
Websensor. The next several bytes have to do with “check-sum”. “TC:” begins the
temperature reading, “HU” is the humidity reading and “IL” is the illumination value.
Figure 17. BROWSER SCREEN response from the HTTP: request

Sensormetrix
Basingstoke Road
Spencers Wood
Reading
Berkshire RG7 1PW
UK
+44(0)118 976 9023
+44(0)118 976 9020
sales@sensormetrix.co.uk
www.sensormetrix.co.uk
sales
fax
email
web
A member of the Olancha Group Ltd
Registered in England No. 4004881
VAT Registration No. GB164 5653 45
EM01b Websensor
Instruction Manual
19
Websensor’s Tail
The EM01b Websensor has a tail. Functionally, the tail is the sensor which measures
temperature and relative humidity. The reason for the tail is to move the temperature
sensor outboard of the EM01b enclosure so that any heat emitted by the EM01b
electronics, will not skew the temperature/relative humidity measurements.
Note: Websensor was designed to measure “air temperature”. Websensor’s tail
should not be immersed in any liquid.
Figure 18. Websensor’s tail (temp/RH sensor).

Sensormetrix
Basingstoke Road
Spencers Wood
Reading
Berkshire RG7 1PW
UK
+44(0)118 976 9023
+44(0)118 976 9020
sales@sensormetrix.co.uk
www.sensormetrix.co.uk
sales
fax
email
web
A member of the Olancha Group Ltd
Registered in England No. 4004881
VAT Registration No. GB164 5653 45
EM01b Websensor
Instruction Manual
20
Additional Websensor Functions
Websensor now offers three (3) new functions to the User, however only one of the
three can be used or programmed into the Websensor at any one time. One of the
three functions should be specied at the time of purchase as only one of the functions
can be congured because all three functions utilize the same port on the Websensor
and each one requires a specic modication to the Websensor hardware.
The Websensor will come pre-congured pending which function is selected. If no
function is specied then the Websensor will come with the ‘Contact Closure’
option congured.

Sensormetrix
Basingstoke Road
Spencers Wood
Reading
Berkshire RG7 1PW
UK
+44(0)118 976 9023
+44(0)118 976 9020
sales@sensormetrix.co.uk
www.sensormetrix.co.uk
sales
fax
email
web
A member of the Olancha Group Ltd
Registered in England No. 4004881
VAT Registration No. GB164 5653 45
EM01b Websensor
Instruction Manual
21
Contact Closure
The Contact Closure option can be used to detect the opening of a server rack door
(intrusion). However, contact closure detection can be used for many applications
other than security.
Connection to the Websensor port is made via a small
plug (3.5mm outside X 1.0 mm pin supplied with each
Websensor) which is inserted. The Websensor’s default is
normally closed.
Magnetic door switches suitable for this application are available from Sensormetrix.
When the door (and switch) is opened and the circuit is broken, the Websensor will
‘latch’ on the open condition. In the event a door is quickly opened and closed in
between Websensor scans (polls), the ‘open condition status’ is captured (latched) so
that an ALERT can be generated by the polling software.
Figure 19. Location of Contact Closure Jack and Plug
If your Websensor is purchased with the Contact Closure feature congured (default)
the following step was already performed during testing. To assure that the correct
rmware is enabled type the following command:
http://192.168.254.102.index.html?eFC

Sensormetrix
Basingstoke Road
Spencers Wood
Reading
Berkshire RG7 1PW
UK
+44(0)118 976 9023
+44(0)118 976 9020
sales@sensormetrix.co.uk
www.sensormetrix.co.uk
sales
fax
email
web
A member of the Olancha Group Ltd
Registered in England No. 4004881
VAT Registration No. GB164 5653 45
EM01b Websensor
Instruction Manual
22
Once this command is entered the Websensor will go through a RESET sequence.
Note that the ‘second character’ in the command string indicates whether the
Websensor detects the contact (switch) as being open or closed.
‘W’ indicates the contact/switch is closed – see Figure 22.
‘N’ indicates that the contact/switch has been opened – see Figure 23.
NOTE: The initial ‘contact closure’ information returned is not valid at the time the
ENABLE command is sent. Any requests sent AFTER the function ENABLE and
Contact Closure RESET commands will contain valid contact closure status.
In Figure 22, the string returned indicates contact closure (switch closed / loop
unbroken) as well as temperature in Fahrenheit, relative humidity and illumination
information.
Figure 20. Command enabling Contact Closure

Sensormetrix
Basingstoke Road
Spencers Wood
Reading
Berkshire RG7 1PW
UK
+44(0)118 976 9023
+44(0)118 976 9020
sales@sensormetrix.co.uk
www.sensormetrix.co.uk
sales
fax
email
web
A member of the Olancha Group Ltd
Registered in England No. 4004881
VAT Registration No. GB164 5653 45
EM01b Websensor
Instruction Manual
23
Figure 21. Contact Closure RESET command issued
Figure 22. Valid Contact Closure status showing switch closed after resetting
NOTE: Contact Closure status is VALID after the command is issued

Sensormetrix
Basingstoke Road
Spencers Wood
Reading
Berkshire RG7 1PW
UK
+44(0)118 976 9023
+44(0)118 976 9020
sales@sensormetrix.co.uk
www.sensormetrix.co.uk
sales
fax
email
web
A member of the Olancha Group Ltd
Registered in England No. 4004881
VAT Registration No. GB164 5653 45
EM01b Websensor
Instruction Manual
24
Figure 23 shows a regular command being issued, but this time the ‘N’ indicates
that the switch has opened (loop broken) even if only momentarily.
Figure 23. Open switch or open loop indication
NOTE: Contact closure can only be reset after the switch (loop) has been
restored to a closed condition.
NOTE: Should the Websensor lose power or have its power recycled, the
Websensor will report an open switch/loop condition and will need to be reset by
using the ‘eL’ command.

Sensormetrix
Basingstoke Road
Spencers Wood
Reading
Berkshire RG7 1PW
UK
+44(0)118 976 9023
+44(0)118 976 9020
sales@sensormetrix.co.uk
www.sensormetrix.co.uk
sales
fax
email
web
A member of the Olancha Group Ltd
Registered in England No. 4004881
VAT Registration No. GB164 5653 45
EM01b Websensor
Instruction Manual
25
Thermistor Interface
The Thermistor Interface permits the User to utilize an additional external temperature
sensor with Websensor. An example might be to use a thermistor sensor suitable for
immersion in liquids or gases.
If the thermistor interface feature is desired it must be indicated at the time the
Websensor is ordered so that the correct hardware options are enabled prior to
shipment.
Prior to using the Websensor Thermistor Interface for the rst time, the following
command should be issued to assure the correct rmware is selected for operation.
http://192.168.254.102/index.html?eFR
Figure 24. Command used to enable Thermistor function.
(A suitable thermistor is available from Sensormetrix)
Once this command is entered the Websensor will go through a RESET sequence.
Before accurate thermistor readings can be taken, it will be necessary to calibrate
the Websensor by accurately measuring the temperature which the thermostat
sensor is reading. If the thermistor sensor is measuring liquid, either a thermometer
or other electronic temperature reading device must be used to capture the reference
temperature being read by the thermistor.

Sensormetrix
Basingstoke Road
Spencers Wood
Reading
Berkshire RG7 1PW
UK
+44(0)118 976 9023
+44(0)118 976 9020
sales@sensormetrix.co.uk
www.sensormetrix.co.uk
sales
fax
email
web
A member of the Olancha Group Ltd
Registered in England No. 4004881
VAT Registration No. GB164 5653 45
EM01b Websensor
Instruction Manual
26
Figure 25. Using Websensors own temperature for calibration
Once the calibration value is known, enter it into the Websensor using the following
command:
In this example, the value 70.500 degrees Fahrenheit will be entered,
http://192.168.254.102/index.html?er70.500
NOTE: All temperatures entered must be of the format **.***
Figure 26. Calibration temperature is entered.

Sensormetrix
Basingstoke Road
Spencers Wood
Reading
Berkshire RG7 1PW
UK
+44(0)118 976 9023
+44(0)118 976 9020
sales@sensormetrix.co.uk
www.sensormetrix.co.uk
sales
fax
email
web
A member of the Olancha Group Ltd
Registered in England No. 4004881
VAT Registration No. GB164 5653 45
EM01b Websensor
Instruction Manual
27
An example of entering a Celsius temperature of 25.5 degrees would be:
http://192.168.254.102/index.html?er25.500
NOTE: Websensor Temperature Units should be selected prior to temperature cali-
brations.
Figure 27. How to obtain a Thermistor reading

Sensormetrix
Basingstoke Road
Spencers Wood
Reading
Berkshire RG7 1PW
UK
+44(0)118 976 9023
+44(0)118 976 9020
sales@sensormetrix.co.uk
www.sensormetrix.co.uk
sales
fax
email
web
A member of the Olancha Group Ltd
Registered in England No. 4004881
VAT Registration No. GB164 5653 45
EM01b Websensor
Instruction Manual
28
Measure Voltage (DC)
The Measure Voltage feature permits the User to read a DC voltage with Websensor.
The range of DC voltage that can be measured is 0.0 VDC to +18 VDC.
This feature can be used to monitor the Websensor’s supply voltage in applications
where the Websensor is located remotely and is being powered by a battery.
NOTE: The Websensor is normally congured to measure its own supply voltage.
However the Websensor can be ordered and congured so that an external DC
voltage source can be measured.
Prior to using the Websensor Measure Voltage feature for the rst time, the following
command should be issued to assure the correct rmware is selected for proper
operation.
http://192.168.254.102/index.html?eFV
Figure 28. Command to enable DC Voltage Measurement.

Sensormetrix
Basingstoke Road
Spencers Wood
Reading
Berkshire RG7 1PW
UK
+44(0)118 976 9023
+44(0)118 976 9020
sales@sensormetrix.co.uk
www.sensormetrix.co.uk
sales
fax
email
web
A member of the Olancha Group Ltd
Registered in England No. 4004881
VAT Registration No. GB164 5653 45
EM01b Websensor
Instruction Manual
29
Similar to the other features, it is necessary to specify the ‘Measure Voltage’ feature at
the time the Websensor order is placed.
Before accurate DC Voltage readings can be taken, it will be necessary to calibrate
the Websensor by using a DVM (digital volt meter) to accurately measure the DC
Voltage which the Websensor will be reading.
Figure 29. Command to calibrate DC Voltage Measurement.
Once the calibration value is known, enter it into the Websensor using the following
command:
In this example, the value 8.00 volts DC will be entered. The voltage must be entered
in the format **.***
http://192.168.254.102/index.html?ec08.000
Once calibrated the Websensor command to read DC voltage is:
http://192.168.254.102/index.html?ev

Sensormetrix
Basingstoke Road
Spencers Wood
Reading
Berkshire RG7 1PW
UK
+44(0)118 976 9023
+44(0)118 976 9020
sales@sensormetrix.co.uk
www.sensormetrix.co.uk
sales
fax
email
web
A member of the Olancha Group Ltd
Registered in England No. 4004881
VAT Registration No. GB164 5653 45
EM01b Websensor
Instruction Manual
30
Figure 30. Command to Measure DC Voltage.

Sensormetrix
Basingstoke Road
Spencers Wood
Reading
Berkshire RG7 1PW
UK
+44(0)118 976 9023
+44(0)118 976 9020
sales@sensormetrix.co.uk
www.sensormetrix.co.uk
sales
fax
email
web
A member of the Olancha Group Ltd
Registered in England No. 4004881
VAT Registration No. GB164 5653 45
EM01b Websensor
Instruction Manual
31
Connector Connections
The connections to the connector should be made such that the centre pin goes to
the positive (+) polarity.
Command Function
http://192.168.254.102/index.html?em Measure temperature, illumination
and humidity.
http://192.168.254.102/index.html?etpF Change temperature to Farenheit
http://192.168.254.102/index.html?etpC Change temperature to Celsius
http://192.168.254.102/index.html?eFC Change additional functions to
door closed
http://192.168.254.102/index.html?eFR Change addition function to
additional thermistor
http://192.168.254.102/index.html?eFV Change additional functions to
voltage measure
http://192.168.254.102/index.html?ev Measure voltage command
http://192.168.254.102/index.html?ecXXXXX Calibrate voltage where XXXXX is
calibration voltage (14.156 eg)
http://192.168.254.102/index.html?erXXXXX Calibrate temperature of additional
thermistor where XXXXX is
calibrated temperature (eg 36.823)
http://192.168.254.102/index.
html?eipaaabbbcccddd
Change IP address where
aaabbbcccddd is the new IP
address
http://192.168.254.102/index.html?eR Read additional thermistor tem-
perature
http://192.168.254.102/index.html?eL Reset contact closure switch

Sensormetrix
Basingstoke Road
Spencers Wood
Reading
Berkshire RG7 1PW
UK
+44(0)118 976 9023
+44(0)118 976 9020
sales@sensormetrix.co.uk
www.sensormetrix.co.uk
sales
fax
email
web
A member of the Olancha Group Ltd
Registered in England No. 4004881
VAT Registration No. GB164 5653 45
EM01b Websensor
Instruction Manual
32
Troubleshooting the Websensor
This section describes some common problems associated with the initial set-up and
conguration of Websensor.
1. If you are not able to “PING” the Websensor follow these steps:
a. Conrm that there is power to the Websensor. The Websensor comes with and
is powered by the 9 volt DC wall transformer.
b. Conrm that the NIC (network interface card) is working in the PC being used to
congure and test the Websensor. Proper operation can be veried by opening a
“Command Prompt” window and issuing a “PING” command to the IP address
of the NIC card. For example: ping 192.168.254.1. A reply should be received
almost immediately. If no reply is received, conrm that the NIC card is congured with the desired IP address through the “Control Panel” in Windows.
c. Conrm that the correct “Ethernet patch cable” is being used. When properly
connected, the LEDS on the NIC card should “light”.
“No LEDs lit”, may indicate some hardware issue like an incorrect, or a faulty
cable is being used. Connecting the Websensor directly to the NIC of a PC
requires a crossover type of patch cable. The crossover cable included in the
Websensor Kit is solid GREY colour with BLACK connectors.
Connecting the Websensor to an Ethernet HUB requires a “straight” type of
patch cable. The “straight” type of patch cable included in the Websensor Kit is
BLUE.
d. It is important that the Websensor and the PC being used to “ping” the
Websensor are in the same sub-network.
What this means is if you using a sub-network mask of 255.255.255.0 the rst
three (3) octets of the PC’s IP address and the Websensor’s IP address must
match.
Example of invalid IP addresses:
PC’s IP address: 155.6.20.1
Websensor’s IP address: 192.168.254.102
Example of valid IP addresses:
PC/Server IP address: 192.168.254.10
Websensor’s IP address: 192.168.254.102
e. Conrm with the IT Systems Administrator that the IP address being used by
the Websensor has not been previously assigned. Using the PING command to
test the availability of a specic IP address could result in a false indication if the
device using the IP address has its PING RESPOND disabled.

Sensormetrix
Basingstoke Road
Spencers Wood
Reading
Berkshire RG7 1PW
UK
+44(0)118 976 9023
+44(0)118 976 9020
sales@sensormetrix.co.uk
www.sensormetrix.co.uk
sales
fax
email
web
A member of the Olancha Group Ltd
Registered in England No. 4004881
VAT Registration No. GB164 5653 45
EM01b Websensor
Instruction Manual
33
2. If you are not able to execute commands using “Internet explorer” please
make the following changes to turn off caching in IE.
Go to “tools”, “internet options”. Then under Temporary Internet Files tab, click on
settings….then click on the radio button for “Every visit to the page”. Finally, click
on ok.
Websensor connection via router
:Q Why doesn’t the Websensor need a subnet mask and default gateway?
:A Neither a subnet mask nor default gateway is needed because the
Websensor only responds to HTTP requests. The incoming packet contains
the necessary information needed for the Websensor to return data. As in
Q4, we know that incoming TCP/IP packets include the source IP/MAC
addresses. Websensor will never initiate any TCP/IP communication.
:Q How can I retrieve data from a Websensor?
:A The Websensor has a WWW service built in (mini web-server). You can use
any web browser to access the Websensor.
:Q Will a Websensor initialize any kind of TCP/IP communication?
:A No. The Websensor will not initialize any TCP/IP communication. It only listens
on port 80, waiting for other computers to send a HTTP request.
:Q How does the Websensor return data to the computer which sends the HTTP
request?
:A Every TCP/IP packet will include the destination IP/MAC, and source IP/
MAC addresses. When the Websensor responds to a request (within the
same subnet), it simply swaps the source and destination IP/MAC addresses.
(During the very rst transmission when the PC knows the Websensor IP
address, but not the Websensor MAC address, it will issue an ARP request
which contains the Websensor’s IP address and use ‘FF’s’ to ll-in the
Websensor’s MAC address. The Websensor performs an ‘ARP respond’ to
broadcast its IP address and associated MAC address.)
:Q How does the Websensor return data between subnets?
:A In the case where a packet passes through a router, the router will substitute
its own MAC address in place of the originating source MAC address. The
source IP/MAC addresses can be retrieved from any incoming TCP/IP
packet. The Websensor will use the modied IP/MAC address to return its
data. This is further explained in the examples following the Q & A section.
Please Reference the Figure on page 34

Sensormetrix
Basingstoke Road
Spencers Wood
Reading
Berkshire RG7 1PW
UK
+44(0)118 976 9023
+44(0)118 976 9020
sales@sensormetrix.co.uk
www.sensormetrix.co.uk
sales
fax
email
web
A member of the Olancha Group Ltd
Registered in England No. 4004881
VAT Registration No. GB164 5653 45
EM01b Websensor
Instruction Manual
34
:Q How do computers know the Websensor's MAC Address?
:A Websensor has a portion of the ARP protocol built in. It will only do ARP responds
(RFC1180).
For further information and details on IP kindly reference RFC791 INTERNET PROTOCOL, DARPA INTERNET PROGRAM PROTOCOL SPECIFICATION and other related
documents.
Websensor connection over the internet
Websensor
EM01b HVAC Monitor
TRANSMIT POWER
Temperature, Humidity & Illumination
www.sensormetrix.co.uk
12V DC
AUX
SENSOR
LAN

Sensormetrix
Basingstoke Road
Spencers Wood
Reading
Berkshire RG7 1PW
UK
+44(0)118 976 9023
+44(0)118 976 9020
sales@sensormetrix.co.uk
www.sensormetrix.co.uk
sales
fax
email
web
A member of the Olancha Group Ltd
Registered in England No. 4004881
VAT Registration No. GB164 5653 45
EM01b Websensor
Instruction Manual
35
Websensor connection over the internet
Addressing Examples
Please Reference the Figure on page 38
Example A. Server A tries to access Websensor A
The Websensor can retrieve exactly the IP/MAC addresses of Server A from the HTTP
request that is sent from Server A.
Example B. Server A tries to access Websensor B
The HTTP request will be forwarded by Router A rst. Router A replaces the
Websensor B MAC address with the Router A MAC address, and then sends the
request to Router B. Router B does the same thing, replaces the Router A MAC
address with the Router B MAC address, and then sends the request to Websensor
B. Websensor B uses the IP (of Server A) and MAC (of Router B) to return the TCP/
IP packet back to Router B. Router B knows how to forward these packets back to
Router A (Server A IP address), Router A forwards the Websensor data packet back
to Server A.
Example C. Computer B tries to access Websensor C
The HTTP request will be forwarded by Router B (with Router B MAC) to Router A.
Router A then forwards it (with Router A MAC) to Router C. Router C sends it (with
Router C MAC) to Websensor C. Websensor C uses the IP(Computer B) and MAC
(Router C) and basically reverses the sequence in order to return the requested data
back through the routers to Computer B.
Websensor
EM01b HVAC Monitor
TRANSMIT POWER
Temperature, Humidity & Illumination
www.sensormetrix.co.uk
12V DC
AUX
SENSOR
LAN
Websensor
EM01b HVAC Monitor
TRANSMIT POWER
Temperature, Humidity & Illumination
www.sensormetrix.co.uk
12V DC
AUX
SENSOR
LAN
Websensor
EM01b HVAC Monitor
TRANSMIT POWER
Temperature, Humidity & Illumination
www.sensormetrix.co.uk
12V DC
AUX
SENSOR
LAN

Sensormetrix
Basingstoke Road
Spencers Wood
Reading
Berkshire RG7 1PW
UK
+44(0)118 976 9023
+44(0)118 976 9020
sales@sensormetrix.co.uk
www.sensormetrix.co.uk
sales
fax
email
web
A member of the Olancha Group Ltd
Registered in England No. 4004881
VAT Registration No. GB164 5653 45
EM01b Websensor
Instruction Manual
36
Application Information
The EM01b does not work with Internet Explorer...
Solution: The EM01b does not work with Internet Explorer after .NET 2.0, this is
because of the limitation of the thin Ethernet stack on the EM01b Websensor.
Power LED blinks and the devices loses connectivity...
Solution: The small Ethernet stack on the EM01b Websensor cannot service multiple
simultaneous requests and work on a 10BaseT. You might want to put the EM01b
behind a 10/100 Switch to lter the trafc. Avoid multiple simultaneous requests to
the device.
Specications
Ranges
Temperature: -40 °C (-40°F) to +123.8 °C (254.9 °F)
Illumination:
0 to 1000 Lux
Relative Humidity: 0 to 100% RH
Accuracy
Temperature:
+/- 0.2 °C @ 25 °C
Illumination:
Uncalibrated
Relative Humidity: +/- 3%
DC Voltage Measurement
0 to +18 VDC (Centre pin of connector is (+) positive.)
Thermistor Interface
Customer supplied specications – resistance at 25°C required to determine
correct components.

Sensormetrix
Basingstoke Road
Spencers Wood
Reading
Berkshire RG7 1PW
UK
+44(0)118 976 9023
+44(0)118 976 9020
sales@sensormetrix.co.uk
www.sensormetrix.co.uk
sales
fax
email
web
A member of the Olancha Group Ltd
Registered in England No. 4004881
VAT Registration No. GB164 5653 45
EM01b Websensor
Instruction Manual
37
Websensor Plug-in’s
Plug-in’s written in both PERL and C languages are provided on our website:
http://www.sensormetrix.co.uk/em01b-stn_websensor_p_12.php#
IP Based Facility Management
Suite
Contact Sensormetrix for more information on IP based remote monitoring of your facility,
incorporating alarm and reporting functionality.
Let us demonstrate to you how management of alarms and reports via your existing network
can be used to safeguard your facility. Automated text alerts or emails are sent to warn of
dangerous temperature/humidity or ood conditions 24/7.

Sensormetrix
Basingstoke Road
Spencers Wood
Reading
Berkshire RG7 1PW
UK
+44(0)118 976 9023
+44(0)118 976 9020
sales@sensormetrix.co.uk
www.sensormetrix.co.uk
sales
fax
email
web
A member of the Olancha Group Ltd
Registered in England No. 4004881
VAT Registration No. GB164 5653 45
EM01b Websensor
Instruction Manual
38
© 2014 Olancha Group Ltd. All rights reserved.
No part of this publication may be reproduced, transmitted, transcribed, stored in a retrieval system, or
translated into any language in any form or by any means without the written permission of Olancha Group Ltd.
To improve internal design, operational function, and/or reliability, Olancha Group Ltd reserves the right to make
changes to the products described in this document without notice. Olancha Group Ltd does not assume
any liability that may occur due to use, or application of, the product(s) or circuit layouts(s) described in this
document.
 Loading...