

Page 1
Instruction Manual
for AV8 Inspector Models
KNOW YOUR ENVIRONMENT
Technical Specications
CO Range: 0 - 500ppm, display 0 to 1,999ppm
Resolution: 1ppm
CO Accuracy: +/-10%, 0 to 500ppm
Initial Response Time: < 5 seconds
T90 Response Time: < 20 seconds
Display: real-time continuous readings
Size: 3.2” x 2.2” x 0.86”
Weight: 4 ounces
Warranty: 2 years
Battery Life: 2 years (depending on alarm condition)
CO Alarm Set Points: 35ppm low, 200ppm high
Alarms: Vibrating (AV8 Inspector Pro), Audio and visual
Temperature Range: -4 to 122°F (-20 to 50°C)
Humidity Range: 20 - 90% (0 to 99% intermittent)
Introduction
Thank you for choosing the Sensorcon AV8 Inspector!
We want to be your go to resource for all of your
professional gas detection needs! Please contact us
if you have any questions or concerns and we’ll do
our best to make sure you’re 100% satisfied.
This manual covers the features, specifications
and operating instructions for the AV8 Inspector and
AV8 Inspector Pro carbon monoxide (CO) monitors.
Contact Information
Office: 1-716-276-2975
[email protected]
www.sensorcon.com
Hours of Operation
Monday through Friday: 8am to 4pm
Note: East Coast Time Zone
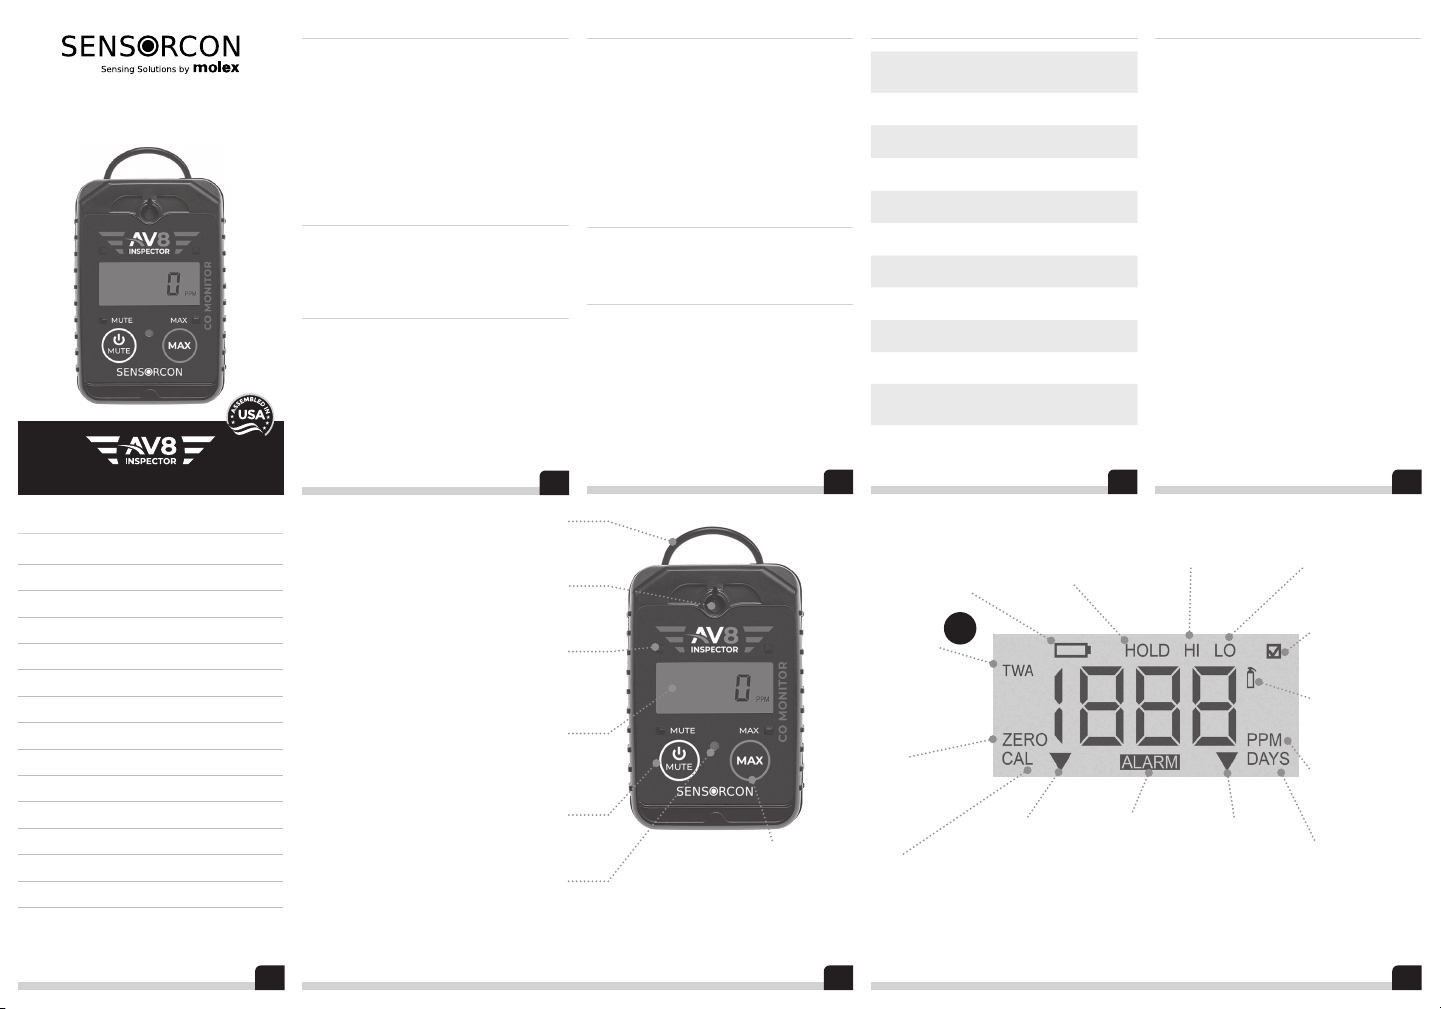
Lanyard Loop & Clip
A clip is on the back of the device. Use this
to attach to your shirt or other location.
Where gas is measured. Keep it clean
and do not puncture the membrane.
LED Indicator Lights
These red lights will flash when the gas
concentration is high enough for an alarm.
There are four lights around the LCD.
Shows CO gas concentration from
0 - 1,999 parts per million
Power / MUTE Button
Press & hold to turn the power ON or OFF.
Press to mute the buzzer for up to 5 Minutes.
Buzzer / Speaker
Makes a beeping sound when an alarm
is active. Do not puncture the membrane.
6
Sensor Inlet
LCD Display
Warranty
Each AV8 Inspector comes standard with a two year
warranty on all of its parts. It is recommended that
you calibrate the AV8 Inspector every six months to
ensure the best accuracy possible. An EOL (End of Life)
symbol will display on the LCD after two years of use. A
successful calibration will remove the EOL notification
for an additional 180 days. Future successful calibrations
can continue to be done as long as the electrochemical
sensing element remains in good condition.
Maximum Operating Conditions
Temperature: -20°C to +50°C (-4°F to +122°F)
Humidity: 20-90% R.H. (0-99% intermittent)
Practical Considerations
Short-term measurements (i.e. <1hr) in any humidity
(0-99% R.H.) are fine as long as condensation does not
block the sensor inlet. Longer term exposure to extreme
humidity or temperature outside the specified range can
result in damage to the sensor. Please note that the LCD
display and sensor will not function properly at colder
temperatures outside of the specified operating range.
NOTE: Exposure to higher temperatures
and humidity can damage the device.
2
MAX Button
Press to make the LCD display the
maximum concentration measured
while the function is enabled.
Note: New readings will only be displayed
after a new high is encountered.
AV8 Inspector Features Comparison
Models:
Two Year Warranty
Water Resistant
Shockproof
Pre-set Alarms
Visual Alarm
Audio Alarm
CE Certified
Vibrating Alarm
Adjustable Alarms
24 Hour TWA
AV8 Inspector
AV8-CO-01
AV8 Inspector Pro
AV8-CO-03
Mounting Bracket
AV8 Inspectors come with a mounting bracket that
allow it to be mounted to the Instrument panel or other
location in the aircraft. Four screws or bolts are required
to mount the AV8 bracket. Since mounting locations and
scenarios will vary greatly, mounting hardware is
not included.
43
Battery
Indicator
Displays when the
battery is low and
needs a replacement.
Time
Weighted
Average
HOLD
Displays a countdown for
powering off or entering
the calibration mode.
Pro
HI
Displays when the HIGH alarm
is exceeded (200ppm CO).
Displays the maximum
8 hour average in the
last 24 hours (AV8
Inspector Pro model only).
Zero
Displays as 1st step
during calibration to
establish 0 ppm
status.
Cal
Indicates the device
is in calibration mode.
Arrow 1
Displays over MUTE
to indicate when
alarm is muted.
ALARM
Displays when the
lower alarm level has
been exceeded
(35ppm CO).
Arrow 2
Displays over
MAX to indicate
the device is in
MAX hold mode.
NOTE: Time Weighted Average (TWA) is a feature that is only available on the AV8 Inspector Pro Model.
7
5
LO
Displays when the
LOW alarm is exceeded
(35ppm CO).
Check Box
Indicates a successful
zero calibration.
Gas Icon
Displays when applying
gas in calibration mode.
PPM
Displays on the screen
when measuring gas.
DAYS
Indicates the number
of days until calibration
is due.
8
Page 2
Operating Instructions
1. Turning on the AV8 Inspector
Hold POWER/MUTE for 1 to 2 seconds to turn on.
A 10 second count down timer allows the sensor to
warm up before displaying real-time readings.
2. Muting audible alarms
If an alarm occurs and you want to mute the sound,
briefly press the POWER/MUTE button.
3. Shutting off the AV8 Inspector
Simply hold POWER/MUTE for 3 seconds to turn the
device off. A count down from 3 will be displayed
while you are shutting off the AV8 Inspector.
4. Turning on MAX mode
To enable MAX mode, briefly press the MAX button.
MAX mode will only show the highest, peak reading
encountered by the AV8 Inspector while the MAX mode
is active. The display will only show another value once
a new, higher reading is encountered.
1. Entering the advanced features menus
Press the POWER/MUTE and MAX buttons at the
same time for 5 seconds to access the advanced features
series of menus. Only CAL mode is available for the
AV8 Inspector, while the AV8 Inspector Pro will have
four advanced features (TWA, CAL mode, Lo Alarm
SEt mode and Hi Alarm SEt mode). To exit, press
POWER/MUTE as many times as required to exit.
2. Viewing TWA readings
(AV8 Inspector Pro Only)
Pro
Press the POWER/MUTE and MAX buttons at the
same time for 5 seconds to access the TWA screen
which displays the maximum 8 hour exposure during
the last 24 hours. To exit, press POWER/MUTE as
many times as needed to exit.
3. Adjusting the Lo Alarm
(AV8 Inspector Pro Only)
Pro
Press the POWER/MUTE and MAX buttons at the same
time for 5 seconds to access the advanced features series
of menus. Press POWER/MUTE twice to get to the
Lo Alarm SEt screen.
Push or push and hold the MAX button to adjust the
Lo Alarm to a setting from 5 to 100ppm CO. Press
POWER/MUTE as many times as needed to exit.
4.) Adjusting the Hi Alarm
(AV8 Inspector Pro Only)
Pro
Press the POWER/MUTE and MAX buttons at the
same time for 5 seconds to access the advanced features
series of menus. Press POWER/MUTE thrice to get
to the Hi Alarm SEt screen. Push or push and hold the
MAX button to adjust the Hi Alarm to a setting from 40
to 500ppm CO. Press POWER/MUTE as many times
as needed to exit.
Calibration Instructions for the AV8 Inspector Advanced Operating Instructions
Calibration is done at the factory or by the customer
using a gas regulator, some Tygon tubing and 50ppm
CO calibration gas. Go to https://sensorcon.com or call
us at 1-716-276-2975 for more info.
Follow these steps below to calibrate
the AV8 Inspector:
1. Entering CAL mode
Press the POWER/MUTE and MAX buttons at the
same time for 5 seconds to access the CAL screen.
2. Performing the ZERO cal
In a clean air environment, press the MAX button to
begin ZERO calibration. A 30 second countdown timer
will be displayed while zero calibration is being done.
Once complete, the sensor will beep, quickly flash
CAL dn and then quickly flash the BASELINE value
just before continuously displaying the word GAS. If you
want to continue on with the GAS calibration, skip to step
3. If you only want to perform ZERO cal and not the gas
calibration, press POWER/MUTE to exit. no CAL will
flash on the screen before returning to normal operation.
Note: ZERO cal in a non-clean environment will
cause errors in the readings!
3. Performing GAS cal
When ZERO cal is complete, use 1/4” OD, 1/8” ID
Tygon tubing to attach the cal gas cylinder and regulator
to the sensor inlet. Turn on the gas flow (rate of 0.3 to
0.5L/min). Press the MAX button to start the GAS cal
process. A timer will countdown from 60 seconds. Once
the countdown has finished, the sensor will beep, quickly
flash CAL dn and then display the SENSITIVITY for
2 seconds before returning to normal operation. If there
is an issue with the sensor calibration, the sensor will
display err before returning to normal operation. If the
sensor displayed err during calibration, please contact
Sensorcon for further support.
Note: Do not service this device in a
hazardous environment.
9
Calibration Instructions for the AV8 Inspector Pro:
1. Entering CAL mode
Press the POWER/MUTE and MAX buttons at the
same time for 5 seconds to access the advanced features
series of menus. Press POWER/MUTE once to get to
the CAL screen.
2. Performing the ZERO cal
In a clean air environment, press the MAX button to
begin ZERO calibration. A 30 second countdown timer
will be displayed while zero calibration is being done.
Once complete, the sensor will beep, quickly flash
CAL dn and then will show the BASELINE value.
Pressing the MAX button will advance to the next screen
displaying the word GAS. If you want to continue on
with the GAS calibration, skip to step 3. If you only want
to perform ZERO cal and not the gas calibration, press
POWER/MUTE to exit. no CAL will flash on the screen
3. Performing GAS cal
When ZERO cal is complete, use 1/4” OD, 1/8” ID
Tygon tubing to attach the cal gas cylinder and regulator
to the sensor inlet. Turn on the gas flow (rate of 0.3 to
0.5L/min). Press the MAX button to start the GAS cal
process. A timer will countdown from 60 seconds. Once
the countdown has finished, the sensor will beep, quickly
flash CAL dn and then display the SENSITIVITY for 2
seconds before returning to normal operation. If there
is an issue with the sensor calibration, the sensor will
display err before returning to normal operation. If the
sensor displayed err during calibration, please contact
Sensorcon for further support.
Note: Do not service this device in a
hazardous environment.
before returning to the next advanced features series
of menus. To return to normal operation, press
POWER/MUTE two more times to exit.
Note: ZERO cal in a non-clean environment will
cause errors in the readings!
10
CO Exposure Chart
Pro
CO Level Effect
1,600 PPM Dizziness in 20 minutes. Death in 1 hour.
1,000 PPM Loss of consciousness after 1 hour.
800 PPM Dizziness and headache after 45 minutes.
400 PPM Life threatening in and around 3 hours.
200 PPM Dizziness, nausea, fatigue *HIGH ALARM POINT STARTS*
100 PPM Sight headache after 1-2 hours.
50 PPM Maximum possible exposure in workspace.
35 PPM NIOSH 10 hour TWA *LOW ALARM SET POINT STARTS*
25 PPM Max TWA Exposure for an 8 hour work-day (ACGIH).
10 PPM Possible heath effects with long-term exposure.
0 PPM Normal fresh air with no CO.
12
EPA & NIOSH Concentration
Guidelines:
Carbon Monoxide
0-5ppm Average inside homes
35ppm NIOSH 8hr exposure limit
200ppm NIOSH 15min. exposure limit
Feel free to contact us should you
have further questions.
Office: 1-716-276-2975
www.sensorcon.com
13
11
14
 Loading...