

Neon Family
User Manual
Sensormetrix is a division of Sequoia Technology Group Ltd
Registered in England No. 4004881
VAT Registration No. GB614 5653 45
Sensormetrix
sales
+44 (0) 845 451 2021
Basingstoke Road
fax
+44 (0) 118 976 9020
Spencers Wood
email
sales@sensormetrix.co.uk
Reading
web
www.sensormetrix.co.uk
Berkshire RG7 1PW
Page 1 of 39
Neon 100 & Neon 110 User Manual
Firmware version 4

Neon Family
User Manual
Sensormetrix is a division of Sequoia Technology Group Ltd
Registered in England No. 4004881
VAT Registration No. GB614 5653 45
Sensormetrix
sales
+44 (0) 845 451 2021
Basingstoke Road
fax
+44 (0) 118 976 9020
Spencers Wood
email
sales@sensormetrix.co.uk
Reading
web
www.sensormetrix.co.uk
Berkshire RG7 1PW
Page 2 of 39
Contents
Introduction ..................................................................................................................................................................... 5
Family Overview ............................................................................................................................................................... 5
Quickstart ........................................................................................................................................................................ 6
Accessing the Neons web interface ................................................................................................................................... 6
NetBIOS ....................................................................................................................................................................... 6
IP Addressing ............................................................................................................................................................... 6
Web Interface ................................................................................................................................................................... 7
Home page ................................................................................................................................................................... 8
Setup page ................................................................................................................................................................... 9
Unit Name ............................................................................................................................................................... 10
User name and password ........................................................................................................................................ 10
Network Page ............................................................................................................................................................. 11
Ethernet Connection Mode ...................................................................................................................................... 12
IP address ............................................................................................................................................................... 12
Netmask ................................................................................................................................................................. 13
Gateway Address .................................................................................................................................................... 13
Primary DNS Address ............................................................................................................................................... 13
Secondary DNS address .......................................................................................................................................... 13
Current settings ....................................................................................................................................................... 13
Time Page ................................................................................................................................................................... 13
Date Format ............................................................................................................................................................ 14
Time Format ............................................................................................................................................................ 14
GMT offset in minutes .............................................................................................................................................. 14
Summer Time / Daylight Saving ............................................................................................................................... 14
NTP Server .............................................................................................................................................................. 15
Sensors Page .............................................................................................................................................................. 15
Temperature Units ................................................................................................................................................... 16
Temperature High Alarm .......................................................................................................................................... 16
Temperature Low Alarm ........................................................................................................................................... 16
Humidity High Alarm................................................................................................................................................ 17
Humidity Low Alarm................................................................................................................................................. 17
Alarms Page ............................................................................................................................................................... 17
Alarm email subject ................................................................................................................................................. 18
Alarm To: email Address .......................................................................................................................................... 18
Alarm email Importance ........................................................................................................................................... 18
Temperature Alarm email Alert ................................................................................................................................. 19

Neon Family
User Manual
Sensormetrix is a division of Sequoia Technology Group Ltd
Registered in England No. 4004881
VAT Registration No. GB614 5653 45
Sensormetrix
sales
+44 (0) 845 451 2021
Basingstoke Road
fax
+44 (0) 118 976 9020
Spencers Wood
email
sales@sensormetrix.co.uk
Reading
web
www.sensormetrix.co.uk
Berkshire RG7 1PW
Page 3 of 39
Humidity Alarm email Alert ...................................................................................................................................... 19
System Power Restored email Alert .......................................................................................................................... 19
Periodic Status email Alert ....................................................................................................................................... 19
Logs Page ................................................................................................................................................................... 19
Log email Subject .................................................................................................................................................... 20
Log To: email address .............................................................................................................................................. 20
Log email Importance .............................................................................................................................................. 20
Log Interval (minutes) .............................................................................................................................................. 21
Info Page .................................................................................................................................................................... 21
Serial number ......................................................................................................................................................... 21
MAC Address........................................................................................................................................................... 21
Manufacture Date .................................................................................................................................................... 21
Version ................................................................................................................................................................... 22
Reboot .................................................................................................................................................................... 22
Email page (Neon 110 only) ........................................................................................................................................ 22
Server Address ........................................................................................................................................................ 23
Port......................................................................................................................................................................... 23
Authenticate ........................................................................................................................................................... 23
Username ............................................................................................................................................................... 23
Password ................................................................................................................................................................ 23
From Address .......................................................................................................................................................... 23
Test Mail ................................................................................................................................................................. 23
Lock Page ................................................................................................................................................................... 24
Logged data format ........................................................................................................................................................ 25
XML file format (Neon 110 only) ...................................................................................................................................... 26
Reset to factory default ................................................................................................................................................... 27
Firmware update procedure ............................................................................................................................................ 27
Technical Specification ................................................................................................................................................... 29
Measurement probe .................................................................................................................................................... 29
Temperature............................................................................................................................................................ 29
Humidity ................................................................................................................................................................. 29
Other characteristics ................................................................................................................................................... 29
Product History ............................................................................................................................................................... 30
Application Information .................................................................................................................................................. 31
Troubleshooting email problems ................................................................................................................................. 31
Setting a PCs IP address .............................................................................................................................................. 31
Windows 7 .............................................................................................................................................................. 31

Neon Family
User Manual
Sensormetrix is a division of Sequoia Technology Group Ltd
Registered in England No. 4004881
VAT Registration No. GB614 5653 45
Sensormetrix
sales
+44 (0) 845 451 2021
Basingstoke Road
fax
+44 (0) 118 976 9020
Spencers Wood
email
sales@sensormetrix.co.uk
Reading
web
www.sensormetrix.co.uk
Berkshire RG7 1PW
Page 4 of 39
Windows 8 .............................................................................................................................................................. 34
Connection via mobile phone network ......................................................................................................................... 37
Connection via WiFi ..................................................................................................................................................... 37
Fixing the IP address ................................................................................................................................................... 37
Hysteresis explained ................................................................................................................................................... 38
Neon 100 SMTP settings ............................................................................................................................................. 38
Glossary ......................................................................................................................................................................... 38
3G/GPRS (3rd Generation / General packet Radio Service) ......................................................................................... 38
DHCP (Dynamic Host Configuration Protocol) ............................................................................................................ 38
DMZ (De-Militarised Zone) ....................................................................................................................................... 38
DNS (Domain Name Service) .................................................................................................................................... 38
Dynamic DNS (Dynamic Domain Name Service) ........................................................................................................ 39
Gateway Address .................................................................................................................................................... 39
IP Address (Internet Protocol Address) ..................................................................................................................... 39
ISP (Internet Service Provider) .................................................................................................................................. 39
LAN (Local Area Network) ......................................................................................................................................... 39
NetBIOS (Network Basic Input/Output System) ........................................................................................................ 39
VLAN (Virtual LAN) ................................................................................................................................................... 39
Wi-Fi ....................................................................................................................................................................... 39

Neon Family
User Manual
Sensormetrix is a division of Sequoia Technology Group Ltd
Registered in England No. 4004881
VAT Registration No. GB614 5653 45
Sensormetrix
sales
+44 (0) 845 451 2021
Basingstoke Road
fax
+44 (0) 118 976 9020
Spencers Wood
email
sales@sensormetrix.co.uk
Reading
web
www.sensormetrix.co.uk
Berkshire RG7 1PW
Page 5 of 39
Introduction
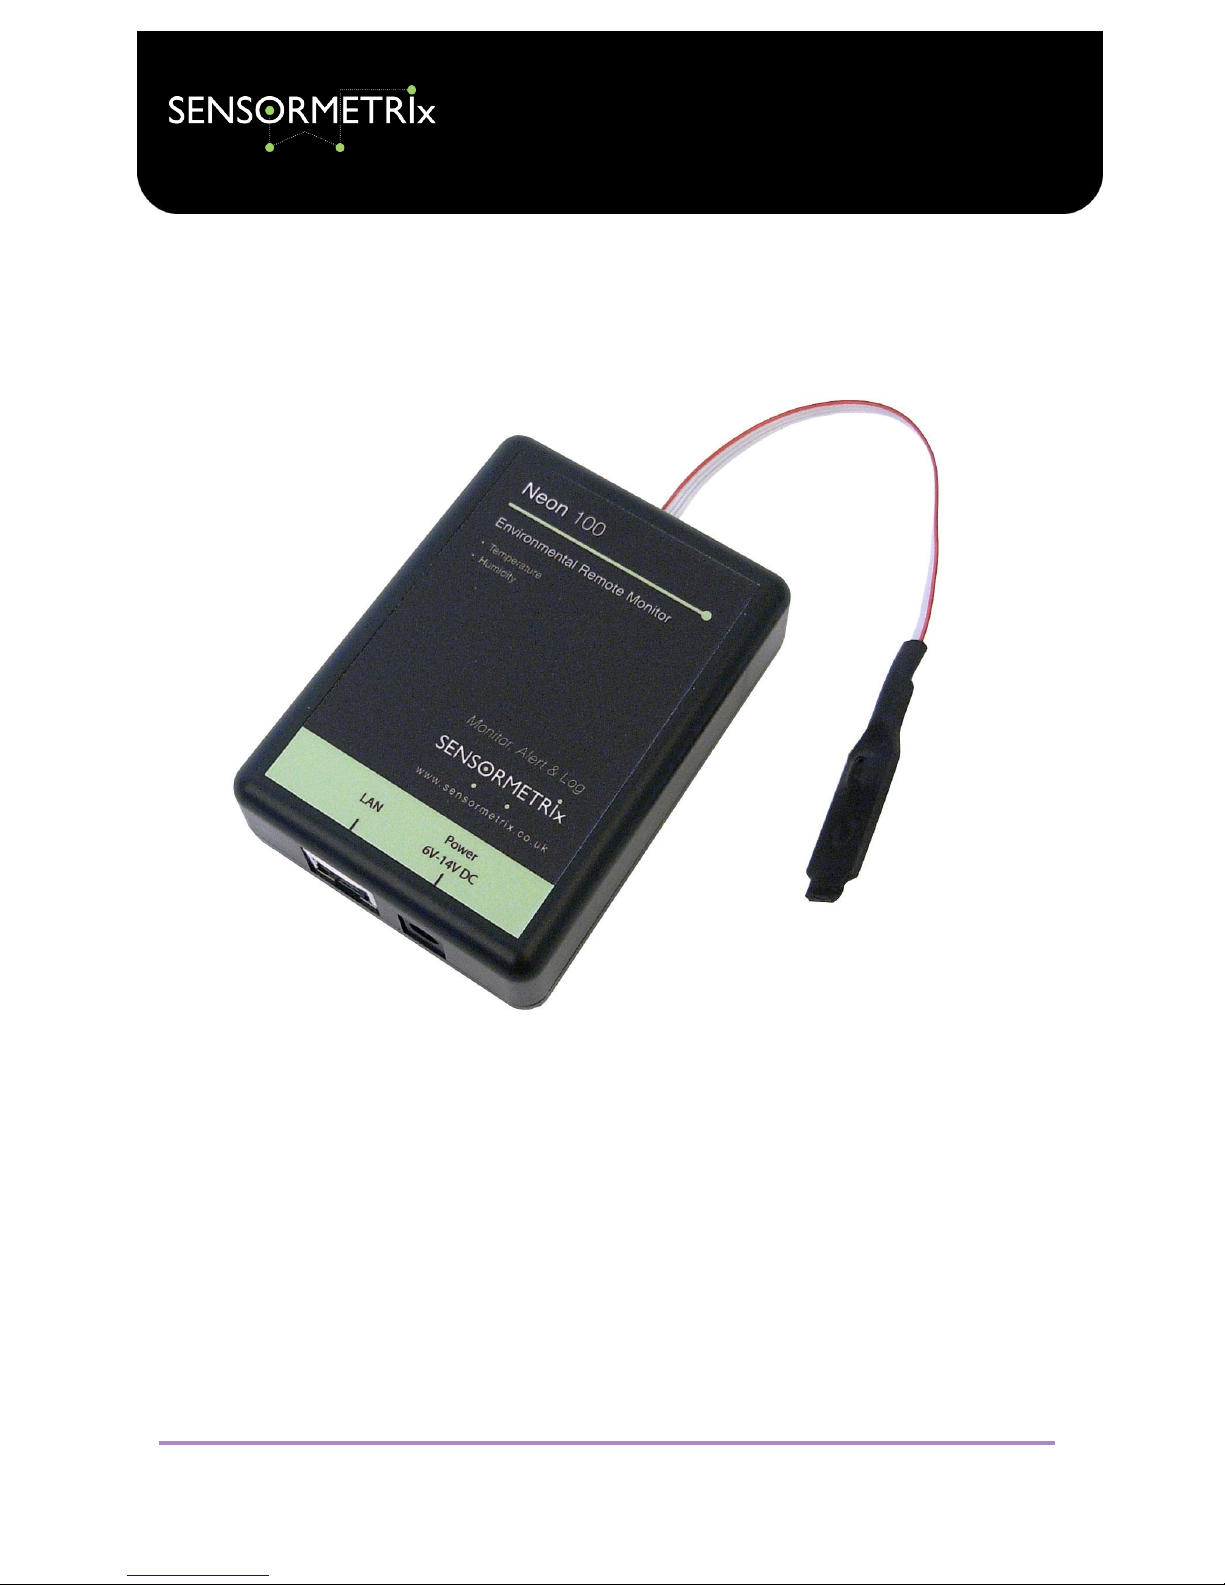
The Neon family of IP sensors are a range of products designed to measure temperature and humidity in a simple, easy to
use manner. When either temperature or humidity goes outside of the user set safe limits, an email may be sent to alert
operators to the unsafe measured conditions. An email alert may also be generated when power is restored to alert that
there has been a power outage. Periodic email of status as verification that all is well is also supported. Additionally,
temperature and humidity measurements may be recorded and emailed as logs so that past measurements may be saved,
exported to Microsoft Excel etc and reviewed. The Neon 110 additionally makes measurement and device data available to
other computers via an XML file.
Current temperature, humidity and configuration may be obtained at any time by browsing the Neon 100’s built in web
server.
Important: All references to Neon in this manual refer to all members of the Neon family members unless otherwise stated.
All family members are shown in the family overview.
Family Overview
The Neon family of IP based sensors currently consists of two products, aimed at two market segments. The Neon 100 is
designed for easy setup in a stand-alone application. The target audience for such a device is small businesses and
individuals.
The Neon 110 is designed more for IT professionals and allows more control over the email settings of the unit. The
addition of the XML file interface allows other computers to directly access measurement and alarm information, allowing
the Neon 110 to be integrated into Network Management Systems.
Feature
Neon 100
Neon 110
Fixed factory email client
Yes
No
User programmable SMTP client
No
Yes
XML device status page
No
Yes

Neon Family
User Manual
Sensormetrix is a division of Sequoia Technology Group Ltd
Registered in England No. 4004881
VAT Registration No. GB614 5653 45
Sensormetrix
sales
+44 (0) 845 451 2021
Basingstoke Road
fax
+44 (0) 118 976 9020
Spencers Wood
email
sales@sensormetrix.co.uk
Reading
web
www.sensormetrix.co.uk
Berkshire RG7 1PW
Page 6 of 39
Quickstart
Finding the Neon web interface and using it straight away is very straightforward. Just connect it directly to a PC, apply
power, and after a few seconds its internal web server should be accessible to the PC. Its IP address will be 192.168.1.4
(this is the factory default IP address). Make sure that the PCs subnet is compatible with this IP address (see Setting a PCs
IP address) in the Application Information section for details on how to do this). Enter http://192.168.1.4 in a web browser
to connect to the unit.
Important: Please ensure that the PC being used for configuration has been set a fixed IP address compatible with the
Neon, i.e. is on the same subnet. If unsure what this means, set the PC’s IP address to 192.168.1.20 and subnet mask to
255.255.255.0.
To change a setting on the web interface, it will first be required to unlock the unit by clicking “unlock” on the right of the
menu bar and using “admin” and “password” as the username and password. Once this has been done, the settings on
the Network page may be altered to suit the network on which the Neon will be used and saved. Click “Lock” to enable
security afterwards (changing the username and password on the setup page before doing this is advisable).
Then connect the Neon directly to the network on which it will be used and cycle the power to the unit. If DHCP has been
used, the Neon’s IP address will not be known. In this circumstance, viewing the internal web server can be done most
simply by using NetBIOS. Alternatively, the IP address can be looked up by a utility and used to access the Neon. Please
see the next chapter, Accessing the Neons web interface, for the detail of how to do this.
Important: Please make sure that the Ethernet connection to the Neon is plugged in before power is applied to the unit
otherwise the product may not operate correctly.
Accessing the Neons web interface
The Neons web interface can be accessed either by typing its IP address into a web browser, or by using its NetBIOS name
in the web browser as explained below. In both cases it is important that the PC used to access the Neon is on the same
subnet as Neon as explained in the in the Application Information section.
NetBIOS
To use NetBIOS to access the Neon, simply enter http://neon<serial number> into the web browser where <serial number> is
the 6 digit serial number printed on the product label of the Neon. So, for example, http://neon033112 would be a valid
address to use for Neon serial number 033112. Once connected to the Neon, its assigned IP address can be obtained from
the Network page.
Important: With NetBIOS, most web browsers will expect the http:// to be entered, so just entering neon<serial number> is
likely to fail to resolve the address. Note also that this will only work if the browser is on the same subnet as the Neon.
Important: The serial number of the Neon is always 6 digits. Any leading zeros in the serial number are important and are
part of the Neons NetBIOS name.
IP Addressing
Run the Sensormetrix Autodetector Software utility that can be downloaded from the Neon 100 or Neon 110 page on the
Sensormetrix web site. Find these pages by searching for Neon at http://www.sensormetrix.co.uk. When first run, Windows
will probably ask it the application should be allowed and if a rule should be made for it in Windows Firewall. Agree to
these actions for the Autodetector to function correctly. Click the Find Devices button to search for all the devices attached
to the network. This detects attached devices by means of a network broadcast on port 49157, and ensures that any Neon
will be detected even if they are on a different subnet. Devices detected will be shown, together with some basic details
that can be used to identify to units if there are several on a network. Clicking the IP address of the desired device will open
up that devices web page in the default browser.

Neon Family
User Manual
Sensormetrix is a division of Sequoia Technology Group Ltd
Registered in England No. 4004881
VAT Registration No. GB614 5653 45
Sensormetrix
sales
+44 (0) 845 451 2021
Basingstoke Road
fax
+44 (0) 118 976 9020
Spencers Wood
email
sales@sensormetrix.co.uk
Reading
web
www.sensormetrix.co.uk
Berkshire RG7 1PW
Page 7 of 39
Important: Note that in order to work, the Neon being detected needs to have been assigned an IP address. If the unit has
been configured to have an address assigned by an DHCP server, and that server is unavailable, the Neon will be without
an IP address. A PC does not have a DHCP server (normally), so if a Neon with DHCP addressing is connected directly to a PC
it will not be found. In this case, a factory reset will set the IP address to 192.168.1.4 (fixed IP address) which will allow the
Neon to be directly accessed from the PC.
Important: Make sure that the broadcasts made by the Autodetector are not blocked by the network. A VLAN separating the
PC from the Neon will block traffic. Network infrastructure may also do so. Sensormetrix have found that a Vigor AP-800 in
Station Infrastructure mode blocks port 49157 traffic for some reason.
Web Interface
Setup and configuration of the Neon may only be done via its web interface. This chapter explains all the web pages in the
Neon and how all the user settings work. All screenshots are taken with factory default settings of a Neon 100 shown
unless explained otherwise.
Important: Note that before any changes are made to the configuration, the unit needs to be unlocked by pressing unlock
on the menu bar entering the administration User Name and Password. The factory defaults are User Name “admin”;
Password “password”

Neon Family
User Manual
Sensormetrix is a division of Sequoia Technology Group Ltd
Registered in England No. 4004881
VAT Registration No. GB614 5653 45
Sensormetrix
sales
+44 (0) 845 451 2021
Basingstoke Road
fax
+44 (0) 118 976 9020
Spencers Wood
email
sales@sensormetrix.co.uk
Reading
web
www.sensormetrix.co.uk
Berkshire RG7 1PW
Page 8 of 39
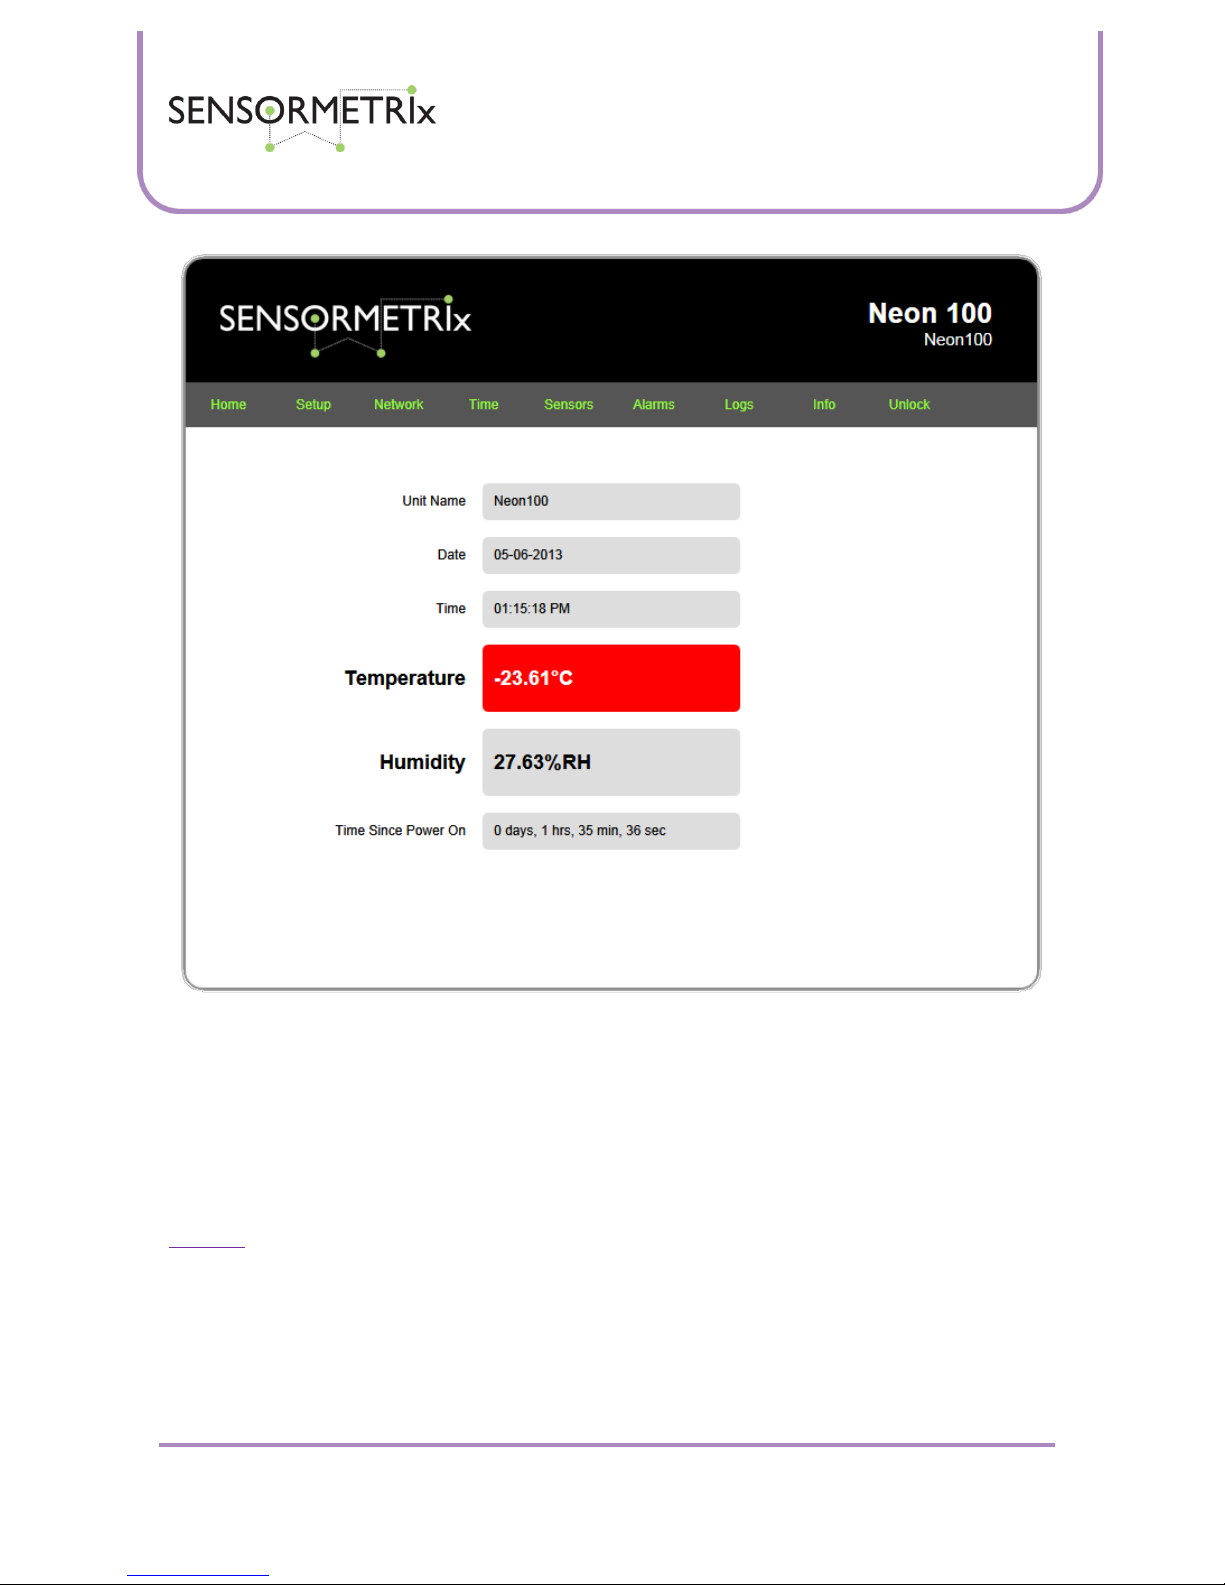
Home page
The home page of the Neon provides an “at a glance” indication of the current measured temperature and humidity.
Measurements and the web page are updated once a second automatically.
The unit name is a user defined name that may be entered on the setup page. By default the name given to the unit is Neon
100 or Neon 110 (dependant on model), but this may be changed on the setup page and allows the unit to be given a
unique identity which is used not only in the web interface, but also emails from the Neon.
The date and time shown are the current values being used by the Neon. This is important if data-logging is being used, as
it is this clock that will be used to timestamp measurements. All the while that there is network connectivity with the Neon,
the clock will be seen to advance. But if there is a network connectivity issue the clock will stop while there is a network
outage. This provides assurance that the connection is valid and that the displayed measurement is current.
A record is maintained of the amount of time that has elapsed since the Neon has been powered. This allows unexpected
power outages to be discovered and provides confirmation of the time period over which the Neon has been providing
monitoring.
Neon Family
User Manual
Sensormetrix is a division of Sequoia Technology Group Ltd
Registered in England No. 4004881
VAT Registration No. GB614 5653 45
Sensormetrix
sales
+44 (0) 845 451 2021
Basingstoke Road
fax
+44 (0) 118 976 9020
Spencers Wood
email
sales@sensormetrix.co.uk
Reading
web
www.sensormetrix.co.uk
Berkshire RG7 1PW
Page 9 of 39
When the measured temperature or humidity goes into an alarm condition (goes outside of the operating range defined in
the sensors tab), the measurement in alarm is highlighted in red. The screenshot above shows the temperature to be in
alarm.
Setup page
The setup page allows administrator security of the unit to be configured, and a friendly name assigned to the Neon. Once
changes have been made, press the save changes button to apply them. There is no need to power cycle or reboot the unit
as the changes are applied immediately.
Important: Remember to click the Save Changes button if changes have been made to this page before navigating away
from this page.

Neon Family
User Manual
Sensormetrix is a division of Sequoia Technology Group Ltd
Registered in England No. 4004881
VAT Registration No. GB614 5653 45
Sensormetrix
sales
+44 (0) 845 451 2021
Basingstoke Road
fax
+44 (0) 118 976 9020
Spencers Wood
email
sales@sensormetrix.co.uk
Reading
web
www.sensormetrix.co.uk
Berkshire RG7 1PW
Page 10 of 39
Unit Name
Any name entered here is used in a number of places as a friendly name for the unit. Specifically, it is used on the home
page, on emails sent by the unit and shows in the Sensormetrix product finder utility. It is suggested that if multiple Neons
are deployed that the physical location of the unit be part of the unit name to aid in identification.
This field is 31 characters in length, including spaces. Any characters entered in excess of 31 characters are trimmed and
deleted when this page is saved. The factory default setting for the unit name is “Neon100” or “Neon110” dependant on
the model purchased. Note that there is no space between Neon and 100/110.
User name and password
The username and password fields provide a mechanism to prevent unauthorised configuration changes to the unit. The
unit supports just one user account. Both user name and password may be up to 15 characters in length. Any characters in
excess of 15 characters will be trimmed and deleted when this page is saved.
Important: Care is required to make sure that the username and password is not trimmed by the Neon when saved
otherwise what is actually saved into the Neon is not what the user expects.
The factory defaults are User Name “admin”; Password “password”

Neon Family
User Manual
Sensormetrix is a division of Sequoia Technology Group Ltd
Registered in England No. 4004881
VAT Registration No. GB614 5653 45
Sensormetrix
sales
+44 (0) 845 451 2021
Basingstoke Road
fax
+44 (0) 118 976 9020
Spencers Wood
email
sales@sensormetrix.co.uk
Reading
web
www.sensormetrix.co.uk
Berkshire RG7 1PW
Page 11 of 39
Note that after the changes to the password are saved, the password box is blanked out so that the entered password
cannot be seen. This means that an entered password cannot be edited – it must be entered in full again if a change is
required.
If the user name and/or password are forgotten, the only way to recover the unit is to do a factory reset. Please make a note
of any important configuration settings before doing this so that they can be re-entered.
Network Page
The network page allows the networking settings for the unit applied and reviewed. Once the settings on this page have
been entered, they should be stored in the unit by clicking the save changes button. Clicking the save changes button
applies the new settings immediately – If manual settings have just been applied they are immediately usable; if DHCP has
been set then the address request to the DHCP server will be made immediately. Any invalid fields are highlighted in red
and will not be saved – correct them and save the changes.
Important: Sensormetrix recommends using DHCP for networking as this allows appropriate network setting to be assigned
to the Neon automatically by the DHCP server. Please view the application information section of this user manual for
advice on how to fix the units IP address while using DHCP.
Important: Remember to click the Save Changes button if changes have been made to this page before navigating away
from this page.
Important: Although the Neon applies network changes immediately, this does not mean that any routers in the system will
be aware of these changes immediately. It is recommended that the Neon be rebooted after making any changes to the
networking properties. This can be done by cycling the power to the unit, or by initiating a reboot from the Info page.
Important: If the network settings are changed, the IP address used to view the Neon’s web server will most likely change
causing an error viewing the web page. Please allow 10-15 seconds for the Neon to reboot and the network to adjust to the
change before reconnecting to the unit at its new address.

Neon Family
User Manual
Sensormetrix is a division of Sequoia Technology Group Ltd
Registered in England No. 4004881
VAT Registration No. GB614 5653 45
Sensormetrix
sales
+44 (0) 845 451 2021
Basingstoke Road
fax
+44 (0) 118 976 9020
Spencers Wood
email
sales@sensormetrix.co.uk
Reading
web
www.sensormetrix.co.uk
Berkshire RG7 1PW
Page 12 of 39
Ethernet Connection Mode
Select either manual or DHCP addressing. When DHCP is selected, the IP address, Netmask, Gateway address and DNS
addresses are obtained from the DHCP server. All other network settings are greyed out, but the original settings used (or
the factory default settings if not changed) are retained and will become active again if manual addressing is subsequently
selected.
The user should make sure that there is an active DHCP server in the network to which the Neon is attached if DHCP is used,
otherwise the Neon will never get an IP address and will therefore not be reachable. Should this happen, a factory reset will
be necessary.
When manual addressing is selected, the IP address, Netmask, Gateway address and DNS addresses must all be set by the
user.
The factory default setting is manual IP addressing, with the IP address set to 192.168.1.4. This will allow the Neon to be
directly connected to a PC.
IP address
When DHCP is enabled, this dialogue box cannot be edited and will show the last manually set value greyed out.

Neon Family
User Manual
Sensormetrix is a division of Sequoia Technology Group Ltd
Registered in England No. 4004881
VAT Registration No. GB614 5653 45
Sensormetrix
sales
+44 (0) 845 451 2021
Basingstoke Road
fax
+44 (0) 118 976 9020
Spencers Wood
email
sales@sensormetrix.co.uk
Reading
web
www.sensormetrix.co.uk
Berkshire RG7 1PW
Page 13 of 39
When manual settings are enabled, enter a valid IP address for the unit. Take care not to use an address already used by
another device on the network. The factory default IP address setting is 192.168.1.4
Important: Please take care to enter a valid IP address for the network. Entering an address used by another device may
prevent the unit from functioning correctly and may require a factory reset.
Netmask
When DHCP is enabled, this dialogue box cannot be edited and will show the last manually set value greyed out.
When manual settings are enabled, enter a valid netmask for the unit. The factory default netmask setting is 255.255.255.0
Important: Please take care to enter a valid netmask for the network. Entering an incorrect netmask may prevent the unit
from connecting to a network and may require a factory reset.
Gateway Address
When DHCP is enabled, this dialogue box cannot be edited and will show the last manually set value greyed out.
When manual settings are enabled, enter a valid gateway address for the unit. The factory default gateway address is
192.168.1.1
Important: Please take care to enter a valid gateway address. Entering an invalid gateway address will prevent the unit from
connecting to the Internet and will prevent the sending of email, as well as possibly displaying the wrong time.
Primary DNS Address
When DHCP is enabled, this dialogue box cannot be edited and will show the last manually set value greyed out.
When manual settings are enabled, enter a valid primary DNS address for the unit. The factory default Primary DNS address
is 8.8.8.8 (which is a Google DNS server) which should be sufficient for most users.
Important: Please take care to enter a valid primary DNS address. Entering an invalid DNS address will prevent the sending
of email, as well as possibly displaying the wrong time.
Secondary DNS address
When DHCP is enabled, this dialogue box cannot be edited and will show the last manually set value greyed out.
When manual settings are enabled, enter a valid secondary DNS address for the unit. The factory default secondary DNS
address is 8.8.4.4 (which is a Google DNS server) which should be sufficient for most users.
Important: Please take care to enter a valid secondary DNS address. Entering an invalid DNS address may prevent the
sending of email, as well as possibly displaying the wrong time.
Current settings
The current settings show the network settings currently being used by the Neon. These are either the manually assigned
settings, or the DHCP assigned settings dependant on the Ethernet Connection Mode. If the Neon is being accessed via its
NetBIOS name, this allows the units IP address to be established.
Time Page
This page allows the correct time and desired time format to be set on the Neon. The time is always displayed on the Neon
home page, and is additionally used to time stamp events and logs generated by the Neon. The settings are applied when
the save changes button is pressed. No reboot of the Neon is required.
Important: Remember to click the Save Changes button if changes have been made to this page before navigating away
from this page.

Neon Family
User Manual
Sensormetrix is a division of Sequoia Technology Group Ltd
Registered in England No. 4004881
VAT Registration No. GB614 5653 45
Sensormetrix
sales
+44 (0) 845 451 2021
Basingstoke Road
fax
+44 (0) 118 976 9020
Spencers Wood
email
sales@sensormetrix.co.uk
Reading
web
www.sensormetrix.co.uk
Berkshire RG7 1PW
Page 14 of 39
Date Format
Select the date format used by the Neon from the drop down menu. Choices are Day-Month-Year, Year-Month-Day and
Month-Day-Year. The factory default value is Day-Month-Year.
Time Format
Select the time format used by the Neon from the drop down menu. Choices are 12 Hour Clock and 24 Hour clock. The
factory default value is 12 hour clock.
GMT offset in minutes
Enter the time zone offset from GMT (Greenwich Mean Time) in minutes. For positive numbers, do not prefix with “+”. For
negative numbers, prefix with “-”. The factory default value is “0”. The maximum time zone offset allowed is ±840 minutes
(±14 hours). Values entered greater than these values will be set to the maximum offset.
As an example, for New York which is -5 hours behind GMT, enter -300.
Summer Time / Daylight Saving
Select the setting required from the drop down menu. Choices are off, European summer time and USA/Canada daylight
saving. The default value is off.

Neon Family
User Manual
Sensormetrix is a division of Sequoia Technology Group Ltd
Registered in England No. 4004881
VAT Registration No. GB614 5653 45
Sensormetrix
sales
+44 (0) 845 451 2021
Basingstoke Road
fax
+44 (0) 118 976 9020
Spencers Wood
email
sales@sensormetrix.co.uk
Reading
web
www.sensormetrix.co.uk
Berkshire RG7 1PW
Page 15 of 39
When European Summer Time is selected, time will move forward one hour at 01:00 on the last Sunday in March and move
back one hour at 01:00 on the last Sunday in October.
When USA/Canada daylight saving is selected, time will move forward one hour at 02:00 on the second Sunday in March
and back at 02:00 on the first Sunday in November.
NTP Server
For correct display of time on the Neon, a valid NTP (Network Time Protocol) server address must be entered here. The
maximum NTP server address length that may be specified is 63 characters. The default value is uk.pool.ntp.org.
Important: Entering an invalid NTP server address will result in the incorrect display of time. If your Neon is not located in
the United Kingdom it is recommended that a local time server be used. It is suggested that a server listed at
www.pool.ntp.org or that provided by your local ISP be used.
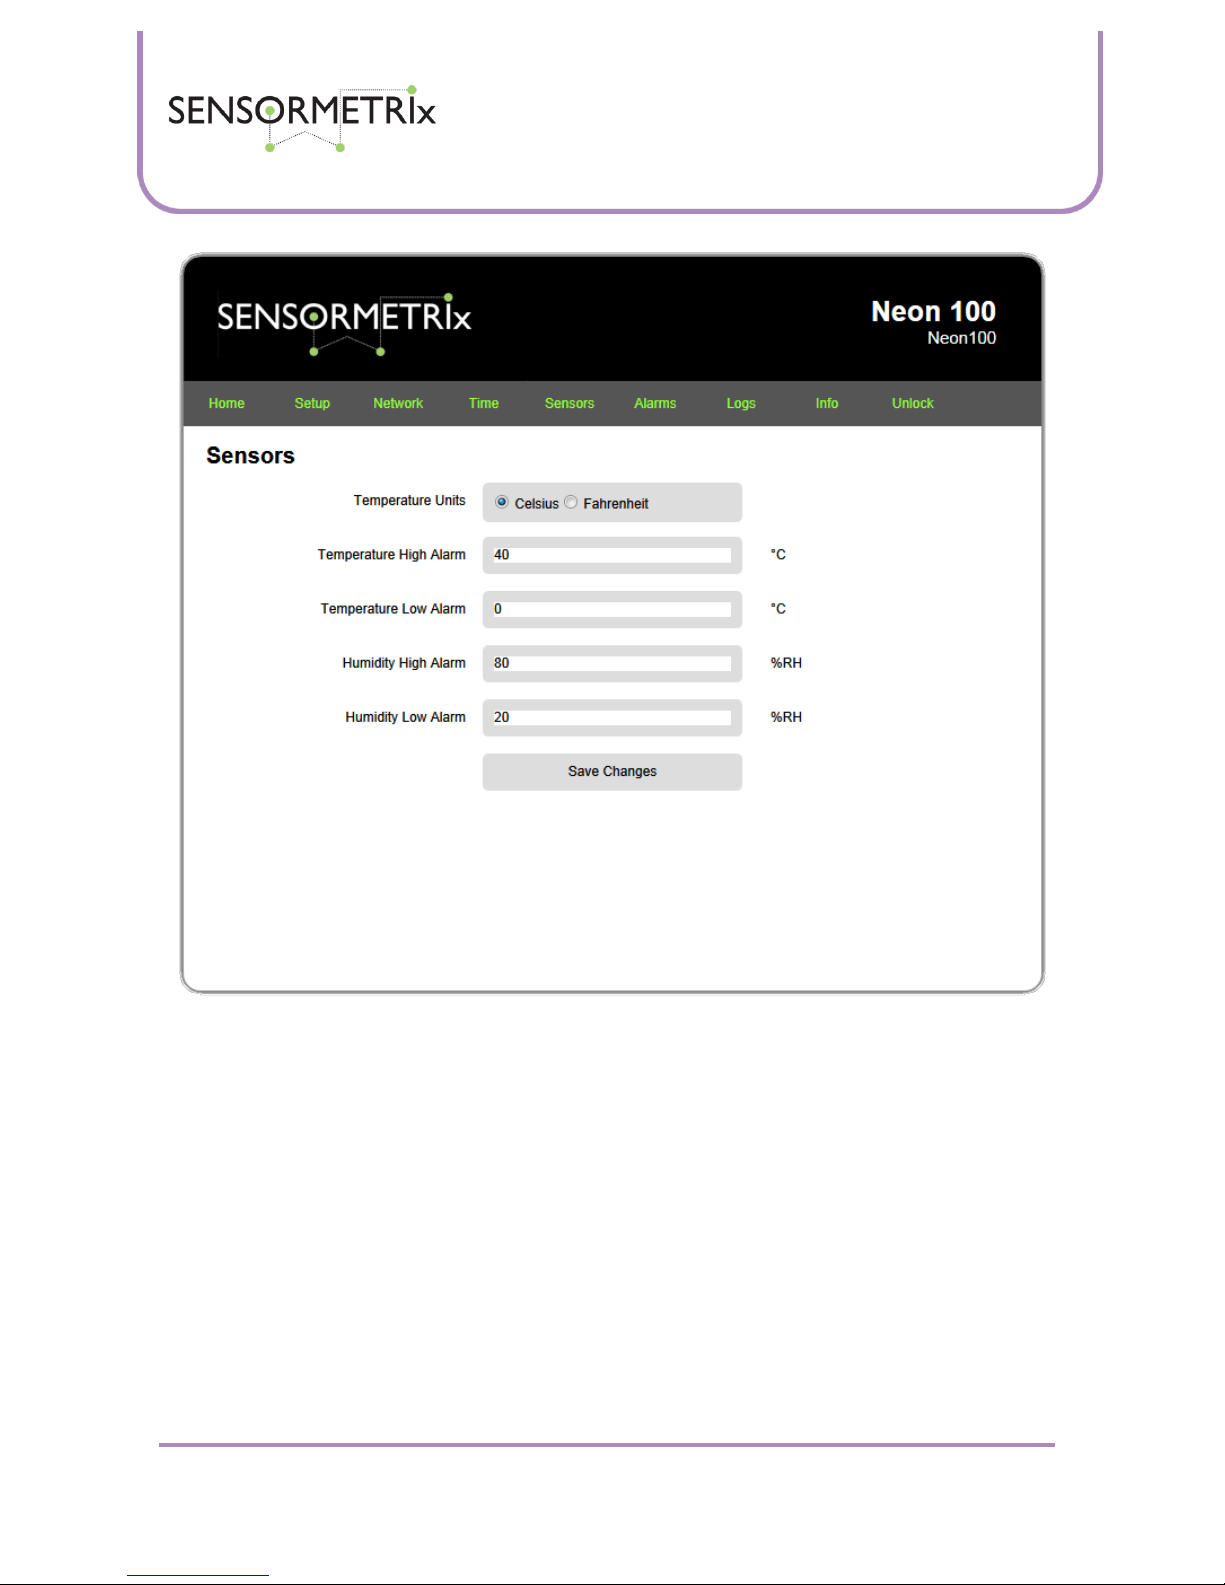
Sensors Page
The sensors page allows for the units of temperature measurement and for maximum/maximum safe thresholds for the
temperature and humidity to be set. Settings are applied as soon as the save changes button is pressed.
Information set here is used as thresholds when sending email alerts (see the Alarms page) and displaying measurements
on the home page.
Important: To prevent alarms from toggling on and off rapidly if the temperature or humidity is dithering around an alarm
threshold, there is a built in hysteresis of 1°C / 1%RH. This creates an idle area that prevents email floods. Please refer to
the application section for an explanation of hysteresis if this is not understood.
Important: Remember to click the Save Changes button if changes have been made to this page before navigating away
from this page.
Neon Family
User Manual
Sensormetrix is a division of Sequoia Technology Group Ltd
Registered in England No. 4004881
VAT Registration No. GB614 5653 45
Sensormetrix
sales
+44 (0) 845 451 2021
Basingstoke Road
fax
+44 (0) 118 976 9020
Spencers Wood
email
sales@sensormetrix.co.uk
Reading
web
www.sensormetrix.co.uk
Berkshire RG7 1PW
Page 16 of 39
Temperature Units
Use the radio button to select either Celsius or Fahrenheit as the unit of measurement for temperature. This will be used by
the internal web server and in emails sent by the Neon. Switching between units of measurement will cause the
temperature alarm thresholds to be recalculated in the new unit. The factory default setting is Celsius.
Temperature High Alarm
Enter an integer value for the temperature that when exceeded will cause a temperature alarm. In alarm, an email be sent if
configured to do so, and the temperature measurement on the home page of the Neon webserver will be shown with a red
background.
The maximum temperature that can be read by the sensor is 125°C (257°F), so if a high temperature alarm is not required it
is recommended that this be set to 126°C. Any temperature entered greater than 126°C will be set to 126°C.
Factory default for this setting is 40°C.
Temperature Low Alarm
Enter an integer value for the temperature that when exceeded will cause a temperature alarm. In alarm, an email be sent if
configured to do so, and the temperature measurement on the home page of the Neon webserver will be shown with a red
background.

Neon Family
User Manual
Sensormetrix is a division of Sequoia Technology Group Ltd
Registered in England No. 4004881
VAT Registration No. GB614 5653 45
Sensormetrix
sales
+44 (0) 845 451 2021
Basingstoke Road
fax
+44 (0) 118 976 9020
Spencers Wood
email
sales@sensormetrix.co.uk
Reading
web
www.sensormetrix.co.uk
Berkshire RG7 1PW
Page 17 of 39
The minimum temperature that can be read by the sensor is -40°C (-40°F), so if a low temperature alarm is not required it is
recommended that this be set to -41°C. Any temperature entered lower than -41°C will be set to -41°C.
Factory default for this setting is 0°C.
Humidity High Alarm
Enter an integer value for the humidity that when exceeded will cause a humidity alarm. In alarm, an email be sent if
configured to do so, and the humidity measurements on the home page of the Neon webserver will be shown with a red
background.
The maximum humidity that can be read by the sensor is 100%RH. If a high humidity alarm is not required it is
recommended that this be set to 101%RH (such an impossible value is deliberately permitted so that the alarm may be
disabled). Any humidity entered greater than 101%RH will be set to 101%RH.
Factory default for this setting is 80%RH.
Humidity Low Alarm
Enter an integer value for the humidity that when exceeded will cause a humidity alarm. In alarm, an email be sent if
configured to do so, and the humidity measurements on the home page of the Neon webserver will be shown with a red
background.
The minimum humidity that can be read by the sensor is 0%RH. If a low humidity alarm is not required it is recommended
that this be set to 101%RH (such an impossible value is deliberately permitted so that the alarm may be disabled). Any
humidity entered greater less than -1% will be set to -1%RH.
Factory default for this setting is 20%RH.
Alarms Page
This page is used to configure the events which will generate an email from the Neon, the email subject header, importance
and recipient.
The Neon 100 comes with its own pre-configured email account, so there are no email account administration settings to
enter. Email will always be sent from sensormetrix@servergateway.co.uk.
The Neon 110 allows the user to enter their own SNTP settings which is done using the email page of the web interface.
Email from a Neon 110 will always be sent from the user configured email account.
Settings are applied as soon as they are saved. There is no requirement to reboot the unit for new settings to take effect.
An easy way to test that emails are working is to enable the power fail alarm once the email subject and address has been
set up, and then to cycle power to the unit. Please remember to save the changes before doing this!
All alarm emails from the Neon will include the unit’s name, serial number, date, time, and current temperature and
humidity measurements.
Important: The Neon can only send one email at a time. If there is a network problem that prevents sending of email, the
Neon will re-try until the email is sent. However, if a new event (alarm or log) causes another email to be sent, this will overwrite the email in the send buffer which will be lost. If power to the unit is lost with an email pending to be sent, that email
will be lost.
Important: Remember to click the Save Changes button if changes have been made to this page before navigating away
from this page.

Neon Family
User Manual
Sensormetrix is a division of Sequoia Technology Group Ltd
Registered in England No. 4004881
VAT Registration No. GB614 5653 45
Sensormetrix
sales
+44 (0) 845 451 2021
Basingstoke Road
fax
+44 (0) 118 976 9020
Spencers Wood
email
sales@sensormetrix.co.uk
Reading
web
www.sensormetrix.co.uk
Berkshire RG7 1PW
Page 18 of 39
Alarm email subject
Whatever text is entered in this field will be used as the subject line of any alarm email sent. The maximum length of the
email subject text is 63 characters (including spaces). The factory default value for this field is blank.
Alarm To: email Address
Enter the email address of a single recipient of the email alarm here. The maximum length of the email address is 255
characters. If the Neon is being used in a business environment it is recommended that the email be sent to a group email
address rather than a named individual. By doing this email may be sent to multiple recipients and the distribution list can
be centrally managed on the destination email server. If this is not possible, Google mail can be used to create a
distribution group – please ask Sensormetrix for details about how to setup Gmail to do this.
Alarm email Importance
Use the radio button to set the importance level of the emails sent by the Neon. The factory default importance level is
Normal.

Neon Family
User Manual
Sensormetrix is a division of Sequoia Technology Group Ltd
Registered in England No. 4004881
VAT Registration No. GB614 5653 45
Sensormetrix
sales
+44 (0) 845 451 2021
Basingstoke Road
fax
+44 (0) 118 976 9020
Spencers Wood
email
sales@sensormetrix.co.uk
Reading
web
www.sensormetrix.co.uk
Berkshire RG7 1PW
Page 19 of 39
Temperature Alarm email Alert
Use the radio button to select if sending of email on a temperature alarm event is to be enabled. If enabled, as soon as the
temperature goes into alarm the Neon will send a warning email advising that the temperature has gone into alarm. When
the alarm event is cleared the Neon will send another email saying that the temperature is no longer in alarm.
The factory default setting is temperature alarm email alerts is disabled.
Humidity Alarm email Alert
Use the radio button to select if sending of email on a humidity alarm event is to be enabled. If enabled, as soon as the
humidity goes into alarm the Neon will send a warning email advising that the humidity has gone into alarm. When the
alarm event is cleared the Neon will send another email saying that the humidity is no longer in alarm.
The factory default setting is humidity alarm email alerts is disabled.
System Power Restored email Alert
Use the radio button to select if sending of an email when the Neon is powered up is enabled. If enabled, the Neon will
send a warning email reporting that it has been powered up when power is applied or the unit is rebooted. Note that there
will be a few seconds delay in doing this as the Neon will wait until it has got the correct network time and taken a
temperature and humidity reading before sending the email.
The factory default setting is power restored email alert is disabled.
Periodic Status email Alert
Periodic Status email Alert is used to send a periodic email with the Neon’s current measurements. This is a peace of mind
feature which reminds the user that the product is powered up and is monitoring its environment. Status reports may be
sent hourly, daily, weekly or never. The timer used for determining when the status report is sent starts when the unit is
powered up or rebooted. To manually make sure that a report is sent at a specific time, the unit needs to be rebooted at the
sending interval before the time required to set the timer start point. Rebooting the unit can be done on the info page if it is
not convenient to reach the unit to power cycle it. The subject of the sent email will be the units name followed by the
words “status report”.
The factory default setting for the periodic status email alert is never
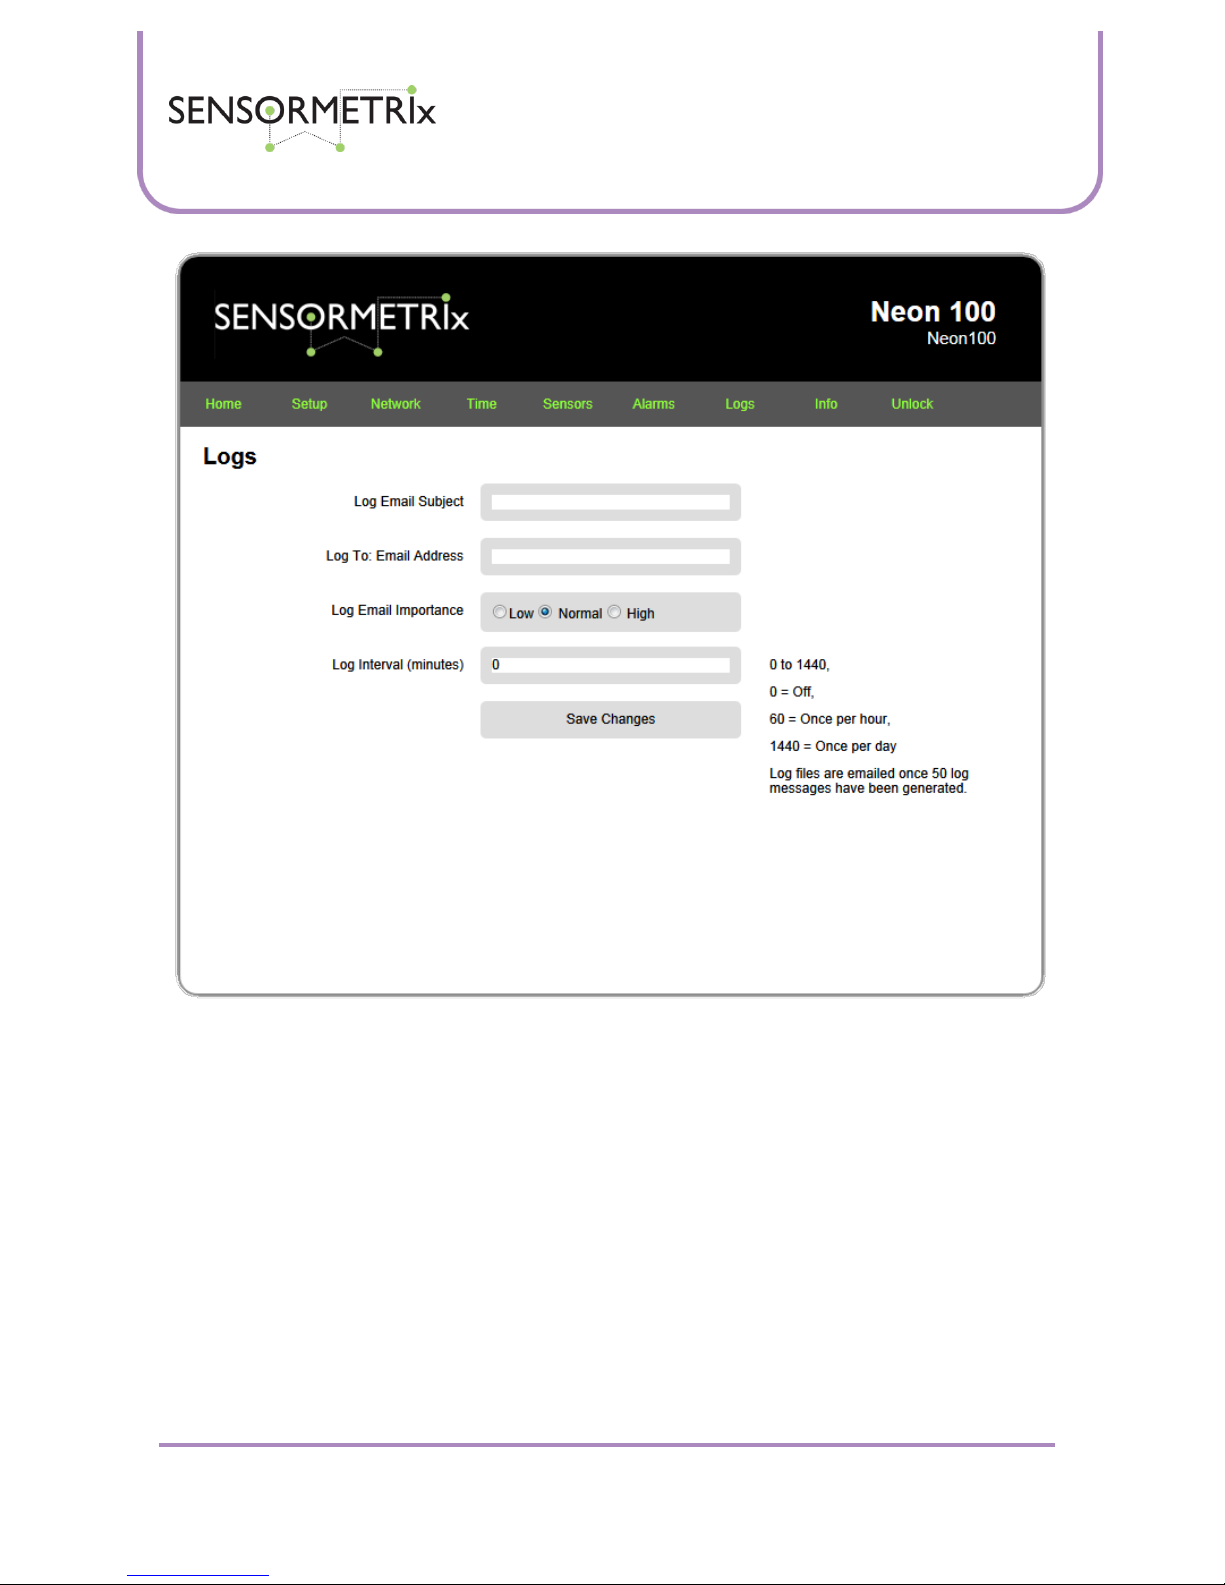
Logs Page
The logs page allows a log of measured values to be sent to a specific email address. This allows for a history of measured
values to be retained. Data is sent as a .CSV file that can be imported into Excel. Doing this allows the user to graph
recorded data and perform statistical analysis if required.
Two sorts of events are recorded into the log.
Periodic measurements of temperature and humidity.
Alarm events, including power up
Periodic measurements are made at the time interval set on this configuration page. Alarm events are made at the instant
that they occur. Note that both entering and leaving an alarm state is treated as an alarm event. The recorded log indicates
the alarm state of the channel when it is entered into the log.
Once 50 logged events have been accumulated in the Neon, if logs have been enabled, the event log will be sent by email.
Important: Logged data is held in the Neon. If there is a power failure or the Neon is rebooted, any logged data that has not
been sent will be lost.
Important: Remember to click the Save Changes button if changes have been made to this page before navigating away
from this page.
Neon Family
User Manual
Sensormetrix is a division of Sequoia Technology Group Ltd
Registered in England No. 4004881
VAT Registration No. GB614 5653 45
Sensormetrix
sales
+44 (0) 845 451 2021
Basingstoke Road
fax
+44 (0) 118 976 9020
Spencers Wood
email
sales@sensormetrix.co.uk
Reading
web
www.sensormetrix.co.uk
Berkshire RG7 1PW
Page 20 of 39
Log email Subject
Whatever text is entered in this field will be used as the subject line of all log email sent. The maximum length of the email
subject text is 63 characters (including spaces). The factory default value for this field is blank.
Log To: email address
Enter the email address of a single recipient of the email log here. The maximum length of the email address is 255
characters. If the Neon is being used in a business environment it is recommended that the email be sent to a group email
address rather than a named individual. By doing this email may be sent to multiple recipients and the distribution list can
be centrally managed on the destination email server. If this is not possible, Google mail can be used to create a
distribution group – please ask Sensormetrix for details about how to setup Gmail to do this.
Log email Importance
Use the radio button to set the importance level of the emails sent by the Neon. The factory default importance level is
Normal.
Neon Family
User Manual
Sensormetrix is a division of Sequoia Technology Group Ltd
Registered in England No. 4004881
VAT Registration No. GB614 5653 45
Sensormetrix
sales
+44 (0) 845 451 2021
Basingstoke Road
fax
+44 (0) 118 976 9020
Spencers Wood
email
sales@sensormetrix.co.uk
Reading
web
www.sensormetrix.co.uk
Berkshire RG7 1PW
Page 21 of 39
Log Interval (minutes)
To disable logging, enter 0. To enable logging, enter a value between 1 and 1440 which is the measurement interval in
minutes. A setting of 1 will mean that a measurement will be recorded once/minute Setting 60 will take a measurement
once/hour. A measurement means the recording of both temperature and humidity. Any value in excess of 1440 minutes
(once/day) will be capped at 1440.
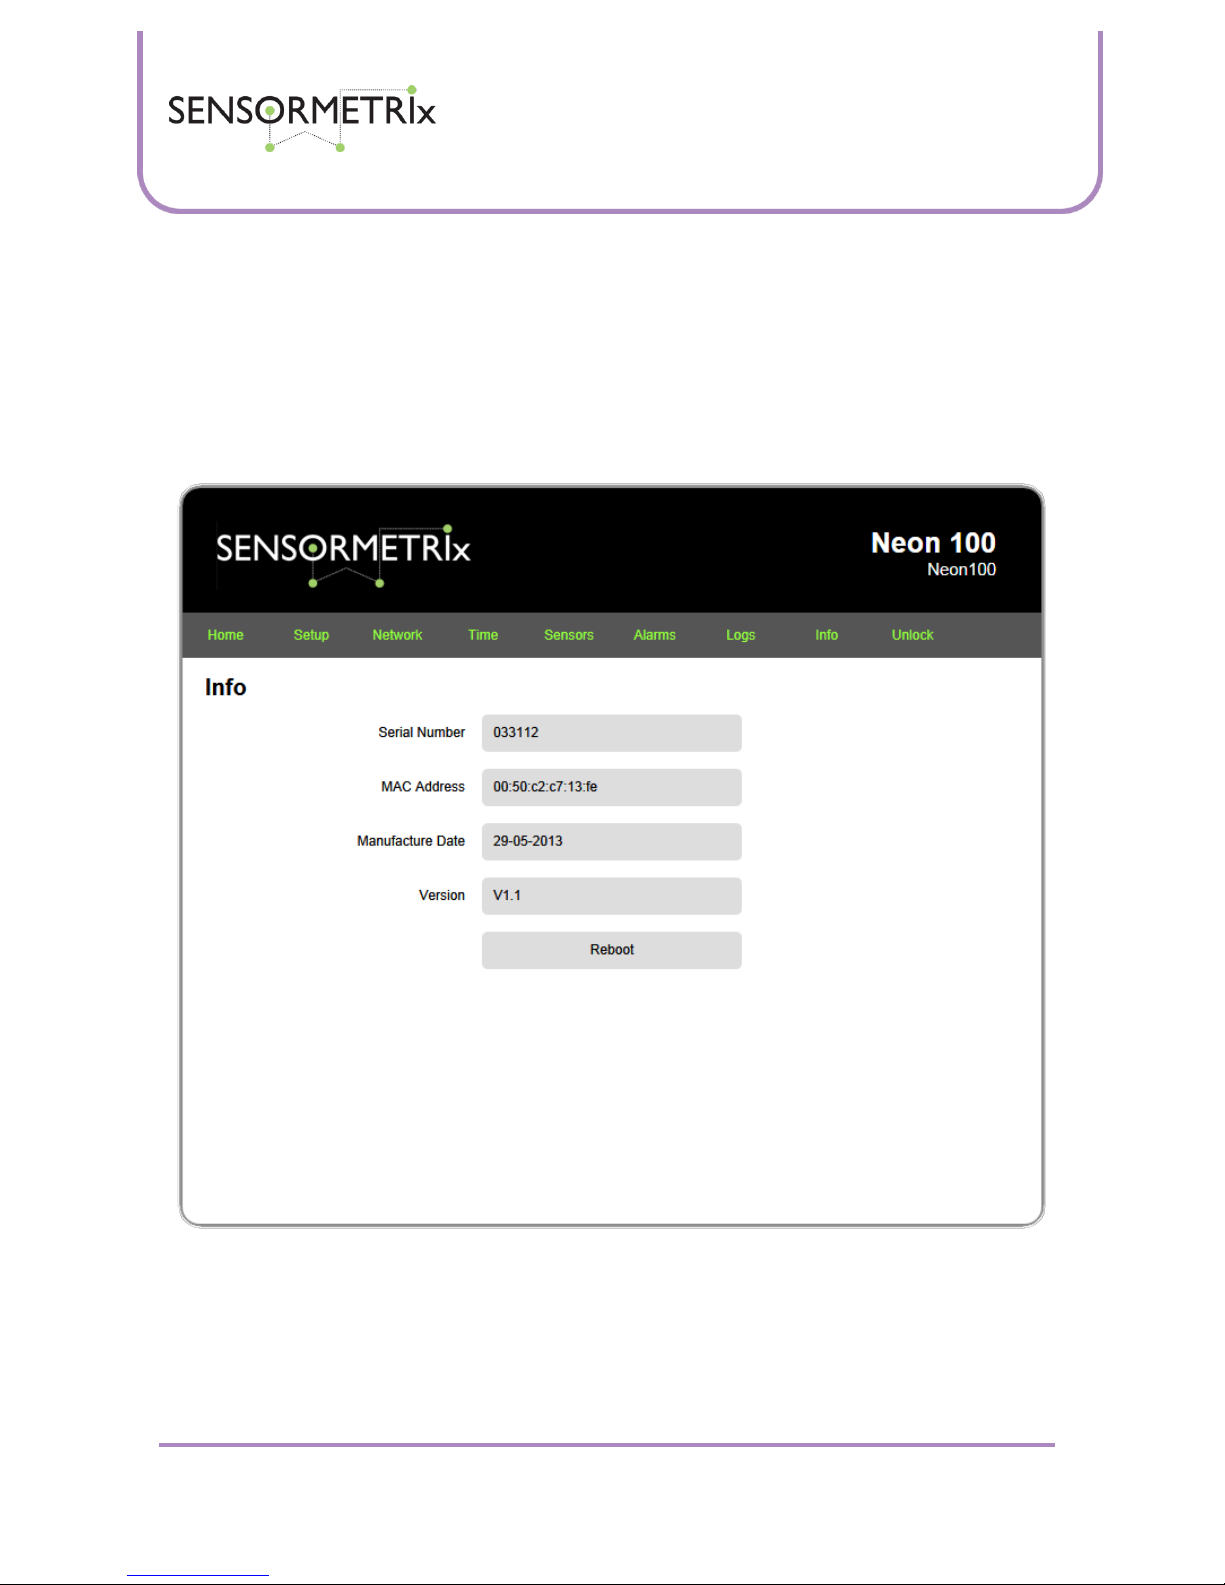
Info Page
The info page displays manufacturing data about the Neon, and allows the user to reboot the unit. There are no user
editable fields on this page.
Serial number
A unique serial number programmed by Sensormetrix at manufacture
MAC Address
The IEEE MAC address that has been assigned to the unit at manufacture
Manufacture Date
The date of manufacture

Neon Family
User Manual
Sensormetrix is a division of Sequoia Technology Group Ltd
Registered in England No. 4004881
VAT Registration No. GB614 5653 45
Sensormetrix
sales
+44 (0) 845 451 2021
Basingstoke Road
fax
+44 (0) 118 976 9020
Spencers Wood
email
sales@sensormetrix.co.uk
Reading
web
www.sensormetrix.co.uk
Berkshire RG7 1PW
Page 22 of 39
Version
The version of the device. This is in the format hardware version.firmware version. So V1.3 would mean hardware version 1,
firmware version 3. The hardware version is locked at manufacture. The firmware version is the version currently
programmed in the unit. From time to time new versions of firmware may be made available on the Sensormetrix web site.
See the firmware update procedure for details of how to upgrade the firmware in the Neon.
Reboot
Pressing this button will reboot the Neon 100. This has the same effect as cycling power to the unit.
Email page (Neon 110 only)
This page allows a user defined email account to be set up and used with the Neon110 for outgoing messages using the
SMTP protocol. Authentication is supported, but SSL/TLS is not. If a user defined email account is not required, the factory
default Sensormetrix email account may be used.
Important: Some third party email service providers require SSL/TLS support. Please see the Sensormetrix email
application note for more details about compatible email service providers and ways to avoid the SSL/TLS requirement.

Neon Family
User Manual
Sensormetrix is a division of Sequoia Technology Group Ltd
Registered in England No. 4004881
VAT Registration No. GB614 5653 45
Sensormetrix
sales
+44 (0) 845 451 2021
Basingstoke Road
fax
+44 (0) 118 976 9020
Spencers Wood
email
sales@sensormetrix.co.uk
Reading
web
www.sensormetrix.co.uk
Berkshire RG7 1PW
Page 23 of 39
Server Address
Enter the address of the email server. The maximum length of the username field is 63 characters (including spaces). The
factory default value for this field is the neon100 setting, mail.servergateway.co.uk.
Port
Enter the port used by the email server. The maximum length of this field is 5 digits. If characters other than numbers are
entered, the field will set to 0. The factory default value for this field is the neon100 setting, 25. This is the port used by
most SMTP servers.
Authenticate
Choose the setting required for this using the radio button. The default setting is on. Most email systems will require
authentication.
Username
Enter the SMTP username here. The maximum length of the username field is 63 characters (including spaces). The factory
default value for this field is the neon100 setting, sensormetix@servergateway.co.uk.
Password
Enter the password associated with the SMTP account here. This is only required if email authentication has been enabled.
Characters typed in this field will be shown as a dot for security reasons, so please type the password carefully. Once
saved, only 6 dots will be shown no matter how long the password stored was. The default password is the password that
will work with the factory default email account.
From Address
Enter an email address which is displayed as the address of the email on the email sent. Normally this should be set to the
address of the email account. It can be set to other addresses if the user wants any reply to the email sent by the Neon110
sent elsewhere. The maximum length of the username field is 63 characters (including spaces).
Important: Setting the from address to an address other than the originating accounts address will almost always cause
any email server that the email passes through to treat the email as spam. Please ensure that a rule is added to any spam
filter to trust the email address.
Test Mail
Selecting a test email and saving the email settings page will generate a test email to the email address specified on the
alarms page.
Neon Family
User Manual
Sensormetrix is a division of Sequoia Technology Group Ltd
Registered in England No. 4004881
VAT Registration No. GB614 5653 45
Sensormetrix
sales
+44 (0) 845 451 2021
Basingstoke Road
fax
+44 (0) 118 976 9020
Spencers Wood
email
sales@sensormetrix.co.uk
Reading
web
www.sensormetrix.co.uk
Berkshire RG7 1PW
Page 24 of 39
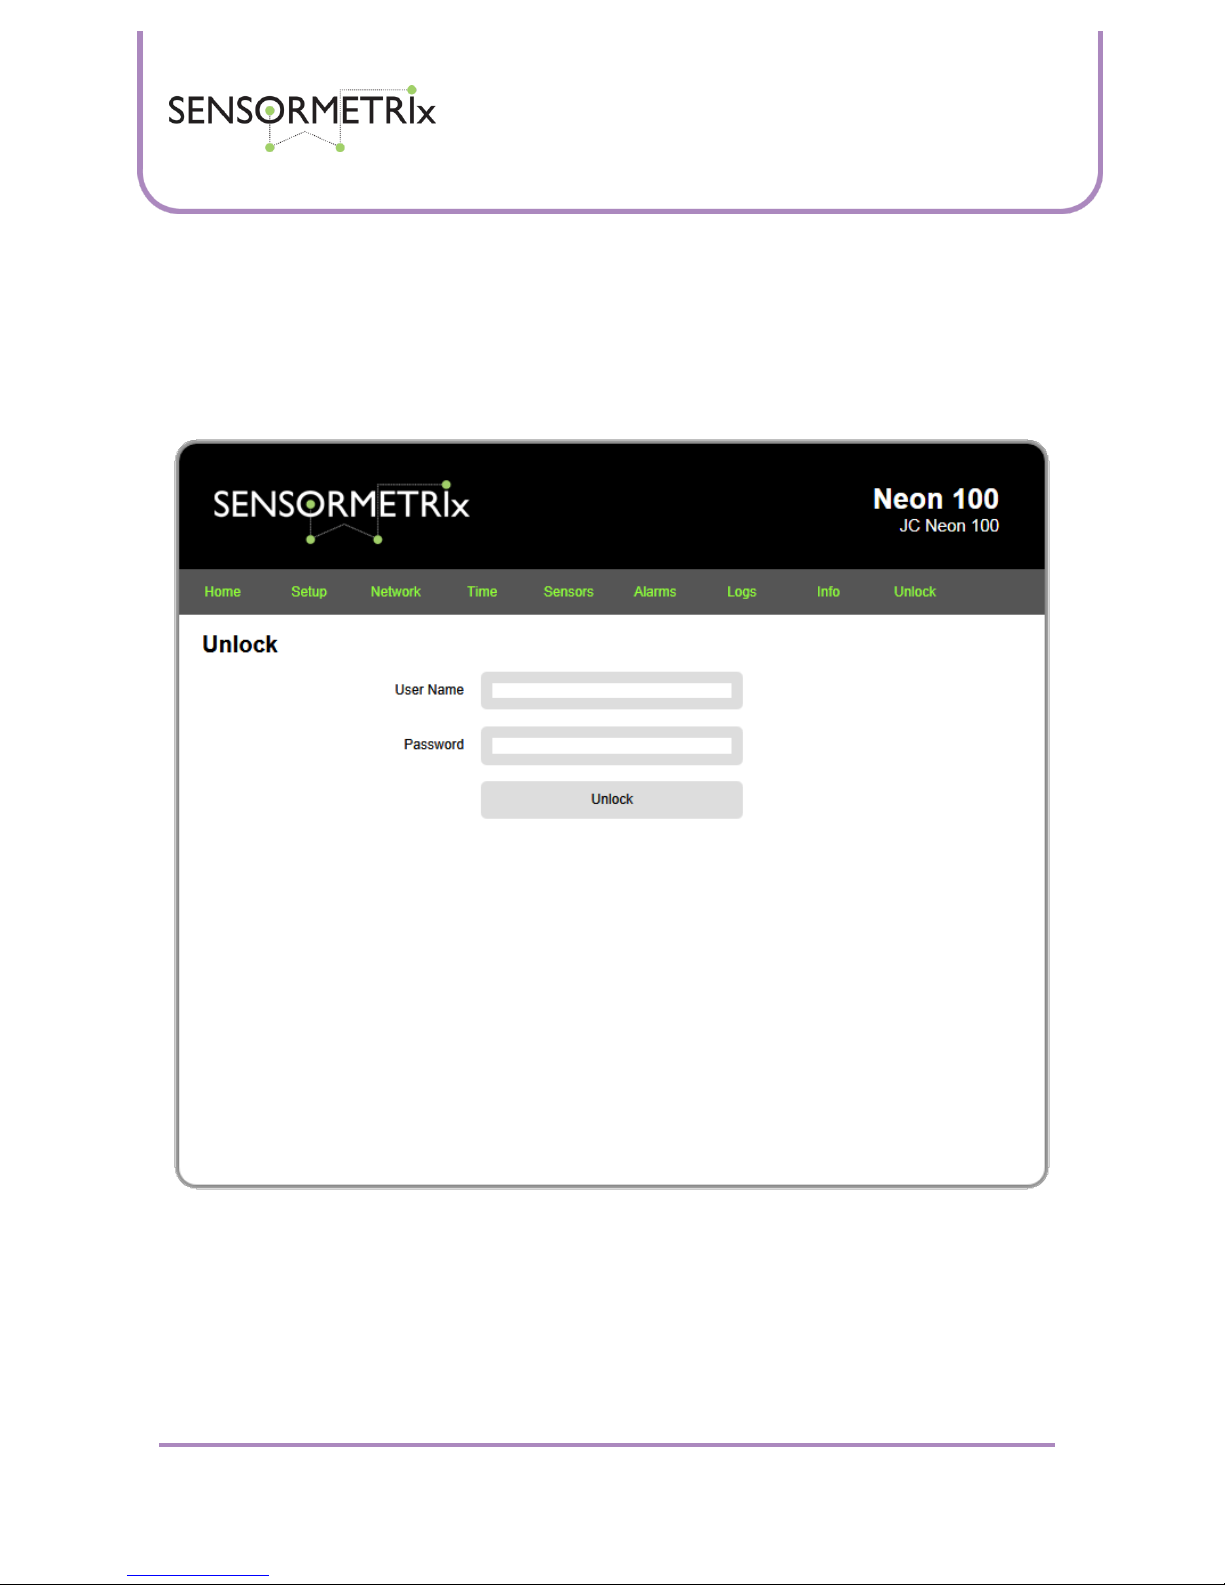
Lock Page
The security state is shown by a Lock / Unlock message on the right hand side of the menu bar. When the message says
“lock”, this means that the unit is unlocked and that by clicking on the word “lock”, this will lock the unit to prevent
unauthorised editing changes. Locking the unit does not require any password to be entered – authority is assumed as
editing access is currently granted. The “lock” indication will turn to “unlock” which indicates that the unit is currently
locked, preventing editing changes.
Clicking “unlock” will bring up a web page requiring the User Name and password to be entered.
On entering the correct user name and password, the home page of the unit will display and the lock state message will
change to lock. This indicates that the unit is unlocked and may be locked by clicking the lock message.
It is not possible to disable security – a username and password is always required in order to edit any of the Neon’s
configuration pages.

Neon Family
User Manual
Sensormetrix is a division of Sequoia Technology Group Ltd
Registered in England No. 4004881
VAT Registration No. GB614 5653 45
Sensormetrix
sales
+44 (0) 845 451 2021
Basingstoke Road
fax
+44 (0) 118 976 9020
Spencers Wood
email
sales@sensormetrix.co.uk
Reading
web
www.sensormetrix.co.uk
Berkshire RG7 1PW
Page 25 of 39
Logged data format
Logged data, when emailed, is attached to the email as a .csv file of fixed data format to assist with importing into different
applications. Each log entry is on a line of its own in the CSV file.
Each line has the data fields comma delimitated and formatted as
<date>,<time>,<temperature state>,<temperature>,<humidity state>,<humidity>
Where
<date> is the date in date format set on the time page. Day and month both have a leading zero inserted when required so
that that this field is always 10 characters in length. Day, month and year are always separated by a “–” (minus sign).
<time> is the time in the time format set on the time page. Hours, minutes and seconds are always presented as two digits
and have leading zeros inserted as necessary so that this field is always fixed in length. Hours, minutes and seconds are
always separated by a “:” (colon). If 12 hour time format is used, the time will be followed by a space and then AM or PM
and the field will be 11 characters in length. If a 24 hour time format is used this field will be 8 characters in length.
<temperature state> indicates the state of the temperature measurement. This is always a single character and is either “L”
indicating that it is an normal logged value, “A” indicating that the temperature was in alarm when logged, or “P” indicating
that it is the value at power up.
<temperature> is the measured temperature taken at the date and time stamp of the line entry. The temperature will always
have a sign followed by 3 integer digits, the decimal place, and then 2 fraction digits making the field always 7 characters
long. Leading and trailing zeros are used as necessary to ensure that the field is always of fixed length.
<humidity state> indicates the state of the humidity measurement. This is always a single character and is either “L”
indicating that it is an normal logged value, “A” indicating that the humidity was in alarm when logged, or “P” indicating
that it is the value at power up.
<humidity> is the measured humidity taken at the date and time stamp of the line entry. The humidity will always have a
sign followed by 3 integer digits, the decimal place, and then 2 fraction digits making the field always 7 characters long.
Leading and trailing zeros are used as necessary to ensure that the field is always of fixed length.
An example log file, starting with a power up event will therefore look like this
11-06-2013,10:49:49 AM,P,+024.65,P,+034.86
11-06-2013,10:50:49 AM,L,+024.52,L,+035.22
11-06-2013,10:51:49 AM,L,+024.49,L,+035.35
11-06-2013,10:52:49 AM,L,+024.50,L,+035.51
11-06-2013,10:53:49 AM,L,+024.50,L,+035.52

Neon Family
User Manual
Sensormetrix is a division of Sequoia Technology Group Ltd
Registered in England No. 4004881
VAT Registration No. GB614 5653 45
Sensormetrix
sales
+44 (0) 845 451 2021
Basingstoke Road
fax
+44 (0) 118 976 9020
Spencers Wood
email
sales@sensormetrix.co.uk
Reading
web
www.sensormetrix.co.uk
Berkshire RG7 1PW
Page 26 of 39
XML file format (Neon 110 only)
The Neon 110 contains an XML file called values.xml. This is available as a web page at
http://<neon 110 IP address>/values.xml
This is always available to be read by other applications running on the network that can access the neon’s IP address. The
XML file format can be decoded as follows:
<Root>
Start of data marker
<ProductName>Neon 110</ProductName>
Product name
<UnitName>Head Office</UnitName>
Name assigned to unit from setup page
<SerialNumber>033130</SerialNumber>
Serial number from Info page
<Version>V1.4</Version>
Version number from info page
<Time>Current time setting of unit in Unix time</Time>
Current time from time page
<GMTOffset>0</GMTOffset>
GMT Offset from time page
<DST>1</DST>
0=Off, 1=European, 2=USA/Canada (from time page)
<PowerUp>2 days, 16 hrs, 35 min, 33 sec</PowerUp>
Time since power on from home page
<IPAddress>172.16.0.17</IPAddress>
Current IP address from network page
<Netmask>255.255.255.0</Netmask>
Current netmask from network page
<DHCP>1<DHCP>
0 = DHCP off; 1 = DHCP On, from network page
<MAC>00:50:c2:c7:14:10</MAC>
MAC address from info page
<Temperature>
Start of temperature sensor header
<unit>°C</unit>
Units of temperature measurement from sensors page
<Value>22.19</Value>
Current temperature reading
<Alarm>0</Alarm>
Current temperature alarm state; 0=Off, 1=On
<LowAlarm>0</LowAlarm>
Low alarm threshold from sensors page
<HighAlarm>40</HighAlarm>
High alarm threshold from sensors page
</Temperature>
End of temperature header
<Humidity>
Start of humidity header
<unit>%RH</unit>
Units of humidity measurement (fixed field)
<Value>33.86</Value>
Current humidity reading
<Alarm>0</Alarm>
Current humidity alarm state; 0=Off, 1=On
<LowAlarm>20</LowAlarm>
Low alarm threshold from sensors page
<HighAlarm>80</HighAlarm>
High alarm threshold from sensors page
</Humidity>
End of humidity header
</root>
End of data marker

Neon Family
User Manual
Sensormetrix is a division of Sequoia Technology Group Ltd
Registered in England No. 4004881
VAT Registration No. GB614 5653 45
Sensormetrix
sales
+44 (0) 845 451 2021
Basingstoke Road
fax
+44 (0) 118 976 9020
Spencers Wood
email
sales@sensormetrix.co.uk
Reading
web
www.sensormetrix.co.uk
Berkshire RG7 1PW
Page 27 of 39
Reset to factory default
The unit may be set back to factory default settings at any time by pressing and holding in the reset button for 5 seconds.
The reset button is concealed through a hole to prevent accidental pressing – a bent paper clip is recommended to reach
through and hold the button down. The picture shows where the hole is located.
Visual indication that a factory default reset has occurred can be seen by watching the LEDs on the Ethernet jack. If the
reset pin has been held low for sufficiently long, when the reset button is released both LEDs will go out briefly, turn on
briefly and then go out again briefly before assuming their normal state.
Firmware update procedure
Obtain the current version of the file “neon100.bin” (Neon 100) or “neon110.bin” (Neon 110) from the Sensormetrix web
site. Put this in an easily accessible directory on the computer being used.
Change the IP address of the computer being used to 192.168.1.12, subnet address 255.255.255.0. Gateway and DNS
settings are not required.
Connect the Neon and the PC to the same network. Note that the default Neon IP address used during the upgrade process
will be 192.168.1.4 so only one unit may be connected to the network for reprogramming at any time and care should be
taken that this address does not conflict with an address already used on the network. If in doubt, connect the PC and Neon
to a switch that is not connected to a larger network.
Remove power from the Neon, then power up the Neon while pressing the reset button. The reset button is accessed
through the small hole in the side of the unit, so a bent paperclip or similar will be required to depress it. Wait for and
check that the LEDs on the Ethernet socket blink alternately and then release the reset button.
Open a web browser (Firefox recommended) and browse to http://192.168.1.4 and get the following screen:
Username is “sequoia” and the password is “23cf11335e5138”. This username and password is independent of any
security password that may have been set up for the unit by the user. Enter these details and hit login to get to the next
screen.
Reset button

Neon Family
User Manual
Sensormetrix is a division of Sequoia Technology Group Ltd
Registered in England No. 4004881
VAT Registration No. GB614 5653 45
Sensormetrix
sales
+44 (0) 845 451 2021
Basingstoke Road
fax
+44 (0) 118 976 9020
Spencers Wood
email
sales@sensormetrix.co.uk
Reading
web
www.sensormetrix.co.uk
Berkshire RG7 1PW
Page 28 of 39
Browse to where the new firmware was saved on the programming computer and open the file “neon100.bin” (Neon 100)
or “neon110.bin” (Neon 110). The unit will only accept a correctly named file (case sensitive). Make sure that the computer
and Neon are powered from a source that is unlikely to be interrupted during the upgrade process (don’t do this during a
thunderstorm, etc). Click upload.
When the popup box asking if you wish to upgrade with this file appears, click OK. After 15 seconds or so the web page
refreshes with a confirmation message that the upgrade file has been uploaded.
Press the button to complete the upgrade process. The Neon will then restart with the settings that it had before the
firmware was upgraded. This means that it will probably be on a new IP address.
Important: Make sure that pops are allowed on the browser are enabled otherwise the pop-box with the confirmation
message will never be displayed, preventing the upgrade of the unit.
Important: If you have issues logging in or uploading the firmware, please temporarily disable any anti-virus software
running on the PC used to do the upgrade. This has been found to interfere with the upgrade process.

Neon Family
User Manual
Sensormetrix is a division of Sequoia Technology Group Ltd
Registered in England No. 4004881
VAT Registration No. GB614 5653 45
Sensormetrix
sales
+44 (0) 845 451 2021
Basingstoke Road
fax
+44 (0) 118 976 9020
Spencers Wood
email
sales@sensormetrix.co.uk
Reading
web
www.sensormetrix.co.uk
Berkshire RG7 1PW
Page 29 of 39
Important: Malware and other web browser add-ons have been found to prevent the upgrade process. Internet explorer has
been found particularly sensitive in this respect. If the upgrade process fails, try a different browser or a different PC. Firefox
has been found to be the most reliable web browser for the upgrade process.
Technical Specification
Measurement probe
Probe length: 165mm (approx.) to sensing element
Temperature
Resolution: 0.01°C
Accuracy: ±0.3°C (measured at 25°C)
Repeatability: ±0.1°C
Operating temperature range: -40°C to +125°C
Important: although the temperature probe can measure -40°C to +125°C, the ribbon cable attached to the sensor is only
specified over the range -40°C to +105°C
Humidity
Resolution: 0.01%RH
Accuracy: ±3.0%RH (20 to 80%RH)
Repeatability: ±0.2%RH
Linearity: <2.0%RH
Operating range: 0 to 100%RH (non-condensing)
Important: Non-condensing means that the measurement probe is not designed to be and must not be dipped in fluid.
Doing so is likely to cause permanent damage and will invalidate the products warranty.
Other characteristics
Ethernet characteristics:
10Base-T or 100Base-TX
Full or half duplex
Auto-negotiation determines mode of operation
LEDs:
Green: Power applied
Amber: Ethernet activity
Power Supply voltage: 6-14V
Power supply current: 115mA max
Operating temperature range: 0- 45°C
Dimensions: 93mm long x 67mm wide x 28mm high

Neon Family
User Manual
Sensormetrix is a division of Sequoia Technology Group Ltd
Registered in England No. 4004881
VAT Registration No. GB614 5653 45
Sensormetrix
sales
+44 (0) 845 451 2021
Basingstoke Road
fax
+44 (0) 118 976 9020
Spencers Wood
email
sales@sensormetrix.co.uk
Reading
web
www.sensormetrix.co.uk
Berkshire RG7 1PW
Page 30 of 39
Product History
From time to time new versions of firmware may be made available for the Neon which add or improve features. This
manual will always be maintained to reflect the latest firmware build. Neon’s with old firmware can always be upgraded to
the latest firmware. For customers with version 1 firmware, the product will need to be returned to Sensormetrix for a
complementary upgrade. Version 2 and later firmware may be user upgraded by following the update procedure.
Firmware version
Features added / improved
1
a) Initial release.
2
a) Humidity measurement accuracy improved.
b) No response to pings generated from some operating systems/hardware fixed.
c) Added robots.txt to web interface to aid search engines indexing units placed on the Internet.
d) Fixed error where Google indexing the web interface of an on line unit could cause it to reboot.
e) Changed boot-loader so that end users are now capable of doing firmware updates.
f) Fixed error where occasionally the power up alarm thought it was 1970
3
a) Corrected an error where the detector utility failed to find the Neon if it was on a different
subnet to the PC on which the utility was run.
b) Improved resilience to fault conditions – Neon will reboot if something nasty happens to it.
c) Fixed IP addressing (and not DHCP) is now the factory default.
d) Changed DHCP operation. If DHCP is used, unit will no longer default back to a fixed IP
address if a DHCP server cannot be found within 30 seconds of power on. This fixes an issue
where some networks and DHCP servers can take a long time to recover after power is
restored from an outage and the Neon would drop back to the last used fixed IP settings.
4
a) Introduction of Neon 110 features:
Data values in XML file
User setting of SMTP server details allowed
b) Further improvements to fault resilience
c) Cosmetic changes to web interface to improve operation with different web browsers

Neon Family
User Manual
Sensormetrix is a division of Sequoia Technology Group Ltd
Registered in England No. 4004881
VAT Registration No. GB614 5653 45
Sensormetrix
sales
+44 (0) 845 451 2021
Basingstoke Road
fax
+44 (0) 118 976 9020
Spencers Wood
email
sales@sensormetrix.co.uk
Reading
web
www.sensormetrix.co.uk
Berkshire RG7 1PW
Page 31 of 39
Application Information
Troubleshooting email problems
If no emails are being received from the Neon, please check the following.
Cycle power to the Neon and look at the home page of the Neon where the temperature and humidity is displayed. Is the
time displayed correct/ If so, the Neon has an Internet connection and can send emails. If the time displayed is incorrect,
this means that there is no Internet connection available and the Neon will not be able to send email. Please check the
network settings and in particular gateway address.
Please make sure that sensormetrix@servergateway.co.uk (for Neon 100) or the email address entered on the email page
(for Neon 110) is added to the recipients email client as a trusted email address so that any email is not trapped by spam
or junk email filters.
Outgoing email is sent from port 25 (neon 100) or whatever port has been set on the email page (neon 110). It has been
known for some ISPs to block this port by default which stops email operation. If there are problems with email, please
connect the neon directly to the router providing Internet access to ensure that nothing in the local network is blocking
operation, and if this fails to fix any email problem please contact the ISP to ensure that port 25 is not being blocked.
Sensormetrix can check to ensure that email from the neon 100 has reached the email server on request – please provide
the email address to which the neon is emailing so that we can trace it on our server.
Setting a PCs IP address
Windows 7
1. Right click the networking icon in the bottom right of the display. The icon will either be for a wireless
connection or if the network connection is wired. Two options will appear. Select “Open Network and Sharing
Centrer” by left clicking on that option. The Network and Sharing Center window will open:
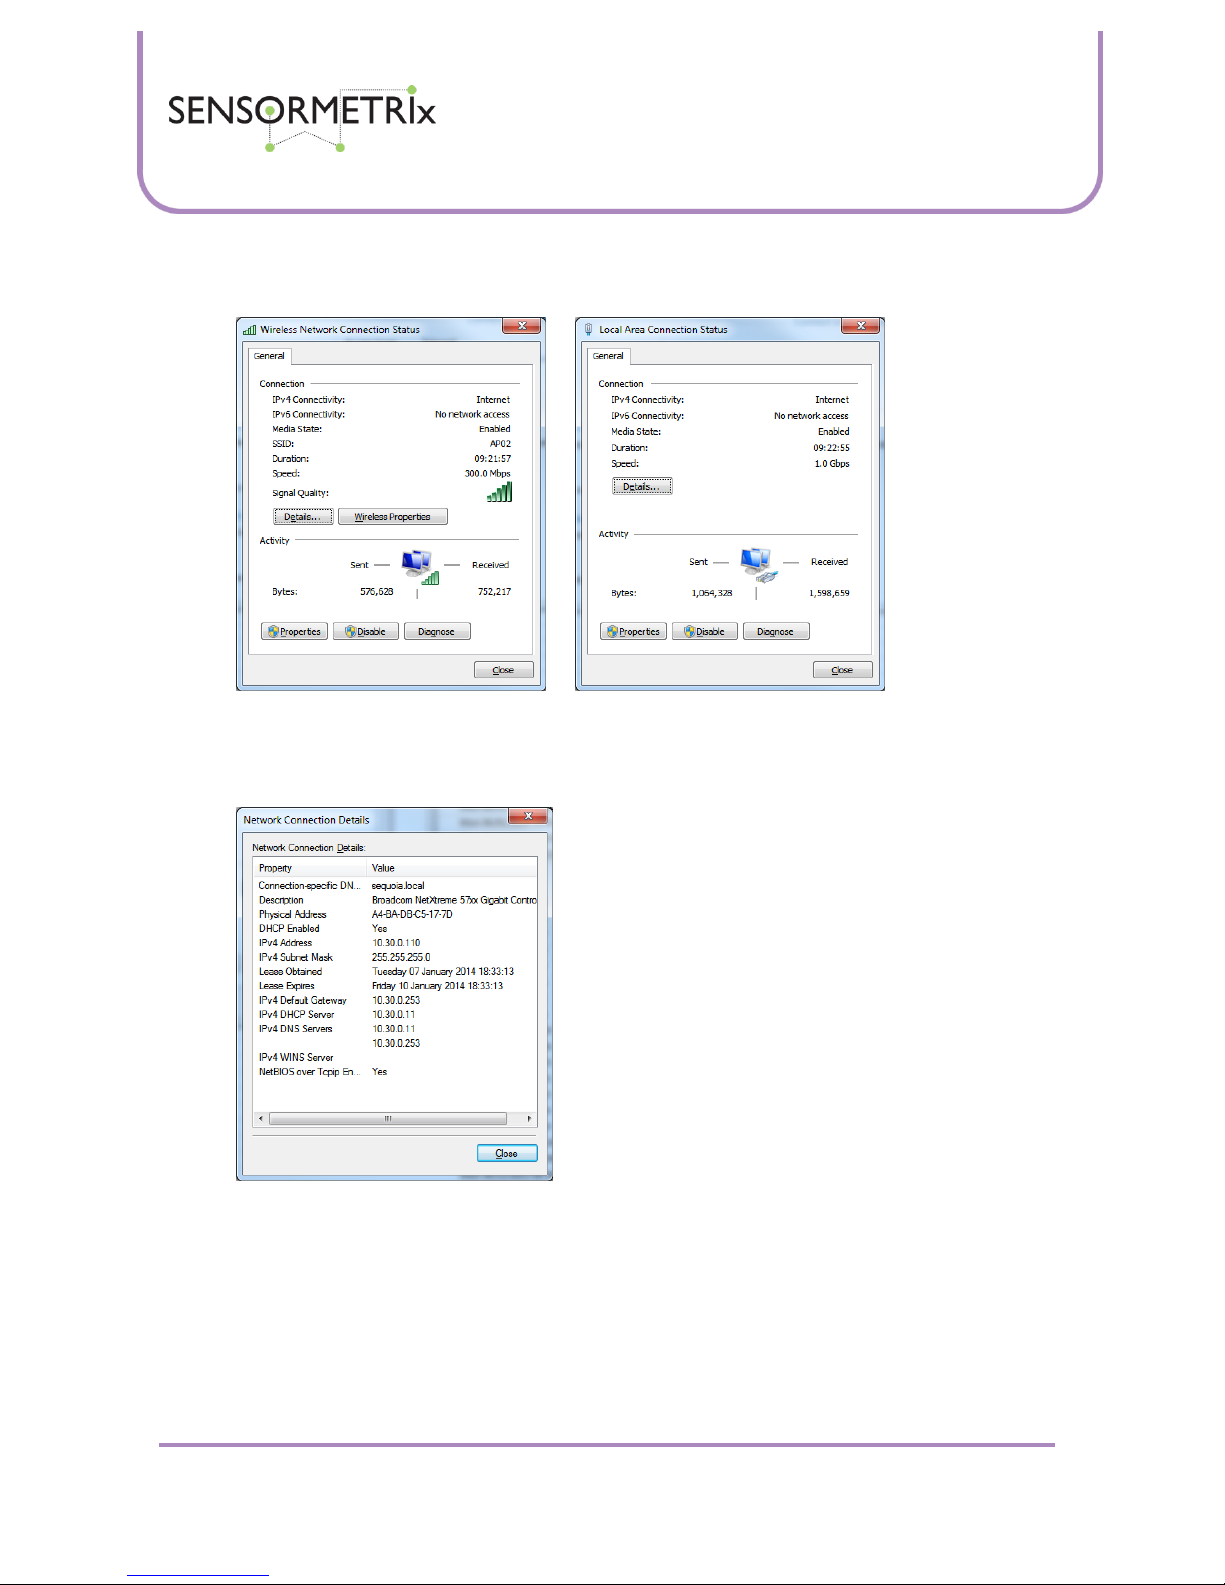
Neon Family
User Manual
Sensormetrix is a division of Sequoia Technology Group Ltd
Registered in England No. 4004881
VAT Registration No. GB614 5653 45
Sensormetrix
sales
+44 (0) 845 451 2021
Basingstoke Road
fax
+44 (0) 118 976 9020
Spencers Wood
email
sales@sensormetrix.co.uk
Reading
web
www.sensormetrix.co.uk
Berkshire RG7 1PW
Page 32 of 39
2. Left click on “Local Area Connection” (wired connection) or Wireless Network Connection (wireless connection) in
the right hand section of the window under the “View your active networks” heading. The Wireless Network or
Local Area Connection Status box appears.
3. Clicking the Details button will display the current network settings of the PC. These have probably been assigned
automatically by the DHCP server in the network. The DHCP Enabled setting in the connection details box will
verify this. The other important parameter to note is the currently assigned IPv4 address (which will have been
assigned by the DHCP server if it is enabled). In order to connect to a factory default settings Neon, the PC’s IP
address will have to be 192.168.1.xxx where xxx is a number between 1 and 255 (but not 4).
Close this box to return to the Connection Status page.

Neon Family
User Manual
Sensormetrix is a division of Sequoia Technology Group Ltd
Registered in England No. 4004881
VAT Registration No. GB614 5653 45
Sensormetrix
sales
+44 (0) 845 451 2021
Basingstoke Road
fax
+44 (0) 118 976 9020
Spencers Wood
email
sales@sensormetrix.co.uk
Reading
web
www.sensormetrix.co.uk
Berkshire RG7 1PW
Page 33 of 39
4. Click the Properties button to open the properties page, and highlight the “Internet Protocol Version 4 (TCP/IPv4)”
line (but take care not to uncheck the checkbox to the left of it).
5. Click the properties button to open up the properties box of this feature. Make a note of the settings before
proceeding further. In all probability they will be the same as the screenshot below, but this cannot be certain.
6. Click the radio button to the left of “Use the following IP address” to select this feature, and then enter an address
of 192.168.1.20, Subnet Mask 255.255.255.0 as shown in the screenshot. Click the OK button on this and the
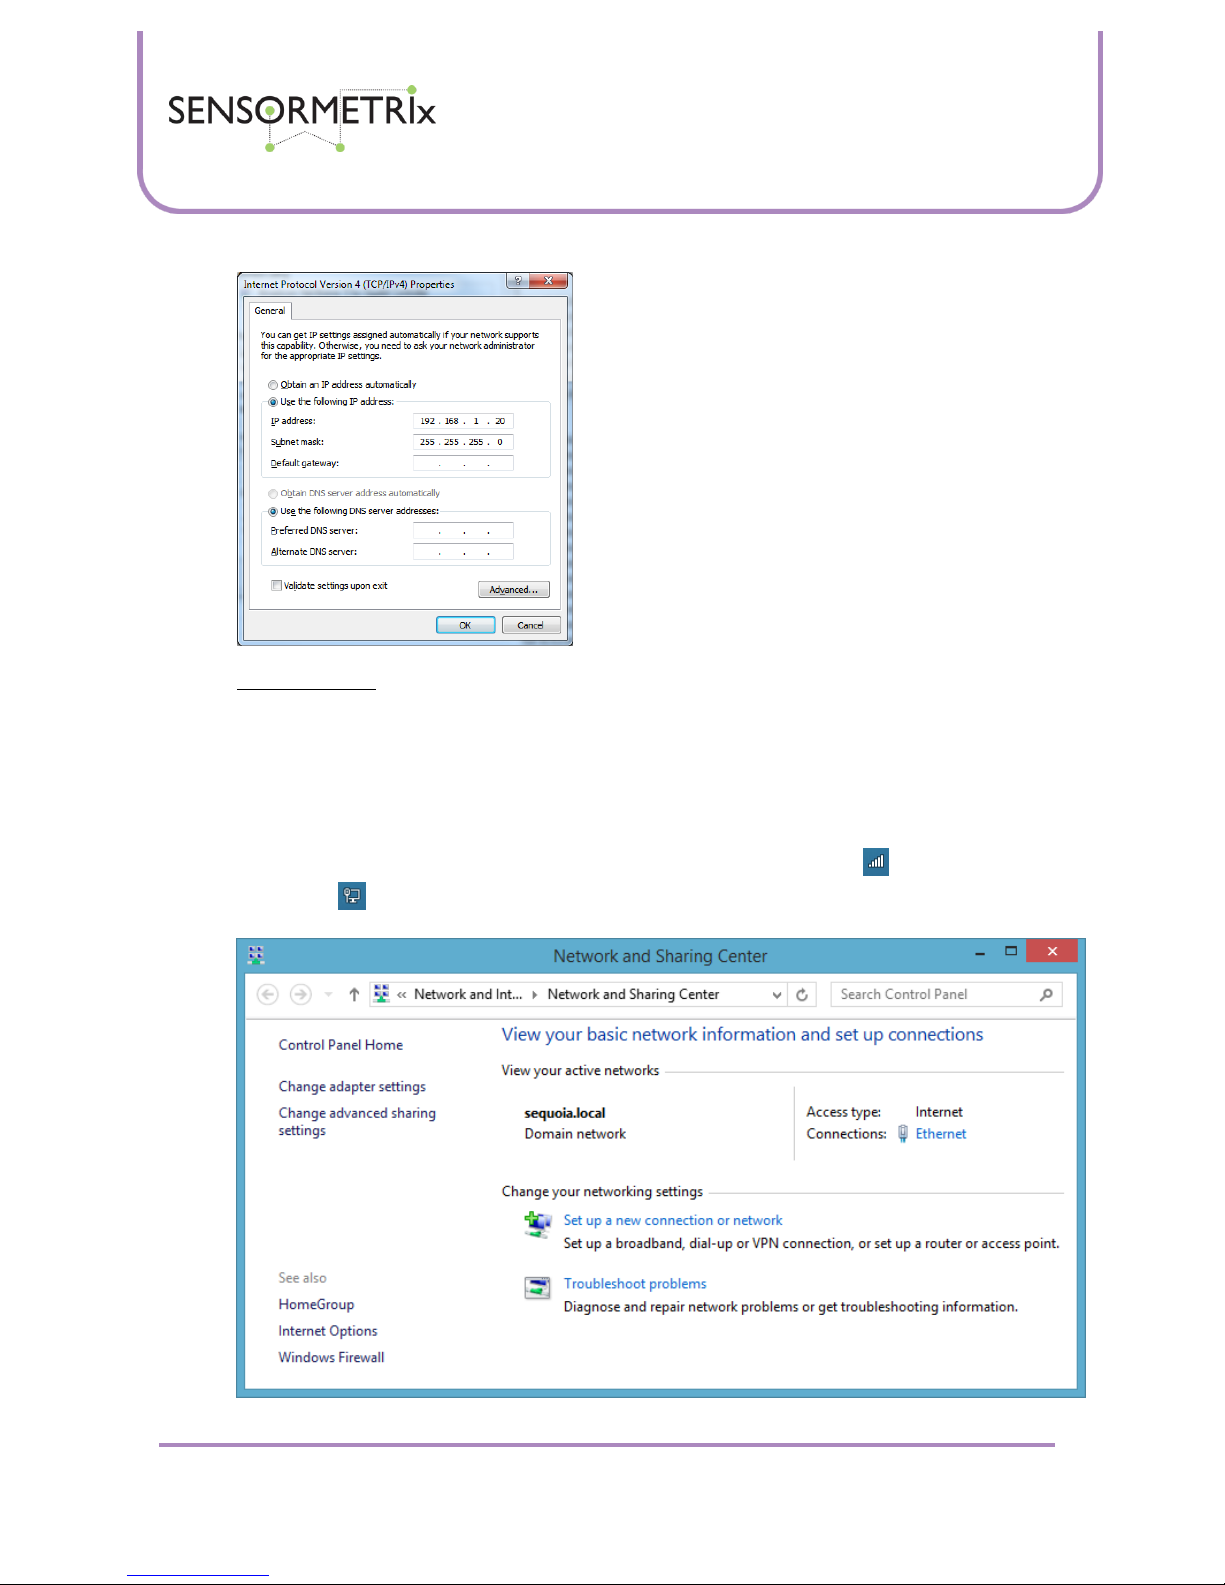
Neon Family
User Manual
Sensormetrix is a division of Sequoia Technology Group Ltd
Registered in England No. 4004881
VAT Registration No. GB614 5653 45
Sensormetrix
sales
+44 (0) 845 451 2021
Basingstoke Road
fax
+44 (0) 118 976 9020
Spencers Wood
email
sales@sensormetrix.co.uk
Reading
web
www.sensormetrix.co.uk
Berkshire RG7 1PW
Page 34 of 39
other windows that are open.
7. If the Neon is directly connected by wire to the computer, it will now be accessible in a web browser at
http://192.168.1.4 It will now be possible to change the settings of the Neon. After making the desired changes
to the Neon’s networking settings (remember to unlock first and save the settings before restarting the Neon), this
setup procedure used to set the PCs IP address can be repeated and the original settings noted in paragraph 5
returned to the PC.
Windows 8
1. Navigate to the Windows desktop, either via a shortcut to the desktop already placed on the start page, or by
clicking the down arrow at the bottom left of the start page and selecting desktop from under the Apps section.
2. Right click the networking icon in the bottom right of the display. The icon will either be for a wireless
connection or if the network connection is wired. Two options will appear. Select “Open Network and Sharing
Centrer” by left clicking on that option. The Network and Sharing Center window will open:

Neon Family
User Manual
Sensormetrix is a division of Sequoia Technology Group Ltd
Registered in England No. 4004881
VAT Registration No. GB614 5653 45
Sensormetrix
sales
+44 (0) 845 451 2021
Basingstoke Road
fax
+44 (0) 118 976 9020
Spencers Wood
email
sales@sensormetrix.co.uk
Reading
web
www.sensormetrix.co.uk
Berkshire RG7 1PW
Page 35 of 39
3. Left click on “Ethernet” (wired connection) or WiFi (wireless connection) in the right hand section of the window
under the “View your active networks” heading. If the connection is WiFi, the access point name should be
displayed in brackets after WiFi. The WiFi or Ethernet Status box appears.
4. Clicking the Details button will display the current network settings of the PC. These have probably been assigned
automatically by the DHCP server in the network. The DHCP Enabled setting in the connection details box will
verify this. The other important parameter to note is the currently assigned IPv4 address (which will have been
assigned by the DHCP server if it is enabled). In order to connect to a factory default settings Neon, the PC’s IP
address will have to be 192.168.1.xxx where xxx is a number between 1 and 255 (but not 4).
Close this box to return to the Status page.
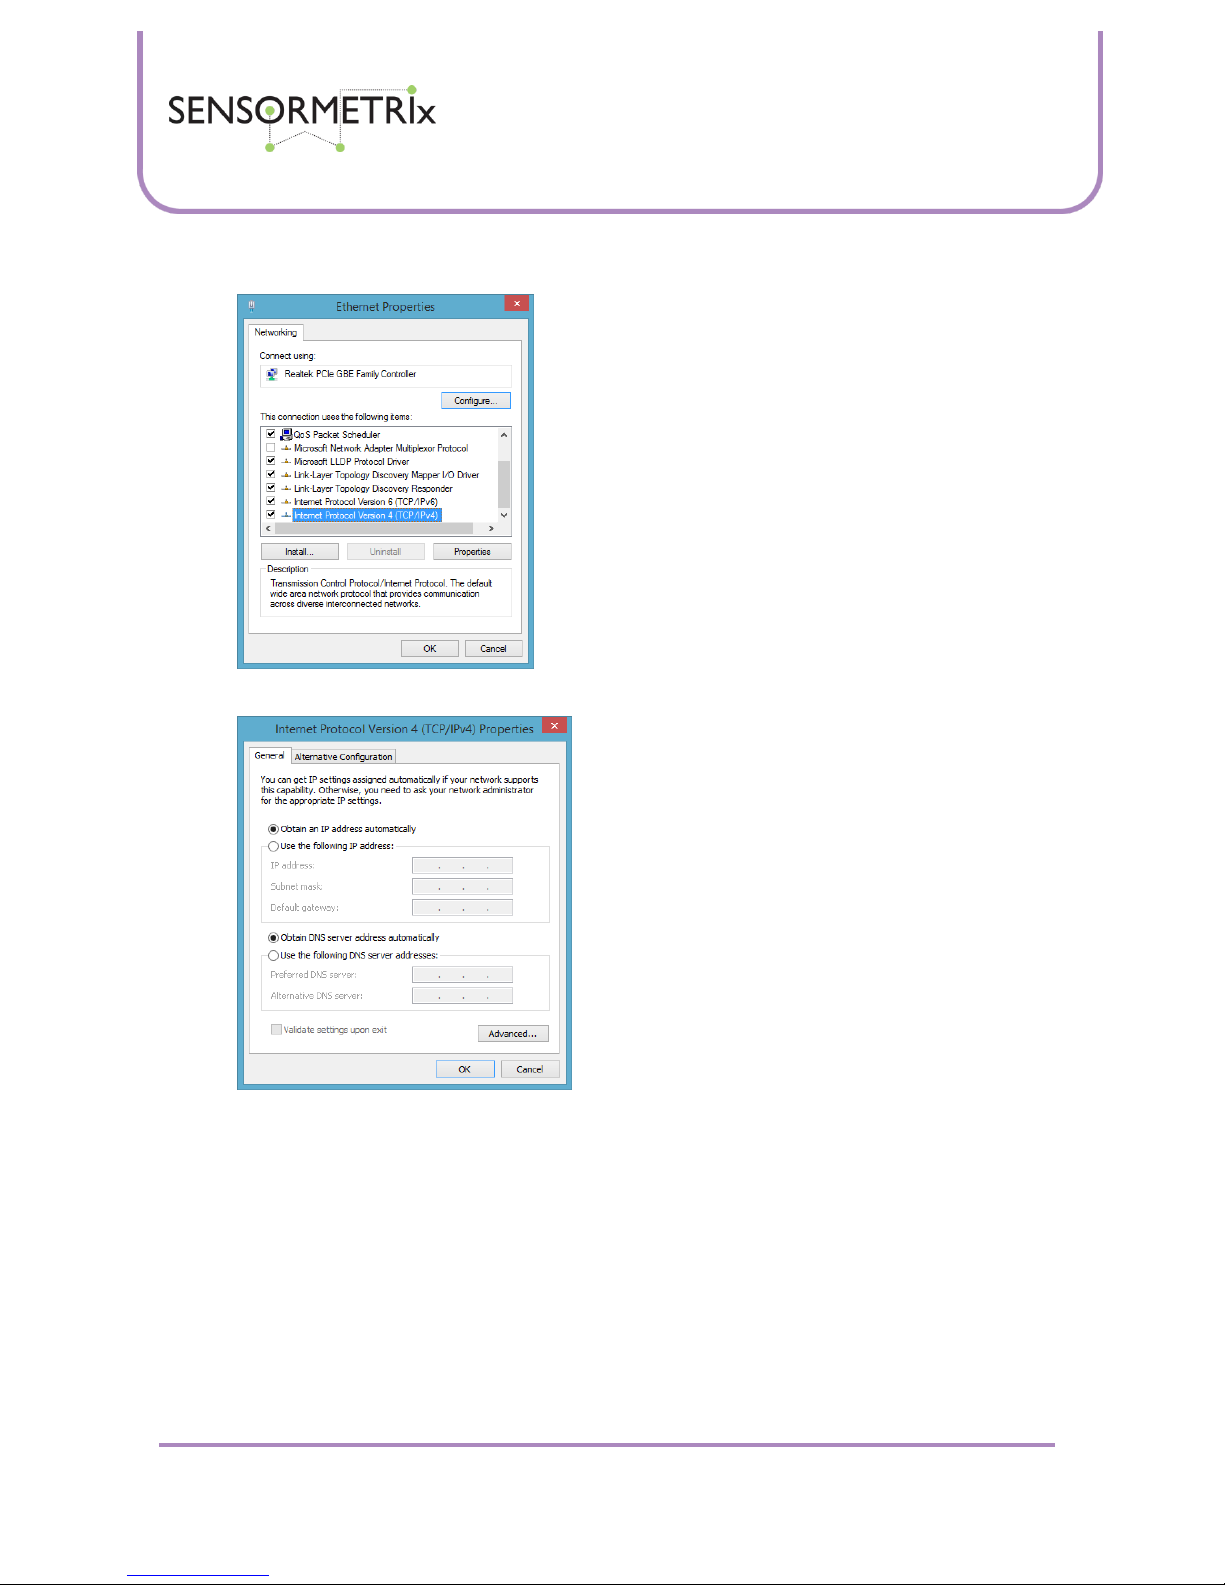
Neon Family
User Manual
Sensormetrix is a division of Sequoia Technology Group Ltd
Registered in England No. 4004881
VAT Registration No. GB614 5653 45
Sensormetrix
sales
+44 (0) 845 451 2021
Basingstoke Road
fax
+44 (0) 118 976 9020
Spencers Wood
email
sales@sensormetrix.co.uk
Reading
web
www.sensormetrix.co.uk
Berkshire RG7 1PW
Page 36 of 39
5. Click the Properties button to open the properties page, and highlight the “Internet Protocol Version 4 (TCP/IPv4)”
line (but take care not to uncheck the checkbox to the left of it).
6. Click the properties button to open up the properties box of this feature. Make a note of the settings before
proceeding further. In all probability they will be the same as the screenshot below, but this cannot be certain.
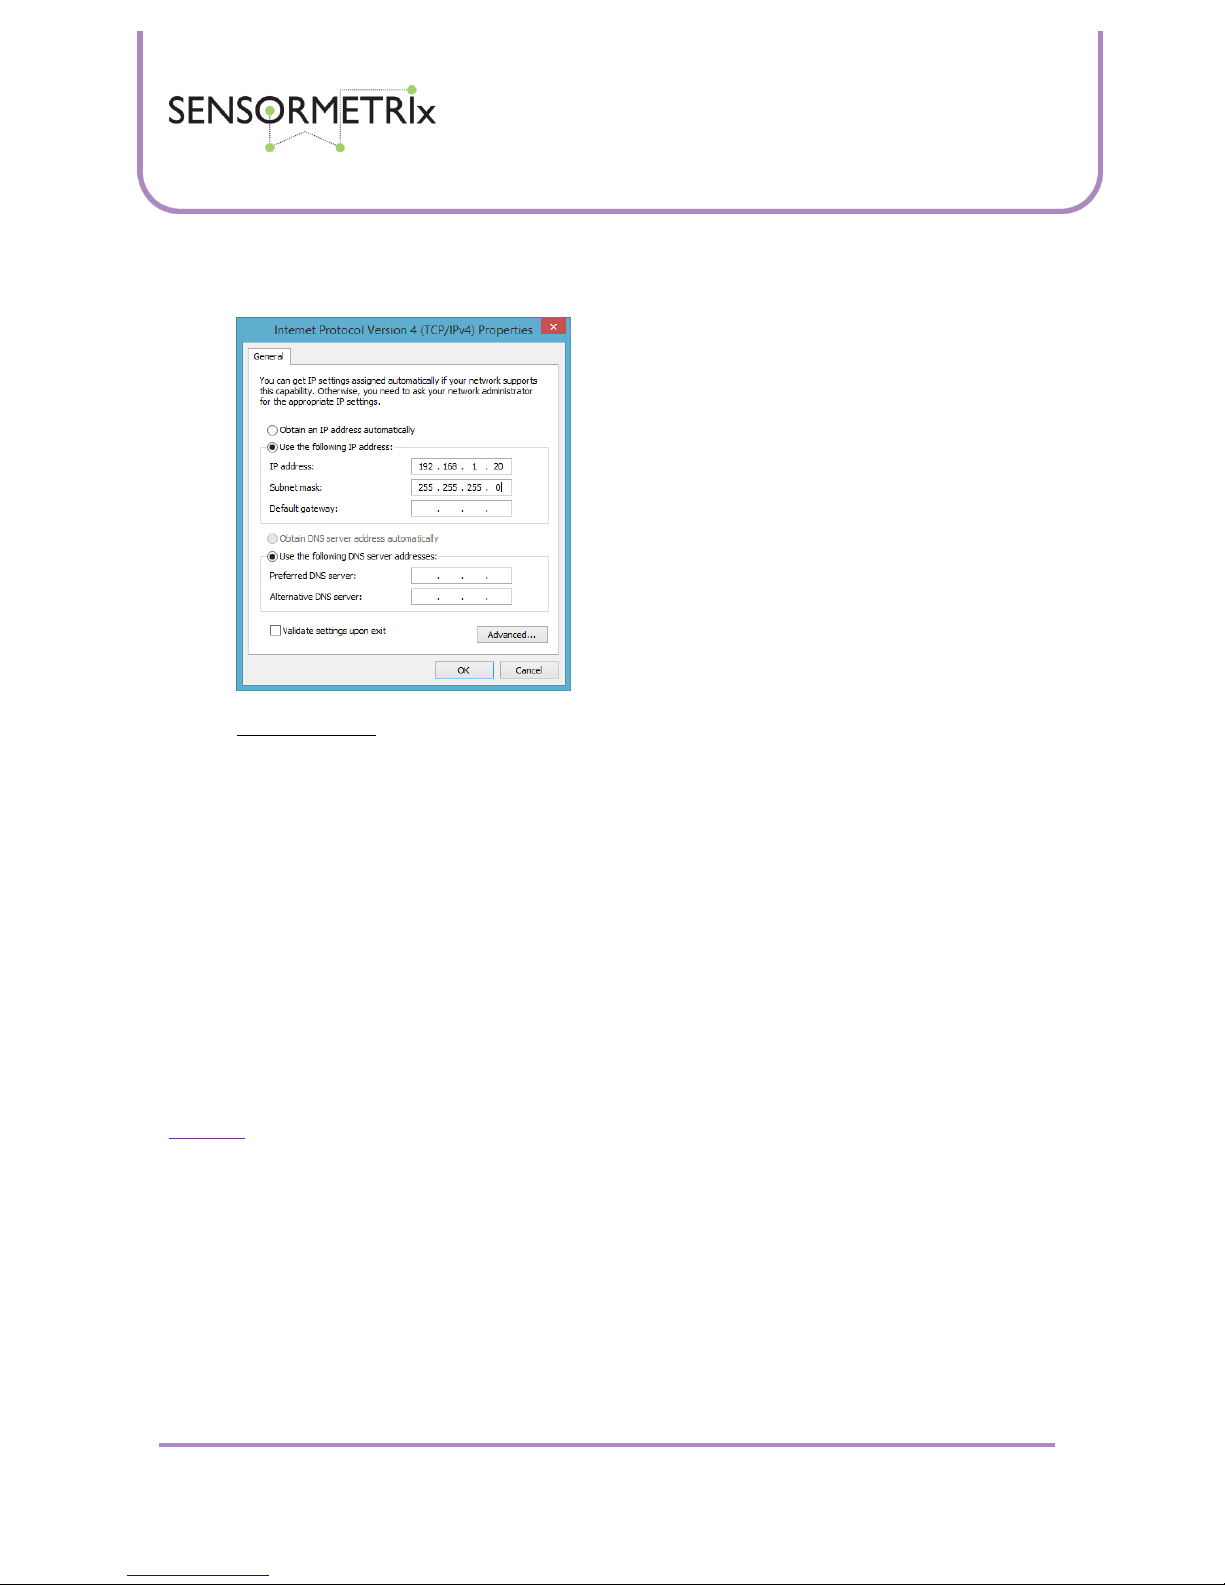
Neon Family
User Manual
Sensormetrix is a division of Sequoia Technology Group Ltd
Registered in England No. 4004881
VAT Registration No. GB614 5653 45
Sensormetrix
sales
+44 (0) 845 451 2021
Basingstoke Road
fax
+44 (0) 118 976 9020
Spencers Wood
email
sales@sensormetrix.co.uk
Reading
web
www.sensormetrix.co.uk
Berkshire RG7 1PW
Page 37 of 39
7. Click the radio button to the left of “Use the following IP address” to select this feature, and then enter an address
of 192.168.1.20, Subnet Mask 255.255.255.0 as shown in the screenshot. Click the OK button on this and the
other windows that are open.
8. If the Neon is directly connected by wire to the computer, it will now be accessible in a web browser at
http://192.168.1.4 It will now be possible to change the settings of the Neon. After making the desired changes
to the Neon’s networking settings (remember to unlock first and save the settings before restarting the Neon), this
setup procedure used to set the PCs IP address can be repeated and the original settings noted in paragraph 6
returned to the PC.
Connection via mobile phone network
The Neon may be used with a GPRS/3G router such as the Sequoia RUT500. With a data enabled SIM, this will allow the
Neon to send email via the GPRS/3G. Sensormetrix always recommends using a contract SIM card in remote monitoring
applications as pay-as-you-go contracts can run out of credit preventing use, but without giving any obvious error
messages.
For remote browsing of the Neon’s web interface, the Sequoia RUT500 supports Dynamic DNS and the recommended
configuration would be to connect the Neon to the DMZ. Please ask Sensormetrix for more detail on how to do this.
The data transfer bandwidth used by viewing the home page is 4114 bytes/second uploaded by the Neon and 647
bytes/second downloaded by the Neon. When the unit is connected via the Sequoia RUT500, this will allow on line data
costs to be predicted.
Important: Data will flow for as long as the web page is open in a browser, even if the browser is minimised. The only way to
stop the data flow is to close the browser. Each browser window connected (be they on the same PC or different PCs) will
use the shown data rate.
Connection via WiFi
The Neon may be connected to a Wireless access point to WiFi enable the product. Not all wireless access points are able to
work in the correct way to allow this. Please contact Sensormetrix for details of solutions that will work with the Neon.
Fixing the IP address
Rather than fix the IP address at the Neon, the better way to fix the IP address is to use the DHCP server. Most DHCP servers
will allow an IP address to be fixed or bound to a specific MAC address. The advantage of this is that the Neon will always
have a fixed address, but it is actually picking up all the networking parameters from the server. This means that if any of
the networks characteristics are altered over time (new gateway, different DNS server, etc) these changes will automatically

Neon Family
User Manual
Sensormetrix is a division of Sequoia Technology Group Ltd
Registered in England No. 4004881
VAT Registration No. GB614 5653 45
Sensormetrix
sales
+44 (0) 845 451 2021
Basingstoke Road
fax
+44 (0) 118 976 9020
Spencers Wood
email
sales@sensormetrix.co.uk
Reading
web
www.sensormetrix.co.uk
Berkshire RG7 1PW
Page 38 of 39
ripple down to the Neon rather than have to be changed on the Neon. Additionally, the fixed IP binding should be clearly
visible to anyone doing the network administration while if it was fixed at the Neon this would not be immediately
apparent.
Hysteresis explained
Hysteresis is the dependence of a state on not only its current condition but also its past condition.
Hysteresis is best explained by an example. Suppose that a product has a hysteresis of 1°C and has the temperature alarm
set at 40°C. As the measured temperature slowly rises from below 40°C to greater than 40°C, an alarm state will exist when
the temperature exceeds 40°C and will continue to persist at any temperature over 40°C. This would be expected
behaviour.
However, with 1°C of hysteresis, when the temperature drops the alarm state will persist until the temperature has dropped
to 1°C below 40°C (39°C). This means that when the temperature is falling between 40°C and 39°C, this will still be an
alarm state. This is the dependence of the current state with the past. Applying hysteresis prevents a possible flood of
email alerts if a measured value dithers around an alarm threshold.
Neon 100 SMTP settings
The Neon 100 was designed specifically with the email settings pre-configured to make it easy to use. In some applications
this is not always desirable. While it is not supported by Sensormetrix, advanced users may redirect emails to their own
server by altering their local networks DNS to redirect emails to their own server. If the alternative email server does not
require authentication, this can be achieved knowing the settings that are pre-set in the Neon 100. If authentication is also
required a password is required. This is available on application to Sensormetrix and will only be done so if a nondisclosure agreement is signed. Note that SSL/TLS is not supported.
SMTP server: "mail.servergateway.co.uk"
SMTP port: 25
SMTP account: sensormetrix@servergateway.co.uk
SMTP password: By request only
SMTP address: sensormetrix@servergateway.co.uk
If entering of the users own a SMTP setting is required, the Neon 110 should be used rather than the Neon 100.
Glossary
3G/GPRS (3rd Generation / General packet Radio Service)
3G is the third generation mobile phone network. GPRS is the data transfer method used by 2G mobile phone networks. In
the UK Vodafone, EE and O2 operate 2G and 3G networks, Three operates a 3G network.
DHCP (Dynamic Host Configuration Protocol)
DHCP is a procedure by which a PC is assigned a certain IP configuration (IP address, subnet mask, etc.) at startup.
DMZ (De-Militarised Zone)
A DMZ is an IP address on a local area network that is directly exposed to the Internet without any firewall protection. It is a
method of exposing one device on the local network to the Internet without exposing any other local address.
DNS (Domain Name Service)
Name resolution on the Internet and in the LAN. DNS translates the names of PCs or web pages into the relevant IP
addresses.

Neon Family
User Manual
Sensormetrix is a division of Sequoia Technology Group Ltd
Registered in England No. 4004881
VAT Registration No. GB614 5653 45
Sensormetrix
sales
+44 (0) 845 451 2021
Basingstoke Road
fax
+44 (0) 118 976 9020
Spencers Wood
email
sales@sensormetrix.co.uk
Reading
web
www.sensormetrix.co.uk
Berkshire RG7 1PW
Page 39 of 39
Dynamic DNS (Dynamic Domain Name Service)
Dynamic DNS is a method of providing a DNS address to a device which does not have a fixed IP address assigned to it by
the network to which it is attached. This is achieved by the device reporting its current IP address to the dynamic DNS
server, and ensuring that when its IP address changes that these changes are reported to the dynamic DNS server.
Gateway Address
The gateway IP address is the IP address of the router in the local network that is used to connect with the Internet. Without
a valid gateway address, access to the Internet is not possible.
IP Address (Internet Protocol Address)
A numeric address that a device participating in a Local Area Network must have in order to be uniquely addressed.
Typically this is a 32 bit number (IPv4), but this is slowly transitioning to 128 bit numbers (IPv6).
ISP (Internet Service Provider)
An ISP is a business that supplies Internet connectivity services to individuals, businesses, and other organizations. Some
ISPs are large national or multinational corporations that offer access in many locations, while others are limited to a single
city or region.
LAN (Local Area Network)
The network connections between network devices such as PCs in a building.
NetBIOS (Network Basic Input/Output System)
A method of using a NetBIOS name assigned to a device as an alternative to IP addressing.
VLAN (Virtual LAN)
A mechanism where a LAN’s physical connections are virtualised so that 2 or more LANs can share the same wiring,
switches, etc, yet have no connection between each other as if they were independent wires. Typically used for adding
guest networks to a corporate network, or having a separate management network.
Wi-Fi
WiFi is a wireless local area network based on IEEE802.11 standards
Author: John Culver
Version E3, released 03 March 2014
© 2014 Sequoia Technology Group Ltd. All rights reserved.
No part of this publication may be reproduced, transmitted, transcribed, stored in a retrieval system, or translated into any
language in any form or by any means without the written permission of Sequoia Technology Group Ltd.
To improve internal design, operational function, and/or reliability, Sequoia Technology Group Ltd reserves the right to
make changes to the products described in this document without notice. Sequoia Technology Group Ltd does not assume
any liability that may occur due to use, or application of, the product(s) or circuit layouts(s) described in this document.
 Loading...