


TempTale® Ultra
Humidity Monitor
Instructions for Use
sensitech.com
@sensitech
Sensitech Inc. • 800 Cummings Center, Suite 258X • Beverly, MA 01915
+1-800-843-8367 • +1-978-927-7033 • Fax 978-921-2112 • clientservices@sensitech.com
© 2018 Sensitech Inc. All Rights Reserved.
T83006699 Rev. A • 10 Sept 2018
The TempTale® Ultra Humidity monitor can be programmed with custom start-up delays,
measurement intervals, and temperature/humidity alarm settings.
Starting a TempTale® Ultra Humidity Monitor
• Press and hold the Start button (1 – 3 seconds) until the Sunshine icon appears on the LCD screen (1).
The LED (2) will blink GREEN to indicate that the monitor has been started.
• The monitor will begin to record temperature and humidity data after the programmed start-up delay period has passed.
Marking an Event and Reading Data on the LCD Screen
• To mark an event while the monitor is recording, press and release the Start button. An Arrow icon will appear briey
at the top of the LCD screen and trip summary data will display. Press and release the Start button to cycle through the
trip summary data. Data appears in the following order:
1. Average temperature recorded (AVG)
2. Minimum temperature recorded (MIN)
3. Maximum temperature recorded (MAX)
4. Average RH% value recorded
5. Minimum RH% value recorded
6. Maximum RH% value recorded
7. Current temperature reading (If this LCD option is enabled)
8. Current RH% reading (If this LCD option is enabled)
Alarming
When the TempTale Ultra Humidity monitor is exposed to relative humidity and/or temperatures
outside the programmed alarm limits, an will appear at the top of the screen. The icon
will display if the high alarm(s) were triggered. The icon will display if the low alarm(s) were
triggered.
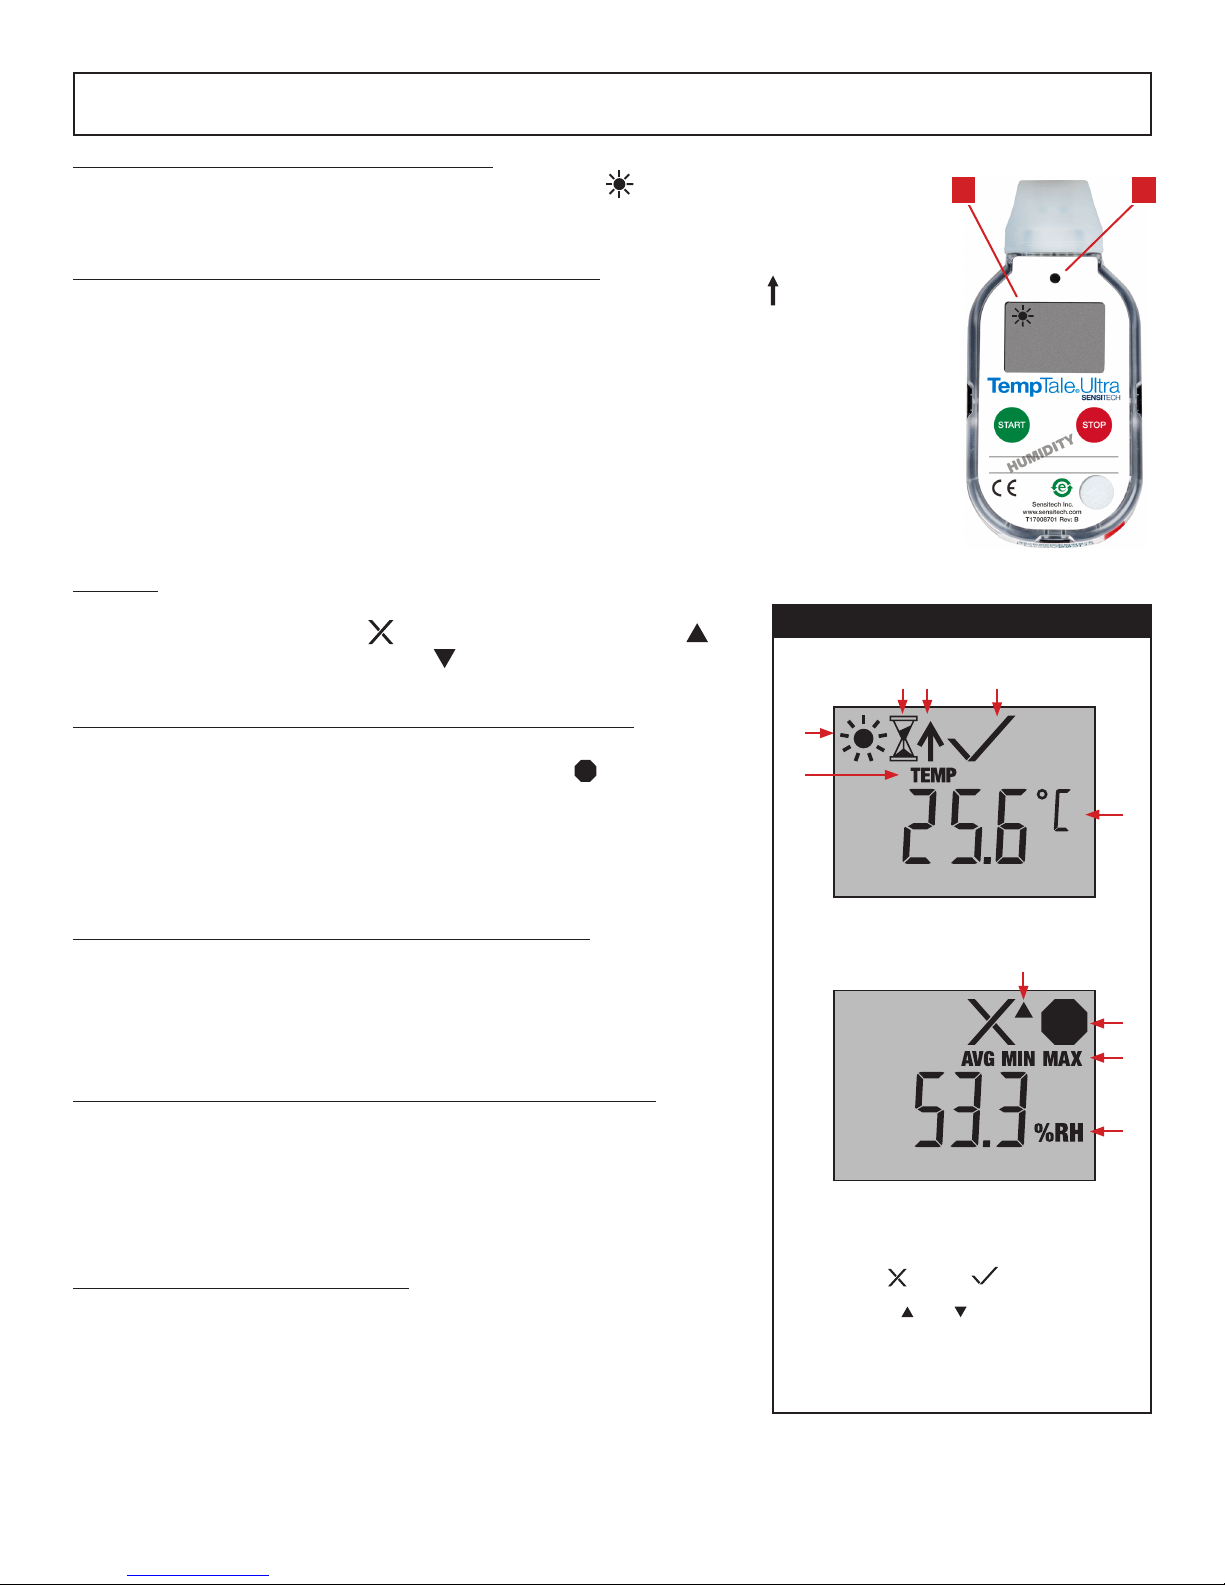
Displayed Information
Sample running display, no alarm
3 4 5
1 2
Stopping and Receiving a TempTale Ultra Humidity Monitor
There are two ways to stop a TempTale Ultra Humidity monitor:
• Press and hold the Stop button (1 – 3 seconds) until the Stop icon appears in the
upper right corner of the screen.
• Plug the monitor into a USB port on a computer.
NOTE: If the monitor is not stopped manually, the TempTale Ultra Humidity monitor will
continue to record data until it is plugged into a USB port on the computer or until the pro-
grammed trip length is reached.
Accessing TempTale Ultra Humidity Monitor Data Files
• After the monitor is stopped, plug the monitor into a USB port on the computer. The LED
will blink RED while the Adobe® PDF report and TTV data le are being created. When the
RED LED stops blinking and displays solid GREEN, the le generation process is complete.
The les are now accessible. (Windows® 7, 8.1, and 10).
NOTE: Do not disconnect the monitor from the USB port while the RED LED is blinking.
Managing and Viewing TempTale Ultra Humidity Monitor Files
• If the computer has Adobe PDF compatible reader software installed, double-click the PDF
le icon to open and view the PDF le.
• If the computer has Sensitech’s TempTale Manager® Desktop Software installed (8.3 or
higher), double-click the TTV le icon to open and view trip summary statistics and the
time-temperature graph.
• Both the PDF and TTV les can be copied, saved, or emailed as an attachment.
Direct USB Printing of PDF Reports
• To place the monitor in Direct Print mode, press and hold the Start and Stop buttons
simultaneously until the RED LED starts blinking. The monitor is now in Direct Print mode.
NOTE: Direct Print mode times out after approximately 10 seconds. If time out occurs
before the monitor is connected to a USB port, repeat the previous step.
• While the LED is blinking, plug the monitor into the USB port located on the exterior of a
USB-enabled printer, and then print the PDF report.
NOTE: Not all USB printers support USB-direct printing of PDF documents. Consult your
printer’s user manual for support.
2
1
6
Sample stopped display, with alarm
7
8
9
10
1. Temperature display indicator
2 Running
3. Start-up delay
4. Marked point
5. Alarm Status = alarm(s), = no alarm(s)
6. Current temperature (pre-programmed to display °C or °F)
7. Alarm triggered HIGH / LOW
8. Stopped recording
9. Avg/min/max relative humidity (RH%) recorded
10. Current relative humidity
 Loading...