


SHCK001 Instruction Manual
Need extra help?
Don’t worry we are just at the other end of the phone. If you’re experiencing problems
using your new product, before returning it to the retailer just call 0345 467 6743.
PLUS
Easy to follow
delicious recipes


Contents
Safety Instructions 1
Electrical Safety 2
Features 3
Before First Use 4
Getting Started 4
The Pre-set Cooking Functions 5
How to use the Control Panel 6
Settings 7
Recipes 9
Autumn/Winter Weekly Meal Planner 20
Spring/Summer Weekly Meal Planner 21
Troubleshooting 22
Cleaning 22
Storage 22
Servicing 23
Guarantee 23
Environmentally Friendly Disposal 23
The Multi Cooka has been designed to make your mealtimes easy. This super-efficient onepot Cooka has been built for everyday use and provides a whole range of cooking options
that mirror how you would cook regularly. You can create delicious, nutritious recipes for all
the family catering up to 6 people. Use the ‘hands-free’ auto-stir function so you don’t have
to hover over your kitchen pots. Specifically designed to stir risotto and porridge slowly,
you don’t have to worry about your food sticking to the bottom of the pan! The sauté
function is also auto-stir allowing you to brown your onions whilst you get on with chopping
meat and vegetables.
Whether you are a novice cook or a time-strapped cook, it’s time to celebrate - you have
just found your irreplaceable kitchen chef.

Safety Instructions
Read this manual thoroughly before first use, even if you are familiar with this type of
product. The safety precautions enclosed herein reduce the risk of fire, electric shock and
injury when correctly adhered to. Keep the manual in a safe place for future reference,
purchase receipt and carton. If applicable, pass these instructions on to the next owner of
the appliance.
Always follow basic safety precautions and accident prevention measures when using an
electrical appliance, including the following:
1. Ensure the unit is used on a stable, level, heat-resistant surface out of the reach of children.
If necessary place a chopping board or heat resistant mat underneath the Multi Cooka
during use.
2. Always attach the connector end of the power cord into the appliance before inserting the
plug into the wall socket.
3. Do not touch the hot surfaces of the Multi Cooka, use the handles only.
4. Always keep the unit out of the reach of young children. This appliance can be used
by children ages from 8 years and above and persons with reduced physical, sensory
or mental capabilities or lack of experience and knowledge if they have been given
supervision or instruction concerning use of the appliance in a safe way and understand
the hazards involved. Children shall not play with the appliance. Cleaning and user
maintenance shall not be made by children without supervision.
5. Do not operate the appliance with a damaged cord or plug, or after the appliance
malfunctions or has been damaged in any manner.
6. Do not let the cord hang over the edge of the table or counter.
7. Do not use this Multi Cooka on or near a hot plate. Do not position it under hanging
kitchen cabinets as any steam produced may cause damage.
8. Before placing the removable cooking bowl into the unit ensure the base is clean and free
of debris as well as the heating plate inside the unit
9. Do not place food or liquid directly into the base of the unit. Only the removable cooking
pot is designed to contain food or liquid.
10. Never operate the Multi Cooka without food or liquid in the removable cooking bowl. Leave
some space at the top of the bowl to allow for foods to bubble and boil. If overfilling occurs
it may cause the contents to boil over.
11. Ensure there is sufficient water in the removable cooking bowl when steaming; it should
reach the minimum mark at least.
12. Do not use the Multi Cooka for Deep Frying, it designed for Shallow Frying only.
13. Do not use metal utensils as they will scratch the premium non-stick coating on the removable
cooking bowl, use the heat resistant plastic utensils provided or use a wooden spoon.
14. Steam will escape from the steam valve on the top of the lid, keep hands and face away
from this to prevent scalding.
15. To protect against electric shock, do not immerse the Multi Cooka, power cord or plug into
water or any other liquid.
16. Always regularly check the mains cord for damage. If damaged, discontinue use
immediately and do not use until the appliance has been inspected and approved by a
qualified electrician.
17. Never attempt repairs yourself. Repairs to electrical appliances should only be performed
by a qualified electrician. Improper repairs may place the user at serious risk and will
invalidate the guarantee.
1

Do not use the appliance for other than intended use, this is for HOUSEHOLD USE ONLY.
Electrical Safety
Read these instructions thoroughly before using this appliance or connecting it to the mains supply.
A 13 amp BS1362 ASTA approved fuse must be fitted.
This appliance must be earthed.
Before switching on, make sure that the voltage of your electricity supply is the same as that
indicated on the rating plate. Connecting it to any other power source may cause damage.
There are no user-serviceable parts inside this appliance. Always refer servicing to qualified
service personnel. The mains lead of this product is not replaceable by the user. If the
mains lead is damaged, discontinue use immediately and do not use until the appliance has
been inspected and approved by a qualified electrician.
Do not allow this product to be exposed to rain or moisture during use or storage.
Before switching on, make sure that the voltage of your electricity supply is the same as that
indicated on the rating plate. Connecting it to any other power source may cause damage.
This product may be fitted with a non-rewireable plug. If it is necessary to change the fuse
in the plug, the fuse cover must be refitted. If the fuse cover becomes loose or damaged,
the plug must not be used until a suitable replacement is obtained.
If the plug has to be changed because it is not suitable for your socket, or due to damage,
it should be cut off and a replacement fitted, following the wiring instructions shown.
The old plug must be disposed of safely because inserting it into a 13 amp socket could
cause an electrical hazard.
The wires in the power cable of this product are coloured in accordance with the following code:
Blue = Neutral Brown = Live Green/Yellow = Earth
If the markings on the terminals of your plug do not correspond to the colours of the wires in the
power cable, proceed as follows:
• The wire which is coloured Blue must be
connected to the terminal which is marked N
or coloured Black.
• The wire which is coloured Brown must be
connected to the terminal which is marked L or
coloured Red.
• The wire which is coloured Green/Yellow must
be connected to the terminal which is marked
with the earth symbol ( ) or coloured Green.
2

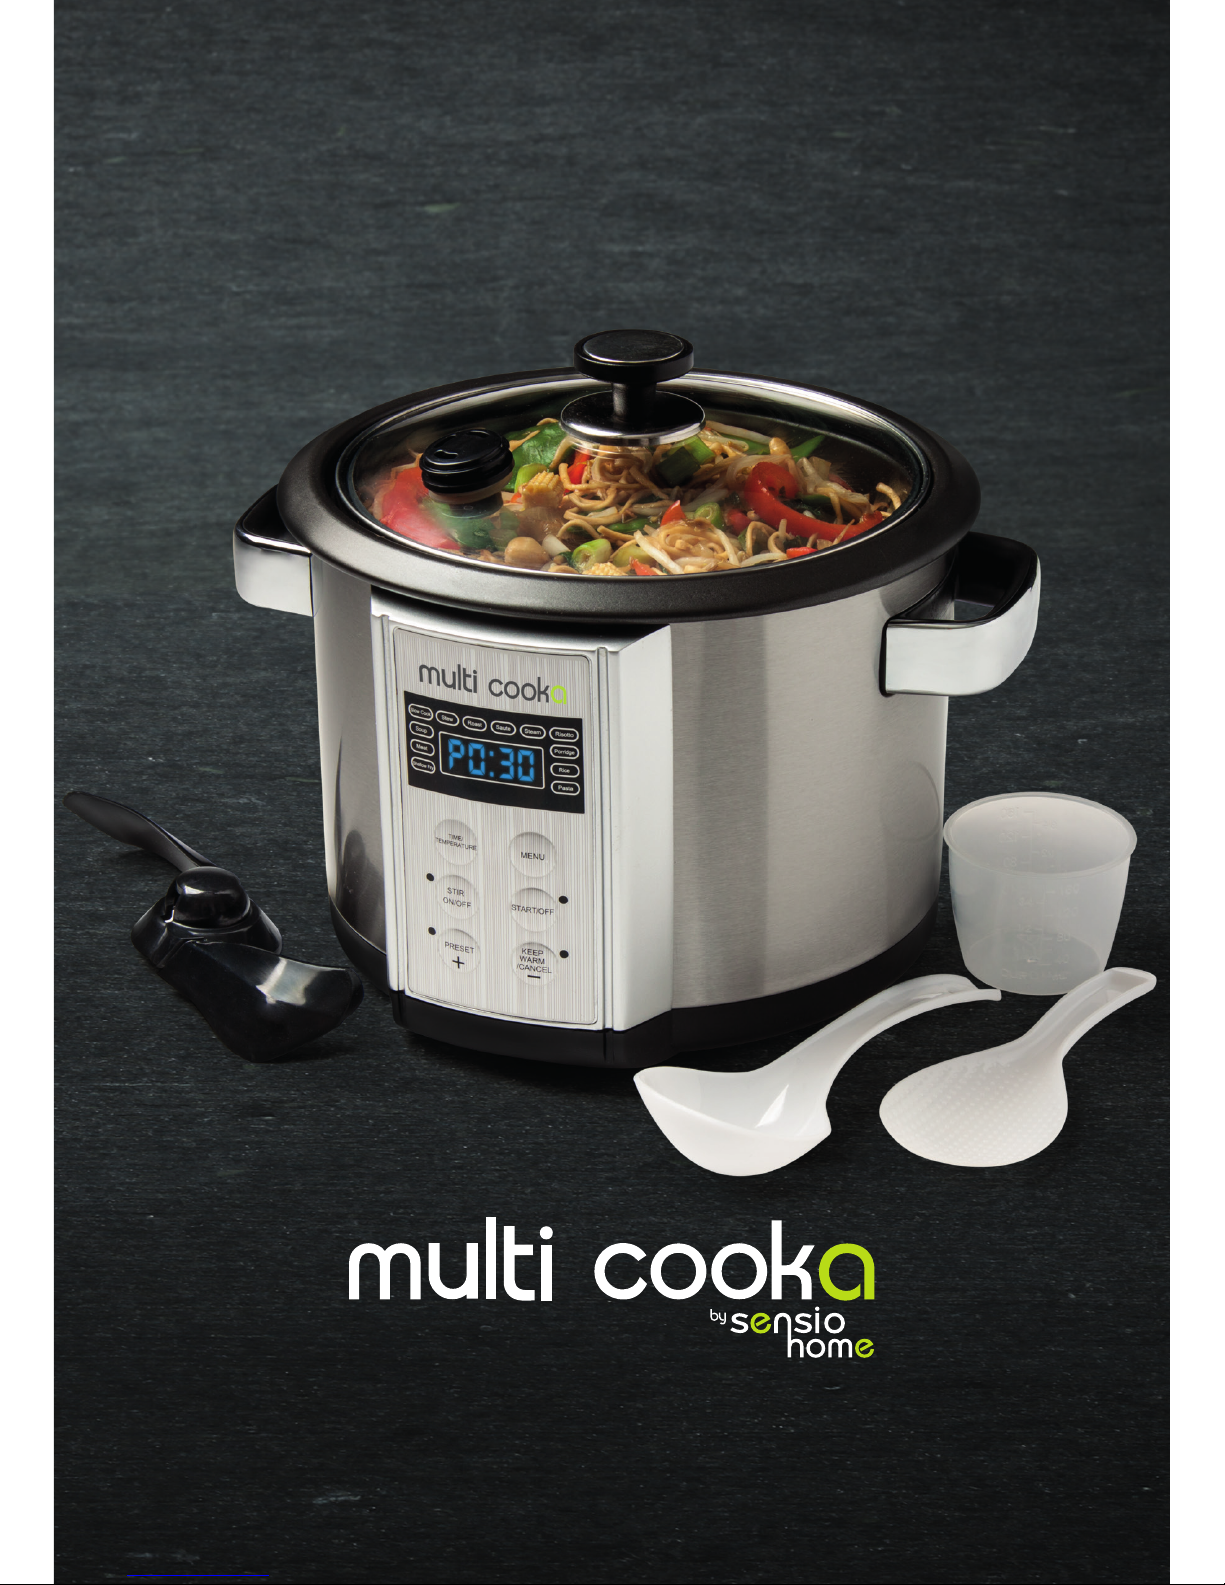
Features
1. Steam Release Valve
2. Silicone Valve holder
3. Glass lid handle
4. Glass lid silicone seal
5. Stainless Steel Steamer Basket
6. Silicone Stirring Paddle
7. Non-stick removable cooking pot
8. Stainless Steel Main Body
9. Control Panel
10. Menu Selection
11. Start/Off
12. Display Panel
13. Time/Temperature
14. Stir ON/OFF
15. Time Pre-set / Increase
16. Keep Warm/Cancel/ Decrease
17. Removable power cord inlet socket
18. Power cord
19. Measuring Cup
20. Rice Spoon
21. Ladle
120
3/4
100
1/2
80
Stew
Shallow Fry
Meat
Sauté
Roast
Soup
Slow Cook
Steam
Porridge
Risotto
Rice
Pasta
STIR
ON/OFF
MENU
PRESET
TIME/
TEMPERATURE
START/OFF
KEEP
WARM
/CANCEL
1
2
3
4
5
6
7
9 8
11
20
10
19
12
13
14
15 16
21
18
17
Due to our policy of continuous improvement, the actual product may differ slightly from the
one illustrated in this manual.
Missing a part?
In the unlikely event of a missing part, please contact our Customer Services team on:
0345 467 6743.
3

Before First Use
• Before first use, remove all promotional labels and
packaging materials.
• Wash all parts in hot soapy water; these include the
removable cooking pot, lid, steaming basket, ladle, rice
spoon and measuring cup.
• The removable parts are not suitable for dishwasher
cleaning.
• Wipe the inside of the base and heating plate with a soft
damp cloth and dry everything thoroughly.
• Replace the cooking pot back into the base ensuring it sits flat on the temperature
sensor to ensure proper contact.
• Ensure the Silicone Valve holder is sandwiched between the glass before the steam
valve is placed into the lid (see Fig. 1).
N.B. DO NOT SUBMERGE THE BASE UNIT IN WATER OR ANY OTHER LIQUID THIS IS
TO PREVENT AN ELECTRIC SHOCK.
Getting Started
1. Insert the power cord into the Multi Cooka base and
insert the plug into the socket. A single beep will sound
and the display panel will be blank.
2. Insert the cooking bowl into the unit.
3. If using the stirring function make sure the stirring paddle
is placed into the bowl BEFORE any ingredients are
added (see Fig. 2). The paddle fits over the metal pins
in the base of the bowl. The paddle should lie flat on the
bottom of the non-stick bowl when fitted correctly.
4. Turn the bowl slightly to ensure a good connection with
the base (see Fig. 3). Add ingredients or oil/butter if
sautéing. If not add the ingredients in the order listed in
your recipe.
5. When filling the bowl make sure that the food and liquid
combined reaches the minimum mark on the inside of
the cooking bowl ( 2 cup) but never more than the 10
cup mark on the bowl as ingredients expand and may
bubble over (see Fig. 4).
6. Select the desired setting and press the START button.
Fig. 1
Fig. 2
2 Cups
Minimum
10 Cups
Maximum
Fig. 4
Fig. 3
4

There are 12 different functions to choose from, each option has been designed for you
to use with minimal effort. However you can adjust the time and temperature of certain
functions if desired. See the table below
The Pre-set Cooking Functions
Programmes Cooking Time Adjustable Time Adjustable Temp Auto Stir Auto Keep Warm
Slow Cook
8 hours 4-16 hours 40-170°C No Yes
Stew
4 hours 2-8 hours 40-170°C No Yes
Roast
3 hours 3-5 hours 40-170°C No Yes
Sauté
30 mins 5-99 mins 40-170°C Yes Yes
Steam
35 mins 5-99 mins No No No
Risotto
30 mins 5-99 mins No Ye s Yes
Soup
60 mins 5-99 mins No No Yes
Porridge
45 mins 5-99 mins No Ye s Yes
Meat
50 mins 5-99 mins 40-170°C No Yes
Rice
45 mins 5-99 mins No No Yes
Shallow Fry
35 mins 5-99 mins No No No
Pasta
35 mins 5-99 mins No No No
The cooking times are approximate and may differ depending on the ingredients used,
always make sure the food is thoroughly cooked and piping hot before serving. If a longer
cooking time is needed increase the time on the programme.
5

How to use the Control Panel
Menu
This button is used to select the desired programme. Press it until the desired programme
is illuminated on the display panel; the chosen function will flash. When the programme has
been selected press the start button. The display panel will show a pre-set time and this will
now countdown until it finishes. The P will flash to show the unit is in operation.
After cooking has finished the programmes with automatic keep warm function will go into
the keep warm mode. If this is not desired simply press the CANCEL button.
Stir
The programmes without automatic stir function can also benefit from the stirring setting. The
stirring paddle has to be in positon before cooking begins. To activate the stir function during
a cooking programme simply press the STIR button and to stop press the button again.
The P on the panel will rotate until the stir function is deactivated. The bowl may need to be
turned slightly to lock the stirring mechanism into place under the bowl, the bowl may move
automatically to begin with but it will stop turning when it is in position.
Time/Temperature
This button will adjust both the time and temperature of the pre-programmed settings if
they can be adjusted. This is great if you want to increase the time on a particular setting
or decrease the temperature to a simmer. Select the desired programme and immediately
press the TIME/TEMPERATURE button; the time will start to flash, use the + and – buttons
to increase or decrease the time then press the START button to initiate the cooking
programme. If you want to increase or decrease the cooking temperature press the TIME/
TEMPERATURE button twice the temperature will then flash use the + or – buttons to
increase or decrease the temperature by 5°C then press the START button.
Pre-set
This function is great if you want to delay the start of your cooking time. Simply press the
PRESET button, each press of the button increases the delay time by 10 minutes. You may
select a delay time from 10 mins upto 24 hours. Then select your desired programme by
Stew
Shallow Fry
Meat
Sauté
Roast
Soup
Slow Cook
Steam
Porridge
Risotto
Rice
Pasta
Fig. 5
6

using the MENU button. If you want to increase or decrease the cooking time of the setting
select the TIME/TEMPERATURE and use the +/- buttons to change. Press the START
button and the timer will then count down. Once the delayed time has passed, the cooking
process will automatically begin.
N.B Do not leave perishable foods such as meat, poultry, fish, cheese and dairy
products at room temperature for longer than 2 hours.
Keep Warm
Programmes which have an automatic keep warm function will switch to this after the
cooking programme has finished. If you would like to use the keep warm function, simply
press the KEEP WARM button the display will read 00.00, it will then start to count up in
minutes. The unit can keep food warm up to 24 hours; however it is not recommended
that the keep warm function is used longer than 6 hours this is to ensure the food is at its
optimum.
Settings
Slow cook
The Multi Cooka can be used to slow cook dishes for up to 16 hours; perfect if you are
away from home all day. The benefit of this unit is that you can Sauté the ingredients first
without the need for extra pans. It really is worth sautéing vegetables, browning meat and
warming spices before slow cooking, it may take a little longer to prepare but the end result
will be worth it. It adds depth of flavour to the finished result. Simply select the SAUTE
function, when you have finished cancel the sauté function and then switch to SLOW
COOK. The time is pre-set for 8 hours but this can be changed if required. Do not lift the
lid during cooking instead use the stir function with the paddle if you prefer. At the end of
cooking if there is extra liquid remaining simply increase the temperature on the unit and
cook for an extra 10 minutes this will evaporate and thicken the liquid.
Stew
This is similar to the slow cook setting except it is faster. The higher cooking temperature
means that the results will be ready in about half the time, this is similar to a high setting on
a slow cooker. You can sauté first by using the SAUTE setting and then switch to STEW to
carry on. This setting is pre-programmed for 4 hours but you can increase or decrease as
you like.
Roast
This is designed for pot roasting; great for meat that requires longer moist cooking such as
Beef Brisket, Silverside or Ox-Tail, Shoulder of Lamb, Lamb Shanks, Chicken Drumsticks,
Chicken Thighs, Belly pork, Pork Cheek or Chump. To get the best flavour from the meat
or chicken it is advised to brown the meat or chicken first on the SAUTE function, as
it caramelises which adds extra flavour to the cooking pot. When finished simply add
your liquid of choice and select the ROAST function and leave to cook, this setting is
programmed for 3 hours but you can adjust the time depending on your ingredients.
Sauté
This can be used with or without the stirring paddle. If using the stirring paddle ensure it
is fitted to the unit first. Add oil or butter to the cooking bowl and add the ingredients to
7

be sautéed, if cooking a large amount of meat or chicken this should be done in batches
to prevent the meat from stewing rather than browning. Press the SAUTE button the
automatic stir will start; this however can be switched off by simply pressing the stir button.
Steaming
Fill the bowl to the 2 cup mark with boiling water and press STEAM. Insert the steaming
basket into the unit and add the ingredients to be steamed into the basket, place the lid
onto the unit and steam. The cooking time will depend on the type of food being cooked,
steaming is a very effective way of cooking, it retains essential vitamins and minerals, but
take care not to overcook it will take less time than you think!
Risotto
Normally when cooking a risotto you have to stir it continuously which means you cannot
take your eye off it. With the Multi Cooka you can use the risotto setting with the paddle in
place and it does all the work for you. For a risotto you would normally sauté the vegetables
first which you can on the SAUTE function ensuring the paddle is in place first. When
the vegetables have been sautéed switch the setting to RISOTTO and add the remaining
ingredients and stock. This setting is programmed for 30 minutes which you can either
increase or decrease. This setting will stir the risotto the whole duration of cooking meaning
you do not have to stand over it but you will still achieve the desired creamy texture.
Soup
Simply add your chosen ingredients to the cooking bowl; add your choice of liquid whether
it is stock, water or milk and select the SOUP button. This is set for 60 minutes, so you can
increase or decrease the time depending on the ingredients being used.
Porridge
This setting has auto stir, it has been designed to ensure as the porridge cooks it does not
stick to the base, this means that while the porridge cooks you can be doing other things.
Simply add the silicone paddle along with your oats and milk or water and place the lid on
the Multi Cooka. Select PORRIDGE and adjust the time according to your portion size, the
pre-set time is 45 minutes which is for a full pot. Take extra care when cooking porridge as
it will swell do not exceed the maximum 10 cup capacity.
Meat/Chicken
Use this setting for your bolognese sauces, chilli’s or one pot chicken dishes, you can either
use the SAUTE function first to brown your ingredients or use the MEAT/CHICKEN function
straight away. This is set for 50 minutes so adjust the time according to the quantity you are
cooking.
Rice
On this setting the rice is cooked using the fully absorption method. Use the measuring cup
provided to measure out the quantity of rice required, the ratio of rice to water is 1 cup of
rice to 2 cups of water for white rice and 1 cup of rice to 2.5 cups of water for brown rice.
Remember to make sure that the quantity of rice and water reaches the minimum mark on
the inside of the pot .The pre-set time is 45 minutes, this is for the maximum quantity of
rice, so depending on the quantity you will have to adjust the time. For best results leave
the rice to rest for 10 minutes before serving.
8

Shallow fry
Fill the cooking pot the the 2 cup mark with a suitable oil such as Rapeseed, Vegetable
or Groundnut oil and select the SHALLOW FRY option, wait for the oil to heat up before
cooking. To check the oil is hot enough simply place a cube of bread into the hot oil, if it’s
hot enough it will sizzle and turn golden brown. Add the ingredients to be shallow fried, do
not overcrowd the oil otherwise the temperature of the oil will drop too quickly and the food
will be soggy not crisp.
Pasta
Fill the bowl with boiling water and press the PASTA button, wait for the water to come
back to the boil and add the pasta to the bowl making sure any pasta is submerged under
the water, the cooking time will depend on the type and shape of pasta.
9
Recipes for the Multi Cooka
Linguine with Puttanesa Sauce and King Prawns
This is such a quick meal to make, perfect after a long day at work. This works well with
frozen king prawns; just make sure that when you add them from the freezer you allow
some extra cooking time.
Ingredients - Serves 4
• 400g dried linguine
• Olive oil
• 6 x anchovy fillets in olive oil, reserve some oil
• 5 x cloves of garlic, crushed.
• Large pinch of chilli flakes
• 60g Kalamata olives
• 50g capers
• 2 x 400g tins tomatoes
• 200g raw king prawns, scored down the back with a knife
• Small handful chopped flat leaf parsley
Method
1. Fill the cooking bowl with boiling water from the kettle and select the PASTA setting,
when the water comes back to the boil add the pasta pushing it down beneath the
water. Cook until the pasta is tender make sure you leave the lid OFF during cooking.
2. When tender drain the pasta into a colander and drizzle with olive oil and mix well. Set
aside and keep warm.
3. Replace the cooking bowl and switch to the SAUTE setting add a little of the olive oil
from the anchovies, add the anchovies and garlic, when the anchovies are sizzling add
the chilli flakes cook them for 30 seconds and add the olives, capers and tomatoes
cook for 10 minutes until slightly reduced.
4. Add the prawns and cook for a further 3 minutes until they turn pink. Add most of the
chopped parsley and stir. Add the pasta back into the sauce and coat the pasta with
the sauce.
Serve with a sprinkle of chopped parsley on top.

10
Salad Nicoise
Simple summery and delicious, this is great for a weekend lunch with friends in the sunshine.
Ingredients - Serves 4
• 5 Ruby red tomatoes, quartered
• 4 little gem lettuce, leaves separated
• 700g charlotte potatoes
• 4 large eggs
• 60g Kalamata olives
• 100g green beans, trimmed
• 30g good quality anchovies, drained
• 2 x tins good quality tuna in oil, drained
• Croutons to serve
Method
1. Add some water to the base of the cooking pot and select the STEAM function. Add
the potatoes and eggs to the steaming basket and add the basket to the cooking pot.
Steam for 25 minutes, after this time remove the eggs and add to a bowl of cold water.
2. Add the beans to the steaming basket and cook for a further 5 minutes. After 5 minutes
place the beans into the cold water and leave the potatoes to cool slightly then slice
them in half lengthways. Peel the eggs and cut them into quarters.
3. To make the dressing, place the garlic clove on a chopping board and chop finely add
the salt and work the garlic and salt into a paste. If you have a jam jar place the garlic
paste into this add the mustard, wine vinegar and oil. Give it a good shake until it is all
mixed together, add the parsley and black pepper and shake again, or simply place the
ingredients into a bowl and whisk together.
4. Lay the lettuce leaves onto a large plate and place the tomatoes, potato, tuna and
beans on and around the lettuce leaves spoon over the dressing and gently mix the
ingredients together coating everything. Finish by adding the eggs and anchovies.
5. Serve with a handful of Croutons sprinkled over, this adds a delicious crunch.
Moules Mariniere with Cream, Garlic and Parsley
This is fast food at its best, it takes no time for these delicious beauties to open and the
best bit is mopping all the lovely juices with crusty bread!
Ingredients - Serves 2-3
• 1.5kg Mussels
• 20g butter
• 2 garlic cloves, crushed
• 2 shallots, peeled and finely diced
• 150ml Dry white wine
• 150ml Double cream
• Handful chopped parsley
• Crusty bread to serve
Dressing
• 1 garlic clove
• 1 tsp good sea salt flakes
• 1 tsp Dijon mustard
• 1 tbsp. white wine vinegar
• 6 tbsp. good olive oil
• 1 tbsp. chopped parsley
• Pepper

Method
1. Clean the mussels thoroughly; scrub the mussels under running water to remove any
barnacles and discard any that don’t open with a tap against the sink. Remove any
beards from the sides of the mussels by simply pulling them away and discard these.
Fill the sink with cold water and give them a good mix about. Drain in a colander.
2. Place the cooking pot in the Multi Cooka and choose the SAUTE function; switch the
auto stir off. Add the butter to the pan and when sizzling add the garlic and shallots and
allow to soften.
3. Add the wine and bring to the boil, switch to the STEAM setting and add the mussels
giving them a stir and cover with the lid.
4. Allow to cook for between 5 and 10 minutes until all the mussels have opened. Pour
over the cream and add the parsley, give them a good stir. Remove from the heat.
5. Decant into 4 serving bowls and ladle the sauce over the top of the mussels, serve with
plenty of crusty bread to mop up the juices.
Greek-Style Lamb Kleftico
This lamb dish is flavoured with garlic, fresh herbs and lemon. The beauty of cooking in
liquid results in succulent, flavoursome meat which will fall from the bone.
Ingredients - Serves 4 (plus extra for leftovers)
• 1-1.5kg rolled shoulder of lamb
• 1 tsp dried oregano
• 1 tsp fresh rosemary, chopped
• 1 lemon, grated zest and juice
• 3 tbsp. olive oil
• 1 whole bulb of garlic
• 150ml white wine
• 700-900ml lamb stock
• 1 tbsp. honey
• 12 shallots, peeled
• 500g small charlotte potatoes
Method
1. Combine the dried oregano, rosemary, lemon zest and 2 tbsp. of olive oil in a small
bowl and rub all over the lamb and leave to marinate for a minimum of 1 hour or
overnight if possible.
2. When ready to cook, select the SAUTE function and add the remaining olive oil, season
the meat with salt and pepper and sear the meat on all sides.
3. Add the garlic, white wine, 700ml lamb stock, honey and the reserved juice of the lemon.
4. Select the ROAST setting, change the time to 2 hours and place the lid onto the
cooking bowl, remove the steam value during cooking. (Turn the lid so the steam vent is
at the back of the unit).
5. After 2 hours has passed, turn the meat over in the cooking pot and add the shallots and
potatoes top up with the reserved lamb stock and cook for a further hour.
6. Remove the lamb, shallots and potatoes from the liquid and set aside, turn the heat up and
reduce the liquid to thick gravy (skim the fat off if necessary). Pass through a sieve before
serving to remove any garlic pieces.
7. The lamb should be very tender and fall off the bone, remove in chunks and serve on a platter
with shallots and potatoes pour over the gravy and serve with fresh seasonal vegetables.
11

Moroccan-style Lamb Tagine
This is a great way of using up left over lamb, the Moroccan inspired ingredients add a
wonderful flavour to the meat, just make sure you add it in at the end of cooking time so it
does not disintegrate.
Ingredients - Serves 4
• 1 tbsp. olive oil
• 1 onion, chopped
• 1 garlic clove, crushed
• 450g sweet potato, peeled and chopped into bite sized pieces
• 1.5 tbsp. Rose Harissa Paste (Belazu is good)
• Small pinch of ground cinnamon
• 1 x 400g chickpeas, drained
• 1 x 400g can chopped tomatoes
• 350ml hot vegetable stock
• 1 heaped tsp of honey
• 300g leftover lamb, chopped (from the Greek lamb keliftico)
• 1 tbsp. chopped parsley and coriander
• Serve with cous cous
Method
1. Insert the stirring paddle into the cooking pot and select the SAUTE function and add the oil.
2. Add the onion and cook until softened this will take between 5-10 minutes.
3. Add the garlic, sweet potato, harissa paste and cinnamon and cook for 5 minutes.
4. Add the chickpeas, tomatoes, vegetable stock and honey and bring to the boil. Switch
to the MEAT setting and set the time for 35 minutes. Give the dish a stir using the auto
stir button a few times throughout the cooking.
5. After 30 minutes add the lamb and allow to reheat. Ensure the lamb is fully reheated
before serving.
6. Sprinkle over the herbs before serving and serve with cous cous.
If you are not using leftover lamb for this you can use lamb leg steaks and brown them at
stage 2 before the onions.
Sausage and Chicken Jambalaya
Great for a midweek meal and perfect for the whole family.
Ingredients - Serves 4
• 1 tbsp. Oil
• 6 pork sausages with chilli or chorizo style
• 1 onion diced
• 2 garlic cloves, crushed
• 1 red pepper, sliced
• 1 green pepper, sliced
• 1 tbsp. Cajun seasoning
• 1tsp. smoked paprika
• 250g easy cook long grain rice
• 400g tinned tomatoes
• 400-500ml chicken stock
• 200g skinless and boneless chicken fillets
12

Method
1. Heat the oil in the cooking pot on the SAUTE setting with the auto-stir switched off.
Brown the sausages on all sides then remove and set aside.
2. Add the stirring paddle to the cookpot and switch the auto- stir on. Add the chicken
to the pot and brown on all sides. Then add the onions and sauté until the onion has
softened.
3. Add the garlic, peppers, spices and the rice and stir for 2 minutes.
4. Add the tomatoes and the 400ml of the chicken stock and stir. Switch off the auto-stir
at this point.
5. Slice the sausages into 3 on the diagonal and add these to the cooking pot.
6. Allow to cook for 25-30 minutes, stirring at intervals through cooking until the rice is
tend er, if the rice requires a little more liquid add more of the reserved stock.
Risotto with Butternut Squash, Sage and Chestnuts
This is a very simple risotto with very few ingredients but it has bags of flavour. The auto stir
means the machine does all the work for you!
Ingredients - Serves 4
• 50g butter
• 8 cooked chestnuts, chopped
• 12 sage leaves shredded
• ½ tbsp. olive oil
• 1 small onion
• 250g risotto rice
• 300g peeled butternut squash, chopped into small bite size pieces
• 700ml Vegetable stock
• Parmesan cheese to serve
Method
1. Add the stirring paddle to the cooking pot and add the butter and select the SAUTE
function. When the butter is sizzling add the chopped chestnuts and half of the
shredded sage, fry for a minute or 2 until the butter browns. Remove the chestnuts and
sage and set aside, leaving the butter behind. You may need to stop the auto-stir to do
this.
2. Add a splash of olive oil and add the onion, and cook until softened. Add the rice and the
remainder of the chopped sage. Fry for 2 minutes and then add the butternut squash.
3. Switch the unit to the RISOTTO setting add the stock, cook for 25-30 minutes. Just
before serving stir in half the reserved chestnuts and sage.
4. Sprinkle the remaining chestnuts on top of the risotto before serving.
Serve with shaved parmesan cheese
Mexican Chicken Burritos
This is a great dish for feeding a crowd, it’s very tasty and so easy. They can dig in and help
themselves. Don’t be put off by brown rice, it holds together better when cooked for a long
time and its high in fibre!
13

Ingredients - Serves 6-8
• 600g skinless and boneless chicken thigh fillets
• 1 x 400g tinned tomatoes
• 2 tsp ground cumin
• 2 tsp hot chilli powder
• 2 tsp salt
• 400ml chicken stock
• 200g brown rice
• 150g fresh sweetcorn sliced from the cob
• 1 x can black eye beans, drained
• 2 tbsp. chopped fresh coriander
To serve: Tortilla wraps, salsa, grated cheese, chopped fresh coriander, guacamole.
Method
1. Add the chicken fillets, canned tomatoes, ground cumin, chilli powder, salt and 300ml
chicken stock, stir to combine. Select the STEW function. The timer should read 4
hours.
2. One hour before the end of cooking time add in the rice, sweetcorn, beans and the
remaining stock and stir to combine. Replace the lid and leave to cook for a further
hour.
3. When the cooking time has finished, shred the chicken using two forks add the
chopped coriander and give it a stir.
4. To serve place a big bowl of the Chicken Burrito mix in the middle of the table and fill
tortilla wraps with the chicken mixture and top with a variety of delicious toppings, roll
up to serve.
South Indian Vegetable Curry with Paneer
This curry is lightly spiced and lovely and fragrant, the addition of Paneer gives the curry
more body, serve it with warm naan bread to soak up the sauce.
Ingredients - Serves 4-5
• 2 tbsp. vegetable oil
• 1 large onion sliced
• 2 tsp peeled and grated ginger
• 2 garlic cloves, crushed
• 2 tsp black mustard seeds
• 12-15 curry leaves (fresh if possible)
• 1 tsp ground cumin
• 2 tsp garam masala
• 1 tsp. turmeric
• ¼ tsp cracked black pepper
• 2 finger green chilli, finely chopped
• 400ml coconut milk
• 150ml vegetable stock
• 2 carrots, peeled cut into batons
• 350g cauliflower, broken into florets
• 2 courgettes, chopped into chunky pieces
14

• 300g sweet potato, peeled and chopped into small chunks
• 150g green beans, trimmed and sliced in half
• 227g block Paneer cheese, cubed into bite size pieces
• 100g baby spinach leaves
• Small bunch coriander, chopped
• To serve: warm naan bread, basmati rice and lemon wedges
Method
1. Add stirring paddle to the unit and add the oil, select the SAUTE function add the sliced
onion and fry until softened but not coloured, add the ginger, garlic, spices and chilli
and fry until fragrant.
2. Add the coconut milk and stock and bring to the boil. Stir in the carrot, cauliflower
courgettes, sweet potato, green beans and stir well to coat the vegetables. Turn
the heat down to 120°C and set the time to 45 minutes. Stop the auto-stir, but use it
periodically through cooking to give it a stir.
3. Five minutes before the end of cooking time add the paneer, spinach and chopped
coriander and stir into the curry. Replace the lid to allow the spinach to wilt, use the
auto-stir to mix together.
Serve the curry with warm Naan bread and lemon wedges and scattered with a little more
chopped coriander.
Celeriac and Stilton Soup
This soup is made using Celeriac which is a very under rated vegetable. The combination of
the subtle sweetness from the pear and the creaminess from the Stilton is a real winner.
Ingredients - Serves 4
• Knob of butter
• 1 large onion, peeled and chopped
• 500g celeriac, peeled and chopped into small chunks, squeeze a little lemon juice over
to stop from going brown.
• 250g potatoes, peeled and chopped
• 1 ripe pear, peeled, cored and diced
• Few sprigs of thyme
• Sea salt and freshly ground black pepper
• 1 litre vegetable stock
• 100g Stilton, crumbled
• Serve with Crusty bread and a swirl of cream
Method
1. Add the butter to the cooking pot and select the SAUTE function cancel the auto stir.
Add the onion and gently fry for 5-6 minutes until softened.
2. Add the celeriac, potato, pear and thyme to the pan with some salt and pepper and
add the vegetable stock. Bring to the boil and switch to the SOUP setting.
3. Cook until the vegetables are tender and remove any stalks from the thyme. Then blend
until smooth using a hand stick blender, taking care of the stirring mechanism in the
base of the bowl.
4. Stir in half the Stilton and allow to gently melt in the soup.
15

5. Divide the soup between warm bowls and sprinkle the remaining Stilton over each
portion to serve.
Serve with a swirl of cream and some warm crusty bread.
Vegetable Chow Mein
Chow Mein is one of the best known Chinese noodle dishes, it really is very easy to make
and much healthier than any you will pick up in your local Chinese Take Away. This dish is
great for a main course for 3 people or 4 as a side dish. This also works well with chicken
or prawns.
Ingredients - Serves 3 - 4
• 3 x sheets of dried egg noodles
• 1 tsp. sesame oil
• 2 tbsp. vegetable oil
• 1 onion, peeled and sliced
• 1 red pepper, sliced
• 2 pak or bok choi, sliced
• 60g mange tout
• 100g babycorn
• 4 spring onions white and green parts sliced, keep some for garnish
• 100g beansprouts
• 75g unsalted cashew nuts
• 4 tbsp. light soy sauce
• 2 tbsp. Chinese rice wine
• 1 tsp. sugar
• 2 tsp. cornflour
Method
1. To cook the noodles, place the noodle nests into a large bowl or saucepan and pour
boiling water over them, cover with cling film or a lid and allow to sit for 5-10 minutes.
When they are tender drain and add the sesame oil and toss the oil through the noodles
to prevent them from sticking together.
2. Add the vegetable oil to the cooking bowl and select SAUTE, switch the auto sir off.
Add the onion and red pepper and stir fry for 5 minutes. Add the pak choi and the
mange tout and stir-fry for a further 2 -3 minutes.
3. Add the drained noodles, spring onions, beansprouts and cashew nuts to the cooking
bowl and stir well.
4. Blend together the soy sauce, rice wine, sugar and corn flour and pour over the
noodles and vegetables, stir well and heat until piping hot, the sauce should coat all the
vegetables and the noodles.
5. Serve in bowls with a little sliced spring onion on the top.
16

Patatas Bravas
This is a great sharing Tapas side dish, perfect served alongside a selection of sliced
Chorizo, Serrano ham, Olives and Manchego cheese.
Ingredients - Serves 4
4 Potatoes (such as Maris Piper), peeled and sliced into 1” cubes
1 bay leaf
1 tsp. Smoked paprika
600ml Oil for frying such as rapeseed, vegetable or groundnut
For the Aioli
• 200g Mayonnaise
• 4 cloves of garlic
• 1 tsp. Salt
• 1 tsp. Smoked paprika
• ½. tsp. Cayenne pepper
• 1 tbsp. tomato paste
• 1 tsp. Sherry Vineagar or lemon juice to taste
• Few dashes Chipotle Tabasco Sauce
Seasoning
• 1/2 tsp. Black Pepper
• 1/2 tsp. Salt
• 1/2 tsp. Smoked paprika
Method
1. Fill half the cooking pot with some boiling water and add a bayleaf and smoked paprika
to the water. Select the PASTA option, bring the water back to the boil and add the
cubed potatoes, cook these for 3-4 minutes until almost cooked but still firm. Drain
and allow to cool on a wire rack, this is very important as you want the potatoes
completely dry and cold.
2. While the potatoes are cooling, make the Aioli by pounding the garlic and salt in a
pestle and mortar until it is like a puree. Add the smoked paprika and cayenne pepper
and mix together. Add this to the mayonnaise in a serving bowl and add a dash of
sherry vinegar or lemon juice and a few dashes of Chipotle Tabasco sauce. Taste and
adjust the acidity if needed. Place in the fridge until required.
3. When the potatoes are cool fill the cooking pot with oil, select the SHALLOW FRY
option and heat the oil (to check the oil is hot enough simply place a cubed potato into
the oil, when it starts sizzling its ready). Cook the potatoes in batches until they are
golden brown and crisp then remove from the oil and drain.
4. Mix together the seasoning and sprinkle over the hot potatoes.
5. Serve in a bowl with the Aioli spooned over the top, and extra Aioli in a bowl on the
side.
Serve with toothpicks so people can dip the potatoes into the Aioli.
17

Beef Shin Ragu
This is comfort food at its best made with a great cheap cut Shin of Beef. The long slow
cooking time tenderises the meat and makes it deliciously tender. This thick meaty sauce
needs to be served with wide pasta such as pappardelle.
Ingredients - Serves 4- 6
• 1.5 kg shin of beef, sliced into think pieces
• 75g pancetta, chopped into small pieces
• 1 large onion
• 4 garlic cloves, crushed
• 2 sticks celery, finely chopped
• 2 carrots, finely chopped
• 2 tbsp. tomato puree
• 3 anchovy fillets
• 200ml red wine
• 300ml beef stock
• Bouquet garni made with thyme, rosemary and bayleaf
To serve thick pasta such as pappardelle and shaved parmesan
Method
1. Add the oil to the cooking pot and select the SAUTE function, brown the beef on all
sides you will have to do this in batches so it does not stew; when brown set aside.
2. Add a little more oil if needed and sauté the pancetta till crisp, then add the onion,
garlic, celery and carrots and sauté till softened this will take about 10 minutes.
3. Add the tomato puree and the anchovy fillets and cook for a few minutes. Add the wine
and bring to a bubble then add the stock and bouquet garni.
4. Add the beef back to the pan along with any resting juices and switch the unit to SLOW
COOK. Cook the Ragu for 8-12 hours, if you can, give it a stir during cooking.
5. After the cooking time has finished, remove the beef and shred with 2 forks, increase
the heat to a rapid boil and reduce the sauce to a thick consistency. Add the meat
back to the pot and stir through.
6. Serve with hot freshly cooked pappardelle and shaved parmesan cheese.
18

Chicken with Chorizo
This dish is a delicious combination of chicken with smoky chorizo; make sure you have
lots of crusty bread to mop up the rich sauce.
Ingredients - Serves 4
• 1 tsp. oil
• 600g chicken fillets, sliced into bite sized pieces
• 1 chorizo ring, chopped into bite size pieces
• 2 x red onions, diced
• 2 x garlic cloves
• 2 red peppers, sliced
• 2 sticks celery, sliced
• 1.5 tsp chilli powder
• 1 x tin of cherry tomatoes
• 300ml chicken stock
• 1 x tin Borlotti beans
• 1 tbsp. chopped parsley
Method
1. Add the stirring paddle to the base of the bowl, add the oil to the pot and select the
SAUTE function. Add the chicken pieces and sauté until browned. Then add the chorizo
pieces and cook for a further 5 minutes.
2. Add the onion and garlic and sauté for 5 minutes until slightly softened, and then add
peppers, celery and the chilli powder.
3. Add the cherry tomatoes and stock and stir. Change the setting to MEAT and leave to
cook for 50 minutes.
4. Add the beans and chopped parsley 10 minutes before the end of cooking time and
use the automatic stir.
Serve with crusty bread.
19

Autumn / Winter
Weekly Meal Planner
20
Healthy start!
LINGUINE WITH KING PRAWNS
PASTA and SAUTÉ setting
Winter Warmer
RISOTTO WITH BUTTERNUT SQUASH
SAUTÉ and RISOTTO setting
Midweek meal
SAUASAGE AND CHICKEN JAMBALAYA
SAUTÉ setting
Ooh La La!
MOULES MARINIERE
SAUTÉ and STEAM setting
Family Feast
BEEF SHIN RAGU
SAUTÉ and SLOW COOK settings
Curry Night
SOUTH INDIAN VEGETABLE CURRY
SAUTÉ and RICE settings
Easy Sunday
CHICKEN WITH CHORIZO
SAUTÉ and MEAT settings
Monday
Wednesday
Friday
Tuesday
Thursday
Saturday
Sunday

Monday
Wednesday
Friday
Tuesday
Thursday
Saturday
Sunday
21
Monday Warmer
CELERIAC and STILTON SOUP
SAUTÉ and SOUP setting
Noodle Doodle
VEGETARIAN CHOW MEIN
SAUTÉ setting
Midweek Family Meal
CHICKEN BURRITOS
STEW setting
Summer Loving
SALAD NICOISE
STEAM setting
Family Feast
BEEF SHIN RAGU
SAUTÉ and SLOW COOK setting
Greek Islands
LAMB KLEFTICO
SAUTÉ and ROAST setting
Leftover Lamb
LAMB TAGINE
SAUTÉ and MEAT setting
Spring / Summer
Weekly Meal Planner

Cleaning
1. Unplug and let the appliance cool down before cleaning.
2. Clean the main outer body with a soft damp cloth. DO NOT IMMERSE THE BASE
INTO WATER OR ANY OTHER LIQUID.
3. Wash the lid, paddle, steaming basket and removable cooking pot in hot soapy water,
using a sponge or dishwashing brush do not use a scoring pad as this may damage
the non-stick coating. Rinse and dry thoroughly. The removable parts are not suitable
for dishwasher cleaning.
4. Wipe the internal heating plate with a soft damp cloth and dry thoroughly.
5. Replace the cooking pot back into the unit. Store the unit with the lid loosely on top of
the Multi Cooka to prevent aromas, moulds and odours.
Storage
1. Ensure the appliance and removable parts are completely dry, and the appliance is
switched off and unplugged from the electrical outlet before storage.
2. Store in the original box in a cool, dry place.
3. Store in a safe place, away from children.
22
Troubleshooting
Problem Reason Solution
The Multi Cooka will not
operate after the programme
has been selected.
The start button has not been
pressed.
The start button must be
pressed after the selection for
the cooking cycle to begin.
The stirring setting is not
working correctly.
The paddle is not in position. Make sure it it fitted to the bowl
before adding ingredients.
Turn the bowl left and right until
it makes a good connection
with the stirring mechanism
under the bowl.
E1 is displayed on the screen
Open circuit of the sensor. Unplug the unit and allow to sit
for 20 minutes.
E2 is displayed on the screen
Short Circuit of the sensor. Ensure the cooking bowl is cor-
rectly positioned inside; it must
have direct contact with the
heating plate. Wipe the base
with a soft cloth.
E3 is displayed on the screen
The unit has overheated.
The unit has boiled dry.
Switch off and cool down before continuing.
Make sure there is sufficient
liquid in the unit.

Servicing
There are no user serviceable parts inside this appliance. Always refer servicing to qualified
service personnel. If you drop or damage your Multi Cooka it should not be used until it has
been examined and approved by a qualified electrician.
Guarantee
This product is guaranteed for 1 year from the date of original purchase. If any defect arises
due to faulty materials or workmanship, the unit will either be replaced or refunded where
possible during this period, by the dealer from whom you purchased the unit.
The following conditions apply:
• The product must be returned to the retailer with original proof of purchase.
• The produce must be installed and operated in accordance with the instructions
contained in this instruction guide.
• It must only be for domestic purposes. The guarantee will be rendered invalid if the
product is re-sold or has been damaged by inexpert repair. It does not cover wear and
tear, damage, misuse or consumable parts. We accept no responsibility for incidental
or consequential loss or damage.
• The guarantee is in addition to, and does not diminish your statutory or legal rights.
Specifications are subject to change without notice.
• Valid in the UK only.
For technical queries, please contact:
MPL Home Ltd IMEX, 575 - 599 Maxted Road,Hemel Hempstead, Herts, HP2 7DX
Customer Helpline: 0345 467 6743
Environment Friendly Disposal
IMPORTANT INFORMATION FOR CORECT DISPOSAL OF THE PRODUCT IN
ACCORDANCE WITH EC DIRECTIVE 2002/96/EC At the end of its working life, the
product must not be disposed of as urban waste. It must be taken to a special local
authority differentiated waste collection centre or to a dealer providing this service.
Disposing of a household appliance separately avoids possible negative consequences
for the environment and health, deriving from inappropriate disposal and enables the
constituent materials to be recovered to obtain significant savings in energy and resources.
As a reminder of the need to dispose of household appliance separately, the product is
marked with crossed-out wheeled dustbin.
23

www.thearange.co.uk
 Loading...