

Page 1
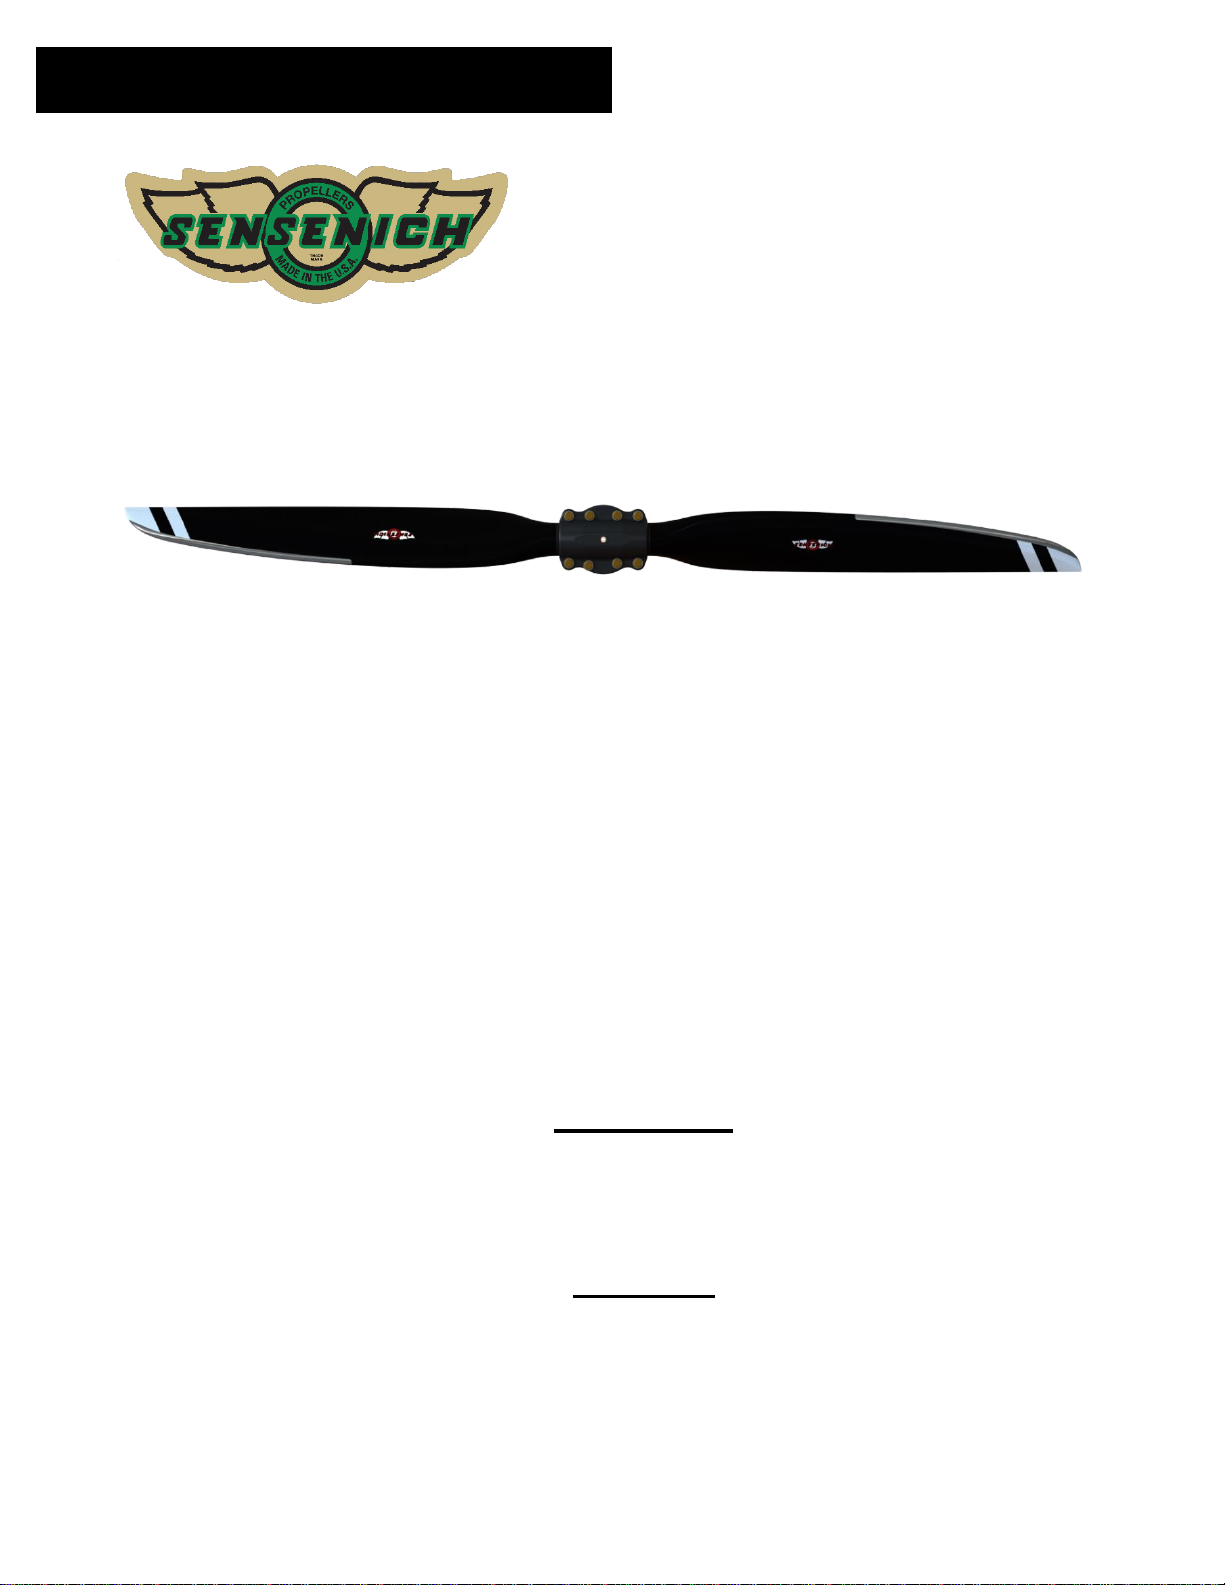
SENSENICH TWO BLADE COMPOSITE
AIRCRAFT PROPELLER
INSTALLATION AND OPERATION INSTRUCTIONS
FOR LYCOMING AND CONTINENTAL ENGINES
DOC#: 2F0- Installation_Instructions_Rev B 11/12/21
ATTENTION
Failure to follow these instructions will void all warranties, expressed and
implied. Mounting difficulties, vibration, and/or failure can result with
improper assembly of the propeller blades and hub parts.
CAUTION
Rotating propellers are particularly dangerous. Extreme caution must be
exercised to prevent severe bodily injury or death.
Composite Aircraft Propellers
2008 Wood Court Plant City, FL 33563 USA
Phone (813)752-3711 Fax (813)752-2818
http://www.sensenich.com/
Page 2

2F0_Installation_Instructions_RevB-2023-03-07.docx1 1
TABLE OF CONTENTS
Propeller Packing List – 2F0 2
FIG 1. 2F0 Propeller Assembly 2
Propeller Description and Features 3
Required Tools 3
Propeller Installation 4
FIG 2. Nord-Lock Lock Washer 4
FIG 3. Pitch Setting Gage 4
Re-pitching 5
Propeller Removal 5
Tachometer Inspection 6
TABLE 1: Installation Torque for Mounting and Clamping Hardware 6
TABLE 2: Approved Engine / Propeller Combinations and Limitations 6
Propeller Performance 7
Pitch Notes and Limitations 7
Instructions for Continued Airworthiness (ICA) 8
Inspections 9
Repair s 11
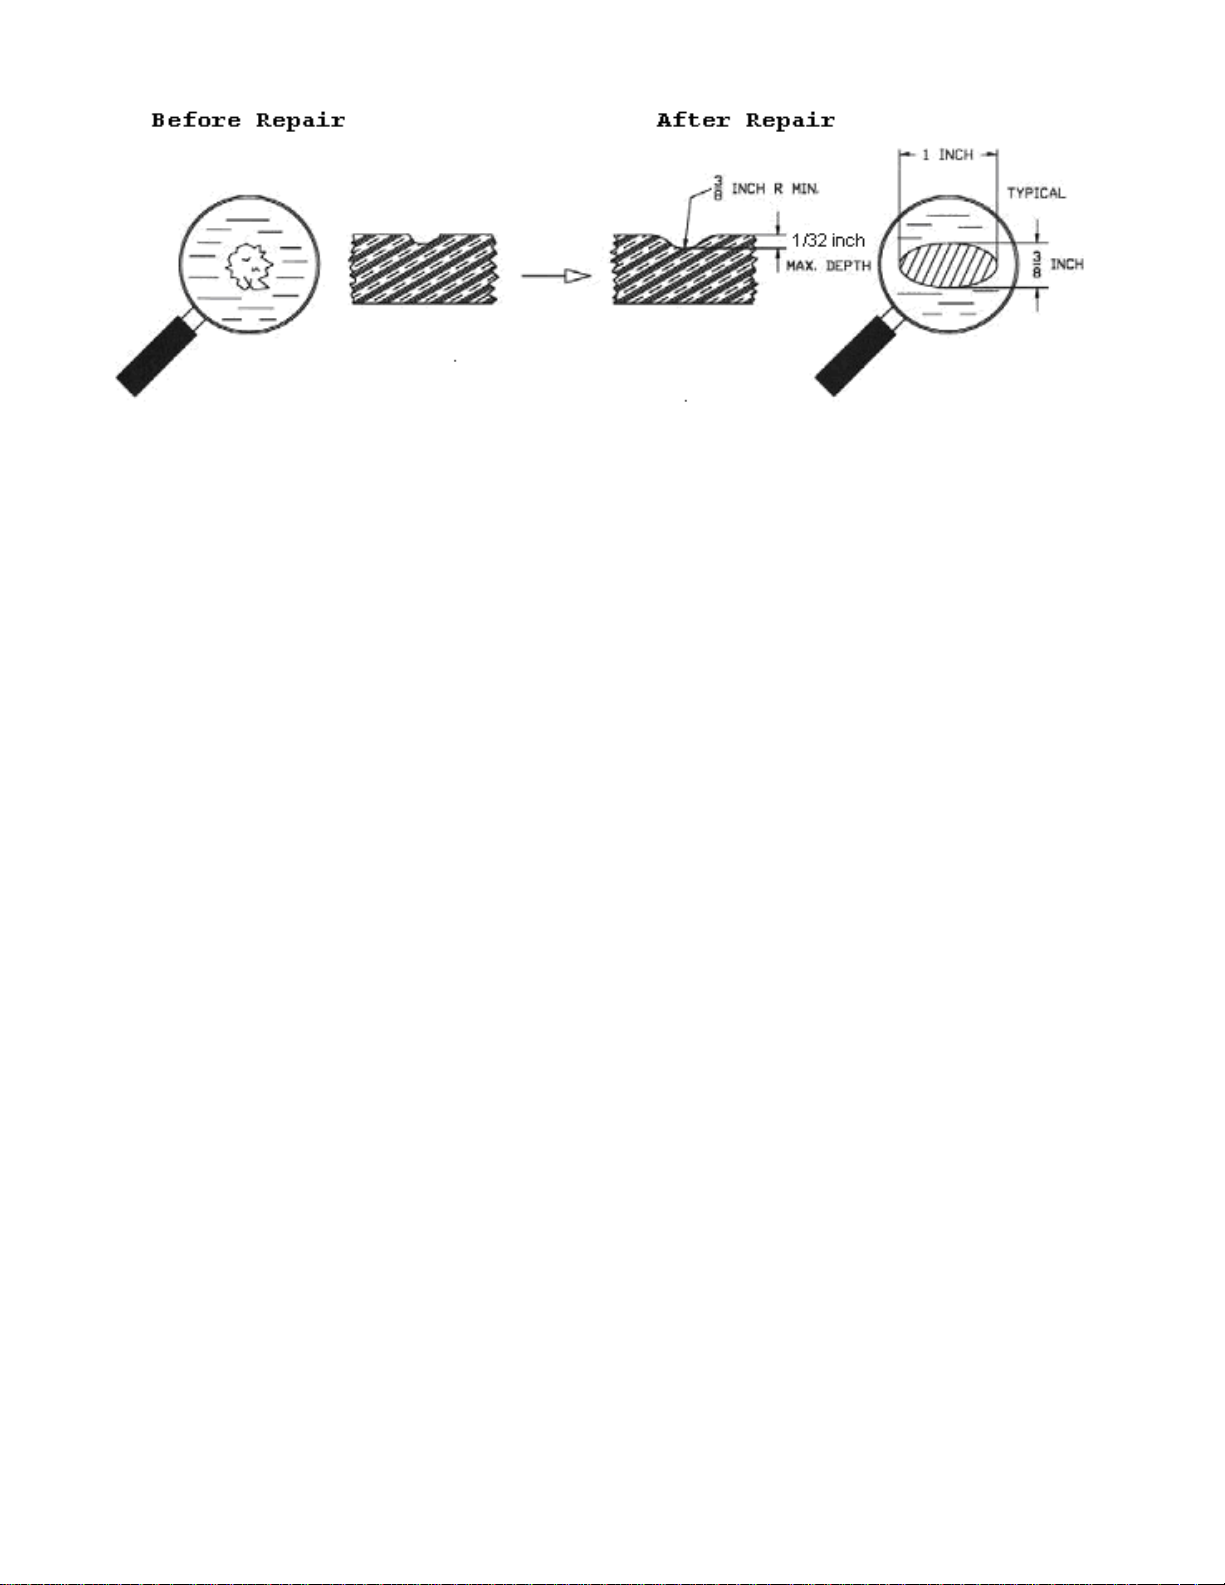
FIG 4. Minor Hub Repair Limits 12
Limited Warranty 12
Propeller Logbook 13
Page 3
2F0_Installation_Instructions_RevB-2023-03-07.docx1 2
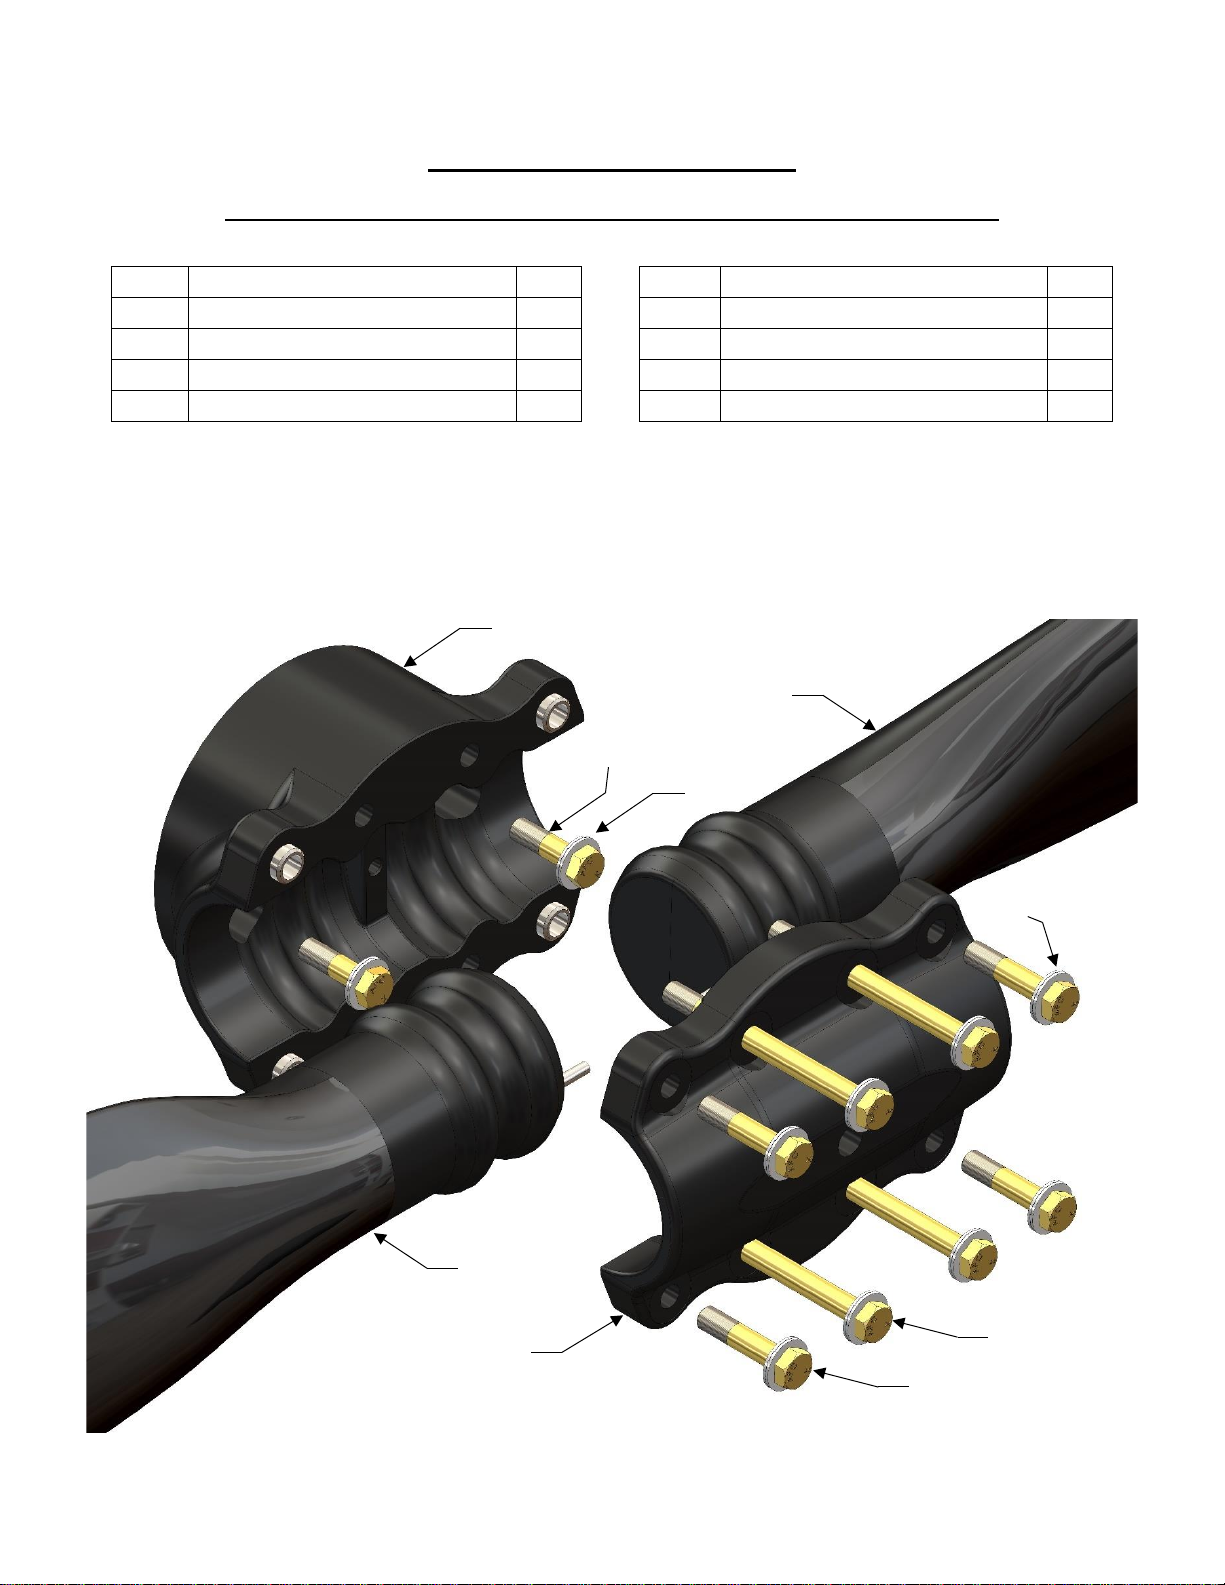
PACKING LIST FOR 2F0K-CXXAF
INSTALLATION WITH CONTINENTAL THREADED FLANGE BUSHINGS
Item
Description
Qty Item
Description
Qty
1
Hub Mount
1 5
Clamp Bolts 3/8”-24 x 1.75”
4
2
Inner Mount Bolts 3/8”-24 x 1.75”
2 6
Hub Cover Half
1 3 CXXAF Propeller Blades
2 7
NL3/8SP Nord-lock
10 4 Outer Mount Bolts 3/8”-24 x 4.50”
4
FIGURE 1. PROPELLER ASSEMBLY
1 2 7 4 5 6 3
7
3
Page 4

2F0_Installation_Instructions_RevB-2023-03-07.docx1 3
OVERALL DESCRIPTION OF THE PROPELLER AND ITS FEATURES:
Your Sensenich composite propeller was manufactured using aerospace quality materials and
processes. Propeller balance was verified before shipment from the factory.
The blades were manufactured by internal pressure molding, utilizing the latest technology in
carbon fiber and glass prepreg materials in a high temperature internal pressure molding process. This
yields a hollow, low inertia propeller with superior performance and durability.
The propeller finish provides UV and environmental protection. Rain and sand protection is
provided by metal erosion shields on the blade leading edges. The erosion shields are co-cured with
the blade prepreg, providing a smoother finish and a superior bond.
Sensenich’s Pitch Gage/Hub system allows its users to set a broad range of pitches, using the
system’s preset gages when making adjustments. The various gages provide numerous settings of
pitch change affording maximum performance within an efficient aerodynamic envelope. The blade
pins contact the pitch setting gage providing a very precise blade angle and therefore eliminating the
need for a blade angle measurement device.
REQUIRED TOOLS
Torque Wrench
Variable Socket Sizes
Note: Certain aircraft manufacturers limit total pitch range to comply with aircraft design regulations.
Page 5
2F0_Installation_Instructions_RevB-2023-03-07.docx1 4
PROPELLER INSTALLATION
1. Ensure the aircraft magneto switch is in the “OFF”
position and that both magnetos are grounded any
time the propeller is handled. Chock the aircraft wheels
to prevent movement. Clean dirt and oil residue from
the engine flange. Refer to Figure 1 for views of the
two piece hub, blade, and pitch setting gauge.
2. Place spacer (if required), rear spinner bulkhead (if
used) and the hub mount, as shown in Figure 1, on the
propeller mounting flange. The hub must sit flush on
the mounting flange.
Note:
Bolt breakage WILL occur if there is a gap
between the propeller hub, the spacer (if
required), and the engine flange.
3. Refer to Figure 1 for views of the two-piece hub, blade,
and pitch setting gauge. Using the two Nord-Lock
washers and two short mount bolts, secure the hub
mount, rear spinner bulkhead (if used), and the spacer
(if required) to the engine flange. Using a calibrated
torque wrench, torque the 2 mounting bolts evenly
using an alternating pattern. Tighten the bolts in several
increments up to full torque, such as 50%, 75%, and
full torque. See Table 1 or hub decal for bolt torque
values.
4. Each blade airfoil has a round side and a flat side.
Insert the blades into the hub mount half with the round
side facing away from the aircraft.
5. Place the Nord-Lock washers on each of the 4
outboard clamping bolts and insert bolts into the bolt
holes at the outboard end of each hub barrel.
NOTE: Each Nord-lock washer works in pairs with
the “ramped” sides facing each other. See Figure
2.
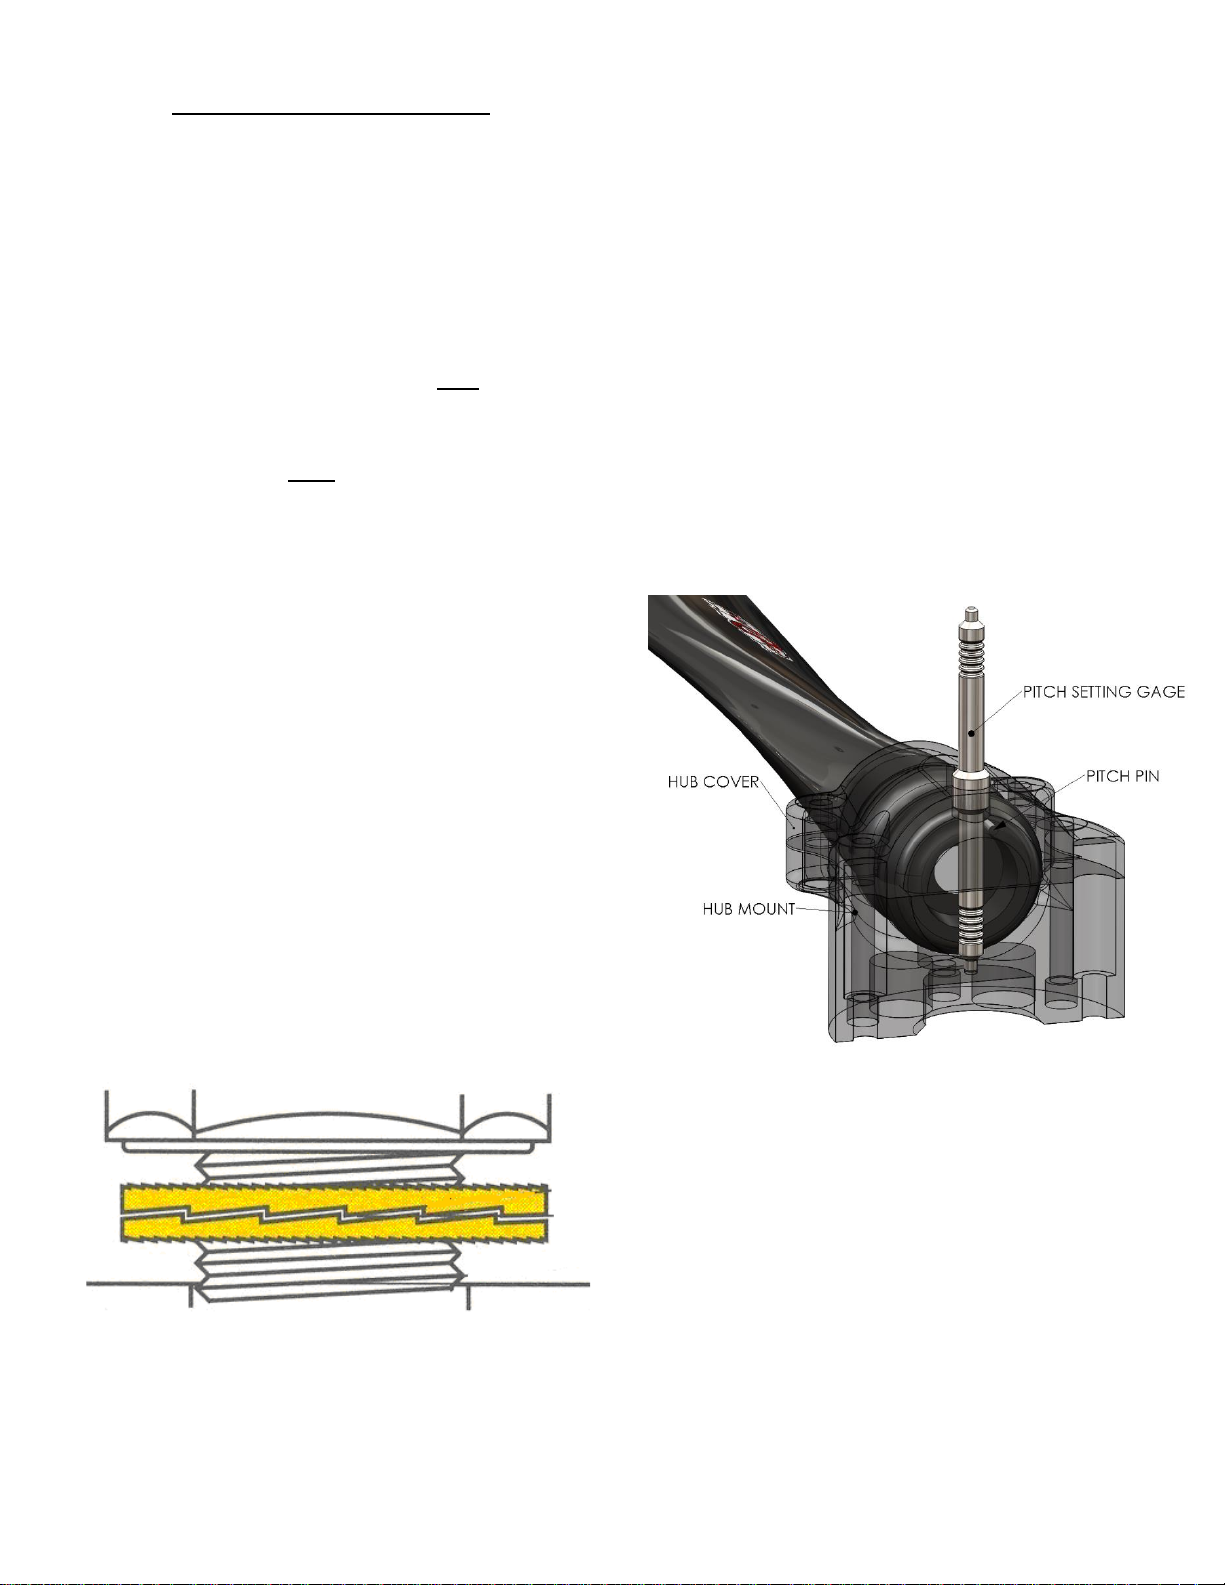
FIGURE 2. NORD-LOCK LOCK WASHER
6. Hand tighten the clamping bolts. The blades should
rotate in the hub but they should not be loose. If the
blades cannot rotate in the hub, loosen the clamping
bolts slightly.
7. Rotate each blade towards high pitch, ensuring that the
pitch pin on the blade shank is not obstructing the
receiving hole for the pitch setting gage. Rotate the
blade’s leading edge away from the work surface to
produce high pitch, or more “bite”.
8. Insert the pitch setting gage through the clearance hole
in the hub cover half and into the receiving hole in the
hub mount half. See Figure 3. Be sure to use the
nominal setting of 4 to start. The pitch setting #
indicates relative pitch; pitch 5 is higher pitch than pitch
setting 4, etc...
9. With the pitch setting gage in place, rotate the blade to
low pitch until the pitch pin is touching the pitch setting
gage. Snug the two clamping bolts for the
corresponding blade barrel to prevent unwanted
rotation of the blade.
FIGURE 3. PITCH SETTING GAGE DETAIL
10. Remove the pitch setting gage from the hub.
11. Repeat steps 8-10 for the opposite blade.
12. Using a calibrated torque wrench, torque the four mount
bolts and four clamp bolts in a criss-cross pattern.
Tighten the bolts in several increments up to full torque,
such as 50%, 75%, and full torque. See Table 1 or
hub decal for bolt torque values.
13. Check the propeller blades for track. The blades
should track within 3/16” of each other at the tip. Note
Page 6

2F0_Installation_Instructions_RevB-2023-03-07.docx1 5
that setting the pitch accurately is more important than
track from blade to blade.
BEFORE ENGINE START:
Make sure the pitch setting gauges have been
removed from the hub and check engine
compartment for tools before starting the
engine.
Tachometer accuracy is critical for safe
operation of the propeller. Refer to the
TACHOMETER INSPECTION section for
important considerations.
14. Start engine and run propeller for approximately 5
minutes at 50% of the desired RPM. After such time,
shut down the engine and check all eight bolts to see if
they have lost torque. It is a normal occurrence for the
bolts to lose a small amount torque due to seating of
the blades. If this has occurred, tighten again to the
proper torque.
Note: This torque value should be checked after
the first 5 hours of operation and at least once a
year thereafter.
15. See Table 2 for Engine / Propeller Combinations
and Limitations.
CAUTION: YOU SHOULD NEVER EXCEED THE
MAXIMUM RPM RATING FOR YOUR ENGINE.
With the brakes on, run up the propeller to check your
pitch for desired maximum RPM. Remember, the
propeller will pick up RPM at full throttle/level flight. If
your RPM’s are too low, adjust the blades to a lower
pitch setting. If the RPM’s are too high, adjust the
blades to a higher pitch setting using the procedure
below. Check your aircraft and/or engine manual for
recommended static rpm. If you are not seeing your
correct static RPM, be certain the tach was properly
calibrated. You may contact Sensenich to purchase a
slightly lower or higher pitch setting gauge if you feel
this is the problem due to your density altitude.
CAUTION: YOU SHOULD NEVER MASK A
POSSIBLE ENGINE PROBLEM WITH A PITCH
CHANGE. If you are unsure, please contact the
factory.
16. Install spinner front bulkhead (not used in some
spinners) and spinner dome (if used).
Refer to Sensenich Supplemental Instructions for
Composite Spinners.
NOTE: Ensure there is adequate clearance between
the spinner dome cutouts and the propeller blades and
hub. Inadequate clearance may result in the spinner
dome wearing into the blade or hub. The amount of
clearance depends on engine type and spinner
construction, but a minimum of 1/8” clearance is
recommended.
REPITCHING
1. Ensure that the aircraft magneto switch is in the “OFF”
position and that both magnetos are grounded any
time the propeller is handled.
2. Loosen the clamp and mount bolts slightly.
NOTE: The Nord-Lock washers may click loudly when
loosened; this is normal.
New Nord-Lock washers are assembled with
rubber adhesive, which will fall apart after first
use.
3. Rotate each blade’s leading edge towards high pitch to
ensure that the pitch pin on the blade shank is not
obstructing the receiving hole for the pitch setting
gauge.
4. Insert the desired pitch setting gauge thru the
clearance hole in the hub cover half and into receiving
hole in the hub mount half. See Figure 3.
5. With the pitch setting gauge in place, rotate the blade
to low pitch until the pitch pin is touching the pitch
setting gauge. Be sure not force the blade onto pitch
setting gage as you may bend the pin.
6. Tighten the eight bolts to prevent unwanted rotation of
the blade.
7. Remove the pitch setting gauge.
8. Re-torque all bolts as stated in step 12 of the propeller
installation section.
REPITCHING: ALTERNATE METHOD
A propeller protractor may be used to set blade pitch. Since
some blade models have high performance, round airfoils,
the protractor cannot be placed at the blade tip. Mark a
straight line from leading edge to trailing edge
approximately 3.6” in from each tip and use the protractor
to set individual blade angles. Set each blade within ¼
degree to each other
PROPELLER REMOVAL
To remove the propeller, follow the installation instructions
in reverse order.
Page 7
2F0_Installation_Instructions_RevB-2023-03-07.docx1 6
TACHOMETER INSPECTION
Owing to the exceptionally high stresses that may be
generated by particular propeller/engine combinations at
certain operating ranges, propeller and aircraft
manufacturers have established revolutions per minute
(RPM) restrictions and maximum RPM limits for some
models. An improperly operating tachometer can cause an
engine to exceed the maximum RPM limits or allow operation
unknowingly within a restricted RPM band. Since there are
no post-manufacture accuracy requirements for engine
tachometers, tachometer inaccuracy could be a direct cause
of propeller failure, excessive vibration, or unscheduled
maintenance.
Proper tachometer operation and accuracy should
always be checked (using the manufacturer’s procedure, if
available) during normal maintenance intervals. One means
of checking the tachometer’s accuracy is with a commercial
optical unit which is pointed at the rotating propeller.
Table 1: Torque Figures for Specific Bolt Sizes
Bolt
Size
Hardware Part Number
Recommended Torque
3/8"
AN6 3/8"
340-360 in-lbs*
*Torque callout for use with Nord-lock Washers
Notes: Check mounting bolt torque at least once a year or if vibration occurs.
Hubs use bolts with Nord-Lock washers. Each lock washer works in pairs with the “ramped” sides facing
each other. See Figure 4.
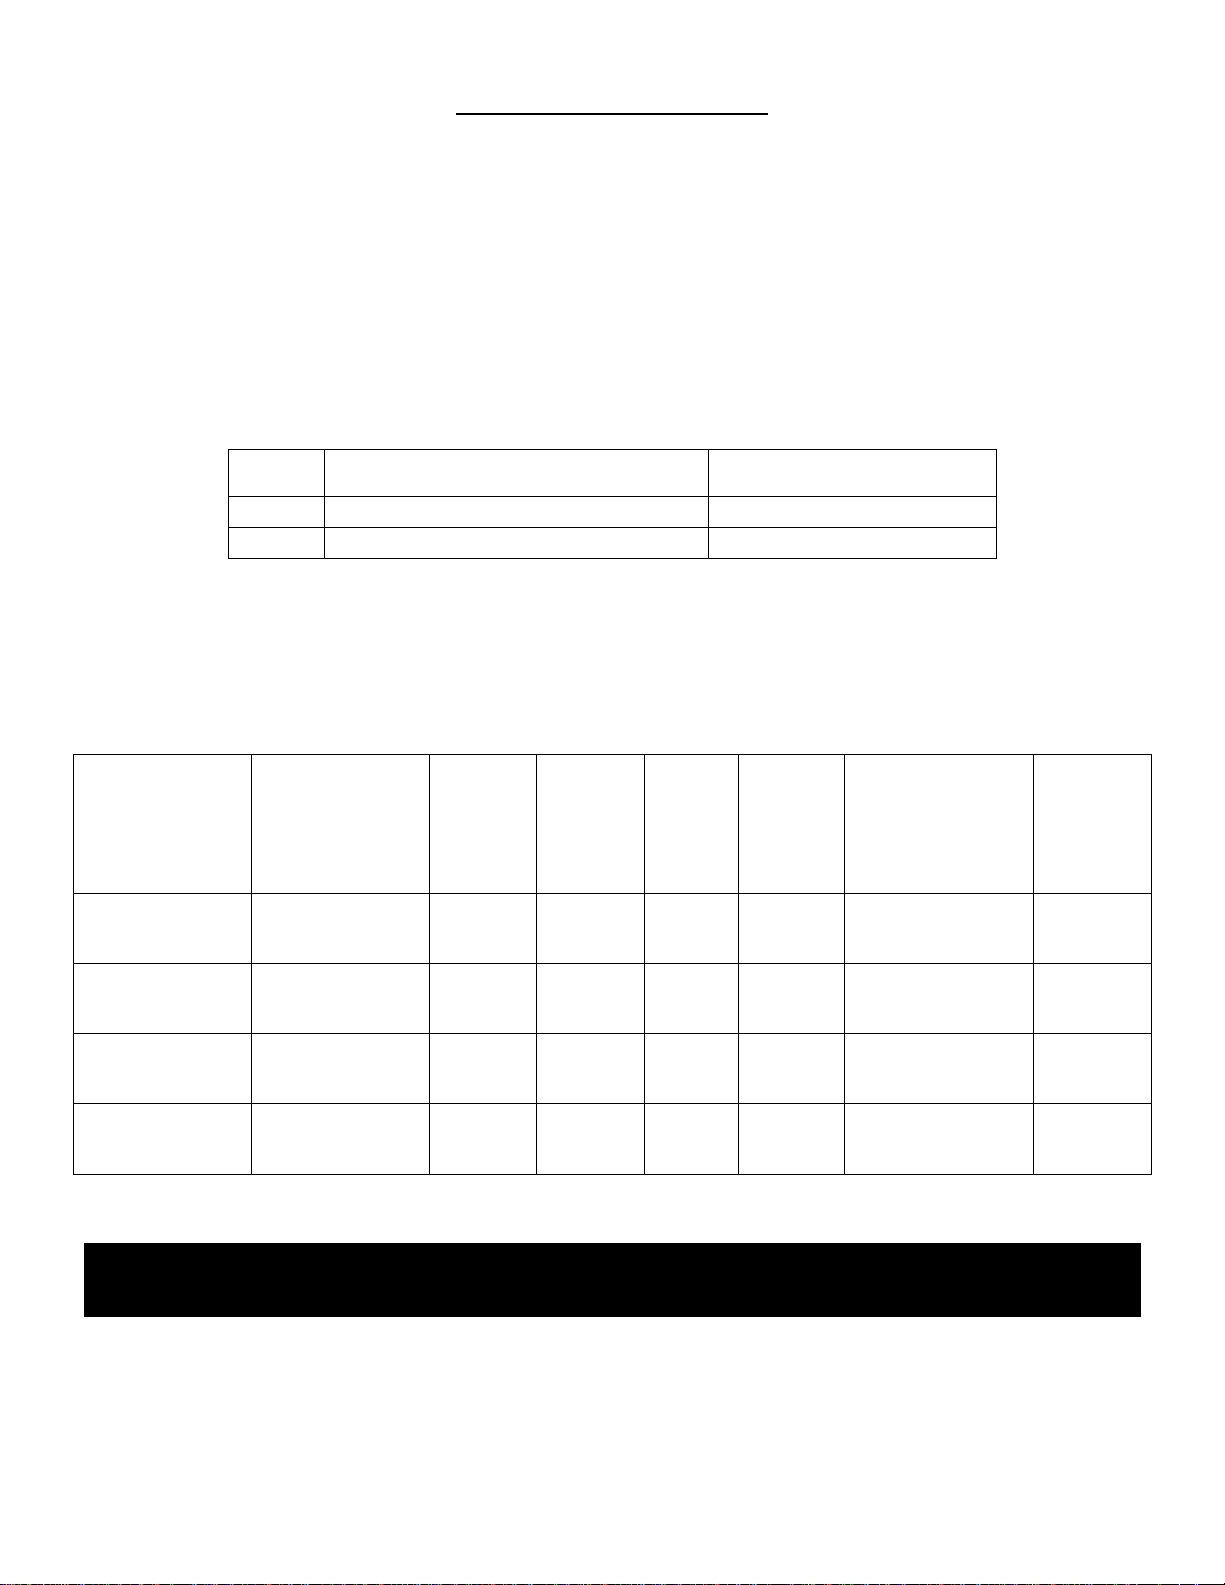
Table 2: Approved Engine / Propeller/Spacer Combinations and Limitations
Propeller Model
Configuration
Max
Diameter
(inches)
Min
Diameter
(inches)
Weight
(lbs)
Mass
Moment
of
Inertia
(kg-
cm^2)
Approved Engine
Models
Limits
2F0K6-C76AF
Tractor
76
72
14
5200
Continental
O-200A
100 HP
@ 2800
RPM
2F0K6-C76AF
Tractor
76
72
14
5200
Lycoming O-233,
O-235
125 HP
@ 2800
RPM
2F0M6-C76AF
Tractor
76
72
15
5300
Lycoming O-233,
O-235
125 HP
@ 2800
RPM
2F0M6-C78BF
Tractor
76
72
14
5300
Lycoming
O-290D, O-290D2
135 HP
@ 2800
RPM
WARNING: Propeller blade failure may occur if maximum propeller
RPM is exceeded – resulting in severe bodily injury or death!
Page 8

2F0_Installation_Instructions_RevB-2023-03-07.docx1 7
PROPELLER PERFORMANCE
In selecting a propeller, keep in mind that both
aircraft and engines of the same model may vary in
performance, and that operators may want different
performance characteristics. For instance, one person may
require a high climb rate while another seeks maximum
cruising efficiency.
STANDARD PITCH / NORMAL FLYING
For normal or cross country flying, a propeller that
turns up to maximum continuous engine RPM at full throttle
level flight will give best all-around performance.
CRUISE PITCH
A cruise propeller will turn 100 to 200 engine RPM
less than a standard pitch propeller. While cruise pitches
will provide 4-7 mph higher airspeeds at cruise power
rpm’s, maximum level flight speeds are no better than climb
or standard pitches, and the take-off and climb performance
will noticeably suffer.
CLIMB PITCH / HIGH ALTITUDE OPERATION For
improved take-off and climb performance, use a climb pitch
propeller that will turn 100 to 200 engine rpm more than a
standard pitch propeller (Refer to your particular aircraft
operating manual for propeller limitations). Climb pitches
will typically reduce flight speeds by 4-7 mph at cruise
power RPM’s. A climb pitch is also recommended for
aircraft operating from high density altitude runways.
PITCH NOTES AND LIMITATIONS
The faster the airplane, the higher the pitch setting
that will be required to keep the engine from over-speeding
at Wide Open Throttle (WOT).
While the propeller may be structurally operated at any
pitch setting from 0 through 9, the take-off RPM at WOT
must meet the aircraft manufacturer’s recommended limits
to ensure safe flight. Although this propeller model has
many pitches available, Propeller RPM should never
exceed the engine manufacturers recommended
maximum RPM. Please refer back to Table 2.
NOTE: Certain aircraft manufacturers limit the
available propeller pitch range to comply with aircraft
design regulations.
NOTE: When pitching propeller for a climb pitch, the
propeller WILL overspeed in full throttle level flight.
Propeller RPM should never exceed the engine
manufacturers recommended maximum RPM. Please
refer back to Table 2.
Page 9
2F0_Installation_Instructions_RevB-2023-03-07.docx1 8
INSTRUCTIONS FOR CONTINUED
AIRWORTHINESS
The following will help you operate your propeller safely,
keep it looking good and help it to last longer.
• Never install a propeller on an aircraft unless it is a
model approved for the aircraft and the engine. The
service history must be properly documented, and a
pre-installation inspection must indicate that the
propeller is airworthy.
A visual Inspection is the primary defense against early
failure of propellers. When inspecting propellers, it is
necessary to use touch and hearing, as well as visual
clues. Changes in surface roughness, unusual free
play, and odd sounds give hints as to conditions that
may affect airworthiness. Feel for roughness and look
for texture changes, waviness, and changes in
reflection that may signal the removal of protective
coatings.
• Do not operate your propeller above the recommended
engine RPM. If your propeller has been subjected to an
over speed condition of 10% over the maximum rating
(example 2700 X 1.1 = 2970) for more than 2 minutes,
you must perform the Inspection After Suspected
Impact listed below. Do not spin your propeller
above the engine RPM Limits given in Table 2.
• Do not operate any aircraft after a propeller has been
subjected to an impact without a thorough inspection.
See Inspection After Suspected Impact below
• The pre-flight inspection is a necessary step in the
process of airworthiness maintenance. It should not
be merely a superficial look, but a studied review of
the condition of everything that might give trouble
during the forthcoming flight. Carefully examine the
propeller assembly for looseness, any signs of
damage, excessive wear or any other condition that
would make the propeller unsafe to operate. Check
the leading edge for cracks and debonds. Externally
check the spinner and bulkhead for security, missing
fasteners, damage, and cracks. Cracks typically
originate from the attachment screws. Check for
looseness of the bulkhead. This could be an indication
that the mounting bolts are loose and need to be
torqued again. If any of the following damage is
discovered during the preflight inspection, the
propeller must be removed from service until such
time as it can be evaluated and repaired by an
approved propeller shop:
(a) Cracks in the metal hub or bolts
(b) Loose metal erosion shield
(c) Any crack across or along the blade
(d) Blade impact damage with missing
composite material larger than .5 square
inches and/or deeper than .025”
or (e) Obvious damage or wear beyond
economical repair.
• This propeller has been static balanced with precision
digital equipment. Modern dynamic balancing can be
performed with the propeller on the aircraft, and can
help reduce vibration and wear of engine accessories
and other aircraft components.
• Do not use the propeller as a tow-bar to move your
aircraft.
• Apply a good quality automotive paste wax to the
blades at least once a year. Avoid liquid waxes.
• Avoid running-up in areas containing loose stones,
sand, and gravel, to reduce erosion and/or damage to
the leading edges and blades.
• Finish loss off the leading edge is a normal wear item
and is dependent on the amount of operation in rain
and grit.
• Whenever there is evidence of roughness on
operation, check bolt torque on both the clamping and
mounting bolts, and check the propeller blades for
track. The blades should track within 3/16” of each
other at the tip. For new installations, rotating the
propeller 180 degrees and reinstalling may help.
• If the bolts are ever over-torqued, they should be
replaced immediately.
• Check bolt torque at least once a year.
• When the propeller is not in use and exposed to
weather, cover it with a waterproof cover to extend the
life of the finish.
LIFE LIMITATIONS: None
MAJOR PERIODIC INSPECTION: 2000 HRS
NOTE: There is no specified overhaul time. The propeller
parts are removed from service when they can no longer
meet the Continued Airworthiness Requirements.
Page 10

2F0_Installation_Instructions_RevB-2023-03-07.docx1 9
INSPECTIONS
Inspection After Suspected Lightning Strike
-- To be accomplished by an A&P, IA, or repairman.
Any Sensenich composite blade suspected of lightning strike
should be inspected and may require repair or replacement.
Lightning strikes usually enter a composite blade through the
metal erosion shield. If a lightning strike is present, a
darkened area and possible pitting, usually in the proximity of
the tip, will be noticeable. If a lightning strike is suspected or
detected, consider the blade unairworthy. Return the blade to
the factory or an Approved Propeller Repair Station for
further examination.
Inspection After Suspected Impact
-- To be accomplished by an A&P, IA, or repairman.
Propellers that have been involved in a known or suspected
static or rotating impact with relatively solid objects (e.g.,
ground, maintenance stands, runway lights, birds, etc.) or
relatively yielding objects (e.g., snow banks, puddles of
water, heavy accumulation of slush, etc.) should be
inspected for damage before further flight. If the inspection
reveals one or more of the following listed indications, the
propeller should be removed and sent to an Approved
Propeller Repair Station.
(1) A blade that tracks more than 3/16” to the other blades.
(2) Loose blades in the hub.
(3) Any noticeable or suspected damage to the blade pitch
pins.
(4) Any diameter reduction (tip damage).
(5) Visible major damage to the hub that cannot meet the
Minor Hub Repairs criteria. In particular, inspect for
cracks in the bolt holes, counterbores, and barrel cavities
which clamp the blades.
(6) Visible major damage to a blade that cannot meet the
Minor Blade Repairs criteria.
(7) Operating changes, such as vibration or abnormal RPM.
NOTE: The bolts should be magnetic particle inspected
per ASTM E 1444 or replaced after any propeller strike.
Mandatory Inspections:
• Annual Inspection -- To be accomplished by an A&P,
IA, or repairman.
1. Remove spinner dome and examine it for
damage, and cracks. If necessary, replace the
spinner dome. See Spinner Repairs below.
2. Remove clamp bolts. -- The bolts should be
dimensionally checked against one another. Any
bolts that exhibit stretching, corrosion or damage
such as cracks or nicks are to be replaced.
3. Remove the hub cover half and set aside.
4. Remove each blade and inspect blade shanks for
any wear, also making sure the blade pitch pin is
still tight in the blade shank. A thorough visual
inspection is recommended together with a coin
tap inspection of each composite blade, including
the metal erosion shield on the leading edge (see
AC 43-5). No dents in the metal erosion shield
should be deeper than 1/8”. No dents should
puncture the metal erosion shield. There should
be no excessive wear on the leading edge. If blade
damage is beyond Minor Blade Repair
instructions below, the blade must either be retired
from service or sent to a repair station for
evaluation before further service.
5. Examine the data plate on the shank of each
blade. Verify that you are using approved blades
for the hub and that everything appears normal. If
you are unsure, you can go to
http://www.sensenich.com/ for reference or
contact the factory for assistance.
6. Conditions requiring blade replacement:
a) Any hole in hollow blade shell (doesn’t apply
if a replacement metal erosion shield will
cover hole)
b) Any crack deeper than .025”
c) Any solid tip damage that can’t be trimmed off
completely with a 2” diameter reduction
7. Remove the mounting bolts -- The bolts should
be dimensionally checked against one another.
Any bolts that exhibit stretching, corrosion or
damage such as cracks or nicks are to be
replaced.
Page 11

2F0_Installation_Instructions_RevB-2023-03-07.docx1 10
8. Remove the hub mount half and spacer. Inspect
both hub halves for corrosion. If necessary,
carefully remove any flaked or blistered paint
from the hub surface, taking care not to scratch
the aluminum surface. If there is any corrosion or
damage present, please see Minor Hub Repair
instructions below.
9. Remove the rear spinner bulkhead and examine
for missing fasteners, damage, and cracks. If
damaged, replace the spinner bulkhead.
10. Inspect the Nord-Lock washers on the inside
cam surfaces and outside serrations. Replace
washers with excessive wear. Lubricate
acceptable washers with a light coating of engine
oil or equivalent. NOTE: Each Nord-Lock
washer works in pairs with the “ramped”
sides facing each other. See Figure 2.
11. Reinstall the assembly per the above installation
instructions.
• 2000 Hour Inspection -- To be accomplished by an
A&P,IA, or repairman
1. Remove spinner dome and examine for damage,
and cracks. If necessary, replace the spinner
dome. See Spinner Repairs below
2. Remove clamp bolts and special lock washers
and retire both sets from service.
3. Remove the hub cover half and blades. Set
aside.
4. Remove mount bolts and special lock washers
and retire from service.
5. Remove rear spinner bulkhead and examine for
damage, and cracks. If necessary, replace the
rear bulkhead.
6. Remove the hub mount half and spacer (if
applicable).
7. Send hub cover half, hub mount half, and blades
to an Approved Propeller Repair Station for
the remaining 2000 hour inspection.
8. Reinstall propeller repair station approved or new
propeller, spacer (if necessary), and spinner per
the above installation instructions.
Page 12

2F0_Installation_Instructions_RevB-2023-03-07.docx1 11
REPAIRS
Minor Blade Repairs
-- To be accomplished by an A&P, IA, or repairman
Minor impact damage, nicks, and gouges in composite
material of blade not to exceed .025 depth and or .5
square inches of surface area: Fill with high strength
epoxy resin West System 105/206 or equivalent (NOT
5 minute epoxy) thickened with aerospace filler
material, such as Colloidal Silica 406, Cabosil, or
equivalent. Sand smooth when dry.
Wear and/or roughness of metal erosion shield on
blade leading edge: If metal is not worn through, use
220 grit sandpaper or coarse scotch pad to remove
roughness or minor pitting, being careful to not grind
through the erosion shield. Polish with fine scotch pad
or equivalent to remove scratches.
Paint wear on blade:
NOTE, wear is inevitable on the metal erosion shield.
The wear rate depends on several factors, including
high operating RPM’s in rain or sandy areas, FOD on
taxiways and runways, etc. Touch up paint using
Tempo A150 Flat Black,A152 White, or equivalent.
When using touch up paint, keep in mind that paint can
cause an out of balance situation so touch up should be
kept to a minimum.
Minor Hub Repairs
-- To be accomplished by an A&P, IA, or repairman
Any hub or spacer that would exceed what is depicted
in Figure 6 for minor repair must be retired from
service. These dimensions (other then radius) are
maximum allowable. Anything less is acceptable.
Radius can be greater. A hub can be returned to
service with the following limitations:
• No more then two (2) repairs in a single barrel
half (where the blade touches the hub) for a total
of 8 barrel repairs in one (1) complete hub, as
long as the repairs do not touch.
• General hub repairs can be indefinite, both inside
and outside, as long as the repairs do not touch.
• No repairs over a previous repair.
• No repairs on the hub mounting flange face.
• No repairs on either flange face of the spacer.
Clean the area thoroughly, apply an approved
penetrant (ASTM E 1417 or equivalent), and
inspect with a l0X glass before returning to
service.
Corrosion – All corrosion must be removed before a
hub can be returned to service. Corrosion is considered
a repair.
Instructions for removing the damage or corrosion spot:
1. Sand the area with 220 wet-or-dry abrasive
paper until all evidence of corrosion is removed.
A small motorized grinding tool may be used.
2. Polish the area with 320 grit (or finer) to remove
all scratches.
3. Clean the area thoroughly, apply an approved
penetrant (ASTM E 1417 or equivalent), and
inspect with a l0X glass. NOTE: It is extremely
important that all corrosion be completely
removed. If cavities reappear during penetrant
inspection, the repair operation must be
repeated.
4. Remove penetrant from the affected area.
Spinner Repair
-- To be accomplished by an A&P, IA, or repairman
The following repairs are directed toward composite
spinners supplied by Sensenich Propeller. For repair
of composite spinners not supplied by Sensenich
please refer the spinner manufacturers repair
instructions.
Minor impact damage, nicks, and gouges in
composite material of dome or rear bulkhead not to
exceed .025 depth and or .5 square inches of
surface area: Fill with high strength epoxy resin
West System 105/206 or equivalent (NOT 5 minute
epoxy) thickened with aerospace filler material, such
as Colloidal Silica 406, Cabosil, or equivalent. Sand
smooth when dry.
Page 13
2F0_Installation_Instructions_RevB-2023-03-07.docx1 12
FIGURE 4. MINOR HUB REPAIR LIMITS
LIMITED WARRANTY
We hope you enjoy your new composite propeller. We have
worked hard to ensure that your propeller will meet or exceed
your expectations for years to come.
We offer a one year limited warranty (the “Warranty Period”)
on any defect in materials and workmanship.
In the event a unit does not conform to this express warranty
during the Warranty Period, Sensenich Composites, Inc.
(“Sensenich”), will repair or replace the defective material at
it’s place of business at Plant City, FL USA. Sensenich will
decide at its sole discretion which remedy, repair or
replacement, it will provide. Any replacement of a unit or a
part of a unit during the Warranty Period will not extend the
Warranty beyond the original duration. The remedy of repair
or replacement is exclusive and does not include the cost of
shipping, removal, or installation, all of which are the
customer's responsibility.
Procedure for Obtaining Warranty Service
Units or parts that are defective must be shipped prepaid to
Sensenich at the address listed on page 1. The unit must be
accompanied by a copy of the original (Distributor or Dealer)
invoice, a Return Authorization Number (which can be
obtained by phoning Sensenich), and a brief description of
the defect.
Conditions, Exclusions, and Disclaimers
This limited warranty applies only to units that have been
installed, used, and maintained properly in strict accordance
with our specifications, instructions, and recommendations. It
does not cover units that show abuse, alterations, improper
installation, improper maintenance or repair, or improper
packaging for shipment; and it does not pertain to damage
due to object strike, or excessive blade wear due to
operation. Racing use of any kind automatically voids this
Warranty. The use of units on or with engines or equipment
not approved by Sensenich automatically voids this warranty.
For purposes of this limited warranty, “engines or equipment
not approved by Sensenich” shall mean engines or
equipment that are not explicitly consistent with all
specifications and instructions applicable to that engine or
equipment, including, without limitation, those established by
the Federal Aviation Administration, those established by the
manufacturers of any component parts used in connection
with the units, and/or those established by Sensenich. The
purchaser has sole responsibility for ensuring that the use of
the units is in compliance with all applicable specifications
and instructions, and no conduct by Sensenich shall prevent
this Warranty from being voided for failure to comply with the
instructions or specifications provided by any third-party.
This Limited Warranty is the only warranty provided with
respect to covered units, and THERE ARE NO OTHER
WARRANTIES, REPRESENTATIONS, CONDITIONS OR
GUARANTEES, EXPRESS OR IMPLIED, WITH RESPECT
TO THE COVERED UNITS OR THE MANUFACTURE
THEREOF, INCLUDING, WITHOUT LIMITATION, ANY
IMPLIED WARRANTIES OF MERCHANTABILITY OR
FITNESS FOR A PARTICULAR PURPOSE.
Repair or replacement of a nonconforming unit or part is the
exclusive remedy for breach of this limited warranty, and
shall constitute fulfillment of all liabilities of Sensenich to a
customer or user, whether based on contract, negligence or
otherwise. IN NO EVENT SHALL SENSENICH BE LIABLE
FOR ANY OTHER EXPENSES, CLAIMS OR DAMAGES OF
ANY KIND HOWSOEVER CAUSED, INCLUDING
(WITHOUT LIMITATION) ANY OTHER PRODUCT
REPLACEMENT OR INSTALLATION COSTS AND/OR
ANY DIRECT, INDIRECT, CONSEQUENTIAL,
INCIDENTAL OR SPECIAL DAMAGES.
The purchaser of the covered units has read, understood
and, by purchasing the units, agrees to be bound by the
above terms and conditions.
Some states do not allow the exclusion of incidental or
consequential damages, so the above limitations may not
apply to you.
This Warranty gives you specific legal rights and you may also
have other rights which vary from state to state.
Page 14
2F0_Installation_Instructions_RevB-2023-03-07.docx1 13
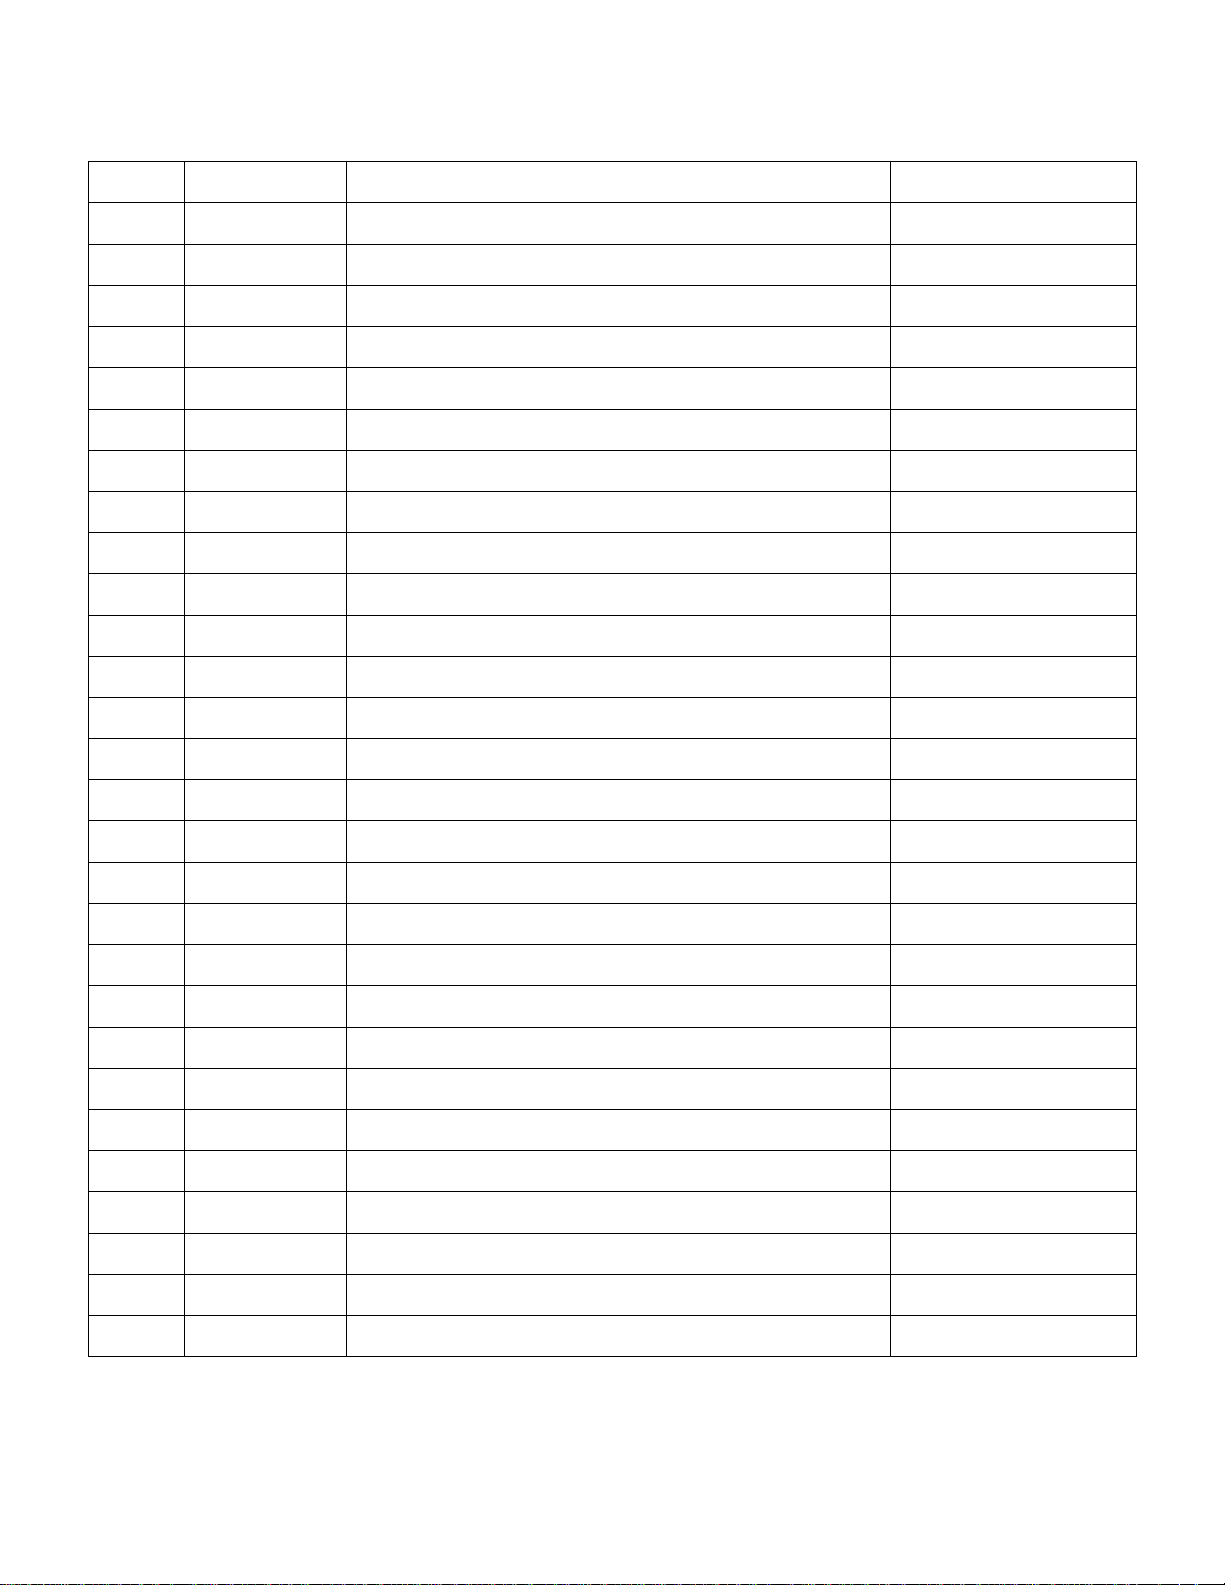
DESCRIPTION OF ALL OPERATIONS PERTAINING TO INSPECTIONS AND MAINTENANCE
DATE
TACH TIME
DESCRIPTION OF WORK
SIGNATURE
 Loading...