

Page 1

USER GUIDE
Page 2
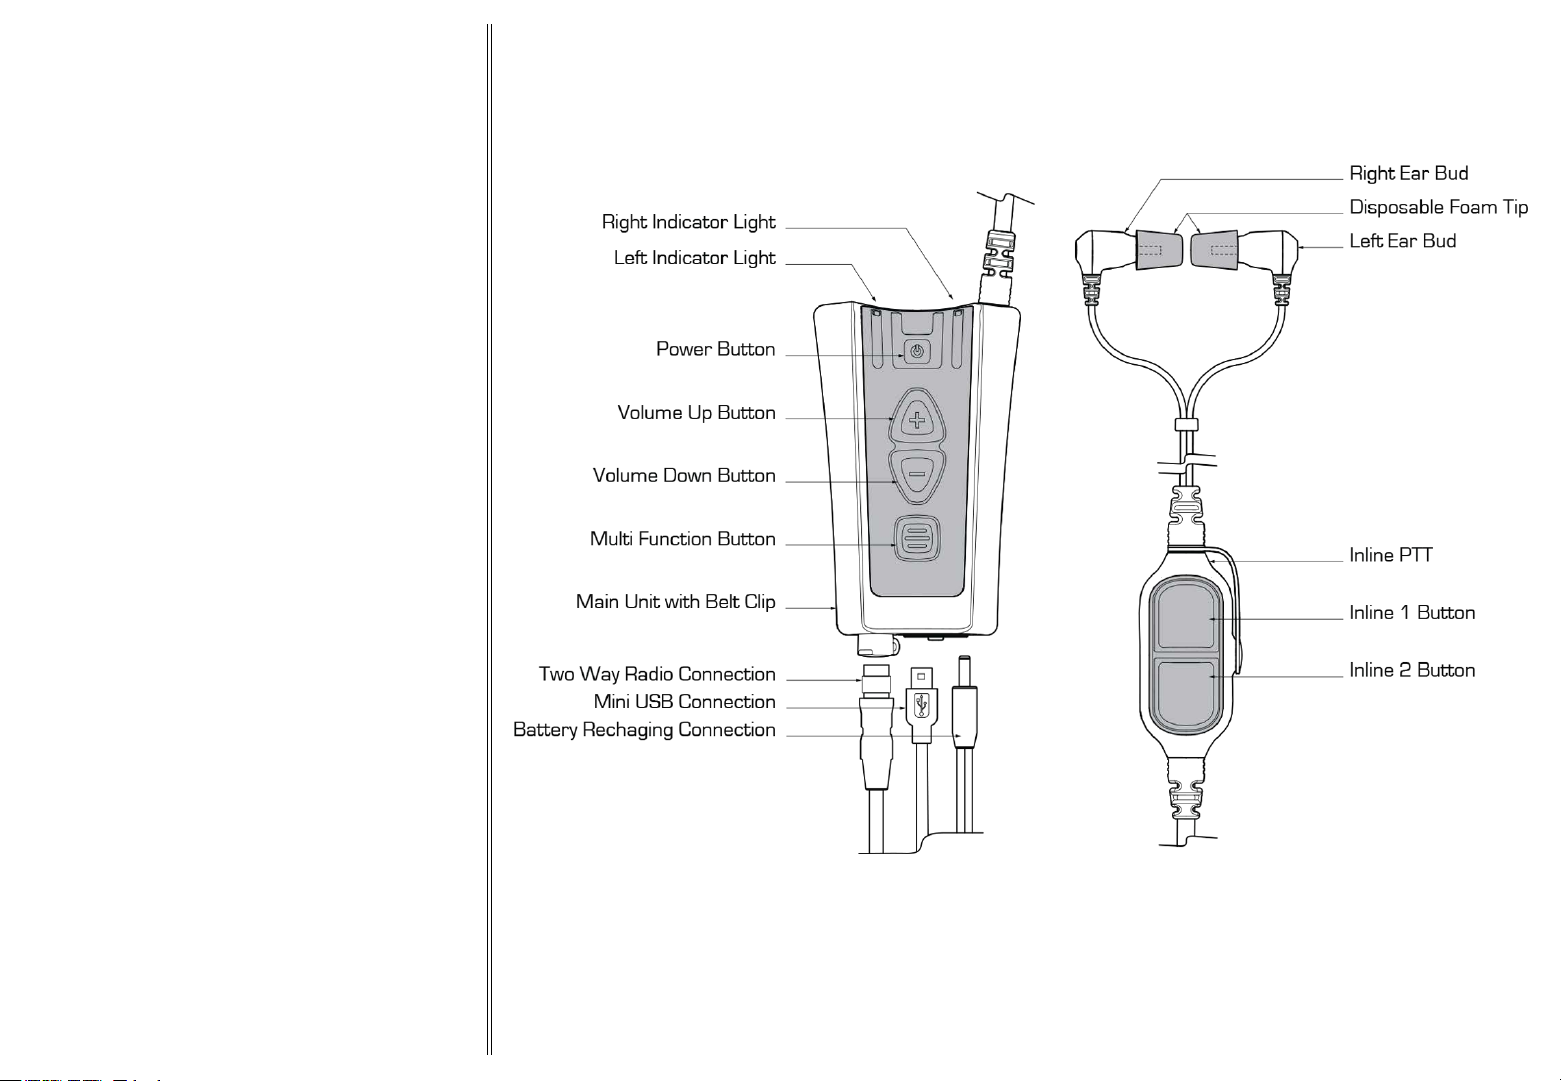
1. Headset anatomy
2. Wearing the headset
3. Fitting the Earbuds
4. Charging the headset
5. Power up the headset
6. Environmental modes
7. Connecting A Two Way Radio
8. Using Bluetooth
9. Bluetooth pairing and connecting
10. Using Short Range
11. Using FM Radio
12. Troubleshooting
1. HEADSET ANATOMYGETTING STARTED
1
Page 3
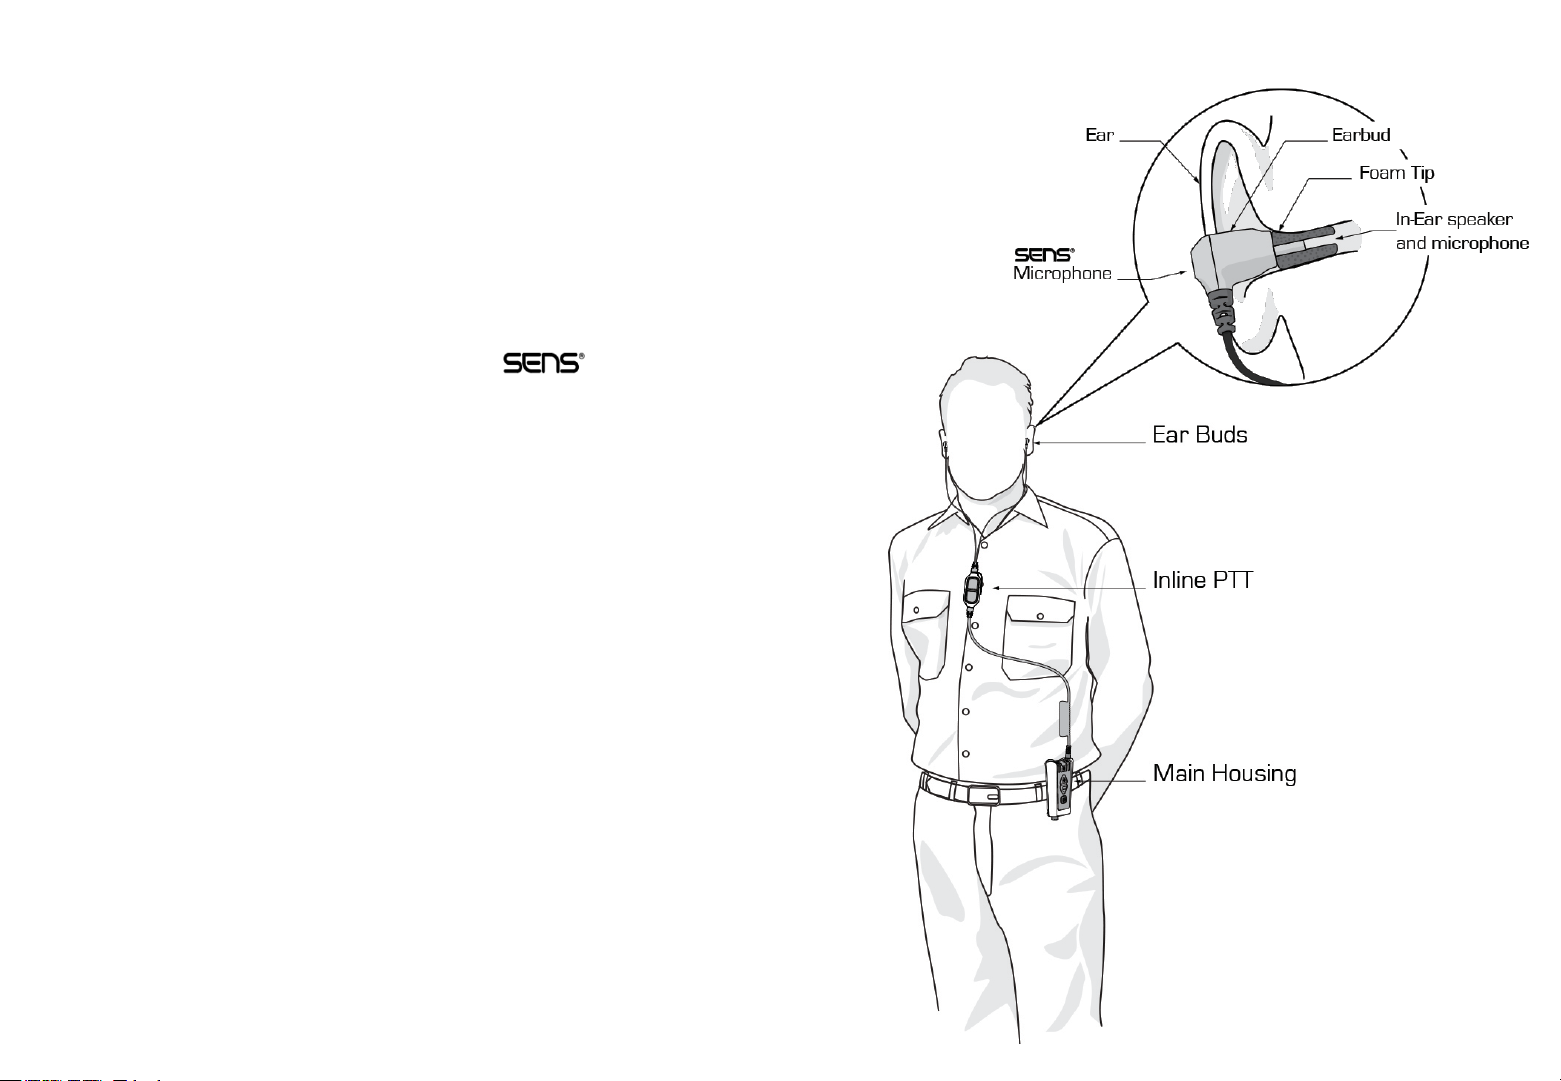
2. WEARING THE HEADSET
The smartPlug is a state of the art hearing protection
communication system that allows you to retain situational
awareness while being in full contact with all your
communication devices.
Situational awareness is provided by processing
technology and environmental microphones within the
Earbuds.
Contact through other communication devices is enabled by:
- Two Way Radios interface cables (sold separately).
- Bluetooth to Two Way Radios and cell phones (if
installed)
- Direct Headset to Headset communications through
Short Range (if installed)
The smartPlug is designed to be worn with the main housing
attaching to the belt or pant seam, and the Inline PTT
attaching to the shirt / upper garment of the user.
Note: For SR communications, the best communication
range is achieved with the Inline PTT set as high up on the
user as possible.
2
Page 4
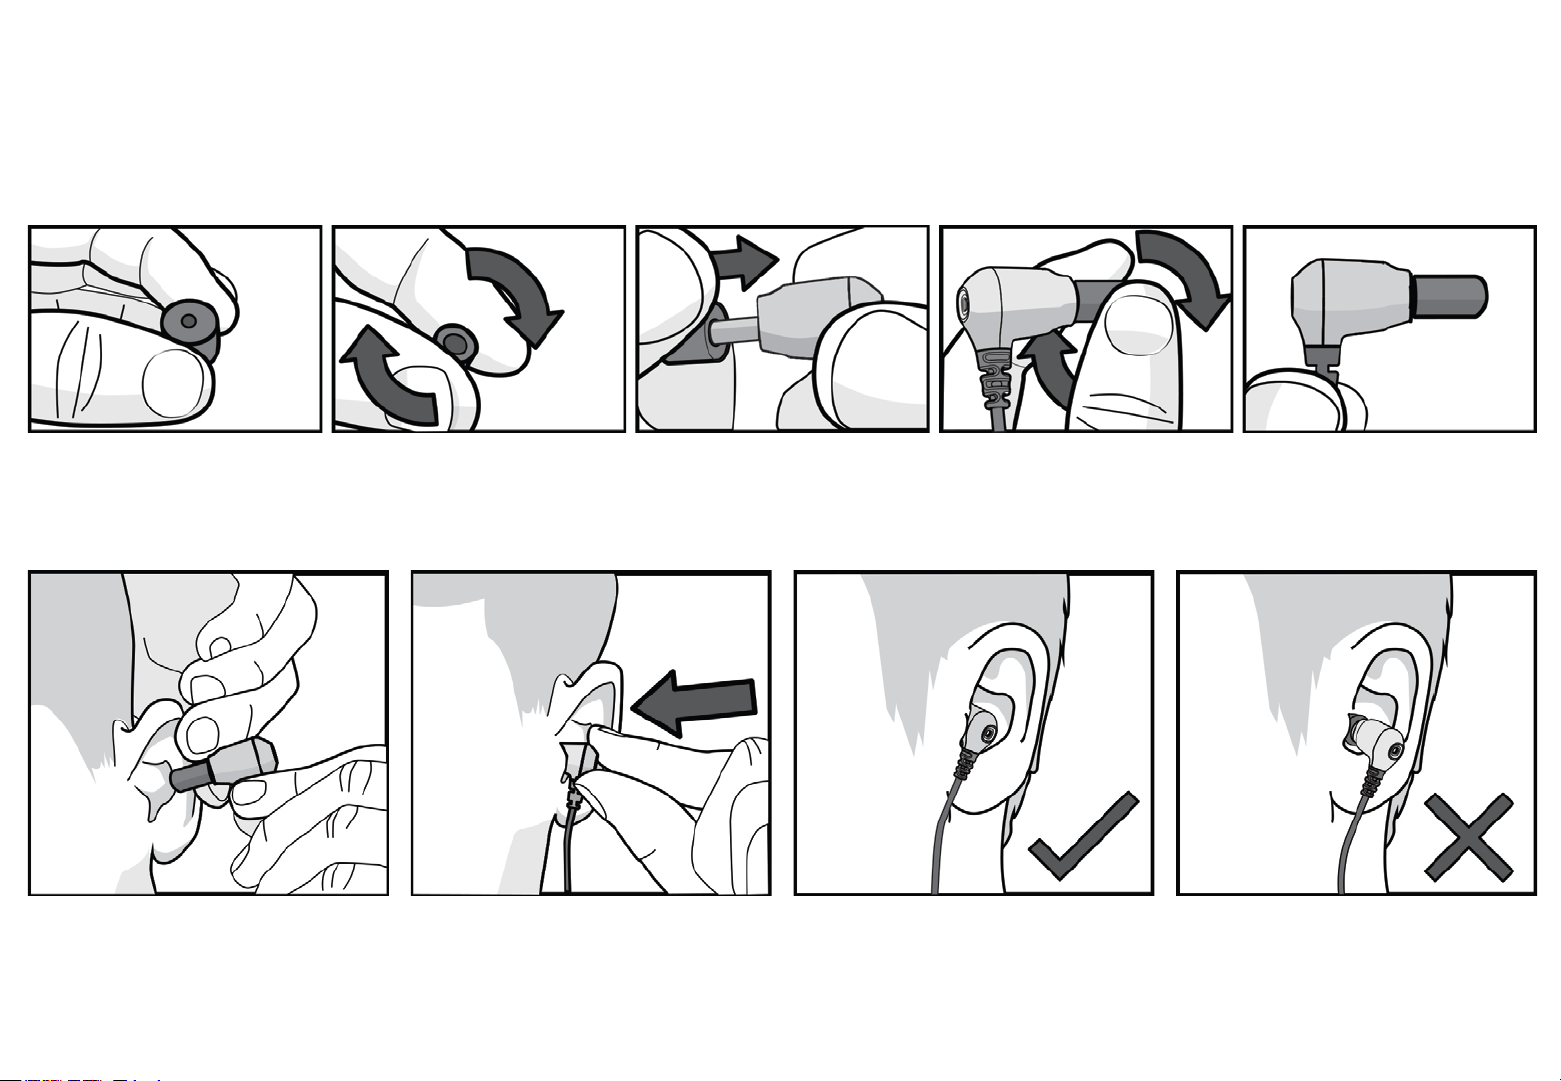
3. FITTING THE EARBUDS
It is critical the earbuds are correctly fitted to ensure the correct level of hearing protection and communication abilities. The Earbuds incorporate an
in-ear pickup, if the Earbuds are not fitted correctly, the speech quality may be lower than expected.
1. Place Disposable Foam
Tip between thumb and
forefinger.
6. Using your opposite hand, pull
your ear upward and outward.
Insert the Ear Bud deeply into the
ear - as you would normally do with
a Foam Ear Plug.
2. Roll Foam Tip to a
compressed, crease free
cylinder
3. Push the Foam Tip all the
way onto the Ear Bud spout.
7. Hold the Ear Bud in place for 30
seconds while the Foam Tip
expands.
4. Roll the Foam Tip again
between the thumb and
forefinger.
8. Check to ensure the Ear Buds
are correctly inserted.
3
5. Ensure the Foam Tip
remains a compressed,
crease free cylinder on the
Ear Bud.
9. A poor fit will be visible by the
Earbuds being far away from the
ear. No foam tip should be visible.
Repeat the process until a good fit
is achieved.
Page 5

4. CHARGING
Your headset comes supplier with a charger. Do not
attempt to use third party chargers as damage may
result.
The headset should be regularly charged. To charge your
headset connect the charger to the headset and connect
to the mains power.
While charging the Right Indicator LED will be Red.
When charging is complete the LED will turn Green.
Note: Be sure to charge your headset fully before first
use.
Note: Your headset will automatically power up when the
charger is connected to the headset.
Charge Time: 5 hours
Battery Life: 15 hours
Your headset is powered by a built-in high capacity Lithium Ion
battery. This is designed to last the life of your headset and should be
returned to the manufacturer for replacement and servicing. Any attempt
to access the battery will damage the headset. Please see accompanying
smartPlug Headset Information guide for additional safety battery
precautions.
4
Page 6

5. POWER ON HEADSET
Your headset must be powered up to use
situational awareness and the
communication connectivity features.
Power on / off
To power up your headset press and release the
power button.
To power off your headset press and hold the
power button until the unit powers off.
6. ENVIRONMENTAL MODES
Your smartPlug headset features
situational awareness technology.
(Speech Enhancement, Noise Suppression)
allows you to be in audible contact with your
surroundings while wearing your headset.
To toggle situational awareness on or off
momentarily press and release the power button.
5
Page 7

7. CONNECTING TWO WAY RADIO
smartPlug headset can be connected to most
Two Way Radios through interface cables (sold
separately).
1. Connect the Two Way Radio Cable into the
Two way Radio Connector located on the
bottom of the Main Unit.
2. Turn the Two Way Radio on. A tone will be
heard through the headset indicating it has
detected the Two Way Radio.
3. Adjust the volume of the Two Way Radio
communication by the normal controls of
your Two Way Radio until a comfortable level
is reached.
4. To transmit, press and hold the Inline 1
Button or the button programmed by your
dealer.
Note: See ‘Using Bluetooth’ for more information
on connecting Two-Way Radios by Bluetooth.
6
Page 8

8. USING BLUETOOTH
smartPlug Headsets also feature Bluetooth connectivity (if installed).
Bluetooth enables wireless connections to some models of Two Way
Radio, industrial computers, vibration analysers and most Cell phones. If
Bluetooth is installed on your smartPlug, the following details apply.
Default automatic connection setting: When the headset powers up,
the smartPlug searches for previously paired devices. If a previously
paired device is within range, it will automatically attempt to reconnect
to this device. A blue light will flash slowly if a Bluetooth connection is
made and you will hear a tone in the headset.
Note: When entering pairing mode the smartPlug forgets all previously
connected devices.
Note: Bluetooth is discoverable for 2 minutes in pairing mode. If no
connection has been made within this time, the process will need to be
repeated.
Bluetooth Phone: To answer calls, press the Multi Function Button (or
programmed button, consult your dealer). To end or reject a call, press
and hold the Multi Function button for 2 seconds.
Bluetooth PTT: Some radios and cell phones feature PTT over
Bluetooth. Please consult your dealer for more information.
7
Page 9

9. BLUETOOTH PAIRING AND CONNECTING
Bluetooth pairing to new device:
For Bluetooth functionality, the smartPlug headset must
be paired and connected.
1. Enable Bluetooth on the device which you want to
connect to the smartPlug
2. Power up the smartPlug
3. Hold the Multi Function Button for 5 seconds to enable
pairing. A blue light indicator will switch on.
4. Follow pairing instructions on the device that you want
to connect to, search and pair the smartPlug. If asked
for a passkey, enter 0000
5. Once paired, the headset will automatically connect
and the blue light indicator will flash slowly.
6. If automatic connection fails, use the device
instructions to connect to the smartPlug headset.
8
Page 10

10. USING SHORT RANGE
Short Range (SR) is a technology enabling communication directly
between compatible smartPlug headsets.
Short Range units tuned to the same channel and within range will
hear your transmissions.
SR behaves similarly to Two-Way Radios, where only one unit can
transmit at one time.
If Short Range is installed on your smartPlug, the following applies:
By default, Short Range is disabled and must be enabled. To enable
Short Range press Volume Up and Volume Down buttons
simultaneously, the smartPlug headset will make a tone indicating SR
has been enabled.
Headset to Headset Communication with SR: To communicate with
other smartPlug headsets push and hold the Inline 2 Button and talk.
Other headsets within range and tuned to the same frequency will
hear your transmissions.
SR Change frequency channel: To change SR channel up press and
hold Volume Up. To change SR channel down press and hold Volume
Down. The smartPlug headset will speak the channel number. Up to 8
channels can be programmed.
The SR frequency can only be set by your dealer. Please contact your
dealer for reprogramming of channels.
9
Page 11

11. USING FM RADIO
SmartPlug headsets can also be configured to receive FM
radio stations. This enables you to listen to FM radio while
wearing the smartPlug. If FM Radio is installed on your
smartPlug, the following applies:
By default, FM Radio Reception is disabled and must be
enabled as follows:
FM Radio on / off: Press the Power Button + Multi Function
Button together simultaneously. The smartPlug will make a
tone indicating that FM radio has been enabled and you will
hear the currently tuned radio station in the headset.
To change radio stations, scan for a new station:
FM Radio Scan: Press and hold the Volume Up button for 2
seconds to scan up, or press and hold the Volume Down
button for 2 seconds to scan down. The smartPlug headset
will tune to the next stations
Note: SR and FM radio cannot be enabled simultaneously. Enabling FM
radio will automatically disable SR Radio and vice versa.
10
Page 12

12. TROUBLESHOOTING
Having Trouble pairing the headset
Make sure any previously paired devices are powered off. Make
sure the radio is configured with Bluetooth enabled.
Headset and Radio will not connect
Wired:
Make sure the cable is securely fastened to both the Two Way
Radio and the Main Housing.
Bluetooth:
Make sure your radio and headset are paired together and within
range. Try pairing the two devices together again. Make sure the
Two Way Radio is not connected to another device or headset.
Having Trouble Hearing
Check your headset is on. Make sure your radio and headset are
paired, connected and within range. Check the radio’s LED indicator
to check transmit/receive is not stuck on. Check your radio is
functioning by turning off the headset and listening through the
radio. If the radio is working, try turning up the volume control on
the headset and on the radio controls.
Two-Way Radio distorted
Check your Two-Way Radio volume level. If the volume
is set too high, this may be breaching the volume level
on the smartPlug and affecting the sound quality.
Light Indicator Headset Function
Red On Charging
Green on Charge Complete
Red slow flash Battery Low <1hr remains
Green fast flash Quiet mode
Green slow flash situational awareness
active
Blue on Bluetooth on and discoverable
Blue slow flash Bluetooth connected
Blue fast flash Bluetooth incoming call
Having trouble being heard
Check the headset is on. Make sure the radio and headset are
paired, connected and within range. Check your radio is functioning
by turning off the headset and talking through the radio. Make sure
you have fitted the Ear Buds correctly. Ensure radio gain is set to a
reasonable level.
11
DOC00071 - Rev.00
 Loading...