


smartPlug
USER GUIDE

English
English

English
GETTING STARTED
1. Headset anatomy
2. Wearing the headset
3. Fitting the Earbuds
4. Charging the headset
5. Power up the headset
6. Environmental modes
7. Connecting A Two Way
Radio
8. Using Bluetooth
9. Bluetooth pairing and
connecting
10. Using Short Range
11. Using FM Radio
12. Troubleshooting
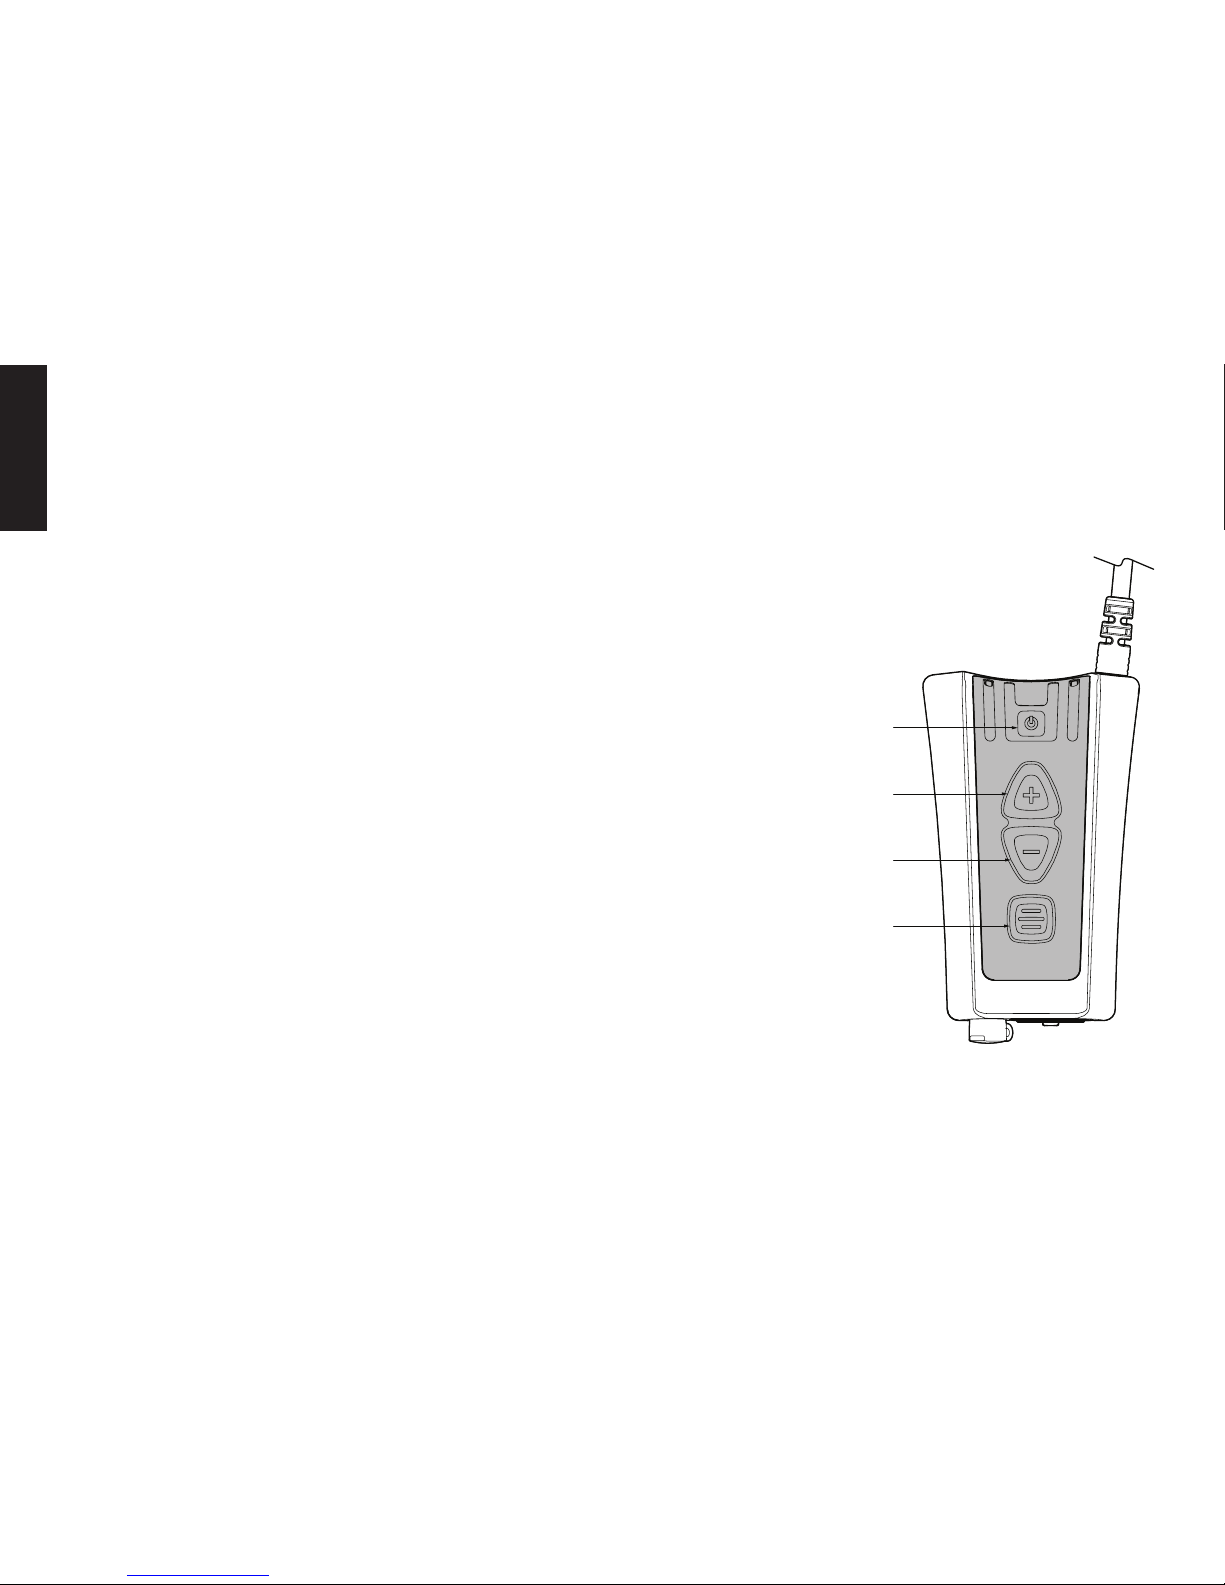
1. HEADSET ANATOMY
Right indicator light
Right Ear Bud
Disposable Foam Tip
Left Ear Bud
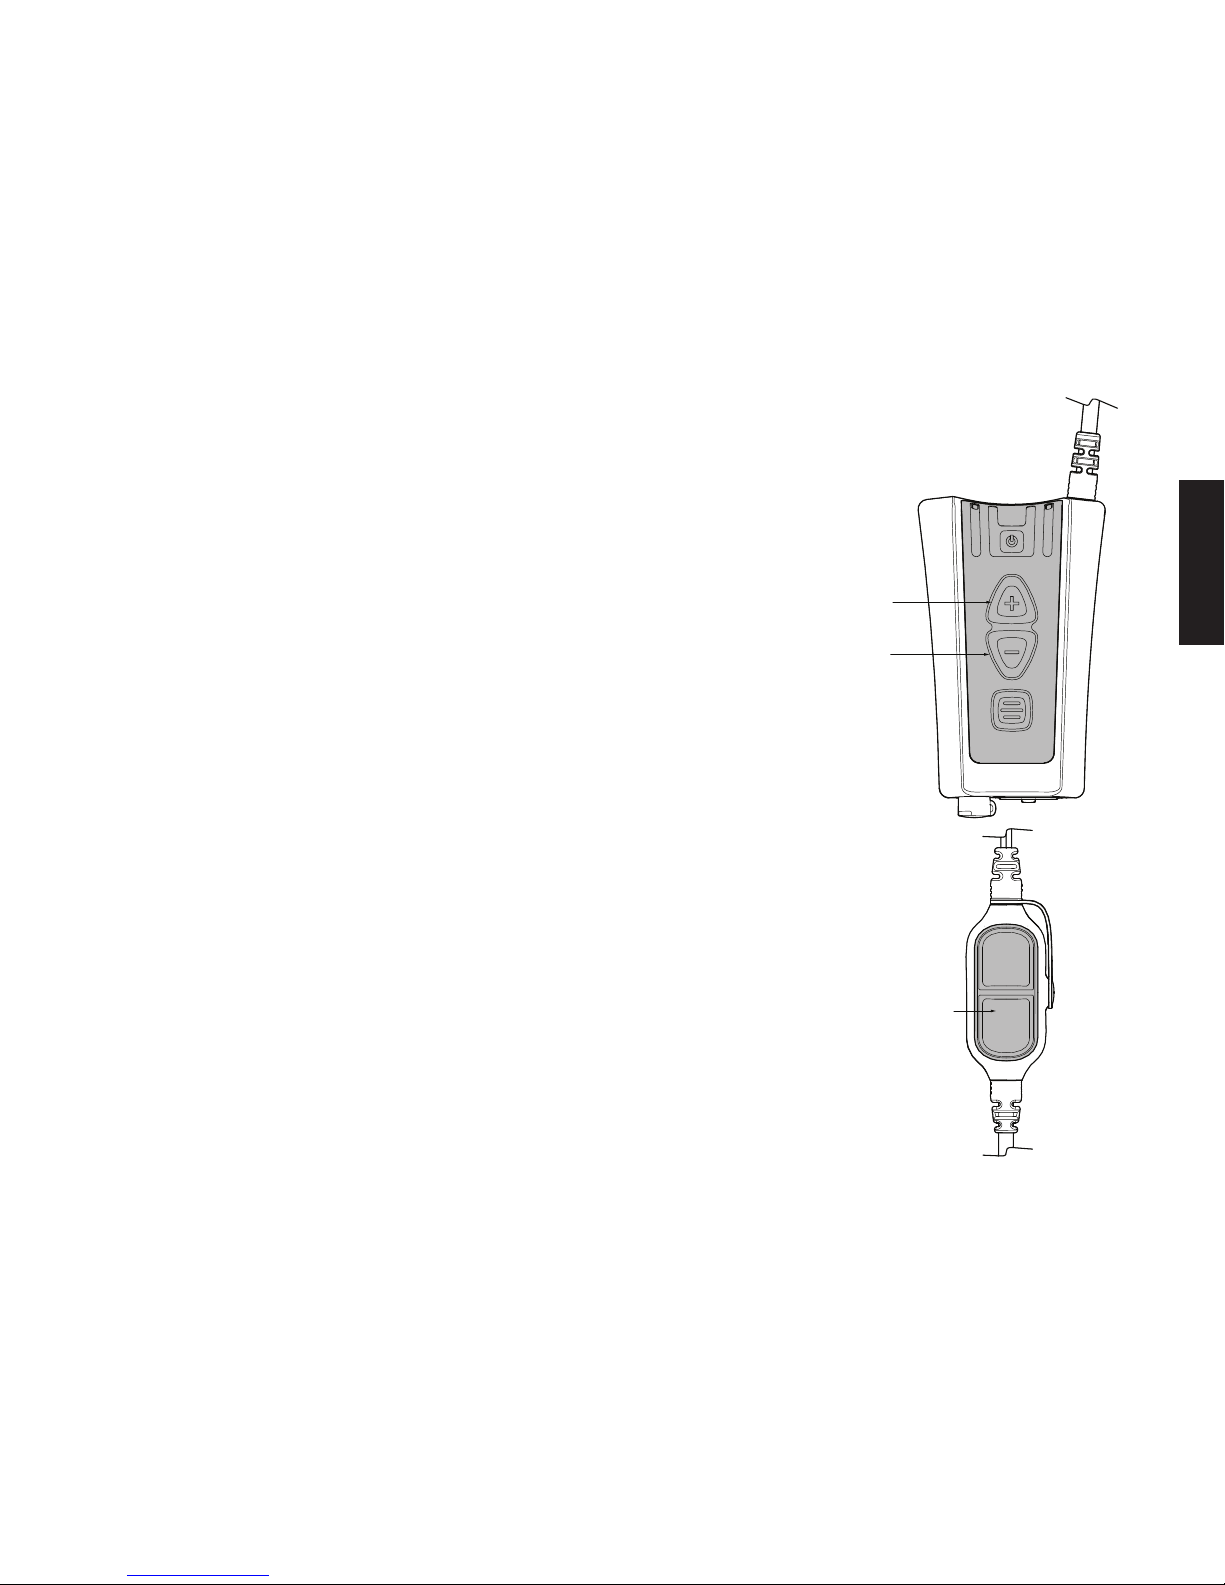
Inline PTT
Inline 1 Button
Inline 2 Button
Left Indicator Light
Power Button
Volume Up Button
Multi Function Button
Volume Down Button
Main Unit with Belt Clip
Two-Way Radio Connection
Mini USB Connection
Battery Rechaging Connection
1

English
2
2.WEARING THE HEADSET
The smartPlug is a state of the art hearing protection
communication system that allows you to retain situational
awareness while being in full contact with all your
communication devices.
Situational awareness is provided by processing
technology and environmental microphones within the
Earbuds.
Contact through other communication devices is enabled by:
- Two Way Radios interface cables (sold separately).
- Bluetooth to Two Way Radios and cell phones (if installed)
- Direct Headset to Headset communications through
Short Range (if installed)
The smartPlug is designed to be worn with the main housing
attaching to the belt or pant seam, and the Inline PTT
attaching to the shirt / upper garment of the user.
Note: For SR communications, the best communication
range is achieved with the Inline PTT set as high up on the
user as possible.
Ear
Ear
Microphone
Ear Buds
Inline PTT
Main Housing
Earbud
Foam Tip
In-Ear speaker
and microphone

English
3
3. FITTING THE EARBUDS
1. Place Disposable Foam
Tip between thumb and
forefinger.
6. Using your opposite hand, pull
your ear upward and outward.
Insert the Ear Bud deeply into the
ear -as you would normally do with
a Foam Ear Plug.
7. Hold the Ear Bud in place for
30 seconds while the Foam Tip
expands.
8. Check to ensure the Ear Buds
are correctly inserted.
9. A poor fit will be visible by the
Earbuds being far away from the
ear. No foam tip should be visible.
Repeat the process until a good
fit is achieved.
2. Roll Foam Tip to a
compressed, crease free
cylinder
3. Push the Foam Tip all the
way onto the Ear Bud spout.
4. Roll the Foam Tip again
between the thumb and
forefinger.
5. Ensure the Foam Tip
remains a compressed,
crease free cylinder on the
Ear Bud.
It is critical the earbuds are correctly fitted to ensure the correct level of hearing protection and communication abilities. The Earbuds
incorporate an in-ear pickup, if the Earbuds are not fitted correctly, the speech quality may be lower than expected.

English
4
4. CHARGING
Your headset comes supplier with a charger. Do not
attempt to use third party chargers as damage may
result.
The headset should be regularly charged. To charge
your headset connect the charger to the headset and
connect to the mains power.
While charging the Right Indicator LED will be Red.
When charging is complete the LED will turn Green.
Note: Be sure to charge your headset fully before first
use.
Note: Your headset will automatically power up when the
charger is connected to the headset.
Charge Time :5 hours
Battery Life: 15 hours
Your headset is powered by a built-in high capacity Lithium Ion battery.
Thisis designed to last the life of your headset and should be returned to
the manufacturer for replacement and servicing. Any attempt to access
the battery will damage the headset. Please see accompanying smartPlug
Headset Information guide for additional safety battery precautions.
Right Indicator
Red: Charging
Green: Charge Complete
Charger
Charging Jack

English
5
5. POWER ON HEADSET
Your headset must be powered up to use
situational awareness and the communication
connectivity features.
Power on / off
To power up your headset press and release the
power button.
To power off your headset press and hold the power
button until the unit powers off.
6. ENVIRONMENTAL MODES
Your smartPlug headset features situational
awareness technology.
(Speech Enhancement, Noise Suppression)
allows you to be in audible contact with your
surroundings while wearing your headset.
To toggle situational awareness on or off
momentarily press and release the power button.
Right Indicator
Green fast flash: Quiet Mode
Green slow flash:
active
Red flash:
Battery low (less than 1 hour)
Off: Headset off
Power Button

English
English
7. CONNECTING TWO WAY RADIO
smartPlugheadset can be connected to most Two Way
Radios through interface cables (sold separately).
1. Connect the Two Way Radio Cable into the Two way
Radio Connector located on the bottom of the Main
Unit.
2. Turn the Two Way Radio on. A tone will be heard
through the headset indicating it has detected the
Two Way Radio.
3. Adjust the volume of the Two Way Radio
communication by the normal controls of your Two
Way Radio until a comfortable level is reached.
4. To transmit, press and hold the Inline 1 Button or
the button programmed by your dealer.
Note: See ‘Using Bluetooth’ for more information on
connecting Two-Way Radios by Bluetooth.
Two Way Radio Connector
Two Way Radio Cable
Inline PTT
Inline 1 Button
6

English
8. USING BLUETOOTH
smartPlug Headsets also feature Bluetooth connectivity
(if installed). Bluetooth enables wireless connections to some
models of Two Way Radio, industrial computers, vibration analysers
and most Cell phones. If Bluetooth is installed on your smartPlug,
the following details apply.
Default automatic connection setting: When the headset powers
up, the smartPlug searches for previously paired devices. If a
previously paired device is within range, it will automatically attempt
to reconnect to this device. A blue light will flash slowly if a Bluetooth
connection is made and you will hear a tone in the headset.
Note: When entering pairing mode the smartPlug forgets all
previously connected devices.
Note: Bluetooth is discoverable for 2 minutes in pairing mode. If no
connection has been made within this time, the process will need to
be repeated.
Bluetooth Phone :To answer calls, press the Multi Function Button
(or programmed button, consult your dealer). To end or reject a
call, press and hold the Multi Function button for 2 seconds.
Bluetooth PTT:Some radios and cell phones feature PTT over
Bluetooth. Please consult your dealer for more information.
7

English
English
8
9. BLUETOOTH PAIRING AND
CONNECTING
Bluetooth pairing to new device:
For Bluetooth functionality, the smartPlug headset must be paired
and connected.
1. Enable Bluetooth on the device which you want to connect to the
smartPlug
2. Power up the smartPlug
3. Hold the Multi Function Button for 5 seconds to enable pairing.
A blue light indicator will switch on.
4. Follow pairing instructions on the device that you want to
connect to, search and pair the smartPlug. If asked for a
passkey, enter 0000
5. Once paired, the headset will automatically connect and the blue
light indicator will flash slowly.
6. If automatic connection fails, use the device instructions to
connect to the smartPlugheadset.
Multi Function Button

9
10. USING SHORT RANGE
Short Range (SR) is a technology enabling communication directly
between compatible smartPlug headsets. Short Range units tuned
to the same channel and within range will hear your transmissions.
SR behaves similarly to Two-Way Radios, where only one unit can
transmit at one time.
If Short Range is installed on your smartPlug, the following applies:
By default, Short Range is disabled and must be enabled. To
enable Short Range press Volume Up and Volume Down buttons
simultaneously, the smartPlug headset will make a tone indicating
SR has been enabled.
Headset to Headset Communication with SR: To communicate
with other smartPlug headsets push and hold the Inline 2 Button
and talk. Other headsets within range and tuned to the same
frequency will hear your transmissions.
SR Change frequency channel: To change SR channel up press
and hold Volume Up. To change SR channel down press and hold
Volume Down. The smartPlug headset will speak the channel
number. Up to 8 channels can be programmed.
The SR frequency can only be set by your dealer. Please contact
your dealer for reprogramming of channels.
Volume Up Button
Volume Down Button
Inline 2 Button
English
English
English
10
11. USING FM RADIO
SmartPlugheadsets can also be configured to receive FM radio
stations. This enables you to listen to FM radio while wearing
the smartPlug. If FM Radio is installed on your smartPlug, the
following applies:
By default, FM Radio Reception is disabled and must be enabled
as follows:
FM Radio on / off: Press the Power Button + Multi Function
Button together simultaneously. The smartPlugwill make a tone
indicating that FM radio has been enabled and you will hear the
currently tuned radio station in the headset.
To change radio stations, scan for a new station:
FM Radio Scan: Press and hold the Volume Up button for 2
seconds to scan up, or press and hold the Volume Down button
for 2 seconds to scan down. The smartPlugheadset will tune to
the next stations
Note: SR and FM radio cannot be enabled simultaneously. Enabling FM
radio will automatically disable SR Radio and vice versa.
Multi Function Button
Power Button
Volume Up Button
Volume Down Button

12. TROUBLESHOOTING
Having Trouble pairing the headset
Make sure any previously paired devices are powered off. Make
sure the radio is configured with Bluetooth enabled.
Headset and Radio will not connect
Wired:
Make sure the cable is securely fastened to both the Two Way
Radio and the Main Housing.
Bluetooth:
Make sure your radio and headset are paired together and within
range. Try pairing the two devices together again. Make sure the
Two Way Radio is not connected to another device or headset.
Having Trouble Hearing
Check your headset is on. Make sure your radio and headset
are paired, connected and within range. Check the radio’s LED
indicator to check transmit/receive is not stuck on. Check
your radio is functioning by turning off the headset and listening
through the radio. If the radio is working, try turning up the
volume control on the headset and on the radio controls.
Having trouble being heard
Check the headset is on. Make sure the radio and headset
are paired, connected and within range. Check your radio is
functioning by turning off the headset and talking through the
radio.Make sure you have fitted the Ear Buds correctly.
Ensure radio gain is set to a reasonable level.
Two-Way Radio distorted
Check your Two-Way Radio volume level. If the volume
is set too high, this may be breaching the volume level
on the smartPlug and affecting the sound quality.
English
11
Light Indicator Headset Function
Red On Charging
Green on Charge Complete
Red slow flash Battery Low <1hr remains
Green fast flash Quiet mode
Green slow flash
situational
awareness active
Blue on Bluetooth on and
discoverable
Blue slow flash Bluetooth connected
Blue fast flash Bluetooth incoming call
DOC00071 - Rev.00

smartPlug
GUÍA DEL USUARIO
Español
12

Español
PRIMEROS PASOS
1. Anatomía de los
auriculares
2. Uso de los auriculares
3. Montaje de los audífonos
4. Carga de los auriculares
5. Encendido de los
auriculares
6. Modalidad ambiental
7. Conexión de radio
bidireccional
8. Uso de Bluetooth
9. Asociación y conexión
por Bluetooth
10. Uso de corto alcance
(Short Range en inglés)
11. Uso de radio FM
12. Solución de problemas
1. ANATOMÍA DE LOS AURICULARES
Luz de indicador derecho
Audífono derecho
Protector de
espuma descartable
Audífono izquierdo
Línea PTT
Botón de linea 1
Botón de linea 2
Luz de indicador izquierdo
Botón de encendido
Botón para subir volumen
Botón multifunción
Botón para bajar volumen
Unidad principal con
sujetador para cinturón
Conexión de radio bidireccional
Mini conexión USB
Conexión para recarga
de batería
13

14
2. USO DE LOS AURICULARES
El smartPlug es un sistema de comunicación de protección
auditiva de última generación que le permite conservar la
conciencia situacional y simultáneamente mantener pleno
contacto con todos sus dispositivos de comunicación.
La conciencia situacional es proporcionada
por el procesamiento de la tecnología y los micrófonos
ambientales dentro de los audífonos.
El contacto a través de otros dispositivos de comunicación
se activa por medio de:
- Cables de interfaz de radio bidireccional (se venden por
separado).
- Bluetooth para radios bidireccionales y teléfonos
celulares (si están instalados).
- Comunicación directa de auricular a auricular a través
del sistema de corto alcance (si está instalado).
El smartPlug está diseñado para uso con la carcasa
principal sujeta al cinturón o a la costura del pantalón, y la
línea PTT sujeta a la camisa / prenda superior del usuario.
Nota: Para las comunicaciones de corto alcance, la mejor
cobertura de comunicación se logra con la línea PTT
colocada lo más elevada posible en el usuario.
Oído
MIcrófono
Audífonos
Línea PTT
Carcasa principal
Audífono
Protector de espuma
Auricular
dentro del oído
y micrófono
Español

15
3. MONTAJE DE LOS AUDÍFONOS
1. Coloque el protector de
espuma desechable entre
el pulgar y el índice.
6. Con la mano opuesta, tire
de la oreja hacia arriba y hacia
afuera. Inserte el audífono
profundamente en el oído - como
lo haría normalmente con un
tapón de oídos.
7. Sostenga el audífono en su sitio
por 30 segundos mientras se
expande el protector de espuma.
8. Compruebe que los audífonos
se inserten correctamente.
9. Un mal ajuste se Observação
porque los audífonos quedan
lejos de la oreja. Ningún protector
de espuma debe quedar visible.
Repita el proceso hasta lograr
un buen ajuste.
2. Enrolle el protector de
espuma hasta formar un
cilindro comprimido libre de
pliegues.
3. Empuje el protector de
espuma hacia el pitorro del
audífono.
4. Enrolle el protector de
espuma otra vez entre el
pulgar y el índice.
5. Compruebe que el
protector de espuma
siga siendo un cilindro
comprimido libre de
arrugas en el audífono.
Es fundamental que los audífonos estén correctamente colocados para asegurar el nivel correcto de protección auditiva y capacidad de
comunicación. Los audífonos incorporan la recepción dentro del oído. Si los audífonos no se montan correctamente, la calidad de la voz puede
ser menor de lo esperado.
Español

16
4. CARGA
El auricular viene con un cargador. No intente utilizar
cargadores de terceros, pues podría provocar daños.
El auricular debe cargarse regularmente. Para cargar
el auricular, conecte el cargador al auricular y a la red
eléctrica.
Mientras carga, el indicador LED derecho está rojo.
Cuando finaliza la carga, el LED se pone verde.
Nota: Asegúrese de cargar el auricular completamente
antes del primer uso.
Nota: El auricular se encenderá automáticamente
cuando el cargador esté conectado al auricular.
Tiempo de carga: 5 horas
Duración de la batería: 15 horas
El auricular es alimentado por una batería de iones de litio de alta
capacidad incorporada. Está diseñada para durar toda la vida del auricular
y debe ser devuelta al fabricante para sustitución y mantenimiento.
Cualquier intento de acceder a la batería dañará el auricular. Consulte la
guía informativa de los auriculares smartPlug adjunta para adicionales
precauciones de seguridad de la batería.
Cargador
Conector de
carga
Español
Indicador derecho
Rojo: Cargando
Verde: Carga completa

17
El auricular debe estar encendido para usar las
funciones de conciencia situacional y de
conectividad de comunicación.
Encendido (on) / Apagado (off)
Para encender el auricular, presione y suelte el
botón de encendido.
Para apagar el auricular, presione el botón de
encendido y manténgalo presionado hasta que se
apague la unidad.
6. MODALIDAD AMBIENTAL
El auricular smartPlug utiliza la tecnología
de conciencia situacional (Speech
Enhancement, Noise Suppression: mejora del habla
y supresión de ruidos).
le permite estar en contacto auditivo con el
entorno mientras escucha los auriculares.
Para apagar o encender la conciencia situacional
presione un momento y suelte el botón
de encendido.
Indicador derecho
Parpadeo verde rápido: Modo silencioso
Parpadeo verde lento:
activo
Parpadeo rojo:
Batería baja
(menos de 1 hora)
Off: Auriculares apagados
Botón de
encendido
Español
5. ENCENDIDO DE LOS AURICULARES

El auricular smartPlug se puede conectar a la mayoría
de los radios bidireccionales a través de los cables de
interfaz (se venden por separado).
1. Conecte el cable del radio bidireccional al conector
de radio bidireccional situado en la parte inferior de
la unidad principal.
2. Encienda el radio bidireccional. Escuchará un tono
por el auricular que indica que éste ha detectado el
radio bidireccional.
3. Ajuste el volumen de la comunicación del radio
bidireccional por los controles normales de su radio
hasta alcanzar un nivel cómodo.
4. Para transmitir, mantenga presionado el botón de
línea 1 o el botón programado por el distribuidor.
Nota: Vea ‘Uso de Bluetooth’ para mayor información
sobre cómo conectar un radio bidireccional por
Bluetooth.
Conector de radio
bidireccional
Cable de radio bidireccional
Línea PTT
Botón
de línea 1
18
Español Español
7. CONEXIÓN DE RADIO BIDIRECCIONAL

8. USO DE BLUETOOTH
Los auriculares smartPlug también cuentan con conectividad
Bluetooth (si está instalado). Bluetooth permite conexiones
inalámbricas a algunos modelos de radio bidireccional,
computadoras industriales, analizadores de vibración y la mayoría
de los teléfonos celulares. Vea los detalles siguientes si Bluetooth
está instalado en su smartPlug.
Configuración de conexión automática por defecto: Cuando se
enciende el auricular, el smartPlug busca dispositivos previamente
asociados. Si un dispositivo asociado antes está dentro del
alcance, intentará volver a conectarse automáticamente a él.
Si se establece una conexión Bluetooth, una luz azul parpadeará
lentamente y escuchará un tono en el auricular.
Nota: Al entrar en la modalidad de asociación, el smartPlug olvida
todos los dispositivos conectados previamente.
Nota: El Bluetooth es detectable durante 2 minutos en la
modalidad de asociación. Si no establece conexión dentro de
este tiempo, será necesario repetir el proceso.
Teléfono Bluetooth: Para responder llamadas, presione el botón
multifunción (o el botón programado, consulte a su vendedor). Para
finalizar o rechazar una llamada, mantenga presionado el botón
multifunción durante 2 segundos.
PTT Bluetooth: Algunos radios y teléfonos celulares cuentan con
PTT a través de Bluetooth. Consulte a su distribuidor para obtener
más información.
19
Español

20
9. ASOCIACIÓN Y CONEXIÓN
POR BLUETOOTH
Cómo asociar un nuevo dispositivo por Bluetooth:
Para utilizar la función Bluetooth, el auricular smartPlug debe estar
asociado y conectado.
1. Active Bluetooth en el dispositivo que desea conectar al
smartPlug.
2. Encienda el smartPlug.
3. Presione el botón multifunción durante 5 segundos para
permitir la asociación. Se encenderá un indicador de luz azul.
4. Siga las instrucciones de asociación del dispositivo al que desea
conectarse, busque y asocie el smartPlug. Si se le solicita una
clave de acceso, introduzca 0000.
5. Una vez asociado, el auricular se conectará automáticamente y
el indicador de luz azul parpadeará lentamente.
6. Si falla la conexión automática, utilice las instrucciones del
dispositivo para conectar a los auriculares smartPlug.
Botón multifunción
Español
English
21
10. USO DE CORTO ALCANCE
Corto Alcance (SR) es una tecnología que permite la comunicación
directa entre auriculares smartPlug compatibles.Las unidades de
corto alcance sintonizadas en el mismo canal y dentro del radio de
conexión escucharán sus transmisiones. El corto alcance (SR) se
comporta de manera similar a los radios bidireccionales, es decir
que solo una unidad puede transmitir por vez.
Vea los detalles siguientes si el corto alcance está instalado en su
smartPlug:
Por defecto, el corto alcance se desactiva y debe ser activado. Para
hacerlo, presione simultáneamente los botones de Subir y Bajar
volumen. El auricular smartPlug hará un tono indicando que se
activó el corto alcance.
Comunicación de auricular a auricular con corto alcance:
Para comunicarse con otros auriculares smartPlug, mantenga
presionado el botón de línea 2 y hable. Otros auriculares dentro del
radio de conexión y sintonizados en la misma frecuencia escucharán
sus transmisiones.
Cambio del canal de corto alcance: Para cambiar para arriba
el canal de corto alcance, mantenga presionado Subir volumen.
Para cambiar de canal para abajo, mantenga presionado Bajar
volumen. El auricular smartPlug dirá el número de canal. Se pueden
programar hasta 8 canales.
Solo su distribuidor puede configurar la frecuencia de corto alcance.
Póngase en contacto con su distribuidor para reprogramar los
canales.
Botón para
subir volumen
Botón para bajar
volumen
Botón de
linea 2
Español

22
11. USO DE RADIO FM
Los auriculares smartPlug también se pueden configurar para
recibir emisoras de radio FM. Esto le permite escuchar radio
FM mientras usa el smartPlug. Vea los detalles siguientes si
tiene instalada la radio FM en su smartPlug:
Por defecto, la recepción de radio FM está desactivada y se
debe activar de la siguiente manera:
Encendido / Apagado de Radio FM: Presione juntos y al mismo
tiempo los botones de encendido y de multifunción. El smartPlug
hará un tono indicando que se activó la radio FM y usted
escuchará en el auricular la emisora sintonizada.
Para cambiar las estaciones de radio, busque una nueva
estación:
Búsqueda de radios FM: Mantenga presionado el botón
Subir volumen durante 2 segundos para buscar hacia arriba
o mantenga presionado Bajar volumen durante 2 segundos
para buscar hacia abajo. El auricular smartPlug sintonizará las
próximas estaciones.
Nota: No se pueden activar simultáneamente las radios SR y FM.
Al habilitar una radio FM, se desactiva automáticamente la de corto
alcance (SR) y viceversa.
Botón multifunción
Botón de
encendido
Botón para
subir volumen
Botón para
bajar volumen
Español

12. SOLUCIÓN DE PROBLEMAS
Problemas de asociación del auricular
Compruebe que todos los dispositivos previamente asociados estén
apagados. Asegúrese de que la configuración radio tenga Bluetooth
activado.
Auricular y radio no se conectan
Cable:
Asegúrese de que el cable esté bien conectado al radio
bidireccional y a la carcasa principal.
Bluetooth:
Compruebe que haya asociación entre radio y auriculares y
que estén dentro del radio de conexión. Intente asociar los dos
dispositivos otra vez. Asegúrese de que el radio bidireccional no
esté conectado a otro dispositivo o auriculares.
Problemas de audición
Compruebe que el auricular esté encendido. Asegúrese de que
el radio y los auriculares estén asociados, conectados y dentro
del radio de conexión. Examine el indicador LED del radio para
verificar que transmitir / recibir no se haya atascado. Compruebe
el funcionamiento del radio apagando el auricular y escuchando el
radio. Si el radio funciona, intente subir el control de volumen del
auricular y del radio.
Problemas para ser escuchado
Compruebe que el auricular esté encendido. Asegúrese de que
el radio y los auriculares estén asociados, conectados y dentro
del radio de conexión. Compruebe el funcionamiento del radio
apagando el auricular y hablando por el radio. Asegúrese de
haberse colocado los audífonos correctamente. Compruebe que la
amplitud del sonido esté configurada en un nivel razonable.
Distorsión en el radio bidireccional
Compruebe el nivel de volumen del radio bidireccional.
Si el volumen es demasiado alto, puede estar
superando el nivel de volumen del smartPlug y
afectando la calidad del sonido.
23
Indicador de luz Función del auricular
Rojo Carga
Verde Carga completa
Parpadeo rojo lento Batería baja < 1 h restante
Parpadeo verde rápido Modo silencioso
Parpadeo verde lento Conciencia situacional
activa
Azul Bluetooth encendido y
detectable
Parpadeo azul lento Bluetooth conectado
Parpadeo azul rápido Llamada entrante de
Bluetooth
Español

Português
24
smartPlug
MANUAL DO USUÁRIO

Português
25
GUIA RÁPIDO
1. Estrutura do fone de
ouvido
2. Usando o fone de ouvido
3. Ajustando os fones intraauriculares
4. Carregando o fone de
ouvido
5. Ligue o fone de ouvido.
6. Modos ambientais
7. Conectando um rádio
emissor/receptor
8. Usando o Bluetooth
9. Pareamento e conexão
por Bluetooth
10. Usando a função de curto
alcance
11. Usando o rádio FM
12. Solução de problemas
1. ESTRUTURA DO FONE DE OUVIDO
Luz indicadora direita
Fone intra-auricular
direito
Ponta de espuma
descartável
Fone intraauricular esquerdo
PTT integrado
Botão integrado 1
Botão integrado 2
Luz indicadora esquerda
Botão Liga/Desliga
Botão Aumentar volume
Botão Multifunção
Botão Diminuir volume
Unidade principal
com clipe para cinto
Conexão de rádio
emissor/receptor
Mini conexão USB
Conexão de recarga
de bateria

26
Português
2. USANDO O FONE DE OUVIDO
O smartPlug é um sistema de comunicação e proteção
auricular de ponta que lhe permite manter a percepção
situacional estando em pleno contato com todos os seus
dispositivos de comunicação.
A percepção situacional é fornecida pelos microfones
ambientais e tecnologia de processamento dentro
dos fones intra-auriculares.
O contato através de outros dispositivos de comunicação é
viabilizado por:
- Cabos de interface de rádios emissores/receptores
(vendidos separadamente)
- Bluetooth para rádios emissores/receptores e celulares
(se instalado)
- Comunicações diretas por curto alcance entre fones de
ouvido (se instalado)
O smartPlug é projetado para ser usado com o suporte
principal preso ao cinto ou ao cós da calça, e o PTT
integrado preso à camisa/parte superior da vestimenta do
usuário.
Observação: Em comunicações de curto alcance , a melhor
faixa de comunicação é obtida com o PTT integrado ajustado
no ponto mais alto possível junto ao corpo do usuário.
Orelha
MIcrofonoe
Fones intra-auriculares
PTT integrado
Suporte principal
Fone intra-auricular
Ponta de espuma
Alto-falante
intra-auricular e
microfone

27
Português
3. AJUSTANDO OS FONE INTRA-AURICULARES
1. Coloque a ponta de
espuma descartável entre
o polegar e o indicador.
6. Usando a mão oposta, puxe
sua orelha para cima e para fora.
Insira o fone intra-auricular no
ouvido - como faria normalmente
com um protetor auricular de
espuma.
7. Segure o fone intra-auricular
esta posição por 30 segundos
enquanto a ponta de espuma se
expande.
8. Certifique-se de que os fones
intra-auriculares estão inseridos
da forma certa.
9. O encaixe incorreto ficará visível,
com os fones intra-auriculares fora
do ouvido. Nenhuma parte da ponta
de espuma deve estar visível. Repita
o processo até conseguir o ajuste
adequado.
2. Gire a ponta de espuma
comprimindo-a e formando
um cilindro sem dobras/
rugas.
3. Coloque a ponta de
espuma na extremidade
do fone intra-auricular.
4. Gire novamente a ponta
de espuma descartável
entre o polegar e o
indicador.
5. Certifique-se de que a
ponta de espuma continua
comprimida e formando um
cilindro sem dobras/rugas
no fone intra-auricular.
É essencial que os fones de ouvido sejam encaixados corretamente para garantir o nível certo de proteção auditiva e habilidades de
comunicação. Os fones intra-auriculares têm um captador sonoro e se não estiverem encaixados de forma adequada, a qualidade da voz pode
ser inferior à esperada.

28
Português
4. CARGA
O fone de ouvido vem com um carregador. Não tente
usar carregadores de terceiros, pois isso pode causar
danos.
O fone de ouvido deve ser carregado com frequência.
Para carregar o fone, conecte o carregador ao fone de
ouvido e conecte-o à fonte de alimentação.
Durante a carga, o LED indicador direito ficará
vermelho. Quando a carga estiver completa, o LED
ficará verde.
Observação: Carregue o fone de ouvido por completo
antes do primeiro uso.
Observação: O fone ligará automaticamente quando o
carregador for conectado a ele.
Tempo de carga: 5 horas
Vida útil da bateria: 15 horas
O fone de ouvido é acionado por uma bateria de íon de lítio embutida de
alta capacidade. Ela é projetada para durar por toda a vida útil do fone e
deve ser devolvida ao fabricante caso seja necessário substituí-la ou fazer
manutenção. Quaisquer tentativas de acesso à bateria danificarão o fone
de ouvido. Consulte o guia de informação que acompanha o fone de ouvido
smartPlug para mais precauções de segurança relacionadas à bateria.
Carregador
Conector do
carregador
Indicador direito
Vermelho: Carregando
Verde: Carga completa

29
Português
O fone de ouvido deve ser ligado para utilização
dos recursos de percepção situacional e
conectividade de comunicação.
Ligar/Desligar
Para ligar o fone de ouvido, pressione e solte o
botão liga/desliga.
Para desligar o fone de ouvido, mantenha o botão
liga/desliga pressionado até desativar a unidade.
6. MODOS AMBIENTAIS
O fone de ouvido smartPlug conta com a tecnologia
de percepção situacional (Speech
Enhancement, Noise Suppression - em tradução
livre: Aprimoramento da voz, supressão de ruído) .
A
permite que você mantenha contato
audível com o ambiente ao seu redor enquanto usa
o fone de ouvido.
Para ativar ou desativar momentaneamente a
percepção situacional , pressione e solte
o botão de acionamento
Indicador direito
Verde piscando rapidamente: Modo silencioso
Verde piscando lentamente: ativo
Vermelho piscando: Bateria fraca
(menos de 1 hora)
Desligado: Fone de ouvido desativado
Botão
Liga/Desliga
5. LIGAR O FONE DE OUVIDO

30
Português
O fone de ouvido smartPlug pode ser conectado à
maioria dos cabos de interface de rádios emissores/
receptores (vendidos separadamente).
1. Conecte o cabo do rádio emissor/receptor ao
conector do rádio emissor/receptor localizado na
parte inferior da unidade principal.
2. Ligue o rádio emissor/receptor. O fone emitirá um
som, indicando que o rádio emissor/receptor foi
detectado.
3. Ajuste o volume de comunicação do rádio emissor/
receptor através dos controles normais do aparelho
até encontrar um nível confortável.
4. Para transmitir, pressione e segure o botão
integrado 1 ou o botão programado pelo seu
revendedor.
Observação: Consulte a seção “Usando o Bluetooth”
para mais informações sobre a conexão de rádios
emissores/receptores por Bluetooth.
Conector do rádio
emissor/receptor
Cabo do rádio
emissor/receptor
PTT integrado
Botão
integrado 1
7. CONECTANDO UM RÁDIO EMISSOR/RECEPTOR

31
Português
8. USANDO O BLUETOOTH
Os fones de ouvido smartPlug também contam com conectividade
Bluetooth (se instalada). O Bluetooth permite conexões sem fio
com alguns modelos de rádio emissor/receptor, computadores
industriais, analisadores de vibração e a maioria dos telefones
celulares. Se seu smartPlug tiver Bluetooth, as seguintes
informações são pertinentes.
Configuração padrão de conexão automática: Quando o fone de
ouvido é acionado, o smartPlug faz uma busca por dispositivos
que já tenham sido pareados. Se um dispositivo que já tenha sido
pareado estiver no raio de alcance, ele tentará se reconectar
automaticamente a este dispositivo. Uma luz azul piscará
lentamente se uma conexão Bluetooth for estabelecida e você
ouvirá um som no fone de ouvido.
Observação: Ao entrar no modo de pareamento, o smartPlug
desconsidera todos os outros dispositivos previamente conectados.
Observação: No modo de pareamento, o Bluetooth fica detectável
por 2 minutos. Se nenhuma conexão for estabelecida dentro deste
prazo, o processo terá que ser repetido.
Telefone Bluetooth: Para atender chamadas, pressione o botão
multifunção (ou o botão programado, consulte seu revendedor).
Para encerrar ou rejeitar uma chamada, pressione e segure o
botão multifunção por 2 segundos.
Bluetooth do PTT: Alguns rádios e telefones celulares contam com
a função PTT através do Bluetooth. Consulte seu revendedor para
mais informações.

32
Português
Pareando o Bluetooth com um novo dispositivo:
Para a funcionalidade Bluetooth, o smartPlug deve ser pareado e
conectado.
1. Habilite o Bluetooth no dispositivo que você deseja conectar ao
smartPlug.
2. Ligue o smartPlug.
3. Mantenha o botão multifunção pressionado por 5 segundos
para habilitar o pareamento. Uma luz indicadora azul acenderá.
4. Siga as instruções de pareamento no dispositivo ao qual deseja
se conectar, faça a busca e pareie o smartPlug. Se uma senha
for solicitada, digite 0000.
5. O fone será conectado automaticamente quando estiver
pareado e a luz indicadora azul piscará lentamente.
6. Se a conexão automática falhar, use as instruções do dispositivo
para conectá-lo ao fone de ouvido smartPlug.
Botão Multifunção
9. PAREAMENTO E CONEXÃO POR BLUETOOTH

33
Português
O curto alcance (SR) é uma tecnologia que viabiliza a comunicação
direta entre fones de ouvido smartPlug compatíveis.
Unidades de curto alcance sintonizadas no mesmo canal e dentro
do raio de alcance ouvirão suas transmissões.
O SR funciona de maneira semelhante aos rádios emissores/
receptores, onde apenas uma unidade pode transmitir de cada vez.
Se seu smartPlug tiver a função de curto alcance, as seguintes
informações são pertinentes:
Por padrão, o curto alcance está desativado e deve ser habilitado.
Para habilitar o curto alcance, pressione simultaneamente os
botões aumentar e diminuir volume. O fone de ouvido smartPlug
emitirá um som indicando que o SR foi ativado.
Comunicação entre fones de ouvido com SR: Para se comunicar
com outros fones de ouvido smartPlug, mantenha o botão integrado
2 pressionado e fale. Outros fones de ouvido no raio de alcance e
sintonizados na mesma frequência ouvirão suas transmissões.
Mudança da frequência do canal de curto alcance: Para aumentar
o canal de SR, mantenha o botão aumentar volume pressionado.
Para diminuir o canal de SR, mantenha o botão diminuir volume
pressionado. O fone de ouvido smartPlug falará o número do canal.
É possível programar até 8 canais.
A frequência de SR só pode ser configurada pelo seu revendedor.
Entre em contato com seu revendedor para reprogramar os canais.
Botão Aumentar
volume
Botão Diminuir
volume
Botão integrado 2
10. USANDO A FUNÇÃO DE CURTO ALCANCE

34
Português
11. USANDO O RÁDIO FM
Os fone de ouvido smartPlug também podem ser configurados
para receber estações de rádio FM. Isso lhe permite ouvir rádio
FM enquanto usa o smartPlug. Se seu smartPlug tiver rádio FM,
as seguintes informações são pertinentes:
Por padrão, a recepção de rádio FM está desativada e deve ser
habilitada da seguinte maneira:
Ligar/Desligar o rádio FM: Pressione simultaneamente o
botão liga/desliga e o botão multifuncional. O smartPlug emitirá
um som indicando que o rádio FM foi ativado e você ouvirá a
estação de rádio sintonizada no fone de ouvido.
Para mudar as estações de rádio, faça uma varredura por uma
nova estação:
Varredura no rádio FM: Mantenha o botão Aumentar
volume pressionado por 2 segundos para buscar estações
em frequências mais altas ou mantenha o botão Diminuir
volume pressionado por 2 segundos para buscar estações em
frequências mais baixas. O fone de ouvido smartPlug sintonizará
nas estações subsequentes.
Observação: A função SR e o rádio FM não podem ser habilitados
simultaneamente. Habilitar o rádio FM desabilitará automaticamente a
função SR e vice-versa.
Botão Multifunção
Botão Liga/Desliga
Botão Aumentar
volume
Botão Diminuir
volume

Luz indicadora Funcionamento do fone
de ouvido
Vermelha Carregando
Verde Carga completa
Vermelha piscando
lentamente
Bateria fraca (restando
menos de 1h)
Verde piscando
rapidamente
Modo silencioso
Verde piscando
lentamente
Percepção situacional
ativa
Azul Bluetooth acionado e
detectável
Azul piscando lentamente Bluetooth conectado
Azul piscando rapidamente Ligação recebida por
Bluetooth
35
Português
12. SOLUÇÃO DE PROBLEMAS
Problemas para parear o fone de ouvido
Certifique-se de que quaisquer dispositivos pareados anteriormente
estejam desligados. Confirme que o rádio está configurado com o
Bluetooth habilitado.
Fone de ouvido e rádio não conectam
Conexão cabeada:
Certifique-se de que o cabo está preso de forma segura ao rádio
emissor/receptor e ao suporte principal.
Bluetooth:
Certifique-se de que o rádio e o fone de ouvido estão pareados e
na mesma frequência. Tente parear os dois dispositivos juntos
novamente. Verifique se o rádio emissor/receptor não está
conectado a outro dispositivo ou fone de ouvido.
Problemas para ouvir
Verifique se o fone está ligado. O rádio e o fone de ouvido devem
estar pareados, conectados e dentro do raio de alcance. Observe
o indicador LED do rádio para verificar se a transmissão/recepção
não está travada. Desligue o fone e ouça através do rádio para
confirmar que o rádio está funcionando. Caso o rádio esteja
funcionando, tente aumentar o controle de volume no fone de
ouvido e nos controles do rádio.
Problemas para ser ouvido
Verifique se o fone está ligado. O rádio e o fone de ouvido devem
estar pareados, conectados e dentro do raio de alcance. Desligue
o fone e fale através do rádio para confirmar que o rádio está
funcionando. Ajuste corretamente os fones intra-auriculares.
O ganho de rádio deve estar configurado a um nível moderado.
Rádio emissor/receptor destorcido
Verifique o nível de volume do rádio emissor/receptor.
O volume muito alto pode estar ultrapassando o nível
de volume no smartPlug e afetando a qualidade do
som.

36
Français
smartPlug
MODE D’EMPLOI

37
Français
PRISE EN MAIN
1. Anatomie du casque
d’écoute
2. Port du casque d’écoute
3. Placement des écouteursboutons
4. Charge du casque d’écoute
5. Mise en marche du casque
d’écoute
6. Modes environnementaux
7. Connexion à une radio
bidirectionnelle
8. Utilisation de Bluetooth
9. Couplage et connexion
par Bluetooth
10. Utilisation de la radio à
courte distance
11. Utilisation de la radio FM
12. Dépannage
1. ANATOMIE DU CASQUE D’ÉCOUTE
Voyant lumineux droit
Écouteur-bouton
droit
Coussinet de
mousse jetable
Écouteur-bouton
gauche
PTT En-ligne
Bouton En-ligne 1
Bouton En-ligne 2
Voyant lumineux gauche
Bouton Marche
Bouton augmentation volume
Bouton Multifonction
Bouton diminution volume
Unité principale avec
attache de ceinture
Prise Radio bidirectionnelle
Prise Mini USB
Connexion de recharge
de batterie

38
Français
2. PORT DU CASQUE D’ÉCOUTE
Le smartPlug est un système de communication avec
protection auditive qui vous permet de retenir votre
conscience situationnelle tout en restant totalement en
contact avec vos appareils de communication.
La conscience situationnelle est assurée par la
technologie de traitement et les micros environnementaux
situés dans les écouteurs-boutons.
Le contact au moyen d’autres appareils de communication
est rendu possible par :
- Les câbles d’interface de radios bidirectionnelles
(vendus séparément)
- Le lien Bluetooth aux radios bidirectionnelles et
téléphones mobiles (s’il est installé)
- La communication directe de casque à casque par radio
à courte distance (SR) (si installée)
Le smartPlug est conçu pour être porté avec le boitier
principal attaché à la ceinture ou à la bordure du pantalon, et
le PTT (en anglais Push To Talk, Presser pour transmettre)
en-ligne attaché à la chemise ou au vêtement supérieur de
l’utilisateur.
Note : Pour les communications SR (en anglais Short
Range), la meilleure portée de communication est
obtenue avec le PTT en-ligne situé le plus haut possible
sur l’utilisateur.
Oreille
Micro
Écouteurs-boutons
PTT En-ligne
Boîtier principal
Écouteur-bouton
Coussinet mousse
Écouteur et
micro intraauriculaires

39
Français
3. PLACEMENT DES ÉCOUTEURS-BOUTONS
1. Placez le coussinet de
mousse jetable entre le
pouce et l’index.
6. Avec l’autre main, tirez votre
oreille vers le haut et l’extérieur.
Insérez l’écouteur-bouton
profondément dans l’oreille –
comme vous le feriez avec un
bouchon d’oreille de mousse.
7. Maintenez l’écouteur-bouton
en place pendant 30 secondes
pendant que le coussinet de
mousse se dilate.
8. Vérifiez que les écouteursboutons sont insérés
correctement.
9. Un mauvais placement sera
visible parce que les écouteursboutons seront écartés de l’oreille.
Le coussinet de mousse doit être
invisible. Répétez le processus
jusqu’à ce qu’un bon placement
soit réalisé.
2. Roulez le coussinet
de mousse pour en faire
un cylindre comprimé et
sans plis.
3. Poussez le coussinet de
mousse à fond sur l’embout
de l’écouteur-bouton.
4. Roulez le coussinet de
mousse à nouveau entre le
pouce et l’index.
5. Assurez-vous que le
coussinet de mousse reste
un cylindre comprimé sans
plis sur l’écouteur-bouton.
Il est très important que les écouteurs-boutons soient placés correctement pour assurer le niveau correct de protection auditive et les
capacités de communication. Les écouteurs-boutons comprennent des micros intra-auriculaires, et s’ils ne sont pas placés correctement, la
qualité d’élocution peut ne pas être aussi bonne que prévu.

Français
40
4. CHARGE DU CASQUE D’ÉCOUTE
Votre casque d’écoute est livré avec un chargeur.
N’essayez pas d’utiliser des chargeurs de tiers car des
dommages pourraient se produire.
Le casque d’écoute doit être chargé régulièrement. Pour
charger votre casque d’écoute connectez le chargeur au
casque d’écoute et connectez le chargeur à une prise de
courant.
Pendant la charge le voyant DEL de droite sera rouge.
Lorsque la charge sera terminée la DEL passera
au vert.
Note : Assurez-vous de charger votre casque d’écoute
complètement avant sa première utilisation.
Note : Votre casque d’écoute se met automatiquement
en marche lorsqu’il est connecté au chargeur.
Durée de la charge : 5 heures
Autonomie de la batterie : 15 heures
L’énergie de votre casque d’écoute est fournie par une batterie au
lithium-ion de haute capacité. Elle est prévue pour la durée de vie de votre
casque d’écoute et doit être retournée au fabricant pour remplacement et
entretien. Toute tentative d’accéder à la batterie endommagera le casque
d’écoute. Veuillez consulter le guide d’information sur le casque d’écoute
smartPlug pour les précautions de sécurité supplémentaires
sur la batterie.
Chargeur
Fiche Jack
chargeur
Voyant lumineux droit
Rouge : Charge en cours
Vert : Charge terminée

Français
41
Votre casque d’écoute doit être en marche
pour utiliser la conscience situationnelle
et les caractéristiques de connectivité pour la
communication.
Marche / Arrêt
Pour mettre votre casque d’écoute en marche
pressez et relâchez le bouton marche.
Pour arrêter votre casque d’écoute pressez
et maintenez le bouton marche jusqu’à ce que
l’appareil s’éteigne.
6. MODES ENVIRONNEMENTAUX
Votre casque d’écoute smartPlug est muni de la
technologie de conscience situationnelle
(Speech Enhancement, Noise Suppression :
Amélioration de l’élocution, Suppression du bruit) .
vous permet d’être en contact auditif avec
votre environnement lorsque vous portez votre
casque d’écoute.
Pour activer ou désactiver la conscience
situationnelle momentanément, pressez et
relâchez le bouton marche.
Voyant droit
Vert clignotant rapide : Mode silencieux
Vert clignotant lent : activé
Rouge clignotant : Batterie faible (moins
d’une heure d’autonomie)
Off: Casque d’écoute éteint
Bouton
Marche/Arrêt
5. MISE EN MARCHE DU CASQUE D’ÉCOUTE

42
Français
Le casque d’écoute smartPlug peut être connecté à la
plupart des radios bidirectionnelles au moyen des câbles
d’interface (vendus séparément).
1. Connectez le câble de la radio bidirectionnelle au
Connecteur de radio bidirectionnelle situé sur la face
inférieure de l’Unité principale.
2. Allumez la Radio bidirectionnelle. Une tonalité sera
entendue dans le casque d’écoute pour indiquer qu’il
a détecté la Radio bidirectionnelle.
3. Réglez le volume de la communication de la Radio
bidirectionnelle au moyen des boutons de contrôle
normaux de votre Radio bidirectionnelle de manière
à obtenir un niveau d’audition confortable.
4. Pour émettre, pressez et maintenez le bouton Inline
1 ou le bouton programmé par votre fournisseur.
Note : Consultez « Utilisation de Bluetooth » pour en
savoir plus sur la connexion de Radios bidirectionnelles
par Bluetooth.
Prise radio
bidirectionnelle
Câble radio bidirectionnelle
PTT en-ligne
Bouton
En-ligne 1
7. BRANCHEMENT D’UNE RADIO BIDIRECTIONNELLE

43
Français
8. UTILISATION DE BLUETOOTH
Les casques d’écoute smartPlug sont également munis de
connectivité Bluetooth (si installée). Bluetooth permet la connexion
à certains modèles de Radios bidirectionnelles, d’ordinateurs
industriels, d’analyseurs de vibrations et à la plupart des téléphones
portables. Si Bluetooth est installé sur votre smartPlug, les détails
suivants s’appliquent.
Paramètre de connexion automatique par défaut : À la mise en
marche du casque d’écoute, le smartPlug recherche les appareils
couplés précédemment. Si un appareil couplé précédemment
est à portée, il essaye automatiquement de se reconnecter à cet
appareil. Un voyant bleu clignotera lentement si une connexion est
établie et vous entendrez une tonalité dans le casque d’écoute.
Note : En passant au mode couplage le smartPlug oublie tous les
appareils connectés précédemment.
Note : Bluetooth est détectable pendant 2 minutes en mode
couplage. Si aucune connexion n’est établie dans ce délai, le
processus devra être répété.
Téléphone Bluetooth : Pour répondre à un appel, pressez le
bouton Multifonction (ou le bouton programmé, consultez votre
fournisseur). Pour terminer ou rejeter un appel, pressez et
maintenez le bouton Multifonction pendant 2 secondes.
PTT Bluetooth : Certaines radios et certains téléphones sont munis
d’une fonction PTT (Push To Talk, Presser pour transmettre) par
Bluetooth. Veuillez consulter votre fournisseur pour en savoir plus.

44
Français
Couplage d’un nouvel appareil par Bluetooth :
Pour la fonctionnalité Bluetooth, le casque d’écoute smartPlug doit
être couplé et connecté.
1. Activez Bluetooth sur l’appareil que vous voulez connecter au
smartPlug
2. Mettez le smartPlug en marche
3. Maintenez le bouton Multifonction appuyé pendant 5 secondes
pour activer le couplage. Un voyant bleu s’allumera.
4. Suivez les instructions de couplage sur l’appareil auquel vous
voulez vous connecter, recherchez et couplez le smartPlug.
Si une clé vous est demandée, saisissez 0000
5. Une fois couplé, le casque d’écoute se connectera
automatiquement et le voyant bleu clignotera lentement.
6. Si la connexion automatique échoue, utilisez les instructions de
l’appareil pour le connecter au casque d’écoute smartPlug.
Bouton Multifonction
9. COUPLAGE ET CONNEXION PAR BLUETOOTH

45
Français
La radio à courte distance (en anglais SR pour Short Range) est une
technologie permettant la communication directe entre casques
d’écoute compatibles smartPlug.
Les appareils SR réglés sur le même canal et se trouvant à portée
entendront vos émissions.
La SR se comporte de manière semblable aux Radios bidirectionnelles,
pour lesquelles un seul appareil peut émettre à un moment donné.
Si la SR est installée sur votre smartPlug, ce qui suit s’applique :
Par défaut, la SR est désactivée et doit être activée. Pour activer la
SR, pressez les boutons d’augmentation et de diminution du volume
simultanément, le casque d’écoute smartPlug émettra une tonalité
indiquant que la SR a été activée.
Communication d’un casque d’écoute à un autre avec SR : Pour
communiquer avec d’autres casques d’écoute smartPlug pressez et
maintenez le bouton Inline 2 et parlez. Les autres casques d’écoute à
portée réglés sur la même fréquence entendront vos émissions.
Changement de canal de fréquence en SR : Pour changer de
canal SR vers un canal plus haut, pressez et maintenez le bouton
d’augmentation du volume. Pour changer vers un canal SR plus bas,
pressez et maintenez le bouton de diminution du volume. Le casque
d’écoute smartPlug dira le numéro du canal. On peut programmer
jusqu’à 8 canaux.
La fréquence SR ne peut être établie que par votre fournisseur.
Veuillez contacter votre fournisseur pour la reprogrammation des
canaux.
Bouton augmentation
volume
Bouton diminution
volume
Bouton En-ligne 2
10. UTILISATION DE LA RADIO À COURTE DISTANCE

46
Français
11. UTILISATION DE LA RADIO FM
Les casques d’écoute smartPlug peuvent aussi être configurés
pour recevoir les stations radio FM. Ceci vous permet d’écouter
la radio FM lorsque vous portez le smartPlug. Si la radio FM est
installée sur votre smartPlug, ce qui suit s’applique :
Par défaut, la Réception radio FM est désactivée et doit être
activée comme suit :
Marche / Arrêt radio FM : Pressez le bouton Marche et le
bouton Multifonction simultanément. Le smartPlug émettra
une tonalité indiquant que la radio FM a été activée et vous
entendrez la station radio sur laquelle le casque d’écoute est
actuellement réglé.
Pour changer de station radio, effectuez un balayage vers une
nouvelle station :
Balayage radio FM : Pressez et maintenez le bouton
d’augmentation du volume pendant 2 secondes pour balayer
vers le haut, ou pressez et maintenez le bouton de diminution du
volume pendant 2 secondes pour balayer vers le bas. Le casque
d’écoute smartPlug se règlera sur les stations suivantes.
Note : Les radios SR et FM ne peuvent pas être activées simultanément.
Activer la radio FM désactivera automatiquement la radio SR et vice
versa.
Bouton Multifonction
Bouton Marche
Bouton
augmentation volume
Bouton
diminution volume

Voyant lumineux Fonction du casque
d’ecoute
Rouge fixe Charge en cours
Vert fixe Charge terminée
Rouge clignotant lent Batterie faible
< 1h d’autonomie
Vert clignotant rapide Mode silencieux
Vert clignotant lent
Conscience situationnelle
activée
Bleu fixe Bluetooth activé et
découvrable
Bleu clignotant lent Connecté par Bluetooth
Bleu clignotant rapide Appel par Bluetooth reçu
47
Français
12. DÉPANNAGE
Difficultés de couplage du casque d’écoute
Assurez-vous que tous les appareils précédemment couplés sont
éteints. Assurez-vous que la radio est configurée avec Bluetooth
activé.
Le casque d’écoute et la radio refusent de se connecter
Connexion par câble :
Assurez-vous que le câble est ancré correctement à la Radio
bidirectionnelle et au Boitier principal.
Bluetooth:
Assurez-vous que votre radio et votre casque d’écoute sont couplés
et à portée l’un de l’autre. Essayez de coupler les appareils à
nouveau. Vérifiez que la Radio bidirectionnelle n’est pas connectée à
un autre appareil ou casque d’écoute.
Difficultés de réception
Vérifiez que votre casque d’écoute est en marche. Assurez-vous
que votre radio et votre casque d’écoute sont couplés, connectés
et à portée l’un de l’autre. Vérifiez le voyant DEL de la radio pour
vous assurer que la fonction émission/réception n’est pas bloquée.
Vérifiez que votre radio fonctionne et éteignant le casque d’écoute
et en écoutant la radio directement. Si la radio fonctionne, essayez
d’augmenter le volume sur le casque d’écoute et sur la radio.
Difficultés d’émission
Vérifiez que le casque d’écoute est en marche. Assurez-vous que la
radio et le casque d’écoute sont couplés, connectés et à portée l’un
de l’autre. Vérifiez que votre radio fonctionne et éteignant le casque
d’écoute et en parlant par la radio directement. Assurez-vous
d’avoir placé les écouteurs-boutons correctement. Assurez-vous
que le gain de la radio est fixé à un niveau raisonnable.
Distorsion sur la Radio bidirectionnelle
Vérifiez le niveau du volume de votre Radio
bidirectionnelle. Si le volume est trop haut, il peut
dépasser le niveau de volume admissible du smartPlug
et affecter la qualité du son.

Italiano
48
smartPlug
MANUALE D’USO

Italiano
49
GUIDA
INTRODUTTIVA
1. Struttura delle cuffie
2. Indossare le cuffie
3. Indossare gli auricolari
4. Caricamento delle cuffie
6. Accensione delle cuffie
7. Modalità ambientali
8. Connessione a un
ricetrasmettitore
9. Uso del Bluetooth
10. Associazione e
connessione via Bluetooth
11. Uso della frequenza
a corto raggio
12. Uso della Radio FM
13. Risoluzione problemi
1. STRUTTURA DELLE CUFFIE
Spia luminosa destra
Auricolare destro
Tappo di gommapiuma
usa e getta
Auricolare sinistro
Tasto inline PTT
Tasto inline 1
Tasto inline 2
Spia luminosa sinistra
Tasto power
Tasto volume su
Tasto multifunzione
Tasto volume giù
Unità centrale con
clip da cintura
Connessione ricetrasmettitore
Connessione mini USB
Connessione caricatore
batteria

50
Italiano
2. INDOSSARE LE CUFFIE
Le cuffie auricolari smartPlug rappresentano un
modernissimo sistema di comunicazione e protezione
dell’udito che consente di mantenere la percezione
ambientale mentre si usano tutti i vari dispositivi di
comunicazione.
La percezione ambientale è assicurata dalla tecnologia di
elaborazione e dai microfoni ambientali all’interno
degli auricolari.
I contatti mediante altri dispositivi di comunicazione sono
resi possibili da:
- cavi di interfaccia per ricetrasmettitori (venduti
separatamente).
- Bluetooth per ricetrasmettitori e cellulari (se installato)
- comunicazioni dirette tra cuffie mediante frequenza a
corto raggio (se installata)
Le cuffie smartPlug sono concepite per essere indossate
con l’alloggiamento principale fissato alla cintura o alla
cucitura dei pantaloni, e il tasto inline PTT fissato alla
camicia/parte superiore dell’indumento dell’utente.
Nota: per le comunicazioni a corto raggio, la miglior portata
di comunicazione si ottiene con il tasto inline PTT fissato
sull’indumento dell’utente il più in alto possibile.
Orecchio
Microfono
Auricolari
Inline PTT
Alloggiamento principale
Auricolare
Tappo di
gommapiuma
Speaker e
microfono
intrauricolari

51
Italiano
3. INDOSSARE GLI AURICOLARI
1. Prendere il tappo usa e
getta di gommapiuma tra
pollice e indice.
6. Usando la mano opposta, tirare
l’orecchio in su e verso l’esterno.
Inserire l’auricolare in profondità
nell’orecchio – come si farebbe
normalmente con un tappo per
le orecchie.
7. Tenere fermo l’auricolare
per 30 secondi mentre la
gommapiuma si espande.
8. Controllare che gli auricolari
siano correttamente inseriti.
9. Il fatto che gli auricolari siano
lontani dall’orecchio è indice di un
inserimento scorretto. Il tappo
di gommapiuma non dovrebbe
risultare visibile. Ripetere il
procedimento fino al corretto
inserimento.
2. Far ruotare il tappo
di gommapiuma fino
a ottenere un cilindro
compresso e privo di grinze.
3. Spingere il tappo di
gommapiuma fino in fondo
nel tubicino dell’auricolare.
4. Far ruotare nuovamente
il tappo di gommapiuma tra
pollice e indice.
5. Assicurarsi che il tappo di
gommapiuma sia un cilindro
compresso e privo di grinze
sull’auricolare.
È importante che gli auricolari siano indossati correttamente per assicurare il livello corretto di protezione dell’udito e di capacità di
comunicazione. Gli auricolari hanno un sensore integrato, se non vengono indossati correttamente, la qualità del parlato potrebbe essere
inferiore al previsto.

52
Italiano
4. CARICAMENTO
Alle cuffie è abbinato un caricatore. Non utilizzare altri tipi
di caricatori al fine di evitare eventuali danni.
Le cuffie vanno ricaricate regolarmente. Per ricaricare le
cuffie connettere il caricatore al dispositivo e collegarlo
alla rete elettrica.
Durante la ricarica la spia LED destra sarà rossa.
Quando la ricarica sarà completa il LED diventerà
verde.
Nota: assicurarsi di ricaricare completamente le cuffie
prima del primo utilizzo.
Nota: Le cuffie si accenderanno automaticamente
quando il caricatore è connesso al dispositivo.
Tempo di ricarica: 5 ore
Durata della batteria: 15 ore
Le cuffie sono alimentate da una batteria integrata agli ioni di litio ad alta
capacità. È concepita per durare quanto il prodotto e deve essere inviata
al produttore per eventuali sostituzioni e riparazioni. Ogni tentativo di
accedere alla batteria danneggerà le cuffie. Si prega di leggere la guida
informativa di accompagnamento delle cuffie smartPlug per ulteriori
misure di sicurezza a proposito della batteria.
Caricatore
Connettore di
ricarica
Spia destra
Rosso: in carica
Verde: ricarica completa

Italiano
53
Le cuffie devono essere accese per poter utilizzare
le funzioni di percezione ambientale e di
connettività di comunicazione.
Accensione/spegnimento
Per accendere le cuffie premere e rilasciare il tasto
power.
Per spegnere le cuffie premere e rilasciare il tasto
power finché l’unità non si spegne.
6. MODALITÀ AMBIENTALI
Le cuffie smartPlug includono una tecnologia
di percezione ambientale (Speech
Enhancement, Noise Suppression) .
consente il contatto uditivo con l’ambiente
circostante mentre si indossano le cuffie.
Per attivare o disattivare momentaneamente la
funzione di percezione ambientale premere
e rilasciare il tasto power.
Spia destra
Verde lampeggiante veloce: Modalità silenziosa
Verde lampeggiante lento: attivo
Rosso lampeggiante: Livello batteria basso
(meno di 1 ora)
Spenta: Cuffie spente
Tasto power
5. ACCENSIONE DELLE CUFFIE

54
Italiano
Le cuffie smartPlug si possono connettere alla
maggioranza dei ricetrasmettitori mediante cavi di
interfaccia (venduti separatamente).
1. Connettere il cavo del ricetrasmettitore al
connettore per ricetrasmettitori situato sul fondo
dell’unità centrale.
2. Accendere il ricetrasmettitore. Si udirà un
segnale acustico all’interno delle cuffie che
indica il rilevamento del ricetrasmettitore.
3. Regolare il volume della comunicazione con il
ricetrasmettitore mediante i normali controlli del
ricetrasmettitore fino al raggiungimento di un livello
soddisfacente.
4. Per trasmettere, tenere premuto il tasto inline 1
o il tasto programmato dal rivenditore.
Nota: vedere ‘uso del Bluetooth’ per ulteriori informazioni
sulla connessione con ricetrasmettitori mediante
Bluetooth
Connettore
ricetrasmettitore
Cavo ricetrasmettitore
Tasto inline
PTT
Tasto
inline 1
7. CONNESSIONE A UN RICETRASMETTITORE

55
Italiano
8. USO DEL BLUETOOTH
Le cuffie smartPlug includono anche la connettività via Bluetooth (se
installato). Il Bluetooth consente la connessione wireless con alcuni
modelli di ricetrasmettitori, i computer industriali, gli analizzatori di
vibrazioni e la maggior parte dei telefoni cellulari. Se il Bluetooth è
installato sulle cuffie smartPlug, sono valide le seguenti indicazioni.
Impostazioni di connessione automatica predefinite: quando le
cuffie smartPlug si accendono, cercano i dispositivi precedentemente
associati. Se un dispositivo precedentemente associato è nella zona
di copertura, tenteranno automaticamente di riconnettersi a questo
dispositivo. Se la connessione via Bluetooth è avvenuta, lampeggerà
lentamente una spia blu e si udirà un segnale acustico all’interno
delle cuffie.
Nota: quando entrano nella modalità di associazione, le cuffie
smartPlug dimenticano tutti i dispositivi precedentemente connessi.
Nota: il Bluetooth è reperibile per 2 minuti nella modalità di
associazione. Se non è avvenuta alcuna connessione entro questo
periodo di tempo, si dovrà ripetere il procedimento.
Telefono Bluetooth: per rispondere alle chiamate, premere il tasto
multifunzione (o il tasto programmato, consultare il rivenditore).
Per terminare o rifiutare una chiamata, tenere premuto il tasto
multifunzione per 2 secondi. .
Bluetooth con PTT: alcuni ricetrasmettitori e cellulari includono la
funzione Bluetooth con PTT. Si prega di consultare il rivenditore per
ulteriori informazioni.

56
Italiano
Associazione via Bluetooth con un nuovo dispositivo:
Per usufruire della funzionalità Bluetooth, le cuffie smartPlug vanno
associate e connesse.
1. Attivare il Bluetooth sul dispositivo che si desidera connettere
alle cuffie smartPlug
2. Accendere le cuffie smartPlug
3. Tenere premuto il tasto multifunzione per 5 secondi per
consentire l’associazione. Si accenderà una spia blu.
4. Seguire le istruzioni di associazione sul dispositivo a cui ci si
desidera connettere, cercare e associare le cuffie smartPlug.
Se viene richiesta una chiave di accesso, inserire 0000
5. Una volta associate, le cuffie si connetteranno automaticamente
e la spia blu lampeggerà lentamente.
6. Se la connessione automatica fallisce, utilizzare le istruzioni del
dispositivo per connettersi alle cuffie smartPlug.
Tasto multifunzione
9. ASSOCIAZIONE E CONNESSIONE VIA BLUETOOTH

57
Italiano
La frequenza a corto raggio (SR) è una tecnologia che consente
direttamente la comunicazione tra cuffie smartPlug compatibili.
Le unità a corto raggio sintonizzate sullo stesso canale e nella zona
di copertura udiranno le vostre trasmissioni.
Il corto raggio si comporta in modo simile ai ricetrasmettitori,
per cui solo una unità alla volta può trasmettere.
Se la frequenza a corto raggio è installata sulle cuffie smartPlug,
risultano valide le seguenti indicazioni:
Come impostazione predefinita, il corto raggio è disabilitato e deve
essere attivato. Per attivare il corto raggio premere i tasti volume su
e volume giù simultaneamente, le cuffie smartPlug emetteranno un
segnale acustico che indica l’attivazione del corto raggio.
Comunicazione tra cuffie tramite la frequenza a corto raggio: per
comunicare con altre cuffie smartPlug tenere premuto il tasto inline
2 e parlare. Le altre cuffie nella zona di copertura e sintonizzate sulla
stessa frequenza udiranno le vostre trasmissioni.
Cambiamento del canale di frequenza del corto raggio: per cambiare
il canale della frequenza a corto raggio verso l’alto tenere premuto il
tasto volume su. Per cambiare canale verso il basso tenere premuto
il tasto volume giù. Le cuffie smartPlug indicheranno il numero del
canale. Si possono programmare fino a 8 canali.
La frequenza a corto raggio può essere impostata solo dal rivenditore.
Si prega di contattare il rivenditore autorizzato per riprogrammare i
canali.
Tasto volume su
Tasto volume giù
Tasto inline 2
10. USO DELLA FREQUENZA A CORTO RAGGIO

58
Italiano
11. USO DELLA RADIO FM
Le cuffie SmartPlug si possono configurare anche per ricevere
le stazioni FM. Questo consente di ascoltare la radio su
frequenze FM mentre si indossano gli auricolari. Se la radio FM
è installata sulle vostre cuffie smartPlug, fare riferimento alle
seguenti istruzioni:
Come impostazione predefinita, la ricezione della radio FM è
disabitata e deve essere attivata come segue:
Radio FM accesa/spenta: premere insieme il tasto power
+ il tasto multifunzione simultaneamente. Le cuffie auricolari
smartPlug emetteranno un segnale acustico per indicare che la
radio FM è stata attivata, pertanto si sentirà la stazione radio su
cui sono sintonizzate in quel momento.
Per cambiare stazione radio, cercare una nuova stazione:
Scansione radio FM: tenere premuto il tasto volume su per
2 secondi per effettuare la scansione verso l’alto, o tenere
premuto il tasto volume giù per 2 secondi per effettuare la
scansione verso il basso. Le cuffie smartPlug si sintonizzeranno
sulle stazioni successive
Nota: la frequenza a corto raggio e la radio FM non si possono attivare
simultaneamente. L’attivazione della radio FM disabilità automaticamente
la frequenza a corto raggio e viceversa.
Tasto multifunzione
Tasto power
Tasto volume su
Tasto volume giù

Spia luminosa Funzione delle cuffie
Rosso fisso In carica
Verde fisso Ricarica completata
Rosso lampeggiante lento Livello batteria basso,
<1 ora di autonomia
Verde lampeggiante veloce Modalità silenziosa
Verde lampeggiante lento
Percezione ambientale
attiva
Blu fisso Bluetooth acceso
e reperibile
Blu lampeggiante lento Bluetooth connesso
Blu lampeggiante veloce Chiamata in entrata via
Bluetooth
59
Italiano
12. RISOLUZIONE PROBLEMI
Problemi con l’associazione delle cuffie
Assicurarsi che i dispositivi precedentemente associati siano spenti.
Accertarsi che la radio sia configurata con il Bluetooth attivo.
Le cuffie e il ricetrasmettitore non si connettono
via cavo:
Assicurarsi che il cavo sia saldamente allacciato sia al
ricetrasmettitore che all’alloggiamento principale.
via Bluetooth:
Assicurarsi che il ricetrasmettitore e le cuffie siano associati e
nella zona di copertura. Tentare nuovamente di associare i due
dispositivi. Assicurarsi che il ricetrasmettitore non sia connesso a
un altro dispositivo o ad altre cuffie.
Problemi nell’udire
Controllare che le cuffie siano accese. Assicurarsi che il
ricetrasmettitore e le cuffie siano associati, connessi e nella
zona di copertura. Controllare la spia LED del ricetrasmettitore
per accertarsi che la trasmissione/ricezione non sia bloccata.
Controllare che il ricetrasmettitore funzioni spegnendo le cuffie e
ascoltando via ricetrasmettitore. Se quest’ultimo funziona, provare
ad alzare il volume sulle cuffie e sui controlli del ricetrasmettitore.
Problemi nell’essere uditi
Controllare che le cuffie siano accese. Assicurarsi che il
ricetrasmettitore e le cuffie siano associati, connessi e nella zona di
copertura. Controllare che il ricetrasmettitore funzioni spegnendo
le cuffie e parlando via ricetrasmettitore. Assicurarsi di aver
inserito correttamente gli auricolari. Accertarsi che il guadagno del
ricetrasmettitore sia impostato a un livello ragionevole.
Distorsione del ricetrasmettitore
Controllare il livello di volume del ricetrasmettitore. Se
il volume è troppo alto, potrebbe disturbare il volume
delle cuffie smartPlug e incidere sulla qualità del suono.

Deutsch
60
smartPlug
BEDIENUNGSANLEITUNG

Deutsch
61
EINFÜHRUNG
1. Aufbau des Headsets
2. Tragen des Headsets
3. Einsetzen der Ohrhörer
4. Aufladen des Headsets
5. Einschalten des Headsets
6. Betriebsarten
7. Anschließen an ein
Funkgerät
8. Nutzung von Bluetooth
9. Verbinden (Pairing) und
Anschließen von Bluetooth
10. Nutzung im Nahbereich
11. Nutzung des UKW-Radios
12. Fehlerbehebung
1. AUFBAU DES HEADSETS
Rechte Anzeigeleuchte
Rechter Ohrhörer
Einweg-
Schaumstoffaufsatz
Linker Ohrhörer
Taste PTT
Taste Inline 1
Taste Inline 2
Linke Anzeigeleuchte
Einschalttaste
Lautstärketaste+
Multifunktionstaste
Lautstärketaste–
Hauptgerät mit
Gürtelschnalle
Anschluss Funkgerät
Mini-USB-Anschluss
Batterieladestecker

Deutsch
62
2. TRAGEN DES HEADSETS
Das smartPlug ist ein dem Stand der Technik
entsprechendes Gehörschutz-/Kommunikationssystem,
mit dem Sie unabhängig von den herrschenden akustischen
Bedingungen jederzeit alle Ihre Kommunikationsgeräte
nutzen zu können.
Die Unabhängigkeit von den herrschenden akustischen
Bedingungen wird durch die - Technologie in
Verbindung mit den Umgebungsmikrofonen in den
Ohrhörern erreicht.
Kontakte über sonstige Kommunikationsgeräte sind möglich
über:
- Verbindungskabel zu Funkgeräten (nicht im
Lieferumfang enthalten).
- Eine Bluetooth-Verbindung mit Funkgeräten und
Mobiltelefonen (sofern installiert)
- Direkte Kommunikation von Headset zu Headset ist über
die Nahbereichsfunktion möglich (sofern installiert).
Das smartPlug ist so ausgelegt, dass es mit am Gürtel oder
Hosenbund befestigtem Hauptgehäuse und am Hemd oder
der Jacke des Benutzers befestigtem Inline PTT benutzt
werden kann.
Hinweis: Mit der Nahbereichsfunktion werden die besten
Ergebnisse erzielt, wenn das Inline PTT so weit oben wie
möglich am Benutzer befestigt wird.
Ohr
Mikrofon
Ohrhörer
Taste PPT
Hauptgehäuse
Ohrhörer
SchaumstoffOhrhöhrer
InohrLautsprecher
und -Mikrophon

Deutsch
63
3. EINSETZEN DER OHRHÖRER
1. Fassen Sie das
Schaumstoffpolster
zwischen Daumen und
Zeigefinger.
6. Ziehen Sie dann mit der
anderen Hand die Ohrmuschel
nach oben und außen und setzen
Sie den Ohrhörer dann so ein, wie
Sie einen Gehörschutzstopfen aus
Schaumstoff einsetzen würden.
7. Halten Sie den Ohrhörer
dann, während sich das
Schaumstoffpolster ausdehnt,
etwa 30 Sekunden lang an
seinem Platz.
8. Vergewissern Sie dann, dass
der Ohrhörer korrekt sitzt.
9. Ein mangelhafter Sitz ist
daran erkennbar, dass zwischen
dem Ohrhörer und dem Ohr ein
größerer Abstand besteht. Das
Schaumstoffpolster darf von außen
nicht sichtbar sein. Wiederholen
Sie das Einsetzen, bis der Ohrhörer
einwandfrei sitzt
2. Rollen Sie das Polster
zu einem komprimierten
faltenfreien Zylinder.
3. Schieben Sie das Polster
vollständig auf das Ohrstück
auf.
4. Rollen Sie das Polster
dann nochmals zwischen
Daumen und Zeigefinger.
5. Vergewissern Sie
sich, dass das Polster
komprimiert und faltenfrei
ist.
Damit der korrekte Gehörschutzpegel und die Kommunikationsmöglichkeiten gewährleistet werden, ist es entscheidend, dass die Ohrhörer
korrekt eingesetzt werden. Da die Ohrhörer mit einem eingebauten Mikrofon ausgestattet sind, kann bei nicht korrekt eingesetzten Ohrhörern
die Sprachqualität geringer ausfallen als erwartet.

Deutsch
64
4. AUFLADEN DES AKKUS
Ihr Headset wird von dem Lieferanten komplett mit
Ladegerät geliefert. Verwenden Sie kein Ladegerät eines
anderen Herstellers, da dies Schäden an dem Gerät
hervorrufen kann.
Das Headset sollte regelmäßig aufgeladen werden. Zum
Aufladen wird das Headset an das Ladegerät und dieses
an die Netzspannung angeschlossen.
Während des Ladens leuchtet die rechte Anzeige-LED
rot. Ist der Akku vollständig geladen, zeigt die LED
grünes Licht.
Hinweis: Achten Sie darauf, dass das Headset vor der
ersten Benutzung vollständig geladen wird.
Hinweis: Beim Anschließen an das Ladegerät wird das
Headset automatisch eingeschaltet.
Ladedauer: 5 Stunden
Entladedauer: 15 Stunden
Das Headset ist mit einem Hochleistungs-Lithium-Ionen-Akku ausgestattet,
der während der gesamten Lebensdauer des Headsets funktionsfähig
bleibt. Sollte der Akku defekt werden, muss das Headset zur Reparatur
(zum Auswechseln des Akkus) an den Hersteller eingeschickt werden.
Bei jedem Versuch, den Akku selbst auszutauschen, wird das Headset
beschädigt. Bitte beachten Sie auch die Sicherheitshinweise und
Vorsichtsmaßnahmen im dem smartPlug-Headset beigefügten
Informationsblatt.
Ladegerät
Ladestecker
Rechte Anzeigeleuchte
Rot: Laden
Grün: Voll geladen

Deutsch
65
Um die durch die -Technologie mögliche
Unabhängigkeit von den herrschenden akustischen
Bedingungen und die Kommunikationsmöglichkeiten
nutzen zu können, muss das Headset eingeschaltet
sein.
Ein-/Ausschalten
Das Ein-/Ausschalten des Headsets erfolgt durch
Betätigen des Ein/Aus-Taste. Beim Ausschalten
muss die Taste solange betätigt werden, bis sich
das Gerät ausgeschaltet hat.
6. UMGEBUNGSBETRIEBSARTEN
Ihr smartPlug-Headset ist mit der
-Technik
(Speech Enhancement, Noise Suppression
= Verbesserte Sprachverständlichkeit durch
Unterdrücken des Geräuschumfeldes) ausgestattet.
Die
-Funktion ermöglicht es Ihnen auch beim
Tragen des Headsets, den Hörkontakt mit Ihrer
Umgebung aufrecht zu halten.
Die
-Funktion lässt sich durch kurzzeitiges
Drücken der Ein/Aus-Taste ein- bzw. ausschalten.
Rechte Anzeigeleuchte
Grün schnelles Blinken: Lautlos-Betrieb
Grün langsames Blinken: -aktive
Blinken: Rot: Batterie schwach {< 1 h)
Aus: Headset Aus
Ein/Aus-Taste
5. HEADSET EINSCHALTEN

Deutsch
66
Das smartPlug-Headset lässt sich über (nicht
mitgelieferte) Verbindungskabel an die meisten
Funkgeräte anschließen.
1. Stecken Sie das Verbindungskabel zum Funkgerät
an den Funkgerätanschluss an der Unterseite des
Hauptgerätes an.
2. Schalten Sie das Funkgerät ein. Im Headset hören
Sie einen Ton, der Ihnen anzeigt, dass das Gerät das
Funkgerät erkannt hat.
3. Stellen Sie die Lautstärke des Funkgerätes mit
den normalen Schaltern des Funkgerätes auf ein
angenehmes Niveau ein.
4. Drücken und halten Sie für die Übertragung
die Taste Inline 1 bzw. die vom Händler hierfür
programmierte Taste.
Hinweis: Informationen über den Anschluss eines
Funkgerätes finden Sie im Kapitel „Verwendung von
Bluetooth“.
Anschluss
Funkgerät
Funkgerätkabel
Taste PTT
Taste
Inline 1
7. FUNKGERÄT ANSCHLIESSEN

Deutsch
67
8. VERWENDUNG
VON BLUETOOTH
Ferner verfügt das smartPlug-Headset auch (sofern installiert)
über eine Funktion zur Verwendung von Bluetooth. Bluetooth
ermöglicht den drahtlosen Anschluss einer Reihe von Funkgeräten,
industriellen Computern, Schwingungsanalysatoren sowie der meisten
Mobilfunkgeräte. Ist die Bluetooth-Funktion bei Ihrem smartPlug
installiert, so gelten die nachstehenden Erläuterungen.
Einstellung für die automatische Herstellung der Verbindung: Wird
das Headset eingeschaltet, so sucht das smartPlug nach bereits
verbundenen Geräten in seinem Sende-/Empfangsbereich. Befindet
sich ein solches Gerät innerhalb des Bereichs, versucht das smartPlug
automatisch, die Verbindung wieder herzustellen. Eine langsam
blinkende, blaue Anzeigeleuchte zeigt das Herstellen der Verbindung an,
gleichzeitig ertönt im Headset ein Signalton.
Hinweis: Beim Aufruf des Pairing-Betriebs vergisst das smartPlug alle
bisher angeschlossenen Geräte.
Hinweis: Im Pairingbetrieb ist Bluetooth für 2 Minuten erreichbar. Wird
innerhalb dieser Zeit keine Verbindung hergestellt, so muss der Vorgang
neu gestartet werden.
Bluetooth-Telefon: Zum Beantworten eines Anrufs betätigen Sie die
Multifunktionstaste (oder die von Ihrem Händler hierfür programmierte
Taste). Zum Beenden oder Ablehnen eines Anrufs drücken und halten
Sie die Multifunktionstaste für zwei Sekunden.
Bluetooth PTT: Eine Reihe von Funkgeräten und einige Mobiltelefone
sind mit PTT über Bluetooth ausgestattet. Für weitere Auskünfte wenden
Sie sich bitte an ihren Händler.

Deutsch
68
Bluetooth mit einem neuen Gerät verbinden:
Soll die Bluetooth-Funktion genutzt werden, so muss das smartPlugHeadset verbunden werden.
1. Schalten Sie die Bluetooth-Funktion des Gerätes ein, das Sie mit
dem smartPlug verbinden wollen.
2. Schalten Sie das smartPlug ein.
3. Drücken Sie zum Aufruf des Pairings die Multifunktionstaste 5
Sekunden lang. Eine blaue Anzeigelampe leuchtet auf.
4. Befolgen Sie dann die Pairinghinweise für das Gerät, mit dem
Sie eine Verbindung herstellen wollen. Suchen und verbinden
Sie das smartPlug. Sollten Sie nach einem Passwort gefragt
werden, geben Sie 0000 ein.
5. Ist das Pairing abgeschlossen, stellt das Headset automatisch
die Verbindung her, und die blaue Anzeigeleuchte beginnt
langsam zu blinken.
6. Kann die automatische Verbindung nicht hergestellt werden,
muss das Gerät gemäß den Anweisungen manuell mit dem
smartPlug Headset verbunden werden.
Multifunktionstaste
9. BLUETOOTH-PAIRING UND -VERBINDUNG

Deutsch
69
Nahbereich (Short Range - SR) ist eine Technik, die eine direkte
Kommunikation zwischen kompatiblen smartPlug-Headsets ermöglicht.
Alle Nahbereichgeräte, die auf den gleichen Kanal eingestellt sind und sich
innerhalb des Bereichs befinden, können Sie hören.
Die Funktion Nahbereich funktioniert so ähnlich wie Funkgeräte, bei denen
immer nur einer sprechen kann.
Ist die Funktion Nahbereich auf Ihrem smartPlug installiert, so gilt:
Standardmäßig ist diese Funktion ausgeschaltet, sie muss bei Bedarf
eingeschaltet werden.
Zum Einschalten der Funktion Nahbereich werden die Tasten Lautstärke
+ und Lautstärke – gleichzeitig betätigt. Das smartPlug Headset gibt dann
einen Ton ab, der anzeigt, dass die Funktion Nahbereich aktiviert ist.
Kommunikation von Headset zu Headset mit der Funktion Nahbereich:
Um mit anderen smartPlug-Headsets kommunizieren zu können, wird die
„Inline 2“-Taste gedrückt und gehalten. Es kann dann gesprochen werden.
Alle Headsets, die auf den gleichen Kanal eingestellt sind und sich innerhalb
des Bereichs befinden, können Sie hören.
Wechseln der Kanalfrequenz im Nahbereichsbetrieb: Zum Wechseln
auf einen höheren Kanal wird die Taste Lautstärke + gedrückt und
gehalten. Zum Wechseln auf einen niedrigeren Kanal wird die Taste
Lautstärke - gedrückt und gehalten. Das smartPlug-Headset sagt dann die
Kanalnummer an. Programmierbar sind bis zu acht Kanäle.
Die Frequenzen des Nahbereichs können nur von Ihrem Handler eingestellt
werden. Setzen Sie sich daher zum Umprogrammieren der Kanäle mit
Ihrem Händler in Verbindung.
Taste Lautstärke+
Taste Lautstärke–
Taste Inline 2
10. NAHBEREICH (SHORT RANGE)

Deutsch
70
11. UKW-RADIO
Die smartPlug-Headsets lassen sich auch so konfigurieren, dass
sie UKW-Sender empfangen können. Hierdurch haben Sie die
Möglichkeit, beim Tragen des Headsets UKW-Sendungen zu
hören. Ist der UKW-Bereich auf Ihrem smartPlug installiert, so gilt:
Standardmäßig ist der UKW-Empfang gesperrt, er muss immer
wie nachstehend beschrieben gesondert aktiviert werden:
UKW-Empfang ein / aus: Betätigen Sie gleichzeitig die
Einschalt- und die Multifunktionstaste. Das smartPlug gibt dann
einen Ton ab, der anzeigt, dass der UKW-Empfang aktiviert ist,
und Sie hören den Sender, der gerade einstellt ist.
Neue Sender werden mit dem Suchlauf eingestellt:
UKW-Radio-Suchlauf: Drücken Sie 2 Sekunden lang entweder
die Taste Lautstärke + oder -. Das smartPlug wechselt dann zu
dem nächsten zu empfangenden Sender.
Hinweis: Die Nahbereichs- und die UKW-Funktionen können nicht
gleichzeitig aktiviert werden. Beim Aktivieren der UKW-Funktion wird
automatisch die Nahbereichsfunktion gesperrt und umgekehrt.
Multifunktionstaste
Ein/Aus-Taste
Taste Lautstärke+
Taste Lautstärke–

Anzeige Funktion des Headsets
Rot an Laden
Grün an Laden abgeschlossen
Langsames rotes Blinken Batterie schwach
<1 h Betriebszeit
Schnelles grünes Blinken Stummschaltung
Langsames grünes Blinken
Umfeldunterdrückung
aktiv
Blau an Bluetooth ein und sichtbar
Langsames blaues Blinken Bluetooth verbunden
Schnelles blaues Blinken Bluetooth ankommender
Ruf
Deutsch
71
12. FEHLERBEHEBUNG
Probleme beim Pairing des Headsets
Vergewissern Sie sich zuerst, dass die zuvor verbundenen Geräte
ausgeschaltet sind.
Headset und Funkgerät verbinden sich nicht miteinander
Kabelverbindung:
Vergewissern Sie sich, dass die Kabel sowohl am Funkgerät als auch
am Hauptgehäuse fest angeschlossen sind.
Bluetooth-Verbindung:
Vergewissern Sie sich, dass Ihr Funkgerät und das Headset über
Pairing verbunden und auf den gleichen Bereich eingestellt sind. Achten
Sie vor einem erneuten Pairing-Versuch darauf, dass das Funkgerät
nicht mit einem anderen Gerät oder Headset verbunden ist.
Bei gestörtem Hören
Überprüfen Sie, dass Ihr Headset eingeschaltet ist. Vergewissern Sie
sich, dass Ihr Funkgerät und das Headset über Pairing verbunden
und auf den gleichen Bereich eingestellt sind. Überprüfen Sie an den
LEDs des Funkgerätes, dass Senden/Empfangen nicht blockiert ist.
Überprüfen Sie durch Abschalten des Headsets am Funkgerät, dass Ihr
Funkgerät betriebsbereit ist, versuchen Sie die Lautstärke sowohl am
Headset als auch am Funkgerät zu verändern.
Sie werden nicht gehört
Überprüfen Sie, dass das Headset eingeschaltet ist. Vergewissern Sie
sich, dass Funkgerät und Headset über Pairing verbunden und auf den
gleichen Bereich eingestellt sind. Überprüfen Sie, dass Ihr Funkgerät
funktioniert, indem Sie das Headset ausschalten und über das
Funkgerät sprechen. Vergewissern Sie sich ferner, dass Ihre Ohrhörer
korrekt sitzen. Überprüfen Sie auch, dass die Verstärkung ihres
Funkgerätes auf einen angemessenen Pegel eingestellt ist.
Der Funkverkehr ist verzerrt
Überprüfen Sie die Einstellung der Lautstärke Ihres
Funkgerätes. Ist die Lautstärke zu hoch eingestellt, kann
der Lautstärkebereich des smartPlug überschritten
werden, was zu Verzerrungen führt.

Nederlands
72
smartPlug
GEBRUIKERSHANDLEIDING

Nederlands
73
AAN DE SLAG
1. Onderdelen
2. Dragen van de headset
3. Aanpassen van de
oordopjes
4. Opladen van de headset
5. Inschakelen van de headset
6. Omgevingsgeluid horen
7. Verbinding maken met een
portofoon
8. Bluetooth gebruiken
9. Bluetooth koppeling en
verbinding
10. Directe communicatie over
korte afstand
11. Gebruik van de FM radio
12. Oplossen van problemen
1. ONDERDELEN
Rechter indicatielampje
Rechter oordopje
Vervangbare
schuimrubber tipjes
Linker oordopje
Zend/ontvangeenheid
Zend/ontvangknop 1
Zend/ontvangknop 2
Linker indicatielampje
Aan/uit-knop
Volume hoger-knop
Multifunctie-knop
Volume lager-knop
Hoofdeenheid
met riemclip
Portofoonaansluiting
Mini-USB aansluiting
Aansluiting voor
opladersnoer

Nederlands
74
2. DRAGEN VAN DE HEADSET
De smartPlug is een modern gehoorbeschermingssysteem
waarmee de gebruiker omgevingsgeluid kan horen en toch
gebruik kan maken van diverse soorten communicatieapparatuur.
Horen van omgevingsgeluid wordt mogelijk gemaakt door
computertechnologie en microfoons in de oordopjes.
Contact met andere communicatie-apparatuur is mogelijk
door middel van:
- aansluiting op een portofoon (portofoonkabeltje apart
leverbaar);
- Bluetooth voor verbinding met portofoons en mobiele
telefoons (indien aanwezig);
- directe SR communicatie tussen headsets door
overdracht over korte afstand (indien aanwezig).
De smartPlug is bedoeld om als volgt gedragen te worden:
de hoofdeenheid bevestigd aan een riem of de broekband en
de zend/ontvangeenheid bevestigd aan het overhemd of de
bovenkleding van de gebruiker.
NB: bij SR communicatie is het bereik het grootst als de
zend/ontvangeenheid zo hoog mogelijk bevestigd is.
Oor
microfoon
oordopjes
Zend/ontvangeenheid
Hoofdeenheid
Oordopje
Schuimrubber tipje
In-ear
luidspreker
en microfoon

Nederlands
75
3. AANPASSEN VAN DE OORDOPJES
1. Houd het vervangbare
schuimrubbertipje tussen
duim en wijsvinger.
6. Trek met de andere hand
het oor naar boven en naar
buiten. Duw het oordopje zo diep
mogelijk in het oor (net als een
schuimrubber oordopje).
7. Houd het oordopje 30
seconden op zijn plaats terwijl het
tipje uitzet.
8. Controleer of beide oordopjes
goed zijn ingebracht.
9. Als het oordopje te ver uit het
oor steekt, past het niet goed.
Het tipje mag niet zichtbaar zijn.
Herhaal indien nodig stappen
1-8 voor een goede pasvorm.
2. Rol het tipje op tot een
dunne cilinder zonder
plooien.
3. Duw het tipje helemaal op
het oordopbuisje.
4. Rol het tipje opnieuw heen
en weer tussen duim en
wijsvinger.
5. Zorg ervoor dat het tipje
samengedrukt en zonder
plooien blijft zitten op het
oordopjebuisje.
Om de juiste geluiddemping en optimale communicatie te verkrijgen, is het uiterst belangrijk dat de oordopjes goed passen. De oordopjes zijn
uitgerust met een in-ear microfoon. Als de oordopjes niet goed passen, kan de gebruiker minder goed verstaanbaar zijn.

Nederlands
76
4. OPLADEN VAN DE HEADSET
Bij de headset wordt een oplader geleverd. Gebruik geen
opladers van andere merken, aangezien dit kan leiden tot
schade.
De headset moet regelmatig opgeladen worden. Om de
headset op te laden, sluit u de headset aan op de lader
en steekt u de lader in het stopcontact.
Tijdens het opladen is het rechter indicatielampje rood.
Wanneer het opladen voltooid is, wordt het lampje
groen.
NB: laad de headset volledig op vóór het eerste gebruik.
NB: de headset wordt automatisch ingeschakeld als hij
op de lader wordt aangesloten.
Oplaadtijd: 5 uur
Accuduur: 15 uur
De headset is uitgerust met een ingebouwde lithium-ion-accu
met hoge capaciteit. Deze is zodanig ontworpen dat hij de gehele
levensduur van de headset meegaat. Voor vervanging en onderhoud
moet de accu naar de fabrikant worden teruggestuurd. Elke poging
om toegang tot de accu te krijgen, leidt tot schade aan de headset.
Raadpleeg het bijgevoegde smartPlug headset informatieboekje voor
meer informatie over verantwoord omgaan met de accu.
Oplader
Opladerplugje
Rechter indicatielampje
r
ood: opladen
groen: opladen voltooid

Nederlands
77
De headset moet ingeschakeld zijn om het
omgevingsgeluid te kunnen horen en de
communicatiemogelijkheden te benutten.
In- en uitschakelen
Om de headset in te schakelen, drukt u de aan/
uit-knop kort in.
Om de headset uit te schakelen, houdt u de aan/uitknop ingedrukt tot de headset is uitgeschakeld.
6. OMGEVINGSGELUID HOREN
De smartPlug headset is uitgerust met
technologie, wat staat voor
Speech Enhancement,
Noise Suppression
(betere verstaanbaarheid en
geluiddemping).
stelt de gebruiker in staat omgevingsgeluid
te horen terwijl hij de headset draagt.
Druk kort op de aan/uit-knop en laat deze weer los
om tijdelijk in of uit te schakelen.
Rechter indicatielampje:
groen (snel knipperend): disabled
groen (langzaam knipperend):
ingeschakeld
rood (knipperend): batterij bijna leeg
(< 1 uur)
uit: headset uitgeschakeld
Aan/uit-knop
5. INSCHAKELEN VAN DE HEADSET

Nederlands
78
De smartPlug headset kan communiceren met
de meeste portofoons door middel van een
portofoonkabeltje (apart verkrijgbaar).
1. Steek het portofoonkabeltje in de
portofoonaansluiting onderaan de hoofdeenheid.
2. Zet de portofoon aan. U hoort een toon in de
headset die aangeeft dat de smartPlug de portofoon
heeft gevonden.
3. Regel het volume van de conversatie met de
volumeknoppen op de portofoon.
4. Om te zenden, houd zend/ontvangknop 1 of de door
de leverancier geprogrammeerde knop ingedrukt.
NB: zie ‘Bluetooth gebruiken’ voor meer informatie over
communiceren met een portofoon via Bluetooth.
Portofoonaansluiting
Portofoonkabeltje
Zend/
ontvangeenheid
Zend/
ontvangknop 1
7. VERBINDING MAKEN MET EEN PORTOFOON

Nederlands
79
8. BLUETOOTH GEBRUIKEN
smartPlug headsets kunnen ook communiceren via Bluetooth (indien
aanwezig). Bluetooth maakt het mogelijk draadloos te communiceren
met bepaald typen portofoons, industriële computers, apparatuur voor
trillingsanalyse en de meeste mobiele telefoons. Volg onderstaande
aanwijzingen als uw smartPlug met Bluetooth is uitgerust.
Automatisch verbinding maken (standaardinstelling): wanneer de
headset ingeschakeld wordt, zoekt de smartPlug naar apparaten
waarmee deze eerder verbonden was. Als zo’n apparaat binnen bereik
is, probeert de smartPlug automatisch verbinding te maken. Als de
verbinding tot stand gebracht is, zal een blauw lampje langzaam gaan
knipperen en hoort de gebruiker een toon in de headset.
NB: Wanneer deze afstemmodus wordt gebruikt, herkent de
smartPlug alle eerder verbonden apparaten niet meer.
NB: De smartPlug probeert gedurende twee minuten automatisch
verbinding te maken. Herhaal de procedure als dan nog geen
verbinding tot stand gebracht is.
Mobiele telefoon met Bluetooth: druk op de multifunctie-knop (of een
andere hiervoor geprogrammeerde knop: raadpleeg uw leverancier)
om een gesprek aan te nemen. Houd de multifunctie-knop twee
seconden ingedrukt om niet op te nemen of een gesprek te beëindigen.
Bluetooth PTT: Sommige portofoons en mobiele telefoons zijn uitgerust
met PTT (‘push to talk’) via Bluetooth. Neem contact op met uw
leverancier voor meer informatie.

Nederlands
80
Nieuwe Bluetooth koppeling:
Om te kunnen communiceren met een apparaat via Bluetooth, moet
de smartPlug gekoppeld én verbonden zijn met dat apparaat.
1. Schakel Bluetooth in op het apparaat dat verbinding moet
maken met de smartPlug.
2. Schakel de smartPlug in.
3. Houd de multifunctie-knop 5 seconden ingedrukt om de
koppeling met het doelapparaat tot stand te brengen. Een blauw
lampje gaat branden.
4. Volg de instructies voor het koppelen van het lapparaat, laat
het apparaat de smartPlug vinden en koppel de smartPlug
met het apparaat. Voer 0000 in als gevraagd wordt om een
wachtwoord.
5. Na de koppeling wordt de headset automatisch verbonden
met het apparaat en zal het blauwe indicatielampje langzaam
knipperen.
6. Als het niet lukt automatisch verbinding te maken, volg dan
de gebruiksaanwijzing van het doelapparaat.
Multifunctie-knop
9. BLUETOOTH KOPPELING EN VERBINDING

Nederlands
81
SR
(short range)
is een technologie waarmee compatibele smartPlug
headsets direct met elkaar kunnen communiceren over korte
afstand. SR apparaten die afgestemd zijn op hetzelfde kanaal en
binnen bereik zijn, kunnen uw boodschappen opvangen. SR lijkt op
portofooncommunicatie, maar daarbij kan slechts één apparaat
tegelijk zenden.
Als SR aanwezig is op uw smartPlug, geldt het volgende:
Standaard staat SR uitgeschakeld. Druk tegelijk op beide
volumeknoppen om SR in te schakelen. Als SR is ingeschakeld, laat de
headset een toon horen.
Headset-headsetcommunicatie via SR: houd zend/ontvangknop 2
ingedrukt om te communiceren met andere smartPlug headsets.
Andere headsets die afgestemd zijn op hetzelfde kanaal en binnen
bereik zijn, vangen dan uw boodschap op.
Wijzigen van het SR-kanaal: houd de volume hoger-knop ingedrukt om
een hoger SR kanaal te kiezen. Houd de volume lager-knop ingedrukt
om een lager SR kanaal te kiezen. De headset laat het nummer van
het gekozen kanaal horen. Er kunnen maximaal acht kanalen worden
geprogrammeerd.
SR kanalen kunnen alleen door de leverancier worden ingesteld. Neem
contact op met de leverancier voor herprogrammering van de kanalen.
Volume hoger-knop
Volume lager-knop
Zend/ontvangknop 2
10. DIRECTE COMMUNICATIE OVER KORTE AFSTAND

Nederlands
82
11. GEBRUIK VAN DE FM RADIO
smartPlug headsets kunnen ook FM stations ontvangen, zodat u
naar FM radio kunt luisteren terwijl u de headset draagt. Als uw
smartPlug uitgerust is met FM-ontvangst, geldt het volgende.
Standaard staat FM-ontvangst uitgeschakeld. Inschakelen gaat
als volgt.
FM radio aan/uit: druk tegelijk de aan/uit-knop en de
multifunctie-knop in. De smartPlug laat een toon horen om aan
te geven dat FM radio ingeschakeld is. Vervolgens hoort u de
uitzending van het station waarop is afgestemd.
Om een ander station te kiezen, moet de FM-band afgezocht
worden.
Afzoeken van de FM-band: houd de volume-hoger knop twee
seconden ingedrukt om stations met een hogere frequentie te
vinden; houd de volume-lager knop twee seconden ingedrukt
om stations met een lagere frequentie te vinden. De smartPlug
stemt af op het gevonden station.
NB: SR en FM radio kunnen niet tegelijk ingeschakeld zijn.
Bij inschakelen van de FM radio, wordt SR automatisch
uitgeschakeld en vice versa.
Multifunctie-knop
Aan/uit-knop
Volume hoger-knop
Volume lager-knop

Indicatielampjes Headsetfunctie
rood (continu) opladen
groen (continu) opladen voltooid
rood (langzaam
knipperend)
accu bijna leeg (< 1 uur over)
groen (snel knipperend)
uitgeschakeld
groen (langzaam
knipperend)
ingeschakeld
blauw (continu) Bluetooth aan, koppeling
mogelijk
blauw (langzaam
knipperend)
Bluetooth verbinding gemaakt
blauw (snel knipperend) binnenkomend gesprek via
Bluetooth
Nederlands
83
12. OPLOSSEN VAN PROBLEMEN
Problemen met de Bluetooth koppeling
Zorg ervoor dat alle eerder gekoppelde apparaten zijn uitgeschakeld. Zorg ervoor dat Bluetooth ingeschakeld is op het
doelapparaat.
De headset kan geen verbinding maken met de portofoon
Via een kabeltje:
Zorg ervoor dat het kabeltje goed vast zit in zowel de portofoon als
de hoofdeenheid.
Bluetooth:
Zorg ervoor dat de portofoon en de headset gekoppeld en binnen
bereik zijn. Probeer de apparaten opnieuw te koppelen. Zorg ervoor
dat de portofoon niet verbonden is met een ander apparaat of
headset.
Het geluid is te zacht of afwezig
Controleer of de headset is ingeschakeld. Zorg ervoor dat de
portofoon en de headset gekoppeld, verbonden en binnen bereik
zijn. Controleer de indicatielampjes van de portofoon om te zien of
deze wellicht permanent op zenden/ontvangen staat. Controleer
of de portofoon werkt, door de headset uit te schakelen en met de
portofoon te luisteren. Als de portofoon werkt, zet dan het geluid
van de headset en de portofoon harder.
Anderen horen u niet
Controleer of de headset is ingeschakeld. Zorg ervoor dat de
portofoon en de headset gekoppeld, verbonden en binnen bereik
zijn. Controleer of de portofoon werkt door de headset uit te
schakelen en in de portofoon te spreken. Zorg ervoor dat de
oordopjes goed passen. Zorg ervoor dat het ingangsvolume
van de portofoon voldoende hoog is
Het portofoongeluid wordt vervormd
Controleer het uitgangsvolume van de portofoon.
Als het geluid te hard staat, kan het de drempelwaarde
van de smartPlug overschrijden en de geluidskwaliteit
nadelig beïnvloeden.
DOC00071 - Rev.00

 Loading...