


1
ENGLISH

2
FCC COMPLIANCE STATEMENT
The Sensear models comprising the SM1 - (Ear-muff without Bluetooth module), the SM1x - (Earmuff with Bluetooth module), and the SM1x SR – (Ear-muff with Bluetooth module as well as FM
transmit and receive capabilities), comply with Part 15 of the FCC Rules.
Operation is subject to the following two conditions:
(i) This device may not cause harmful interference
(ii) This device must accept any interference received, including interference that may cause
undesired operation.
WARNING: Any changes or modifi cations not expressively approved by Sensear Pty. Ltd. could
void the user’s authority to operate this equipment.
This equipment has been tested and found to comply with the limits for a Class B digital device,
pursuant to Part 15 of the FCC Rules. These limits are designed to provide reasonable protection
against harmful interference in a residential installation. This equipment generates, uses and can
radiate radio frequency energy and, if not installed and used in accordance with the instructions, may
cause harmful interference to radio communications. However, there is no guarantee that interference
will not occur in a particular installation. If this equipment does cause harmful interference to radio
or television reception, which can be determined by turning the equipment off and on, the user is
encouraged to try to correct the interference by one or more of the following measures:
• Reorient or relocate the receiving antenna
• Increase the separation between the equipment and receiver
• Connect the equipment into an outlet on a circuit different from that to which the receiver is
connected.
CONSULT THE DEALER OR AN EXPERIENCED RADIO/TV TECHNICIAN FOR HELP.
NRR AND SLC80
The SM1, SM1x and SM1x SR models have been certifi ed to European Standards EN352-
1:2002, ANSI S12.6-1997 and AS/NZS 1270-2002. The following passive attenuation ratings were
observed;
SNR NRR SLC80
SM1/SM1x 29 dB 25 dB 28 dB
SM1/SM1x Helmet 29 dB 23 dB 27 dB
Revision: 1.2 – September 2009
Copyright Notice
This document remains the property of Sensear Pty. Ltd. All rights reserved. No part of this document
may be reproduced in any form, either in an electronic retrieval system or otherwise, without the
prior written consent of Sensear Pty. Ltd.
IMPORTANT NOTICE
Sensear Pty. Ltd. reserves the right to make corrections, modifi cations, enhancement, improvements
and other changes to it’s products and services and to discontinue any product or service without
notice.
Whilst Sensear Pty. Ltd. makes every effort to ensure that the information in this document is correct
at the time of publication, users and potential users should fi rst check with Sensear Pty. Ltd. to
ensure that they have received the most up-to-date documentation.

3
Contents
OVERVIEW _______________________________________________________ 4
GETTING STARTED ________________________________________________ 5
BLUETOOTH _____________________________________________________ 6
Pairing and Connecting with a Cell Phone _________________________ 6
Using Bluetooth Functions _____________________________________ 7
SHORT RANGE FM COMMUNICATIONS (SM1XSR MODEL) ______________ 8
FM RADIO OPERATION ____________________________________________ 8
TWO-WAY RADIO AND WIRED COMMUNICATION INTERFACE _____________9
BOOM MICROPHONE POSITIONING AND USE ________________________ 10
VOX OPERATION AND PRIVACY MODE _______________________________ 11
EXTERNAL AUDIO PASS-THROUGH _________________________________ 11
SYSTEM SET-UP _________________________________________________ 12
LED INDICATORS ________________________________________________ 13
CHARGING _____________________________________________________ 13
TECHNICAL SPECIFICATIONS _____________________________________ 14
SIZE RANGES ___________________________________________________ 14
HELMET MOUNTS _______________________________________________ 15
MAINTENANCE AND CLEANING ___________________________________ 15
ACCESSORIES AND SPARE PARTS ________________________________ 16
DECLARATION OF CONFORMITY __________________________________ 16
TROUBLE-SHOOTING ____________________________________________ 17

4
OVERVIEW
The Sensear SM1, SM1x and SM1x SR models hearing defense systems are state-of-the-art hearing
protectors. The systems have sophisticated electronics and algorithms to enhance speech in noisy
environments. As a result, Sensear SM1, SM1x and SM1x SR users do not need to remove their
hearing protection to hear speech in noisy environments.
In addition, the SM1x SR units incorporate FM short range connectivity, Bluetooth technology,
external audio pass-through and two-way radio connectivity. This enables users to communicate
to other SM1x SR users wirelessly, effectively answer a phone call, listen to an MP3 player or use
a two-way radio whilst wearing their hearing protection.
The SM1x unit is functionally identical to the SM1x SR in every respect, with the exception of the
FM short range connectivity. The SM1x communication features include Bluetooth technology,
external audio pass-through, face-to-face and two-way radio connectivity.
The SM1 unit is functionally identical to the SM1x in every respect, with the exception of the
Bluetooth connectivity function. The SM1 communication features include face-to-face and twoway radio connectivity.
The SM1 Ultra and SM1x (SR) Ultra models include a noise cancelling boom microphone for extreme
noise environments. Standard models may be upgraded by purchasing the Boom microphone
upgrade kit.
The SM1, SM1x and SM1x SR are available in over-the-head headband or helmet mount models.
Helmet mount adaptors are available for a wide range of helmets. See section Helmet Mounts.
The basis of the SM1, SM1x and SM1x SR units consists of advanced signal processing algorithms
that process sound. The output of these algorithms is referred to as the SENS processed sound. In
the SENS processed sound, the speech of nearby speakers is enhanced while at the same time,
the surrounding noise is suppressed. The SENS processed sound is the sound delivered to the
SM1, SM1x and SM1x SR users.
Noise reduction will be adversely affected by anything that impairs the seal of the earmuff cushions
against the head, such as thick spectacle frames, balaclavas, etc. Cushions may deteriorate with
use and should be renewed regularly.

5
GETTING STARTED
To fully utilise the functionality provided by the Sensear SM1, SM1x and SM1x SR models, please
ensure that the Sensear SM1, SM1x and SM1x SR are worn correctly. See Figure 1 for an illustration
of fi tting the SM1/SM1x(SR).
It is recommended that the SM1/SM1x(SR) are fi tted, adjusted and maintained in accordance with
Sensear’s instructions; the ear-muffs are worn at all times in noisy surroundings and the cushions
are regularly inspected for serviceability. If these recommendations are not adhered to, the protection
afforded by the ear muffs will be chemical impaired.
The basic functions of getting started with the Sensear SM1, SM1x and SM1x SR are described below.
Powering Up the Product
• Press and release the “Power” button shown in Figure 1.
• All the light-emitting diodes (LEDs) will turn on briefl y and the system software will load.
• The system will play the welcome message, after which it will deliver the SENS processed
sound.
• The Green LED will fl ash at the normal rate. Refer to Section, “LED INDICATORS”, for more
information.
Powering Down the Product
• Press and hold the “Power” button for two seconds.
• All the LEDs will turn on.
• The system will play the goodbye message, after which it will shut down.
Adjusting the Volume of the SENS Processed Sound
• Press and release the “Volume Up” button to increase the volume.
• Press and release the “Volume Down” button to decrease the volume.
NOTE: SM1/SM1x(SR) models incorporate a volume limiting function which ensures that the
maximum noise exposure is limited according to EN352-4. In high noise environments, the
volume may be automatically reduced to ensure that the noise exposure does not exceed
safe levels. Refer to the Section, “Criterion Levels”, for further information.
Warning – The output of the level dependent circuit of this hearing protector may exceed
the external sound level.
Muting the SENS Processed Sound
• Press and release the “Power” button to enter “Quiet Mode”.
• The user will still be able to use the two-way radio and answer phone calls, however the user
will not hear the SENS processed sound.
• When in the “Quiet Mode”, the green LED will fl ash at the faster rate.
Refer to Section, “LED INDICATORS” for more information.
Restoring the SENS Processed Sound
• Press and release the “Power” button.
• When exiting the “Quiet Mode”, the green LED will return to fl ashing at the normal rate.
IMPORTANT NOTE: The SM1/SM1x(SR) cannot be powered down while charging is taking
place. While the user is in the “System Set-up”, or on a telephone call, the volume of SENS
processed sound cannot be changed.
Please refer to the Sections, “BLUETOOTH” and “SYSTEM SET-UP” for more information.

6
BLUETOOTH
Confi guring the SM1x(SR) to be a Bluetooth headset for a cell phone is a two-step process.
Firstly, the SM1x(SR) must be paired with the cell phone. Secondly, the SM1x(SR) must be connected
to the cell phone. Pairing is required only once. When completed, each time the SM1x(SR) is powered
up, the SM1x(SR) automatically connects to the cell phone it was last paired with.
Pairing and Connecting with a Cell Phone
Pairing represents the exchange of a security key to enable secure communications between the
SM1x(SR) and the cell phone. To complete pairing, the following steps should be followed:
Step 1. Enter “Pairing Mode”, which makes the Bluetooth module on SM1x(SR)
discoverable:
• Press and hold the “Multi-Function” button for fi ve seconds. The Blue LED will illuminate solid blue
and an audible message will be played. The user can now use a cell phone to fi nd the Sensear
SM1x(SR) and commence the pairing process.
Step 2. Find the SM1x(SR) on a cell phone:
• Ensure that Bluetooth is enabled on the cell phone. Perform a search for Bluetooth devices on
the cell phone and select Sensear SM1x(SR) from the list of discovered devices.
Step 3. Enter the PIN (Passkey) on the cell phone:
• The PIN (Passkey) is “0000” (zeros). The pairing will then be completed. Note at this point, some
cell phones will automatically connect to the SM1x(SR). If so, Step 4 is not required.
Following pairing, the Sensear SM1x(SR) will be stored in the list of paired devices on your cell
phone. Similarly, your cell phone is stored in the memory of the SM1x(SR).
Step 4. Connect the SM1x(SR) to the cell phone:
• Press and hold down the “Volume Down” button for one second. An audible message will play,
notifying the user that the SM1x(SR) is attempting to connect to the cell phone. When connection
is completed successfully, the SM1x(SR) plays the message “Connection Completed” and the
Blue LED fl ashes at the normal rate. On some cell phones the user may have to “authorise” the
SM1x(SR) to complete the connection.
IMPORTANT NOTES:
The SM1x(SR) stores pairing information for only ONE cell phone at a time. Each cell phone
paired over-writes the previously paired phone in the memory of the SM1x(SR). Any cell
phone that is not registered in the memory of the SM1x(SR), regardless if it has previously
been paired, will require pairing with the SM1x(SR) again.
If pairing is not completed within two minutes after entering “Pairing Mode”, the system will
leave “Pairing Mode” and notify the user with a message.
NOTE: The SM1x(SR) can only enter the “Pairing Mode” if the two-way radio interface is
NOT operational. Ensure that the two-way radio is unplugged before attempting to enter the
“Pairing Mode”. Alternatively, leave the two-way radio plugged into the system, ensuring
that the radio is turned off.
NOTE: The SM1x SR can only enter the “Pairing Mode” if Short Range Communication is
NOT operational. Short Range Communication may be enabled in the User Menu, but must
be ‘OFF’ (simultaneous press on “Volume-Up” and “Volume-Down”) before attempting to
enter “Pairing Mode”.

7
Using Bluetooth Functions
The user must fi rst have connected the SM1x(SR) to the cell phone to use Bluetooth functions on
the SM1x(SR).
The functions are described below:
Accepting an incoming call
• When the phone is ringing, press and release the “Multi-Function” button. Note that when the
phone is ringing, a ring tone will also be delivered by the SM1x(SR). In addition, the Blue LED
will fl ash at the faster rate.
• After accepting the call, a brief “Call Accepted” sound will be heard and the Blue LED will continue
to fl ash at the faster rate.
Rejecting an incoming call
• When the cell phone is ringing, press and hold the “Multi-Function” button for one second.
A “Call Rejected” sound will be heard and the Blue LED will return to fl ash at the normal rate.
If “Call Divert” is enabled on the cell phone, the caller will be directed to voicemail.
Ending an active call
• When the user is on a phone call, press and hold the “Multi-Function” button for one second.
A “Call Ended” sound will be heard and the Blue LED will return to fl ash at the normal rate.
Adjusting the Bluetooth phone call volume
• While the user is on a phone call, press and release the “Volume Up” button.
• While the user is on a phone call, press and release the “Volume Down” button.
Disconnecting the cell phone from SM1x(SR)
• Using the cell phone, navigate through the “Active Bluetooth Devices” menu, select the SM1x
and select “Disconnect”. The Blue LED will turn off.

8
SHORT RANGE FM COMMUNICATIONS (SM1XSR MODEL)
The SM1xSR provides short range, half duplex, wireless communications with a range of up to
50 meters.
Before Short Range Communication can begin, Short Range FM must be enabled in the System
Setup. Navigate through the menu to Communication Option and Enable Short Range FM.
After it has been “Enabled”, SHORT RANGE COMMUNICATIONS MUST BE TURNED ON. Turn
ON Short Range FM by simultaneously pressing “Volume up” and “Volume down”. The user will
then receive a message advising that Short Range FM has been turned on.
Frequency The Short Range Communication Frequency can be selected in the System Setup. The
default frequency is 101.3MHz (Region1), 107.9 MHz (Region 2) or 97.0 MHz (Region 3).
All SM1xSR units must be setup on the same frequency if they are to communicate with each
other.
NOTE: A Frequency must be found that is entirely free from interference (eg radio stations) to
ensure best performance.
Region The Short Range Communication Region can be selected in the system Setup. The region
selection determines the appropriate RF Power Level settings for the SM1x SR required to satisfy
regulatory requirements.
Region 1 Australia and New Zealand
Region 2 Western Europe (CE Countries)
Region 3 USA and Canada (FCC Countries)
WARNING: Selecting the incorrect regional setting may violate regulatory requirements. The default
regional setting will be set to the region where the product was purchased.
Volume To adjust the Short Range FM volume the SM1x SR should fi rst be placed in QUIET
Mode. Press and release the “Power” button until QUIET Mode is selected. Press the “Volume Up”
or “Volume Down” buttons to adjust the Short Range FM volume.
Note that SENS volume can only be adjusted when the SM1x SR is in SENS Mode.
FM Radio Operation
SM1xSR units with FM hardware allows the user to tune into broadcast FM in the 88-108MHz
frequency range.
Prior to operation, the FM Radio option must fi rst be enabled in the System Settings. Once this
has been done, FM Radio can be turned on or off by simultaneously pressing the “Multifunction”
and “Power” buttons.
Adjusting FM Radio Volume To adjust the FM Radio volume the SM1x SR should fi rst be placed
in QUIET Mode. Press and release the “Power” button until QUIET Mode is selected. Press the
“Volume Up” or “Volume Down” buttons to adjust the FM Radio volume.
Note that SENS volume can only be adjusted when the SM1x SR is in SENS Mode.
Selecting FM Radio Stations The FM radio is set to a default station of 94.5 MHz. To select a
different station the SM1x SR must fi rst be placed in QUIET mode. Press and release the “Power”
button until QUIET mode is selected.
PRESS AND HOLD THE “VOLUME UP” BUTTON TO SCAN UP IN FREQUENCY TO THE NEXT
FM RADIO STATION. PRESS AND HOLD THE “VOLUME DOWN” BUTTON TO SCAN DOWN
IN FREQUENCY TO THE PREVIOUS FM RADIO STATION.

9
TWO-WAY RADIO AND WIRED COMMUNICATION INTERFACE
The 6 pin connector at the bottom of the right earcup is used for connecting to two-way radios,
mobile phones and other wired communications devices.
Two-way Radio Before a two-way radio can be used on this interface “two-way radio” must be
“enabled” in “communications options” in the system setup. See section on system set-up.
Connecting a two-way radio unit to the SM1/SM1x(SR) requires a 2-way radio audio adapter cable
available from your Sensear stockist. Several adaptors are available to suit a wide range of motorola,
icom and kenwood radios. Insert the six pin connector into the 2-way radio interface socket on the
SM1/SM1x(SR). Attach the audio adapter to the two-way radio unit. Contact your nearest sensear
distributor to obtain the required adapters for two-way radios.
The SM1/SM1x(SR) will deliver the incoming two-way radio transmission. Note that the incoming
two-way audio is mixed with the sens processed sound.
To speak over the two-way radio, use the following function:
Push-to-talk (ptt)
• Press and hold the “multi-function button”, which has the same effect as pressing the “ptt” button
on the two-way radio. Speak normally and the user’s voice will be sent through the sensear
system to the two-way radio.
IMPORTANT NOTES:
Always use the “Multi-Function” button and not the “PTT” button on the two-way radio, to
activate the PTT.
The volume of the two-way radio played back cannot be changed using the SM1/SM1x(SR)
volume controls. The volume is controlled only by the two-way radio unit.
PTT functionality is disabled if there is an incoming Bluetooth phone call, or if the user is
currently on a phone call via Bluetooth.
The two-way radio interface can be enabled/disabled as described in “SYSTEM SET-UP”.
If the interface is enabled, the user will be able to use the SM1/SM1x(SR) as a two-way
radio accessory to communicate on two-way channels. Note that the factory setting for the
communications options is “Two-Way radio Enabled” for the SM1 and SM1x models and
“Short RangeFM Enabled” for the SM1xSR models.
WIRED COMMUNICATIONS
Before a device other than a two-way radio can be used on this interface “wired communications”
must be “enabled” in “communications options” in the system setup. See section on system set-up.
For compatible cables to use with devices see your Sensear stockist.
Note: Wired communication can be turned on and off by pressing the “multifunction button”.
In this mode, the SM1/SM1x(SR) will deliver the incoming audio to the wearer’s ears. Note that the
incoming audio is mixed with the SENS processed sound. The wearer’s speech is continuously
transmitted over the cable.
Different devices that could interface to this connector may require different audio levels. Use the
“Wired Communications Levels” in the System Setup to adjust the outgoing audio volume.

10
BOOM MICROPHONE POSITIONING AND USE
The SM1 Ultra and SM1x(SR) Ultra are fi tted with fl exible boom microphones that allow 2-way radio
and mobile phone call operation in extreme noise situations. The standard SM1, SM1x and SM1xSR
may be upgraded by purchasing the Ultra Boom Microphone Upgrade – see ACCESSORIES AND
SPARE PARTS. The upgrade kit contains an Allan key, M5 nut and boom clamp.
Remove the rubber microphone attachment cover and attach the boom microphone and clamp as
shown in Figure 3. Lightly tighten M5 screw so that the boom position can just be adjusted by hand.
Place the ear-muffs on the head and adjust the boom position until the end of the microphone is
adjacent to the corner of the mouth. Remove the ear-muffs and tighten the M5 screw using the
Allan key provided, Insert the 2.5mm audio connector into the audio jack.
For optimum use, the boom microphone should be positioned within 5mm of the mouth.

11
VOX OPERATION AND PRIVACY MODE
The SM1, SM1x and SM1x SR support Voice Operated Switch (VOX) functionality, allowing hands
free operation of 2-way radios and Short Range FM (SM1xSR model). Note that this option is only
available if a boom microphone is attached.
By default the VOX setting is disabled. Follow the steps in SYSTEM SET-UP to enable the VOX.
Once enabled, the VOX function detects speech through the boom microphone and automatically
activates the radio transmitter.
If VOX has been enabled then speech may trigger the VOX, transmitting to all listeners on the same
frequency. In some situations this may not be desirable, if for example the speaker wishes to have
a private conversation with someone nearby.
In this situation the SM1/SM1x(SR) can be placed in “PRIVACY Mode”. PRIVACY Mode inhibits
transmission of the user’s speech over the Short Range FM communication channel.
By pressing and releasing the “Power” button the SM1/SM1x(SR) will cycle between, SENS, PRIVACY
and QUIET modes. Note that the PRIVACY Mode option is only available when VOX is enabled.
VOX operation is not recommended in windy conditions.
EXTERNAL AUDIO PASS-THROUGH
If the external audio pass-through has been enabled, (Factory setting is “Disabled” - see important
notes following), the SM1/SM1x(SR) can be used as a stereo headset to listen to audio from external
devices. External devices that can be used include iPods, other portable MP3 players, PC’s, laptops,
portable CD/cassette players, FM/AM radios and any other device with “line-out” audio output.
Connecting an external audio device to the SM1/SM1x(SR) requires an optional audio cable, available
from your Sensear stockist. Insert the 3.5mm end of the cable into the Audio socket on the SM1/
SM1x(SR). Insert the other 3.5mm end of the audio cable into the external audio device.
Note that the audio coming from external devices is mixed together with the SENS processed sound
and delivered to the user. External audio pass-through can also be permanently disabled.
To complete this, take the following steps:
Step 1 • When the SM1/SM1x(SR) is turned off, while pressing and holding down the “Multi-
Function” button and the “Volume Down” button, press and release the “Power”
button.
Step 2
• Press and release the “Volume Up” button to confi rm.
• The user will then receive a message advising that external audio pass-through has
been permanently disabled. The SM1/SM1x(SR) will then shut down automatically.
When powered up again, all functions relating to external audio pass-through,
including System Set-up options, will have disappeared.
IMPORTANT NOTES:
Once permanently disabled, the external audio pass-through cannot be restored.
The volume of external audio cannot be changed using the SM1/SM1x(SR) volume controls.
The volume must be controlled on the user’s external audio device.
External audio pass-through can be temporarily enabled/disabled, as described in “SYSTEM
SET-UP”.
Note that the factory setting of the external audio pass-through is “Disabled”.

12
Battery Status
Press and release “Volume Up” or “Volume Down”
Advises the battery status
External Audio Pass Through Options
Press and release “Volume Up”; Enables the
external audio passthrough. Press and release
“Volume Down”; Disables the external audio
passthrough
Bluetooth Options (SM1x(SR) only)
Press and release “Volume Up”; Enables Bluetooth.
Press and release “Volume Down”;
Disables Bluetooth (Suitable for aircraft use, etc)
Communications Options
Press and release “Volume Up” or “Volume Down”;
Navigates through and enables 2-way Radio, Wired
Communications OR Short Range FM.
Wired Communications Level
Press and release “Volume Up” or “Volume Down”;
Navigates through and selects Low, Medium OR
High. This selects the level of Audio transmitted
Default level is set to Low.
SYSTEM SET-UP
The Sensear SM1, SM1x and SM1x SR models
are confi gured by using System Set-up, in which
the following functions are available:
Activating the System Set-up
• Press and hold down the “Volume Up” button
for one second. A message will be heard
when the System Set-up is activated.
De-activating the System Set-up
• Press and hold down the “Volume Up” button
for one second. Alternatively, the System
Set-up will be exited nine seconds after the
last button press. A message will be heard
when the user has exited the System Setup.
Navigating to the next option in the
System Set-up
• Press and release the “Power” button.
Changing options in the System Set-up
• Press and release the “Volume Up” button
or the “Volume Down” button, depending on
the option required.
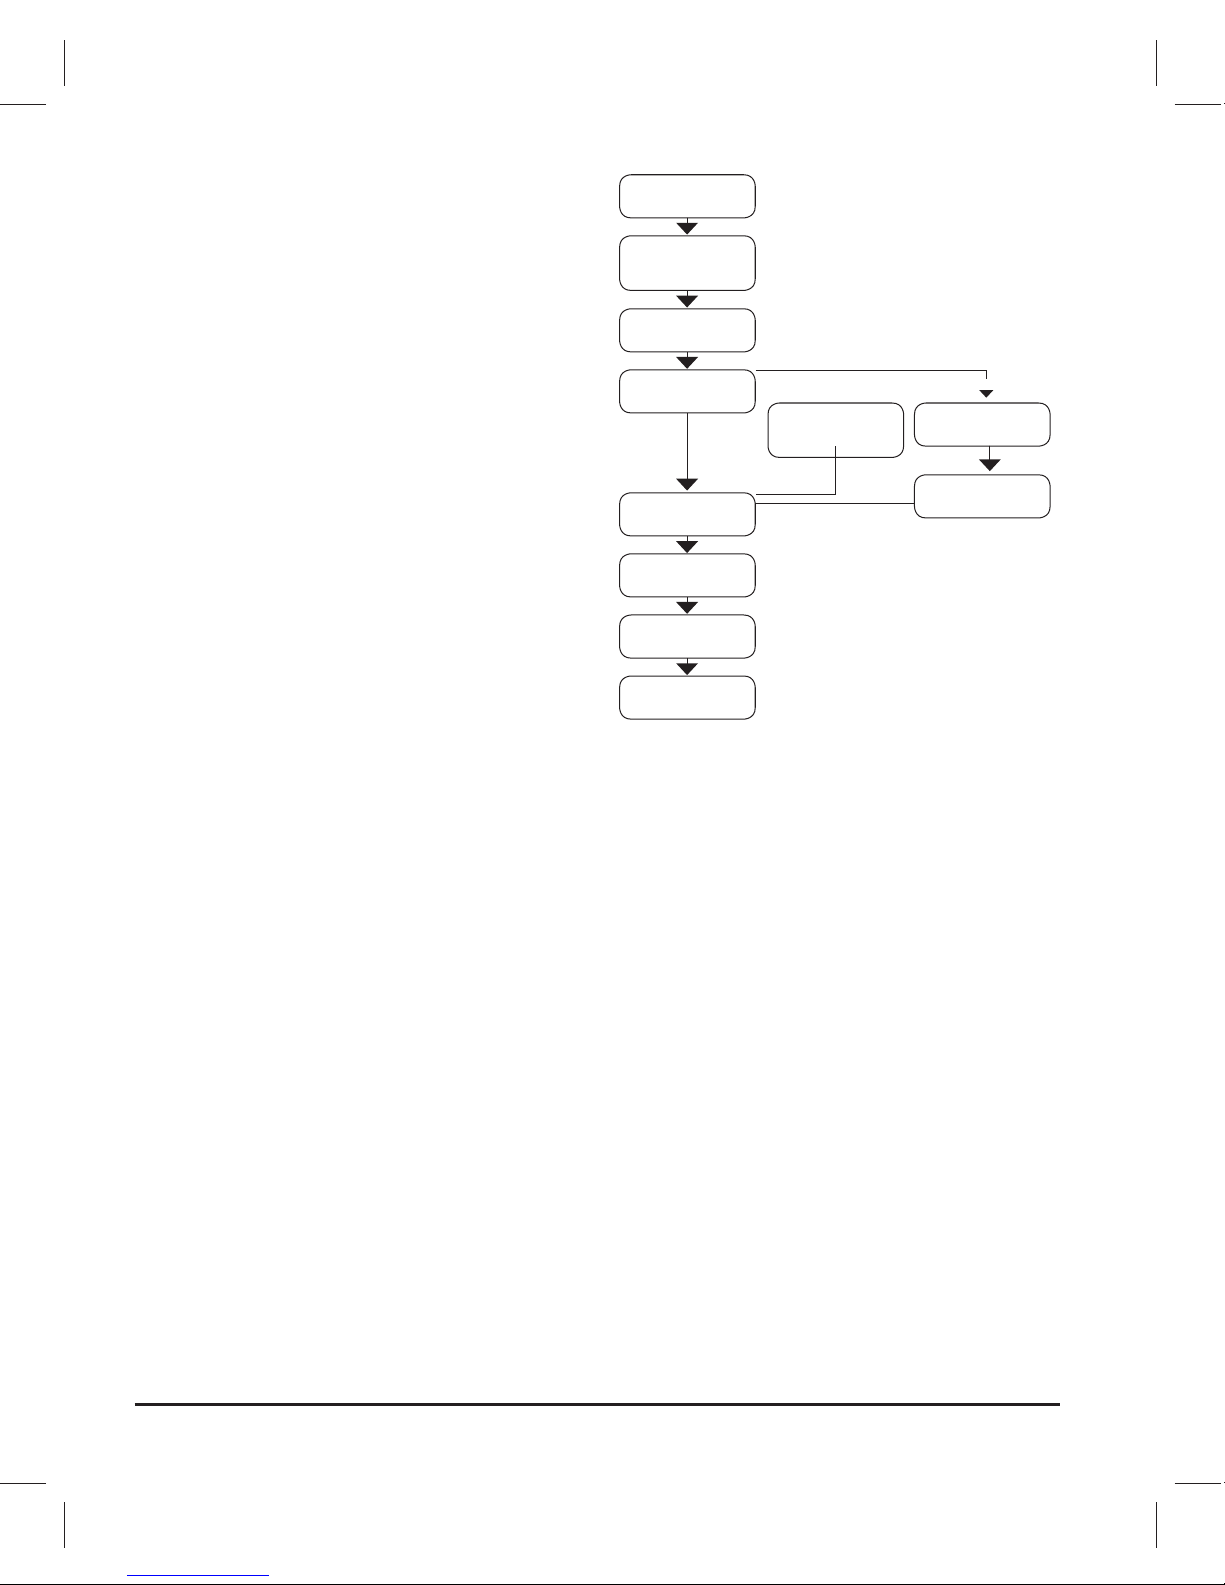
The order of System Set-up options available
to the user is shown below.
Short Range FM Frequency (SM1x SR only)
Press and release “Volume Up” or “Volume Down”;
Navigates through and selects the frequency for
Short Range FM Communication
Short Range FM Region (SM1x SR only)
Press and release “Volume Up” or “Volume
Down”"; Navigates through and selects Region 1,
2 OR 3.
FM Radio Options (FM And SR models only)
Press and release “Volume Up”; Enables the FM
Radio. Press and release “Volume Down”; Disables
the FM Radio
VOX Options (if Boom Mic installed)
Press and release “Volume Up”; VOX Enabled
Press “Volume Down”; VOX Disabled
Volume Balance Options
Press and release “Volume Up”; Increases left ear
volume relative to the right. Press "Volume Down";
Increases right ear volume relative to the left.
Restore Factory Defaults
Press and release “Volume Up”; Restores factory
defaults. The user will be asked to confi rm by
pressing and releasing “Volume Up” again. If
confi rmed, factory settings are restored and a
message is played and the system will shut down
Press “Volume Down”; Cancels restoring factory
defaults.
Wired Com-
munications Level
Short Range
FM Region
Battery Status
Extend Audio Pass-
through Options
Bluetooth Options
Communications
Options
2-way Radio
FM Radio Options
VOX Options
Volume Balance
Options
Restore Factory
Defaults
Wired Communications Short Range FM
Short Range FM
Frequency

13
LED INDICATORS
On the Sensear SM1/SM1x(SR) models, there are three LEDs: Red, Green and Blue.
Each LED has the following four modes of operation;
• Off
• Solid on
• Flashing at the normal rate. The normal rate is defi ned as once every 2.5 seconds
• Flashing at the faster rate. The faster rate is defi ned as 5 times per second.
The meaning of LED indicators for Sensear SM1, SM1x and SM1x SR is given in Table 1, below.
Off Solid On Normal Rate Faster Rate
Red Battery OK Battery charging Charge complete Battery low
Green SM1/SM1x turned off. N/A SENS processed,
sound active.
SENS processed,
sound muted.
Blue Bluetooth not
connected to a cell
phone.
Bluetooth “Pairing
Mode” engaged.
Bluetooth
connected to a cell
phone.
Incoming call,
outgoing call, or
active call.
Figure 4: LED Indicators
CHARGING
Sensear SM1/SM1x(SR) models are supplied with an AC adapter that operates globally when fi tted
with the appropriate electrical local adapter fi tting.
To charge the Sensear SM1/SM1x(SR), take the following steps:
Step 1
Plug the Sensear AC adapter into an appropriate electrical power outlet.
Step 2
Insert the cable end of the Sensear AC adapter into the DC Power socket on the SM1/SM1x(SR).
While the battery is charged, the Red LED will turn on solid red. When the charging is complete,
the Red LED will fl ash at the normal rate.
Refer to the Section, “LED INDICATORS”, for more information.

14
TECHNICAL SPECIFICATIONS
Weight: _______________________ 422 g
Operational temperature: _________ 0 ºC - 40 ºC charging. 0ºC - 50 ºC discharging
Battery use: ___________________ 15 hours (Bluetooth disabled)
Battery charge: _________________ 7 hours
Cushions material: ______________ Polyurethane
Headband material: _____________ Acetyl
Helmet mount material: __________ PVC
The Sensear SM1, SM1x and SM1x SR are active hearing protectors that allow audible contact
with your surroundings while providing protection from harmful noise.
WARNING: Performance may deteriorate with battery usage. The typical period of continuous use
that can be expected from the SM1 or SM1x(SR) is 15 to 18 hours.
SIZE RANGES
WARNING: Ear-muffs complying with EN352-1 and EN352-3 are of ‘small size range’, ‘medium
size range’ or ‘large size range’. Medium size range’ ear-muffs will fi t the majority of wearers. ‘Small
size range’ or ‘large size range’ ear-muffs are designed to fi t wearers for whom ‘medium size range’
ear-muffs are not suitable. The SM1, SM1x and SM1x SR headband may be adjusted for small,
medium or large size.
Clamping Force
The clamping force of the SM1, SM1x and SM1xSR have been measured in accordance with
AS1270. Initial measurements for the headband mount were 14.2 15.3 and 14.2 Newtons. Post-fl ex
measurements for the headband mount were 13.0 14.2 and 13.6 Newtons. Initial measurements
for the helmet mount were 11.2 10.7 and 10.7 Newtons. Post fl ex measurements for the helmet
mount 10.7 10.7 and 10.2 Newtons.
HELMET MOUNTS
The SM1, SM1x and SM1x SR were tested in combination with the following industrial safety helmets,
and may give different levels of protection if fi tted to different helmets.These ear-muffs should be
fi tted to, and used only with, the following industrial safety helmets: MSA VGard, Protector Tuffmaster
Lite, Protector Tuffmaster II, Protector Alsafe (Ansafe) 410, Protector HC600.

15
ATTENUATION VALUES
SM1, SM1x and SM1xSR with standard headband.
F(Hz) 63 125 250 500 1000 2000 3150 4000 6300 8000 H M L SNR
Mf(dB) 19.1 20.0 23.1 26.9 27.6 30.6 37.8 38.7 39.5 39.8
Sf(dB) 4.3 3.3 2.6 2.7 2.2 3.8 2.7 3.2 3.4 2.9 29 26 22 29
Mf-sf(dB) 14.8 16.7 20.5 24.2 25.4 26.8 35.1 35.5 36.1 36.9
SM1, SM1x and SM1xSR with helmet mount.
F(Hz) 63 125 250 500 1000 2000 3150 4000 6300 8000 H M L SNR
Mf(dB) 17.3 18.9 23.1 26.4 27.9 31.2 36.5 38.4 38.9 39.2
Sf(dB) 4.2 3.8 2.8 2.4 1.9 3.0 2.5 3.6 4.1 2.8 30 26 21 29
Mf-sf(dB) 13.1 15.1 19.3 24.0 26.0 28.2 34.0 34.8 34.8 36.4
WARNING: The reported attenuation will be obtained only if the SM1/SM1x(SR) is in good condition
and worn as directed (Refer to AS/NZS 1269.3 for guidance).
CRITERION LEVEL
The SM1, SM1x and SM1xSR have level dependant facilities and the criterion levels defi ned in
EN352-4 are displayed below.
SM1, SM1x and SM1xSR with standard headband H=113dBA M=108dBA L=93dBA.
SM1, SM1x and SM1xSR with helmet mount H=113dBA M=109dBA L=95dBA.
EXTERNAL AUDIO INPUT
The electrical input level for which the mean plus one standard deviation A-weighted diffused-fi eld
related sound pressure level is equal to 82dB is an RMS voltage U=18.9mV
MAINTENANCE AND CLEANING
Ear-muffs, and in particular cushions, may deteriorate with use and should be examined at frequent
intervals for cracking and leakage, for example.
The ear-muff replaceable cushions should be replaced if any visible sign of damage is detected.
Inspect regularly and replace if any visible sign of damage is evident. Refer to ACCESSORIES
AND SPARE PARTS for details of the replacement hygiene kit.
The ear-muff cushions can be cleaned with a damp cloth using warm soapy water. The ear-muffs
must not be immersed in water as this may destroy the electronic circuits. This product may be
adversely affected by certain chemical substances. Further information should be sought from
Sensear Pty Ltd.
Fitting of hygiene covers to the cushions may affect the acoustic performance of the ear-muffs.
Please note that the battery is not user replaceable. If it becomes damaged or faulty, return to a
Sensear authorised distributor for repair.
The SM1, SM1x and SM1x SR are fi tted with level-dependent attenuation. The wearer should check
the correct operation before use. If distortion or failure is detected, the wearer should refer to the
manufacturer’s advice for maintenance and replacement of the battery.

16
ACCESSORIES AND SPARE PARTS
The following accessories and spare parts may be ordered separately:
• SPPA0000 – Power pack adaptor, multizone.
• SRCK0006 – Radio connection kit, Motorola Aoba/Plus.
• SRCK0007 – Radio connection kit, Motorola Waris.
• SRCK0008 – Radio connection kit, Motorola MTS/XTS.
• SRCK0009 – Radio connection kit, Motorola CP150/CP200.
• SRCK0010 – Radio connection kit, ICOM F50/F60.
• SRCK0011 – Radio connection kit, Kenwood TK3140/3180.
• SRCK0012 – Radio connection kit, ICOM 2 pin.
• SRCK0013 – Radio connection kit, Kenwood 2 pin TK260/360.
• SRCK0014 – Radio connection kit, Motorola Mototurbo XPR6300/6500.
• SCAJ00002 – 3.5mm spiral audio cable suitable for external MP3.
• SMBM0001 – SM1 Ultra Boom Microphone Upgrade.
• SMHK0000 – SM1 Ear-muff Hygiene Kit.
• SMWS0001 – SM1 Wind Noise Foam Kit.
• SMHA0001 – SM1 Helmet Adaptor – MSA-Vguard.
• SMHA0002 – SM1 Helmet Adaptor – Protector Allsafe.
• SMHA0003 – SM1 Helmet Adaptor – Protector Tuffmaster.
• SMHA0004 – SM1 Helmet Adaptor – Unisafe Unilite.
Further information may be obtained from your Sensear stockist, via the Sensear web site, or by
emailing or writing to the addresses on Page 11 of this User Manual.
DECLARATION OF CONFORMITY
We, the undersigned:
Company Sensear Pty Ltd
Address 197-199 Great Eastern Highway Belmont WA 6104
Country Australia
Telephone Number +61 8 9277 7332
Fax number +61 8 9277 7338
Website www.sensear.com
Email info@sensear.com
Declare that:
Models SM1, SM1x and SM1x SR, in accordance with the following directives:
• 69/686/EEC • 99/5/EC • 2006/95/ED
• 2004/108/EC • 98/37/ED
Have been designed and manufactured to the following specifi cations:
• ETSI EN 352-1, EN 352-3, EN 352-4, EN 352-6 • ETSI EN 301 489, EN 301 357
• ETSI EN 300 220 • EN 60950

17
TROUBLE-SHOOTING
If the Sensear SM1, SM1x or SM1x(SR) is not functioning correctly, fi rst refer to this Section for
simple trouble-shooting. This can save time and effort, however if symptoms persist, consult your
nearest Sensear Service Centre.
The SM1/SM1x(SR) does not power up.
Ensure that the battery is suffi ciently charged. Charge the battery according to the instructions
given in the Section, “CHARGING”.
Bluetooth is not working.
Ensure that the Bluetooth is enabled in the System Set-up.
Two-way radio interface is not working.
Ensure that the two-way radio interface is enabled in the System Set-up.
External audio pass-through is not working.
Ensure that the external audio pass-through has not been permanently disabled and that it is
enabled in the System Set-up.
Volume of the two-way radio is too loud or too quiet.
Adjust the volume on your two-way radio.
The volume of the two-way radio cannot be adjusted using the volume controls on the SM1/SM1x.
Volume of the external audio device is too loud or too quiet.
Adjust the volume on your external audio device.
The volume of your external audio device cannot be adjusted using the volume controls on the
SM1/SM1x.
Unable to enter “Pairing Mode” (i.e., unable to make the Bluetooth module on the SM1x(SR)
discoverable).
The SM1x(SR) can only enter the “Pairing Mode” if the two-way radio interface is not in use. Ensure
the two-way radio is unplugged before attempting to enter the “Pairing Mode”. Alternatively, leave
the radio plugged into the system, however ensure that the radio is turned off.
The SM1x(SR) does not connect, either automatically or manually, to the cell phone it was
last paired with.
Ensure that the cell phone is ready to accept Bluetooth connections. This means that Bluetooth is
enabled on the cell phone and the phone is not connected to other Bluetooth devices.
Please note that on some phones, the user may also need to “authorise” the SM1x(SR) to connect
to the phone.
The SM1x(SR) does not connect, either automatically or manually, to a previously paired
cell phone after another cell phone has paired with the SM1x(SR).
The SM1x(SR) stores pairing information for only one cell phone at a time. If another cell phone has
paired with the system since last paired with it, the user will need to pair with the system again..

18
The SM1x(SR) connects, either automatically or manually, to another cell phone.
The SM1x(SR) contains pairing information for the other cell phone. Press and hold the “MultiFunction” button for fi ve seconds to enter “Pairing Mode”.
This will clear the current pairing memory, which will ensure that the SM1x(SR) does not connect
to another cell phone.
The SM1x(SR) does not re-connect to the cell phone when powered on immediately after it
was powered off while connected to the cell phone.
If the SM1x(SR) is powered off while connected to the cell phone, it can take up to 20 seconds for
the phone to become ready to accept a new Bluetooth connection.
If the SM1x(SR) is powered back up during these 20 seconds, the automatic connection at the
power-up will fail. To prevent this, ensure that 20 seconds lapse between powering off and back up.
If the automatic connection fails, the user can still connect manually to the cell phone once the
phone becomes ready to accept a new Bluetooth connection.
Bluetooth connection is lost after an incoming call is accepted using the cell phone’s
“Answer” button.
When an incoming call is accepted using the cell phone’s “Answer” button, a small proportion of cell
phones automatically close the connection to their Bluetooth headset, (in this case, the SM1x(SR))
and re-route the audio to the phone’s speakers. They do this on the assumption that by answering
the call using the phone, the user wishes to use the phone’s microphone and speaker and not those
on the Bluetooth headset. To prevent this from happening, always use the “Multi-Function” button
on the SM1x(SR) to accept incoming calls.
Short Range FM does not work.
Ensure fi rstly that “Communications Options” in the System Setup has been set to “Short Range
FM Enabled”. Secondly Short Range FM has to be turned ON by simultaneously pressing “Volume
Up” and “Volume Down”.
Short Range FM is turned ON but will not transmit or receive.
If two SM1xSR units are to communicate, they must be tuned to the same frequency. See section
on Short Range FM Communications Frequency.
If all SM1xSR units are tuned to the same frequency but still do not communicate, try changing
the frequency on all SM1xSR units to ensure that there is no FM Broadcast Radio station on the
operating frequency.
VOX Does not work properly.
VOX is designed to operate in environments with up to 105dBA of noise. The trigger level of the
VOX has been set at the factory to ensure that it does not trigger in these noise levels. In order for
your voice to trigger the VOX –
Move the boom close to your mouth and fi nd a position where it picks up the greatest 1.
amount of your voice.
Speak Firmly.2.
There is a short processing delay after you start to speak before VOX enables the transmitter.
Continuous speech is required to ensure that the transmitter remains enabled.

1
Indholdsfortegnelse
OVERSIGT ________________________________________________________2
KOM GODT I GANG _________________________________________________3
BLUETOOTH ______________________________________________________4
Sammenkobling og forbindelse med en mobiltelefon ______________ 4
Brug af Bluetooth funktioner ___________________________________ 5
KORT RÆKKEVIDDE FM KOMMUNIKATIONER (SM1XSR MODEL) __________ 6
FM RADIO ANVENDELSE ____________________________________________6
TO-VEJS RADIO OG KABELFORBUNDEN KOMMUNIKATIONSINTERFACE ___7
PLACERING AF MIKROFON PÅ MIKROFONARM OG BRUG _______________8
VOX ANVENDELSE OG UFORSTYRRETHEDSTILSTAND __________________9
EKSTERN LYD GENNEMGANG _______________________________________ 9
SYSTEM INDSTILLINGER ___________________________________________10
LED INDIKATORER ________________________________________________ 11
OPLADNING _____________________________________________________ 11
TEKNISKE SPECIFIKATIONER ______________________________________ 12
STØRRELSES SORTIMENT _________________________________________12
HÆNGSLER TIL HJELM ____________________________________________12
VEDLIGEHOLDELSE OG RENGØRING ________________________________ 13
TILBEHØR OG RESERVEDELE ______________________________________14
KONFORMITETSERKLÆRING ______________________________________ 14
FEJLRETNING ____________________________________________________15
DANISH

2
OVERSIGT
Sensear SM1, SM1x og SM1x SR høreværn modeller er de allernyeste indenfor beskyttelse af hørelsen.
Systemerne har avancerede elektronikker og algoritmer der forbedrer tale i støjende omgivelser.
Det betyder at med Sensear SM1, SM1x og SM1x SR kan brugerne beholde deres høreværn på
når de skal høre tale i støjende omgivelser.
Derudover tilbyder SM1x SR indbygget FM kort rækkevidde radio, Bluetooth teknologi, ekstern
lydgennemgang og to-vejs radio kommunikation. Dette sætter brugerne i stand til at kunne
kommunikere trådløst med andre SM1x SR brugere, besvare en telefonopringning, lytte til en MP3
afspiller eller bruge en to-vejs radio mens de har høreværnet på.
SM1x apparatet har præcist de samme funktioner som SM1x SR med undtagelse af FM kort
rækkevidde radioen. SM1x kommunikationsfunktionerne omfatter Bluetooth teknologi, ekstern
lydgennemgang, direkte ansigt til ansigt og to-vejs radio kommunikation.
SM1 apparatet har præcist de samme funktioner som SM1x med undtagelse af Bluetooth
tilslutningsfunktionen. SM1 kommunikationsfunktioner omfatter ansigt til ansigt og to-vejs radio
kommunikation.
SM1 Ultra og SM1x (SR) Ultra modellerne har desuden en støjreducerende mikrofon på en
mikrofonarm til meget støjende omgivelser. Standardmodellerne kan opgraderes ved at købe en
mikrofon på mikrofonarm som ekstratilbehør.
SM1, SM1x og SM1x SR modellerne er tilgængelige som hovedtelefon eller til påmontering på en
hjelm. Tilpasningsstykker til hjelme fi ndes til en lang række forskellige hjelme. Se afsnittet hjelm
beslag.
Grundlaget for SM1, SM1x og SM1x SR apparaterne består af avancerede signal bearbejdnings
algoritmer som behandler lyd. Effekten af disse algoritmer omtales som SENS bearbejdet lyd. SENS
bearbejdet lyd forstærker tale fra personer i nærheden samtidigt med at støj fra omgivelserne bliver
undertrykt. SENS bearbejdet lyd er lyden der leveres til brugerne af SM1, SM1x og SM1x SR.
Støjreduceringen vil blive betydeligt forringet af alt der forhindrer hovedtelefonerne i at sidde tæt
mod hovedet som f.eks et kraftigt brillestel, en balaklavahue osv. Puderne på hovedtelefonerne
bliver slidte og bør jævnligt udskiftes.

3
KOM GODT I GANG
For at kunne gøre brug af funktionerne der er tilgængelige sammen med SM1, SM1x og SM1x SR
modellerne skal du sørge for at Sensear SM1, SM1x og SM1x SR sidder rigtigt. På fi gur 1 kan man
se en tegning der illustrerer hvordan SM1/SM1x(SR) skal sidde.
Det anbefales at SM1/SM1x(SR) bliver justeret, tilpasset og vedligeholdt i overensstemmelse med
Sensears vejledninger og at hovedtelefonerne altid bliver anvendt i støjende omgivelser samt at
puderne bliver kontrolleret regelmæssigt. Hvis disse anbefalinger ikke bliver efterlevet vil beskyttelsen
som hovedtelefonerne yder blive forringet.
De basale trin til at komme godt i gang med Sensear SM1, SM1x og SM1x SR er beskrevet
nedendor.
Tænd for apparatet
• Tryk på “Tænd” knappen og giv slip som vist på fi gur 1.
• Alle lysdioderne (LED’ere) vil lyse i et kort øjeblik og systemsoftwaren vil blive indlæst.
• Systemet afspiller en velkomstbesked og bagefter vil den SENS bearbejdede lyd være klar til brug.
• Den grønne LED blinker ved normal hastighed. Se venligst afsnittet ”LED INDIKATORER” hvis
du ønsker yderligere oplysninger.
Sluk for apparatet
• Tryk på “Tænd” knappen i to sekunder.
• Alle lysdioderne vil lyse.
• Systemet afspiller en afslutningsbesked og bagefter afbrydes det.
Tilpasning af lydstyrken på den SENS bearbejdede lyd.
• Tryk på “Forhøj lydstyrke” knappen og giv slip for at øge lydstyrken.
• Tryk på “Sænk lydstyrke” knappen og giv slip for at sænke lydstyrken.
BEMÆRK: SM1/SM1x(SR) modellerne har en indbygget begrænsende lydstyrke funktion,
der sikrer at den maksimale støjeksponering bliver begrænset ifølge EN352-4. I meget
støjende omgivelser, bliver lydstyrken automatisk nedsat for at sikre at støjeksponeringen
ikke overstiger et sikkert niveau. Se venligst afsnittet “Niveau kriterier” for yderligere
oplysninger.
Advarsel. Effekten af det niveauafhængige kredsløb i dette høreværn kan overstige det
udefrakommende lydniveau.
Dæmpning af den SENS bearbejdede lyd
• Tryk på “Tænd” knappen og giv slip for at få adgang til “Stille tilstand”.
• Brugeren vil stadigvæk kunne bruge den to-vejs radio kommunikation og besvare telefonopkald
men vil ikke høre den SENS bearbejdede lyd.
• Når apparatet befi nder sig i ”Stille tilstand” vil den grønne LED indikator blinke hurtigere.
Se venligst afsnittet ”LED INDIKATORER” hvis du ønsker yderligere oplysninger.
Genopret den SENS bearbejdede lyd
• Tryk på “Tænd” knappen og giv slip igen.
• Når man forlader ”Stille tilstand” vil den grønne LED indikator blinke med normal hastighed igen.
VIGTIG BEMÆRKNING: SM1/SM1x(SR) apparatet kan ikke slukkes mens det bliver opladet.
Mens brugeren befi nder sig i “System indstillinger” eller under en telefonsamtale, kan
lydstyrken af den SENS bearbejdede lyd ikke ændres.
Se venligst afsnittene ”Bluetooth” og ”System indstillinger” for yderligere oplysninger.

4
BLUETOOTH
Konfi gurationen af SM1x(SR) til brug sammen med en mobiltelefon er en to-trins process.
Først skal SM1x(SR) sammenkobles med mobiltelefonen. Dernæst skal SM1x(SR) forbindes med
mobiltelefonen. Sammenkobling skal kun udføres en enkelt gang. Når det er udført, vil SM1x(SR)
automatisk blive forbundet med den mobiltelefon den sidst var sammenkoblet med hver gang den
tændes.
Sammenkobling og forbindelse med en mobiltelefon
Sammenkobling indbefatter udveksling af en sikkerhedsnøgle der gør sikker kommunikation mellem
SM1x(SR) og mobiltelefonen mulig. For at udføre sammenkoblingen skal følgende trin følges:
1. trin. Aktiver “Sammenkoblings tilstand” hvilken gør Bluetooth modulet på SM1x(SR)
synligt:
• Tryk på “Multi funktion” knappen og hold den nede i fem sekunder. Den blå LED indikator vil lyse
klar blå og en hørbar meddelelse vil blive afspillet. Brugeren kan derefter bruge en mobiltelefon
til at søge efter Sensear SM1x(SR) og påbegynde sammenkoblingsprocessen.
2. trin. Søg efter SM1x(SR) på en mobiltelefon:
• Sørg for at Bluetooth er aktiveret på mobiltelefonen. Udfør en søgning efter Bluetooth apparater
på mobiltelefonen og vælg Sensear SM1x(SR) fra listen over fundne apparater.
3. trin. Indtast PIN koden på mobiltelefonen:
• PIN koden er “0000” (fi re nuller). Sammenkoblingen vil blive udført. Her bør det bemærkes, at
visse mobiltelefoner vil automatisk blive forbundet til SM1x(SR). Hvis dette er tilfældet kan 4.
trin springes over.
Efter sammenkoblingen vil Sensear SM1x(SR) blive gemt på listen over sammenkoblede apparater
i din mobiltelefon. Din mobiltelefon bliver ligeledes gemt i hukommelsen på SM1x(SR).
4. trin. Forbind SM1x(SR) til mobiltelefonen:
• Tryk og hold “Sænk lydstyrke” knappen nede i et sekund. Der afspilles en hørbar meddelelse som
informerer brugeren om, at SM1x(SR) forsøger at forbinde til mobiltelefonen. Når forbindelsen er
succesfuldt udført, afspiller SM1x(SR) meddelelsen “Forbindelse udført” og den blå LED indikator
blinker ved normal hastighed. På nogle mobiltelefoner skal brugeren først autorisere SM1x(SR)
for at kunne udføre forbindelsen.
VIGTIGE BEMÆRKNINGER:
SM1x(SR) gemmer kun sammenkoblingsoplysninger for én mobiltelefon ad gangen.
Hver mobiltelefon der sammenkobles overskriver den forrige sammenkoblede telefon i
hukommelsen på SM1x(SR). Enhver mobiltelefon der ikke er registreret i hukommelsen
på SM1x(SR), uanset om den tidligere har været sammenkoblet, vil kræve at den bliver
sammenkoblet med SM1x(SR) igen.
Hvis sammenkoblingen ikke fi nder sted indenfor to minutter efter “Sammenkoblings
tilstand” åbnes, vil systemet forlade ”Sammenkoblings tilstand” og informere brugeren
med en meddelelse.
BEMÆRK: SM1x(SR) kan kun åbne “Sammenkoblings tilstand” hvis det to-vejs radio
kommunikations interface IKKE er i brug. Sørg for at den to-vejs radio kommunikation er
afbrudt inden du begynder at åben ”Sammenkoblings tilstand”. Du kan evt. lade den to-vejs
radio kommunikation være forbundet men du skal sørge for at radioen er slukket.

5
Brug af Bluetooth funktioner
Brugeren skal først have forbundet SM1x(SR) apparatet til mobiltelefonen for at anvende Bluetooth
funktionerne på SM1x(SR).
Funktionerne beskrives nedenfor:
Besvar et opkald
• Når telefonen ringer skal du trykke på “Multi funktion” knappen. Bemærk at når telefonen ringer, vil
der samtidigt lyde en ringetone fra SM1x(SR) apparatet. Og derudover vil den blå LED indikator
blinke med en højrere hastighed.
• Efter du har besvaret opringningen, vil en kortvarig ”Opkald besvaret” lyd kunne høres og den
blå LED indikator vil fortsætte med at blinke med høj hastighed.
Afvis et opkald
• Når telefonen ringer skal du trykke på “Multi funktion” knappen og holde denne nede i et sekund.
En “Opkald afvist” lyd høres og den blå LED indikator vil begynde at blinke med normal hastighed.
Hvis ”Viderestilling” er aktiveret på mobiltelefonen, vil vedkommende der har ringet op blive
viderestillet til telefonsvarer.
Afslut en samtale
• Når brugeren taler i telefon, skal du trykke på “Multi funktion” knappen og holde denne nede i et sekund.
En “Opkald afsluttet” lyd høres og den blå LED indikator vil begynde at blinke med normal
hastighed.
Justering af Bluetooth lydstyrken
• Under telefonsamtalen tryk på “Forhøj lydstyrke” knappen og giv slip.
• Under telefonsamtalen tryk på “Sænk lydstyrke” knappen og giv slip.
Afbryd mobiltelefonen fra SM1x(SR) apparatet
• Ved hjælp af mobiltelefonen navigeres gennem “Aktiv Bluetooth apparater” menuen og “Afbryd”
SM1x(SR) vælges. Den blå LED indikator vil slukke.

6
KORT RÆKKEVIDDE FM KOMMUNIKATIONER (SM1XSR MODEL)
SM1xSR apparatet tilbyder kort rækkevidde, halv-dupleks, trådløse kommunikationer med en
rækkevidde på op til 50 m.
Inden kort rækkevidde kommunikation kan begynde, skal kort rækkevidde FM aktiveres i system
indstillinger. Gå gennem menuen til Kommunikation valgmuligheder og Aktiver kort rækkevidde
FM.
Efter den er blevet “Aktiveret”, skal KORT RÆKKEVIDDE KOMMUNIKATIONER TÆNDES. TÆND
for kort rækkevidde FM ved at trykke på “Forhøj lydstyrke” og ”Sænk lydstyrke” samtidigt. Brugeren
vil derefter modtage en meddelelse at kort rækkevidde FM er blevet tændt.
Frekvens Kort rækkevidde kommunikationsfrekvensen kan vælges i system indstillinger.
Standardfrekvensen er 101,3MHz (Region 1), 107,9 MHz (Region 2) eller 97,0 MHz (Region 3).
Alle SM1xSR apparater skal indstilles på den samme frekvens hvis de skal kunne kommunikere
med hinanden.
BEMÆRK: Man skal fi nde en frekvens helt uden forstyrrelser (f.eks fra radiostationer) for at sikre
det bedste resultat.
Region Kort rækkevidde kommunikationsfrekvense regionen kan vælges i system indstillinger.
Valget af region er afgørende for den passende RF strømniveau indstilling til SM1xSR der kræves
for at overholde gældende regler.
Region 1 Australien og New Zealand
Region 2 Vesteuropa (Central europæiske lande)
Region 3 USA og Canada (FCC lande)
ADVARSEL: Valg af den forkerte regionale indstilling kan være et brud på gældende regler. Standard
regionindstillingen vil være den samme som hvor apparatet er blevet fremstillet.
Lydstyrke For at tilpasse kort rækkevidde FM lydstyrken bør SM1xSR apparatet først anvendes
i STILLE tilstand. Tryk på “Tænd” knappen indtil STILLE tilstand fremkommer og giv slip. Tryk på
“Forhøj lydstyrke” eller “Sænk lydstyrke” knapperne for at justere kort rækkevidde FM lydstyrken.
Bemærk at SENS lydstyrken kun kan justeres når SM1xSR befi nder sig i SENS tilstand.
FM radio anvendelse
SM1xSR apparater med FM hardware sætter brugeren i stand til at lytte til udsendelser på FM
88-108 MHz båndet.
Inden anvendelse skal FM radioen først aktiveres i system indstillinger. Når det er sket, kan FM
radioen blive tændt og slukket ved at trykke ”Multi funktion” og ”Tænd” knapperne ned samtidigt.
Justering af FM radio lydstyrken For at tilpasse FM radio lydstyrken bør SM1xSR apparatet først
indstilles i STILLE tilstand. Tryk på “Tænd” knappen indtil STILLE tilstand fremkommer og giv slip.
Tryk på “Forhøj lydstyrke” eller “Sænk lydstyrke” knapperne for at justere FM radio lydstyrken.
Bemærk at SENS lydstyrken kun kan justeres når SM1xSR befi nder sig i SENS tilstand.
Valg af FM radiostationer FM radioen er indstillet som standard på en station på 94,5 MHz. For
at vælge en anden station skal SM1xSR først indstilles i STILLE tilstand. Tryk på “Tænd” knappen
indtil STILLE tilstand fremkommer og giv slip.
TRYK PÅ “FORHØJ LYDSTYRKE” KNAPPEN FOR AT SCANNE FREKVENSERNE OPAD TIL
DEN NÆSTE RADIOSTATION. TRYK PÅ “SÆNK LYDSTYRKE” KNAPPEN FOR AT SCANNE
FREKVENSERNE NEDAD TIL DEN FORRIGE RADIOSTATION.

7
TO-VEJS RADIO OG KABELFORBUNDEN KOMMUNIKATIONSINTERFACE
Den seks-benede stikforbindelse i bunden af den højre hovedtelefon bruges til at tilslutte to-vejs
radioer, mobiltelefoner og andet kabelforbundet kommunikationsudstyr.
To-vejs radio
Inden en to-vejs radio kan bruges på dette interface, skal to-vejs radio kommunikation ”aktiveres”
under kommunikations valgmuligheder i system indstillinger. Se afsnittet om system indstilling.
For at tilslutte en to-vejs radio enhed til SM1x(SR) kræves der et to-vejs radio lydadapter kabel
som kan købes hos Sensear. Der fi ndes adskillige forskellige tilgængelige kabler der passer til de
fl este Motorola, Icom og Kenwood radioer. Isæt den seks-benede stikforbindelse i to-vejs radio
interface kontakten på SM1/SM1x(SR) apparatet. Forbind radioadapteren til den to-vejs radioenhed.
Henvend dig hos din nærmeste Sensear forhandler for at anskaffe de nødvendige adaptere til tovejs radio kommunikation.
SM1/SM1x(SR) leverer den indkommende to-vejs radio transmission. Bemærk at den indkommende
to-vejs lyd er blandet med den SENS bearbejdede lyd.
For at tale henover to-vejs radioen, skal du bruge følgende funktion:
Tryk for at tale (ptt)
• Tryk og hold “Multi funktionsknappen” nede, hvilket har samme virkning, som når du trykker
på ”PTT” knappen på to-vejs radioen. Tal ganske almindeligt og brugerens stemme vil blive
transmitteret gennem Sensear systemet til den to-vejs radio.
VIGTIGE BEMÆRKNINGER:
Brug altid “Multi funktions” knappen og ikke “PTT” knappen på to-vejs radioen til at aktivere PTT.
Lydstyrken i to-vejs radioen kan ikke ændres ved hjælp af SM1/SM1x(SR) lydstyrke
indstillingen. Lydstyrken kan kun justeres med den to-vejs radioenhed.
PTT funktionaliteten bliver deaktiveret hvis der kommer et Bluetooth telefonopkald eller hvis
brugeren taler i telefon via Bluetooth.
Det to-vejs radio interface kan blive aktiveret/deaktiveret som beskrevet i “SYSTEM
INDSTILLINGER”. Hvis interfacet er aktiveret, vil brugeren kunne bruge SM1/SM1x(SR) som en
to-vejs radioenhed til at kommunikere med på to-vejs kanaler. Bemærk at fabriksindstillingen
for kommunikations valgmulighederne er ”To-vejs radio aktiveret” for SM1 og SM1x
modellerne og ”Kort rækkevidde FM aktiveret” for SM1xSR modellen.
KABELFORBUNDNE KOMMUNIKATIONER
Inden en enhed, bortset fra en to-vejs radio, kan bruges på dette interface, skal kabelforbundet
kommunikation ”aktiveres” under kommunikations valgmuligheder i system indstillinger. Se afsnittet
under system indstillinger. Hvis du ønsker at se en liste over kompatible kabler der kan bruges
med enheder kontakt sensear.
Bemærk: kabelforbundne kommunikationer kan tændes og slukkes ved at trykke på “multifunktions
knappen”.
I denne tilstand vil sm1/sm1x(sr) apparatet levere den indkommende lyd til brugerens øre. Bemærk
at den indkommende lyd er blandet med den sens bearbejdede lyd. Brugerens tale bliver uophørligt
transmitteret via kablet.
Forskellige apparater der passer til denne stikforbindelse kræver muligvis forskellige lydniveauer.
Brug ”kabelforbundne kommunikationsniveauer” i system indstillinger til at justere den udgående
lydstyrke.

8
PLACERING AF MIKROFON PÅ MIKROFONARM OG BRUG
SM1 Ultra og SM1x(SR) Ultra er udstyrede med fl eksible mikrofoner på mikrofonarme som tillader
to-vejs radio kommunikation og mobiltelefonsamtaler i meget støjende omgivelser. Standard
SM1, SM1x og SM1xSR kan opgraderes ved at købe Ultra Boom Microphone Upgrade – se
TILBEHØR OG RESERVEDELE. Opgraderingssættet indeholder en skruenøgle, M5 møtrik og
en mikrofon spændbøjle.
Fjern gummidækslet til mikrofonen og fastgør mikrofonarmen og spændbøjlen som vist på
fi gur 3. Stram M5 møtrikken forsigtigt således at mikrofonarmens placering kan justeres med hånden.
Anbring hovedtelefonerne på hovedet og tilpas mikrofonarmen således at mikrofonen befi nder sig lige
ud for munden. Fjern hovedtelefonerne og stram M5 møtrikken med den medfølgende skruenøgle.
Isæt 2,5 mm lyd stikforbindelsen i jack stikket.
Til optimal ydelse anbefales det at mikrofonen placeres indenfor 5 mm afstand fra munden.
Figur 3: Mikrofon på mikrofonarm fastgørelses vejledninger
VENSTRE
HOVEDTELEFON
STØVBETRÆKKER
MIKROFONFAST-
GØRER
MIKROFON PÅ
MIKROFONARM
MINI JACK
M5 MØTRIK
2,5 mm
LYDSTIKFORBINDELSE
5 mm
5 mm

9
VOX ANVENDELSE OG UFORSTYRRETHEDSTILSTAND
SM1, SM1x og SM1x SR understøtter Voice Operated Switch (VOX) funktionalitet og tillader håndfri
betjening af to-vejs radioer og kort rækkevidde FM (SM1xSR model). Bemærk at denne mulighed
kun er tilgængelig hvis en mikrofonarm er monteret.
Som standard er VOX indstillingen deaktiveret. Følg trinene i SYSTEM INDSTILLINGER for at
aktivere VOX. Når den først er aktiveret, vil VOX funktionen registrere tale gennem mikrofonen og
automatisk aktivere radiotransmitteren.
Hvis VOX er blevet aktiveret så kan tale foranledige at VOX transmitteres til alle lyttere på samme
frekvens. Dette kan i visse tilfælde vise sig at være uhensigtsmæssigt hvis brugeren f.eks ønsker
at føre en privat samtale med en person i nærheden.
I dette tilfælde kan SM1/SM1x(SR) indstilles i “PRIVAT tilstand”. PRIVAT tilstand hindrer transmission
af brugerens stemme over kanalen til kort rækkevidde FM kommunikation.
Ved at trykke på “Tænd” knappen og give slip igen, vil SM1/SM1x(SR) skifte mellem SENS,
PRIVAT og STILLE tilstande. Bemærk at PRIVAT tilstand muligheden kun er tilgængelig når VOX
er aktiveret.
VOX anvendelse kan ikke anbefales i omgivelser med kraftig vind.
UDVENDIG LYD GENNEMGANG
Hvis den eksterne lydgennemgang er blevet aktiveret (fabriksindstillingen er “Deaktiveret” – se
efterfølgende vigtige bemærkninger), så kan SM1/SM1x(SR) bruges som stereo hovedtelefoner til
at høre musik fra eksterne afspillere. Eksterne afspillere der kan benyttes omfatter iPods og andre
bærbare MP3 afspillere, PC’ere, laptops, bærbare CD afspillere, walkman, FM/AM radioer og enhver
anden afspiller med en ”line-out” lydudgang.
Hvis du ønsker at tilslutte en ekstern afspiller til SM1/SM1x(SR) apparatet kræves der et ekstra
lydkabel som kan købes hos Sensear. Isæt den 3,5 mm lange ende af kablet i lydkontakten på SM1/
SM1x(SR) apparatet. Isæt den modsatte ende af kablet i den eksterne afspiller.
Bemærk at lyden der kommer fra eksterne afspillere bliver blandet med den SENS
bearbejdede lyd der sendes til brugeren. Ekstern lydgennemgang kan permanent deaktiveres.
For at gøre dette skal du udføre følgende:
1. trin • Mens SM1/SM1x(SR) er slukket, skal du trykke og holde ”Multi funktionsknappen”
nede samtidig med at du trykker på ”Sænk lydstyrke” knappen og trykker og holder
”Tænd” knappen nede.
2. trin
• Tryk på “Forhøj lydstyrke” knappen og giv slip for at bekræfte handlingen.
• Brugeren vil derefter modtage en meddelelse der fortæller, at den eksterne
lydgennemgang er blevet permanent deaktiveret. SM1/SM1x(SR) vil automatisk
slukke. Når du tænder for apparatet igen, vil alle funktioner med relation til
lydgennemgang inklusive System indstillings valgmuligheder være forsvundet.
VIGTIGE BEMÆRKNINGER:
Når du først har permanent deaktiveret den eksterne lydgennemgang kan den ikke
genoprettes.
Lydstyrken på eksterne afspillere kan ikke ændres med SM1/SM1x(SR) lydstyrke reguleringen.
Lydstyrken skal justeres på brugerens eksterne afspiller.
Ekstern lydgennemgang kan blive aktiveret/deaktiveret som beskrevet i “SYSTEM
INDSTILLINGER”.
Bemærk at fabriksindstillingen for den eksterne lydgennemgang er ”Deaktiveret”.
LED
10
SYSTEM INDSTILLINGER
Sensear SM1, SM1x og SM1xSR modellerne
konfi gureres ved hjlæp af System indstillinger
hvor følgende funktioner er tilgængelige:
Aktivering af System indstillinger
• Tryk og hold “Forhøj lydstyrke” knappen nede
i et sekund. Der høres en meddelelse når
System indstillingen er blevet aktiveret.
Deaktivering af System indstillinger
• Tryk og hold “Forhøj lydstyrke” knappen nede
i et sekund. Ellers vil man forlade System
indstillinger ni sekunder efter det sidste tryk
på knappen. Der høres en meddelelse når
brugeren har forladt System indstillinger.
Navigering til den næste valgmulighed i
System indstillinger
• Tryk på “Tænd” knappen og giv slip igen.
Ændring af valgmuligheder i System
indstillinger
• Tryk på “Forhøj lydstyrke” knappen eller
på “Sænk lydstyrke” knappen og giv slip
afhængigt af den krævede funktion.
Ordenen for de tilgængelige system indstillinger
vises nedenfor.
Forbundne
kommunikations-
niveauer
Kortbølge FM
region
Forbundne kommunikationer LKortbølge FM
Kortbølge FM
frekvens
Batteristatus
Ekstern
lydgennemgang
valgmuligheder
Bluetooth
valgmuligheder
Kommunikations
valgmuligheder
2-way Radio
FM radio
valgmuligheder
VOX valgmuligheder
Lydstyrke balance
valgmuligheder
Genopret
fabriksindstillinger
Batteristatus
Tryk på “Forhøj lydstyrke” eller “Sænk lydstyrke” knapperne
og giv slip.
Viser batteristatussen.
Ekstern lydgennemgang valgmuligheder
Tryk på “Forhøj lydstyrke” og giv slip.
Aktiverer den eksterne lydgennemgang.
Tryk på “Sænk lydstyrke” og giv slip.
Deaktiverer den eksterne lydgennemgang.
Bluetooth valgmuligheder (gælder kun SM1x(SR) udgaven)
Tryk på “Forhøj lydstyrke” knappen og giv slip.
Aktiverer Bluetooth.
Tryk på “Sænk lydstyrke” knappen og giv slip.
Deaktiverer Bluetooth (velegnet til brug i fl yvemaskiner osv.)
Kommunikationsmuligheder
Tryk på “Forhøj lydstyrke” eller “Sænk lydstyrke” knapperne
og giv slip.
Navigerer gennem og frigører to-vejs radio, kabelforbunden
kommunikation eller
kort rækkevidde FM
Kabelforbunden kommunikationsniveau
Tryk på “Forhøj lydstyrke” eller “Sænk lydstyrke” knapperne
og giv slip.
Navigerer gennem og vælger Lav, Mellem eller Høj. Dette
vælger det transmitterede lydniveau. Standardniveauet er Lav.
Kort rækkevidde FM frekvens (gælder kun SM1x og SR
udgaverne)
Tryk på “Forhøj lydstyrke” eller “Sænk lydstyrke” knapperne
og giv slip. Navigerer gennem og vælg frekvensen for kort
rækkevidde FM kommunikation.
Kort rækkevidde FM region (gælder kun SM1x og SR
udgaverne)
Tryk på “Forhøj lydstyrke” eller “Sænk lydstyrke” knapperne
og giv slip. Navigerer gennem og vælger region 1, 2 eller 3.
FM radio valgmuligheder (gælder kun FM og SR udgaverne)
Tryk på “Forhøj lydstyrke” og giv slip.
Aktiverer FM radioen.
Tryk på “Sænk lydstyrke” knappen og giv slip.
Deaktiverer FM radioen.
VOX valgmuligheder (hvis mikrofonarm er monteret)
Tryk på “Forhøj lydstyrke” og giv slip.
Aktivering af VOX .
Tryk på “Sænk lydstyrke” knappen og giv slip.
Deaktivering af VOX.
Lydstyrkekontrol valgmuligheder
Tryk på “Forhøj lydstyrke” og giv slip.
Forhøjer lydstyrken i venstre hovedtelefon i forhold til den højre.
Tryk på “Sænk lydstyrke” knappen og giv slip.
Forhøjer lydstyrken i højre hovedtelefon i forhold til venstre.
Genskab fabriksindstillinger
Tryk på “Forhøj lydstyrke” og giv slip.
Genskaber fabriksindstillingerne. Brugeren vil blive opfordret
til, at bekræfte
ved at trykke på “Forhøj lydstyrke” knappen igen og give slip.
Hvis der bekræftes vil fabriksindstillingerne blive genskabt og
der høres en meddelelse
hvorefter systemet lukkes.
Tryk på “Forhøj lydstyrke” knappen og giv slip.
Annullerer genskab fabriksindstillinger.

11
INDIKATORER
På Sensear SM1/SM1x(SR) modellerne fi ndes der tre LED’er: Rød, grøn og blå.
Hvert LED har følgende fi re driftstilstande:
• Slukket
• Tændt
• Blinker ved normal hastighed. Normal hastighed defi ners som en gang hver 2,5 sekunder.
• Blinker ved hurtigere hastighed. Den hurtigere hastighed defi ners som 5 gange pr. sekund.
Betydningen af LED indikatorerne for Sensear SM1, SM1x SR fi ndes i tabel 1 nedenfor.
Slukket Lyser vedvarende Alm. hastighed Hurtigere
hastighed
Rød Batteriniveau ok Oplader batteri Opladning fuldført Lavt batteriniveau
Grøn SM1/SM1x er
slukket
--- SENS bearbejdet
lyd er aktiv
SENS bearbejdet
lyd er afbrudt
Blå Bluetooth er
ikke tilsluttet en
mobiltelefon
Bluetooth
”sammenkoblingstilstand”
er aktiveret
Bluetooth er
tilsluttet en
mobiltelefon
Opkald besvaret,
opkald foretaget
eller igangværende
opkald
Figur 4: LED INDIKATORER
OPLADNING
Sensear SM1/SM1x(SR) modellerne leveres med en vekselstrøm adapter som kan bruges over
hele verden når den udstyres med de passende elektriske tilpassere.
For at oplade Sensear SM1/SM1x(SR) bør du følge disse trin:
1. trin
Isæt Sensear vekselstrøm adapteren i en passende elektrisk stikkontakt.
2. trin
Isæt Sensear vekselstrøm ledningen i jævnstrøm stikforbindelsen på SM1/SM1x(SR) apparatet.
Mens batteriet oplader vil den røde LED konstant lyse rødt. Når opladningen er fuldført vil den røde
LED blinke ved normal hastighed.
Se venligst afsnittet ”LED INDIKATORER” hvis du ønsker yderligere oplysninger.

12
TEKNISKE SPECIFIKATIONER
Vægt: __________________________________ 422 g
Driftstemperaturer: ________________________ 0 ºC - 40 ºC opladning. 0ºC - 50 ºC afl adning
Batteri anvendelse: _______________________ 15 timer (Bluetooth deaktiveret)
Batteri opladning: _________________________ 7 timer
Pude material: ___________________________ polyuretan
Pandebånd material ______________________ acetyl
Hjelm beslag material _____________________ PVC
Sensear SM1, SM1x og SM1x SR er aktive høreværn der tillader lydhør kontakt med dine omgivelser
samtidig med at de yder beskyttelse mod skadelig støj.
ADVARSEL: Ydelsen kan blive forringet i takt med at batteriet bliver tømt. Den almindelige
tidsperiode for uophørligt brug der kan forventes af SM1 eller SM1x(SR) er 15-18 timer.
STØRRELSES SORTIMENT
ADVARSEL: Hovedtelefoner der overholder EN352-1 og EN352-3 er ‘små’, ’mellem’ eller ’store’.
Mellem størrelse hovedtelefoner passer til de fl este brugere. ‘Små’ eller ‘store’ hovedtelefoner er
beregnede til brugere der ikke kan passe ’mellem’ størrelse hovedtelefoner. SM1, SM1x og SM1x
SR pandebåndene kan tilpasses til små, mellem eller stor størrelse.
Fastspændingskraft
Fastspændingskraften på SM1, SM1x og SM1xSR er blevet målt og er i overensstemmelse med
AS1270. De første målinger af pandebånd beslagene var 14,2, 15,3 og 14,2 N. Efterfølgende
målinger af pandebånd beslagene viste 13,0, 14,2 og 13,6 N. De første målinger af hjelm beslaget
var 11,2, 10,7 og 14,2 N. Efterfølgende målinger af hjelm beslaget viste 10,7, 10,7 og 10,2 N.
HJELM BESLAG
SM1, SM1x og SM1xSR blev testede sammen med følgende sikkerhedshjelme fra industrien og kan
give forskellige beskyttelsesgrader hvis de monteres på forskellige hjelme. Disse hovedtelefoner bør
monteres på og kun anvendes med følgende sikkerhedshjelme fra industrien: MSA VGard, Protector
Tuffmaster Lite, Protector Tuffmaster II, Protector Alsafe (Ansafe) 410, Protector HC600.
 Loading...