

Page 1
Flex_5000_570735_0117_PRT.book Seite 1 Montag, 10. Oktober 2016 3:58 15
Information on this manual EN
Information on this manual
This manual describes how to put your Flex 5000 into
operation and gives an overview of its most important
functions. Also observe the safety guide enclosed with
the product and the detailed instruction manual which
can be downloaded at www.sennheiser.com/download.
Contents
Information on this manual ................................................... 1
Package contents ..................................................................... 2
Product overview ..................................................................... 3
Receiver status
Transmitter status
Overview of the acoustic signals/beeps ............................. 5
Putting the Flex 5000 into operation .................................... 6
Setting up the transmitter .................................................... 6
Connecting the transmitter to an audio source ................ 6
Connecting the transmitter to the mains ........................ 10
Charging the receiver’s rechargeable battery ................. 11
Displaying the remaining operating time of the
rechargeable battery ........................................................... 12
Using the charging reminder function ............................. 13
Using the Flex 5000 ............................................................... 14
Connecting headphones or an induction loop to the
receiver ................................................................................... 14
Switching the wireless headphone system on ................ 15
Switching the wireless headphone system off ............... 16
Attaching the receiver to clothing .................................... 16
Adjusting the volume .......................................................... 18
Adjusting the balance .......................................................... 19
Selecting a hearing profile for sound enhancement ...... 20
Activating/deactivating the speech intelligibility
function ................................................................................... 22
Cleaning and maintaining the Flex 5000 ............................ 24
Replacing the receiver’s rechargeable battery ............... 24
Using additional functions ................................................... 26
Pairing one or several receivers with the transmitter ... 26
Advanced settings ................................................................ 26
Restoring the factory default settings ............................. 30
LED ................................................................ 5
LED .......................................................... 5
DEFRES EN
If a problem occurs ... ............................................................. 32
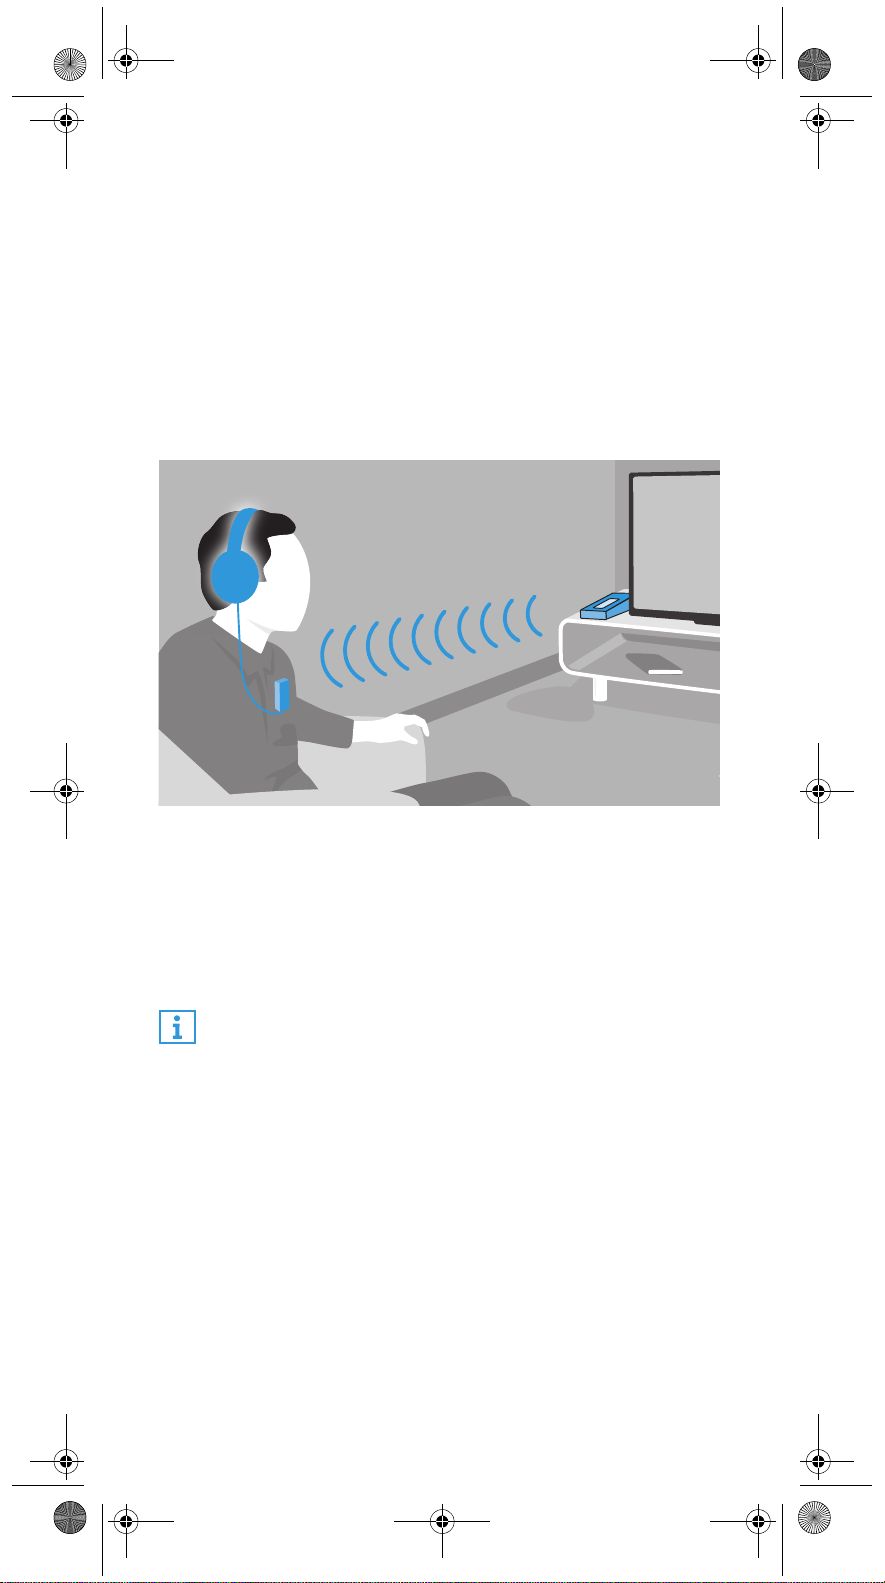
Leaving the range of the transmitter ............................... 35
Specifications .......................................................................... 36
Flex 5000 |1
Page 2
+
Flex_5000_570735_0117_PRT.book Seite 2 Montag, 10. Oktober 2016 3:58 15
EN Package contents
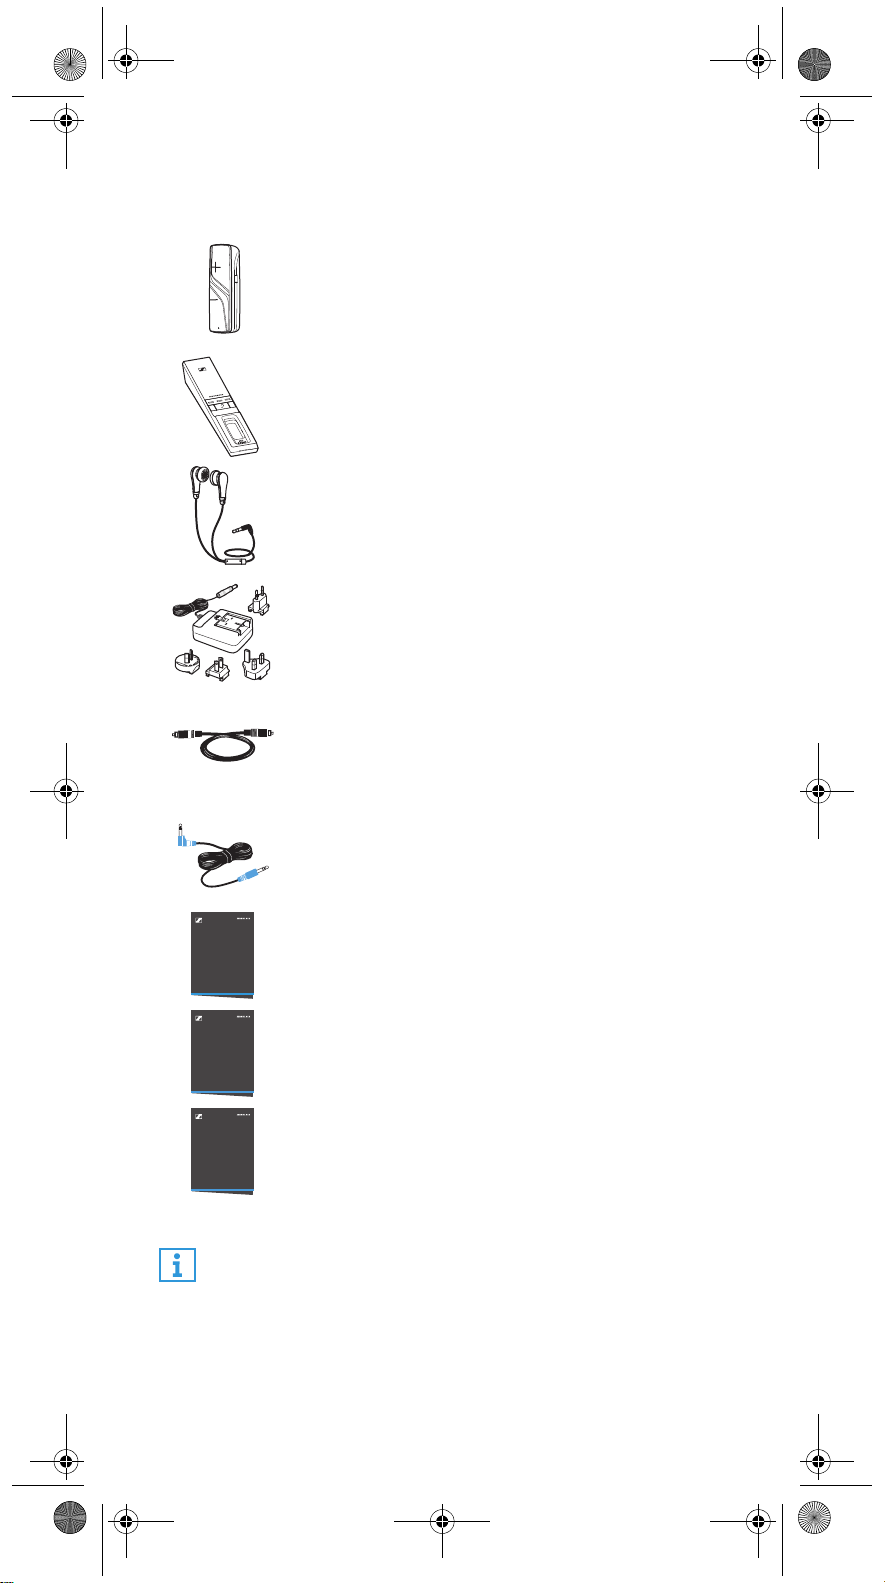
Package contents
RR Flex receiver with built-in
rechargeable battery
TR 5000 transmitter with charging station
MX 475 earphones
NT 5-10AW power supply unit with
multi-country adapters (EU, UK, US, AU)
Optical digital cable, 1.5 m
Stereo audio cable with 3.5 mm jack plugs,
1.5 m
Safety Guide
Quick Guide
Safety guide
Quick guide
Instruction manual in English, German, French,
Instruction
Manual
and Spanish
The instruction manual in other languages can
be downloaded as a PDF file at www.sennheiser.com/download.
A list of accessories can be found on the Flex 5000 product page at www.sennheiser.com. For information on
suppliers, contact your Sennheiser partner.
To find a Sennheiser partner in your country, search at
www.sennheiser.com.
2|Flex 5000
Page 3
Flex_5000_570735_0117_PRT.book Seite 3 Montag, 10. Oktober 2016 3:58 15
Product overview EN
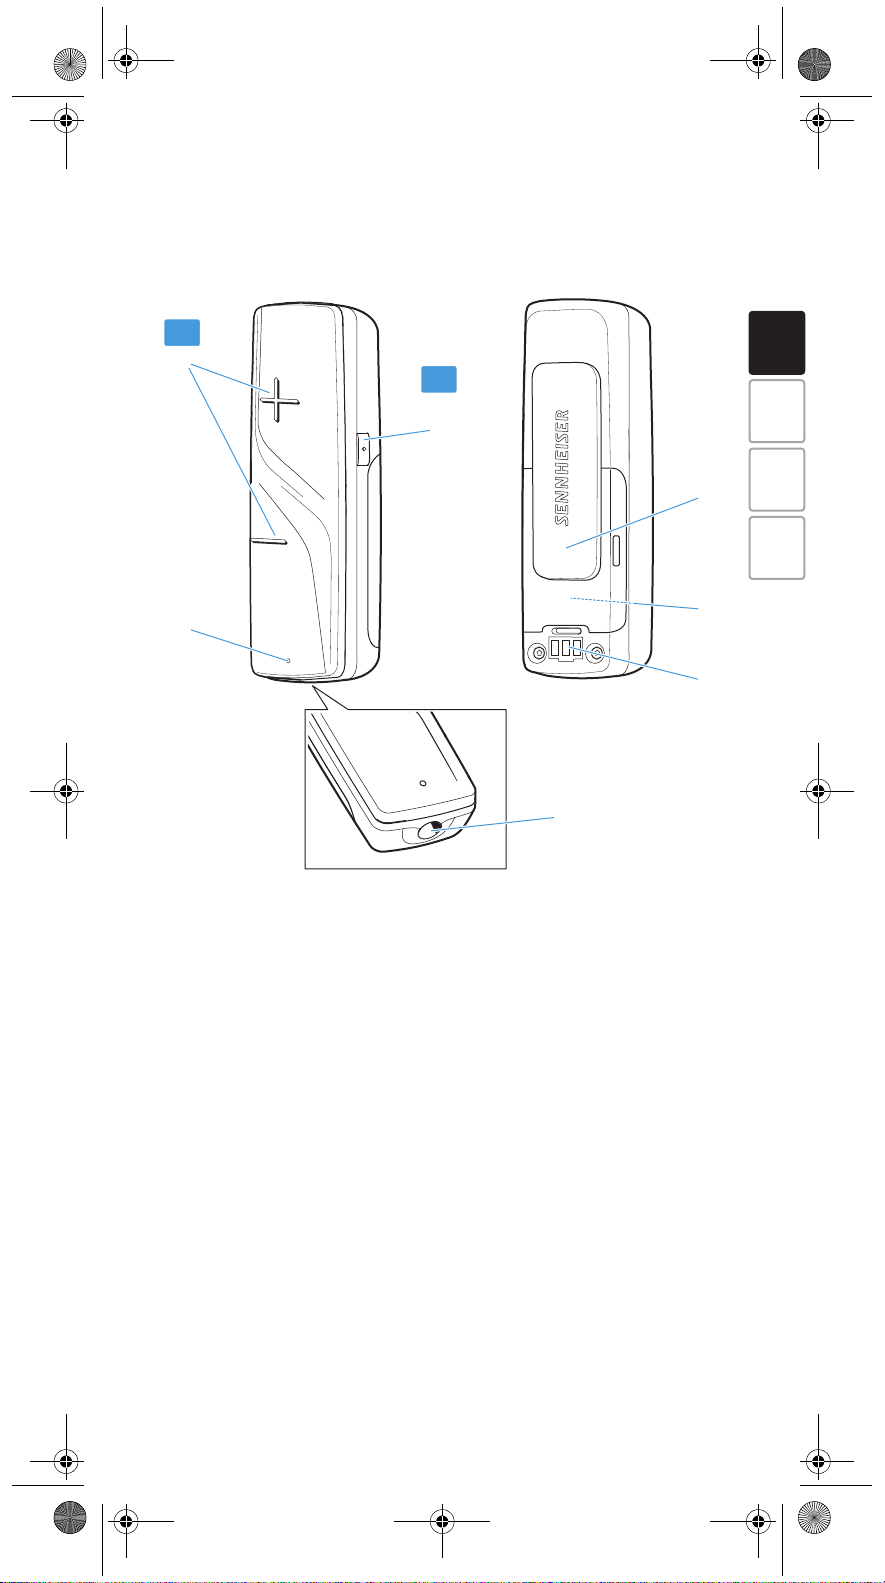
Product overview
Overview of the RR Flex receiver
On
1
Off
(2 s)
3
DEFRES EN
7
2
4
1 Volume buttons + and –
and for switching the receiver on
2
Receiver status
LED
(see page 5)
3
Speech intelligibility
button
and for switching the receiver off
(press for 2 seconds)
4 3.5 mm jack socket for connecting headphones or and
induction loop for hearing aids
6
5
5 Charging contacts
6 Built-in rechargeable battery
7 Attachment clip
Flex 5000 |3
Page 4
5
4
2
6
7
1
2
3
0
98
1A
Flex_5000_570735_0117_PRT.book Seite 4 Montag, 10. Oktober 2016 3:58 15
EN Product overview
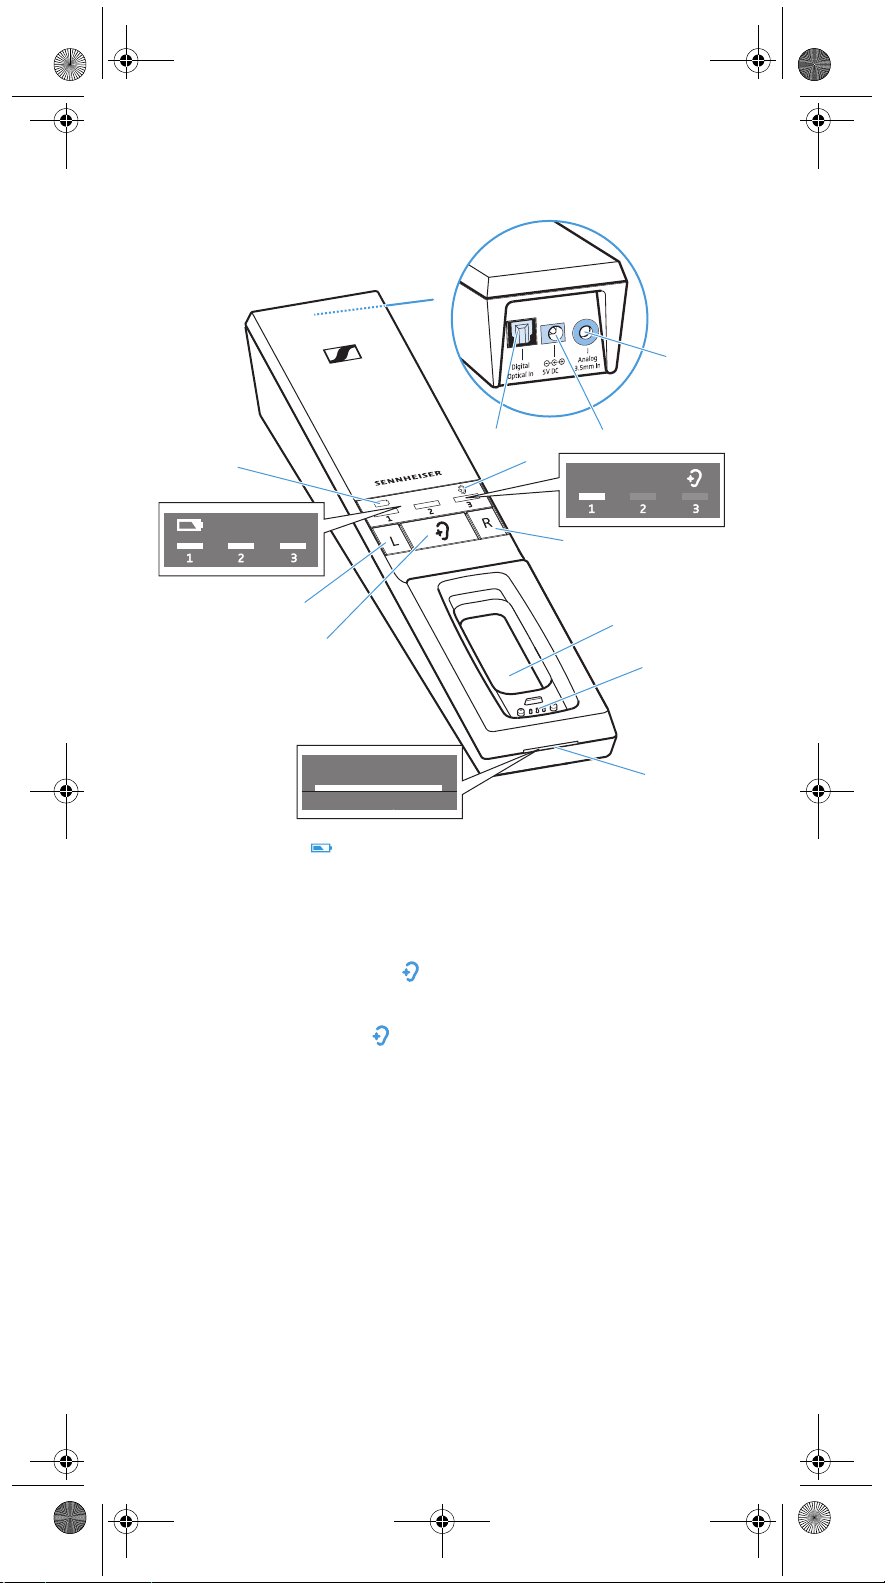
Overview of the TR 5000 transmitter
1
Battery
LED ,
indicating the charging process/remaining operating time
of the receiver (see page 11 and 12)
2 Balance buttons for the right ear R and the left ear L
3 Hearing profile button
for selecting the hearing profiles (see page 20)
4 Hearing profile LED ,
indicating the activated hearing profile (see page 20)
5 Charging compartment for receiver
6 Charging contacts for receiver with holding magnets
7
Transmitter status
LED (see page 5)
8 Digital Optical In audio input (marked pink) for connecting
a digital audio source (optical)
9 5V DC 1A socket (marked yellow) for connecting the power
supply unit
0 Analog 3.5 mm In audio input (marked blue) for
connecting an analog audio source (3.5 mm jack socket)
4|Flex 5000
Page 5
1s1s
Flex_5000_570735_0117_PRT.book Seite 5 Montag, 10. Oktober 2016 3:58 15
Product overview EN
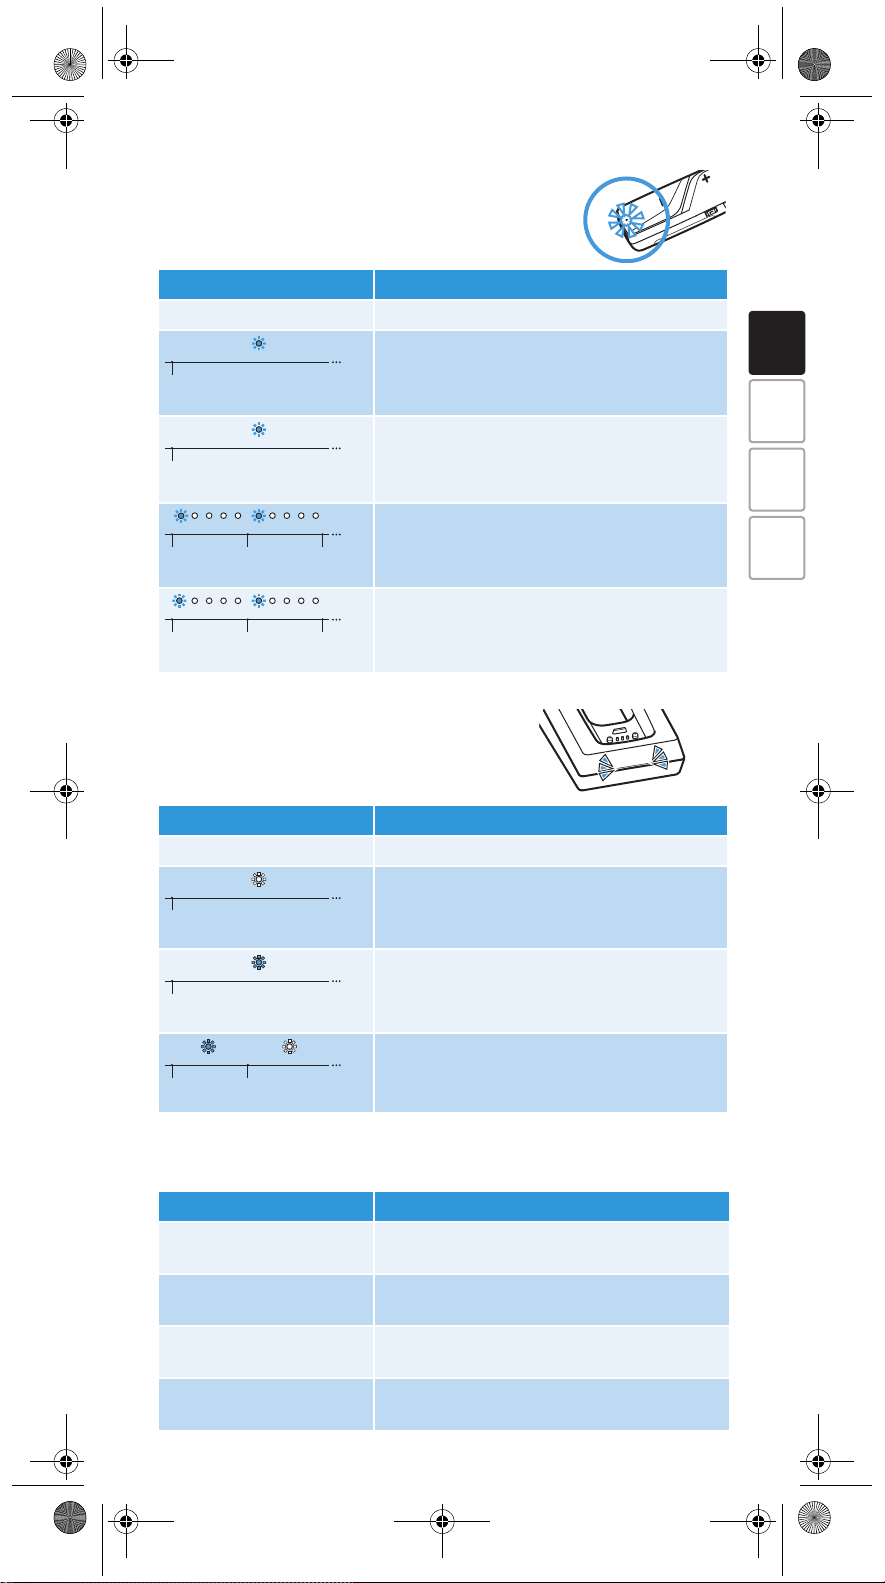
Receiver status
Receiver status
lights up green
lights up red
flashes green
flashes red
LED Receiver ...
– ... is switched off.
1s1s
LED
Transmitter status
... is connected to the transmitter.
... is connected to the transmitter, the
rechargeable battery is almost empty.
... is not connected to the transmitter or
cannot connect to the transmitter.
... is not connected to the transmitter or
cannot connect to the transmitter, the
rechargeable battery is almost empty.
LED
DEFRES EN
Transmitter status
lights up white
lights up blue
flashes blue and white
LED Transmitter...
– ... is in standby mode.
... and stethoset receiver are connected. The
speech intelligibility function is deactivated
(see page 22).
... and stethoset receiver are connected. The
speech intelligibility function is activated
(see page 22).
... has detected an incompatible digital audio
signal (see page 7).
Overview of the acoustic signals/beeps
Beeps... Meaning
during operation,
2 beeps
during operation, no audio
transmission, 5 beeps
when changing the
volume
when changing the
balance setting
The rechargeable battery is almost empty,
recharge it (see page 11).
The receiver is outside the transmission
range (see page 35).
The maximum or minimum volume is
reached (see page 18).
The maximum or minimum balance setting is
reached (see page 19)
Flex 5000 |5
Page 6
Flex_5000_570735_0117_PRT.book Seite 6 Montag, 10. Oktober 2016 3:58 15
EN Putting the Flex 5000 into operation
Putting the Flex 5000 into operation
Setting up the transmitter
왘 Choose a suitable place near your sound source.
왘 Separate the transmitter from other wireless devices in the
room by at least 50 cm/20” to avoid interference.
왘 Do not place the transmitter close to metal objects such as
shelf bars, reinforced concrete walls, etc. as this can
decrease the transmitter’s range.
Connecting the transmitter to an audio source
You can connect the transmitter either to a digital or an
analog audio source (e.g. a TV and a stereo hi-fi system).
If you connect an audio source to both inputs (digital and
analog), only the analog audio source will be reproduced.
You can also refer to the beginner’s video guides on how
to connect your digital wireless headphone system to a
TV: www.sennheiser.com/how-to-videos.
왘 Switch your audio sources off before connecting the trans-
mitter.
왘 Check the connection possibilities of your audio source
(audio output, usually marked “OUT”).
왘 Select the corresponding connection cable and, if neces-
sary, a suitable adapter
왘 To connect the transmitter to your audio source, refer to
the connection diagram suitable for your audio source (see
the following chapters). Follow the color codings on the
transmitter and on the cables.
6|Flex 5000
Page 7

Flex_5000_570735_0117_PRT.book Seite 7 Montag, 10. Oktober 2016 3:58 15
Putting the Flex 5000 into operation EN
Connection
possibilities of
the audio source
Optical
A
(digital)
Color on
trans-
Connection cable
mitter
pink Optical digital cable 7
3.5 mm
B
jack
socket
Stereo audio cable 8
(analog)
Stereo audio cable with
C
RCA
(analog)
blue
RCA adapter (3.5 mm jack
socket to 2 RCA connectors;
9
optional accessory)
Stereo audio cable with
D
SCART
(analog)
SCART adapter (3.5 mm
jack socket to SCART con-
10
nector; optional accessory)
Accessories and adapters are available from your local
Sennheiser partner.
Connection possibility A: optical (digital)
A
To achieve the best possible listening experience, connect the transmitter to your TV or hi-fi system using the supplied optical digital cable.
Note that your wireless headphone system only supports digital signals coded in the PCM format. Information on how to
set the audio format of the connected audio source to PCM
can be found in the Sound menu or in the instruction manual
of your device.
If an incompatible digital audio signal is being received, the
Transmitter status
be reproduced.
LED flashes white and blue. Audio cannot
Page
DEFRES EN
*
nu
e
m
d
oun
S
Digital sound output
P
C
M
Bitst
re
am
Digital Audio
* The appearance of the Sound menu can vary depending on the device you
are using.
Flex 5000 |7
Page 8

Flex_5000_570735_0117_PRT.book Seite 8 Montag, 10. Oktober 2016 3:58 15
EN Putting the Flex 5000 into operation
왘 Connect the optical digital cable to the pink Digital Optical
In digital audio input of the transmitter and to the optical
output of your audio source.
OPTICAL OUT
Digital Audio
Connection possibility B: 3.5 mm jack socket (analog)
왘 Connect the stereo audio cable to the blue Analog
3.5 mm In audio input (3.5 mm jack socket) of the trans-
mitter and to the 3.5 mm headphone socket of your audio
source.
PHONES
Analog Audio
TV VOLUME
Adjust the volume of the headphone socket on your TV/
audio source to at least a medium level.
This improves the quality of wireless audio transmission. For detailed information, please refer to the
instruction manual of your TV/audio source.
B
If the headphones socket on your audio source is a 6.3 mm/
¼“ jack socket, you require an adapter (3.5 mm jack plug to
6.3 mm/¼“ jack plug, optional accessory) for the supplied 3.5
mm stereo audio cable.
8|Flex 5000
Page 9

Flex_5000_570735_0117_PRT.book Seite 9 Montag, 10. Oktober 2016 3:58 15
Putting the Flex 5000 into operation EN
Some TV models mute the loudspeakers when you connect
the transmitter to the 3.5 mm headphone socket. Other TV
models have their own menu for adjusting the volume of the
headphone socket. Check the menu of your TV for information
on how to deactivate the muting function or adjust the volume. Alternatively, connect the TV and the transmitter using
a different connection possibility (A, C or D).
Connection possibility C: RCA sockets (analog)
C
왘 Plug the RCA adapter* onto the stereo audio cable.
왘 Connect the stereo audio cable to the blue 3.5 mm jack
socket of the transmitter.
왘 Connect the RCA connectors to the RCA sockets (mostly
labeled “AUDIO OUT” or ) of your audio source. Connect
the red connector to the red RCA socket and the white connector to the white or black RCA socket.
AUDIO OUT
LR
Analog Audio
*
DEFRES EN
* optional accessory
Flex 5000 |9
Page 10

Flex_5000_570735_0117_PRT.book Seite 10 Montag, 10. Oktober 2016 3:58 15
EN Putting the Flex 5000 into operation
Connection possibility D: SCART socket (analog)
왘 Plug the SCART adapter* onto the stereo audio
D
cable.
왘 Connect the stereo audio cable to the blue 3.5 mm jack
socket of the transmitter.
왘 Connect the SCART connector to the SCART socket (mostly
labeled or ) of your audio source.
Analog Audio
*
* optional accessory
Connecting the transmitter to the mains
1 Connect the connector of the power supply unit to the
yellow socket of the transmitter.
2 Select a suitable country adapter and slide it onto the
power supply unit until it clicks audibly into place.
3 Plug the power supply unit into the wall socket.
All LEDs on the transmitter light up for 5 seconds. The
transmitter is in standby mode.
1
1A
3
Power
1A
2
EU
UK
US
AU
10 | Flex 5000
Page 11

Flex_5000_570735_0117_PRT.book Seite 11 Montag, 10. Oktober 2016 3:58 15
Putting the Flex 5000 into operation EN
Charging the receiver’s rechargeable battery
A complete charging cycle takes about 3 hours. Before using
the receiver for the first time, charge its rechargeable battery
for a complete charging cycle without interruption.
When the rechargeable battery is almost empty, the
status
LED lights up red and you hear 2 beeps via the receiver.
The
Battery
LED on the transmitter lights up white. The
receiver switches off after a few minutes.
왘 Place the receiver into the transmitter’s charging compart-
ment so that the volume buttons face upwards. The
receiver is magnetically oriented to the correct position.
The receiver automatically switches off and the
LED on the transmitter lights up white. The LED segments display the charge status of the rechargeable battery. When the rechargeable battery is fully charged, all
LED segments light up white.
Receiver
Battery
DEFRES EN
+
Battery
LED Meaning
– Transmitter is not charging.
Rechargeable battery is being
charged. Less than 1/3 of the
1st segment flashes
charge capacity is reached.
Rechargeable battery is being
1st segment lit,
nd
2
segment flashes
charged. Up to 1/3 of the charge
capacity is reached.
3 h
100
%
1st + 2nd segments lit,
rd
3
segment flashes
All segments lit
Rechargeable battery is being
charged. Up to 2/3 of the charge
capacity is reached.
Rechargeable battery is fully charged.
Flex 5000 |11
Page 12

Flex_5000_570735_0117_PRT.book Seite 12 Montag, 10. Oktober 2016 3:58 15
EN Putting the Flex 5000 into operation
Battery
Battery
rapidly
LED Meaning
A charging error/battery error has
LED flashes
Always store the receiver in the transmitter’s charging
compartment to ensure that it is fully charged when
needed. The intelligent battery charging technology
prevents overcharging.
The display during charging can be set so that it automatically switches off after 30 seconds (see page 27).
occurred (see page 24).
Displaying the remaining operating time of the
rechargeable battery
When you switch the receiver on, the
the remaining operating time/charge status.
Battery
Battery
LED Meaning
Rechargeable battery is empty;
LED flashes slowly
recharge it
Battery
LED displays
approx. 4 hrs of operating time
1st segment lit
approx. 8 hrs of operating time
1st + 2nd segments lit
approx. 12 hrs of operating time
All segments lit
To indicate that the operating time is decreasing, each LED
segment slowly dims before it goes off completely.
If the actual operating time differs widely from the specified
values, the rechargeable battery is probably exhausted and
should be replaced. Information on the rechargeable battery
can be found on page 24.
The display of the remaining operating time can be set
so that it automatically switches off after 30 seconds
(see page 27).
If more than one receiver is connected to the transmitter, the remaining operating time/charge status cannot
be displayed.
12 | Flex 5000
Page 13

Flex_5000_570735_0117_PRT.book Seite 13 Montag, 10. Oktober 2016 3:58 15
Putting the Flex 5000 into operation EN
Using the charging reminder function
When the receiver is switched off
and the transmitter automatically
switches off (standby mode), the
Battery
remind you to charge the receiver.
왘 Charge the receiver by placing it into the transmitter’s
LED will flash back and forth for 10 minutes to
charging compartment (see page 11).
The LED stops flashing and the charging process starts.
You can also switch off the charging reminder function
(see page 28).
DEFRES EN
Flex 5000 |13
Page 14

Flex_5000_570735_0117_PRT.book Seite 14 Montag, 10. Oktober 2016 3:58 15
EN Using the Flex 5000
Using the Flex 5000
Connecting headphones or an induction loop to
the receiver
You can connect any headphones or induction loop for hearing aids with a 3.5 mm jack plug to the RR Flex receiver.
Connecting headphones
We recommend using closed headphones or earphones/ear
canal phones to avoid echoes from e.g. the TV loudspeaker.
왘 Connect the 3.5 mm jack plug of the headphones (e.g.
MX 475, supplied) to the jack socket of the receiver.
*
Connecting an induction loop for hearing aids
You can only use an induction loop if your hearing aid supports an induction coil (T-coil).
*
왘 Connect the 3.5 mm jack plug of the induction loop (e.g.
Sennheiser EZT 3012, optional accessory) to the jack
socket of the receiver.
왘 Set your hearing aid to position “T”.
* optional accessory
If your hearing aid has no position “T” or if you want to
use another connection possibility for your hearing aid
or cochlea implant, please contact your hearing aid
acoustician.
14 | Flex 5000
Page 15

VOLUME
Flex_5000_570735_0117_PRT.book Seite 15 Montag, 10. Oktober 2016 3:58 15
Using the Flex 5000 EN
Switching the wireless headphone system on
WARNING
Danger of hearing damage due to high volumes!
This receiver allows you to set higher volumes than
conventional devices. Constant high-volume use can
cause hearing damage.
왘 Before putting the receiver and the connected head-
phones on, set the volume on the receiver to a low
level.
왘 Do not expose yourself to high volume levels for
extended periods of time.
왘 Use a hearing profile (see page 20) that improves
especially speech intelligibility without the need for
a high volume.
1 Switch your audio source on.
If the transmitter is connected to the headphone socket (see page 8) of your TV/audio
source, adjust the volume of the headphone
socket on your TV/audio source to at least a
medium level.
DEFRES EN
2 Take the receiver out of the transmitter’s charging com-
partment and press the volume button + or –.
The receiver switches on. The
Receiver status
LED lights up
green. The transmitter automatically switches on and the
Transmitter status
LED lights up white or blue. The audio
transmission starts.
The remaining operating time of the receiver is displayed
on the transmitter (see page 12).
1
ON
2
ON
Flex 5000 |15
Page 16

Flex_5000_570735_0117_PRT.book Seite 16 Montag, 10. Oktober 2016 3:58 15
EN Using the Flex 5000
Switching the wireless headphone system off
왘 Place the receiver into the transmitter’s charging compart-
ment.
The receiver switches off. The
The charging process starts (see page 11).
Or, if you want to switch the receiver off without placing it
into the transmitter’s charging compartment:
왘 Press the
Speech intelligibility
The receiver switches off. The
The transmitter automatically switches off (standby)
when there is no receiver connected. The
tus
LED goes off.
Always store the receiver in the transmitter’s charging
compartment to ensure that it is fully charged when
needed.
Receiver status
LED goes off.
button for 2 seconds.
Receiver status
LED goes off.
Transmitter sta-
OFF
+
2s
* LED goes off
If the receiver is outside the transmission range for
more than 5 minutes or if the transmitter receives no
audio signal for more than 30 minutes, the wireless
headphone system switches off automatically
(standby).
To disconnect the transmitter from the power supply system
(e.g. when you are on holiday):
왘 Unplug the power supply unit from the wall socket.
Attaching the receiver to clothing
Depending on the connected headphones or induction loop,
please observe the following attachment recommendations
for your receiver:
• Place the receiver next to you so that you can take it in
your hand and operate it.
• Use the clip to attach the receiver to your clothing. Make
sure that the headphone cable does not hinder your move-
16 | Flex 5000
Page 17

Flex_5000_570735_0117_PRT.book Seite 17 Montag, 10. Oktober 2016 3:58 15
Using the Flex 5000 EN
ments and that there is a free line of sight between the
receiver and the transmitter. The volume buttons face
away from your body to facilitate ease of use.
• Place the induction loop around your neck so that the
receiver rests on your chest. The volume buttons face
away from your body to facilitate ease of use.
DEFRES EN
Flex 5000 |17
Page 18

Flex_5000_570735_0117_PRT.book Seite 18 Montag, 10. Oktober 2016 3:58 15
EN Using the Flex 5000
Adjusting the volume
WARNING
Danger of hearing damage due to high volumes!
왘 Before putting the receiver and the connected
headphones on, set the volume on the receiver to a
low level.
왘 Do not expose yourself to high volume levels for
extended periods of time.
왘 Press the volume button + or the volume button – until the
volume is adjusted to a comfortable level. When the minimum or maximum volume is reached, you hear a beep via
the receiver.
VOLUME
VOLUME
If you have set a very high volume level and switch the
receiver off and on again, the volume is reset to a moderate level to protect your hearing.
18 | Flex 5000
Page 19

Flex_5000_570735_0117_PRT.book Seite 19 Montag, 10. Oktober 2016 3:58 15
Using the Flex 5000 EN
Adjusting the balance
The Balance buttons allow for left/right volume adjustment.
Adjust the balance so that you hear equally well with both
ears.
The balance setting is stored on the receiver. If you are
using several receivers with a transmitter, the respective receivers are optimally adjusted to match the personal hearing preferences of the users (e.g. you and
your partner). Please note that the personal hearing
preferences can only be adjusted when only receiver is
connected to the transmitter.
왘 Press the balance button R (right) or L (left) on the trans-
mitter to gradually increase or reduce the volume for your
right or left ear.
When the minimum or maximum balance setting is
reached, you hear a beep via the receiver.
DEFRES EN
To reset the balance setting to the middle setting:
왘 Simultaneously press the bal-
ance buttons R (right) and L
(left) on the transmitter for
3seconds.
To prevent accidental adjustment of the balance settings, you can activate the balance protection (see page
29).
3s
Flex 5000 |19
 Loading...