

Page 1
Book_XXXXXX_0308_Sp6.book Seite 1 Mittwoch, 6. Februar 2008 10:59 10
Bedienungsanleitung
Instructions for use
Notice d‘emploi
Istruzioni per l‘uso
Instrucciones de uso
Gebruiksaanwijzing
Manual de utilização
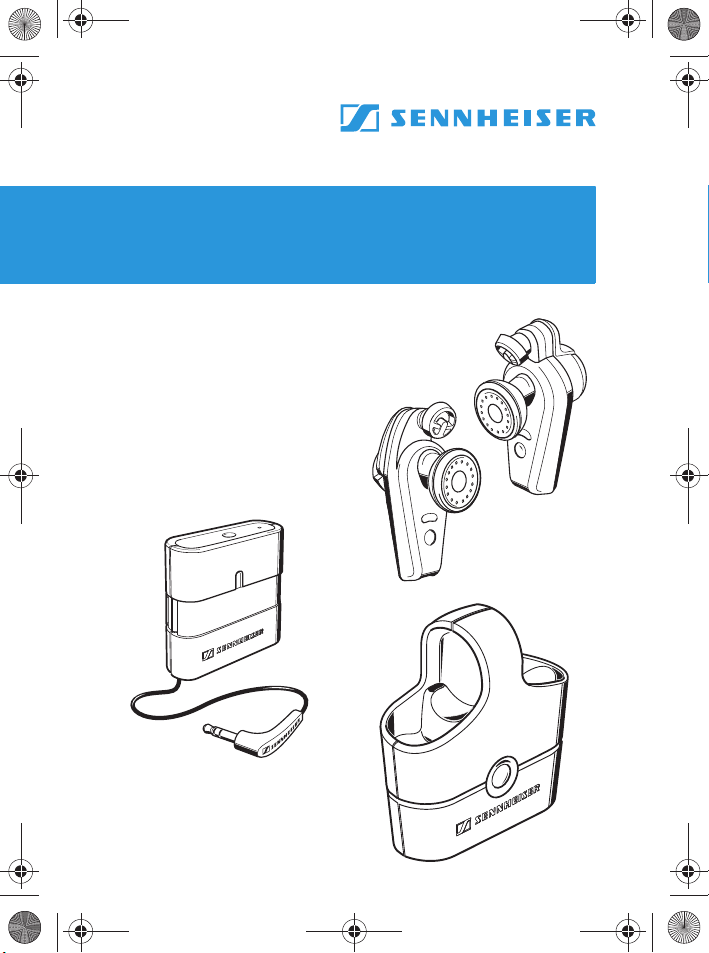
MX W1
Page 2
Book_XXXXXX_0308_Sp6.book Seite 2 Mittwoch, 6. Februar 2008 10:59 10
Page 3
Book_XXXXXX_0308_Sp6.book Seite 1 Mittwoch, 6. Februar 2008 10:59 10
English
Deutsch
Français
Italian
Español
Nederlands
Portugues
Руский
Page 4

Book_XXXXXX_0308_Sp6.book Seite 2 Mittwoch, 6. Februar 2008 10:59 10
Page 5

Book_XXXXXX_0308_Sp6.book Seite 1 Mittwoch, 6. Februar 2008 10:59 10
Contents
Important safety instructions ............................................. 2
MX W1 digital wireless earphone system ......................... 4
Delivery includes .................................................................... 4
Product overview ................................................................... 5
LED indications of the devices ...................................................6
Putting the MX W1 into operation ..................................... 6
Charging the MX W1 ...................................................................6
Associating the earphones to the transmitter (Pairing) .....9
Setting up your MX W1 for usage .........................................12
Using the MX W1 .................................................................14
Switching the earphones on/off ............................................14
Switching the transmitter on/off .......................................... 15
Putting on the earphones .......................................................16
Care and maintenance ........................................................17
Get the most out of your Sennheiser MX W1! ................19
Troubleshooting ...................................................................20
Accessories and spare parts ...............................................22
Specifications ........................................................................23
Manufacturer declarations .................................................24
1
Page 6

Book_XXXXXX_0308_Sp6.book Seite 2 Mittwoch, 6. Februar 2008 10:59 10
Important safety instructions
The MX W1 has been manufactured according to the accepted rules
of safety and current technology. However, there is still a danger of
damage to equipment if the following general safety instructions
are not complied with.
• Please read these instructions for use carefully and completely
before using the devices.
• Make these instructions for use easily accessible to all users at all
times. Always include these instructions for use when passing
the devices on to third parties.
• Do not use the devices in situations which require special
attention (e.g. in traffic or when performing skilled jobs).
• Always keep the devices dry and do not expose them to extreme
temperatures (normal operating temperatures: 0 °C to 40 °C).
• Use the devices with care and store them in a clean, dust-free
environment.
• Switch off the devices after use to conserve battery power.
Remove the batteries if the earphones will not be used for
extended periods of time.
•Protect your hearing from high volume levels. Sennheiser
earphones also sound exceptionally good at low volumes.
• Use only Sennheiser supplied charging cables and power supply
units.
Intended use of the devices
Appropriate use of the devices includes:
• having read and understood these instructions, especially the
section “Important safety instructions”,
• using the devices within the operating conditions and
limitations described in this instruction manual.
2
Page 7
Book_XXXXXX_0308_Sp6.book Seite 3 Mittwoch, 6. Februar 2008 10:59 10
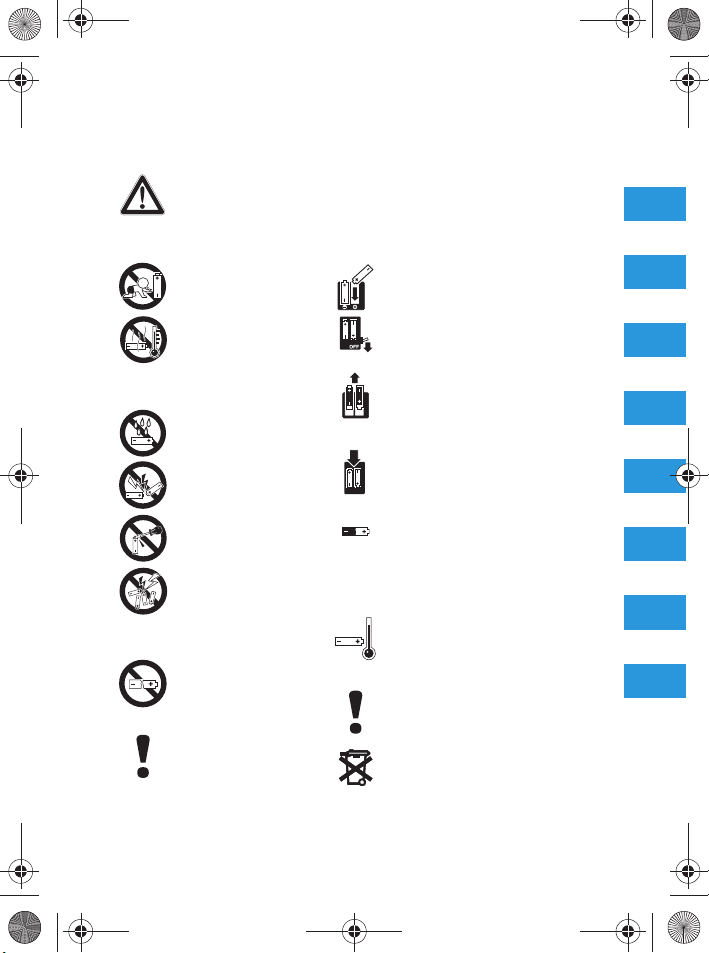
Safety instructions for Lithium-Ion rechargeable batteries
If abused or misused, rechargeable batteries may leak. In extreme
cases, they may even present a
•heat hazard
•fire hazard
• explosion hazard
• smoke and gas hazard
Please understand that Sennheiser does not accept liability for
damage arising from abuse or misuse.
Keep away from
children.
Observe correct polarity.
Do not heat above
70°C/158°F, e.g. do
not expose to
sunlight or throw into
a fire.
Do not expose to
moisture.
Do not short-circuit.
Do not mutilate or
dismantle.
Do not get fully
charged but
unpacked
rechargeable
batteries mixed up.
Do not continue to
use defective
rechargeable
batteries.
Only use original
Sennheiser
rechargeable
batteries.
Switch rechargeable batterypowered devices off after
use.
Remove rechargeable
batteries when the unit is not
used for extended periods of
time.
Only charge rechargeable
batteries with the
appropriate Sennheiser
chargers.
When not using rechargeable
batteries for extended
periods of time, charge them
regularly (about every three
months).
Only charge rechargeable
batteries at ambient
temperatures between 10°C
and 40°C.
Immediately remove
rechargeable batteries from
obviously defective devices.
Dispose of rechargeable
batteries at special collection
points or return them to your
specialist dealer.
3
Page 8

Book_XXXXXX_0308_Sp6.book Seite 4 Mittwoch, 6. Februar 2008 10:59 10
MX W1 digital wireless earphone system
Thank you for purchasing MX W1 - Sennheiser's completely
digital wireless earphone system. We trust that you will enjoy
using it and that it will satisfy your expectations.
The MX W1 is simple to operate. These instructions for use have
been designed to help you get started. Please take some time to
read them carefully so as to ensure your utmost listening
pleasure.
Enjoy your new MX W1!
Delivery includes
1 MX W1-T transmitter
2 MX W1-R earphones (left/right) incl.
– earpads (1 pair, foam)
– twist-to-fit pads (3 pairs: size S/M/L)
1 MX W1-C docking station
1 carrying case
1 elastic fabric strap
4 rubber bands (2 x S/2 x L)
1 charging cable with USB plug
1 power supply unit with 4 country adaptors (US/UK/EU/AU)
1 instructions for use
4
Page 9
쐋
Book_XXXXXX_0308_Sp6.book Seite 5 Mittwoch, 6. Februar 2008 10:59 10
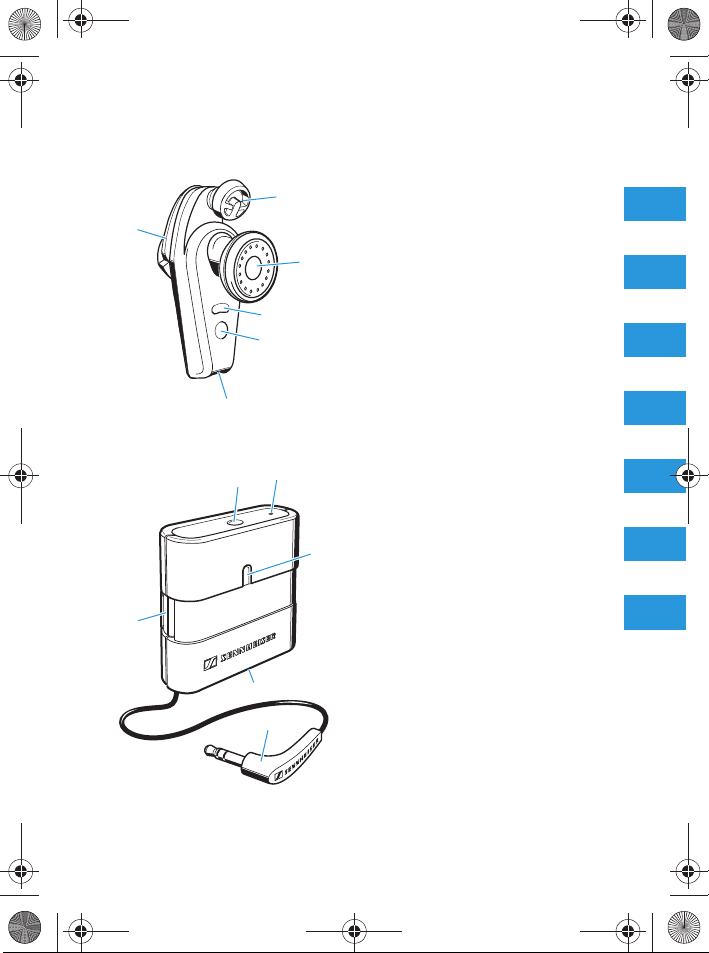
Product overview
Earphones
Twist-to-fit pad
Speaker
LED (orange/blue)
Operation/pairing button of
the earphone
2.5 mm charging jack
Battery compartment
Transmitter
Operation/pairing button of
the transmitter
Reset button
LED (orange/blue)
2.5 mm charging jack
Connecting cable with
3.5 mm stereo jack plug
Dowel pin
5
Page 10
1s0 2s
Book_XXXXXX_0308_Sp6.book Seite 6 Mittwoch, 6. Februar 2008 10:59 10
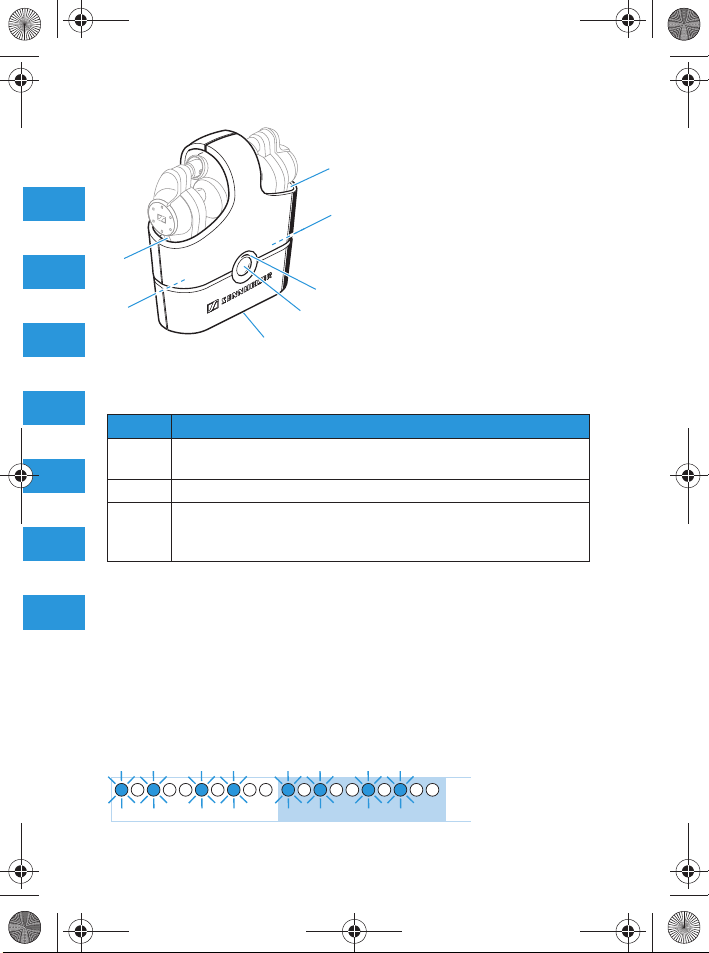
Docking station
Charging compartment for
earphones
Charging plugs for
earphones (inside the
charging compartment)
LED (orange/red)
Charging button
2.5 mm charging jack
LED indications of the devices
LED Description
orange Charging of a device (see following chapter)
red Charging of the docking station (see following chapter)
blue
Docking station: Battery capacity < 5%
Associating the earphones to the transmitter (see page 9)
Switching the devices on/off (see page 14)
Transmitter/earphones: Battery capacity < 5%
Putting the MX W1 into operation
Charging the MX W1
Charge the rechargeable batteries of all MX W1 devices for
3 hours before first use.
When the battery is almost flat, the LED , or flashes
orange. You then have to charge the device.
6
Page 11

Book_XXXXXX_0308_Sp6.book Seite 7 Mittwoch, 6. Februar 2008 10:59 10
Charging the devices
To charge the devices (simultaneously or separately):
왘 Connect the charging cable to the power supply unit .
왘 Connect the suitable country adaptor to the power supply
unit .
왘 Connect the charging cable to the charging jack of:
– the transmitter and the docking station
– or the earphones .
왘 If you want to charge all devices at one go, insert the
earphones into the charging compartments of the
docking station.
왘 Plug the country adaptor into a wall socket.
The batteries are being charged. The corresponding LEDs
light up orange.
왘 Charge the rechargeable batteries until the LEDs go off
(approx. 2 hours).
7
Page 12

쐋
Book_XXXXXX_0308_Sp6.book Seite 8 Mittwoch, 6. Februar 2008 10:59 10
Note:
– Alternatively, you can charge the devices by connecting
the USB plug of the charging cable to the USB port of a PC
(see illustration).
– The transmitter has its own built-in rechargeable battery.
So it will not drain your audio device’s battery.
– With a fully charged rechargeable battery, the operating
time of the transmitter is approx. 10 hours and of the
earphones approx. 3 hours.
Charging the earphones on the move
When on the move, the earphones can be charged up to three
times in the docking station, without the docking station having
to be connected to the mains.
왘 Insert the earphones into the charging compartments of
the docking station. Make sure that the earphones are
inserted correctly.
왘 Press the charging button to start charging.
The rechargeable batteries are being charged. The LEDs
and light up orange.
왘 Charge the rechargeable batteries until the LEDs go off.
8
Page 13

1s0 2s
1s0 2s
5s0 10s
Book_XXXXXX_0308_Sp6.book Seite 9 Mittwoch, 6. Februar 2008 10:59 10
Associating the earphones to the transmitter
(Pairing)
The MX W1 earphones and transmitter are already paired on
delivery.
To enable wireless transmission, both the earphones and the
transmitter have to recognize each other:
1. Enrollment mode
After switch-on, a suitable device is searched.
2. Association mode
If a suitable device is detected, both devices will exchange
device identification information.
3. Pairing mode
If the exchange of device identification information is possible,
the devices automatically try to connect.
9
Page 14

ON ON OFF
4s
ON OFF OFF
7s
ON OFF ON
Book_XXXXXX_0308_Sp6.book Seite 10 Mittwoch, 6. Februar 2008 10:59 10
Associating a second pair of earphones to the transmitter
With one transmitter you can associate up to two pairs of
earphones. If you want to use another pair of earphones, you
have to pair your transmitter and the new earphones:
왘 Switch the new earphones off (see page 14).
왘 Switch the transmitter and the already paired earphones on
(see page 14).
왘 Switch the transmitter off (see page 14).
왘 Press and hold the operation/pairing button of the new
earphones until the LEDs flash rapidly.
10
Page 15

ON ON ON
7s
ON ON ON
Book_XXXXXX_0308_Sp6.book Seite 11 Mittwoch, 6. Februar 2008 10:59 10
왘 Press and hold the operation/pairing button of the
transmitter until the LED flashes rapidly.
After approx. 3 seconds, the new earphones are also paired
to the transmitter. The LEDs flash blue once every 5 seconds.
Note:
The distance between transmitter and earphones should not
exceed 1 m during association.
Associating the earphones to Kleer compatible devices
MX W1 is fully compatible to Kleer wireless standard. For pairing
the MX W1 with other Kleer compatible devices, please refer to
the preceding chapter and to the user manual of your device in
question.
11
Page 16

Book_XXXXXX_0308_Sp6.book Seite 12 Mittwoch, 6. Februar 2008 10:59 10
Setting up your MX W1 for usage
Fixing the transmitter to your audio device
Fix the transmitter with the help of:
•the fabric strap
• or one of the rubber bands (see illustration).
Connecting the transmitter to your audio device
You can connect the transmitter to an
MP3 player or any audio device with a 3.5 mm
stereo headphone socket:
왘 Connect the stereo plug of the transmitter
to the 3.5 mm stereo headphone socket of
your audio device.
12
Page 17

S
M
L
Book_XXXXXX_0308_Sp6.book Seite 13 Mittwoch, 6. Februar 2008 10:59 10
Adjusting the earphones to your ears
Sennheiser’s twist-to-fit system and comfortable earpads allow
for the best custom fit enabling you to enjoy seamless high
fidelity stereo sound. The perceived sound quality of the
earphones depends to a large extent on a correct fit. For best
sound enjoyment, please use the supplied earpads and twist-tofit pads.
If the pre-mounted twist-to-fit pads (size M) do not fit your ear,
use the smaller or larger ones.
왘 Carefully remove the twist-to-fit
pads from the earphones.
왘 Mount the new twist-to-fit
pads to the earphones.
왘 Pull the earpads over the
speakers.
13
Page 18

쐋
0 4s
Book_XXXXXX_0308_Sp6.book Seite 14 Mittwoch, 6. Februar 2008 10:59 10
Using the MX W1
To switch the system on, proceed as follows:
1. Switch your audio device on.
2. Switch the earphones on (see following chapter).
3. Switch the transmitter on (see page 15).
4. Put the earphones on (see page 15).
You will hear the sound from your sound source.
Switching the earphones on/off
To switch the earphones on:
왘 Remove the earphones from the docking
station
or:
왘 Press and hold the earphones’
operation/pairing button until the
LEDs flash blue.
The earphones switch on.
To switch the earphones off:
왘 Press and hold the operation/pairing button until the
LEDs light up blue.
The earphones switch off.
14
4s0
8
Page 19

0 4s
4s0
8
Book_XXXXXX_0308_Sp6.book Seite 15 Mittwoch, 6. Februar 2008 10:59 10
Note:
– When you insert the earphones into the docking station,
the earphones automatically switch off.
– If there is no transmitter in enrollment mode for at least
5 minutes, the earphones automatically switch off.
Switching the transmitter on/off
To switch the transmitter on:
왘 Press and hold the transmitter’s
operation/pairing button until the
LED flashes blue.
The tranmitter switches on.
To switch the transmitter off:
왘 Press and hold the operation/pairing button until the
LED lights up blue.
The transmitter switches off.
Note:
– The transmitter remains switched on during charging. To
switch the transmitter off, press and hold the operation/
pairing button for 4 seconds.
– If there are no earphones in enrollment mode for at least
5 minutes, the transmitter automatically switches off.
15
Page 20

CAUTION!
Book_XXXXXX_0308_Sp6.book Seite 16 Mittwoch, 6. Februar 2008 10:59 10
Putting on the earphones
Danger of hearing damage!
Listening at high volume levels for long periods
can lead to permanent hearing defects.
Sennheiser earphones also sound exceptionally
good at low volumes.
왘 Set the volume of the audio device to the
minimum before switching the earphones
on.
왘 Check the R (right) an L (left) marks on the earphones to
identify them and put on the earphones as shown in the
illustration above.
16
Page 21

CAUTION!
Book_XXXXXX_0308_Sp6.book Seite 17 Mittwoch, 6. Februar 2008 10:59 10
Care and maintenance
Cleaning the devices
Liquids can damage the electronics of the
devices!
Liquids entering the housing of the devices can
cause a short-circuit and damage the electronics.
왘 Keep all liquids away from the devices.
왘 Do not use any cleansing agents or solvents.
For reasons of hygiene, clean your Sennheiser products
regularly.
왘 Before cleaning, disconnect the devices from the mains.
왘 Only use a slightly damp cloth to clean the devices.
Changing the twist-to-fit pads/earpads/rubber rings
For reasons of hygiene, the twist-to-fit pads, earpads and
rubber rings should be replaced from time to time. Please order
these spare parts from your Sennheiser dealer.
왘 Carefully remove the twist-to-fit
pads /rubberrings/
earpads from the earphones.
왘 Mount the new twist-to-fit
pads /rubber rings to the
earphones.
왘 Pull the earpads over the
speakers.
17
Page 22

CAUTION!
Book_XXXXXX_0308_Sp6.book Seite 18 Mittwoch, 6. Februar 2008 10:59 10
Replacing the earphones’ rechargeable batteries
Danger of damage to the devices!
Rechargeable button cells from other
manufacturers may cause damage to the
earphones and will invalidate the warranty.
왘 Only use original Sennheiser rechargeable
button cells (see page 22).
왘 Slightly lift the end of the caps and slide the caps out of the
guide rails.
왘 Insert the new rechargeable batteries as shown. Observe
correct polarity when inserting the batteries.
왘 Replace the caps and slide them onto the guide rails until
it clicks audibly.
왘 Charge the earphones until the corresponding LEDs go off
(see page 8).
18
Page 23

Book_XXXXXX_0308_Sp6.book Seite 19 Mittwoch, 6. Februar 2008 10:59 10
Get the most out of your Sennheiser
MX W1!
Your Sennheiser MX W1 uses the latest digital wireless
transmission technology. This technology offers high
transmission quality and reliability but, like other wireless
technologies, can also be influenced by various factors such as:
• objects or walls, as these can reflect (amplify) or attenuate
the transmitted signal.
• the position of the transmitter on your body: optimally, the
distance to both earphones should be the same.
• other wireless devices operating on similar frequencies
(around 2.4 GHz) within your immediate vicinity.
In order to optimise the transmission quality of your MX W1,
please make sure to:
• attach the transmitter at the centre of your chest or back,
• observe a minimum distance of 5 mm between your body
and the transmitter,
• place the audio device between the transmitter and your
body.
19
Page 24

Book_XXXXXX_0308_Sp6.book Seite 20 Mittwoch, 6. Februar 2008 10:59 10
Troubleshooting
Problem Possible cause Possible solution
No operation
indication
No sound Jack plug connection is
Sound
dropouts
Battery is flat Recharge the battery
incorrect
Transmitter or
earphones are switched
off
Audio device is switched
off
Volume of the audio
device is adjusted too
low
Housing of player or
something else blocks
the transmission
Transmission between
the transmitter and
earphones is disturbed
by any interferences in
the vicinity
Device is out of range Reduce the distance
Signal is shielded Remove obstacles
Interfering devices in
the vicinity
(see page 6, page 17)
Check the connection
to your audio device
(see page 12)
Switch the device on
(see page 14)
Switch the audio
device on
Adjust the volume to a
higher level
Remove obstacles
between transmitter
and earphones
Briefly press the
operation/pairing
button
of the
transmitter
between earphones
and transmitter
between transmitter
and earphones
Try relocation
20
Page 25

Book_XXXXXX_0308_Sp6.book Seite 21 Mittwoch, 6. Februar 2008 10:59 10
Problem Possible cause Possible solution
Humming
noise
Only one
earphone has
audio
Earphones
cannot be
switched on
Interference when
charging from the PC
Transmitter was
switched on before the
earphones were
switched on
Rechargeable batteries
have just been replaced
Charge from the
power supply unit or
choose a different
audio source
Briefly press the
transmitter’s
operation/pairing
button
Briefly charge the
earphones
(see page 18)
Resetting the transmitter to the factory settings
In case of system malfunction:
왘 Use a pointed tool to press the reset button
for 1 second.
The transmitter is reset to the factory
settings and then restarted.
If a problem occurs that is not listed in the above table or if the
problem cannot be solved with the proposed solutions, please
contact your local Sennheiser agent for assistance.
21
Page 26

Book_XXXXXX_0308_Sp6.book Seite 22 Mittwoch, 6. Februar 2008 10:59 10
Accessories and spare parts
The following accessories are available from your authorized
Sennheiser dealer:
Cat. No. Accessory/Spare part
525766 Carrying case
525767 MX W1-C docking station
525768 MX W1-T transmitter
525769 Transmitter straps:
525770 Lithium-ion rechargeable button cell (2 pieces) for the
525773 Design plates: battery compartment covers for the
525774 Earpads (5 pairs, foam)
525775 Accessory pack: Twist-to-fit pads
525776 MX W1 charging cable, power supply unit and
525777 MX W1-R earphone (left)
525778 MX W1-R earphone (right)
1 elastic fabric strap, 4 rubber bands (2 x S/2 x L)
earphones , 40 mAh, 3.7 V DC
earphones (1 pair)
(4 pieces each of size) and 4 rubber rings
country-adaptors
22
Page 27

Book_XXXXXX_0308_Sp6.book Seite 23 Mittwoch, 6. Februar 2008 10:59 10
Specifications
System
Modulation MSK Digital
Carrier frequencies 2.4 – 2.48 GHz
Range approx. 10 m in open area
Power supply unit with
country adaptors
Operating temperature 0 – 40 °C
Transmitter
Audio connection 3.5 mm stereo jack socket
Charging time of
rechargeable battery approx. 2 hrs
Power supply Input: 5 V DC/120 mA
Operating time approx. 10 hrs
Weight approx. 16 g
Dimensions approx. 40 x 13 x 40 mm
Earphones
Max. SPL 115 dB (SPL)
THD <0.5 % at 1 kHz 100 dB SPL
Frequency response 19 Hz – 20 kHz
Charging time of
rechargeable battery approx. 2 hrs
Power supply Input: 5 V DC/30 mA
Rechargeable battery
(lithium-ion button cell) 3.7 V, 40 mAh
Operating time approx. 3 hrs
Weight approx. 10 g
Dimensions approx. 29 x 20.5 x 51 mm
100 – 240 V, 50/60 Hz,
5V DC/0.5A (x2)
23
Page 28

Book_XXXXXX_0308_Sp6.book Seite 24 Mittwoch, 6. Februar 2008 10:59 10
Docking station
Charging time of
rechargeable battery approx. 2 hrs
Power supply Input: 5 V DC/400 mA
Weight approx. 42 g
Dimensions approx. 71 x 26 x 74 mm
Output: 5 V DC/100 mA
“kleer” wireless technology
The MX W1 is based on “kleer” digital wireless transmission technology.
• Multiple (stereo) earphones capability
• Lossless sound transmission (CD quality)
• Smaller size of the devices
• Lower battery consumption
The Kleer logo is a trademark of Kleer Inc.
Manufacturer declarations
Warranty
2 years
Declaration of Conformity
This equipment is in compliance with the essential requirements and
other relevant provisions of Directives:
• R&TTE directive (1999/5/EC)
• EMC Directive (2004/108/EC)
• Low Voltage Directive (2006/95/EC)
• RoHS Directive (2002/95/EC)
• WEEE Directive (2002/96/EC).
The declaration is available on the internet site at www.sennheiser.com.
Before putting the device into operation, please observe the respective
country-specific regulations!
24
Page 29

SENNHE ISER
Model No:MX W1
FC C Declar ation of Co nformity (D oC)
We,
Sennheiser Electronic Corporation
Strat. Marketing • Stefanie Reichert
One Enterprise Drive • Old Lyme •
CT 06371 • USA
Tel: +1 (860) 434 9190, ext. 144
Fax: +1 (860) 434 1759
declare the above device comply with the requirement s of Federal Communications Commission.
This device complies with Part 15 of the FCC rules. Operat ion is subject ed to the following t wo conditions :
1) This device may not c ause harmful interference, and
2) This device must ac cept any interference recei ved, i ncluding interference that m ay caus e undesired operation.
Responsible P arty: John Falcone
Book_XXXXXX_0308_Sp6.book Seite 25 Mittwoch, 6. Februar 2008 10:59 10
Statements regarding FCC and industry Canada
This device complies with Part 15 of the FCC Rules and with RSS-210 of
Industry Canada. Operation is subject to the following two conditions:
(1) this device may not cause harmful interference, and (2) this device
must accept any interference received, including interference that may
cause undesired operation.
This equipment has been tested and found to comply with the limits for
a Class B digital device, pursuant to Part 15 of the FCC Rules. These limits
are designed to provide reasonable protection against harmful
interference in a residential installation. This equipment generates, uses
and can radiate radio frequency energy and, if not installed and used in
accordance with the instructions, may cause harmful interference to
radio communications. However, there is no guarantee that interference
will not occur in a particular installation. If this equipment does cause
harmful interference to radio or television reception, which can be
determined by turning the equipment off and on, the user is encouraged
to try to correct the interference by one or more of the following
measures:
• Reorient or relocate the receiving antenna.
• Increase the separation between the equipment and receiver.
• Connect the equipment into an outlet on a circuit different from that
• Consult the dealer or an experienced radio/TV technician for help.
This class B digital apparatus complies with the Canadian ICES-003.
Changes or modifications made to this equipment not expressly
approved by Sennheiser electronic Corp. may void the FCC authorization
to operate this equipment.
to which the receiver is connected.
25
Page 30

Complies with
IDA Standards
DB100582
Book_XXXXXX_0308_Sp6.book Seite 26 Mittwoch, 6. Februar 2008 10:59 10
Meet the requirements for:
USA: FCC ID: DMOMXW1T
Canada: IC: 2099A-MXW1T
Europe:
Australia &
New Zealand:
Singapore:
Korea:
Taiwa n:
Russia:
DMOMXW1R
2099A-MXW1R
China: CMII ID : XXXXDJXXXX
Japan:
26
YYYYDJXXXX
Page 31

Book_XXXXXX_0308_Sp6.book Seite 1 Mittwoch, 6. Februar 2008 10:59 10
Sennheiser electronic GmbH & Co. KG
Am Labor 1
30900 Wedemark, Germany
Phone +49 (5130) 600 0
Fax +49 (5130) 600 300 Printed in China
www.sennheiser.com 03/08
 Loading...