

Page 1
Putting the RS 175 into operation
1
2
3
4
5
NEW
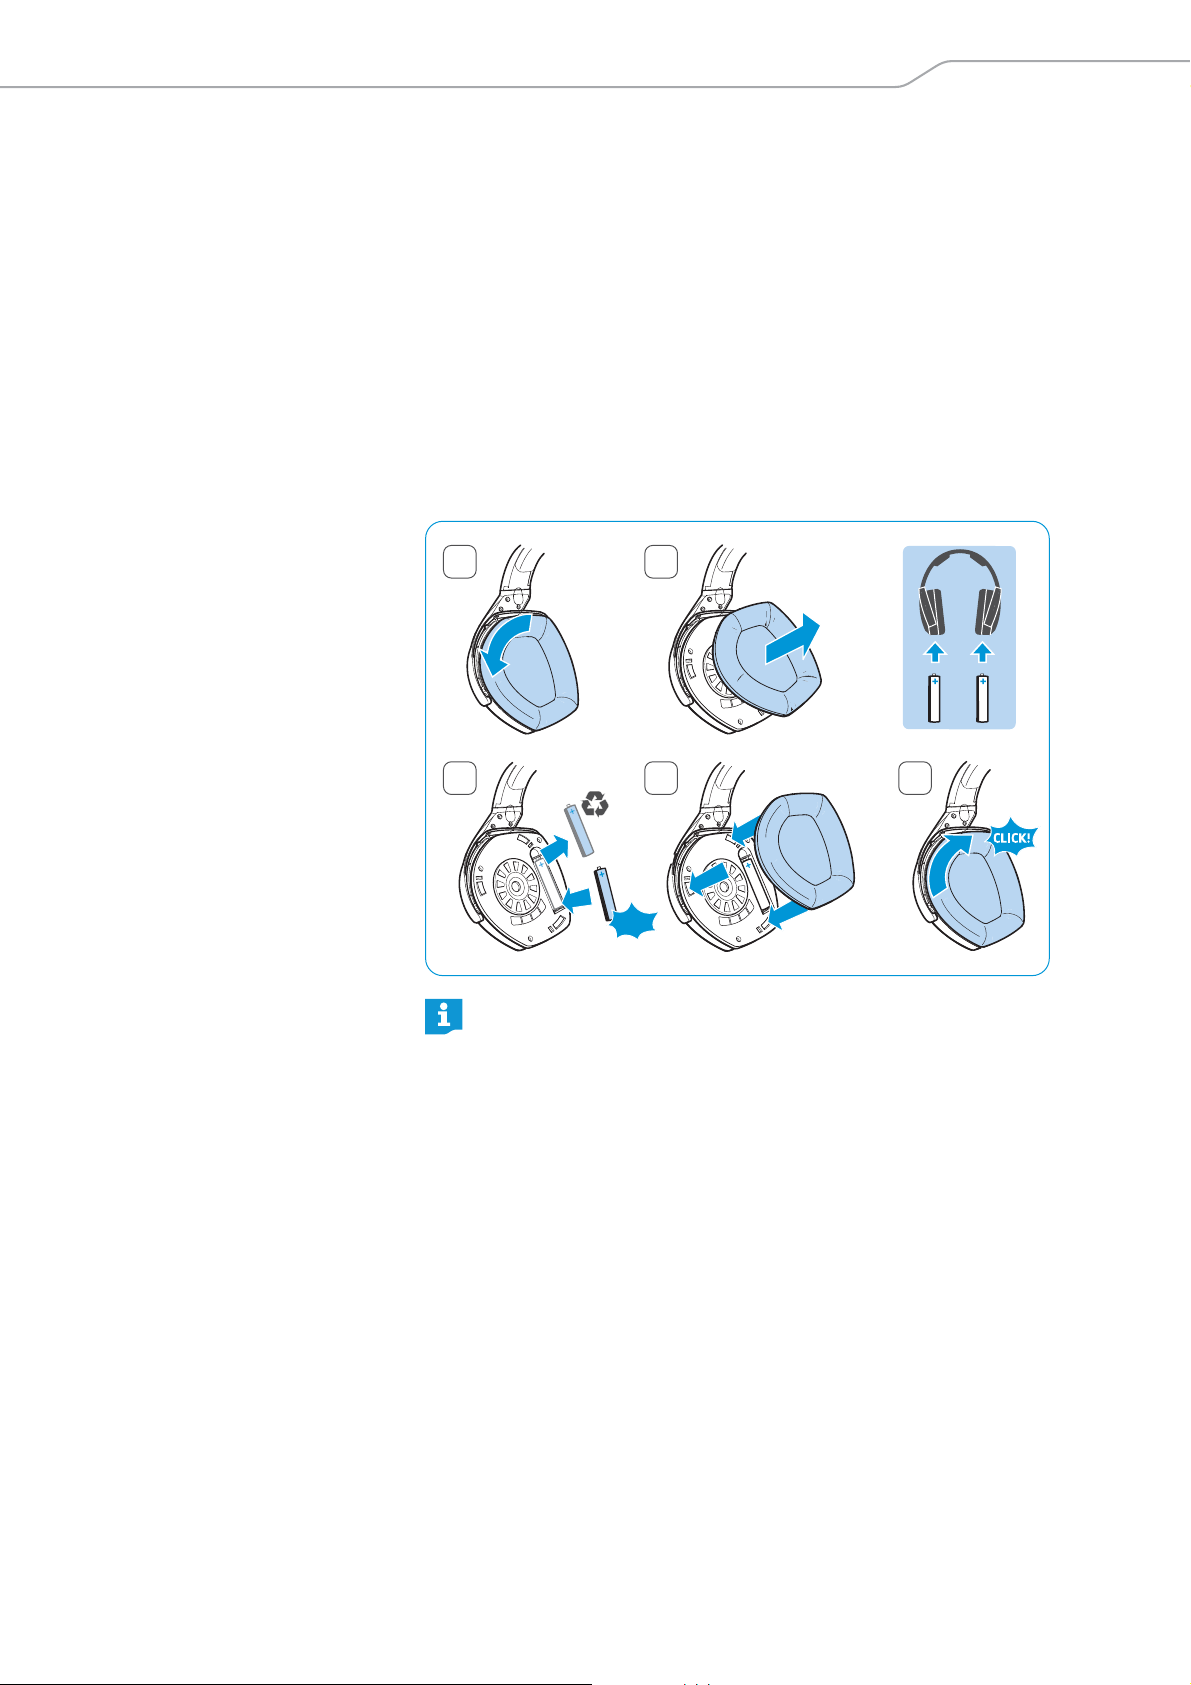
Inserting and replacing the rechargeable batteries
1 Lightly twist the ear pads counterclockwise until you overcome a slight
resistance.
2 Lift the ear pads off the ear cups to reveal
3 Insert the rechargeable batt
eries into the compartments. To replace the
batteries, pull the batteries out of the compartments and insert the
new ones. Be sure to observe correct polarity when inserting the batteries. Please dispose old batteries as special waste or return them to
your specialist dealer.
4 Hook the ear pads onto the ear cups. A
observe the L (left) and R (right) markings on the rear of the ear pads.
5 Twist the ear pads clockwise until you
they are locked firmly onto the ear cups.
the battery compartments.
s
you put back the ear pads,
hear a click sound. Ensure that
You can also power the headphones using standard batteries (AAA
size, 1.5 V). Note however, that standard batteries are not rechargeable, and if you are using non-rechargeable batteries, you must not
place the headphones on the headphones holder.
RS 175 | 17
Page 2
Putting the RS 175 into operation
8.5h
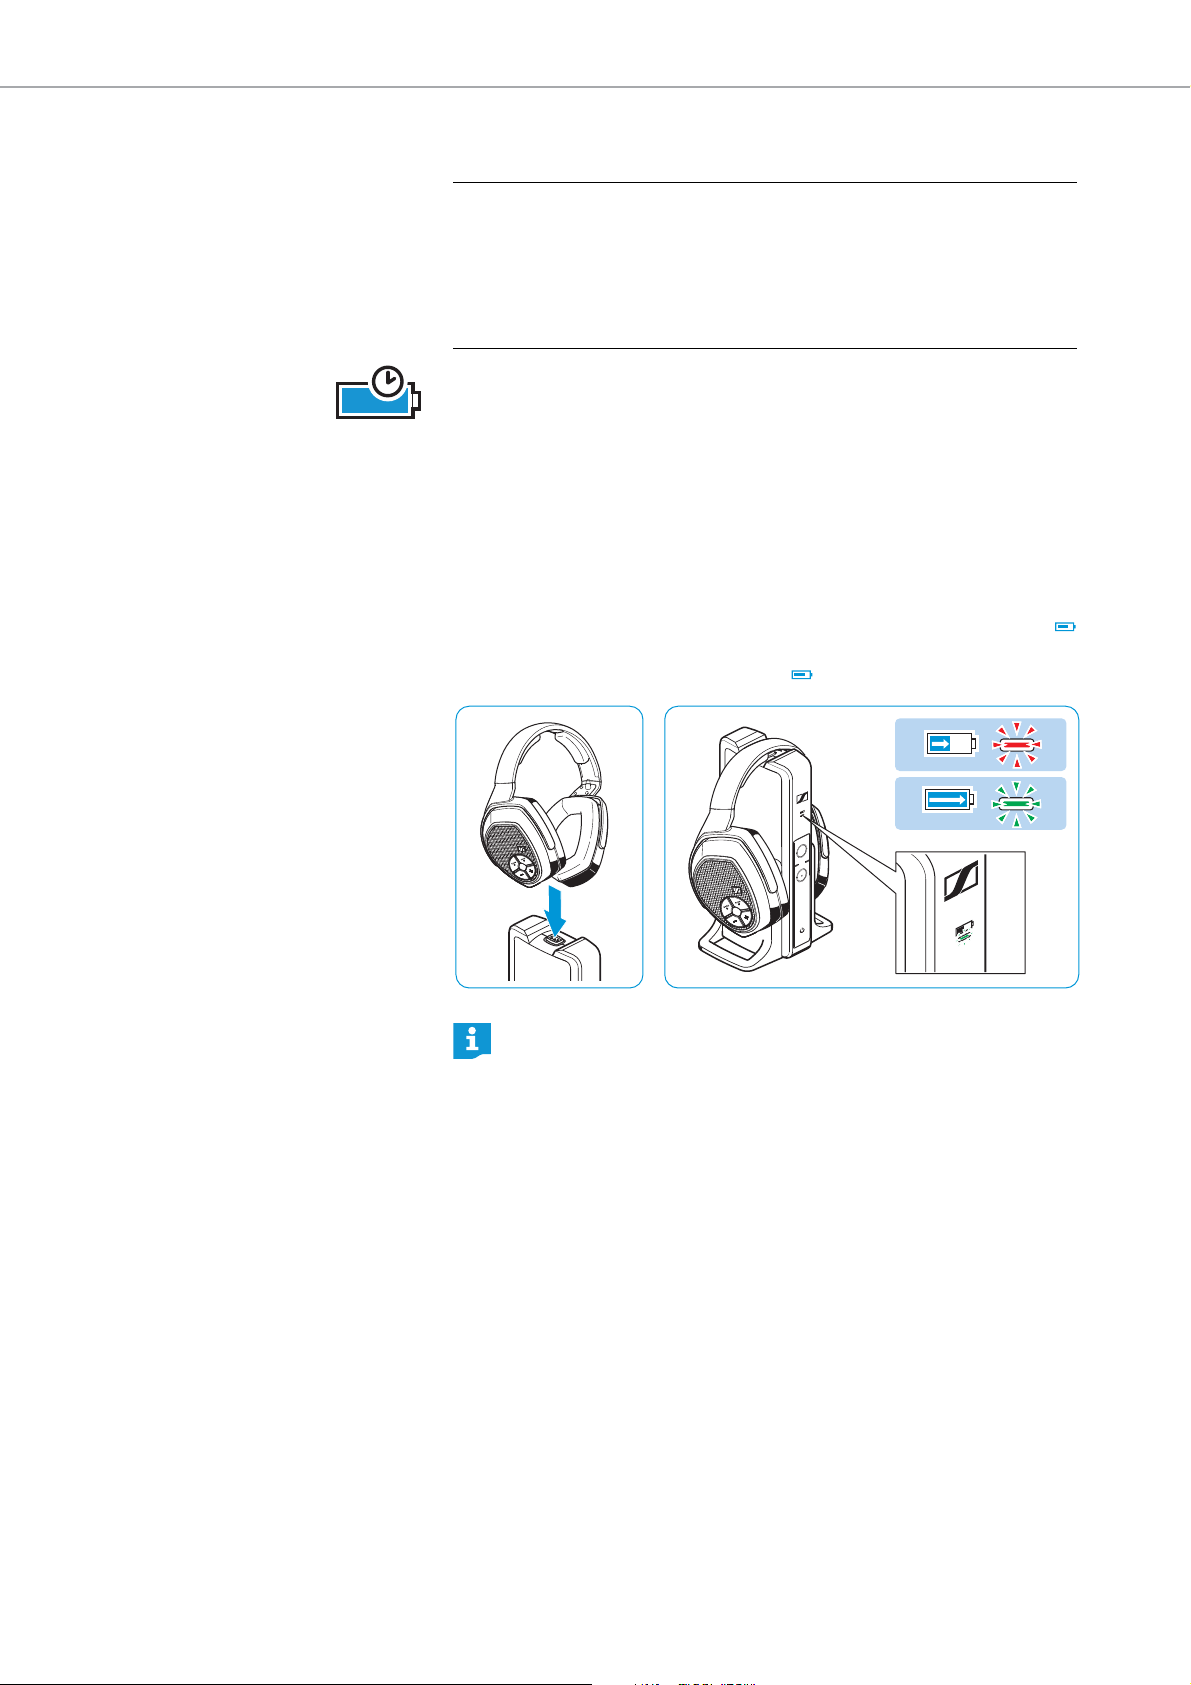
Charging the rechargeable batteries
CAUTION Danger of damage to the headphones!
If you insert
compartments, the batteries may leak during charging and
can damage your headphones.
왘 Do not place the headphones on the headphon
you are using non-rechargeable batteries.
In general, a complete charging cycle takes about 8.5 hours. However,
before using the headphones for the first time, charge the rechargeable
batteries for at least 16 hours without interruption to optimize the performance of the batteries.
When the rechargeable batteries are almost empty, the HDR status LED
turns red and you hear beeps in the headphones. The headphones switch
off after few minutes.
왘 Place the headphones on the headphone charger of the transmitter.
u may place the headphones on either side provided that the
o
Y
charging contacts of the headphones and the transmitter connect.
The headphones automatically switch off and the Charge status LED
on the transmitter lights up red. When the rechargeable batteries are
y char
full
ged, the Charge status LED turns green.
non-rechargeable batteries into the battery
es holder if
RR
U
S
HI
LO
S
BAS
100%
When not in use, place the headphones on the headphones holder to
ensure that batteries are fully charged when needed. The transmitter utilizes an intelligent battery charging technology that prevents
overcharging.
After taking the headphones from the holder, the Charge status LED
indicates the approximate operating time (see page 9).
18 | RS 175
Page 3
Putting the RS 175 into operation
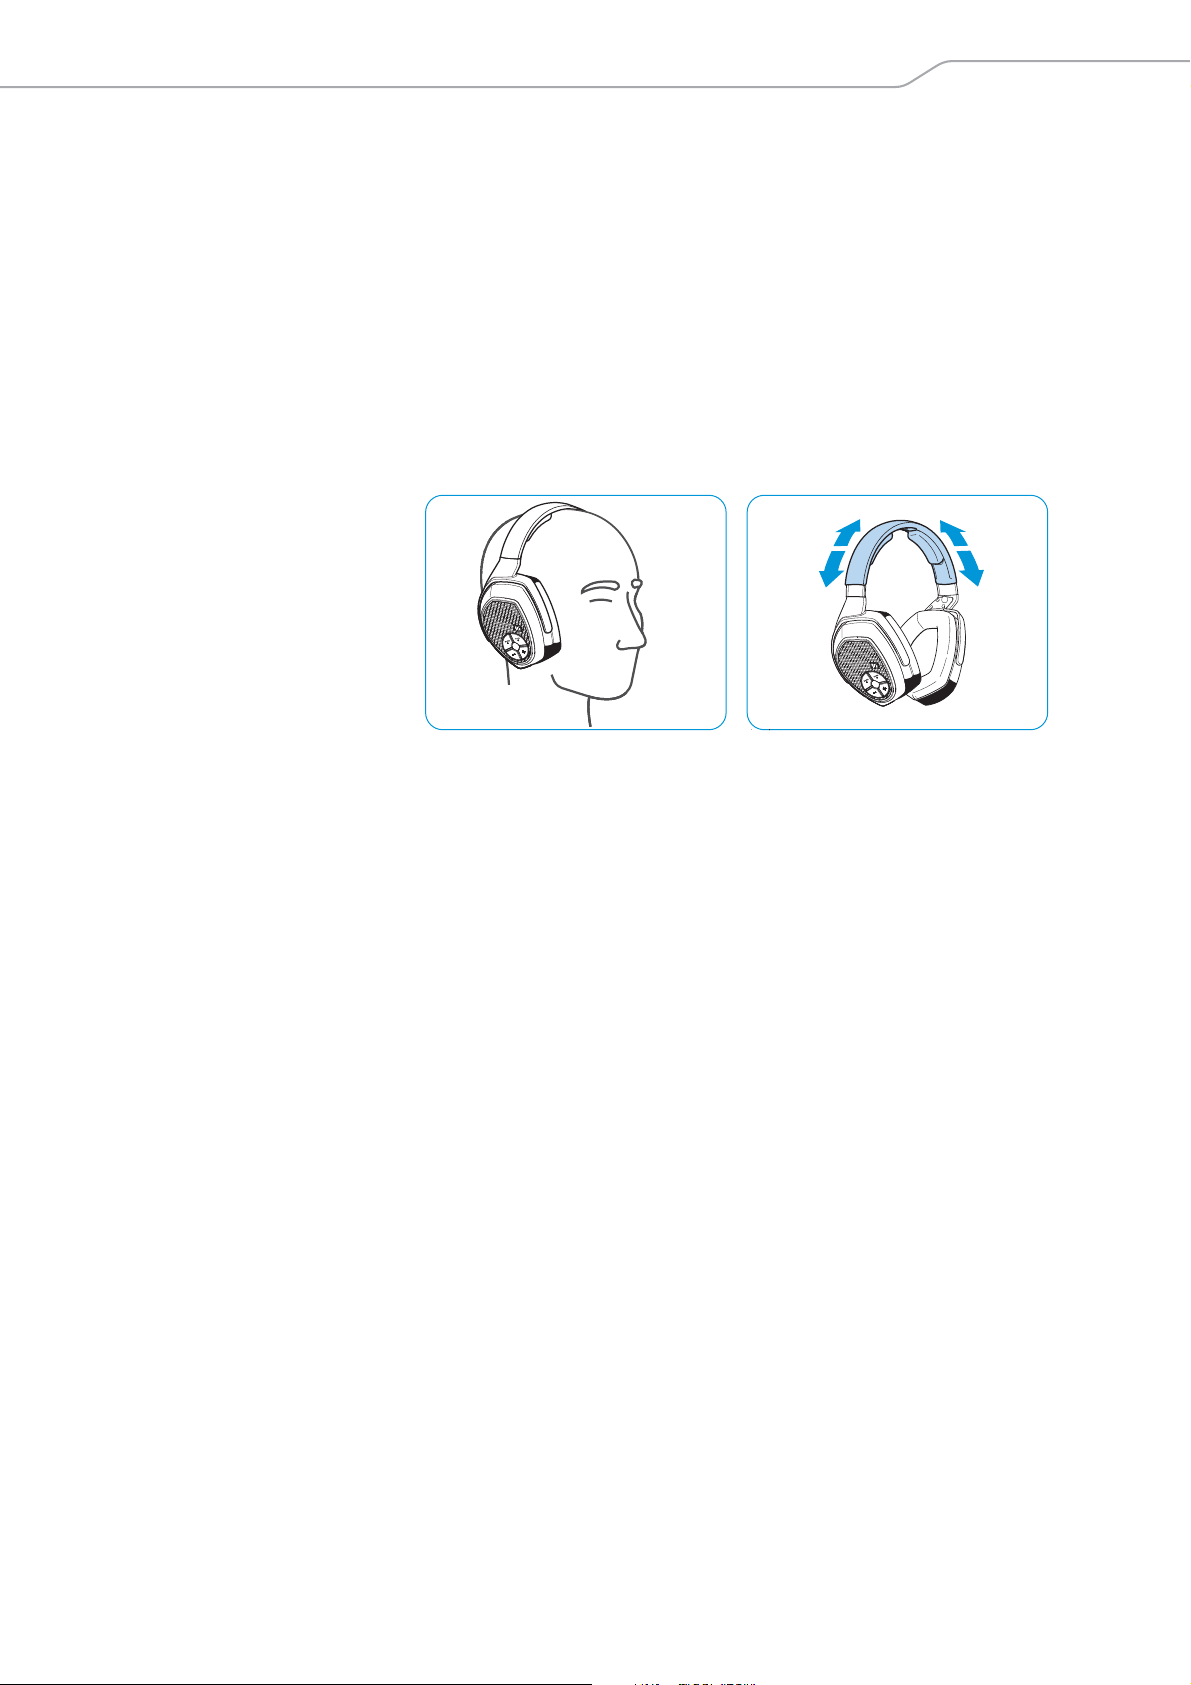
Adjusting the headband
For good sound quality and best possible wearing comfort, the headband
has to be adjusted to properly fit your head. The headphones feature an
adjustable headband with a snap-in locking mechanism for easy adjustment.
왘 Wear the headphones so that the headband runs over the top of your
ead. Observe
h
band when putt
왘 Adjust the length of the headband until
our ears are comfortably covered by the ear pads,
– y
– you feel even, gentle pressure around your ears,
– a snug fit of the headband on the head is ensured.
the L (left) and R (right) markings on the outer head-
ing the headphones on.
RS 175 | 19
Page 4
Using your RS 175 headphone system
VOLUME
S
U
RR
L
O
HI
B
A
S
S
2s
AUTO-ON
Analog
Digital
S
U
RR
LO
HI
BA
S
S
1
2
3
ON
ON
Using your RS 175 headphone system
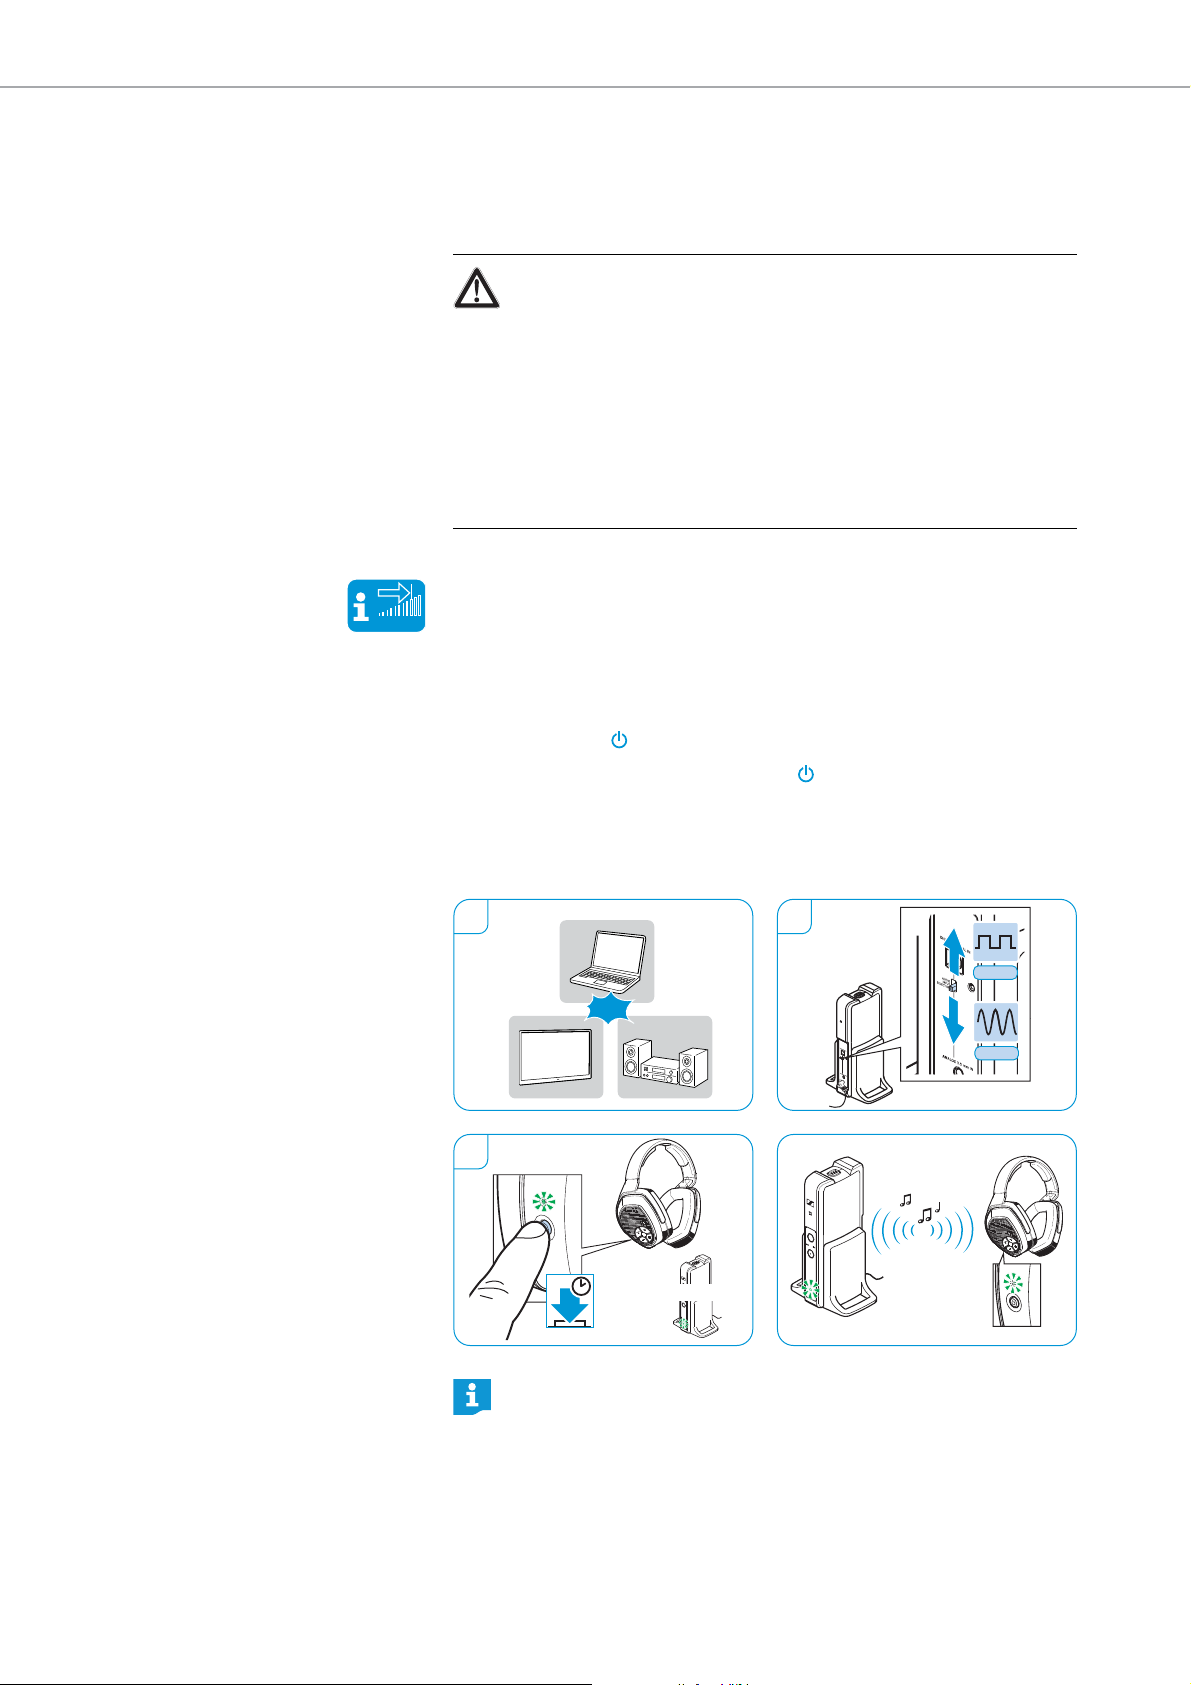
Switching your wireless headphone system on
WARNING
Danger due to high volume levels!
Listening at high volume levels can lead to permanent hearing
defects.
왘 Before putting the headphones on and before toggli
your audio inputs, adjust the volume on the headphones to a
low level. Toggling between different inputs may cause enormous volume jumps that can damage your hearing.
왘 Do not expose yourself to high volume levels for long periods of
me.
ti
1 Switch your audio source on.
If you are using the headphone connection (see page 14) to connect to
your audio source,adjust the volume from the source, or in some cases
from the headphone socket on your audio source (e.g. TV), to at least
the medium level.
2 Slide the AUDIO INPUT SELECTION switch up or down to select your
udi
o source (see page 21).
a
The status LED on the transmitter lights up green.
3 Press and hold the HDR power button for approx. 2 seconds to switch
the headphones
The tr
ansmitter in standby mode recognizes the active paired head-
on.
phones and automatically transmits a signal. The status LEDs on the
transmitter and the headphones light up green.
ng between
20 | RS 175
If the headphones are brought outside the transmission range or if
there is no audio signal received from the transmitter for more than
5 minutes, the headphones switch off automatically.
Page 5
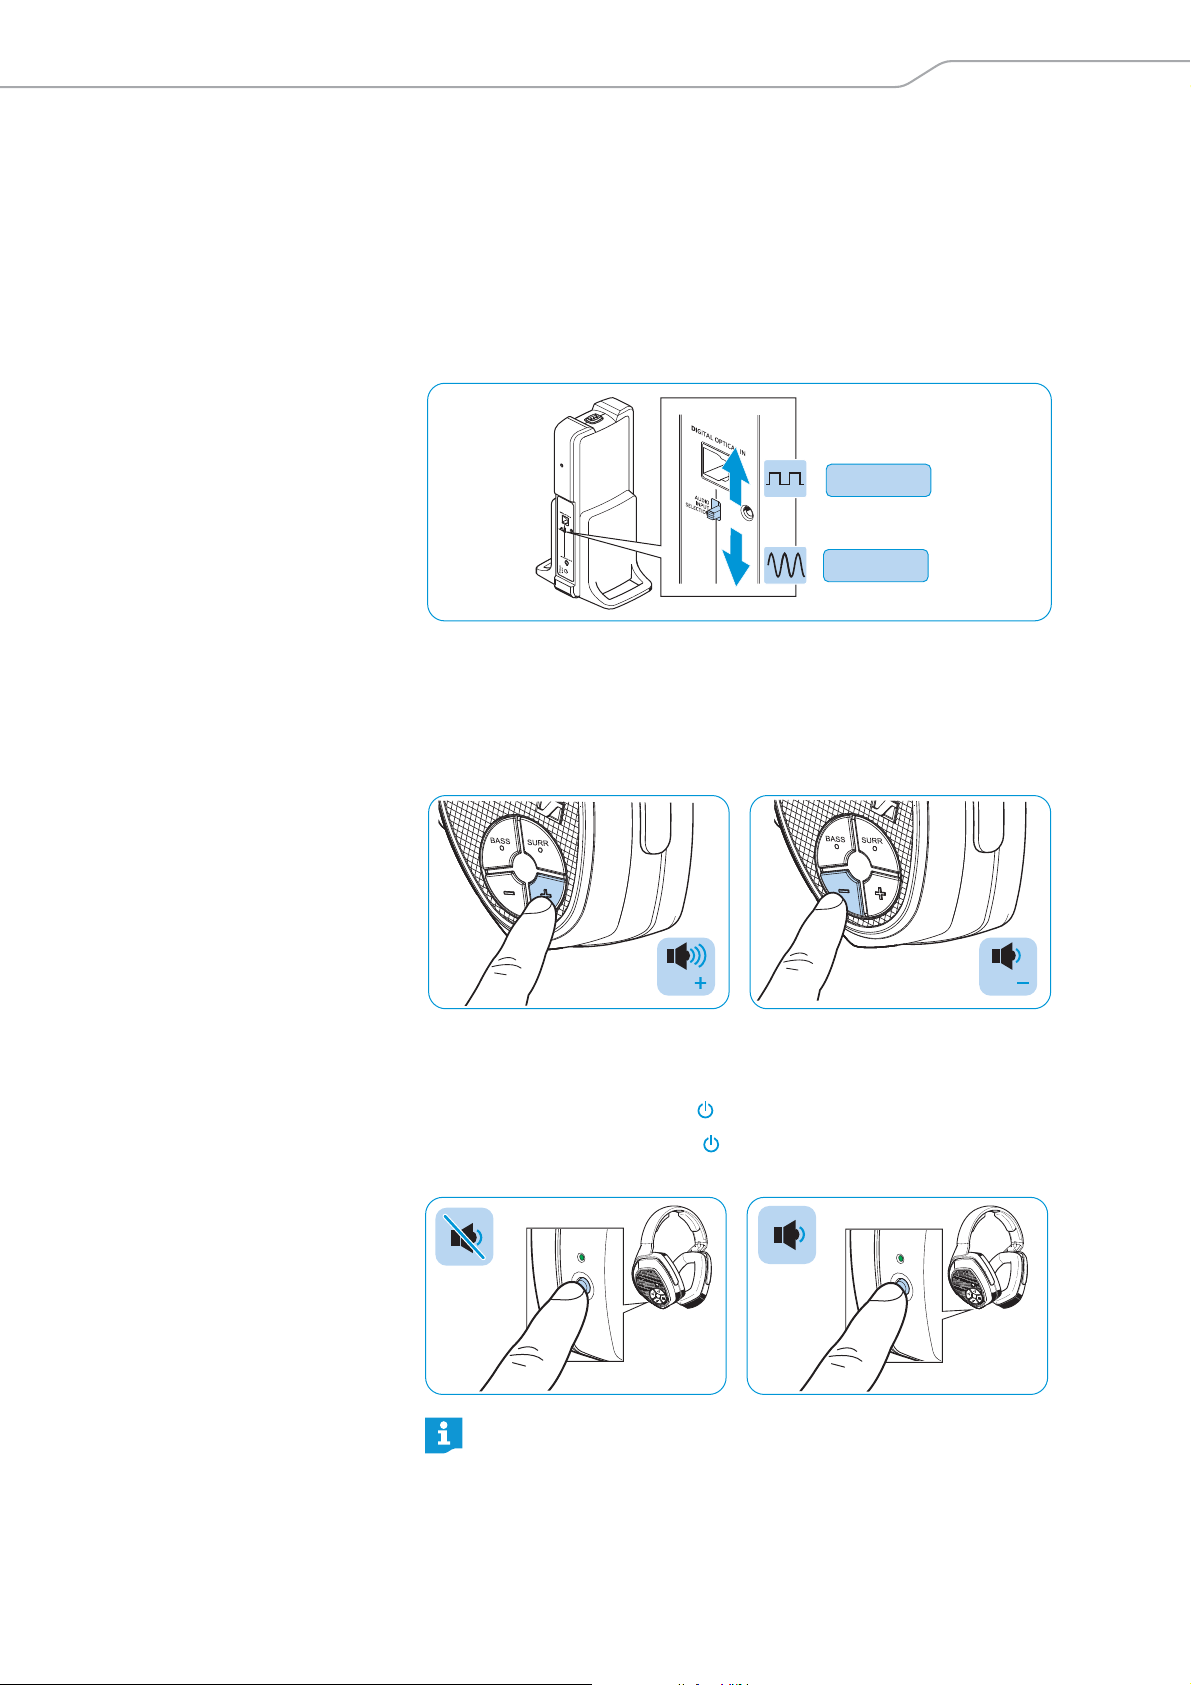
Using your RS 175 headphone system
Selecting an audio input
If both analog and digital audio inputs are connected to different audio
sources, the headphone system enables you to toggle between the two
inputs.
to an
왘 Push the AUDIO INPUT SELECTION switch up to listen
connected to the digital optical input (see page 13).
왘 Push the AUDIO INPUT SELECTION switch down to listen to an audio
source
connected to the analog input (see pages 14 and 15).
Digital
Analog
audio source
Adjusting the volume
왘 Press the Volume + button or the Volume – button repeatedly until the
volume is adjusted to the desired level. When the minimum or maximum volume setting is reached, you hear a beep in the headphones.
Vol Vol
Muting/unmuting the headphones
왘 Press the HDR power button to mute the headphones.
왘 Press the HDR power button or any of the Volume +/–, buttons to
ncel the muting.
ca
If the headphones are muted for 15 minutes, the headphones switch
off automatically to save energy.
RS 175 | 21
Page 6
Using your RS 175 headphone system
LO
SURR
HI
High
OR
LO
SURR
HI
Low
LO
SURR
HI
Off
LO
SURR
HI
LO
SURR
HI
LO
SURR
HI
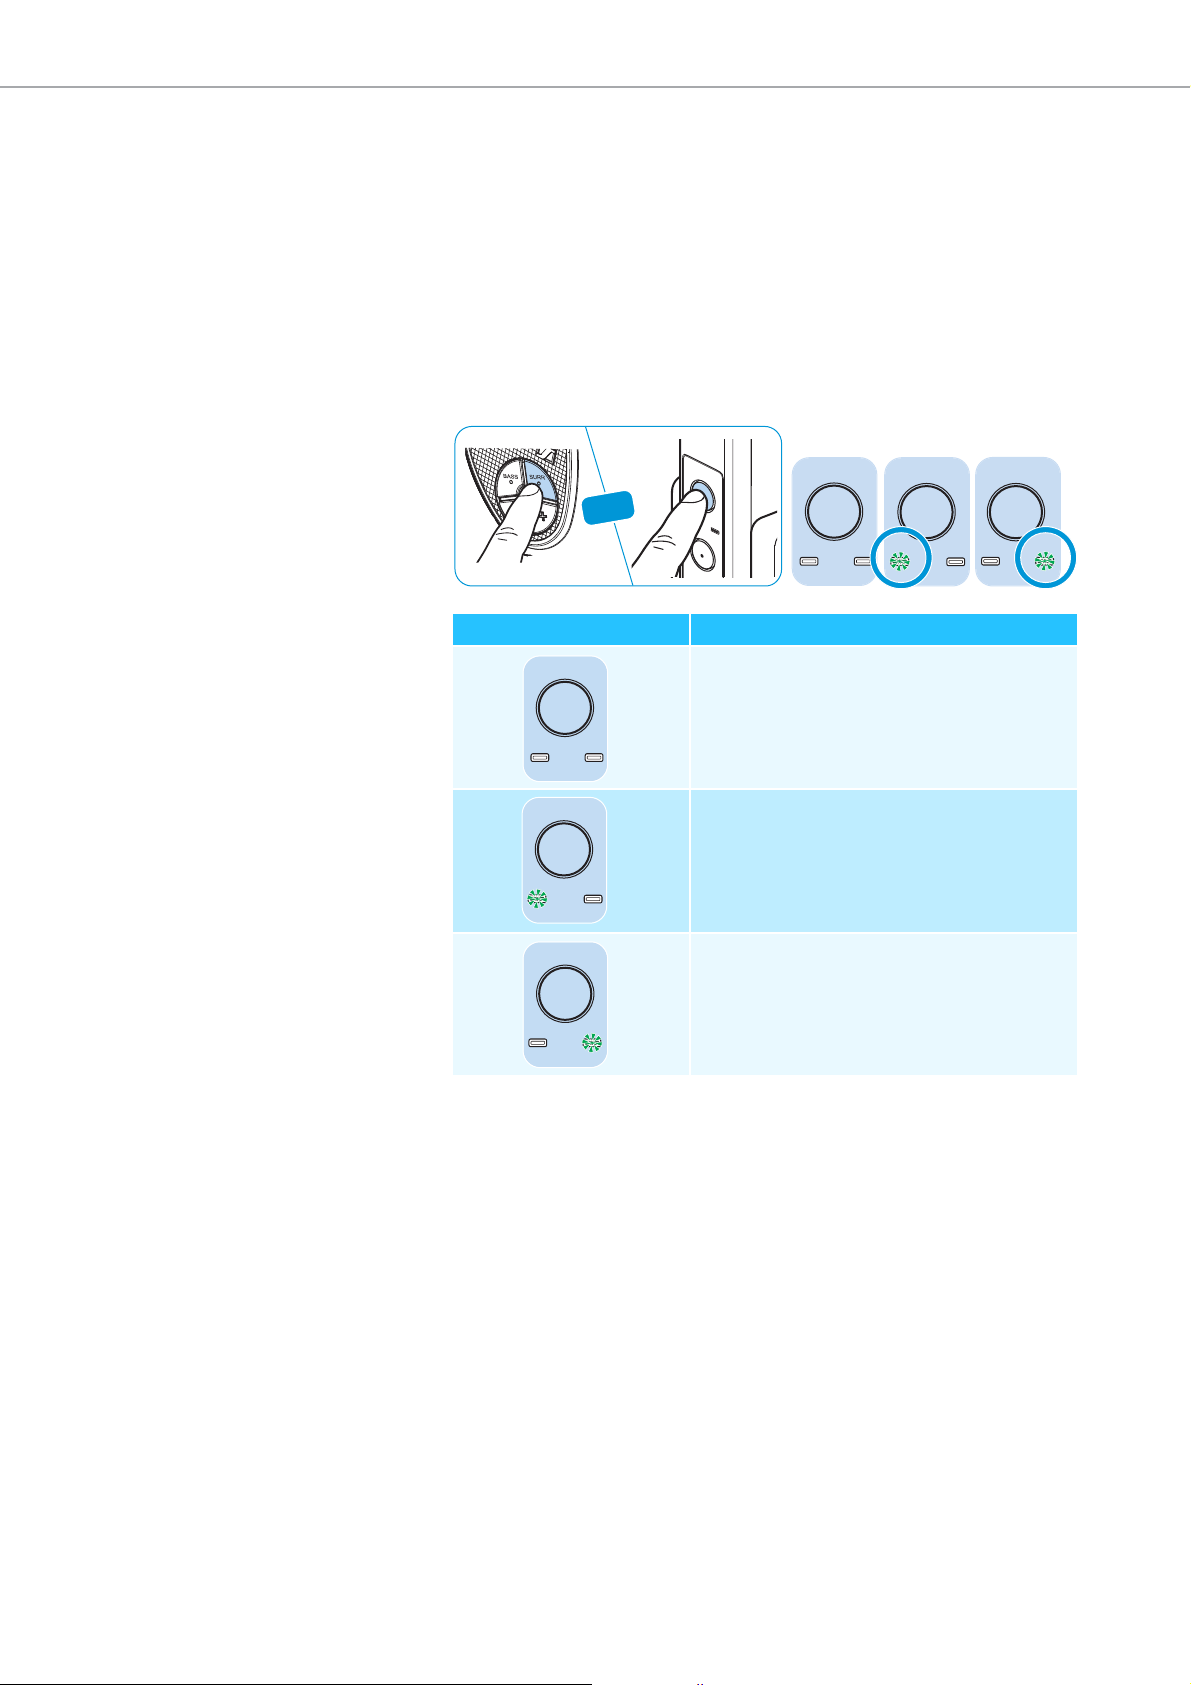
Activating/Deactivating the virtual surround sound
The RS 175 headphone system offers two virtual surround modes
(high HI/low LO) that simulate the sound generated by external stereo
speakers
The intensity of the surround effect however differs according to the mode
selected. Depending on your personal preference for spatial sound quality,
you can set the mode to either high HI or low LO.
왘 Press the SURR button on the headphones or the transmitter.
Surround sound LED Meaning
, thus, producing spatial and livelier sound.
surround e
The
ffect toggles between off and the 2 surround sound
modes, as indicated by the LO, HI LEDs.
SURR
LO
HI
B
Virtual surround sound is off
Low LO virtual surround sound mode is
active
High HI virtual surround sound mode is
active
22 | RS 175
Page 7

Using your RS 175 headphone system
BASS
Activating/Deactivating the dynamic bass boost
The dynamic bass boost increases the audio bass response.
왘 Press the BASS button either on the headphones or the transmitter.
The bass
by the BASS LED indicator.
boost effect switches between on and off modes, as indicated
SURR
OR
LO HI
BASS
BASS LED Meaning
The bass boost effect is active.
The bass boost effect is inactive.
BASS
bass boost direct
RS 175 | 23
Page 8

Using your RS 175 headphone system
Pairing one or several headphones to the transmitter
The headphones and the transmitter enclosed in this package have been
paired from the factory. The following procedure is only necessary if you
have cleared all pairing information from your wireless headphone system
and you want to revive the lost pairing, or if you want to pair another set
of headphones to the transmitter.
You can connect up to 2 paired headphones simultaneously with your
TR 175 transmitter.
왘 Place the headphones on the headphones holder of the transmitter for
cond.
e
a s
The Charge status LED on the transmitter lights up red. The headphones are paired to the transmitter.
1s
R
SUR
HI
LO
BASS
24 | RS 175
Page 9

Using your RS 175 headphone system
2s
SU
RR
LO
H
I
BA
SS
OFF AUTO-STANDBY
B
A
Switching your wireless headphone system off
There are two ways to switch your wireless headphone system off.
왘 Press and hold the HDR power button for approx. 2 seconds.
e headphones switch off. If no other pair of active wireless head-
Th
phones is connected to the transmitter, the transmitter switches to
standby mode. All LEDs are off.
왘 Place the headphones on the headphones holder of the transmitter.
nes switch off and the charging process starts (see
The he
page 18). If no other pair of active wireless headphones is connected to
the transmitter, the transmitter switches to standby mode.
adpho
OFF
R
SUR
HI
LO
AUTO-
BASS
STANDBY
To disconnect the transmitter from the power source, unplug the
power supply unit from the AC wall outlet.
RS 175 | 25
Page 10

Cleaning and maintaining the RS 175
1
2
3
4
Cleaning and maintaining the RS 175
CAUTION
Liquids can damage the electronics of the product!
Liquids entering the housing of the product can cause a short-circuit and
damage the electronics.
왘 Keep all liquids away from the product.
왘 Do not use any cleansing agents or solvents.
To clean the wireless headphone system:
왘 Switch your wireless headphone system off and disconnect t
mitter from the AC wall outlet before cleaning.
왘 Clean the product only with a soft, dry cloth.
he trans-
Replacing the ear pads
For reasons of hygiene, you should replace the ear pads from time to time.
Spare ear pads are available at your local Sennheiser partner.
1 Lightly twist the ear pads counterclockwise until you overcome a slight
stance.
resi
2 Lift the ear pads off the ear cups and
3 Hook the new ear pads onto the ear cups. Observe the L (left) and R
(right) markings on the rear of the ear pads.
4 Twist the ear pads clockwise until you hear a click sound. Ensure that
k
they are loc
ed firmly onto the ear cups.
dispose of them properly.
26 | RS 175
Page 11

Troubleshooting
Troubleshooting
Sound problems
Problem Possible cause Possible solutions Page
Headphones are switched off. Switch the headphones on. 20
Check the connection of the power supply
unit.
Increase the volume on the audio source
to at least a medium level/Deactivate the
muting function from the audio source.
Pair the headphones with the transmitter
again.
Set the digital audio output of your
device/audio source to “PCM”, with a
sampling rate of max. 96 kHz (see the
instruction manual of your audio source).
Reduce the distance between headphones
and transmitter.
Remove obstacles between the
transmitter and headphones.
Change the position of the transmitter or
of the headphones.
Ensure that the transmitter is separated
from other wireless devices by at least
50 cm/20”.
Increase the volume on the analog audio
source to at least a medium level.
Check the audio output settings of your
TV and set the latency to „0“.
Decrease the volume of the analog audio
source at least to a medium volume level.
No sound
Occasional
sound
dropouts
Sound is too
low
Echos when
using
headphones
and TV tone
Sound only on
one ear
Sound is
distorted
No power connection.
Headphones are muted. Deactivate the muting function. 21
Audio plug is not properly connected. Check the audio plug connection. 12
Audio source is switched off. Switch the audio source on. –
Volume of the analog audio source is
either set to the minimum or is on mute.
Audio cable is defective. Replace the audio cable. –
Headphones are not correctly paired with
the transmitter (e.g. additional
headphones).
Wrong audio input is selected. Select the other audio input. 21
Digital audio connection uses
incompatible data transmission settings.
Headphones are out of the transmitter’s
range.
Signal is shielded.
There are interfering devices (e.g. WLAN
routers, Bluetooth devices or microwaves)
in the vicinity.
Headphone volume is adjusted too low. Increase the volume on the headphones. 21
Volume of the analog audio source is
adjusted too low.
Some TVs can adjust a delay or latency of
the audio signal for the digital audio
output.
Audio cable is not properly connected. Check the plug connection. 12
Audio cable is defective. Replace the audio cable. –
Signal of the audio source is distorted. Reduce the volume of the audio source. –
Headphone volume is adjusted too high. Reduce the volume on the headphones. 21
Volume of the analog audio source is
adjusted too high.
16
–
24
–
–
–
11
–
–
–
–
RS 175 | 27
Page 12

Troubleshooting
Other problems
Problem Possible cause Possible solutions Page
Transmitter
does not turn
on
Headphones do
not turn on
Operating time
decreases
You hear beeps
in the
headphones
Headphones
cannot be
connected to
the transmitter
No power connection.
The rechargeable batteries are almost
empty.
No batteries inside the battery
compartments.
The rechargeable batteries are inserted
the wrong way round.
The rechargeable batteries are exhausted.
The rechargeable batteries are almost
drained.
Distance to the transmitter is too large. Reduce the distance to the transmitter. –
Headphones are not paired with the
transmitter.
Another set of headphones is being
charged so I can‘t pair my second
headphones.
Headphones are not compatible.
Check the connection of the power supply
unit.
Recharge the rechargeable batteries. 18
Insert the rechargeable batteries. 17
Remove the rechargeable batteries from
the headphones and reinsert them again.
Observe correct polarity.
Replace the rechargeable batteries with
new ones.
Recharge the rechargeable batteries. 18
Pair the headphones with the transmitter. 24
Perform a proximity pairing:
1. Place the headphones as close as
possible to the transmitter.
2. Switch headphones on.
3. Press the Volume +/- buttons
simultaneously for about 7 seconds.
Use Sennheiser HDR 165, 175, 185, or
195 wireless headphones only.
16
17
17
–
–
If you encounter a problem that is not listed in the table, or if the solutions provided do not work, please visit
our FAQ page at www.sennheiser.com for the most up-to-date list of frequently asked questions.
You may also contact your local Sennheiser service partner for assistance. To find a Sennheiser service partner
in your country, visit www.sennheiser.com.
28 | RS 175
Page 13

Troubleshooting
S
UR
R
LO
HI
BA
S
S
1 2
BASS
SURR
BASSBASS
SURRSURR
2s
Leaving the range of the transmitter
The range of the transmitter largely depends on environmental conditions
such as wall thickness, wall composition etc. If the headphones leave the
range of the transmitter, the audio first cuts out occasionally until it finally
cuts out completely.
a
If you re-enter the transmission r
nge within 5 minutes, the connection is
automatically re-established.
If you spend more than 5 minutes outside the transmission range, the
headphon
switch off automatically.
es
Clearing the pair settings on the headphones
1 Press the Volume +/- buttons simultaneously and hold for 2 seconds.
The HDR status LED blinks red rapidly.
2 Press the HDR power button while continuously holding the Volume
+/- buttons. Release all 3 buttons.
t
The HDR s
condition, and starts blinking slowly. The pair settings on the headphones are cleared.
atus LED lights up green or red, depending on the battery
RS 175 | 29
Page 14

Specifications
Specifications
RS 175 system
Carrier frequency 2.40 to 2.48 GHz
Modulati
RF output power max. 10 dBm Class 1
Transmission range up to 100 m line of sight
Max. numbers of paired
headphones
Temperature range
Relative humidity
HDR 175 headphones
Transducer principle circumaural, closed
Transducer system dynamic, neodymium magnets
Frequency response 17 Hz to 21 kHz
Max. SPL 109 dB at 1 kHz, 100 dB SPL
THD < 0.5 % at 1 kHz, 100 dB SPL
Operating time up to 18 hours
Charging time of
rechargeable batteries
Power supply
Weight (incl. batteries) approx. 310 g
Dimensions (W x H x D) approx. 17 cm x 20 cm x 9.5 cm
on 8-FSK Digital
2
Operation: 0 °C to +40 °C/32 °F to 104 °F
Storage: -25 °C to +70 °C/-13 °F to 158 °F
Operation: 10 to 80 %
Storage: 10 to 90 %
up to 8 hours 30 min
2 AAA size low self-discharge NiMH
rechargeable batteries, 1.2 V, 820 mAh
TR 175 transmitter
Connections
Power supply 9 V , 300 mA
Power consumption
Dimensions (W x H x D) approx. 12.7 cm x 23.4 cm x 10 cm
Sennheiser NT 9-3AW power supply unit
Rated input 100 – 240 Vac, 0.2 A, 50 – 60 Hz
Rated output 9 V , 300 mA
Temperature range
Relative humidity
Digital: optical
Analog: 3.5 mm stereo jack socket
Operation: typ. 4 W
Standby mode: typ. 0.25 W (without
charging)
Operation: 0 °C to +40 °C/32 °F to 104 °F
Storage: -25 °C to +70 °C/-13 °F to 158 °F
Operation: 10 to 80 %
Storage: 10 to 90 %
30 | RS 175
Page 15

Manufacturer declarations
Manufacturer declarations
Warranty
Se nnheiser ele ctronic Gm bH & Co. KG giv es a warran ty of 24 months on this
product.
For the current warranty conditions, please visit our website at www.sennheiser.com or contact your Sennheiser partner.
FOR AUSTRALIA ONLY
Sennheiser goods come with guarantees that cannot be excluded under
the Australian Consumer Law. You are entitled to a replacement or refund
for a major failure and compensation for any other reasonably foreseeable
loss or damage. You are also entitled to have the goods repaired or
replaced if the goods fail to be of acceptable quality and the failure does
not amount to a major failure.
This warranty is in addition to other rights or remedies under law. Nothing
in this warranty excludes, limits or modifies any liability of Sennheiser
which is imposed by law, or limits or modifies any remedy available to the
consumer which is granted by law.
To make a claim under this warranty, contact Sennheiser Australia Pty Ltd,
Unit 3, 31 Gibbes Street Chatswood NSW 2067, Australia;
Phone: (02) 9910 6700, email: service@sennheiser.com.au
All expenses of claiming the warranty will be borne by the person making
the claim.
The Sennheiser International Warranty is provided by Sennheiser Australia
Pty Ltd (ABN 68 165 388 312), Unit 3, 31 Gibbes Street Chatswood NSW
2067, Australia.
In compliance with the following requirements
• WEEE Directive (2012/19/EU)
ose of this product at the end of its operational life-
Please
time by taking it to your local collection point or recycling center
for such equipment.
• Battery Directive (2013/56/EU)
The supplied standard/rechargeable batteries can be recycled.
Please dispose of them as special waste or return them to your
specialist dealer. In order to protect the environment, only dispose of exhausted batteries.
CE Declaration of Conformity
• R&TTE Directive (1999/5/EC)
MC Directive (2014/30/EU)
• E
• Low Voltage Directive (2014/35/EU)
• ErP Directive (2009/125/EC)
• RoHS Directive (2011/65/EU)
The CE Declaration of Conformity is available on our website at
www.sennheiser.com.
disp
RS 175 | 31
Page 16

Manufacturer declarations
SENNHEISER
Model No: RS 175
FCC Declaration of Conformity (DoC)
We,
Sennheiser Electronic Corporation
One Enterprise Drive • Old Lyme •
CT 06371 • USA
Tel: +1 (860) 434 9190
Fax:
+1 (860) 434 1759
declare the above device c omply with t he requirements of Federal Communications Commiss ion.
This device complies with Part 15 of the FCC rules. Operation is subjected to the following two conditions :
1) This device may not cause harmful interference, and
2) This device must accept any interference received, including interference that may caus e undesired operation.
Responsible Party: Greg Beebe
Statements regarding FCC and In
dustry Canada
This device complies with Part 15 of the FCC Rules and with RSS-210 of
In
dustry Canada. Operation is subject to the following two conditions:
(1) this device may not cause harmful interference, and (2) this device
must accept any interference received, including interference that may
cause undesired operation.
This equipment has been tested and found to comply with the limits for a
Class B digital device, pursuant to Part 15 of the FCC Rules. These limits are
designed to provide reasonable protection against harmful interference in
a residential installation. This equipment generates, uses and can radiate
radio frequency energy and, if not installed and used in accordance with
the instructions, may cause harmful interference to radio communications.
However, there is no guarantee that interference will not occur in a particular installation. If this equipment does cause harmful interference to
radio or television reception, which can be determined by turning the
equipment off and on, the user is encouraged to try to correct the interference by one or more of the following measures:
• Reorient or relocate the receiving antenna.
• Increase the separation between the equipment and receiver.
• Connect the equipment into an outlet on a circuit different from that to
which the receiver is connected.
• Consult the dealer or an experienced radio/TV technician for help.
CAN ICES-3 (B)/NMB-3(B)
RF Radiation Exposure Information
Since the radiated output power of this device is far below the FCC radio
equency
fr
exposure limits, it is not subjected to routine RF exposure eval-
uation as per Section 2.1093 of the FCC rules.
Trademarks
Sennheiser is a registered trademark of
Sennheiser electro
32 | RS 175
Other product and company names mentioned in this instruction manual
may be the trademarks or registered trademarks of their respective holders.
nic GmbH & Co. KG.
Page 17

Page 18

Sennheiser electronic GmbH & Co. KG
Am Labor 1, 30900 Wedemark, Germany
www.sennheiser.com
Publ. 08/14, A01
 Loading...