

Page 1
Instruction Manual
Bedienungsanleitung
Notice d’emploi
Istruzioni per l’uso
Instrucciones de uso
Manual de instruções
Gebruiksaanwijzing
Betjeningsvejledning
Handhavande Manual
Bruksanvisning
BW 900
Page 2

Contents
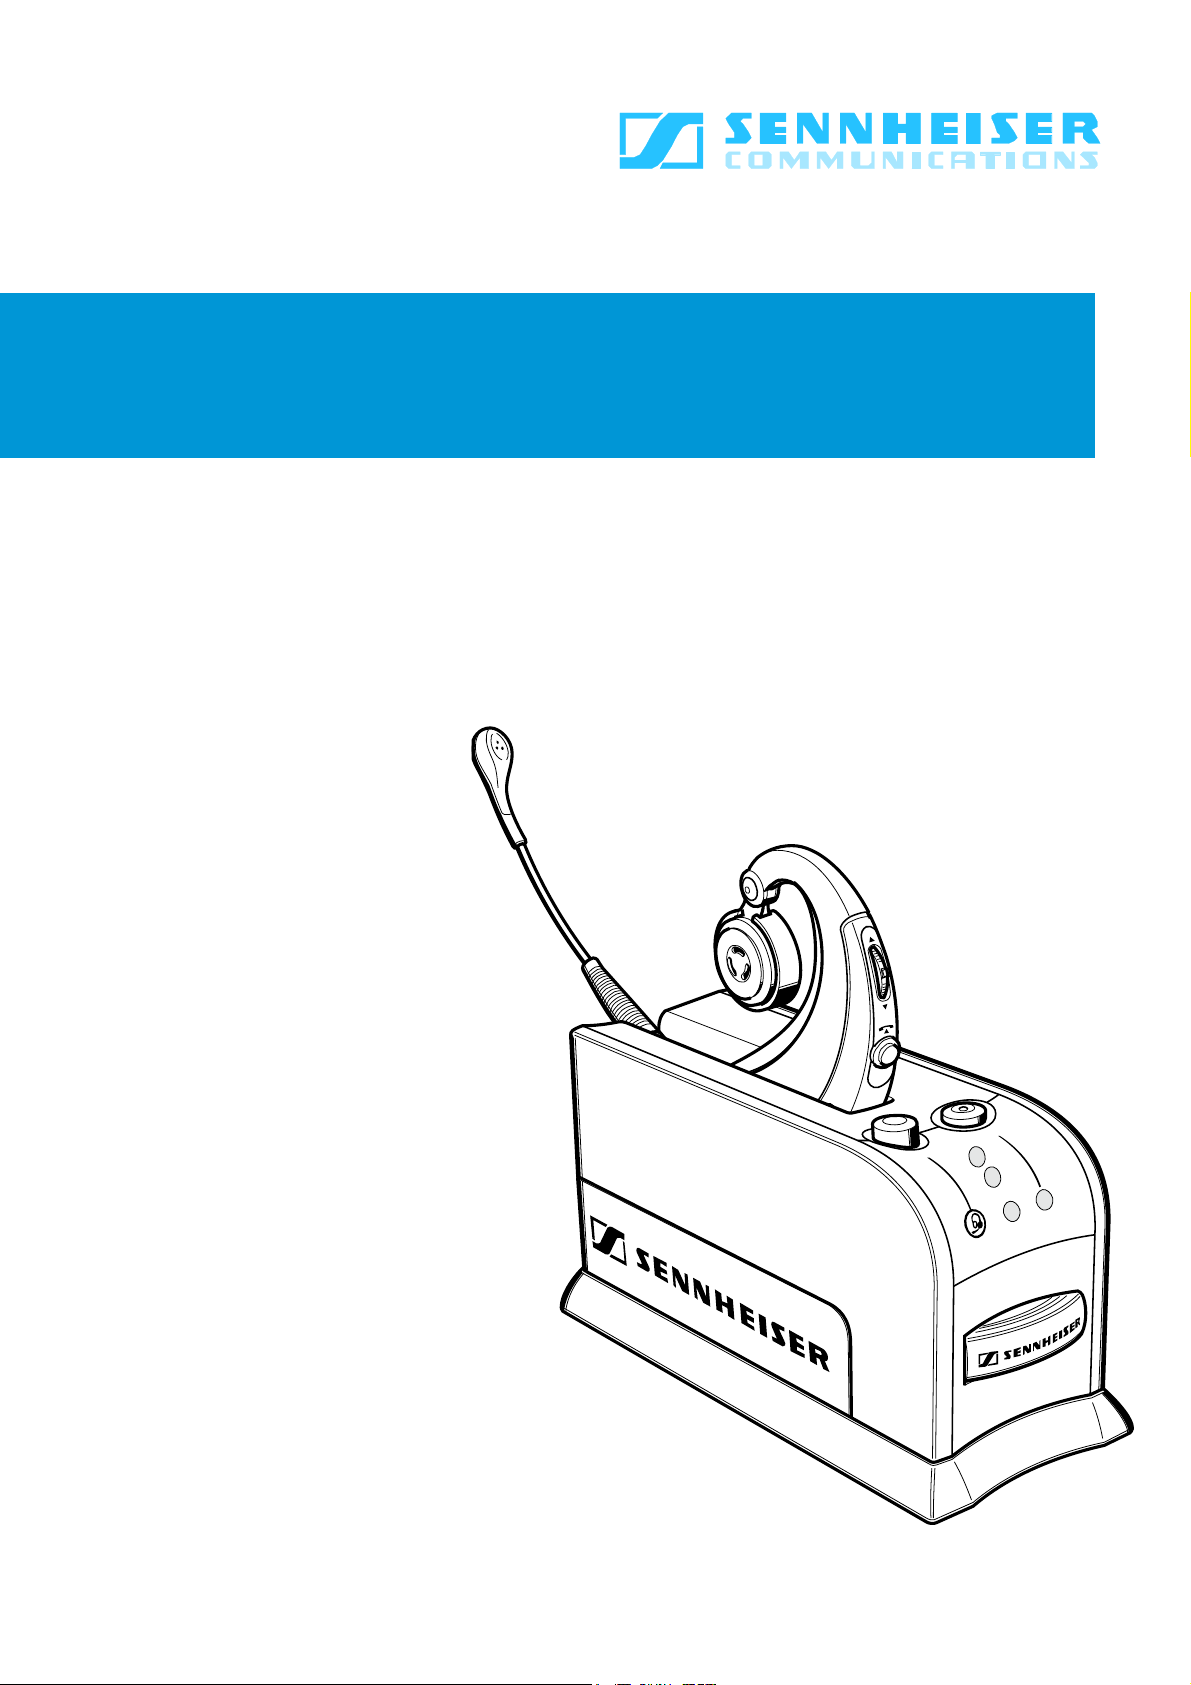
Wireless System BW 900
Contents
Intended use .................................................................................................... 4
Observe the following instructions for the BW 900 system.................... 4
Related documents.......................................................................................... 5
Product description......................................................................................... 5
Adaptive Intelligence for optimal speech intelligibility............................ 5
ActiveGard™ for your well-being .................................................................. 5
Stylish and lightweight, with high wearing comfort................................. 5
More room to move ......................................................................................... 5
Optimum connectivity..................................................................................... 5
Non-stop talking .............................................................................................. 6
Delivery includes ............................................................................................. 6
Operating elements ........................................................................................ 7
BW 900 base station....................................................................................... 7
BW 900 headset............................................................................................... 7
Button overview.............................................................................................. 8
Setting up the BW 900 system ..................................................................... 9
Setting up the headset ........................................................................................ 9
Inserting the battery into the headset ........................................................ 9
Adapting the headset to your ear ................................................................9
Setting up the base station ................................................................................ 9
Connecting the base station to the office phone....................................... 9
Connecting a handset lifter to the BW 900 system (optional).............10
Testing the setup...........................................................................................10
Testing the handset lifter setup (optional)..............................................10
Adjusting the BW 900 to your office phone.............................................11
Connecting the headset to other Bluetooth devices (pairing).............. 11
Connecting the BW 900 system to a PC (optional) ................................. 12
Summary of settings .................................................................................... 13
Basic settings................................................................................................. 14
Switching the headset on/off...........................................................................14
Switching the base station on/off................................................................... 14
Phoning.................................................................................................................15
Accepting incoming calls ..............................................................................15
Making calls with your office phone...........................................................15
Making calls with your mobile device ........................................................ 15
Voice dialling................................................................................................... 16
Redialling.........................................................................................................16
Terminating office phone calls .................................................................... 16
Terminating mobile phone calls..................................................................16
Setting the volume.............................................................................................16
Setting the speaker volume.........................................................................16
Changing the ring tone volume...................................................................17
Power management...........................................................................................17
How long does the battery last?.................................................................17
Indications when the battery is about to run flat ...................................18
Charging the battery.....................................................................................18
Changing the battery during a call.............................................................18
2
Page 3

Contents
If you leave the transmitting range................................................................19
Leaving/entering the transmitting range of the base station..............20
Leaving/entering the transmitting range of the mobile device ........... 20
Advanced settings ........................................................................................21
Call management................................................................................................21
Redialling.........................................................................................................21
Toggling between calls via office phone and via mobile phone............21
Transferring calls between headset and phone.......................................21
Rejecting a call from the mobile device.....................................................22
Muting...................................................................................................................22
Muting/unmuting the headset microphone.............................................22
Muting the ring tone ..................................................................................... 22
Listening to an external audio source.............................................................22
Activating/deactivating the adaptive volume adjustment........................ 23
Pairing...................................................................................................................23
Resetting the BW 900 system..........................................................................24
Maintenance and care .................................................................................. 24
Spare parts..................................................................................................... 24
Accessories..................................................................................................... 24
Specifications................................................................................................. 25
Overall system................................................................................................25
Headset............................................................................................................25
Manufacturer declarations .......................................................................... 25
Warranty regulations.................................................................................... 25
CE Declaration of Conformity....................................................................... 25
FCC statements............................................................................................... 26
Batteries or rechargeable batteries............................................................ 26
WEEE Declaration ........................................................................................... 26
Index ............................................................................................................... 27
We have designed this product to give you reliable operation over many
years. Over 60 years of accumulated expertise in the design and manufacture of high-quality electro-acoustic equipment have made Sennheiser
a world-leading company in this field.
Please take a few moments to read these instructions carefully, as we
want you to enjoy your new Sennheiser product quickly and to the fullest.
3
Page 4

Safety information
Safety information
The BW 900 system has been manufactured according to the accepted
rules of safety and current technology. However, there is still a danger of
damage to equipment if the following general safety instructions are not
complied with.
• Read these instructions completely before working with the BW 900
system.
• Keep these instructions in a location where they are accessible to all
users at all times.
• Always include the operating instructions when you pass the BW 900
system on to third parties.
Intended use
The BW 900 system is an accessory for fixed line phones, and Bluetoothenabled devices such as mobile phones, PCs and PDAs, allowing for wireless communication in office and home office applications.
It is considered improper use when the BW 900 system
• is used for any application not named in these instructions,
• is used under operating conditions that deviate from those described
in these instructions.
General instructions
Before assembly
During assembly
During operation
Observe the following instructions for the BW 900 system
• Never disassemble or modify components of the BW 900 system. The
right to disassemble or modify is reserved to authorized personnel.
This applies especially to all units connected to AC outlets. If units are
opened by customers in breach of this instruction, the warranty be-
comes null and void.
• The rechargeable battery used in this device may present a fire or
chemical burn hazard if mistreated. Therefore, do not disassemble,
heat above 100°C (212°F) or incinerate the battery.
• Sennheiser Communications is not liable for damages resulting from
the loss of connection.
• Use the BW 900 system in dry places only and keep liquids and small
electrically conductive parts away from the BW 900 system and its
connecting sockets.
• Set up the unit on an even surface and lay the cables in such a way
that nobody can pull the BW 900 system or your phone from the table
by accident.
• This equipment generates, uses and can radiate radio frequency en-
ergy and, if not installed and used in accordance with the instructions,
may cause harmful interference to radio communications. However,
there is no guarantee that interference will not occur in a particular in-
stallation.
• When you are not using your headset, place it in the base station cra-
dle to recharge its battery.
• The rechargeable headset battery must be charged in the BW 900
base station, only! Never try to charge batteries other than those
specified for use with the BW 900 headset in the base station!
• Only to be used with Sennheiser Communications supplied approved
and certified power supply (EU 094707, UK 092892, US 092893, AUS
520334).
4
Page 5

Product description
Cleaning
Disposal
• For cleaning the BW 900 system, use a dry cloth only. Do not use any
solvents or cleansing agents.
• Dispose of used batteries according to the legal regulations of your
country.
Related documents
The BW 900 system may be used together with other Sennheiser Communications system components. Also follow the instructions for the
other system components. This includes:
• the HSL 10 Handset Lifter for all types of fixed line phones
• the TCI 01 “Telephone Controlling Interface” for phones featuring an
AEI or DHSG interface
Product description
Adaptive Intelligence for optimal speech intelligibility
The new Bluetooth office headset BW 900 features unique Adaptive
Intelligence technology (patent pending) providing excellent sound quality. The BW 900 automatically compensates for ambient noise and “remembers” the user's preferred settings. During conversation, these
settings are adapted automatically in order to compensate for fluctuations in ambient noise levels.
Adaptive Intelligence also ensures that the interlocutor listening to the
headset user can enjoy optimum speech clarity.
ActiveGard™ for your well-being
The headset is equipped with ActiveGard™, a unique technology patented by Sennheiser Communications. It uses sophisticated sound pressure limitation systems to actively safeguard your hearing against
acoustic shocks. A safe and comfortable sound level allows for stress-free
work with the headset.
Stylish and lightweight, with high wearing comfort
Its discreet design is another plus of this headset. The fashionable and
lightweight device is placed behind the user’s ear. As it is barely noticeable, it is comfortable enough to wear it all day. It can be adjusted ergonomically for a perfect fit on any ear. The BW 900 blue-and-charcoal
design is unobtrusive. The small microphone boom impairs neither the
user's freedom of movement nor his or her field of vision.
More room to move
BW 900 is a Bluetooth Class 1 device supporting the version 1.2 standard. It provides long-range operation and maximum compatibility. With
the base station connected to your office phone, you can roam around
the building up to a distance of 100 m. Additionally, you can move up to
10 metres away from your Bluetooth-enabled devices such as mobile
phones, PCs and PDAs.
Optimum connectivity
The Bluetooth interface allows the BW 900 to be connected to several
devices. Whether you are using a mobile phone or other phone types
such as smart phones or soft phones – the BW 900 is compatible with all
types of speech-based Bluetooth devices. The user-friendly pushbutton
5
Page 6

Delivery includes
interface provides for seamless changeover between your fixed line
phone and any Bluetooth-enabled phone paired.
Non-stop talking
Should the battery run flat while you are talking via your office phone,
you can easily replace it with a fully charged battery without terminating
your call. While no battery is being connected, the BW 900 base station
maintains the connection to the telephone line.
Delivery includes
1 BW 900 base station
1 BW 900 Bluetooth headset
1 rechargeable Li-polymer battery, partially pre-charged
3 speaker adjustment rings, sizes S, M (premounted on earpeace) and L
1 phone connecting cable already plugged to base station
1 quick guide
1 CD with detailed instruction manual (PDF)
1 power supply
1 microphone windshield
1 battery dummy, inserted in the base station’s spare battery charging
slot
6
Page 7
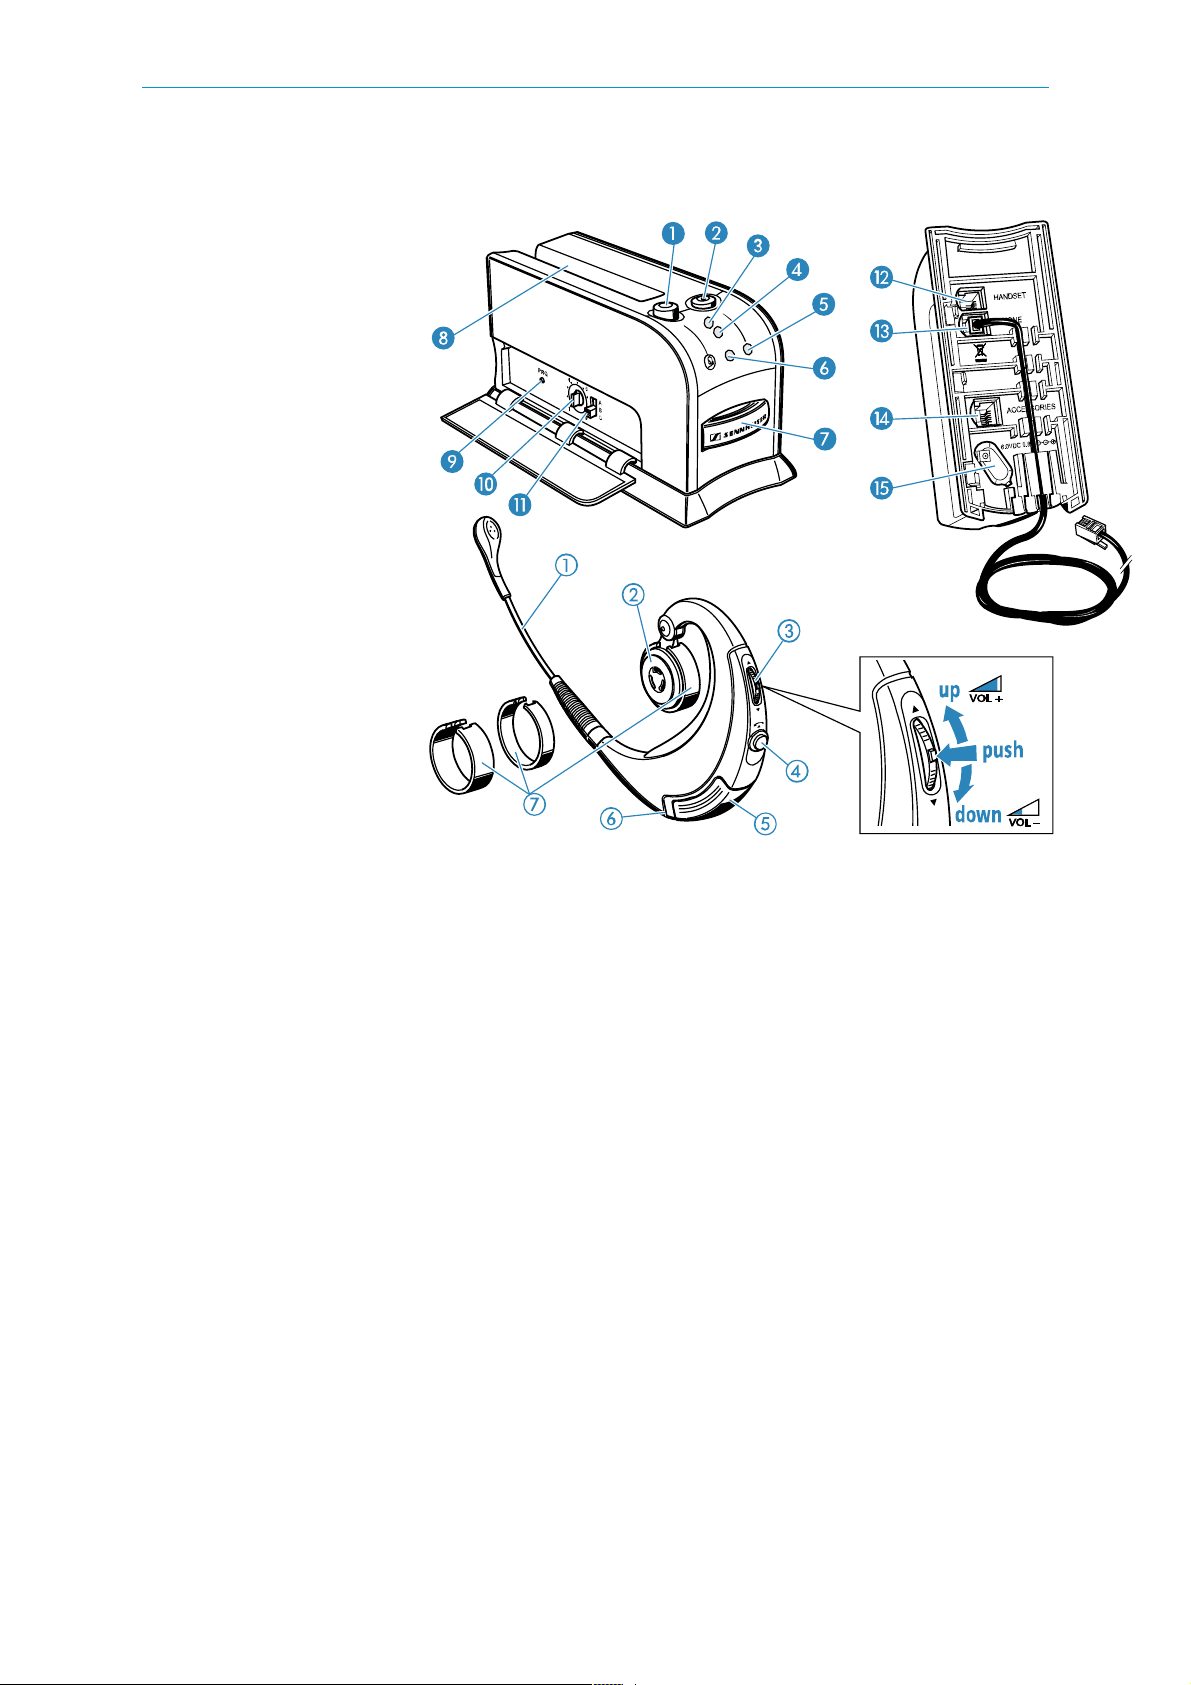
Operating elements
Operating elements
BW 900 base station
Headset/handset switch
Base station hook button
Headset charging LED
Spare battery charging LED
Hook LED
Mute LED
Spare battery charging slot
Headset cradle
Program button
Microphone volume knob
Telephone adjustment switch
HANDSET socket
PHONE socket
ACCESSORIES socket
DC IN socket
BW 900 headset
Microphone boom
Hinged speaker
Multi switch
Headset hook button
Battery compartment
Headset LED
Speaker adapters
7
Page 8
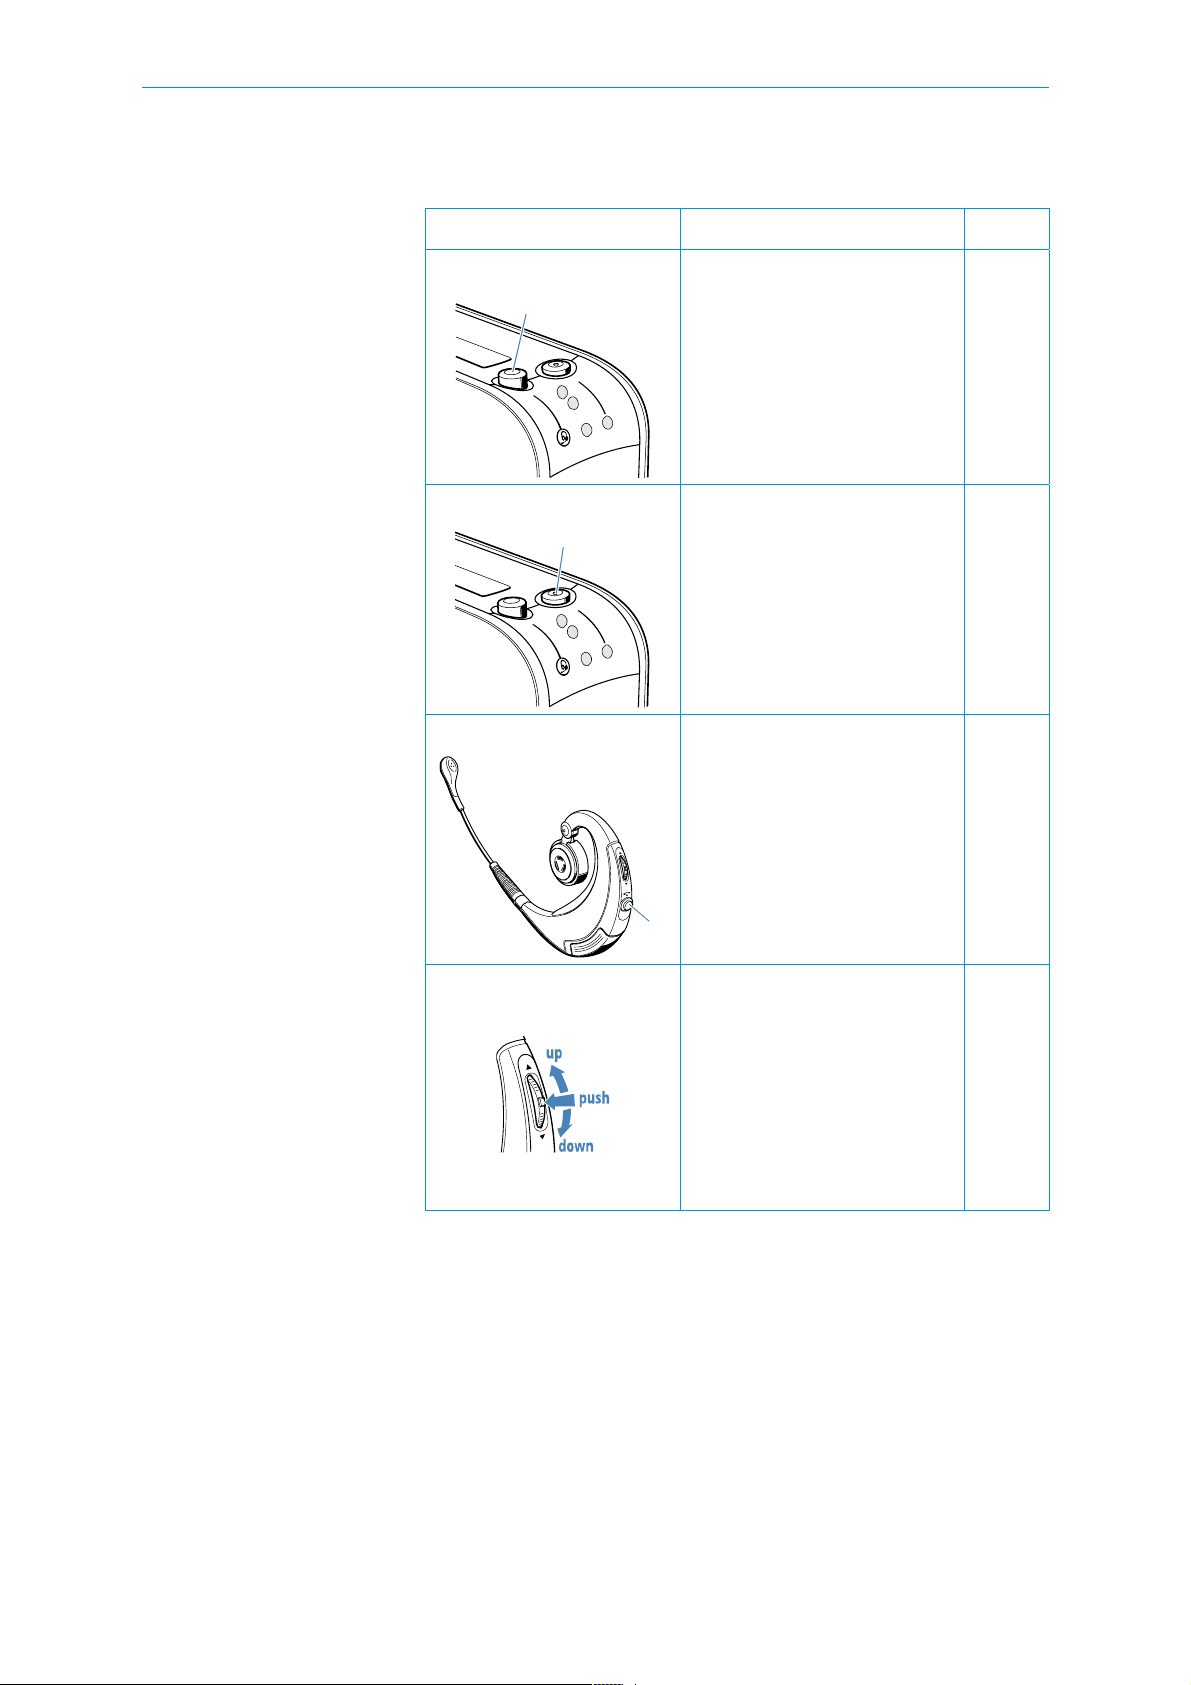
Button overview
Button overview
Button Function See
Headset/handset switch
Base station hook button
Headset hook button
Multi switch
• toggle between the office
phone handset (up position)
and the BW 900 headset
(down position)
• accept an incoming call
• end a call
• accept a call
• end a call
• toggle between mobile
phone and office phone
• redial with mobile device
• activate voice dialling
• adjust the volume (up/down)
• mute the headset micro-
phone or acoustic signals
(push)
• reject calls from the mobile
device (push)
• switch on/off (push until LED
flashes 3 x blue: on – red:
off)
page 14
page 15
page 16
page 14
page 16
page 21
page 21
page 15
page 16
page 22
page 22
page 14
8
Page 9
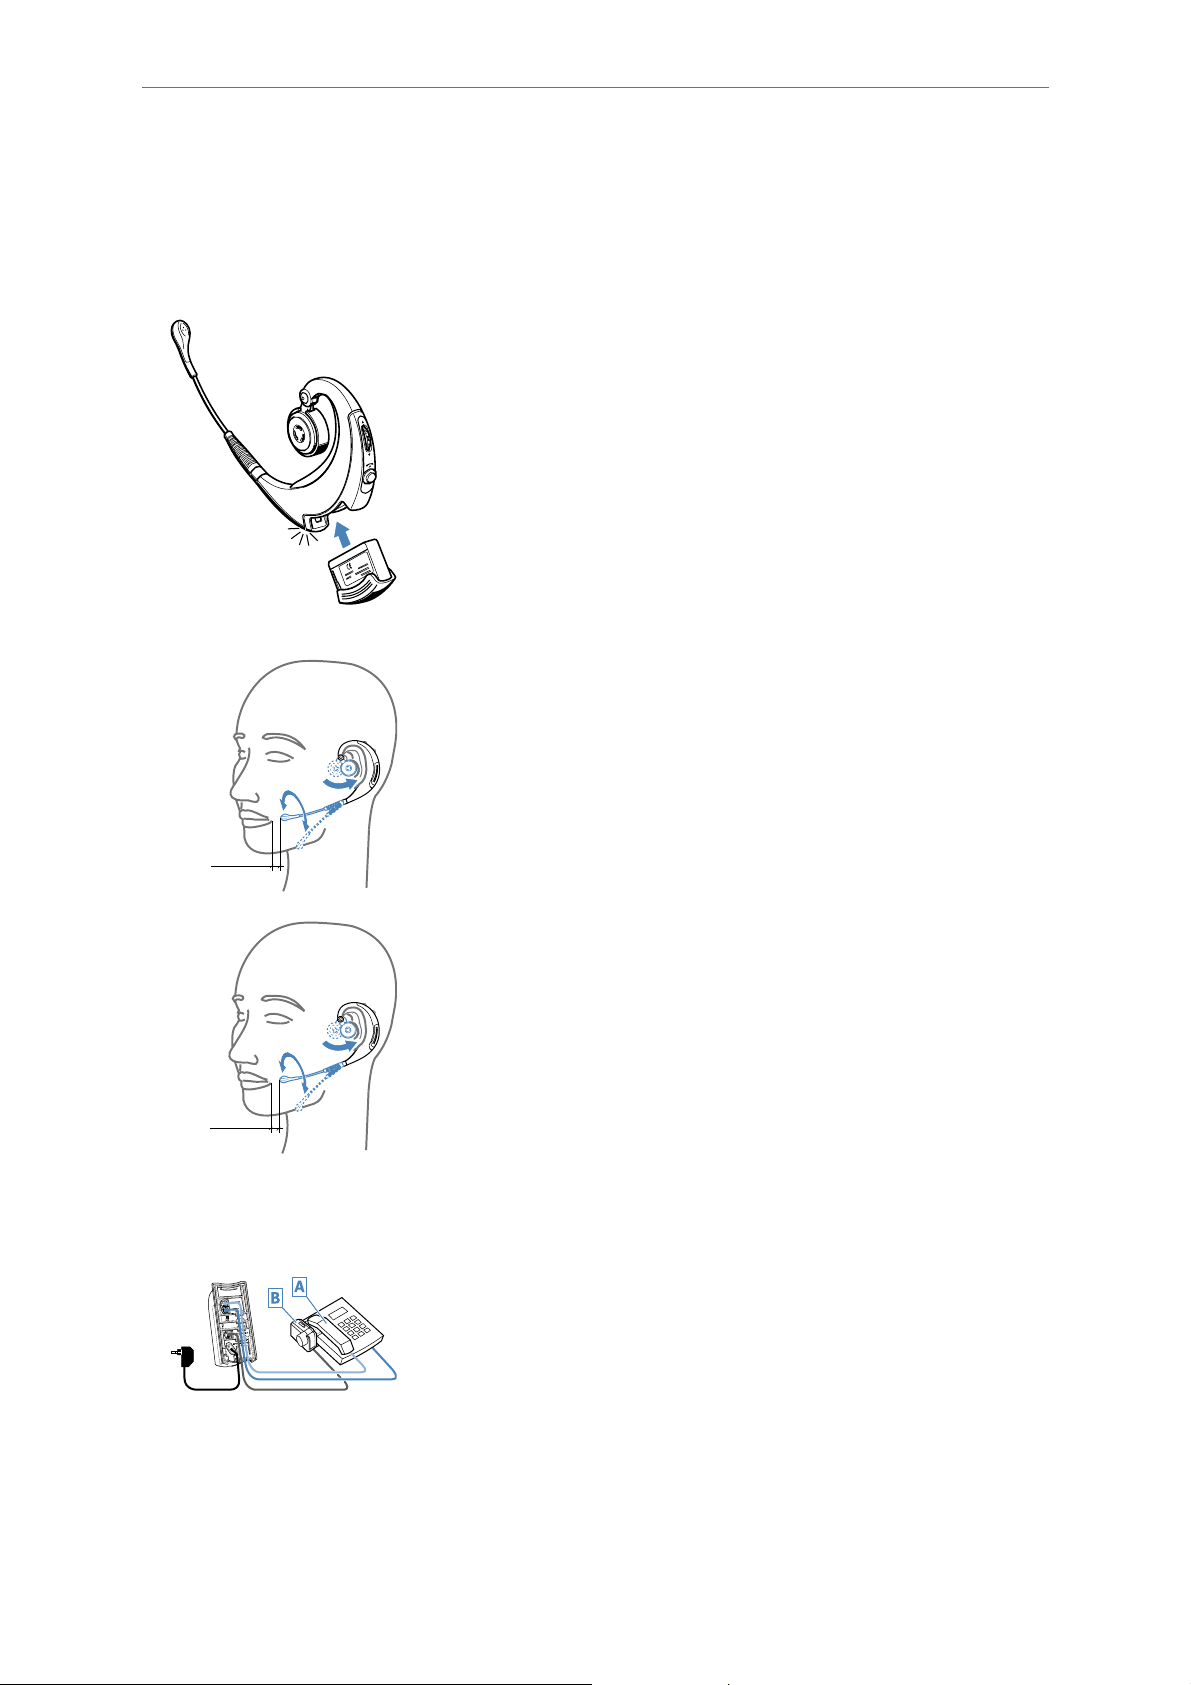
Setting up the BW 900 system
Setting up the BW 900 system
Setting up the headset
Inserting the battery into the headset
f Insert the battery into the headset’s battery compartment.
The headset LED flashes blue every 5 seconds to indicate that the
headset is in standby mode.
Note
If the headset is not switched on automatically, the battery is flat and
must be charged as described under “Charging the battery” on
page 18.
Adapting the headset to your ear
f Put the headset on. You can wear the headset on either the left or
right ear without changing the headset.
f Close the speaker housing so that the headset firmly fits your ear.
2 cm
2 cm
f Then adjust to your own comfort level by opening the housing just a
few millimetres.
Note:
If the pre-installed speaker adapter size “M” does not fit your ear,
clip on the smaller or larger one.
f Turn the microphone boom towards your mouth. The optimal mi-
crophone position is two cm from the corner of the mouth.
Setting up the base station
Connecting the base station to the office phone
f Disconnect the handset A from your office phone, but leave it on the
phone.
f Plug the free handset cable connector to the BW 900 HANDSET
socket .
f Connect the cable which is already connected to the base station
(PHONE socket ) to the office phone socket where the handset cable
was connected before.
f Connect the power supply to the DC IN socket and to the mains.
All LEDs light up for 2 seconds.
9
Page 10

Setting up the BW 900 system
Connecting a handset lifter to the BW 900 system (optional)
When connecting a Sennheiser Communications handset lifter (see
“Accessories” on page 24):
f Connect the handset lifter B to the ACCESSORIES socket .
f Install the microphone as described in the handset lifter manual.
f Attach the handset lifter to the phone as described in the handset
lifter manual.
Note:
The BW 900 system also supports handset lifters from manufacturers
other than Sennheiser Communications but you require an additional
interface (TCI 01, see “Accessories” on page 24).
If your office phone features an AEI or a DHSG interface, you do not require any mechanical handset lifter but only the TCI 01 interface:
f Connect the TCI 01 as described in the TCI 01 manual.
Testing the setup
f Make sure the headset is in standby mode and the base station is in
range (the headset LED flashes once every five seconds).
f Press the headset/handset switch to the “up” position
The connection to the handset is established.
f Pick up the handset from your office phone.
If a dial tone is heard in the handset, the system is connected properly.
If no dial tone is heard, please refer to the next section.
Testing the handset lifter setup (optional)
f Put the headset in the headset cradle and wait until the headset
charging LED lights up.
f Take the headset out of the headset cradle .
The headset LED flashes once every 5 seconds to indicate that the
headset is in standby mode.
f Press theheadset/handset switch to the “down” position
The connection to the headset can be established.
f Press either the headset hook button or the base station hook but-
ton .
A wireless link is established between the headset and the base sta-
tion. The handset lifter lifts off the handset automatically and the dial
tone is heard in the headset.
If no clear dial tone is heard, please refer to the next section.
10
Page 11

Setting up the BW 900 system
Adjusting the BW 900 to your office phone
To ensure optimum intelligibility, adjust the BW 900 system to your
phone as follows:
f Press the headset/handset switch to the “down” position.
The connection to the headset can be established.
f Put on the headset and adjust it for comfort.
f Press the headset hook button or the base station hook button .
A wireless link is established between the headset and the base sta-
tion.
f Pick up the phone handset from its cradle.
f Adjust the telephone adjustment switch so that the dial tone can
be heard loud and clear in the headset.
f Turn the microphone volume knob to position 1.
f Make a test call to someone while adjusting the microphone sensitiv-
ity.
f Speak to the other party by alternately using the handset (head-
set/handset switch is in the “up” position) and the headset (head-
set/handset switch is in the “down” position), always starting with
the handset.
f Turn the microphone volume knob so that the other party can hear
you at a comfortable level, whether you use the headset or the hand-
set.
4 Sec.
Connecting the headset to other Bluetooth devices (pairing)
The headset is capable of being paired with up to three Bluetooth devices:
• one base station (cannot be changed)
• one mobile phone (can be changed for another mobile phone)
• one PC or one PDA (can be changed for another PC or PDA, respectivly)
The Bluetooth devices must feature a “hands free profile” and “headset
profile”.
Note:
As soon as you pair for example a new mobile phone, the old mobile
phone is no longer detected. Certain features like redialling and voice
dialling are only possible if supported by the mobile device.
f Make sure the headset is turned on and placed close to your mobile
device.
f Set your mobile device to Bluetooth pairing mode (see the manual of
your mobile device).
f Press and hold down both the headset hook button and the multi
switch (in “push” direction) until the headset LED
starts flashing
blue and red alternately.
The headset is in pairing mode.
Note:
If pairing is not successful within 60 seconds, the headset returns
automatically to standby mode.
11
Page 12

Setting up the BW 900 system
f When your mobile device prompts a keyword, enter four zeros (0000).
When pairing was successful, the headset LED lights up blue 3
times. The headset acknowledges with a tone, and your mobile device
displays a message.
Note:
See also www.senncom.com/bw900 for pairing instructions for your
mobile device.
Connecting the BW 900 system to a PC (optional)
For multimedia purposes or voice over IP (internet telephony), the
BW 900 base station can be connected to a computer. There are two
ways to connect to a PC:
• Connecting via the PC sound card – no office phone connection:
you require a PC cable (see “Spare parts” on page 24)
• If you wish to connect via Bluetooth:
refer to “Connecting the headset to other Bluetooth devices” on page
11).
Please refer to the corresponding manual for setup information.
12
Page 13

Summary of settings
Summary of settings
Function Button(s) to be actuated See
switching the headset on/off press and hold down for 4 seconds the multi switch in
“push” direction
activating the headset set the headset/handset switch to its “down” position page 14
activating the office phone
handset
accepting an office phone call press the base station hook button or the headset hook
accepting a mobile device call press and hold down the headset hook button until a
making an office phone call press the base station hook button or the headset hook
making a mobile phone call press the headset hook button , then dial page 15
voice dialling (if supported by
your mobile device)
redialling the last number
(mobile device only)
terminating an office phone
call
terminating a mobile device
call
set the headset/handset switch to its “up” position page 14
button and lift the handset
confirmation beep is heard in the headset
button and lift the handset, then dial
press and hold down the headset hook button until a
confirmation beep is heard, then speak
quickly press the headset hook button two times page 16
press the base station hook button or the headset hook
button and hang up the handset
press the base station hook button or the headset hook
button
page 14
page 15
page 15
page 15
page 16
page 16
page 16
increasing the speaker volume
by one step
reducing the speaker volume
by one step
increasing the ring tone volume by one step
reducing the ring tone volume
by one step
muting the ring tone on a call
from the office phone
rejecting a call press the multi switch in “push” direction while the mo-
muting/unmuting the headset
microphone
starting the pairing mode press and hold both the multi switch
deactivating the adaptive volume adjustment
press the multi switch in “up” direction during the conversation
press the multi switch in “down” direction during the
conversation
press the multi switch in “up” direction while the phone
is ringing or in standby mode
press the multi switch in “down” direction while the
phone is ringing or in standby mode
press the multi switch in “push” direction – once muted,
the ring tone cannot be unmuted
bile device is ringing
press the multi switch in “push” direction during the
conversation
and the headset hook button for 4 seconds
press and hold the program button
and the base station hook button for 4 seconds
page 16
page 16
page 17
page 17
Page 22
page 22
page 22
page 23
page 22
13
Page 14

Basic settings
Basic settings
Switching the headset on/off
In the office it is not necessary to switch off the headset. If you do not
want to use the headset:
f Simply place the headset in the headset cradle and set the head-
set/handset switch to the “up” position.
The headset is deactivated. Your office phone works as usual with the
handset.
To switch off the headset (e.g. when taken away from the base station):
f Press and hold down the headset multi switch for approx. 4 sec-
onds until the headset LED flashes red three times to indicate that
the headset is switched off.
Note:
All settings are saved when the headset is switched off.
To switch the headset on, either:
f Place the headset in the headset cradle .
or:
f Press and hold the headset hook button for approx. 4 seconds until
the headset LED flashes blue three times to indicate that the head-
set is switched on. Then the headset LED flashes blue once every
5 seconds to indicate that the headset is in standby mode.
Switching the base station on/off
To switch the base station off:
f Unplug the power supply.
14
Page 15

Basic settings
Phoning
Accepting incoming calls
When you receive a call either via your office phone or via your mobile
device, you hear a ring tone in the headset. In addition, the headset
LED flashes quickly.
Note:
There are two different ring tone melodies:
• one ring tone melody for incoming calls from the office phone,
• another ring tone melody for incoming calls from the mobile device.
It is not possible to change the ring tone melody.
To accept the call:
f Press either the base station hook button or the headset hook but-
ton .
A wireless link is established between the headset and the base sta-
tion.
f If you receive a call via your office phone and no automatic handset
lifter is installed to your office phone, pick up the phone’s handset
manually. If an automatic handset lifter is installed, the handset lifter
picks up the handset automatically.
The link to the phone line is established.
f Start to talk.
Making calls with your office phone
f Press either the base station hook button or the headset hook but-
ton .
A wireless link is established between the headset and the base sta-
tion.
f If no automatic handset lifter is installed to your office phone, pick up
the phone handset manually.
If an automatic handset lifter is installed, the handset lifter picks up
the handset automatically.
The link to the phone line is established and the dial tone is heard.
f Dial the number and talk.
Making calls with your mobile device
f Press and hold down the headset hook button until a beep is heard
in the headset.
A wireless link is established between the headset and your master
mobile device.
f Dial the number and talk.
15
Page 16

Basic settings
Voice dialling
The voice dialling function must be supported by your mobile device.
Please refer to your mobile phone’s manual.
f Make sure the breaking-in of the voice dialling function is done with
the headset as the headset provides a better sound quality than most
mobile phone microphones do.
f Press and hold down the headset hook button until a confirmation
beep is heard.
f Say the name of the other party.
The mobile device dials the corresponding number automatically.
Redialling
Automatic redialling the last number is only possible with certain mobile
devices. Please refer to your mobile phone’s manual.
f Quickly press the headset hook button two times.
The last dialled number is redialled.
Terminating office phone calls
f Press either the base station hook button or the headset hook but-
ton . The wireless link between the headset and the base station is
terminated.
f If no automatic handset lifter is installed to your office phone, hang up
the phone’s handset manually. If an automatic handset lifter is in-
stalled, the handset lifter hangs up the handset automatically.
Terminating mobile phone calls
f Press the headset hook button . The wireless link between the head-
set and the mobile phone is terminated.
See your mobile phone manual whether your mobile phone terminates
the call automatically or you have to terminate the call manually.
Setting the volume
Use the multi switch to adjust the volume.
Setting the speaker volume
The adaptive volume adjustment function adjusts the volume automatically, e.g. when you enter or leave a noisy environment. If you take corrective action, the adaptive volume adjustment will memorize your
settings and apply them automatically next time.
The speaker volume can be adjusted between step 1 and step 9. The
factory setting is step 5. Your settings for your office phone and your
mobile device are saved independently.
16
Page 17

Basic settings
To manually increase the speaker volume:
f Push the multi switch in “up” direction during a conversation.
A confirmation beep is heard and the speaker volume is increased.
To manually decrease the speaker volume manually:
f Push the multi switch in “down” direction during a conversation.
A confirmation beep is heard and the speaker volume is decreased.
Changing the ring tone volume
The ring tone volume can be adjusted between step 1 and 9. The factory
setting is step 5. To be able to change the ring tone volume the headset
must be in standby mode or ringing.
To increase the ring tone volume:
f Push the multi switch in the “up” direction while the ring tone is
being heard in the headset.
One high frequency beep is heard in the headset. The ring tone volume
is increased by one step.
Note:
When the maximum volume is reached, two high frequency beeps are
heard.
To decrease the ring tone volume:
f Push the multi switch in the “down” direction while the ring tone is
being heard in the headset.
One low frequency beep is heard in the headset. The ring tone volume
is decreased by one step.
Note:
When the minimum volume is reached, two low frequency beeps are
heard.
Power management
How long does the battery last?
The battery life depends on the distance between headset and the base
station or mobile phone and corresponds to 4 to 5 hours of talk time.
To prevent the battery from running flat:
f Place the headset in the headset cradle when you are not using it.
The battery is recharged.
17
Page 18

Basic settings
Indications when the battery is about to run flat
When the battery is about to run flat:
• The hook LED flashes red three times every 15 seconds.
• The headset LED flashes red three times every 15 seconds.
• Three beeps are heard every 15 seconds, however, after three times
there is no further warning.
Note:
With every new connection either to the base station or to the mobile
phone the warning sequence will start again.
Charging the battery
Note:
If you charge the battery for the first time, allow charging for at least
4 hours without interruption.
To charge the battery in the headset:
f Place the headset in the headset cradle .
The headset charging LED lights up red to indicate that the battery
is being recharged. When recharging is complete, the headset charging
LED lights up blue.
To charge a second battery:
f Insert the battery in the spare battery charging slot .
The spare battery charging LED lights up red indicating the battery
is being recharged. When recharging is complete the spare battery
charging LED lights up blue.
Note:
When – after 2-3 years – the battery capacity is reduced significantly,
replace the battery with a new one.
Changing the battery during a call
If you have a second, fully charged battery, you can replace a flat battery
even during an office phone call as follows:
Note:
Do not take the battery out of the headset during a mobile device call
as this will interrupt the phone link immediately!
18
f Take the flat battery out of the headset.
The headset LEDHeadset LED goes off and the hook LED lights up
red indicating the headset is not received (out of range).
The call is briefly interrupted, however, the call is held by the base sta-
tion for 40 seconds.
f Take the fully charged battery out of the spare battery charging
slot and insert it into the headset.
The headset LEDHeadset LED flashes blue three times indicating the
headset is switched on. Subsequently the headset LEDHeadset LED
Page 19

Basic settings
flashes blue once every 5 seconds to indicate that the headset is in
standby mode and a ring tone is heard via the headset.
f Press the headset hook button .
The call is resumed.
f Insert the flat battery into the spare battery charging slot .
The spare battery charging LED lights up red to indicate that the
battery is being recharged.
If you leave the transmitting range
Telephoning is only possible in the Bluetooth transmitting range of the
base station or the mobile device, respectively. The transmitting range
depends largely on environmental conditions like wall thickness, wall
composition etc. With a free line of sight, the transmitting range of the
base station is up to 100 metres; the transmitting range of the mobile
device is up to 10 metres.
Position D
u
p
t
o
1
0
0
m
Position A
Position B
u
Position C
p
t
o
1
0
m
Indication
Headset is
in position
base station
hook LED
headset LED
Result
no telephoning via
A
B
is off
flashes blue once
every 5 seconds
mobile device
telephoning possible
via base station or
mobile device
no telephoning via
base station but only
via mobile device
no telephoning via
base station or mobile device
C
D
lights up red
constantly
flashes blue twice
every 5 seconds,
two high frequency
beeps are heard in
the headset every 10
seconds
We recommend to make a test call to another person in the same office
and to walk around during the call to find out if any areas are out of
range.
19
Page 20

Basic settings
Leaving/entering the transmitting range of the base station
If the headset leaves the base station transmitting range during a call:
• The sound quality deteriorates before the connection finally brakes
down.
• The hook LED lights up red constantly to indicate that the headset
is out of the base station range.
• The headset LEDHeadset LED flashes blue twice every 5 seconds
indicating that the headset is out of the base station range in standby
mode.
If you get back into range within 40 seconds, a ring tone is heard in the
headset. To resume the call:
f Press the headset hook button
.
Leaving/entering the transmitting range of the mobile device
If the headset leaves the mobile device transmitting range during a call:
• The sound quality deteriorates before the connection finally breakes
down.
• Your mobile device displays the loss of connection.
• Please refer to your mobile device’s manual to find out whether the
call is transferred to the mobile device automatically or requires an ac-
knowledgement to do so.
20
Page 21

Advanced settings
Advanced settings
Call management
Redialling
To redial the same number as in the mobile call before:
f Double press the headset hook buttonHeadset hook button .
The mobile device dials the same number as in the call before.
Note:
The redialling function works only with the mobile device. For further
information please refer to your mobile device’s manual.
Toggling between calls via office phone and via mobile phone
Toggling between calls via office phone and via mobile phone allows you
to quickly switch from one call to another.
f Press and hold the headset hook buttonHeadset hook button until
a beep is heard in the headset.
The current call is terminated automatically and the new call is ac-
cepted.
Note:
You can use the call waiting functions of your office and mobile phone
as usual.
Transferring calls between headset and phone
To transfer a call from your mobile device to the headset:
f Press and hold the headset hook buttonHeadset hook button until
a beep is heard in the headset.
To transfer a call from the headset to your mobile device:
f Switch off the headset (see page 14) or use the mobile phone to
transfer the call from the headset to the mobile phone.
To transfer a call from your office phone handset to the headset:
f Set the base station headset/handset switch to the “down” posi-
tion.
f Press either the base station hook buttonBase station hook button
or the headset hook buttonHeadset hook button .
To transfer a call from the headset to your office phone handset:
f Set the base station headset/handset switch to the “up” position.
21
Page 22

Advanced settings
Rejecting a call from the mobile device
f Press the multi switch in “push” direction.
Depending on the mobile device settings, the call is transferred to a
voice mailbox.
Note:
It is not possible to reject an office phone call. But you can mute the
ring tone as described in “Muting the ring tone” on page 22.
Muting
Muting/unmuting the headset microphone
To mute the headset microphone:
f Press the multi switch in “push” direction during a conversation.
On the base station, the mute LED lights up red constantly. A high
frequency beep is heard every 5 seconds in the headset.
To unmute the headset microphone:
f Press the multi switch in “push” direction.
On the base station the mute LED goes off. The beeping stops.
Muting the ring tone
To mute the ring tone in the headset:
f Press the multi switch in “push” direction while a ring tone is being
heard in the headset.
The ringing stops. However, you can still accept the call by pressing
the base station hook buttonBase station hook button or the head-
set hook buttonHeadset hook button .
Listening to an external audio source
To establish a link to a Bluetooth audio source:
f Pair the headset with the audio source as described unter “Connecting
the headset to other Bluetooth devices” on page 11.
f Use the audio source to establish a Bluetooth connection to the head-
set (the headset hook buttonHeadset hook button does not work
with external audio sources).
The headset accepts the audio signal automatically. The audio is heard
in the headset.
22
Note:
During the reception of a Bluetooth audio source the headset is unable
to detect or to make any call via your mobile or office phone!
To end the link to a Bluetooth audio source:
f Press the headset hook buttonHeadset hook button or use the
audio source to end the Bluetooth connection to the headset.
Page 23

Advanced settings
Activating/deactivating the adaptive volume adjustment
If you wish to deactivate the adaptive volume adjustment:
f Press and hold down the program button and additionally press the
base station hook buttonBase station hook button .
The hook LEDHook LED flashes red twice to indicate that the adap-
tive volume adjustment is deactivated.
If you wish to reactivate the adaptive volume adjustment:
f Press and hold the program button and additionally press the base
station hook buttonBase station hook button .
The hook LEDHook LED flashes blue twice indicating that the adap-
tive volume adjustment is activated.
Note:
If you get out of range of the base station, the adaptive volume ad-
justment is activated!
Pairing
4 Sec.
Upon delivery, the headset and the base station are already paired , i.e.
they automatically recognize each other and do not interfere with other
Bluetooth devices. You do not have to pair them again.
However, if you have to replace the headset with a new one, e.g. because
it is damaged, the base station will not recognize the new headset unless
they are paired as follows:
f Press the program button quickly two times.
The base station is set to pairing mode. The hook LEDHook LED
flashes blue.
f Press and hold down for 4 seconds the headset hook buttonHeadset
hook button and the multi switch .
The headset LEDHeadset LED lights up blue and red and then
flashes blue to indicate that the headset is in pairing mode.
Note:
If pairing is not successful within 60 seconds, the headset returns to
standby mode.
The pairing process starts automatically. When pairing has been successful, the blinking stops and the headset LEDHeadset LED and the base
station hook LED quickly flash blue three times.
23
Page 24

Maintenance and care
Resetting the BW 900 system
In order to reset the system to the factory setting:
f Pair the base station and the headset (see “Pairing” on page 23)
All learning memory values and all volume settings are reset to the
factory setting.
Maintenance and care
If you do not want to use the headset for a longer time:
f Set the headset/handset switchHeadset/handset switch to the
“up” position.
You can still use your office phone as usual.
To clean the components of the system:
f Use a dry cloth only. Do not use any solvents or cleansing agents.
Spare parts
• Headset
• Base station
• Rechargeable battery
• Power supply (AUS, EU, UK, US)
• Ear pad, foam
• Ear pad for headband, leather-like
• Quick Guide
• CD with manual as a PDF file
• Microphone windscreen
Accessories
• PC cable
• Handset lifter including a ring tone detection microphone unit
• Adjustment ring set – 3 sizes S, M and L
• Headband
• TCI 01 “Telephone Controlling Interface” for phones featuring an AEI or
DHSG interface
• Cable extension kit (to increase the distance between the office phone
and the base station).
• Long handset/phone connection cable (2.5 m)
• Long handset connection cable
• PC cable RJ 11 with two 3.5 mm jack plugs (2.5 m)
24
Page 25

Specifications
Specifications
Overall system
Host phone compatibility with all types of business phones which comply
with the RF immunity standard IEC CISPR24/EN55024.
Indoor operating range (depending on the environment) up to 100 m
Operating range with free line of sight up to 150 m
Temperature range for use 10 °C (50 °F) to 40 °C (104 °F)
Headset
Charging time of rechargeable battery approx. 3 h
Talking time approx. 4.5 h
Transmitting power p
Weight (incl. battery) approx. 26 g
<100 mW (20 dBm) EIRP
A
Manufacturer declarations
Warranty regulations
The guarantee period for this Sennheiser product is 24 months from the
date of purchase. Excluded are accessory items, rechargeable or disposable batteries that are delivered with the product; due to their characteristics these products have a shorter service life that is principally
dependent on the individual frequency of use.
The guarantee period starts from the date of original purchase. For this
reason, we recommend that the sales receipt be retained as proof of
purchase. Without this proof (which is checked by the responsible
Sennheiser service partner) you will not be reimbursed for any repairs
that are carried out.
Depending on our choice, guarantee service comprises, free of charge, the
removal of material and manufacturing defects through repair or
replacement of either individual parts or the entire device. Inappropriate
usage (e.g. operating faults, mechanical damages, incorrect operating
voltage), wear and tear, force majeure and defects which were known at
the time of purchase are excluded from guarantee claims. The guarantee
is void if the product is manipulated by non-authorised persons or repair
stations.
In the case of a claim under the terms of this guarantee, send the device,
including accessories and sales receipt, to the responsible service partner.
To minimise the risk of transport damage, we recommend that the
original packaging is used. Your legal rights against the seller, resulting
from the contract of sale, are not affected by this guarantee.
The guarantee can be claimed in all countries outside the U.S. provided
that no national law limits our terms of guarantee.
CE Declaration of Conformity
This equipment is in compliance with the essential requirements and
other relevant provisions of Directives 1999/5/EC, 89/336/EC or 73/
23/EC.
Before putting the device into operation, please observe the respective
country-specific regulations!
25
Page 26

Manufacturer declarations
FCC statements
Warning!
Changes or modifications made to this equipment not expressly approved by Sennheiser Communications may void the FCC authorization to
operate this equipment.
This device complies with Part 15 of the FCC Rules and with RSS-210 of
Industry Canada.
Operation is subject to the following two conditions:
• this device may not cause harmful interference, and
• this device must accept any interference received, including interfer-
ence that may cause undesired operation.
The radiated output power of the BW 900 system is far below the FCC
radio frequency exposure limits. Nevertheless, the BW 900 system shall
be used in such a manner that the potential for human contact during
normal operation is minimized.
Batteries or rechargeable batteries
The supplied batteries or rechargeable batteries can be recycled. Please
dispose of them as special waste or return them to your specialist dealer.
In order to protect the environment, only dispose of exhausted batteries.
WEEE Declaration
Your Sennheiser product was developed and manufactured with high
quality materials and components which can be recycled and/or reused.
This symbol indicates that electrical and electronic equipment must be
disposed of separately from normal waste at the end of its operational
lifetime.
Please dispose of this product by bringing it to your local collection point
or recycling centre for such equipment. This will help to protect the
environment in which we all live.
26
Page 27

Index
Index
accepting incoming calls 15
accessories 24
ActiveGard™ 5
adaptive intelligence 5
activating 23
deactivating 23
battery
battery life 17
changing during a call 18
charging 18
indications when the battery
runs flat 18
inserting into headset 9
Bluetooth 11
transmitting range 19
call
accepting 15
making with mobile phone
15
making with office phone 15
rejecting 22
terminating 16
toggling between calls 21
transferring between headset
and phone 21
cleaning 24
functions
summary 13
handset lifter 9, 10, 15, 16
headset
switching off 14
switching on 14
headset button 7
hook button
base station 7
headset 7
intended use 4
LED
headset charging LED 7
hook LED 7
mute LED 7
on headset 7
spare battery charging LED 7
making calls with a mobile
phone 15
making calls with the office
phone 15
microphone
muting 22
microphone sensitivity
adjustment knob 7
multi-switch 7
muting
headset microphone 22
ring tone 22
office phone 10
connection to base station 9
pairing
headset with base station 23
headset with Bluetooth
device 11
PC 11
phoning 15
programme button 7
putting out of operation 24
redialling 16, 21
resetting 24
ring tone
muting 22
ring tone volume
changing 17
safety 4
socket
ACCESSORIES 7
HANDSET 7
PHONE 7
spare battery
charging slot 7
speaker volume
changing 16
switching on/off
headset 14
Switching on/off
headset 14
telephone adjustment switch 7
testing 10
toggling between calls 21
transmitting range 19
(re-) entering 20
leaving 20
of mobile phone 20
voice dialling 16
volume
of ring tone 17
of speaker 16
27
 Loading...