

Page 1
VMX
Instruction Manual
Bedienungsanleitung
Notice d‘emploi
Istruzioni per l‘uso
Instrucciones de uso
Manual de utilização
Betjeningsvejledning
Bruksanvisning
Bruksanvisning
Gebruiksaanwijzing
OFFICE
Page 2

Page 3

English
Deutsch
Français
Italiano
Español
Portugues
Dansk
Svenska
Norsk
Nederlands
Page 4

Page 5

Contents
Features ................................................................................................................................... 3
Delivery includes ................................................................................................................... 4
Operating elements .............................................................................................................. 5
Headset ................................................................................................................................ 5
Base Station ........................................................................................................................ 5
Button overview .................................................................................................................... 6
Buttons on the headset .................................................................................................... 6
Buttons on the base station ............................................................................................ 6
Setting up ............................................................................................................................... 7
Connecting the base station to the mains ........................................................................ 7
Connecting the base station to a fixed line phone ......................................................... 7
Type 1:
Connecting the base station to a fixed line phone with a headset socket ............ 7
Type 2:
Connecting the base station to a usual fixed line phone .......................................... 8
Type 3:
Connecting the base station to a fixed lined DHSG phone ........................................ 8
Connecting the base station to a computer ..................................................................... 9
Connecting the base station to the headphone output and the microphone
input socket of a computer sound card ........................................................................ 9
Connecting the base station with UUSB 7 socket to the computer sound card ..... 10
Connecting the base station to a USB socket of a computer .................................... 10
Connecting a handset lifter to the base station (optional) ........................................ 11
Adjusting to your fixed line phone .................................................................................. 12
Limiting the speaker volume ............................................................................................. 13
Pairing the headset ............................................................................................................. 13
Pairing to a mobile phone .............................................................................................. 13
Pairing to other Bluetooth devices .............................................................................. 14
Operating .............................................................................................................................. 14
Charging the headset .......................................................................................................... 14
1. Charging in the base station charging slot ............................................................ 15
2. Charging with the VMX OFFICE car charger unit ................................................... 15
3. Charging with a USB socket ...................................................................................... 15
4. Charging with the USB wall plug available as an accessory ............................... 15
English
1
Page 6

English
Wearing the headset .......................................................................................................... 15
Switching on/off .................................................................................................................. 16
Switching the headset on .............................................................................................. 16
Switching the headset off .............................................................................................. 16
Switching the base station off ...................................................................................... 16
Switching the base station on ...................................................................................... 16
Basic telephoning ................................................................................................................ 16
Accepting a call via the base station ........................................................................... 16
Accepting a mobile phone call ...................................................................................... 17
Making a call via the base station ................................................................................ 17
Making a call with the mobile phone or Bluetooth device ...................................... 17
Redialling with the mobile phone ................................................................................ 17
Voice dialling .................................................................................................................... 17
Ending a call via the base station ................................................................................. 18
Ending a mobile phone call ............................................................................................ 18
Advanced call management .............................................................................................. 18
Toggling between calls via fixed line phone and mobile phone and
vice versa ........................................................................................................................... 18
Rejecting a call from the mobile phone or Bluetooth device .................................. 18
Transferring an ongoing call from the mobile phone to the headset ................... 18
Transferring a call from the headset to the mobile phone ..................................... 19
Listening to an external audio source ......................................................................... 19
If you leave the transmission range ................................................................................ 19
Changing the speaker volume .......................................................................................... 20
Changing the ring tone volume ........................................................................................ 20
Muting/un-muting the headset microphone ................................................................. 20
Activating/deactivating the adaptive volume adjustment ........................................ 21
Pairing to the base station ................................................................................................ 21
Restoring factory settings ................................................................................................. 21
Maintenance and care ........................................................................................................ 22
Accessories ........................................................................................................................... 22
If problems occur ... ............................................................................................................ 22
Specifications ....................................................................................................................... 22
Manufacturer declarations ............................................................................................... 23
2
Page 7

Features
Headset features
• VoiceMax™ Dual Microphone technology
• Adaptive Intelligence: automatically
compensating for ambient noise and
“remembering” the user‘s preferred
settings
• 3D ball joint for individual wearing
comfort
• Automatic power off/on when microphone arm is closed/opened
• ActiveGard™ protection against
acoustic shocks
• Bluetooth 2.0: compatible with all
Bluetooth 1.1, 1.2 and 2.0 devices that
support the “hands free” or “headset”
profile
• Supports eSCO (extended Synchronous Connections) improving the
sound quality of the Bluetooth audio
link
• Security: 128-bit digital encryption
• Up to five hours talk time
• Up to 100 hours stand-by time
• Charging directly from your PC and car
adapter
• Superior Sennheiser audio quality
• Two way speaker for choice of left/
right side wearing
• Steel mesh protected speaker unit
• Extremely lightweight and comfortable (15 grams)
• Small microphone boom impairs
neither the user's freedom of movement nor his or her field of vision
Base Station features
• Dual connectivity technology (phone
and PC)
• PC USB interface (accessory cable not
included)
• Direct DHSG fixed line phone support
• AEI phone support via TCI 01 interface
(not included)
• Direct handset lifter support
• Automatic handset switching when
headset is charging
More room to move
The VMX OFFICE system is a Class 2
mobile phone and Bluetooth device
supporting the Bluetooth 2.0 standard.
It provides long-range operation and
maximum compatibility. With the base
station connected to your fixed line
phone and PC, you can roam around the
building up to a distance of 30 m. Additionally, you can move up to 10 metres
away from your Bluetooth-enabled
devices such as mobile phones, PCs and
PDAs.
English
3
Page 8

English
Optimum connectivity
The Bluetooth interface allows the VMX
OFFICE system to be connected to
several devices. Whether you are using a
mobile phone or other phone types such
as smart phones or soft phones – the
VMX OFFICE system is compatible with
all types of speech-based mobile phone
and Bluetooth devices.
The user-friendly pushbutton interface
provides for seamless changeover
between your mobile phone or any Bluetooth device connected, respectively,
and your fixed line phone or PC, respectively, that is connected via the base
station.
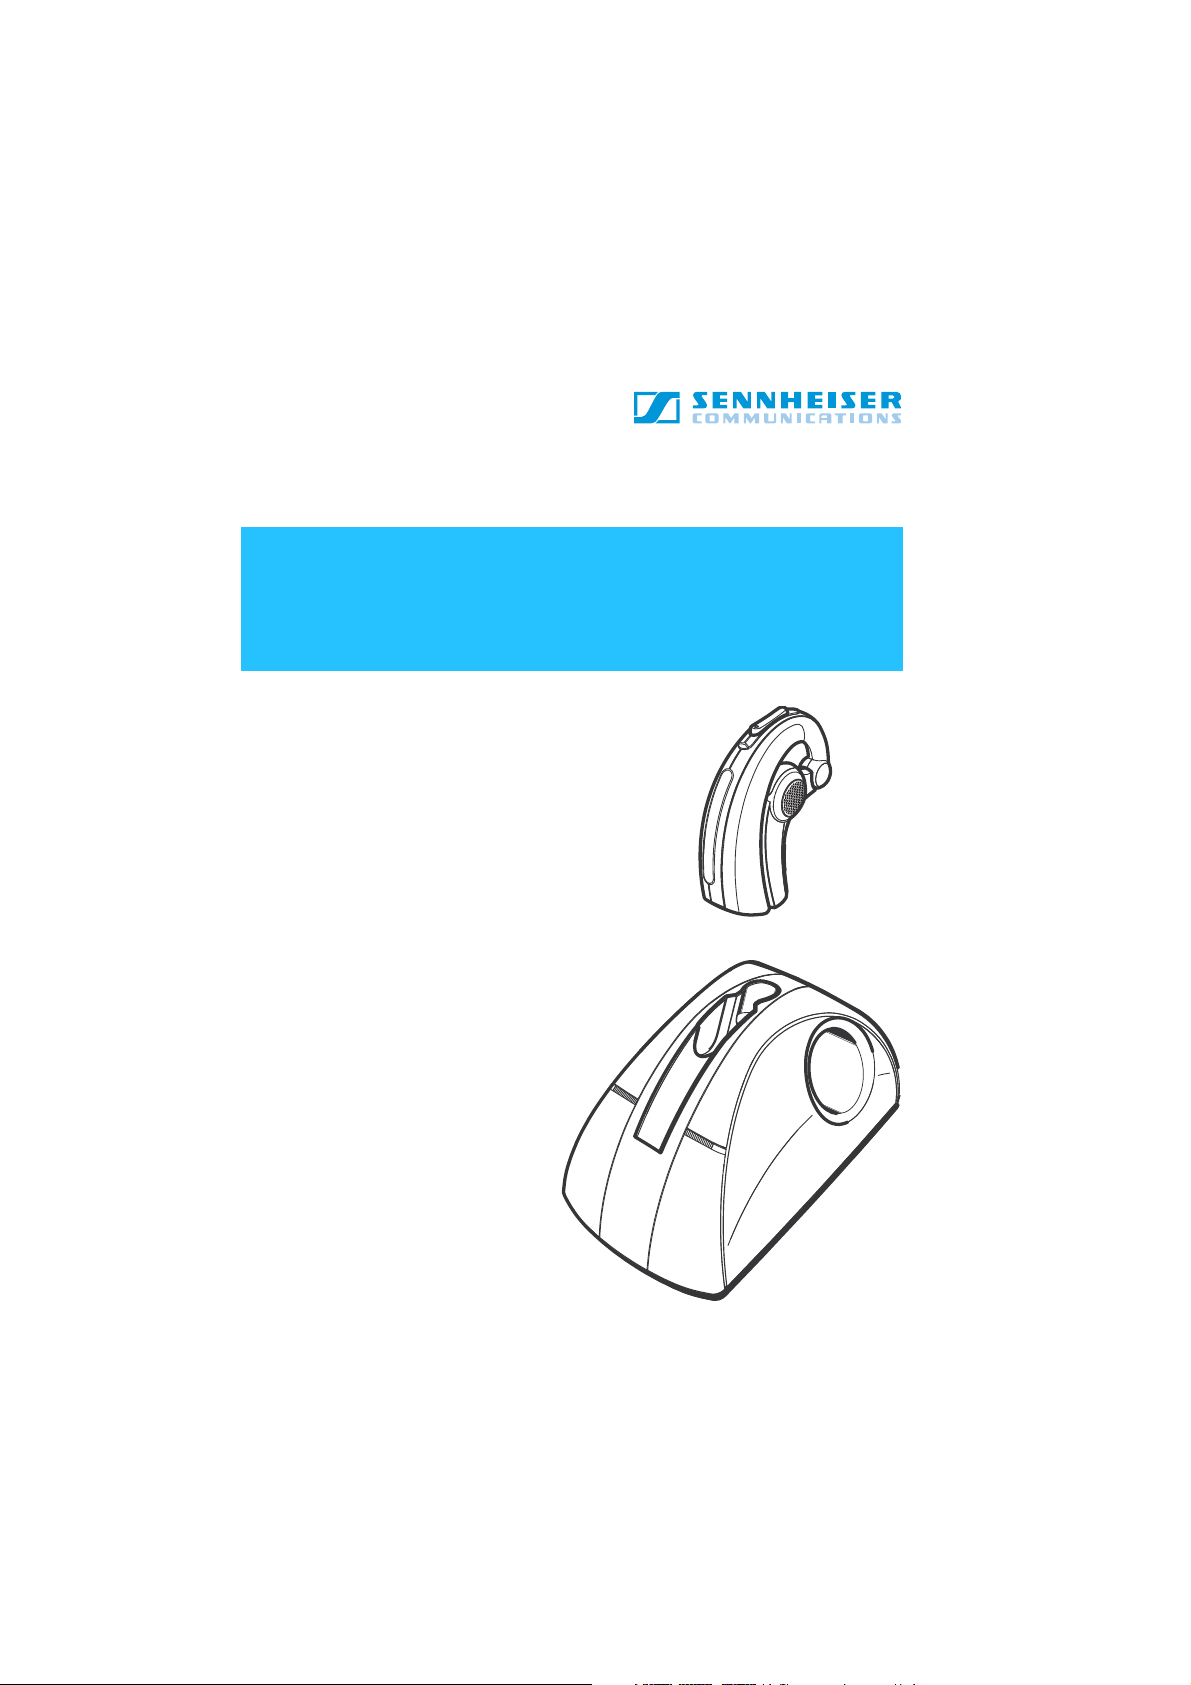
Delivery includes
1 VMX Bluetooth headset with built-in
rechargeable Li-polymer battery
1 VMX OFFICE base station
1 phone connecting cable (already
plugged to the base station)
1 base station power supply
1 USB charging cable
1 car charger unit
1 Quick Setup Guide
1 CD with detailed Instruction Manual
4
Page 9
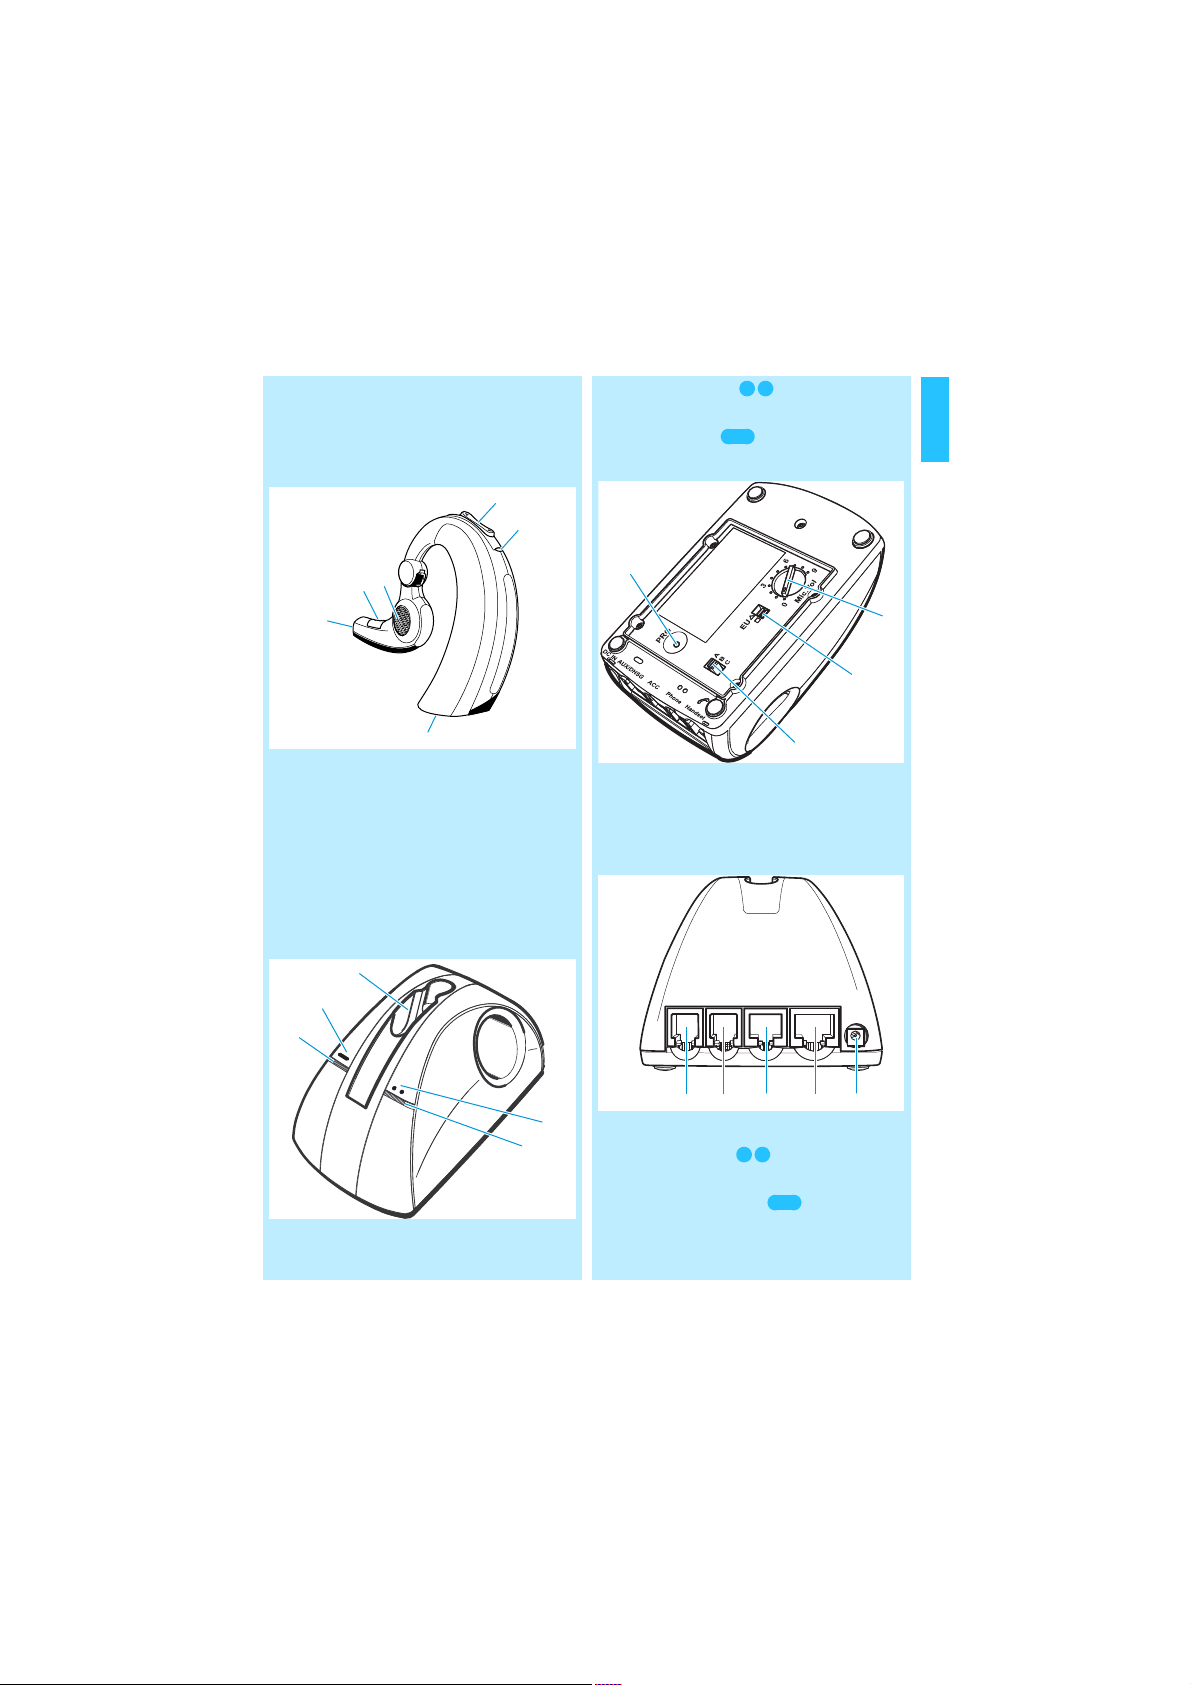
Operating elements
햵
햶
햷
햲
햳
햴
쐃
쐄
쐏
쐇
쐋
Headset
햲 volume button
햳 headset LED
햴 socket for power supply
햵 microphone boom
햶 hook button
햷 speaker
Base Station
쐇 PHONE button
쐋 PHONE LED
쐏 AUX button
쐄 AUX LED
쐎
쐊
쐂 microphone volume control
쐆 EU switch
쐊 ABC switch
쐎 PROGRAM button
English
쐂
쐆
쐃 charging slot
쐅
쐅 HANDSET socket
쐈 PHONE socket
쐉 ACC socket
씈 AUX/DHSG socket
씉 DC IN socket
씈쐈쐉 씉
5
Page 10

English
Button overview
Buttons on the headset Buttons on the base station
Button Function Page
microphone
boom 햵
hook
button 햶
volume
button 햲
volume
button 햲
+ microphone
boom 햵
switch the headset
on or off
accept incoming call 16
end a call 18
accept incoming call 16
reject a call 18
end a call 18
transfer a call from the
mobile phone to the
headset
activate redialling 17
activate voice dialling 17
mute the microphone 20
un-mute the microphone 20
change the speaker
volume
change the ring tone
volume
un-mute the microphone 20
enter pairing mode 13
16
18
20
20
Button Function Page
PHONE
button 쐇
()
AUX
button 쐏
()
activate connection to
the device connected to
the PHONE socket 쐈
(usually fixed line
phone)
activate connection to
the device connected to
the AUX/DHSG socket 씈
(e.g. PC for VoIP)
16
6
Page 11

Setting up
씉
Upon delivery, the headset and the base
station are pre-paired together. You just
have to:
1. connect the base station to the mains
2. connect the base station to your
fixed line phone and/or PC
3. pair the headset to your mobile
phone.
Connecting the base station to
the mains
왘 Connect the power supply to the
DC IN socket 씉 and to the mains.
All LEDs light up for 2 seconds.
Connecting the base station to
a fixed line phone
There are three different types of fixed
line phones:
1. fixed line phones with headset socket
2. usual fixed line phones
3. fixed lined phones featuring a DHSG
interface
Type 1:
Connecting the base station to a fixed
line phone with a headset socket
쐈
If there is a dedicated headset socket at
your phone, it should be used.
Please refer to your fixed lined
phone manual to find out which
socket should be used for connecting.
왘 Connect the cable which is already
connected to the base station
(PHONE socket 쐈) to the fixed line
phone headset socket.
To test the phone connection:
왘 Pick up the handset.
If the dial tone is heard in the handset, the system is connected properly.
If no dial tone is heard, please refer to
“Adjusting to your fixed line phone”
on page 12.
English
7
Page 12

English
쐅
쐈
씈
Type 2:
Connecting the base station to a usual
fixed line phone
왘 Disconnect the handset from your
fixed line phone, but leave it on the
phone.
왘 Plug the free handset cable connector
to the base station HANDSET
socket 쐅.
왘 Connect the cable which is already
connected to the base station
(PHONE socket 쐈) to the fixed line
phone socket where the handset
cable was connected before.
To test the phone connection:
왘 Pick up the handset.
If the dial tone is heard in the handset, the system is connected properly.
If no dial tone is heard, please refer to
“Adjusting to your fixed line phone”
on page 12.
Type 3:
Connecting the base station to a fixed
lined DHSG phone
왘 Connect the accessory cable (RJ 45
DHSG cable, not included) to the
AUX/DHSG socket 씈 and to the DHSG
phone.
To connect special phones
with call control please ask
your service partner.
To test the phone connection:
왘 Make sure the base station AUX
LED 쐄 is on. If not:
Press the AUX button 쐏 ().
The AUX LED 쐄 is on now.
왘 Put on the headset.
왘 On the headset, press the hook
button 햶.
If the dial tone is heard in the handset, the system is connected properly.
If no dial tone is heard, please refer to
“Adjusting to your fixed line phone”
on page 12.
8
Page 13

Connecting the base station to
씈
쐈
a computer
For multimedia purposes or voice over IP
(internet telephony) you can connect
the VMX OFFICE system to a computer.
There are two ways to connect to a
computer:
1. If your computer features a Bluetooth
interface, you can connect the
headset directly via Bluetooth as
described in “Pairing to other Bluetooth devices” on page 14. In this
case you do not require the base
station for VoIP.
2. Connecting the Base Station:
– either to two 3.5 mm jack sockets
of a usual sound card
– or via UUSB 7 to a special sound
card
– or via USB. This is the only connec-
tion that allows to make and
accept calls with a mouse-click, i.e.
without having to press any button
(this requires a VoIP call control
software).
Connecting the base station to the
headphone output and the microphone
input socket of a computer sound card
왘 Connect the RJ 9 plug of the acces-
sory cable (not included):
– to the AUX/DHSG socket 씈 if you
use a usual fixed line phone or no
phone at all
– to the PHONE socket 쐈 if you use a
DHSG phone
왘 Connect the cable with 3.5 mm jack
plugs to the RJ 45 plug of the accessory cable (not included).
왘 Connect the 3.5 mm jack plugs to the
green headphone output socket and
the red microphone input socket
To test the PC connection:
Before testing make sure
the PC works accordingly.
왘 Make sure the base station AUX
LED 쐄 is on. If not:
Press the AUX button 쐏 ().
The AUX LED 쐄 is on now.
왘 Put on the headset.
왘 Play a sound file on the PC.
왘 On the headset, press the hook
button 햶.
If the sound file is heard in the headset, the system is connected properly.
If no sound file is heard, please refer
to “Adjusting to your fixed line
phone” on page 12.
English
9
Page 14

English
USB
씈쐈
Connecting the base station with
UUSB 7 socket to the computer sound
card
UUSB 7
씈
왘 Connect the RJ 9 plug of the acces-
sory cable (not included):
– to the AUX/DHSG socket 씈 if you
use a usual fixed line phone or no
phone at all
– to the PHONE socket 쐈 if you use a
fixed line DHSG phone
왘 Connect the cable with the UUSB 7
plug to the RJ 45 plug of the accessory cable (not included).
왘 Connect the UUSB 7 plug to the
UUSB 7 socket of the computer sound
card.
To test the PC connection
Before testing make sure
the PC works accordingly.
왘 Make sure the base station AUX
LED 쐄 is on. If not:
Press the AUX button 쐏 ().
The AUX LED 쐄 is on now.
왘 Put on the headset.
왘 Play a sound file on the PC.
왘 On the headset, press the hook
button 햶.
If the sound file is heard in the headset, the system is connected properly.
If no sound file is heard, please refer
to “Adjusting to your fixed line
phone” on page 12.
Connecting the base station to a
USB socket of a computer
쐈
왘 Connect the RJ 9 plug of the acces-
sory cable (not included):
– to the AUX/DHSG socket 씈 if you
additionally connect a usual fixed
line phone or no phone at all
– to the PHONE socket 쐈 if you addi-
tionally connect a fixed line DHSG
phone
왘 Connect the cable with the USB plug
to the RJ 45 plug of the accessory
cable (not included):
왘 Connect the USB plug to a USB socket
of the computer.
왘 Install the Sennheiser call control
software as described in the
Sennheiser call control software
manual.
10
Page 15

To test the PC connection:
HSL 10
쐉
Before testing make sure
the PC works accordingly.
왘 Make sure the base station AUX
LED 쐄 is on. If not:
Press the AUX button 쐏 ().
The AUX LED 쐄 is on now.
왘 Put on the headset.
왘 Dial up a contact with your VoIP soft-
phone.
왘 On the headset, press the hook
button 햶.
왘 Have a conversation via the headset.
왘 End the call by pressing the hook
button 햶 on the headset.
If the communication stops and the
VoIP softphone ends the call, the
system is connected properly.
If the communication does not stop
or the VoIP softphone does not end
the call, please refer to the Sennheiser call control software manual.
Connecting a handset lifter to
the base station (optional)
When connecting a Sennheiser Communications handset lifter (e.g. HSL 10, see
“Accessories” on page 22):
왘 Connect the handset lifter to the
ACC socket 쐉.
왘 Install the microphone as described in
the handset lifter manual.
왘 Attach the handset lifter to the
phone as described in the handset
lifter manual.
왘 Connect the TCI 01 as described in the
TCI 01 manual.
To test the handset lifter setup:
왘 Close and then open the microphone
boom 햵.
The headset LED 햳 flashes once
every 5 seconds to indicate that the
headset is in standby mode.
왘 Press the PHONE button 쐇 ().
The connection to the headset can be
established.
왘 Press either the hook button 햶 or
the PHONE button 쐇 ().
A wireless link is established between
the headset and the base station.
The handset lifter lifts off the handset automatically and the dial tone is
heard in the headset.
왘 If no clear dial tone is heard, please
refer to “Manufacturer declarations”
on page 23.
English
11
Page 16

English
Adjusting to your fixed line
phone
To ensure optimum intelligibility, adjust
the VMX OFFICE system to your phone as
follows:
왘 Press the PHONE button 쐇 ().
왘 Wait until the PHONE LED 쐋 lights up
blue.
The headset is recognised.
왘 Put on the headset.
왘 Press the hook button 햶.
A wireless link is established between
the headset and the base station.
왘 Pick up the phone handset.
왘 Adjust the ABC switch 쐊 so that the
dial tone can be heard loud and clear
in the headset.
왘 Turn the microphone volume
control 쐂 to position 1.
왘 Make a test call to someone while
adjusting the microphone sensitivity.
왘 Speak to the other party by alter-
nately using the handset and the
headset:
– Start with the handset.
– Switch between the both by press-
ing the PHONE button 쐇 ().
When the handset is activated the
PHONE LED 쐋 is lit constant blue.
When the headset is activated the
PHONE LED 쐋 blinks blue.
쐊쐊
Mic.Vol.
왘 Turn the microphone volume
control 쐂 so that the other party can
hear you at a comfortable level,
whether you use the headset or the
handset.
왘 Hang up the phone and press either
the headset hook button 햶 or the
PHONE button 쐇 ().
12
Page 17

Limiting the speaker volume
The VMX OFFICE allows you to limit the
speaker volume of the headset to comply with EU Directive 2003/10/EC.
쐆
왘 Push the EU switch 쐆 in the desired
position:
– : The speaker volume is not
reduced.
– : When telephoning via the base
station, the speaker volume is
reduced. Even if you set the volume
at maximum, the volume will never
exceed 85 dB (A) per day as a
time-weighted average
which is in compliance with the
EU Noise Directive
1)
The time-weighted average value is based
on a breakdown of a typical working day
and measured as the sound pressure level
with a B&K HATS (Head and Torso Simulator).
2)
EU Directive 2003/10/EC on the minimum
health and safety requirements regarding
the exposure of workers to the risks arising
from physical agents (noise).
1)
value,
2)
.
Pairing the headset
Upon delivery, the headset and the base
station are pre-paired together. You can
pair the headset to:
• a mobile phone
• or a similar device with a Bluetooth
“handsfree” or “headset” profile
Pairing means forming a pair
of devices by establishing a
trusted relationship. This has
to be done only once.
Connecting means establish-
ing a certain Bluetooth connection to the paired device.
This is done each time you
make or receive a call.
Once you have paired and connected to
a Bluetooth device, the headset will
remember this setting and automatically try to connect to the last used
device every time you open the boom
arm.
• If last connected to a base station, the
headset will try to connect to a base
station when the boom arm is opened
the next time.
• After a firmware update, the headset
will automatically connect to a base
station.
Pairing to a mobile phone
왘 Make sure the headset is switched on
and placed close to the mobile phone.
왘 Enter the pairing mode by opening
the microphone boom 햵 while pressing the volume button 햲 at the same
time.
English
13
Page 18

English
The headset LED 햳 flashes alternately in red and blue to indicate that
the headset is in the pairing mode.
왘 On the mobile phone, start a search
for Bluetooth devices (see the
manual of your mobile phone) and
follow any instructions displayed on
the mobile phone display.
왘 Once the headset is detected by the
mobile phone, select “VMX”.
When the Bluetooth connection is
successfully established, the headset
is identified as “VMX OFFICE” in the
mobile phone display.
왘 When the mobile phone prompts a
keyword, enter four zeros (0000).
If pairing was successful, the headset
LED 햳 flashes slowly in blue.
Once paired, the mobile phone is able to
transfer the call audio to the headset –
either automatically or manually (please
see the mobile phone manual whether
the call audio is transferred automatically or manually). Most mobile phones
show a headset symbol in their display,
if successfully connected.
Pairing to other Bluetooth devices
If you wish to pair the headset to other
Bluetooth devices, please see the Bluetooth device manual.
Operating
Charging the headset
Charging the Headset for the first time,
allow to charge for at least two hours
without interruption. Later, 1½ hours is
enough to fully charge the battery.
A fully charged headset provides a talk
time of up to five hours or a stand-by
time of up to 100 hours.
When the battery is about to run flat:
• The headset LED 햳 flashes red.
• Three beeps are heard in the headset
every 30 seconds (3x).
• Less than five minutes of talk time are
left.
There are four ways to charge the
battery in the headset:
1. In the base station charging slot 쐃.
2. With the VMX car charger unit.
3. With any USB socket of a computer.
14
Page 19

4. With the USB wall plug available as
an accessory.
If the battery is completely drained, the
headset LED 햳 flashes red in the beginning of the charging process. During
charging, the headset LED 햳 lights up
red. When charging is complete, the
headset LED 햳 lights up blue.
1. Charging in the base station charging
slot
왘 Take off the headset and close the
microphone boom 햵.
The headset is switched off.
왘 Put the headset in the charging
slot 쐃.
The headset LED 햳 lights up red.
When you leave the headset on while it is being
charged, the headset
remains connected to the
base station.
When a call comes in via
the base station, just
remove the charging cable.
The headset will be ready
immediately to answer the
call.
2. Charging with the VMX OFFICE car
charger unit
왘 Take off the headset.
왘 Connect the small plug of the USB
charging cable to the socket for
power supply 햴.
왘 Connect the USB plug of the USB
charging cable to the USB socket of
the VMX car charger unit.
왘 Connect the car charger unit to the
cigarette lighter in the car.
English
3. Charging with a USB socket
왘 Take off the headset.
왘 Connect the small plug of the USB
charging cable to the socket for power
supply 햴.
왘 Connect the USB plug of the USB
charging cable to a USB socket of a
computer.
4. Charging with the USB wall plug
available as an accessory
왘 Take off the headset.
왘 Connect the small plug of the USB
charging cable to the socket for power
supply 햴.
왘 Connect the USB plug of the USB
charging cable to the USB socket of
the power supply
왘 Connect the power supply to the
mains.
Wearing the headset
왘 Open the microphone boom 햵.
The headset is turned on. The headset LED 햳 starts flashing slowly in
blue.
왘 Put the headset on. The headset can
be worn on either the left or right ear.
왘 Turn the microphone boom 햵
towards your mouth.
15
Page 20

English
The speaker 햷 operates in
two directions so that you can
wear the headset on either
your left or right ear without
changing it. However, the
speaker is designed so that
other people in the vicinity
cannot listen to the other
party and are not disturbed by
the speaker.
Switching on/off
Switching the headset on
왘 Open the microphone boom 햵.
A call is answered immediately from the last used
device by opening the
microphone boom without
any further action (there
might be a little delay
depending on the type of
mobile phone used).
Switching the headset off
왘 Close the microphone boom.
All settings are saved when
the headset is switched
off.
Basic telephoning
Provided the headset is switched on and
in transmission range of either the base
station or the mobile phone or both (see
page 19), you can accept and make calls.
Accepting a call via the base station
When you receive a call either via your
OFFICE or PC phone
tone in the speaker 햷. In addition, the
headset LED 햳 and the PHONE LED 쐋
flash quickly.
To accept the call from a fixed line phone
when the headset is already switched
on:
왘 Press
– the hook button 햶 to answer any
call from the phone or PC or
– the PHONE button 쐇 () to
answer calls from the phone.
A wireless link is established between
base station and headset.
왘 If no automatic handset lifter is
installed on your fixed line phone,
pick up the phone handset manually.
The link to the phone is established.
If an automatic handset
lifter is installed on your
phone, it picks up the
handset automatically.
1)
you hear a ring
Switching the base station off
왘 Unplug the power supply.
Switching the base station on
왘 Connect the base station to the mains
as described on page 7.
16
왘 Start to talk.
1)
Only if you use a handset lifter with ring
tone detection or the TCI 01 box or the
Sennheiser Communications USB call control software.
Page 21

To accept the call when the headset is
not switched on:
왘 Open the microphone boom 햵.
The headset is switched on and the
call is answered immediately without
any further action (there might be a
delay depending on the type of
mobile phone you use).
왘 Put the headset on your ear.
왘 Start to talk.
Accepting a mobile phone call
When you receive a call via your mobile
phone you hear a different ring tone in
the headset. In addition, the headset
LED 햳 flashes quickly.
왘 Press the hook button 햶.
A wireless link is established between
headset and mobile phone.
왘 Start to talk.
If no ring tone is heard in the headset:
왘 Press and hold the hook button 햶 for
approx. two seconds.
The Headset will then answer the
mobile phone call.
Making a call via the base station
왘 Press either the base station PHONE
button 쐇 ( ) or briefly press the
headset hook button 햶.
A wireless link is established between
the headset and the base station.
왘 If no automatic handset lifter is
installed to your fixed line phone, pick
up the phone handset manually.
The link to the phone is established
and the dial tone is heard.
If an automatic handset
lifter is installed to your
phone, it picks up the
handset automatically.
왘 Dial the number and talk.
Making a call with the mobile phone or
Bluetooth device
Make sure the headset and the mobile
phone are connected. If not see “Pairing
to a mobile phone” on page 13.
왘 Dial the number and talk.
Redialling with the mobile phone
Automatic redialling the last number is
only possible with certain mobile phone
or Bluetooth devices. Please refer to
your Mobile phone or Bluetooth device's
manual.
왘 Quickly press the headset hook
button two times.
The last dialled number is redialled.
Some mobile phones
require several double
pushes on the headset
hook button to start redialling.
Voice dialling
The voice dialling function must be
supported by your mobile phone or Bluetooth device and be activated.
왘 Make sure the recording of your code
word of the voice dialling function is
done with the headset as the headset
provides a better sound quality than
English
17
Page 22

English
most mobile phone or Bluetooth
device microphones do.
왘 Press and hold the headset hook
button 햶 until a confirmation beep is
heard.
왘 Say the name of the other party.
The mobile phone or Bluetooth device
dials the corresponding number
automatically.
Not all mobile phones
support this feature.
Ending a call via the base station
왘 Press either the base station PHONE
button 쐇 ( ) or the headset hook
button 햶.
The wireless link between the headset and the base station is terminated.
왘 If no automatic handset lifter is
installed to your fixed line phone,
hang up the phone handset manually.
The link to the phone is terminated.
If an automatic handset
lifter is installed on your
phone, it hangs up the
handset automatically.
Ending a mobile phone call
왘 Press the headset hook button 햶.
The call ends.
왘 See your mobile phone manual
whether your mobile phone terminates the call automatically or you
have to terminate the call manually.
Advanced call management
Toggling between calls via fixed line
phone and mobile phone and vice versa
Toggling between fixed line phone calls
and mobile phone calls allows you to
quickly switch from one call to another
and vice versa.
왘 Press and hold the hook button 햶
until a beep is heard in the headset.
The current call is ended automatically and the new call is accepted.
If your fixed line or mobile
phone support call waiting,
please control from the
phone.
Rejecting a call from the mobile phone
or Bluetooth device
왘 Press and hold the hook button 햶
while the mobile phone is ringing
until a beep is heard in the headset.
The ringing stops. Depending on the
mobile phone or Bluetooth device
settings, the call is either rejected or
transferred to a voice mailbox.
We recomend that rejection of phone
calls are done from the mobile phone.
Transferring an ongoing call from the
mobile phone to the headset
왘 Press and hold the hook button 햶.
A beep is heard in the headset. The
call audio is transferred to the headset.
18
Page 23

Transferring a call from the headset to
the mobile phone
Please see your mobile phone manual on
how to transfer the call audio from the
headset to your mobile phone.
Listening to an external audio source
conditions like wall thickness, wall composition etc.
With a free line of sight, the transmission range of the base station is up
to 30 metres; the transmission range of
the mobile phone or Bluetooth device is
up to 10 metres.
English
During the reception of a Bluetooth audio source the headset is unable to detect or to
make any call via your mobile
or fixed line phone.
To establish a link to a Bluetooth audio
source:
왘 Pair the headset with the Bluetooth
audio source (please see the Bluetooth device manual).
왘 With the audio source, establish a
Bluetooth connection to the headset.
The headset hook button is not
usable to establish a Bluetooth connection with external audio sources.
The headset accepts the audio signal
automatically. The audio is heard in
the headset.
To end the link to a Bluetooth audio
source:
왘 Press the hook button 햶 or use the
audio source to end the Bluetooth
connection to the headset.
If you leave the transmission range
Telephoning is only possible in the Bluetooth transmission range of the base
station or the mobile phone or Bluetooth
device, respectively. The transmission
range depends largely on environmental
C
PHONE
Range
A
is on
(blue)
B
C
is off
D
Indication
LED 쐋
30 m
B
10 m
headset
LED 햳
flashes
blue once
every 5
seconds
flashes
blue twice
every 5
seconds
A
D
Result
no telephoning via
mobile phone or
Bluetooth device
telephoning possible via base station
or mobile phone or
Bluetooth device
no telephoning via
base station but
only via mobile
phone or Bluetooth
device
no telephoning via
base station or
mobile phone or
Bluetooth device
19
Page 24

English
We recommend to make a test call to
another person in the same office and to
walk around during the call to find out if
any areas are out of transmission range.
If the headset leaves the transmission
range of the base station during a call:
• The sound quality deteriorates before
the connection finally breaks down.
• The PHONE LED 쐋 turns off to indicate
that the headset is out of the base
station’s transmission range.
• The headset LED flashes blue twice
every 5 seconds indicating that the
headset is out of the base station
transmission range in standby mode.
If you get back into the transmission
range within 40 seconds, a ring tone is
heard in the headset. To resume the call:
왘 Press the headset hook button.
If the headset leaves the transmission
range of the mobile phone during a call:
• The sound quality deteriorates before
the connection finally breaks down.
• Your mobile phone or Bluetooth
device displays the loss of connection.
• A failure beep is heard in the headset.
• Please refer to your mobile phone or
Bluetooth device manual to find out
whether the call is transferred to
the mobile phone or Bluetooth device
automatically or requires an acknowledgement to do so.
Changing the speaker volume
왘 Press the volume button 햲 during a
call.
The speaker volume is changed by
one step. The speaker volume can be
adjusted in 8 steps. The factory
setting is 4. When the minimum or
maximum volume is reached, a beep
is heard in the speaker 햷.
In addition, the adaptive intelligence
“learns” your preferred settings and
adjusts the volume automatically.
If you close the headset, the current
volume setting is saved.
Changing the ring tone volume
왘 Press the volume button 햲 while the
headset is in stand-by mode (no
active call).
The ring tone volume is changed by
one step. The ring tone is played once
in the set volume. The set volume is
saved.
The ring tone volume can be adjusted
between step 1 and 8. The factory
setting is step 4.
Muting/un-muting the headset
microphone
To mute the headset microphone:
왘 Press and hold the volume button 햲
during a call until a beep is heard in
the headset.
The microphone is muted. A beep is
heard every 1.5 seconds in the headset.
20
Page 25

To un-mute the headset microphone:
왘 Press the volume button 햲.
The beeping stops. The microphone
works as usual.
Activating/deactivating the
adaptive volume adjustment
To deactivate the adaptive volume
adjustment:
왘 Press and hold both the PROGRAM
button 쐎 and the PHONE button 쐇.
The PHONE LED 쐋 flashes blue twice
to indicate that the adaptive volume
adjustment is deactivated.
To reactivate the adaptive volume
adjustment:
왘 Press and hold both the PROGRAM
button 쐎 and the PHONE button 쐇.
The AUX LED 쐄 flashes blue twice
indicating that the adaptive volume
adjustment is activated.
If you leave the base station’s transmission range,
the adaptive volume
adjustment is activated!
recognize the new headset unless they
are paired as follows:
왘 Press the program button quickly two
times.
The base station is set to pairing
mode. The PHONE LED 쐋 and the
AUX LED 쐄 on the base station are
flashing blue.
왘 Press and hold down the volume
button 햲.
The headset goes into pairing mode.
The headset LED first lights up blue
and red and then flashes blue to indicate that the headset is in pairing
mode.
If pairing is not successful within 60 seconds, the
headset returns to standby
mode.
When pairing has been successful,
the blinking stops and the PHONE
LED 쐋 flashes three times.
When pairing has not been successful, the AUX LED 쐄 flashes three
times.
English
Pairing to the base station
Upon delivery, the headset and the base
station are already paired, i.e. they automatically recognize each other and do
not interfere with other Mobile phone or
Bluetooth devices. You do not have to
pair them again.
However, if you have to replace the
headset with a new one, e.g. because it is
damaged, the base station will not
Restoring factory settings
You can restore the factory settings of
speaker volume and pairing as follows:
왘 Repair an already paired the base sta-
tion and the headset (see “Pairing
the headset” on page 13).
All learning memory values and all
volume settings are reset to the
factory settings.
21
Page 26

English
Maintenance and
If problems occur ...
care
If you do not want to use the headset for
a longer time:
왘 Close the microphone boom 쐃.
왘 Store the headset in a clean and dry
environment.
To clean the headset:
왘 Only clean with a dry cloth. Do not use
any liquids, solvents or cleansing
agents.
Accessories
502309 USB charging cable
502310 Power supply EU version
502311 Power supply UK version
502312 Power supply US version
502313 Car charger unit
502314 Carrying case
500712 Handset lifter including a ring
tone detection microphone unit
500275 TCI 01 “Telephone Controlling
Interface” for phones featuring
an AEI or DHSG interface
If no dial tone is heard:
왘 Make sure your office phone is set up
correctly according to its manual.
If no sound file is heard:
왘 Make sure your PC and sound prefer-
ences are set up correctly and
connected through either phone
interface or directly through the AUX
interface.
Specifications
Directional microphone system
Microphone
type
Sensitivity –36 dBV at 94 dB SPL, 1 kHz
Speaker
type
Max. output
Dimensions
Weight 15 g
Power
supply
Car charger
2 electret microphones,
paired/balanced
Speaker unit
dynamic, bi-directional,
neodymium magnet
110 dB SPL limited by ActiveGard™ technology
General
52mm x 65mm x 9mm
(width x height x depth)
input 100–240 V AC, output
5 V DC, 150 mA
(only VMX 3in1) input 12–24
V DC, output 5 V DC, 150 mA
22
Page 27

Manufacturer
declarations
Warranty regulations
The guarantee period for this
Sennheiser Communications product is
24 months – for the battery 6 months –
from the date of purchase. Excluded
are accessory items, rechargeable or
disposable batteries that are delivered
with the product. Due to their
characteristics, these products have a
shorter service life that is principally
dependent on the individual frequency
of use.
The guarantee period starts from the date
of original purchase. For this reason, we
recommend that the sales receipt be
retained as proof of purchase. Without
this proof (which is checked by the
responsible Sennheiser Communications
service partner) you will not be reimbursed for any repairs that are carried out.
Depending on our choice, guarantee
service comprises, free of charge, the
removal of material and manufacturing
defects through repair or replacement of
either individual parts or the entire
device. Inappropriate usage (e.g.
operating faults, mechanical damages,
incorrect operating voltage), wear and
tear, force majeure and defects which
were known at the time of purchase are
excluded from guarantee claims. The
guarantee is void if the product is
manipulated by non-authorised persons
or repair stations.
In the case of a claim under the terms of
this guarantee, send the device,
including accessories and sales receipt,
to the responsible service partner. To
minimise the risk of transport damage,
we recommend that the original
packaging is used. Your legal rights
against the seller, resulting from the
contract of sale, are not affected by this
guarantee.
The guarantee can be claimed in all
countries outside the U.S. provided that
no national law limits our terms of
guarantee.
CE Declaration of Conformity
This equipment is in
compliance with the
essential requirements and
other relevant provisions
of Directives 1999/5/EC, 89/336/EC or
73/23/EC.
Before putting the device into operation,
please observe the respective countryspecific regulations.
FCC statements
This equipment has been tested and
found to comply with the limits for a
Class B digital device, pursuant to
Part 15 of the FCC Rules. These limits
are designed to provide reasonable
protection against harmful interference
in a residential installation. This equipment generates, uses and can radiate
radio frequency energy and, if not
installed and used in accordance with
the instructions, may cause harmful
interference to radio communications.
English
23
Page 28

English
However, there is no guarantee that
interference will not occur in a particular
installation. If this equipment does
cause harmful interference to radio or
television reception, which can be determined by turning the equipment off and
on, the user is encouraged to try to
correct the inter-ference by one or more
of the folrlowing measures:
• Reorient or relocate the receiving
antenna.
• Increase the separation between the
equipment and receiver.
• Connect the equipment into an outlet
on a circuit different from that to
which the receiver is connected.
• Consult the dealer or an experienced
radio/TV technician for help.
This device complies with Part 15 of the
FCC Rules and with RSS-210 of Industry
Canada.
Operation is subject to the following two
conditions:
1. this device may not cause harmful
interference, and
2. this device must accept any inter-
ference received, including interference that may cause undesired
operation.
This Class B digital apparatus complies
with Canadian ICES-003.
Notice: Changes or modifications made to
this equipment not expressly approved
by Sennheiser Communications A/S may
void the FCC authorization to operate this
equipment.
Radio frequency radiation exposure
information
This transmitter must not be co-located
or operated in conjunction with any
other antenna or transmitter.
The radiated output power of the device
is far below the FCC radio frequency
exposure limits. Nevertheless, the device
must be used in such a manner that the
potential for human contact during
normal operation is minimized.
Batteries or rechargeable batteries
The supplied batteries or
rechargeable batteries can be
recycled. Please dispose of them
as special waste or return them
to your specialist dealer. In order to
protect the environment, only dispose of
exhausted batteries.
WEEE Declaration
Your Sennheiser Communications
product was developed and
manufactured with high quality
materials and components which
can be recycled and/or reused. This
symbol indicates that electrical and
electronic equipment must be disposed
of separately from normal waste at the
end of its operational lifetime.
Please dispose of this product by
bringing it to your local collection point
or recycling centre for such equipment.
This will help to protect the environment
in which we all live.
24
 Loading...