

Page 1
ADN-W C1
ADN-W D1
Wireless Units
ADN C1
ADN D1
Wired Units
Instruction manual
Page 2

Page 3
For your safety
www.sennheiser.com
www
Manual
IN OUT
Contents
For your safety ............................................................................................... 1
The ADN D1/C1 and ADN-W D1/C1 conference units ............................ 1
Package contents .......................................................................................... 2
Components required for operation .......................................................... 3
Product overview ADN D1/C1 ..................................................................... 5
Product overview ADN-W D1/C1 ............................................................... 6
Preparing the ADN-W D1/C1 wireless conference
units for operation ........................................................................................ 7
Operating a delegate unit .......................................................................... 10
Operating a chairperson unit .................................................................... 12
Cleaning and maintaining the conference units ................................... 13
Specifications ............................................................................................... 14
For your safety
Please make sure to read the “Safety information” supplement
included separately with the ADN CU1 central unit. This supplement
contains important information on the safe operation of the ADN
conference system as well as the manufacturer’s declaration and
warranty notes.
A detailed instruction manual for the overall ADN conference system
can be found
• on the Internet at www.sennheiser.com or
• on the DVD-ROM supplied with the
ADN CU1 central unit.
The ADN D1/C1 and ADN-W D1/C1 conference units
The ADN D1 wired delegate unit and the ADN C1 wired chairperson unit
as well as the ADN-W D1 wireless delegate unit and the ADN-W C1
wireless chairperson unit are part of the Sennheiser ADN conference
system.
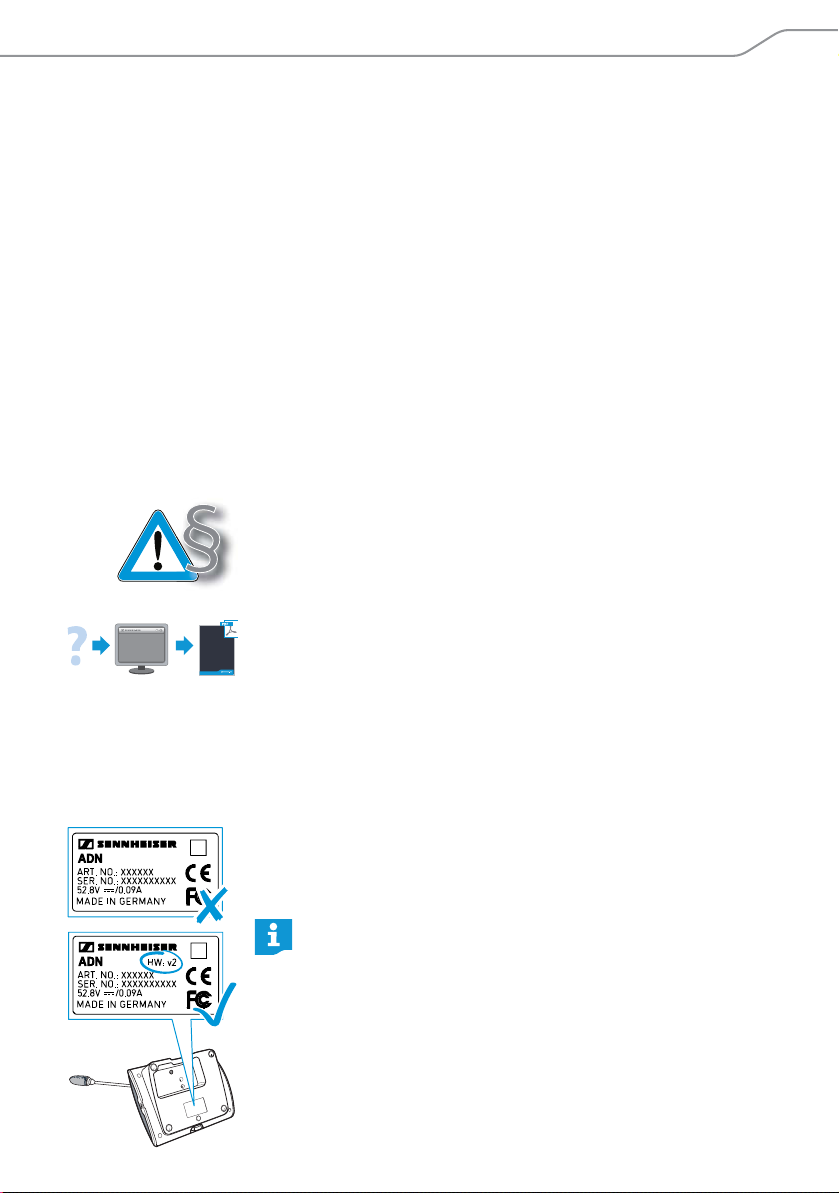
To ensure full operational reliability in a redundant ring
topology, the hardware of the ADN C1 and ADN D1 has been
revised. If you combine conference units with hardware
1 (no marking on the type plate) and conference units
revision
with hardware revision 2 (“
plate), fail-safe operation is only possible to a limited extent.
왘 In a redundant ring topology, only use conference units
with hardware revision 2.
ADN C1/ADN D1 | ADN-W C1/ADN-W D1 | 1
HW: v2” is printed on the type
Page 4

Package contents
www.sennheiser.com
www
Manual
Console of the wireless
conference unit
Wireless
conference unit kit for
e unit
delegat
Package contents
ADN standard system components
1ADN D1 delegate unit or ADN C1 chairperson unit
1 instruction manual
The ADN D1 and ADN C1 wired conference units are ready for
operation upon delivery. You have to connect the conference
units to the ADN CU1 central unit by means of system cables
(detailed information can be found in the ADN system manual).
ADN wireless components
1 console of the ADN-W D1 wireless delegate unit or ADN-W C1
wireless chairperson unit (
microphone)
1 instruction manual
For operating a wireless conference unit, you additionally
require one ADN-W BA battery pack and one ADN-W MIC 15 or
ADN-W MIC 36 gooseneck microphone.
1 console of the ADN-W D1 wireless delegate unit
1 ADN-W BA Lithium-Ion battery pack
1 gooseneck microphone
(ADN-W MIC 15-39 or 36-29, depending on version of the kit)
3 instruction manuals (one for the wireless conference unit, one for
the battery pack and one for the gooseneck microphone)
without battery pack and gooseneck
Intended use
Intended use of the products includes
• using the products for professional purposes,
• having read and understood the safety i
system manual,
• using the products within the operatin
described in the ADN system manual.
“Improper use” means using the products other than as described in
N system manual, or under operating conditions which differ
the AD
from those described therein.
All instruction manuals for components of the
are also available on the Internet at www.sennheiser.com.
2 | ADN C1/ADN D1 | ADN-W C1/ADN-W D1
nstructions and the ADN
g conditions and limitations
ADN conference system
Page 5

Components required for operation
Components required for operation
Wired and wireless components can be combined arbitrarily.
Central unit
Power supplies
Conference units
System cables
Number Description Cat. No. Function
1 ADN CU1-EU central unit,
EU version
ADN CU1-UK central unit,
UK version
ADN CU1-US central unit,
US version
505553 Controls the conference
(wired and wireless
505554
505555
components) and
supplies power to a max.
of 40 conference units
and/or one antenna
module
Wired standard components
Number Description Cat. No. Function
1 - 15
(optional)
Number Description Cat. No. Function
max. 400 ADN D1 delegate unit 502758 Allows to make contribu-
1 - 10
(optional)
The system cables are black and have two shielded RJ45 plugs.
ADN PS-EU power supply,
EU version
ADN PS-UK power supply,
UK version
ADN PS-US power supply,
US version
ADN C1 chairperson unit 502759 Allows to manage the
505546 Supplies power to
505547
505548
conference units
connected in simple
strings or in redundant
ring topology,
for conferences with up
to 400 conference units
tions to the conference
conference
Number Description, length Cat. No. Function
Divers SDC CBL RJ45-2, 2 m 009842 Allows to interconnect
SDC CBL RJ45-3, 3 m 009843
SDC CBL RJ45-5, 5 m 009844
SDC CBL RJ45-10, 10 m 009845
SDC CBL RJ45-20, 20 m 009846
SDC CBL RJ45-50, 50 m 009847
components and
conference units
ADN C1/ADN D1 | ADN-W C1/ADN-W D1 | 3
Page 6

Components required for operation
Wireless components
Antenna module
Wireless
confer
ence units
Number Description Cat. No. Function
1-4 ADN-W AM antenna module 504743 Allows to transmit data
ADN-W AM-US antenna
module, US version
Number Description Cat. No. Function
max. 150 ADN-W D1 wireless
delegate unit
1 - 10
(optional)
depending on the
mber of
nu
wireless
conference units
ADN-W C1 wireless
chairperson unit
ADN-W BA battery pack 504744 Supplies power to wire-
ADN-W MIC 15-39 504750 Gooseneck microphones
ADN-W MIC 36-29 504751
ADN-W MIC 15-50 504752
ADN-W MIC 36-50 504753
505715
504748 Allows to make contribu-
504745 Allows to manage the
via RF
tions to the conference
conference
less conference units
to make contributions
Additional accessories for the ADN conference system can be
found at www.sennheiser.com.
4 | ADN C1/ADN D1 | ADN-W C1/ADN-W D1
Page 7

Product overview ADN D1/C1
ADN C1 ADN D1
:
2
1
A
3
6
5
4
7
8
9
B
2
1
3
6
7
8
9
1
2
3
4
5
6
7
8
9<A
B
Product overview ADN D1/C1
Sound inlet basket with glued windshield
Signal light ring
Headphone socket
Priority key
Next key
Headphone volume control for
headphone socket
Microphone key
Microphone LED
Loudspeaker
IN socket
OUT socket
Type plate (see bottom)
ADN C1/ADN D1 | ADN-W C1/ADN-W D1 | 5
Page 8

Product overview ADN-W D1/C1
ADN-W D1
ADN-W C1
9
8
7
6
3
ADN-W MIC 15-39
ADN-W MIC 15-50
ADN-W MIC 36-29
ADN-W MIC 36-50
D
D
E
B
9
8
7
6
5
4
3
B
C
A
<
A
<
A
<
A
<
1
2
1
2
1
2
1
2
12345
6
7
89<ABCD
E
Product overview ADN-W D1/C1
Sound inlet basket with glued windshield
ADN-W MIC 15: glued windshield
ADN-W MIC 36: plug-on windshield
Signal light ring
Headphone socket
Priority key
Next key
Headphone volume control for
headphone socket
Microphone key
6 | ADN C1/ADN D1 | ADN-W C1/ADN-W D1
Microphone LED
Loudspeaker
Fastening thread
Sliding contacts
Microphone connection
Guide rails for ADN-W BA battery pack
Connection for ADN-W BA battery pack
Type plate
Page 9

Preparing the ADN-W D1/C1 wireless conference units for operation
B
0
B<<82
Preparing the ADN-W D1/C1 wireless
conference units for operation
To operate the wireless conference unit, you have to connect
a gooseneck microphone (ADN-W MIC 15 or ADN-W MIC 36; available
in different lengths) to the console of the conference unit. The
ADN-W
BA battery pack supplies power to the wireless conference
unit. The conference system automatically recognizes if the connected
wireless conference unit is a chairperson unit (ADN-W C1) or a delegate
unit (ADN-W D1) and initializes it automatically. Information on how
to configure the wireless conference components can be found in the
ADN system manual or in the instruction manuals of the ADN CU1
central unit and the ADN-W AM antenna module.
If you do not connect a microphone to the wireless conference
unit, you can use the console as a loudspeaker to output the
floor channel.
Screwing on/unscrewing the ADN-W MIC 15/36 gooseneck microphone
To
screw on the gooseneck microphone:
왘 Put the gooseneck microphone onto the microphone
connection .
왘 Screw the microphone to the microphone connection by turning
the fastening thread clockwise.
The microphone is securely connected to the conference unit.
unscrew the gooseneck microphone:
To
왘 Unscrew the microphone by turning the fastening thread
counterclockwise.
왘 Carefully remove the gooseneck microphone from the microphone
connection.
Function check of the microphone
After switch-on, the wireless conference unit checks the proper
functioning of the gooseneck microphone.
If errors occur during the check of the microphone, the microphone
LED and, if the microphone is power supplied, the signal light ring
flash red rapidly and the microphone is automatically deactivated.
왘 Replace the defective microphone by a new one.
ADN C1/ADN D1 | ADN-W C1/ADN-W D1 | 7
Page 10

Preparing the ADN-W D1/C1 wireless conference units for operation
C
8
C
8
8
8782282
2
If you screw the microphone to or unscrew it from the wireless
conference unit during operation (wireless conference unit is switched
on), proper functioning of the conference unit cannot be guaranteed,
i.e. volume differences or noise may occur.
왘 First connect the microphone and then switch the conference unit on.
Inserting/removing the battery pack
To insert the ADN-W BA battery pack into the wireless conference unit:
왘 Check the battery pack before using it in order to ensure sufficient
battery capacity and to exclude a defective battery pack (see the
instruction manual of the battery pack).
왘 Charge the battery pack if necessary (see the instruction manual of
the battery pack).
왘 Slide the battery pack into the battery guide rails of the wireless
conference unit.
The battery release clip locks into place with an audible click and
secures the battery pack.
To remove the battery pack from the wireless conference unit:
왘 Press the battery release clip and pull the battery pack out of
the battery guide rails.
Switching the wireless conference unit on/off
To switch the wireless conference unit
왘 Press the microphone key .
The microphone LED and the signal light ring flash red and
the RF status indicator on the ADN-W BA battery pack flashes
blue slowly. Once the initialization process is complete and after
connection to the ADN-W AM antenna module is established, the
microphone LED and the signal light ring go off. The RF status
indicator on the ADN-W BA battery pack indicates the
transmission quality:
8 | ADN C1/ADN D1 | ADN-W C1/ADN-W D1
on:
Page 11

Preparing the ADN-W D1/C1 wireless conference units for operation
2
8
7
2
ADN-W BA
2
7
Status LED Color Meaning
RF status
indictor
– good transmission quality
blue, flashing slowly transmission quality is
blue, flashing rapidly transmission quality is
If no connection to an antenna module can be established
within 5 minutes, the wireless conference unit automatically
switches off.
To switch all wireless conference units off:
왘 Set the on/off switch of the ADN CU1 central unit to position “0”.
The central unit is switched off and the display panel goes off. The
ADN-W AM antenna module connected to the central unit is
switched off. All switched-on and connected wireless conference
units are automatically switched off after 5 minutes.
If you are using the “Conference Manager” software, you can
also switch off all wireless conference units with a mouse click
(detailed information can be found in the ADN system manual).
temporarily reduced
permanently reduced
To
switch individual wireless conference units off:
왘 Press the microphone key for 5 seconds.
Or:
왘 Remove the ADN-W BA battery pack from the conference unit (see
page 8).
The conference unit switches off. All LEDs go off.
If the conference mode is set to “Push to talk”, you can only
switch off the wireless conference unit by removing the battery
pack.
The manual switch-off function via the microphone key can be
deactivated (detailed information can be found in the ADN
system manual).
ADN C1/ADN D1 | ADN-W C1/ADN-W D1 | 9
Page 12

Operating a delegate unit
2
8
7
7
8
2
97829782882
9
Operating a delegate unit
The operation of the ADN D1 wired conference unit and the ADN-W D1
wireless conference unit is identical.
Taking the floor/Making a request to speak
If the conference mode is set to “Direct Access” or “Override” (detailed
information can be found in the ADN system manual):
왘 Press the microphone key .
Your microphone switches on and you can take the floor
immediately. The microphone LED and the signal light ring
light up red. The loudspeaker is muted. Depending on the
conference mode and the speaker limit set, the microphone of the
previous speaker will be deactivated.
If the conference mode is set to “
왘 Press the microphone key and keep it pressed for the duration
of your contribution.
Your microphone switches on and you can take the floor
immediately. The microphone LED and the signal light ring
light up red. The loudspeaker is muted.
If the conference mode is set to “Request”, you have to be granted
speaking privileges:
왘 Press the microphone key .
Depending on the setting adjusted in the operating menu (detailed
information can be found in the ADN system manual)
– the microphone LED flashes green and the signal light ring
flashes red or
– only the microphone LED flashes green.
When the chairperson grants you speaking privileges, your
microphone is activated. The microphone LED and the signal
light ring light up red. The loudspeaker is muted. Depending
on the conference mode and the speaker limit set, the microphone
of the previous speaker will be deactivated.
Push to talk”:
10 | ADN C1/ADN D1 | ADN-W C1/ADN-W D1
Page 13

Operating a delegate unit
782
7
8
2
3
3
Vol +
Vol -
6
6
Deactivating the microphone/Canceling a request to speak
To deactivate the microphone when you have finished speaking or to
cancel a request to speak (“
Direct Access”, “Override” or “Request”
mode):
왘 Press the microphone key once more.
The microphone LED and the signal light ring go off.
If the conference mode is set to “Push to talk”:
왘 Release the pressed microphone key .
The microphone LED and the signal light ring go off.
Connecting headphones
Connect headphones with a 3.5 mm jack plug to the headphone
왘
socket .
Adjusting the headphone volume
CAUTION
Hearing damage due to high volumes!
Listening at high volume levels for long periods can lead
to permanent hearing defects.
왘 Set the volume to a medium level.
왘 Do not continuously expose yourself and other
conference participants to high volumes.
To adjust the volume:
왘 Turn the headphone volume control
– to the right to increase the volume or
– to the left to reduce the volume.
At switch-off, the headphone volume is reset to a medium level.
The volume of the conference units’ loudspeakers can be set via
the central unit (detailed information can be found in the ADN
system manual).
ADN C1/ADN D1 | ADN-W C1/ADN-W D1 | 11
Page 14

Operating a chairperson unit
828
5
4
Main Menu
Conference Menu
Clear Request List on Cancel
4
4
Operating a chairperson unit
The operation of the ADN C1 wired conference unit and the ADN-W C1
wireless conference unit is identical.
Beside the chairperson functions, chairperson units offer the same
functions as delegate units.
A chairperson unit allows you to take the floor at any time without
having to “apply” for a comment. If your conference system comprises
several chairperson units, all chairperson units have equal rights.
Granting speaking privileges
All participants who have made a request to speak will join a requestto-speak list. Depending on the setting adjusted in the operating
menu:
• the microphone LED flashes green and the signal light ring
• only the microphone LED flashes green.
To grant speaking privileges to the next participant from the requestto-speak list:
왘 Press the Next key .
5
flashes red or
The next participant from the request-to-speak list is granted
speaking privileges.
If you are using the “Conference Manager” software, you can
also grant speaking privileges with a mouse click (detailed
information can be found in the ADN system manual).
Ending a conference or withdrawing speaking privileges (cancel function)
왘 Set the function (“Clear Request List on Cancel”) of the chairperson
unit’s priority key via the central unit’s operating menu:
Setting Function of the priority key
“On” Pressing the priority key deactivates all delegate units.
“Off” Pressing the priority key deactivates all currently active
12 | ADN C1/ADN D1 | ADN-W C1/ADN-W D1
All requests to speak are deleted.
delegate units. All requests to speak are retained.
Page 15

Cleaning and maintaining the conference units
4
4
2
8
4
4
82824
왘 Briefly press the priority key .
The conference system behaves as set.
If you are using the “Conference Manager” software, you can
also deactivate all delegate units with a mouse (detailed
information can be found in the ADN system manual).
Muting all delegate units temporarily (priority function)
Using the priority function, the chairperson can interrupt a discussion
at any time. The speaking privileges of all chairperson units remain
active at any time.
왘 Keep the priority key pressed for as long as you want to mute
the delegate units.
All conference units – except for the chairperson units – are muted
immediately. The microphone LED and the signal light ring of
the previously active conference units flash red. You can take the
floor immediately. The microphone LED and the signal light
ring of your chairperson unit light up red.
왘 Release the priority key .
The muting of the conference units is canceled. The discussion is
continued.
Cleaning and maintaining the conference
units
왘 Remove the ADN-W BA battery pack from the ADN-W C1 or
ADN-W D1 wireless conference units (see page 8).
왘 Only use a dry and soft cloth to clean the products.
왘 Clean the grids of the conference units with a soft brush or
paintbrush in order to avoid dust deposits.
ADN C1/ADN D1 | ADN-W C1/ADN-W D1 | 13
Page 16

Specifications
Specifications
ADN D1 and ADN C1 conference units
Console
Supply voltage 35 V to 52.8 V
Power consumption 2 W (without reproduction via loudspeakers)
Headphone socket 3.5 mm stereo jack socket
Output level at
headphone socket
THD (at 1 kHz) 0.03 % at 50 mW/16 Ω
Frequency response 100 Hz to 14.5 kHz
Signal-to-noise ratio > 70 dB(A)
Temperature range operation: +10°C to +40°C
Relative humidity operation: 10 to 80%
Dimensions (W x H x D) 185 x 63 x 140 mm; without gooseneck
Weight approx. 700 g
Microphone
Pick-up pattern super-cardioid
Frequency response 190 Hz to 14.5 kHz
50 mW/16 Ω
storage: -25°C to +70°C
storage: 10 to 90%
In compliance with
Europe: EMC EN 55103-1/-2
ADN-W D1 and ADN-W C1 wireless
Console
RF frequency ranges 2.4 GHz, 5.1 to 5.9 GHz
RF output power max. 100 mW
Audio quality 16 bit / 32 kHz
Operating time > 20 hours (ADN-W BA battery pack)
Voltage for optional external
power sup
Charging time of
battery pack
Headphone socket 3.5 mm stereo jack socket
ply
14 | ADN C1/ADN D1 | ADN-W C1/ADN-W D1
Safety EN 60065
conference units
12 V via ADN-W BA battery pack
typ. 4 hours
Page 17

Specifications
Output level at
headphone socket
THD (at 1 kHz) 0.03% at 50 mW/16 Ω
Frequency response
Signal-to-noise ratio
Temperature range
Relative humidity
Dimensions (W x H x D)
Weight
Microphone
50 mW/16 Ω
100 Hz to 14.5 kHz
> 70 dB(A)
operation: +5°C to +45°C
storage: -25°C to +70°C
operation: 20 to 80%
storage: 10 to 90%
185 x 67 x 180 mm; without gooseneck
approx. 940 g
see the instruction manual of the
ADN-W MIC 15 or ADN-W MIC 36 gooseneck
microphone
In compliance with
Europe
Approved by
USA
Canada
Japan
202-SMA058
D 12-0045 202
Brazil
EMC EN 301489-1/-17
Radio EN 300328
EN 301893
Safety EN 60065
47 CFR Part 15
FCC ID: DMOADNWDU
CAN ICES-3(B)/NMB-3(B)
Industry Canada RSS 210
IC: 2099A-ADNWDU
Japanese Radio Law an
Telecommunications Business Law Compliance
This device is granted pursuant to the
Japanese Radio Law ( 電波
Telecommunications Business Law ( 電気通信事
業法)This device should not be modified (other-
wise the granted designation number will
become i
ADN-W D1: 3100-15-7356
ADN-W C1: 3108-15-7356
EN 300440-1/-2
EN 62311 (SAR)
d Japanese
法) and the Japanese
nvalid)
ADN C1/ADN D1 | ADN-W C1/ADN-W D1 | 15
Page 18

Specifications
CE Declaration of Conformity
RoHS Directive (2011/65/EU)
Radio Equipment Directive (2014/53/EU)
EMC Directive (2014/30/EU)
The declaration is available at
www.sennheiser.com/download
Before putting the product into operation,
please observe the respective country-specific
tions.
regula
Italy: For private use, a general authorization
the frequency band 5150 - 5725 MHz is
for
required if our wireless system is used outside
own premises.
For public use, a general authorization is required.
Statements regarding the FCC and Industry Canada rules
This device complies with part 15 of the FCC rules and RSS-210 of
Industry Canada. Operation is subject to the following two conditions:
(1) this device may not cause harmful interference, and (2) this device
must accept any interference received, including interference that may
cause undesired operation.
The device for operation in the band 5150-5250 MHz is only for indoor
use
to reduce the potential for harmful interference to co-channel
mobile satellite systems.
This equipment has been tested and found to comply with the limit
s
for a Class B digital device, pursuant to part 15 of the FCC Rules. These
limits are designed to provide reasonable protection against harmful
interference in a residential installation. This equipment generates,
uses and can radiate radio
frequency energy and, if not install
ed and used in accordance with the
instructions, may cause harmful interference to radio communications.
However, there is no guarantee that interference will not occur in a
particular installation. If this equipment does cause harmful
interference to radio or television reception, which can be determined
by turning the equipment off and on, the user is encouraged to try to
correct the interference by one or more of the following measures:
• Reorient or relocate the receiving antenna.
• Increase the separation between
• Connect the equipment into an outlet on a circuit diff
the equipm
ent and receiver.
erent from that
to which the receiver is connected.
• Consult the dealer or an experienced radio/ TV technician for help.
Changes or modifications not expressly approved by Sennheiser
electronic Corp. could void the user’s authority to operate the
equipme
nt.
This Class B digital apparatus complies with the Canadian ICES-003.
16 | ADN C1/ADN D1 | ADN-W C1/ADN-W D1
Page 19

Specifications
Radiofrequency radiation exposure Information:
This equipment complies with FCC radiation exposure limits set forth for an
uncontrolled environment. This equipment should be installed and operated
with minimum distance of 20 cm between the radiator and your body. This
transmitter must not be co-located or operating in conjunction with any other
antenna or transmitter.
ADN C1/ADN D1 | ADN-W C1/ADN-W D1
| 17
Page 20

Sennheiser electronic GmbH & Co. KSennheiser electronic GmbH & Co. KGG
Am Labor 1, 30900 Wedemark, Germany
www.sennheiser.com
Printed in Germany, Publ. 08/16, 549160/A04
 Loading...