

Sennheiser HMEC 460 - 08-07, HMEC 461, HMEC 466, NoiseGard HMEC 460 Instructions For Use Manual
Page 1
Instructions for use
HMEC 460
Page 2

Page 3

1
Contents
Safety instructions ...................................................................................................................... 3
The HMEC 460 headset ............................................................................................................... 5
Delivery includes .......................................................................................................................... 7
Overview of operating elements ............................................................................................... 8
Preparing the headset for use ................................................................................................... 9
Connecting the headphones and the microphone .............................................................................. 9
Powering the NoiseGard active noise compensation ........................................................................ 10
Activating the “auto shut-off” function ............................................................................................. 13
Connecting a mobile telephone ............................................................................................................. 13
Connecting an additional audio player ................................................................................................ 15
Adjusting the headset ............................................................................................................................ 16
Using the headset ...................................................................................................................... 19
Switching between mono and stereo mode ....................................................................................... 19
Adjusting the volume .............................................................................................................................. 20
Switching NoiseGard on/off ................................................................................................................... 21
Attaching the cable clip .......................................................................................................................... 21
Folding up the headphones ................................................................................................................... 22
Page 4

2
Care and maintenance .............................................................................................................. 23
Cleaning the headset ............................................................................................................................... 23
Replacing the wind shield ....................................................................................................................... 23
Replacing the earpads ............................................................................................................................. 24
Replacing the headband padding ......................................................................................................... 24
If a problem occurs... ................................................................................................................. 25
Accessories/spare parts ........................................................................................................... 27
Valuable information on NoiseGard ....................................................................................... 28
Specifications .............................................................................................................................. 30
Headphones ............................................................................................................................................... 30
Microphone incl. preamplifier ................................................................................................................ 30
General data .............................................................................................................................................. 31
Connector assignment ............................................................................................................................ 32
Manufacturer Declarations ...................................................................................................... 33
Thank you for choosing Sennheiser!
We have designed this product to give you reliable operation over many years. Over 60 years of
accumulated expertise in the design and manufacture of high-quality electro-acoustic
equipment have made Sennheiser a world-leading company in this field.
Please take a few moments to read these instructions carefully, as we want you to enjoy your
new Sennheiser products quickly and to the fullest.
Page 5

3
Safety instructions
y Please read these instructions carefully and completely before using the headset.
y Make these instructions easily accessible to all users at all times.
y Always include these instructions when passing the headset on to third parties.
y During flight operation, do not use the headset for telephone calls.
y With the NoiseGard active noise compensation switched on, typical aircraft sounds
(for example, those from engines, propellers, warning alarms, etc.) may sound
different to you. Before operating any aircraft, make sure that, with NoiseGard
switched on, you can hear and recognize these sounds. Set the volume to safe levels
that do not interfere with your ability to hear informational sounds and warning
alarms.
y The headset is capable of producing sound pressure exceeding 85 dB(A). 85 dB(A) is
the sound pressure corresponding to the maximum permissible volume which is by
law (in some countries) allowed to affect your hearing for the duration of a working
day. Higher volumes or longer durations can damage your hearing!
y Never repair or attempt to repair a defective headset yourself. Contact your
Sennheiser agent or the Sennheiser Service Department.
y Only replace parts of the headset whose replacement is described in this manual. All
other parts of the headset must be replaced by your Sennheiser agent.
Page 6

4
y Protect the headset from humidity. Only use a slightly damp cloth to clean the
headset. For information on how to clean the headset, contact your Sennheiser agent.
Intended use of the headset
Intended use includes:
y having read and understood these instructions, especially the chapter “Safety
instructions”.
y using the headset in helicopters, propeller and turboprop aircraft and within the
operating conditions and limitations described in these instructions.
Improper use
“Improper use” means using the headset other than as described in these instructions,
or under operating conditions which differ from those described herein.
Page 7

5
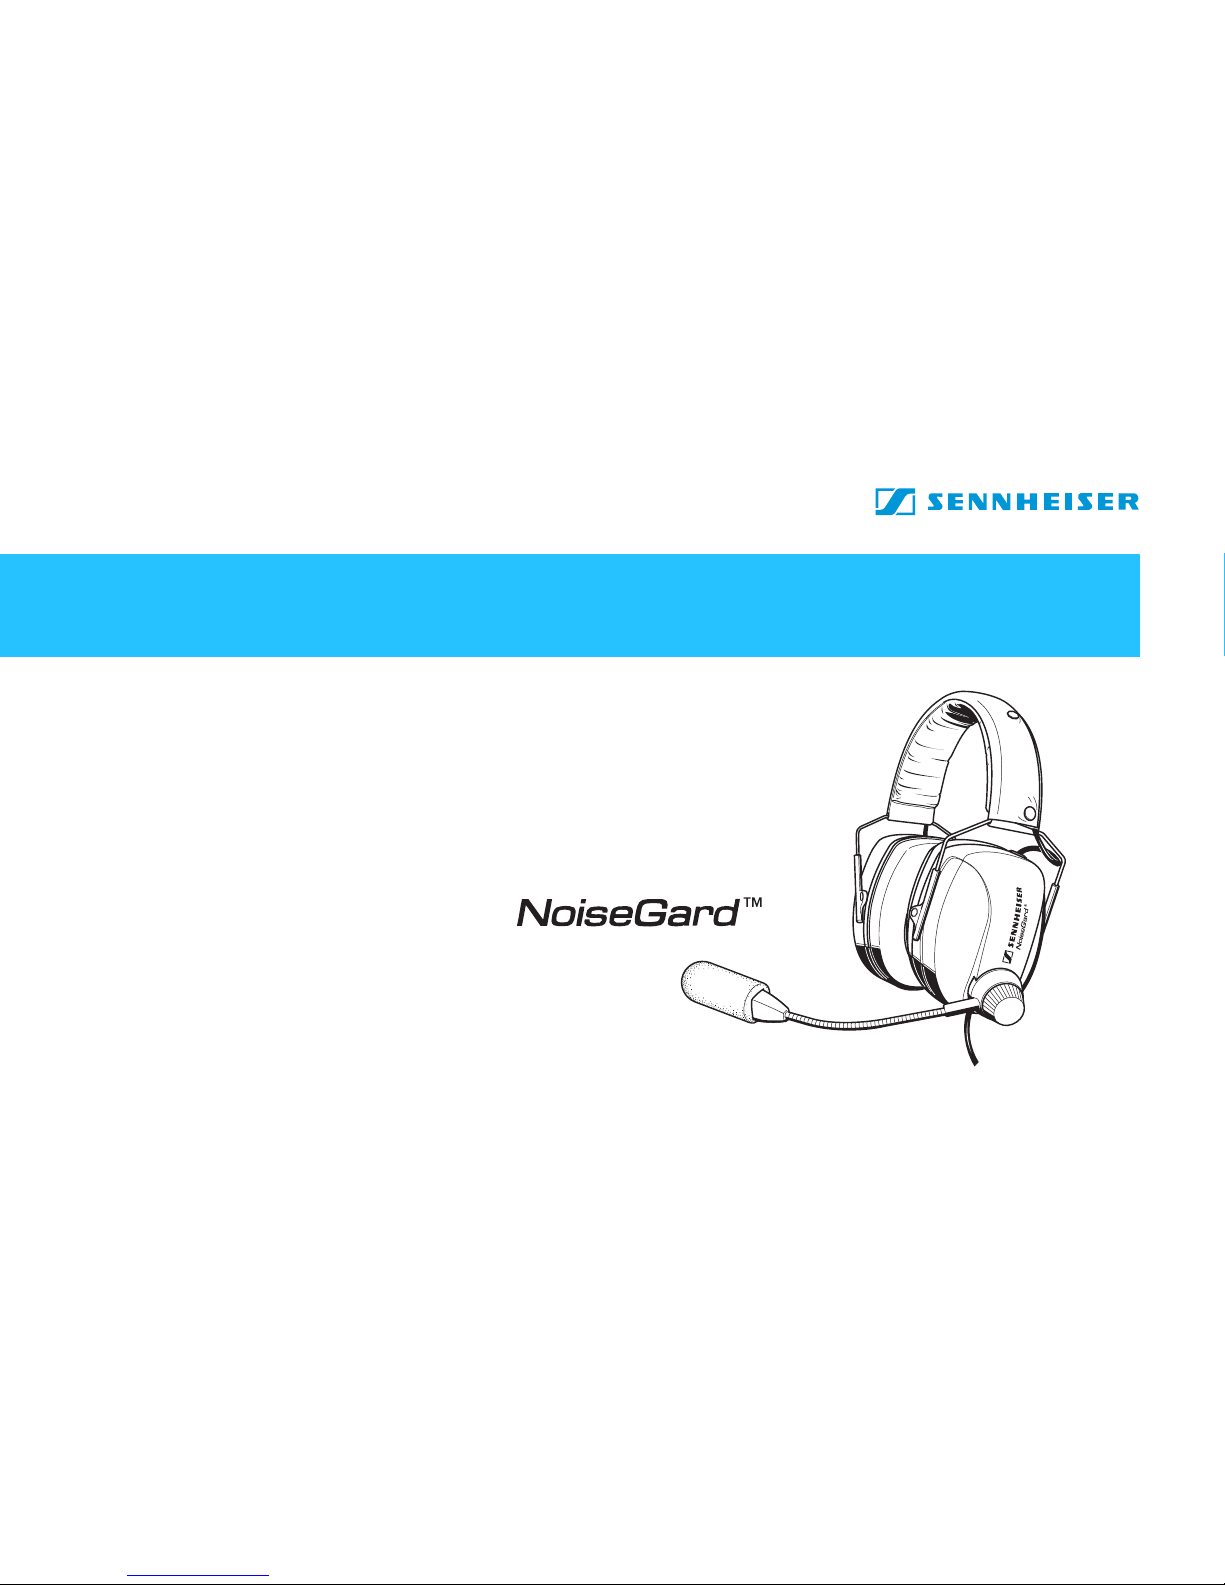
The HMEC 460 headset
The HMEC 460 is a pilot headset with closed ear protector headphones and NoiseGard
active noise compensation for use in helicopters, propeller and turboprop aircraft.
The headset has the following features:
y Flexible microphone boom with quick-fixing device
y Lightweight
y Comfortable leatherette earpads (replaceable)
y Padded headband
y Headband padding can be buttoned
y Single-sided connecting cable
y Folding mechanism for space-saving transport
y Stylish silver design
y Good attenuation of ambient noise due to NoiseGard active noise compensation
y Clear communications even in the noisiest environment due to NoiseGard active noise
compensation and MKE 45-1 pre-polarized condenser microphone with adjustable
sensitivity
y Increased speech intelligibility due to a frequency response optimized in the 500 Hz
to 5 kHz region
Page 8

6
y Adaption to the aircraft intercom system via mono/stereo switch
y Separate volume control for left and right channel
y Boom switch for microphone boom left/right position
y With the NoiseGard active noise compensation switched off, the headset can be used
as a conventional headset
y “Audio-In” signals from the 3.5 mm jack socket mute automatically in the presence
of intercom and/or RT traffic
y 2.5 mm jack socket for connecting a mobile telephone
y 3.5 mm jack socket for connecting a portable audio player
y Three options for powering NoiseGard
(on-board power supply system, cigarette lighter socket or batteries)
y Fail safe operation in case of power failure
y 10-year warranty and “Made in Germany“
Page 9

7
Delivery includes
1HMEC460 headset
1 audio cable (1.4 m) with 2 x 2.5 mm stereo jack for compatible mobile telephones
1 audio cable (1.4 m) with 2 x 3.5 mm stereo jack for portable audio players
1 padded carry and storage bag for headset and accessories
1 wind shield for microphone
1 MZQ 2002-1 cable clip
1 instruction manual
Page 10
8
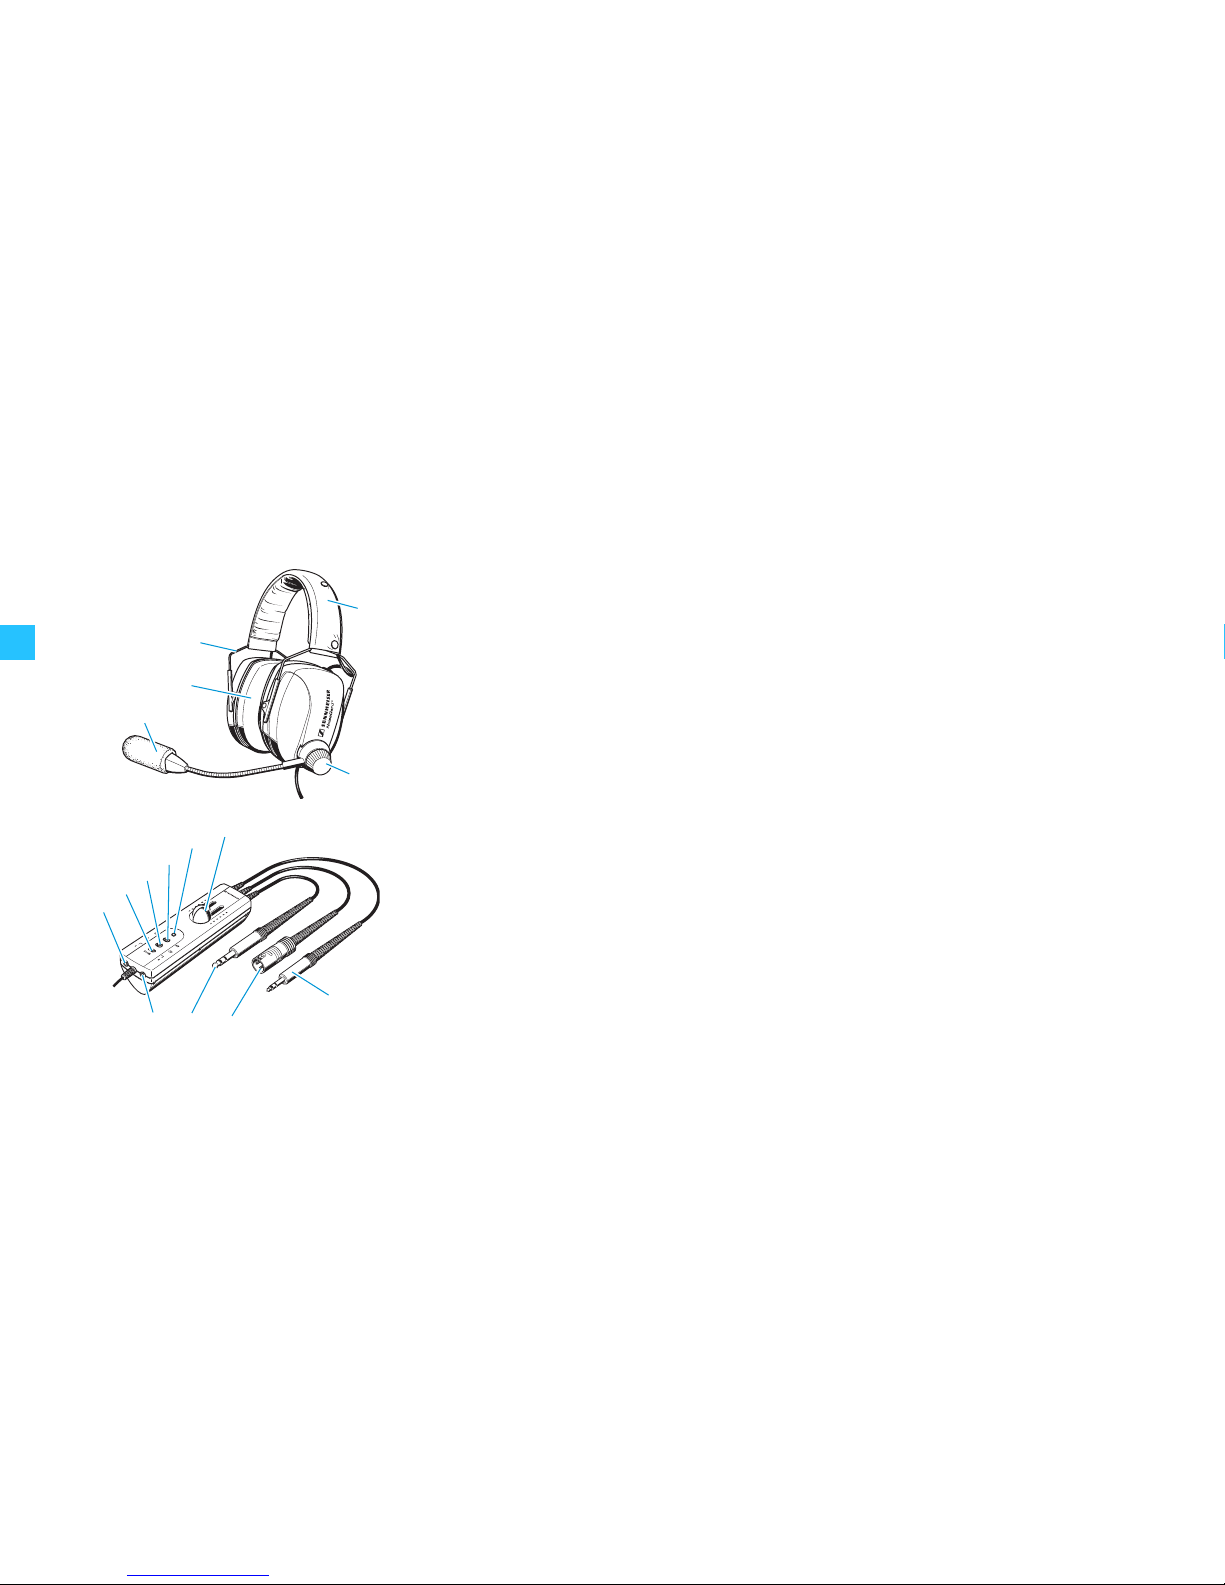
Overview of operating elements
Headset
Operating control
Headband padding
Quick-fixing device
Microphone
Earpads
Headband
5.25 mm jack plug
(PJ-068 equivalent)
XLR-3 plug
¼” (6.35 mm) jack plug
2.5 mm jack socket
3.5 mm jack socket
Boom switch
Mono/stereo switch
ON/OFF switch
LED for operation and
battery status indication
Separate slide volume controls for
left and right channel
Page 11
9
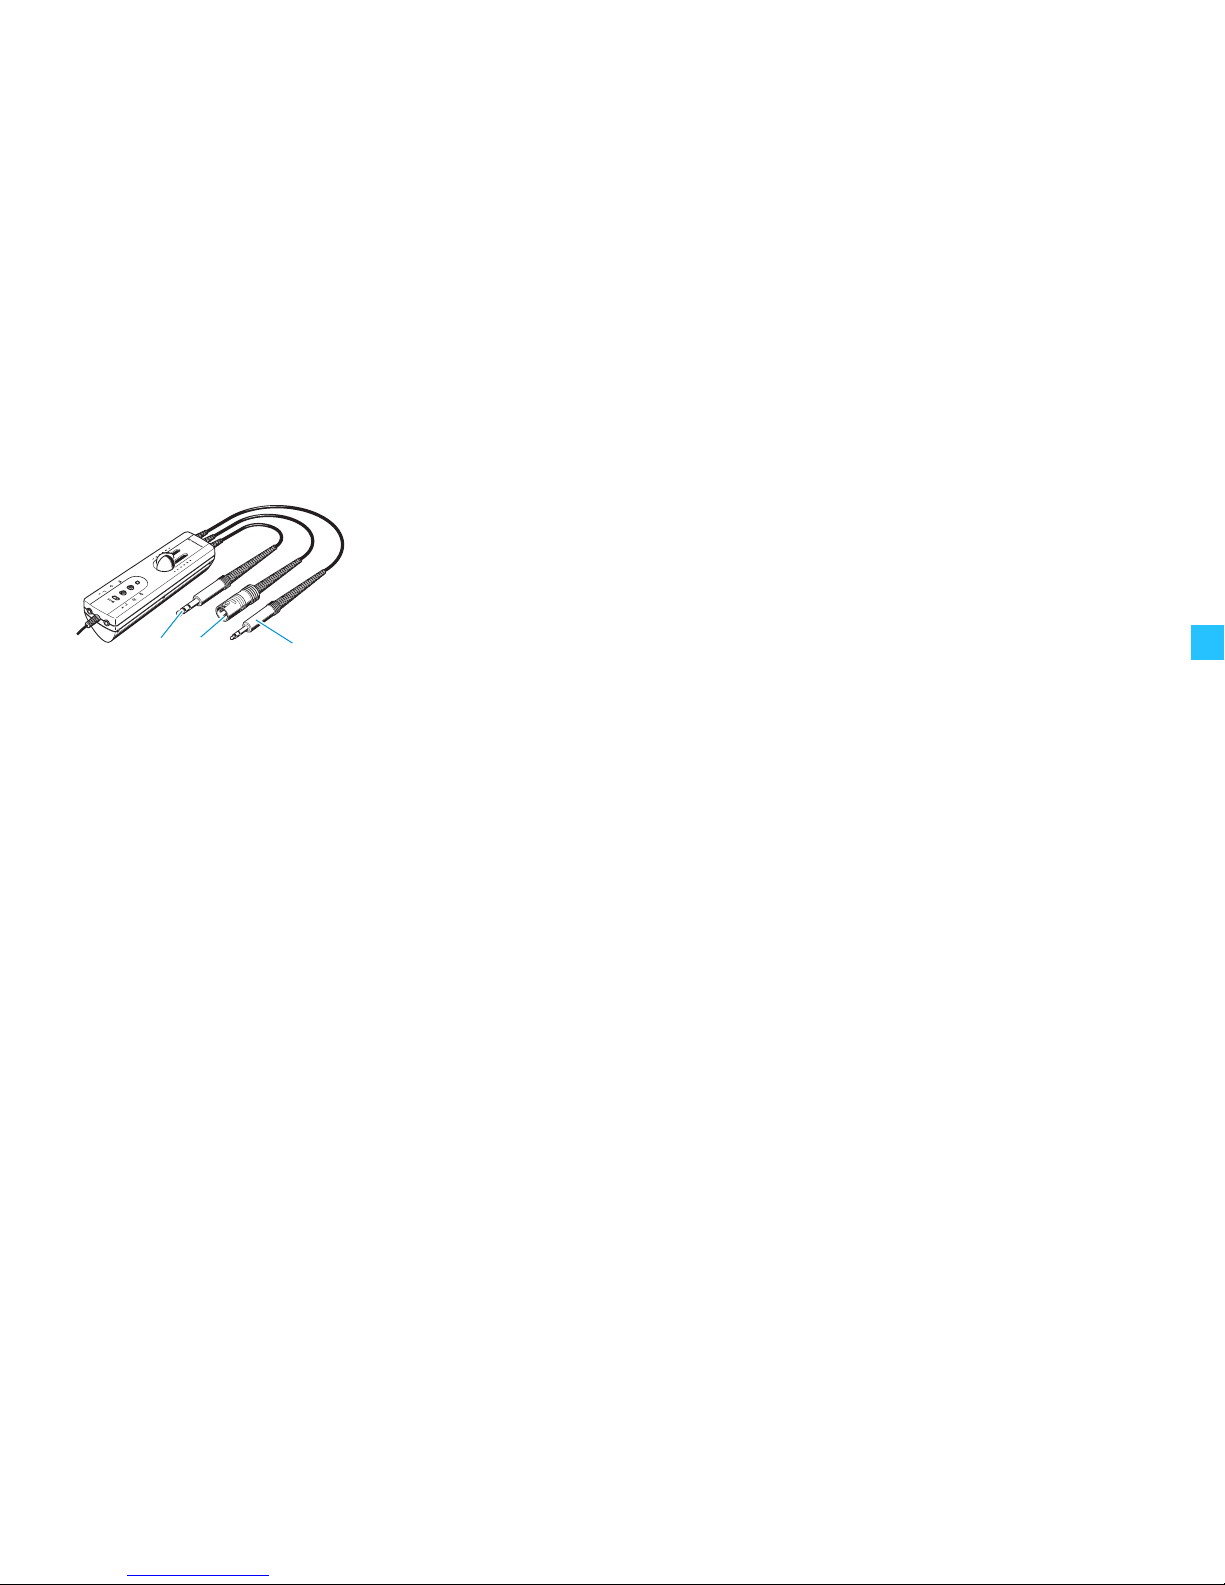
Connecting cable
1 5.25 mm jack plug (PJ-068 equivalent) for connecting the microphone
1¼” (6.35 mm) jack plug for connecting the headphones
1XLR-3 plug for connecting the power supply for the NoiseGard electronics
Preparing the headset for use
Connecting the headphones and the microphone
To connect the headset to the intercom:
왘 Connect the jack plugs and to the corresponding jack sockets of your intercom.
Page 12
10
Powering the NoiseGard active noise compensation
There are three options for powering the NoiseGard active noise compensation:
1. Connection to the on-board DC power supply system (12–35 V
DC
)
2. Connection to the cigarette ligther socket (12–35 V
DC
) via an adapter cable (optional
accessory)
3. Power supply via two AA batteries (not included) inserted in the operating control
The supply voltage for the NoiseGard system is processed by the in-line electronics in the
connecting cable.
Danger of short circuit!
In the unlikely case of a fault, a short circuit could occur.
왘 Before switching NoiseGard on, ensure that the aircraft electrical circuit
which supplies the headset from the on-board DC power supply system
is protected by a 1 A fuse.
CAUTION!
Page 13

11
Connecting the headset to the on-board DC power supply system
To power the NoiseGard electronics, you can connect the headset to the on-board DC
power supply system (12–35 V
DC
).
왘 Have a 3-pole XLR socket (optional accessories) be mounted by a technician qualified
to perform this type of installation.
왘 Connect the XLR-3 plug to the 3-pole XLR socket.
Connecting the headset to a cigarette lighter socket (12–35 V
DC
) via an adapter cable
Sennheiser offers special adapter cables with XLR-3 socket for connecting the NoiseGard
electronics of the headset to the on-board DC power supply via the cigarette lighter
socket:
y ACX-1 adapter cable for powering one headset via the cigarette lighter socket
y ACX-2 adapter cable for powering two headsets via the cigarette lighter socket
The adapter cables are also available with a right-angled jack plug featuring a 7.5 A fuse
and a green LED operation indicator:
y ACX-11 adapter cable for powering one headset via the cigarette lighter socket
y ACX-22 adapter cable for powering two headsets via the cigarette lighter socket
ACX-1
ACX-11 ACX-22
ACX-2
Page 14

12
To connect the headset via an adapter cable:
왘 Connect the XLR-3 plug of the headset to the XLR-3 socket of the adapter cable.
왘 Connect the plug or right-angled jack plug of the adapter cable to the cigarette lighter
socket.
Powering the NoiseGard electronics via two (rechargeable) batteries
왘 Open the cover of the battery compartment on the operating control.
왘 Insert two 1.5 V AA alkaline-manganese batteries (IEC LR 6) or two 1.2 V AA NiMH
rechargeable batteries. Observe correct polarity.
왘 Close the cover of the battery compartment .
With NoiseGard switched on (see “Switching NoiseGard on/off” on page 21), the LED
provides information on the remaining battery/rechargeable battery capacity.
If the battery voltage is too low, NoiseGard automatically switches off to protect the
batteries from total discharge and leakage.
왘 Replace the batteries or recharge the rechargeable batteries.
LED lights up yellow: The battery capacity is sufficient.
LED lights up red: The batteries are flat. Replace the batteries.
Page 15

13
Activating the “auto shut-off” function
The battery-saving “auto shut-off” function automatically switches the NoiseGard
electronics off when the headset is disconnected from the intercom or when the aircraft
avionics are switched off. The headset is delivered ex-works with the “auto shut-off”
function deactivated.
To activate the “auto shut-off” function:
왘 Open the cover of the battery compartment on the operating control.
왘 Set the switch to the position “ASO”.
왘 Close the cover of the battery compartment .
Connecting a mobile telephone
The 2.5 mm jack socket allows you to connect a mobile telephone. A suitable adapter
for your mobile telephone with 2.5 mm jack socket is available from your Sennheiser
agent.
Page 16

14
Note:
The latest information on cell phone compatibility can be downloaded from the
HMEC 460 product page at www.sennheiser.com.
왘 Connect the audio cable to the 2.5 mm jack socket on the operating control and to
the corresponding 2.5 mm jack socket on your mobile telephone.
You can adjust the volume of the mobile telephone via the headset’s operating
control. However, the functions of the mobile telephone cannot be controlled via the
headset’s operating control.
왘 Switch NoiseGard on (see page 21).
Audio from the mobile telephone and from the intercom are heard simultaneously
through the headset.
왘 Operate your mobile telephone as usual and observe the manufacturers instructions.
Danger of accident due to reduced attention!
Making telephone calls or operating the mobile telephone limits your
attention and may cause accidents.
왘 During flight operation, do not use the headset for telephone calls!
DANGER!
Page 17

15
Connecting an additional audio player
The operating control has a 3.5 mm jack socket , allowing you to connect an additional
audio player. The required audio cable fitted with two 3.5 mm jack plugs is included.
왘 Connect the audio cable to the 3.5 mm jack socket on the operating control and to
the corresponding 3.5 mm jack socket on your audio player.
왘 Switch NoiseGard on (see page 21).
“Audio-In” signals mute automatically in the presence of intercom and/or RT traffic.
Danger of accident due to reduced attention!
Listening to music or operating an audio device limits your attention and
may cause accidents.
왘 During flight operation, do not use the headset for listening to additional
audio sources!
Hearing damage due to high volumes!
This headset is capable of producing high sound pressure levels. Higher
volumes or longer durations can damage your hearing!
왘 Set the volume to a medium level. Make sure that you can hear critical
sounds such as warning alarms.
DANGER!
Page 18

16
Adjusting the headset
Adjusting the headband
For good noise attenuation and best possible comfort, the headband has to be adjusted
to properly fit your head:
Note:
Make sure not to squeeze any connecting cable when adjusting the headband.
Squeezing can damage the connecting cables.
왘 Wear the headset so that the headband runs over the top of your head.
왘 Adjust the length of the headband as shown so that
– your ears are completely inside the earpads,
– you feel even, gentle pressure around your ears,
– a snug fit is ensured.
Page 19

17
Rotating the microphone boom
The microphone boom can be worn on either side of the mouth.
왘 Loosen the quick-fixing device .
왘 Rotate the microphone boom by 180°.
왘 Tighten the quick-fixing device .
Changing the left and right stereo channel
The operating control is fitted with a boom switch . The position “R” or “L” of the
boom switch corresponds to the position of the microphone on the left or right side of
the mouth. When the microphone boom is rotated to permit left or right side
microphone orientation, the boom switch allows you to correctly assign the audio
channels (L/R) to the appropriate headphone sides. This enables the correct orientation
of the volume controls and any stereo audio signals.
If the microphone is worn on the right side of the mouth:
왘 Set the boom switch to the position “R”.
If the microphone is worn on the left side of the mouth:
왘 Set the boom switch to the position “L”.
쐋
Page 20

18
Positioning the microphone towards the corner of the mouth
The microphone boom is flexible, so you can position it individually.
왘 Bend the microphone boom so that the microphone is placed at the corner of the
mouth. Maintain a distance of approx. 2 cm between microphone and mouth.
Page 21

19
Using the headset
Switching between mono and stereo mode
The operating control is fitted with a mono/stereo switch, which allows you to switch
between mono and stereo mode to suit the aircraft radio / audio panel / intercom
installation.
If the audio panel, intercom system or radio installation in your aircraft is mono:
왘 Set the mono/stereo switch on the operating control to position “
”(mono).
The RT and or intercom will be heard in both ears.
If the audio panel, intercom system or radio installation in your aircraft is stereo, for
example if there is a music player such as a CD player installed in the panel:
왘 Set the mono/stereo switch on the operating control to position “
”(stereo).
The left and right channels from the audio panel will be fed to the corresponding sides
of the headset.
Notes:
– If you set the mono/stereo switch to “
” (stereo) and you find that you only hear
RT or intercom in one side of the headset then you should set the mono/stereo
switch to “
” (mono).
Page 22

20
– Setting the mono/stereo switch to “” (mono) when the aircraft panel is wired as
a stereo system will result in you hearing only the left channel of audio from the
panel in both sides of the headset. Depending on how the panel is configured you
may not hear some sounds from the panel in this case. Refer to the aircraft
operating handbook or a qualified avionics engineer.
Adjusting the volume
The operating control is fitted with two slide volume controls with which you can
adjust the volume for the left and right channel separately.
왘 Use the two slide controls to adjust the desired volume.
Hearing damage due to high volume levels!
The headset is capable of producing high sound pressure levels. Higher
volumes or longer durations can damage your hearing!
왘 Adjust the volume to a medium level. Make sure that you can hear critical
sounds such as warning alarms.
CAUTION!
Page 23

21
Switching NoiseGard on/off
왘 Set the NoiseGard ON/OFF switch to the desired position: “ON” or “OFF”.
With the NoiseGard active noise compensation switched off, the headset can be used as
a conventional headset.
Attaching the cable clip
The headphone cable can be fixed by means of the cable clip.
왘 Guide the headphone cable through the metal cable clip as shown.
왘 Attach the cable clip to your clothing.
왘 Loop the cable through the clip so that the headphone cable doesn‘t hinder or distract
you.
ON: NoiseGard is switched on. The LED lights up, indicating the battery status
(see page 12) or power supply via the on-board DC power supply system.
OFF: NoiseGard is switched off. The LED goes off.
Page 24

22
Folding up the headphones
For easy and space-saving transportation, the earcups can be folded up and tucked
between the headband.
To fold up the headphones:
왘 Grasp both earcups.
왘 Fold up the earcups and tuck them between the headband.
To unfold the headphones:
왘 Grasp both earcups.
왘 Pull the earcups down and away from the headband.
Page 25

23
Care and maintenance
Cleaning the headset
왘 Use a soft, slightly damp cloth to clean the headset from time to time.
왘 If the headset is very dirty, use a cloth dampened with mild, soapy water.
Replacing the wind shield
To replace a damaged wind shield, proceed as follows:
왘 Carefully pull the wind shield from the microphone.
왘 Slide-on the new wind shield and ensure that it fits securely over the microphone.
Danger of short-circuit due to the ingress of water!
Water entering the housing of the headset can cause a short-circuit and
damage the electronics.
왘 Only use a soft, slightly damp cloth to clean the headset. Do not use any
solvents or cleansing agents.
CAUTION!
Page 26

24
Replacing the earpads
To replace a damaged earpad, proceed as follows:
왘 Hold the headset on the outside of the earcup and on the headband .
왘 Grasp the edge of the earpad behind the earcup as shown and peel it up and away
from the earcup.
왘 Slide the new earpad onto the earcup. Repeat for the other earcup.
Replacing the headband padding
To replace a damaged headband padding, proceed as follows:
왘 Open the snaps on the headband padding and remove it.
왘 Put the new headband padding around the headband.
왘 Close the snaps.
Page 27

25
If a problem occurs...
Problem Possible cause Possible solution
No active noise
compensation
The NoiseGard
electronics are switched
off.
Set the NoiseGard ON/OFF switch to
“ON”.
The batteries/
rechargeable batteries
are low.
Check to see if the LED is lit yellow.
If the LED is lit red, replace the
batteries/rechargeable batteries.
The XLR-3 plug is
not connected to the
power source.
Connect the XLR-3 plug to the power
source.
The aircraft fuse is
defective.
Replace the aircraft fuse.
Page 28

26
If a problem occurs that is not listed in the above table or if the problem cannot be solved
with the proposed solutions, please contact your local Sennheiser agent for assistance.
Active noise
compensation but
very low volume
communication
The volume is set too
low.
Increase the volume of your headset.
The headphone jack plug
is not connected
correctly.
Connect the headphone jack plug.
Active noise
compensation but
reduced
intelligibility
The microphone jack
plug is not connected
correctly.
Connect the microphone jack plug.
Communications in
one ear only
You are receiving a mono
source but the headset is
set to stereo operation.
Set the mono/stereo switch to “”
(mono).
Problem Possible cause Possible solution
Page 29

27
Accessories/spare parts
Product name Product description Cat. No.
– Gel earpads 093807
– Spare earpads 517607
ACX-1 Adapter cable for powering one headset ACX-1
ACX-11 Adapter cable for powering two headsets ACX-11
ACX-2 Adapter cable with a right-angled jack plug for powering one headset ACX-2
ACX-22 Adapter cable with a right-angled jack plug for powering two headsets ACX-22
MZW 45 Wind and pop shield 075823
MZQ 2002-1 Cable clip 044740
– Padded carry and storage bag for headset and accessories 078366
– Headband padding 515462
– Audio cable with two 2.5 mm stereo jacks 515468
– Audio cable with two 3.5 mm stereo jacks 515466
– XLR 3-pole socket 048883
Page 30

28
Valuable information on NoiseGard
The NoiseGard principle
One of the greatest stress factors today is noise. Research has shown that noise affects
the nervous system, and can cause tiredness, poor concentration, irritability and
tension. Of even greater concern is the permanent damage to hearing that can result
from noise at high levels.
This problem concerns pilots in particular. Cockpit noise amounts to about 80 dB(A) in
jets and to 90 up to 97 dB(A) in turboprops. During takeoff and landing, the noise level
is even higher. To be able to understand radio traffic in spite of the noisy environment,
the ATC signal level must be set to at least 95 dB(A). Permanent hearing loss caused by
the continuous noise in aircraft is one reason why many pilots became prematurely
disabled or lose their pilot´s license.
Circumaural communication headsets provide noise attenuating properties and are
commonly used to address this problem. However, the noise attenuation of these
headsets is uneven. High frequencies are reduced considerably, but low frequency wind
and engine noise, the most prominent noise in many of today's aircraft, is attenuated
very little. In response to these problems, Sennheiser has developed an active noise
compensation system – NoiseGard – which, combined with a high-quality passive
hearing protector, provides consistent noise attenuation over the entire audio range.
The overall noise level is reduced so that the radio volume can be turned down but
enough noise still remains for the pilot to safely monitor the aircraft engines.
Page 31

29
NoiseGard active noise compensation is achieved by generating a signal identical in
sound pressure level but exactly reversed in phase to the noise signal, the effect being
that the out-of-phase signal cancels most of the noise signal.
Active noise compensation is accomplished in the following manner: Each earcup
includes a microphone, a feedback control circuit, and a transducer to reproduce both
the communication and the noise cancelling signal. The feedback control microphones
sense the total sound pressure within each earcup resulting from both the desired radio
signal from the receiver and the undesired noise that has come through the earcup. The
microphone signal is amplified and the radio signal is subtracted from it. The remaining
signal (noise) is then filtered and inverted and the radio signal is added back in.
Eventually, the entire signal is amplified and fed back to the transducer in each earcup.
Since the noise component of the signal is inverted, it cancels the noise signal coming
through the earcup. The radio signal remains unaffected, as it was not processed
through the cancellation circuits.
The diagram on the left shows noise compensation with NoiseGard: Passive hearing
protectors effectively attenuate noise from the middle and upper frequency range, the
effect decreasing sharply in the lower range. However, active noise compensation with
NoiseGard combined with passive hearing protectors results in a reduction of noise of
approx. 25 dB in the 25–500 Hz frequency range. The total attenuation resulting from
active and passive noise compensation is about 30 dB over the entire audio range.
A 10 dB reduction in noise is perceived subjectively as a halving in volume. A further
reduction in noise of 10 dB again results in a decrease in unwanted noise by 50 %.
Page 32

30
Specifications
Headphones
Microphone incl. preamplifier
Transducer principle dynamic
Ear coupling circumaural, closed
Frequency response 20–20,000 Hz
Nominal impedance active/passive 400/300 Ω, mono
600/600 Ω, stereo
Attenuation (active/passive) > 25–40 dB
Contact pressure approx. 8 N
Transducer principle pre-polarized condenser microphone capsule,
noise-compensating, MKE 45-1
Frequency response 300–5,000 Hz
Max. sound pressure level 120 dB
Min. terminating impedance 150 Ω
Output voltage 400 mV ± 3dB at 114dB (as per RTCA/DO 214)
Supply voltage typ. 16 V
DC
(8-16 VDC, approx. 8-25 mA, as per
RTCA/DO 214)
Page 33

31
General data
Connecting cable 1.5 m, single-sided
Weight without cable 370 g
Power supply for NoiseGard 12–35 V
DC
Fuse 1.5 A fuse
Connectors 5.25 mm jack plug (PJ-068 equivalent) for microphone,
¼” (6.35 mm) jack plug for headphones,
XLR-3 plug for NoiseGard
Controls mono/stereo switch
on/off switch for NoiseGard
LED for operation and battery status indicator
volume control for headphones
Temperature range operation: -15 °C to +55 °C
storage: -55°C to +55°C
Operating time approx. 30 hours
with two 1.5 V AA alkaline-manganese batteries
or two 1.2 V AA NiMH rechargeable batteries
Page 34

32
Connector assignment
XLR-3 plug
1 Power supply for NoiseGard (12–35 V
DC+
)
2 Ground
3 Not assigned!
5.25 mm jack plug (PJ-068 equivalent)
1 Not assigned!
2 Microphone High
3 Microphone Low
¼” (6.35 mm) jack plug
1 Audio High left
2 Audio High right
3 Audio Low
Page 35

33
Manufacturer Declarations
Warranty
The original Sennheiser product you have purchased is covered by a warranty of 10 years. The warranty
period begins on the date of purchase of brand new, unused products by the first end user. Please retain
your sales receipt (or your warranty certificate) as proof of purchase. Unless you submit proof of
purchase, which will be verified by your local Sennheiser service partner, you will be obliged to pay for
any repairs that are carried out. Proof of purchase must state the date of purchase and name of the
product.
We shall satisfy our warranty obligations by remedying any material or manufacturing faults free of
charge at our discretion either by repair or by exchanging individual parts or the entire appliance. Any
defective parts removed from a product during the course of a warranty claim shall become the
property of Sennheiser electronic GmbH & Co. KG.
The following cases are not covered by the above warranty:
y
minor faults or deviations in the quality of a product which do not affect the product's value or
fitness for its intended purpose
y
any accessories supplied with the product
y
rechargeable and disposable batteries (these products have a shorter service life, the length of which
also depends on the frequency of use)
y
faults resulting from improper use (e.g. operating errors, mechanical damage, incorrect operating
voltage)
Proper use for the purposes of this warranty is defined as use of the product under the conditions
stated in the instructions for use.
y
faults due to wear and tear
Page 36

34
y
any modification of Sennheiser products effected by you or a third party, unless Sennheiser has
given its prior written consent to the nature and extent of the modification
y
faults due to force majeure
y
faults of which the purchaser was already aware at the time of purchase
All warranty claims become void if the product is tampered with by unauthorised persons or repair
shops.
Warranty claims can be enforced in any country throughout the world in which the statutory rights of
the country concerned are not in conflict with our warranty regulations. No other warranty claims or
claims over and above the rights stated in these terms and conditions will be accepted.
Consumers may be entitled to statutory rights in their own countries which are not restricted by these
warranty terms and conditions, as the warranty is governed by the laws of the country in which the
Sennheiser product was purchased by the consumer. The provisions of the UN Convention on the
International Sale of Goods do not apply to this service.
If you wish to file a claim under the warranty, please send the product to your local service partner,
together with accessories and proof of purchase.
The customer bears the risk of shipment. To avoid any damage in transit, please use the original
packaging if possible.
CE Declaration of Conformity
This equipment is in compliance with the essential requirements and other relevant provisions of
Directive 2004/108/EC. The declaration is available on the internet site at www.sennheiser.com.
Before putting the device into operation, please observe the respective country-specific regulations!
Sennheiser and NoiseGardTM are registered trademarks of Sennheiser electronic GmbH & Co. KG.
Page 37

Sennheiser electronic GmbH & Co. KG
Am Labor 1
30900 Wedemark, Germany
Phone +49 (5130) 600 0
Fax +49 (5130) 600 300
www.sennheiser.com
Printed in Germany Publ. 08/07 515872 / A02
 Loading...