

Page 1
SNnlI31NVSH::mVH83S
3SnHO:!SNOI1::mH1SNI
3svsn.l HnOdSN0I1::mH1SNI
H:lSI:lHNN:lS[Zj
ZOOZ3>1W
Page 2
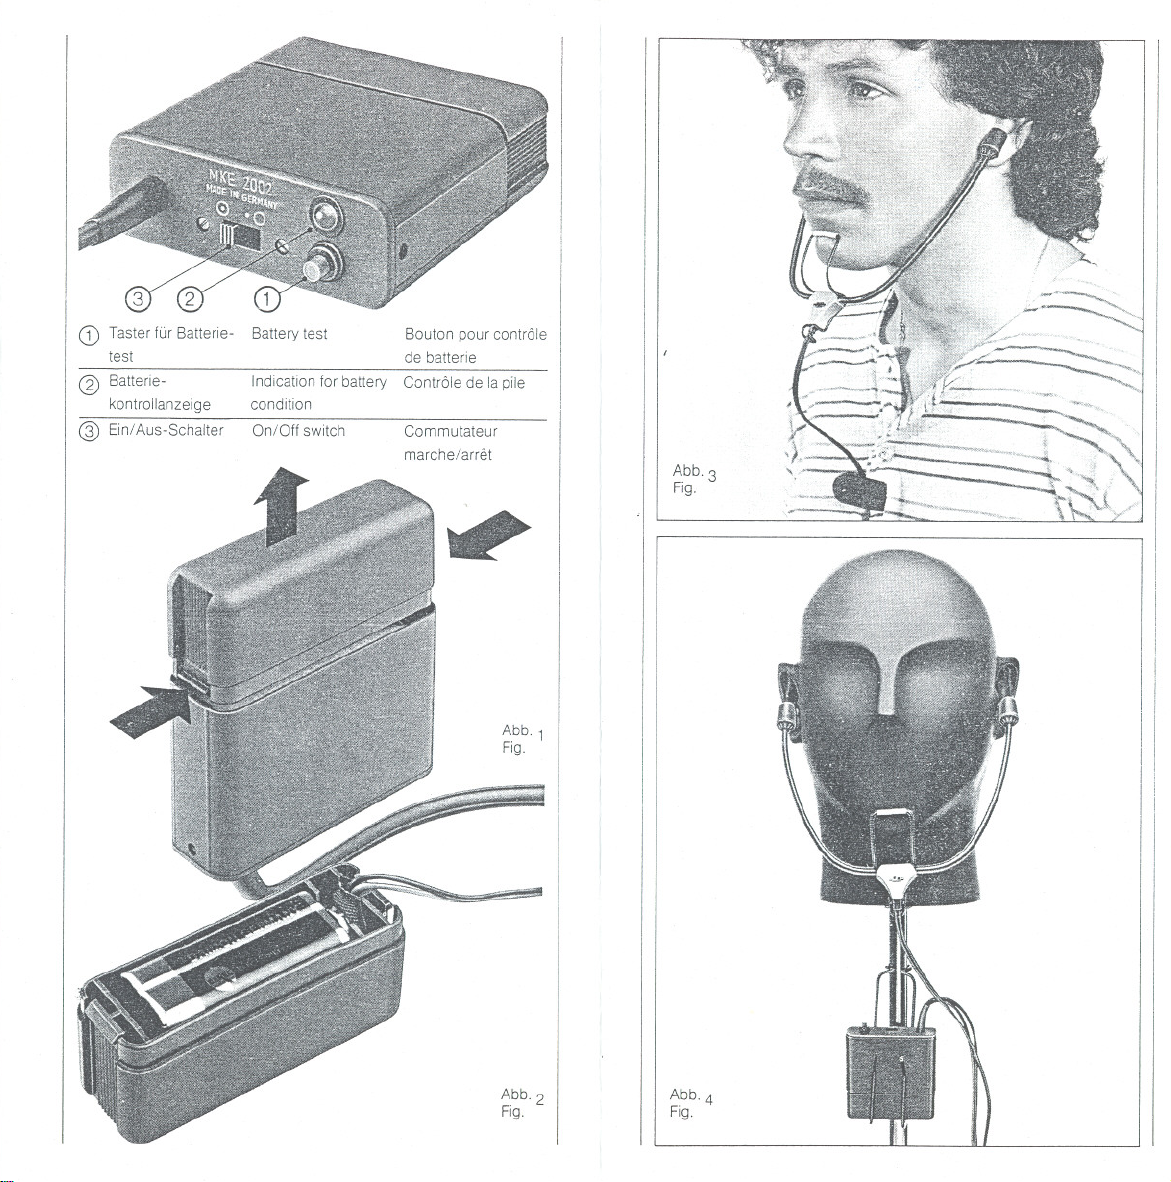
CD Tasterfür BatterIe-
test
@ Batterie-
kontrollanzeige
@ Ein/Aus-Schalter
Battery test
Indication for battery Contröle de la pile
condition
On/Off switch Commutateur
Bouton pour contröle
de batterie
marche/am':t
Abb.1
Fig.
11
Abb.3
Fig.
Abb.2
Fig.
Abb.4
Fig.
Page 3
KOPF-STEREO-MIKROFON MKE 2002
Einleitung
Die Kunstkopf-Stereofonie wurde aus der Erkenntnis heraus entwickelt,
daß bei Tonaufnahmen der Schall dort aufgenommen werden sollte, wo
ihn der Mensch auch hört, nämlich am Trommelfell im Ohr. So entstand
ein künstlicher Kopf, bei dem sich anstelle der Trommelfelle Konden-
sator-Mikrofone befinden, deren Signale mit einem 2kanallgen Tonband-
gerät aufgezeichnet werden. Obwohl diese Technik dem Hörer einen
bisher nicht erlebten dreidimensionalen Höreindruck vermittelt, hat sie
den Nachteil, technisch recht aufwendig zu sein.
Mit dem Kopf-Stereo-Mikrofon MKE
Weg der Kunstkopf-Technik beschritten. Ausgangspunkt der Entwicklung
dieses Mikrofons waren Untersuchungen, die ergaben, daß es nicht
zwingend erforderlich ist, den Schall dort aufzunehmen, wo sich die
Trommelfelle befinden, sondern daß es bereits ausreicht, die Schall-
abtastung durch kleine hochempfindliche Mikrofone am Gehöreingang
eines menschlichen Kopfes vorzunehmen. Bei dieser Aufnahmetechnk
Ihr Kopf die Grundlage Ihrer stereofonen kopfbezogenen Auf-
bildet
nahme, die im Ergebnis der mit einem professionellen Kunstkopf ge-
machten Aufnahme ebenbürtig ist. Die beiliegende Oemonstratrons-
Schallplatte »Kunstkopf-Stereofonie 2« gibt Ihnen die Möglichkeit, sich
von der Einzigartigkeit der Senn heiser Kunstkopf-Stereofonie zu über-
zeugen.
2002 hat Sennheiser einen anderen
2
r
Page 4

Inbetriebnahme
A. Einsetzen der Batterie
Die Stromversorgung erfolgt aus einer 9-V-Batterie IEC 6 F 22. Zum
Einlegen der Batterie öffnen Sie die Batteriefach-Abdeckung am Ver-
sorgungsteil (Abb. 1) Schieben Sie die Batterie gemäß Abb. 2 in die
Abdeckung ein und lassen diese wieder in das Versorgungsteil ein-
rasten. Danach ist zur Kontrolle der Schiebeschalter 3 in Stellung (!) zu
bringen. Durch Druck auf die Taste 1 können Sie an der Helligkeit, mit der
die LED 2 leuchtet, feststellen, ob die Batterie ausreichende Betriebs-
spannung liefert.
Da Braunstein-Batterien die Eigenschaft haben, sich nach längerer Lager-
zeit in gewissen Maßen zu regenerieren, sollten Sie, um sicherzugehen,
daß es sich um eine frische Batterie handelt, den Taster ca. 10 Sekunden
lang niederdrücken und dabei die Helligkeit der LED beobachten. Läßt
sie erkennbar nach, sollten Sie die Batterie wechseln. Vorzugsweise
sollten Sie eine Alkali-Mangan-Batterie verwenden, da dieser Batterietyp
leistungsstärker und besser lagerfähig ist als Braunstein-Batterien.
B. Anschluß des Mikrofons
DasMKE2002läßt sich direkt oder unter Verwendung entsprechender
Adapterkabel an fast jedes Stereo- Tonbandgerät sowie fast jeden
Stereo-Kassettenrecorder anschließen. Die Beschaltung ist asymme-
trisch ausgeführt und nach DIN
Masse) niederohmig und 1 und 4 (2 = Masse) mittel- und hochohmig
anschließbar. Den richtigen Anschluß des MKE 2002 an Ihr Tonband-
gerät entnehmen Sie bitte der beiliegenden »Mikrofon-Anschluß-Fibel«,
Seite 34 und 35.
C. Aufstellen des Mikrofons
Nachdem das Kopf-Stereo-Mikrofon ordnungsgemäß an das Tonband-
gerät angeschlossen ist, wird es entsprechend Abb. 3 lose in die Ohren
eingehängt. Farbringe an den Kapseln markieren rechts (rot) und links
(gelb). Um das Gewicht des Versorgunsteiles und des Anschlußkabels
vom Mikrofonbügel fernzuhalten, sollte das Versorgungsteil in der
Jacken- oder Hosentasche getragen werden. Mit Hilfe des Clips am
Verbindungskabel zwischen Bügel und Versorgungsteil wird das Kabel
an der Kleidung zur Vermeidung von Reibegeräuschen abgestützt. Der
Kinnbügel hält das Mikrofon in der akustisch günstigsten Lage stabil und
reduziert die bei leichten Kopfbewegungen möglichen Störgeräusche.
Bei Außenaufnahmen sollte der als Zubehör erhältliche Windschutz
2002 verwendet werden.
MZW
Der zum Lieferumfang des MKE 2002 Set gehörende künstliche Kopf
(Abb. 4) ist für die Fälle vorgesehen, bei denen Sie das Mikrofon nicht
selbst tragen können, z. B. in Hörspielen. Für die Aufnahme wird der
Kunstkopf auf ein Stativ geschraubt e/s"-Gewinde) und das Mikrofon in
gleicher Weise wie bereits beschrieben angebracht. Mit der zum Liefer-
umfang gehörenden Befestigungklammer ist das Versorgungsteil am
Stativ zu befestigen (Abb. 4).
Nach den vorbereitenden Maßnahmen setzen Sie sich in die Position,
in der Sie den besten Höreindruck von der aufzunehmenden Schall-
quelle haben. (Bei Live-Mitschnitten von Konzerten, im Theater oder in
der Oper wird dies nicht immer so uneingeschränkt möglich sein wie bei
eigenen Produktionen, trotzdem wird das Aufnahmeergebnis weit über-
zeugender sein, als wenn Sie ein konventionelles Mikrofon in der Hand
halten würden.) Während der Aufnahme achten Sie bitte darauf, den
Kopf möglichst wenig zu bewegen. Bei Aufnahmen mit dem künstlichen
Kopf stellen Sie diesen an dem Punkt auf, an dem Sie den besten Hör-
eindruck haben. Das zu verwendende StCltivwird bis zu der Höhe ClUS-
gezogen, in der sich Ihr Kopf befindet, wenn Sie sitzen.
3
45594 über die Kontakte 3 und 5 (2 =
Einsatzmöglichkeiten für das MKE 2002
Eigenproduktionen von Hörspielen, Mitschnitte von Musikdarbietungen,
Aufnahme der Schallwelt, wie z. B. auf Bahnhöfen, Flughäfen, Straßen
usw., oder in der freien Natur, Selbstkontrolle beim Musizieren oder beim
Erlernen einer Sprache. Dieses sind nur einige Beispiele für die Einsatz-
möglichkeiten des MKE 2002. Über das Experimentieren mit dem Kopf-
Stereo-Mikrofon werden Sie sicherlich noch weitere Anwendungs-
bereiche erschließen.
Tips und Hinweise
. Das Mikrofon nicht zu weit vor der Schallquelle positionieren, da sonst
der Raumhall überwiegt.
.Ein interessanter Effekt für Hörspiele oder Interviews ergibt sich, wenn
man das MKE 2002 selber trägt und dClbeiauch spricht. Im Gegensatz
zu anderen Geräuschen, die außerhalb des Kopfes geortet werden,
hört man die eigene Stimme im Kopf.
. Nach Möglichkeit das Kopf-Stereo-Mikrofon immer selbst tragen und
nur in Ausnahmefällen den künstlichen Kopf einsetzen.
. Zum Abhören der Aufnahme möglichst offene Kopfhörer verwenden.
Zur Verbesserung der Vorne-Ortung die Wiedergabe eventuell optisch
durch Bilder etc. unterstützen.
Technische Daten
Uberlragungsberelch
Akustische ArbeitsweISe
Rlcilicharaktenslik
Feld -Leerla ul-Uberlrag ungsla klor
Eleklnsc:llC Impedanz
Minimale Abschlußlmpedancz
Ger ausehspan n ungsabstand
Slecker
Steckerbeschaltung
Stromversorgung
BetriebszeitmiteinerBattene
Gewicht ohne Batterie
SM.Beschallung
40 20000 Hz
Druckemplanger
Kugel
10 mV/Pa" 1 mV/pbar
ct 3 dB
ca. 1 kU
4,7 kQ
ca. 64 dB
5pol Norrnstecker
(z B Mas 50S)
1 ~ linker Kanal
4 ~ rechter Kanal
2 ~ Masse
9-V-Battene IEC 6 F 22
ca. 300 Stunden mit
Braunsteln-Battene
ca. 600 Stunden mit
Alkali- Mangan- Batterje
ca 195 9
SL-Beschallung
40 20000 Hz
Druckemplanger
Kugel
3 mV/Pa" 0,3 mV/pbar
ca t kll
1 kQ
ca. 64 dB
"pol Normstecker
.L. B. Mas 50S)
3 ~ linker Kanal
5 ~ recllter Kanal
2 ~ Masse
9-V-Baltene tEC 6 F 22
ca. 300 Stunden mit
Braunstein-Batterie
ca. 600 Stunden mit
Alka 11-Mangan -Batterie
c3.195g
4
Page 5

TRIAXIALSTEREOMICROPHONE MKE2002
Introduction
Thetriaxialstereo microphone was developed from the basic idea that
when recording, sound should be recorded where the person hears it
i. e. via the eardrum Inside the ear. Thus an artificlal head was created
containing condensor microphones In place of eardrums. The signals
available at the microphone outputs are then recorded onto a 2-track tape
recorder. Although this system does give the listener an impression of
3-dimensional sound, which was previously unheard of, it does have the
disadvantage of being technically very expensive.
Sennheiser has found another method 01achieving the deslred dummy
head microphone effect with the triaxial stereo mlcrophone MKE 2002.
Development of this microphone was first of all based on investigatlons
wh ich revealed that it is not absolutely vital to record the sound where the
eardrums are located; instead it is quite sufficient to perform the sound
recoroing by means of small, highly sensitive microphones at the outer
auditory canal 01a human head. With thls recording technique it ISyour
own head which creates your personal binaural recordings, resulting in a
recording which is a good match for one made with a professional dummy
head The enclosed demonstration disc "Triaxial Stereo Microphone 2"
gives you the chance to prove for yourself how unlque the Sennheiser
triaxial stereo mlcrophone iso
5
Operation
A. Inserting the battery
The power is supplled from a 9 V-battery IEC 6 F 22. To insert the battery
open the battery compartment cover at the supply section (Fig. 1). Slide
the battery into the cover and slot this back Into the supply section. The
slide control 3 should then be adjusted to the position 0. By pressing
key 1 it can be ascertained - depending on how brightly the LED 2 lights
up - whether the battery is delivering enough operational voltage or not.
Since, after being stored for some time, the zinc-carbon batteries have
the property of regenerating themselves to a certain extent, the key should
be held down for about 10 seconds, while observing the brightness ofthe
LED, to ensure that the battery is fresh If brightness decreases noticeably,
i
the batteries should be changed. An alkali-manganese battery ISto be
preferred, since these batteries are more powerful and can be stored
Ionger than zinc-carbon batteries
~
B. Connecting the microphone
The MKE
stereo cassette recorder either directly or by using corresponding adapter
cables. The circuitry is designed asymmetrically and may be connected
according to DIN
impedance inputs and via 1 and 4 (2 = ground) to medium or high
Impedance inputs. For the correct connection of the MKE 2002 to your
tape recorder please see the accompanying "Microphone connectlon
manual", pp. 34 and 35.
C. Setting up the microphone
After connecting the triaxial stereo microphone to the tape recorder
according to the instructlons, it is placed into the ears as shown in Fig. 3.
Coloured rings on the capsules denote right (red) and left (yellow). In
order to keep the welght of the supply unit and connecting cables away
from the microphone, the supply unit should be placed in the jacket pocket
or trouser pocket. The cable ISsupported on the cloth es by means of a clip
on the lead from the microphone to the supply unlt so as to avoid rubbing
nOlses. The microphone support keeps the microphone steady in an
acoustlcally favourable position and reduces the disturbance noises which
may arise when the head is moved slightly. The windscreen MZW 2002,
available as an 'accessory, should be used for outside recordings. The
dummy head (Fig. 4), included in the packaging of the MKE 2002 set, is
designed for cases in whlch you cannot carry the microphone yourself,
e. g. in radio plays. For recording the dummy head is screwed onto a
tripod e/s"-thread) and the microphone is mounted as described
previously. The supply unit may be attached to the tripod with the special
i
clip included in the set (Fig. 4).
r
2002 can be connected to almost any stereo tape recorder or
45594 via contacts 3 and 5 (2 = ground) to low
~
Recording with the triaxial stereo microphone
Having completed allthe necessary preparation, sit in the position in whlch
the sound source to be recorded sounds best. (With live recordlngs of
concerts, theatre or opera this is not always as unrestricted as for private
productions, but all the same the resulting recording will be far more
impressive than if simply uSlng a conventional hand-held microphone)
Please take care to move the head as liWeas possible during the
recording. When recordlng with the dummy head, place the latter on the
spot where you hearthe best sound. The tripod used should be extended
to the height your head ISat when you are sltting.
;:,
Page 6

Possible applications tor the MKE 2002
Personal radio play productions, recordings 01musical performances,
recordlngs 01environmental sound such as on railway stations, at airports,
lOads etc. or in the country; sell-control when playinQ music or learning a
language. These are only a few examples of possible applications of the
MKE 2002. You are bound to come up with more ideas when you
experiment with the triaxIal stereo microphone.
Tips and advice
. Don't position the microphone too far away from the sound source,
otherwise the echo effect will predominate.
. An interesting effect for radio plays or interviews results when one
carries the MKE 2002 oneself and speaks at the same time.
. If possible always wear the triaxial stereo microphone yourself and only
employ the dummy head in exceptional cases.
. Use open headphones (if possible) for listening to recordings.
To improve front-Iocalization pictures may be used to support the
playback optically
MICROPHONE STEREO A TETE MKE 2002
~
4
~
Technical Data
Frequeney response
Acousllealoperatlon
Dllecllonal charaete"stlc
Open meuit output voltage
Eleelrieallmpedanee
Mln.load Impedanee
S/Nrallo
Plug
Plug mcuilry
Power supply
Operalionailime with one battery
Welght wilhout battery
7
SM circuitry
40 10 20000 Hz
Pressure mlcrophone
ommdlleetlonal
10 mV/Pa 1; 1 mV/llbar
:!: 3 dB
approx. 1 kU
4.7 kU
approx. 64 dB
5-pln DIN plug
(e g Mos 50S)
1 ~ lell channel
4~ right ehannel
2 ~ ground
9 V battery IEC 6 F 22
approx 300 hours
wlth earbon "ne
battery
approx. 600 hours
wilh Alkali-manganese
ballery
approx 195 g
S L circuitry
40 to 20000 Hz
Pressure mlcrophone
omnldireetlonal
3 mV/Pa 1;03 mV/llbar
approx 1 kU
1 kU
approx 64 dB
5-pln DIN plag
(e g. Mas 50S)
3 ~ lell ehannel
5 ~ nght ehannel
2~ ground
9 V ballery IEC 6 F 22
approx. 300 hours
wllIl carbon lIne
ballery
approx. 600 hours
wllh Alkali manganese
ballery
approx. 195 g
Introduction
f.i,'!!:
Differentes etudes sur leson ont abouti au resultat suivant: le son devrait
etre enregistre 13ou I'homme I'entend, c'est 3 dire dans le tympan de
I'oreille. On a construit ainsi une tete artificielle de stereophonie. Sur cette
~
tete, des microphones electrostatiques prennent laplace des tympans et
leurs signaux sont enregistres par un magnetophone 3 deux canaux.
Bien que cette technique donne une acoustique «3 trois dimensions»
jusqu'3 present non realisee, elle a I'inconvenient d'etre fort compliquee.
Grace au micro stereo 3 tete artificielle MKE 2002, Sennheiser atrouve un
autre chemin dans la technique de la tete artificielle. Ceci a ete rendu
possible par des recherches qui ont prouve qu'il n'etait pas absolument
necessaire d'enregistrer le son 13ou se trouve le tympan. 11suffit de placer
des petits micros tres sensibles a I'entree de I'oreille d'une tete humaine
Ainsi votre tete constitue les bases de votre enregistrement stereo, qui
est de meme valeur qu'un enregistrement fait avec une tete artilicielle
prolessionnelle. Le disque de demonstration ci-joint «Stereo
artificielle 2" permet de vous rendre compte de laqualite unique de la
stereophonie
3tete artlficielle de Sennheiser.
3tete
8
Page 7

Mise en service
A. Mise en piace des piles
L'alimentation se fait par des piles 9 V IEC 6 F 22. Pour placer les piles,
ouvrez le compartiment piles du bloc d'alimentation (Fig. 1). Placez les
piles selon la Fig. 2 et refermez. Mettez I'interrupteur poussoir 3 en
position @.Appuyez sur latouche 1 pour verifier I'etat de charge des piles
a I'aide de la LED 2. Comme les piles ordinaires ont la faculte de se
regenerer apres un certain temps de stockage, appuyez pend~nt env. 10 s
sur latouche et observez laluminosite de laLED pour etre sur que les piles
sont neuves. Si la luminosite de la LED diminue, changez les piles. I1est
preferable d'utiliser des piles alcallnes car elles ont plus de puissance et
peuvent etre stockees plus longtemps.
B. Branchement du microphone
LeMKE2002 peut etre branche directement ou par l'lntermediaire de
cables adapteurs sur presque tous les magnetophones stereo et sur
presque tous les magnetocassettes. Le brochage est asymetrique et
selon la DIN 45594. Les broches 3 et 5 supportent un branchement a
faible resistance, les broches 1 et 4 un branchement a resistance
moyenne et elevee, la broche 2 est la masse. Vous trouverez le
branchement correct du MKE
2002 sur votre magnetophone dans le
«guide de branchement" ci-joint, pages 34 et 35.
C. Installation du micro
Apres avoir ete branche sur le magnetophone, le micro sera suspendu
librement dans I'oreille, selon la Fig. 3. Des annaux de couleur sur les
mlcros indlquent le cote: rouge pour le droit Jaune pour le gauche. Pour
eviter que le poids du bloc d'allmentation et du cable de raccordement
ne se repercute sur I'etrier por!ant les micros, le bloc d'alimentation devra
etre mis dans la poche de la veste ou du pantalon. Grace a la pince
sltuee sur le cable entre le bloc et I'etrier, le cable sere fixe au vetement
pour eviter les bruits de frottement. Pour les enreg'istrements en exterieur,
il est recommande d'utillser la bonnette anti-vent
Dans le cas ou vous ne pouvez pas porter le micro vous-meme, u@sez
latete artlficlelle(Fig.4) livreeavec laversion MKE2002 set. Lors de
MZW2002.
I'enregistrement,la-teteseravisseesur unpied (filetage3/8") et le micro
sera place comme nous I'avons deja decrit ci-dessus. Le bloc d'alimen-
tation sera fixe sur le pied avec la pince qui I'accompagne (Fig. 4).
Recommandations
. Placer le microphone pres de la source du son, sinon les bruits
environnants seront trop iorts.
. Un effet interessant dans les pieces de theatre et les interviews se
produit lorsque I'on porte le micro et que I'on parle en meme temps.
On entend sa propre voix dans
latele, au contraire des autres bruits
qui viennent de I'exterieur.
. Portez de preference vous-meme les micros et n'ulilisez la tete
artificielle qu' exceptionnellement.
. Ecoutez I'enregistrement avec un casque overt. Pour determiner la
direction du son, renforcez la demonstration p. e. par des images.
I;'
I
I
'"f
Enregistrement
Apres tous ces preparatifs, asseyez vous laou vous pensez recevoir au
mieux leson (ceci ne sera pastouJours possible au concer!, au theatre ou
a I'opera, cependant le resultat est bien meilleur que celui obtenu en
utilisant un microconventionnel tenu ala main). Pendant I'enregistrement,
ne remuez pas trop la tete. Si vous utilisez la tete artificielle, placez-Ia
ou vous recevez le meilleur son. Deployez le pied de fac;:onque la tete
soit a la hauteur de lavötre lorsque vous eIes assls.
Utilisationsdu MKE 2002
Enregistrements amateurs de pieces de theatre, de musique, des sons
environnents comme p. e. dans les gares, aerodromes, rues ou dans la
nature, possibilites de contröle lorsque I'on joue de lamusique ou lorsque
I'on apprend une langue. VoilE,seulement quelques exemples. Vous en
decouvriez certainement d'autres en experimenlant le micro stereo a
tete artificielle.
9
~
~
Bandepassante
Pnnclpeacoustlque
Ollectlvlte
Facteurde transmission avlde
Impedanceelectnque
Impedancedechargeminimale
Rapportsignal brUlt
Fiche
Brochage
Alimentation
Temps de fonctlonnement
avec une pile
POlds sans pile
Branchement SM
40 20000 Hz
capteur de pression
omnidllectlonnelle
10 mV/Pa ~ 1 mV/ubar
:': 3 dB
env 1 kQ
4,7 kQ
env. 64 dB
normallsee 5 poles
(p. e. Mas 50S)
1 = canal gauche
4 = canal drait
2 = masse
piles 9 V IEC 6 F 22
env. 300 h avec
pile ordlnalle
env 600 h avec
pile alcaline
env. 195 g
Branchement SL
40 20000 Hz
capteur de pression
omnldlleclionnelle
3mV/Pa~0,3 mV/ubar
:': 3 dB .
env. 1 kQ
1kQ
env. 64 dB
normallsee 5poles
(p. e. Mas50S)
3 = canalgauche
5 = canaldralt
2 = masse
piles 9 V IEC6 F 22
env 300 h avec
pile ordlnalle
env 600 h avec
pile alcallne
env 195 g
10
Page 8

Änderung
Die im Text genannte Schallplatte "Kunstkopf-
Stereophonie 22 befindet sich nicht mehr im
Lieferumfang des Mikrofones MKE2002.
Notification of change
The record "TriaxialStereo Microphone 2"
mentioned in the text is no langer supplied
with the MKE 2002.
Changement
Le disque "Stereoa lat8te artificielle 2"
mentionne dans le texte n'est plusfourni
avec le MKE2002.
Sennheiser electronic KG . D-30892 Wedemark, Germany
Phone (0 51 30) 6 00-0 . Fax (0 51 30) 63 12
Printed in Germay Pub!. 10/90 18291/A 03
 Loading...