

Page 1
Bedienungsanleitung
Instructions for use
Notice d‘emploi
Instrucciones de uso
Page 2

Bedienungsanleitung.......................................................................................................3
Instructions for use .......................................................................................................15
Notice d’emploi ............................................................................................................. 27
Instrucciones de uso..................................................................................................... 39
Page 3
Instructions for use
15
Page 4

Contents
Safety instructions ...........................................................................16
The freePORT systems .....................................................................17
Delivery includes ........................................................................18
EM 1 receiver .....................................................................................18
SK 2 bodypack transmitter .............................................................20
SKM 3 radio microphone .................................................................22
Optimizing the system ....................................................................23
Care and maintenance .....................................................................24
If problems occur... ..................................................................... 25
Accessories and variants ................................................................25
Specifications of the freePORT systems ......................................26
Connector assignment ..............................................................26
Thank you for choosing Sennheiser!
We have designed this product to give you reliable operation over many
years. Over half a century of accumulated expertise in the design and
manufacture of high-quality electro-acoustic equipment have made
Sennheiser a world-leading company in this field.
Please take a few moments to read these instructions carefully, as we
want you to enjoy your new Sennheiser products quickly and to the
fullest.
16
Safety instructions
Never open electronic units! If units are opened by customers in breach
of this instruction, the warranty becomes null and void.
Keep the units away from central heating radiators and electric heaters.
Never expose them to direct sunlight.
Use the units in dry rooms only.
Use a damp cloth for cleaning the units. Do not use any cleansing agents
or solvents.
Page 5

The freePORT systems
Designed for different areas of application, the freePORT systems are
available in three variants.
y Presentation Set:
This system is ideal for presentation applications. The unobtrusive
ME 2 clip-on microphone is virtually invisible.
y Instrument Set:
This system is for connecting musical instruments (e.g. guitar) which
have a ¼” (6.3 mm) jack socket directly to the bodypack transmitter.
y Vocal Set:
This system is ideal for vocal and speech applications.
Transmitters and receivers of the freePORT systems have four factorypreset frequencies for direct channel selection – ready for immediate
use after switch-on.
The freePORT systems are available in three UHF frequency ranges:
y Frequency range A: 719 to 721 MHz
y Frequency range C: 742.5 to 744.5 MHz
y Frequency range E: 863 to 865 MHz
Hinweise:
The Frequency ranges A and C can only be used in certain areas in
the EU and must be licensed with the regulating authorities. Frequency E is license-free in most EU countries (i.e. ETSI signatory
countries).
Please be legal and observe the country-specific regulations of the
licensing authorities. Sennheiser are not responsible if you operate
illegally.
To avoid interfering with other users, the transmitter should be
switched off when not in use.
Features of the freePORT systems:
y Up to four transmission links per frequency range which can be
operated simultaneously
y Reliable transmission technology
y Diversity technology for minimizing dropouts in the reception
y Adjustable squelch for eliminating RF interference
y Rugged housings
y Crystal-clear reception due to dynamic processor
17
Page 6
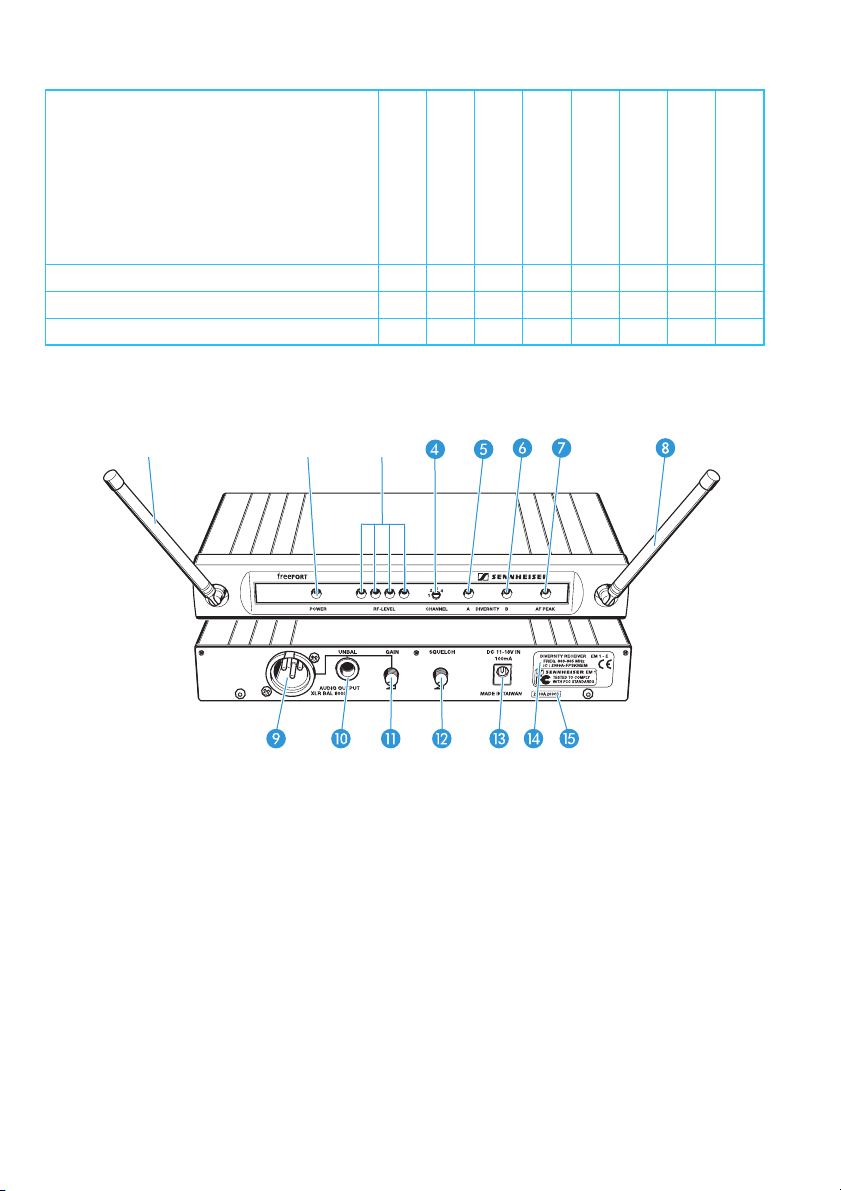
Delivery includes
FreePORT systems
Stand mount
EM 1 receiver
SK 2
bodypack transmitter
SKM 3
radio microphone
Mains unit
ME 2
clip-on microphone
¼” (6.3 mm) jack cable
Instructions for use
Presentation Set (Model No. 21101) XX XX X
Instrument Set (Model No. 21104) XXXXX
Vocal Set (Model No. 21105) XXX XX
EM 1 receiver
Operating controls
Antenna A
Operation indication, green LED (POWER)
RF level indication, four green LEDs
(RF LEVEL)
Channel selector switch CHANNEL (1 to 4)
Diversity indication, yellow LED A
(lights up if antenna is active)
Diversity indication, yellow LED B
(lights up if antenna is active)
AF PEAK, red LED (lights up if the audio
level is too high)
18
Antenna B
Audio output, XLR-3M socket, balanced
(AUDIO OUTPUT XLR BAL)
Audio output, ¼” (6.3 mm) jack socket,
unbalanced (AUDIO OUTPUT UNBAL)
Audio output level control (GAIN)
Squelch threshold control (SQUELCH)
DC socket for connection of mains unit
(DC 11–18 V IN, 100 mA)
Type plate
Serial number
Page 7

Connecting the receiver
왘 Insert the DC connector on the mains cable into the DC socket and
connect it to the mains. The green LED for operation indication
(POWER) lights up and the receiver is ready for operation.
왘 To deactivate the receiver, remove the mains plug from the mains
outlet.
Aligning the antennas
왘 Set up the antennas and align them upwards in a V-shape.
The LEDs A and B indicate which diversity section (i.e. which
antenna) is active.
Connecting the amplifier/mixing console
왘 Connect the amplifier/mixing console to the XLR-3M socket or
the ¼” (6.3 mm) jack socket .
왘 Use the GAIN control to adapt the level of the audio output to the
input of the amplifier or mixing console. The adjusted audio output
level is common for both sockets. If the level is adjusted too high,
the audio signal will be distorted. If, on the other hand, the level is
adjusted too low, this will result in an audio signal with high
background noise.
Selecting and changing a channel
You can change the channel on the receiver during running operation.
The receiver then immediately receives on the new channel.
왘 Use a small screwdriver to set the channel selector switch to the
desired channel. You can switch between four different channels
(see “Selecting a channel” on page 24).
19
Page 8
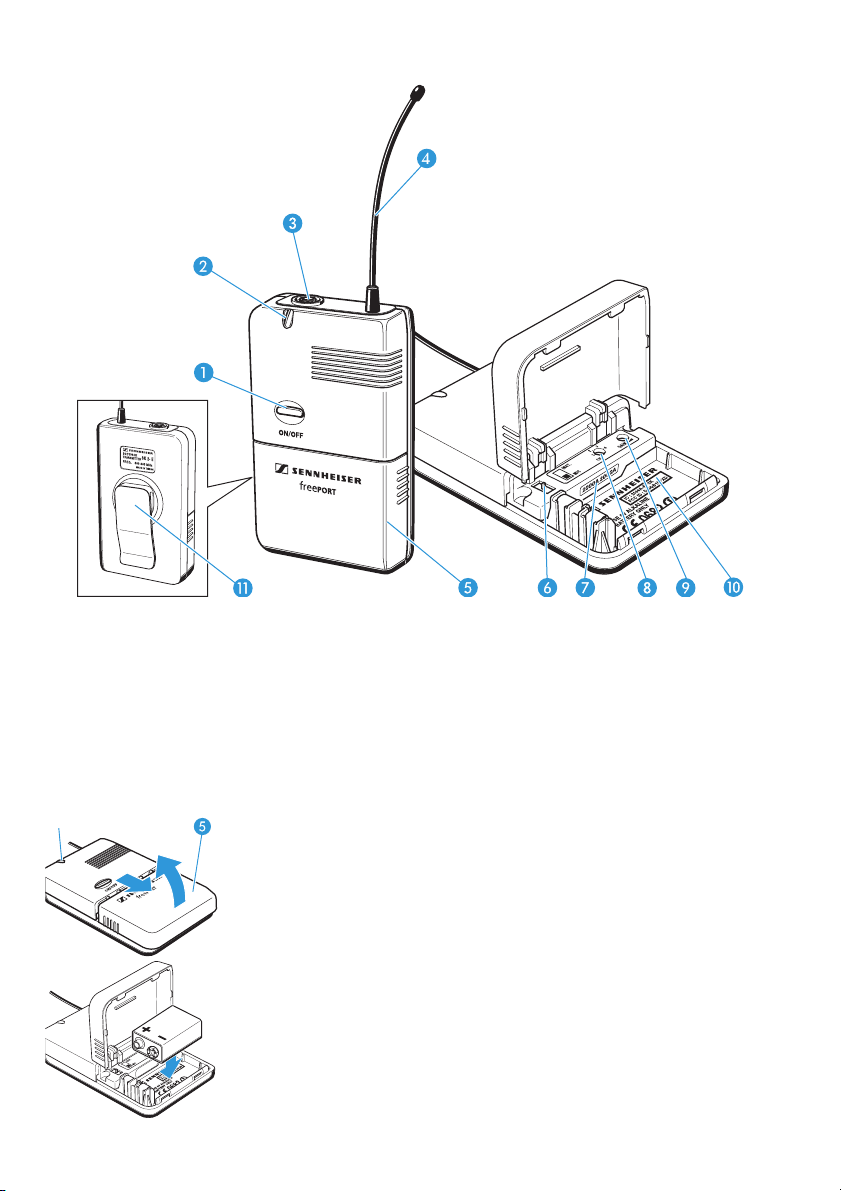
SK 2 bodypack transmitter
Operating controls
ON/OFF button
Operation and battery status indication, red LED
Microphone/instrument input,
3.5 mm jack socket (lockable)
Antenna (can be screwed off)
Battery compartment cover
MIC/INST slide switch
Serial number
Channel selector switch CH (1 to 4)
Sensitivity control GAIN
Type plate
Belt clip
20
Inserting/replacing the battery
We recommend powering the bodypack transmitter by a 9 V PP3
alkaline battery (IEC 6 LR 61). If powered by a rechargeable 9 V battery,
the operating time will be drastically reduced.
왘 Open the battery compartment by first sliding the battery
compartment cover in the direction of the arrow. Then flip the
battery compartment cover open.
왘 Insert the battery as shown. Please observe correct polarity when
inserting the battery.
왘 Close the battery compartment.
Note:
When the red LED goes off during operation, you must replace
the battery as soon as possible.
Page 9
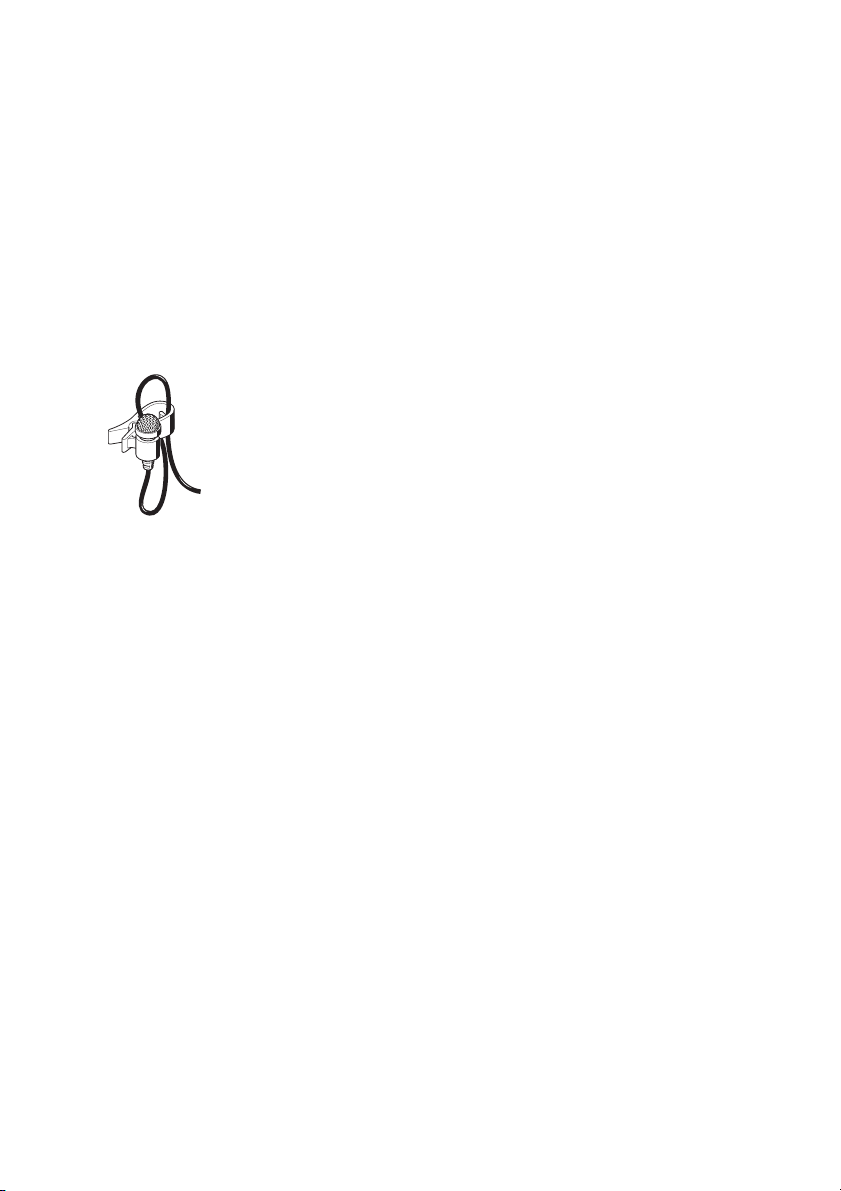
Connecting the microphone/instrument cable
The audio input is designed for the connection of both the ME 2 clip-on
microphone and instruments (e.g. guitars).
왘 Connect the 3.5 mm jack plug from the microphone/instrument
cable to the 3.5 mm jack socket .
왘 Check the setting of the MIC/INST slide switch which allows you
to switch between microphone and instrument operation. If
necessary, readjust the setting.
왘 Use the GAIN control to adjust the transmitter sensitivity so that
the receiver receives a good audio signal (no distortion and no
background noise).
Attaching and positioning the microphone
Use the microphone clip to attach the ME 2 clip-on microphone to
clothing (e.g. tie, lapel). Conduct the microphone cable so that noise due
to friction is avoided and make sure that the antenna and the cable do
not cross. The omni-directional microphone picks up sound equally from
all directions. However, it should be attached as close as possible to the
sound source.
Attaching the bodypack transmitter to clothing
왘 Use the supplied belt clip to attach the bodypack transmitter to
clothing. Make sure that the antenna is at least 1 cm away from the
body and is not kinked.
Switching the bodypack transmitter on/off
왘 Press the ON/OFF button to switch the bodypack transmitter on
or off. If the bodypack transmitter is switched on, the red LED
lights up.
Note:
Remove the battery when the transmitter will not be used for
extended periods of time.
Selecting and changing a channel
왘 Switch off the transmitter before you change the channel.
왘 Use a small screwdriver to set the channel selector switch to the
desired channel. You can switch between four different channels.
When you switch on the bodypack transmitter again, it will transmit
on the new channel (see “Selecting a channel” on page 24).
21
Page 10
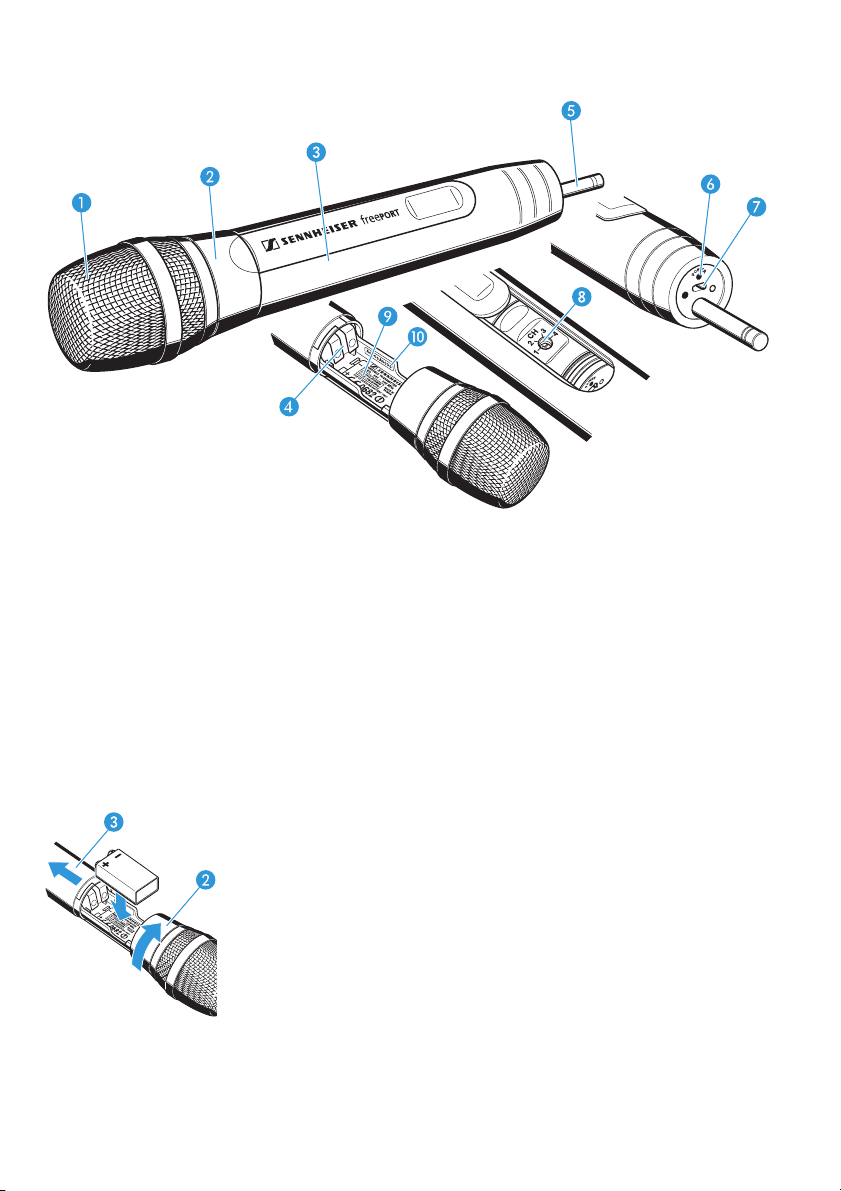
SKM 3 radio microphone
Operating control
Sound inlet basket
Locking ring of battery compartment
Body of radio microphone
Battery compartment (not visible from
outside)
Antenna (can be screwed off)
Operation and battery status indication,
red LED (POWER)
ON/OFF switch
Channel selector switch CH (1 to 4)
Type plate
Serial number
22
Note:
The microphone head of the radio microphone cannot be changed.
Inserting/replacing the battery
We recommend powering the radio microphone by a 9 V PP3 alkaline
battery (IEC 6 LR 61). If powered by a rechargeable 9 V battery, the
operating time will be drastically reduced.
왘 Turn the locking ring of the battery compartment in the direction
of the arrow.
왘 Pull the body of the radio microphone in the direction of the
arrow as far as it will go.
왘 Insert the battery as shown. Please observe correct polarity when
inserting the battery.
왘 Close and lock the radio microphone.
Note:
When the red LED goes off during operation, you must replace
the battery as soon as possible.
Page 11

Switching the radio microphone on/off
왘 Use the ON/OFF switch to switch the radio microphone on or off.
If the radio microphone is switched on, the red LED lights up.
Note:
Remove the battery when the transmitter will not be used for
extended periods of time.
Selecting and changing a channel
왘 Switch off the radio microphone.
왘 Open the radio microphone (see “Inserting/replacing the battery”
on page 22).
왘 Use a small screwdriver to set the channel selector switch to the
desired channel. You can switch between four different channels
(see “Selecting a channel” on page 24).
왘 Close and lock the radio microphone.
왘 Switch on the radio microphone again.
Sensitivity of the radio microphone
You can vary the bass reproduction by increasing/decreasing the
talking distance.
Setting up the system
Before starting transmission, do a soundcheck and set up the system as
follows:
Setting up the reception
The receiver’s four LEDs (RF LEVEL) indicate the level of the received
RF signal. With the transmitter, walk up and down the transmission
area and check if the received RF signal is sufficient everywhere.
Reception is good if all four LEDs light up. Please observe the following:
y Transmission range depends to a large extent on location and can be
up to 100 m. Observe a minimum distance of 3 m between
transmitter and receiver. There should be a “free line of sight”
between transmitting and receiving antennas.
y Do not operate the system close to metal objects such as cross
members or reinforced-concrete walls. Computers or mobile phones
in direct proximity to the antenna will interfere with the reception.
y Each transmitter requires a receiver. When using several trans-
mission links simultaneously, make sure that all transmission links
operate on different channels.
23
Page 12
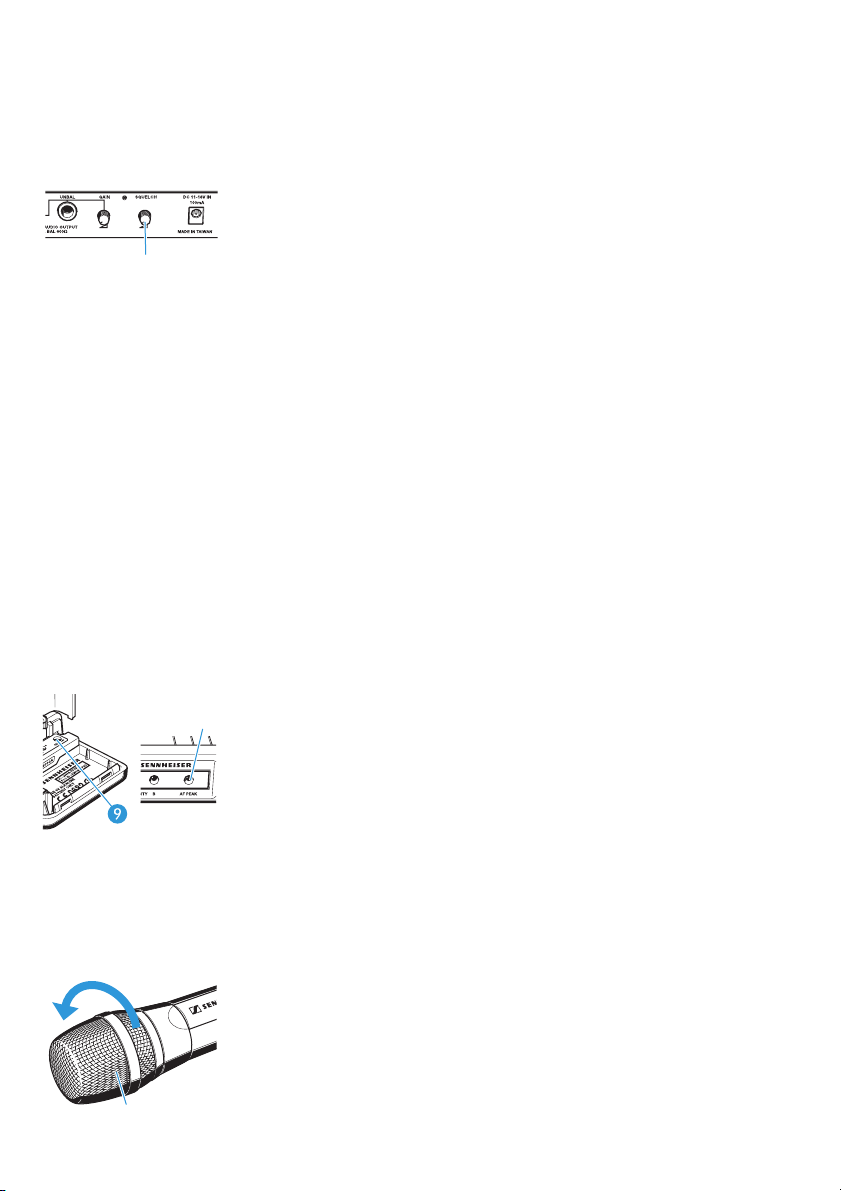
Adjusting the squelch threshold
Interference due to other transmission links can be eliminated as
follows:
왘 Switch off the transmitter. The receiver should no longer receive a
signal.
왘 If the receiver still receives a signal, use the SQUELCH control to
increase the squelch threshold so that the signal will no longer be
received. If the signal cannot be eliminated in this way, set the
transmitter and the receiver to a different channel.
왘 Switch on the transmitter again and check if the receiver receives
the transmitter signal.
Note:
If the squelch threshold is adjusted too high, the transmission range
will be reduced. Therefore, always adjust the squelch treshold to the
lowest possible setting.
Selecting a channel
Transmitters and receivers have four channels respectively with
intermodulation-free frequencies.
Note:
These frequencies are different to those in evolution systems and
freePORT systems should not be used together with evolution sys-
tems without great care.
24
왘 Always set the transmitter and the receiver to the same channel.
Adjusting the transmitter sensitivity
왘 Use the GAIN control on the SK 2 bodypack transmitter to adjust
the sensitivity so that even during the loudest passages the
AF PEAK LED on the EM 1 receiver does not light up.
Care and maintenance
Use a slightly damp cloth to clean the units from time to time.
Note:
Do not use any cleansing agents or solvents.
To clean the SKM 3’s sound inlet basket:
왘 Unscrew the sound inlet basket (turn counterclockwise) and
remove it.
왘 Remove the foam insert and use a slightly damp cloth to clean the
sound inlet basket.
왘 Reinsert the dry foam insert, replace the sound inlet basket on the
SKM 3 and screw it tight.
Page 13

If problems occur...
Problem Possible cause Possible solution
No operation indication Battery is flat Replace the battery
No mains connection (receiver) Check the connections of the mains
unit
No RF signal Transmitter and receiver are not on
the same channel
Transmitter is out of range Reduce the distance between
RF signal available,
no audio signal
Audio signal has a high
level of background
noise or is distorted
Receiver’s squelch threshold is
adjusted too high
Transmitter sensitivity is adjusted
too low or too high
The MIC/INST slide switch on
the SK 2 transmitter is not set
correctly
Receiver’s audio output level is
adjusted too low or too high
Set transmitter and receiver to
the same channel
transmitter and receiver
See “Adjusting the squelch
threshold” on page 24
See “Connecting the microphone/
instrument cable” on page 21
See “Connecting the amplifier/
mixing console” on page 19
Accessories and variants
04839 MZW 1 Wind- and popshield for SKM 3
76670 MZQ 1 Microphone clamp for SKM 3
05018 ME 2 Clip-on microphone for SK 2, pre-polarized condenser microphone, omni-
directional
05019 ME 3 Headmic for SK 2, pre-polarized condenser microphone, super-cardioid
05020 ME 4 Clip-on microphone for SK 2, pre-polarized condenser microphone, cardioid
512889 CI1-fp Guitar cable
Frequency range Presentation Set Instrument Set Vocal Set
719
–721 MHz:
with US mains unit freePort fp 12-A-US freePort fp 72-A-US freePort fp 35-A-US
742.5
–744.5 MHz:
with EU mains unit freePort fp 12-C-EU freePort fp 72-C-EU freePort fp 35-C-EU
with US mains unit freePort fp 12-C-US freePort fp 72-C-US freePort fp 35-C-US
863
–865 MHz:
with EU mains unit freePort fp 12-E-EU freePort fp 72-E-EU freePort fp 35-E-EU
with UK mains unit freePort fp 12-E-UK freePort fp 72-E-UK freePort fp 35-E-UK
25
Page 14

Specifications of the freePORT systems
System characteristics
Transmission/receiving
frequencies
Switching bandwidth 2 MHz
Signal-to-noise ratio
THD (1 kHz)
Temperature range –10 bis +45 °C / 95 relative humidity
Individual components
Power supply 12V DC
Operating time
(with alkaline battery)
Frequency response – 60...16,000 Hz ± 3 dB 80...16,000 Hz ± 3 dB
RF output power (-3 dB) – 10 mW 10 mW
AF output voltage
¼’’ (6.3 mm) jack socket
(unbal.):
XLR socket (balanced):
Dimensions in mm approx. 35 x 213 x 98 approx. 60 x 100 x 30
Weight approx. 570 g approx. 90 g approx. 210 g
Transducer principle – – dynamic
Pick-up pattern––cardioid
ME 2 clip-on microphone
Transducer principle
Pick-up pattern
Type approval
EU
USA
Canada
4 UHF transmission/receiving frequencies
Range A: 719 to 721 MHz
(719.15 – 719.75 – 720.15 – 720.85 MHz)
Range C : 742.5 to 744.5 MHz
(742.65 – 743.35 – 743.85 – 744.45 MHz)
Range E: 863 to 865 MHz (863.1 – 863.7 – 864.1 – 864.9 MHz)
>
95 dB(A)
<
1 %
EM 1
receiver
/100 mA 9 V PP3 battery 9 V PP3 battery
NOM
SK 2
bodypack transmitter
SKM 3
radio microphone
– approx. 10 hrs approx. 10 hrs
––
max. +10 dB
max. +16 dB
u
u
approx. 285;
(with belt clip)
∅ approx . 35 x 50
pre-polarized condenser
omni-directional
see page 51
FCC - Part 74.861 grant of eqipment authorization DMOH1FPXD und
DMOB1FPXD
RSS - 123 with authorization IC: 2099A-FPSKMEM und IC: 2099A-FPSK
Connector assignment
EM 1:
¼’’ (6.3 mm) stereo
jack plug,unbalanced
NC/GND
26
EM 1:
¼’’ (6.3 mm) mono
jack plug,unbalanced
EM 1:
XLR-3F connector,
balanced
21
+
3
EM 1:
DC connector for
power supply
SK 2:
3.5 mm jack plug
NC/GND
Instr./MIC
Page 15

EG-Konformitätserklärung
Diese Geräte ensprechen den grundlegenden Anforderungen und den
weiteren Vorgaben der Richtlinien 1999/5/EU, 89/336/EU und 73/23/
EU. Die Erklärung steht im Internet unter www.sennheiser.com zur
Verfügung.
Vor Inbetriebnahme sind die jeweiligen länderspezifischen Vorschriften
zu beachten!
EC Declaration of Conformity
This equipment is in compliance with the essential requirements and
other relevant provisions of Directives 1999/5/EC, 89/336/EC or 73/
23/EC. The declaration is available on the internet site at
www.sennheiser.com.
Before putting the device into operation, please observe the respective
country-specific regulations!
Déclaration de conformité pour la CEE
Ces appareils sont conformes aux exigences essentielles et aux autres
dispositions pertinentes de les Directives 1999/5/EC, 89/336/EC et 73/
23/EC. Vous trouvez cette déclaration dans la internet sous
www.sennheiser.com.
Avant d'utiliser l'appareil, veuillez observer les dispositions légales en
vigueur dans votre pays.
Declaración de Conformidad
Este equipo cumple tanto los requisitos esenciales como otras
disposiciones de las Directivas 1999/5/CE, 89/336/CE y 73/23/CE. Si
desea leer el declaración, visite la página www.sennheiser.com.
!Anterior a la puesta en funcionamiento deberán observarse las
correspondientes ordenanzas nacionales!
51
Page 16

863 - 865 MHz
Frequenzbereich, zugelassen in:
Frequency range, approved in:
Bande de fréquence, agrée en:
Banda di frequenza, ammessa in:
Gama de frecuencias, autorizado en:
Frequentiebereik, toegelaten in:
Taajuusalue, hyväksytty:
Gama de frequências, autoriz. em:
Πεδίο συχνοτήτων, µε άδεια για:
A, B, CH, CY, CZ, D, DK, E, EST, F, FIN,
FL, GB, GR, H, I, IRL, IS, L, LT, LV, M,
N, NL, P, PL, S, SK, SLO
52
Page 17

Garantiebestimmungen
Wir übernehmen für das von Ihnen gekaufte Produkt eine Garantie von
24 Monaten. Ausgenommen hiervon sind dem Produkt beigefügte
Zubehörartikel, Akkus und Batterien; denn diese Produkte haben
wegen ihrer Beschaffenheit eine kürzere Lebensdauer, die zudem im
Einzelfall konkret von Ihrer Nutzungsintensität abhängt.
Die Garantiezeit beginnt ab Kaufdatum. Zum Nachweis heben Sie bitte
unbedingt den Kaufbeleg auf. Ohne diese Nachweise, die der zuständige Sennheiser-Service-Partner prüft, werden Reparaturen grundsätzlich kostenpflichtig ausgeführt.
Die Garantieleistungen bestehen nach unserer Wahl in der unentgeltlichen Beseitigung von Material- oder Herstellungsfehlern durch Reparatur, Tausch von Teilen oder des kompletten Geräts. Von der Garantie
ausgenommen sind Mängel durch unsachgemäßen Gebrauch (z.B.
Bedienungsfehler, mechanische Beschädigungen, falsche Betriebsspannung), Verschleiß, aufgrund höherer Gewalt und solche Mängel, die
Ihnen beim Kauf bereits bekannt sind. Der Garantieanspruch erlischt bei
Eingriffen in das Produkt durch nicht autorisierte Personen oder Werkstätten.
Im Garantiefall senden Sie das Gerät inklusive Zubehör und Kaufbeleg
an den für Sie zuständigen Service-Partner. Zur Vermeidung von Transportschäden sollte möglichst die Original-Verpackung verwendet werden.
Ihre gesetzlichen Mängelansprüche aus dem Kaufvertrag gegen den
Verkäufer werden durch diese Garantie nicht eingeschränkt. Die Garantie kann weltweit in allen Ländern – außer in den USA – in Anspruch
genommen werden, in denen das jeweils nationale Recht unseren
Garantiebestimmungen nicht entgegensteht
Warranty regulations
The guarantee period for this Sennheiser product is 24 months from the
date of purchase. Excluded are accessory items, rechargeable or
disposable batteries that are delivered with the product; due to their
characteristics these products have a shorter service life that is
principally dependent on the individual frequency of use.
The guarantee period starts from the date of original purchase. For this
reason, we recommend that the sales receipt be retained as proof of
purchase. Without this proof (which is checked by the responsible
Sennheiser service partner) you will not be reimbursed for any repairs
that are carried out.
Depending on our choice, guarantee service comprises, free of charge,
the removal of material and manufacturing defects through repair or
replacement of either individual parts or the entire device.
Inappropriate usage (e.g. operating faults, mechanical damages,
incorrect operating voltage), wear and tear, force majeure and defects
which were known at the time of purchase are excluded from guarantee
53
Page 18

claims. The guarantee is void if the product is manipulated by nonauthorised persons or repair stations.
In the case of a claim under the terms of this guarantee, send the device,
including acces-sories and sales receipt, to the responsible service
partner. To minimise the risk of transport damage, we recommend that
the original packaging is used. Your legal rights against the seller,
resulting from the contract of sale, are not affected by this guarantee.
The guarantee can be claimed in all countries outside the U.S. provided
that no national law limits our terms of guarantee.
Conditions de garantie
La période de garantie pour ce produit Sennheiser est de 24 mois à
compter de la date d'achat. Sont exclues, les batteries rechargeables ou
jetables livrées avec le produit. En raison de leurs caractéristiques ces
produits ont une durée de vie plus courte liée princi-palement a la
fréquence d'utilisation.
La période de garantie commence à la date de I'achat. Pour cette raison,
nous vous recom-mandons de conserver votre facture comme preuve
d'achat. Sans cette preuve -qui est vérifiée par Sennheiser -aucune prise
en compte de la garantie ne pourra être retenue.
La garantie comprend, gratuitement, la remise en état de
fonctionnement du matériel par la réparation ou le remplacement des
pièces défectueuses ou dans le cas où la réparation n'est pas possible,
par échange du matériel. L'utilisation inadéquate (mauvaise utilisation,
dégâts mécaniques, tension électrique incorrecte), sont exclus de la
garantie. La garantie est invalidée en cas d'intervention par des
personnes non-autorisées ou des stations de réparation non agrées.
Pour faire jouer la garantie, retournez I'appareil et ses accessoires,
accompagne de la fac-ture d'achat, a votre distributeur agrée. Pour
éviter des dégâts durant le transport il est recommandé d'utiliser
I'emballage d'origine.
Votre droit légal de recours contre le vendeur n'est pas limité par cette
garantie. La garan-tie peut être revendiquée dans tous les pays à
l'extérieur des Etats-Unis à condition qu'aucune loi nationale n'en
invalide les termes.
54
Page 19

Declaración de garantia
EI periodo de garantia para este producto es de 24 meses desde la fecha
de compra. Quedan excluidos los accesorios adjuntos al producto,
acumuladores y baterias dado que, debido a sus caracteristicas, la vida
útil de dichos productos es mucho más corta y, en determinados casos,
depende concretamente de la intensidad de utililación. EI periodo de
garantia comienza a partir de la fecha de compra. Por eso le
recomendamos que guarde el recibo como prueba de compra. Sin dicha
prueba, que será verificada par el respectivo concesionario Sennheiser,
cualquier reparación que sea necesaria será efectuada contra factura.
Según determine el fabricante, las prestationes de garantia consistirán
en la eliminación gratuita de defectos de materiales o fabricatión, por
medio de reparación, sustitución de piezas, o bien en la sustitución del
aparato completo. La garantia no tendrá validez en caso de defectos
ocasionados par un uso inadecuado (tales como manejo incorrecto
daños mecánicos, tensión de servicio equivocada), desgaste, o bien
efectos de fuerza mayor, y desperfectos ya detectados en el momento
de adquirir el producto. La garantia carecerá de validez si el defecto se
debe a modificationes y reparaciones hechas en el pro- ducto por
personas o talleres no autorizados.
En caso de reclamación sirvase remitir el aparato incluyendo los
accesorios y la factura al con-cesionario Sennheiser encargado de su
zona. A fin de evitar daños durante el transporte se aconseja emplear el
envase original. Las pretensiones legales por defectos y emanadas del
contrato de compraventa frente al vendedor, no quedan limitadas por
esta garantia.
La garantia esta disponible en todos los paises a excepción de EE.UU.,
siempre que la legislación nacional aplicable no sea contraria a nuestras
determinaciones de garantia.
55
Page 20

Sennheiser electronic GmbH & Co. KG
30900 Wedemark, Germany
Phone +49 (5130) 600 0
Fax +49 (5130) 600 300
www.sennheiser.com
Printed in Taiwan Publ. 11/05 514013 / A03
 Loading...