

Page 1
Instruction Manual
Bedienungsanleitung
Notice d’emploi
Istruzioni per l’uso
Instrucciones de uso
Gebruiksaanwijzing
Manual de utilização
FLX 70
Page 2

Page 3

Bluetooth QD ID B012858
English
Deutsch
Français
Italiano
Español
Nederlands
Portugues
Page 4

Page 5

1
Contents
Contents ......................................................................................................... 1
Important safety instructions..................................................................... 2
Features of the FLX 70 ................................................................................. 6
Delivery includes ........................................................................................... 6
Operating elements ...................................................................................... 7
Button overview............................................................................................ 8
Quick Setup Guide ......................................................................................... 9
Setting up the FLX 70................................................................................. 11
Charging the battery in the headset............................................................11
Switching the headset on/off .......................................................................12
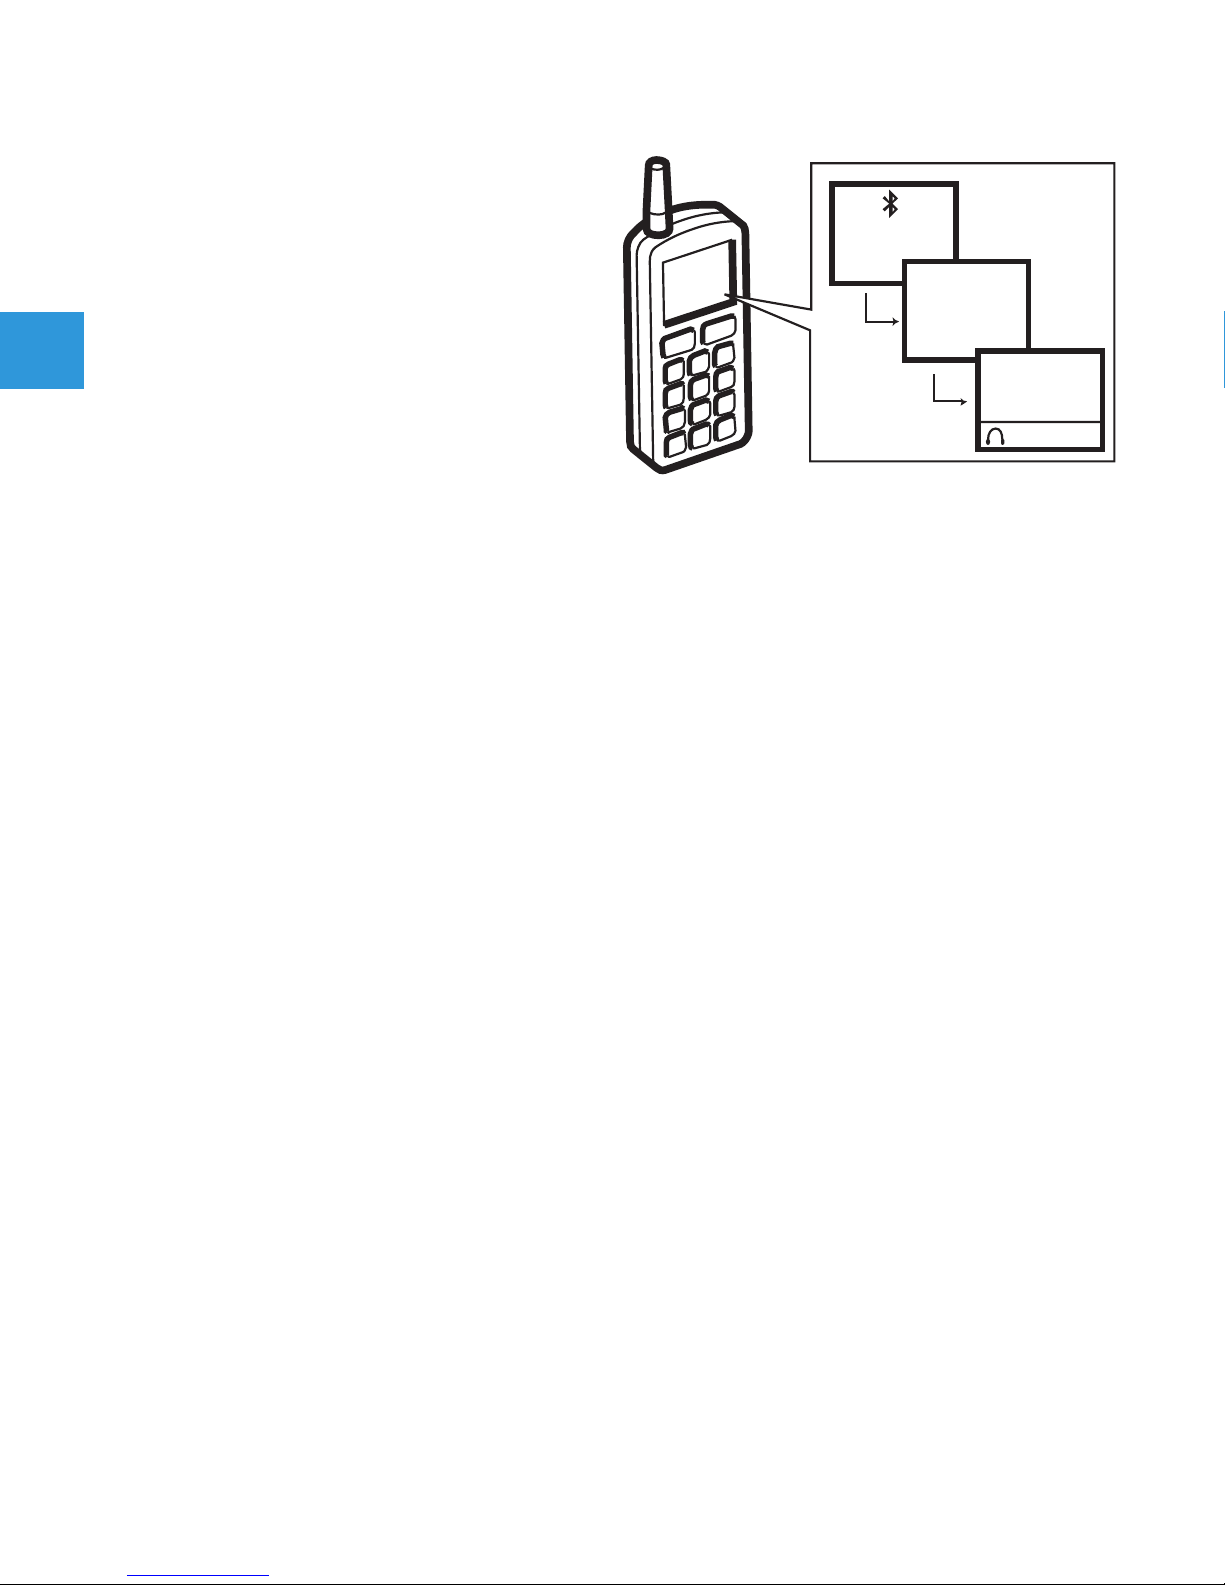
Pairing the headset to mobile phones or other Bluetooth devices .......13
Wearing the headset.......................................................................................15
Operating the FLX 70.................................................................................. 17
Telephoning with the FLX 70.........................................................................17
Changing the speaker volume.......................................................................20
Changing the ring tone volume ....................................................................20
Muting/un-muting the headset microphone.............................................20
Restoring factory settings .............................................................................21
Maintenance and care ................................................................................ 22
Accessories...................................................................................................22
Specifications............................................................................................... 23
Manufacturer declarations ........................................................................ 24
We have designed this product to give you reliable operation over many years. Over half a
century of accumulated expertise in the design and manufacture of high-quality electroacoustic equipment have made Sennheiser a world-leading company in this field.
Please take a few moments to read these instructions carefully, as we want you to enjoy your
new Sennheiser product quickly and to the fullest.
Page 6

2
Important safety instructions
The FLX 70 has been manufactured according to the accepted rules of safety and current technology. However,
there is still a danger of damage to equipment if the following general safety instructions are not complied with.
• Read these instructions.
• Follow these instructions.
• Keep these instructions in a location where they are accessible to all
users at all times.
• Always include the operating instructions when you pass the FLX 70
on to third parties.
Intended use
The FLX 70 is an accessory for mobile phones or any Bluetooth compliant device with a “hands free” or a “headset” profile intended for
wireless communication via Bluetooth in dry environments.
It is considered improper use when the FLX 70 is used
• for any application not named in these instructions,
• under operating conditions that deviate from those described in
these instructions.
To avoid damage to your hearing
• Set a low volume setting before putting on the headset!
• Do not use the headset for long periods of time with a high volume
setting!
Page 7

3
To avoid damage to your auditory canals and eardrums:
• Place a suitable earbud on the headset (S, M or L). Never insert the
headset without earbud!
• Always insert and remove the headset from the auditory canal
slowly and carefully! Do not insert the headset too far into the ear!
• Always keep the headset dry.
To prevent accidents
• Do not use the headset in environments in which particular attention
must be paid (e.g. on roads or while carrying out manual work).
General instructions
• Never disassemble or modify components of the FLX 70.
• Keep away from children.
• The built-in rechargeable battery may present a fire or chemical burn
hazard if mistreated. Therefore, do not disassemble, heat above
40 °C (104 °F) or incinerate the rechargeable battery.
• Sennheiser Communications is not liable for damages resulting from
the loss of connection due to a run flat battery, an old battery or exceeding the transmitting range.
Before operation
• Use the FLX 70 in dry places only and keep liquids and small electri-
cally conductive parts away from the FLX 70 and its connecting sockets.
• Do not expose the FLX 70 to extreme temperatures. Normal operat-
ing temperatures are 10 °C (50 °F) to 40 °C (104 °F).
• Store the headset in a clean, dust-free environment.
Page 8
4
During charging
• Do not wear the headset when charging.
• Sennheiser Communications is not liable for damages to USB devices
that are not consistent with the USB specifications.
• The headset must be charged either with the FLX 70 power supply
(EU: 502310, UK: 502311, US: 502312), the FLX 70 car charger unit
(502313) or a USB socket of a computer. Never try to charge batteries other than the one in the FLX 70 headset with the FLX 70 power
supply or the FLX 70 car charger unit.
During operation
• This equipment generates, uses and can radiate radio frequency
energy and, if not used in accordance with the instructions, may cause harmful interference to radio communications. However, there is
no guarantee that interference will not occur in a particular installation.
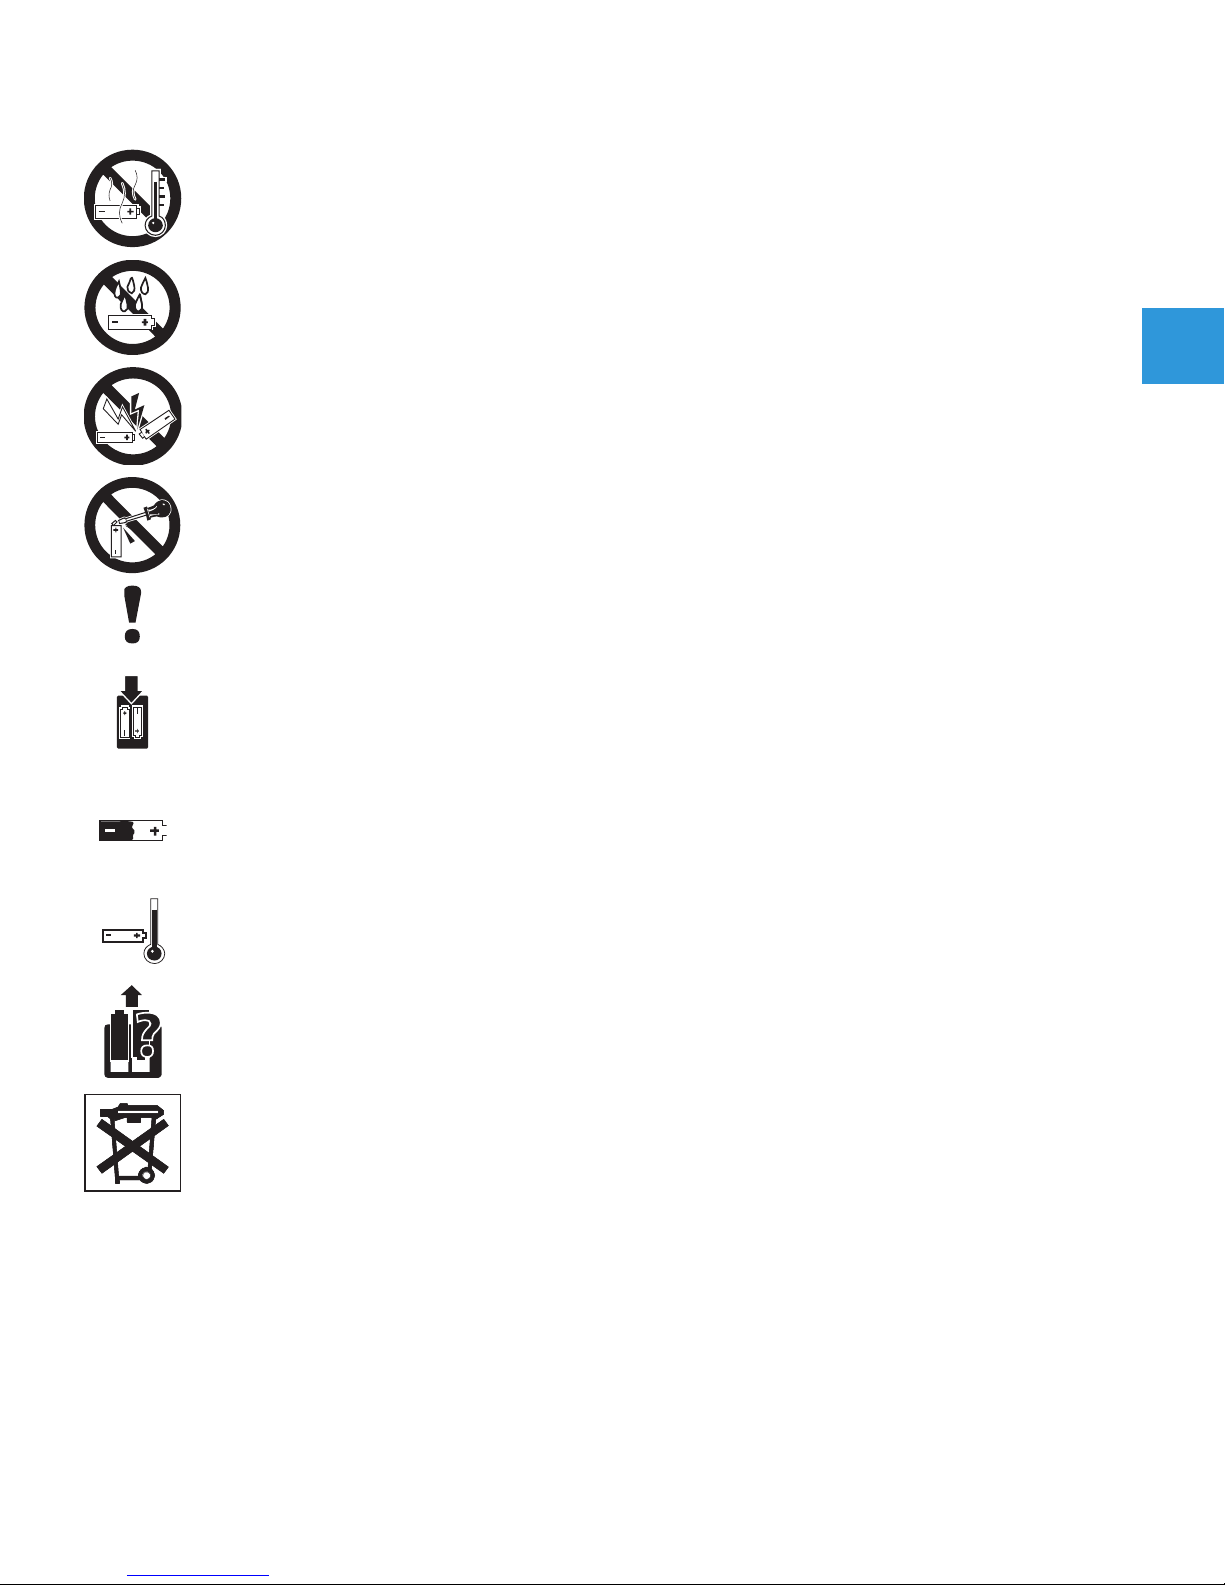
Safety instructions for Lithium-Polymer rechargeable batteries
The FLX 70 has a built-in Lithium-Polymer rechargeable battery. If
abused or misused, rechargeable batteries may leak.
WARNING! In extreme cases, rechargeable batteries may even
present
• a heat hazard
• a fire hazard
• an explosion hazard
• a smoke and gas hazard
Please understand that Sennheiser Communications does not accept
liability for damage arising from abuse or misuse.
Page 9
5
Do not heat above 40 °C (104 °F), e.g. do not expose to
sunlight or throw into a fire.
Do not expose to moisture.
Do not short-circuit.
Do not mutilate or dismantle.
Store the units/re-chargeable batteries in a cool and dry
place at room temperature (approx. 20 °C).
Only charge rechargeable batteries with the appropriate
Sennheiser Communications chargers.
When not using rechargeable batteries for extended periods of time, charge them regularly (every six months for
about 1 hour).
Only charge rechargeable batteries at ambient temperatures between 10 °C and 40 °C.
Do not charge the rechargeable battery if the unit is obviously defective.
Return defective units or units with defective rechargeable
batteries to your specialist dealer.
Page 10

6
Features of the FLX 70
• FlexFit™ technology for perfect fit
• Closed speaker design, shutting out ambient noise
• Flexible and removable earhook for individual wearing comfort
• Interchangeable left/right wearing
• ActiveGard™ protection against acoustic shocks
• Bluetooth 2.0, eSCO and EDR: compatible with all Bluetooth 1.1, 1.2
and 2.0 devices that support the “hands free” or “headset” profile
• Up to six hours talk time
• Up to 240 hours standby time
• Charging directly from USB
• Superior Sennheiser audio quality
• Extremely lightweight and comfortable (13 grams)
Delivery includes
1 FLX 70 Bluetooth headset with built-in rechargeable Li-polymer
battery
2 Extra earbuds, sizes M and L (size S is already mounted)
1 Earhook
1 FLX 70 power supply
1 USB charging cable
1 Lanyard
1 Lanyard clip
1 Instruction manual
Page 11
7
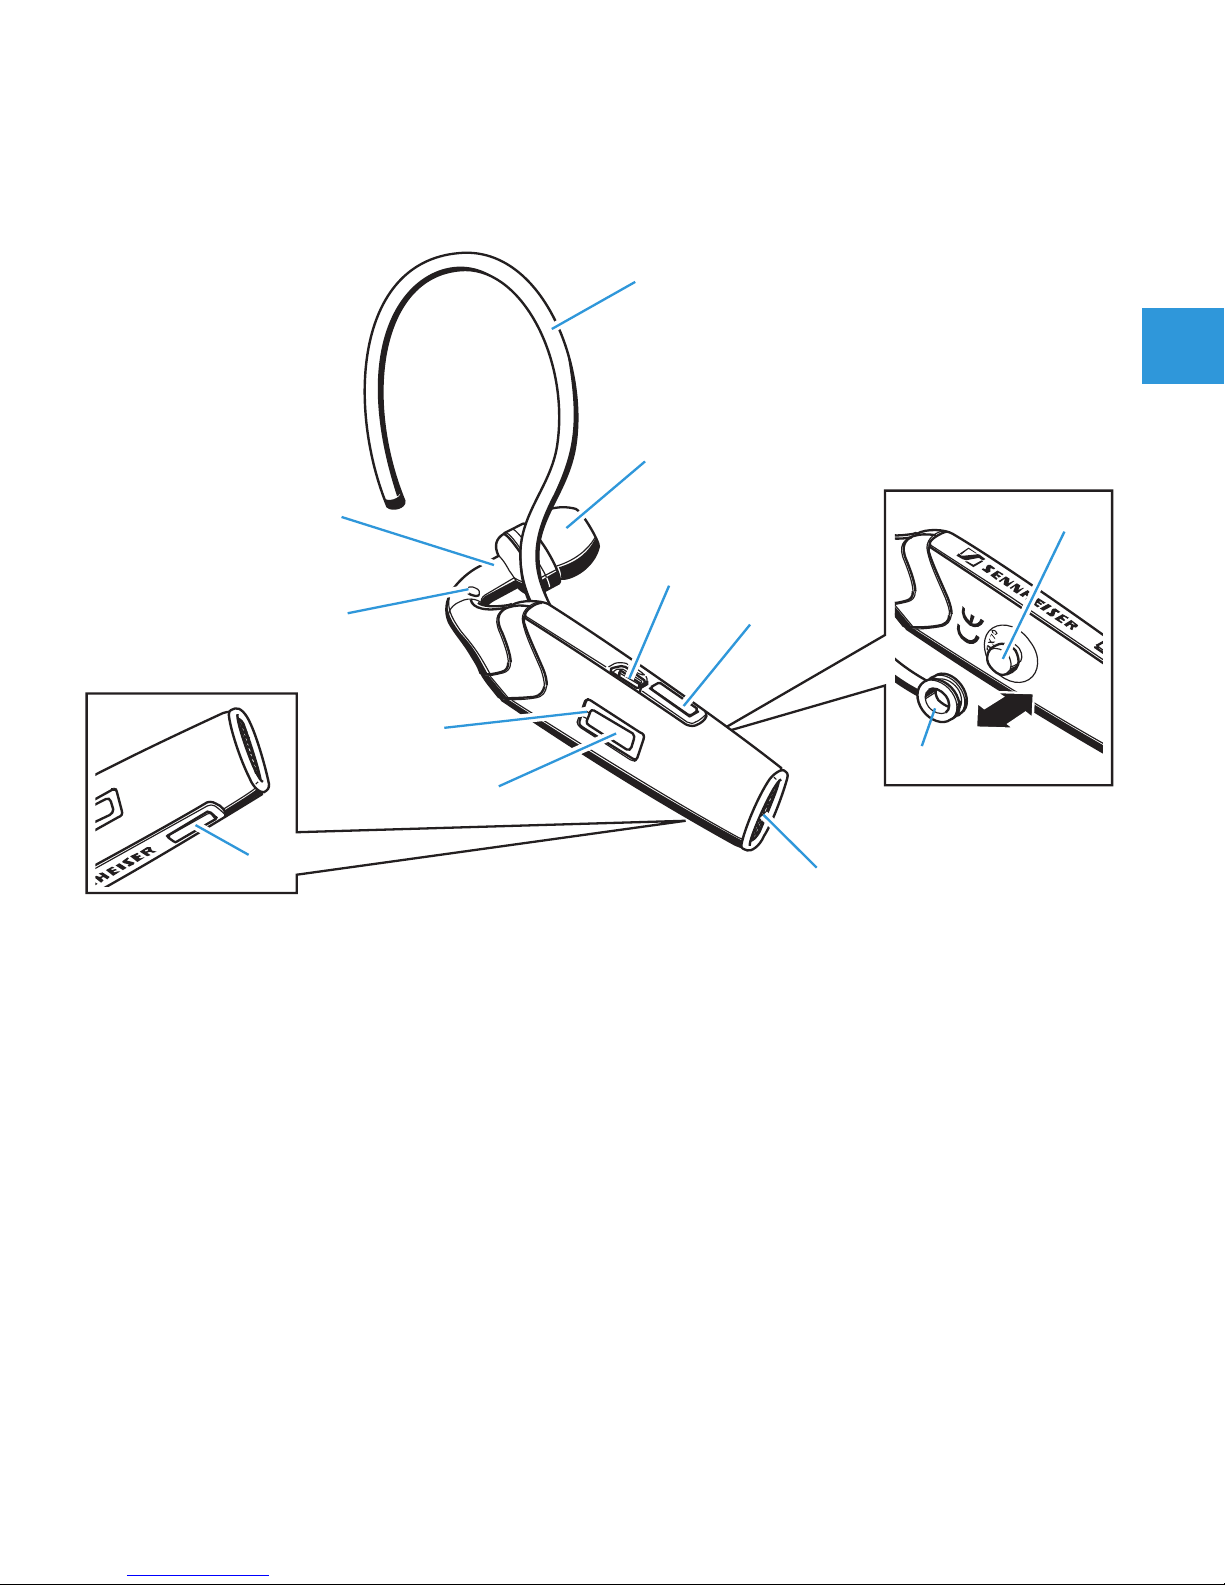
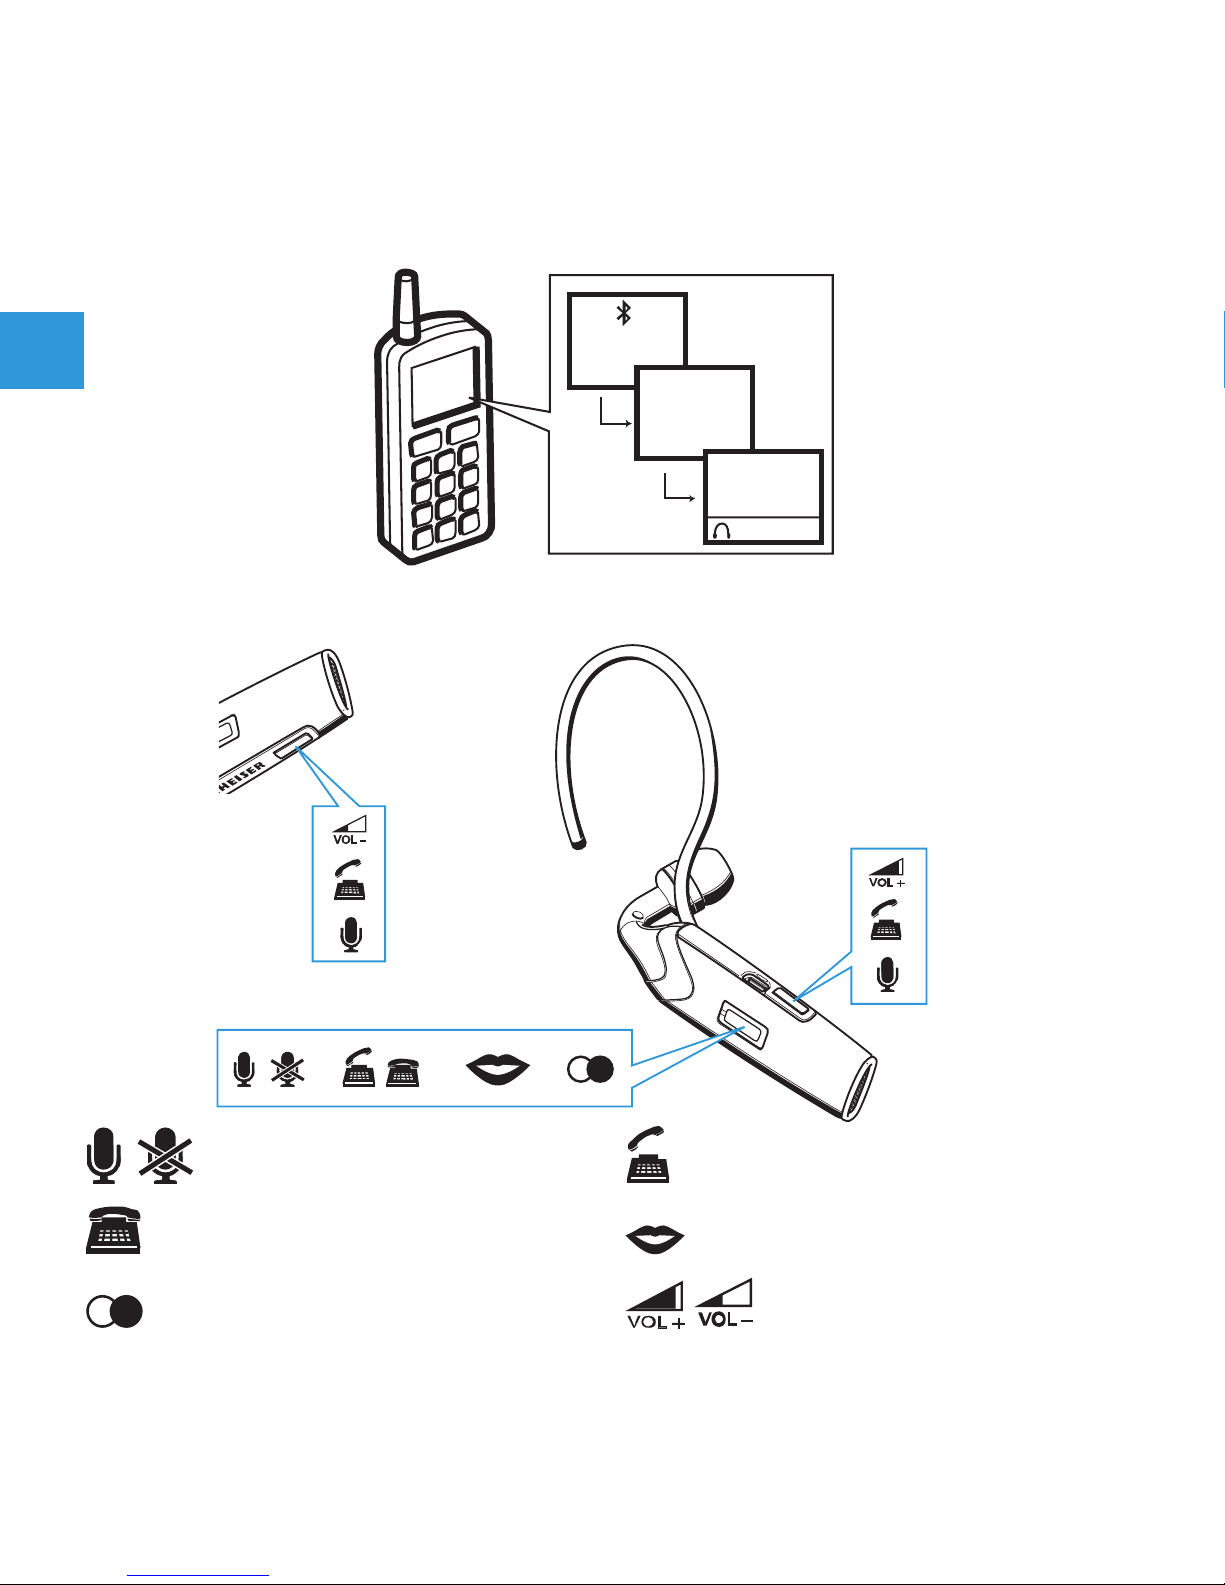
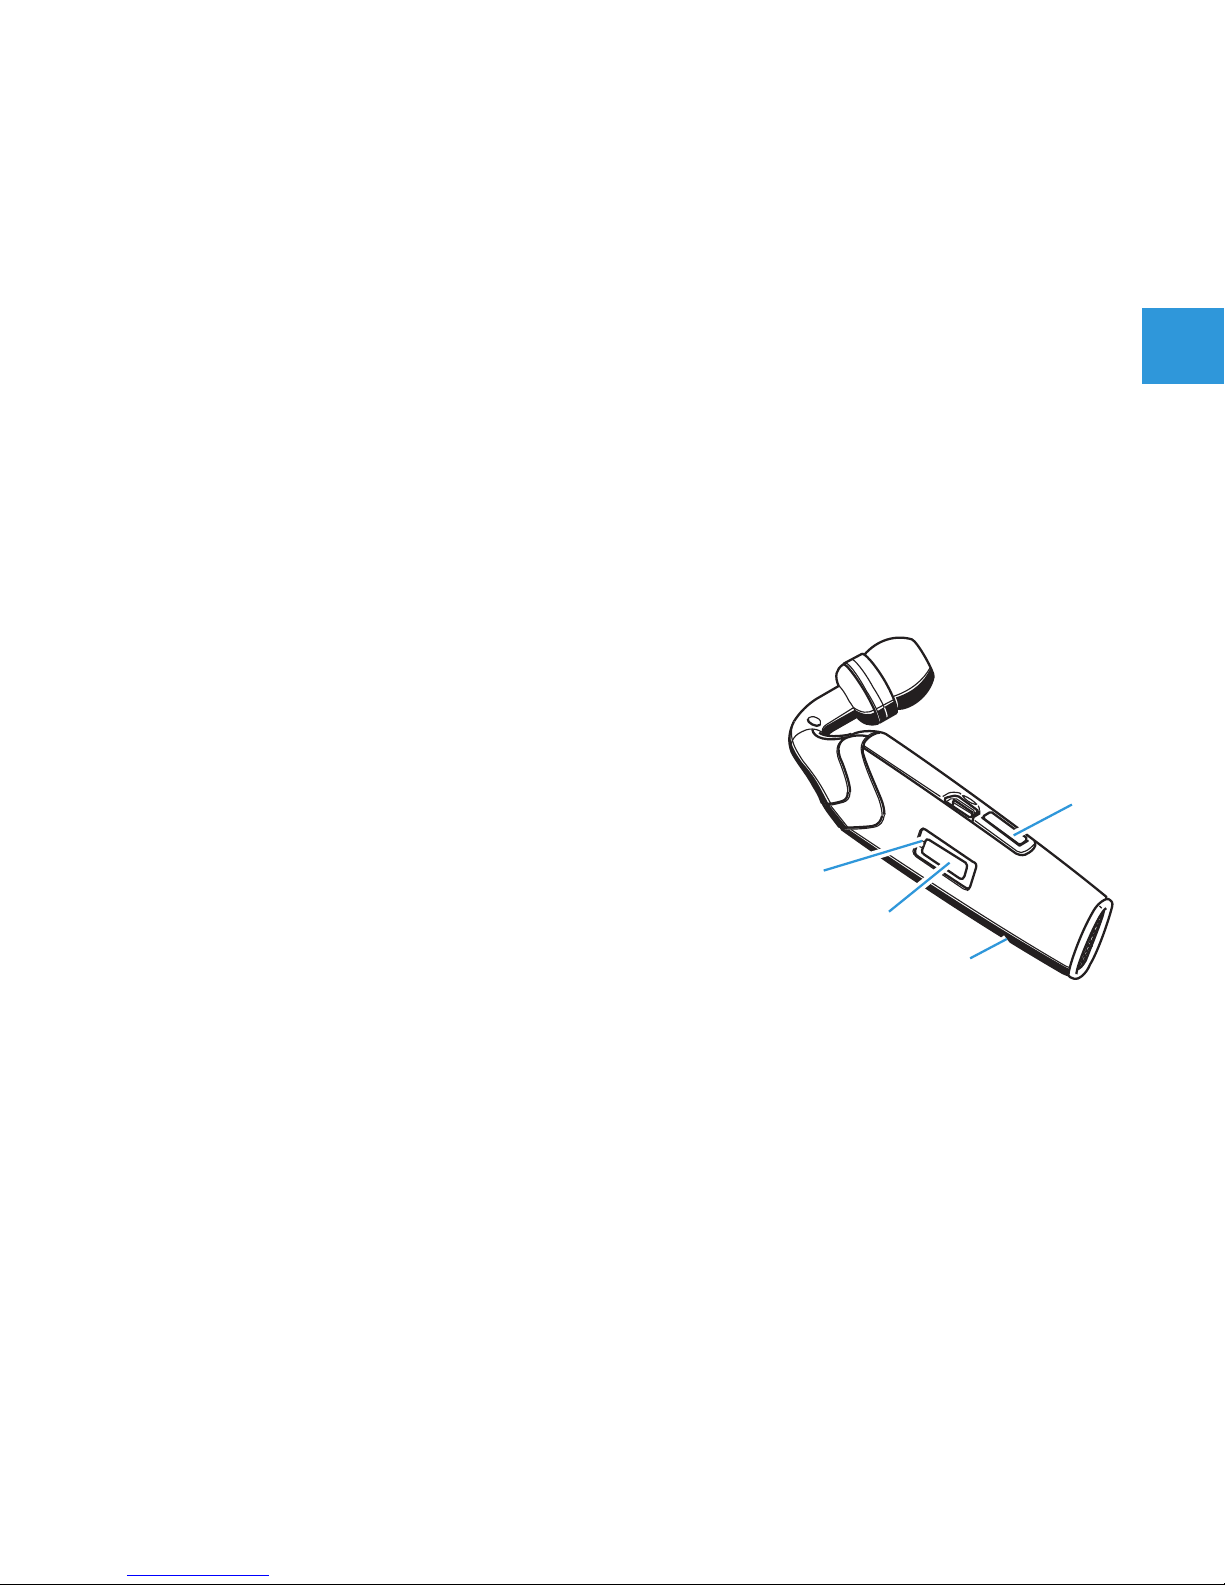
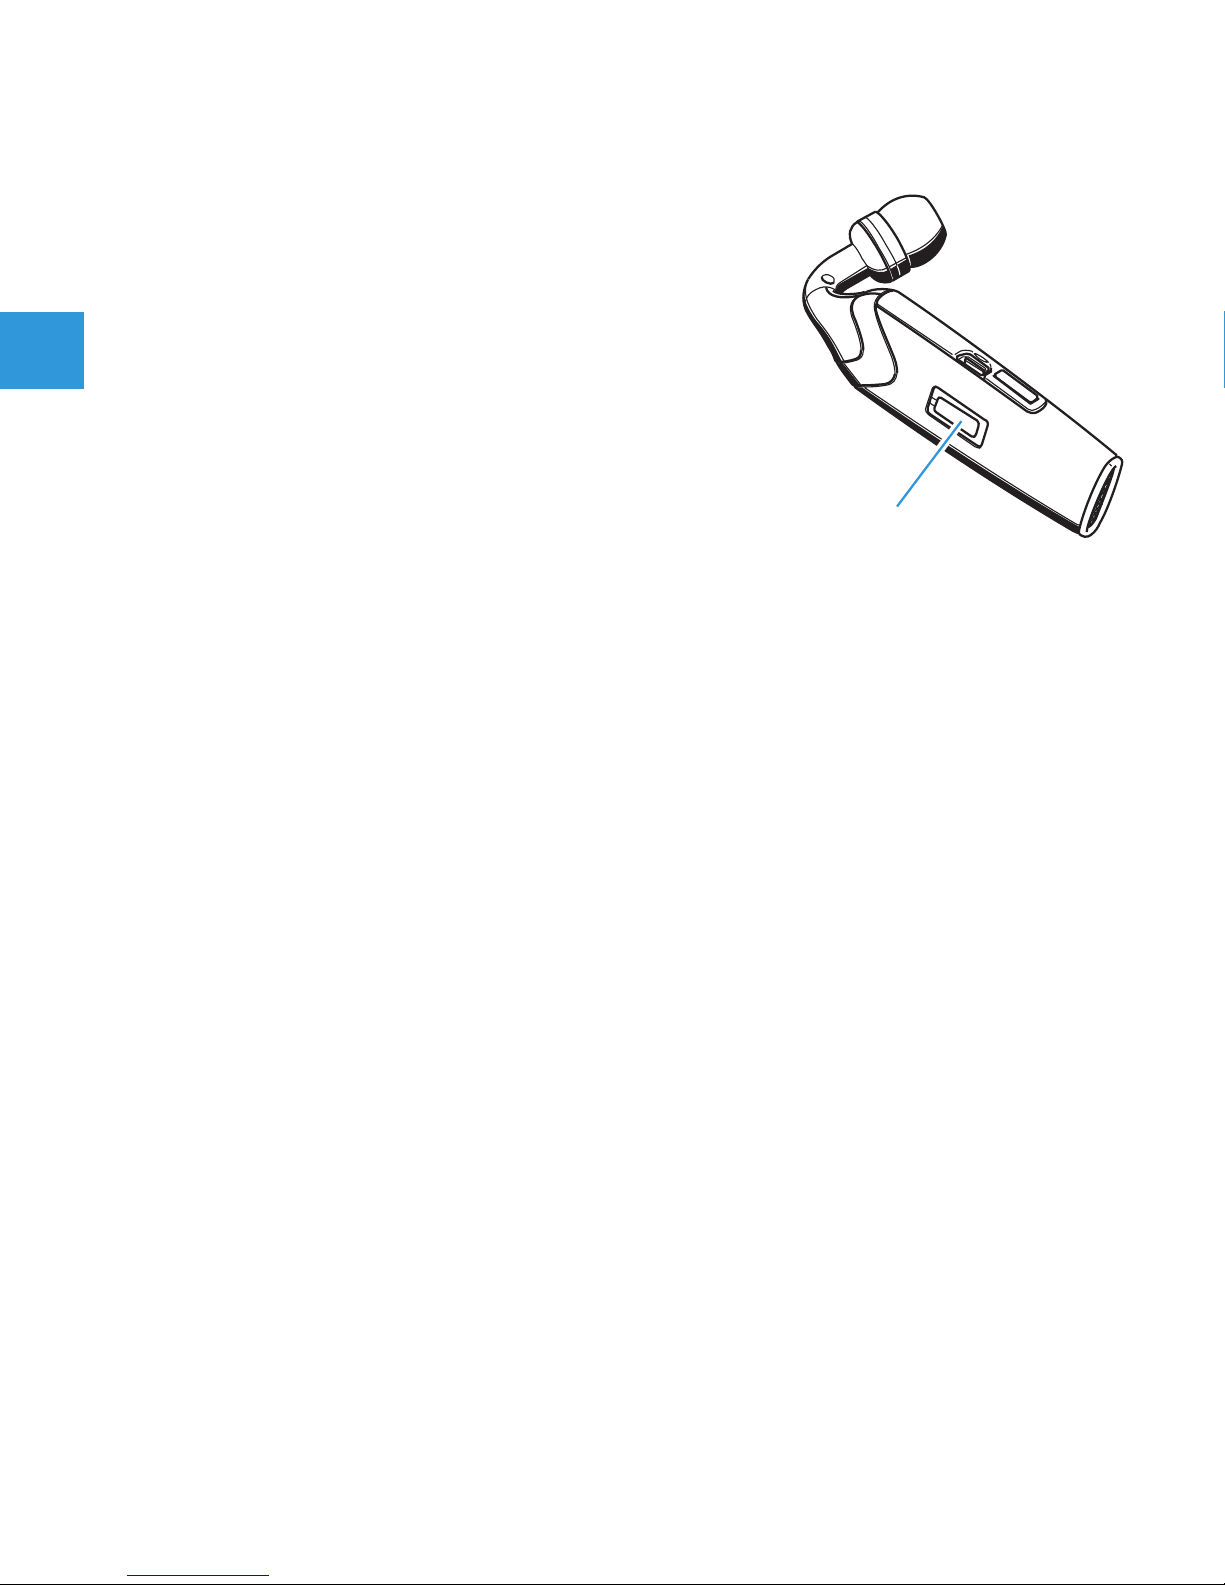
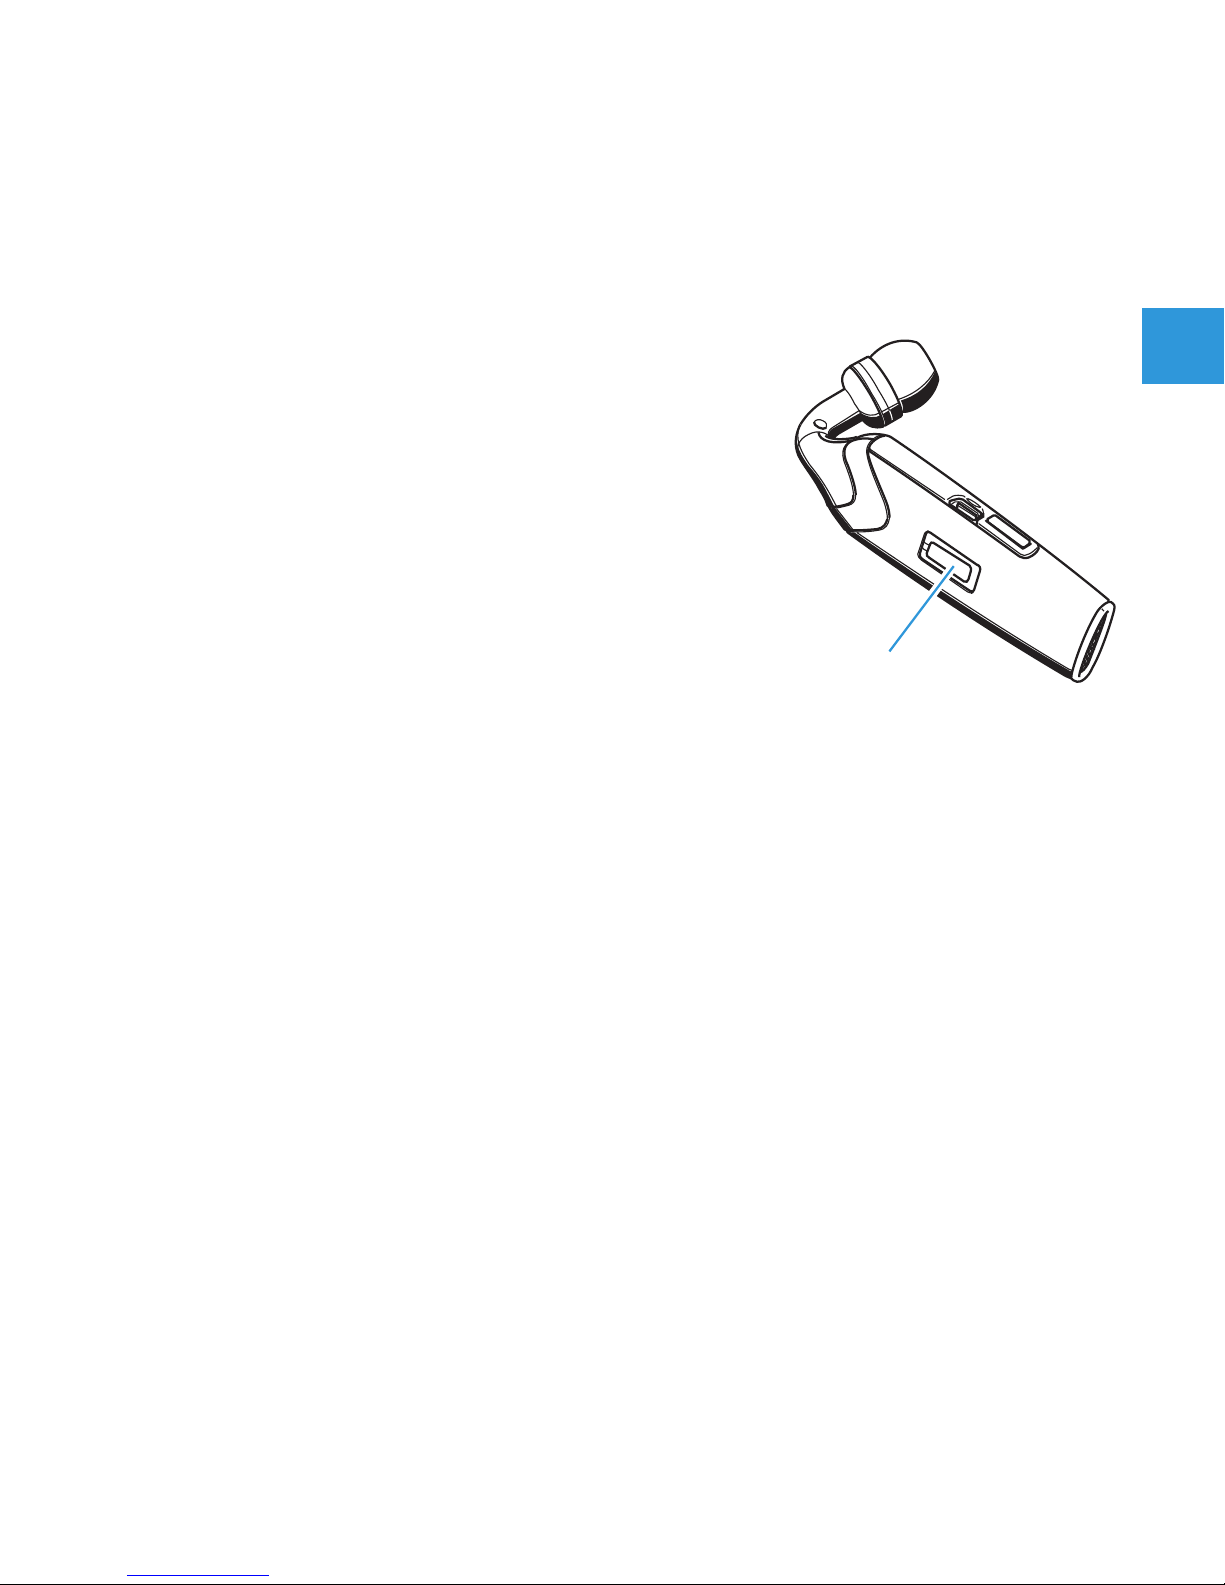
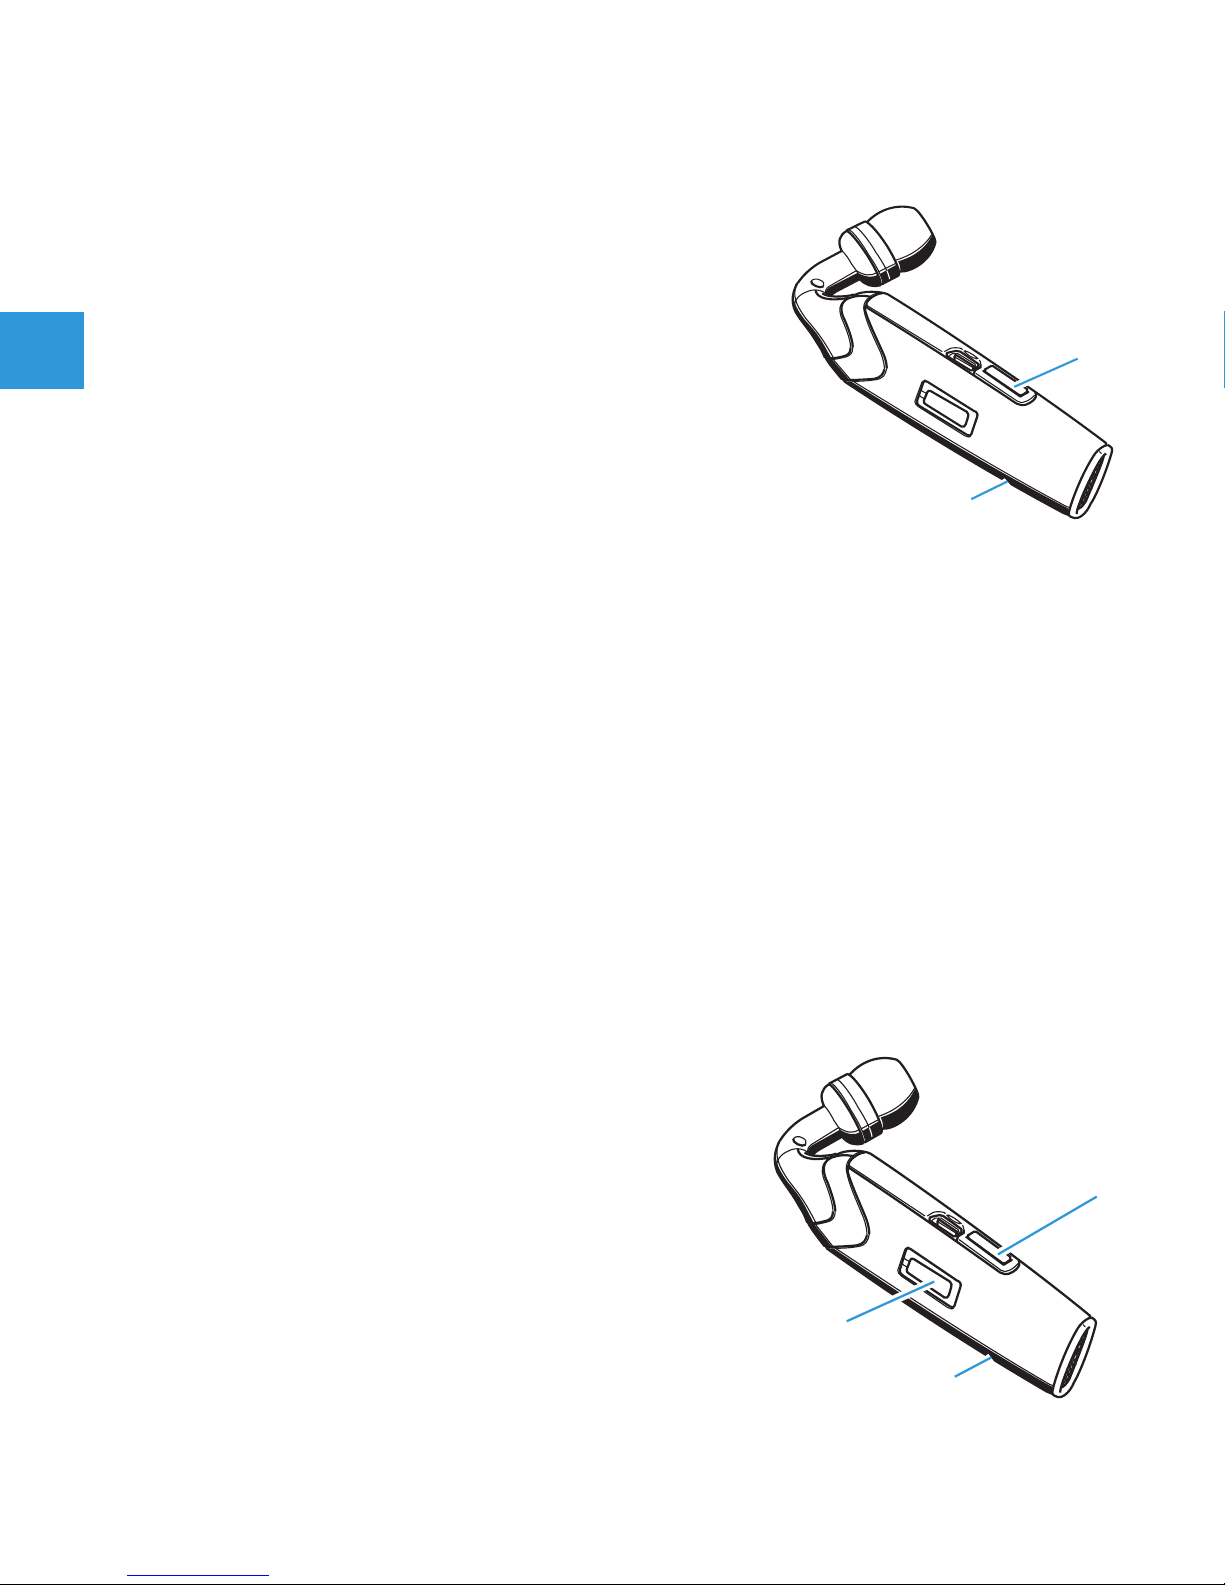
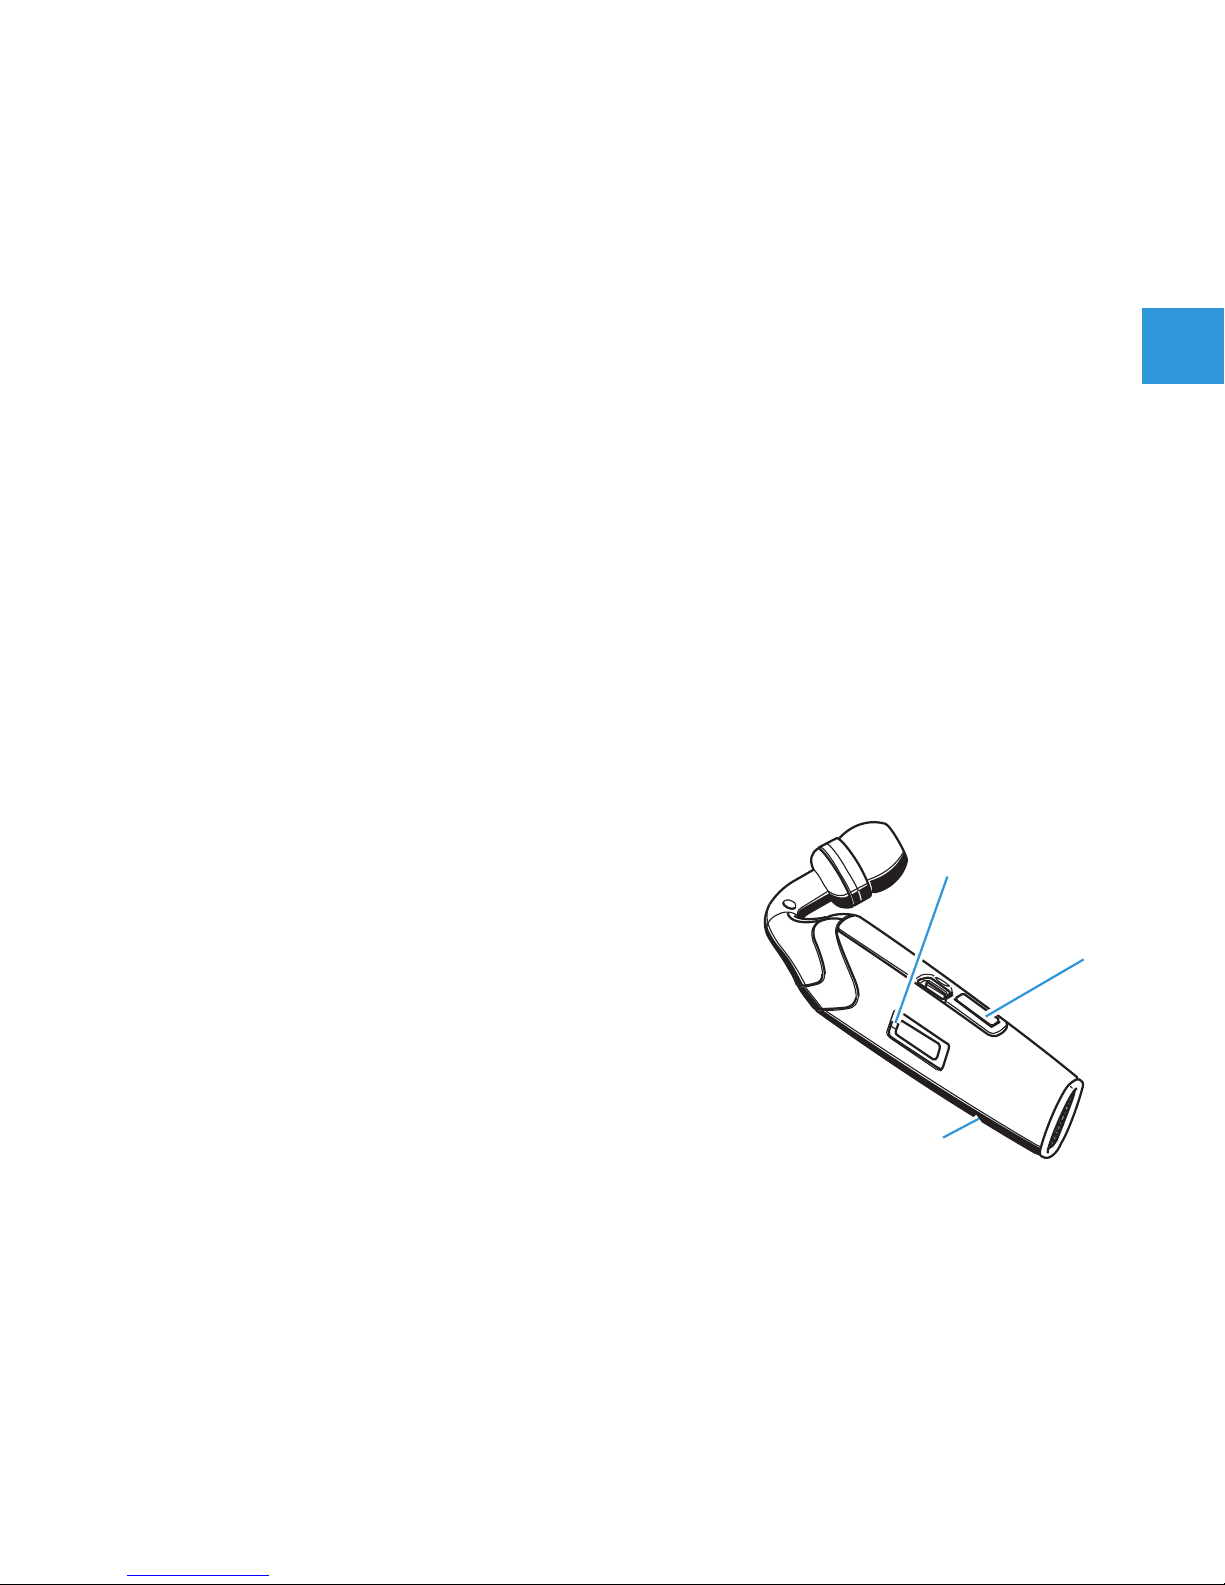
Operating elements
쐃 earhook
(removable, flexible)
쐇 earbud
(exchangeable)
쐋 socket for power supply
쐏 volume up button
쐄 volume down button
쐂 microphone
쐆 hook button
쐊 LED
쐎 grommet for lanyard
쐅 attachment point for lanyard clip
쐈 ball joint for the earhook
쐃
쐇
쐊
쐋
쐆
쐏
쐎
쐅
쐈
쐃
쐂
쐄
Page 12

8
Button overview
Button Function Page
hook button 쐆
• switch the headset on or off
• enter pairing mode
• accept incoming call
• making a call
• reject an incoming call
• redial
• voice dial
• end a call
• transfer a call from the mobile
phone to the headset
• mute/un-mute
12
13
17
18
18
18
18
19
19
20
volume up button 쐏
• increase the speaker volume
• increase the ring tone volume
• un-mute the microphone
• accept incoming call
20
20
20
17
volume down button 쐄
• decrease the speaker volume
• decrease the ring tone volume
• un-mute the microphone
• accept incoming call
20
20
20
17
Page 13

9
Quick Setup Guide
! First, charge the headset.
For the first charging allow 3 hours. Later, 2½ hours suffice to fully
charge the battery. For details see page 11.
*) The car charger unit is available as an accessory (see page 22).
3h
*)
Page 14
10
! Then switch on the headset (details on page 12) and pair it to your
mobile phone. For details and information on how to pair to another
Bluetooth device see page 13.
! Put the headset on your ear.
(un)muting (p. 20)
accepting calls (p. 17)
ending calls (p. 19)
voice dialling (p. 18)
redialling (p. 18)
volume (p. 20)
FLX 70
OK
Key w or d
0000
Page 15
11
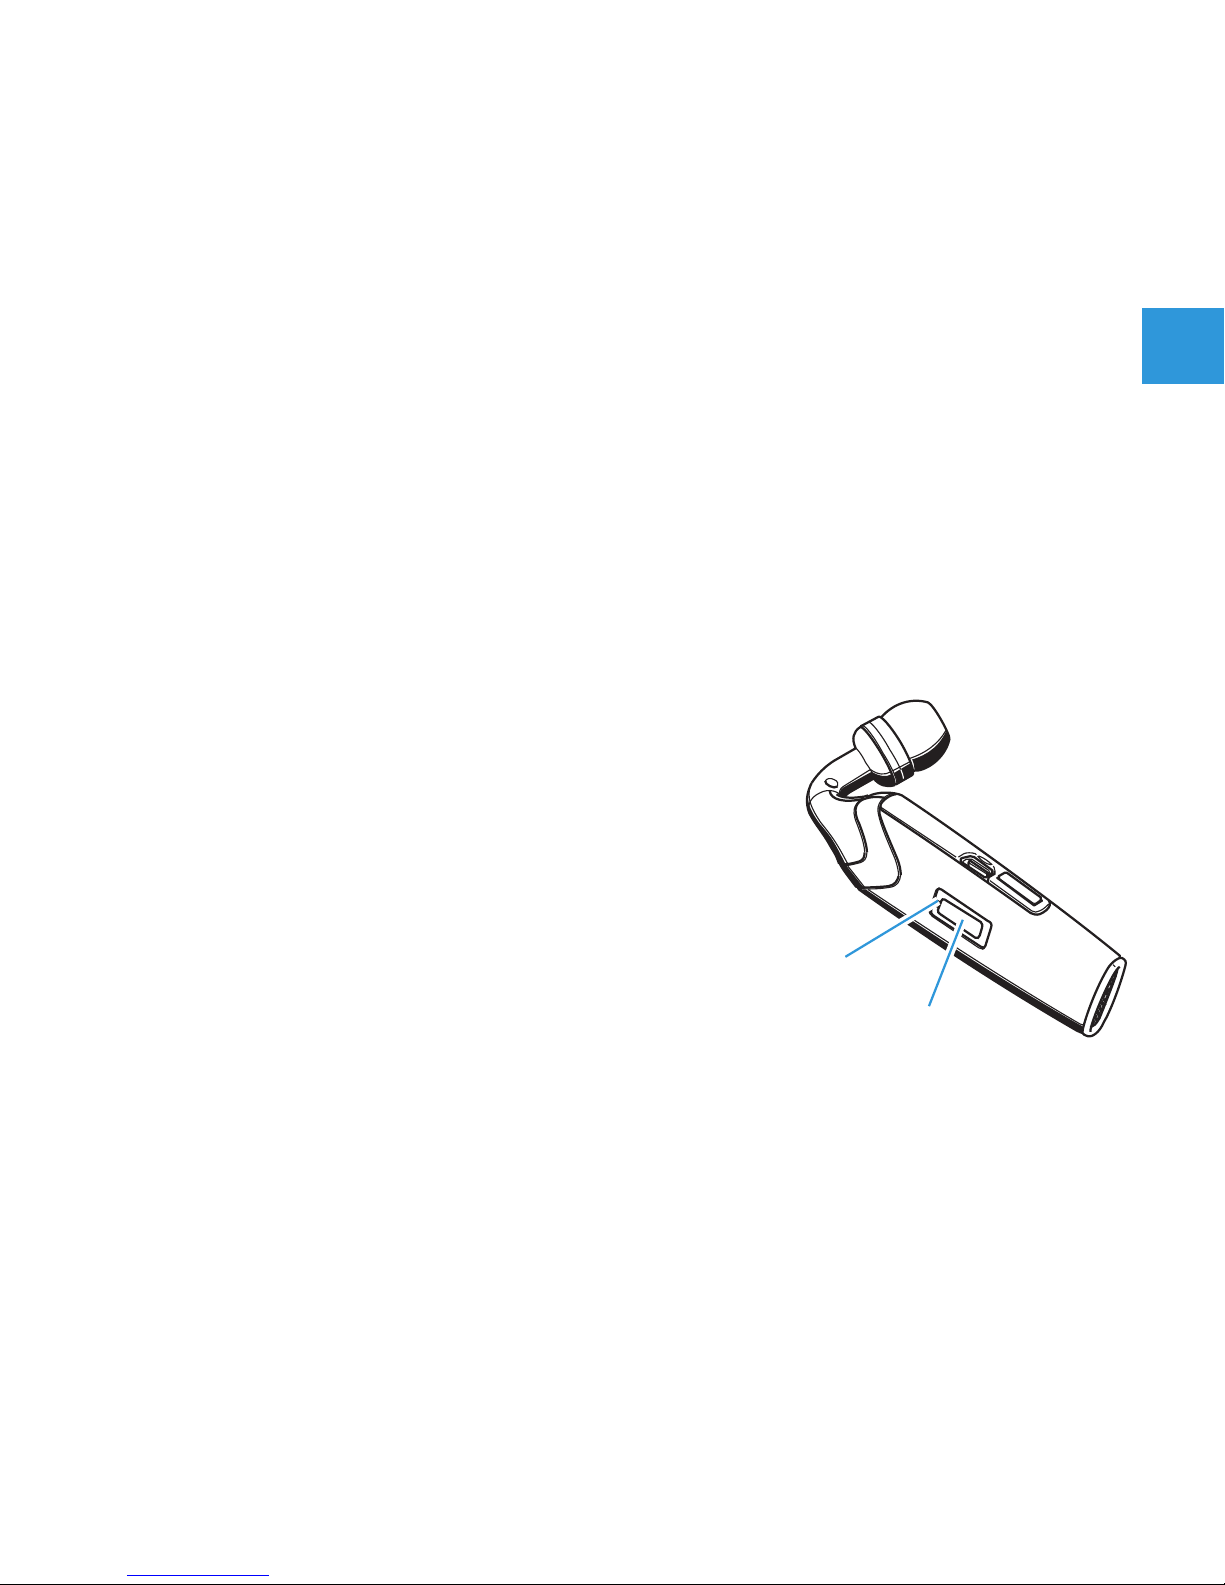
Setting up the FLX 70
Charging the battery in the headset
If you charge the battery for the first time, allow charging for at least
3 hours without interruption. Later, 2½ hours suffice to fully charge the
battery. The headset cannot be used during the charging process.
To charge the battery in the headset:
! Take off the headset and switch it off (see
page 12).
! Connect the USB charging cable to the
socket for power supply 쐋.
! Connect the USB plug of the USB charging
cable to:
– either the USB socket of the FLX 70
power supply
– or a USB socket of a computer
– or the USB socket of the FLX 70 car charger unit (available as an
accessory)
! Connect either the power supply or the car charger unit to the
appropriate power outlet.
If the battery was completely drained, the LED 쐊 flashes red in the
beginning of the charging process. During charging, the LED 쐊
lights up red. When charging is complete, the LED 쐊 lights up blue.
The charging process cannot be started during an ongoing call. A fully
charged battery provides a talk time of up to six hours or a standby
time of up to 240 hours. When the battery is about to run flat:
쐊
쐋
Page 16
12
• The LED 쐊 flashes red.
• Three beeps are heard in the speaker 3 times with an interval of 15
seconds and thereafter with an interval of 2 minutes.
• Less than 10 minutes of talk time are left.
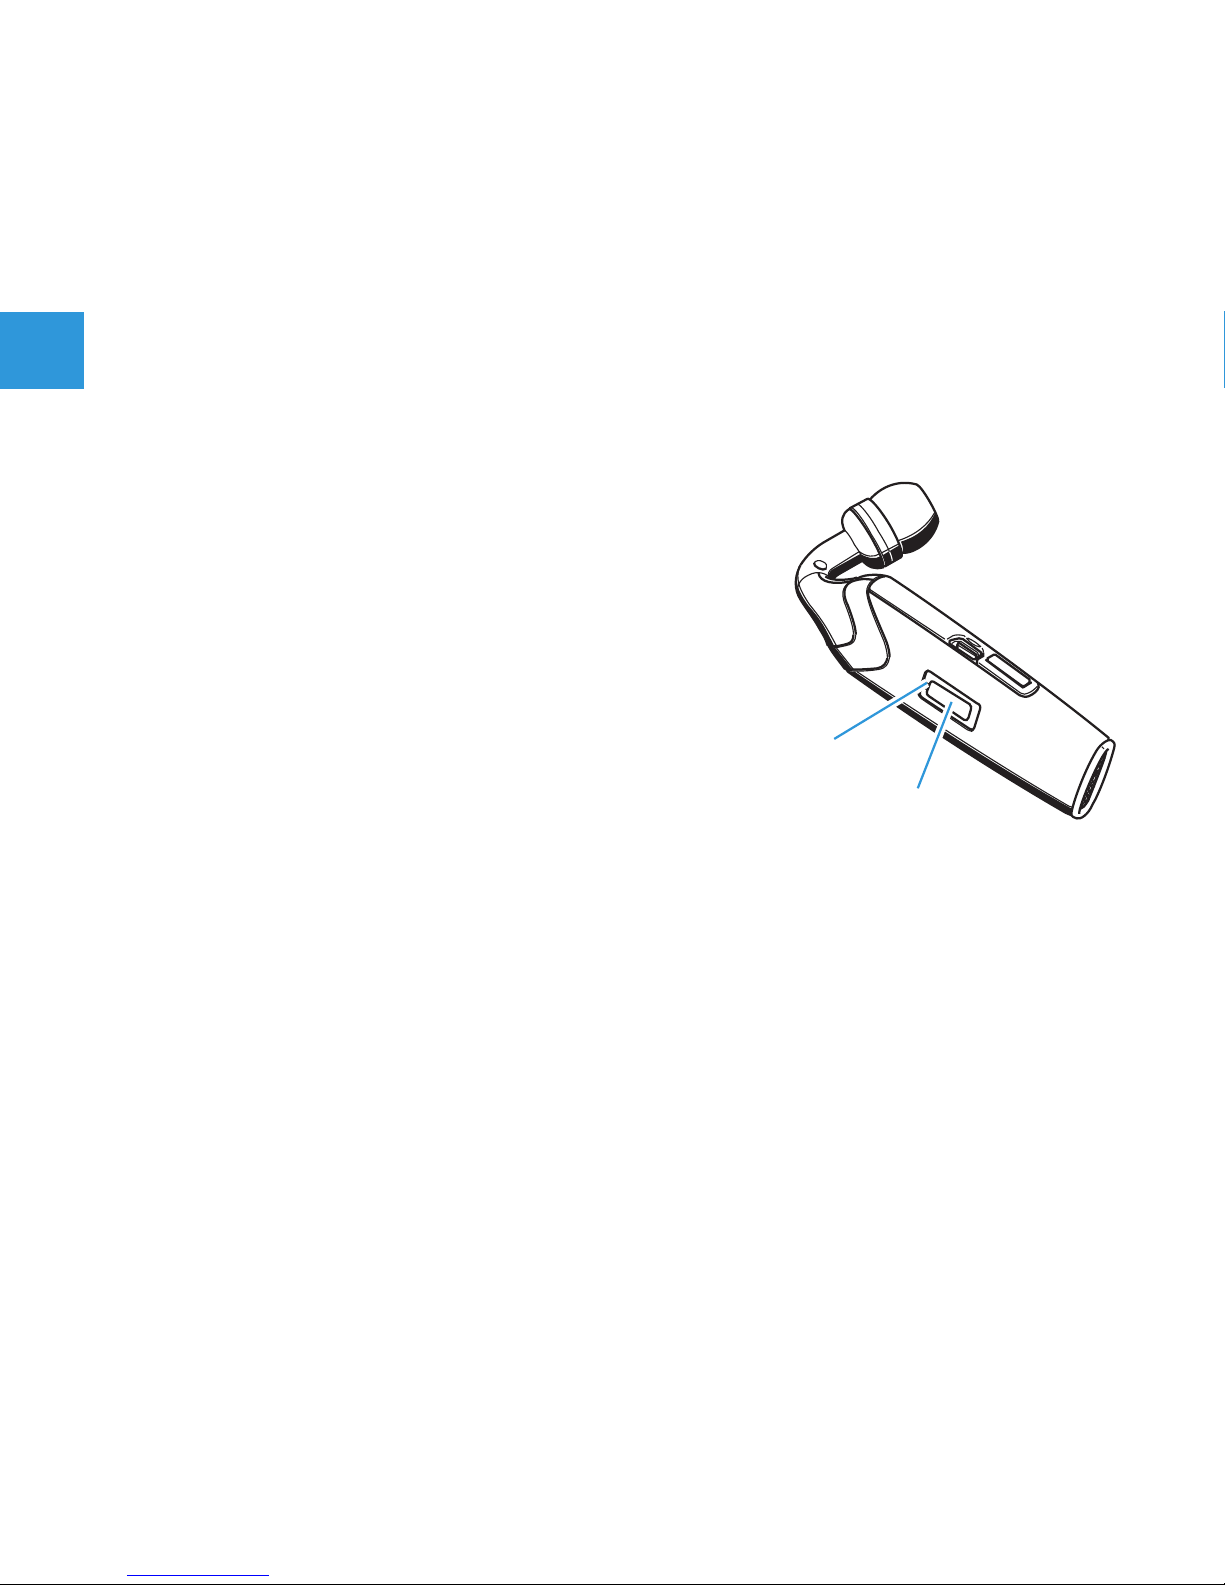
Switching the headset on/off
!
Press the hook button 쐆 for more than 3 sec. until the LED 쐊 lights
up blue.
The headset is switched on and in one of
the following modes:
– If the headset is already paired to a mo-
bile phone, the headset is ready to use.
– If the headset is not yet paired to a mo-
bile phone, pair it as described under
“Pairing the headset to mobile phones or
other Bluetooth devices” on page 13.
– If the headset is already paired to a mobile phone and if there is
an incoming call on your mobile phone, the call is answered im-
mediately by pressing the hook button 쐆 once.
To switch off the headset:
! Press the hook button 쐆 for more than 3 sec. until the LED 쐊
flashes red and then turns off.
All settings are saved. The battery lasts longer, if you switch off the
headset when you are not using it.
쐊
쐆
Page 17
13
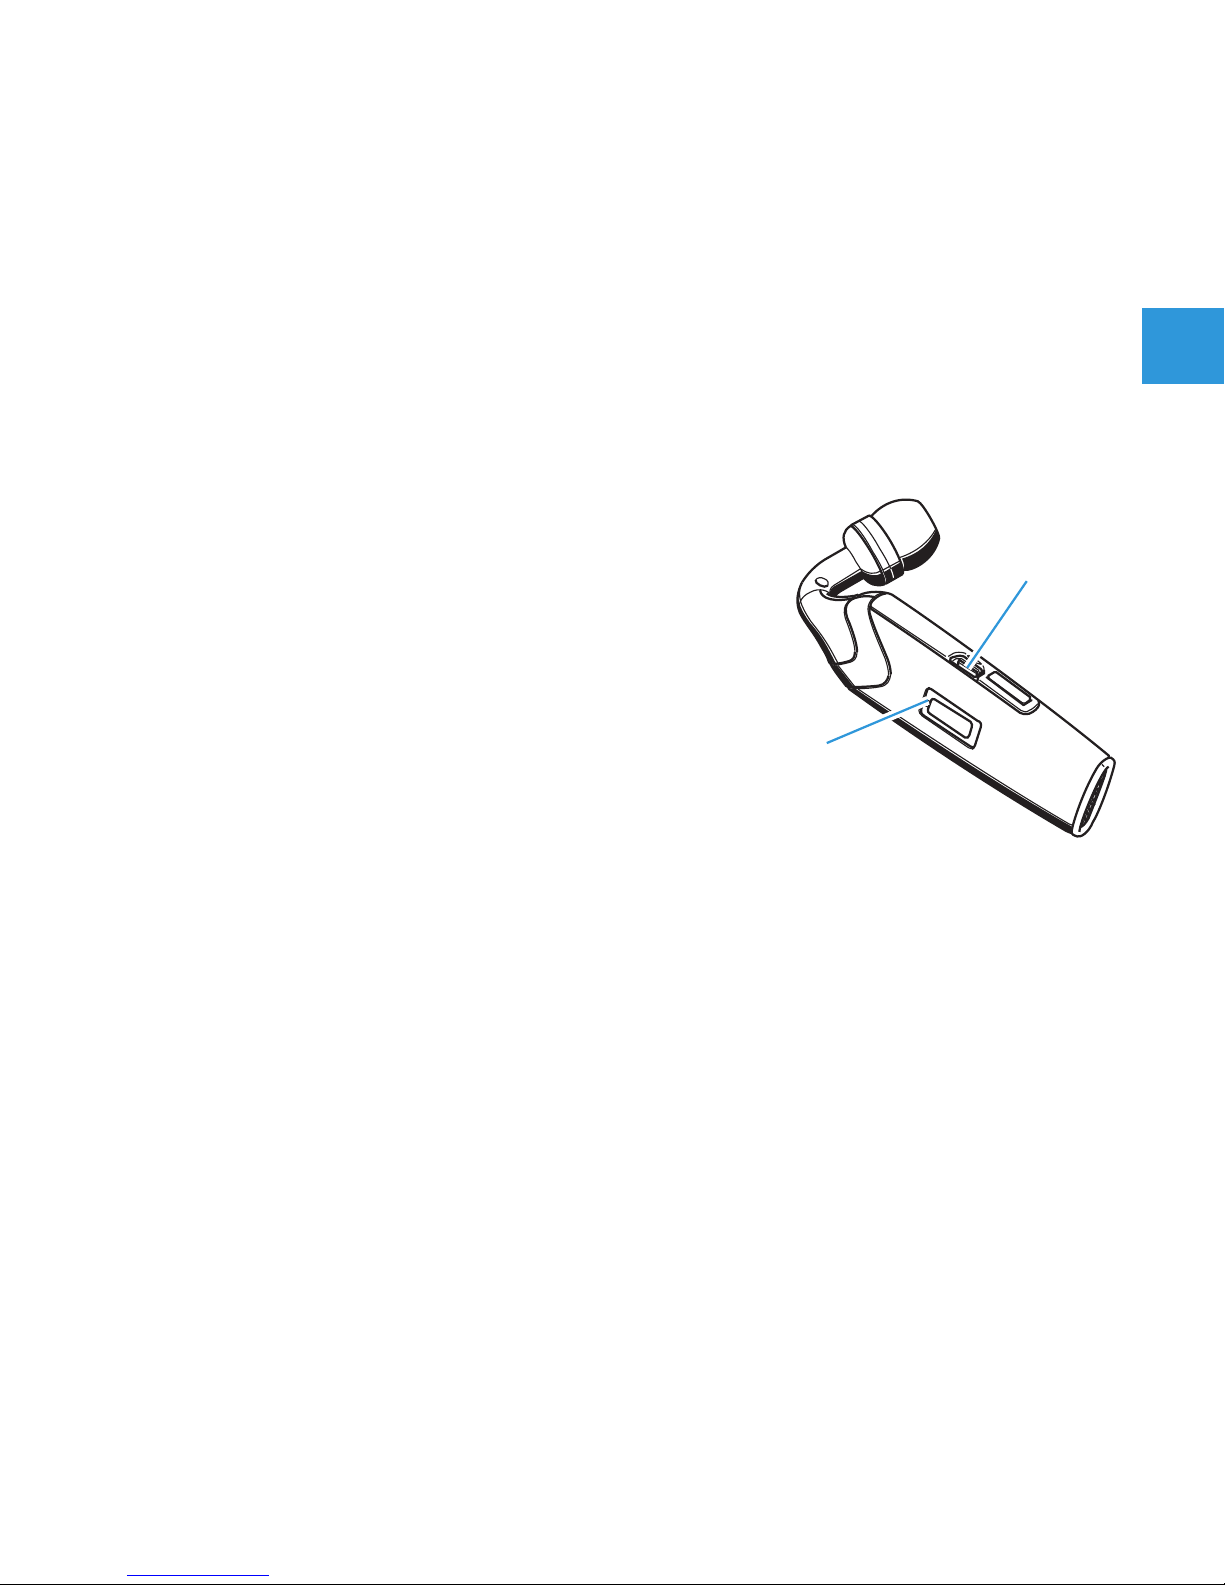
Pairing the headset to mobile phones or other Bluetooth devices
Pairing to a mobile phone
To be able to use the headset, you must first pair it to your mobile
phone or a similar device with a Bluetooth hands-free or headset profile. Once you have paired the headset to a mobile phone, the headset is
connected automatically each time this mobile phone and the headset
detect each other.
! Make sure the headset is switched on and placed close to your
mobile phone.
– If you have not yet paired the headset to a mobile phone, the
headset enters the pairing mode automatically.
– If you have already paired the headset to
another mobile phone before, you have to
enter the pairing mode manually by first
switching off the headset and then
switching it on again and keeping the
hook button 쐆 pressed for 6 seconds.
– As soon as the headset is in the pairing
mode, the LED 쐊 flashes alternatingly in
red and blue.
! On your mobile phone, start a search for Bluetooth devices (see the
manual of your mobile phone) and follow any instructions displayed
on your mobile phone display.
! Once the headset is detected by your mobile phone, select “FLX 70”.
When the Bluetooth connection is successfully established, the
headset is identified as “FLX 70” in the mobile phone’s display.
쐊
쐆
Page 18
14
! When your mobile phone
prompts for a keyword, enter
four zeros (0000).
If pairing was successful, the
LED 쐊 stops flashing.
Once paired, your mobile phone
will be able to transfer the call
audio to the headset – either
automatically or manually
(please see your mobile phone’s manual whether the call audio is
transferred automatically or manually). Most mobile phones show a
headset symbol in their display, if successfully paired.
Pairing to other Bluetooth devices
If you wish to pair the headset to other Bluetooth devices, please see
the Bluetooth device’s manual.
Pairing to several mobile phones
If you wish to pair the headset to a second mobile phone, you first have
to disconnect from the first mobile phone (see the manual of the first
mobile phone). The headset saves up to four pairing profiles. As soon
as the headset is switched on it tries to connect to the mobile phone
that it was last connected to. If this mobile phone is not detected by
the headset, you can manually connect it with one of the other three
mobile phones (see the manual of the respective mobile phone).
FLX 70
OK
Key wo rd
0000
Page 19
15
Wearing the headset
WARNING! Danger of injury!
If you insert the headset without earbud,
your auditory canal can be harmed!
! Never insert the headset without earbud!
You can wear the headset
• with the lanyard, with the earhook 쐃 or with both
• on the left or right ear
Attaching the lanyard
Use the lanyard to prevent the headset from coming off – especially
when you do not use the earhook 쐃! To attach the lanyard perma-
nently:
! Pull the narrow loop of the lanyard through
the grommet 쐎.
! Pull the lanyard through the narrow loop.
! Pull tight the lanyard.
To attach the lanyard temporarily:
! Clip the lanyard clip on the attachment
point 쐅.
쐎
쐅
Page 20
16
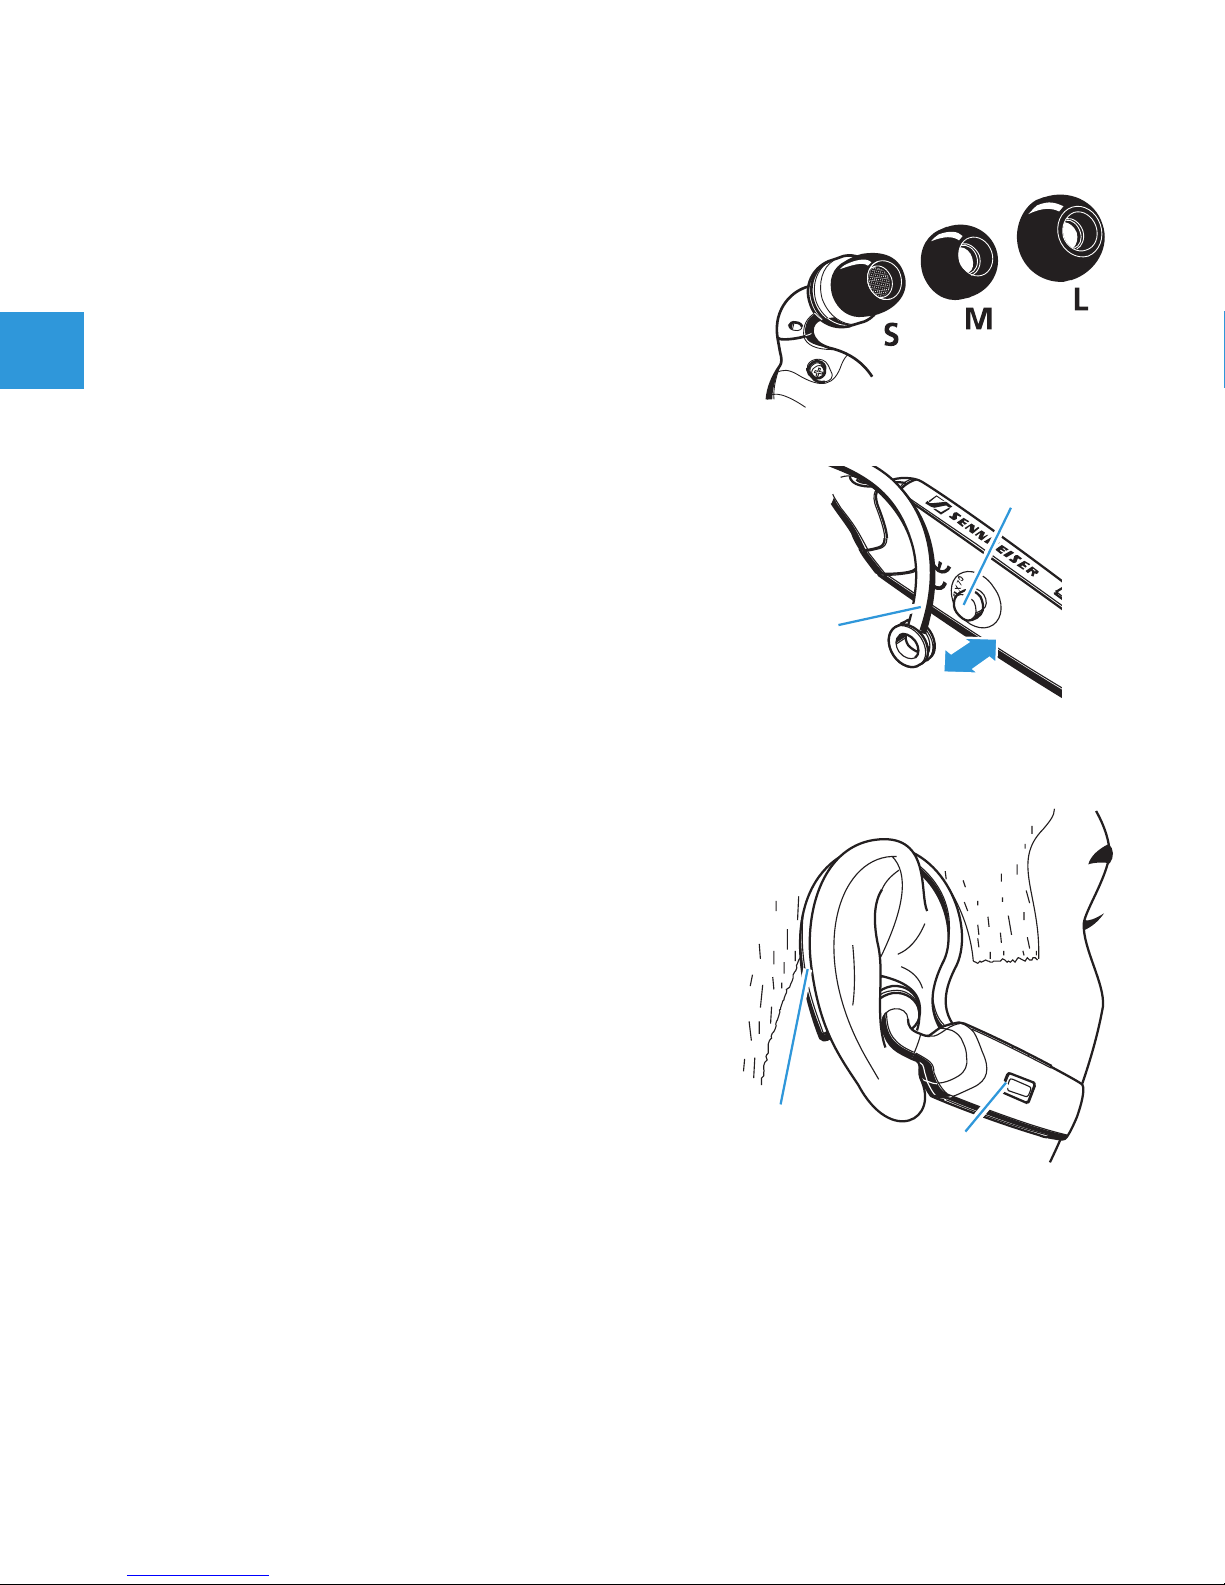
Exchanging the earbud
If the pre-mounted earbud (size
S) does not
fit your ear:
! Detach the earbud from the headset and
replace it by the larger or smaller one included in delivery.
Attaching and adapting the earhook
Please note that the earhook 쐃 has to be
turned when changing from the left to the right
ear or vice versa.
! Clip the earhook 쐃 on the ball joint 쐈, so
that the earhook can be turned and inclined to fit comfortably on
your ear.
Putting on and adjusting
! Switch the headset on. The LED 쐊
flashes blue three times.
! Put the headset on so that the earbud
fits into your auditory canal as shown
on the right.
! Bend the flexible earhook 쐃 until it fits
perfectly on your ear.
쐊
쐃
쐈
쐃
Page 21
17
Operating the FLX 70
Telephoning with the FLX 70
Accepting an incoming call
! Make sure the headset is paired to your mobile phone (see “Pairing
the headset to mobile phones or other Bluetooth devices” on page
13).
When you receive a call, a ring tone is heard in the speaker and the
LED 쐊 flashes blue quickly. To accept this call if the headset is already
switched on:
! Press the hook button 쐆 or one of the
volume buttons 쐏 or 쐄.
A beep is heard in the speaker.
! Start to talk.
To accept the call if the headset is not
switched on:
! Press the hook button 쐆 for more than
3 sec.
The headset is switched on and the call is answered immediately
without any further action, however, there might be a delay depending on the type of mobile phone you use.
! Put the headset on your ear.
! Start to talk.
쐊
쐆
쐏
쐄
Page 22
18
Rejecting an incoming call
! Press and hold the hook button 쐆 while the
mobile phone is ringing until a beep is heard
in the speaker.
The ring tone stops. Depending on the mobile phone settings, the call is either rejected or transferred to a voice mailbox.
Making a call
! Dial the number on your mobile phone as
usual.
If your mobile phone automatically transfers the call audio to the
headset, a beep is heard in the speaker.
If your mobile phone does not automatically transfer the call audio
to the headset, you must press a button on your mobile phone to
transfer the call audio to the headset manually.
! Start to talk.
Redialling
! Press and hold the hook button 쐆 for 1.5 seconds.
A beep is heard in the speaker. The mobile phone redials the last
dialled number automatically.
Voice dialling
The voice dialling function must be supported by your mobile phone
and be activated.
! Press the hook button 쐆.
쐆
Page 23
19
! After you hear a confirmation beep: Say the name of the other
party.
The mobile phone dials the corresponding number automatically.
Ending a call
! Press the hook button 쐆 or use your mo-
bile phone to end the call.
A beep is heard in the speaker. The call is
ended.
Transferring an ongoing call from the mobile
phone to the headset
! Press the hook button 쐆.
A beep is heard in the speaker. The call audio is transferred to the headset.
Transferring a call from the headset to the mobile phone
! See your mobile phone’s manual on how to transfer the call audio
from the headset to your mobile phone.
If you leave the transmitting range
If the headset leaves the mobile phone’s transmitting range during a
call:
• The sound quality deteriorates before the connection finally breaks
down.
• A beep is heard in the headset when the connection is lost.
• Your mobile phone might display the loss of connection.
• See the manual of your mobile phone whether or not your mobile
phone ends the call automatically.
쐆
Page 24
20
Changing the speaker volume
!
Press the volume button 쐏 or 쐄 during a
call.
The speaker volume is changed by one step.
– The speaker volume can be adjusted in 8
steps. The factory setting is 4. When the
minimum or maximum volume is
reached, a beep is heard in the speaker.
– In addition, the adaptive intelligence
“learns” the users preferred settings and adjusts the volume
automatically.
– If you switch off the headset, the current volume setting is saved.
Changing the ring tone volume
!
Press the volume button 쐏 or 쐄 while the headset is in standby
mode (no active call).
The ring tone volume is changed by one step. The ring tone is played
once in the set volume. The selected volume is saved.
– The ring tone volume can be adjusted in 8 steps. The factory set-
ting is 4.
Muting/un-muting the headset
microphone
To mute the headset microphone:
! Press and hold the hook button 쐆 during
a call until a beep is heard in the speaker.
쐏
쐄
쐆
쐏
쐄
Page 25
21
The microphone is muted. A beep is heard every 5 seconds in the
speaker.
To un-mute the headset microphone:
! Press either the hook button 쐆 or one of the volume buttons 쐏
or 쐄.
The beeping stops. The microphone works as usual.
Restoring factory settings
You can restore the following settings to factory settings:
• speaker volume
• ring tone volume
• pairing
! Set the headset to pairing mode as described under “Pairing the
headset to mobile phones or other Bluetooth devices” on page 13.
! Press and hold both the volume but-
tons 쐏 and 쐄 while the headset is in
pairing mode until the LED 쐊 stops flashing for a short time.
Afterwards the LED 쐊 flashes alternat-
ingly in red and blue to indicate that the
headset is in the pairing mode. The headset needs to be paired again before using.
쐋
쐂
쐅
Page 26

22
Maintenance and care
If you do not want to use the headset for a longer time:
! Turn the headset off.
! Store the headset in a clean and dry environment.
! Charge the rechargeable battery at least once every six months.
To clean the headset:
! Only clean with a dry cloth. Do not use any liquids, solvents or clean-
sing agents.
Accessories
502564 FLX 70 accessory set
(earhook, lanyard, lanyard clip and earbuds)
502309 USB charging cable
502310 Power supply EU version
502311 Power supply UK version
502312 Power supply US version
502313 Car charger unit
Page 27

23
Specifications
Directional microphone system
Microphone type: electret microphone
Sensitivity: -45 dBV at 94 dB SPL, 1 kHz
Speaker unit
Speaker type: Dynamic – Neodymium magnet
Max. output: 110 dB SPL
General
Dimensions: 52 mm x 20 mm x 31 mm (width x height x depth)
Weight: 10 g (13g with earhook mounted)
Power supply: input 100–240 V AC, output 5 V DC, 150 mA
Car charger
(accessory): input 12–24 V DC, output 5 V DC, 150 mA
Page 28
24
Manufacturer declarations
Warranty regulations
The guarantee period for this Sennheiser Communications product is 24 months – for the
battery 6 months – from the date of purchase. Excluded are accessory items, rechargeable or
disposable batteries that are delivered with the product; due to their characteristics these
products have a shorter service life that is principally dependent on the individual frequency of
use.
The guarantee period starts from the date of original purchase. For this reason, we recommend
that the sales receipt be retained as proof of purchase. Without this proof (which is checked by
the responsible Sennheiser Communications service partner) you will not be reimbursed for any
repairs that are carried out.
Depending on our choice, guarantee service comprises, free of charge, the removal of material
and manufacturing defects through repair or replacement of either individual parts or the
entire device. Inappropriate usage (e.g. operating faults, mechanical damages, incorrect
operating voltage), wear and tear, force majeure and defects which were known at the time of
purchase are excluded from guarantee claims. The guarantee is void if the product is manipulated by non-authorised persons or repair stations.
In the case of a claim under the terms of this guarantee, send the device, including accessories
and sales receipt, to the responsible service partner. To minimise the risk of transport damage,
we recommend that the original packaging is used. Your legal rights against the seller, resulting
from the contract of sale, are not affected by this guarantee.
The guarantee can be claimed in all countries outside the U.S. provided that no national law
limits our terms of guarantee.
CE Declaration of Conformity
This equipment is in compliance with the essential requirements and other relevant
provisions of Directives 1999/5/EC, 89/336/EC or 73/ 23/EC.
Before putting the device into operation, please observe the respective country-
specific regulations!
Please see also www.sennheisercommunications.com/doc.
FCC statements
This equipment has been tested and found to comply with the limits for a Class B digital device,
pursuant to Part 15 of the FCC Rules. These limits are designed to provide reasonable protection
against harmful interference in a residential installation. This equipment generates, uses and
Page 29
25
can radiate radio frequency energy and, if not installed and used in accordance with the
instructions, may cause harmful interference to radio communications. However, there is no
guarantee that interference will not occur in a particular installation. If this equipment does
cause harmful interference to radio or television reception, which can be determined by turning
the equipment off and on, the user is encouraged to try to correct the interference by one or
more of the following measures:
• Reorient or relocate the receiving antenna.
• Increase the separation between the equipment and receiver.
• Connect the equipment into an outlet on a circuit different from that to which the receiver is
connected.
• Consult the dealer or an experienced radio/TV technician for help.
This device complies with Part 15 of the FCC Rules and with RSS-210 of Industry Canada.
Operation is subject to the following two conditions:
(1) this device may not cause harmful interference, and
(2) this device must accept any interference received, including interference that may cause
undesired operation.
This Class [*] digital apparatus complies with Canadian ICES-003.
Batteries or rechargeable batteries
The supplied batteries or rechargeable batteries can be recycled. Please dispose of
them as special waste or return them to your specialist dealer. In order to protect the
environment, only dispose of exhausted batteries.
WEEE Declaration
Your Sennheiser Communications product was developed and manufactured with high
quality materials and components which can be recycled and/or reused. This symbol
indicates that electrical and electronic equipment must be disposed of separately from
normal waste at the end of its operational lifetime.
Please dispose of this product by bringing it to your local collection point or recycling centre for
such equipment. This will help to protect the environment in which we all live.
Page 30

Page 31

1
Inhalt
Inhalt............................................................................................................... 1
Wichtige Sicherheitsanweisungen ............................................................. 2
Merkmale des FLX 70.................................................................................... 6
Lieferumfang ................................................................................................. 6
Bedienelemente ............................................................................................ 7
Überblick......................................................................................................... 8
Kurzanleitung................................................................................................ 9
Das FLX 70 in Betrieb nehmen .................................................................. 11
Den Akku im Headset laden...........................................................................11
Headset ein-/ausschalten ..............................................................................12
Das Headset mit Mobiltelefonen oder anderen Bluetooth-Geräten
paaren ................................................................................................................13
Das Headset tragen.........................................................................................15
Das FLX 70 bedienen ..................................................................................17
Telefonieren mit dem FLX 70 ........................................................................17
Die Lautsprecher-Lautstärke ändern ...........................................................20
Die Klingelton-Lautstärke ändern ................................................................20
Stummschalten des Headset-Mikrofons.....................................................20
Wiederherstellen der Werkseinstellungen (Reset)...................................21
Pflege und Reinigung ................................................................................. 22
Zubehör ........................................................................................................22
Technische Daten ........................................................................................ 23
Herstellererklärungen ................................................................................24
Sie haben die richtige Wahl getroffen!
Diese Sennheiser-Produkte werden Sie lange Jahre durch Zuverlässigkeit, Wirtschaftlichkeit und
einfache Bedienung überzeugen. Dafür garantiert Sennheiser mit seinem guten Namen und
seiner in mehr als 60 Jahren erworbenen Kompetenz als Hersteller hochwertiger elektroakustischer Produkte. Nehmen Sie sich nun ein paar Minuten Zeit, um diese Anleitung zu lesen.
Wir möchten, dass Sie einfach und schnell in den Genuss dieser Technik kommen.
Page 32

2
Wichtige Sicherheitsanweisungen
Das FLX 70 wurde entsprechend dem heutigen Stand der
Technik und den anerkannten sicherheitstechnischen Regeln
hergestellt. Trotzdem besteht die Gefahr von Sachschäden,
wenn Sie die folgenden allgemeinen Sicherheitshinweise
nicht beachten.
• Lesen Sie diese Anleitung.
• Befolgen Sie alle Anweisungen.
• Bewahren Sie die Anleitung so auf, dass sie jederzeit für alle Benut-
zer zugänglich ist.
• Geben Sie das FLX 70 an Dritte stets zusammen mit der Bedienungs-
anleitung weiter.
Bestimmungsgemäßer Gebrauch
Das FLX 70 ist ein Zubehör für Mobiltelefone und andere BluetoothGeräte mit einem „Hands Free-“ oder „Headset-Profil“, das kabelloses
Telefonieren in trockener Umgebung ermöglicht.
Als nicht bestimmungsgemäßer Gebrauch gilt, wenn Sie das FLX 70
• anders benutzen, als in dieser Bedienungsanleitung beschrieben,
• unter Betriebsbedingungen nutzen, die von den in dieser Bedie-
nungsanleitung beschriebenen abweichen.
Um Gehörschäden zu vermeiden
• Stellen Sie eine geringe Lautstärke ein, bevor Sie das Headset auf-
setzen!
• Verwenden Sie das Headset nicht über längere Zeit mit hoher Laut-
stärke!
Page 33

3
Um Schäden am Gehörgang und Trommelfell zu verhindern
• Setzen Sie einen passenden Ohrhörer (Größe S, M oder L) auf das
Headset, bevor Sie es aufsetzen. Setzen Sie das Headset niemals
ohne Ohrhörer auf!
• Gehen Sie beim Aufsetzten und Abnehmen des Headsets stets lang-
sam und vorsichtig vor! Führen Sie den Ohrhörer nicht zu tief in den
Gehörgang!
• Halten Sie das Headset stets trocken.
Um Unfälle zu vermeiden
• Benutzen Sie das Headset nicht, wenn Ihre Umgebung besondere
Aufmerksamkeit erfordert (z. B. im Straßenverkehr oder bei handwerklichen Tätigkeiten).
Allgemeine Hinweise
• Sie dürfen die Komponenten des FLX 70 weder öffnen noch um-
bauen!
• Nicht in Reichweite von Kindern aufbewahren.
• Bei Missbrauch oder nicht ordnungsgemäßem Gebrauch kann der
eingebaute Akku auslaufen. In extremen Fällen besteht Explosionsbzw. Brandgefahr. Daher dürfen Sie den Akku nicht zerlegen und
nicht über 40 °C erwärmen oder verbrennen.
• Sennheiser Communications haftet nicht für Schäden aus Verbin-
dungsabbrüchen wegen leerer oder überalteter Akkus oder Überschreiten des Bluetooth-Sendebereichs.
Vor der Inbetriebnahme
• Benutzen Sie das FLX 70 ausschließlich in trockener Umgebung und
halten Sie Flüssigkeiten und elektrisch leitfähige Kleinteile vom
FLX 70 und seinen Anschlussbuchsen fern.
Page 34

4
• Setzen Sie das FLX 70 niemals extremen Temperaturen aus. Die
normale Betriebstemperatur ist 10 °C bis 40 °C.
• Bewahren Sie das Headset in einer sauberen, staubfreien Umgebung
auf.
Beim Laden
• Tragen Sie das Headset niemals während des Ladens!.
• Sennheiser Communications haftet nicht für Schäden an USB-
Geräten, die nicht mit den USB-Spezifikationen im Einklang sind.
• Das Headset muss entweder mit dem FLX 70-Ladenetzteil (EU:
502310, UK: 502311, US: 502312), dem FLX 70 Auto-Ladegerät
(502313) oder über die USB-Buchse eines Computers geladen werden. Versuchen Sie nie, andere Akkus als die des FLX 70 Headsets mit
dem Ladenetzteil oder dem Auto-Ladegerät zu laden.
Während des Betriebs
• Das FLX 70 strahlt Hochfrequenz-Energie ab. Wenn das FLX 70 nicht
so installiert und benutzt wird, wie in dieser Bedienungsanleitung
beschrieben, dann kann es andere Hochfrequenzkommunikationen
stören. Interferenzen können in jeder Installation auftauchen.
Sicherheitshinweise für Lithium-Polymer-Akkus
Das FLX 70 hat einen eingebauten Lithium-Polymer-Akku. Bei Missbrauch oder nicht ordnungsgemäßem Gebrauch kann dieser Akku
auslaufen.
WARNUNG! In extremen Fällen besteht die Gefahr von:
• Hitzeentwicklung
• Feuerentwicklung
• Explosion
• Rauch- oder Gasentwicklung
Page 35

5
Bei Missbrauch oder nicht ordnungsgemäßem Gebrauch übernimmt
Sennheiser keine Haftung.
Nicht über 40 °C erhitzen (z. B. durch Sonneneinstrahlung) oder ins Feuer werfen.
Keiner Nässe aussetzen.
Nicht kurzschließen.
Nicht demontieren oder verformen.
An einem kühlen, trockenen Ort aufbewahren (ca. 20 °C).
Akku ausschließlich mit dem mitgelieferten
Sennheiser Communications Ladegerät laden.
Bei längerem Nichtgebrauch Akkus
regelmäßig nachladen (alle 6 Monate für ca. 1 Stunde)
Akkus nur bei Umgebungstemperatur von 10 °C bis
40 °C laden.
Bei offensichtlich defektem Gerät den Akku nicht laden.
Geben Sie verbrauchte Akkus nur an Sammelstellen
oder an Ihren Fachhändler zurück.
Page 36

6
Merkmale des FLX 70
• FlexFit™ Technologie für perfekte Passform
• Geschlossener Lautsprecher schließt Umgebungslärm aus
• Flexibler und abnehmbarer Ohrbügel für individuellen Tragekomfort
• Links oder rechts zu tragen
• ActiveGard™ Schutz vor akustischen Schocks
• Bluetooth 2.0, eSCO und EDR: Kompatibel mit allen Bluetooth 1.1, 1.2
und 2.0 Geräten, die ein „Hands Free-“ oder „Headset-Profil“ unterstützen
• Bis zu sechs Stunden Sprechzeit
• Bis zu 240 Stunden Stand-by
• Laden direkt über USB
• Ausgezeichnete Sennheiser-Audioqualität
• Extrem leicht und komfortabel (13 g)
Lieferumfang
1 FLX 70 Bluetooth Headset mit eingebautem Li-Polymer-Akku
2 zusätzliche Ohrhörer, M und L (S ist bereits aufgesteckt)
1 Ohrbügel
1 FLX 70 Ladenetzteil
1 USB Ladekabel
1 Trageschlaufe
1 Trageschlaufenklammer
1 Bedienungsanleitung
Page 37

7
Bedienelemente
쐃 Ohrbügel
(abnehm- und verformbar)
쐇 Ohrhörer
(austauschbar)
쐋 Buchse für das Ladenetz-
teil
쐏 Lautstärketaste +
쐄 Lautstärketaste –
쐂 Mikrofon
쐆 Sprech-/Rufannahmetaste
쐊 LED
쐎 Öse für Trageschlaufe
쐅 Befestigungsposition für die
Trageschlaufenklammer
쐈 Ohrbügel-Befestigung
쐃
쐇
쐊
쐋
쐆
쐏
쐎
쐅
쐈
쐃
쐂
쐄
Page 38

8
Überblick
Taste Funktion Page
Sprech/Rufannahmetaste 쐆
• Headset ein-/ausschalten
• Paarungsmodus starten
• Anruf annehmen
• Anruf machen
• Anruf abweisen
• Wahlwiederholung
• Sprachwahl
• Anruf beenden
• Anruf vom Mobiltelefon aufs
Headset übertragen
• Stummschaltung
12
13
17
18
17
18
18
19
19
20
Lautstärketaste + 쐏
• Lautstärke des Lautsprechers
erhöhen
• Lautstärke des Klingeltons
erhöhen
• Stummschaltung aufheben
• Anruf annehmen
19
20
20
17
Lautstärketaste – 쐄
• Lautstärke des Lautsprechers
verringern
• Lautstärke des Klingeltons verrin-
gern
• Stummschaltung aufheben
• Anruf annehmen
19
20
20
17
Page 39

9
Kurzanleitung
! Laden Sie zuerst das Headset.
Beim ersten Laden werden drei Stunden, später nur 2½ Stunden benötigt, um den Akku voll aufzuladen. Einzelheiten siehe Seite 11.
*) Das Auto-Ladegerät ist als Zubehör erhältlich (siehe Seite 22).
3h
*)
Page 40

10
! Schalten Sie anschließend das Headset ein (Einzelheiten auf Seite
12) und paaren Sie es mit Ihrem Mobiltelefon (weitere Einzelheiten
und Paaren mit weiteren Bluetooth-Geräten siehe Seite 13).
! Setzen Sie das Headset auf Ihr linkes oder rechtes Ohr.
Stummschalten (S. 20)
Anruf annehmen (S. 17)
Anruf beenden (S. 19)
Sprachwahl (S. 18)
Wahlwiederholung (S. 18)
Lautstärke (S. 19)
FLX 70
OK
Key w or d
0000
Page 41

11
Das FLX 70 in Betrieb nehmen
Den Akku im Headset laden
Wenn Sie den Akku zum ersten Mal laden, laden Sie ihn für drei Stunden ohne Unterbrechung. Später genügen 2½ Stunden, um den Akku
voll aufzuladen.
Um den Akku im Headset zu laden:
! Nehmen Sie das Headset ab und schalten
Sie es aus (siehe Seite 12).
! Schließen Sie das USB-Ladekabel an die
Buchse für das Ladenetzteil 쐋 an.
! Schließen Sie den USB-Stecker des USB-
Ladekabels wie folgt an:
– entweder an die USB-Buchse des FLX 70
Ladenetzteils
– oder an eine USB-Buchse eines Computers
– oder an die USB-Buchse des FLX 70 Auto-Ladegeräts (als Zubehör
erhältlich)
! Schließen Sie das Ladenetzteil bzw. das Auto-Ladegerät an die
entsprechende Stromquelle an.
Wenn der Akku völlig leer war, blinkt die LED 쐊 zunächst rot. Wäh-
rend des Ladens leuchtet die LED 쐊 rot. Sobald der Akku vollständig
geladen ist, leuchtet die LED 쐊 blau.
Das Headset kann nicht während eines Telefonats geladen werden. Ein
vollständig geladener Akku ermöglicht eine Sprechzeit von bis zu sechs
Stunden oder eine Standby-Zeit von bis zu 240 Stunden.
쐊
쐋
Page 42

12
Wenn der Akku fast leer ist:
• blinkt die LED 쐊 rot,
• ertönen dreimal je drei Signaltöne im Headset, zunächst im Abstand
von 15 Sekunden, danach im Abstand von zwei Minuten,
• verbleiben weniger als zehn Minuten Sprechzeit.
Headset ein-/ausschalten
!
Halten Sie die Sprech-/Rufannahmetaste 쐆 für ca. 3 Sekunden
gedrückt, bis die LED 쐊 blau leuchtet.
Das Headset ist eingeschaltet und in einem
der folgenden Betriebszustände:
– Wenn das Headset bereits mit einem
Mobiltelefon gepaart ist, ist es sofort be-
triebsbereit.
– Wenn das Headset noch nicht mit einem
Mobiltelefon gepaart ist, dann paaren Sie
es, wie unter „Das Headset mit Mobiltele-
fonen oder anderen
Bluetooth-Geräten paaren“ auf Seite 13 beschrieben.
Wenn das Headset bereits mit einem Mobiltelefon gepaart ist und
dieses Mobiltelefon klingelt, dann genügt ein einziger Druck auf die
Sprech-/Rufannahmetaste 쐆, um das Headset einzuschalten und den
Anruf anzunehmen.
Um das Headset auszuschalten:
! Halten Sie die Sprech-/Rufannahmetaste 쐆 für 3 Sekunden ge-
drückt bis die LED 쐊 rot aufleuchtet und dann ausgeht.
Alle Einstellungen werden gespeichert. Der Akku hält länger, wenn
Sie das Headset ausschalten, solange Sie es nicht nutzen.
쐊
쐆
Page 43

13
Das Headset mit Mobiltelefonen oder anderen
Bluetooth-Geräten paaren
Mit einem Mobiltelefon paaren
Damit Sie das Headset benutzen können, müssen Sie es zunächst
einmalig mit Ihrem Mobiltelefon oder einem ähnlichen Bluetooth-Gerät
mit „Hands Free-“ oder „Headset-Profil“ paaren. Danach wird das
Headset automatisch über Bluetooth mit dem Mobiltelefon verbunden,
sobald sich Headset und Mobiltelefon gegenseitig erkennen.
! Stellen Sie sicher, dass das Headset eingeschaltet und nahe beim
Mobiltelefon platziert ist.
– Wenn Sie das Headset noch nicht mit einem Mobiltelefon gepaart
haben, startet der Paarungsmodus automatisch.
– Wenn Sie das Headset bereits mit einem
anderen Mobiltelefon gepaart hatten,
müssen Sie den Paarungsmodus manuell
starten. Schalten Sie dazu das Headset
erst aus- und dann wieder ein, während
Sie die Sprech-/Rufannahmetaste 쐆
sechs Sekunden gedrückt halten.
– Sobald das Headset im Paarungsmodus
ist, blinkt die LED 쐊 abwechselnd rot und
blau.
! Starten Sie mit Ihrem Mobiltelefon eine Suche nach Bluetooth-
Geräten (siehe die Anleitung Ihres Mobiltelefons) und folgen Sie den
Anweisungen auf dem Display des Mobiltelefons.
! Nachdem das Headset vom Mobiltelefon erkannt wurde, wählen und
bestätigen Sie „FLX 70“.
쐊
쐆
Page 44

14
Sobald die Bluetooth-Verbindung erfolgreich hergestellt wurde, erscheint „FLX 70“ im Display des Mobiltelefons.
! Sobald Ihr Mobiltelefon ein
Passwort abfragt, geben Sie
vier Nullen (0000) ein.
Wenn das Paaren erfolgreich
war, hört die LED 쐊 auf zu blin-
ken.
Ihr Mobiltelefon kann Anrufe
nun auf das Headset weiterleiten – entweder automatisch
oder manuell (siehe die Anleitung Ihres Mobiltelefons, ob die Anrufe
automatisch oder manuell zum Headset weitergeleitet werden). Die
meisten Mobiltelefone haben ein Headset-Symbol im Display, wenn
das Paaren erfolgreich war.
Mit anderen Bluetooth-Geräten paaren
Wenn Sie das Headset mit anderen Bluetooth-Geräten paaren möchten,
dann siehe die Anleitung dieses Bluetooth-Geräts.
Mit mehreren Mobiltelefonen paaren
Wenn Sie das Headset mit einem zweiten Mobiltelefon paaren möchten, müssen Sie zuerst die Paarung mit dem ersten Mobiltelefon aufheben (siehe dazu die Anleitung Ihres Mobiltelefons). Das Headset speichert bis zu vier Paarungsprofile. Sobald das Headset eingeschaltet
wird, versucht es, eine Bluetooth-Verbindung zu dem Mobiltelefon
herzustellen, mit dem es zuletzt verbunden war. Wenn das Headset
dieses Mobiltelefon nicht findet, können Sie manuell eine BluetoothVerbindung zu einem anderen Mobiltelefon herstellen (siehe dazu die
Anleitung dieses Mobiltelefons).
FLX 70
OK
Key wo rd
0000
Page 45

15
Das Headset tragen
WARNUNG! Verletzungsgefahr!
Wenn Sie das Headset ohne Ohrhörer aufsetzen, können
Sie Ihren Gehörgang verletzen!
! Setzen Sie das Headset niemals ohne Ohrhörer auf!
Sie können das Headset wie folgt tragen:
• entweder mit Trageschlaufe oder mit Ohrbügel 쐃 oder mit beidem
• auf dem linken oder rechten Ohr
Die Trageschlaufe befestigen
Die Trageschlaufe verhindert, dass das Headset herunterfällt – insbesondere, wenn Sie es ohne Ohrbügel 쐃 tragen.
Um die Trageschlaufe dauerhaft zu befestigen:
! Ziehen Sie das dünne Befestigungsband der
Trageschlaufe durch die Öse 쐎.
! Ziehen Sie die Trageschlaufe durch das
dünne Befestigungsband.
! Ziehen Sie die Trageschlaufe fest.
Um die Trageschlaufe so zu befestigen, dass
sie jederzeit abgenommen werden kann:
! Klemmen Sie die Trageschlaufe mit der
Klammer an die Befestigungsposition 쐅.
쐎
쐅
Page 46

16
Den Ohrhörer auswechseln
Wenn der bereits aufgesteckte Ohrhörer
(Größe M) nicht passt:
! Ziehen Sie den Ohrhörer vom Headset ab
und ersetzen Sie ihn durch den kleineren
oder größeren.
Den Ohrbügel befestigen und anpassen
Der Ohrbügel 쐃 muss abgenommen und herumge-
dreht werden, wenn Sie vom linken auf das rechte
Ohr wechseln oder umgekehrt.
! Stecken Sie den Ohrbügel 쐃 auf die Ohrbügel-
Befestigung 쐈.
Der Ohrbügel kann gedreht und geneigt werden,
so dass er komfortabel auf dem Ohr sitzt.
Das Headset aufsetzen und anpassen
! Schalten Sie das Headset ein.
Die LED 쐊 blinkt drei Mal blau.
! Setzen Sie das Headset so auf, dass der
Ohrhörer in den Gehörgang passt, wie
nebenstehend abgebildet.
! Biegen Sie den verformbaren Ohrbü-
gel 쐃, bis er genau auf Ihr Ohr passt.
쐊
쐃
쐈
쐃
Page 47

17
Das FLX 70 bedienen
Telefonieren mit dem FLX 70
Annehmen eines Anrufs
! Stellen Sie sicher, dass das Headset mit Ihrem Mobiltelefon gepaart
ist (siehe „Das Headset mit Mobiltelefonen oder anderen
Bluetooth-Geräten paaren“ auf Seite 13).
Wenn Sie angerufen werden und das Headset bereits eingeschaltet ist,
hören Sie einen Klingelton im Headset und die LED 쐊 blinkt schnell
blau. Sie nehmen den Anruf wie folgt an
! Drücken Sie entweder die Sprech-
/Rufannahmetaste 쐆 oder eine der Lautstärketasten 쐏 oder 쐄.
Sie hören einen Signalton im Headset.
! Sprechen Sie.
Um den Anruf anzunehmen, wenn das Headset
noch nicht eingeschaltet ist:
! Halten Sie die Sprech-/Rufannahmetaste 쐆
für 3 Sekunden gedrückt.
Das Headset schaltet sich automatisch ein und der Anruf wird sofort
angenommen. Sie müssen keine weitere Taste drücken (bei einigen
Mobiltelefonen kann eine Verzögerung auftreten).
! Setzen Sie das Headset auf.
! Sprechen Sie.
쐊
쐆
쐏
쐄
Page 48

18
Abweisen eines Anrufs
! Halten Sie, während das Mobiltelefon klingelt, die Sprech-/Rufan-
nahmetaste 쐆 gedrückt, bis Sie einen Signalton im Headset hören.
Das Klingeln hört auf. Je nach Einstellung Ihres Mobiltelefons wird
der Anruf abgewiesen oder zu Ihrer Sprachmailbox umgeleitet.
Tätigen eines Anruft
! Wählen Sie mit Ihrem Mobiltelefon die gewünschte Nummer wie
gewohnt.
Wenn Ihr Mobiltelefon den Anruf automatisch zum Headset weiterleitet, dann hören Sie einen Signalton im Headset.
Wenn Ihr Mobiltelefon den Anruf nicht automatisch zum Headset
weiterleitet, dann müssen Sie dazu eine Taste drücken (siehe die
Anleitung Ihres Mobiltelefons).
! Sprechen Sie.
Mit Wahlwiederholung wählen
! Halten Sie die Sprech-/Rufannahmetaste 쐆 gedrückt, bis Sie einen
Signalton im Headset hören.
Das Mobiltelefon wählt die zuletzt gewählte Nummer automatisch
noch einmal.
Mit Sprachwahl wählen
Die Sprachwahl-Funktion muss von Ihrem Mobiltelefon unterstützt
werden und aktiviert sein.
! Drücken Sie die Sprech-/Rufannahmetaste 쐆.
! Sprechen Sie nach dem Signalton den Namen dessen, den Sie anru-
fen möchten.
Das Mobiltelefon wählt automatisch die dazugehörende Nummer.
Page 49

19
Beenden eines Anrufs
! Drücken Sie entweder die Sprech-/Rufan-
nahmetaste 쐆 oder
verwenden Sie die Tasten Ihres Mobiltelefons, um den Anruf zu beenden. Sie hören
einen Signalton im Headset. Der Anruf wird
beendet.
Weiterleiten eines laufenden Telefonats vom Mobiltelefon zum Headset
! Drücken Sie während des Telefonats die Sprech-/Rufannahme-
taste 쐆.
Sie hören einen Signalton im Headset. Das laufende Telefonat wird
zum Headset weitergeleitet.
Zurückleiten eines laufenden Telefonats vom Headset zum Mobiltelefon
! Siehe die Anleitung Ihres Mobiltelefons, wie ein laufendes Telefonat
von einem Headset zurück auf das Mobiltelefon transferiert wird.
Wenn Sie den Sende- und Empfangsbereich verlassen
Wenn das Headset während eines Telefonats den Bluetooth-Sende- und
Empfangsbereich des Mobiltelefons verlässt,
• verschlechtert sich die Klangqualität, bevor die Verbindung endgültig
abbricht,
• ertönt ein Signalton im Headset, wenn die Verbindung abbricht,
• zeigt das Mobiltelefon ggf. den Verbindungsabbruch im Display an.
• Siehe die Anleitung Ihres Mobiltelefons, ob das Mobiltelefon automa-
tisch auflegt oder nicht.
쐆
Page 50

20
Die Lautsprecher-Lautstärke ändern
!
Drücken Sie während des Telefonats eine
der beiden Lautstärketasten 쐏 oder 쐄.
Die Lautsprecher-Lautstärke ändert sich
um eine Stufe.
– Die Lautstärke kann in acht Stufen ein-
gestellt werden. Die Werkseinstellung ist
Stufe vier. Wenn die minimale oder
maximale Lautstärke erreicht ist, hören
Sie einen Signalton.
– Außerdem „lernt“ die Adaptive Intelligence Ihre bevorzugten Ein-
stellungen und passt die Lautstärke automatisch an.
– Wenn Sie das Headset ausschalten, wird die aktuelle Lautstärke-
einstellung gespeichert.
Die Klingelton-Lautstärke ändern
!
Drücken Sie eine der beiden Lautstärketasten 쐏 oder 쐄 (nicht
während eines Telefonats).
Die Klingelton-Lautstärke ändert sich um eine Stufe. Der Klingelton
ertönt ein Mal in der eingestellten Lautstärke. Die Lautstärkeeinstellung wird gespeichert.
– Die Klingelton-Lautstärke kann in acht Stufen eingestellt werden.
Die Werkseinstellung ist Stufe vier.
Stummschalten des Headset-Mikrofons
Um das Headset-Mikrofon stummzuschalten:
! Halten Sie die Sprech-/Rufannahmetaste 쐆 während des Telefonats
gedrückt, bis Sie einen Signalton im Headset hören.
쐏
쐄
Page 51

21
Das Mikrofon wird stumm geschaltet. Alle
5 Sekunden ertönt ein Signalton.
Um die Stummschaltung aufzuheben:
! Drücken Sie entweder die Sprech-/Rufan-
nahmetaste 쐆 oder eine der Lautstärketasten 쐏 oder 쐄.
Die Signaltöne hören auf. Das Mikrofon
arbeitet wieder.
Wiederherstellen der Werkseinstellungen (Reset)
Sie können folgende Einstellungen auf Werkseinstellungen zurücksetzen:
• Lautsprecher-Lautstärke
• Klingelton-Lautstärke
• Paarung
! Starten Sie den Paarungsmodus wie unter „Das Headset mit Mo-
biltelefonen oder anderen
Bluetooth-Geräten paaren“ auf Seite 13 beschrieben.
! Halten Sie, während das Headset im
Paarungsmodus ist, beide Lautstärketasten 쐏 und 쐄 gedrückt, bis die LED 쐊 für
kurze Zeit zu blinken aufhört.
Anschließend blinkt die LED 쐊 abwech-
selnd rot und blau. Das Headset ist im
Paarungsmodus und muss neu gepaart
werden, bevor es verwendet werden
kann.
쐆
쐏
쐄
쐋
쐂
쐅
Page 52

22
Pflege und Reinigung
Wenn Sie das Headset längere Zeit nicht benutzen möchten:
! Schalten Sie das Headset aus.
! Bewahren Sie das Headset an einem sauberen und trockenen Ort
auf.
! Laden Sie den Akku mindestens einmal alle sechs Monate.
Um das Headset zu reinigen:
! Verwenden Sie nur ein trockenes Tuch, keinerlei Flüssigkeiten, Löse-
oder Reinigungsmittel.
Zubehör
502564 FLX 70 Zubehör-Set
(Ohrbügel, Trageschlaufe, Clip und Ohrhörer)
502309 USB-Ladekabel
502310 Ladenetzteil EU-Version
502311 Ladenetzteil UK-Version
502312 Ladenetzteil USA-Version
502313 Auto-Ladegerät
Page 53

23
Technische Daten
Gerichtetes Mikrofonsystem
Mikrofontyp: Elektret-Mikrofon
Empfindlichkeit: –45 dBV bei 94 dB SPL und 1 kHz
Lautsprecher
Lautsprechertyp: Dynamisch – Neodymmagnet
Schalldruckpegel: 110 dB SPL
Allgemein
Abmessungen: 52 mm x 20 mm x 31 mm (B x H x T)
Gewicht: 10 g (13g mit Ohrbügel)
Ladenetzteil: Eingang 100–240 V AC, Ausgang 5 V DC, 150 mA
Auto-Ladegerät
(Zubehör): Eingang 12–24 V DC, Ausgang 5 V DC, 150 mA
Page 54

24
Herstellererklärungen
Garantiebestimmungen
Wir übernehmen für das Headset eine Garantie von 24 Monaten – für den Akku
von 6 Monaten. Ausgenommen hiervon sind dem Produkt beigefügte Zubehörartikel, Akkus und Batterien, denn diese Produkte haben wegen ihrer Beschaffenheit eine kürzere Lebensdauer, die zudem im Einzelfall konkret von ihrer Nutzungsintensität abhängt.
Die Garantiezeit beginnt ab Kaufdatum. Zum Nachweis heben Sie bitte unbedingt
den Kaufbeleg auf. Ohne diese Nachweise, die der zuständige Sennheiser-ServicePartner prüft, werden Reparaturen grundsätzlich kostenpflichtig ausgeführt.
Die Garantieleistungen bestehen nach unserer Wahl in der unentgeltlichen Beseitigung von Material- oder Herstellungsfehlern durch Reparatur, den Tausch von
Teilen oder des kompletten Geräts. Von der Garantie ausgenommen sind Mängel
durch unsachgemäßen Gebrauch (z. B. Bedienungsfehler, mechanische Beschädigungen, falsche Betriebsspannung), Verschleiß, aufgrund höherer Gewalt und
solche Mängel, die Ihnen beim Kauf bereits bekannt sind. Der Garantieanspruch
erlischt bei Eingriffen in das Produkt durch nicht autorisierte Personen oder
Werkstätten.
Im Garantiefall senden Sie das Gerät inklusive Zubehör und Kaufbeleg an den für
Sie zuständigen Service-Partner. Zur Vermeidung von Transportschäden sollte
möglichst die Original-Verpackung verwendet werden.
Ihre gesetzlichen Mängelansprüche aus dem Kaufvertrag gegen den Verkäufer
werden durch diese Garantie nicht eingeschränkt. Die Garantie kann weltweit in
allen Ländern – außer in den USA – in Anspruch genommen werden, in denen das
jeweils nationale Recht unseren Garantiebestimmungen nicht entgegensteht.
EG-Konformitätserklärung
Diese Geräte ensprechen den grundlegenden Anforderungen und den
weiteren Vorgaben der Richtlinien 1999/5/EU, 89/336/EU oder 73/
23/EU.
Vor Inbetriebnahme sind die jeweiligen länderspezifischen Vorschriften zu
beachten!
Siehe auch www.sennheisercommunications.com/doc.
Page 55

25
Akkus und Batterien
Die mitgelieferten Akkus oder Batterien sind recyclingfähig
Bitte entsorgen Sie die Akkus über den Batteriecontainer oder den Fach-
handel. Entsorgen Sie nur leere Batterien oder Akkus, um den Umwelt-
schutz zu gewährleisten.
WEEE Erklärung
Ihr Sennheiser-Produkt wurde mit hochwertigen Materialien und Komponenten entworfen und hergestellt, die recycelbar sind und wieder verwendet werden können. Dieses Symbol bedeutet, dass elektrische und elektronische Geräte am Ende ihrer Nutzungsdauer vom Hausmüll getrennt ent-
sorgt werden müssen.
Bitte entsorgen Sie dieses Gerät bei Ihrer örtlichen kommunalen Sammelstelle
oder im Recycling Center. Bitte helfen Sie mit, die Umwelt, in der wir leben, zu
erhalten.
Page 56

Page 57

1
Sommaire
Sommaire ....................................................................................................... 1
Consignes de sécurité importantes ............................................................ 2
Points forts du FLX 70 .................................................................................. 6
Contenu .......................................................................................................... 6
Commandes................................................................................................... 7
Vue d’ensembles des touches ..................................................................... 8
Guide d’installation rapide .......................................................................... 9
Mise en service du FLX 70 .......................................................................... 11
Charger la batterie intégrée de l’oreillette .................................................11
Allumer/éteindre l’oreillette..........................................................................12
Appairer l’oreillette avec téléphones mobiles ou d’autres appareils
Bluetooth...........................................................................................................13
Port de l’oreillette ............................................................................................16
Utilisation du FLX 70 .................................................................................. 18
Téléphoner avec le FLX 70..............................................................................18
Régler le volume d’écoute..............................................................................21
Régler le volume de la sonnerie ....................................................................21
Couper/réactiver le micro de l’oreillette......................................................22
Rétablir les réglages d’usine..........................................................................22
Maintenance et entretien .......................................................................... 24
Accessoires................................................................................................... 24
Caractéristiques techniques ...................................................................... 25
Déclarations du fabricant .......................................................................... 26
Nous avons conçu ce produit pour une fiabilité maximale pendant de nombreuses années. Plus
de 60 ans d’expérience dans le domaine de la conception et de la fabrication d’appareils électroacoustiques de haute qualité ont fait de Sennheiser un des principaux acteurs dans ce domaine.
Prenez le temps de lire cette notice avec soin : elle vous permettra d’exploiter rapidement votre
nouveau produit Sennheiser, à son maximum.
Page 58

2
Consignes de sécurité importantes
Le FLX 70 a été fabriqué conformément aux spécifications
s’appliquant aux technologies actuelles en matière de
sécurité. Toutefois, si vous ne suivez pas les consignes
générales de sécurité mentionnées ci-après, vous risquez
quand même d’endommager l’équipement.
• Lisez soigneusement et intégralement la présente notice.
• Suivez toutes les instructions.
• Conservez cette notice à un endroit accessible à tout moment pour
tous les utilisateurs.
• Si vous mettez le FLX 70 à la disposition d’un tiers, joignez-y toujours
la notice.
Utilisation conforme aux directives
Le FLX 70 est un accessoire pour téléphones mobiles ou tout autre
appareil Bluetooth possédant le profil « mains libres » ou « oreillette »,
prévu pour une communication sans fil via Bluetooth dans des environnements secs.
Est considérée comme une utilisation non conforme aux directives
• toute application différant de celle décrite dans la présente notice,
• ou le non-respect des conditions d’utilisation décrites ici.
Pour éviter d’endommager votre ouïe
• Baisser le volume avant de mettre l’oreillette !
• Ne pas utiliser longtemps l’oreillette avec un volume élevé !
Page 59

3
Pour éviter d’endommager votre canal auditif et tympan
• Placer un embout adapté (taille S, M ou L) sur l’oreillette. Ne jamais
insérer l’oreillette sans l’embout !
• Enlever toujours l’oreillette délicatement. Ne pas insérer l’oreillette
trop loin dans l’oreille.
• Maintenir toujours l’oreillette sèche.
Pour éviter des accidents
• Ne pas utiliser l’oreillette dans un environnement où vous devez être
concentré (exemple : sur la route ou lors de réalisation de travaux
manuels).
Généralités
• Ne jamais démonter ni modifier les composants du FLX 70.
• Conservez le FLX 70 hors de portée des enfants.
• La batterie utilisée dans cet appareil peut présenter un risque d’incendie
ou de brûlure chimique en cas de mauvais traitement. Ne pas démonter,
chauffer à plus de 40 °C (104 °F) ou incinérer la batterie.
• Sennheiser Communications décline toute responsabilité en cas de
dommage résultant de la perte de connexion due à une batterie
épuisée, une vieille batterie ou si vous dépassez la portée de transmission.
Avant la mise en service
• Utiliser le FLX 70 uniquement dans des locaux secs et tenir tout
liquide et petit objet conducteur à l‘écart du FLX 70 et ses prises de
raccordement.
• Ne pas exposer le FLX 70 à des températures extrêmes. Les températu-
res normales de fonctionnement sont de 10 °C (50 °F) à 40 °C (104 °F).
• Stocker l’oreillette à un endroit sec et exempt de poussière.
Page 60

4
Pendant la charge
• Ne pas porter l’oreillette lors de la charge.
• Sennheiser Communications décline toute responsabilité en cas de
dommage aux appareils USB qui ne répondent pas aux spécifications
USB.
• L’oreillette doit uniquement être rechargée par le bloc secteur FLX 70
(EU: 502310, UK: 502311, US: 502312), par le chargeur pour voiture
FLX 70 (502313) ou par la prise USB d’un ordinateur. Ne jamais utiliser le bloc secteur FLX 70 ou le chargeur pour voiture FLX 70 pour
recharger des batteries autres que celles de l’oreillette FLX 70 !
Pendant le fonctionnement
• Cet équipement produit, utilise et peut émettre une énergie haute
fréquence et, s’il n’est pas installé et utilisé conformément aux instructions, provoquer des interférences gênantes pour les communications radio. Des risques d’interférences ne peuvent toutefois pas être
totalement exclus dans certaines installations.
Consignes de sécurité sur les batteries Lithium-Polymer
Le FLX 70 dispose d’une batterie Lithium-Polymer intégrée. En cas de
mauvaise utilisation ou d’utilisation abusive, les batteries peuvent
couler.
AVERTISSEMENT ! Dans des cas extrêmes, il y a un risque
• de surchauffage
• d’incendie
• d’explosion
• de fume et de gaz
Page 61

5
Sennheiser Communications décline toute responsabilité en cas de
mauvaise utilisation ou d’utilisation abusive.
Ne chauffez pas les batteries à plus de 70°C/158°F, par ex.
n’exposez pas les batteries à la lumière du soleil ou ne les
jetez pas au feu.
N’exposez pas les batteries à l’humidité.
Ne court-circuitez pas les batteries.
Ne désassemblez et ne déformez pas les batteries.
Stockez les appareils/batteries dans un endroit frais et sec, à
température ambiante (env. 20°).
Ne rechargez les batteries qu’avec des chargeurs
Sennheiser Communications appropriés.
En cas de non utilisation prolongée, rechargez les batteries
régulièrement (charge d’env. une heure tous les six mois).
Ne rechargez les batteries qu’à une température ambiante
entre 10°C et 40°C.
Ne rechargez la batterie d’un appareil manifestement défectueux.
Retournez les appareils/batteries défectueux à votre revendeur.
Page 62

6
Points forts du FLX 70
• Technologie FlexFit™ pour un confort parfait
• Design étudié, réduction des bruits ambiants
• Crochet d’oreille flexible et amovible pour un confort individuel
• Port à gauche ou à droite
• Protection ActiveGard™ contre les chocs acoustiques
• Bluetooth 2.0, eSCO et EDR : fonctionne avec tous les appareils Blue-
tooth 1.1, 1.2 et 2.0 compatibles avec le profil « mains libres » ou
« oreillette »
• Jusqu’à 6 heures de conversation
• Autonomie en mode veille : jusqu’à 240 heures
• Charge directe depuis le port USB
• Excellente qualité audio Sennheiser
• Extrêmement léger et confortable (13 grammes)
Contenu
1 oreillette Bluetooth FLX 70 avec batterie Li-Po rechargeable
2 embouts intra-auriculaires, taille M et L (taille S est prémontée)
1 crochet d’oreille
1 bloc secteur FLX 70
1 câble de recharge USB
1 lanière
1 crochet de lanière
1 notice d’emploi
Page 63

7
Commandes
Crochet d’oreille
(amovible, flexible)
Embout intra-auriculaire
(interchangeable)
Prise d’alimentation
Touche « Volume + »
Touche « Volume – »
Microphone
Touche « Décrocher/Raccrocher »
LED
Œillet pour lanière
Point de fixation pour crochet de
lanière
Articulation à rotule pour
crochet d’oreille
Page 64

8
Vue d’ensembles des touches
Touche Fonction Page
Touche « Décrocher/Raccrocher »
• Allumer/éteindre l’oreillette
• Passer en mode « appairage »
• Prendre un appel
• Passer un appel
• Rejeter un appel
• Recomposer le dernier numéro
• Activer la numérotation vocale
• Terminer un appel
• Transférer un appel du télé-
phone mobile vers l’oreillette
• Couper/réactiver le microphone
12
13
18
19
19
19
19
20
20
22
Touche « Volume + »
• Augmenter le volume d’écoute
• Augmenter le volume de la
sonnerie
• Réactiver le microphone
• Prendre un appel
21
21
22
18
Touche « Volume – »
• Réduire le volume d’écoute
• Réduire le volume de la sonnerie
• Réactiver le microphone
• Prendre un appel
20
21
22
18
Page 65

9
Guide d’installation rapide
! Charger l’oreillette.
Si vous chargez la batterie pour la première fois, ne pas interrompre
le processus de charge avant un minimum de 3 heures. Par la suite,
il faut 2½ heures pour charger complètement la batterie. Pour des
détails, voir la page 11.
*) Le chargeur pour voiture est disponible en accessoire (voir la
page 24).
3h
*)
Page 66

10
! Allumer l’oreillette (pour des détails, voir la page 13) et l’appairer
avec votre téléphone mobile. Pour des détails et des informations
sur l’appairage avec d’autres appareils Bluetooth, voir la page 14.
! Mettre l’oreillette sur l’oreille.
Couper/réactiver le micro (p. 22)
Prendre des appels (p. 18)
Terminer des appels (p. 20)
Numérotation vocale (p. 19)
Recomposition (p. 19)
Volume (p. 20)
FLX 70
OK
Key w or d
0000
Page 67

11
Mise en service du FLX 70
Charger la batterie intégrée de l’oreillette
Si vous chargez la batterie pour la première fois, ne pas interrompre le
processus de charge avant un minimum de 3 heures. Par la suite, il faut
2½ heures pour charger complètement la batterie. L’oreillette ne peut
pas être utilisée pendant le processus de charge.
Pour charger la batterie de l’oreillette :
! Enlever l’oreillette et l’éteindre (voir la
page 12).
! Raccorder le câble de recharge USB à la
prise d’alimentation 쐋 de l’oreillette.
! Brancher le connecteur USB du câble de
recharge USB :
– soit dans la prise USB du bloc secteur
FLX 70
– soit dans la prise USB d’un ordinateur
– soit dans la prise USB du chargeur pour voiture FLX 70 (disponible
en accessoire)
! Brancher soit le bloc secteur, soit le chargeur pour voiture dans une
prise de courant.
Si la batterie est complètement épuisée, la LED 쐊 clignote en rouge
au début du processus de charge. Pendant la charge, la LED 쐊
s’allume en rouge. Lorsque la charge est terminée, la LED 쐊 s’allume
en bleu.
쐊
쐋
Page 68

12
Le processus de charge ne peut pas être démarré en cours d’appel. Une
batterie complètement chargée offre une autonomie de jusqu’à 6
heures en mode conversation ou de jusqu’à 240 heures en veille.
Lorsque la batterie devient faible :
• La LED clignote en rouge.
• Trois bip sont entendus dans l’oreillette 3 fois dans un intervalle de
15 secondes, puis dans un intervalle de 2 minutes.
• L’autonomie en mode conversation est de moins de 10 minutes.
Allumer/éteindre l’oreillette
!
Appuyer pendant plus de 3 secondes sur la
touche « Décrocher/Raccrocher » jusqu’à
ce que la LED s’allume en bleu.
L’oreillette s’allume.
– Si l’oreillette est déjà appairée avec un
téléphone mobile, l’oreillette est prête à
l’emploi.
– Si l’oreillette n’est pas encore appairée
avec un téléphone mobile, appairez
l’oreillette avec le téléphone mobile
comme décrit dans la section « Appairer l’oreillette avec télépho-
nes mobiles ou d’autres appareils Bluetooth » à la page 13.
– Si l’oreillette est déjà appairée avec votre téléphone mobile et
vous recevez un appel sur votre mobile, vous pouvez prendre cet
appel immédiatement en appuyant une fois sur la touche « Dé-
crocher/Raccrocher » .
Page 69

13
Pour éteindre l’oreillette :
! Appuyer pendant plus de 3 secondes sur la touche « Décro-
cher/Raccrocher » jusqu’à ce que la LED s’allume en rouge et
puis s’éteint.
Tous les réglages sont mémorisés. Si vous n’utilisez pas l’oreillette,
éteignez-la afin d’économiser de la batterie.
Appairer l’oreillette avec téléphones mobiles ou
d’autres appareils Bluetooth
Appairage avec un téléphone mobile
! Pour pouvoir utiliser l’oreillette, vous devez d’abord l’appairer avec
votre téléphone mobile ou un autre appareil possédant le profil
Bluetooth « mains libres » ou « oreillette ». Une fois que vous avez
appairé l’oreillette avec un téléphone mobile, l’oreillette se connecte
automatiquement à chaque fois que ce téléphone mobile et
l’oreillette se reconnaissent entre eux.
! S’assurer que l’oreillette est allumée et positionnée près de votre
téléphone mobile.
– Si vous n’avez pas encore appairé l’oreillette avec un téléphone
mobile, l’oreillette passe automatiquement en mode « appai-
rage ».
– Si l’oreillette était déjà appairée avec
un autre téléphone mobile, vous
devez passer en mode « appairage »
manuelle-ment. Pour ce faire, étein-
dre l’oreillette et la rallumer en ap-
puyer sur la touche « Décro-
Page 70

14
cher/Raccrocher 0» pendant 6 secondes.
– La LED clignote alternativement en rouge et en bleu, indiquant
que l’oreillette est en mode « appairage ».
! Lancer la recherche d’appareils Bluetooth depuis votre téléphone
mobile (voir la notice d’emploi de votre mobile) et suivre toutes les
instructions affichées sur l’écran de votre mobile.
! Dès que l’oreillette est reconnue par votre téléphone mobile, sélec-
tionner « FLX 70 ».
Une fois la liaison Bluetooth établie, l’oreillette est affichée comme
« FLX 70 » sur l’écran de votre mobile.
! Si votre téléphone mobile vous
demande un mot de passe, entrer quatre zéros (0000).
Si l‘appairage est effectué avec
succès, la LED arrête de cli-
gnoter.
Une fois appairé, votre téléphone mobile peut transférer
des appels vers l’oreillette, soit
automatiquement, soit manuellement (voir la notice d’emploi de votre téléphone mobile pour déterminer si l’appel est automatiquement transféré, ou s’il faut appuyer sur une touche pour ce faire).
Une fois appairés avec succès, la plupart des téléphones mobiles affichent une icône « oreillette » sur leurs écrans.
Appairage avec d’autres appareil Bluetooth
Si vous souhaitez appairer l’oreillette avec un autre appareil Bluetooth,
voir la notice d’emploi de l’appareil Bluetooth.
FLX 70
OK
Key wo rd
0000
Page 71

15
Appairage avec plusieurs téléphones mobiles
Si vous souhaitez appairer l’oreillette avec un deuxième téléphone
mobile, vous devez d’abord la déconnecter du premier téléphone mobile (voir la notice d’emploi du premier téléphone mobile). L’oreillette
peut être appairée avec jusqu’à quatre téléphones mobiles. Dès que
l’oreillette est allumée, elle essaie de se connecter au dernier téléphone
mobile auquel elle a été connectée. Si ce téléphone mobile n’est pas
reconnu par l’oreillette, vous pouvez connecter l’oreillette manuellement à l’un des trois autres téléphones mobiles (voir la notice d’emploi
du téléphone mobile correspondant).
Page 72

16
Port de l’oreillette
AVERTISSEMENT ! Danger de blessure !
Si vous insérez l’oreillette sans l’embout, votre
canal auditif peut être blessé !
! Ne jamais insérer l’oreillette sans l’embout !
Vous pouvez porter l’oreillette
• avec la lanière, avec le crochet d’oreille ou avec les deux
• sur l’oreille droite ou gauche
Attacher la lanière
Utilisez la lanière pour éviter à l’oreillette de se détacher – surtout
lorsque vous n’utilisez pas le crochet d’oreille ! Pour attacher la
lanière :
! Passer l’étroite boucle de la lanière à
travers l’œillet .
! Passer la lanière à travers l’étroite boucle.
! Serrer la lanière.
Pour attacher la lanière temporairement :
! Attacher le crochet de lanière sur le point
de fixation prévu à cet effet .
Page 73

17
Changer l’embout
Si l’embout prémonté (taille S) ne convient
pas bien à votre oreille :
! Enlever l’embout de l’oreillette et le rem-
placer par un adapté à votre oreille.
Attacher et adapter le crochet d’oreille
Le crochet d’oreille doit être tourné lorsque vous
le changez de la gauche à la droite ou vice versa.
! Attacher le crochet d’oreille sur l’articulation
à rotule pour crochet d’oreille de façon à ce
que le crochet d’oreille puisse être tourné ou incliné pour s’adapter confortablement à votre
oreille.
Mettre et ajuster l’oreillette
! Allumer l’oreillette. La LED clignote
trois fois en bleu
! Mettre l’oreillette sur l’oreille de façon à
ce que l’embout soit inséré dans votre
canal auditif comme illustré à droite.
! Plier le crochet d’oreille flexible jus-
qu’à ce qu’il soit parfaitement adapté à
votre oreille.
Page 74

18
Utilisation du FLX 70
Téléphoner avec le FLX 70
Prendre un appel
! S’assurer que l’oreillette est appairée avec votre téléphone mobile
(voir « Appairer l’oreillette avec téléphones mobiles ou d’autres appareils Bluetooth » à la page 13).
Lorsque vous recevez un appel, vous entendez la sonnerie dans
l’écouteur et la LED clignote rapidement en bleu. Pour prendre
l’appel lorsque l’oreillette est allumée :
! Appuyer sur la touché « Décrocher/Rac-
crocher » ou sur une des deux touches
« Volume » ou .
Vous entendez un bip dans l’oreillette.
! Commencer à parler.
Pour prendre l’appel lorsque l’oreillette est
éteinte :
! Appuyer pendant plus de 3 secondes sur la
touché « Décrocher/Raccrocher » .
L’oreillette s’allume et vous pouvez prendre l’appel immédiatement,
Cependant, il peut y avoir un retard selon le type de téléphone mobile que vous utilisez.
! Mettre l’oreillette sur l’oreille.
! Commencer à parler.
Page 75

19
Rejeter un appel
! Pendant que le téléphone mobile sonne,
appuyer sur la touché « Décrocher/Raccrocher » et la maintenir enfoncée jusqu’à ce que un bip soit audible dans
l’oreillette.
La sonnerie s’arrête. Selon le réglage du téléphone mobile, l’appel est soit rejeté, soit
transféré sur une boîte vocale.
Passer un appel
! Composer le numéro sur votre téléphone mobile.
Si votre téléphone mobile transfère automatiquement l’appel sur
l’oreillette, vous entendez un bip dans l’oreillette.
Si votre téléphone mobile ne transfère pas automatiquement l’appel
sur l’oreillette, appuyer sur un bouton sur votre mobile pour transférer manuellement l’appel sur l’oreillette.
! Commencer à parler.
Recomposer le dernier numéro composé
! Appuyer sur la touche « Décrocher/Raccrocher » et la maintenir
enfoncée pendant 1,5 secondes.
Vous entendez un bip dans l’oreillette et le téléphone mobile recompose automatiquement le dernier numéro composé.
Numéroter vocalement
La fonction « Numérotation vocale » doit être supportée par votre
téléphone mobile et doit être activée.
! Appuyer sur la touche « Décrocher/Raccrocher » .
Page 76

20
! Après avoir entendu un bip dans l’oreillette :
Enoncer le nom de la personne que vous souhaitez appeler.
Le téléphone mobile compose automatiquement le numéro correspondant.
Terminer un appel
! Appuyer sur la touche « Décro-
cher/Raccrocher » ou utiliser votre téléphone mobile pour terminer l’appel.
Vous entendez un bip dans l’oreillette et
l’appel est terminé.
Transférer un appel en cours du téléphone
mobile vers l’oreillette
! Appuyer sur la touche « Décro-
cher/Raccrocher » .
Vous entendez un bip dans l’oreillette et l’appel est transféré vers
l’oreillette.
Transférer un appel de l’oreillette vers le téléphone mobile
! Voir la notice d’emploi de votre téléphone mobile pour savoir com-
ment transférer un appel de l’oreillette vers votre mobile.
Si vous quittez la portée du téléphone mobile
Si l’oreillette quitte la portée du téléphone mobile en cours d’appel :
• La qualité sonore se détériore, puis la connexion est interrompue.
• Un bip est entendu dans l’oreillette lorsque la connexion est perdue.
• Votre téléphone mobile indique la perte de connexion.
• Voir la notice d’emploi de votre téléphone mobile pour déterminer si
l’appel est automatiquement terminé.
Page 77

21
Régler le volume d’écoute
!
Pendant une conversation, appuyer sur la
touche « Volume » ou .
Le volume d’écoute est modifié.
– Le volume d’écoute peut être réglé entre
1 et 8. Le réglage d’usine est 4. Si le vo-
lume minimum ou maximum est atteint,
vous entendez un bip dans l’oreillette.
– De plus, la fonction Adaptive Intelligence
mémorise les réglages préférés de
l’utilisateur et règle le volume automatiquement en fonction du
bruit ambiant.
– Lorsque vous éteignez l’oreillette, le volume sonore réglé est mé-
morisé.
Régler le volume de la sonnerie
!
Pendant que l’oreillette est en mode veille (pas d’appel en cours),
appuyer sur la touche « Volume » ou .
Le volume de la sonnerie est modifié. La sonnerie est reproduite une
fois avec le réglage de volume actuel. Puis le réglage de volume est
mémorisé.
– Le volume de la sonnerie peut être réglé entre 1 et 8. Le réglage
d’usine est 4.
Page 78

22
Couper/réactiver le micro de l’oreillette
Pour couper le micro de l’oreillette :
! Pendant une conversation, appuyer sur
la touche « Décrocher/Raccrocher »
et la maintenir enfoncée jusqu’à ce que
vous entendiez un bip dans l’oreillette.
Le micro est coupé et vous entendez
un bip toutes les 5 secondes.
Pour réactiver le micro de l’oreillette:
! Appuyer sur la touche « Décrocher/
Raccrocher » ou sur une des deux touches « Volume » ou .
Les bips s’arrêtent et le micro fonctionne comme d’habitude.
Rétablir les réglages d’usine
Vous pouvez rétablir les réglages d’usine suivants :
• volume d’écoute
• volume de la sonnerie
• appairage
! Mettre l’oreillette en mode « appairage » comme décrit dans la
section « Appairer l’oreillette avec téléphones mobiles ou d’autres
appareils Bluetooth » à la page 13.
Page 79

23
! Appuyer simultanément sur les touches
« Volume » et et les maintenir enfoncée jusqu’à ce que la LED arrête
brièvement de clignoter.
Puis la LED clignote alternativement en
rouge et en bleu, indiquant que
l’oreillette est en mode « appairage ».
Avant l’utilisation, l’oreillette doit être
appairée de nouveau.
Page 80

24
Maintenance et entretien
Si vous n’utilisez pas l’oreillette pendant une longue période :
! Eteindre l’oreillette.
! Stocker l’oreillette à un endroit sec et exempt de poussière.
! Charger la batterie au moins une fois tous les six mois.
Pour nettoyer l’oreillette :
! Utiliser exclusivement un chiffon sec. Ne pas utiliser de liquides, de
solvants ou de détergents.
Accessoires
502564 FLX 70 jeu d’accessoires
(Crochet d’oreille, lanière, crochet de lanière et
embouts intra-auriculaires)
502309 Câble de recharge USB
502310 Bloc secteur, version EU
502311 Bloc secteur, version UK
502312 Bloc secteur, version US
502313 Chargeur pour voiture
Page 81

25
Caractéristiques techniques
Système de microphone directionnel
Type de micro : microphone statique
Sensibilité : -45 dBV à 94 dB SPL, 1 kHz
Ecouteur
Type d’écouteur : dynamique – aimant néodyme
Niveau de
sortie max. : 110 dB SPL
Généralités
Dimensions : 52 mm x 20 mm x 31 mm (L x H x P)
Poids : 10 g (13g avec crochet d’oreille)
Bloc secteur : entrée 100–240 V AC, sortie 5 V DC, 150 mA
Chargeur pour
voiture
(accessoire) : entrée 12–24 V DC, sortie 5 V DC, 150 mA
Page 82

26
Déclarations du fabricant
Conditions de garantie
La période de garantie pour ce produit Sennheiser Communications est de 24 mois – et pour la
batterie de 6 mois – à compter de la date d’achat. Sont exclues, les batteries rechargeables ou
jetables livrées avec le produit. En raison de leurs caractéristiques ces produits ont une durée de
vie plus courte liée principalement a la fréquence d'utilisation.
La période de garantie commence à la date de d’achat. Pour cette raison, nous vous recommandons de conserver votre facture comme preuve d’achat. Sans cette preuve – qui est vérifiée par
le partenaire SAV de Sennheiser Communications – aucune prise en compte de la garantie ne
pourra être retenue.
La garantie comprend, gratuitement, la remise en état de fonctionnement du matériel par la
réparation ou le remplacement des pièces défectueuses ou dans le cas où la réparation n'est pas
possible, par échange du matériel. L’utilisation inadéquate (mauvaise utilisation, dégâts
mécaniques, tension électrique incorrecte), sont exclus de la garantie. La garantie est invalidée
en cas d’intervention par des personnes non-autorisées ou des stations de réparation non
agrées.
Pour faire jouer la garantie, retournez I’appareil et ses accessoires, accompagne de la facture
d’achat, a votre distributeur agrée. Pour éviter des dégâts durant le transport il est recommandé d’utiliser I’emballage d’origine. Votre droit légal de recours contre le vendeur n’est pas limité
par cette garantie.
La garantie peut être revendiquée dans tous les pays à l’extérieur des Etats-Unis à condition
qu’aucune loi nationale n’en invalide les termes.
Déclaration de conformité pour la CEE
Cet appareil est conforme aux exigences essentielles et aux autres dispositions
pertinentes des Directives 1999/5/EC, 89/336/EC et 73/23/EC.
Avant d’utiliser l’appareil, veuillez observer les dispositions légales en vigueur dans
votre pays.
Voir aussi www.sennheisercommunications.com/doc.
Déclarations FCC
Cet équipement a été testé et trouvé conforme aux limites définies pour un dispositif numérique de classe B, dans le cadre de la Partie 15 des réglementations de la FCC. Ces limites sont
conçues pour offrir une protection raisonnable contre les interférences nocives pour une
installation résidentielle. Cet équipement produit, utilise et peut émettre une énergie haute
fréquence et, s’il n’est pas installé et utilisé conformément aux instructions, provoquer des
Page 83

27
interférences gênantes pour les communications radio. Des risques d’interférences ne peuvent
toutefois pas être totalement exclus dans certaines installations. Dans le cas d’interférences
gênantes pour la réception des émissions de radio ou télédiffusées (il suffit, pour le constater,
d’allumer et d’éteindre l’équipement), l’utilisateur est invité à prendre l’une des mesures
suivantes pour les éliminer :
• Réorienter ou déplacer l’antenne réceptrice.
• Eloigner l’équipement du récepteur.
• Brancher l’équipement sur une prise ou un circuit différent de celui du récepteur.
• Consulter un revendeur ou un technicien de radio ou télévision expérimenté.
Cet appareil est conforme à la Partie 15 des réglementations de la FCC et avec la norme RSS-210
de l’Industrie Canadienne.
Son utilisation est soumise aux deux conditions suivantes :
(1) il ne doit pas provoquer d’interférences gênantes et
(2) il doit tolérer les interférences reçues, y compris celles susceptibles d’en perturber le
fonctionnement.
Cet appareil numérique de la classe [*] est conforme à la norme NMB-003 du Canada.
Accus ou piles
Les accus ou piles fournis peuvent être recyclés. Jetez les accus usagés dans un
conteneur de recyclage ou ramenez-les à votre revendeur. Afin de protéger
l’environnement, déposez uniquement des accus ou piles complètement déchargés.
Déclaration WEEE
Votre produit Sennheiser a été conçu et fabriqué avec des matériaux et composants de
haute qualité, susceptibles d’être recyclés et réutilisés. Ce symbole signifie que les
appareils électriques et électroniques, lorsqu’ils sont arrivés en fin de vie, doivent être
éliminés séparément des ordures ménagères.
Veuillez rapporter cet appareil à la déchetterie communale ou à un centre de recyclage. Vous
contribuez ainsi à la préservation de l’environnement.
Page 84

Page 85

1
Indice
Indice............................................................................................................... 1
Informazioni importanti per la sicurezza.................................................. 2
Caratteristiche di FLX 70.............................................................................. 6
La dotazione comprende.............................................................................. 6
Elementi operativi......................................................................................... 7
Panoramica dei pulsanti............................................................................... 8
Guida di avvio rapido.................................................................................... 9
Configurazione di FLX 70 ........................................................................... 11
Caricamento della batteria nella cuffia................................................... 11
Accensione/spegnimento della cuffia..................................................... 12
Accoppiamento della cuffia con telefoni cellulari o altri dispositivi
Bluetooth ......................................................................................................13
Indossare la cuffia ....................................................................................... 15
Funzionamento di FLX 70 .......................................................................... 17
Esecuzione di una chiamata con FLX 70 ................................................. 17
Modifica del volume dell'altoparlante..................................................... 20
Modifica del volume della suoneria ......................................................... 20
Attivazione/disattivazione del silenziamento del microfono della
cuffia.............................................................................................................. 21
Ripristinare le impostazioni di fabbrica.................................................. 21
Cura e manutenzione.................................................................................. 22
Accessori....................................................................................................... 22
Specifiche .....................................................................................................23
Dichiarazioni del costruttore..................................................................... 24
Questo prodotto è stato progettato per garantire un funzionamento affidabile per molti anni.
Oltre mezzo secolo di esperienza accumulata nella progettazione e nella produzione di apparecchiature elettroacustiche di alta qualità ha fatto di Sennheiser un'azienda leader del settore a
livello mondiale. Vi invitiamo a dedicare un po' del vostro tempo per leggere con attenzione le
presenti istruzioni affinché possiate sfruttare al meglio e rapidamente i vantaggi del vostro
nuovo prodotto Sennheiser.
Page 86

2
Informazioni importanti per la sicurezza
FLX 70 è stato costruito rispettando le normative di sicurezza comunemente accettate e in base alle tecnologie più
avanzate. Se le istruzioni di sicurezza indicate nel presente
manuale non vengono rispettate, tuttavia, sussiste il rischio
di danneggiamento dell'apparecchio.
• Leggere tutte le istruzioni.
• Seguirle attentamente.
• Conservare le istruzioni in un luogo a cui tutti gli utenti possono
accedere in qualsiasi momento.
• Quando si cede FLX 70 a terzi, includere sempre le istruzioni per l'uso.
Uso previsto
FLX 70 è un accessorio per telefoni cellulari o dispositivi abilitati Bluetooth dotati di profilo “vivavoce” o di profilo “cuffia” che consentono una
comunicazione wireless tramite Bluetooth in ambienti asciutti.
Si considera uso improprio quando FLX 70
• viene impiegato per applicazioni non indicate in queste istruzioni,
• viene impiegato in condizioni di funzionamento diverse da quelle
descritte nelle presenti istruzioni.
Per evitare lesioni all'apparato uditivo
• Impostare il volume a un valore basso prima di inserire la cuffia!
• Non utilizzare la cuffia per lunghi periodi di tempo con il volume
impostato a un valore alto!
Page 87

3
Per evitare lesioni ai meati acustici e al timpano:
• Posizionare sulla cuffia una capsula auricolare adeguata (S, M o L).
Non inserire mai la cuffia senza le imbottiture!
• Inserire e rimuovere sempre la cuffia lentamente e con attenzione dal
meato acustico! Non inserire la cuffia troppo interna nell'orecchio!
• Mantenere sempre la cuffia asciutta.
Per evitare infortuni
• Non utilizzare la cuffia in ambienti nei quali è necessario prestare
particolare attenzione (es. sulle strade o durante lo svolgimento di
lavori manuali).
Istruzioni generali
• Non smontare o modificare i componenti di FLX 70.
• Tenere fuori dalla portata dei bambini.
• La batteria ricaricabile integrata utilizzata in modo errato potrebbe
provocare incendi o ustioni chimiche. Pertanto, la batteria non deve
essere smontata, riscaldata oltre 40°C (104°F) o bruciata.
• Sennheiser Communications non può essere ritenuta responsabile
per danni dovuti a perdita di connessione in seguito a batterie scariche, batterie vecchie o qualora si esca dal raggio di trasmissione.
Prima dell'uso
• Utilizzare FLX 70 esclusivamente in luoghi asciutti e tenerlo lontano
da liquidi e piccole parti elettricamente conduttive e dalle rispettive
prese di collegamento.
• Non esporre FLX 70 a variazioni estreme di temperatura. Normali
temperature d'esercizio sono comprese tra 10 °C (50 °F) e 40 °C
(104 °F).
• Conservare la cuffia in un luogo pulito e privo di polvere.
Page 88

4
Durante il caricamento
• Non indossare la cuffia durante il caricamento.
• Sennheiser Communications non può essere ritenuta responsabile
per danni a dispositivi USB che non corrispondono alle specifiche USB.
• La cuffia deve essere caricata esclusivamente con alimentatore
FLX 70 (EU: 502310, UK: 502311, US: 502312), caricabatterie per
auto FLX 70 (502313), presa USB di un computer. Non tentare di caricare batterie diverse da quelle fornite con la cuffia FLX 70 con alimentatore FLX 70 o caricabatterie per auto FLX 70.
Durante il funzionamento
• Questo apparecchio genera e utilizza e può irradiare energia a radio-
frequenza. Se non viene utilizzato in base alle istruzioni, si possono
verificare interferenze dannose alle comunicazioni radio. È possibile,
tuttavia, che si verifichino interferenze in particolari installazioni.
Istruzioni di sicurezza delle batterie ricaricabili ai polimeri di litio
FLX 70 è dotato di una batteria ricaricabile integrata ai polimeri di litio.
Se utilizzate in modo errato, le batterie ricaricabili possono perdere
liquido.
AVVERTENZA! In casi estremi, le batterie ricaricabili possono
• surriscaldarsi
• prendere fuoco
• esplodere
• provocare fuoriuscita di fumo o gas
Page 89

5
Sennheiser Communications non può essere ritenuta responsabile per
danni causati da uso improprio.
Non riscaldare le batterie oltre 40 °C (104 °F), ad es. esponendole ai raggi solari o gettandole nel fuoco.
Non esporre all'umidità.
Non cortocircuitare.
Non aprire o disassemblare.
Conservare le unità/batterie ricaricabili in un luogo fresco e
asciutto a temperatura ambiente (ca. 20 °C).
Caricare le batterie ricaricabili esclusivamente con caricabatterie consigliati da Sennheiser Communications.
Quando le batterie non vengono utilizzate per periodi
prolungati, caricarle a intervalli regolari (ogni sei mesi per
circa 1 ora).
Caricare le batterie ricaricabili solo a temperature ambiente
comprese tra 10 °C e 40 °C.
Non caricare le batterie ricaricabili se l'unità è difettosa.
Restituire le unità difettose o le unità con batterie ricaricabili difettose al rivenditore specializzato.
Page 90

6
Caratteristiche di FLX 70
• Tecnologia FlexFit™ per un adattamento perfetto
• Altoparlante integrato per eliminare i rumori ambientali
• Aggancio all'orecchio flessibile e rimuovibile per un comfort di utiliz-
zo in base alle esigenze individuali
• Può essere indossato indipendentemente a destra o a sinistra
• Protezione ActiveGard™ contro gli shock acustici
• Bluetooth 2.0, eSCO e EDR: compatibile con tutti i dispositivi
Bluetooth 1.1, 1.2 e 2.0 che supportano il profilo “vivavoce” o “cuffia”
• Fino a 6 ore di conversazione
• Fino a 240 ore in standby
• Caricamento direttamente tramite USB
• Qualità audio superiore Sennheiser
• Estremamente leggero e comodo da indossare (13 grammi)
La dotazione comprende
1 Cuffia Bluetooth FLX 70 con batteria ricaricabile integrata ai polimeri
di litio
2 Capsule auricolari aggiuntive, dimensioni M e L (la S è già installata)
1 Aggancio all'orecchio
1 Alimentatore FLX 70
1 Cavo di carica USB
1 Cordoncino
1 Fermaglio per cordoncino
1 Manuale di istruzioni
Page 91

7
Elementi operativi
쐃 aggancio all'orecchio
(rimuovibile, deformabile)
쐇 capsula auricolare
(sostituibile)
쐋 Presa dell'alimentatore
쐏 pulsante Alza volume
쐄 pulsante Abbassa volume
쐂 microfono
쐆 pulsante di aggancio
쐊 LED
쐎 anello di rinforzo per cordoncino
쐅 punto di aggancio per fermaglio
del cordoncino
쐈 anello di aggancio all'orecchio
쐃
쐇
쐊
쐋
쐆
쐏
쐎
쐅
쐈
쐃
쐂
쐄
Page 92

8
Panoramica dei pulsanti
Pulsante Funzione Pagina
pulsante di
aggancio 쐆
• per accendere e spegnere la cuffia
• per avviare la modalità di
accoppiamento
• per rispondere a una chiamata in entrata
• per effettuare una chiamata
• per rifiutare una chiamata in entrata
• per ripetere il numero
• per utilizzare la composizione vocale
• per terminare una chiamata
• per trasferire una chiamata dal telefono
cellulare alla cuffia
• per attivare/disattivare il
silenziamento
12
13
17
18
18
18
18
19
19
21
pulsante Alza
volume 쐏
• per alzare il volume dell'altoparlante
• per alzare il volume della suoneria
• per disattivare il silenziamento del
microfono
• per rispondere a una chiamata in entrata
20
20
21
17
pulsante
Abbassa
volume 쐄
• per abbassare il volume
dell'altoparlante
• per abbassare il volume della suoneria
• per disattivare il silenziamento del
microfono
• per rispondere a una chiamata in entrata
20
20
21
17
Page 93

9
Guida di avvio rapido
! Per prima cosa caricare la cuffia.
Al primo caricamento lasciare la batteria sotto carica per 3 ore. In
seguito, 2½ ore saranno sufficienti per caricare completamente la
batteria. Per i dettagli vedere pagina 11.
*) Il caricabatterie per auto è disponibile come accessorio
(vedere pagina 22).
3h
*)
Page 94

10
! Quindi accendere la cuffia (per i dettagli vedere pagina 12) e accop-
piarla al proprio telefono cellulare. Per dettagli e informazioni sul-
l'accoppiamento a un altro dispositivo Bluetooth vedere pagina 13.
! Indossare la cuffia sull'orecchio.
Attivazione/disattivazione
del silenziamento (pag. 21)
risposta a una
chiamata (pag. 17)
conclusione di una chiamata (pag. 19)
composizione
vocale (pag. 18)
ripetizione (pag. 18)
volume (pag. 20)
FLX 70
OK
Key w or d
0000
Page 95

11
Configurazione di FLX 70
Caricamento della batteria nella cuffia
Se si effettua il caricamento per la prima volta, lasciare la batteria sotto
carica per almeno 3 ore senza interruzioni. In seguito, 2½ ore saranno
sufficienti per caricare completamente la batteria. Non è possibile
utilizzare la cuffia durante il processo di carica.
Per caricare la batteria nella cuffia:
! Togliere la cuffia e spegnerla (vedere pagi-
na 12).
! Collegare il cavo di carica USB alla presa di
alimentazione 쐋.
! Collegare il connettore USB del cavo di
carica USB alla:
– presa USB dell'alimentatore FLX 70
– oppure alla presa USB di un computer
– o alla presa USB del caricabatterie per auto FLX 70 (disponibile
come accessorio)
!
Collegare l'alimentatore oppure il caricabatterie per auto a un'uscita
di corrente adeguata.
Se la batteria è completamente scarica, all'inizio del caricamento il
LED
쐊
lampeggia in rosso. Durante il caricamento, il LED 쐊 si illumina
in rosso. Quando il caricamento è completo, il LED
쐊
si illumina in blu.
La cuffia non può essere caricata quando è in corso una chiamata. Una
batteria completamente carica fornisce un tempo di conversazione fino
a 6 ore o un tempo di standby fino a 240 ore. Quando la batteria è
quasi scarica:
쐊
쐋
Page 96

12
• Il LED 쐊 si illumina in rosso.
• La cuffia emette tre bip per 3 volte con un intervallo di 15 secondi e,
quindi, con un intervallo di 2 minuti.
• Significa che rimane a disposizione un tempo di conversazione infe-
riore a 10 minuti.
Accensione/spegnimento della cuffia
!
Premere il pulsante di aggancio 쐆 per più di 3 sec. finché il LED 쐊
non si illumina in blu.
La cuffia è accesa.
– Se la cuffia è già accoppiata al telefono
cellulare. La cuffia è pronta all'uso.
– Se la cuffia non è ancora accoppiata al te-
lefono cellulare, effettuare l'accoppiamento come descritto in “Accoppiamento
della cuffia con telefoni cellulari o altri dispositivi Bluetooth” a pagina 13.
– Se la cuffia è già accoppiata a un telefono cellulare e se quest'ultimo
ha una chiamata in entrata, è possibile rispondere immediatamente
alla chiamata premendo una volta il pulsante di aggancio
쐆
.
Per spegnere la cuffia:
! Premere il pulsante di aggancio 쐆 per più di 3 sec. finché il LED 쐊
non si illumina in rosso e quindi si spegne.
Tutte le impostazioni vengono salvate. La batteria dura più a lungo
se la cuffia viene spenta quando non la si utilizza.
쐊
쐆
Page 97

13
Accoppiamento della cuffia con telefoni cellulari o altri
dispositivi Bluetooth
Accoppiamento a un telefono cellulare
Per poter utilizzare la cuffia è necessario accoppiarla dapprima al proprio telefono cellulare o a un dispositivo Bluetooth simile con profilo
vivavoce o profilo cuffia. Una volta accoppiata la cuffia al cellulare, la
cuffia risulta automaticamente collegata ogni volta che il cellulare e la
cuffia si rilevano a vicenda.
! Accertarsi che la cuffia sia accesa e che venga collocata accanto al
telefono cellulare.
– Se la cuffia non è stata ancora accoppiata a un telefono cellulare,
la cuffia stessa avvia automaticamente la modalità di accoppiamento.
– Se la cuffia è stata in precedenza accop-
piata a un telefono cellulare, è necessario
attivare manualmente la modalità di accoppiamento spegnendo la cuffia e quindi
riaccendendola e tenendo il pulsante di
aggancio 쐆 premuto per 6 secondi.
– Non appena la cuffia si trova in modalità
di accoppiamento, il LED 쐊 lampeggia al-
ternativamente in rosso e in blu.
! Avviare la ricerca di dispositivi Bluetooth sul proprio telefono cellula-
re (vedere il manuale del telefono cellulare) e seguire le istruzioni
visualizzate sul display del telefono cellulare.
! Quando il telefono cellulare ha rilevato la cuffia, selezionare
“FLX 70”.
Dopo che la connessione Bluetooth è riuscita, la cuffia viene identifi-
cata come “FLX 70” sul display del telefono cellulare.
쐊
쐆
Page 98

14
! Quando il telefono cellulare
richiede una parola chiave, im-
mettere quattro zeri (0000).
Se l'accoppiamento è riuscito, il
LED 쐊 smette di lampeggiare.
Una volta completata la proce-
dura di accoppiamento, il tele-
fono cellulare sarà in grado di
trasferire in cuffia l'audio della
chiamata – automaticamente oppure manualmente (consultare il
manuale del telefono cellulare per sapere se l'audio della chiamata
viene trasferito automaticamente oppure manualmente). Se l'ac-
coppiamento è riuscito la maggior parte dei telefoni cellulari mostra
sul display il simbolo della cuffia.
Accoppiamento ad altri dispositivi Bluetooth
Se si desidera accoppiare la cuffia ad altri dispositivi Bluetooth, consultare il manuale del dispositivo Bluetooth.
Accoppiamento a più telefoni cellulari
Se si desidera accoppiare la cuffia a un secondo telefono cellulare,
occorre dapprima scollegare il primo telefono cellulare (consultare il
manuale del primo telefono cellulare). La cuffia è in grado di memorizzare fino a quattro profili di accoppiamento. Non appena si accende la
cuffia, quest'ultima tenta la connessione all'ultimo telefono cellulare al
quale era collegata. Se il telefono cellulare non viene rilevato dalla
cuffia, è possibile connetterlo manualmente a uno degli altri tre telefoni
cellulari (consultare il manuale del rispettivo telefono cellulare).
FLX 70
OK
Key wo rd
0000
Page 99

15
Indossare la cuffia
AVVERTENZA! Pericolo di lesioni!
Se la cuffia viene inserita senza capsula auricolare,
il meato acustico può subire lesioni!
! Non inserire mai la cuffia senza capsula aurico-
lare!
È possibile indossare la cuffia
• con il cordoncino, con l'aggancio all'orecchio 쐃 o entrambi
• sull'orecchio destro o sinistro
Fissaggio del cordoncino
Utilizzare il cordoncino per evitare che la cuffia cada, in particolare
quando non si usa l'aggancio all'orecchio 쐃! Per fissare permanente-
mente il cordoncino:
! Inserire il piccolo cappio del cordoncino
nell'anello di rinforzo 쐎.
! Inserire il cordoncino nel piccolo cappio.
! Tirare il cordoncino stringendolo.
Per fissare temporaneamente il cordoncino:
! Agganciare il fermaglio per il cordoncino
nell'apposito punto di aggancio 쐅.
쐎
쐅
Page 100

16
Sostituzione della capsula auricolare
Nel caso in cui la capsula auricolare preinstallata (dimensione S) non sia adatta all'orecchio:
! Staccare la capsula auricolare dalla cuffia e
sostituirla con la dimensione più grande o
più piccola in dotazione.
Montaggio e sistemazione dell'aggancio all'orecchio
Tenere presente che l'aggancio all'orecchio 쐃 deve
essere ruotato quando si passa dall'orecchio sinistro
a quello destro o viceversa.
! Fissare l'aggancio all'orecchio 쐃 sull'apposito
anello di aggancio 쐈, in modo che l'aggancio al-
l'orecchio possa essere ruotato e inclinato garan-
tendo il massimo comfort sull'orecchio.
Utilizzo e regolazione
! Accendere la cuffia. Il LED 쐊 lampeggia
3x in blu.
! Indossare la cuffia in modo che la capsu-
la auricolare si inserisca nel meato acu-
stico come mostrato a destra.
! Piegare l'aggancio all'orecchio deforma-
bile 쐃 finché non si adatta perfetta-
mente all'orecchio.
쐊
쐃
쐈
쐃
 Loading...