

Sennheiser Evolution EW100 Instruction Manual
45
INSTRUCTION MANUAL
evolution wireless Series
w 100

46
1 Contents
Chap. Contents Page
1 Contents............................................................................................ 46
2 Short description .............................................................................. 47
3 Important notes ................................................................................ 47
4 System variants................................................................................. 48
5 Preparing the devices for use........................................................... 51
EM 100 receiver ......................................................................... 51
EK 100 pocket receiver .............................................................. 54
SK 100 pocket transmitter ......................................................... 57
SKP 100 plug-on transmitter ..................................................... 60
SKM 100 hand-held transmitter ................................................ 63
6 Operation .......................................................................................... 66
7 Troubleshooting ............................................................................... 75
8 Care and maintenance ..................................................................... 77
9 Overview .......................................................................................... 78
Wireless transmission systems ................................................... 78
HDX noise reduction.................................................................... 79
Connector assignment ................................................................ 79
Diversity reception ..................................................................... 80
Technical data ............................................................................. 81
Accessories .................................................................................. 84
Licences ..................................................................................... 255
Thank you for choosing Sennheiser!
We have designed these products to give you reliable operation over many
years.
Please take a few moments to read these instructions carefully, as we want
you to enjoy your new Sennheiser products quickly and to the full.

47
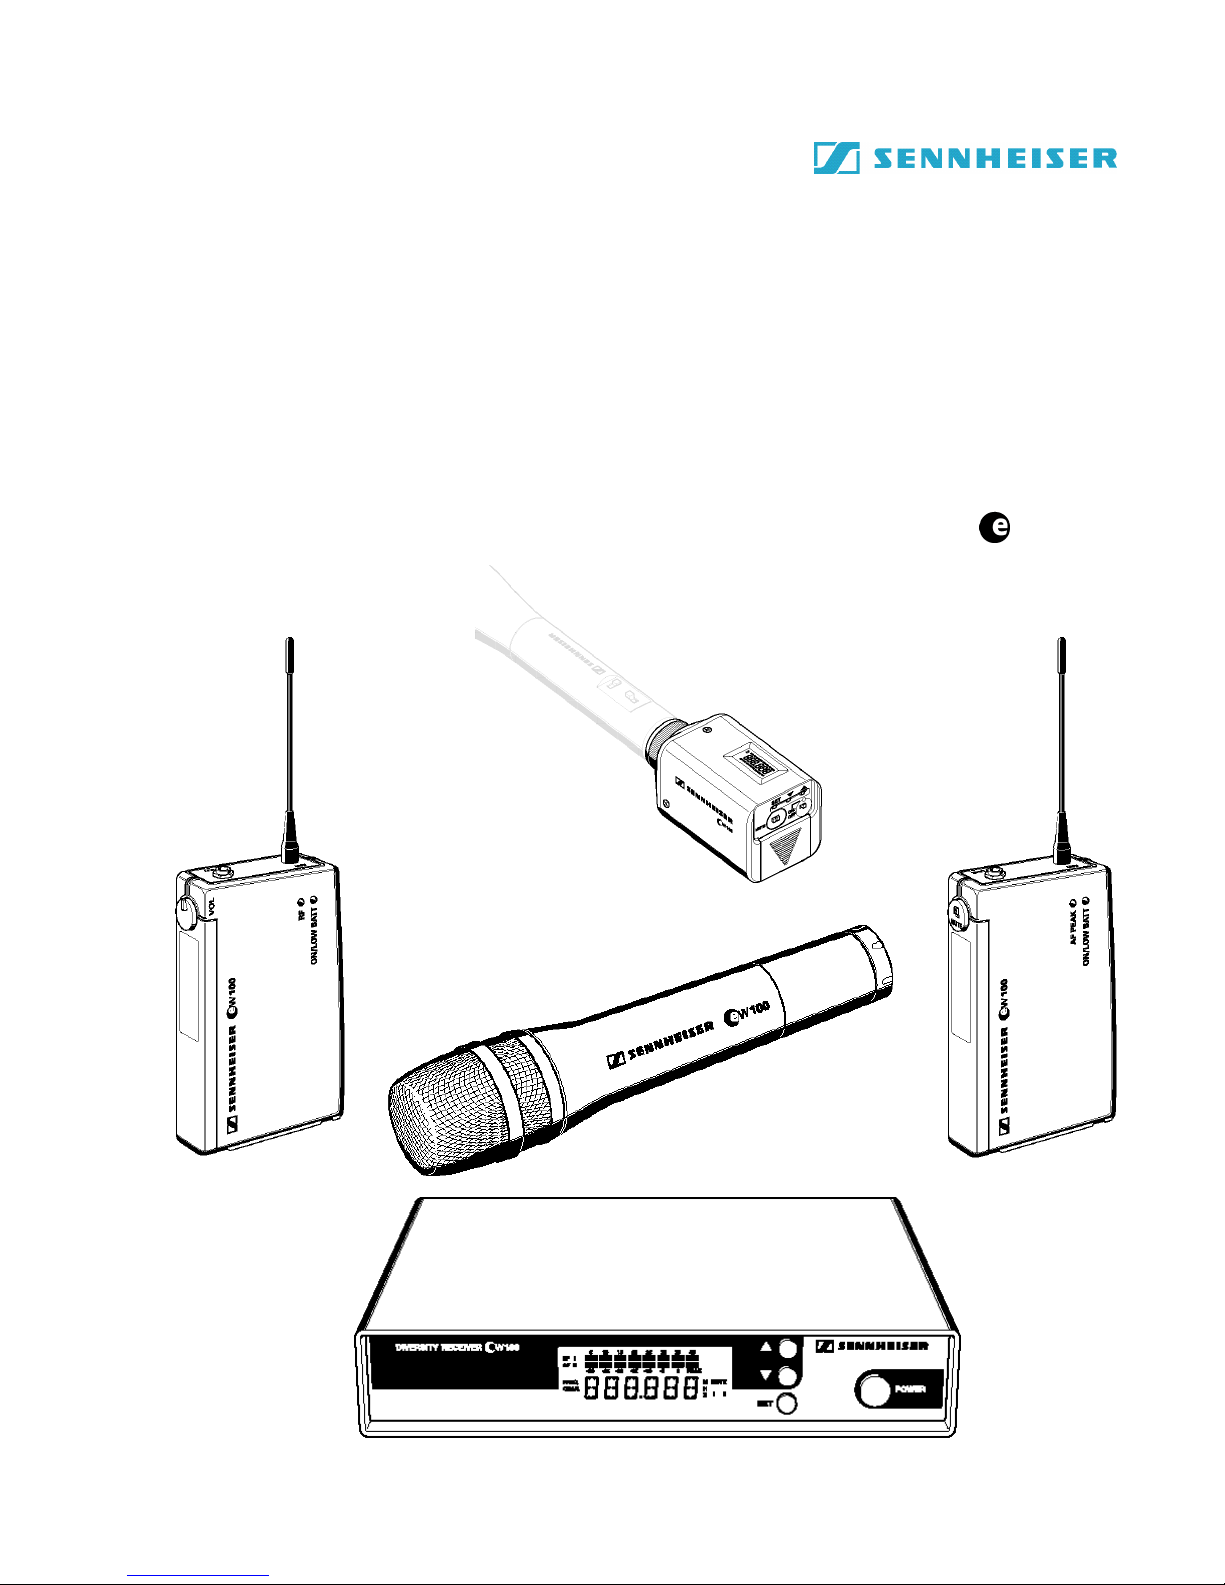
2 Short description
With the evolution wireless series ew 100, Sennheiser offers musicians, video
and sound amateurs high-quality state-of-the-art RF transmission systems
with a high level of operational reliability and ease of use. Transmitters and
receivers permit wireless transmission with studio-quality sound. Due to
further optimised PLL and microprocessor technology, the HDX noise
reduction system and true diversity technology (not pocket receivers), these
transmission systems ensure interference-free transmission and minimise
dropouts in the RF link.
The systems can be supplied in five frequency ranges within the UHF band.
Please note: Frequency usage is different for each country. Your Sennheiser
agent will have all the necessary details on the available legal frequencies for
your area.
Range A: 518 – 550 MHz,
Range B: 630 – 662 MHz,
Range C: 740 – 772 MHz,
Range D: 790 – 822 MHz,
Range E: 838 – 870 MHz.
ew 100 transmitters and receivers are 4-channel switchable. Each transmitter
and receiver has 4 frequency memories to store up to 4 transmission/receiving
frequencies. The frequencies are selectable in 25-kHz steps, giving a selection
of 1280 frequencies within the preset 32 MHz frequency range.
Each system has 4 factory-preprogrammed frequencies, so that
– the systems are ready for immediate use after switch-on,
– several systems can be operated simultaneously on the factory-preset
transmission and receiving frequencies without causing intermodulation
interference. However, all frequency settings can be changed to your
individual needs, if required.
Each system consists of
– a receiver (mains or pocket),
– a hand-held/pocket/plug-on transmitter and
– comes complete with all necessary accessories.
3 Important notes
Never open electronic devices! This must only be done by authorised
personnel and is all the more important for units connected to AC outlets. If
devices are opened by customers in breach of this instruction, the warranty
is voided.
Always disconnect the devices from the mains by removing the plug when
you wish to change connections or move the devices to a different place.
Keep the devices away from central heating radiators and electric heaters.
Never expose them to direct sunlight.
Use the devices in dry rooms only.
Use a damp cloth for cleaning the devices. Do not use any cleansing agents
or solvents.
48
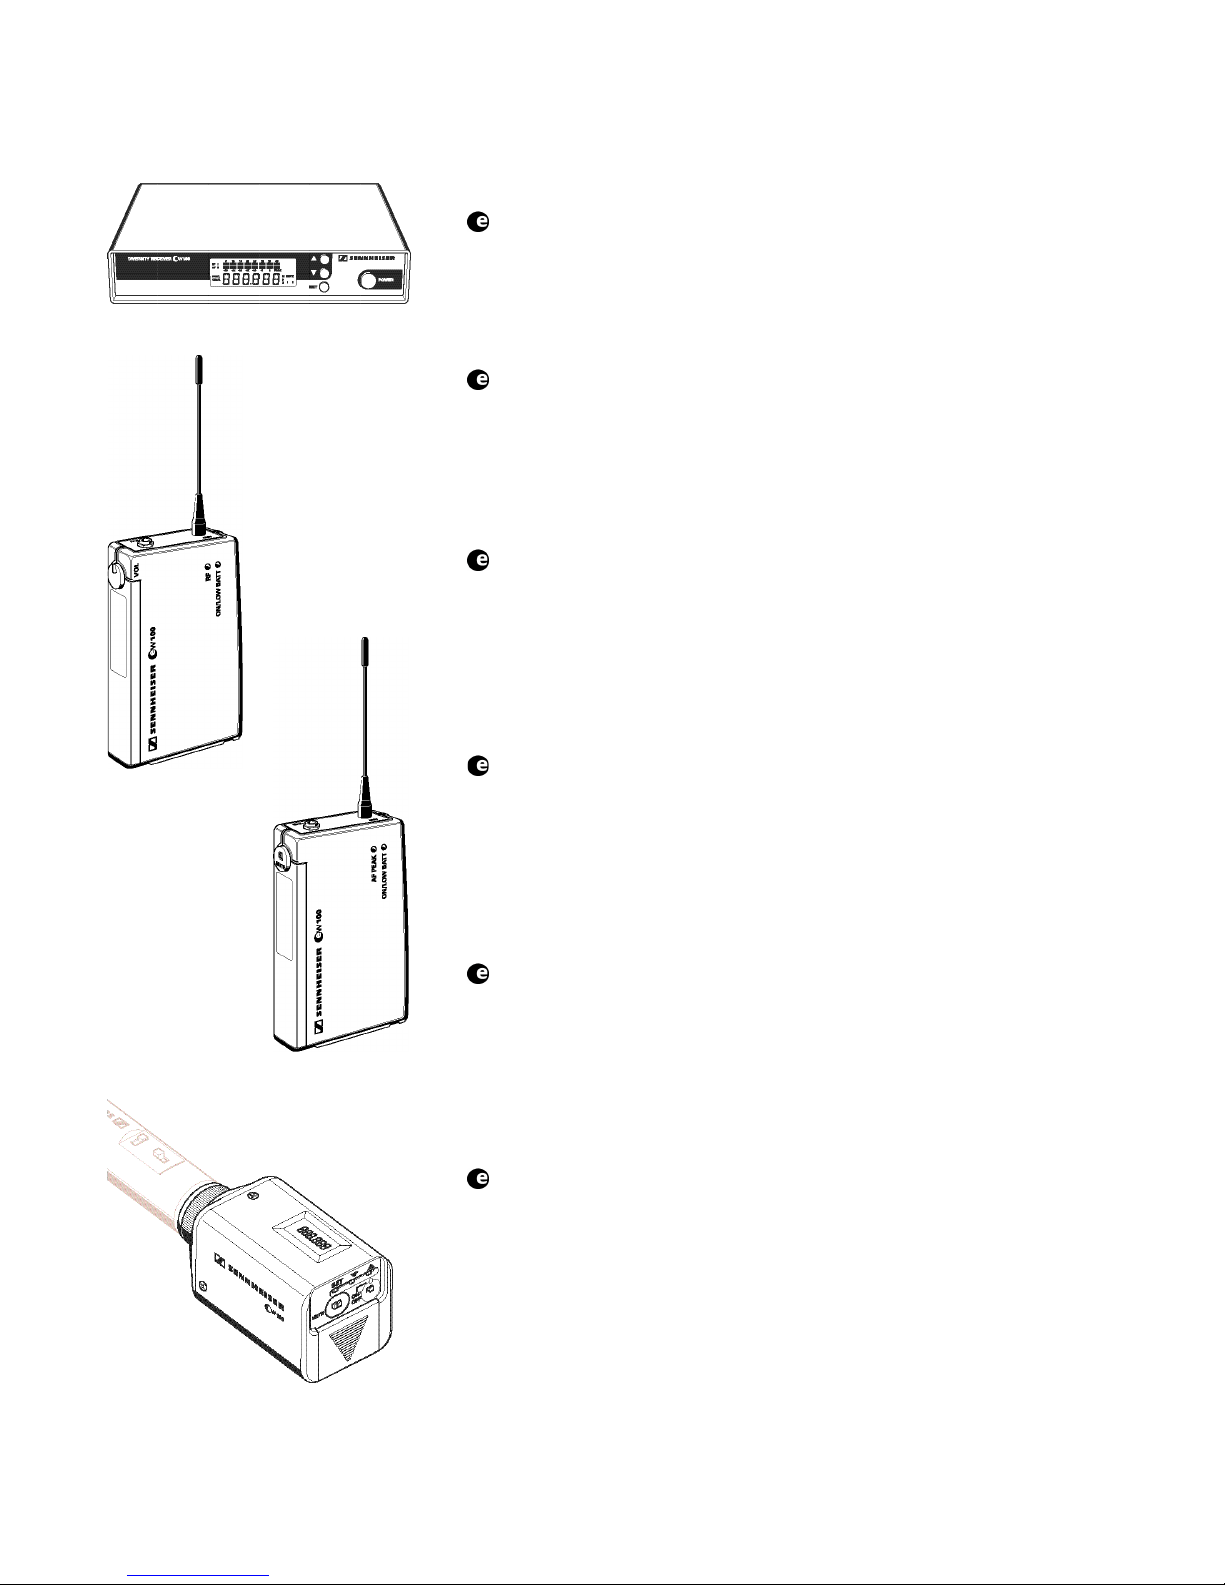
SK 100
EK 100
EM 100
SKP 100
4 System variants
Set w 101
This is a versatile system suitable for many applications. The plug-on
transmitter converts a standard wired microphone into a radiomicrophone.
Set ew 101 consists of: EM 100 receiver, SKP 100 plug-on transmitter, plugin mains unit, battery, antennas and operating manual.
Set w 101-p
Having the same transmitter as the Set ew 101, this system replaces the
mains receiver with a pocket receiver for camera-mounted applications.
Set ew 101-p consists of: EK 100 pocket receiver, SKP 100 plug-on transmitter,
two batteries, antennas, line output cable, camera kit and operating manual.
Set w 112
This system is ideal for theatre and presentation use. The unobtrusive clipon microphone is virtually invisible, and its omni-directional pattern minimises
drop-outs caused by the speaker turning his/her head.
Set ew 112 consists of: EM 100 receiver, SK 100 pocket transmitter, ME 2
miniature clip-on omni-directional condenser microphone, plug-in mains unit,
battery, antennas and operating manual.
Set w 112-p
Having the same transmitter as the Set ew 112, this system replaces the
mains receiver with a pocket receiver for camera-mounted applications.
Set ew 112-p consists of: EK 100 pocket receiver, SK 100 pocket transmitter,
ME 2 miniature clip-on omni-directional condenser microphone, two batteries,
antennas, line output cable, camera kit and operating manual.
Set w 122
This system is ideal for presentation and PA applications in acoustically
difficult rooms. The unobtrusive cardioid clip-on microphone can be directed
towards the speaker’s mouth.
Set ew 122 consists of: EM 100 receiver, SK 100 pocket transmitter, ME 4
miniature clip-on cardioid condenser microphone, plug-in mains unit, battery,
antennas and operating manual.
Set w 122-p
Having the same transmitter as the Set ew 122, this system replaces the
mains receiver with a pocket receiver for camera-mounted applications.
Set ew 122-p consists of: EK 100 pocket receiver, SK 100 pocket transmitter,
ME 4 miniatureclip-on cardioid condenser microphone, two batteries,
antennas, line output cable, camera kit and operating manual.
49
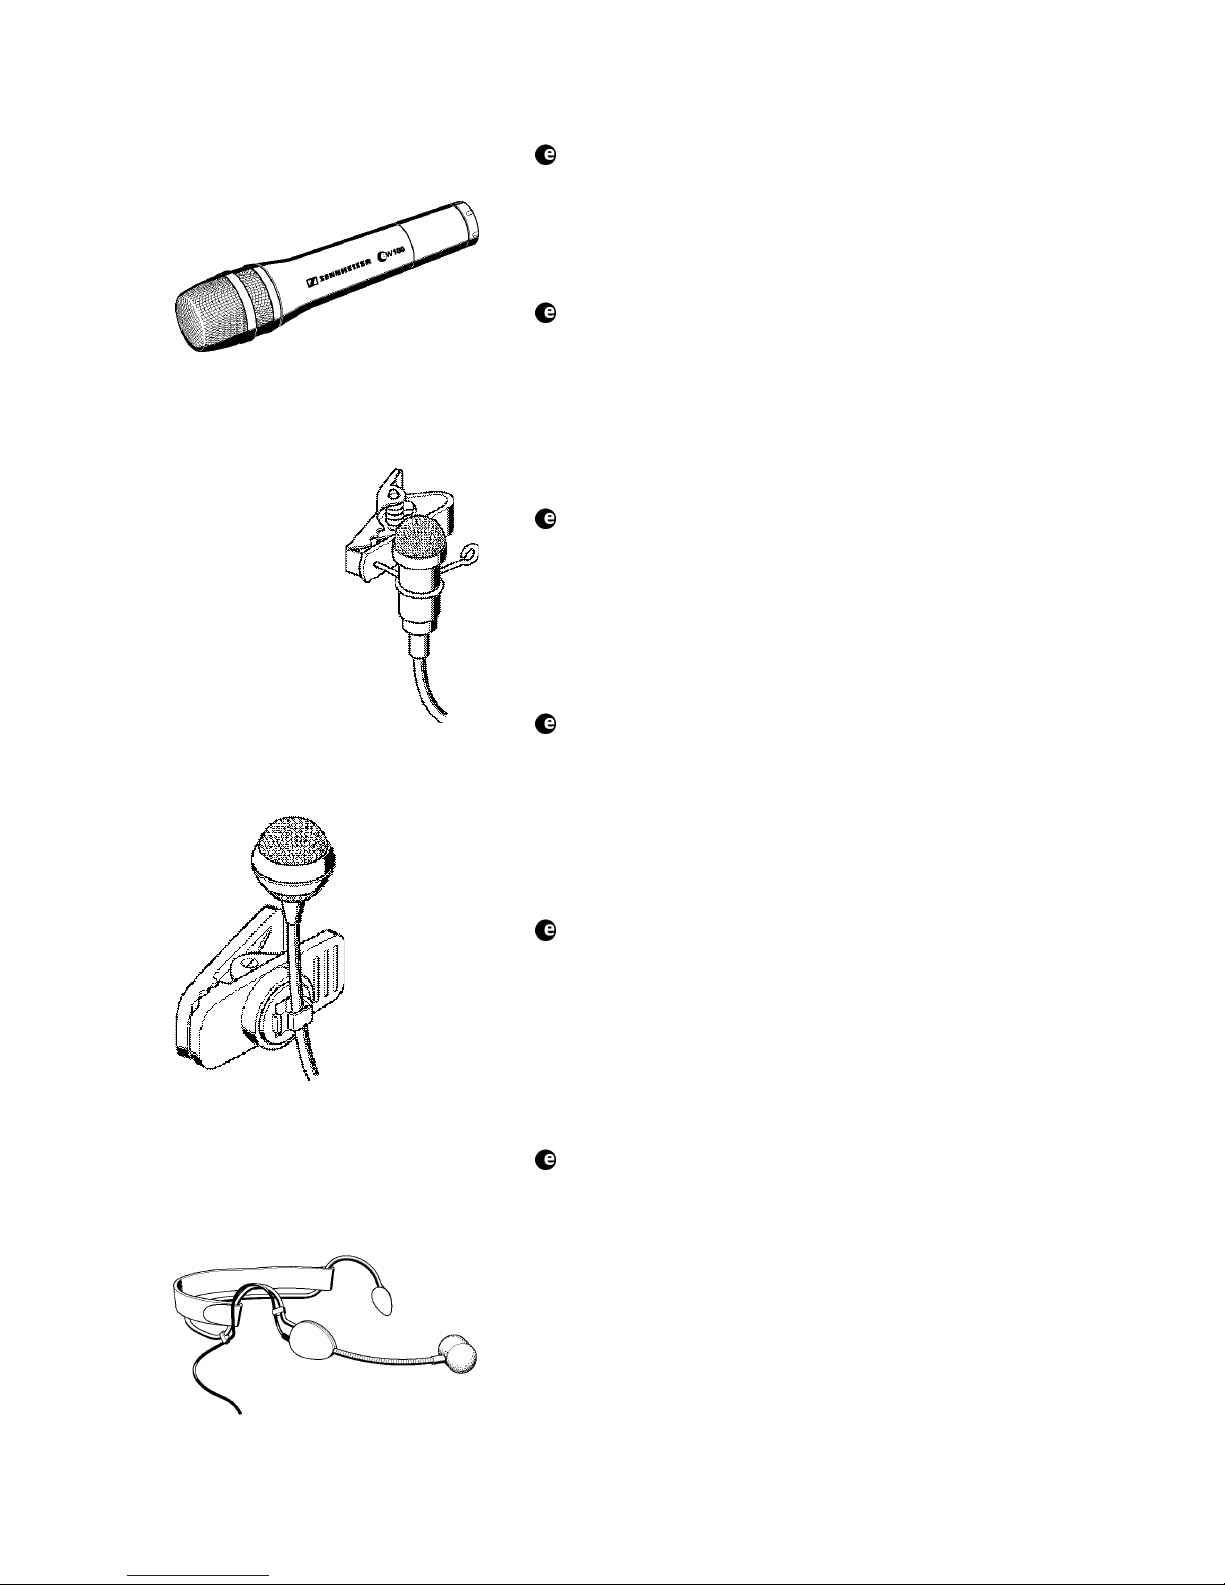
SKM 100
Set w 135
This system is ideal for vocal applications.
Set ew 135 consists of: EM 100 receiver, SKM 100 hand-held transmitter
with MD 835 cardioid dynamic microphone module, plug-in mains unit,
battery, antennas, microphone clamp and operating manual.
Set w 135-p
Having the same transmitter as the Set ew 135, this system replaces the
mains receiver with a pocket receiver for camera-mounted applications.
Set ew 135-p consists of: EK 100 pocket receiver, SKM 100 hand-held
transmitter with MD 835 cardioid dynamic microphone module, two
batteries, antennas, line output cable, camera kit, microphone clamp and
operating manual.
Set w 145
This system is ideal for vocal applications in venues with high ambient noise
levels. The super-cardioid dynamic microphone head has excellent feedback
rejection.
Set ew 145 consists of: EM 100 receiver, SKM 100 hand-held transmitter
with MD 845 super-cardioid dynamic microphone module, plug-in mains
unit, battery, antennas, microphone clamp and operating manual.
Set w 145-p
Having the same transmitter as the Set ew 145, this system replaces the
mains receiver with a pocket receiver for camera-mounted applications.
Set ew 145-p consists of: EK 100 pocket receiver, SKM 100 hand-held
transmitter with MD 845 super-cardioid dynamic microphone module, two
batteries, antennas, line output cable, camera kit, microphone clamp and
operating manual.
Set w 152
This system is ideal for hands-free vocal applications. Supplied complete
with the ME 3 headmic (which has superb feedback rejection), this system
gives complete freedom of expression to stage vocalists as well as proving a
boon to sports commentators/referees and aerobic instructors.
Set ew 152 consists of: EM 100 receiver, SK 100 pocket transmitter, ME 3
condenser super-cardioid headmic, plug-in mains unit, battery, antennas and
operating manual.
Set w 152-p
Having the same transmitter as the Set ew 152, this system replaces the
mains receiver with a pocket receiver for camera-mounted applications.
Set ew 152-p consists of: EK 100 pocket receiver, SK 100 pocket transmitter,
ME 3 condenser super-cardioid headmic, two batteries, antennas, line output
cable, camera kit and operating manual.
ME 4 cardioid clip-on
microphone with
microphone clip
ME 3 headmic
ME 2 omni-directional
clip-on microphone
with microphone clip

50
Set w 165
This system, due to its excellent feedback rejection and wide dynamic range,
is the ideal choice for vocals and presentations.
Set ew 165 consists of: EM 100 receiver, SKM 100 hand-held transmitter
with ME 865 super-cardioid condenser microphone module, plug-in mains
unit, battery, antennas, microphone clamp and operating manual.
Set w 165-p
Having the same transmitter as the Set ew 165, this system replaces the
mains receiver with a pocket receiver for camera-mounted applications.
Set ew 165-p consists of: EK 100 pocket receiver, SKM 100 hand-held
transmitter with ME 865 super-cardioid condenser microphone module, two
batteries, antennas, line output cable, camera kit, microphone clamp and
operating manual.
Set w 172
This system is for connecting musical instruments (e.g. guitar) which have a
1
/4” (6.3 mm) jack socket directly to the pocket transmitter.
Set ew 172 consists of: EM 100 receiver, SK 100 pocket transmitter, CI 1
instrument (guitar) cable, plug-in mains unit, battery, antennas and operating
manual.
Set w 172-p
Having the same transmitter as the Set ew 172, this system replaces the mains
receiver with a pocket receiver for camera-mounted applications.
Set ew 172-p consists of: EK 100 pocket receiver, SK 100 pocket transmitter,
CI 1 instrument (guitar) cable, two batteries, antennas, line output cable,
camera kit and operating manual.
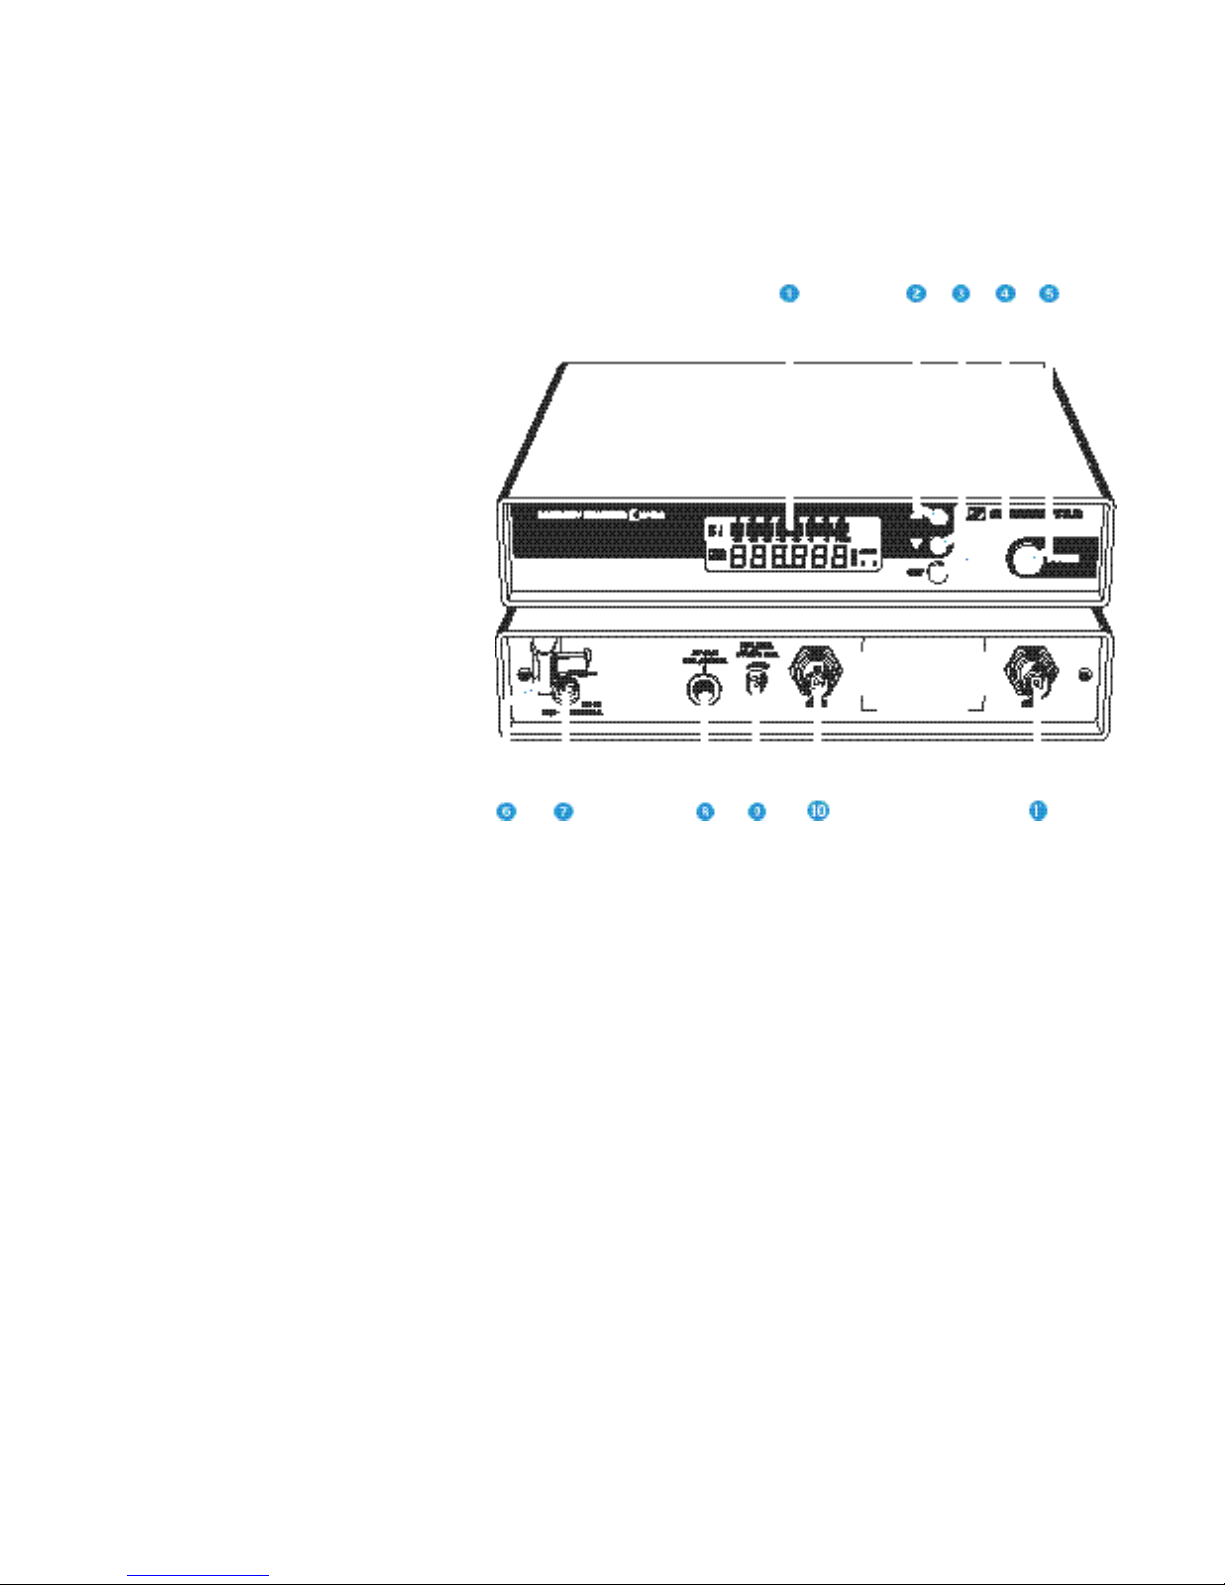
51
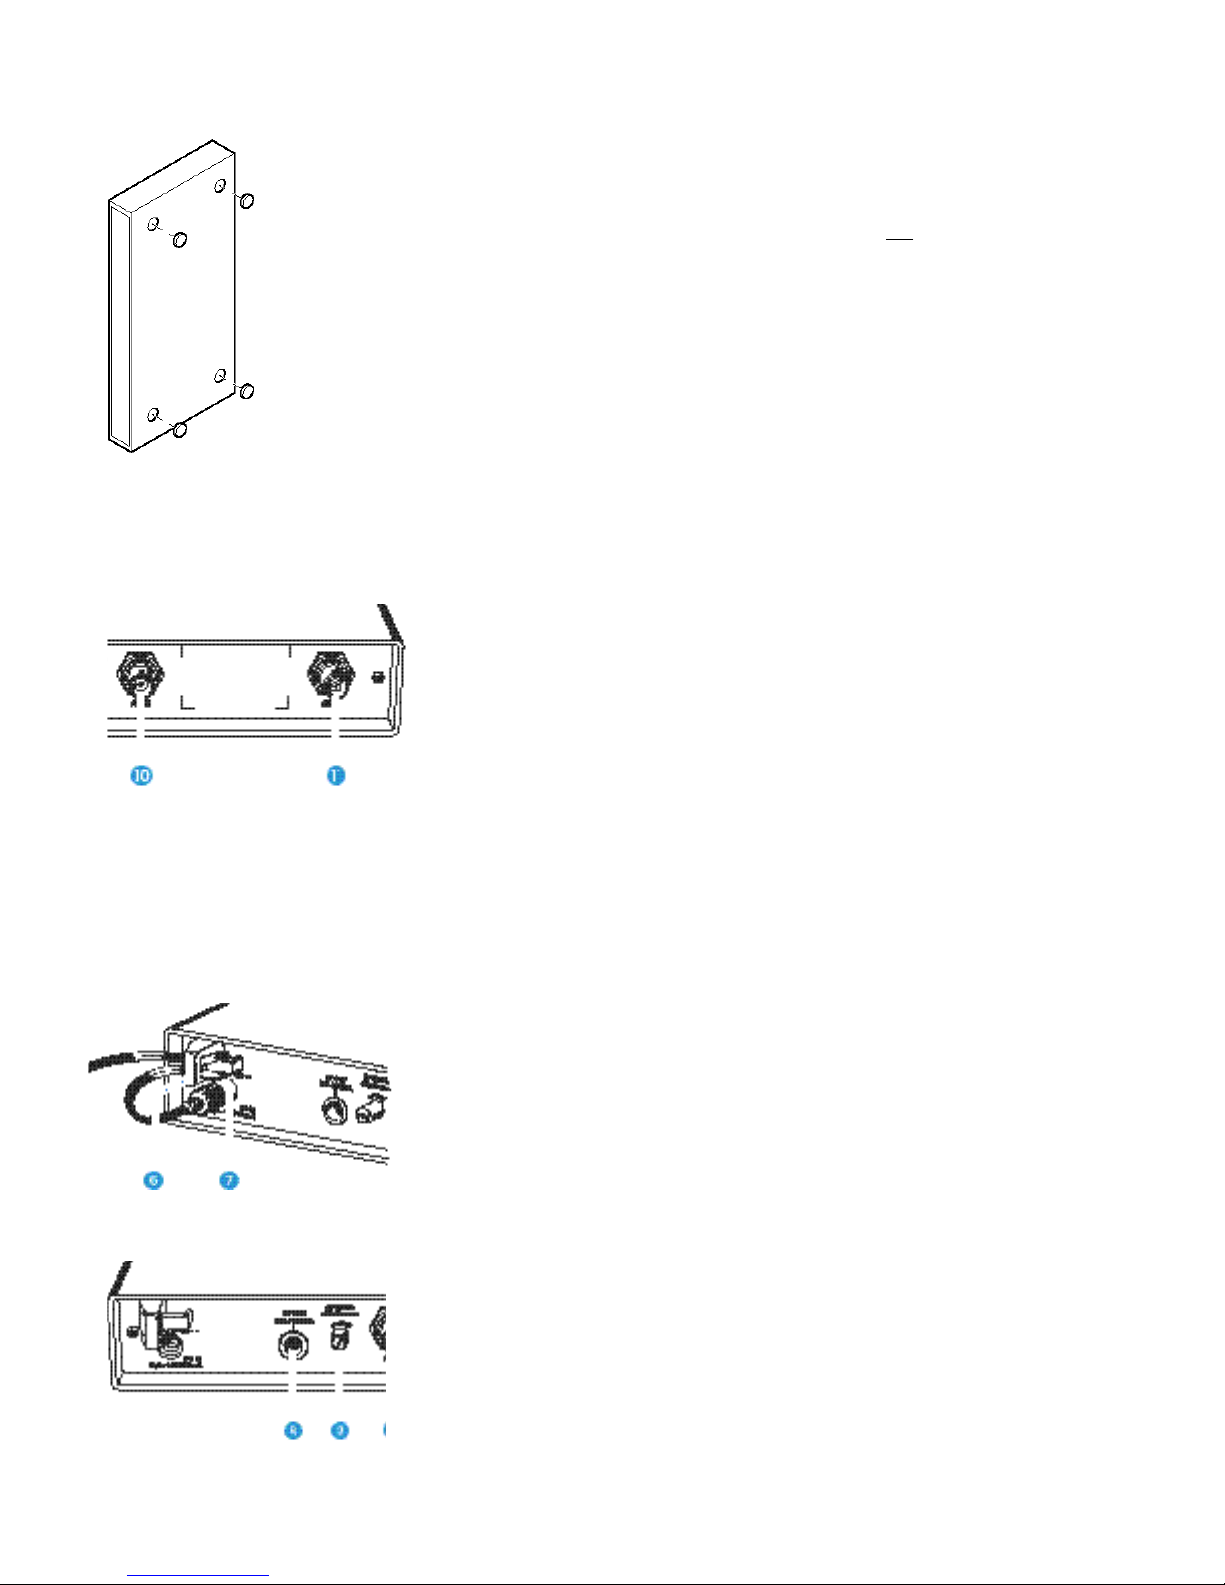
LC display
button (UP)
button (DOWN)
SET button
POWER (ON/OFF) button
Cable grip for power supply DC cable
DC socket for connection of mains unit (DC-IN)
AF output, 1/4” (6.3 mm) jack socket (AF OUT BAL/UNBAL)
AF output level control (AF LEVEL)
Antenna input II (ANT II), BNC socket
Antenna input I (ANT I), BNC socket
5 Preparing the devices for use
EM 100 receiver
52
Mounting the rubber feet
To ensure that the receiver cannot slip on the surface on which it is placed,
four self-adhesive soft rubber feet are supplied. These feet are stuck into the
recesses on the bottom side of the receiver. (N.B.: Do
not use these feet if
rackmounting the receiver).
씰 Ensure that the recesses are clean and free from grease before fixing
the feet.
Attention!
Some furniture surfaces have been treated with varnish, polish or
synthetics which might cause stains when they come into contact with
other synthetics. Despite a thorough testing of the synthetics used by
us, we cannot rule out the possibility of discolouration, since we don’t
know your furniture. You should therefore always place the receiver
on a non-slip pad.
Connecting the antennas
The EM 100 receiver can be used with either telescopic antennas (supplied)
or remote antennas (available as accessories).
The supplied telescopic antennas can be mounted quickly and easily to the
rear of the receiver and are suitable for all applications where – good reception
conditions provided – a wireless transmission system is to be used without a
large amount of installation work.
씰 Connect the telescopic antennas to BNC sockets and at the
rear of the receiver. Pull the antennas out and align them upwards in
a V-shape.
If the receiver position is not the best antenna position for optimum reception,
you can use remote antennas. These are available as accessories.
Connecting the mains unit
씰 Insert the DC connector on the power supply output cable into socket
at the rear of the receiver.
씰 Pass the cable through the cable grip .
Connecting the amplifier/mixing console
씰 Connect the amplifier/mixing console to the
1
/4” (6.3 mm) jack socket .
For information on balanced and unbalanced connection, please refer
to the chapter “9 Overview”.

53
Switching the receiver on/off
씰 Press the POWER button to switch the receiver on.
씰 To switch the receiver off, press the POWER button until “OFF” appears
on the display. You can then release the button.
After a power failure, the device returns to the previous setting (ON/OFF).
Adjusting the AF output level
씰 Use the AF output level control to adjust the AF signal level that
appears at output .

54
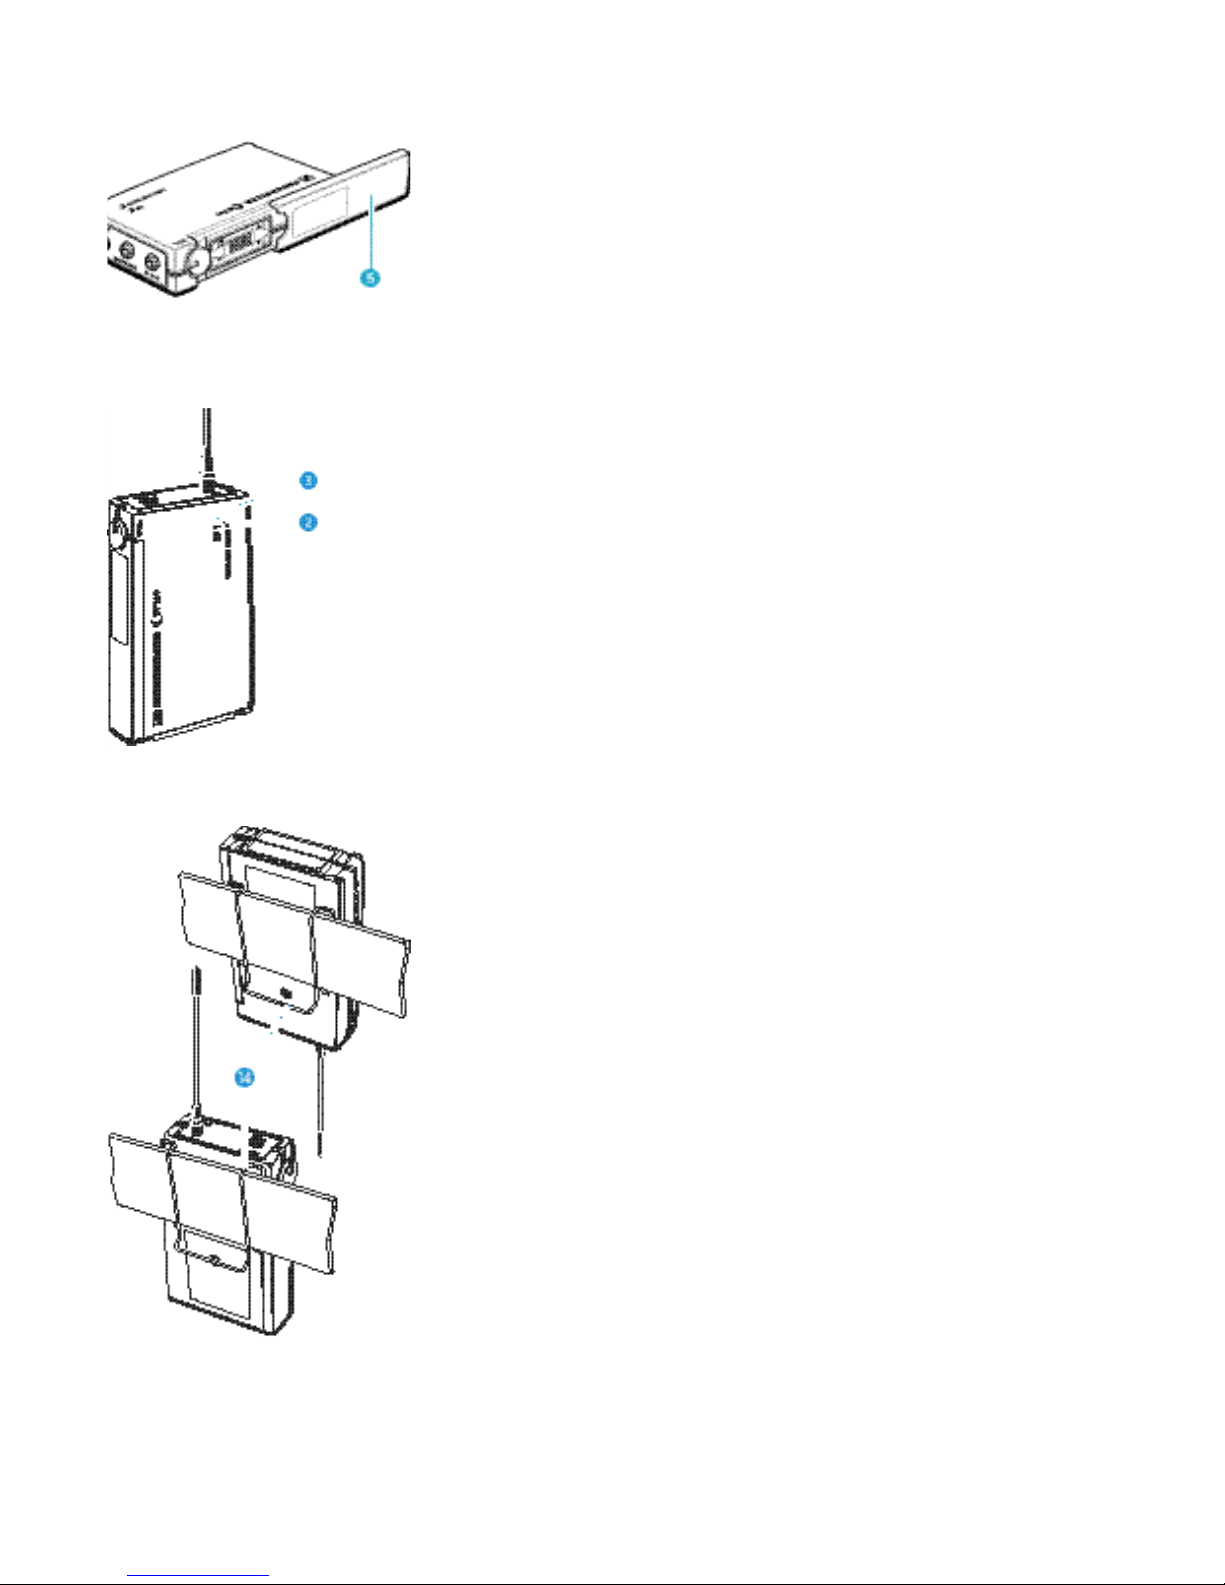
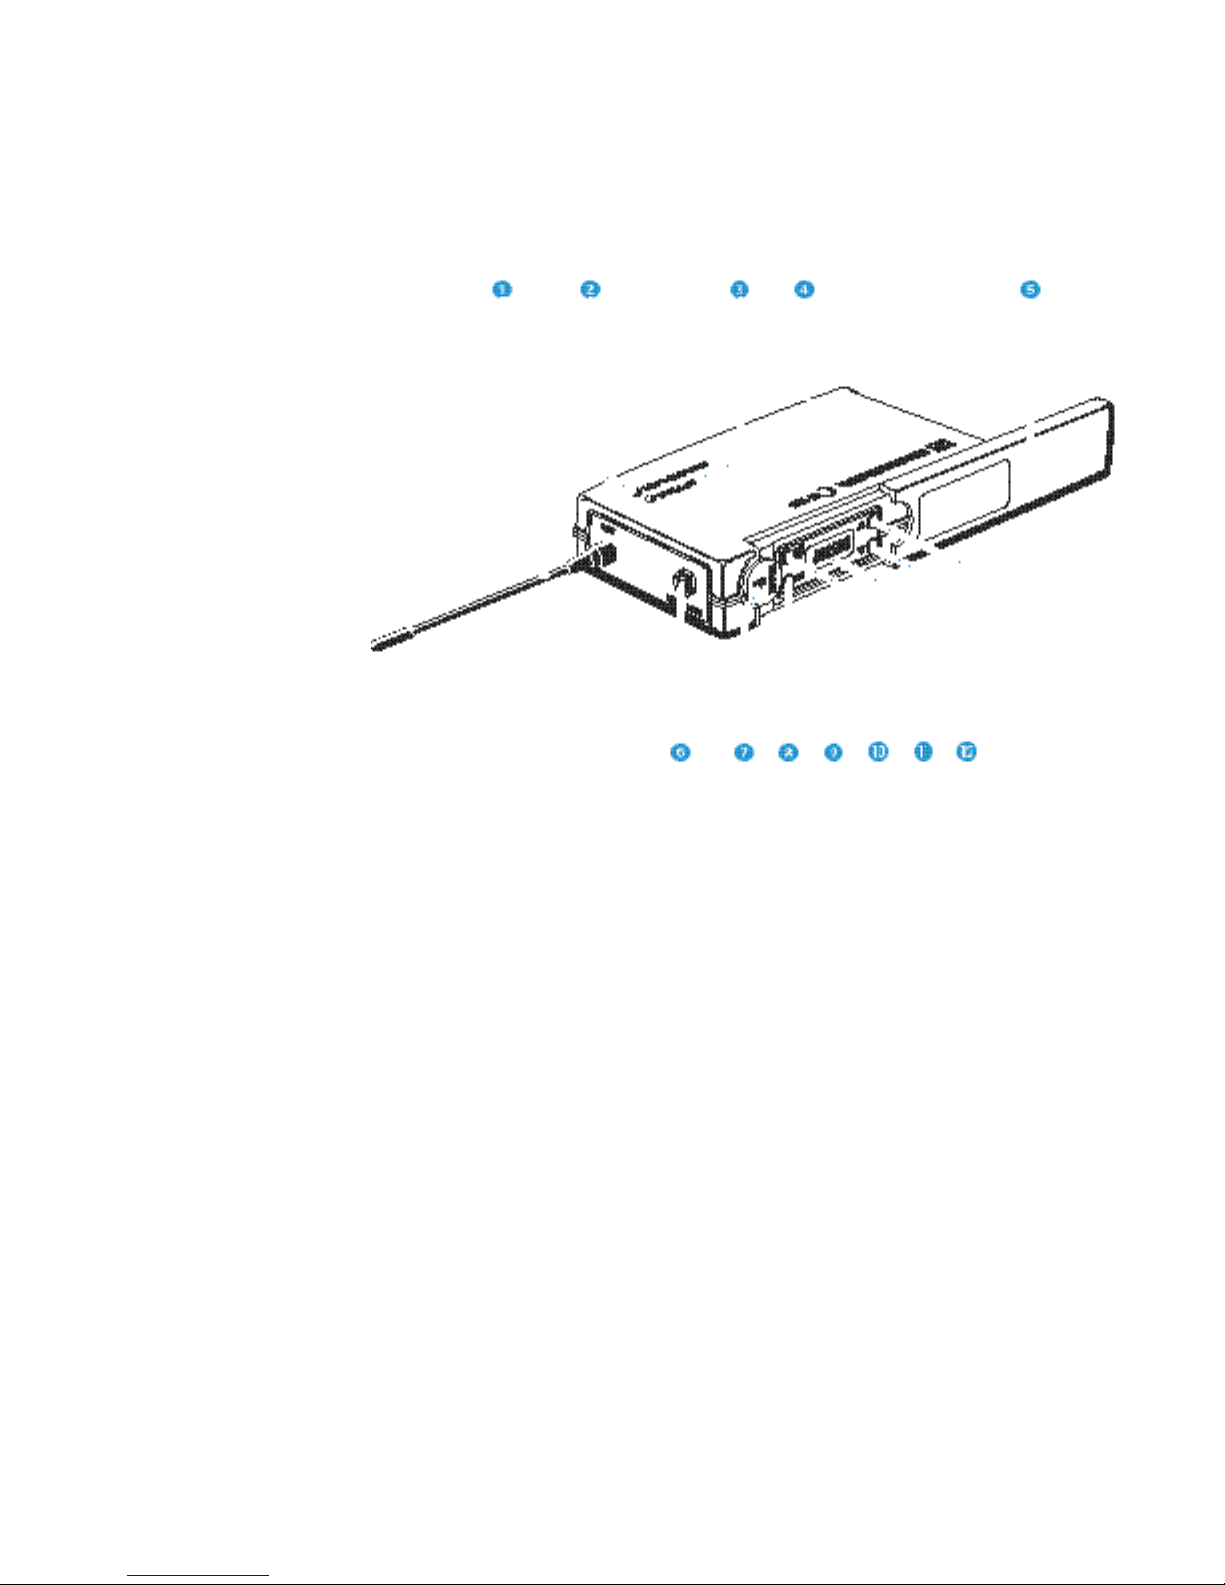
EK 100 pocket receiver
Antenna
Red LED for operation and battery status indication (ON/LOW BAT)
Green LED for RF signal indication (RF)
Cover plate for battery compartment
Cover plate for display and operating controls
AF output (AF OUT), 3.5 mm jack socket
AF output level control
SET button
ON/OFF button
LC display
button (DOWN)
button (UP)

55
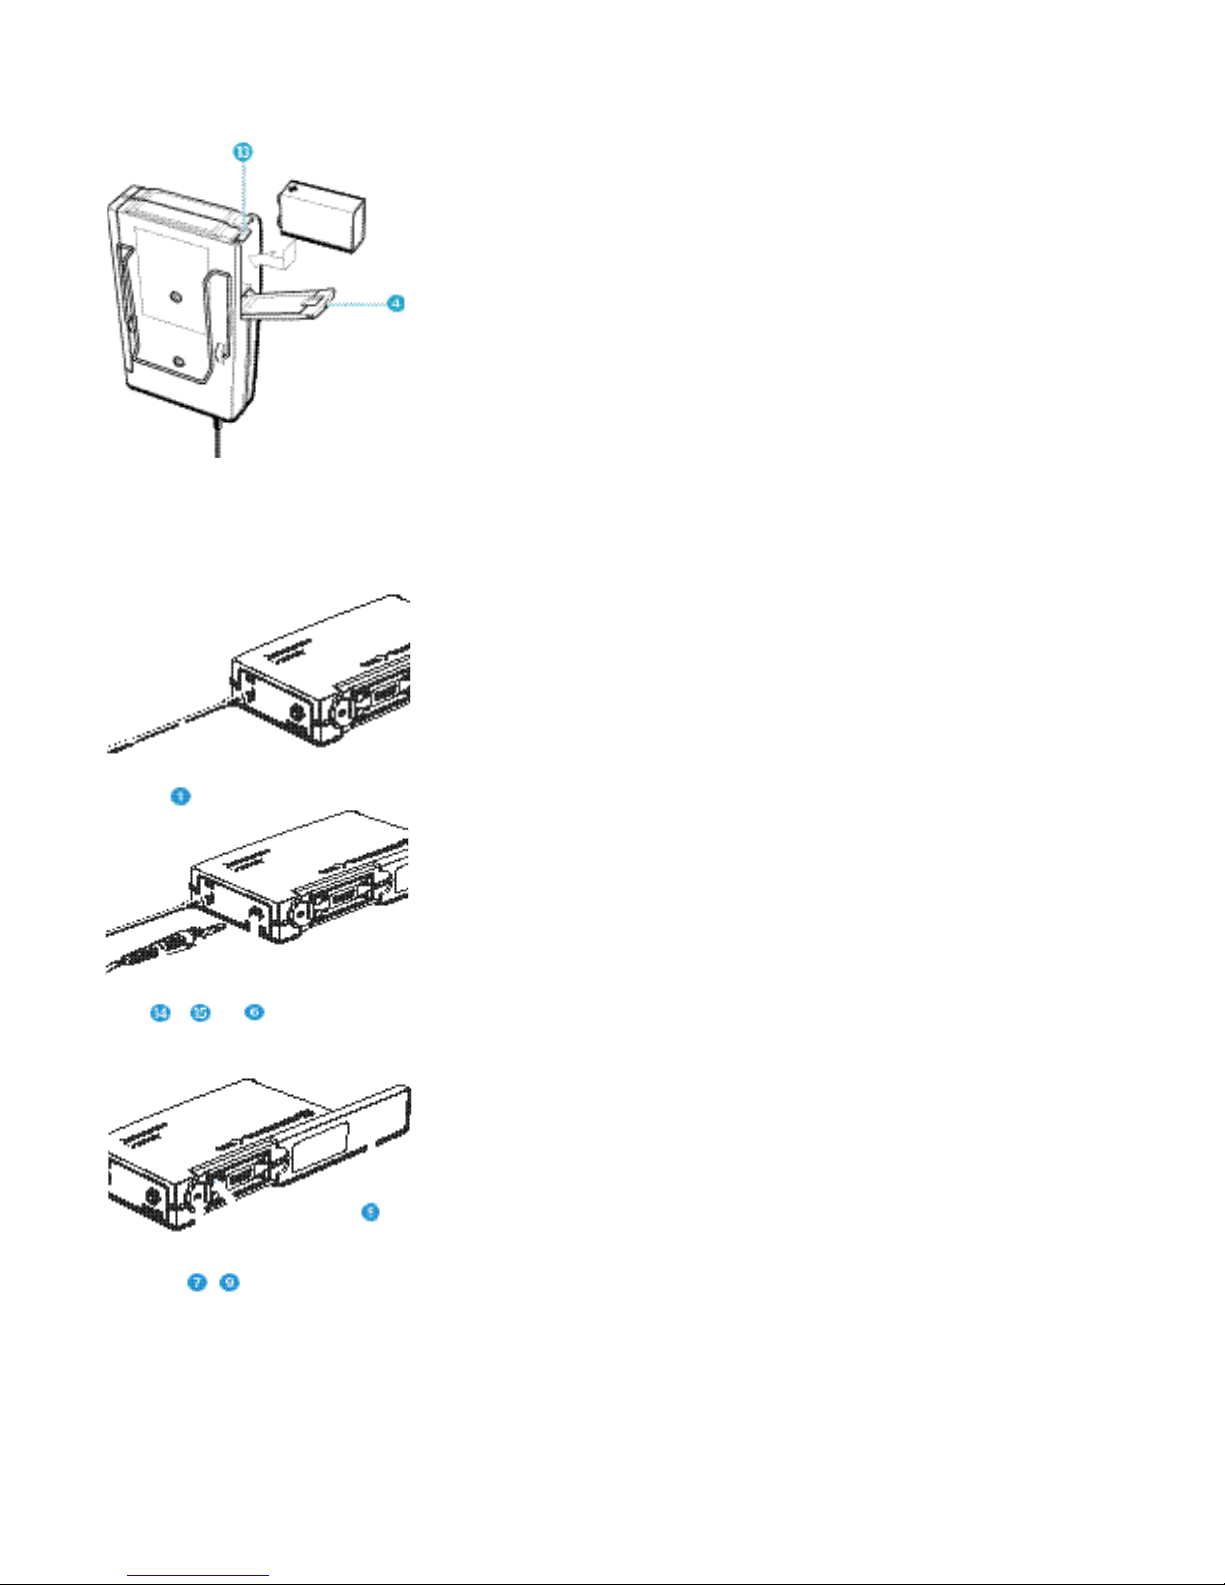
Inserting and changing the battery
씰 Slide the cover of the battery compartment in the direction of the
embossed arrow until it clicks audibly.
씰 Open the cover.
씰 Insert the 9 V PP3 battery (IEC 6 LR 61). Please observe correct polarity
when inserting the battery.
씰 Close the battery compartment.
씰 To remove the battery, push the small red lever in the battery
compartment towards the bottom side of the receiver.
Note:
We recommend powering the receiver by a standard PP3 alkaline
battery. If powered by a rechargeable 9 V battery, the operating time
will be drastically reduced.
Connecting the antenna
씰 Screw the antenna onto the antenna socket (M3 connection).
Connecting sound recording and reproducing equipment
Sound recording and reproducing equipment such as amplifiers, video
cameras, tape recorders etc. can be connected to the EK 100 receiver.
씰 Use the supplied line cable with 3.5 mm jack plug to connect the
sound recording or reproducing device to the line output (AF OUT) .
씰 Lock the jack plug by screwing down the locking ring.
Adjusting the AF output level
Use the AF output level control to adjust the AF signal level for socket .
56
Switching the receiver on/off
씰 Slide back the cover plate .
씰 Press the ON/OFF button to switch the receiver on. The red LED lights
up.
씰 To switch the receiver off, press the ON/OFF button until “OFF” appears
on the display. You can then release the button. The red LED goes
off.
Signal and battery status indication
The green LED at the top of the EK 100 receiver indicates that an RF
signal is being received.
Battery status indication
The red LED provides information on the (remaining) battery capacity:
LED lit up:
The receiver is switched on and the battery capacity is sufficient.
LED flashing:
The battery is going flat! You should immediately replace the battery.
Attachment of the receiver to clothing
The EK 100 receiver is best attached to e.g. the belt with clip .
The clip is detachable so that you can also attach the receiver with the antenna
pointing downwards. To do so, withdraw the clip from its fixing points and
attach it the other way round.
Attachment of the receiver to a camera
Use the supplied camera kit (self-adhesive Velcro tape) to attach the receiver
to a camera. Remove the clip and stick the Velcro tape to the receiver and
the camera. Ensure that the surfaces are clean and free from grease.
(Note: We would suggest using the “hook” Velcro on the receiver and the
“loop” Velcro on the camera.)
57
SK 100 pocket transmitter
Antenna
Red LED for operation and battery status indication (ON/LOW BAT)
Yellow LED for AF peak (AF PEAK)
Cover plate for battery compartment
Cover plate for display and operating controls
AF input (MIC/LINE), 3.5 mm jack socket
MUTE switch
SET button
ON/OFF button
Display
button (DOWN)
button (UP)
58
Inserting and changing the battery
씰 Slide the cover of the battery compartment in the direction of the
embossed arrow until it clicks audibly.
씰 Open the cover.
씰 Insert the 9 V PP3 battery (IEC 6 LR 61). Please observe correct polarity
when inserting the battery.
씰 Close the battery compartment.
씰 To remove the battery, push the small red lever in the battery
compartment towards the bottom side of the transmitter.
Note:
We recommend powering the transmitter by a standard PP3 alkaline
battery. If powered by a rechargeable 9 V battery, the operating time
will be drastically reduced.
Connecting the antenna
씰 Screw the antenna onto the antenna socket (M3 connection).
Connecting the microphone/line cable
Electret powering (“plug-in” power) is available at the AF input for powering
the microphone.
씰 Connect the 3.5 mm jack plug from the microphone/line cable to
the AF input (MIC/LINE) .
씰 Lock the jack plug by screwing down the locking ring .
Switching the transmitter on/off
씰 Slide back the cover plate .
씰 Press the ON/OFF button to switch the transmitter on. The red
LED lights up.
씰 To switch the transmitter off, press the ON/OFF button until “OFF”
appears on the display. You can then release the button. The red LED
goes off.
Muting the transmitter
Use the MUTE switch to noiselessly mute the transmitter’s audio signal
(this switch does not switch off the transmitter).

59
Signal and battery status indication
The yellow LED at the top of the SK 100 transmitter lights up if the
audio signal at the AF input is excessively high (AF peak).
The red LED provides information on the battery status:
LED lit up:
The transmitter is switched on and the battery capacity is sufficient.
LED flashing:
The battery is going flat! You should immediately replace the battery.
Attachment of the transmitter to clothing
The SK 100 transmitter is best attached to e.g. the belt with clip .
The clip is detachable so that you can also attach the transmitter with the
antenna pointing downwards. To do so, withdraw the clip from its fixing
points and attach it the other way round.
Attachment of the microphones
The microphone clips enable the attachment of the ME 2 and ME 4 clipon microphones to clothing (e.g. tie, lapel).
The ME 3 headmic is adjustable to comfortably and securely fit your head.
Positioning the microphones
The ME 3 and ME 4 microphones are directional microphones, i.e. their
sound inlet should always be directed towards the sound source (e.g. mouth).
The ME 2 with omni-directional pick-up pattern picks up sound equally
from all directions. It is the best choice if movements of the speaker’s head
have to be compensated for.
 Loading...