

Sennheiser Evolution E 902, Evolution 902 Instructions For Use Manual [de]
Bedienungsanleitung
Instructions for use
Notice d‘emploi
Istruzioni per l‘uso
Instrucciones para el uso
Gebruiksaanwijzing
902

Bedienungsanleitung..............................................................3
Instructions for use .................................................................9
Notice d’emploi ......................................................................15
Istruzioni per l’uso.................................................................21
Instrucciones para el uso......................................................27
Gebruiksaanwijzing...............................................................33

902
Hochwertiges dynamisches Mikrofon mit Nierencharakteristik. Speziell zur Abnahme von Kick Drums, Bassgitarren-Cabs, Tuba und anderen Bassinstrumenten.
Die hochfeste, extrem dünne Membran ermöglicht die
gute Aufnahme tiefer Frequenzen bei hoher Impulstreue.
Rückwärtig einfallende Schallanteile werden wirksam
ausgeblendet.
Merkmale
y
optimierter Frequenzgang für die Abnahme von
Kick Drums
y
sehr schnelle Ansprache
y
sehr trockene, klar definierte Tief-Basswiedergabe
y
federnd gelagerte Kapsel
y
Brummkompensationsspule
y
extrem robuster Einsprachekorb, austauschbar
y
vergoldeter XLR-Stecker
y
integrierte Stativhalterung
Lieferumfang
Mikrofon 902
Tasche
Bedienungsanleitung
Garantiekarte
3
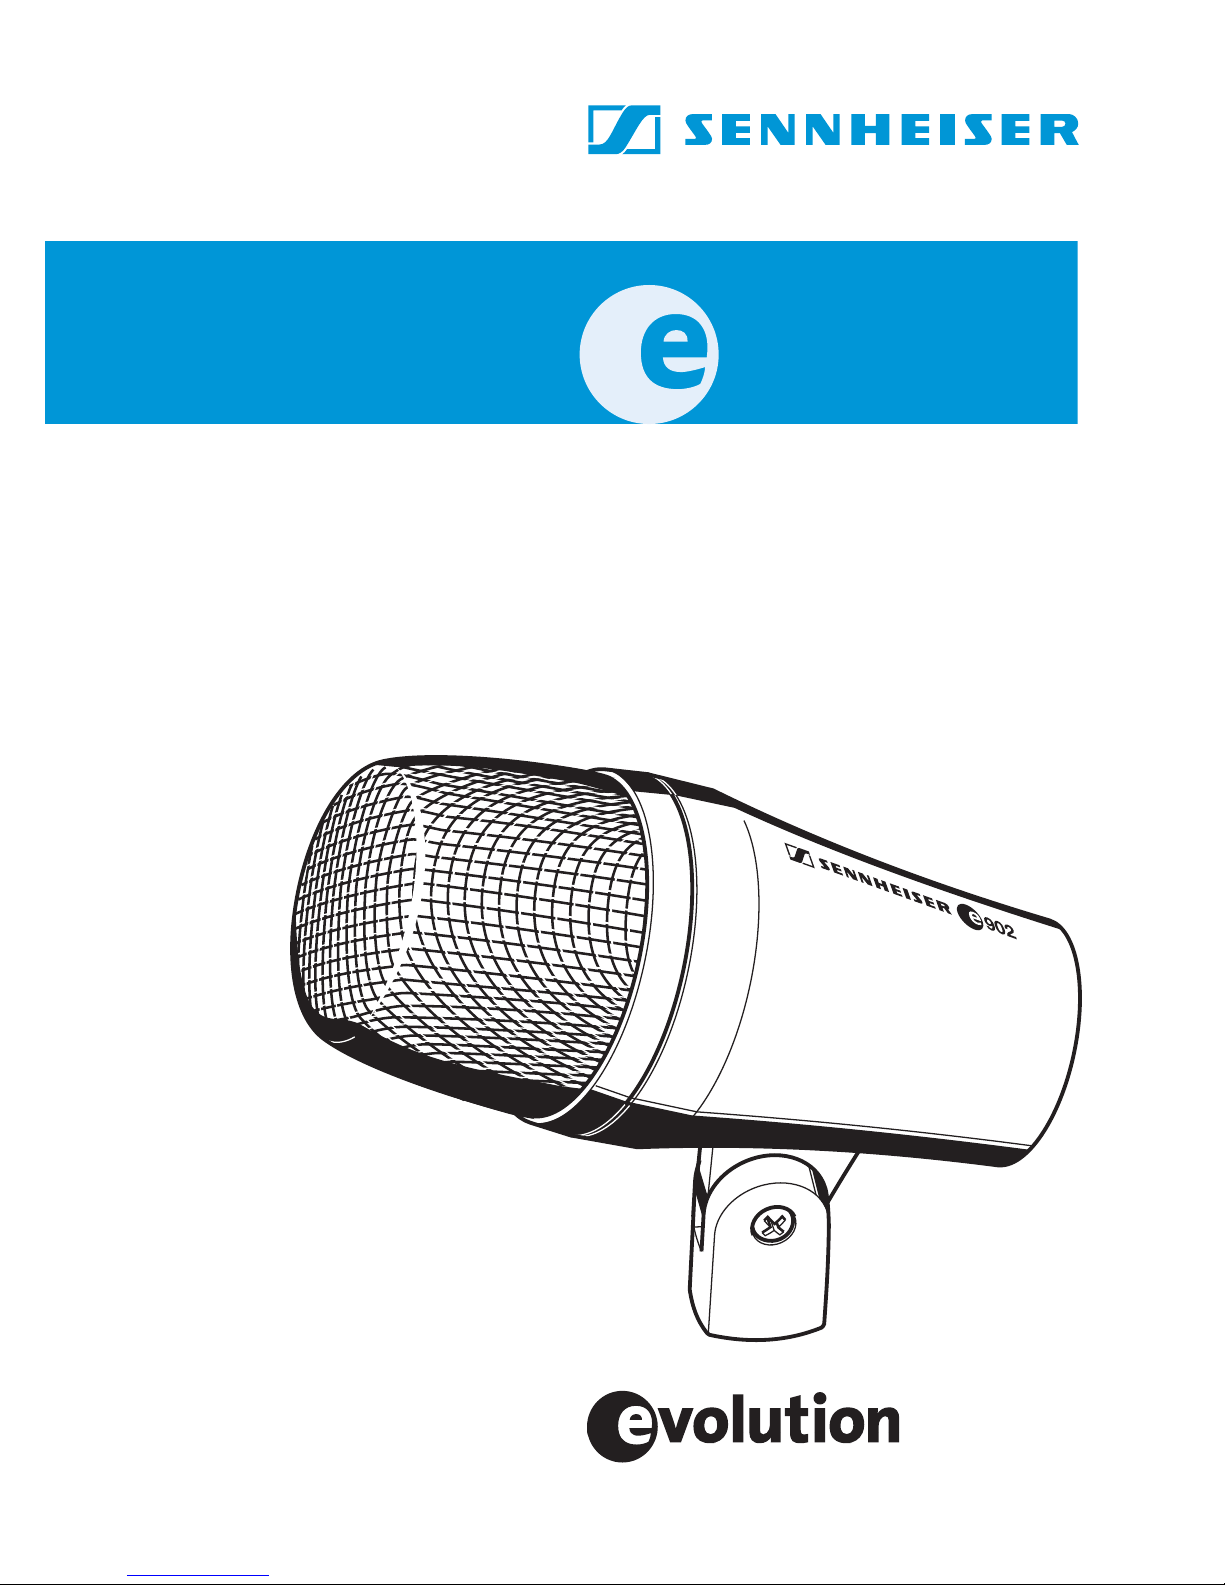
Anschlussbelegung XLR-3
+
+
12
3
1
+
2
3
+
12
3
XLR
Einsprachekorb abdrehen
XLR
+
2
1
3
XLR
6,3 mm
+
2
1
3
XLR 6,3 mm
symmetrisch
XLR
+
+
4

Mikrofon platzieren
Kick Drum
Positionierung Klangresultat Kommentar
viel Attack,
wenig Resonanz,
trocken
weniger Attack,
viel Resonanz
warm, voluminös
weniger Attack Mikrofon in der
Mikrofon mit wenigen Zentimetern
Abstand zum
Schlagfell positionieren.
Mikrofon auf Höhe
des Resonanzfells
positionieren.
Mitte zwischen
Schlagfell und Resonanzfell positionieren. Für weniger
Attack bei allen
Positionen Mikrofon
von der Auftreffstelle des Klöppels
wegrichten.
Um Störungen durch Übersprechen von benachbarten
Schallquellen zu vermeiden, versuchen Sie, das Mikrofon
so zu positionieren, dass die Störschallquelle im Winkelbereich der größten Auslöschung des Mikrofons liegt
(ca. 180°).
5

Polardiagram
0
5
5
0
50
80
50
0
000
z
000
z
z
6000
z
z
z
z
000
z
50
60
0
80
90
0
00
00
000
000
0000
0000
,
m
0
v
1
1
2
12
125 H
250 H
H
1
H
Frequenzgang
B
- 4
-
12
2
4
1
H
H
1
1
H
1
H
-
- 7
-
2
1
1
6
2
1
2
1
2

Technische Daten
Wandlerprinzip dynamisch
Übertragungsbereich 40
−
16.000 Hz
Richtcharakteristik Niere
Freifeldleerlauf- 0,6 mV/Pa (bei 60 Hz)
Übertragungsfaktor 0,2 mV/Pa (bei 1 kHz)
Nennimpedanz (bei 1 kHz) 350 Ω
Min. Abschlussimpedanz 1 kΩ
Stecker XLR-3
Gewicht 440 g
Maße Ø 60 mm,
Länge 128,5 mm
7
Übersicht Mikrofonanwendungen
Modell
e901
e902
e904
e905
e906
e908B
e908D
e914
Anwendung
Gesang xx
Chor x
e935
e945
Studio,
akustische Instrumente
Orchester x
Blechbläser / Saxophon x x x
Akustische Gitarre x
Akustischer Bass x
Gitarrenverstärker x
Bassverstärker x
Leslie xxxx
Piano, Flügel x x
Kick Drum xx
x x
Snare Drum xxx x
Hänge-Tom xxx x
Stand-Tom x xxx x
Congas x xxx
Becken x
Percussion xxxxxx
Overhead x
8

902
High-quality dynamic microphone with cardioid pick-up
pattern, especially suitable for use with kick drums, bass
guitar cabs, tubas and other low frequency instruments.
The extremely thin, high-strength diaphragm delivers a
very low bass response and fast transient signals.
Incidental rear noise is effectively rejected.
Features
y
Frequency response optimized for kick drum miking
y
Fast attack
y
Very dry and precise low-bass response
y Shock-mounted capsule
y Hum compensating coil
y
Extremely rugged sound inlet basket, replaceable
y
Gold-plated XLR connector
y
Integral stand mount
Delivery includes
902 microphone
Pouch
Instructions for use
Warranty Certificate
9
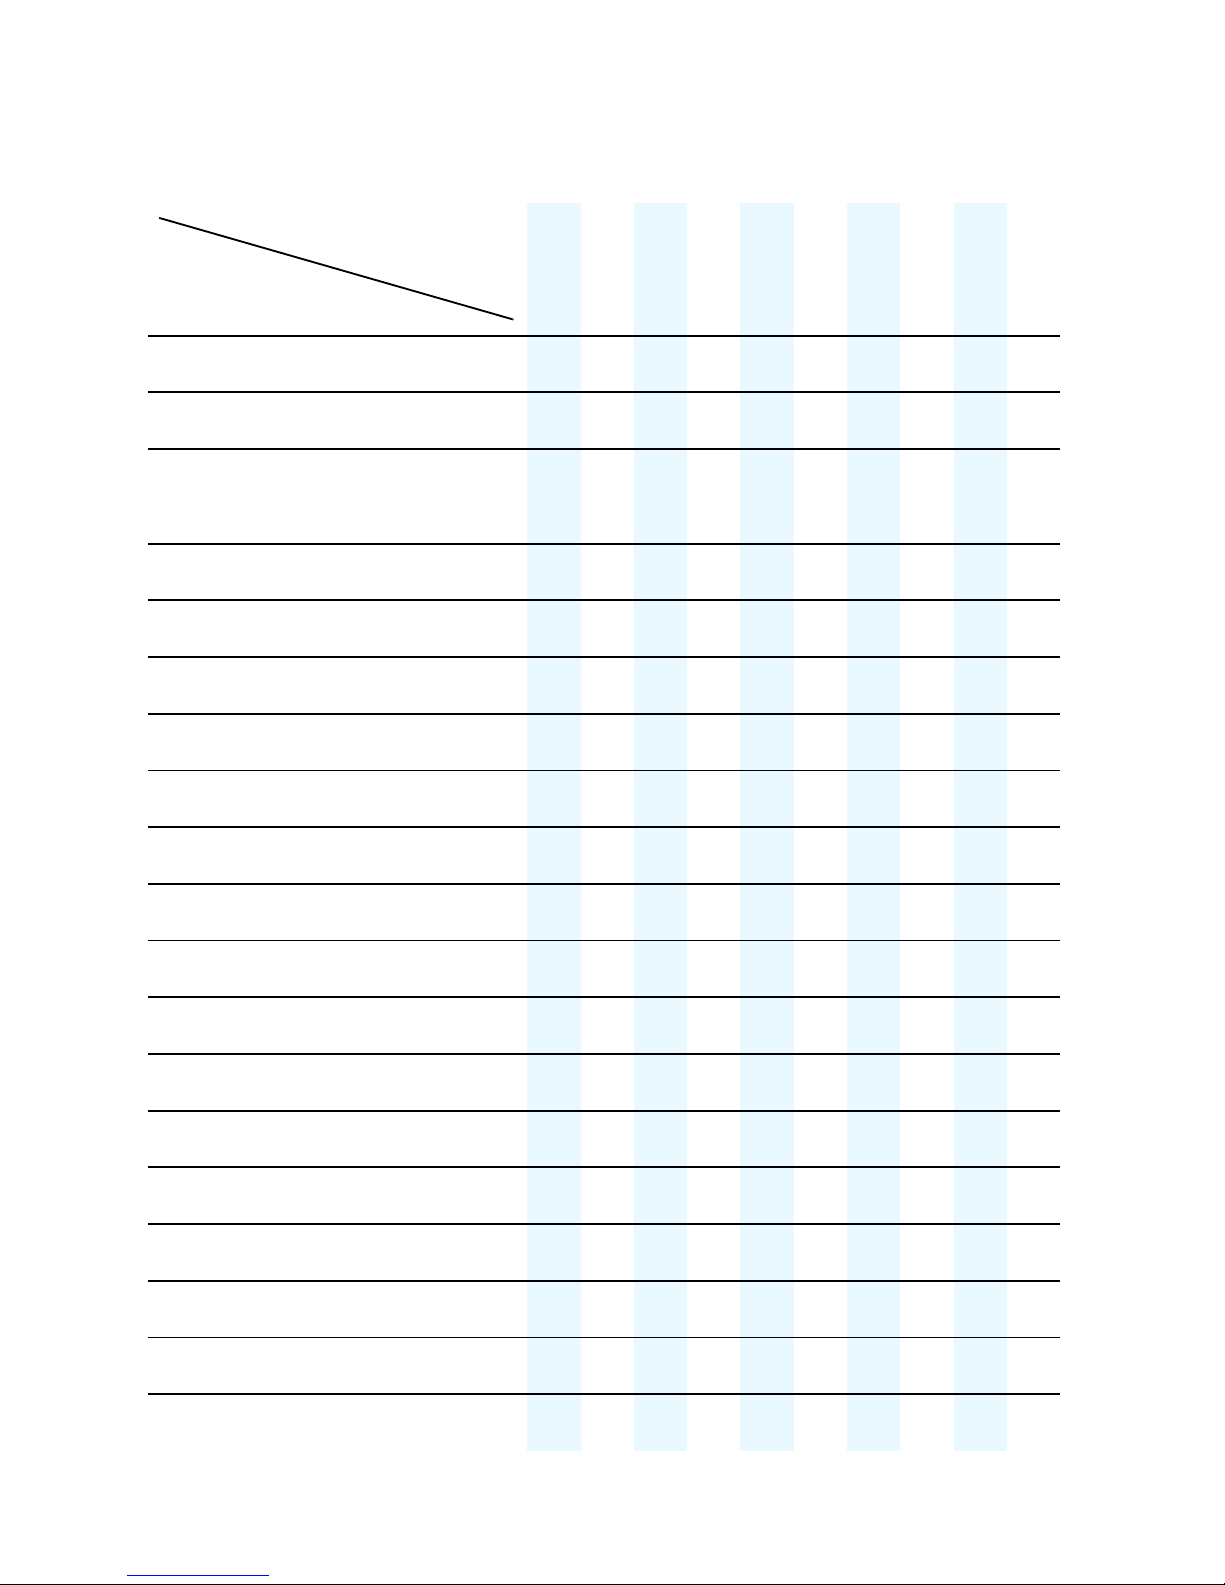
Pin assignment of XLR-3 connector
+
+
12
3
1
+
2
3
+
12
3
XLR
XLR
+
2
1
3
XLR
+
2
1
3
XLR 6,3 mm
balanced
symmetrisch
Removing the sound inlet basket
XLR
+
6,3 mm
+
10
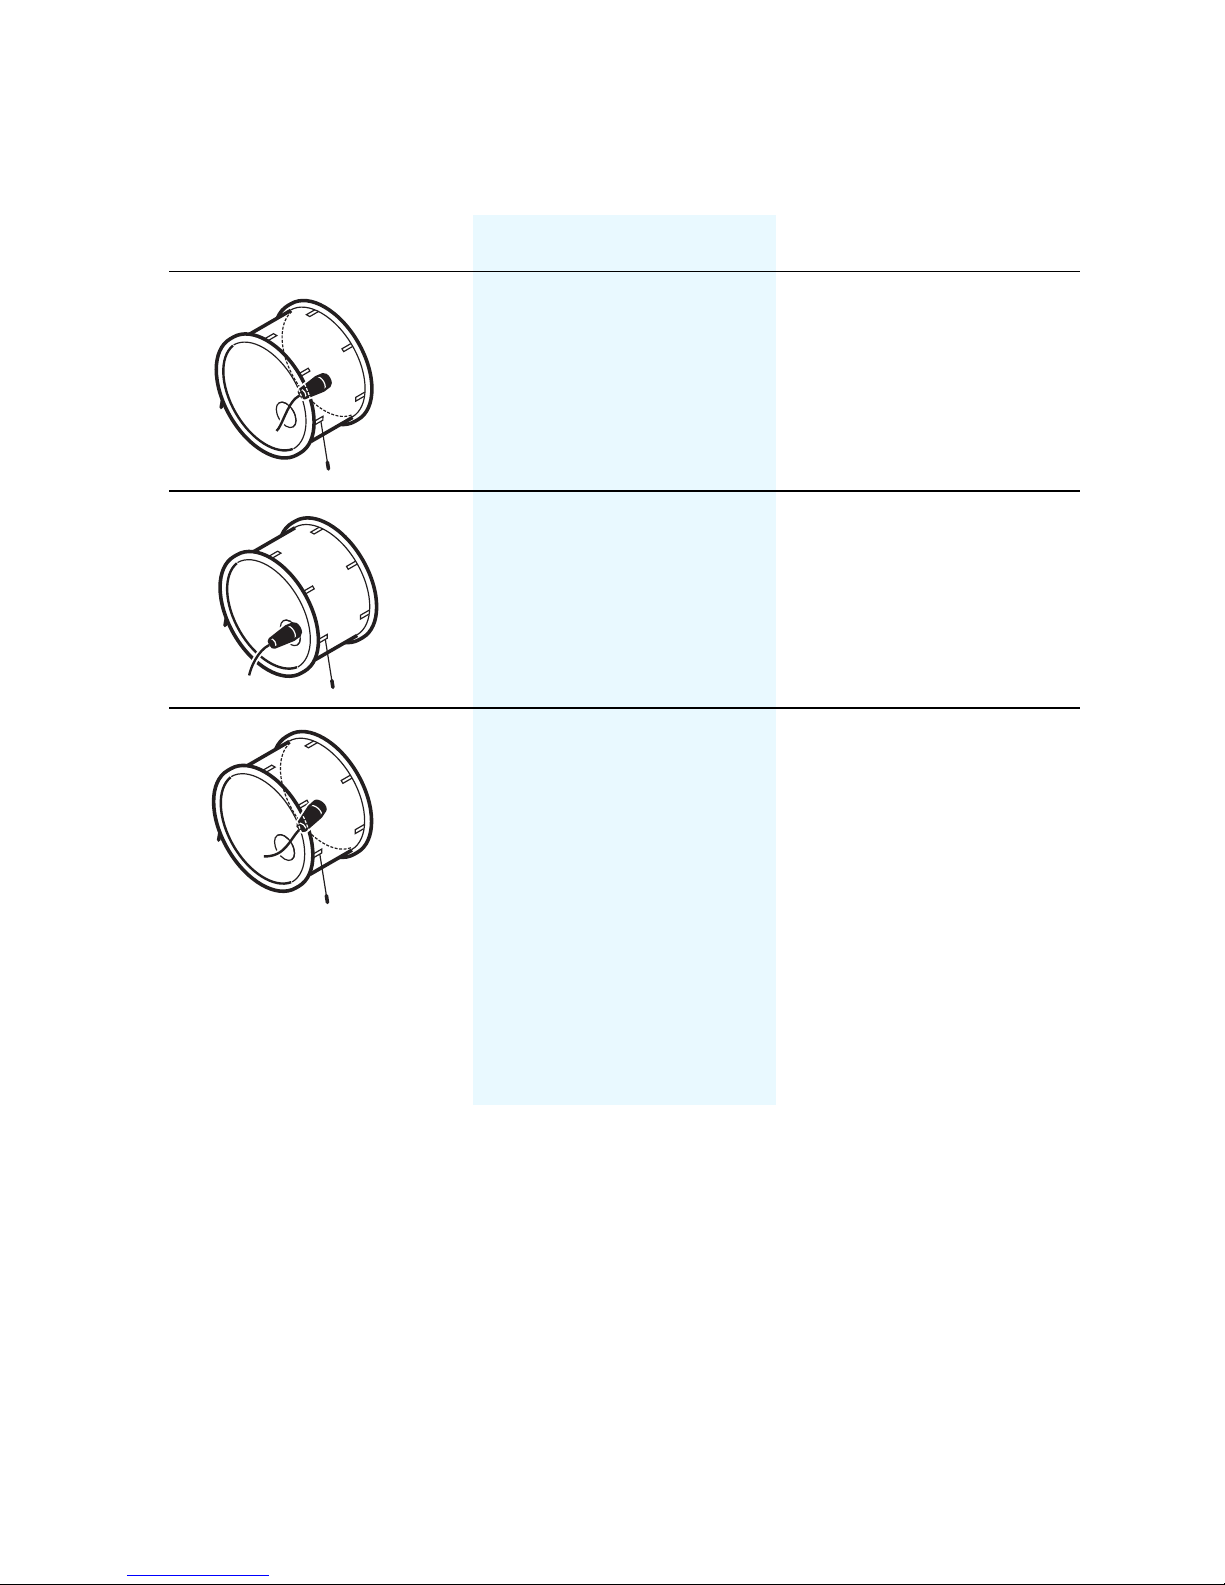
Positioning the microphone
Kick drums
Position Resulting sound Commentary
Much attack,
little resonance, dry
Less attack,
much resonance,
smooth, voluminous
Less attack Position the
Position the
microphone at a
distance of a few
centimeters from
the batter head.
Position the
microphone at the
level of the resonant
head.
microphone in the
middle between the
batter head and the
resonant head. For
less attack in all
three positions, turn
the microphone
away from where
the beater strikes.
In order to prevent interference due to crosstalk between
adjacent sound sources, try to position the microphone so
that the interfering sound source is located in the angle
area of the highest cancellation of the microphone
(approx. 180°).
11
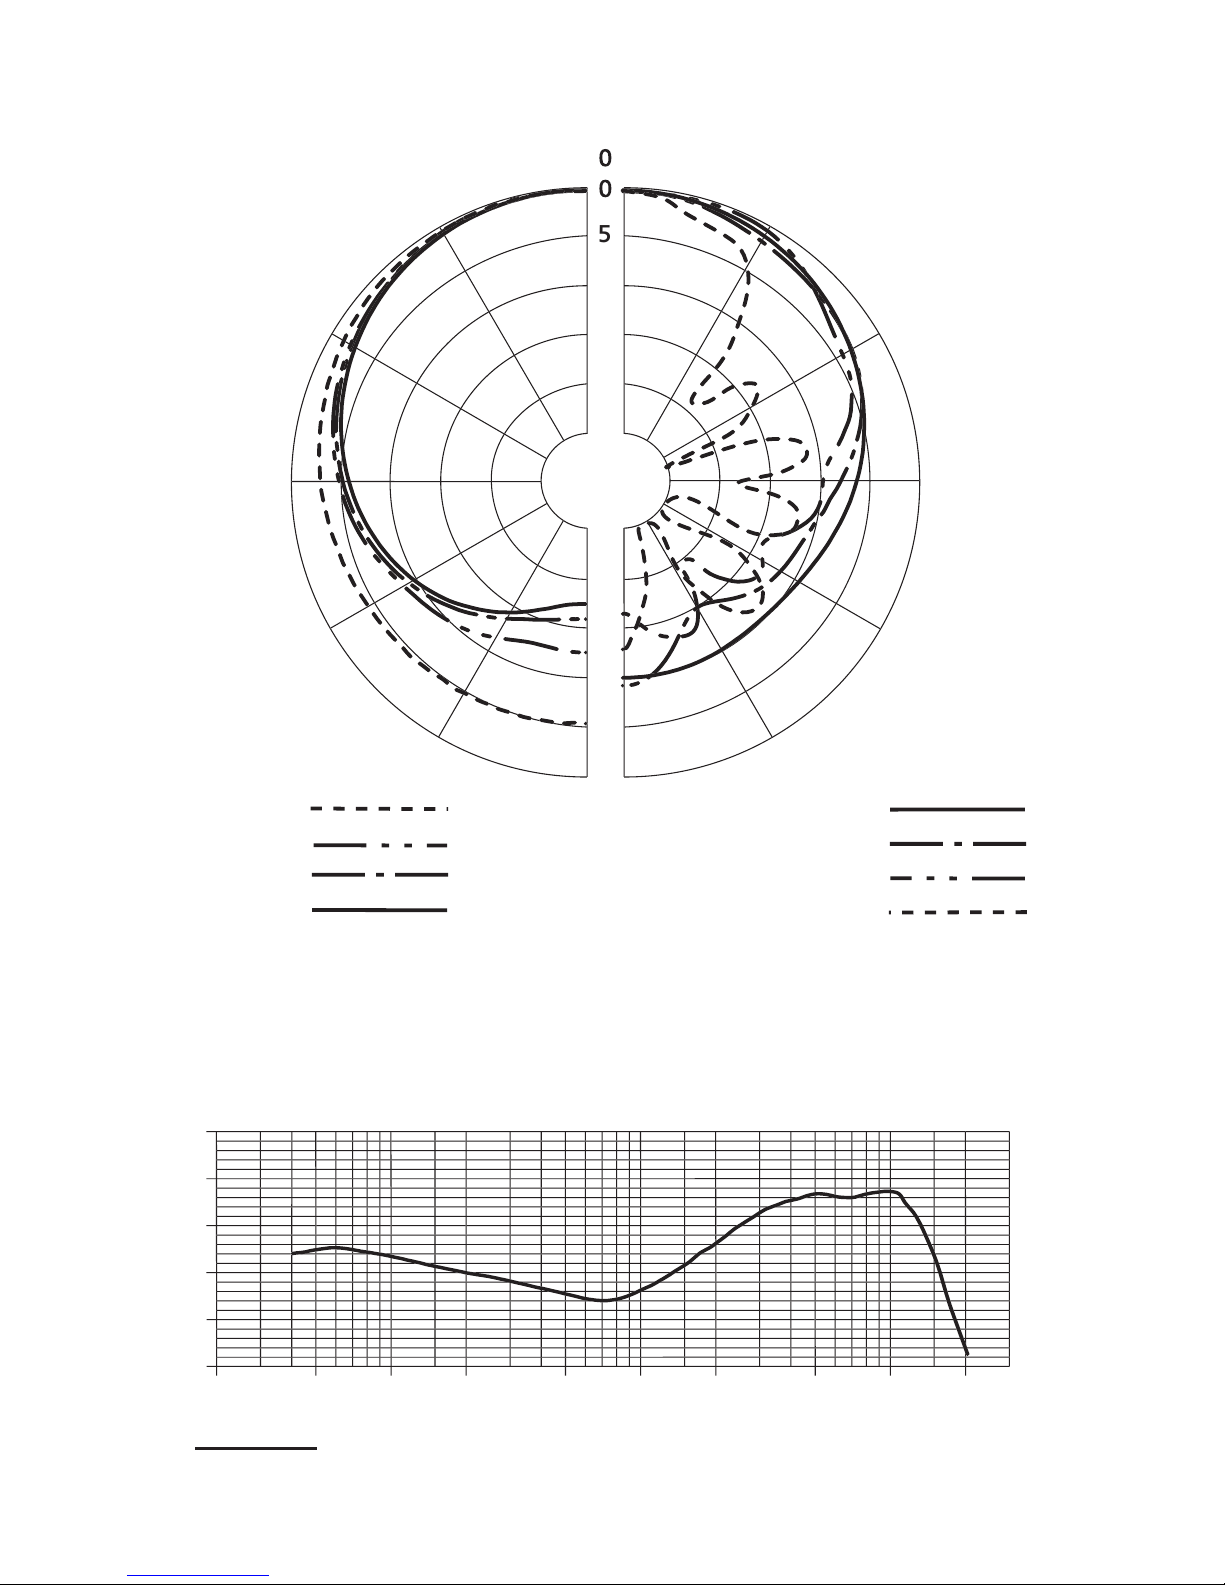
Polar diagram
0
5
5
0
50
80
50
0
000
z
000
z
z
6000
z
z
z
z
000
z
50
60
0
80
90
0
00
00
000
000
0000
0000
,
m
0
v
1
1
2
12
1
1
125 H
250 H
H
1
H
Frequency response curve
B
- 4
-
1
2
4
12
1
H
H
H
H
-
- 7
-
2
1
1
12
2
1
2
1
2
 Loading...