

Page 1
D 10 USB
D 10 USB ML
Getting
started
Advanced
settings
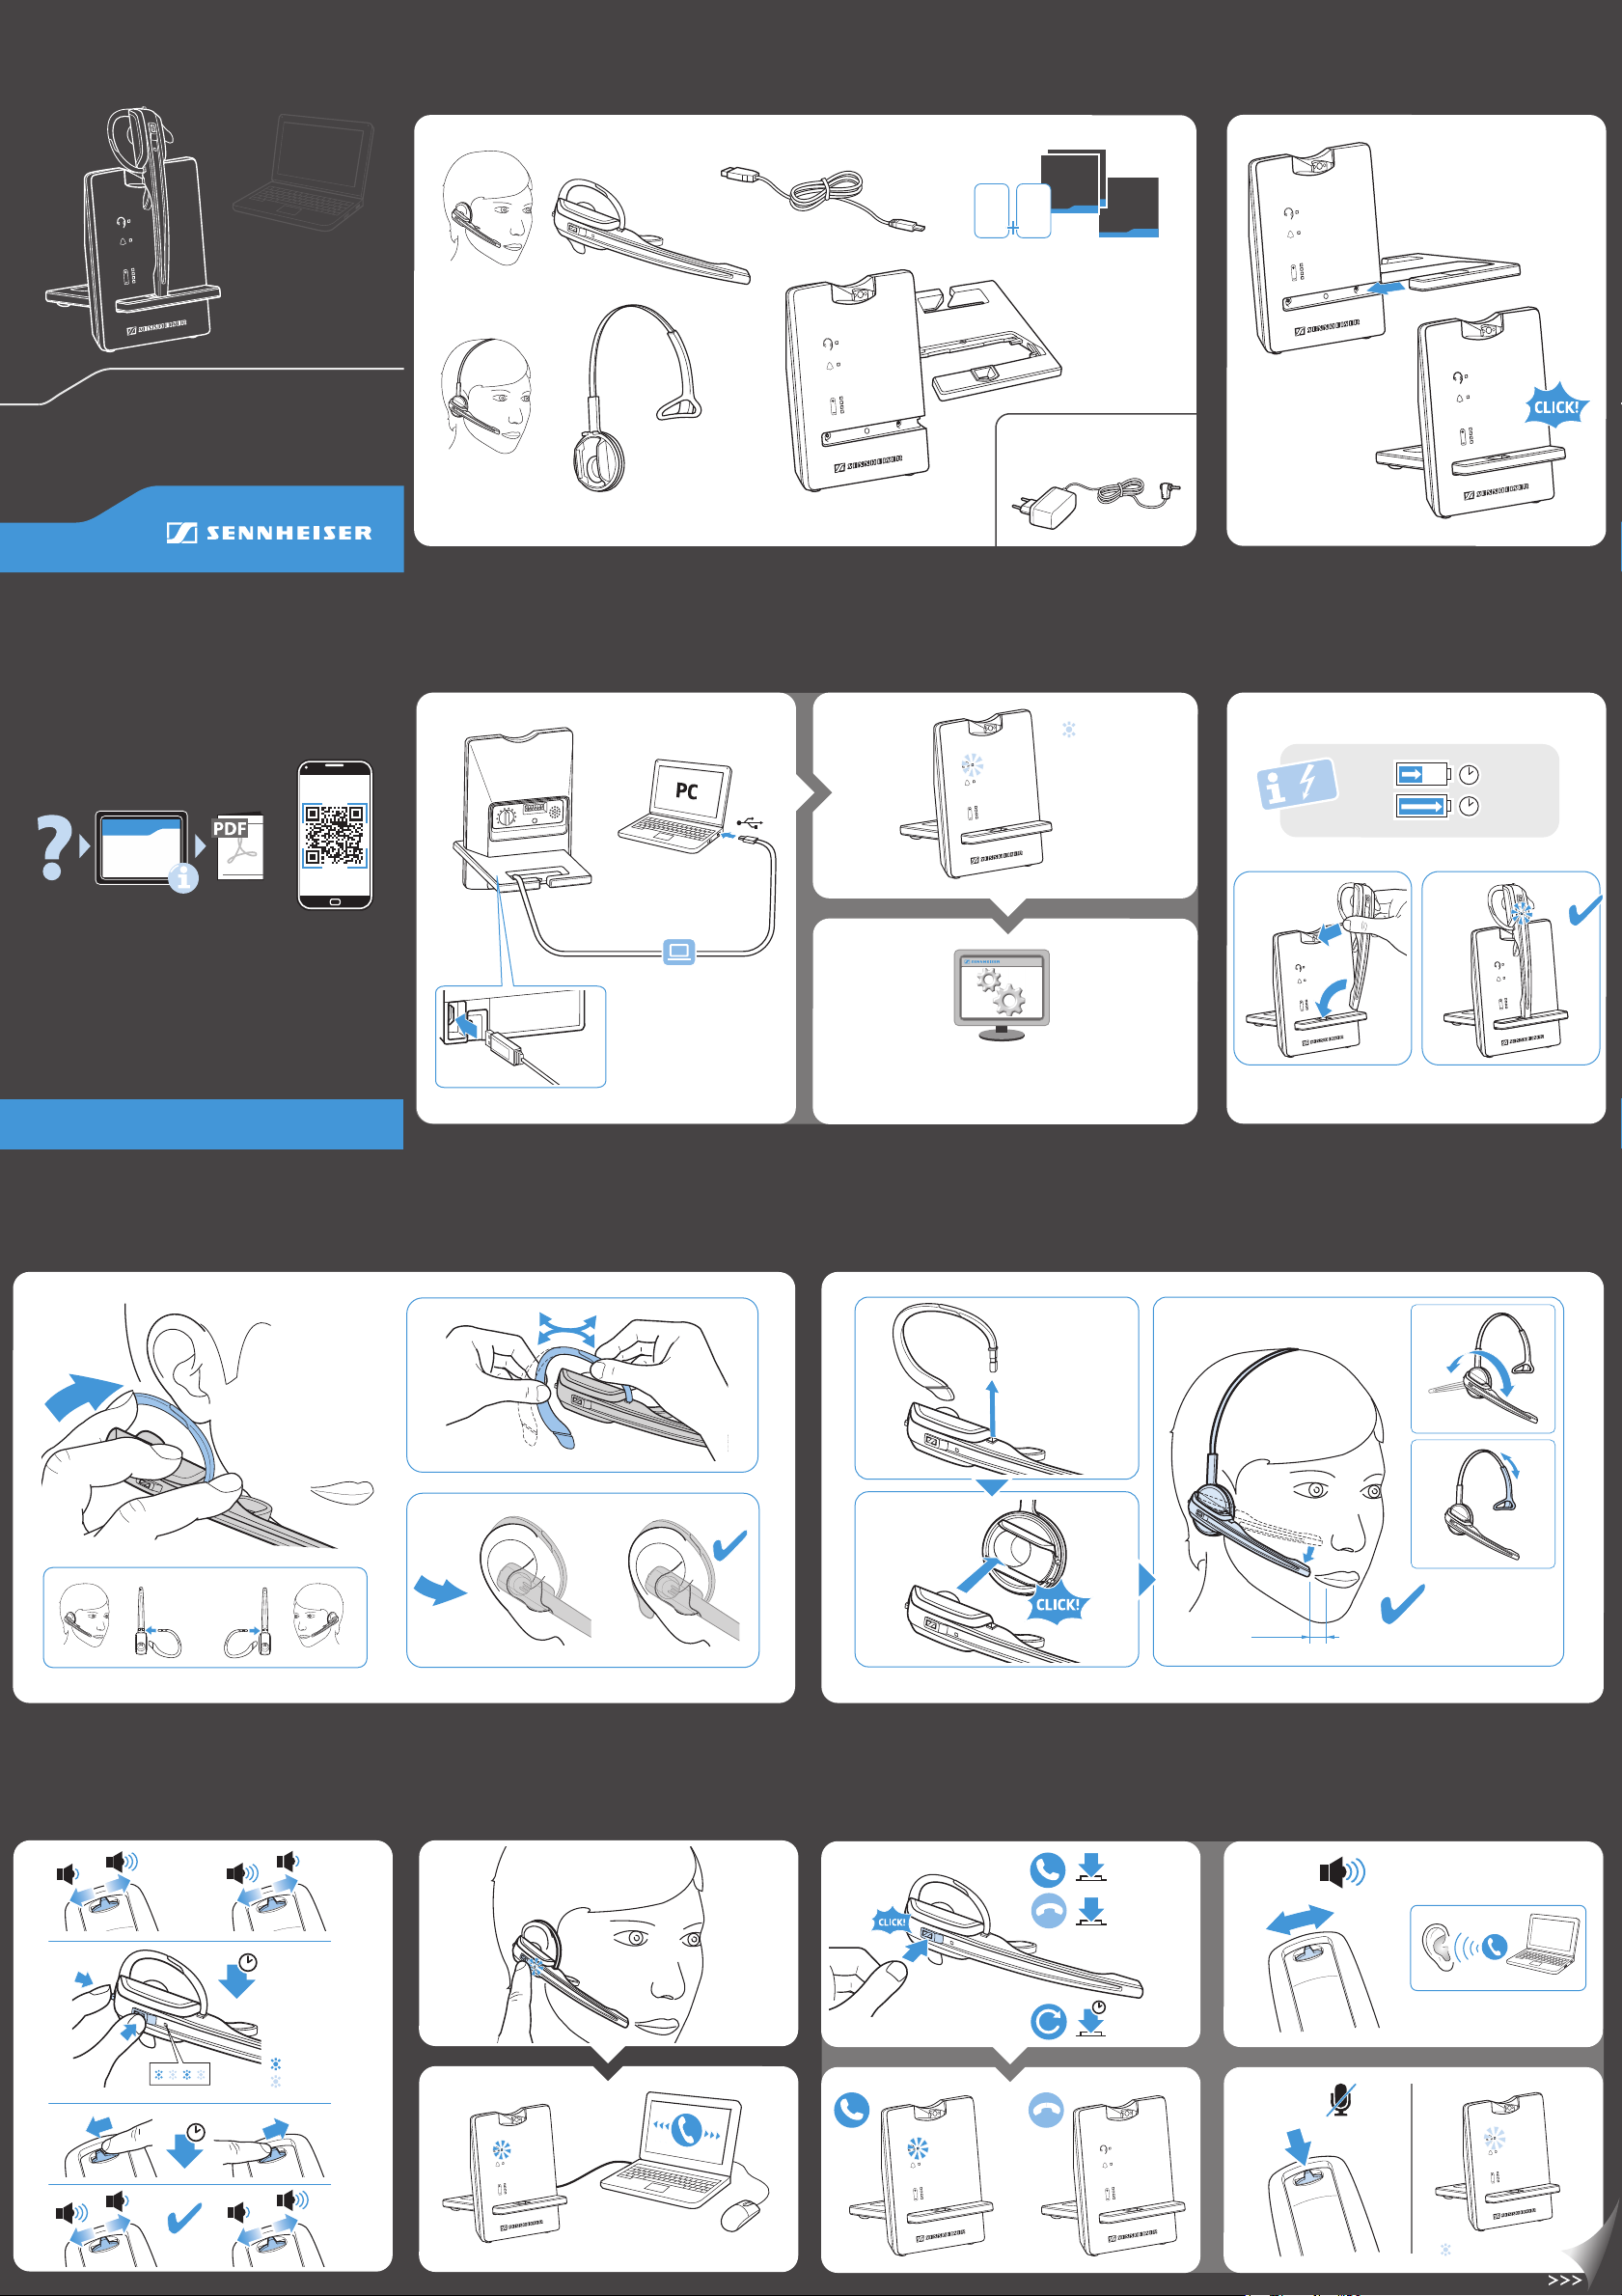
Package contents | Lieferumfang | Contenu | Volumen de suministro |
Leveringsomfang | Medföljande delar | Leveranseomfang
Setting up the base station | Basisstation aufbauen |
Installer la station de base | Montar la estación base |
Opbygning af basisstation | Ställ upp basstationen |
Bygge opp basestasjonen
Quick
Quick
Guide
Guide
NL
PL
EN
DA
IT
TR
DE
NO
PT
ZH
FR
SV
JA
ES
Safety
Guide
Quick Guide
Kurzanleitung
Guide rapide
Instrucciones
resumidas
Kort vejledning
Snabbguide
Hurtigstartveiledning
Specifications | Technische Daten | Caractéristiques
techniques | Especificaciones técnicas | Tekniske data |
Tekniska data | Tekniske data
For Instruction manual and
software go to:
www
www.sennheiser.com/cco/support
Optional:
EU/UK/US/AU
Connecting the base station to a PC | Basisstation mit PC verbinden | Raccorder la station de base à un ordinateur |
Conectar la estación base con el PC | Forbindelse af basisstationen med en pc | Anslut basstationen till datorn | Koble
basestasjonen til en PC
LED lights
up red
6
3
6
5
4
3
2
1
9
0
Settings
Ring Volume
Charging the headset | Headset laden | Charger l’oreillette
Cargar el headset | Opladning af hovedsæt | Ladda
headsetet | Lade hodesett
50%
100%
20 min
1 h
Sennheiser Communications A/S
Industriparken 27, DK-2750 Ballerup, Denmark
www.sennheiser.com
Printed in China, Publ. 07/14, A01
Wearing the headset with the earhook | Headset mit Ohrbügel verwenden | Porter l’oreillette avec le crochet d’oreille |
Utilizar el headset con gancho de auricular | Anvendelse af hovedsættet med ørebøjle | Använd headset med öronbygel
Bruk hodesett med ørebøyle
For product specific software and firmware
upgrade with the “Sennheiser Updater” go to
www.sennheiser.com/cco/software
Wearing the headset with the headband | Headset mit Kopfbügel aufsetzen | Porter l’oreillette avec l’arceau |
Colocarse el headset con gancho de auricular | Sådan bæres hovedsættet med hovedbøjle |
Sätt på headsetet med huvudbygel | Sett på hodesett med hodebøyle
Left
Right
Right
Left
Swapping the assignment of the volume buttons |
Belegung der Lautstärketasten tauschen | Permuter la
fonction des touches Volume+ et Volume– | Cambiar la
asignación de las teclas de volumen | Ændring af funktionen for lystyrkeknappen | Ändra volymknapparnas
funktion | Endre tilordning av lydstyrkeknappene
Check the
direction
5 s
LED lights up blue
LED lights up red
Making calls via the headset | Über das Headset telefonieren
Téléphoner avec l'oreillette | Telefonear mediante el
headset | Opkald via hovedsættet | Ring med headsetet |
Ringe ved hjelp av hodesettet
2-3 cm
Using the headset | Headset verwenden | Utiliser l'oreillette | Utilizar el headset | Anvendelse af hovedsættet |
Använd headsetet | Benytte hodesettet
Accepts a call
Ends a call
Redials the
1s
last number
Volume
MUTE Mic
5 s
LED lights up red
Advanced settings
Page 2
D 10 USB
A
B
D 10 USB ML
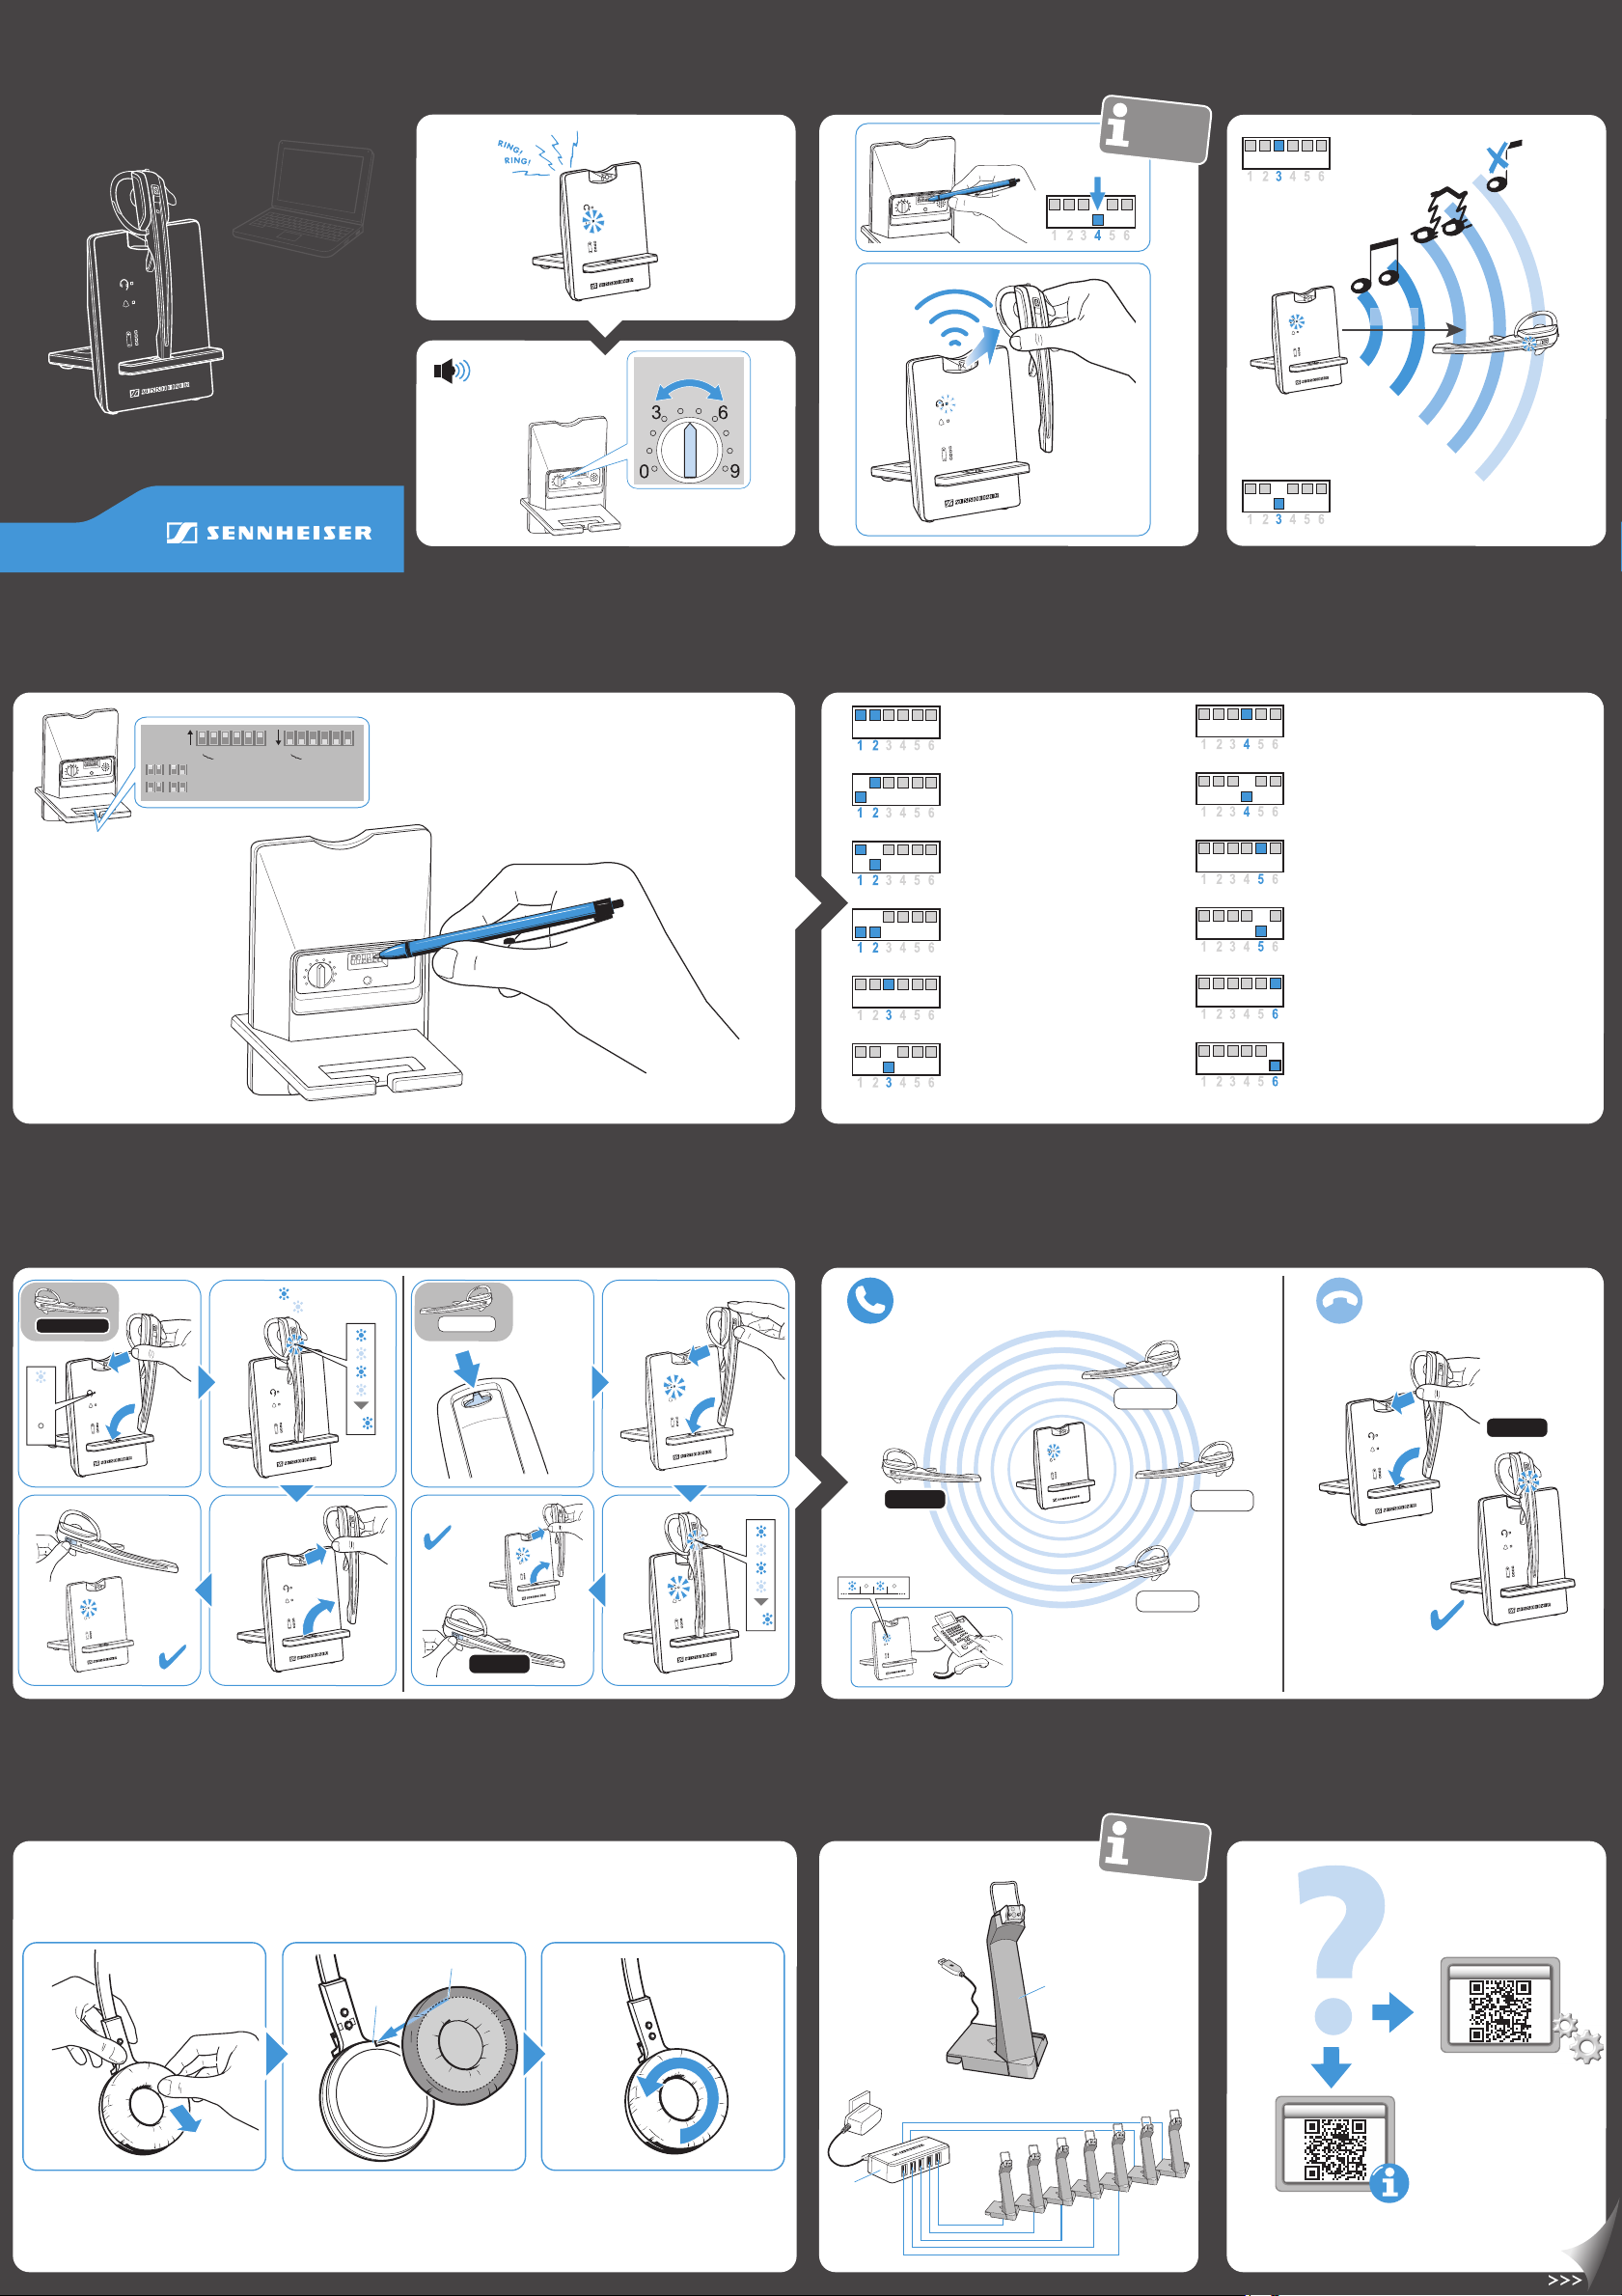
Adjusting the ringtone volume | Lautstärke des Klingel-
tons einstellen | Régler le volume de la sonnerie | Ajustar
el volumen del timbre de llamada | Indstilling af
lydstyrken for ringetonen | Ställ in ringsignalens volym |
Stille inn ringetonens lydstyrke
Automatic link establishment | Automatischer Verbindungsaufbau | Établissement automatique d'une liaison |
Establecimiento de conexión automático | Automatisk
forbindelsesopbygning | Automatisk uppkoppling |
Automatisk forbindelsesoppbygging
Auto Link
DIP switch 4
6
3
6
5
4
3
2
1
9
0
Settings
Ring Volume
Leaving the DECT range | DECT-Reichweite verlassen |
Sortir de la portée DECT | Salir del rango DECT | Sådan
forlades DECT-rækkevidden | Lämna DECT-räckvidden |
Forlate DECT-rekkevidden
Wide range: 55 m
55 m
Getting
started
Ring Volume
Advanced
settings
6
3
6
5
4
3
2
1
9
0
Settings
Ring Volume
Adjusting the headset system using the DIP switches | Headset-System mit den DIP-Schaltern anpassen | Régler le système oreillette à l'aide des commutateurs DIP |
Ajustar el sistema de headset a los interruptores DIP | Tilpasning af hovedsætsystemet med DIP-switches |
Anpassa headsetsystemet med DIP-omkopplarna | Tilpasse hodesettsystemet med DIP-brytere
Ringtone OFF
Ringtone is deactivated.
Ringtone 1
Ringtone 1 is activated.
Ringtone 2
Ringtone 2 is activated.
Ringtone 3
Ringtone 3 is activated.
Standard radio range
3
0
Ring Volume
Extra
Settings
D 10 USB
6
1
9
Ringtone
6
5
4
3
2
Settings
2
OFF
Ringtone
Long Range
1
Auto Link OFF
3
Standard
Wideband
1 2 3 4 5 61 2 3 4 5 6
Ringtone
Short Range
Limiter
Narrowband
Auto Link ON
6
3
0
6
5
4
3
2
1
9
Low range: 10 m | offices with high
density of DECT products or headsets
Manual link establishment
When taking the headset out of the base station,
you have to manually establish the wireless link
between headset & base station.
Automatic link establishment – Auto Link
When taking the headset out of the base station,
a wireless link is automatically established
between headset and base station.
Wideband audio transmission
Automatic frequency adjustment of wideband &
narrowband calls. Wideband audio transmission is
e.g. supported by Skype & gives high speech quality.
Battery life: 8 hours
Narrowband audio transmission
Battery life: 12 hours
Standard limitation
Reduced radio range
Use this setting in order to avoid
interference with other DECT systems.
Range of approx. 10 m indoors
Limited volume (country specific)
EU and US version:
in compliance with Directive 2003/10/EC
AU version: in compliance with Directive
AS/ACIF G616:2006
Holding a conference call: Connecting the master headset & the guest headsets with a base station | Telefonkonferenz durchführen: Master-Headset & Guest-Headsets mit einer Basisstation verbinden |
Tenir une conférence téléphonique : Connecter l'oreillette maître et l'oreillette invitée à la station de base | Realizar una conferencia telefónica: Conexión del headset maestro y de los headsets invitados con la estación base |
Afvikling af en telefonkonference: Etablering af forbindelse mellem master-hovedsæt & gæst-hovedsæt og basisstationen | Telefonkonferens: Anslut masterheadsetet och gästheadseten till en basstation |
Foreta telefonkonferanse: Opprette forbindelsen masterhodesettet og gjestehodesettet skal ha med basestasjonen
New MASTER
LED
red
or
off
LED lights up blue
LED lights up red
3x
GUEST 1-3
Press & hold
the mute button...
... & insert the headset
into the charging
cradle.
Ready for conference call: Master headset &
Guest headsets connected to the base station
GUEST 1
MASTER
End a conference call
GUEST 2
GUEST 3
Accept the
Guest headset.
3x
MASTER
MASTER
Replacing the ear pad | Ohrpolster austauschen | Remplacer le coussinet d'oreille |
Cambiar las almohadillas para las orejas | Udskiftning af ørepolstringer |
Byta öronkuddar | Utskiftning av øreputer
Charging several headsets simultaneously | Mehrere
Headsets gleichzeitig laden | Charger plusieurs oreillettes
simultanément | Cargar simultáneamente varios headsets
Opladning af flere hovedsæt samtidig |
Ladda flera headset samtidigt |
Lade flere hodesett samtidig
optional
CH 10
MZH 7
Detailed information / Accessories | Ausführliche
Informationen / Erhältliches Zubehör | Informations
détaillées / Accessoires | Información detallada /
Accesorios disponibles | Udførlige oplysninger/tilbehør
som kan erhverve | Mer information/tillbehör |
Detaljert informasjon / tilgjengelig tilbehør
For product specific software
and firmware upgrade
with the “Sennheiser Updater” go to
www.sennheiser.com/cco/software
For Instruction manual go to
www.sennheiser.com/cco/support
Getting Started
 Loading...