

Sennheiser 507022 User Manual

SDW 5000 Series
DECT Wireless Headset System
SDW 10 HS
SDW 30 HS
SDW 60 HS
SDW 3 BS
SDW 5 BS
BTD 800 USB
User Guide

CONTENTS1
Contents
Package contents ................................................................................................................................................................. 2
Base stations with components ............................................................................................................................................ 2
Headset with components .....................................................................................................................................................3
Product overview .................................................................................................................................................................. 4
Overview of the base station .................................................................................................................................................4
Overview of the headset ........................................................................................................................................................5
Overview of the BTD 800 USB dongle .................................................................................................................................. 7
Overview of the LEDs ............................................................................................................................................................. 7
Connecting the base station ............................................................................................................................................... 9
Connecting the base station to the mains power supply ................................................................................................. 10
Pairing and charging the headset before first use ............................................................................................................ 10
Connecting the base station to a fixed line phone – SDW 5 BS only ..............................................................................11
Connecting the base station to a computer ...................................................................................................................... 13
Connecting the base station to Bluetooth devices – BTD 800 USB only ....................................................................... 14
Reconnecting/disconnecting Bluetooth ............................................................................................................................ 16
Connecting an optional USB headset or speakerphone ...................................................................................................17
Connecting an optional busy light ......................................................................................................................................17
Assembling and wearing the headset SDW 10 HS ...........................................................................................................18
Using the headset with the headband ................................................................................................................................ 18
Using the headset with the ear hook .................................................................................................................................. 19
Using the headset with the neckband ................................................................................................................................ 21
Detaching headband, ear hook or neckband .....................................................................................................................23
Adjusting and wearing the headset SDW 30 HS | SDW 60 HS .......................................................................................24
Labeling the headset ......................................................................................................................................................... 25
Configuring the headset system ....................................................................................................................................... 26
Configuring the headset system using HeadSetup™ Pro or the DIP switches ..............................................................26
Adjusting the audio signal for desk phones using the ABC switch – SDW 5 BS only ..................................................30
Adjusting the transmission volume ....................................................................................................................................30
Setting up and using the headset ......................................................................................................................................31
Adjusting the volume ............................................................................................................................................................ 31
Muting the headset’s microphone ......................................................................................................................................32
Enabling/disabling voice prompts ......................................................................................................................................32
Verifying battery life .............................................................................................................................................................33
If you leave the DECT or Bluetooth range ..........................................................................................................................33
Making calls using the headset system ...........................................................................................................................34
Preparing calls - initial settings ...........................................................................................................................................34
Selecting audio source – fixed line phone/ computer/ mobile phone ...........................................................................34
Making a call ..........................................................................................................................................................................35
Accepting/rejecting a call ...................................................................................................................................................35
Transferring calls to connected devices ............................................................................................................................36
Ending a call...........................................................................................................................................................................37
Redialing ................................................................................................................................................................................37
Putting a single active call on hold .....................................................................................................................................37
Managing multiple calls - two calls from two audio sources ..........................................................................................38
Setting up conference call .................................................................................................................................................. 40
Using the dictation mode ................................................................................................................................................... 43
Listening to music using the headset ...............................................................................................................................44
Using the motion sensor .................................................................................................................................................... 45
Charging the headset and storing the headset system ..................................................................................................46
Charging the headset ...........................................................................................................................................................46
Switching the headset system off during extended non-use ..........................................................................................47
Sharing a workplace ...........................................................................................................................................................48
Using the headset with a third party base station (DECT-GAP telephone) ...................................................................48
Cleaning and maintaining the headset system ...............................................................................................................49
Replacing the ear pads .........................................................................................................................................................49
Replacing/removing the headset‘s rechargeable battery .............................................................................................. 50
Updating the firmware of the products ............................................................................................................................. 50
If a problem occurs ... ..........................................................................................................................................................51
Specifications .....................................................................................................................................................................54
SDW 5000 series headset system
PACKAGE CONTENTS2
i
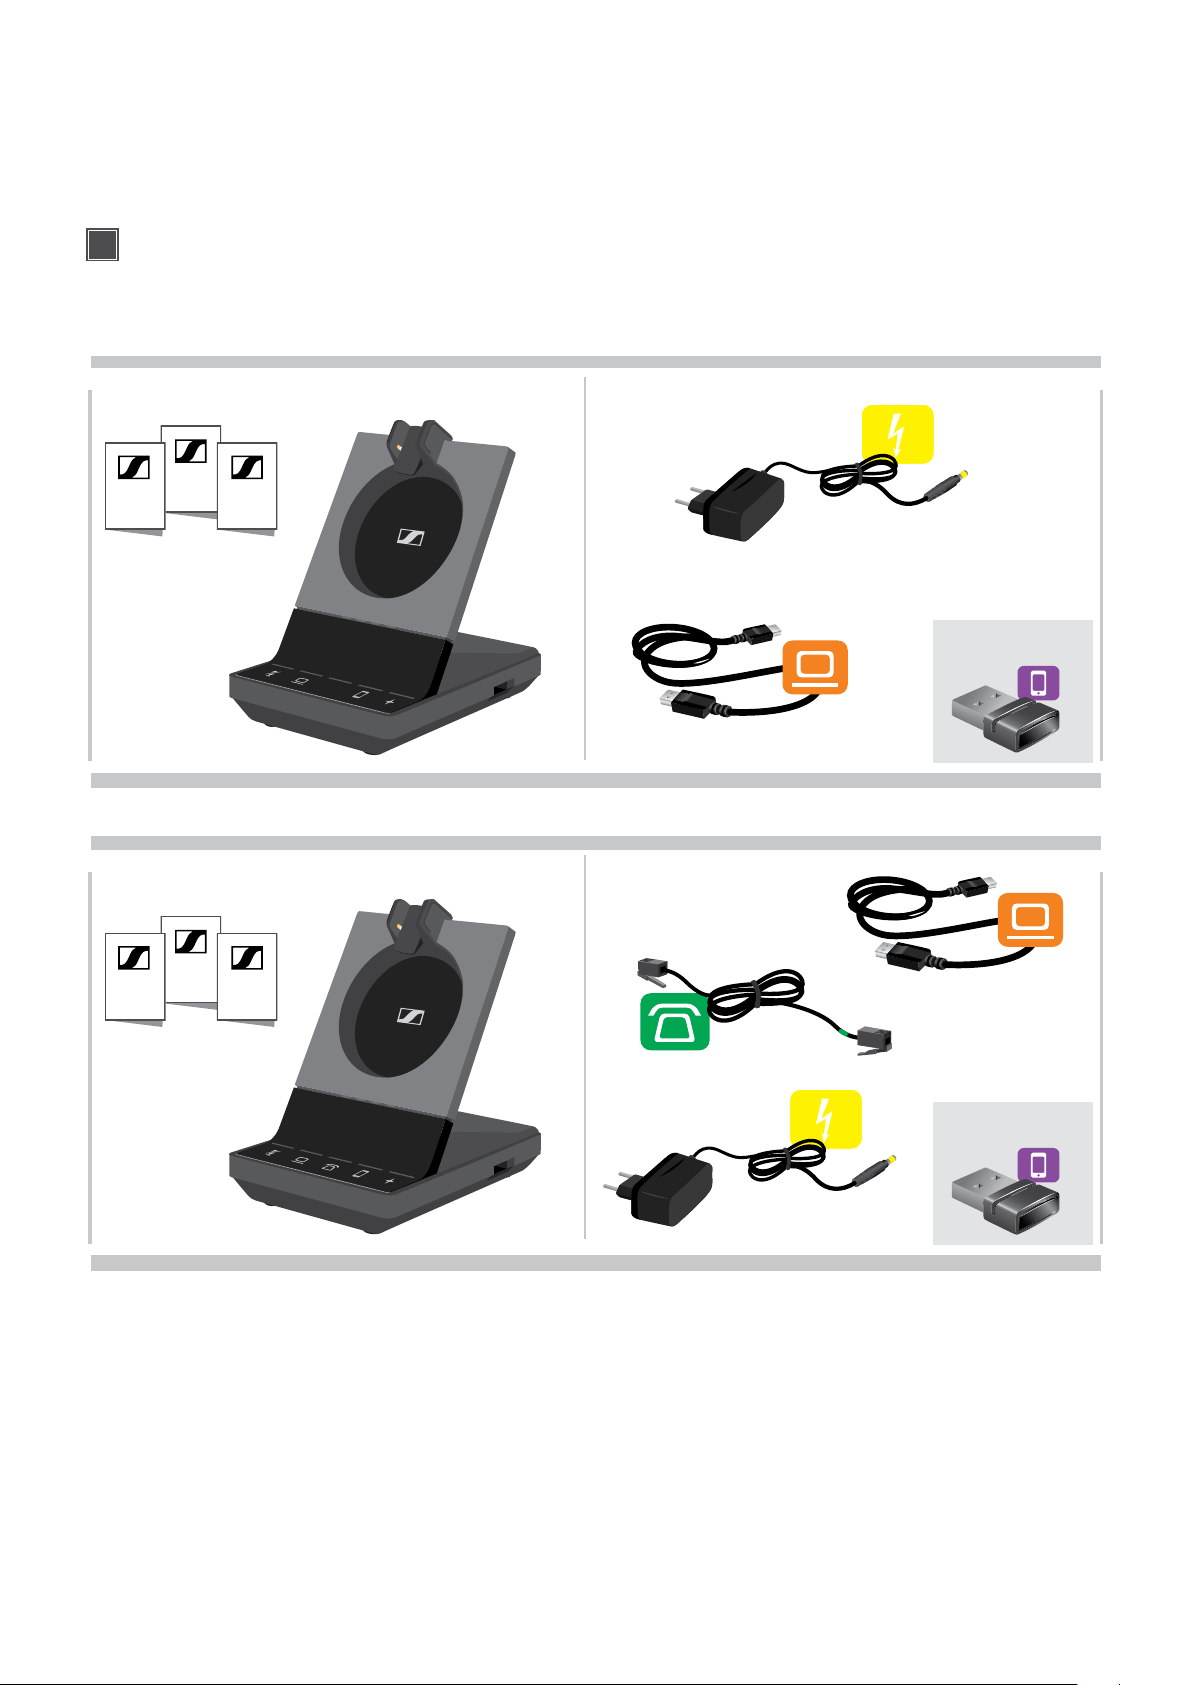
Package contents
In the SDW 5000 Series, all headsets and base stations are compatible with each other, allowing you to combine the
products to meet your needs.
For safety instructions, consult the Safety Guide.
A list of accessories can be found on the product page at www.sennheiser.com/headsets. For information
on suppliers, contact your local Sennheiser partner: www.sennheiser.com/headsets > “Find a dealer”.
Base stations with components
SDW 3 BS SDW 5013 & SDW 5014 bundle
Safety
Compliance
Guide
Quick
Guide
sheet
EU/UK/US/AUS
SDW 5 BS SDW 5015 & SDW 5016 bundle
Safety
Compliance
Guide
Quick
Guide
sheet
SDW 5014 bundle
+ BTD 800 USB
SDW 5016 bundle
+ BTD 800 USB
EU/UK/US/AUS
SDW 5000 series headset system
PACKAGE CONTENTS3
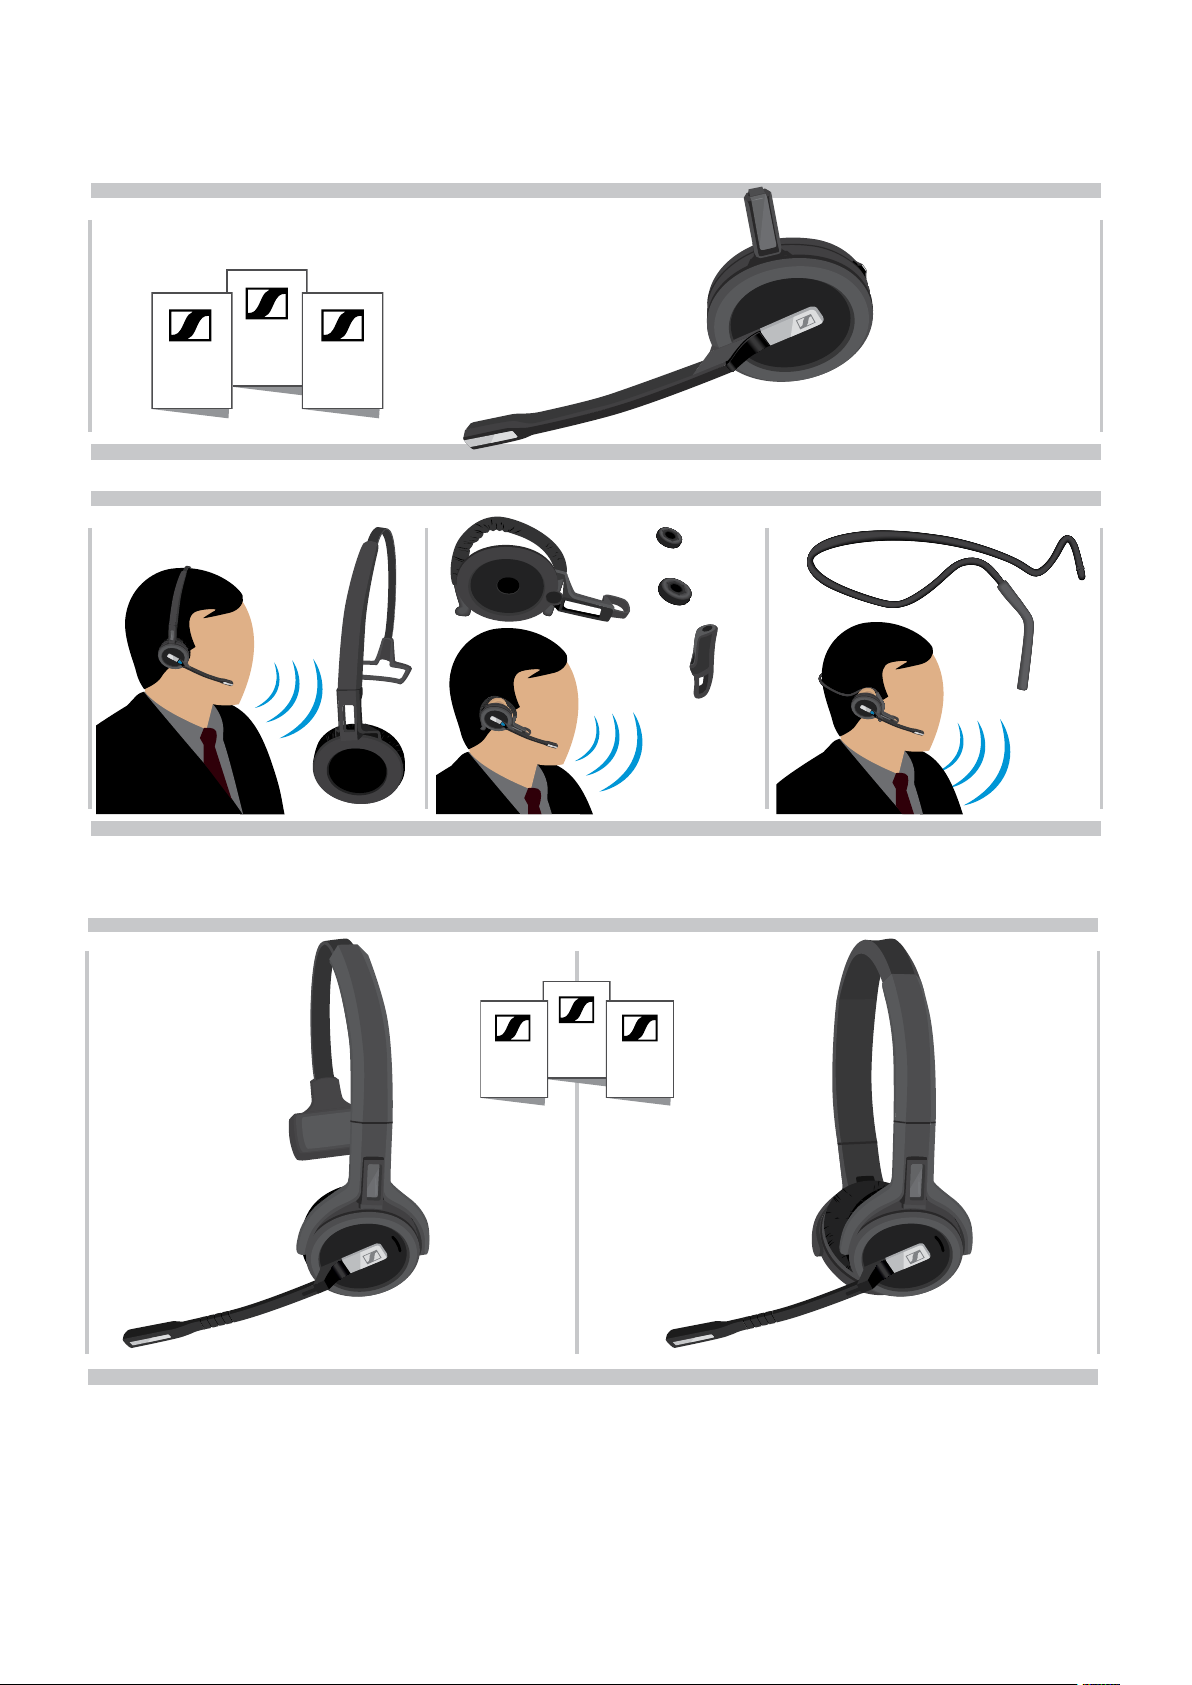
Headset with components
Headset SDW 10 HS
Quick
Guide
Safety
Guide
Compliance
sheet
Headband Ear hook and adapter Neckband
S
pre-mounted
M
*
L
*The wearing style adapter is also needed for assembling the neckband (see page 21).
Headset SDW 30 HS | SDW 60 HS
SDW 30 HS SDW 60 HS
Safety
Compliance
Quick
Guide
Guide
sheet
SDW 5000 series headset system
PRODUCT OVERVIEW4
Product overview
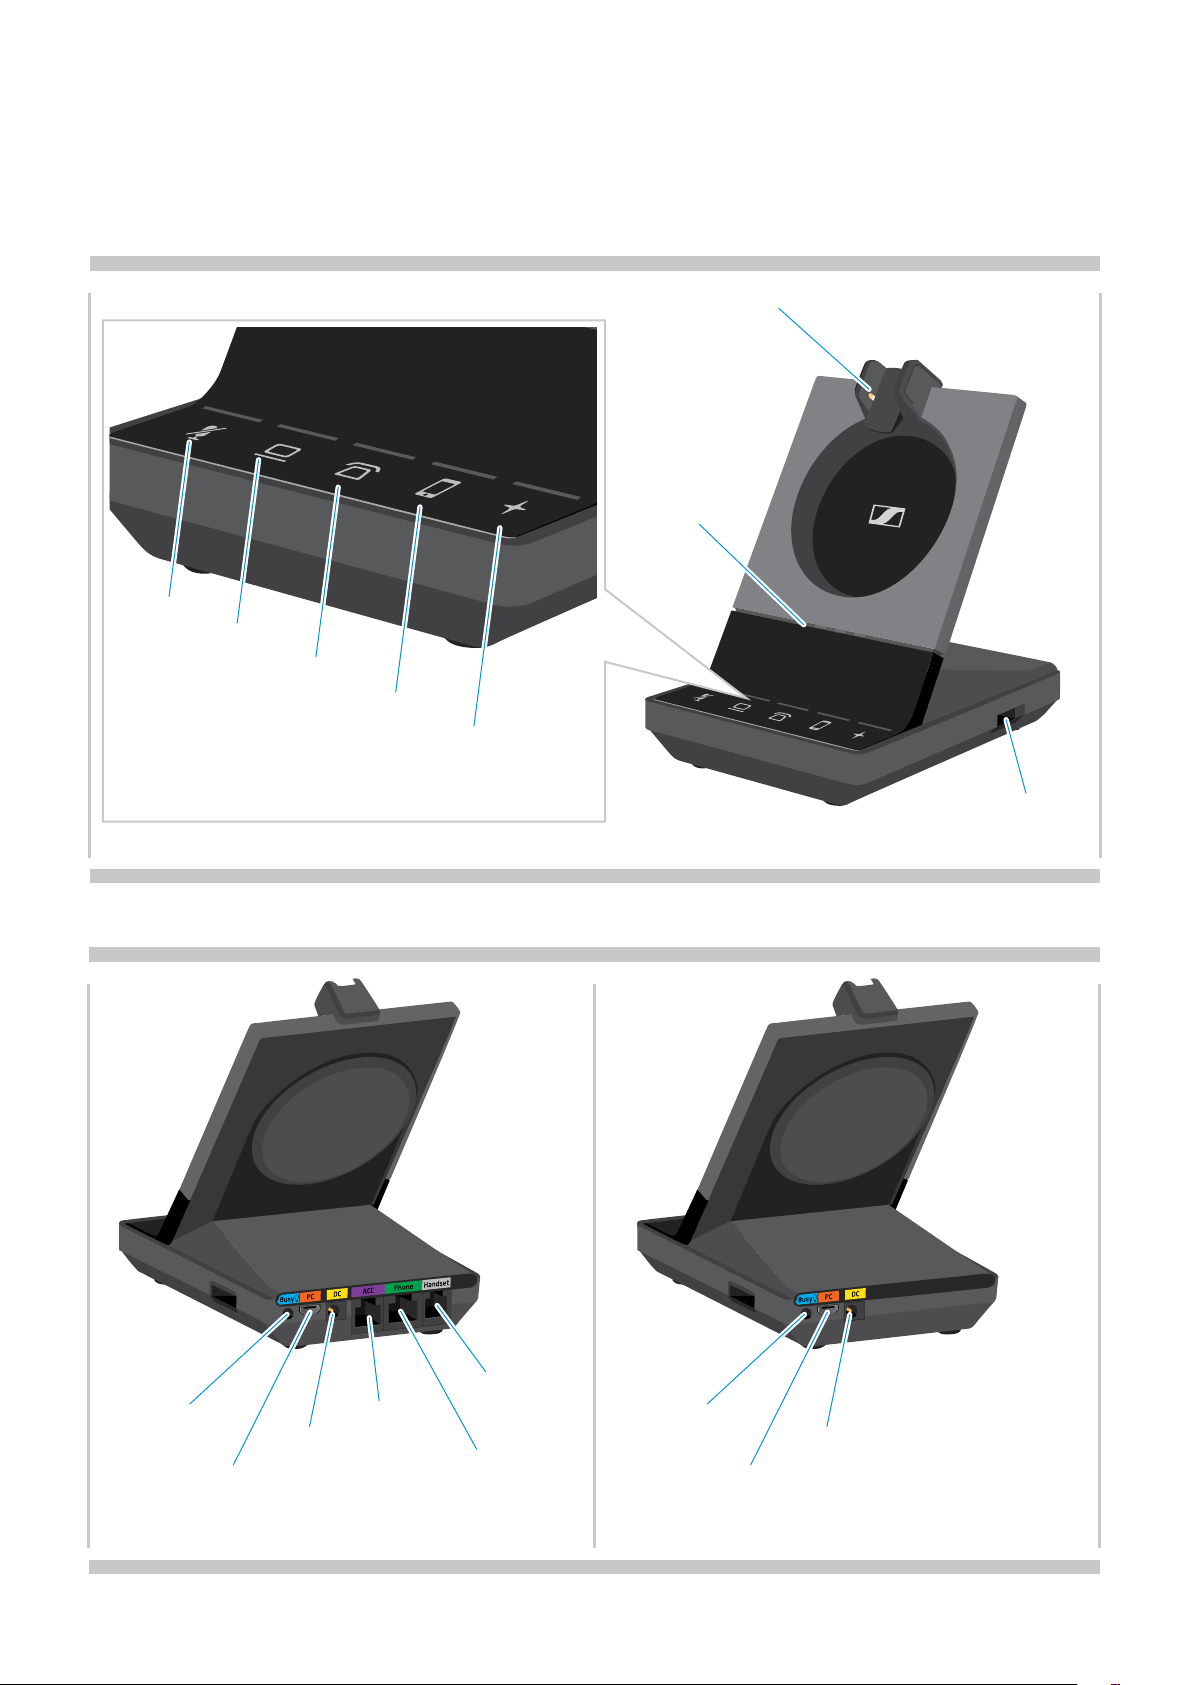
Overview of the base station
Overview of the front
Touch panel with LED
Microphone
mute
Computer
Phone
(SDW 5 BS only)
Mobile phone
Headset charging dock with magnetic holder
Headset
battery
status LED
Multi-function
Overview of the rear sockets
SDW 5 BS SDW 3 BS
USB port
BUSY
Busy Light
PC
Computer
(USB)
SDW 5000 series headset system
DC
Power
supply
ACC
Handset
Lifter
Handset
Phone
Desk phone
BUSY
Busy Light
Computer
(USB)
PC
DC
Power
supply
PRODUCT OVERVIEW5
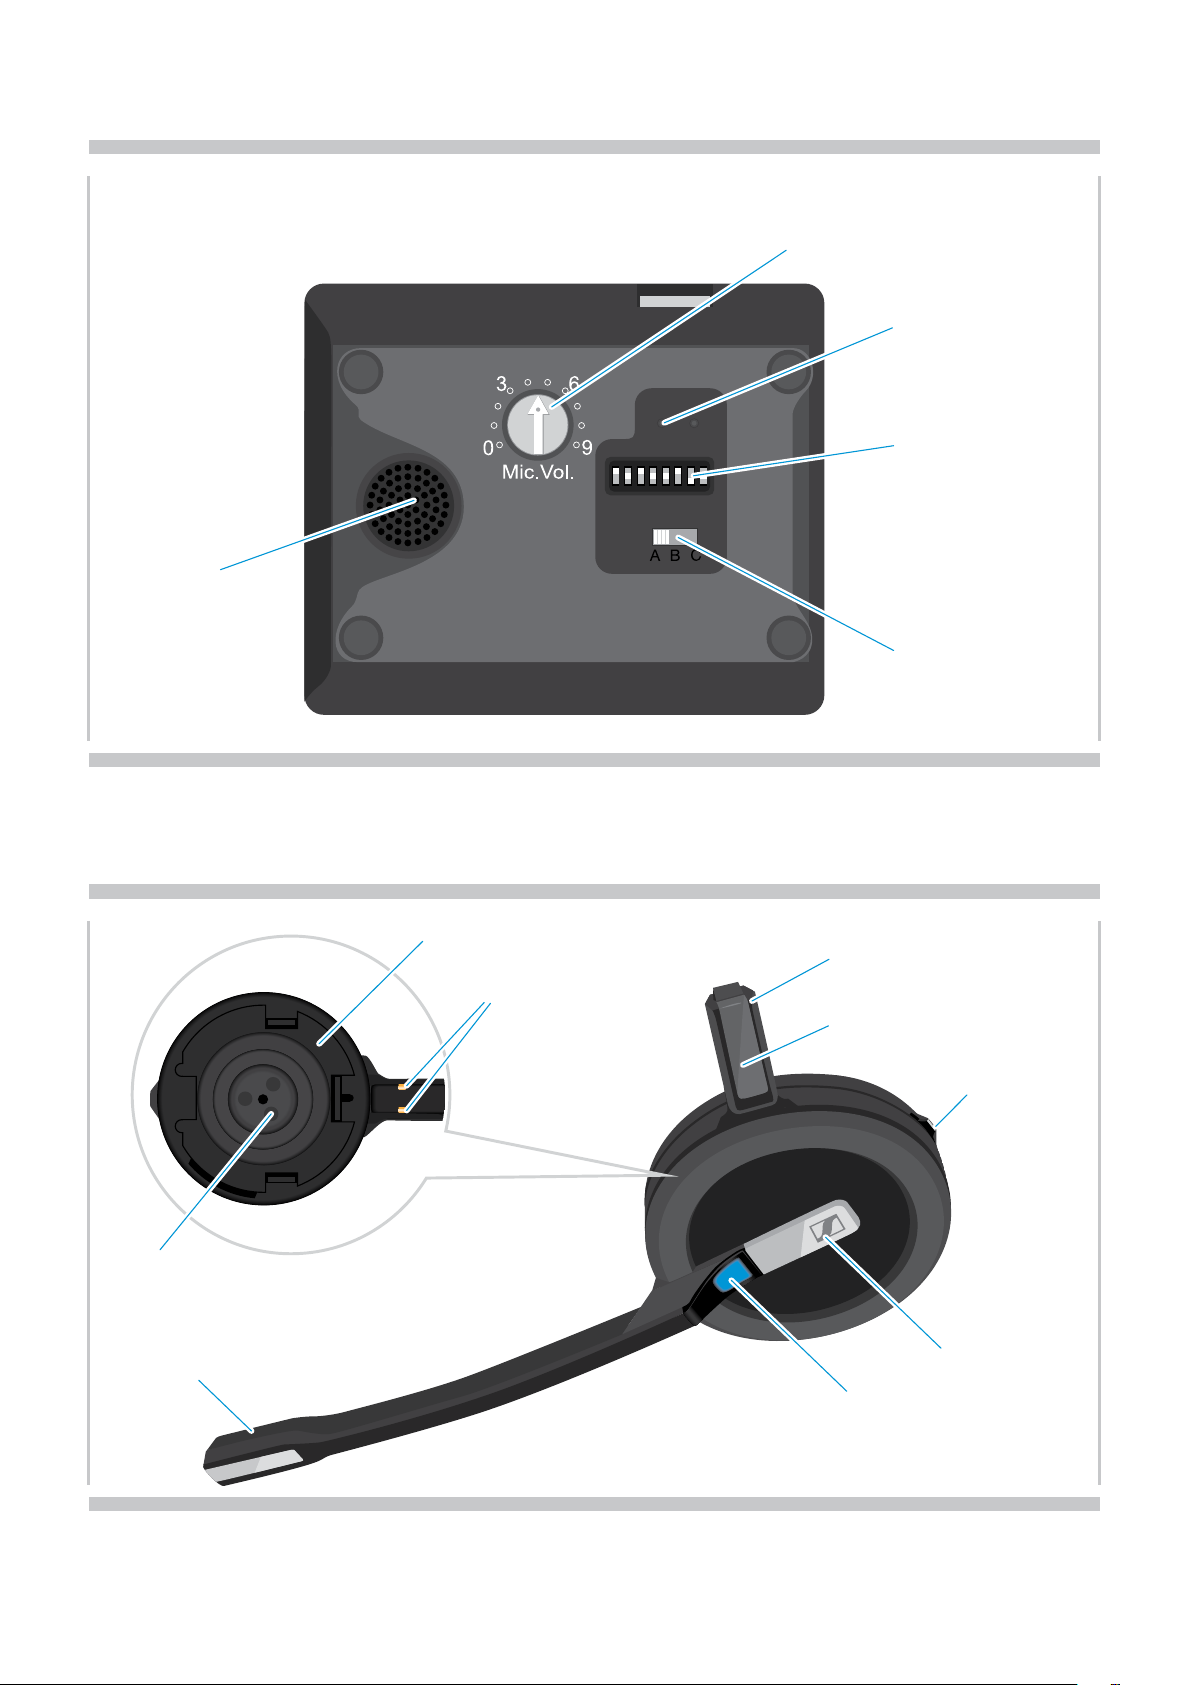
Overview of the bottom
Speaker
S1 S2
1 2 3 4 5 6 7 8
Microphone
volume control
(SDW 5 BS only)
Reset button
DIP switches
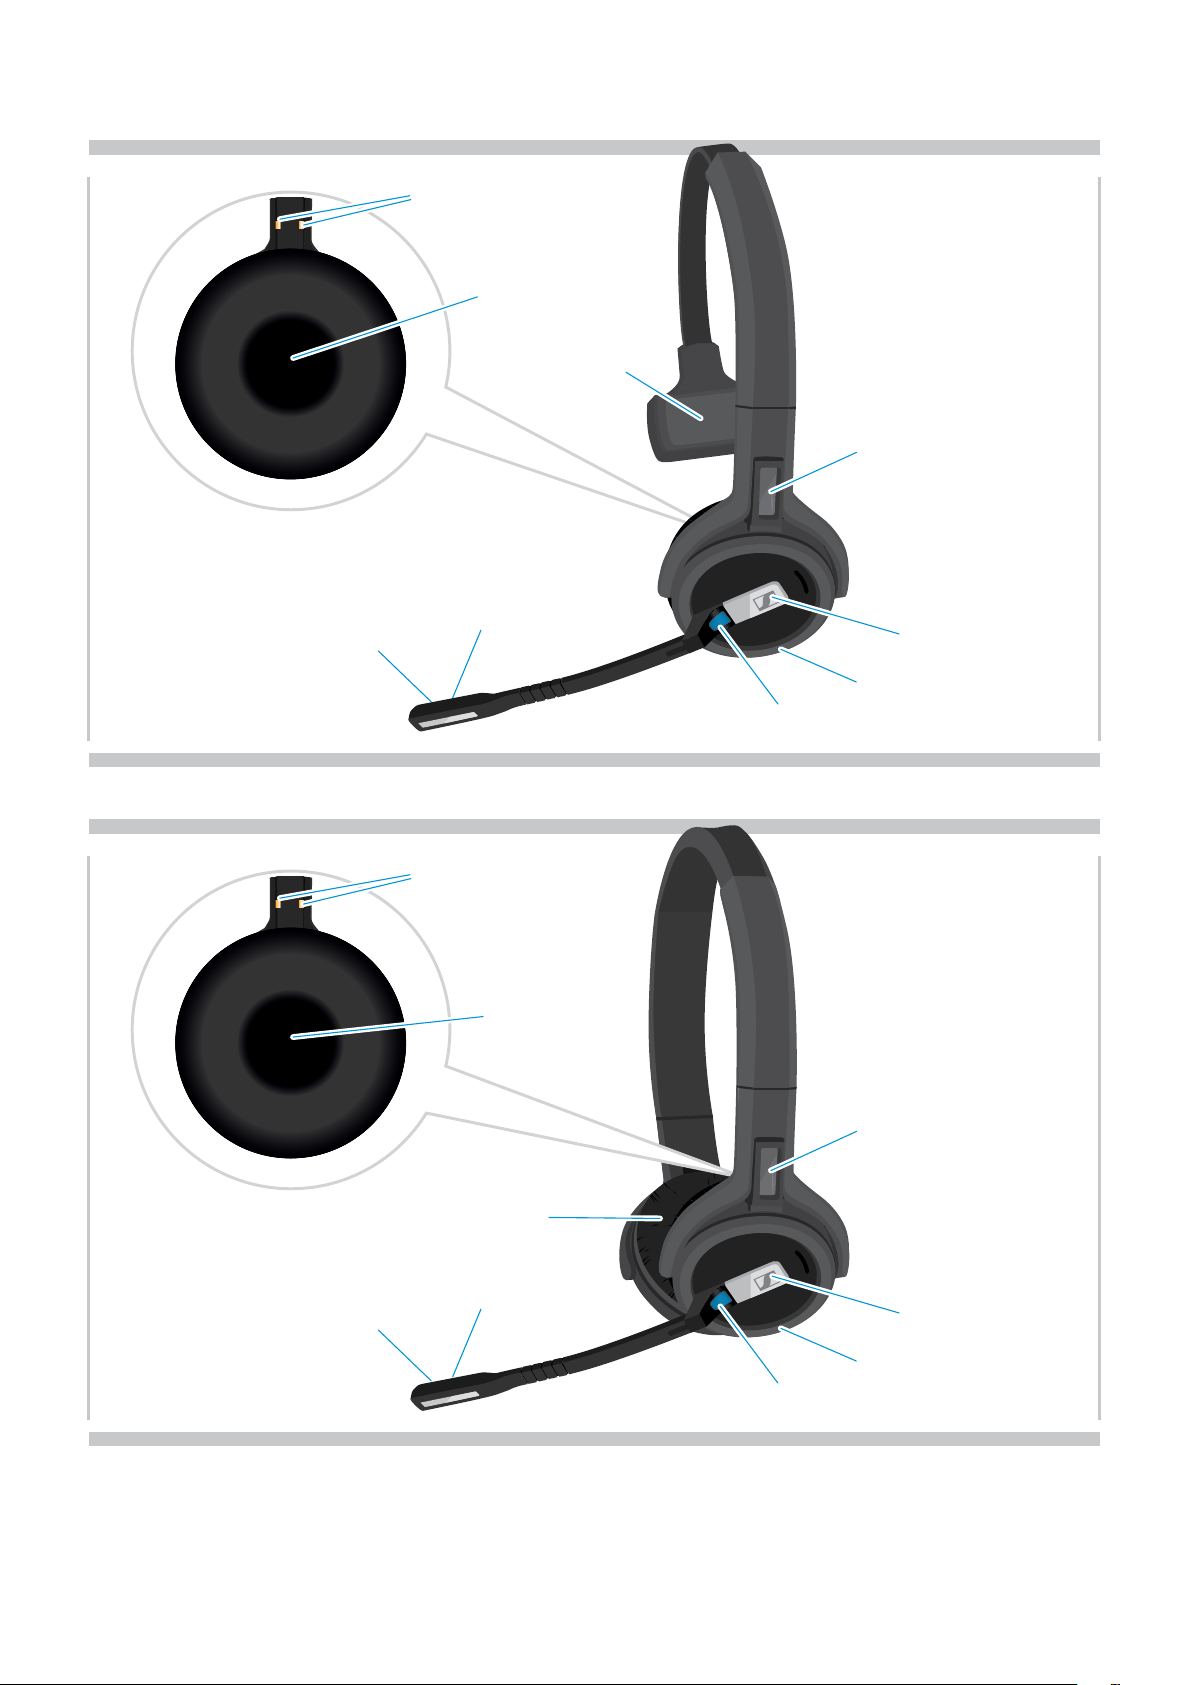
Overview of the headset
Overview of the headset SDW 10 HS
Battery compartment
Charging contacts
ABC switch
(SDW 5 BS only)
Charging pin*
Name plate
Mute & Volume
button
Speaker
Microphone
*Inserted into the holder of the headband or wearing style adapter
SDW 5000 series headset system
Hook
button
Headset
LED
PRODUCT OVERVIEW6
Overview of the headset SDW 30 HS
Charging contacts
Speaker
Battery compartment
Name plate
Microphone
Overview of the headset SDW 60 HS
Mute button
Charging contacts
Speaker
Headset LED
Hook button
Mute & Volume
button
Name plate
Microphone
SDW 5000 series headset system
Battery compartment
Mute button
Hook button
Mute & Volume
button
Headset LED
PRODUCT OVERVIEW7
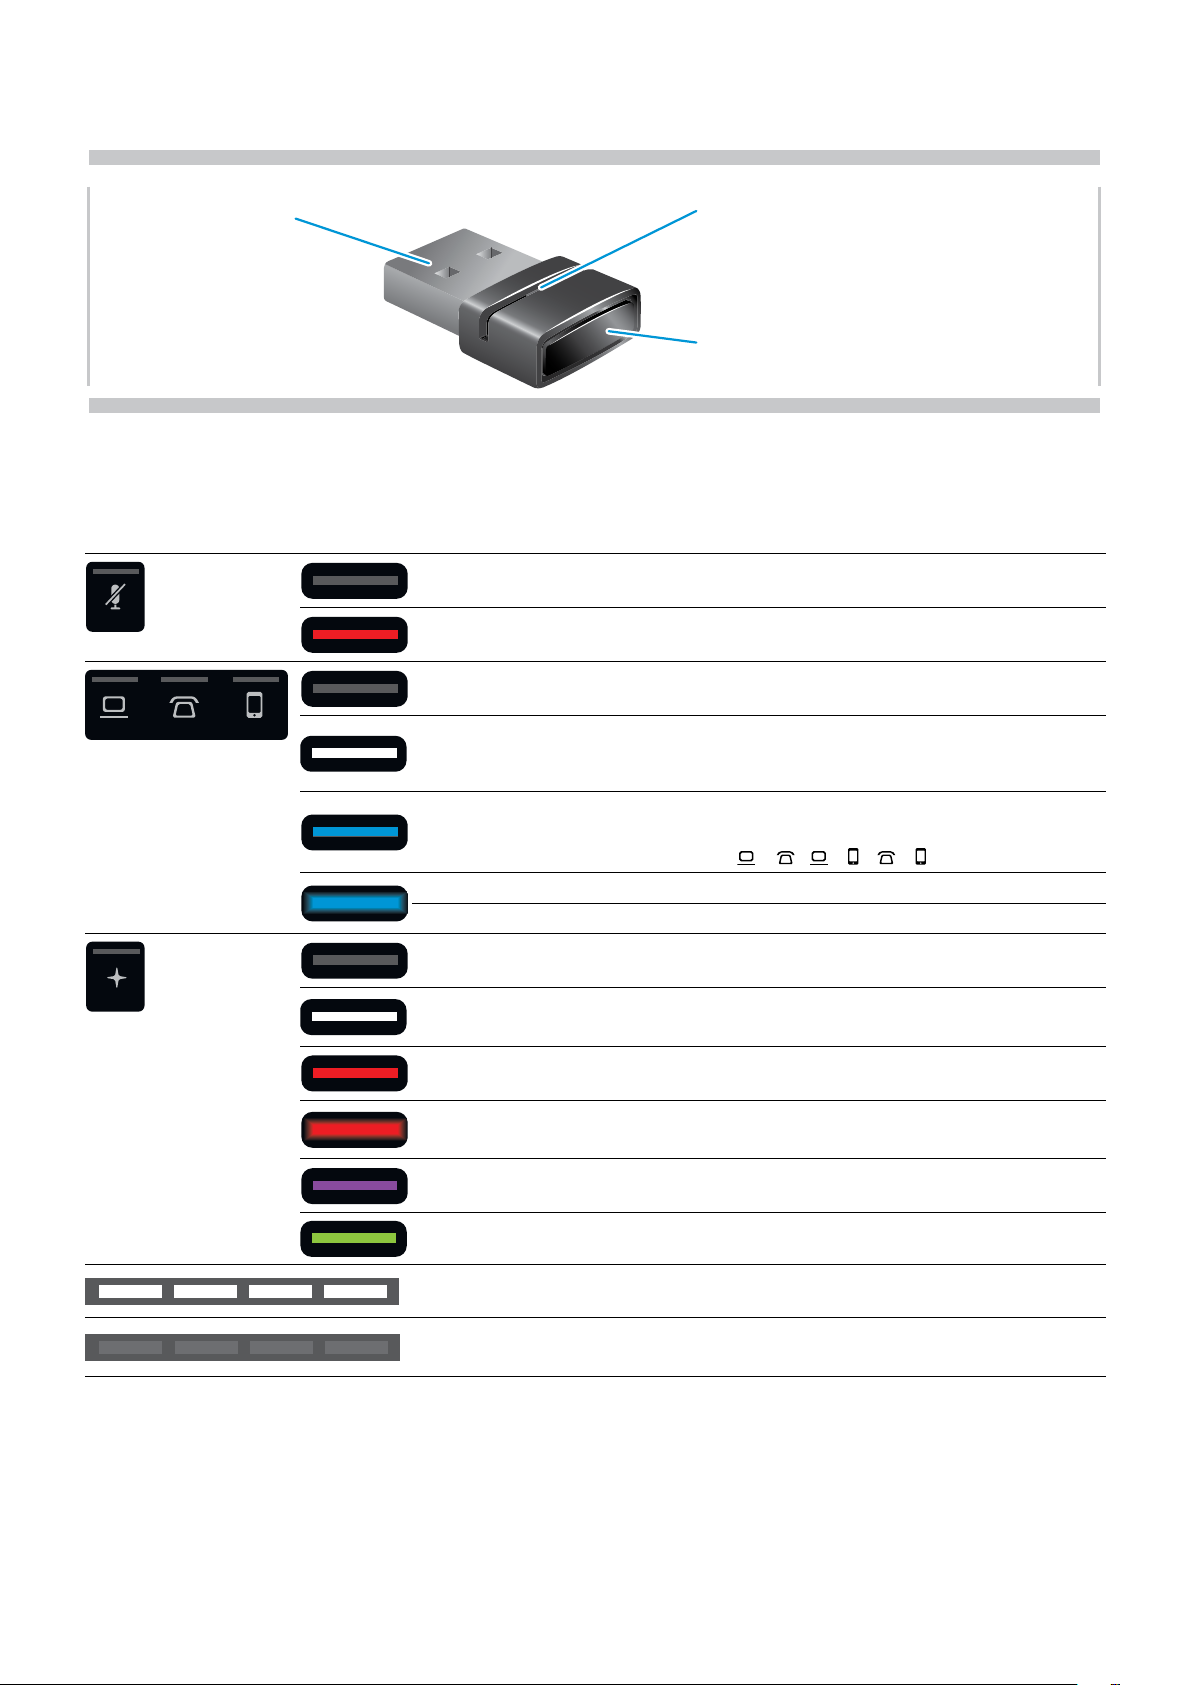
Overview of the BTD 800 USB dongle
Overview of the LEDs
Overview of the base station LEDs
Base station LED Meaning
off Headset microphone is active
Link LEDUSB plug
Link button
constant Headset microphone is muted
off Corresponding device is not in focus*
Corresponding device is in focus*
constant
constant
flashes fast Incoming call
flashes slow Call on hold
off No external USB or Bluetooth headset connected/ no music
constant
constant No headset connected
flashes
constant*
*Focus device: the device that initiates an outgoing call when
the headset’s hook button is tapped.
• outgoing call / active call
• Merged calls from two audio sources:
two LEDs light up
• USB headset connected or
• Bluetooth headset connected via dongle
• Incoming call - no headset connected
• Connected USB headset is not supported
Music streaming
* The LED is off per default and can be enabled via HeadSetup™ Pro.
+ / + / + :
SDW 5000 series headset system
constant Dictation mode on
segments
1 – 4 are lit
off
Charging status of the headset battery (see page 46)
• Headset battery flat
• no SDW 5000 headset connected
PRODUCT OVERVIEW8
2s2s
3x
3x
3x
3x
2s2s
3x
3x
2s2s
0.2s 0.2s
3x
3x
0.5s 0.5s 0.5s 0.5s
mode 1:
3x
3x
3x
3x
2s2s
0.2s 0.2s
3x
3x
2s2s
3x
3x
2s2s
0.2s 0.2s
3x
3x
2s2s
0.2s 0.2s
3x
3x
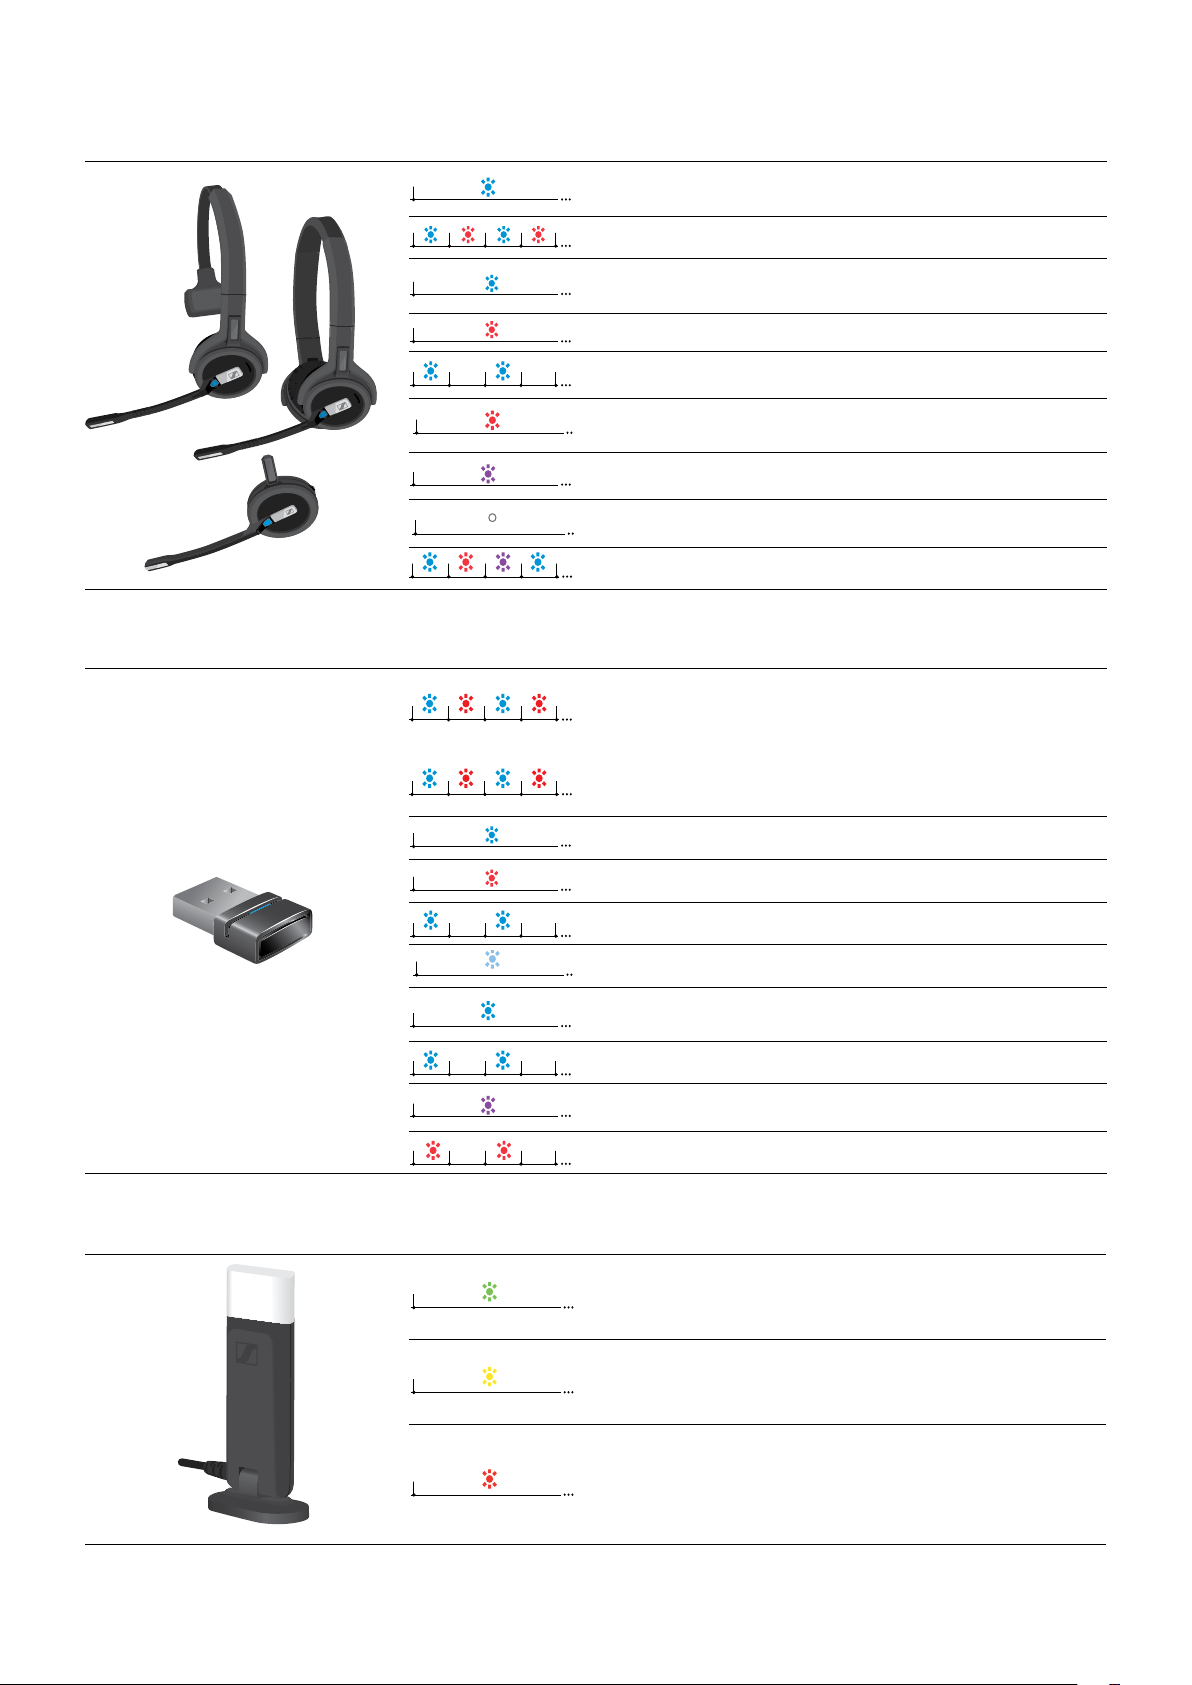
Overview of the headset LED
Headset LED Meaning
• Headset is being charged in the base station
• Headset fully charged in CH 30 charger
Headset is being paired to base station
• Headset switches on
• Headset successfully connected to the base station
3x
Headset switches off
0.2s 0.2s
Incoming call
• Outgoing/active call
• Softphone status: BUSY
Music streaming
* The LED is off per default and can be enabled via HeadSetup™ Pro.
Headset is fully charged in the base station
Firmware upgrade
Overview of the dongle BTD 800 USB LED
Dongle LED Meaning
Dongle in pairing mode:
1s1s 1s1s
mode 2:
searching for Bluetooth devices to pair and connect
• Search mode 1: Mobile phone
• Search mode 2: Bluetooth headset
Pairing successful
3x
2s2s
Pairing failed
Dongle tries to connect to a Bluetooth device
Overview of the busy light LED UI 10 BL
Busy light LED Meaning
*UC Client = Unified communications client such as Microsoft® Skype for Business
SDW 5000 series headset system
0.2s 0.2s
3s 3s
Dongle and Bluetooth device connected
• Outgoing/active call
• Music streaming in standard quality
Incoming call
Music streaming in high quality
Microphone of the connected Bluetooth device is muted
• Presence status softphone: AVAILABLE
• No active call
• Music streaming
• Presence status softphone: AWAY/ be right back
• Headset out of range
• No headset connected
• Presence status softphone:
BUSY/ Presenting/ Do not disturb
• Active call on softphone, desk phone or mobile phone
• UC* client in meeting
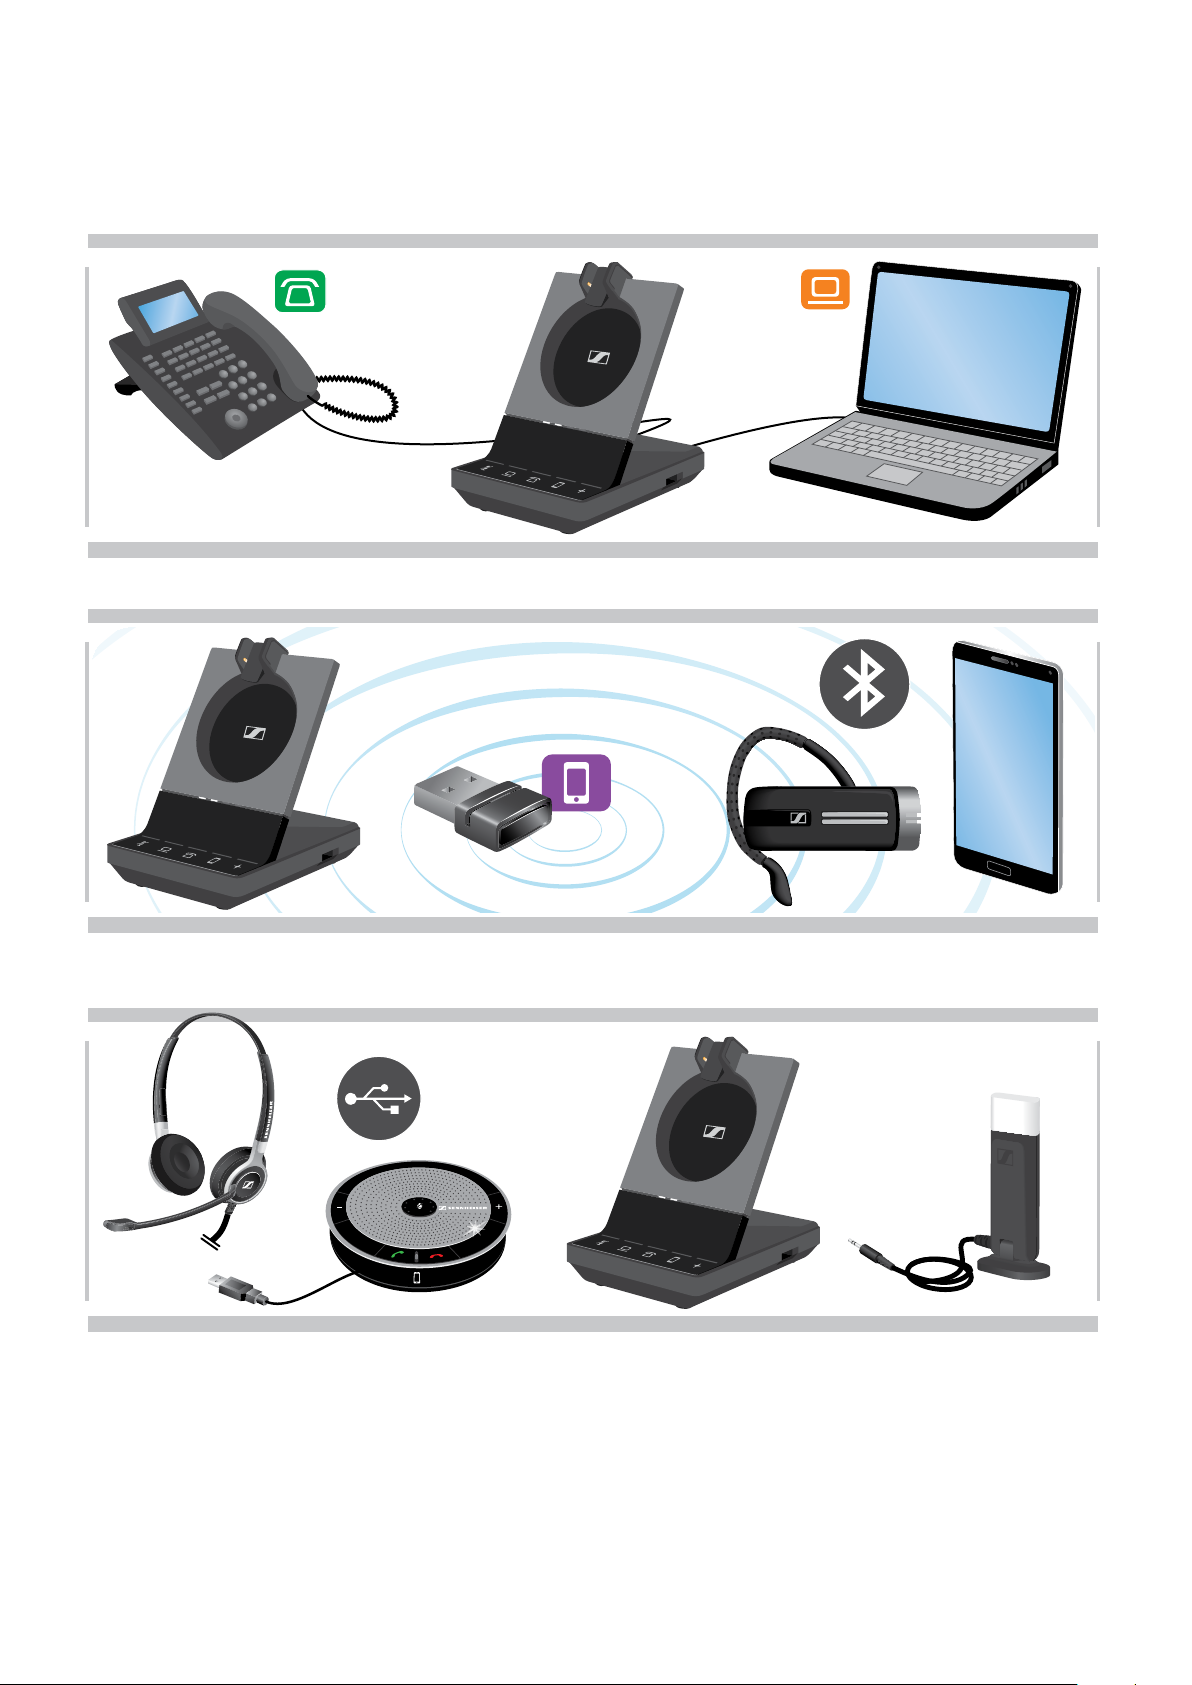
CONNECTING THE BASE STATION9
Connecting the base station
The base station controls the wireless communication to the headset.
Depending on the variant you can plug in the headset system to your fixed line phone and/or your computer.
Via the Bluetooth dongle BTD 800 USB you can connect mobile phones or Bluetooth headsets.
+
Additionally you can plug a USB headset or speakerphone in the USB port or the busy light UI 10 BL in the back of the
base station.
SDW 5000 series headset system
CONNECTING THE BASE STATION10
i
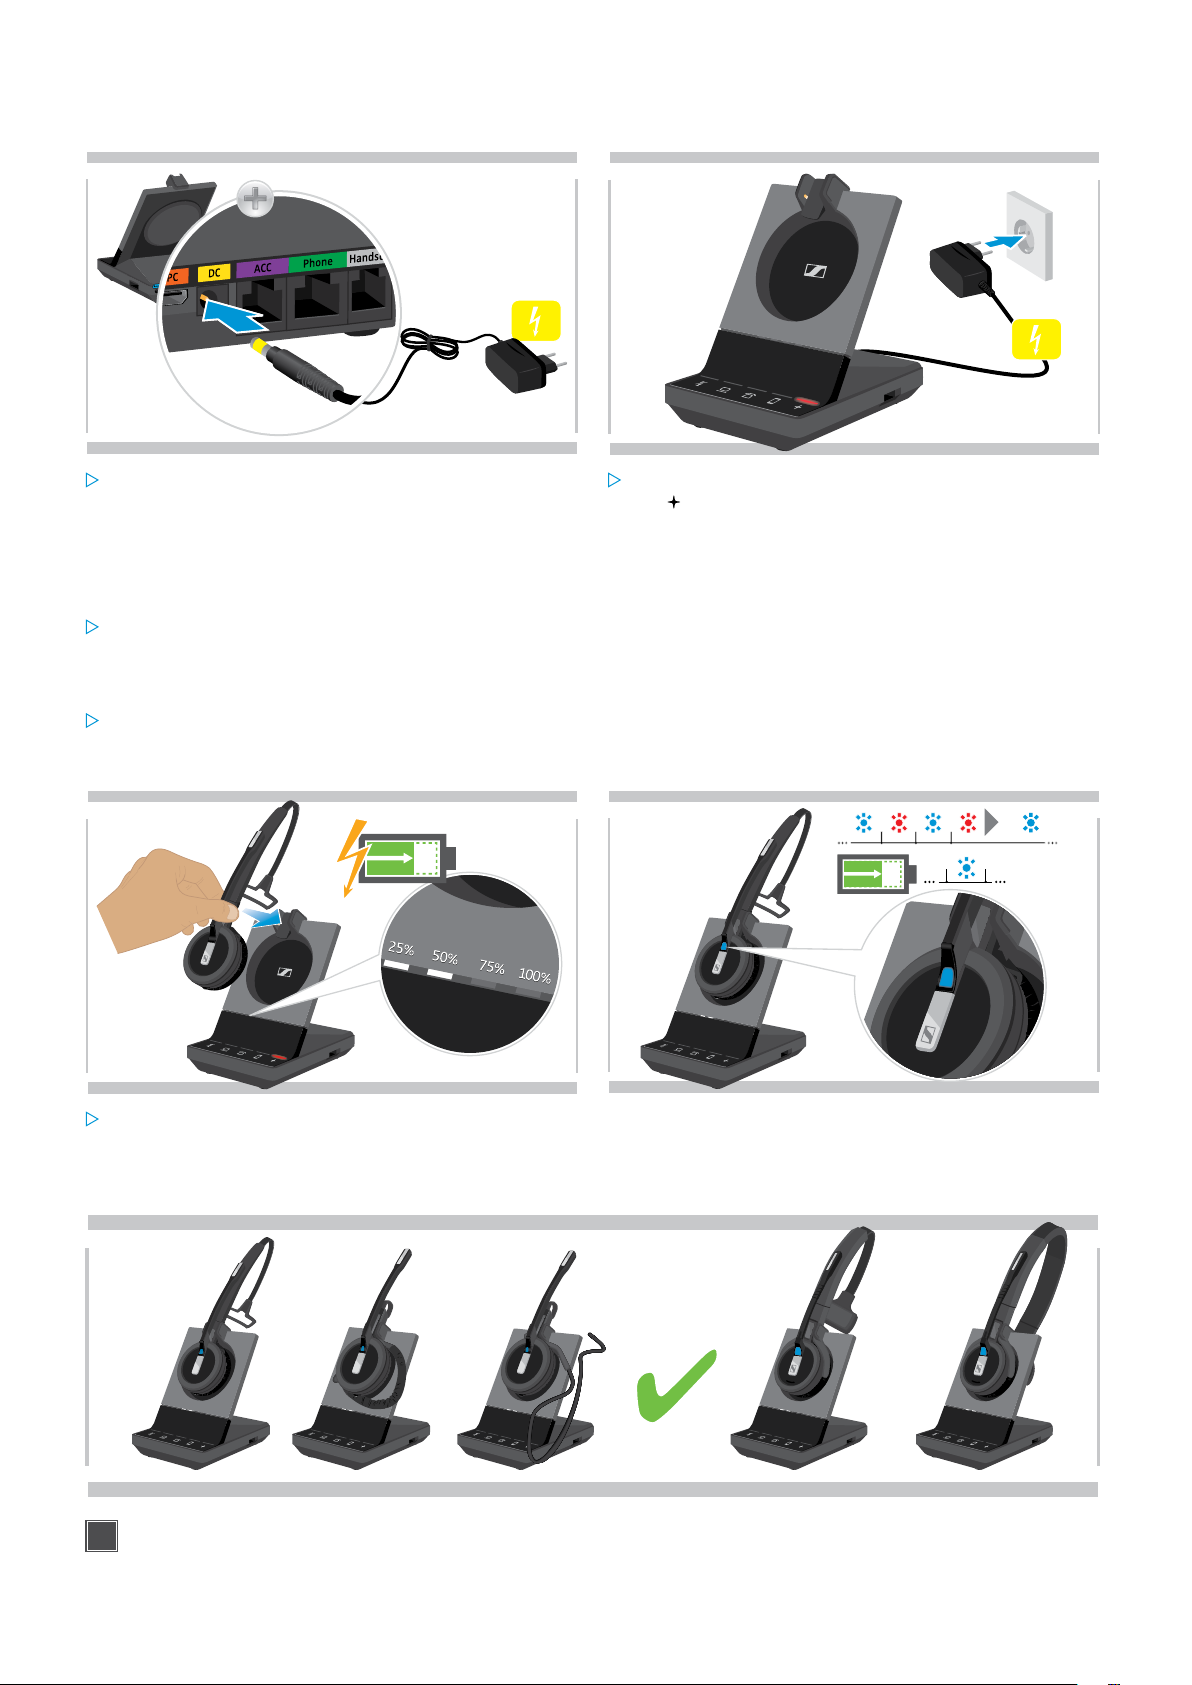
Connecting the base station to the mains power supply
1
Connect the plug of the power supply unit to the
DC socket (marked yellow).
Disconnecting the base station from the mains power supply
Unplug the power supply unit from the wall socket, if the product is not used for extended periods of time.
2
Connect the power supply unit to a wall socket.
The LED lights up red.
See page 13 for supported features with and without
power supply connection.
Pairing and charging the headset before first use
Charge the rechargeable battery for at least 20 minutes before using it for the first time.
A complete charging process takes about 60 minutes for SDW 10 HS and 90 minutes for SDW 30 HS/ SDW 60 HS
(see page 46).
1
Place the headset into the magnetic holder of the base
station.
The Headset battery status LEDs on the base station
indicate the charge status.
SDW 10 HS SDW 30 HS SDW 60 HS
2
If the headset and base station are not paired, the
headset LED flashes blue and red shortly. The LED turns
blue when pairing is complete and the headset will start
charging.
3x
During the first charging process and after long periods of non-use, it may take up to 5 minutes until the headset
LED lights up.
SDW 5000 series headset system
CONNECTING THE BASE STATION11
1 2 3 4 5 6 7 8
S1 S2
Connecting the base station to a fixed line phone – SDW 5 BS only
Check which connection possibility is best suited for your telephone and follow the instructions
in the corresponding chapter A, B, C or D.
Place the base station at a minimum distance of 15 cm from the fixed line phone.
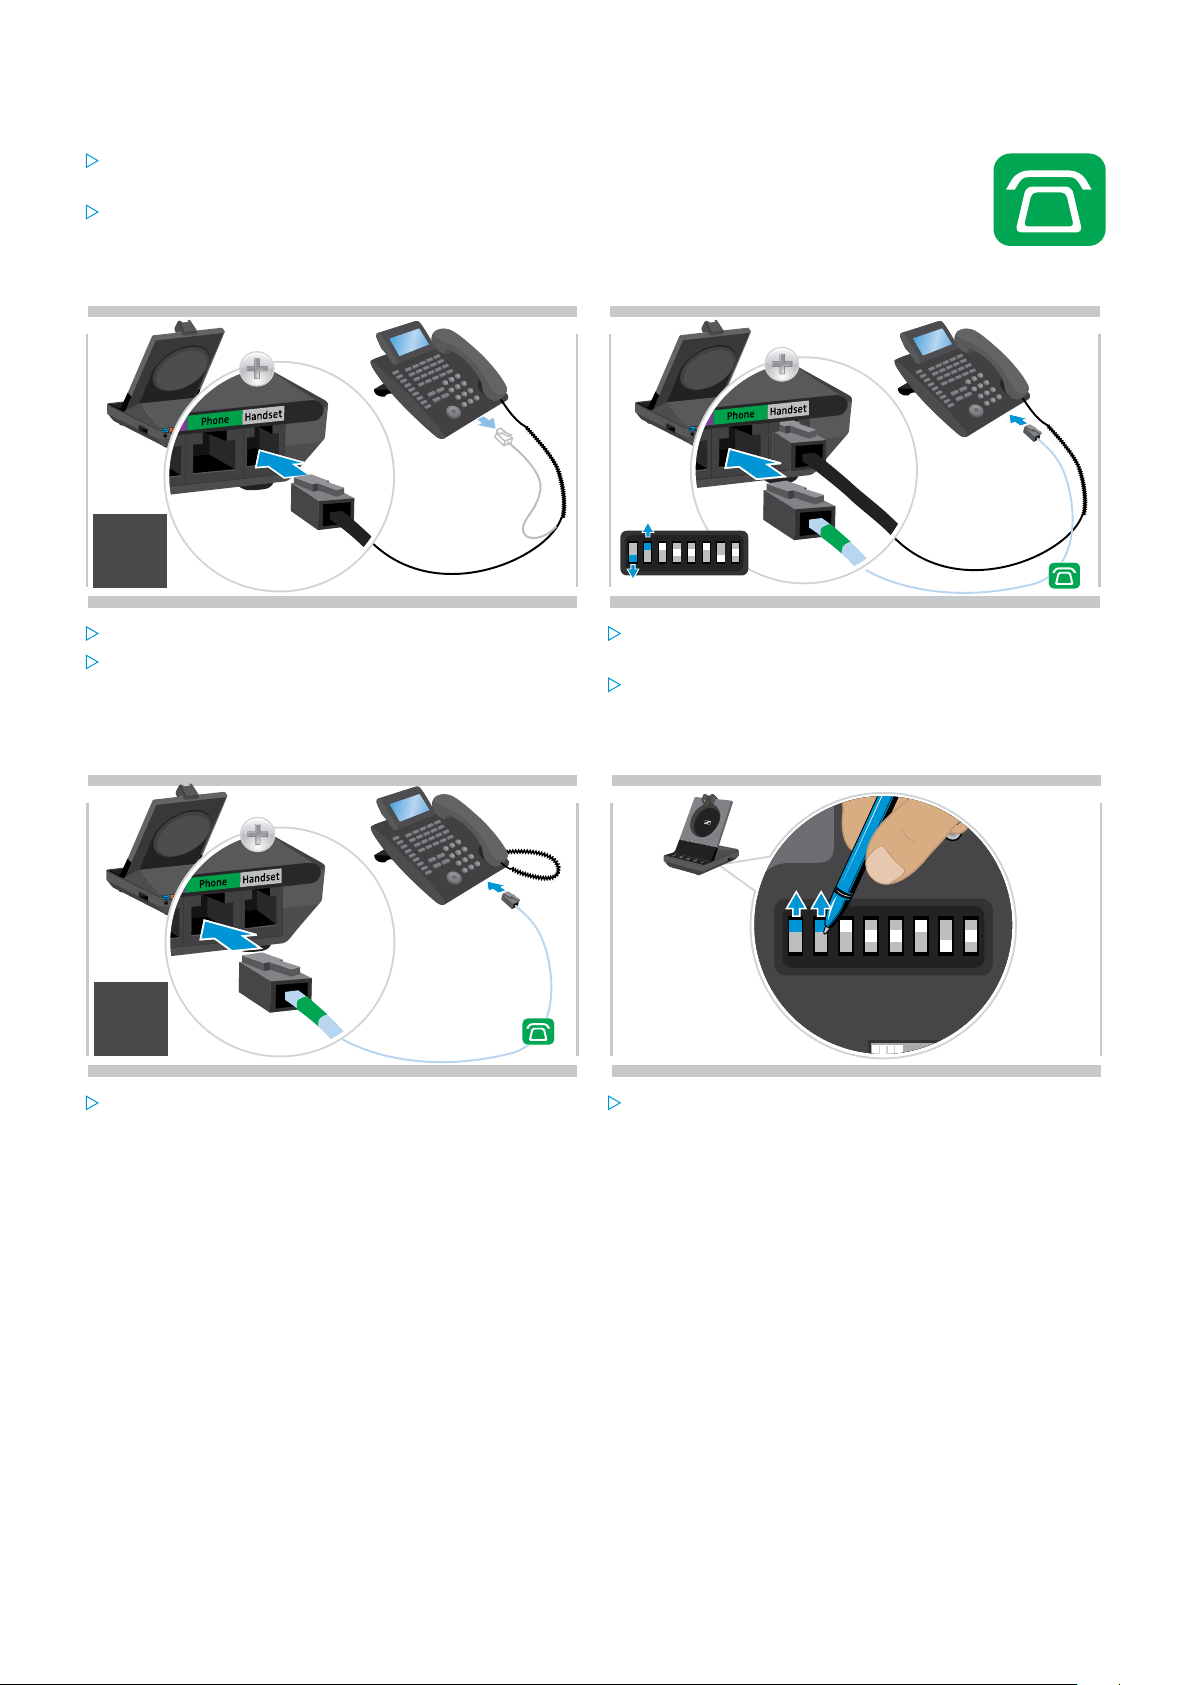
Connecting the base station to a fixed line phone without headset socket
1
2
A
1 2 3 4 5 6 7 8
Disconnect the handset cable from the telephone.
Connect it to the Handset socket on the base station.
Connecting the base station to a fixed line phone with headset socket
1
Connect the telephone cable to the handset socket
and to the Phone socket on the base station.
Use a pointed object to set the DIP switches 1 and 2 at
the bottom of the base station to the position shown.
2
B
Connect the telephone cable to the headset socket on
the telephone and to the Phone socket (marked green)
on the base station.
SDW 5000 series headset system
Use a pointed object to set the DIP switches 1 and 2 to
the position shown.
CONNECTING THE BASE STATION12
1 2 3 4 5 6 7 8
S1 S2
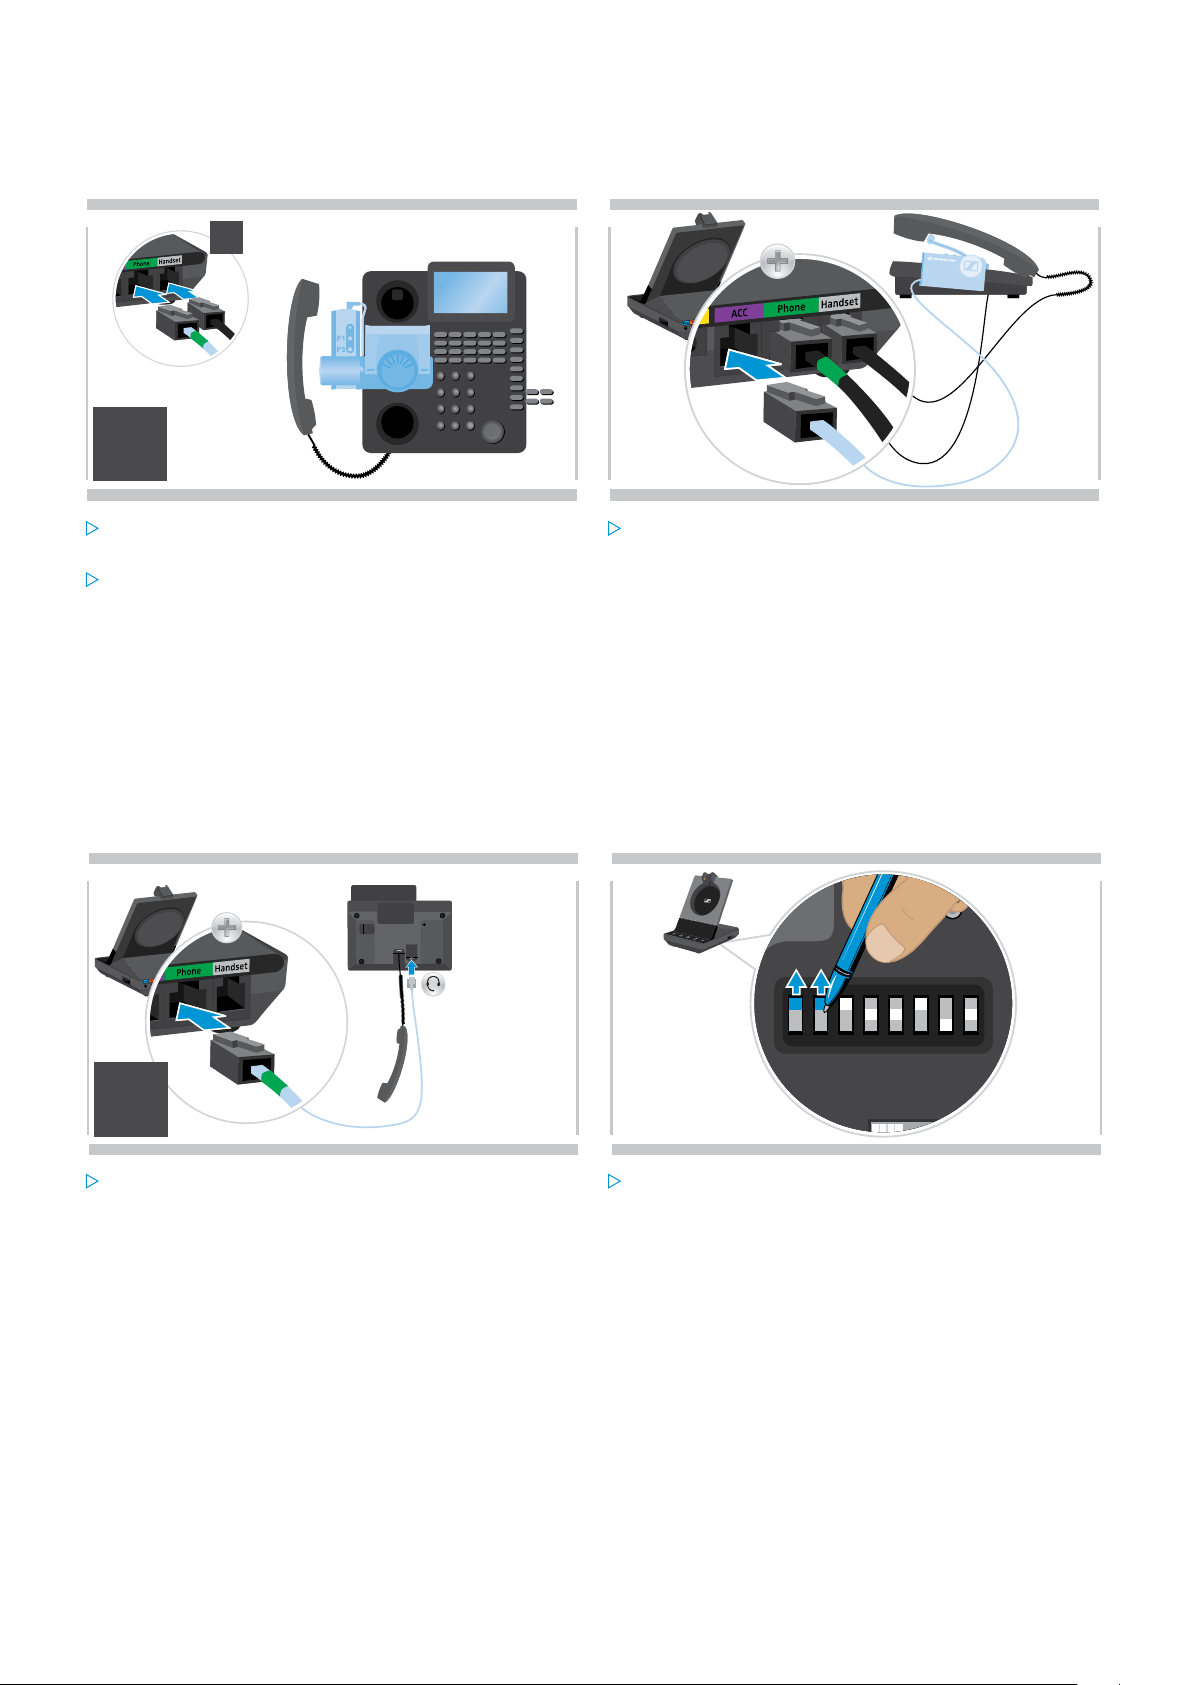
Connecting the base station to an optional mechanical handset lifter
The handset lifter allows you to answer calls even when you are away from your desk. The Sennheiser HSL 10 II
mechanical handset lifter is available from your Sennheiser partner.
1
A
2
C
Connect the base station to the fixed line phone as
described in chapter A.
Connect the handset lifter to the fixed line phone. For
more information, refer to the instruction manual of the
HSL 10 II handset lifter.
Connecting the base station to an optional electronic hook switch control (EHS)
The necessary EHS connection cables as well as adapter cables for manufacturer specific standards are available
from your Sennheiser partner.
For further information concerning corresponding phones and cables visit
www.sennheiser.com/headsetcompatibility.
Quick Guides are supplied with the cables or can be found on the product page on our website at
www.sennheiser.com/headsets.
Connect the handset lifter to the ACC socket on the
base station.
1
Cisco
Alcatel
Polycom
Avaya
Snom
ShoreTel
Panasonic
D
Connect the base station to the fixed line phone as
shown in the cable Quick Guide.
2
Use a pointed object (e.g. a ball pen) to set the DIP
switch to the position shown in the cable Quick Guide.
SDW 5000 series headset system
CONNECTING THE BASE STATION13
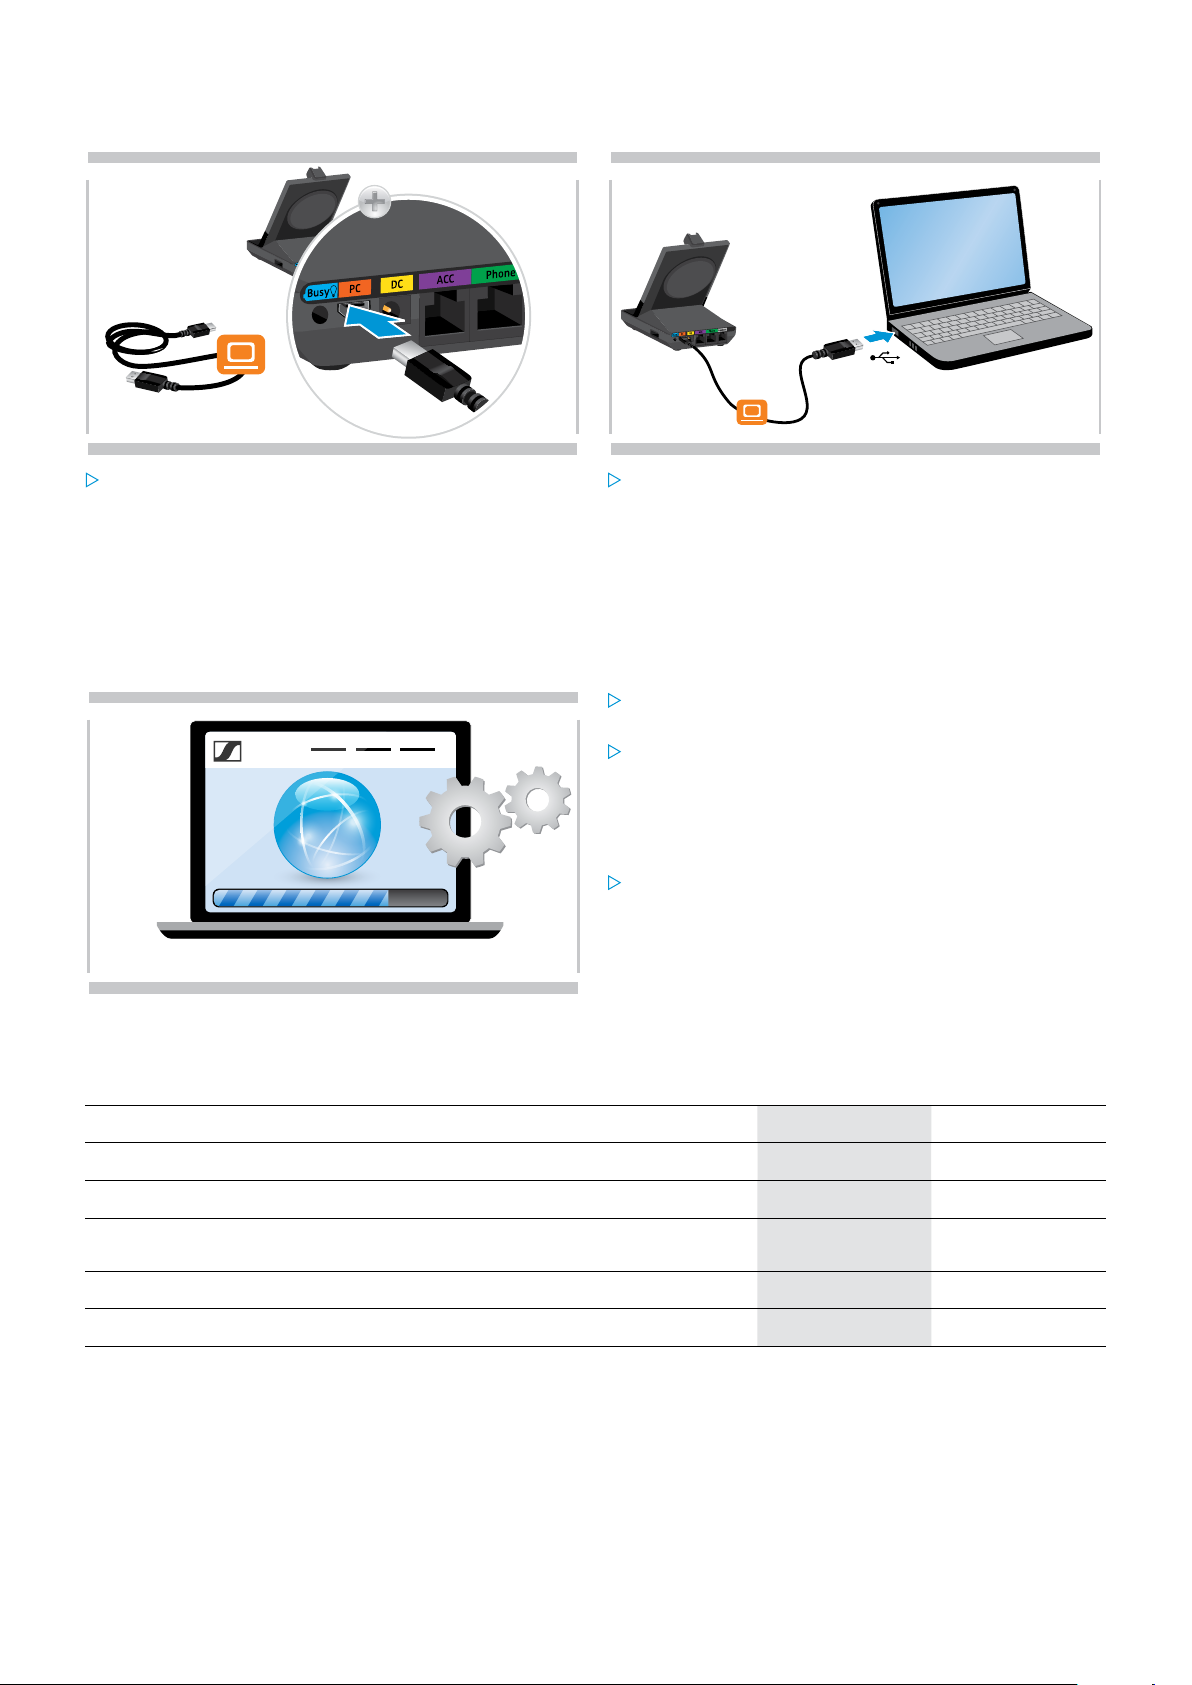
Connecting the base station to a computer
1 2
Connect the USB cable to the PC socket on the base
station.
Installing Sennheiser software
The Sennheiser software allows you to add value to your Sennheiser products. HeadSetup™ Pro enables easy set-up,
configuration and update of your SDW 5000 series.
www.sennheiser.com/software
Features with and without power supply connection
Connect the USB cable to a USB socket on your
computer.
The operating system detects the USB audio device
“Sennheiser SDW 5 BS” or “Sennheiser SDW 3 BS”
and installs the necessary drivers.
Download the software from
www.sennheiser.com/software.
Install the software.
To install the software, you need administrator rights
on your computer. If necessary, contact your IT
department.
To make calls via the computer:
Install a softphone (VoIP Software), such as Skype for
Business or ask your admin for support.
Feature
Full softphone functionality
Conferencing with multiple SDW 5000 headsets
Desk phone connection
USB port functions: Bluetooth headsets & mobile via dongle, USB headsets
& speakerphones
Busy light support
Fast charging
SDW 5000 series headset system
Power via USB
only
ü ü
ü ü
û ü
û ü
û ü
û ü
Power via USB +
power supply unit
CONNECTING THE BASE STATION14
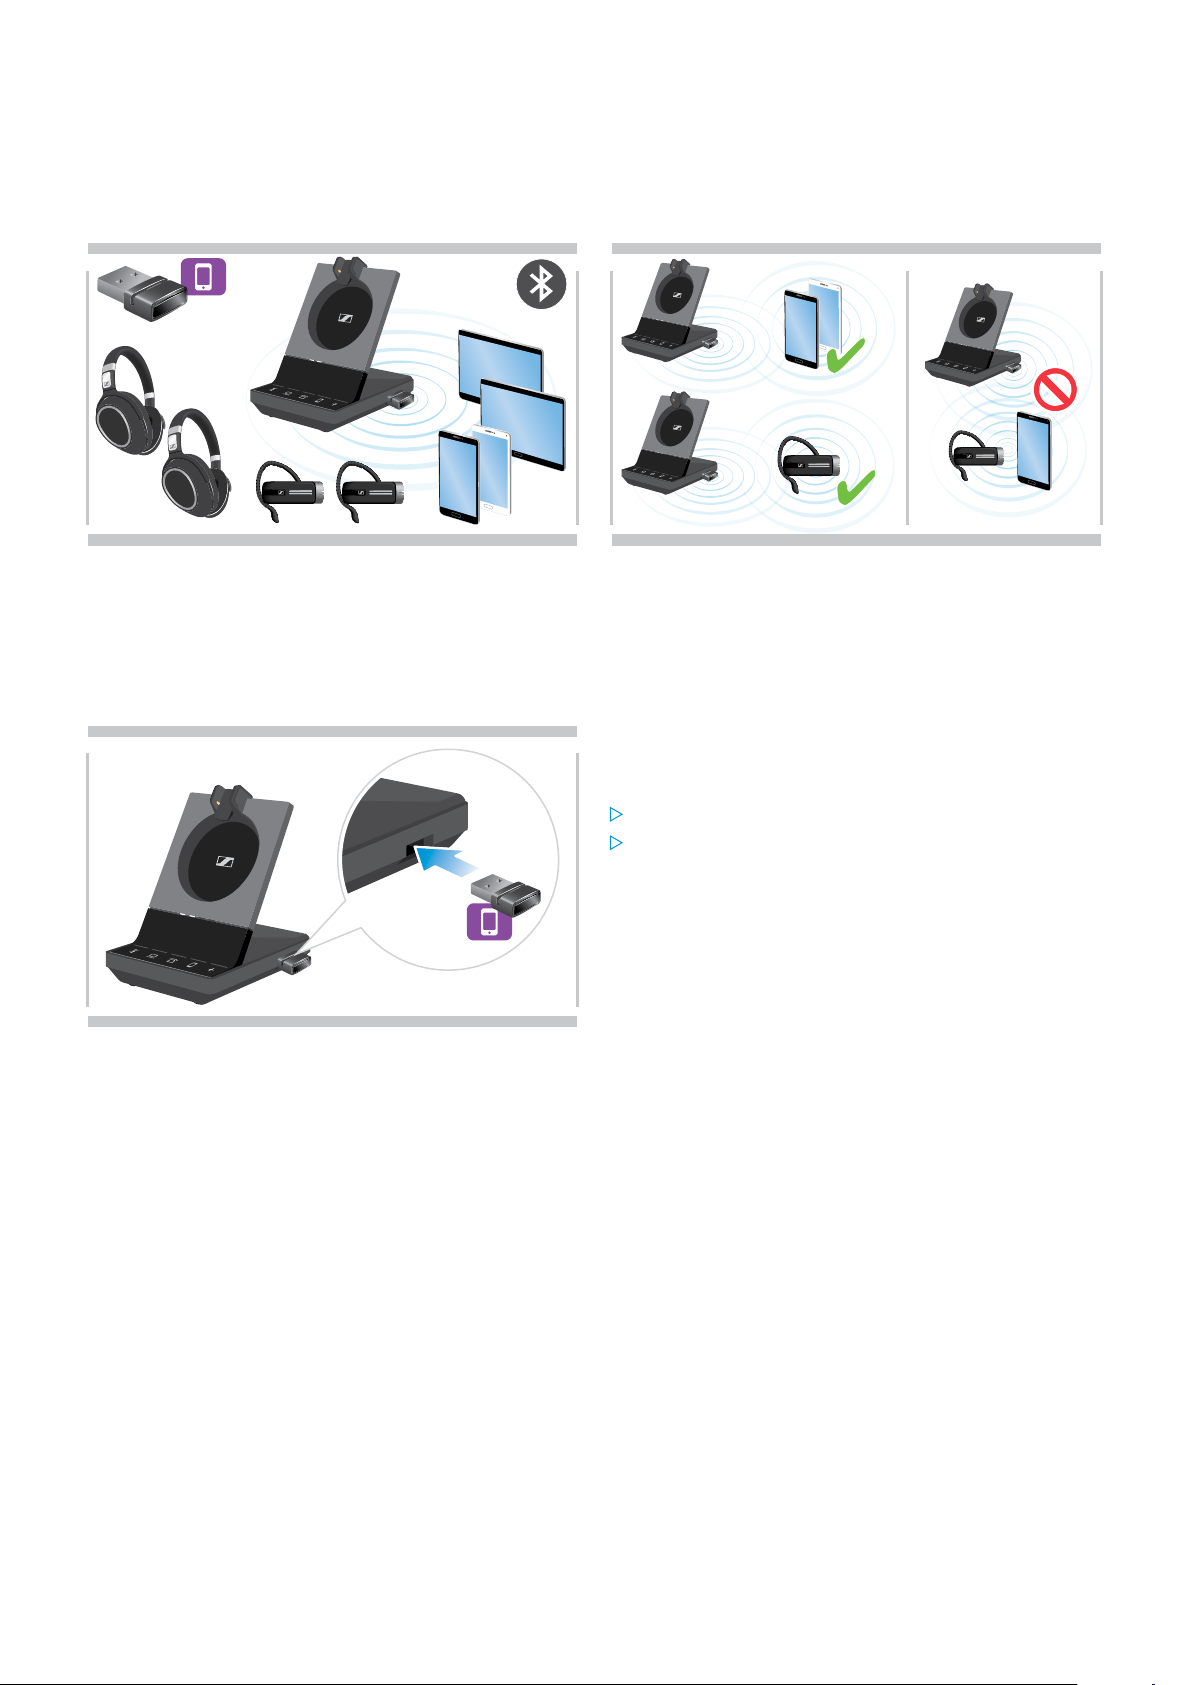
Connecting the base station to Bluetooth devices – BTD 800 USB only
With the dongle BTD 800 USB you can either connect mobile phones or headsets via Bluetooth to the base station.
The dongle complies with the Bluetooth 4.2 standard. Pair Bluetooth devices that support the “hands free profile” (HFP),
the “headset profile” (HSP) or the “advanced audio distribution profile” (A2DP).
The dongle can save up to eight paired Bluetooth devices.
If you pair a ninth device, the saved connection profile of
the least used Bluetooth device will be overwritten. If you
want to re-establish a connection with this device, you
have to pair the devices again.
Connecting the Bluetooth dongle to the base station
After switch-on, the dongle automatically tries to connect
to the two last connected Bluetooth devices – mobile
phone and headset cannot be combined. You can only
connect a third Bluetooth device after having switched
off the first or the second Bluetooth device.
The BTD 800 USB dongle is supplied together with the
SDW 50X4 and SDW 50X6 bundles and also available as
an accessory.
Plug the dongle into the USB port of the base station.
Follow the instructions in one of the two next chapters.
New unused dongles switch automatically to pairing
mode. The LED alternately flashes blue and red.
SDW 5000 series headset system
CONNECTING THE BASE STATION15
Press & hold
3s
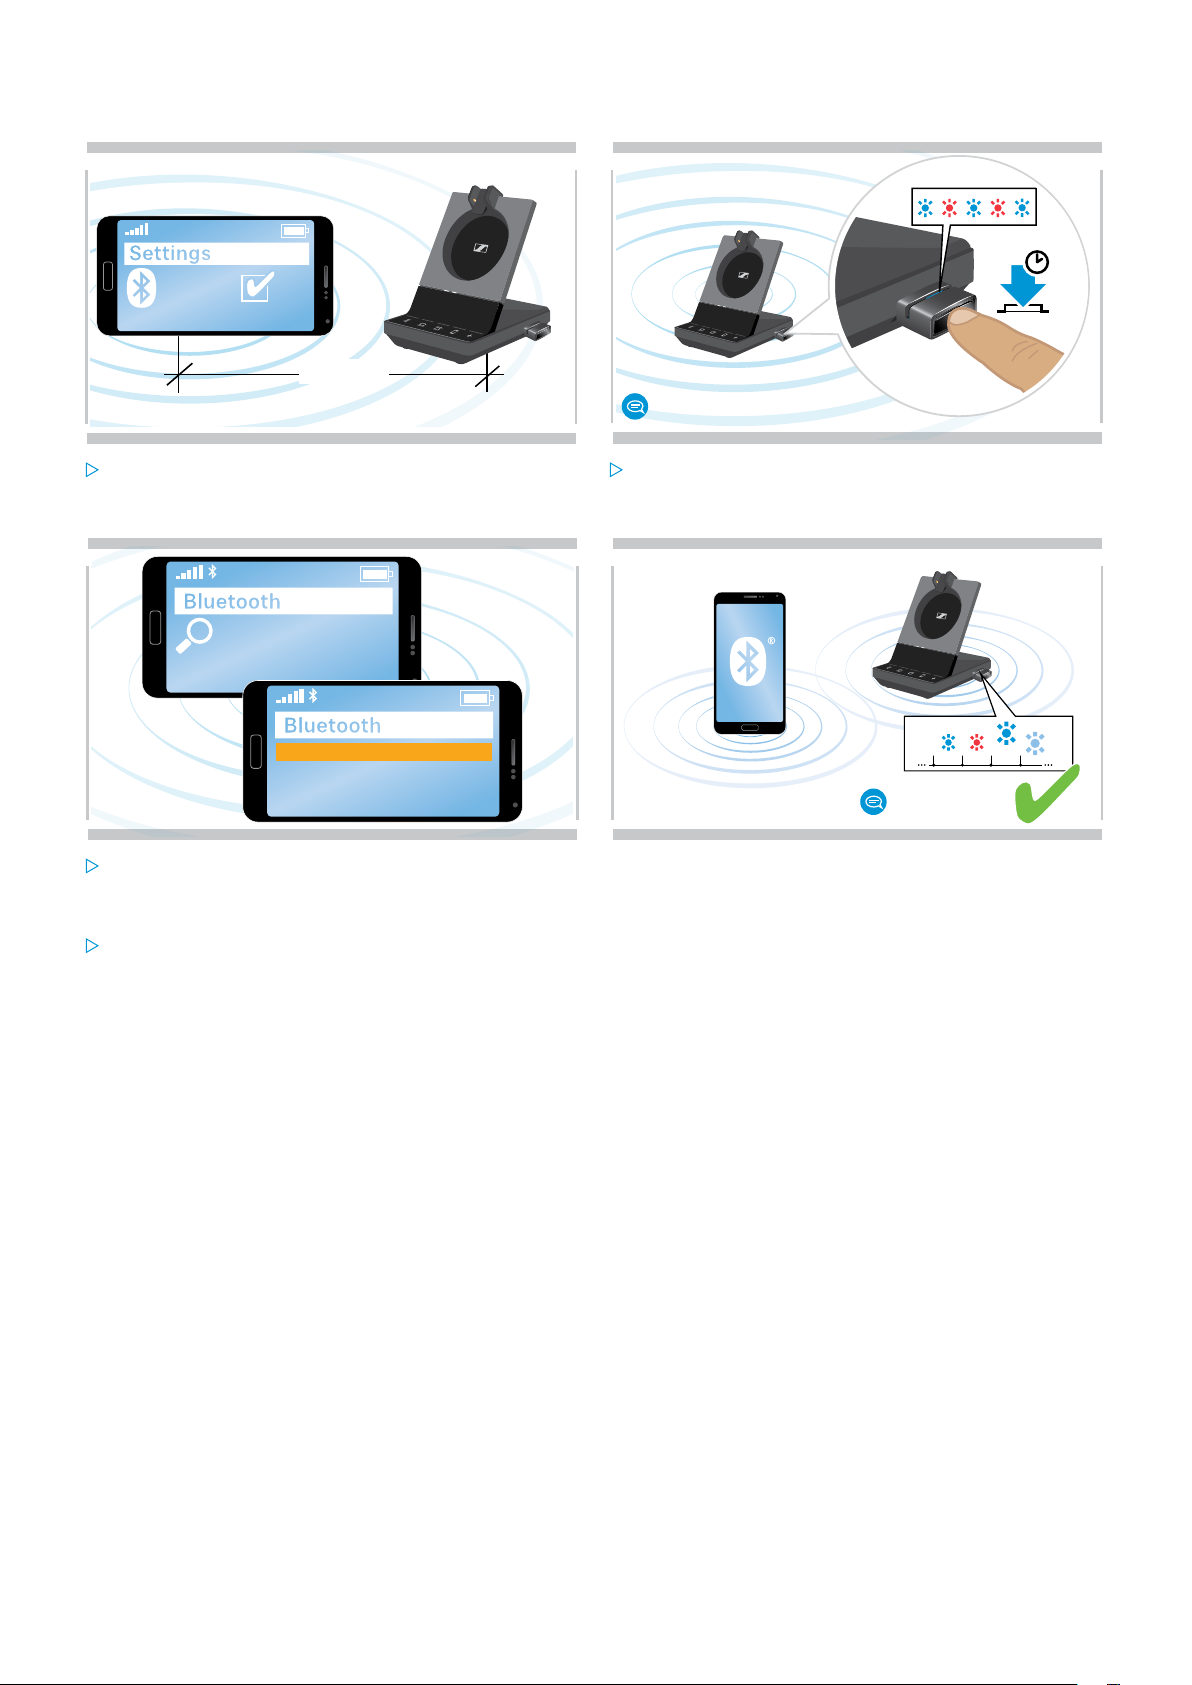
Pairing a mobile phone or tablet via Bluetooth
1
Bluetooth
<20 cm
Activate Bluetooth on your mobile phone or tablet (see
the instruction manual of your device).
3
Search devices...
Sennheiser BTD 800 USB
Laptop Nick
keyword:
0000
2
”Pairing“
Press and hold the dongle’s button for 3 seconds to
enter pairing mode.
The LED alternately flashes blue and red.
4
3x
”Connected“
Start the search for new Bluetooth devices.
All available devices in the proximity of your mobile
phone or tablet are displayed.
Select “Sennheiser BTD 800 USB” to pair the dongle. If
necessary, enter the default PIN code “0000”.
Once the Bluetooth devices are paired, the LED flashes
3 times blue and then lights up in a constant dim blue.
SDW 5000 series headset system
CONNECTING THE BASE STATION16
Press & hold
3s
3x
2x
3x
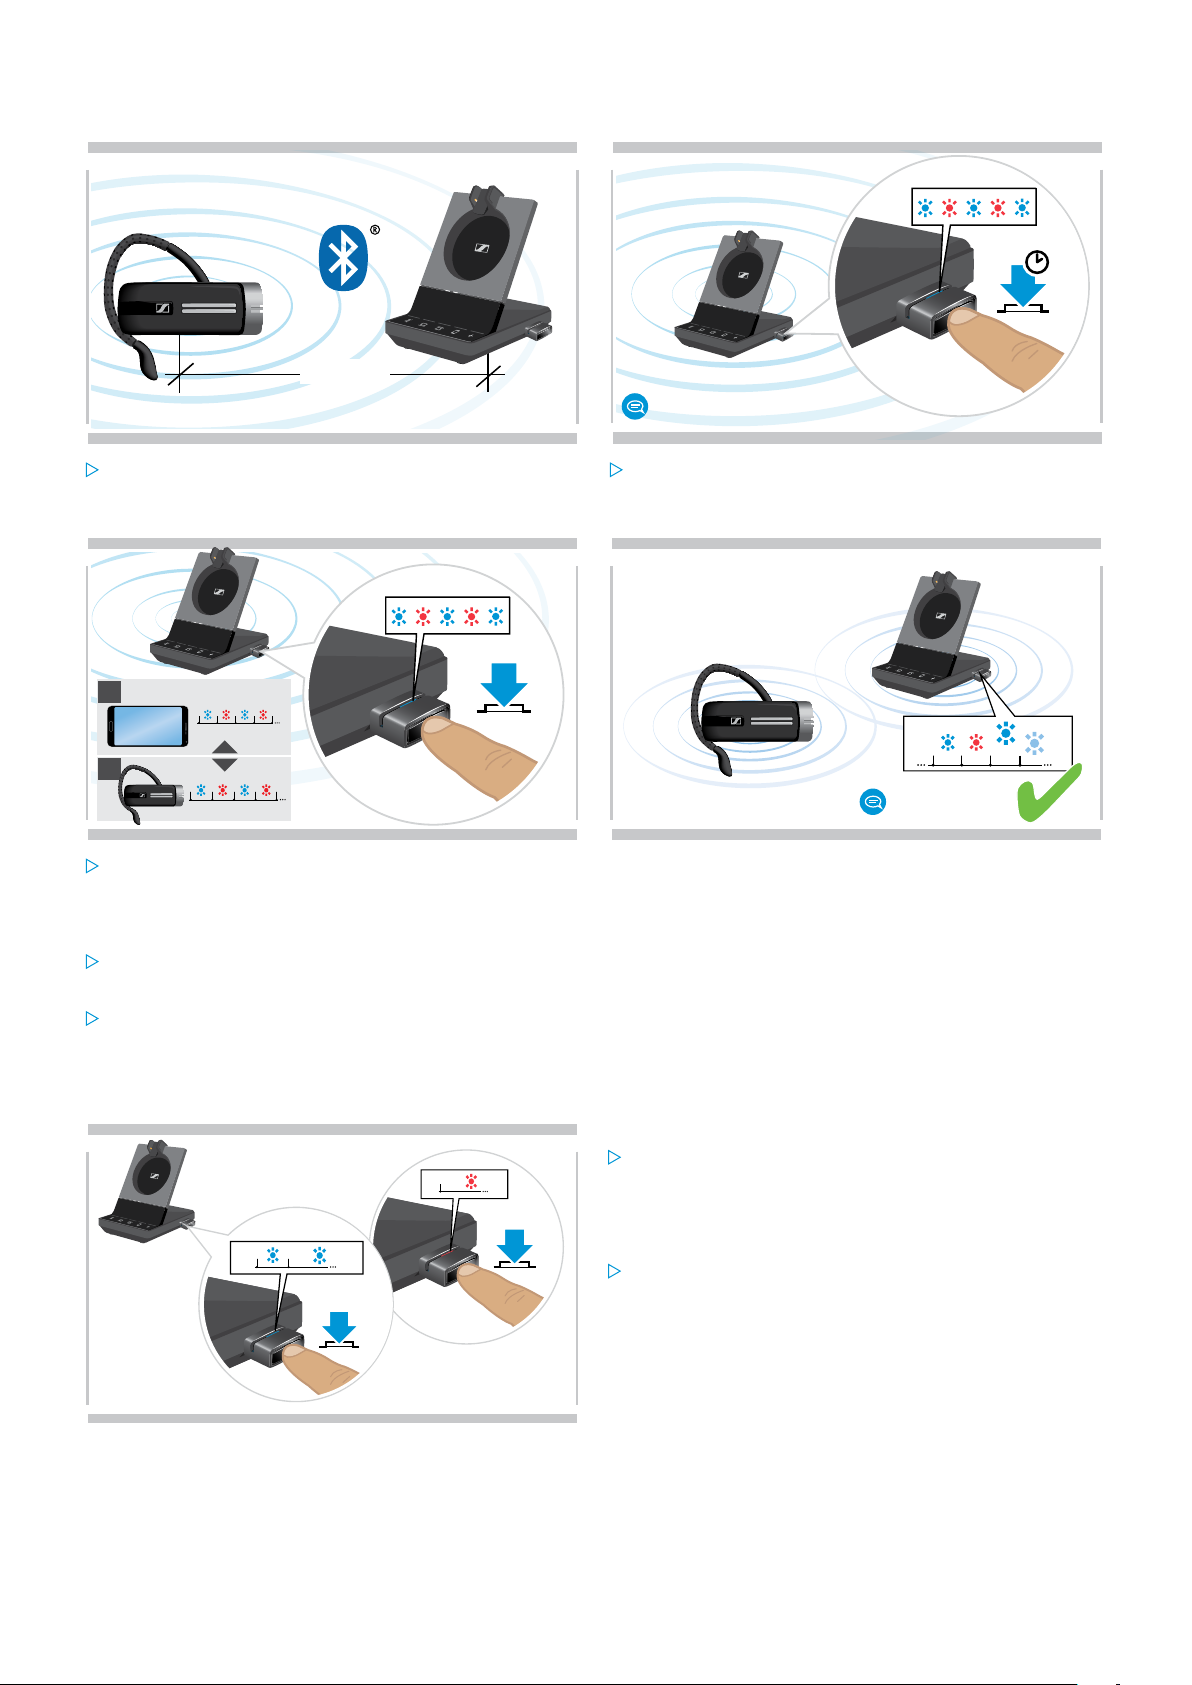
Pairing a headset via Bluetooth
1
<20 cm
Activate the pairing mode on your Bluetooth headset
(see the instruction manual of your device).
3
A
1s 1s 1s 1s
B
0.5s 0.5s 0.5s0.5s
2
”Pairing“
Press and hold the dongle’s button for 3 seconds to
enter pairing mode.
The LED alternately flashes blue and red.
4
3x
”Connected“
Press the button again to switch between pairing mode
for mobile phones A or headsets B.
Once the Bluetooth devices are paired, the LED flashes
3 times blue and then lights up in a constant dim blue.
Clearing the list of previously paired devices
Press and hold the dongle’s button for 3 seconds to enter pairing mode.
The LED alternately flashes blue and red.
Double press the dongle’s button.
The LED flashes purple three times. The pairing list is cleared.
Reconnecting/disconnecting Bluetooth
To reconnect a Bluetooth device:
Tap the dongle’s button.
The LED lights up blue once and after that flashes
3 times blue. The LED is lit constantly in dim blue.
To disconnect a Bluetooth device:
Double tap the dongle’s button.
Bluetooth will be disconnected. The LED flashes
3 times red. The dongle starts flashing blue and
searches for other Bluetooth devices.
SDW 5000 series headset system
CONNECTING THE BASE STATION17
Connecting an optional USB headset or speakerphone
You can connect a Sennheiser USB headset or a USB speakerphone at any time, if for example the battery of your
SDW headset is empty or to add other participants to your conference call.
Connecting a USB headset
1
Connect the headset to the USB socket on the base
station.
Connecting a speakerphone
2
The LED lights up white.
To use an external speaker with microphone such as the
Sennheiser speakerphone SP 10, SP 20 or SP 220:
Connect your speakerphone to the USB socket of the
base station.
The LED lights up white.
If you want to recharge the SDW headset - while using
the speakerphone:
-
+
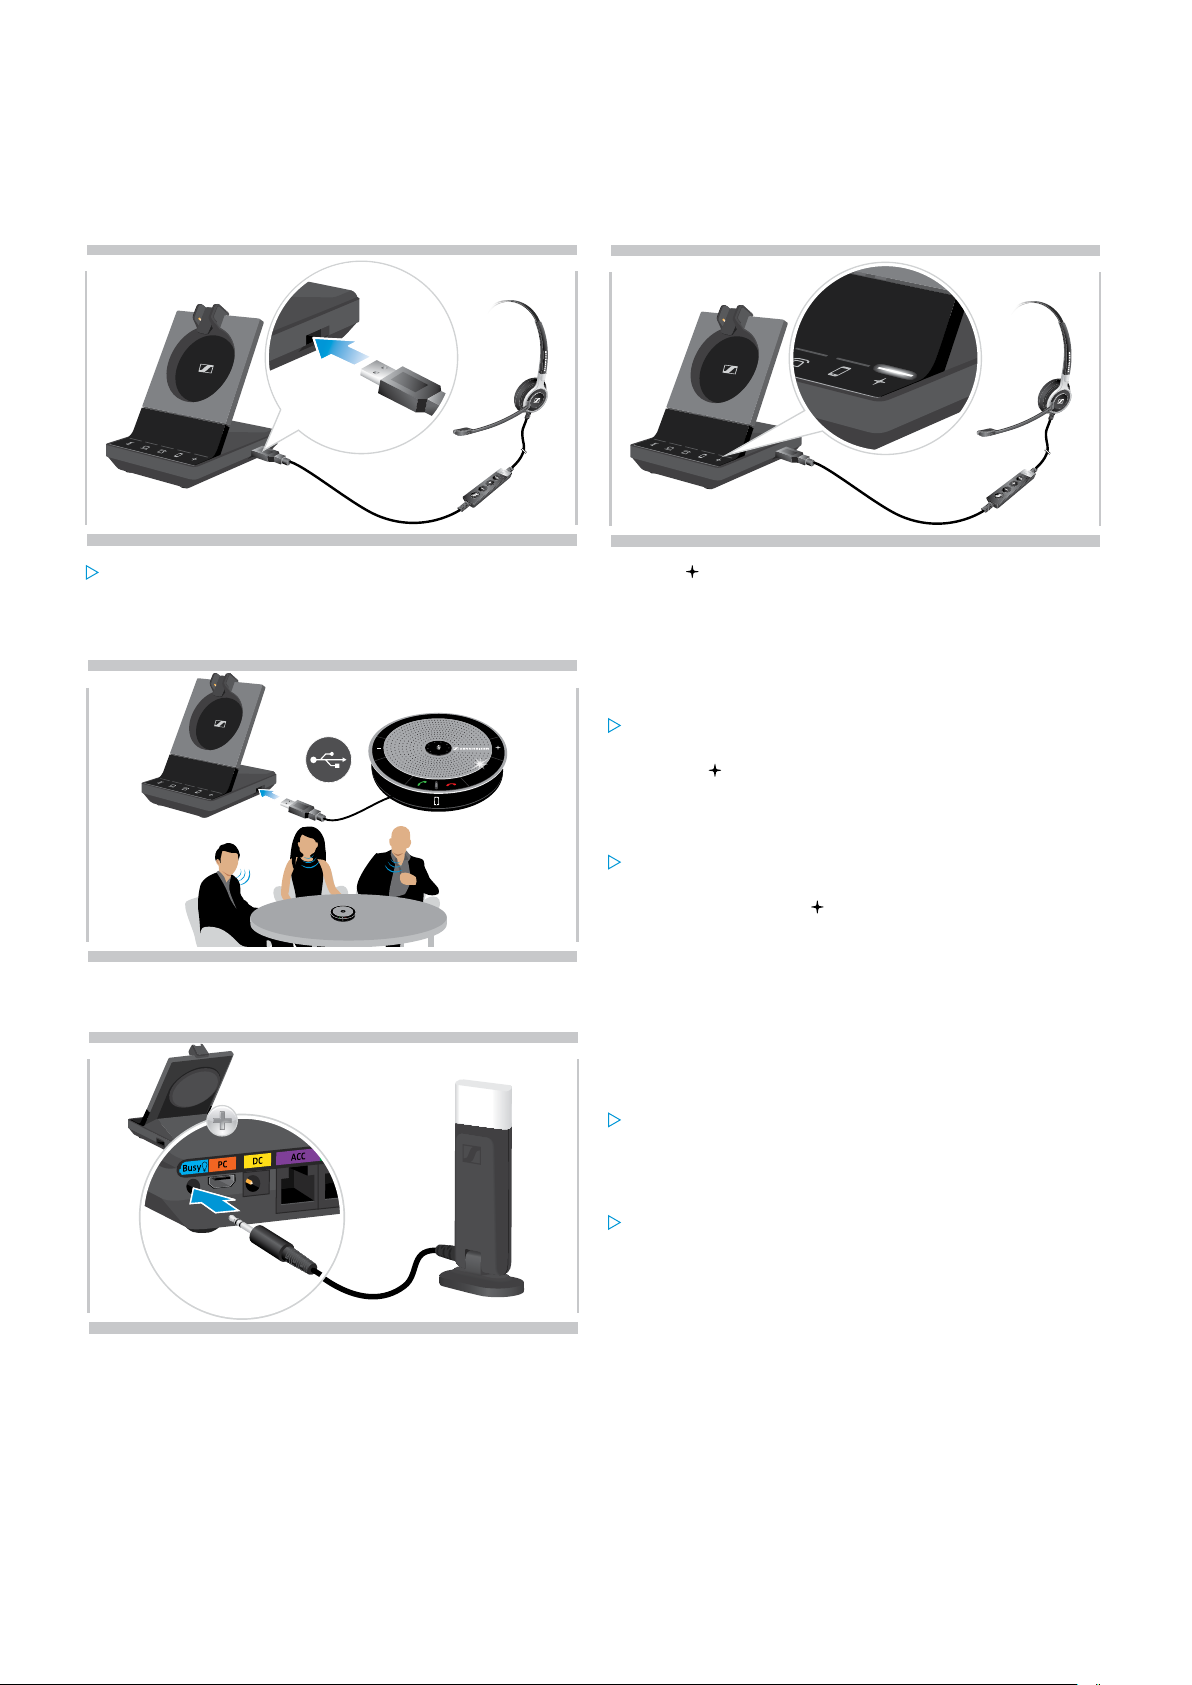
Connecting an optional busy light
Ensure the headset is docked before you initiate the
call OR
Double tap the icon on the base station to transfer
the call from the headset to the speakerphone.
The busy light UI 10 BL signals to your colleagues if
you are available or in a call. The busy light UI 10 BL is
available as an accessory.
Connect the busy light to the Busy socket of the base
station.
The LED of the busy light lights up while the base
station is switched on (see page 8).
Attach the busy light to your monitor or to your desk –
if required (see UI 10 BL Quick Guide).
SDW 5000 series headset system
 Loading...